Jonsbo, a well-known manufacturer of PC cases and cooling solutions, unveiled its new N5 NAS case at the Computex 2024 event. The announcement took place at the company’s stand, where the latest addition to their product line was showcased to attendees.
The Jonsbo N5 NAS case is designed to cater to users who require extensive storage options. It supports a combination of 2.5″ SSDs and 3.5″ HDDs, allowing for up to 12 drives in various configurations. The drive bay can hold 2.5″ SSD x2 / 3.5″ HDD x12 or 2.5″ SSD x4 / 3.5″ HDD x12, providing flexibility depending on the user’s storage needs.
In terms of dimensions, the N5 measures 355mm in width, 403mm in depth, and 350mm in height. This size accommodates a range of motherboard form factors, including ITX, M-ATX, ATX, and E-ATX, making it a versatile option for various build requirements.
The case features extensive cooling options with vent panels on all sides to ensure adequate airflow. The design includes support for SFX power supplies, with the exact size to be confirmed. This is aimed at maintaining efficient power management within a compact form factor.
For users with high-performance components, the N5 supports video cards up to 350mm in length and CPU coolers up to 160mm in height. This ensures compatibility with a wide range of graphics cards and cooling solutions available in the market.
The front I/O port configuration includes a Type-C port and a USB 3.0 port, along with support for audio and mic input. This setup aims to provide easy access to frequently used ports and connectivity options.
Material-wise, the N5 is constructed with a 2.0mm aluminum alloy external cover and a 1.0mm steel internal structure. This combination of materials offers durability while maintaining a sleek and modern aesthetic.
One of the notable features of the N5 is its wooden removable (mesh vented) HDD bay cover panel. This not only adds to the visual appeal of the case but also enhances ventilation for the drives.
The case also includes 12 LEDs, adding a lighting element that can be customized according to the user’s preference. The LEDs are strategically placed to highlight the internal components without being overly intrusive. Another nice touch (and a criticism leveled at the N4 previously for skipping over a little, is that all 12 SATA connections directly go into combined SATA power+data ports on their own backplanes!
When compared to the Jonsbo N2, N3, and N4, the N5 offers the highest number of drive bays and expansion slots. The N2 supports up to 5 HDDs, the N3 up to 8 HDDs, and the N4 up to 6 HDDs, making the N5 a superior choice for users with extensive storage needs.
Attribute
Jonsbo N2
Jonsbo N3
Jonsbo N4
Jonsbo N5
Model
N2 Black
N3 Black
N4 Black
N5
Dimensions
222.5mm(W) * 222.5mm(D) * 224mm(H)
233mm(W) * 262mm(D) * 298mm(H)
286mm(W) * 300mm(D) * 228mm(H)
355mm(W) * 403mm(D) * 350mm(H)
Material
2.0mm Aluminum alloy; 1mm Steel
2.0mm Aluminum alloy; 1mm Steel
0.7mm Steel + Wood
2.0mm Aluminum alloy; 1mm Steel
Drive Bay
2.5″ SSD1 / 3.5″ HDD5
2.5″ SSD1 / 3.5″ HDD8
2.5″ SSD2 / 3.5″ HDD6
2.5″ SSD2 / 3.5″ HDD12 or 2.5″ SSD4 / 3.5″ HDD12
Motherboard Compatibility
ITX
ITX
ITX / M-ATX
ITX / M-ATX / ATX / E-ATX
PCI Expansion Slot
1 x Low profile single slot
2
4
8
Front I/O Port
1*USB3.0 / USB3.2 Gen2 Type-C / Audio+Mic
1*USB3.0 / USB3.2 Gen2 Type-C / Audio+Mic
Type-C1 / USB3.01
Type-C1 / USB3.01
PSU Support
SFX ≤ 150mm
SFX ≤ 105mm
SFX ≤ 125mm
SFX (TBC size)
Max. CPU Cooler Height
≤ 65mm
≤ 130mm
≤ 70mm
160mm
Max. Display Card Length
≤ 197mm (Low profile)
≤ 250mm
≤ 230mm
325-350mm
Cooling System
12015mm fan*1 (built-in)
10025mm2 (optional), 8025mm2 (optional)
120mm*1 (built-in)
Vent Panels on all sides
Weight
Net 2.9kg
Net 3.9kg
3.75kg
Weight not specified
The N5 also surpasses the other models in terms of PCI expansion slots, offering 8 compared to the N2’s single slot, the N3’s 2 slots, and the N4’s 4 slots. This makes it a more suitable option for users requiring additional expansion capabilities.
Overall, the Jonsbo N5 stands out with its higher capacity and versatile design, offering more extensive support for components and storage compared to the N2, N3, and N4 models. This makes it a strong contender for users looking to build a high-performance NAS system.
This description contains links to Amazon. These links will take you to some of the products mentioned in today's content. As an Amazon Associate, I earn from qualifying purchases. Visit the NASCompares Deal Finder to find the best place to buy this device in your region, based on Service, Support and Reputation - Just Search for your NAS Drive in the Box Below
Need Advice on Data Storage from an Expert?
Finally, for free advice about your setup, just leave a message in the comments below here at NASCompares.com and we will get back to you.Need Help?
Where possible (and where appropriate) please provide as much information about your requirements, as then I can arrange the best answer and solution to your needs. Do not worry about your e-mail address being required, it will NOT be used in a mailing list and will NOT be used in any way other than to respond to your enquiry.
[contact-form-7]
TRY CHAT Terms and Conditions
If you like this service, please consider supporting us.
We use affiliate links on the blog allowing NAScompares information and advice service to be free of charge to you.Anything you purchase on the day you click on our links will generate a small commission which isused to run the website. Here is a link for Amazon and B&H.You can also get me a Ko-fi or old school Paypal. Thanks!To find out more about how to support this advice service checkHEREIf you need to fix or configure a NAS, check FiverHave you thought about helping others with your knowledge? Find Instructions Here
Or support us by using our affiliate links on Amazon UK and Amazon US
Alternatively, why not ask me on the ASK NASCompares forum, by clicking the button below. This is a community hub that serves as a place that I can answer your question, chew the fat, share new release information and even get corrections posted. I will always get around to answering ALL queries, but as a one-man operation, I cannot promise speed! So by sharing your query in the ASK NASCompares section below, you can get a better range of solutions and suggestions, alongside my own.
Have you noticed just how diverse the world of DiY NAS has become? I’m old enough to remember when ‘Do It Yourself’ or Build Your Own’ (BYO) in the server world would mean converting an old PC case. Then things got SMALLER! The Rasperry Pi, the Mini PC and eventually we started to see consumer and hobbiest kit in NAS that was smaller than most domestic appliances and client hardware! But there has always been a trade-off with minimalization. Maybe it’s CPU power, CPU architecture, maximum memory or just plane old storage potential. This is where the CWWK x86 P5 steps into things. Build as a 64bit x86 alternative to Raspberry Pi devices, this architecture is not exactly new. Indeed, there are a slew of DiY/Open-Source ready Routers on the market built towards Pfsense and the like for years now, so what makes the CWWK x86 P5 something different? Well, it’s because this device shifts gears from being primarily about network management, and towards NVMe SSD Flash-based SSD storage. Running on an Intel N100 4-Core processor (N200 and N305 versions also available) that is rated at just 6W, the P5 supports up to 32GB of DDR5 memory and FOUR M.2 Gen3 SSD slots and 2 SATA drive connections (more eon that later). This all adds up towards a fantastically low power-consuming but highly capable system! Built with those with a DiY attitude, the system is a semi-bare board that is just ready to be scaled up and built into your next custom server setup with the likes of UnRAID and TrueNAS. But, is the P5 actually any good? Let’s discuss it in today’s hardware review.
Component
Details
Brand
CWWK
Model
x86 P5
Processor
Intel N100
Clock Speed
Base: 800Mhz – to 3.6Ghz
Memory
DDR4 SO-DIMM slot, up to 32GB 4800Mhz
Storage SATA
2x SATA-to-12pin
M.2 Slots
4 x M.2 NVMe slot
Network Interface
2 x 2.5 Gigabit Ethernet ports
USB Ports
2 x USB 3.2 Gen 2 (10G)
Display Outputs
2X HDMI 4K 60FPS
Power Supply
12V DC input
Operating System
Supports Windows 10/11, Linux distributions, and FreeNAS/TrueNAS
Additional Features
Supports RAID 0, 1, 5, 10 for data redundancy and performance, OS Dependant
Cooling
Passive heatsink, supports additional fan VIA INCLUDED KIT
BIOS
UEFI
Audio
Realtek ALC662 5.1-channel audio codec
Accessories
SATA cables, power adapter, user manual
Where to Buy?
CWWK x86 P5 NVMe NAS Board ($155 AliExpress) – HERE
It is INCREDIBLY difficult to find fault with the CWWK x86 P5 NVMe SSD NAS Board when you boil it down to the $150 price tag. The P5 is by no means a perfect device and it is insanely niche in its appeal to DiY homelabbers and those looking for a new ‘plaything’ SSD server, but for what you are getting here for the money (up to and including the PSU, fan kits and SATA-to-12pin cables) just kinda dissolves any of the shortcomings of the device, as it seems obvious that at this value, compromises need to be made. With the diminishing cost of M.2 NVMe SSD storage and the growing market for affordable M.2 SSD NAS solutions in the market, the P5 is a great first choice for those looking to dip their toe into private server ownership without breaking the bank. The base level hardware of the N100/N200/N305 processor, 4x Gen 3 m.2, 2×2.5GbE and ability to still add 2x SATA drives is a great foundation, especially when you look into the lower power consumption of this hardware too. There will be those that will complain about the base model not including memory, but at this price point CWWK would have had to opt for fixed flash memory, which would have been overall limited long term – so better to give a flexible SODIMM to scale up to 32GB at your own choice/budget. The performance of the P5 is not exactly going to blow you away of course, and I would definitely recommend investing in a little more active/passive cooling if you plan on running this 24×7, but overall for the $150, this is an absolute BARGAIN!!!
BUILD QUALITY - 10/10
HARDWARE - 8/10
PERFORMANCE - 6/10
PRICE - 10/10
VALUE - 10/10
8.8
PROS
Cannot argue with the price 4x M.2 NVMe is impressive for scale The N100/N200/N300 Balance power, ability and consumption very well scalability of memory up to 32GB TWIN 2.5GbE and ability to add 2x more 2.5G/5G with adapters (OS Dependant) Kit includes PSU and Fan kit Complete in-house design = well-made heatsink with hidden details Two SATA drives can be connected, which can be overlooked easily WiFi M.2 Adapter slot Included
CONS
Lack of USB-C Power Gets HOT SSD Write performance and Drive-to-Drive copying has poor sustained numbers!
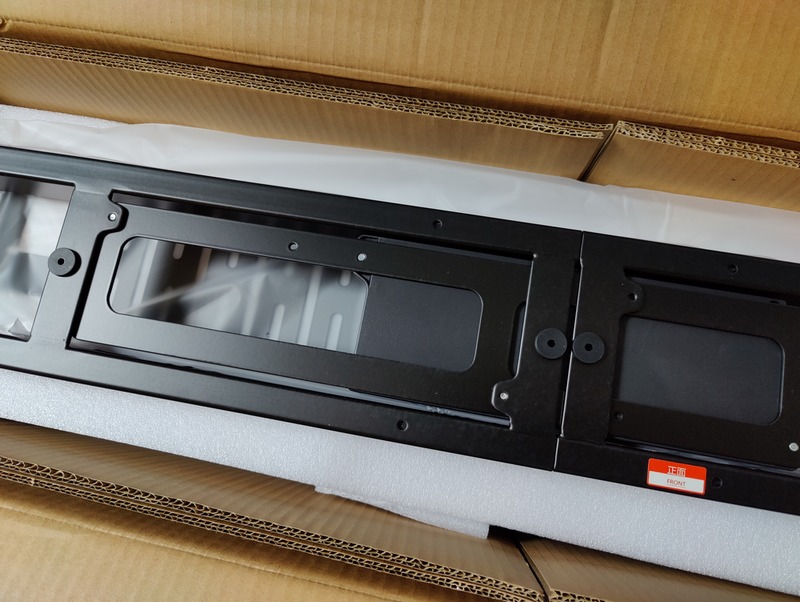
Despite the marketing materials for the x86 P5 heavy highlighting how the device is ‘barebones’ and ‘a NAS Board’, I think they are doing themselves something of a disservice here. It’s ALOT more complete than a lot of the NAS enthusiasts have been offered in recent years. It arrives with the CPU already in place, already fitted to an huge heat sink, it includes an external PSU, SATA-to-12 pin cables and even a fan mounting and desk kit. There is no included memory or storage in the base model (though there are options listed on their site) and you are definitely going to want to buy heatsinks for those m.2s (more on that later), but as a ‘barebones’ purchase, it’s pretty insanely good value at a little over $150.
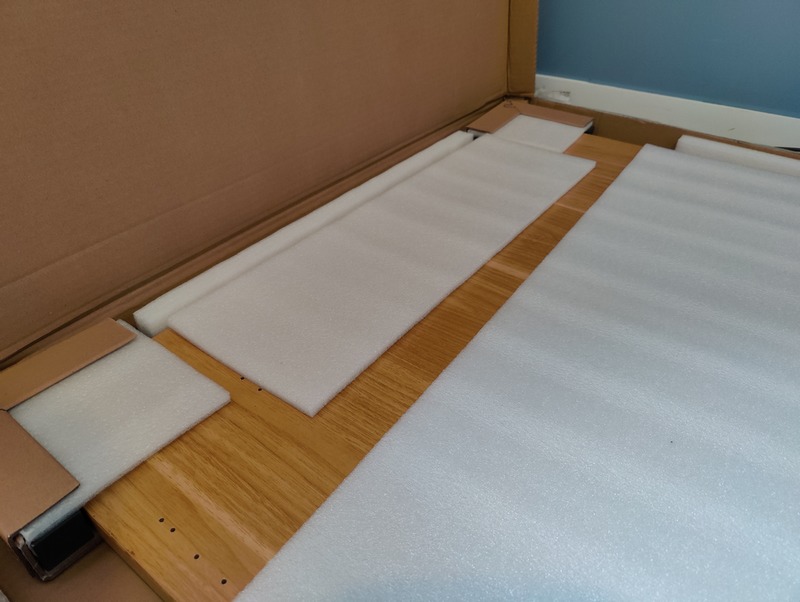
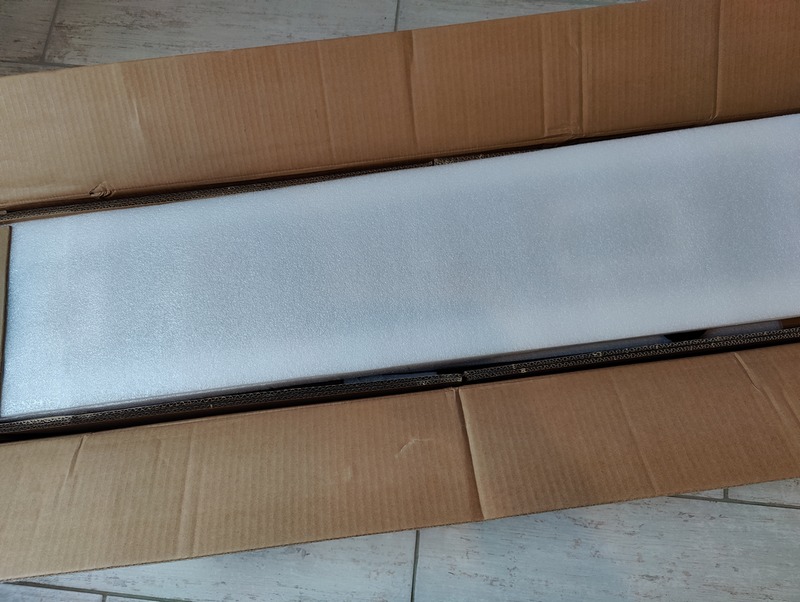
The included mounting fans ARE optional and if you only plan on low-moderate daily use, you may not even need theM, but I am nonetheless impressed that these are included when many other brand would have put these are optional extras. The retail kit is pretty well protected, 2 layers of foam, a cardboard frame internally, accessories in their own bags and the unit itself is in a robust antistatic bag.
Right now, the only alternative product to this in the market of a similar 1 board architecture would be the likes of the Zimaboard/Zimablade from IceWhale. A a quick ‘aside’ the video below outlines that product, what was good and what was not:
The top mounted metallic heatsink is HUGE and it pretty much exclusively there to draw heat from the Intel N100/N200/N305 CPU, as the SSDs are mounted on a sister/riser board (more on that later). There is no active cooling by default (though you have those fan mounting kits included) but this heatsink is pretty great for the N100/N200, though I do wonder about the 8-Core N305-i3 model at peak use.
The device does not feature any included NAS Operating system (no OS drive included in the $150 option), but running TrueNAS r UnRAID was incredibly straight forward and I can confirm that all storage (both the M.2 and the SATA over 12pin) were visible in both of those popular NAS OS. However, it is worth mentioning once again that heatsinks or even just heatshields for those M.2 NVMe SSD bays are pretty essential if you are aiming for sustained use. I had the device running for 30 mins of relatively light tests on each drive and, even after a brief reboot to recalibrate, all four drives were throwing me 65-70+ degree warnings in UnRAID pretty quickly.
When looking a little more about the default configurations, you can see that CWWK have not missed a trick! With scaled memory versions all the way up to 32GB and fully populated SSD options on the table. I am unsure which brands of SSD or Memory you would receive, but given my experience with reviewing solutions like this, I would expect Samsung Memory, but unbranded/lesser-known SSD drives. You will pay penny’s for them, but their durability and reliability is up for question! It’s your call!
Another small grip is regarding the external PSU. On the one side, it’s a decent quality 36W PSU that has international clip replacement – and these clips are like 4 for a $1 on Aliexpress, so you will have easy global connection for this device with ease. Plus USB to Barrel adapters are pretty common too these days, so the option to deploy the P5 with a USB power connection is pretty easy to do too (see my video here on how to run a consumer NAS on a USB Battery Pack on YouTube). Running on a 6W TDP rated CPU and 4 M.2 massively reduces the potential power consumption, so all good so far, right?
HOWEVER! It is 2024… why is this device not arriving with USB-C Power? It would be so, so much more convenient and there are plenty of affordable/domestic USB-C PSU devices in the market that would allow for further eWaste!
Next, lets discuss the means to attached two SATA drives to the system. Adding SATA support to such a microboard with a CPU that only has 8/9 PCI Lanes to play with was always going to be tough! Adding a physical SATA-to-PCIe controller would have been the easiest way, but might not have been the most efficient. Instead (again, drawing comparisons to the ZimaBlade and ZimaBoard) the P5 has two 12 pin connectors and includes 2x SATA-to-12pin cables for attaching two drives.
I can also confirm that when I connected a SATA SSD, it appeared without any additional power needed (it was delivered to the dual SATA POWER + DATA cable). I do have questions about the extent to which it would power something beefier (a 24TB HDD for example), but I did not have these in place in time for this review – I will be returning to this later in a follow-up video on the YouTube Channel soon.
The four M.2 NVMe SSD slots are located on the other side of the P5 device and its a very clean layout. Supporting up to 2280 length M.2 NVMe SSDs, there are no thermal pads or heatsinks included with the CWWK x86 P5 NAS kit.
Each M.2 connector has moderate clearance from the base PCB and appear to be PCIe 3×4 (going by the board print), however, there are mixed messages on different sites listing the CWWK P5, with some stating Gen 3×2, or 3×1 on the SSD slots and others saying 3×4.
Digging into the terminal, we can see that although they ARE physically 3×4, they have been downgraded to 3X1. Not a massive surprise for this architecture – for reasons of efficient resource distribution, lane distribution and/or heat. But A little closer look physically at the device under the M.2 PCB shows a little something…
The M.2 Board seems to be fed into a separate pinned m.2 2280 board that, in turn, is connected into a m.2 located on the CPU/Memory PCB.
Unscrewing the M.2 PCB reveals that it sits on this sister 2280 m.2 board (not unlike a M.2 to SATA-MULTI-PORT card. This is an interesting approach and would definitely make the 3×1 on each m.2 slot a lot understandable when you know that the base M.2 is handling them all.
This adapter is definitely a custom-specific board for this system, to allow it to add to the initial board design (which is often used in those custom pfsense ready routers/gateway devices from CWWK and topton).
And the m.2 allocation does not stop there. Under THAT card there was a further small scale m.2 for a WiFi adapter card. I am surprised that CWWK did not include an Intel WiFi 6/6e adapter in their bundles (these are crazy cheap). That said, this would also mean that you would have to factor in the antenna – and things are already pretty crammed in here!
Unscrewing this board further reveals the CPU and top massive ehatsink connection. One detail it would have been easy to miss is that the massive heatsink has a small copper panel directly on the CPU (with thermal paste). This is a nice extra touch and one that most users will likely never even know about, adding heat conduction and dissipation.
I also wanted to highlight that another small detail that it would be easy for users to never notice is that the heatsink has been cut to ensure it has clearance for several conductor components, as to ensure they are not negatively impacted by the heatsink. It’s a very, very small detail, but does show that a decent degree of thought has gone into this plate and it’s specifically designed for this micro board layout.
The N100/N200/N305 CPU you find under this panel will differ in cores, threads, power and TDP, but all three are SoC/Mobile processors that are designed to run tremendously efficiently – which in a 24×7 NAS setup is pretty bloody important, especially with rising costs of electricity globally in 2024.
With the system fully populated with 4x M.2 NVMe SSDs, 1x SATA 2,5″ SSD, an 8GB DDR5 4800Mhz memory SODIMM module and the CPU at 50% utilization for 20 minutes, the CPU peaked at 22-23W. This is a pretty impressively low, even if we factor in that this is an exclusively SSD-focused system in my test. In idle, without the SSDs being access, this dropped to a little over 10W
One thing that might annoy a few of the SSD NAS veteran users is the lack of ECC memory on the P5. This is going to be a massive debating point for many, but given the $150 pricetag and it’s a large focus on keeping things compact and efficient, it’s not a huge surprise that CWWK has opted for a much more affordable and low energy-consuming CPU – which unsurprisingly does not support ECC. This is NOT a system built for ‘integral business data’ and that is not the target user either. Maybe if CWWK extend this system architecture and logic towards some of the AMD emb.Ryzen processors, then ECC might arrive, but for now you can install up to 1x 32GB DDR 4800Mhz SODIMM module in the P5.
Given the scale and price point, you cannot really fault the CWWK x86 P5 – as a more powerful alternative to a raspberry pi, that also has tremendous M.2 NVMe SSD NAS storage and SATA scalability, there is simply nothing out there for this price point! The lack of ECC is going to put some users off and the 3×1 lanes per SSD might be too limiting of some, but at $150+, it’s a hard case to make! Let’s discuss the ports and connections.
CWWK x86 P5 NAS Review – Ports and Connections
Give the scale of the CWWK x86 P5, you will not be surprised to know that there are not exactly a tonne of ports on show here. That said, they still do manage to squeeze in a decent amount, though there is no means to scale things up (beyond a USB hub or USB NIC), as there is no PCIe slot accessible (as you might find in the Zimaboard and Zimablade). In terms of network interfaces, there are two 2.5GbE network ports, as well as (depending on the NAS OS you choose to install) the option to attach USB-to-2.5G and USB-to-5GbE network adapters.
There are also two HDMI 4K 60FPS outputs (no DP) which will have a varied degree of utility, based on your NAS OS of choice.
As the system uses an external power button, there is a physical LED power button too. As the P5 is a modification of the hardware logic of the custom pfsense/router scene, this button is in a fixed location and not really movable with ease. This will make custom micro case installations a little troublesome.
The system does come with extendable ‘legs’ that allow you to stand the P5 on a desk horizontally, with the M.2 SSDs at the top, case-free. I cannot help by feel like this design, though not great, is still the best option of plenty of bad ones!
You could mount the device on a cage, attaching SATA drives into the SATA cage cavities, but this all still feels very ‘coffee cup’ dangerous! As an ‘add on’ module to an existing encased homelab, I like this, but as a standalone system, I wish it afforded a little more protection out of the box (optional plastic/metal casing included with the kit for like $5 more). Let’s discuss the architecture of the x86 P5.
CWWK x86 P5 NAS Review – PCIe Layout / Performance
When it came to checking out the bios (this is a great deal clearer in the video review) CWWK have pretty much opened everything up to customization, with little ‘hard’ pre-set in place. For a system destined for massively diverse 3rd party installation use, I respect this greatly!
In terms of performance, those SSDs on Gen 3×1 lanes each became pretty clear (also, add to that the efficiency-focused N100 Processor in this review unit). I was hitting around 784MBs read performance on repeated/sustained 1GB tests on a single drive, and hit 1.3-1.4GB/s on the 4 drives in a RAID 5 array. Obviously, this was internal performance, as by default you cannot exceed 550-579MB/s on 2×2.5GbE (maybe with a couple of USB-to-5G adapters at $70-90 a pop, you might get closer).
However, write performance was much more disappointing and quickly diminishing, starting at around the 600MB/s and heading down as low as 250-300MB/s upon sustained 1GB write tests (see below). The SATA connected SSD comfortably hit 470MB/s Read over 425MB/s Write on avg.
However, probably the most damning performance number was when I actioned 1GB of data to be copied between single-disks. This would rarely exceed 150MB/s and after a couple of minutes descended into double digits! How much of this was caused by oversaturation on those 4 M2 Gen3x1 drives having to be negotiated by that m.2 mounted sister board is hard to say. The CPU worked VERY hard during this comparatively modest procedure and the drive temps crept up very fast!
All this added up to the fact that the x86 P5, though very good at short-term use and sporadic activity with ease, it struggled under heavy sustained write actions. Also, the shortfalls of feeding those 4 M.2 SSDs into a single into a single adapter bring into question how a larger RAID array on them would perform over a great deal of time and/or a RAID rebuild. Not ‘bad’, but it definitely demonstrated one of the compromises in architecture that needed to be made to hit the $150 price tag.
CWWK x86 P5 NAS Review – Conclusion & Verdict
It is INCREDIBLY difficult to find fault with the CWWK x86 P5 NVMe SSD NAS Board when you boil it down to the $150 price tag. The P5 is by no means a perfect device and it is insanely niche in its appeal to DiY homelabbers and those looking for a new ‘plaything’ SSD server, but for what you are getting here for the money (up to and including the PSU, fan kits and SATA-to-12pin cables) just kinda dissolves any of the shortcomings of the device, as it seems obvious that at this value, compromises need to be made. With the diminishing cost of M.2 NVMe SSD storage and the growing market for affordable M.2 SSD NAS solutions in the market, the P5 is a great first choice for those looking to dip their toe into private server ownership without breaking the bank. The base level hardware of the N100/N200/N305 processor, 4x Gen 3 m.2, 2×2.5GbE and ability to still add 2x SATA drives is a great foundation, especially when you look into the lower power consumption of this hardware too. There will be those that will complain about the base model not including memory, but at this price point CWWK would have had to opt for fixed flash memory, which would have been overall limited long term – so better to give a flexible SODIMM to scale up to 32GB at your own choice/budget. The performance of the P5 is not exactly going to blow you away of course, and I would definitely recommend investing in a little more active/passive cooling if you plan on running this 24×7, but overall for the $150, this is an absolute BARGAIN!!!
PROS of the CWWK x86 P5
CONs of the CWWK x86 P5
Cannot argue with the price
4x M.2 NVMe is impressive for scale
The N100/N200/N300 Balance power, ability and consumption very well
scalability of memory up to 32GB
TWIN 2.5GbE and ability to add 2x more 2.5G/5G with adapters (OS Dependant)
Kit includes PSU and Fan kit
Complete in-house design = well-made heatsink with hidden details
Two SATA drives can be connected, which can be overlooked easily
WiFi M.2 Adapter slot Included
Lack of USB-C Power
Gets HOT
SSD Write performance and Drive-to-Drive copying has poor sustained numbers!
Where to Buy?
CWWK x86 P5 NVMe NAS Board ($155 AliExpress) – HERE
This description contains links to Amazon. These links will take you to some of the products mentioned in today's content. As an Amazon Associate, I earn from qualifying purchases. Visit the NASCompares Deal Finder to find the best place to buy this device in your region, based on Service, Support and Reputation - Just Search for your NAS Drive in the Box Below
Need Advice on Data Storage from an Expert?
Finally, for free advice about your setup, just leave a message in the comments below here at NASCompares.com and we will get back to you.Need Help?
Where possible (and where appropriate) please provide as much information about your requirements, as then I can arrange the best answer and solution to your needs. Do not worry about your e-mail address being required, it will NOT be used in a mailing list and will NOT be used in any way other than to respond to your enquiry.
[contact-form-7]
TRY CHAT Terms and Conditions
If you like this service, please consider supporting us.
We use affiliate links on the blog allowing NAScompares information and advice service to be free of charge to you.Anything you purchase on the day you click on our links will generate a small commission which isused to run the website. Here is a link for Amazon and B&H.You can also get me a Ko-fi or old school Paypal. Thanks!To find out more about how to support this advice service checkHEREIf you need to fix or configure a NAS, check FiverHave you thought about helping others with your knowledge? Find Instructions Here
Or support us by using our affiliate links on Amazon UK and Amazon US
Alternatively, why not ask me on the ASK NASCompares forum, by clicking the button below. This is a community hub that serves as a place that I can answer your question, chew the fat, share new release information and even get corrections posted. I will always get around to answering ALL queries, but as a one-man operation, I cannot promise speed! So by sharing your query in the ASK NASCompares section below, you can get a better range of solutions and suggestions, alongside my own.
Dans cet article, nous allons découvrir le Mini PC ultra-compact Geekom XT12 Pro équipé d'un processeur Intel Core i9 de 12ème génération, de 32 Go de RAM et de 1 To de SSD. Envie d'en savoir plus sur ce modèle ? Lisez la suite de notre article !
Cet article va présenter ce modèle dans sa globalité, en commençant par les caractéristiques, le design et la qualité du boitier. Puis, nous parlerons des possibilités d'évolution et des performances de ce Mini PC.
Rappel : sur le marché des Mini PC, la marque Geekom est incontournable et elle s'est imposée comme un acteur majeur au niveau mondial. Elle a été créée en 2003 et la direction R&D de Geekom est située à Taiwan. En complément, la marque a plusieurs succursales dans différents pays du monde.
Commençons par découvrir les caractéristiques principales de ce modèle :
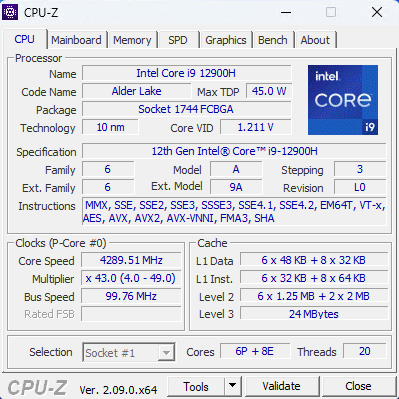
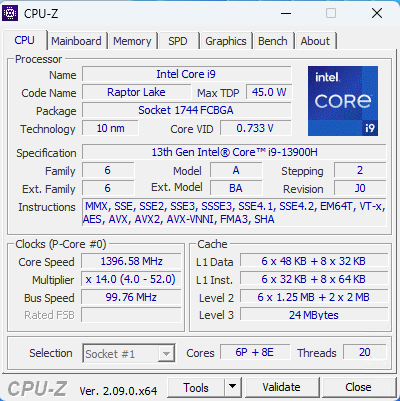
Processeur : Intel Core i9-12900H (14 Cœurs, 20 Threads, 24 Mo de cache, jusqu'à 5,00 GHz)
GPU : Intel Iris Xe
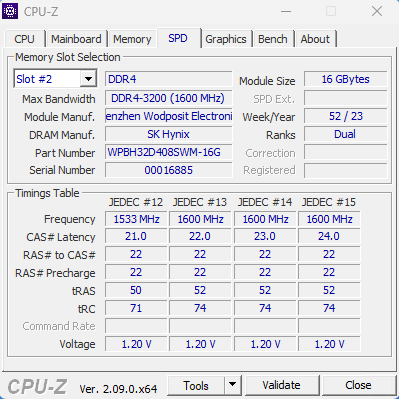
RAM : 32 Go DDR4-3200, extensible jusqu'à 64 Go
Stockage : 1 To de SSD NVMe (Gen.4) + 1 emplacement pour SSD SATA au format M.2 (2242 - Jusqu'à 1 To)
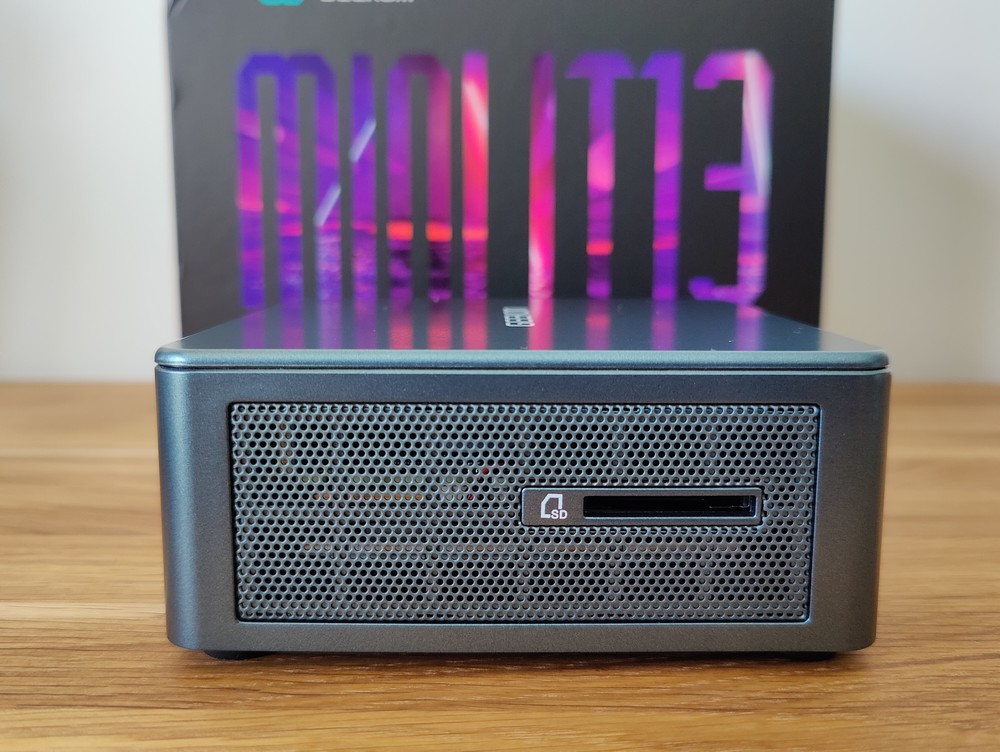
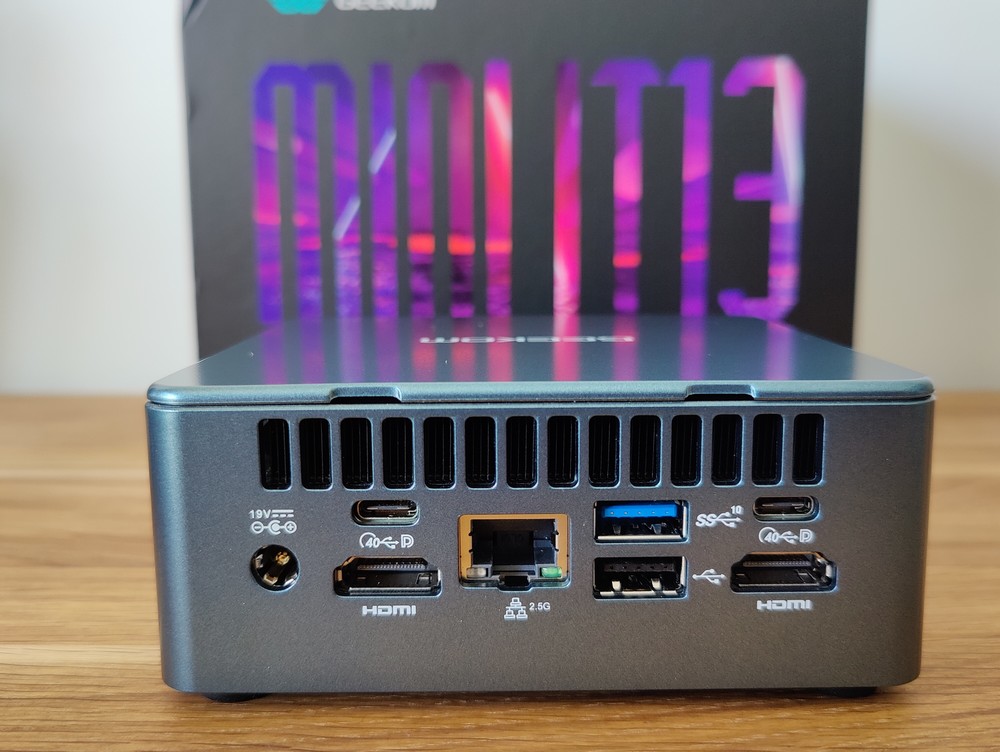
Connectique : 3 x ports USB 3.2 Gen 2 + 1 x port USB 2.0 + 2 x ports USB 4 + 1 prise casque Jack 3.5 mm + 1 x slot pour une carte SD + 1 x interface réseau LAN 2.5 GbE + 2 x ports HDMI 2.0 + 1 x port d'alimentation
Affichage : prise en charge jusqu'à 4 écrans.
WiFi 6E (AX211), Bluetooth 5.2
Alimentation : 19V, 6,32A DC - 120W
Poids : 545 grammes
Dimensions (L x W x H) : 117 x 111 x 38.5mm
Système d'exploitation : Windows 11 Pro
Garantie : 3 ans
Même si le processeur Core i9 n'est pas le plus récent, Geekom a préparé une belle fiche technique pour ce modèle déjà sur le marché depuis plusieurs mois. En effet, entre l'Intel Core i9, l'interface réseau 2.5 GbE, l'USB4 et le WiFi 6E, nous pouvons nous attendre à de belles performances ! La présence d'une interface réseau 2.5 GbE est toujours un point positif, selon moi. Et surtout, ce mini PC est ultra-compact et pourra être emporté partout sans difficultés.
Ce modèle est proposé par Geekom en une seule et unique version qui est celle proposée dans cet article. La série XT se démarque par la finesse de son design et son esthétique très soignée.
III. Package et design
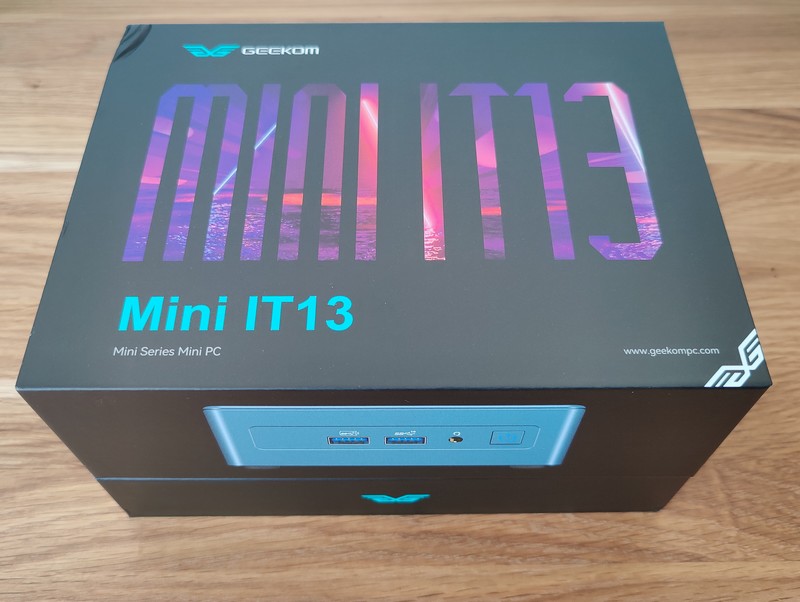
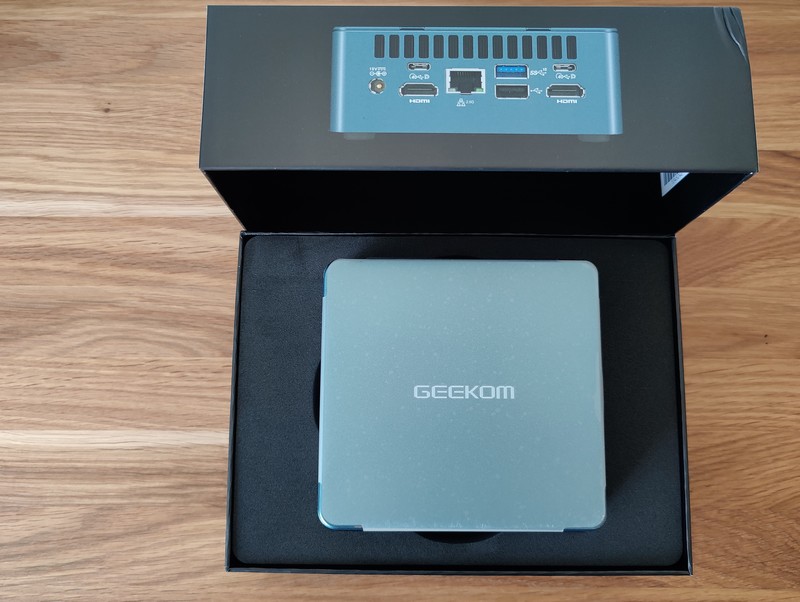
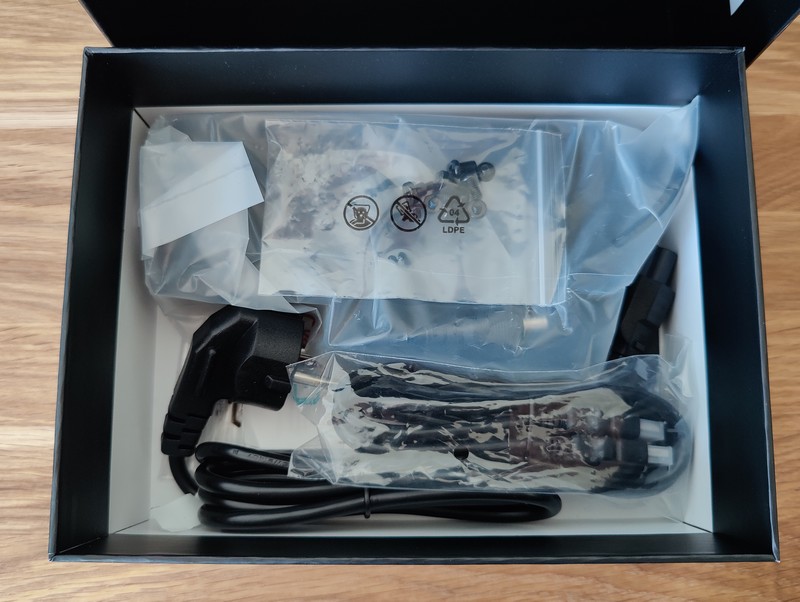
La boite de ce mini PC est très soignée, tout en étant sobre, car il faudra l'ouvrir pour avoir un aperçu du mini PC ! C'est d'ailleurs lui que l'on découvre à l'ouverture de la boite. Il est protégé par un bloc en mousse rigide et après l'avoir retiré, nous retrouvons l'ensemble des accessoires.
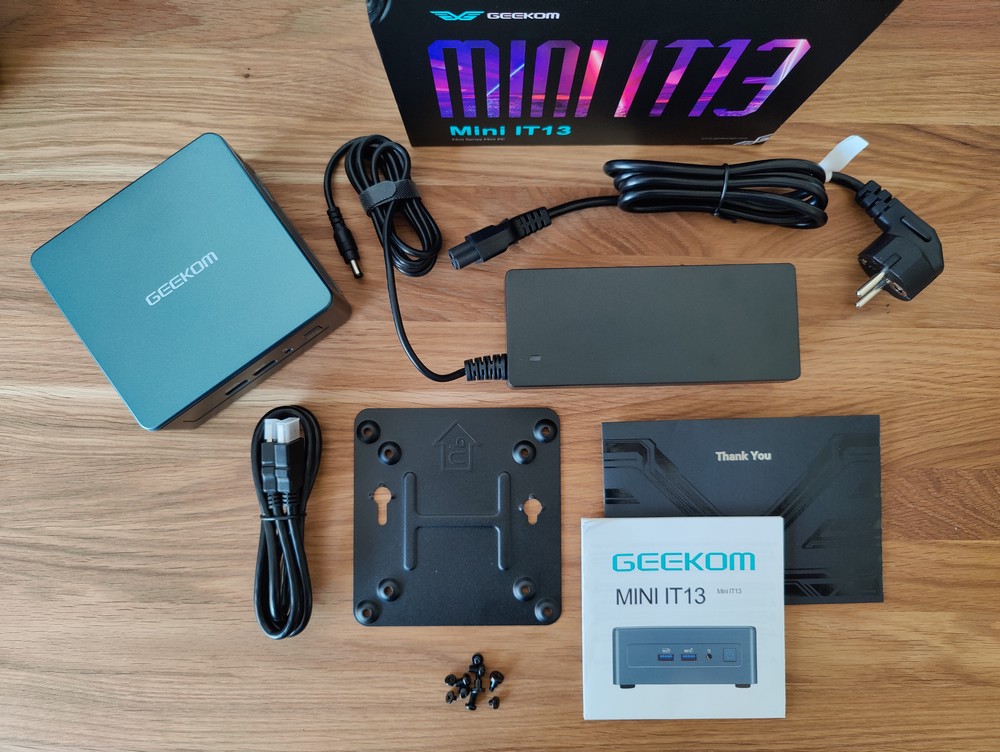
Qu'avons-nous dans la boite ? Au-delà d'avoir un Mini PC XT12 Pro, il y a aussi un câble HDMI, une alimentation externe et son câble, une plaque VESA (et les vis) permettant d'accrocher le mini PC à l'arrière d'un écran (support VESA), une notice et une lettre de remerciement pour l'achat.
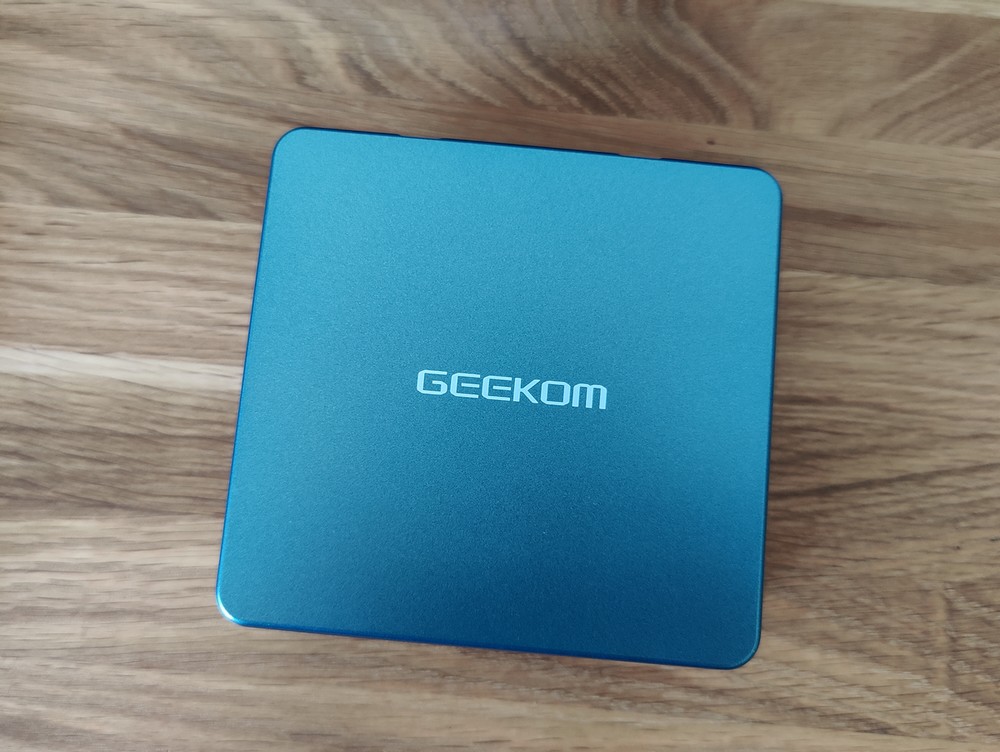
Fidèle à la gamme XT, le boitier de ce modèle XT12 Pro est beau et élégant. Geekom a apporté un soin particulier au design et à la qualité de fabrication de ce boitier en aluminium. Seul le dessus est une coque en plastique blanche estampillée "Geekom". La finesse de ce boitier me plait également : moins de 4 cm de hauteur (38.5 mm). À titre de comparaison, ce boitier est moins épais et plus compact que celui du modèle Geekom IT13, il est moins encombrant disons. J'ai vraiment apprécié le design de ce modèle !
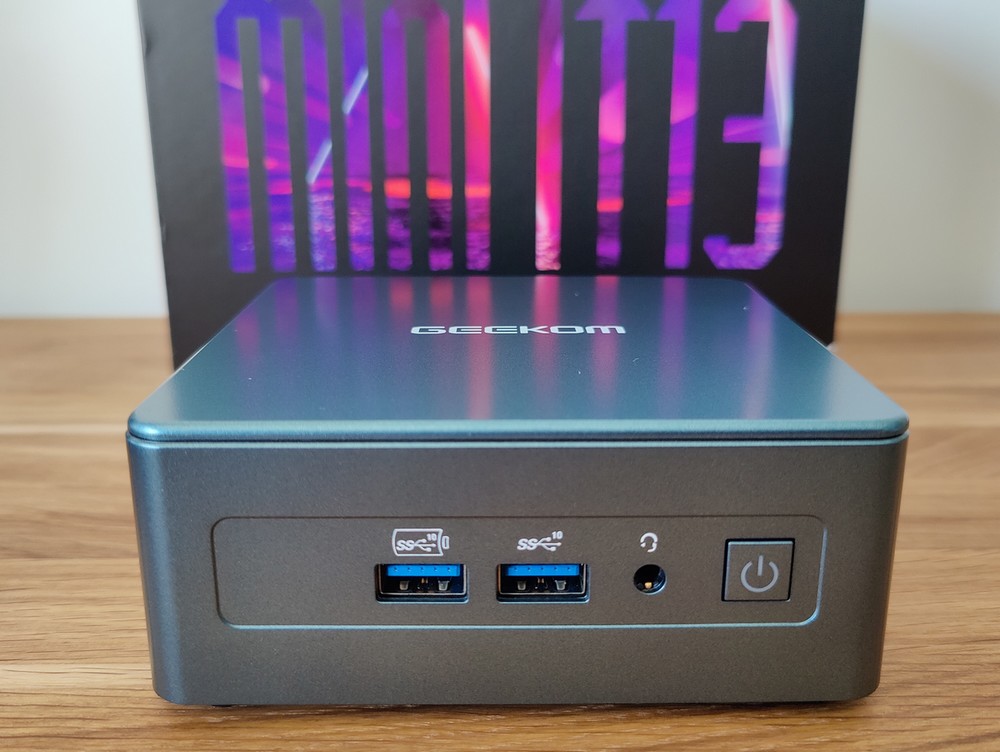
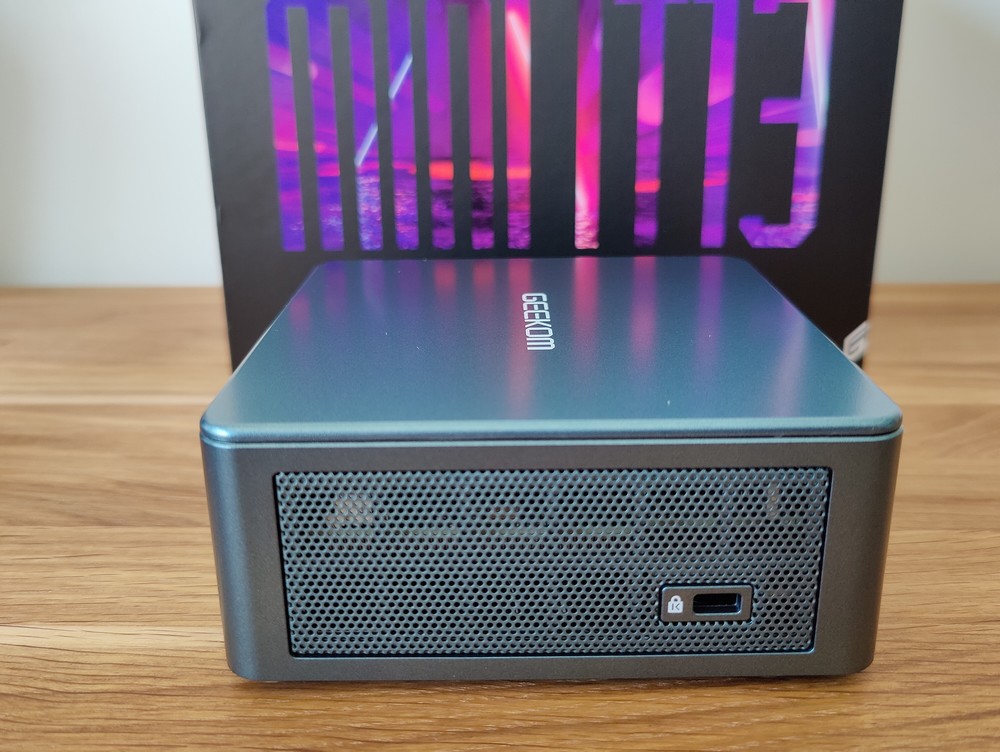
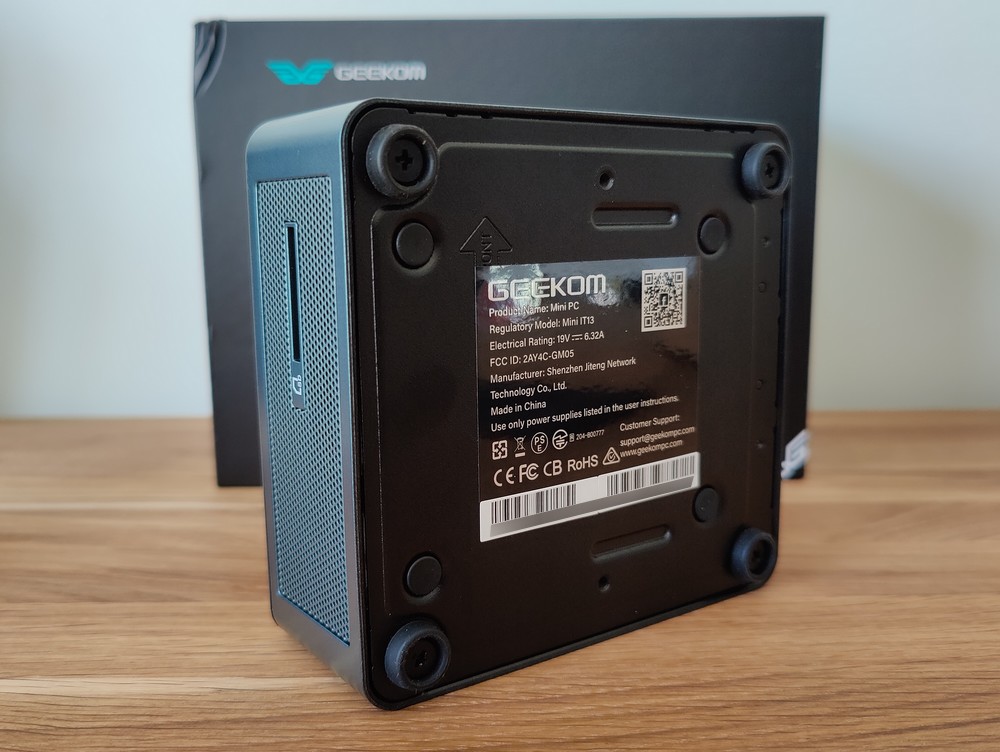
Sur la façade, nous retrouvons deux ports USB, dont un port USB 3.2 Gen2 avec PowerDelivery (PD) et un port USB 3.2 Gen2 (sans PD). Une prise casque et un bouton Power lumineux complète la façade. Sur le côté droit du boitier, il y a uniquement l'aération du boitier, tandis que sur le côté gauche, une fente de verrouillage Kensington a été discrètement incrustée au maillage de l'aération. Le flux d'air entrant s'effectuera par la gauche et la droite du boitier.
Tout le reste de la connectique se situe à l'arrière du boitier. Il y a les deux ports USB4 au format USB-C avec PowerDelivery, ce qui est la norme USB la plus récente à ce jour. Le débit théorique de l'USB4 est de 40 Gbps. Il y a un autre port USB 3 ainsi qu'un port USB 2.0, soit un total de 6 ports USB. N'oublions pas les deux ports HDMI 2.0 et le port RJ45 2.5 GbE.
Ce modèle est équipé de la technologie de refroidissement IceBlast 1.0 de Geekom. Ceci se traduit par la présence d'un grand ventilateur et la présence de cuivre pour dissiper la chaleur. D'ailleurs, l'aération du dissipateur thermique pour permettre l'évacuation de l'air chaud est situé à l'arrière, au-dessus de la connectique.
Comme souvent sur les modèles de cette marque, la mention "Geekom" est présente sur le dessus du boitier. En dessous, il n'y a pas d'aération contrairement à ce que l'on pourrait penser, mais nous avons 2 patins antidérapants très larges, ainsi que 4 vis pour ouvrir très facilement le boitier. Elles restent « accrochées » à la partie amovible du boitier, ce qui évitera de les égarer... Et il n'y a pas de patins à décoller pour accéder aux vis.
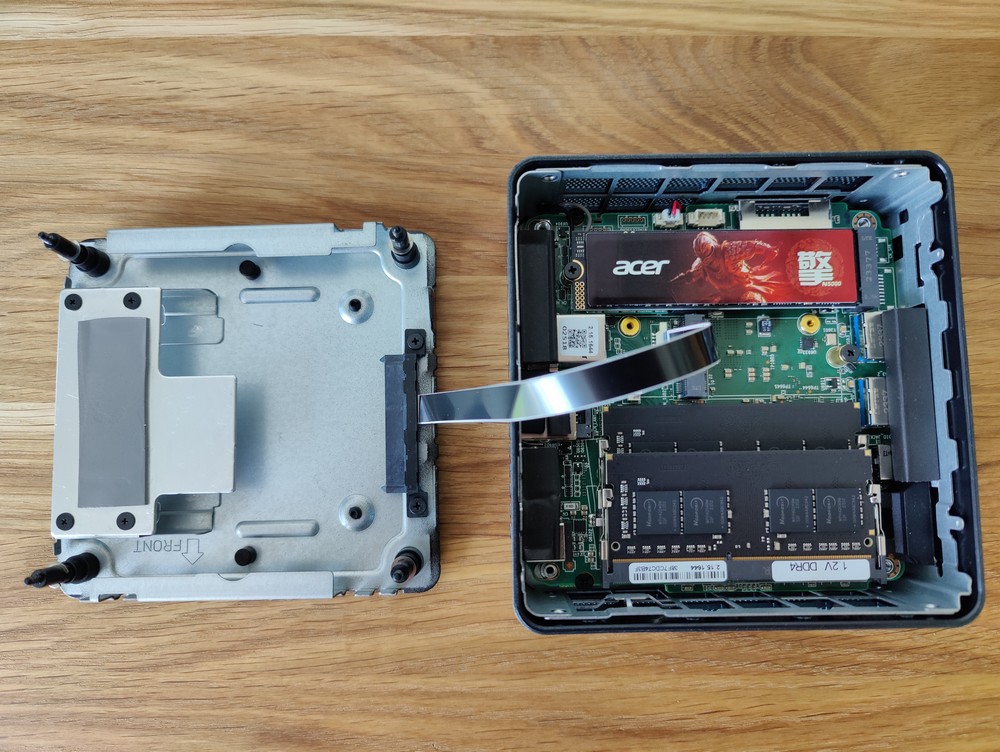
Ce boitier est majoritairement en aluminium brossé, car il n'y a que la partie supérieure qui est en plastique blanc. Cette vue éclatée montre bien la conception du boitier du XT12 Pro :
Jetons un coup d'œil à l'intérieur du boitier. Nous aurons surement l'occasion d'en savoir plus sur les composants utilisés par Geekom. Voici ce que l'on peut apprendre :
Un SSD NVMe de marque Kingston, avec la référence KINGSTON OM8PGP41024N-A0, d'une capacité de 2 To, en PCIe Gen4.0
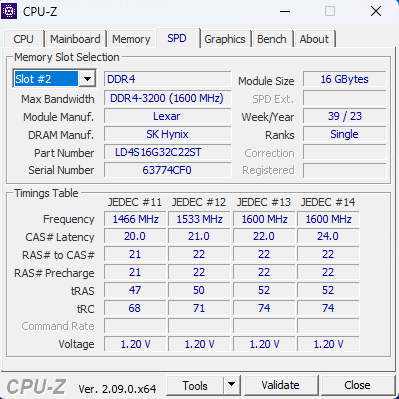
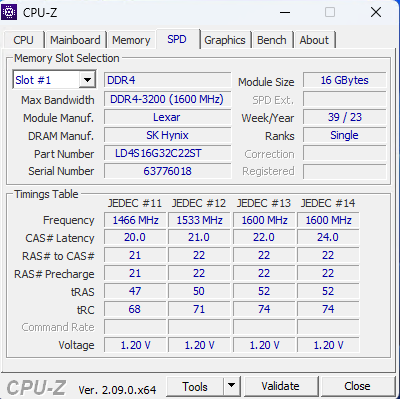
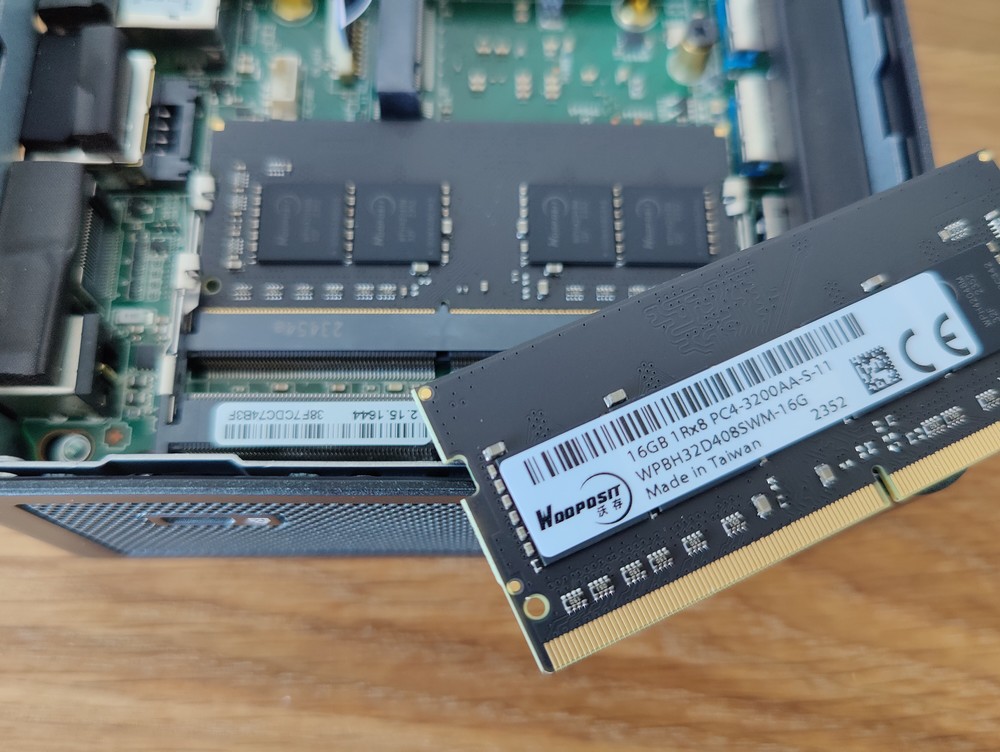
Deux barrettes de RAM de marque Lexar : 16 Go 1Rx8 - PC4-3200AA-SA2. Soit 32 Go au total. Il est possible de passer sur 64 Go de RAM, mais ceci implique de remplacer les deux barettes déjà présentes, car les deux slots sont occupés.
Une carte MediaTek MT7922A22M pour le Wi-Fi et le Bluetooth
Contrairement au modèle Geekom IT13, celui-ci ne peut pas accueillir un disque SATA au format 2.5 pouces car le boitier est moins épais et n'est pas prévu pour cela. Néanmoins, nous pouvons ajouter un disque SSD SATA M.2 supplémentaire, grâce à l'emplacement disponible entre le SSD NVMe et les barrettes de RAM.
Avec ce modèle et compte tenu de la conception du boitier, les composants sont facilement accessibles, identifiables et remplaçables. Que ce soit en cas de panne ou pour une quelconque évolution, c'est important de le préciser.
IV. Évolutivité et performances
A. Mise en route et évolutivité
Mettons en route le mini PC XT12 Pro de chez Geekom ! Avant d'évoquer le système d'exploitation, regardons les options proposées dans le BIOS de la machine. Le moins que l'on puisse dire, c'est que c'est minimaliste. À part la possibilité de définir un mot de passe pour le BIOS, de gérer l'ordre de démarrage et de gérer le Secure Boot, nous n'avons pas grand-chose à notre disposition. C'est à prendre en compte pour ceux qui ont l'habitude de tuner le BIOS de leur PC. Par exemple, le Wake on LAN n'est pas proposé. Sinon, pour information, il n'y a pas d'options relatives à la prise en charge de la virtualisation, mais elle est bien prise en charge : vous pouvez installer un hyperviseur.
La mise en route passe par la finalisation de l'installation du système Windows 11 Pro ! Nous retrouvons les étapes et questions habituelles propres au fonctionnement du système Windows 11. Il est tout à fait possible d'utiliser un compte local ou un compte Microsoft, au choix.
Geekom utilise des images officielles de Windows 11 Pro et elles ne sont pas personnalisées. Il n'y a aucune application supplémentaire ajoutée. Malgré tout, ma recommandation reste la même, peu importe le modèle du PC : effectuer une réinstallation avec votre propre image, que ce soit Windows ou un autre système.
Le premier démarrage est aussi l'occasion de constater que ce mini PC ventile fort pendant 1 ou 2 minutes lorsqu'il est démarré. Ensuite, le silence est de mise : mais jusqu'à quand ? Je reviendrai sur ce point.
Le mini-PC est livré avec 32 Go de RAM en DDR4, mais une mise à niveau est possible. Le processeur i9 utilisé pour cette configuration supporte jusqu'à 64 Go de RAM au maximum, ce qui correspond au maximum pris en charge par ce modèle de mini PC. Par contre, vous devez remplacer les deux barrettes de RAM actuelles pour doubler la RAM. Si vous souhaitez utiliser ce PC pour de la virtualisation afin d'y installer un hyperviseur, ce sera peut-être nécessaire selon vos besoins.
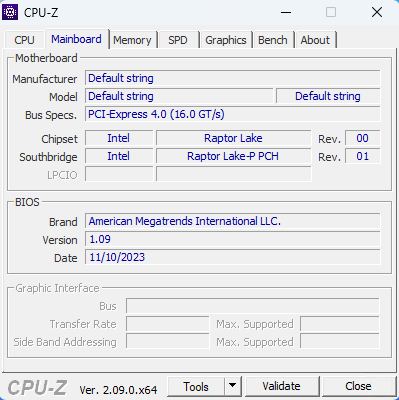
Pour le CPU et la RAM, voici des détails techniques obtenus avec le logiciel CPU-Z :
La présence de deux ports HDMI 2.0 et deux ports USB4 permet de connecter jusqu'à 4 écrans sur ce mini PC ! La connexion HDMI propose un affichage 4K @ 60 Hz, tandis qu'on est sur un affichage à 8K @ 30 Hz sur les ports USB4.
Nous pouvons aussi noter la possibilité d'exploiter la connexion USB4 pour brancher un GPU externe (eGPU), c'est-à-dire une carte graphique externe. Du côté stockage, ce mini PC peut accueillir 1 SSD SATA au format M.2 (2242 - Jusqu'à 1 To) en plus du SSD NVMe intégré au boitier. Attention toutefois, le format M.2 2242, bien qu'adapté pour les formats compacts, n'est pas courant (22 mm de largeur et 42 mm de longueur) au contraire du format 2280 beaucoup plus répandu.
B. Performances
Ce mini PC est équipé d'un processeur Intel Core i9 de 12ème génération lancé au premier trimestre 2022. Le modèle i9-12900H a 14 cœurs et 20 threads, avec fréquence maximale en mode Turbo de 5,0 GHz.
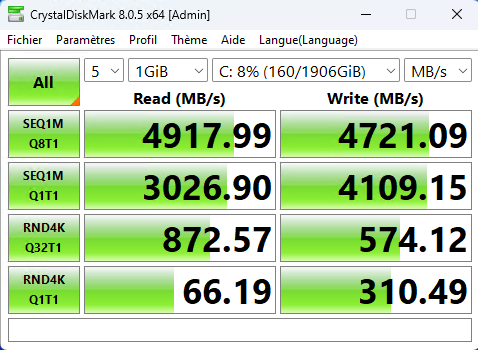
Qu'en est-il des performances du disque SSD NVMe livré avec le mini PC ?
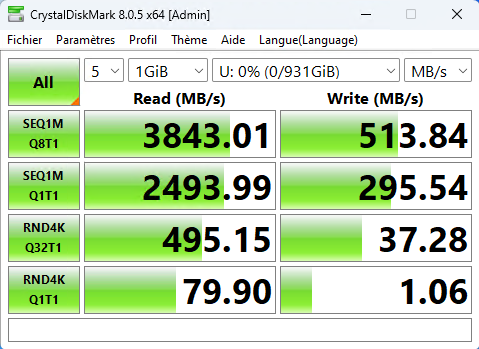
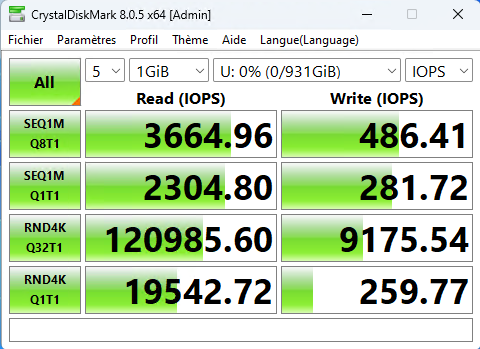
Un copier-coller de gros fichiers en local (de disque à disque, sur le même volume), est effectué avec une vitesse moyenne de 1.30 Go/s, ce qui est bon résultat ! Sur un autre test, en 1 minute et 34 secondes, j'ai pu dupliquer une bibliothèque d'images ISO de 101 Go !
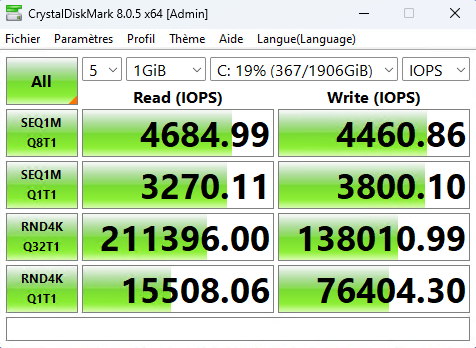
Voici un benchmark du disque effectué avec Crystal Disk Mark :
CrystalDiskInfo
Voici une analyse CrystalDiskInfo du disque SSD NVMe de marque Kingston monté en PCIe 4.0 présent dans ce PC :
Geekbench
J'ai également effectué un benchmark du CPU et du GPU avec Geekbench, vous pouvez y accéder sur ces pages :
Sans surprise, le processeur du modèle XT12 Pro est légèrement moins performant que celui du modèle IT13 : une génération d'écart, cela crée forcément une différence.
Qu'en est-il du bruit du ventilateur ?
Comme je l'évoquais précédemment, lorsque l'ordinateur démarre, il ventile relativement fort. Une fois que la machine a finalisé son démarrage, cela s'arrête et le mini PC devient très silencieux. Utilisée pour de la bureautique, elle reste silencieuse, tout au long de son utilisation.
Par contre, si le mini PC est très sollicité (ce que j'ai pu constater avec les benchmarks, notamment), il se met à ventiler et là, ce sera difficile de ne pas l'entendre : ce qui pourra être plus ou moins gênant selon l'emplacement du mini PC vis-à-vis de l'utilisateur. C'est aussi une question de tolérance de l'utilisateur lui-même. Si le mini PC est derrière l'écran, le bruit sera un peu "étouffé". Le bruit généré fait penser à celui de la ventilation d'un ordinateur portable qui tourne à plein régime. Il y a pire, mais il y a aussi plus discret.
Cette ventilation semble avoir un impact positif sur la gestion de la température du matériel : le boitier est légèrement tiède et la température du CPU bien maitrisée.
Que peut-on faire et ne pas faire avec ce modèle ?
Naviguer sur Internet, lire des vidéos, ouvrir et exécuter plusieurs applications en même temps, ce sont des tâches qui ne vont pas effrayer ce mini PC. Très à l'aise pour la bureautique et le multimédia, il montre ses limites lorsque l'on sollicite la partie graphique. C'est un perpétuel problème sur les machines avec une puce graphique intégrée au processeur, un iGPU "Intel Iris Xe" dans le cas présent.
Ce mini PC pourrait tout à fait être utilisé en tant que serveur pour faire tourner des machines virtuelles : le processeur Intel Core i9 et le 32 Go de RAM permettront de faire tourner plusieurs VMs simultanément.
Jouer à certains jeux n'est pas un problème si vous êtes prêts à diminuer les effets visuels et à réduire la qualité graphique de vos jeux. L'habituel test avec GTA V est un bon exemple : l'expérience en jeu est bonne, car c'est fluide, mais ceci oblige à ajuster les options liées aux graphismes.
V. Conclusion
Ce mini PC, très compact et performant pourrait mettre au placard de nombreux ordinateurs fixes beaucoup plus imposant que lui, moins bien équipé et moins performant. Geekom a pris l'habitude de miser sur l'Intel Core i9 pour plusieurs de ses modèles, dont celui-ci, et c'est à chaque fois une réussite. L'Intel Core i9 de 12ème génération offre de belles performances, et si vous avez besoin d'encore un peu plus, vous pouvez miser sur le Geekom IT13 équipé de la 13ème génération de Core i9.
Ce mini PC polyvalent, avec une configuration moderne, pourra satisfaire les besoins de nombreux utilisateurs pendant plusieurs années. La garantie de 3 ans du constructeur est également là pour nous rassurer.
Le Geekom XT12 Pro avec l'Intel Core i9 est proposé à 749,00 euros. Soit 100 euros de moins que le modèle Geekom IT13 équipé d'un processeur Intel Core i9 de 13ème génération, et un peu plus puissant.
Avantages
Un très beau boitier en aluminium brossé : élégant et compact
Une config convaincante et performante : Intel Core i9, 32 Go de RAM et 1 To de SSD
Windows 11 Pro : image officielle, sans logiciels supplémentaires
Connectique moderne et bien fournie (USB4, RJ45 2.5 GbE, etc.)
Ouverture facile du boitier : 4 vis facilement accessibles
Inconvénients
Disque SSD : le format M.2 2242 de l'emplacement supplémentaire
Bruyant lorsqu'il est sollicité
La puce graphique intégrée (iGPU) ne convient pas si vous souhaitez jouer sans faire de concession sur les graphismes
Offre spéciale sur le Geekom XT12 Pro
Profitez de 5% de réduction sur Amazon.fr ou sur la boutique officielle de Geekom, en utilisant les liens et codes ci-dessous.
QNAP TS-464 NAS – A Comprehensive Review Two Years Post-Launch
Even after two years since its introduction, the QNAP TS-464 NAS continues to hold its ground as one of the most lauded offerings in QNAP’s extensive lineup. Esteemed for its adept balance of hardware efficiency and cost-effectiveness, this model has etched its name among the top contenders in the NAS market. As we delve into this device once more in 2024, our aim is to provide a examination of its performance, features, and potential considerations for prospective buyers – Does it still stack up well in 2024, with new brands and products entering the market?
Physical Design and Hardware Efficiency: A Fusion of Compactness and Performance
The TS-464 makes a lasting impression with its compact and efficient design, catering to environments where space is at a premium. Powered by either an Intel N5105 or N5095 processor, renowned for their remarkable blend of low power consumption and robust performance, this NAS stands as a testament to efficiency and power.
With options ranging from 4 to 8 GB of DDR4 memory and support for up to four hard drive bays, users are afforded ample storage capacity without sacrificing on footprint.
Noteworthy is its energy-efficient operation, boasting a CPU with a thermal design power (TDP) between 10 to 15 watts, ensuring minimal disruption to home or office settings.
Expansion Capabilities: Embracing Versatility
The TS-464 shines in its expandability, offering multiple M.2 NVMe SSD slots and a PCIe slot for additional enhancements. Empowering users to integrate 10 GbE network cards, NVMe storage solutions, or even Wi-Fi cards, this NAS epitomizes adaptability to evolving needs.
Furthermore, the inclusion of USB 3.2 Gen 2 ports facilitates high-speed connectivity to external storage devices and peripherals, enhancing its versatility and usability across diverse applications.
Performance as a Plex Media Server: A Reliable Entertainment Hub
Among its many strengths, the TS-464 excels as a Plex media server, leveraging efficient hardware transcoding capabilities. Capable of seamlessly handling multiple simultaneous 4K video streams, this NAS offers unparalleled value for media enthusiasts. Despite the availability of more powerful alternatives, the TS-464’s exceptional cost-to-performance ratio remains a compelling choice for users seeking a dependable home media server solution.
Broad Compatibility: A Testament to Freedom of Choice
The TS-464 stands out for its broad compatibility with an extensive range of storage media from various manufacturers. This inclusivity empowers users to select from a diverse array of hard drives and SSDs, including enterprise-grade options, without being confined to proprietary solutions.
At a time when some NAS manufacturers prioritize proprietary compatibility, the TS-464’s expansive support for third-party storage drives underscores its commitment to user freedom and flexibility.
Fixed Memory and Software Challenges: Areas for Growth and Enhancement
Recent developments, such as the transition to fixed memory configurations in newer TS-464 models, pose potential limitations for users seeking memory upgrades. While this shift aligns with industry trends towards cost and power efficiency, it may present challenges for users accustomed to the flexibility of upgradable memory configurations. Additionally, criticisms surrounding the QNAP QTS operating system persist, with users citing inconsistencies and complexities in the user interface. Despite ongoing efforts to refine the user experience, software-related challenges continue to warrant attention and improvement.
Security and Future Prospects: Navigating Challenges and Building Trust
Security remains a focal point for QNAP, with efforts to address vulnerabilities and bolster overall security measures. While strides have been made in software updates and security advisories, challenges persist in rebuilding trust and confidence among users. As newer, more efficient CPU options emerge, questions linger regarding potential hardware upgrades in future iterations of the TS-464. However, concrete plans from QNAP regarding hardware refresh cycles remain elusive, leaving room for speculation and anticipation among users.
Category
Specification
CPU
Intel® Celeron® N5095 4-core/4-thread processor, burst up to 2.9 GHz
CPU Architecture
64-bit x86
Graphic Processors
Intel® UHD Graphics
Floating Point Unit
–
Encryption Engine
AES-NI
Hardware-accelerated Transcoding
–
System Memory
8 GB RAM
Maximum Memory
8 GB
Flash Memory
4GB (Dual boot OS protection)
Drive Bay
4 x 3.5-inch SATA 6Gb/s
Drive Compatibility
3.5-inch SATA hard disk drives, 2.5-inch SATA solid state drives
Hot-swappable
Yes
M.2 Slot
2 x M.2 2280 PCIe Gen 3 x1
SSD Cache Acceleration Support
–
2.5 Gigabit Ethernet Port (2.5G/1G/100M)
2 (2.5G/1G/100M/10M)
5 Gigabit Ethernet Port (5G/2.5G/1G/100M)
Optional via PCIe expansion card
10 Gigabit Ethernet Port
Optional via PCIe expansion card
Wake on LAN (WOL)
–
Jumbo Frame
–
PCIe Slot
1
USB 2.0 port
2
USB 3.2 Gen 2 (10Gbps) Port
2 x Type-A
IR Sensor
Optional QNAP RM-IR004 remote control
HDMI Output
1, HDMI 2.1 (up to 4096 x 2160 @ 60Hz)
Form Factor
Tower
LED Indicators
Power/Status, LAN, USB, HDD1-4
Buttons
Power, USB copy, Reset
Dimensions (HxWxD)
165 × 170 × 226.5 mm
Weight (Net)
2.26 kg
Weight (Gross)
3.59 kg
Operating Temperature
0 – 40 °C (32°F – 104°F)
Storage Temperature
-20 – 70°C (-4°F – 158°F)
Relative Humidity
5-95% RH non-condensing, wet bulb: 27˚C (80.6˚F)
Power Supply Unit
90W adapter, 100-240V
Power Consumption: HDD Sleep Mode
21.618 W
Power Consumption: Operating Mode, Typical
40.536 W
Fan
1 x 120mm, 12VDC
System Warning
Buzzer
Kensington Security Slot
–
Standard Warranty
3 years
Max. Number of Concurrent Connections (CIFS) – with Max. Memory
1500
Still A Solid Contender with Room for Scalability
The QNAP TS-464 NAS continues to impress with its adept blend of performance, expandability, and affordability, solidifying its position as a compelling choice in the NAS market. Despite its enduring popularity, areas for refinement and improvement, such as fixed memory configurations and software inconsistencies, underscore opportunities for growth and enhancement. As QNAP navigates security challenges and explores advancements in hardware technology, the TS-464 stands as a testament to the brand’s commitment to delivering innovative and reliable NAS solutions. Whether deployed for media streaming, data storage, or network applications, the TS-464 remains a timeless contender in the ever-evolving landscape of network-attached storage, poised to evolve alongside the evolving needs of its users.
Verdict – Should You Still Buy the QNAP TS-464 in 2024?
The QNAP TS-464 NAS persists as a steadfast contender in the ever-evolving NAS market, showcasing a commendable balance of features and performance even two years post its initial release. Its enduring popularity stems from a blend of compact design and hardware efficiency, underpinned by the Intel N5105 or N5095 processor, renowned for its low power consumption and robust performance. This amalgamation of hardware prowess and cost-effectiveness renders the TS-464 a suitable choice for a spectrum of environments, be it home or small businesses, where space and power efficiency are paramount considerations. Moreover, the device’s expansion capabilities serve as a cornerstone of its appeal, offering users the flexibility to adapt to evolving storage needs seamlessly. With multiple M.2 NVMe slots and PCIe slots at its disposal, the TS-464 embodies versatility, empowering users to augment their storage infrastructure with additional network cards, NVMe storage, or even Wi-Fi cards. These expansion options not only future-proof the NAS but also ensure that it remains adaptable to emerging storage technologies and networking standards.
However, amidst its strengths, potential buyers must navigate certain limitations that could impact their decision-making process. Chief among these is the transition towards fixed memory configurations in newer models, which may restrict the flexibility of memory upgrades—a factor that enthusiasts and power users should consider carefully. Furthermore, while the QTS operating system boasts a plethora of features and functionalities, users may encounter some inconsistencies and complexities in navigating the interface. This discrepancy, although not a deal-breaker, underscores the importance of user experience and interface design in enhancing the overall usability of the NAS. Despite these nuances, the QNAP TS-464 NAS remains a reliable storage solution, catering to diverse user requirements with its performance, expandability, and compatibility features. As such, its enduring relevance in the NAS landscape underscores its status as a noteworthy contender for those seeking a robust and versatile storage solution for their home or business needs.
SOFTWARE - 8/10
HARDWARE - 10/10
PERFORMANCE - 9/10
PRICE - 8/10
VALUE - 9/10
8.8
PROS
Very compact chassis design, despite large storage potential A BIG jump in hardware and scale from the TS-453Be and TS-453D, but with a largely identical RRP at launch Easily one of the most hardware packed SMB/Mid-range 4-Bay on the market Up to 16GB of Memory is fantastic m.2 NVMe SSD Bays AND a PCIe Upgrade Slot (no need to choose one upgrade path) 8x Included Camera Licenses Includes Anti-virus, Firewall Tool, VPN client tools, Malware Remover, network manager and Security Councilor Tool 3 Different Container/VM tools that also feature image download centers 10Gb/s (1,000MB/s) USB Ports will be incredibly useful Large range of expansion options in the TR/TL series in 2, 4, 6, 8 and 12 Bays
CONS
The PCIe Slot is PCIe 3×2 and the M.2 SSD Bays are PCIe 3×1 (likely limitations of all this H/W on a Celeron+chipset QNAP Has had 3 ransomware hits in 2019-2021 (Qlocker, Qsnatch and Deadbolt). Lots of Security app/changes since, but people remember and QNAP needs to win back that trust in 2022/2023
This description contains links to Amazon. These links will take you to some of the products mentioned in today's content. As an Amazon Associate, I earn from qualifying purchases. Visit the NASCompares Deal Finder to find the best place to buy this device in your region, based on Service, Support and Reputation - Just Search for your NAS Drive in the Box Below
Need Advice on Data Storage from an Expert?
Finally, for free advice about your setup, just leave a message in the comments below here at NASCompares.com and we will get back to you.Need Help?
Where possible (and where appropriate) please provide as much information about your requirements, as then I can arrange the best answer and solution to your needs. Do not worry about your e-mail address being required, it will NOT be used in a mailing list and will NOT be used in any way other than to respond to your enquiry.
[contact-form-7]
TRY CHAT Terms and Conditions
If you like this service, please consider supporting us.
We use affiliate links on the blog allowing NAScompares information and advice service to be free of charge to you.Anything you purchase on the day you click on our links will generate a small commission which isused to run the website. Here is a link for Amazon and B&H.You can also get me a Ko-fi or old school Paypal. Thanks!To find out more about how to support this advice service checkHEREIf you need to fix or configure a NAS, check FiverHave you thought about helping others with your knowledge? Find Instructions Here
Or support us by using our affiliate links on Amazon UK and Amazon US
Alternatively, why not ask me on the ASK NASCompares forum, by clicking the button below. This is a community hub that serves as a place that I can answer your question, chew the fat, share new release information and even get corrections posted. I will always get around to answering ALL queries, but as a one-man operation, I cannot promise speed! So by sharing your query in the ASK NASCompares section below, you can get a better range of solutions and suggestions, alongside my own.
Review of the Terramaster D8 Hybrid Storage System
What IS the D8 Hybrid and why is this brand’s newest device getting a lot of media attention of late? Terramaster has been a name in the world of NAS for quite a few years, but what about DAS? Unlike Network Attached Storage, Direct Attached Storage is something that is way, WAY more common and to try and stretch your muscles in this market requires something a little special. It would be unfair to say that Terramaster are new to this market, as they have actually been in this market with numerous USB and Thunderbolt solutions since around 2018/2019. Some of these were RAID enabled, some of them JBOD and thanks to their NAS systems being supporting USB Expansions, this has helped them create a neat crossover between their portfolio of devices. However, what can Terramater bring to the table in the heavy saturated world of USB storage? Well, the D8 is trying something different, with it’s 4 HDD and 4 NVMe USB-C 10Gb connected storage that is half JBOD (loose drives) and half RAID (supporting a mirror RAID on 2x HDDs). There are certainly pros and cons here, putting this much hybrid storage behind a USB connection, as well as the benefits and drawbacks of reliance of a client machine to manage the larger RAID options out there, but the burning question is… is the D8 Hybrid actually any good? Let’s discuss it in today’s review.
The TerraMaster D8 Hybrid excels in blending the high capacity of HDDs with the quick data access speeds of SSDs, housed within a single, efficient unit. The system’s design emphasizes user-friendliness with features like tool-less drive installation and low operational noise, making it an excellent choice for a variety of settings, from busy office environments to quiet home use. However, potential users should weigh the impact of the USB 3.2 Gen 2 interface, which, while sufficient for many applications, might not meet the needs of those requiring the fastest possible data transfer speeds. The absence of Thunderbolt technology is a noted limitation, but this is reflected in the D8 Hybrid’s competitive pricing, which targets a segment of the market more concerned with value and reliability than with leading-edge performance. The TerraMaster D8 Hybrid offers a well-rounded solution for those seeking a storage system that combines large storage capacity with respectable speeds at a cost-effective price point. Its performance, although not pushing the upper limits of current technology, provides ample support for most professional and personal storage needs, making it a worthwhile investment for a broad range of users. The thoughtful design and practical features, coupled with the device’s solid build and reliable performance within its defined limits, establish the D8 Hybrid as a standout offering in its category.
HARDWARE - 7/10
PERFORMANCE - 7/10
PRICE - 10/10
VALUE - 9/10
SUSTAINED SPEED - 10/10
8.6
PROS
Good sustained performance (if you preferred that to \'Peak\' performance Low Power Use and Low Noise Good internal processor choices, especially for the price point NAS Supported, so can be used as a tiered expansion box Very simple to use Mac/Windows Supported (even worked connected to my Android phone!) Almost completely toolless Solid build and good \'feel\' Supports 8TB M.2 NVMes (Tested Addlink A95 8TB 2280 NVMe) HDD Bay 1+2 are RAID Supported Affordable!
CONS
Software is limited and Premium features require a subscription Peak performance is much lower than what you would expect, despite 3x1 speed (max 1GB) on each m.2 USB 10Gb/s is going to be a bummer for those thinking about the real speed that 3x m.2 SSDs could hit. Disappointing that there is no USB 3.2 Gen 2x2 (40Gb/s) or USB4/TB4 Version
Specification
Details
Dimensions
222 x 179 x 154 mm
Weight
1.6 kg
Power Supply
90 W (100V to 240V AC) 50/60 HZ, Single Phase
System Fan
80 mm x 80 mm x 25 mm (x2)
Maximum Noise Level
17.3 dB(A) (Using 4 SATA HDDs/SSDs in standby mode)
Compatible Disk Types
3.5″ SATA HDD, 2.5″ SATA HDD, 2.5″ SATA SSD
Compatible NVMe
M.2 2280 NVMe Slot (x4)
Raw Capacity
Up to 128TB (24 TB HDD x 2 + 8 TB NVMe x 4)
Supported RAID Configurations
SINGLE DISK, JBOD, RAID 0, RAID 1
HDD Sleep Mode
Yes
Connectivity
USB3.2 Type-C gen2 (10Gbps), DC IN 12V Barrelport
Price
€199-299
Introduction to the TerraMaster D8 Hybrid
The TerraMaster D8 Hybrid is engineered to cater to the evolving demands of personal and small business storage by amalgamating traditional hard disk drives (HDDs) with the swift, modern NVMe solid-state drives (SSDs).
This system includes four versatile SATA bays that support both 3.5″ and 2.5″ drives and four M.2 NVMe slots, offering a broad spectrum of storage options. It utilizes USB 3.2 Gen 2 connectivity, capable of reaching speeds up to 1000 MB/s. However, this setup prompts a discussion about the possible limitations of USB connectivity when used with high-performance storage technologies, potentially creating bottlenecks that could affect data transfer speeds.
Exploring the Design and Build
The D8 Hybrid showcases a durable and user-friendly design consistent with Terramaster’s latest NAS models. The system facilitates easy installation of drives with its tool-free “click and load” mechanism, suitable even for users without technical expertise.
The operational noise level is moderately low, which is a crucial consideration for use in shared spaces like small offices or home environments.
The storage solution accommodates up to four HDDs and four NVMe SSDs but opts out of including faster interface technologies such as Thunderbolt to maintain an affordable price point. This choice might restrict the performance potential of the system but makes the D8 Hybrid more accessible financially to a broader audience.
ASMedia and Realtek are two prominent players in the semiconductor industry, particularly known for their contributions to the development of chips that handle data connectivity and processing in various electronic devices.
ASMedia, a subsidiary of ASUS, specializes in high-speed interface technology, particularly USB and PCIe bridge solutions. Notably, their chips are pivotal in enhancing the performance of USB connections. For example, the ASM3042 is a significant advancement in their USB controller lineup, bridging PCI Express to USB3.2 and providing support for legacy USB functions. This chip showcases ASMedia’s capability to deliver high bandwidth and efficient power management, essential for maintaining low power consumption in various devices
In 2022, ASMedia became one of the first to introduce a USB4 host-controller, the ASM4242, designed to support high data transmission speeds up to 64 Gbps, making it backward compatible with Thunderbolt 3 and other protocols. The incorporation of ASMedia’s ASM4242, a high-performance USB4 host controller, into a device configuration represents a significant step towards future-proofing data transfer capabilities. The ASM4242 supports up to 64 Gbps of bandwidth, providing a robust solution for high-speed data, video, and power transmission over a single USB connection. This level of integration ensures that devices are not only meeting current standards but are also prepared for next-generation needs, with backward compatibility ensuring a broad range of device support.
Realtek’s contributions, while more commonly associated with their audio and network solutions, also extend to data interface technologies. Realtek chips are crucial for managing data transmission and ensuring compatibility across a vast ecosystem of computing and multimedia devices.
Their technology helps to stabilize and optimize the data flow, critical for the functionality of hybrid storage systems where data integrity and speed are paramount.
Detailed Performance Assessment
The performance of the D8 Hybrid was meticulously tested under various configurations to truly understand its capabilities and limitations. Configuring the device with two Seagate 24TB Ironwolf Pro Series HDDs in a RAID 0 setup, the system demonstrated robust performance with peak read/write speeds reaching 551/540MB/s.
Next up, to put this into perspective (and measure what that RAID 0 actually provided vs singular use), I ran the same tests with a single 24TB HDD. The results were notable and though unsurprisingly half that of the RAID 0 Dual Disk pool, did also give you a nice idea of what full hardware RAID on this device (or an externally managed RAID Controller/OS-RAID) could have given us.
Finally, I ran the same tests on a single M.2 NVMe SSD in Slot #1 if the system (a Kingston KC3000 M.2 NVMe) and the results was practical full saturation of the 10G USB connection. If we had used an external RAID controller/OS-RAID, we still would not have been able to escape the USB 3.2 Gen 2 1,000MB/s maximum,but it could have improved IOPS/latency further.
We have to look at this device as a JBOD (with a hint of a mirrored RAID) and therefore scale back our expectations a bit. With that in mind, I am happy with what the D8 Hybrid can do without a RAID in place. I could have managed this with my windows client and thrown on a few different RAID’s using software (softRAID or even just Disk Management and stripe etc), but that would limit the results to just my own system/setup. Overall, these numbers suggest a careful balance between performance and cost, ensuring adequate speed for standard tasks without the premium price tag associated with higher-end interfaces like Thunderbolt.
Is This a Comparative Market?
The D8 Hybrid is strategically positioned in the market to appeal to users who prioritize reliable performance over cutting-edge speed. It serves well for small to medium business applications, home offices, and creative professionals who require a dependable storage solution. The device offers an appealing alternative to more expensive options by providing sufficient speed for everyday tasks, including data backup and accessing large files, without compromising on quality or reliability.
Its cost-effectiveness paired with versatile storage capabilities makes the D8 Hybrid a formidable competitor in the hybrid storage market. It’s particularly attractive for budget-conscious buyers who still require a robust storage solution that can handle a mix of data types and usage scenarios.
Final Verdict and Conclusion of the Terramaster D8 Hybrid
The TerraMaster D8 Hybrid excels in blending the high capacity of HDDs with the quick data access speeds of SSDs, housed within a single, efficient unit. The system’s design emphasizes user-friendliness with features like tool-less drive installation and low operational noise, making it an excellent choice for a variety of settings, from busy office environments to quiet home use. However, potential users should weigh the impact of the USB 3.2 Gen 2 interface, which, while sufficient for many applications, might not meet the needs of those requiring the fastest possible data transfer speeds. The absence of Thunderbolt technology is a noted limitation, but this is reflected in the D8 Hybrid’s competitive pricing, which targets a segment of the market more concerned with value and reliability than with leading-edge performance. The TerraMaster D8 Hybrid offers a well-rounded solution for those seeking a storage system that combines large storage capacity with respectable speeds at a cost-effective price point. Its performance, although not pushing the upper limits of current technology, provides ample support for most professional and personal storage needs, making it a worthwhile investment for a broad range of users. The thoughtful design and practical features, coupled with the device’s solid build and reliable performance within its defined limits, establish the D8 Hybrid as a standout offering in its category.
PROs of the Terramaster D8 Hybrid
CONs of the Terramaster D8 Hybrid
Good sustained performance (if you preferred that to ‘Peak’ performance
Low Power Use and Low Noise
Good internal processor choices, especially for the price point
NAS Supported, so can be used as a tiered expansion box
Very simple to use
Mac/Windows Supported (even worked connected to my Android phone!)
Software is limited and Premium features require a subscription
Peak performance is much lower than what you would expect, despite 3×1 speed (max 1GB) on each m.2
USB 10Gb/s is going to be a bummer for those thinking about the real speed that 3x m.2 SSDs could hit. Disappointing that there is no USB 3.2 Gen 2×2 (40Gb/s) or USB4/TB4 Version
The D8 Hybrid crowdfunding project has officially launched on the Kickstarter with up to 33% off. For more details, please visit:
If you are thinking of buying a NAS or DAS system? Please use the links below if you found this article helpful, as it results in us at NASCompares receiving an affiliate fee from Amazon:
Need More Help Choosing the right storage soution?
Choosing the right data storage solution for your needs can be very intimidating and it’s never too late to ask for help. With options ranging from NAS to DAS, Thunderbolt to SAS and connecting everything up so you can access all your lovely data at the touch of a button can be a lot simpler than you think. If you want some tips, guidance or help with everything from compatibility to suitability of a solution for you, why not drop me a message below and I will get back to you as soon as possible with what you should go for, its suitability and the best place to get it. This service is designed without profit in mind and in order to help you with your data storage needs, so I will try to answer your questions as soon as possible.
This description contains links to Amazon. These links will take you to some of the products mentioned in today's content. As an Amazon Associate, I earn from qualifying purchases. Visit the NASCompares Deal Finder to find the best place to buy this device in your region, based on Service, Support and Reputation - Just Search for your NAS Drive in the Box Below
Need Advice on Data Storage from an Expert?
Finally, for free advice about your setup, just leave a message in the comments below here at NASCompares.com and we will get back to you.Need Help?
Where possible (and where appropriate) please provide as much information about your requirements, as then I can arrange the best answer and solution to your needs. Do not worry about your e-mail address being required, it will NOT be used in a mailing list and will NOT be used in any way other than to respond to your enquiry.
[contact-form-7]
TRY CHAT Terms and Conditions
If you like this service, please consider supporting us.
We use affiliate links on the blog allowing NAScompares information and advice service to be free of charge to you.Anything you purchase on the day you click on our links will generate a small commission which isused to run the website. Here is a link for Amazon and B&H.You can also get me a Ko-fi or old school Paypal. Thanks!To find out more about how to support this advice service checkHEREIf you need to fix or configure a NAS, check FiverHave you thought about helping others with your knowledge? Find Instructions Here
Or support us by using our affiliate links on Amazon UK and Amazon US
Alternatively, why not ask me on the ASK NASCompares forum, by clicking the button below. This is a community hub that serves as a place that I can answer your question, chew the fat, share new release information and even get corrections posted. I will always get around to answering ALL queries, but as a one-man operation, I cannot promise speed! So by sharing your query in the ASK NASCompares section below, you can get a better range of solutions and suggestions, alongside my own.
With so, SO many DIY mini server motherboards in the market, what exactly does the $200 CWWK Q670 NAS motherboard bring to the party that we haven’t seen dozen times before? The booming market for 24×7 server mobos in ‘M-ITX in the last 18-24 months has been somewhat meteoric, with Chinese brands such as CWWK and Topton gaining a lot of industry attention for providing versatile solutions that challenge the hardware power and value that we have come to expect. The CWWK Q670 certainly continues this trend, arriving as a M-ITX motherboard that is ready for the slowly rolling out 14th Gen of Intel CPUs (as well as 12 and 13th Generation), Gen 5 PCIe architecture, DDR5 memory in the triple figures, eight native SATA drives and three m.2 NVMes SSDs (covering Gen5x4 and at 22110 length too). There is ALOT here on this little board. But power isn’t everything! How does it all come together? Have compromises been made? And ultimately, does it deserve your data? Let’s find out whether the Q670 deserves to find a home in your homelab.
Important Note – The photos taken for this article were taken AFTER I installed a CPU, Memory and heatsink. The default $200+ model of the CWWK Q670 arrives without any kind of extras.
As long as you do not lose sight of the fact that the CWWK Q670 NAS mobo is designed to be part of a larger and more powerful NAS build, there is ALOT to love here – especially at 200 bucks! For an M-ITX board this thing out specs a lot of bigger and broader M-ATX boards at the price. The Gen 5 architecture, if you are going to build around it ‘hardcore’ enough, as well as spend the time needed to tweak it, is definitely this board’s USP. As is that it manages to challenge conceptions of what an MITX board should arrive with, thanks to those eight native SATA ports. The remote BIOS-level access is a nice extra and although its not going to be used by everyone, in a pinch (ie ‘back against the wall troubleshooting and/or maintenance), it’s a great little bonus. The huge scalability afforded to the NAS builders with the UDIMM memory choice over SODIMM and three M.2s really does allow for a much more aggressively storage-focused system here. All that said, things are super cramped here and extra care is advised when buying your accessories (especially cooling), as aside from airflow restrictions, there is the potential here to accidentally create a air flow dead end! This is NOT a motherboard for the learner homelab’er or shiny new NAS enthusiast… but if you are happy to spend a little more and have the time to configure accordingly, this thing can be a fricking POWERHOUSE!
BUILD QUALITY - 9/10
HARDWARE - 9/10
PERFORMANCE - 8/10
PRICE - 10/10
VALUE - 10/10
9.2
PROS
A Gen5 M-ITX NAS Mobo...SOLD! 8x SATA Ports (actual SATA, not via an m.2 adapter or miniSAS) Good scope to support 13th Gen and more CPUs 3x M.2 at Gen 5 and 4 (one of the 22110) PCIe 5x16 Slot Excellent USB Outputs Full-Length DIMM Memory Support (i.e more memory possible) Very well priced at just over $200+
CONS
CPU Cooler vs Memory slot placement is VERY tight! Need a lot of BIOS tuning by the end user No pre-bundled (CPU/RAM) options 1 PCIe slot (standard M-ITX build) will lead to hard choices about NIC upgrades
CWWK Q670 Gen 5 NAS Board Review – Design and Hardware
Although I set up the CWWK Q670 NAS motherboard with a 12th Gen i5 processor, it’s worth highlighting that this board supports all the way up to the latest 14th Gen of Intel Core processors (no mean feat, given their launch very late last year and very few mobos of this scale being compatible without significant compromise. Bring an M-ITX does mean that there are architectural compromises of course (more on that later) but they do manage to squeeze ALOT in here (for good, and for bad).
It’s also worth touching on that there are 2 versions of the 670, with a remote access network card that allows the end user to access system control and bios level customization over the network via Intel vPro and Intel EMA remotely. It’s quite a niche service for anything less than enterprise/bigger-business use, but its an incredibly useful feature for those that do not have the time or physical deployment for keyboard, Video & Mouse. This service is bound to one of the 2.5G ports, and does not prevent it for typical LAN use by the NAS system.
The CPU and cooler requirements are LGA1700 and the rear of the Q670 is a clean layout, and CWWK have used this spec to include two Gen4 M.2 slots (more eon these later), but we have to talk about something far more intriguing in this M-ITX board…
The Q670 features EIGHT native SATA 6Gb ports (no mini-SAS fan out requires or an m.2-to-SATA adapter) which really is a breath of fresh air, even if this NAS mobo wasn’t so feature rich already. Additionally, native SATA massively smooths any potential NAS OS BIOS conflicts in the event of managing large drive layouts.
That said, this is definitely one of the earliest examples of this motherboard cramming in ALOT of hardware. The 8x SATA ports are directly next to the UDIMM Memory slots. The Q670 features two UDIMM memory slots, which one the face of it is GREAT! Rather than SODIMM (which most would expect from a mobno of this scale), UDIMM allows for larger memory capacity per module, as well as more common ECC modules available in UDIMM. Equally, newer generation CPUs support ALOT of memory, which this board is clearly ready to capitalize on! So what is the problem?
Well, those UDIMM slots are remarkably close to the CPU cooler and although there are plenty of good coolers in the market with a taller and slimmer profile, this can become problematic depending on the NAS case you are choosing to use.
Alternatively (I can hear you thinking) you could just rotate the cooler? Well, on the other side of the cooler is your PCIe Gen 5×4 slot – and for those that know, PCIe Gen 5×4 gets HOT! So, it is always recommended that you use a fan assisted heatsink for a Gen 5 SSD – which will be directly in the path of your CPU cooler, if you rotate it.
Ok, what about facing it downwards? Well, that places you pretty squarely above your PCIe slot. The CWWK Q670 arrives with a very beefy PCIe Gen 5×16 card slot – but that’s just it – a single slot (one of those fun limits of M-ITX that is quite common, that I mentioned earlier). So you will likely be using this for a NIC upgrade (2 port 10g/25GbE card perhaps to get some serious saturation of those M.2 and/or 8xSATA) or adding a multi-port Gen 5×4 M.2 SSD card to start carving up that 5×16 slot into multiple SSDs via bifurcation? Hell, maybe even go extra wild and look at mid-high tier GFX cards.
Regardless, you once again face quite alarming proximity with that CPU cooler if it faces in that direction! In 2 outta 3 (technically 4) of these placements of the cooler, you have nothing to worry about (even less still with a taller and narrower cooler), but that is still a lot of very high throughput components in close proximity that have quite obstructed airflow! Again, there are ways and means to mitigate with upright coolers, or even using watercooling and pipes – but that’s a lot to wrap around an M-ITX board when this scale of mobo is mostly there to reduce physical space on the server enclosure vs ATX.
Returning to the M.2 Gen 5×4 slot, the Q670 might well be the first Gen5 M-ITX NAS Mobo that CWWK have ever released (and there are not a vast number of others out there from other brands either). Additionally, this slot supports up to the longer 22110 M.2 scale, which allows for larger capacity drive potential, better NAND distribution drives (i.e more, smaller capacity NAND cells on an M.2 PCB result in higher consistent performance vs fewer NAND cells of a larger capacity), plus longer 22110 SSDs can put the NAND all on one side of the PCB to better manage heat dissipation and physical space upon installation. This isn;t even factoring PLP SSDs either! This is a savvy move, as SSD makers are now hitting performance and temp walls when expanding Gen5 SSD technology and are perhaps instead favouring side-grading these drives to improve sustained performance and stability.
The rear M.2 NVMe slots are Gen 4×4, which makes a lot of sense, given just how far the architecture on this mobo has been stretched. As the mobo does not arrive with a CPU, the full extent to which an end user can tinker with the architecture and how much lane/speed can be afforded to these slots is up for debate. Just because the board CAN hit Gen 5 and 4 respectively on these M.2. does not mean you are going to get it without the right CPU choice!
Both the Gen 4×4 slots are 2280 in length (only the Gen 5 is 22110) which, in a way, is a bit of a shame, as these two slots have a whole lot of surface area to play with compared with the comparatively cramped surface when the Gen5 slot lives. Nevertheless, it’s great that this board is ready to go for 8 SATA HDD/SSDs and 3 M.2 NVMes (and that is even before you start considering the PCIe Upgrade slot. That said, the BIOS on this board is (on the plus side) incredibly flexible in it’s configuration, but also (bad side) tremendously intimidating in it’s range of choices, with lane distribution depending on your CPU choice being quite hard going!
This opens the door towards how many/much of those M.2 are going to be usable with the PCIe slot in use. With a higher, more modern and more capable processor, there’s a good deal to share around, otherwise you end up making touch lane speed choices!
The rang of ports and connections on the board are actually a fraction ‘safe’, with the USB connectivity and an additional network control feature being the only area with a slight bit of difference from the bulk of CWWK boards.
There is a fairly pedestrian USB-A 3.2 port, but there IS a 20Gb/s USB-C port. This is listed as just “3.2 20Gb/s”, so its a little unclear on whether this is USB 3.2 Gen 2×2 or a USB 4 port that that has had its bandwidth halved.
There are visual outputs of course (an HDMI 2.0 and a DisplayPort 1.4) which can output at 4K 60FPS, but the extent to which these can be used is going to be heavily dependant on your NAS OS of choice again.
The USB Type A connectivity is 5Gb(s) Gen 2 and there are two ports available, a bit ‘so-so’. But better to have lots of USB 5G ports than 1-2 10G ports (I know this is not an opinion often shared!)
But I do like the internal USB 2.0 port, as that is perfect for an UnRAID setup on this motherboard – and now that ZFS pools are fully stable and supported in UnRAID, it makes the 8+3 storage slot CWWK Q670 exceedingly desirable.
The network ports are both 2.5GbE, which is going to be something of a bottle neck externally (especially when you factor in that even a medium-sized mechanical Pro/Ent HDD can hit speeds of 250-282MB/s), but that is where that PCIe slot will add network scalability, and don;t overlook the appeal of combo cards (M.2 + 10G cards) from brands like QNAP that work on this board (I tested the first gen QM2 Combo card).
However, interestingly the Q670 also arrives with the support of Intel vPro which, for most users, is going to serve as the ideal gateway to manage their system backend configuration remotely – I am talking BIOS level. In practice, that means that having to awkwardly KVM into a system that is typically deployed without any accessories is avoidable. It requires a little setup and using the vPro interface requires further setup, but ultimately this is a nice extra that is a lot rarer in DiY NAS boards than you might expect.
Overall, this might be the best balance of hardware scalability and storage scalability on a reduced physical scale that I have EVER seen, not just in DiY. Plus, arriving at the $200 price tag all adds up to a NAS board that provides tremendous hardware customization on a larger NAS system, without braking the bank + allows you to put that money you saved towards a beefy CPU and some excess memory! Let’s discuss that hardware configuration internally and what a fairly average and affordable CPU can get out of it?
CWWK Q670 Gen 5 NAS Board Review – Performance and Tests
Performing any tests on a NAS motherboard that is not available with an integrated CPU was always going to be tricky, as it means the results are always going to be fantastically relative to that specific configuration and represent one of hundreds or even thousands of configurations – and the CWWK Q670 is no exception. To get some base level understanding of the board on it’s own, here is the hardware spec it arrives with:
Feature/Service
Details
vPro Function
Requires i5-1X500 or above processor. F series does not support it and requires core graphics.
Power Efficiency
Recommended T processors such as 13500T for power efficiency and long-term use
Supported Memory Speed
DDR5 supports 5600MHz by default (12th gen processors only support 4800MHz)
USB Features
Built-in set of USB 3.0 and USB 2.0 pin sockets for panel connection
Display Support
HDMI + DP dual display output supports 4K @ 60Hz
Network Management
Intel i226-LM 2.5G RJ45 supports Intel vPro remote management function
Operating System Compatibility
Supports Microsoft Windows 10/11 64-bit, Compatible with Linux (EFI mode only)
I went ahead and installed an Intel 6-Core / 12 Thread 12th Gen i5 Core and 16GB 4800Mhz non-ECC DDR5 Memory. Straight out the gate, just using three M.2 NVMes on the system (full benchmarking, Gen 4 and Gen 5) the system hit around 45W utilization. Had I connected eight SATA HDDs, I can imagine this would have been almost doubled! However, there were not 8 drives in our test area available at the time of this review.
As mentioned earlier, the BIOS that is available on this board is pretty deep, even by ‘bare mobo’ standards. Also, adjusting the PCIe Gen goes up to Gen5 all over the shop!
I went ahead and ran UnRAID on the system (thank you, small internal USB Port!) and a;; the SATA/M.2 slots were visible and good to go!
The layout of the system in it’s default configuration (using the i5 I installed) was reasonable, but the speeds on the M.2 slots was definitely a little ‘funky’, especially when you factor in that I installed Gen 4 Kingston KC3000s and a Gen 5 Phison E26 M.2 in their respectively supported slots.
The first disappointment is that, unless I used up a scaled-up processor and spent some time playing with the bios, the Gen 5×4 slot was downgraded to Gen 4×4. Gen 4 is still good, but the major appeal of this Mobo for some users is going to be the fact its Gen 5 SSD ready. What about the Gen 4 slots?
Well, good news and bad news there. The first Gen 4 M.2 slot was defaulted at Gen 4×4 WITHOUT any downgrade. Great stuff, right? Well…
The 2nd Gen 4 slot had been downgraded to Gen 3×4! Remember, this is how the the system has default laid things out with the i5 12th Gen processor I choose to use. I am sure there is wiggle room for this and as mentioned several times, this configuration is one of literally thousand of possibilities, but I raise this to demonstrate that this board needs some hands on work by the user when its installed to get the most out if it for the end user’s needs.
Looking at performance, within the gen and speed that this motherboard defaulted to, these are all reasonable. Eg the Gen 5×4 slot (that SHOULD hit a potential 10-12GB with the right drive) was hitting a respective 6GB/s, as it was downgraded to 4×4.
Likewise, the Gen 4×4 m.2 slot that had not been downgraded hit 5.9-6GB/s. Not the reported 7GB that Kingston says this drive will be capable of hitting of course, but those benchmarks are based on much more powerful setups and tools than these comparatively primitive tests.
And then there was the Gen4 slot that had been downgraded to 3×4. Thanks to it still being ‘x4’, the Gen 4 drive, even with it’s forced downward auto-negotiation, was still hitting respectable 2.9-3.0GBs numbers.
The forced downgrades that kicked in, I am sure, could be negotiated with a better setup and with more time being spent in bios – but those looking at more modest and affordable NAS setups are likely going to lose out on the full abilities of this motherboard. M.2 slots that sharer lanes with the PCIe slot (or even shared across multiple M.2s) are not a new thing, but ultimately you need to keep in mind that this board is not going to immediately give you a perfect system base to work with – it just opens to doors and windows enough to get you on your way, with an M-ITX NAS build.
CWWK Q670 Gen 5 NAS Board Review – Conclusion and Verdict
As long as you do not lose sight of the fact that the CWWK Q670 NAS mobo is designed to be part of a larger and more powerful NAS build, there is ALOT to love here – especially at 200 bucks! For an M-ITX board this thing out specs a lot of bigger and broader M-ATX boards at the price. The Gen 5 architecture, if you are going to build around it ‘hardcore’ enough, as well as spend the time needed to tweak it, is definitely this board’s USP. As is that it manages to challenge conceptions of what an MITX board should arrive with, thanks to those eight native SATA ports. The remote BIOS-level access is a nice extra and although its not going to be used by everyone, in a pinch (ie ‘back against the wall troubleshooting and/or maintenance), it’s a great little bonus. The huge scalability afforded to the NAS builders with the UDIMM memory choice over SODIMM and three M.2s really does allow for a much more aggressively storage-focused system here. All that said, things are super cramped here and extra care is advised when buying your accessories (especially cooling), as aside from airflow restrictions, there is the potential here to accidentally create a air flow dead end! This is NOT a motherboard for the learner homelab’er or shiny new NAS enthusiast… but if you are happy to spend a little more and have the time to configure accordingly, this thing can be a fricking POWERHOUSE!
PROs of the CWWK Q670 NAS Motherboard
CONs of the CWWK Q670 NAS Motherboard
A Gen5 M-ITX NAS Mobo…SOLD!
8x SATA Ports (actual SATA, not via an m.2 adapter or miniSAS)
Good scope to support 13th Gen and more CPUs
3x M.2 at Gen 5 and 4 (one of the 22110)
PCIe 5×16 Slot
Excellent USB Outputs
Full-Length DIMM Memory Support (i.e more memory possible)
This description contains links to Amazon. These links will take you to some of the products mentioned in today's content. As an Amazon Associate, I earn from qualifying purchases. Visit the NASCompares Deal Finder to find the best place to buy this device in your region, based on Service, Support and Reputation - Just Search for your NAS Drive in the Box Below
Need Advice on Data Storage from an Expert?
Finally, for free advice about your setup, just leave a message in the comments below here at NASCompares.com and we will get back to you.Need Help?
Where possible (and where appropriate) please provide as much information about your requirements, as then I can arrange the best answer and solution to your needs. Do not worry about your e-mail address being required, it will NOT be used in a mailing list and will NOT be used in any way other than to respond to your enquiry.
[contact-form-7]
TRY CHAT Terms and Conditions
If you like this service, please consider supporting us.
We use affiliate links on the blog allowing NAScompares information and advice service to be free of charge to you.Anything you purchase on the day you click on our links will generate a small commission which isused to run the website. Here is a link for Amazon and B&H.You can also get me a Ko-fi or old school Paypal. Thanks!To find out more about how to support this advice service checkHEREIf you need to fix or configure a NAS, check FiverHave you thought about helping others with your knowledge? Find Instructions Here
Or support us by using our affiliate links on Amazon UK and Amazon US
Alternatively, why not ask me on the ASK NASCompares forum, by clicking the button below. This is a community hub that serves as a place that I can answer your question, chew the fat, share new release information and even get corrections posted. I will always get around to answering ALL queries, but as a one-man operation, I cannot promise speed! So by sharing your query in the ASK NASCompares section below, you can get a better range of solutions and suggestions, alongside my own.
QNAP TS-464 or the Synology DS423+ NAS Drive – Which Should You Buy?
Choosing Between the Synology DS423+ and QNAP TS-464 NAS is more than just about how you are spending your money at checkout! Making a move away from 3rd public cloud storage can be a big, BIG decision for some users. The ‘freemium’ and low cost monthly subscription to the likes of Google Drive and DropBox seems like a drop in the ocean, right up until you realise that over the years you have spent hundreds of pounds and you face the fact that you are going to need to consider moving that data onto something more long term and ‘in house’. For many users, this is their first encounter with two of the bigger brands in the world of NAS, Synology and QNAP and although at a glance they seem to provide the same kind of solution, even a brief second glance reveals that these two brands have very, very different ideas of where you should be spending your money. Synology is the sleek, apple-esc presented solution that promises a smooth and uncomplex experience, with an arguably more rigid and fixed architecture. Whereas QNAP is the more customizable and flexible in its hardware and software, but has a slightly higher learning curve and requires more time to configure perfectly. Both brands provide an excellent range of NAS solutions with each of the solutions in today’s comparison being quite similar in price, but what you are getting for your money, the range of software included, the scope of hardware that is available and how they translate to upgradable and scalability is incredibly different! So, today we are going to compare the Synology DS423+ NAS released in March 2023 (HEAVILY comparable to the 2020 gen DS920+) against the spring 2022 released QNAP TS-464 NAS.
Synology DS423+ vs QNAP TS-464 NAS – Design
The design of the QNAP TS-464 and Synology DS423+ are both very uniform to the brands, utilizing existing designs in their respective Home/Prosumer/SMB ranges. Both are 4-Bay desktop solutions that are designed to be deployed easily and pretty much anywhere. They are largely the same in physical volume, with the Synology DS423+ arriving the tiniest pinch larger, but both systems provide a similar level of storage on their four SATA and 2x NVMe M.2 SSD bays. The Synology has the more traditional shape of the lockable storage media bays being immediately visible, but finish this with an incredibly modernistic shape and matt surface design. The front of the system features a single USB backup port, as well as 5 LEDs for system/drive activity and those two M.2 SSD bays are located on the base of the system. The QNAP TS-464 NAS uses a more glossy and slightly coloured design by comparison (featuring a copper side panel), with the 4 drive bays of the system being covered by a slidable and lockable semi-translucent panel. The QNAP also featured the same LED/USB present, but there are more LEDs on the QNAP and the USB here is both a USB 3.2 Gen 2 Port (10Gb/s) and is accompanied by a one-touch copy button. This is one of the early examples of how things in the NAS market have moved forward in hardware but Synology has instead doubled down on their focus of it’s DSM software platform above all else. The QNAP TS-464 is certainly the more expensive NAS of the two, with the DS423+, despite being newer and having a different position in the brand’s portfolio (see the DS923+ to learn more), but the hardware you are getting for that price tag is notably different and will become a clear divide between these two. Because of the compact design, both systems need to factor in intelligent cooling, as they will likely be in operation 24×7. This is another clear area where the brands have gone in different directions here.
QNAP TS-464 NAS
168mm × 170mm × 226 mm
Synology DS423+ NAS
166 mm x 199 mm x 223 mm
The ventilation on the Synology DS423+ is certainly more visible but in a much more ‘branded’ and slick way. The QNAP TS-464 features no front-facing ventilation, instead using two small areas of ventilation on the sides of the chassis and the base of the TS-464 featuring further ventilation under each of the storage bays. The Synology on the other hand has much more passive airflow, with each of the individual storage bays being surrounded by a slit of ventilation and the side panel of the DS423+ having the Synology logo featured as further ventilation. Higher-end Synology desktop models feature metal mesh panels inside these logos to capture dust, but this is less of a concern in the more compact and discreet DS423+. Overall, I would certainly say that the Synology DS423+ have more visible efforts to maintain system temperature than the QNAP TS-464 (which is a real surprise when you see how the hardware these two systems are sporting compares) but both maintain a good operation temperature.
QNAP TS-464 NAS
Synology DS423+ NAS
When you look at the rear of the TS-464 and DS423+ NAS, you see another big difference in how each system maintains their respective internal temperatures, with the QNAP featuring a single 120mm fan that covers the bulk of the internal hardware airflow path and the Synology featuring two 92mm fans that cover around 70% of the rear of the chassis. Of the two, I would say the QNAP TS-464 is the noisier in operation of the two (when populated with 4x 4TB WD Red HDDs) by the tiniest of margins, but it isn’t really till you entertain the idea of enterprise HDDs or drives larger than 10TB that you need to worry about ambient sound around these two systems. Both the DS423+ and TS-464 can have the rotations per minute (RPM) of their fans changed manually or left on automatic as the system changes the internal cooling to ensure maximum efficiency.
QNAP TS-464 NAS
Synology DS423+ NAS
Overall, the design of the Synology DS423+ is still the better-looking system of the two and although I personally really like the copper and glossy look of the QNAP TS-464 NAS, I know that the bulk of users will want to ‘set up and forget’ their NAS, so these aesthetic design choices are less important to them. Equally, although the QNAP fan has the potential to cool its respective system much more, I think the Synology features a better balance of active airflow and passive ventilation overall. The QNAP still wins pretty big on its inclusion of a USB 3.2 Gen 2 One Touch Copy button enabled port for faster and more manual backup options (as well as still allow automated and connection-triggered backups as the Synology), but overall on points, this round belongs to the Synology DS423+ NAS.
QNAP TS-464 versus Synology DS423+ NAS – Internal Hardware
This is an area where you really see how both brands focus their priorities on the solutions they offer, as well as how the components common to NAS have evolved in the 2 years between their respective releases. The Synology DS423+ arrives with a familiar architecture to it’s predecessor (the DS420+) and is a fairly tried and tested formula by the brand. Synology was the first company to introduce NVMe SSD storage bays into desktop NAS systems around 5 years ago (something that QNAP has only really been catching up on in the last 2 YEARS). Likewise, Synology has made a few very brand-specific decisions in their system architecture that this rather more proprietary brand is often keen to implement. For example, the default DDR4 memory inside (2666Mhz SODIMM) is actually soldered to the main internal board (4x 256MB Modules), with an additional empty memory slot to allow an additional 4GB Synology-branded memory module. As the DS423+ has a CPU that has a maximum 8GB of memory, this is an oddly artificial limitation that results in the DS420+ only allowing 6GB of max memory, an odd move that is perhaps done out of system PCI/Bandwidth, rather than any kind of manufacturer restriction. The QNAP features a newer gen CPU (as you would expect after the later release) and this CPU allows up to 16GB of memory (4GB in the default model) across two upgradable slots. Likewise, returning to those M.2 NVMe slots, both system feature 2 bays that can be used for SSD storage upgrades, although both the DS423+ and TS-464 support SSD caching (when a pool of SSDs is used to speed up data write/read in conjunction with the larger HDD RAID array), Synology ONLY RECENTLY allowed NVMe Storage Pools on their platform, whereas QNAP has allowed NVMes as standalone storage pools, for app booting, running the OS from and even their own special internal tiering system known as QTier. This is the first of several key differences between the QNAP TS-464 and Synology DS423+ NAS that show the divide in hardware between these units.
Of course, the clearest difference that most PC builder-minded people are going to notice is the CPU. NAS systems are designed to be operational for days, weeks, months and even years at a time. Therefore, in order to maintain optimal performance, as well as lower power consumption and lessen the damage that long-term operation can inflict on a processor, the CPUs used in NAS are a great deal more modest. In the case of the Synology DS423+ and QNAP TS-464 NAS, they feature Intel Celeron processors, each featuring an embedded graphics component (allowing graphical operations, multimedia handling and visual data to be handled by a specialized area of the processor), quad-core architecture and a base level clock speed of 2.0Ghz that can be burst (turbo/increased when needed). However, the newer generation N5105/N5095 CPU in the QNAP is able to reach a higher overall clock speed and also is more efficient (i.e uses a little less hardware resources to get a task done than it would take on the J4125 typically, so, therefore, can do more tasks overall when the full CPU power is utilized). Indeed, CPUBenchmark rated the newer CPU 30%+ higher in it’s scoring than the J4125 (again, as you would expect for a CPU released more than a year later by Intel), so this processor means that more can be done on the QNAP (in like for like tasks) and also this CPU allows a greater range of hardware to be built into the system. CPUs are one of the largest quantifying factors of how a NAS is built and this is because they can only handle a certain amount of connected hardware (storage bays, ports, expansion slots, etc) when connected to a larger controller/motherboard. This is commonly referred to as the # of PCI lanes and the chipset used in the build of the system. Because this newer Intel N5105 / N5095 CPU has more lanes to use at once than the J4125, it allows the newer NAS drive to have more hardware.
QNAP TS-464 NAS – Intel N5105/N5095 CPU
Synology DS423+ NAS – Intel J4125 CPU
These additional CPU resources, as well as the increased maximum memory and flexibility of how the M.2 NVMe SSD slots can be used ultimately mean that in terms of internal hardware, the newer released QNAP TS-464 wins over the Synology DS423+ NAS. It is worth remembering that the M.2 NVMe SSD slots on the QNAP TS-464 are PCIe Gen 3 x1 (down to the Celeron CPU still not having anywhere near the scope in it’s flexibility that the likes of an Intel Core, Ryzen or Xeon might have) and will bottleneck at 1,000MB/s, but this is still better than nothing and there is still the lingering question of the Gen 2 slots on the DS423+ being 2×2 or 2×4 – which will potentially limit the M.2 NVMes on the DS423+ further still. So the QNAP still seems to have a better balance of NVMe SSD support in its architecture overall.
Synology DS423+ or QNAP TS-464 NAS – Ports & Connections
Now ports and connections on the Synology DS423+ and QNAP TS-464 NAS is an area that is INCREDIBLY diverse in it’s approach by either brand. Once again, the reasons clearly to do with the CPU choice and position on their respective brand portfolios, but also the brand’s own decisions in build architecture/priorities still massively continue to be a contributing factor here. The Synology DS423+ NAS certainly comes across as the weaker of the two here in its connectivity and although a lot of the QNAP’s advancements in connectivity could be described as ‘future upgrades and simply facilitating extras or addons’, it still manages to provide a greater deal of connectivity to the day 1 user than the Synology system here. The port(s) that almost certainly will be the one that jumps out immediately on each system is the network connections. The DS423+ NAS arrives with 2x 1GbE ports which, although allowing link aggregation to create 2GbE with a smart switch, was still a little underwhelming in 2023 when released and looking increasingly out of step with modern network tech in 2024 (as we had already started seeing 2.5GbE arriving at the same price as 1GbE with a number of client hardware devices in 2020). The newer QNAP TS-464 features 2x 2.5GbE (so 5GbE via link aggregation and a supported switch) which now that some ISPs and budget switch manufacturers are providing affordable 2.5GbE solutions, will be incredibly useful. Then the is the additional PCIe upgrade slot on the QNAP NAS that allows upgrades towards 10GbE, dual-port 10GbE cards and even combo cards to add 10G and further M.2 NVMe bays via a single card. Again, there ARE upgrades and not something in the baseline model, but you can not argue with the future-proofing available here. Additionally, the DS923+ NAS released in December 2022 had the option to upgrade to 10GbE – something hugely absent here in the eyes of many on this 4xSATA and 2xNVMe DS423+ NAS. There is simply no avoiding that the 2023 released DS423+ looks a little dated in 2024, in large part to those 1GbE ports are something of a limiting factor.
Model
QNAP TS-464
Synology DS423+
Network Ports
2x 2.5GbE
2x 1GbE
USB 3.2 Ports
2x USB 3.2 Gen 2 (10Gb)
2x USB 3.2 Gen 1 (5Gb)
USB 2.0 Ports
2x USB 2.0
0
HDMI Ports
1x HDMI 2.0 4K 60FPS
n/a
PCIe Upgrade Slots
PCIe Gen 3×2 Slot (2Gb/s)
n/a
After the network and PCIe differences that favour the TS-464, the distance between the 2023 and 2022 NAS hardware architecture here is further extended. The Synology DS423+ features a further USB 3.2 Gen 1 (5Gb/s) port, but LACKS the option to upgrade it’s storage down the line with an expansion (such as with the eSATA port on the DS920+ and DS923+ NAS supporting the DX517 official expansion). QNAP counters this on the TS-464 with the inclusion of another USB 3.2 Gen 2 (10Gb/s) port, as well as some (obviously less useful) USB 2.0 ports. These USB 2.0 Ports are primarily designed to be used in conjunction with the optional visual output (HDMI 2.0 4k 60FPS) on the QNAP as a KVM (Keyboard, video and mouse) setup with the included parallel HD Station application and its tool. The HDMI and direct interface of the QNAP is still pretty niche as a service on this system, but it has a number of useful multimedia, surveillance and VM utilities that can be quite impressive. Expansions on the TS-464 are more diverse than the 5-Bay DX517 on the DS423+ (which again, is NOT supported anyway), with QNAP offering 2, 4, 6, 8 and 12-Bay expansion chassis (arriving in JBOD or hardware RAID enabled) that connect over USB or an inclusive PCIe card. Overall, it comes as no surprise that in terms of hardware, the QNAP TS-464 still takes the first place, as the Synology DS423+ (like most of the brand’s solutions) is prioritizes the DSM platform and it’s tools/services over the hardware. Let’s discuss the software on each of these brands.
QNAP TS-464 or the Synology DS423+ NAS – Software
When you are choosing to buy a Synology or QNAP NAS, it is always worth bearing in mind that you are not just buying a bunch of hardware, but you are actually getting a fully-featured software solution. Both the Synology DS423+ and QNAP TS-464 arrive with each brand’s premium NAS software and services platform, DSM and QTS respectively. Both of these platforms include a traditional operating system level of accessibility and control, that can be accessed via pretty much any web browser or desktop OS, as well as numerous tailored mobile client applications. The Synology DSM platform is a lot more comparable in design and control with Mac OSX and is by far the more user-friendly option of the two. The QNAP QTS platform is a lot more comparable to Android in its initial GUI and then more like Windows in it’s navigation, arriving as the option with a greater deal of configuration and control, but with a steeper learning curve. Another big difference between QTS and DSM is how they present their services, with QNAP providing a larger degree of support of 3rd party applications (both in the app center and in the configuration of their own range of 1st party applications. Synology DSM on the other hand proves a larger and more impressive range of fist party tools that are designed to replace/improve upon the 3rd party tools you might be using, with many of it’s applications being comparable to top tier 3rd party paid tools in the market (the Synology collaboration suite, the Surveillance Station application and pretty much everything in Synology Drive, just as a start). The QNAP platform also, in it’s efforts to be as widely compatible and configurable as possible, occasionally stems into over-complexity and risks the user tripping over itself as it tries to manage the larger scale of configuration Whereas, although the Synology DSM platform may seem a pinch more closed and fixed, it manages to prevent the users from accidentally ruining their own storage system. Here is a full breakdown of the key applications that are included with the QNAP TS-464 and Synology DS423+, broken down into categories:
QNAP TS-464
Synology DS423+
Browser Support
Supports all Browsers
Supports all Browsers
Browser File Management
Browser File Management
Photo/Music/Video Tools
Photo/Music/Video Tools
Multimedia Console
Synology Drive
AI Photo Recognition
AI Photo Recognition
Edge m.2 Coral TPU Support
Storage Services
SED Drive Support
SED Drive Support
QTier
Synology Hybrid RAID
Hybrid Mount
Hybrid Share
ISCSI Target/LUN
ISCSI Target/LUN
vJBOD
Snapshots
Snapshots
SSD Cache (Read/Write/Both)
SSD Cache (Read/Write/Both)
Cloud Sync / QSync
Cloud Sync
Ex-FAT is Free
Fast RAID Rebuild
RAID Resync control
RAID Resync control
Secure Erase
Acrtive Backup Suite
Lots of Expansions (TR/TL)
Hyper Backup
HBS 3
Synology CMS
Qfiling and Qsirch
Business Applications
QVR Pro – 8 Camera Licenses (+USB Camera Support)
Surveillance Station – 2 Camera Licenses
Virtualization Station
Virtual Machine Manager
Ubuntu Linux Station 18/20
Docker Support
Container Station
Active Backup 365 & Workspace
Hypervisor Protector
Synology Office, Chat, Calendar
QMailAgent
Synology Mail / MailPlus
HD Station
Synology C2 and Services
BoXafe
Security Councillor
Security Councillor
Malware Remover
Synology VPN Plus
McAfee Anti-Virus Scanning
Log and Notification Center
QVPN
Auto Blocking on SSH, Telnet etc
Log and Notification Center
256 bit Encryption
Auto Blocking on SSH, Telnet etc
2 Step Authentication
256 bit Encryption
Firewall App
2 Step Authentication
Access Protection and Allow/Deny list
Firewall App
Synology Secure SignIn
Access Protection and Allow/Deny list
Synology C2 Password
As you can see, both NAS brands provide similar levels of software, services and features, but they are presented in very different ways. Once again, I cannot emphasise enough how much more the QNAP platform is configurable but ALSO how it can often give you too much configuration and risk overwhelming less experienced users. The Synology DSM platform, for all its comparative rigidicy, is still overall the better software experience and you definitely see that Software over hardware priority from the brand clearly here. I have made long, LONG reviews on each of the NAS brand’s and their software platforms, which you can watch below for much, much more information on their respective strengths and weaknesses.
QNAP QTS 5.0 Review
Synology DSM 7 Review
Ultimately, it will come as no surprise that Synology come out on top in terms of software compared with the QNAP. That is not to say that the QNAP QTS platform is not good, it really, really is and some of the applications that are included for home and business users are often genuinely impressive, unique and provide facilities to the end-user that are wholly unavailable on any other NAS platform (eg Multimedia Console as a single portal media manager, the 2-3 Click VM storages and repository that are available in Virtualization Station, Linux Station and Container Staton or the QuMagie AI-powered tool that is able to cover a greater range of subjects and categories that any other NAS photo tool out there). However, the QNAP QTS platform is not quite as polished, as user-friendly and as responsive as the Synology DSM platform overall. If you want a better idea how these two NAS software platforms compare directly (i.e face to face), then you can check out my DSM vs QTS video below:
Alternatively, if you are NOT interested in using the software included with your NAS, there is always the option to install TrueNAS – Something that is surprisingly easy on the QNAP NAS (see video below):
QNAP TS-464 or the Synology DS423+ NAS – Conclusion
Ultimately, choosing between the Synology DS423+ and QNAP TS-464 largely comes down to a question of hardware vs software. The QNAP TS-464 is by a long distance the more advanced in hardware in practically every way (thanks of course to the brand’s focus in this direction) which leads to that system having a tremendously large scope in terms of what you can do with it, how far the storage can be expanded and how upgradable the system can be. The QNAP is the better future-proof hardware choice and despite the Synology NAS platform having a stronger software platform, it still has a vast array of software and services available in QTS nonetheless. For those that are hardware-focused or want a NAS to support their existing 3rd party client tools and apps, the QNAP TS-464 is by and larger the better choice. The Synology DS423+ NAS on the other hand, despite its 2-3 year older hardware (already premiered in the 2020 released DS920+) and arguably safer/sensible stance on hardware in general, is still a great NAS that will likely becoming more popular and palatable in the 4-Bay NAS market as the pricing becomes a bit more flexible (as many will still weigh the DS423+ with the older DS920+ that still has stock floating around and opt for the latter). Add to that the core strength and first-party focus of DSM leading to this hardware+software solution providing you with a huge array of polished and premium feeling tools at your disposal. As long as you are happy to do things ‘Synology’s way’ and are looking for an easy to use system that will not tax the end-users brain, you will find Synology the better software choice overall.
QNAP TS-464 NAS – Spring/Summer 2022
Synology DS423+ NAS – Spring 2023
Reasons to Buy it?
Better Hardware inside and out
More Expansion/Upgrade Options
Able to run more simultaneous apps/clients at once
Faster USB Ports (10Gb/s)
Larger bandwidth PCIe upgrade slot (PCIe 3×2 vs 2×2/2×4)
Higher CPU Frequency, Efficiency & Proficiency
M.2 SSD Useable Tiered Storage Option
Reasons to Buy it?
Much more user-friendly
Synology Hybrid RAID for flexibility
Overall Better 1st Party Software
Better Surveillance Access/Streaming
Lower Price Point as it in the SOHO part of Syn’s Portfolio
Quieter Operation
First Party Accessories (HDD, SSD, Memory, etc) Available
This description contains links to Amazon. These links will take you to some of the products mentioned in today's content. As an Amazon Associate, I earn from qualifying purchases. Visit the NASCompares Deal Finder to find the best place to buy this device in your region, based on Service, Support and Reputation - Just Search for your NAS Drive in the Box Below
Need Advice on Data Storage from an Expert?
Finally, for free advice about your setup, just leave a message in the comments below here at NASCompares.com and we will get back to you.Need Help?
Where possible (and where appropriate) please provide as much information about your requirements, as then I can arrange the best answer and solution to your needs. Do not worry about your e-mail address being required, it will NOT be used in a mailing list and will NOT be used in any way other than to respond to your enquiry.
[contact-form-7]
TRY CHAT Terms and Conditions
If you like this service, please consider supporting us.
We use affiliate links on the blog allowing NAScompares information and advice service to be free of charge to you.Anything you purchase on the day you click on our links will generate a small commission which isused to run the website. Here is a link for Amazon and B&H.You can also get me a Ko-fi or old school Paypal. Thanks!To find out more about how to support this advice service checkHEREIf you need to fix or configure a NAS, check FiverHave you thought about helping others with your knowledge? Find Instructions Here
Or support us by using our affiliate links on Amazon UK and Amazon US
Alternatively, why not ask me on the ASK NASCompares forum, by clicking the button below. This is a community hub that serves as a place that I can answer your question, chew the fat, share new release information and even get corrections posted. I will always get around to answering ALL queries, but as a one-man operation, I cannot promise speed! So by sharing your query in the ASK NASCompares section below, you can get a better range of solutions and suggestions, alongside my own.
AOOSTAR GEM10 SSD NAS Review – SUPER COMPACT FLASH!
With so, SO many Chinese players entering the OS-free NAS scene in the last couple of years, several names have bubbled to the top (natural selection in IT?) and one name that is making big waves is Aoostar! At a glance, you could easily lump them into the ever growing pile of ‘mini PC’ companies that spam your Facebook pages, AliExpress and eBay. But what has set them apart is their specifically NAS-tailored development of their server releases. The mini PC crossover from SoC/Mobile scale processors of your favourite Intel Core or Ryzen processor is nothing new, but the growing market for NAS systems that need to spread the focus towards storage and network connectivity is all too often a leap that separates the men from the boys – and what has make Aoostar a player in this arena it would appear. Back in December ’23, I reviewed the Aoostar R1 and Aoostar R7, and I was massively impressed by what these affordable UnRAID/TrueNAS-ready boxes were achieving! Today is the turn of the Aoostar GEM10 – An m.2 NVMe Flash NAS System that features Gen4 SSD architecture, USB4, 32GB DDR5 Memory, 2.5G and oCulink. So, does the Aoostar GEM10 NAS deserve your hot data? Let’s find out in today’s review.
Where to Buy?
Aoostar GEM10 3x Gen4x4 M.2 NVMe NAS (AliExpress $465) – HERE
Aoostar GEM10 3x Gen4x4 M.2 NVMe NAS (7940HS Amazon) – HERE
Aoostar GEM12 3x Gen4x4 M.2 NVMe NAS (7840HS Amazon) – HERE
Aoostar GEM10 3x Gen4x4 M.2 NVMe NAS (6800H Amazon) – HERE
AOOSTAR GEM10 SSD NAS Review – Quick Conclusion
The Aoostar GEM10 is making some pretty bold hardware promises, given it’s scale! The ‘dazzle’ of how powerful mini PCs have been getting in the last few years has definitely become a little duller, as it grows more common. But given how Aoostar has merged this into a much more NAS-tailored system in a meaningful way that clearly cost some $ at the R&D level needs to be appalled. This is not a small SSD NAS with is covered in Mini-PC caveats – this IS a NAS and one that I think might well be the most powerful for it’s scale in the market right now (especially at $499+). That said, it certainly ain’t perfect! Network scalability is a mixed bag, the way memory has been approached (in architecture and ECC support) is debatable, the CPU choices in the range of 4 with the differing process and PCIe layouts is a big baffling and the full utility of oCuLink in this NAS context is still far from fleshed out. BUT, There are prosumer concerns for the more technically minded and IT sophisticated, which I think does not make up the bulk of this device’s target demographic. I struggle to call this system turn-key (due to it’s lack of an included NAS OS, even a 3rd party one, as seen in the UnRAID license-ready LincStation N1), but it’s certainly miles more user-friendly than full DiY. I have often spoken of the growing middle ground between full NAS DiY from the ground up and full ‘out the box’ turnkey from brands like Synology and QNAP. The Aoostar GEM10 is a FANTASTIC example of the kind of product that can evolve from this – well build, powerful, 3rd party OS ready and a step above the churned-out Chinese budget fodder found elsewhere in the ‘pre-built OS free NAS sector’. Recommended – IF you have the time to set it up right!
BUILD QUALITY - 10/10
HARDWARE - 9/10
PERFORMANCE - 7/10
PRICE - 8/10
VALUE - 8/10
8.4
PROS
Insanely Compact, especially for the hardware configuration 8 cores and 16 threads to play with on an SSD NAS - Yum Yum Dual LAN Connectivity = failover USB 4 Support and 4x 10G USB oCuLink inclusion is unusual, but adds potential scalability 32GB LP Memory TONNES of cooling and ventilation No 3rd party NAS OS Locks or Limitations Gen 4 Architecture on the SSD Bays Scope to add a 4th M.2 SSD Bay (removing oCulink and WiFi6 Card)
CONS
Low Noise, but definitely not silent! ECC Support and Memory overclocking is debatable Confusion of CPU configurations
The design of The GEM10 is a little beefier than most mini PCs (though, obviously much smaller than comparable desktop NAS devices running on MITX boards), and a lot of this space is needed for the chunky cooling system internally.
The GEM10 arrives at just 10.7cm x 10.7cm x 6cm in size and just a little under 1KG when fully populated with SSDs. The retail kit includes an external power adapter, instruction manual (which arrives in 2 languages and is a little space tbh), mini screwdriver and thermal pads. Depending on whether you purchase the version with SSD and 32GB DDR5 Media, this will change the # of thermal pads inc.
There is ventilation on practically every side of the device – which given the 8-core 4.7Ghz , 16 thread architecture of the device and it’s three Gen4 M.2 slots should NOT come as a big surprise! This tony little chassis has a lot crammed in and the potential for temperature-related system bottlenecks and throttling is MASSIVE!
Alongside the passive ventilation panels on all 4 sides and the top section (above where the CPU is located), the system also features who internal active cooling fans built into the top and base. Even a casual check through the vented panels reveals the internal heatsink of that CPU. This is a decent amount of cooling provisioning for the scale of the system, even for a Ryzen SoC like this one, for when SSD NAS operations truly kick off!
The base fan is not silent, but it manages to be pretty mild (in the grad scheme of things), as it is parallel with the desk when deployed. I will say that full control of this fan (and the CPU fan) is debatable, as the system does not arrive with NAS software (no Aoostor 1st party NAS OS, or an included UnRAID/TrueNAS/OMV license either). So, how much control you have over these cooling measures is going to be debatable.
For such a compact chassis, you can definitely feel the weight of the internals. The external casing is largely plastic, which I was a little surprised by. Nevertheless, you cannot fault that the brand has clearly factored cooling and ventilation in to their device, whilst still keeping an eye on keeping it fantastically compact. Let’s discuss the connectivity of the Aoostar GEM10.
AOOSTAR GEM10 SSD NAS Review – Ports and Connections
Credit where it is due – Aoostar has done a 10/10 job here to get as many ports featured on this device as they have, given the scale of the GEM10. The ports are located on the front and rear panel, and although there are the usual ‘mini PC’ telltale ones (audio in/out for example, that has practically no use in traditional NAS outside of a locally deployed VM), I will definitely give them credit for keeping pretty much everything else very NAS friendly – with a fun little twist at the end!
The ports are largely separated into network ports and storage ports (at least when you use NAS software) with the front featuring 2x USB 3.2 Gen 2 (10Gb/s), USB 4 (40Gbps) and an Oculink port (more on that later).
The rear on the other hand features two 2.5GbE ports (so, a little good news / bad news there), twin HDMI 4K/8K outputs and two more USB 3.2 Gen 2 10Gb ports. So, although this mini NAS is a little more on the expensive side compared to other Mini SSD NAS that have been launched from China in the last 18 months, I will say that this device features some of the very ports hardware ports out there I have been at this price point.
We are starting to see more and more USB4 NAS-ready devices arrive on the market from China, as the booming industry for NAS-ready Mini ITX and Micro ITX boards scene grows more and more. However, once again, the extent to which you can use this functionality is hugely NAS OS-dependent. So, although I am willing to bet that most NAS software you install on this will happily give you USB 4 speeds on a connected external SSD drive, I do not think we will see this for use as a direct PC/Mac-to-NAS connection anytime soon – QNAP still dominates the market on Thunderbolt NAS devices that allow such a feature.
The GEM10 arriving with two 2.5G ports is mixed news really. Obviously, these two (even if your NAS OS of choice supports LAG, Trunking, SMB MultiChannel or even Load Balancing) mean a total network connection potential of 550MB/s or so (half a gigabyte) network throughput, so these are going to be massively oversaturated with even a single SSD inside. That said, there are still a lot of users who will be happy with this (at least you have 2x ports for failover) as they prioritize internal performance, IOPS and throughput for complex databases, VMs, containers and more. Given the scale of the system, you won’t be surprised to learn that a PCIe slot is simply not available for any kind of NIC upgrade card. You CAN use 2.5G/5G-to-USB adapters (again, NAS OS dependant) as the system has several USB ports available, but the system also arrives with another trick up its sleeve – oCuLink.
OCuLink is a relatively new kind of technology that allows the benefits and scalability of PCIe to be available over an external connection. Hotswapping and plug-n-play is still not in anyway advised, but it does mean that the GEM10 has the potential to add PCIe-connected hardware upgrades (via supports Oculink-to-PCIe enclosures). oCuLink is predominantly associated with eGPU upgrades to allow the power of graphics cards to be added to systems with ease, but the potential to use this for improved network connectivity with 10G/25G/100G cards is MASSIVE!
Noise-wise, I cannot say that the GEM10 is silent by any means. Because of the two FANS inside (base and CPU fan) during peak periods, the ambient noise was noticeable. It was still very much on a small scale and the only really problematic at less than 1 metre distance, but they were definitely there! In idle, the fans were non-existent in noise and I had to check a couple of times to see that it was on! But when the SSDs were in heavy write (as well as during the initial 15 secs of boot), the fans were around 32-35 db.
The power use of the Aoostar GEM10 was pretty reasonable. Obviously, we have to factor in that this is an exclusively M.2 NVMe system and therefore this does seemingly scale the power use down, but this is still a pretty beefy CPU inside (comparative to the non SoC version of course). Idle power use was a conservative 10-12W (this was after the initial boot, running UnRAID and then the system was left to go into IDLE, with all drives in idle).
During heavy active use (UnRAID, accessing all drives and the CPU at 50-60% utilization) the power use was at 34-38W. Had this been a SATA HDD system, it would likely have hit the 50-60W scale easily. Pretty good for the size of the system.
Keep in mind that the CPU supports power adjustment at BIOS and, depending on your NAS OS choice, could result in even better power consumption numbers in your own bespoke setup. Overall, I am not going to say that the GEM10 gives you anything incredible in the connectivity department – but I will say that it is a complete gamechanger when compared to what is on offer from the bulk of Mini-PC NAS hybrid devices in the market. Aoostar have clearly spent serious time and R&D to finesse their NAS range (the GEM10, GEM12, R1 and R7 series are great examples) that are designed to be more than just a mini PC that is pretending to be a NAS. The GEM10 here has the kind of connectivity that I would love to see on more traditional turnkey NAS devices. But what good is all that connectivity, without the right H/W inside to fulfil it! Let’s discuss the internal hardware.
AOOSTAR GEM10 SSD NAS Review – Internal Hardware
The base of the system come away with the removal of four base screws. Doing so reveals the individual storage bays, the WiFi 6 wireless NIC structure and the base cooling and active fan provisioning.
The base fan is encased in its own panel and the intervening panel is a metal plate that sits directly connected to the M.2 SSDs. This is pretty smart (in a way) as it ensures that the heat being generated by the SSDs (Gen4 m.2 SSDs remember) will be passed (via the thermal pads) directly into the metal panel and dissipated into the airflow of the fan. Not an unusual method, but a smart tradeoff of the limited space and creative cooling.
The system arrives with three gen 4×4 SSD bays (according to the specifications tables, but there is room for debate, given the 4 different CPU configurations that are available in the Ryzen 7 7840HS, 7735H, 6800H and Ryzen 9 7940HS), so I will be digging into the BIOS and SSH later on to check. Plus, it becomes clear wh the included thermal pads that the GEM10 arrives with were so thin – there is very VERY little space between the individual M.2 bays and the metal fan-assisted panel. You can FORGET any kind of m.2 heatsinks in between, even particularly aggressive heatshields on SSDs are going to be a little tight.
If you purchase the pre-populated 1TB model, it arrives via a BIWIN 1TB Gen 3×4 SSD (available here for specs on Amazon). On the one hand, having an OS drive is always going to be handy, and in the case of some NAS OS such as TrueNAS, you need a clearly separate operating system OS drive target. But the drive being Gen3 means that you are already potentially underusing that Gen4 slot (you only have x3 total!). Additionally, if you plan on NAS software such as UnRAID (running from an USB) it means that you will need to replace this drive with something a little more uniform and higher performance soon-ish! Just a note to keep in mind when buying a pre-configured version of the GEM10.
Interestingly, another move by Aoostar here to manoeuver so much connectivity into this slim size (and be as efficient as possible with the 20 lanes afforded to that SoC Ryzen AMD chip) is that alongside those 3 Gen4 slots, they have added an adapter into a 4th slot that separates into a wireless NIC adapter slot and into that oCuLINK connector on a riser board. Obviously, this does bring up the question of removing the adapter card to remove wireless connectivity and the oCuLink, in favour of a 4th SSD. That’s one to ponder, for sure!
The WiFi 6 card is a fairly common $20-30 AX200NGW Intel adapter, that has 2×2 connectivity via two antennae that run from the card to two sides of the enclosure – so 2.4Ghz and 5Ghz, and 800Mb and 1.2Gb wireless bands afforded to you. Once again, the NAS OS you use makes all the difference and very few NAS OS’ actually support wireless connectivity in both connections (i.e to attach the NAS to your WiFi network AND connecting to the NAS over WiFi directly as it’s on AP.
Accessing the underside of this board, to access that CPU proved very difficult, as it would undermine the later tests in this article (so I will be coming back to this at a later date and/or in the review). The CPU in the model I reviewed was the AMD Ryzen 7 6800HS mobile SoC and 32GB of memory (pre-attached via individual flash cells – no upgrading). The R7 6800HS integrates all eight cores based on the Zen 3+ microarchitecture. They are clocked at 3.2 (guaranteed base clock) to 4.7 GHz (Turbo) and support SMT / Hyperthreading (16 threads). The chip is manufactured on the modern 6 nm TSMC process. The HS variant offers a 10 W reduced TDP and therefore a lower sustained performance than the H version.
AMD Ryzen 7 6800HS
The new Zen 3+ is a refresh of the Zen 3 architecture and should not offer a lot of changes. The chip itself however, offers a lot of new features, like support for USB 4 (40 Gbps), PCI-E Gen 4, DDR5-4800MT/s or LPDDR5-6400MT/s, WiFi 6E, Bluetooth LE 5.2, DisplayPort 2, and AV1 decode. A big novelty is the integrated GPU Radeon 680M, that is now based on the RDNA2 architecture and offers 12 CUs at up to 2.2 GHz. It should be the fastest iGPU at the time of announcement. This Ryzen 7 has a default TDP of 35 W (also known as the long-term power limit). Which is definitely too high to allow for passively cooled designs. The CPU is cooled by a pre-attached double copper pipe radiator that fans out into the edges of the case.
The scope of this processor is great and exactly the kind of processor you would want if you want to have fast and stable performance from a RAID’d group of SSDs in such a compact system. The fixed memory, although of a decent amount at 32GB (4x 8GB Cells, attached to PCB, not SODIMM), is annoying that it is fixed – additionally, there have been mixed reports online supporting the overclocked speed potential of the LPDDR5-6400 in this configuration.
Plus, there is a lot of ‘grey’ when it comes to ECC support here too – as the 6800HS DOES support ECC memory, but it is very much BIOS, physical config and OS dependant to a degree – so ECC is only really going to be a ‘thing’ here if Aoostar have included it! All that aside, if you are less interested in hardware tinkering and OC’ing the architecture and just looking for fast and stable performance in the default config 0 this has ALOT of the building blocks in hardware that you would want to see on a competent flash NAS.
AOOSTAR GEM10 SSD NAS Review – Software and Performance
The Aoostar GEM10 NAS unit I received arrived with Windows 11 on board and an included OS SSD (this drive is available included, alongside the 32GB pre-attached memory). This software will almost certainly be abandoned after purchase, in favour of the system having UnRAID, TrueNAS, OMV, etc installed by the end user, but whilst it was there, I took a moment to check the Geekbench scores for the CPU and GPU. The GEM10 scored a highly respectable 2039/9435 Single/multi core rating.
The GPU score (something that many plex/vm/container users are going to be concerned with) was pretty good for a smaller class system, at 29336.
Digging into the terminal/SSH we were able to learn a little more about the PCIe allocation across the system. That SSD that was included with the device in m.2 NVMe SSD Bay #1 was indeed a PCIe Gen 4×4 slot, without any kind of downgrade in place – nice to see!
Likewise, slots 2 and 3 were also both 4×4 and not downgrade – surprisingly rare in 2024, with so many flash systems in the market needing to lower the speeds of m.2 bays for reasons of resource use, bifurcation or just heat generation.
Performance testing on these bays was reasonable, with the Seagate Ironwolf 525 SSD (with a reported maximum performance of 5GB/5,000MB/s) hitting in excess of 4GB/s Read on sustained/repeated 1GB file tests.
Likewise, the maximum reported write performance of this drive of 4.4GB/s / 4,400MB/s by Seagate, was not too far off the 3.85GB/s average performance that the drive reached in the GEM10 in sustained 1GB write testing.
Then I tested the performance of copying data between 2 of the M.2 NVMe SSDs. This ended up hitting quite a low number at 1.155GB/s. This was not unusual (shared channel/lane etc vs system overhead etc). but I would have liked/hoped to have at least seen this hit closer to 2GB at least. Still not, terrible, just not great.
The top performance you should be expecting will be MASSIVELY influenced by the drives you chose to use and the NAS OS you choose to install. In the UnRAID and Seagate 525 Ironwolf setup I use, the power use, noise, performance and response times I observed were all pretty solid. But there’s plenty of room for improvement/error in other configurations compared with a standard turnkey solution, especially at this scale.
I reached out to Aoostar on some of the areas of this GEM10 Review that users frequently asked about with Mini PC styled NAS devices, and Aoostar was able to provide the answers to the most recurring questions below
Q – Why Does the Aoostar GEM10 not have ECC Memory?
A – On the subject of ECC, currently 95% of the mini computers on the market don’t support ECC memory, it’s not that we don’t want to get it that way, it’s restricted by some part of the authority, so it leads to most of the mini computers on the market don’t support ECC memory at the moment. However DDR5 does support on die ECC, which provide a similar level of data inconsistency protection.
Q – Why is the Aoostar GEM10 at a maximum 32GB of memory when the CPU supports more?
A – Unfortunately, there is no 64G of inlay RAM available at this scale and deployment, it’s not that we don’t want to do this configuration. If you want to use dual-channel DDR5 RAM like other models, then the size will be bigger, and it will not be able to meet the “mini size” we advertise. But the 32G RAM capacity is good enough for most uses
Q – With so many configurations of the GEM10 and GEM12 series, how does a buyer avoid confusion on what they need?
A – In view of your confusion about the configuration of the GEM10 series of CPUs, let me introduce you to the GEM10 series of CPUs: GEM10 AMD R7 6800H CPU (inlaid memory 32G); GEM10 AMD R7 7735H CPU (inlaid memory 16G, currently discontinued); GEM10 AMD R7 7840HS CPU (32G of inlay memory); GEM10 AMD R9 78940HS CPU (32G of inlay memory). The best price/performance ratio is the GEM10 6800H CPU, but as a company that puts a lot of money into R&D and seeks to produce cost-effective products, the GEM10 Intel N100 SKU (32G of inlaid memory) is already ready, but we are still testing it for the engineering machine, and it should be officially launched in a few months.
Q – Why does the GEM10 use USB4 and not Thunderbolt4?
A – About Thunderbolt and USB4 ports. As we all know, the Thunderbolt interface is Intel’s project, so they produce their own mini-computers are equipped with the Thunderbolt interface. USB4 interface is more open, AMD does not have a proprietary interface of the project, and they, as a competitor to INTEL, want to get the authorization of the Thunderbolt interface is in fact very difficult, which is why the market is equipped with the AMD mini-computer are USB4 interface! . Our company will also launch the INTEL series of minicomputers next month, but I still don’t know whether the project team will license these minicomputers with Thunderbolt interfaces or USB4 interfaces
AOOSTAR GEM10 SSD NAS Review – Conclusion and Verdict
The Aoostar GEM10 is making some pretty bold hardware promises, given it’s scale! The ‘dazzle’ of how powerful mini PCs have been getting in the last few years has definitely become a little duller, as it grows more common. But given how Aoostar has merged this into a much more NAS-tailored system in a meaningful way that clearly cost some $ at the R&D level needs to be appalled. This is not a small SSD NAS with is covered in Mini-PC caveats – this IS a NAS and one that I think might well be the most powerful for it’s scale in the market right now (especially at $499+). That said, it certainly ain’t perfect! Network scalability is a mixed bag, the way memory has been approached (in architecture and ECC support) is debatable, the CPU choices in the range of 4 with the differing process and PCIe layouts is a bit baffling and the full utility of oCuLink in this NAS context is still far from fleshed out. BUT, There are prosumer concerns for the more technically minded and IT sophisticated, which I think does not make up the bulk of this device’s target demographic. I struggle to call this system turn-key (due to it’s lack of an included NAS OS, even a 3rd party one, as seen in the UnRAID license-ready LincStation N1), but it’s certainly miles more user-friendly than full DiY. I have often spoken of the growing middle ground between full NAS DiY from the ground up and full ‘out the box’ turnkey from brands like Synology and QNAP. The Aoostar GEM10 is a FANTASTIC example of the kind of product that can evolve from this – well build, powerful, 3rd party OS ready and a step above the churned-out chinese budget fodder found elsewhere in the ‘pre-built OS free NAS sector’. Recommended – IF you have the time to set it up right!
PROS of the GEM10 Flash NAS
CONs of the GEM10 Flash NAS
Insanely Compact, especially for the hardware configuration
8 cores and 16 threads to play with on an SSD NAS – Yum Yum
Dual LAN Connectivity = failover
USB 4 Support and 4x 10G USB
oCuLink inclusion is unusual, but adds potential scalability
32GB LP Memory
TONNES of cooling and ventilation
No 3rd party NAS OS Locks or Limitations
Gen 4 Architecture on the SSD Bays
Scope to add a 4th M.2 SSD Bay (removing oCulink and WiFi6 Card)
Low Noise, but definitely not silent!
ECC Support and Memory overclocking is debatable
Confusion of CPU configurations
Where to Buy?
Aoostar GEM10 3x Gen4x4 M.2 NVMe NAS (AliExpress $465) – HERE
Aoostar GEM10 3x Gen4x4 M.2 NVMe NAS (7940HS Amazon) – HERE
Aoostar GEM12 3x Gen4x4 M.2 NVMe NAS (7840HS Amazon) – HERE
Aoostar GEM10 3x Gen4x4 M.2 NVMe NAS (6800H Amazon) – HERE
This description contains links to Amazon. These links will take you to some of the products mentioned in today's content. As an Amazon Associate, I earn from qualifying purchases. Visit the NASCompares Deal Finder to find the best place to buy this device in your region, based on Service, Support and Reputation - Just Search for your NAS Drive in the Box Below
Need Advice on Data Storage from an Expert?
Finally, for free advice about your setup, just leave a message in the comments below here at NASCompares.com and we will get back to you.Need Help?
Where possible (and where appropriate) please provide as much information about your requirements, as then I can arrange the best answer and solution to your needs. Do not worry about your e-mail address being required, it will NOT be used in a mailing list and will NOT be used in any way other than to respond to your enquiry.
[contact-form-7]
TRY CHAT Terms and Conditions
If you like this service, please consider supporting us.
We use affiliate links on the blog allowing NAScompares information and advice service to be free of charge to you.Anything you purchase on the day you click on our links will generate a small commission which isused to run the website. Here is a link for Amazon and B&H.You can also get me a Ko-fi or old school Paypal. Thanks!To find out more about how to support this advice service checkHEREIf you need to fix or configure a NAS, check FiverHave you thought about helping others with your knowledge? Find Instructions Here
Or support us by using our affiliate links on Amazon UK and Amazon US
Alternatively, why not ask me on the ASK NASCompares forum, by clicking the button below. This is a community hub that serves as a place that I can answer your question, chew the fat, share new release information and even get corrections posted. I will always get around to answering ALL queries, but as a one-man operation, I cannot promise speed! So by sharing your query in the ASK NASCompares section below, you can get a better range of solutions and suggestions, alongside my own.
Aujourd’hui, nous vous proposons le test de la prise connectée MSS315 version EU/FR de MEROSS. Une prise connectée Wifi, mais surtout une prise compatible Matter.
Vous trouverez sur le marché de nombreuses prises connectées de formes, de technologies (Zigbee, Z-Wave, Wifi, etc…) et de marques différentes. Cela demande souvent de rester dans la même marque ou la même technologie pour éviter de multiplier les Dongles/Hubs.
Mais, la prise MSS315 de MEROSS dispose du dernier standard pour être intégrable à une infrastructure domotique existante (Google, Apple, Amazon, HomeAssistant, etc…) à condition d’avoir un contrôleur Matter (exemple : Apple TV, iPad, appareils Google Nest, Samsung SmartThings Hub, SwitchBot HUB 2, HomeAssistant,…).
Avant d’entamer la présentation de la prise connectée MSS315EU, voici quelques mots sur la marque :
MEROSS, une marque fondée en 2016, par des experts de Microsoft, Cisco, MediaTek et TP-Link. Celle-ci propose une multitude de produits connectés (Prises, multiprises, thermostats, tête thermostatiques, diffuseurs d’huile, détecteurs de fumée ou de monoxyde de carbone, etc…) mais aussi certains en totales autonomies (sonnettes).
Les produits proposés sont compatibles avec/sans hub fourni par le constructeur, principalement en Wifi et sont intégrables à des systèmes existants (Google Home, Apple Home Kit, Alexa, SmartThings de Samsung, etc…). Afin de bénéficier de tous les services MEROSS, il est préférable d’utiliser leur application et leur Hub comme leurs concurrents.
Source : MEROSS
MEROSS propose de plus en plus de produits compatibles Matter. D’après les communications effectuées par la marque, leurs produits sont en perpétuelle évolution afin de les rendre compatibles avec ce nouveau standard (les produits existants ne sont pas forcément compatibles au niveau matériel avec celui-ci, de nouveaux matériels sont développés pour cela).
L’emballage de la prise est fournie dans un emballage carton blanc d’épaisseur standard et sobre aux couleurs de la marque.
Nous retrouvons sur la face principale le nom et la référence du produit, une photo de celui-ci, mais surtout l’indication que ce produit est compatible Matter. Sur les autres faces, nous retrouvons les caractéristiques (face droite), la garantie et les moyens de contact de la marque (face arrière), une description (face gauche) et le logo de la marque (dessus).
À l’ouverture, nous trouvons sur le rabat de gauche un QR Code pour accéder à la FAQ et sur le rabat de droite certaines des caractéristiques principales.
Vous trouverez la prise emboitée dans un carton intérieur pour la soutenir et la verrouiller, elle est accompagnée de deux fascicules, le premier est le guide rapide et le second est sur le standard Matter (« 7 Things You Need to Know About Matter »).
B. Design
Comme beaucoup de modèle de prise, celle-ci est blanche. Sur une des faces, vous retrouvez les caractéristiques (Marque, Modèle, tension d’entrée et intensité de sortie), sur une seconde le bouton de commande manuelle et le rappel que la prise est au standard Matter et sur une 3ème face, le QR Code servant à l’intégration dans votre système.
La prise est de « bonne taille », elle est proportionnelle aux prises des concurrents actuels sur le marché quelle que soit la technologie utilisée (Wifi, Zigbee, …).
Dans le cas d’une prise, nous recherchons plus les caractéristiques de celle-ci que le design (car souvent cachée). Elle est standard dans ces formes, mais reste qualitative au toucher et de bonne fabrication (bonne finition).
C. Caractéristiques techniques/physiques
Entrée
100-240V~, 50/60Hz
Sortie
16A Max.
Moniteur d’énergie
Oui
Bouton
1 x On/Off Bouton Presser le bouton 5 seconde pour réinitialiser l’appareil
LED
1 x LED pour le statut
Dimensions (W x D x H)
5 x 5 x 6.4 cm (Hors broches)
Antenne
1 antenne interne
Standards Sans-fil
Supporte 64/128 bit WEP, WPA-PSK/WPA2-PSK/WPA3-PSK
Certifications
CE,WEEE
Contenus de la boîte
1 x Prise connectée Matter 1 x Guide utilisateur
Prérequis système
Smartphone sous OS 16.1 ou plus, Android 8.1 ou plus Réseau Wi-Fi existant
Environnement
Température de fonctionnement : 0°C~40°C (32°F~104°F) Température de stockage : -40°C~70°C (-40°F~158°F) Humidité de fonctionnement : 10%~90% Humidité de stockage : 5%~90%
IV. Installation, Configuration, Utilisation
A. Installation application MEROSS
Rendez-vous dans le magasin d’applications de l’OS de votre smartphone puis recherchez MEROSS ou scanner directement le QR code fourni sur la notice pour télécharger l’application.
La première étape est la création d’un compte utilisateur pour accéder aux fonctionnalités de l’application.
Une fois cette première étape effectuée, vous accèderez à la page d’accueil, puis aux différentes options de l’application et bien sûr à l’ajout de matériel.
Dans les options vous retrouvez les standards habituels : le tableau de bord avec la liste des périphériques, le profil de l’utilisateur connecté avec un menu complet notamment la gestion avec une montre connectée ou encore des widgets sur le bureau du smartphone ainsi que la mise à jour des périphériques.
Pour les options de l’application, outre le tableau de bord et le profil utilisateur, vous trouverez :
La partie « Intelligent » avec les scènes et les routines
Les scènes permettent de contrôler plusieurs appareils simultanément.
Les routines permettent de gérer les appareils ou une scène à des heures précises ou suivant un délai (Par exemple : éteindre un appareil après 15 min d’activité).
La partie « forum » avec différentes catégories : All, News, InvolvedPost, Event, ….
La partie « boutique »
L’application est proche, au niveau design, des applications de marques concurrentes.
B. Intégration par l’application MEROSS
L’intégration de la prise MSS315 à partir de l’application peut être faite de 2 deux manières possibles. La première en détection automatique avec le Bluetooth, celle-ci est disponible dès que l’on branche pour la première fois la prise, elle est automatiquement mise en mode appairage et est détectée directement par l’application.
La seconde, c’est aller chercher la prise dans le menu d’ajout de périphérique.
Ensuite, le processus d’intégration est identique entre les deux modes d’appairage.
Les tests ont été effectués sur deux smartphones Apple et Android, pour les deux le résultat est le même. L’application Meross recherche par défaut un contrôleur Matter intégré dans l’application native des objets connectés de l’OS du périphérique. Vous avez donc le message d’erreur indiquant qu’il n’y a pas de contrôleur Matter (ceci n’est valable que pour les personnes qui n’ont pas de contrôleur dans Home d’Apple ou de Google).
Donc, si vous utilisez une autre marque pour gérer votre domotique, vérifier bien que votre HUB/BOX intègre le standard Matter.
Vous retrouverez plus de détails sur les prérequis nécessaires pour ce périphérique sur le site de MEROSS.
C. Intégration Smart Life (Tuya)
Tuya/Smart Life étant une application compatible multi-marques, mais aussi compatible Matter, j’ai testé l’intégration avec celle-ci.
L’intégration se fait comme n’importe quel autre périphérique, une fois que la prise est en mode appairage, celle-ci est automatiquement détectée. Ensuite, l’application vous propose de l’intégrer ou comme pour l’application MEROSS, aller dans le menu d’ajout de matériel et sélectionner la catégorie de prise compatible.
Une fois l’intégration effectuée, vous bénéficiez de la fonction principale. Malheureusement, nous n’avons pas la partie consommation d’énergie. Vous pouvez utiliser la prise dans les automatismes.
D. Intégration HomeAssistant
Avec HomeAssistant et Matter, l’intégration doit se faire automatiquement sur smartphone (ceci est nécessaire avec Matter).
Pour se faire, lancer l’application HomeAssistant puis allez dans les paramètres HA. Ensuite, sélectionnez le menu « Appareils et services », l’onglet « Appareil » et cliquer sur le menu « Ajouter un appareil ». Voici un résumé en images des différentes étapes :
L’appareil est intégré et vous le retrouvez dans l’intégration Matter (BETA). Les automatisations et autres fonctionnalités sont possibles avec la prise. Malheureusement, la partie consommation d’énergie n’est pas disponible non plus avec HA.
E. Utilisation de la fonctionnalité multi-admin de Matter
Dès que la prise est intégrée à votre contrôleur Matter (pour mon cas HomeAssistant), retournez dans l’application Meross. Cliquer sur l’ajout d’un appareil, l’application effectue une recherche comme pour un nouvel appairage et affiche la prise trouvée (attention, il faut être sur le même réseau).
Cliquer sur la prise trouvée afin de l’ajouter à l’application. Cela peut prendre plusieurs minutes.
Voici ce processus en images :
Une fois la prise ajoutée, elle apparait sur l’écran d’accueil. Gérer l’appareil comme vous le souhaitez avec les scènes et routines (si vous avez déjà généré des automatismes à partir de votre contrôleur, vérifiez qu’il n’y aura pas d’influence entre les 2 systèmes, il n’est pas recommandé de gérer des automatismes sur 2 plateformes différentes pour le même appareil).
Le fait d’utiliser la fonction multi-admin permet de disposer dans l’application des fonctionnalités manquantes à partir du contrôleur, en l’occurrence ici, de la partie « consommation d’énergie ».
F. Suivi de la consommation d'énergie
Cette fonctionnalité est intéressante, car elle est très complète en comparaison à d’autres prises (Meross à Gauche – Autre à droite).
En effet, avec l’application, vous retrouvez la puissance consommée en temps réelle, un cumul journalier et mensuel en kWh et surtout des graphiques Jour (heure par heure) /Semaine (jour par jour) /Mois etc… (cf. photo ci-dessus).
En plus des graphiques, vous pouvez calculer le montant de la consommation (pour cela, il faut renseigner le tarif du kWh dans les réglages du périphérique). D’autres options sont disponibles comme l’export des données énergétiques par e-mail, un mode de surveillance d’énergie (Consommation ou production).
V. Conclusion
L’intégration de la prise MSS315 est simple quel que soit le système utilisé. La prise reste dans le standard du marché que ce soit pour le design, les fonctionnalités ou le tarif appliqué. Les options disponibles à partir de HomeAsistant ou Tuya/Smartlife sont limitées, mais l’utilisation de la fonctionnalité Multi-Admin permet de disposer de toutes les fonctionnalités à partir de l’application.
La partie « Consommation d’énergie » est très intéressante et complète avec les graphiques et le calcul du montant, dommage que ce ne soit que sur l’application officielle. Ceci changera peut-être avec les mises à jour du protocole Matter.
Cela reste une bonne prise qui effectue le travail demandé. Elle est vendue 19.90 euros seule et 36.18 euros en pack de 2. Vous pouvez l'acheter en utilisant notre lien Amazon : Acheter la prise MEROSS MSS315 (EU) sur Amazon.fr.
Dans cet article, nous allons découvrir le robot aspirateur et laveur de sol Eureka J12 Ultra, accompagné par une station de charge tout-en-un et capable de détecter les objets et obstacles grâce à un système aidé par de l'IA.À l'occasion de ce test, Eureka propose une réduction aux lecteurs d'IT-Connect grâce à un code promo.
L'Eureka J12 Ultra est le nouveau modèle de cette marque, et, c'est aussi le premier modèle aussi complet proposé par Eureka, car il propose des fonctionnalités disponibles chez les ténors du marché.
Quelques mots sur la marque : Eureka est une marque américaine créée en 1909 à Chicago, qui est spécialisée dans la conception d'aspirateurs, et qui s'est lancé sur le marché des aspirateurs robots il y a quelques années. En 2016, la société Eureka a été rachetée par le groupe chinois Midea.
II. Package et design
Nous allons commencer par déballer l'aspirateur robot et l'ensemble des accessoires, afin de découvrir le design, les finitions, mais aussi les caractéristiques techniques de l'ensemble.
A. Qu'avons-nous dans le carton ?
Au sein du carton lourd et imposant, nous retrouvons la station de charge, le robot et les accessoires. Le robot est stocké dans une boite cartonnée dédiée, tout comme les accessoires, tandis que la station est emballée dans un plastique. L'ensemble est bien calé, chaque élément est à sa place et le matériel me semble suffisamment protégé pour résister au transport.
Esthétiquement, le packaging est plutôt léger, mais cela s'inscrit dans une démarche globale d'Eureka d'utiliser des matériaux recyclés et de fabriquer des produits respectueux de l'environnement.
Au-delà de la station et du robot que je vais présenter en détail par la suite, nous avons le droit aux accessoires suivants :
Un guide utilisateur, en plusieurs langues, dont le français
Deux brosses latérales, à positionner sur le robot
Deux serpillières de lavage lavables, à positionner également sur le robot
Un câble d'alimentation pour la station de charge
Un outil de nettoyage
La seule pièce de rechange fournie est un sac à poussières de 3 litres pour la station de charge. Sur Amazon.fr, Eureka commercialise des kits d'accessoires, notamment ceux-ci :
L'Eureka J12 Ultra est équipé d'une station de charge tout-en-un qui est capable de laver les serpillières grâce à son réservoir d'eau propre, tout en collectant l'eau sale grâce son réservoir prévu à cet effet. Elle peut aussi collecter la poussière stockée dans le robot suite à la session de nettoyage, puis laver les serpillières et les sécher à l'air chaud (55 °C). Ces fonctionnalités permettront au robot d'être autonome pour effectuer une multitude de tâches, tout en améliorant l'efficacité du nettoyage.
La station de charge Auto-Dock est imposante, mais en même temps similaire à certains modèles concurrents. Pour être précis, voici les dimensions : 412 mm (largeur) x 567 mm (hauteur) x 379 mm (profondeur).
La coque de la station de charge est entièrement en plastique et elle est totalement grise dans la configuration que j'ai eu l'occasion de tester. Il y a un autre coloris disponible : blanc.
Au premier coup d'œil, nous pouvons être surpris par la qualité de fabrication de cette station de charge, qui n'est pas irréprochable. Il y a des marques visibles sur le côté et à l'arrière, mais Eureka le sait et assume ce choix qui est lié au processus de fabrication. Une note présente à l'intérieur du carton précise ceci : "Veuillez noter que nous utilisons un processus écologique sans impression. Les marques d'écoulement sur le produit sont des textures naturelles dues au moulage à haute température, et non des problèmes de qualité." - Un choix courageux et honorable de la part d'Eureka s'il y a un réel intérêt écologique.
Sachez que le robot vient se loger dans la partie inférieure, tandis qu'au milieu, il y a comme une porte que nous pouvons ouvrir pour accéder au sac à poussière. Sur le dessus, le fait de lever le couvercle donne accès aux réservoirs d'eau.
La station de charge est équipée de 2 réservoirs de chacun 4.6 litres. Il y a un réservoir destiné à collecter les eaux usées et un réservoir qu'il convient de remplir d'eau froide. Une poignée présente sur le dessus de chaque réservoir permet de le manipuler facilement, notamment pour le retirer de la station ou le remettre en place.
Sur le dessus de la station de charge, se situe un panneau de contrôle avec deux LEDs d'état et deux boutons. Ils permettent de démarrer ou mettre en pause le nettoyage, ainsi que de rappeler le robot pour qu'il rentre à la base.
Enfin, le plateau inférieur de la station de charge, est totalement amovible. Ceci est un très bon point pour faciliter le nettoyage de la station de charge sans devoir se plier en quatre. Il suffit de déclipser le réceptacle afin de pouvoir le nettoyer aisément : étant donné que les serpillières seront nettoyées ici, et malgré la fonction d'auto-nettoyage, ceci pourra s'encrasser avec le temps.
Dans la suite de cet article, nous allons découvrir le robot en lui-même.
C. Découverte du robot EUREKA J12 Ultra
Intéressons-nous à la pièce maîtresse en charge du nettoyage de notre logement : l'EUREKA J12 Ultra. Contrairement à beaucoup d'autres modèles présents sur le marché, celui-ci n'est pas rond : il est carré avec des angles arrondis, qui lui permettent d'être relativement élégant. Voici ses dimensions exactes : 350 mm (profondeur) x 342.5 mm (largeur) x 108 mm (hauteur). Son design tranche avec celui des modèles circulaires très présents sur le marché.
Le dessus du robot est surplombé par le système de navigation LiDAR, identifiable grâce à la tourelle estampillée avec le "E" de la marque Eureka. Un peu plus haut, sur la coque, le robot est équipé de trois boutons. Ils donnent accès à plusieurs fonctions : démarrer, reprendre, mettre en pause le nettoyage / revenir à la base / démarrer le nettoyage localisé / gérer le verrouillage enfants. Enfin, un couvercle donne accès au réservoir à poussières, ainsi qu'aux boutons Wi-Fi et reset.
Le robot est équipé de pare-chocs et de différents capteurs, dont le système de détection d'obstacles 3D DuoDetect AI mis au point par Eureka. Il est qualifié de "Dual-View" par Eureka, car il diffuse deux faisceaux lumineux sur l'avant pour lui permettre de détecter et d'éviter les obstacles, y compris lorsque la pièce est sombre.
Le dessous de l'appareil donne un aperçu des différentes brosses ainsi que des serpillières rotatives. D'ailleurs, sachez que ces serpillières très épaisses effectuent 200 rotations par minute lorsque le robot nettoie votre sol. C'est plus que la majorité des robots, où le nombre de rotations par minute habituel est de 180.
La présence de deux brosses latérales est également un plus pour ramener vers le robot un maximum de poussière et autres saletés. Le robot est équipé d'une brosse centrale anti-emmêlement. Enfin, grâce à ses roues principales, le robot est capable de passer des obstacles d'une hauteur maximale de 2 cm (c'est la norme sur les robots).
Enfin, terminons cette présentation par un aperçu global de l'Eureka J12 Ultra. La conception est soignée, mais les finitions pourraient être meilleures, même si c'est lié à un vrai choix de la part de l'entreprise Eureka, comme je l'évoquais précédemment.
III. Installation, nettoyage, autonomie…
A. Installation
L'installation s'effectue en quelques minutes puisqu'il suffit de déballer le matériel, de retirer les différentes protections et d'installer la base ainsi que le robot. Le câble d'alimentation se connecte à l'arrière de la base et le surplus de câble peut être enroulé à l'arrière, de façon à faire une installation propre. Concernant le choix de l'emplacement du robot, sachez qu'Eureka demande 5 cm d'espace libre à droite et à gauche, ainsi que 1.3 mètre devant la station.
Une fois que le matériel est en place et allumé, la suite se passe dans l'application officielle baptisée "eureka robot" qui sera présentée plus largement dans la suite de cet article. Après avoir créé un compte utilisateur, le robot peut être ajouté à l'application : il suffit de se trouver à proximité pour qu'il soit détecté. Le processus d'intégration à l'application est très simple. Le robot se connecte au réseau Wi-Fi, via une connexion en 2.4 GHz.
B. Efficacité du nettoyage
Le robot J12 Ultra commence sa session de nettoyage par l'emplacement le plus loin possible de la base. C'est plutôt astucieux, car cela va lui éviter de rouler sur une zone qu'il a déjà nettoyée auparavant. Il va ensuite effectuer des allers-retours en "S" de façon à nettoyer les espaces de manière logique et cohérente. Son format lui permet de bien aller dans les angles. Je trouve qu'il effectue régulièrement des "pauses" : il s'arrête pendant environ 1 ou 2 secondes, avant de repartir. C'est étonnant quand il le fait alors qu'il est encore à 1 mètre du mur.
Le robot est capable de détecter et de contourner les objets, même s'il a tendance à régulièrement les percuter légèrement. Pour ma part, c'était le cas avec les pieds des chaises, ainsi que certains objets posés volontairement au sol (une paire de chaussures, par exemple). Un léger manque de précision.
La puissance d'aspiration est satisfaisante (5 000 Pa max) mais ne conviendra pas aux utilisateurs les plus exigeants sur ce point. Personnellement, je l'ai trouvé suffisante et bien complétée par le système de nettoyage avec les serpillières. Elles sont épaisses et larges, ce qui permet au robot de bien nettoyer le sol. De plus, je trouve que la station de charge ne consomme pas beaucoup d'eau à chaque lavage, ce qui est un bon point (et amène l'utilisateur à remplir le bac d'eau moins souvent).
Si vous trouvez que l'efficacité n'est pas suffisante, vous pouvez demander au robot d'effectuer un second passage. Ainsi, il va nettoyer deux fois la zone avant de considérer qu'il a terminé son travail. Ceci assure un nettoyage plus en profondeur, et grâce à son autonomie et ses réservoirs d'eau, il en est tout à fait capable.
C. Autonomie
Ce robot est équipé d'une batterie de 5 200 mAh. Eureka annonce une autonomie jusqu'à 150 minutes pour son robot J12 Ultra, soit la possibilité de couvrir une surface maximale de 300 m² en une seule charge. C'est énorme, et ceci me semble difficilement atteignable : à moins, peut-être, d'utiliser le mode silencieux.
Pour une utilisation normale et bénéficier d'un nettoyage efficace, comptez plutôt une autonomie d'environ 110 minutes, soit environ 110 m² nettoyés. Ceci représente déjà une belle surface, surtout qu'il ne faut pas tenir compte de l'espace occupé par les meubles, le canapé, etc... à moins qu'ils soient surélevés car dans ce cas, le robot, n'hésitera pas à passer dessous pour nettoyer.
La recharge complète nécessite plusieurs heures d'attente, et pendant ce temps, le robot lavera puis séchera les serpillières.
IV. L'application Eureka
L'application Eureka offre la possibilité à l'utilisateur de gérer plusieurs appareils. Ici, seul le J12 Ultra va nous intéresser. La première fois qu'on accède à son interface, le robot suggère de créer une carte rapide de votre logement qui sera affinée par la suite. C'est un procédé devenu habituel avec les robots aspirateurs.
L'application intègre plusieurs boutons d'action pour déclencher des opérations sur la station de charge : sécher les serpillières, laver les serpillières, vider le réservoir à poussière du robot et l'autonettoyage de la station elle-même.
Le bouton "Play", qui est celui que l'on utilise le plus, sert à lancer une session de nettoyage. Il est possible d'effectuer un nettoyage complet, un nettoyage d'une ou plusieurs pièces ou le nettoyage d'une zone, selon les besoins et circonstances.
Chaque session de nettoyage est personnalisable c'est-à-dire que nous pouvons ordonner au robot de nettoyer 1 fois, 2 fois ou 3 fois. Nous pouvons aussi ajuster la puissance de l'aspiration ainsi que la fréquence de nettoyage des serpillières (ce qui implique un retour à la station). Le robot peut aussi aspirer et laver en un seul passage, ou procéder en deux temps, voire même ne faire qu'un seul type de nettoyage.
Le système de cartographie joue un rôle clé dans l'utilisation d'un robot laveur de sol. Le modèle Eureka J12 Ultra n'échappe pas à cette règle. La carte générée manque de précisions, car comme le montre les images ci-dessous, il y a énormément d'angles et de coins : ce qui ne reflète pas la forme exacte des pièces du logement, mais plutôt la position des meubles... Néanmoins, Eureka a intégré toutes les fonctionnalités nécessaires :
Gestion de plusieurs cartes.
Création de murs virtuels, de zone à ne pas nettoyer, ou de zone où il faut seulement aspirer et donc ne pas utiliser la serpillière.
Définir un ensemble de pièces correspondantes à votre logement, avec la possibilité de diviser / fusionner les pièces à votre guise.
Nommer les pièces pour les identifier facilement.
Suivi de la progression du robot en temps réel sur la carte lorsqu'un nettoyage est en cours.
Grâce à ces fonctions, en tant qu'utilisateur, vous avez la main pour peaufiner la carte générée par le robot. Si elle ne vous convient pas du tout, il est toujours possible de la supprimer pour repartir de zéro.
Évoquons désormais les autres options de configuration accessibles dans l'application :
Planifier un nettoyage : un seul nettoyage ou un nettoyage régulier plusieurs fois dans la semaine à une heure spécifique.
Historique du nettoyage : liste de toutes les sessions de nettoyage du robot, avec un aperçu de son trajet, de la durée de la session, etc.
Gestion des tapis : le robot doit-il éviter les tapis ou doit-il passer dessus ? À vous de choisir. Il y a aussi une option pour augmenter la puissance d'aspiration sur les tapis.
Mode Ne pas déranger : le robot n'effectuera pas de nettoyage selon la plage horaire définie.
Fréquence de vidage de la poussières : le robot doit-il vider la poussière de son réservoir dans la base à chaque nettoyage ou tous les 3 ou 5 nettoyages ?
Configuration du séchage automatique : lorsque la station va sécher les serpillières, à la fin de la session de nettoyage, doit-il effectuer un séchage à l'air chaud ou air ambiant ? Pendant combien de temps : 2 heures ou 3 heures ?
Suivi de la durée de vie des différents accessoires.
Verrouillage pour enfants : désactiver les boutons du robot et de la station de charge, pour éviter qu'un enfant puisse déclencher une action (super pratique !).
Gestion vocale à distance avec Amazon Alexa et Google Assistant
L'anglais est la langue utilisée la voix du robot, sans qu'il soit possible de modifier la configuration pour utiliser le français. C'est dommage, et ce sera surement un frein pour certains utilisateurs. Pour le moment, Eureka est une marque peu connue en France : ce qui peut expliquer qu'elle n'a pas travaillé sur la traduction en français. Espérons que ce soit dans la feuille de route, mais la bonne nouvelle, c'est que l'application est disponible en français.
Eureka a fait un véritable effort pour nous laisser la main sur la configuration du robot, avec de nombreuses options de configuration. C'est appréciable, et même si l'application manque un peu de réactivité par moment, elle est très complète.
V. Conclusion
Le robot Eureka J12 Ultra est le premier modèle aussi complet de chez Eureka et c'est une belle réussite proposée à un tarif plus bas que de nombreux modèles concurrents. Il n'est pas parfait, mais il a des atouts à faire valoir, comme nous l'avons vu tout au long de ce test. Certaines améliorations, telle que la prise en charge du Français pour la synthèse vocale, pourront arriver par la suite par l'intermédiaire d'une mise à jour du firmware : les clés sont entre les mains d'Eureka.
Avantages
Robot polyvalent et nettoyage satisfaisant.
Moins de 800 euros pour un robot accompagné par une station tout-en-un.
Système de lavage efficace et économe en eau.
Très complet : beaucoup de fonctions et d'options de configuration dans l'application.
Bac de nettoyage de la station amovible, ce qui facilitera son nettoyage.
Inconvénients
Un seul accessoire de rechange : un sac à poussières.
Synthèse vocale en anglais.
La cartographie manque de précision (dans l'application)
Une station imposante qui ne conviendra pas à tous les utilisateurs.
Offre de lancement sur l'Eureka J12 Ultra
Ce modèle est commercialisé au prix de 799 euros, ce qui reste un prix élevé pour un aspirateur robot. Mais, actuellement, sur le marché, il y a des robots qui dépassent les 1 000 euros : donc à ce prix, l'Eureka J12 Ultra à une carte à jouer ! Découvrez notre offre spéciale à l'occasion du lancement de ce produit !
Obtenez 30 euros de réduction sur ce produit en utilisant l'un des deux codes ci-dessous :
Eureka J12 Ultra Blanc : 30 euros de réduction avec le code promo EUREKAJ12B11
Eureka J12 Ultra Noir : 30 euros de réduction avec le code promo EUREKAJ12N11
Proposé à 799 euros, son tarif tombera à 769 euros avec ce code promo. Mais, à l'occasion de son lancement, il est proposé à 679.99 euros, soit 649.99 euros après application du code promo dans votre panier.
Pour terminer, voici notre lien d'achat Amazon.fr :
Review of the TerraMaster D5 Hybrid Storage System
In this review, we delve into the TerraMaster D5 Hybrid Storage System, a versatile and cost-effective solution designed to meet the diverse storage needs of both personal users and small businesses. Combining the high capacity of traditional HDDs with the rapid performance of NVMe SSDs, the D5 Hybrid offers an intriguing mix of speed and storage capabilities within a single device. It features user-friendly design elements like tool-free drive installation and moderate operational noise levels, all while leveraging USB 3.2 Gen 2 connectivity. This review explores the system’s specifications, performance, and overall value to help potential buyers determine if it aligns with their data storage and management requirements.
Good sustained performance (if you preferred that to \'Peak\' performance Low Power Use and Low Noise Good internal processor choices, especially for the price point NAS Supported, so can be used as a tiered expansion box Very simple to use Mac/Windows Supported (even worked connected to my Android phone!) Almost completely toolless Solid build and good \'feel\' Supports 8TB M.2 NVMes (Tested Addlink A95 8TB 2280 NVMe) HDD Bay 1+2 are RAID Supported Affordable!
CONS
Software is limited and Premium features require a subscription Peak performance is much lower than what you would expect, despite 3x1 speed (max 1GB) on each m.2 USB 10Gb/s is going to be a bummer for those thinking about the real speed that 3x m.2 SSDs could hit. Disappointing that there is no USB 3.2 Gen 2x2 (40Gb/s) or USB4/TB4 Version
Specification
Details
Dimensions
222 x 119 x 154 mm
Weight
1.3 kg
Power Supply
40 W (100V to 240V AC) 50/60 HZ, Single Phase
System Fan
80 mm x 80 mm x 25 mm (x1)
Maximum Noise Level
19.0 dB(A) (Using 2 SATA HDDs/SSDs in standby mode)
Compatible Disk Types
3.5″ SATA HDD, 2.5″ SATA HDD, 2.5″ SATA SSD
Compatible NVMe
M.2 2280 NVMe Slot (x3)
Raw Capacity
Up to 68 TB (22 TB HDD x 2 + 8 TB NVMe x 3)
Supported RAID Configurations
SINGLE DISK, JBOD, RAID 0, RAID 1
HDD Sleep Mode
Yes
Connectivity
USB3.2 Type-C gen2 (10Gbps), DC IN 12V Barrelport
Price
€239.99 – $219.99
Introduction to the TerraMaster D5 Hybrid
The TerraMaster D5 Hybrid is engineered to cater to the evolving demands of personal and small business storage by amalgamating traditional hard disk drives (HDDs) with the swift, modern NVMe solid-state drives (SSDs). This system includes two versatile SATA bays that support both 3.5″ and 2.5″ drives and three M.2 NVMe slots, offering a broad spectrum of storage options. It utilizes USB 3.2 Gen 2 connectivity, capable of reaching speeds up to 1000 MB/s. However, this setup prompts a discussion about the possible limitations of USB connectivity when used with high-performance storage technologies, potentially creating bottlenecks that could affect data transfer speeds.
Exploring the Design and Build
The D5 Hybrid showcases a durable and user-friendly design consistent with Terramaster’s latest NAS models. The system facilitates easy installation of drives with its tool-free “click and load” mechanism, suitable even for users without technical expertise.
The operational noise level is moderately low, which is a crucial consideration for use in shared spaces like small offices or home environments.
The storage solution accommodates up to two HDDs and three NVMe SSDs but opts out of including faster interface technologies such as Thunderbolt to maintain an affordable price point. This choice might restrict the performance potential of the system but makes the D5 Hybrid more accessible financially to a broader audience.
ASMedia and Realtek are two prominent players in the semiconductor industry, particularly known for their contributions to the development of chips that handle data connectivity and processing in various electronic devices.
ASMedia, a subsidiary of ASUS, specializes in high-speed interface technology, particularly USB and PCIe bridge solutions. Notably, their chips are pivotal in enhancing the performance of USB connections. For example, the ASM3042 is a significant advancement in their USB controller lineup, bridging PCI Express to USB3.2 and providing support for legacy USB functions. This chip showcases ASMedia’s capability to deliver high bandwidth and efficient power management, essential for maintaining low power consumption in various devices
In 2022, ASMedia became one of the first to introduce a USB4 host-controller, the ASM4242, designed to support high data transmission speeds up to 64 Gbps, making it backward compatible with Thunderbolt 3 and other protocols. The incorporation of ASMedia’s ASM4242, a high-performance USB4 host controller, into a device configuration represents a significant step towards future-proofing data transfer capabilities. The ASM4242 supports up to 64 Gbps of bandwidth, providing a robust solution for high-speed data, video, and power transmission over a single USB connection. This level of integration ensures that devices are not only meeting current standards but are also prepared for next-generation needs, with backward compatibility ensuring a broad range of device support.
Realtek’s contributions, while more commonly associated with their audio and network solutions, also extend to data interface technologies. Realtek chips are crucial for managing data transmission and ensuring compatibility across a vast ecosystem of computing and multimedia devices. Their technology helps to stabilize and optimize the data flow, critical for the functionality of hybrid storage systems where data integrity and speed are paramount.
Detailed Performance Assessment
The performance of the D5 Hybrid was meticulously tested under various configurations to truly understand its capabilities and limitations. Configuring the device with two Seagate 24TB Ironwolf Pro Series HDDs in a RAID 1 setup, the system demonstrated robust performance with peak write speeds reaching 262 MB/s. This configuration allowed for transferring 20 GB of data in slightly over two minutes.
When equipped with SSDs, the system’s performance increased notably. Using a single Kingston 500 GB M.2 NVMe SSD, the peak transfer speed observed was 572 MB/s, reducing the 20 GB data transfer time to around 1 minute and 14 seconds. Moreover, employing two Kingston DC600M enterprise-grade SATA SSDs in a RAID 1 configuration yielded the highest recorded speed of 630 MB/s, allowing for the fastest data transfer rate of just over a minute for 20 GB.
These tests underscore that although the D5 Hybrid doesn’t exhaust the full potential of its 10G external connection, it functions efficiently within the confines of its USB interface. This suggests a careful balance between performance and cost, ensuring adequate speed for standard tasks without the premium price tag associated with higher-end interfaces like Thunderbolt.
Is This a Comparative Market?
The D5 Hybrid is strategically positioned in the market to appeal to users who prioritize reliable performance over cutting-edge speed. It serves well for small to medium business applications, home offices, and creative professionals who require a dependable storage solution. The device offers an appealing alternative to more expensive options by providing sufficient speed for everyday tasks, including data backup and accessing large files, without compromising on quality or reliability.
Its cost-effectiveness paired with versatile storage capabilities makes the D5 Hybrid a formidable competitor in the hybrid storage market. It’s particularly attractive for budget-conscious buyers who still require a robust storage solution that can handle a mix of data types and usage scenarios.
Final Verdict and Conclusion of the Terramaster D5 Hybrid
The TerraMaster D5 Hybrid excels in blending the high capacity of HDDs with the quick data access speeds of SSDs, housed within a single, efficient unit. The system’s design emphasizes user-friendliness with features like tool-less drive installation and low operational noise, making it an excellent choice for a variety of settings, from busy office environments to quiet home use. However, potential users should weigh the impact of the USB 3.2 Gen 2 interface, which, while sufficient for many applications, might not meet the needs of those requiring the fastest possible data transfer speeds. The absence of Thunderbolt technology is a noted limitation, but this is reflected in the D5 Hybrid’s competitive pricing, which targets a segment of the market more concerned with value and reliability than with leading-edge performance. The TerraMaster D5 Hybrid offers a well-rounded solution for those seeking a storage system that combines large storage capacity with respectable speeds at a cost-effective price point. Its performance, although not pushing the upper limits of current technology, provides ample support for most professional and personal storage needs, making it a worthwhile investment for a broad range of users. The thoughtful design and practical features, coupled with the device’s solid build and reliable performance within its defined limits, establish the D5 Hybrid as a standout offering in its category.
PROs of the Terramaster D5 Hybrid
CONs of the Terramaster D5 Hybrid
Good sustained performance (if you preferred that to ‘Peak’ performance
Low Power Use and Low Noise
Good internal processor choices, especially for the price point
NAS Supported, so can be used as a tiered expansion box
Very simple to use
Mac/Windows Supported (even worked connected to my Android phone!)
Software is limited and Premium features require a subscription
Peak performance is much lower than what you would expect, despite 3×1 speed (max 1GB) on each m.2
USB 10Gb/s is going to be a bummer for those thinking about the real speed that 3x m.2 SSDs could hit. Disappointing that there is no USB 3.2 Gen 2×2 (40Gb/s) or USB4/TB4 Version
If you are thinking of buying a NAS or DAS system? Please use the links below if you found this article helpful, as it results in us at NASCompares receiving an affiliate fee from Amazon:
Need More Help Choosing the right storage soution?
Choosing the right data storage solution for your needs can be very intimidating and it’s never too late to ask for help. With options ranging from NAS to DAS, Thunderbolt to SAS and connecting everything up so you can access all your lovely data at the touch of a button can be a lot simpler than you think. If you want some tips, guidance or help with everything from compatibility to suitability of a solution for you, why not drop me a message below and I will get back to you as soon as possible with what you should go for, its suitability and the best place to get it. This service is designed without profit in mind and in order to help you with your data storage needs, so I will try to answer your questions as soon as possible.
This description contains links to Amazon. These links will take you to some of the products mentioned in today's content. As an Amazon Associate, I earn from qualifying purchases. Visit the NASCompares Deal Finder to find the best place to buy this device in your region, based on Service, Support and Reputation - Just Search for your NAS Drive in the Box Below
Need Advice on Data Storage from an Expert?
Finally, for free advice about your setup, just leave a message in the comments below here at NASCompares.com and we will get back to you.Need Help?
Where possible (and where appropriate) please provide as much information about your requirements, as then I can arrange the best answer and solution to your needs. Do not worry about your e-mail address being required, it will NOT be used in a mailing list and will NOT be used in any way other than to respond to your enquiry.
[contact-form-7]
TRY CHAT Terms and Conditions
If you like this service, please consider supporting us.
We use affiliate links on the blog allowing NAScompares information and advice service to be free of charge to you.Anything you purchase on the day you click on our links will generate a small commission which isused to run the website. Here is a link for Amazon and B&H.You can also get me a Ko-fi or old school Paypal. Thanks!To find out more about how to support this advice service checkHEREIf you need to fix or configure a NAS, check FiverHave you thought about helping others with your knowledge? Find Instructions Here
Or support us by using our affiliate links on Amazon UK and Amazon US
Alternatively, why not ask me on the ASK NASCompares forum, by clicking the button below. This is a community hub that serves as a place that I can answer your question, chew the fat, share new release information and even get corrections posted. I will always get around to answering ALL queries, but as a one-man operation, I cannot promise speed! So by sharing your query in the ASK NASCompares section below, you can get a better range of solutions and suggestions, alongside my own.
Vous recherchez un bureau assis-debout électrique et élégant ? Vous devriez lire ce test puisque nous allons découvrir le modèle FlexiSpot E7 Pro ! Un modèle très robuste, personnalisable et esthétiquement réussi ! Ce sera peut-être l'occasion de laisser tomber votre bureau traditionnel utilisable uniquement en position fixe...
Cela fait environ un an que je suis passé sur un bureau assis-debout et cela a changé mon quotidien, car je peux facilement changer de posture tout en continuant à travailler. Rester assis au bureau pendant plusieurs heures, c'est mon quotidien, et c'est également celui de beaucoup de personnes... Notamment dans le domaine de l'IT mais pas seulement. Sur le long terme, cette position assise peut créer des tensions musculaires et autres douleurs. L'utilisation d'un bureau assis-debout, d'une souris verticale et d'un bon siège permettent de se préserver...
Du 13 mai au 17 mai 2024, de nombreux bureaux et autres produits de chez FlexiSpot sont en promotions à l'occasion d'une vente spéciale !
Le bureau FlexiSpot E7 Pro, présenté dans cet article, est proposé à 349.99 euros au lieu de 599.99 euros ! Une réduction importante même si le tarif final pourra varier selon les options choisies. Pour en profiter, suivez ce lien :
Le modèle E7 Pro est entièrement personnalisable, car vous pouvez choisir la couleur du châssis (blanc ou noir), le type de plateau et sa taille, ainsi que sélectionner différents accessoires. Vous avez notamment le choix entre un plateau en bambou, en érable, en noyer, ou encore en chêne massif. Le prix définitif variera en fonction de la taille du plateau, mais aussi du type : le chêne massif sera naturellement beaucoup plus coûteux que le bambou.
Le modèle présenté dans cet article a un cadre noir, un plateau en érable de taille 180*80 avec une fourchette de réglage en hauteur de 63.5 à 128.5 cm. Ce modèle présente l'avantage d'être associé à une garantie de 10 ans, contre 7 ans ou 5 ans pour d'autres modèles. Ce qui donne l'aperçu suivant :
Si l'on regarde les caractéristiques techniques, on peut lire :
Nombre de moteurs : 2 (un dans chaque pied)
Capacité de charge : 160 kg
Vitesse de montée : 4 cm/s au maximum
Système anti-collision : oui
Sécurité enfant : oui, pour verrouiller les touches de l'écran
Certifications : CE, FCC, UL, BIFMA
Garantie : 10 ans
En comparaison du modèle FlexiSpot E7, celui-ci supporte une charge plus importante (160 kg contre 125 kg), et il monte légèrement plus rapidement à la montée. Il peut aussi être réglé en hauteur jusqu'à 128.5 cm contre 123 cm pour l'autre modèle. Ceci peut faire la différence dans certaines configurations et pour les personnes très grandes.
Une fois que ce bureau sera installé, je ferai l'installation de mon setup actuel afin que vous puissiez avoir un aperçu de l'espace occupé par deux écrans 27 pouces, un poste de travail fixe (assez imposant), des haut-parleurs, un clavier, une souris, et un micro.
Sans surprise, le bureau assis-debout de FlexiSpot est livré en deux colis différents : un premier carton contenant le plateau et un second carton contenant le châssis du bureau, ainsi que la notice, les vis, etc. Ceci est logique compte tenu du fait que la configuration est personnalisable.
Le plateau est très bien protégé, avec d'importants renforts dans les angles du carton, à l'extérieur ainsi qu'à l'intérieur. Des mousses sont également présentes à l'intérieur du carton. Le second carton, avec le châssis en métal, bénéficie aussi des protections nécessaires.
Le bois utilisé par FlexiSpot bénéficie du label FSC, ce qui signifie que le bois utilisé est issu d'une exploitation forestière légale associée à une gestion durable. Le plateau est très beau, avec d'excellentes finitions et les angles arrondis le rendent encore plus élégant. L'épaisseur du plateau est de 2.5 cm.
Le carton contient une notice en plusieurs langues dont le français et chaque étape est accompagnée par un schéma. En complément, FlexiSpot propose des vidéos de montage sur sa chaine YouTube, ce qui permet de lever un éventuel doute pendant le montage. Pour nous faciliter la tâche, FlexiSpot a inclus un outil multifonction pour le montage et chaque sachet de vis est identifié par une lettre que nous pourrons retrouver sur la notice. Le montage m'a pris environ 1h15, en étant seul, sans compter le temps nécessaire pour remettre en place tout le matériel.
FlexiSpot a eu la bonne idée d'ajouter une bande de velcro de 2 mètres, à découper soi-même pour attacher les câbles, ainsi qu'un petit accessoire à coller à l'emplacement de votre choix pour accrocher jusqu'à 4 câbles (pratique pour laisser plusieurs câbles en attente).
La majorité des trous sont prépercés, ce qui nous sert de repère pour le montage (ce n'est pas le cas pour la fixation du passe-câble). Il en va de même pour les câbles puisqu'ils sont étiquetés et qu'il y a un code couleur : difficile de se tromper. Le montage prend du temps, mais il s'effectue sans grande difficulté.
L'écran de réglage pourra être positionné sur la droite ou la gauche du bureau, selon vos préférences. Le cache câble estampillé "FlexiSpot" est recouvert par du tissu et il se positionne très facilement : grâce à des aimants, il vient se coller au châssis et masque ainsi tous les câbles liés du bureau en lui-même. À l'arrière, nous viendrons fixer le chemin de câbles. Il fait 12 cm de largeur, ce qui permet de positionner une multiprises et de connecter les câbles de vos appareils. C'est un plus de ce modèle car ce chemin de câbles est inclus d'origine avec le châssis et il est très pratique pour bien organiser les câbles.
Le fait de pouvoir manager les câbles sous le bureau grâce au support de câbles permet de faire une installation très propre. Surtout, vous pouvez augmenter ou diminuer la hauteur du bureau sans vous soucier des longueurs de câbles : vous devez simplement à veiller à ce que le câble d'alimentation de la multiprise soit, quant à lui, suffisamment long. Sur la photo de droite ci-dessous, vous pouvez également apercevoir l'organisateur Pedboard de FlexiSpot, vendu séparément.
L'ensemble des éléments du bureau, du plateau au châssis, me semblent d'excellente qualité et très robuste. Je n'ai pas de doute sur la qualité de ce bureau, ni même sur sa résistance dans le temps. Malgré la présence de deux écrans et de la tour sur le bureau, les dimensions très confortables du plateau (80 x 180 cm) me permettent d'avoir encore un espace suffisant pour ajouter un ordinateur portable, des documents, etc. De plus, le bureau continue de s'élever parfaitement sans broncher : preuve qu'il est prêt à supporter une charge plus lourde. 160 kg, au maximum, c'est énorme.
Remarque : les moteurs d'entraînements utilisés par FlexiSpot sont brevetés. "Les concepteurs de FlexiSpot ont investi 8 millions de dollars dans la recherche et le développement de leurs produits afin d'avoir accès aux matériaux les meilleurs et les plus durables du marché, créant ainsi des produits qui ont résisté à 100 000 tests.", peut-on lire sur le site officiel.
IV. Utilisation du bureau au quotidien
Le bureau est installé et raccordé au secteur, le matériel est en place, il ne reste plus qu'à en profiter. Au quotidien, ce bureau assis-debout change la vie et nous offre la possibilité de travailler debout lorsque le besoin s'en fait sentir. Il faut un temps d'adaptation, afin de prendre l'habitude en quelque sorte.
Grâce à l'écran de contrôle situé sur la gauche ou la droite du bureau, selon l'emplacement retenu, on peut ajuster la hauteur du bureau. Pour faciliter le passage du mode assis au mode debout et inversement, le bureau peut mémoriser 4 positions. La configuration est très simple : on positionne le bureau une première fois dans la position souhaitée, on appuie sur la touche "M" puis sur la touche de mémorisation souhaitée. Ensuite, un simple appui sur un bouton mémoire et le bureau s'ajuste en fonction de la configuration.
Vous pouvez enregistrer plusieurs positions assises, car ceci permet de jouer sur la posture. Le fait de pouvoir régler la hauteur encourage le changement de position : on peut régler la hauteur de son siège et ajuster le bureau en conséquence, ce qui permet de ne pas avoir les jambes positionnées de la même façon tout en restant assis. Ça, c'est nouveau.
Remarque : le bruit généré par les moteurs lorsque l'on ajuste la hauteur du bureau est très faible. Ce n'est pas gênant du tout : on parle d'un niveau de bruit inférieur à 50 dB.
Enfin, sachez qu'un port USB-A est positionné sur le côté droit de l'écran de contrôle. Étant donné que le bureau est alimenté, ce port USB l'est aussi. Je le trouve utile pour recharger des batteries, par exemple, celle d'un appareil photo, ou encore une batterie externe, ou éventuellement son smartphone.
Et alors, debout, est-ce vraiment bien ?
La grande nouveauté, c'est de pouvoir travailler debout tout en utilisant le même setup : clavier, souris, écrans, etc... En pratique, c'est effectivement l'occasion de se dégourdir un peu les jambes et solliciter ses muscles d'une façon différente. Toutefois, les phases en position debout sont plus courtes qu'en étant assis. On peut passer des heures assis, tandis que si l'on passe 1 heure à travailler debout devant l'écran, c'est déjà bien. L'avantage, c'est que quelques secondes suffisent pour passer d'une poste à une autre. Un réel changement.
Rester debout très longtemps, de façon statique, ce n'est pas si évident que cela... Ce n'est donc surement pas un hasard si FlexiSpot propose un tapis anti-fatigue que l'on positionne sous ses pieds. Il doit être acheté en complément et il est vendu 45,99 euros sur le site officiel (voir ici). Personnellement, alterner entre des phases assises plutôt longues et des phases debout plus courtes me convient bien.
V. Conclusion
Comme je le disais en introduction, j'utilise un bureau assis-debout un an et je me vois mal revenir en arrière. C'est appréciable au quotidien et ce n'est pas du tout "un gadget". Il y a un réel intérêt à changer de posture à plusieurs reprises tout au long de la journée. Ce bureau est très fonctionnel !
Mis à part le tarif qui peut être un réel frein, ce bureau n'a pas de point négatif : il est super élégant, avec des finitions impeccables, tout en offrant une surface de travail importante. Si vous décidez d'acheter un FlexiSpot E7 Pro, il ne vous reste plus qu'à choisir le coloris du châssis ainsi que les dimensions et le type de plateau. Enfin, vous pouvez tout à fait acheter le châssis et installer votre propre plateau !
La configuration présentée est commercialisée au prix de 819.98 euros sur le site officiel de FlexiSpot. Comptez 699.98 € pour une combinaison avec le châssis et un plateau 120 x 60 cm en érable.
Should You Back or Bail on the UGREEN NASync Kickstarter Campaign?
With the UGREEN NAS campaign drawing close to an end, I think a lot of users are wondering where exactly the UGREEN NAS system is at? So, SO many reviews online (more on how/why later), but it’s been a month – has the system got better, got worse? Do the comments in those reviews still hold water? I wanted to assemble a few of the earliest and more balanced reviewers I could find who have shared their thoughts on the UGREEN NAS online and chat to them a month later to get their further input on it. I assembled panel, consisting of Me (Robbie from NASCompares) ,Lauri from Tech Notice, Frank from WunderTech and Logan from TwoGuyzTech — to come back to the system and brand, to help users decide whether they should get off the fence and back it, keep continuing to back this Kickstarter Campaign, or ‘get off’ the hype train now before its too late. These three YouTube reviewers and myself were among the first to receive and review the NASync series more than a month ago. Although their reviews are now live, UGREEN have continued to roll out updates to the system software, posted comments and updates on their crowdfunding campaign and outlined a lot of their proposed plans for these new systems. How much of that is going to be present in the finished product, how much is long-term roadmap stuff and how much is just hot air, is up for debate.
I wanted to talk with these three reviewers 1 month later to discuss where they are at with the UGREEN NAS device they were sent, have things improved and their thoughts on what this means for the NAS market. The Kickstarter has been notably successful, raising nearly 5 million pounds with more than 12,000 backers, necessitating a critical and informed analysis for those considering investment. As good as all that sounds, a lot of users who backed this project a month ago at launch might be having cold feet and want to know where the product is ‘at’ now, as updates by UGREEN during the fundraising period have been a little sparse (though responding to commentors has been better). Likewise, there are going to be more cautious users who are still on the fence and just want to know where the NASync series is at ‘at the 11th hour’ before they choose to back this. So, here is the results of that discussion. Thanks again to Lauri, Frank and Logan for their time. None of us have been paid/sponsored by UGREEN for this content or our reviews, these are our own opinions (the good and the bad!).
VIDEO LINK
In a Rush? Here is the TL:DR on The UGREEN NAS 1 Month On
Logan @TwoGuyzTech – Logan, who provided the inaugural review of the DXP 4800 Plus model, begins by praising UGREEN’s capabilities in hardware manufacturing. He describes the unit as robust, featuring an impressive CPU setup with a unique configuration that lends itself well to demanding tasks. Despite this, Logan highlights significant discrepancies between the marketed and actual features—particularly the absence of Thunderbolt 4 support, despite promotional materials suggesting otherwise. This, he argues, could mislead potential buyers about the product’s capabilities. Expanding on hardware limitations, Logan critiques the system’s scalability and expansion potential. Unlike competitors like Synology, which allow for easy scalability through expansion units, UGREEN’s system lacks similar functionalities. This could deter users whose storage needs might grow. Moreover, the absence of a PCIe slot for adding extra network interfaces is seen as a missed opportunity to enhance the system’s connectivity and performance capabilities, potentially limiting its appeal to more advanced users.
Frank @Wundertech – Frank shifts the focus to the software side of the NAS. He appreciates UGREEN’s strategic decision to concentrate on core functionalities, which simplifies the user interface and system maintenance. This approach, according to Frank, allows for a more stable foundational system that can be incrementally improved through updates. However, he identifies critical deficiencies in the backup functionalities that are vital for NAS systems. Initially, the device was limited to basic R-Sync and proprietary UGREEN device backups, which he found inadequate. During his testing, Frank encountered significant issues with the SMB (Server Message Block) protocol, a standard service for file sharing over a network. He discovered that upon attempting to access the NAS via SMB, he had unrestricted access to all directories without needing authentication—a severe security flaw. This issue indicates that the NAS system might not enforce proper user authentication, potentially exposing sensitive data. Despite updates attempting to address these concerns, the initial oversight raises questions about the rigor of UGREEN’s software testing and security protocols.
Lauri @TheTechNotice – Lauri offers a broader critique of the tech industry’s trend towards launching unpolished products with the intent to issue fixes post-launch. He expresses his frustration with the UGREEN system, which was marketed as ready-to-use yet exhibited numerous software glitches and usability issues upon receipt. Basic functionalities like software updates and file access were problematic, echoing a “release now, fix later” approach that he finds unacceptable. Lauri also faced SMB-related challenges, albeit different from Frank’s. His attempts to connect to the NAS via SMB were thwarted by the system’s inability to map network drives or properly save SMB settings, suggesting deeper issues with the software’s network handling capabilities. These experiences highlight inconsistencies in the product’s performance, further complicating the potential user’s decision-making process.
Marketing Strategies, Consumer Impact and Conclusion – The panel extensively discusses UGREEN’s marketing strategy, noting the company’s decision to flood the market with review units. This approach, while ensuring widespread visibility, may dilute the impact of individual reviews and obscure critical feedback due to the sheer volume of content available. Such a strategy can mask the product’s deficiencies, making it difficult for potential buyers to gauge the system’s reliability and performance accurately. Concluding the discussion, the panel agrees that while UGREEN’s NAS hardware is commendably robust and well-designed, the software side lags in maturity and reliability. They stress the importance for potential backers to understand the ongoing development of the software, especially given the critical SMB issues and general lack of software polish at launch.
What did Lauri from TheTechNotice Think of the UGREEN NAS Range 1 Month on, How the Brand Approached the Market and His Experience with the Device?
Lauri from Tech Notice offers a unique perspective by critiquing not just the Ugreen NAS SYNC series but also the broader tech industry’s trend toward releasing products that are not fully vetted or complete. He starts his discussion by expressing a general dissatisfaction with the practice of launching products that are ostensibly unfinished, with the intention of resolving issues through later updates. This approach, he argues, places undue burden on consumers who expect a finished, fully functional product upon purchase. Lauri’s frustration is rooted in his personal experiences with the Ugreen NAS, which was marketed as ready-to-use but exhibited several software glitches and usability issues right out of the box. He details problems such as difficulties with software updates and accessing files—basic functionalities that were inconsistent or non-functional upon initial use. Such issues underscore a “release now, fix later” philosophy that he finds unacceptable, especially when consumers are not adequately forewarned about the state of the product.
Expanding on his critique, Lauri discusses his specific encounters with the SMB (Server Message Block) protocol within the Ugreen system. Unlike Frank’s experience where access was too permissive, Lauri faced the opposite problem: an inability to effectively map network drives or adjust SMB settings. This inconsistency in SMB protocol handling between units further illustrates the lack of uniformity and reliability in Ugreen’s software development, complicating the user experience and diminishing the product’s reliability. Moreover, Lauri notes the NAS’s aesthetic and physical design, acknowledging that while the hardware appears polished and well-designed, the software does not match this quality. This disparity leads to a jarring contrast between the product’s promising physical presentation and its underwhelming functional performance. He points out that such discrepancies can lead to consumer distrust, as the sleek design sets expectations that the software functionality currently does not meet.
Throughout his review, Lauri also touches upon the responsiveness of the company to feedback. While he notes some improvements following user complaints and updates, he emphasizes that the fundamental approach of rushing products to market remains a significant concern. This strategy, prevalent in the tech industry, often results in products that require considerable post-market modification to reach the standard expected by consumers at launch. Lauri’s assessment provides a critical analysis of the Ugreen NAS SYNC series, particularly highlighting the problematic industry trend of premature product releases. His insights stress the importance of aligning product functionality with consumer expectations and market standards. Lauri’s critique serves as a call to action for tech companies to prioritize thorough testing and development before launch, ensuring that products meet all advertised functionalities and security standards to foster trust and satisfaction among users.
You Can find out more about Lauri HEREon his YouTube Channel
How Did Frank from WunderTech Find his time with the UGREEN NAS System? Did He Encounter Problems and Would He Recommend it?
Frank from WunderTech begins his discussion by highlighting the strategic focus Ugreen has adopted in the development of their NAS SYNC series software. He appreciates the company’s deliberate choice to concentrate on refining core features instead of overloading the system with an extensive array of applications. This approach, he argues, facilitates a more stable base system that is easier for users to manage and for developers to troubleshoot and improve over time. It also aligns well with Ugreen’s apparent goal of making the NAS user-friendly and reliable in performing fundamental tasks. However, Frank identifies critical deficiencies in the system’s software, especially concerning its backup functionalities—an essential component for NAS systems. Initially, the device was constrained to basic R-Sync and backups to another proprietary Ugreen device. Such limitations significantly reduce the utility and appeal of the NAS for users who need versatile and robust backup solutions, which are critical for data integrity and disaster recovery. Frank notes that while subsequent software updates have introduced additional features like Docker, which broadens the system’s capabilities and appeal, the core issue with limited backup options remains a significant concern.
During his evaluation, Frank encountered severe issues with the SMB (Server Message Block) protocol, a standard service in NAS systems for sharing files over networks. He was startled to find that upon attempting to access the NAS via SMB, he had unrestricted access to all directories without needing any form of user authentication. This discovery points to a severe security oversight, exposing sensitive data to potential unauthorized access. Such a fundamental flaw in access control is troubling and raises questions about the robustness of Ugreen’s software security measures. Frank further discusses the implications of these security issues, emphasizing the risk they pose not only to data confidentiality but also to the overall trust in Ugreen’s product. He suggests that while the hardware may be solid, the software’s inability to ensure basic security protocols could deter potential users who prioritize data security. This aspect is crucial for businesses and individual users who rely on NAS systems to store sensitive or critical information.
Moreover, Frank appreciates the incremental software updates that Ugreen has been rolling out, which demonstrate the company’s commitment to addressing feedback and improving the product. He highlights a particular update that resolved some of the earlier problems with the backup options, albeit still not to the extent that he considers fully satisfactory. The addition of features like Docker is viewed positively as it indicates Ugreen’s responsiveness to user needs and their willingness to expand the system’s functionality over time. Frank’s analysis provides a detailed critique of the Ugreen NAS SYNC series from a software perspective. He credits the company for its focused and strategic approach to software development but underscores significant areas of concern, particularly around security and backup functionalities. His insights suggest that while the hardware may be competitive, the software requires substantial improvements to meet industry standards and user expectations, particularly in areas crucial for data security and flexibility in data management.
You Can find out more about Frank HEREon his YouTube Channel
What did Logan from TwoGuyzTech Think of the UGREEN NAS and where it is at 1 Month Later?
Logan from TwoGuyzTech, who provided the inaugural review of the DXP 4800 Plus model, begins his feedback by praising the robustness and overall hardware quality of Ugreen’s NAS system. He emphasizes the powerful CPU configuration, which features a single performance core along with four efficiency cores. This setup is particularly notable as it is uncommon in NAS systems within the same price bracket, offering potentially higher processing speeds and better handling of multiple tasks simultaneously. Despite the strong hardware foundation, Logan points out significant discrepancies between Ugreen’s marketing materials and the actual product features—specifically, the absence of Thunderbolt 4 support on half of the range, yet it was very prominent in the advertising (as was the 10GbE connectivity). This issue is not just a minor oversight; it’s a major deviation from what was advertised in terms of what some less knowledgable users would expect to receive, which could mislead potential buyers about the product’s capabilities. Logan stresses that such discrepancies could erode trust and satisfaction among consumers, who may feel they are not getting the full value as promised.
Further expanding on the product’s hardware, Logan notes that while the NAS performs well in its current state, the lack of scalability is a critical downside. He compares the Ugreen NAS SYNC series unfavorably with competitors like Synology, which offers easy scalability through additional expansion units. This limitation in Ugreen’s design means that users with increasing data storage needs would find the product less useful over time as their requirements grow. Logan also criticizes the absence of a PCIe slot, which would allow users to add additional network interfaces or other expansions. This feature is typically valued by advanced users who may need more customization or additional bandwidth for data-intensive tasks. The lack of such a feature further narrows the potential user base of the product, making it less appealing to a segment of the market that could benefit from greater connectivity options.
Addressing another aspect of hardware capability, Logan discusses the system’s input/output options. While he acknowledges that the NAS provides adequate I/O ports that should meet the needs of most users, he points out that the implementation of these ports could have been optimized better to enhance performance further. This feedback suggests a missed opportunity to maximize the hardware’s potential, which could have differentiated the Ugreen NAS SYNC series more clearly from its competitors. Logan’s detailed review provides a nuanced perspective on the Ugreen NAS SYNC series. While he commends the robust hardware and CPU design, he is critical of the marketing misrepresentations and the system’s limitations in scalability and expansion. His feedback underscores the importance of aligning marketing messages with actual product capabilities and designing with future scalability in mind to meet the evolving needs of users.
You Can find out more about Logan HEREon his YouTube Channel
How UGREEN have Approached Marketing and Launching the NASync Series – Good or Bad?
The UGREEN NAS SYNC series marketing strategy reflects a robust and aggressive approach aimed at capturing market attention quickly and broadly. UGREEN’s decision to distribute a large number of review units (possibly in the hundreds in just a matter of weeks) prior to the completion of its Kickstarter campaign ensured that the product received widespread visibility across various media platforms. This saturation strategy is not uncommon in the tech industry but stands out due to the volume of units distributed and the breadth of coverage sought. From a marketing perspective, this approach can significantly amplify product awareness and generate buzz, creating a groundswell of potential customer interest and engagement early in the product lifecycle – choosing to spend their ‘marketing budget’ on sending products to small-niche reviewers and influences, rather than traditional online marketing and targeting bigger platforms. However, this aggressive marketing strategy also raises several concerns. One major issue discussed by the panel is the potential dilution of individual reviews’ impact. With so many reviews available, it becomes challenging for consumers to find consistent information and form a clear opinion about the product’s quality and reliability. This could inadvertently mask critical feedback that might be crucial for potential users making informed purchasing decisions. Additionally, by flooding the market with review units, UGREEN risks creating a perception that might not fully align with the user experience, particularly if the product under-delivers compared to what is seen in widespread positive reviews.
Moreover, there was always an inherent risk in UGREEN’s approach regarding consumer trust. If the product failed to meet the expectations set by its aggressive marketing, it could lead to customer dissatisfaction and damage the brand’s reputation in the long run if a LARGE number of reviewers had encountered persistent issues and that would have been heavility publized in turn. Therefore we have to give them some credit for the courage of their convictions to trust that their product would not ‘hang itself’ in the court of public opinion, when sent at such high volume in a comparatively unfinished state. This is especially pertinent given the software issues highlighted during the panel discussion. The strategy of relying heavily on post-launch updates to address fundamental flaws—flaws that are sometimes glossed over due to the sheer volume of initial positive reviews—could backfire, leading to frustrated users who feel misled by the reviews they consulted before purchasing. While UGREEN’s marketing strategy for the NAS SYNC series has virtues in terms of reach and visibility, it also poses significant risks that hinge on the company’s ability to deliver a product that truly matches the expectations set forth in its widespread marketing campaign. The approach requires a delicate balance between aggressive marketing and product quality assurance to maintain and grow consumer trust. This all brings into question once again, why a brand this large has opted for crowdfunding through Kickstarter – as it is fairly clear that this is a product that is either (in terms of hardware) finished and in production already, or at the very least is more than ready for ‘pre order’ if it had been on sale at your local eShop. The marketing and ‘user interest’ benefits of Kickstarter are useful, but the ‘indie’ and ‘small business’ focus of crowdfunding continues to diminish!
Should You Back the UGREEN NAS Kickstarter? Or Should You Back Out Now?
Based on the detailed discussions from Frank, Lauri, Robbie, and Logan, the consensus on whether to recommend the UGREEN NAS SYNC series appears to be mixed and highly dependent on the specific needs and technical tolerance of potential users. Frank acknowledges the solid hardware and appreciates the strategic focus on core functionalities, which simplifies the user experience and system management. However, he is significantly concerned about the software’s maturity, particularly around security flaws with the SMB protocol and limited backup functionalities. Frank might recommend the NAS to tech-savvy users who are comfortable handling and potentially resolving these issues themselves, particularly those interested in leveraging the strong hardware by installing a third-party OS or those looking for a budget-friendly NAS solution that could improve over time with software updates.
Lauri, on the other hand, expresses strong reservations due to the “release now, fix later” philosophy he perceives in the tech industry, which he finds particularly evident in the UGREEN product. His experience with software glitches and poor user interface could deter him from recommending the NAS to users who expect a seamless, out-of-the-box experience. Lauri might only recommend this product to users who are enthusiasts or hobbyists who enjoy troubleshooting and have the patience to wait for potential fixes and updates that could eventually realize the hardware’s full potential.
Logan is broadly more positive about the system and, if the case of using a 3rd party OS (one you get over the installation hurdles) recommends the system. But still thinks that UGREEN could stand to be a little more clear in how the product is being presented, As a pre-built NAS product, especially at the crowdfunding price point, it’s hard to argue with. However, if/when the system crosses into traditional retail (with a loftier RRP), the virtues of the system’s value may well diminish and hopefully, UGREEN will maintain enthusiasm in the product range and software to roll in a phase 2, phase 3 and eventually an established product that can sand up next to the market leaders.
I (Robbie) acknowledge the potential of the hardware but am cautious about the software issues that have been repeatedly highlighted. I would certainly recommend the NAS to a niche market of users who value hardware specifications and cost-effectiveness over immediate, robust software functionality (the growing ‘middle’ between turnkey NAS and DiY Server Build Home-Labbers). These users would likely be those who are not dependent on advanced features or who have the technical ability to manage and mitigate the system’s current shortcomings. My recommendation would likely come with the caveat that buyers keep their expectations in check regarding the software and stay informed about ongoing updates and community feedback. Ultimately, while the UGREEN NAS SYNC series shows promise due to its robust hardware and competitive pricing, the recommendations from the panel are guarded and tailored to specific types of users. Potential buyers should weigh these considerations carefully against their personal or organizational needs and technical capabilities before making a decision.
Pros
Cons
Robust Hardware
Software Maturity
– The DXP 4800 Plus model features a powerful CPU setup with a single performance core and four efficiency cores, suitable for demanding tasks.
– The software has been criticized for being immature, with ongoing updates needed to address fundamental functionality and stability issues.
– Solid build quality and design that is recognized for its robustness, which adds to the reliability of the physical unit.
– Initial releases lacked comprehensive features, especially in backup functionalities which were limited to basic R-Sync and proprietary backups.
Scalability and Performance
Marketing vs Reality
– The hardware itself is recognized for high performance, which could be suitable for users with extensive data processing needs.
– Despite promotional materials suggesting advanced features like Thunderbolt 4 support, the actual product lacks these capabilities, leading to potential customer dissatisfaction and trust issues.
Focused Software Development
Security Concerns
– The strategy to concentrate on core functionalities rather than an abundance of features can lead to a more stable system that is easier to manage and troubleshoot.
– Significant security flaws were discovered, especially with the SMB protocol where authentication issues could expose sensitive data to unauthorized access.
Market Visibility
Expansion Limitations
– Extensive distribution of review units ensured widespread visibility and coverage, potentially increasing consumer awareness and interest.
– Compared to competitors like Synology, the UGREEN NAS system lacks easy scalability options such as expansion units, which limits the system’s long-term usability for growing storage needs.
Competitive Pricing
Inconsistent User Experience
– The UGREEN NAS offers a better value for its price point, especially when compared to the more expensive models from established brands like Synology and QNAP, making it an attractive option for budget-conscious consumers.
– Users, including tech reviewers, reported inconsistent experiences, particularly with software updates and SMB settings, which could deter potential users from adopting the system.
This description contains links to Amazon. These links will take you to some of the products mentioned in today's content. As an Amazon Associate, I earn from qualifying purchases. Visit the NASCompares Deal Finder to find the best place to buy this device in your region, based on Service, Support and Reputation - Just Search for your NAS Drive in the Box Below
Need Advice on Data Storage from an Expert?
Finally, for free advice about your setup, just leave a message in the comments below here at NASCompares.com and we will get back to you.Need Help?
Where possible (and where appropriate) please provide as much information about your requirements, as then I can arrange the best answer and solution to your needs. Do not worry about your e-mail address being required, it will NOT be used in a mailing list and will NOT be used in any way other than to respond to your enquiry.
[contact-form-7]
TRY CHAT Terms and Conditions
If you like this service, please consider supporting us.
We use affiliate links on the blog allowing NAScompares information and advice service to be free of charge to you.Anything you purchase on the day you click on our links will generate a small commission which isused to run the website. Here is a link for Amazon and B&H.You can also get me a Ko-fi or old school Paypal. Thanks!To find out more about how to support this advice service checkHEREIf you need to fix or configure a NAS, check FiverHave you thought about helping others with your knowledge? Find Instructions Here
Or support us by using our affiliate links on Amazon UK and Amazon US
Alternatively, why not ask me on the ASK NASCompares forum, by clicking the button below. This is a community hub that serves as a place that I can answer your question, chew the fat, share new release information and even get corrections posted. I will always get around to answering ALL queries, but as a one-man operation, I cannot promise speed! So by sharing your query in the ASK NASCompares section below, you can get a better range of solutions and suggestions, alongside my own.
Vous êtes à la recherche d'une station de recharge et vous souhaitez avoir un avis complet sur l'EcoFlow River 2 Pro ? Alors, vous êtes au bon endroit !
Dans cet article, nous allons passer en revue les caractéristiques de l'appareil, ainsi que de son design et l'application officielle EcoFlow. Je vous donnerai aussi mes impressions pour une utilisation au quotidien.
C'est la première fois qu'un test d'un appareil de la marque EcoFlow est publié sur IT-Connect, donc je vais également vous présenter cette entreprise. Créée en 2017 par un groupe d'ingénieurs spécialisés dans les batteries, EcoFlow est une marque chinoise innovante qui propose des stations de charge portables, mais aussi des panneaux solaires et des solutions pour la maison.
"Notre vision est d’alimenter le monde de demain, aujourd’hui. Nous rêvons d’un monde réinventé, porté par l’aspiration d’un futur numérisé, respectueux de l’environnement et partagé par tous."
II. Caractéristiques EcoFlow River 2 Pro
La station de recharge nomade RIVER 2 Pro fait partie de la famille EcoFlow River, au sein de laquelle il y a plusieurs modèles. La famille de produits EcoFlow Delta complète cette gamme de produits. La RIVER 2 Pro est un modèle du milieu de gamme.
Commençons par nous intéresser aux caractéristiques techniques de cette station de recharge :
Capacité : 768 Wh
Type de batterie : LiFePO4
Puissance en sortie : 800 Watts, et jusqu'à 1600 Watts pendant une courte durée avec le mode X-Boost
Sortie courant continu : 12.6V, 10A/3A/3A, 126W Max
Sortie courant alternatif : onde sinusoïdale pure, 800 W au total (surtension 1600 W), 230 V ~ 50 Hz/60 Hz
Sortie USB-A: 5V, 2.4A, 12W Max
Temps de charge : 0 à 100 % en 70 minutes
Durée de vie : 80%+ capacité après 3 000 cycles, soit 10 ans d'utilisation quotidienne
Poids : 7.8 kg
Dimensions : 270 x 260 x 226mm
Garantie : 5 ans par le constructeur
En complément, l'application officielle EcoFlow permet de gérer cet appareil, et les autres de la marque, en temps réel. Ceci offre aussi des capacités de gestion à distance et de nombreuses fonctionnalités, comme nous le verrons dans la suite de cet article.
Au sein de la boite sobrement estampillée "EcoFlow" et donnant un vague aperçu du produit, nous retrouvons la station de recharge parfaitement protégée et calée par un épais bloc de mousse moulé selon la forme de la RIVER. Elle est accompagnée par un guide de démarrage rapide, un câble pour la recharge sur le secteur, un câble pour la recharge sur allume-cigare et un câble de connexion "DC5521".
Sur la façade de la RIVER 2 Pro, nous retrouvons 3 modules distincts : un module avec les prises électriques AC pour la France, un module avec les ports USB et un dernier module avec l'alimentation 12V (allume-cigare et DC). Un bouton on/off permet d'activer ou désactiver l'alimentation des appareils connectés sur 2 des 3 modules d'alimentations. En complément, le bouton central (doré) sert à allumer ou éteindre totalement la RIVER 2 Pro. Il y a peu de boutons, donc le boitier n'est pas trop encombré et la prise en main s'annonce facile.
La façade intègre aussi un écran détaillé et lumineux qui est là pour fournir des informations utiles à l'utilisateur, notamment l'autonomie restante avec un pourcentage et une estimation en minutes ou heures. Le nombre de Watts en entrée et en sortie, est également précisé. Lorsque la batterie est elle-même en charge, l'écran indique le temps restant avant que la batterie soit complètement chargée. Comme nous le verrons par la suite, nous pouvons compter sur l'application mobile pour obtenir des informations supplémentaires.
Une imposante poignée est présente à l'arrière du boitier. Difficile de passer à côté ! Bien qu'elle soit utile pour faciliter le transport de la batterie et avoir une bonne prise en main, elle élargit l'arrière de la batterie, ce qui pourra s'avérer gênant pour la stocker. De plus, elle n'est pratique parce qu'à cause de son positionnement, le poids de la batterie est mal réparti.
Les différents ports et les prises ne sont pas protégés. Ils sont directement accessibles. Les finitions du boitier sont très bonnes et il me semble robuste.
Cette station de recharge est équipée d'un système de gestion de la batterie qui surveille en permanence la tension, le courant et la température. Ceci permet de protéger l'appareil contre la surtension, la surcharge, la surchauffe, le court-circuit, la basse température, la basse tension et la surintensité.
IV. Utilisation au quotidien
Désormais, nous allons évoquer l'utilisation au quotidien de cette station de recharge EcoFlow. Ce sera l'occasion de parler de l'application et de ses fonctionnalités.
A. L'application EcoFlow
L'application officielle s'appelle tout simplement "EcoFlow" et elle est accessible via le Google Play Store ou l'App Store selon votre appareil. Après avoir créé un compte, vous pouvez ajouter un nouvel appareil. À partir du moment où la RIVER 2 Pro est allumée et à proximité du smartphone, il n'y a rien à faire : la détection est immédiate et automatique. C'est appréciable.
La connexion entre votre smartphone équipé de l'application EcoFlow et la station de charge EcoFlow s'effectue au moyen du Wi-Fi ou du Bluetooth. D'ailleurs, le Bluetooth est utilisé pour la connexion initiale et lorsque vous n'êtes pas à votre domicile. Sinon, la RIVER peut se connecter à votre Wi-Fi. La connexion à votre réseau sans-fil doit être effectuée pendant le processus de mise en route afin que la RIVER puisse accéder à Internet et récupérer d'éventuelles mises à jour du firmware.
Au même titre que l'écran de la RIVER, l'application mobile fournie des informations utiles en temps réel, tout en étant plus précise. Pour chaque module d'alimentation, en entrée et en sortie, la RIVER indique la puissance actuelle en Watts. Le pourcentage de batterie est également précisé, tout comme une estimation en heures et la température de l'appareil. Nous pouvons aussi activer ou désactiver à distance les modules d'alimentation, comme avec les boutons physiques.
Au-delà de permettre de partager cet appareil avec un autre utilisateur ou de gérer les mises à jour du firmware, l'application EcoFlow intègre un ensemble de paramètres :
Limiter la vitesse de charge de la batterie
Configurer le courant sur l'entrée allume-cigare : 4A, 6A, 8A
Activer ou désactiver le mode X-Boost
Limiter la charge ou la décharge, pour empêcher la batterie de se charger complète, ou à l'inverse, de se décharger complètement. Par exemple, lorsqu'il reste 10% de batterie, elle peut arrêter de fournir de l'énergie.
Délai de mise en veille de l'appareil s'il est allumé, mais qu'il ne fournit pas d'énergie à un appareil.
Délai de mise en veille de l'écran
Délai de mise en veille de la sortie CA
L'application est bien pensée et elle offre un contrôle plus précis sur sa station de charge. Le fait que la batterie soit équipée du Bluetooth nous permet d'effectuer des réglages depuis n'importe où à condition d'être à proximité de la batterie. J'aimerais tout de même suggérer une amélioration à EcoFlow : l'envoi d'une notification sur le smartphone lorsque la batterie est faible, ou l'émission d'un bip sonore. Actuellement, il n'y a rien pour nous avertir donc si l'on ne surveille pas l'autonomie de la batterie, on peut se faire surprendre.
Remarque : la section "Automatisation" de l'application ne s'applique pas au modèle RIVER 2 Pro.
B. Tests en conditions réelles
Nous pouvons facilement imaginer de nombreux scénarios d'utilisation de cette station de recharge. Par exemple :
- En cas de coupure de courant à son domicile, que ce soit pour alimenter un ordinateur ou un autre appareil (le mode X-Boost sera particulièrement utile dans ce cas).
- En camping, en extérieur ou dans un van aménagé.
- Sur un chantier isolé où il n'y a pas d'électricité, cela peut permettre de connecter une lampe ou encore de recharger les batteries de votre outillage. L'alimentation de certains outils sera possible, mais la puissance en Watts peut être beaucoup trop élevé dans certains cas.
Désormais, nous allons évoquer son utilisation plus précisément.
Panne d'électricité : fournir l'alimentation à un ordinateur fixe avec deux écrans
Pour ce premier scénario, je vais utiliser la RIVER 2 Pro afin de connecter : un ordinateur fixe (avec carte graphique dédiée) et deux écrans Full HD de 27 pouces. Sur cet ordinateur, il y a également des périphériques alimentés par USB : un micro, une webcam et une paire haut-parleurs. L'objectif étant de voir combien de temps, il m'est possible de faire tourner mon setup avec cette RIVER 2 Pro, afin de pallier une éventuelle panne d'électricité. L'ordinateur étant mon outil de travail, il m'est important d'avoir cette solution de secours.
Au bout d'environ 13 minutes d'utilisation, la ventilation s'est activée pendant 2 minutes, avant de s'éteindre. Puis, elle s'est réactivée de façon cyclique et régulière afin de garder le contrôle sur la température de la batterie. Le ventilateur est plutôt bruyant.
Au bout d'une heure d'utilisation, il restait 77 % de batterie, puis au bout de 2 heures, il restait 59 % d'autonomie. Finalement, j'ai pu alimenter mon setup avec la RIVER 2 Pro pendant 4 h 33 avant que la batterie soit épuisée. Autrement dit, elle me permettrait de travailler un peu plus d'une demi-journée !
Ici, inutile d'activer le mode X-Boost, car la puissance totale consommée par les appareils connectés est bien inférieure à 800 watts. Néanmoins, en cas de besoin, nous pourrions activer le mode X-Boost pour que la batterie délivre jusqu'à 1 600 watts, pendant une durée plus courte.
Utilisation en tant qu'UPS
La RIVER 2 Pro peut être utilisée en tant qu'onduleur (UPS) en venant se positionner entre le réseau électrique et vos appareils, grâce à la fonction Pass-Through. Par exemple, la RIVER 2 Pro peut être connectée à la prise électrique murale et l'ordinateur et les deux écrans à la RIVER 2 Pro. Dans ce cas, le courant ne passe pas par l'onduleur, ni même la batterie, et s'il y a une coupure d'électricité, alors elle prendra le relais !
Il y a tout de même une interruption de 30 ms au moment de la bascule sur l'alimentation sur batterie. Bien que ce soit transparent pour nous, certains appareils n'apprécieront pas. Avec un onduleur digne de ce nom, cette interruption n'existe pas. Dans mon cas, c'est passé inaperçu pour mon ordinateur fixe et mes deux écrans : la bascule sur batterie a été transparente.
Recharger un ou plusieurs appareils
La RIVER 2 Pro peut-être utilisée pour recharger des appareils divers et variés, y compris votre smartphone, votre tablette et votre ordinateur portable. En fonction de la capacité de la batterie de vos appareils, celui-ci pourra être rechargé un certain nombre de fois. Pour ma part, j'ai pu recharger près de 7 fois intégralement mon PC Surface Pro 7 (tout en l'utilisant) avec une charge complète de RIVER 2 Pro.
C. La recharge de la RIVER
EcoFlow annonce 70 minutes pour recharger complètement la batterie (0 à 100 %). Avec la recharge sur secteur, c'est effectivement la durée nécessaire pour la recharger intégralement (entre 65 et 70 minutes, d'après mes tests).
C'est vraiment rapide et c'est un gros plus pour ce modèle, notamment si vous avez besoin de recharger la batterie à la dernière minute... Le bémol, c'est le bruit généré par la ventilation pendant que la batterie recharge : il est élevé et constant tout au long de la charge.
Pour recharger les batteries de la station, vous avez 4 modes de charge différents répondant à plusieurs scénarios : la connecter au secteur avec le cordon d'alimentation, la connecter à une prise allume-cigare (en voiture, par exemple), la connecter en USB-C, ou lui associer un panneau solaire pour bénéficier de l'énergie solaire.
V. Conclusion
Facile à transporter avec sa poignée de transport intégrée à la coque, la RIVER 2 Pro d'EcoFlow est facile à utiliser et remplie parfaitement sa mission : fournir de l'énergie à un ou plusieurs appareils. L'application est ergonomique et elle nous donne l'opportunité de configurer l'appareil, selon nos besoins. La fonction d'UPS évoquée dans cet article, ainsi que le X-Boost, sont deux fonctions qui rendent cette station de recharge plus polyvalente.
Lors de ce test, j'ai noté deux points négatifs : le bruit généré par la ventilation de l'appareil. Il est très gênant lorsque la batterie se recharge et l'est un peu moins lorsque la RIVER fournie de l'énergie à des appareils, car c'est plus par intermittence, même si cela dépend de votre utilisation : plus elle est sollicitée, plus elle aura besoin de ventiler pour se refroidir. Et, la poignée qui est mal positionnée bien qu'elle soit indispensable.
Enfin, le fait de pouvoir recharger la batterie à l'aide d'un panneau solaire externe (vendu séparément) offrira certainement un peu plus de liberté et d'autonomie ! Nul doute que ce sera très utile si vous avez l'habitude de partir en camping.
Où acheter la station EcoFlow RIVER 2 Pro ?
L'EcoFlow RIVER 2 Pro est vendue sur plusieurs sites d'e-commerce dont la boutique officielle d'EcoFlow ainsi qu'Amazon. Ci-dessous, vous pouvez utiliser notre lien Amazon pour acheter ce modèle :
Vous avez un disque SSD NVMe et vous souhaitez en faire un disque SSD externe ? Cela tombe bien, dans cet article, nous allons découvrir un boitier de chez UGREEN compatible USB4 ! Il s'agit de la norme USB la plus récente, avec un débit théorique de 40 Gbps.
Commençons par évoquer les caractéristiques de ce boitier UGREEN dont la référence exacte est CM642 :
Connectique : 1 x sortie USB-C
Emplacement pour disque : 1 x disque SSD NVMe M.2 (format 2230 / 2242 / 2260 / 2280)
Capacité maximale du disque : 4 To
Système de dissipation de la chaleur, avec ventilateur, intégré au boitier
Prise en charge des fonctions UASP, TRIM, S.M.A.R.T
Alimentation via USB : 5.0V - 3.0A Max
Systèmes d'exploitation pris en charge : Windows, Linux et macOS
Compatible : USB4 (40 Gbps), Thunderbolt 4, Thunderbolt 3, ainsi que USB3
Pour découvrir tous les produits et accessoires UGREEN, vous pouvez visiter leur site officiel :
Le packaging de ce boitier UGREEN est plutôt soigné puisqu'il nous donne un aperçu du boitier, ainsi que ses principaux atouts et ses caractéristiques techniques. Les accessoires sont dans une petite boite en carton, tandis que le boitier est à part et correctement emballé.
Au-delà du boitier UGREEN en lui-même, voici ce qu'il y a dans la boite : un guide d'utilisation, un câble USB-C vers USB-C, un câble USB-C vers USB-A, un tournevis, une vis, et un pad de pâte thermique. Si votre PC ne possède pas de port USB-C, vous pourrez quand même connecter le boitier grâce aux différents câbles fournit.
Le boîtier est en alliage d'aluminium, ce qui optimise la dissipation de la chaleur vers l'extérieur. Le boitier est protégé par une coque en silicone qui le protégera contre certaines chutes. Personnellement, je trouve que ce boitier est très chic et qu'il a une allure premium. Les finitions sont impeccables. Voici les dimensions du boitier lorsqu'il est équipé de la coque : 12.5 cm x 5.4 cm x 2.3 cm. Sur le dessus du boitier, à gauche de la mention UGREEN, se situe une LED d'activité.
Pour démonter le boitier et installer un disque, il y a une seule vis à retirer : elle se situe sur le dessus du boitier. Ceci permet d'ouvrir le couvercle supérieur pour accéder à l'intérieur du boitier. Un logement est prêt à accueillir votre disque SSD : ici, un disque SSD NVMe Samsung 990 PRO est utilisé. Une fois le disque en place, il faut positionner la pâte thermique sur le dessus avant de refermer le boitier. Par ailleurs, nous pouvons apercevoir le ventilateur intégré au boitier.
L'installation du disque dans le boitier s'effectue facilement et rapidement. En cas de doute, nous pouvons nous référer à la notice fournie par UGREEN. Désormais, le disque est prêt à être utilisé. La première fois, il sera nécessaire de formater le disque à partir du système d'exploitation, s'il s'agit d'un disque neuf.
III. Performances
Désormais, nous allons évoquer les performances, même si cela dépendra fortement des caractéristiques du disque intégré au boitier, ainsi que de la puissance de l'appareil sur lequel est connecté le boitier.
Pour évaluer les performances de ce boitier, j'ai utilisé un mini PC Geekom IT13 équipé de ports USB4. Un disque SSD NVMe Samsung 990 PRO est intégré au boitier, dont les données constructeurs sont les suivantes : vitesse séquentielle de lecture de 7 450 Mo/s et 6 900 Mo/s en écriture.
Sur le même PC et avec le même disque, un benchmark a été réalisé avec CrystalDiskMark en USB4 et en USB 3.2.
Connecté en USB 4.0
Connecté en USB 3.2 Gen2
La température de disque est de 26 °C lorsqu'il est connecté au PC, mais non sollicité. Pendant le benchmark, la température monte à 34 °C puis à 43 °C (et elle reste stable), ce qui reste très correct. Le boitier quant à lui devient un peu chaud, ce qui montre que la chaleur est dissipée vers l'extérieur.
Sous Windows, la copie de gros fichiers de l'ordinateur vers le disque externe (écriture) est effectuée à une vitesse moyenne de 650 Mo/s. La même opération dans l'autre sens, c'est-à-dire en lecture depuis le disque externe, est effectuée à une vitesse moyenne de 980 Mo/s.
IV. Conclusion
Ce boitier UGREEN est excellent : très joli, bien conçu et il répond présent lorsqu'on le sollicite. Il assure des transferts ultra-rapides, ce qui est pratique pour réaliser des sauvegardes sur disque ou transférer des gros fichiers (fichiers vidéos en 4K, etc.). D'après les tests de charge que j'ai réalisés, le système de dissipation thermique semble être au point.
Ce boitier est proposé à 129.99 euros sur Amazon.fr : ce n'est pas donné, mais ce sont les prix actuels pour les boitiers compatibles USB4. Et surtout, les disques SSD externes se font rares sur le marché. Actuellement, la meilleure option, c'est probablement d'acheter un boitier comme celui-ci et d'ajouter le disque SSD de son choix.
UGREEN continues to push forward with its NASync series of NAS devices and although the range is pretty broad, the device in the lineup that business/professional users are looking at as an affordable alternative to Synology and QNAP is the big 8-Bay model – The UGREEN DXP8800 PLUS NAS. Pretty much the ‘top end’ model of the series, this is an 8 SATA and 2 Gen 4 M.2 NVMe SSD System, rolling out the gate with dual 10GbE connectivity, Thunderbolt 4 ports, a PCIe upgrade slot, an i5 10 Core Processor and up to 64GB of DDR5 memory. It’s ALOT. First arriving at $899 for early backers, now at $974, this system is a huge saving when compared with the $1899 Synology DS1823xs+ and $2000-3500 QNAP TVS-h874 series. But what is the catch? What compromises have UGREEN made? Ultimately, does the UGREEN DXP8800 PLUS NAS deserve your money and your data? Let’s discuss it in today’s review.
Other UGREEN NAS Reviews:
The DXP4800 PLUS 4-BAY NAS Review – VIDEO– WRITTEN
The DXP480T 4-BAY NVMe SSD NAS Review – VIDEO– WRITTEN
The DXP8800 PLUS 8-BAY 10GbE NAS Review – VIDEO– WRITTEN
Important– The UGREEN DXP8800 Plus NAS is still in the mid stages of crowdfunding. The unit provided for review by UGREEN might not represent the finished product if/when crowdfunding is concluded and eventual fulfillment begins. UGREEN is an already long-established and trusted brand, but nevertheless, it is important to keep in mind that this is still a product that is initially being made available via crowdfunding and therefore an element of additional care is always advised, compared with a comparable product purchased via traditional retail outlets.
UGREEN DXP8800 PLUS NASync Review – Quick Conclusion
Much like the rest of the NASync series, the UGREEN DXP8800 PLUS 8-Bay NAS is incredibly good value in terms of hardware and, if you are looking for the very best desktop NAS hardware for the price point available in the market – the DXP8800 PLUS is truly unbeatable in its specifications, build quality and overall physical presentation. Even going full ‘DiY’ and trying to build a system of this calibre yourself (case, cables, i5 embedded mobo, 2 port 10GbE card, 2 NVMe, 8 SATA, case, cooling, etc), you would struggle to beat the sub $999 of this system by a meaningful margin. Add to this the fact that UGREEN have now softened their stance on 3rd party NAS OS’ on their NAS devices having no aggressive impact on your 3-year hardware warranty has won a lot more users over, as the DXP8800 PLUS becomes the perfect TrueNAS or UnRAID NAS for users who don’t want the hassle of building from scratch, chasing multiple warranty’s and silicon paste under the fingernails! Genuinely, it is impossible to fault the DXP8800 PLUS on a hardware level (it’s not even that noisy, compared to other 8-Bay NAS in the market at least).
When it comes to software and performance, however, things are a little more complicated. The UGREEN NAS software (UGOS) is still very much in beta, and it feels likes it. The system (at time of writing) has still yet to complete initial crowdfunding and development of the software is still on-going (so we are still judging a software OS that hasn’t finished). But nevertheless, the absence of services such as 2 factor authentication, WORM, a comprehensive security monitor, volume encryption, a virtual machine hypervisor, broader 3rd party cloud sync and backup tools, etc – the absence of these (as well as inconsistencies in the software and performance, that arguably are possibly related to it’s beta status) lead to it being hard to recommend the DXP8800 PLUS on a software level. However, this system will not see physical fulfilment to backers till at least June/July at the very earliest, which is still a decent amount of time to polish the software and roll out beta’s of individual services that are promised on the UGREEN roadmap. Perhaps you are looking at the DXP8800 PLUS series for TrueNAS/UnRAID/OMV etc, or simply to set it up for local SMB storage for your backups and then use the docker app to run Plex. For those users, the DXP8800 is an absolute bargain. Just remember that we are still talking about Kickstarter and crowdfunding (still an odd move by such a big brand) and therefore this needs to be treated as such, not comparable to traditional retail! Overall, I am hugely impressed and look forward to seeing where this system, UGOS and UGREEN go in the exciting world of NAS in the next year or two. The DXP8800 PLUS is a BEAST of a NAS in terms of hardware, but the software is still WiP.
SOFTWARE - 6/10
HARDWARE - 10/10
PERFORMANCE - 7/10
PRICE - 10/10
VALUE - 9/10
8.4
PROS
PCIe Expandability 8 HDDs + 2x Gen 4 M.2 in 1 box under $999 Good Balanced CPU choice 10GbE Dual Ports! An SD Card Slot (wierdly rare!) 10/10 Build Quality Great Scalability Fantastic Mobile Application (even vs Synology and QNAP etc) Desktop/Browser GUI shows promise Established Brand entering the NAS Market Not too noisy (comparatively) Very Appealing retail package+accessories
CONS
10GbE Performance was less than expected Crowdfunding choice is confusing Software (still in Beta) is still far from ready 18/4/24
UGREEN DXP8800 PLUS NASync Review – Presentation
You really do have to hand it to UGREEN. The presentation of the DXP8800 Plus is genuinely top-tier. This brand’s experience in computer accessories has clearly influenced the presentation of their NAS system, opting for glossy retail packaging that boldly showcases the system’s capabilities over a standard dull brown box.
Inside the shiny box is a well-organized shipping container, with the system secured by rigid foam and an accessory kit containing everything needed to get started. As previously mentioned, retail packaging and device protection during transit are often overlooked by brands, risking damage. Despite being largely unpopulated, except for an internal 2280 SSD for the OS, minimizing the risk of damage, the extra effort on protection is appreciated.
The DXP8800 Plus includes nearly everything needed for setup, aside from hard drives. Given the early stage of the system’s crowdfunding campaign, additional storage options may later become available.
The included kit, while basic, ensures users new to hosting their own servers have everything required.
It’s the attention to detail that impresses – from M.2 NVMe heat pads of notable quality and thickness for thermal dissipation, to the included Cat 7 network cables with high-quality gold/copper ends, differentiating them from standard cables.
Even the instruction manual, a rarity as most NAS brands now direct users online, stands out with its glossy presentation and offers more than basic setup guidance.
One thing I wanted to note (especially after reviewing the DXP4800 PLUS and DXP480T NAS systems previously) is that the DXP880 8-Bay NAS arrives with 3 years of warranty, when the bulk other devices in the series arrive with 2-Years. It’s a small but significant difference, as most users who are looking at 8-Bays of storage tend to be doing so for business-related use – so that extra year will certainly be noted and appreciated!
However, the choice of a 3rd party CWT internal power supply (PSU), though expected at this scale, given UGREEN’s reputation for high-quality power adapters and cables. While not a deal-breaker, it’s curious to see a non-UGREEN PSU used, especially when the DXP480t model reviewed elsewhere came with a branded UGREEN PSU. This inconsistency in their approach to PSUs is puzzling.
Overall, the presentation of the DXP8800 Plus from UGREEN, a newcomer to the NAS market intending to launch via Kickstarter, is exceptionally well done. Despite some accessory quality inconsistencies, the overall package is commendable for a pre-release sample. Now, let’s proceed to discuss the system’s design.
UGREEN DXP8800 PLUS NASync Review – Design
At first glance, the DXP 8800 Plus appears to be a fairly standard 8 NAS enclosure, and you might be forgiven for thinking it’s just reiterating the typical case design prevalent among numerous companies. However, there’s more to its design and efficiency than meets the eye. For starters, the external enclosure is entirely metal, enhancing heat dissipation directly from the base panel housing the M.2 modules. Additionally, UGREEN has infused the design with their unique stylistic choices, evident in the presentation of individual bays and the arrangement and accessibility of various ports and connections.
The inclusion of small design flourishes, like the rear removable mesh metallic fan panel that magnetically attaches to the casing, is particularly appreciated. While such a feature is familiar to prosumer PC cases, it’s surprisingly rare in NAS designs – puzzling, given NAS systems’ continuous operation and higher likelihood of accumulating dust and debris. Despite being a relatively minor detail, this fan cover’s presence in UGREEN’s first product impresses me aesthetically and functionally.
The internal fans are two low noise standard 92mm PC fans, that can be fully controlled in their RPM by the system software manually, or left to automatically adapt to the system’s needs.
Handling individual storage bays, however, presents a mixed reaction. The bold numeric design distinguishes it aesthetically from other NAS brands that often opt for bland, nondescript bays. The tool-less, click-and-load trays that forego the need for a screwdriver for drive installation and the inclusion of individual locking mechanisms (with keys) are commendable features.
Yet, these trays feel somewhat flimsy compared to the more robust trays found in desktop solutions from Synology and QNAP. While they secure the hard drives and align with the internal enclosure runners, the internal locking mechanism doesn’t inspire confidence in its security. The trays’ perceived cheap production quality slightly detracts from the overall positive aesthetic. Despite this, the system supports the latest 22TB hard drives (testing of 24TB Seagate Ironwolf Pro HDDs in progress), which means daily interaction with these trays will be minimal.
The main storage area features a pre-constructed PCB with eight integrated SATA and power connectors. The system documentation indicates that SAS drives are unsupported, a non-issue for this system’s scale and price point.
Upon removing the base’s metallic panel, the two M.2 NVMe SSD bays and upgradable DDR5 SODIMM ports are revealed. Space constraints make heat sink installation challenging, but UGREEN has anticipated this with the inclusion of thick heat pads in the accessory kit, facilitating heat dissipation through the external casing.
UGREEN’s entry into 24/7 service storage with the DXP 8800 Plus is noteworthy, especially for a brand new to this sector. Their effort to differentiate through design and functionality is largely successful, although the storage trays’ quality could be improved. Overall, the system’s design is a strong point, and I look forward to discussing ports and connectivity next.
UGREEN DXP8800 PLUS NASync Review – Power Consumption
The DXP8800 PLUS is a beefy system and although I was expecting the system to be a little greedy on the power consumption anyway, it was still arguably a pinch higher than I expected. Initially, UGREEN stated that the power consumption of the 2 and 4 bay systems would be (for general system load):
Now, let’s put those numbers into perspective. Below is the power consumption of the DXP8800 PLUS NAS, populated with 4x Toshiba MG 8TB Enterprise HDDs, 4x Kingston DC600M SATA 480GB SSDs and 2x Kingston KC3000 NVMes, in both Idle and Active:
Based on the figures that UGREEN provided for the DXP4800 PLUS, the DXP8800PLUS was using twice the power. On the face of it, this seems reasonable (the latter system IS twice the scale in almost every way – also using a 10 Core i5 vs a 5 Core Pentium). Nevertheless, this is quite a hungry system and users looking at an 8-Bay 10G system like this, when moving away from more modest 2/4-Bay systems should be aware!
REALLY surprised at the noise level. Given the largely metal construction of the system, I expected it to hit the early 40’s in dBa, at the very least. But it was surprisingly low ambient volume (relative to other 8-Bay NAS of course). Then there is the fact that I used a combination of smaller 8TB HDDs and SSDs, which did reduce noise levels somewhat. If I had been using more aggressive 12-14TB HDDs, then the operational noise of these more industrial built drives would have been much different – but then we would be measuring HDD noise and not system noise.
UGREEN DXP8800 PLUS NASync Review – Ports and Connections
One of the earliest things to notice about the connectivity on offer on the DXP 8800 Plus NAS is that this system brings back support for SD cards. This may seem almost insane to the average photo and video editor, but SD card readers on NAS devices have been largely absent for almost a decade, despite enormous protestations from photo and video editors for years.
Therefore, it’s kind of impressive that UGREEN has opted to provide an SD card slot and a front-mounted USB Type-A 10Gbs connection, AND 2x Thunderbolt 4 USB-C conenctions on the DXP8800 Plus when practically every other brand in the NAS industry does not. It’s going to be a tremendously convenient feature for those wanting to ingest media directly into the system via numerous storage methods and camera systems, making it that much more convenient than many others in the market.
The front-mounted Thunderbolt 4 USB-C ports can only be used with the UGREEN DXP8800 PLUS as the ‘host’ and connected devices as ‘clients’. In ‘normal speak’, that means that these ports can only be used for accessories (storage etc) that are managed by the NAS. That means that currently you cannot use the Thunderbolt 3/4 USB-C port on your PC or Mac to connect with the NAS for a ‘Thunderbolt NAS’ connection, much as you would find from several QNAP Thunderbolt NAS (Guide on this HERE) devices.
Flipping the device around, we see that the system has even more USB ports that can be utilized by the system in a host-client relationship. That means that the UGREEN NAS system will act as the host device for connected storage drives and supported peripherals. Unfortunately, this does mean that you cannot directly connect to this device using those USB ports, and the USB 2.0 connections are pretty much exclusively designed for connecting printers and office peripherals, uninterruptible power supplies, or keyboard/mouse in KVM setups alongside the visual output.
The visual output of this system is a 4K 60 frames per second HDMI 2.0 connection (8K output is possible if you scale the memory up). The software for the UGREEN NAS system is still in beta, and currently, the HDMI output is limited to command line access.
Currently, there is no graphical user interface afforded to the HDMI output, such as you would find on a QNAP or Asustor NAS system, but as this is a relatively niche feature for many, I’m not going to give them too much of a hard time over this.
Although the lack of the Thunderbolt direct connectivity will be a blow for some, the majority of users will be much ,much more impressed with the network connectivity of the DXP8800 PLUS. The system arrives with two 10GbE network ports (which is exceptional at the under $999 price tag, at least during crowdfunding).
Just to put this into perspective, the Synology DS1823xs+ is an 8 Bay NAS that has 1x 10GbE connection (and 2x 1GbE) with a 4 Core / 8 Thread AMD Emb.CPU and arrives at $1800 without TAX. Likewise, the QNAP TVS-h874T4 arrives with several versions with 10GbE and/or Thunderbolt 4 connectivity (with Intel i3/i5/i7/i9 CPUs) and that system starts at around $1999 and can reach as high as $3999). We need to factor in that the DXP8800 Plus is a crowdfunding product (so therefore hardly comparable to traditional retail as a regular over the counter purchase), but whether you purchase it at the $974 crowdfunding or intended $1499 RRP (Realistically, I imagine it will sit at around $1299-1399 at full retail) – this is a HUGE saving on hardware and for a 10GbE ready system, exceedingly hard to beat. Remember though, HAVING 2x 10GbE is not the same as being able to fully USE 20GbE – that depends on so many factors (Shared internal PCI lanes and PCIe switches, SATA and NVMe controllers internally, as well as the actual media you choose to use to try and saturate the connection.
Nevertheless, this DXP8800 PLUS arriving with the two 10GBASE-T (Copper) connections with Aquantia controllers internally to manage it, is very appealing. But it does not stop there. The DXP8800 PLUS is one of a small % of the NASYnc series to feature a PCIe upgrade slot too. It’s a half-height slot and x4 speed (so largely going to be used for NIC upgrades), but nevertheless worked a treat.
Overall, in terms of ports and connectivity, I’m really happy with everything I found on the DXP8800 Plus, and the increased scalability in terms of improving upon the network connectivity down the line, as well as the price point of the base level of network connectivity, combined with a decent degree of functionality and modern storage expandability to boot. The lack of Thunderbolt direct connectivity is a shame, but this is already something of a rarity in the market anyway (QNAP dominate this and despite the likes of QSAN and Promise trying to emulate this previously, they have hit walls) and UGREEN do state they are investigating this at development. Overall, I am really happy with the hardware thus far. Let’s dig a little deeper.
UGREEN DXP8800 PLUS NASync Review – Internal Hardware
As mentioned earlier, it’s surprisingly confident of UGREEN to launch so many different NAS devices simultaneously for their first foray into network-attached storage. Not only have they provided several different storage scales and architectures, but they are also supporting three different internal hardware CPUs in terms of CPU. The scale in terms of price and capabilities of each system varies.
The DXP8800 Plus arrived with an Intel i5 10-core processor (2p + 8e), integrated graphics, 20 PCIe lanes, and a maximum 55W TDP. Despite its compact SOC form, this 12th generation Intel i5 processor offers substantial power, benchmarking well against the N100 and Pentium 8505 models in other UGreen NAS models. Testing this processor, especially in this early crowdfunding prototype, presents challenges. Though UGREEN have softened their position on 3rd party OS support (and it’s impact on your hardware warranty if you pursue this), it is still not the intended USE CASE of what UGREEN state this system is to be deployed in (to verify their claims on it’s performance). See video below for more information on this:
Consequently, we’re limited in our ability to benchmark using third-party OSs or reference previous benchmarks for similar architectures. The UGreen NAS’s operating system, still in beta, requires further optimization to fully showcase what the hardware can achieve.
This processor is well-equipped with sufficient PCIe lanes to manage the 8 SATA drives and 2x M.2 NVMe SSDs, offering respectable speeds through SSH (at least on slot #1 – more on that later). The main concern with this processor selection is the lack of ECC memory support, crucial for high-speed flash systems to minimize bit errors during intensive operations.
Although SOC processors that support ECC are rare, especially from Intel, using one for this system and potentially for the DXP8800 Plus could significantly impact the price and development timeline. Nevertheless, this CPU is arguably the best choice for such a compact system in 2024, balancing power efficiency, heat management, and performance capabilities.
Arriving with integrated graphics, supporting up to 64 gigabytes of memory (arriving with 8GB of DDR5 SODIMM and two slots), there is a lot to like here. It is especially surprising when you realize that the brand already provides closely priced N100 and Pentium models next to this device in UGREEN’s NAS portfolio. This processor performs exceedingly well with Plex Media Server and, thanks to those 20 lanes, also means there’s a decent spread of available hardware architecture across the whole device.
But do keep in mind that this system does not support ECC memory. Indeed, none of the UGREEN systems support ECC memory, and although they make a point of highlighting the on-die checks associated with DDR5, most experienced storage enthusiasts tend to prefer traditional ECC memory support. Nevertheless, 8GB is a good amount of memory to start with, and it’s great to know that you are not locked in with presoldered and fixed memory on the board, which is a move often used by more economical brands to save some money and dedicate lanes more efficiently. The layout of the internal architecture is still yet to be confirmed at the time of writing this review, but digging a little into the backend via SSH revealed that each of the M.2 NVMe slots on the base of this system are Gen 4 x 4.
However, further digging into the 2nd M.2 slot showed that it has been downgraded the 8GT/s x2 :
Not entirely sure what to make of this, as this IS a prototype review unit. But it does seemingly though a little initial shade on the whole ‘two Gen 4×4 slots’. I will need to investigate this further with the brand and when I get a further update on this, I will let you know by updating the article here. Meanwhile, the OS SSD bay that hosts the UGOS NAS software arrives on that Phison E13 Gen 3 SSD, that is downgraded the Gen 3×1 (SO, SUB 1,000MB/s performance – which is fine for the Operating System SSD, but does mean that data passing through it (or at least managed to a large degree) might be potentially bottlenecked.
So, how this all separates out on the system chipset and whether these are being delivered into PCIe switches to spread the architecture out for the rest of the system storage, double network connectivity, and dedicating lanes to all those available connections, is definitely an area that leaves pause for thought.
(image below from other UGREEN NAS Systems)
Which I had difficulty identifying, but I suspect is a Marvell AQtion Aquantia AQC113/AQC114/AQC114CS/AQC115Cs, comprising (from official pages) a high-performance,Scalable mGig, Ethernet MAC+PHY Controllers designed to support the following network rates: 10GBASE-T/5GBASET/ 2.5GBASE-T/1000BASET/100BASE-TX/10BASE-Te. When equipped with a PCI Express Gen 4 x4, this family of Scalable mGig Ethernet MAC+PHY Controllers easily handle the 10 GbE line-rate performance. The AQC113, AQC114, AQC114CS, AQC115C device family combines a mGig Ethernet MAC Controller with a full-reach, low-power, highperformance, multi-gigabit, single-port Gen 4 Ethernet Alaska PHY transceiver into a single, monolithic device that is designed using the latest 14nm, multi-gate, FinFET process technology.
(image below from other UGREEN NAS Systems)
The USB controller/manager appears to be an ASM1543, (from the ASmedia pages) a one Four to two differential channels mux switch with integrated Type-C Configuration Channel Logic Circuitry, using for USB3.1 type-C mux and CC detection application. The signal performance of mux switch is up to 10Gbps SuperSpeedPlus USB bus with low insertion loss and return loss, and it also supports USB plug orientation, configurable as DFP role or UFP role through the setting of strapping pins, and implementing the strapping for the setting/detection of Type-C current mode, following USB3.1 Revision 1.0 and USB Type-C Connector and Cable Revision 1.3 standard specification.
(image below from other UGREEN NAS Systems)
Next, we find a Richtek RT3624BE, (from the manf pages) a synchronous buck controller which supports 2 output rails and can fully meet Intel IMVP9.1 requirements. The RT3624BE adopts G-NAVPTM (Green Native AVP) which is Richtek’s proprietary topology derived from finite DC gain of EA amplifier with current mode control, making it easy to set the droop to meet all Intel CPU requirements of AVP (Adaptive Voltage Positioning). Based on the G-NAVPTM topology, the RT3624BE features a new generation of quick response mechanism (Adaptive Quick Response, AQR) to optimize AVP performance during load transient and reduce output capacitors. The RT3624BE integrates a high accuracy ADC for platform and function settings, such as ICCMAX, switching frequency, over-current threshold or AQR trigger level.
(image below from other UGREEN NAS Systems)
In terms of the SATA storage management, I found a ASMedia ASM116 SATA host controller(AHCI). (TBC) Which is upstream PCIe Gen3 x2 and downstream eight SATA Gen3 ports. It’s a low latency, low cost and low power AHCI controller. With four SATA ports and cascaded port multipliers, ASM1164 can enable users to build up various high speed IO systems, including server, high capacity system storage or surveillance platforms.
(image below from other UGREEN NAS Systems)
Earlier in March when I was testing the (late alpha, early Beta) version of the NAS software, system and services, the performance numbers I got were not hugely encouraging internally. However, there have been numerous improvements on the system software and I am pleased to confirm that the M.2 NVMe slot 1 was indeed 4×4 bandwidth and that some brief 1GB transfer/creation testing showed some early 5.5GB/s benchmarks on the Gen 4×4 SSD I has inside the system.
Now we cannot rule out the impact of caching internally and these tests are NOT reflective of everyday (i.e non synthetic) use, but it was definitely an encouraging sign. However, when I tried to repeatedly move 1GB of data between each of the NM,2 NVMe, the performance would drop down to 1.1-1.5Gb/s, which further suggested some lane sharing and a possible bottleneck by a controller and/or that downgrade perhaps. Again, this is a beta software/system and UGREEN repeated that this system is still undergoing optimization.
External performance over 10GbE was also an area that I really, REALLY hope this is sees significant optimization. I was hitting a bottleneck of around 650-700MB/s on upload and download (on a 10Gbe / 1,000MB/s connection). The performance numbers below were over 10GbE (with the MTU set at 1500 – As the software is currently not allowing me to scale it to 9000 MTU/Jumbo frames). Below is the tests for 4x 8TB Toshiba HDDs in RAID 5, 4x Kingston DC600M SATA SSDs in RAID 0 and 1x Kingston KC3000 Gen4 NVMe SSD.I then went ahead and conducted a windows 10GbE transfer to the RAID 5 array:
Further testing confirmed performance dips when transferring data between SSDs, indicating a shared pathway. Despite this being a pre-release sample, and acknowledging potential future optimizations, the observed SSD performance, though still faster than many market alternatives, fell comparatively short of expectations given the hardware capabilities (though still higher than the majority of M.2 SSD performance offered by other brands providing HDD SATA + M.2 solutions right now).
The UGREEN NAS’s software, still in beta, promises further insights into the brand’s direction with their NAS solution and its accompanying software and services, warranting a closer examination as development progresses.
UGREEN DXP8800 PLUS NASync Review – Software
At the time of writing, the UGREEN NAS software is still in beta, with the mobile application is live now. Reviewing the software included with the DXP8800 Plus—as a final product—feels somewhat premature. The NASsync software beta reveals many baseline functions and long-term plans, detailed in the video below in our initial overview and first impressions of the UGREEN NAS software:
it’s on track to become a smooth and user-friendly experience, comparable to giants like Synology and QNAP, especially in terms of the web browser experience. Unlike opting for the complexity of TrueNAS or the streamlined, container-focused UI of UnRAID, the UGREEN NAS software is more akin to Synology DSM. The foundation is clearly laid out for expansion in terms of features and tools for the user’s disposal. However, there are notable absences of baseline applications such as container or virtual machine support, and a multi-tiered backup solution within the web GUI (though the UGREEN NAS mobile and desktop clients are in development, expected to preview in March). Basic services for file management, shares, user account control, and an app center—soon to be linked to a repository—are all user-friendly but present some inconsistencies, likely due to its beta status and ongoing development. The physical product may be closer to final development, but the software needs more time for optimization. SMB services were less consistent than desired, and settings changes sometimes didn’t save or recall correctly. This is common for beta software finding its footing, yet it’s important to note that the hardware feels more refined than the software at this stage, months before user delivery. In brief:
What I liked:
Intuitive UI with services located logically and responsive controls.
The mobile application for iOS and Android is one of the best I have ever used in NAS!
Baseline services such as network interface management, user account control, firewall handling, and SSH interface control are all present.
A clearly defined app center awaiting connection to an online repository.
Helpful tips and guidance are available on most pages, aiding new users.
Support for modern services like SMB3 multi-channel and domain services in the beta.
Clear account and resource management accessible from the desktop, likely appealing to most users.
The inclusion of a remote access relay service and UGREEN account creation from day one, simplifying remote access for new users with built-in firewall and domain tools.
UPDATE 5/4/24 – The HDMI output is now full controllable via the mobile application and is intiuative
UPDATE 5/4/24 – A Docker application has now been added with access to numerous repository options!
UPDATE 5/4/24 – SSH is now disabled by default
What I disliked:
Absence of two-factor authentication in the software.
Lack of virtualization applications at this stage.
Sporadic SMB performance.
The Security Advisor tool is only suitable for Antivirus and Anti-Maleware protection, not to scan the system for security weaknesses and advisory actions
The HDMI output cannot be used by the desktop/browser user to the same extent as the mobile application + cannot be used by container tools (Plex, Home Automation, etc)
In-progress language integration, leading to occasional default displays in Chinese or error messages in Chinese despite English settings.
Improvements needed:
Expansion of app integration and desktop client tools for easier system-client bridging.
Introduction of a default application for device discovery on the local network, a basic service offered by many NAS brands.
More information on UGREEN account and remote access security.
Acknowledging this is a beta, it’s fair to reserve full judgment until the software fully rolls out. As it stands, this beta is promising yet lacks some established NAS software fundamentals. Hopefully, we’ll see significant advancements as the release approaches.
UGREEN DXP8800 Plus NAS Storage Review – Verdict and Conclusion
Much like the rest of the NASync series, the UGREEN DXP8800 PLUS 8-Bay NAS is incredibly good value in terms of hardware and, if you are looking for the very best desktop NAS hardware for the price point available in the market – the DXP8800 PLUS is truly unbeatable in its specifications, build quality and overall physical presentation. Even going full ‘DiY’ and trying to build a system of this calibre yourself (case, cables, i5 embedded mobo, 2 port 10GbE card, 2 NVMe, 8 SATA, case, cooling, etc), you would struggle to beat the sub $999 of this system by a meaningful margin. Add to this the fact that UGREEN have now softened their stance on 3rd party NAS OS’ on their NAS devices having no aggressive impact on your 3-year hardware warranty has won a lot more users over, as the DXP8800 PLUS becomes the perfect TrueNAS or UnRAID NAS for users who don’t want the hassle of building from scratch, chasing multiple warranty’s and silicon paste under the fingernails! Genuinely, it is impossible to fault the DXP8800 PLUS on a hardware level (it’s not even that noisy, compared to other 8-Bay NAS in the market at least).
When it comes to software and performance, however, things are a little more complicated. The UGREEN NAS software (UGOS) is still very much in beta, and it feels likes it. The system (at time of writing) has still yet to complete initial crowdfunding and development of the software is still on-going (so we are still judging a software OS that hasn’t finished). But nevertheless, the absence of services such as 2 factor authentication, WORM, a comprehensive security monitor, volume encryption, a virtual machine hypervisor, broader 3rd party cloud sync and backup tools, etc – the absence of these (as well as inconsistencies in the software and performance, that arguably are possibly related to it’s beta status) lead to it being hard to recommend the DXP8800 PLUS on a software level. However, this system will not see physical fulfilment to backers till at least June/July at the very earliest, which is still a decent amount of time to polish the software and roll out beta’s of individual services that are promised on the UGREEN roadmap. Perhaps you are looking at the DXP8800 PLUS series for TrueNAS/UnRAID/OMV etc, or simply to set it up for local SMB storage for your backups and then use the docker app to run Plex. For those users, the DXP8800 is an absolute bargain. Just remember that we are still talking about Kickstarter and crowdfunding (still an odd move by such a big brand) and therefore this needs to be treated as such, not comparable to traditional retail! Overall, I am hugely impressed and look forward to seeing where this system, UGOS and UGREEN go in the exciting world of NAS in the next year or two. The DXP8800 PLUS is a BEAST of a NAS in terms of hardware, but the software is still WiP.
PROS of the UGREEN DXP8800 PLUS NAS
CONS of the UGREEN DXP8800 PLUS NAS
PCIe Expandability 8 HDDs + 2x Gen 4 M.2 in 1 box under $999 Good Balanced CPU choice 10GbE Dual Ports! An SD Card Slot (wierdly rare!) 10/10 Build Quality Great Scalability Fantastic Mobile Application (even vs Synology and QNAP etc) Desktop/Browser GUI shows promise Established Brand entering the NAS Market Not too noisy (comparatively) Very Appealing retail package+accessories
10GbE Performance was less than expected Crowdfunding choice is confusing Software (still in Beta) is still far from ready 18/4/24
Click the Link Below to find out more about the UGREEN NASync NAS Series on the brand’s official Site:
This description contains links to Amazon. These links will take you to some of the products mentioned in today's content. As an Amazon Associate, I earn from qualifying purchases. Visit the NASCompares Deal Finder to find the best place to buy this device in your region, based on Service, Support and Reputation - Just Search for your NAS Drive in the Box Below
Need Advice on Data Storage from an Expert?
Finally, for free advice about your setup, just leave a message in the comments below here at NASCompares.com and we will get back to you.Need Help?
Where possible (and where appropriate) please provide as much information about your requirements, as then I can arrange the best answer and solution to your needs. Do not worry about your e-mail address being required, it will NOT be used in a mailing list and will NOT be used in any way other than to respond to your enquiry.
[contact-form-7]
TRY CHAT Terms and Conditions
If you like this service, please consider supporting us.
We use affiliate links on the blog allowing NAScompares information and advice service to be free of charge to you.Anything you purchase on the day you click on our links will generate a small commission which isused to run the website. Here is a link for Amazon and B&H.You can also get me a Ko-fi or old school Paypal. Thanks!To find out more about how to support this advice service checkHEREIf you need to fix or configure a NAS, check FiverHave you thought about helping others with your knowledge? Find Instructions Here
Or support us by using our affiliate links on Amazon UK and Amazon US
Alternatively, why not ask me on the ASK NASCompares forum, by clicking the button below. This is a community hub that serves as a place that I can answer your question, chew the fat, share new release information and even get corrections posted. I will always get around to answering ALL queries, but as a one-man operation, I cannot promise speed! So by sharing your query in the ASK NASCompares section below, you can get a better range of solutions and suggestions, alongside my own.
Dans cet article, nous allons découvrir le Mini PC Geekom IT13 dans sa version la plus puissante dotée d'un processeur Intel Core i9 de 13ème génération, de 32 Go de RAM et de 2 To de SSD. D'autres versions de ce modèle sont proposées avec des processeurs Intel Core i5 et Intel Core i7.
Nous allons passer en revue les caractéristiques techniques, le design et la qualité du boitier, ainsi que les possibilités d'évolution. Forcément, cet article va évoquer les performances de ce Mini PC à la configuration très musclée !
Sur le marché des Mini PC, la marque Geekom est incontournable et elle s'est imposée comme un acteur majeur au niveau mondial. Elle a été créée en 2003 et la direction R&D de Geekom est située à Taiwan. En complément, la marque a plusieurs succursales dans différents pays du monde.
Commençons par découvrir les caractéristiques principales de ce modèle :
Processeur : Intel Core i9-13900H (14 Cœurs, 20 Threads, 24 Mo de cache, jusqu'à 5,40 GHz)
GPU : Intel Iris Xe
RAM : 32 Go DDR4-3200, extensible jusqu'à 64 Go
Stockage : 2 To de SSD NVMe (Gen.4) + 1 emplacement pour SSD SATA au format M.2 (2242 - Jusqu'à 1 To) + 1 emplacement vide pour disque 2.5 pouces (2 To max.)
Connectique : 3 x ports USB 3.2 Gen 2 + 1 x port USB 2.0 + 2 x ports USB 4 + 1 prise casque Jack 3.5 mm + 1 x slot pour une carte SD + 1 x interface réseau LAN 2.5 GbE + 2 x ports HDMI 2.0 + 1 x port d'alimentation
Affichage : prise en charge jusqu'à 4 écrans.
WiFi 6E (AX211), Bluetooth 5.2
Alimentation : 19V, 6,32A DC - 120W
Poids : 652 grammes
Dimensions (L x W x H) : 117 mm x 112 mm x 49,2 mm
Système d'exploitation : Windows 11 Pro
Garantie : 3 ans
Comme vous le voyez, la fiche technique est très alléchante ! Entre l'Intel Core i9, l'interface réseau 2.5 GbE, l'USB4 et le WiFi 6E, nous sommes servis ! J'insiste aussi sur la présence d'une garantie constructeur de 3 ans.
Deux autres versions du modèle Geekom IT13 sont disponibles :
Intel Core i7-13700H (14 Cœurs, 20 Threads, 24 Mo de cache, jusqu'à 5,00 GHz) avec 32 Go de DDR4 + un SSD NVMe de 1 To
Intel Core i5-13500H (12 Cœurs, 16 Threads, 24 Mo de cache, jusqu'à 4,70 GHz) avec 16 Go de DDR4 + un SSD NVMe de 512 Go
III. Package et design
Il est temps de déballer ce Mini PC pour voir à quoi ils ressemblent. L'emballage est très soigné et la boite nous donne un aperçu plus précis sur la connectique de ce modèle et le positionnement des différents ports. À l'intérieur, le Mini PC est parfaitement protégé par un bloc en mousse rigide. En dessous de lui, nous avons l'ensemble des accessoires.
Au final, voici les éléments inclus par Geekom : un Mini PC IT13, un câble HDMI, une alimentation externe et son câble, une plaque VESA (et les vis) permettant d'accrocher le mini PC à l'arrière d'un écran (support VESA), une notice (qui explique comment ajouter un disque, comment utiliser le support VESA, etc.), ainsi qu'une lettre de remerciement pour l'achat. Un kit complet !
Regardons de plus près ce boitier. Premier constat : les finitions sont excellentes et la qualité de fabrication rassurante. C'est vraiment un beau boitier. Ce boitier n'est pas gris : Geekoma fait le choix d'opter pour un boitier coloris gris-bleu.
Sur la façade, nous retrouvons deux ports USB, dont un port USB 3.2 Gen2 avec PowerDelivery (PD) et un port USB 3.2 Gen2 (sans PD). Ils sont accompagnés par la prise casque et le bouton Power. Sur le côté droit du boitier, nous avons une fente de verrouillage Kensington, tandis que sur le côté gauche, nous avons un slot pour insérer une carte SD.
À l'arrière du boitier, nous avons tout le reste de la connectique, dont les deux ports USB4 au format USB-C avec PowerDelivery. Pour rappel, le débit théorique de l'USB4 est de 40 Gbps. Au total, nous avons à notre disposition 6 ports USB, dont un port USB 2.0 (un intrus ?), ce qui est confortable et rare sur ce type de PC (c'est plus souvent 4).
La connectique est surplombée par l'aération du dissipateur thermique pour permettre l'évacuation de l'air chaud par l'arrière, tandis que l'air pourra rentrer de chaque côté du boitier grâce aux aérations. La technologie de refroidissement baptisée GEEKCOOL se veut particulièrement silencieuse : 43.6 dBA, lorsque le matériel est fortement sollicité.
Sur le dessus du boitier, la marque est inscrite, tandis qu'en dessous, nous avons une étiquette avec diverses informations (modèle, adresse MAC, numéro de série, etc.) et nous constatons la présence de patins antidérapants. Les 4 vis que vous apercevez permettent d'ouvrir le boitier facilement et rapidement. Elles restent « accrochées » au support amovible, ce qui évite de les égarer.
Il est important de préciser que ce boitier est à la fois en métal et en plastique. Les composants sont protégés par une cage métallique, tandis que la coque du boitier est en plastique. Cette illustration montre bien la conception de ce boitier :
Comme je l'évoquais précédemment, le boitier s'ouvre facilement puisqu'il y a seulement 4 vis à retirer et elles sont directement accessibles. C'est l'occasion de jeter un coup d'œil à l'intérieur du boitier et de connaitre le type de SSD et de RAM.
Un SSD NVMe de marque ACER, avec la référence N5000CN-2TB, d'une capacité de 2 To (pour lequel je ne suis pas parvenu à trouver d'informations supplémentaires).
Deux barrettes de RAM de marque Wooposit : 16 Go Rx8 - PC4-3200AA-S-11. Soit 32 Go au total. Il est possible de passer sur 64 Go de RAM, mais ceci implique de remplacer les deux barettes déjà présentes car les deux slots sont occupés.
L'ajout d'un disque SATA au format 2.5 pouces s'effectue directement au sein de la cage métallique intégrée à la partie amovible du boitier (partie de gauche sur la première photo ci-dessous). De plus, nous pouvons ajouter un disque SSD SATA M.2 supplémentaire, grâce à l'emplacement disponible entre le SSD NVMe et les barrettes de RAM.
Les composants sont facilement accessibles et identifiables, donc vous n'aurez aucun mal à remplacer la RAM ou la mémoire SSD, que ce soit en cas de panne ou pour passer sur d'autres références.
IV. Évolutivité et performances
A. Mise en route et évolutivité
Mettons en route le mini PC IT13 de chez Geekom ! La première chose à effectuer après avoir branché les périphériques, c'est finir l'installation du système Windows 11 Pro ! Nous retrouvons les étapes et questions habituelles propres au fonctionnement du système Windows 11. Il est tout à fait possible d'utiliser un compte local ou un compte Microsoft, au choix.
À première vue, il s'agit d'une image officielle de Windows 11 Pro qui n'a pas été personnalisée par Geekom. Nous retrouvons uniquement les applications natives ajoutées par Microsoft.
Le mini-PC est livré avec 32 Go de RAM en DDR4, mais une mise à niveau est possible. Le processeur i9 de ce modèle supporte 96 Go de RAM, et Geekom annonce une prise en charge jusqu'à 64 Go. Cela veut dire que nous pouvons doubler la RAM actuellement présente dans le mini PC, à condition de remplacer les deux barrettes de RAM. Si vous souhaitez utiliser ce PC pour de la virtualisation, cela peut s'avérer utile !
Voici des détails techniques obtenus avec le logiciel CPU-Z :
Sur ce mini PC, vous pouvez connecter jusqu'à 4 écrans en exploitant les deux ports HDMI et les deux ports USB4. Sur les deux ports HDMI 2.0, vous pouvez bénéficier d'un affichage 4K @ 60 Hz, tandis qu'on est sur un affichage à 8K @ 30 Hz sur les ports USB4.
Comme je l'évoquais précédemment, ce mini PC peut également accueillir 1 SSD SATA au format M.2 (2242 - Jusqu'à 1 To) et 1 disque 2.5 pouces (2 To max.).
En résumé, l'évolutivité est possible au niveau du stockage et de la RAM, tout en sachant que le processeur est très performant et qu'il y a un port Ethernet en 2.5 Gbit/s qui offre de belles possibilités !
B. Performances
Ce mini PC, avec un boitier très compact, est propulsé par un processeur Intel Core i9 de 13ème génération lancé au premier trimestre 2023. Le modèle i9-13900H a14 cœurs et 20 threads, 24 Mo de cache et sa fréquence maximale en mode Turbo est 5,40 GHz.
Commençons par mesurer les performances du disque SSD NVMe intégré à l'ordinateur.
Les performances de ce disque SSD NVMe sont excellentes ! Un copier-coller de gros fichiers en local (de disque à disque, sur le même volume), est effectué avec une vitesse moyenne de 1.82 Go/s ! En 56 secondes, j'ai pu dupliquer une bibliothèque d'images ISO de 101 Go !
Voici un benchmark du disque effectué avec Crystal Disk Mark :
CrystalDiskInfo
Voici une analyse CrystalDiskInfo du disque SSD NVMe présent dans ce PC :
Geekbench
J'ai également effectué un benchmark du CPU et du GPU avec Geekbench, vous pouvez y accéder sur ces pages :
Pendant le stress test du CPU (charge à 100%), le ventilateur s'emballe de façon cyclique, de façon à gérer la température du CPU et du boitier. Le mini PC perd en discrétion à ce moment-là, et la soufflerie est clairement audible. Au ralenti, lorsque la machine est peu sollicitée, les ventilateurs sont vraiment très discrets et ne vous gêneront pas du tout. Il n'y a qu'au tout début du démarrage du PC où la ventilation n'est pas discrète, mais il est probable que ce soit un "auto-test" du matériel à son lancement.
D'après HWMonitor, lorsque le mini PC est allumé sans être sollicité, la température du CPU est de 40°C, dans une pièce où il fait 25 degrés. Pendant le stress test du CPU, la température du CPU monte en flèche jusqu'à 100.0°C (au bout de quelques secondes) puis elle descend jusqu'à 85°C et ensuite, c'est stable tout au long du stress CPU. La machine semble bien gérer le stress CPU, ce qui m'a plutôt rassuré. Geekom semble aussi confiant sur ce point grâce à sa technologie Geekcool.
Que peut-on faire et ne pas faire avec ce modèle ?
Grâce à son excellent processeur, ce mini PC est super à l'aide pour de la bureautique et le multimédia (tout dépend du niveau d'exigence pour le GPU). Que ce soit pour la lecture de vidéos, le montage vidéo basique, la navigation sur Internet, etc... Il fonctionne parfaitement, tout en étant silencieux. Grâce à ses 32 Go de RAM et son Intel Core i9, il est à l'aise avec le multi-tâches.
Sur un modèle comme celui-ci, dépourvu de GPU dédié, la principale limitation, c'est la puce graphique intégrée. Ici, un iGPU "Intel Iris Xe", tout de même plus performant que son prédécesseur Intel UHD Graphics. Si vous êtes prêts à faire quelques concessions sur les graphismes des jeux-vidéos, en diminuant la qualité et en désactivant certaines options, vous pourrez jouter en Full HD à certains jeux. J'ai testé GTA V et l'expérience est bonne. Le jeu est très fluide, avec la désactivation de certains effets visuels.
Voici un aperçu avec deux copies d'écran :
V. Conclusion
Ce mini PC, très compact et très léger, car il ne pèse que 652 grammes, est une excellente surprise ! À ce jour, le Geekom IT13 dans sa version avec un Core-i9 est probablement l'un des plus puissants des mini PC ! En attendant la prochaine génération !
Son design, son format et son Intel Core i9-13900H sont de gros atouts pour ce modèle ! À cela s'ajoutent une connectique ultra-complète et correspondante aux besoins actuels des utilisateurs les plus exigeants, ce qui en fait un mini PC polyvalent. Cette fiche technique solide fait que ce PC répondra aux besoins de nombreux utilisateurs pendant plusieurs années.
À l'inverse, la partie graphique (iGPU) est en retrait par rapport au reste, sans surprise, mais elle n'est pas mauvaise pour autant. Bien que le port USB 2.0 puisse surprendre, il peut être utile pour connecter un dongle USB sans utiliser un autre port. Enfin, si vous recherchez un appareil ultra-discret, sachez que son ventilateur a tendance à s'emballer par moment, notamment lorsqu'il est fortement sollicité (charge CPU élevée).
Le Geekom IT13 avec le Core i9 est proposé à 849,00 euros. C'est logique, compte tenu du tarif du processeur en lui-même. Une bonne alternative peut être de s'orienter vers la version équipée d'un Core i5.
Offre spéciale sur le Geekom IT13
Profitez de 5% de réduction sur Amazon.fr ou sur la boutique officielle de Geekom, en utilisant les liens et codes ci-dessous.