UGREEN NAS Prime Day 2026 Deals: Up to $300 Off NASync Storage UGREEN has launched its Prime Day 2026 NASync sale, with discounts across its home, enthusiast, professional and all-flash NAS range. The main promotional period runs from June 23 to June 28, with savings reaching up to $300 on selected models. UGREEN is also […]
Amazon Prime Day 2026 Bargains on Synology, QNAP, UGREEN, Terramaster, Seagate and More to Watch That’s right, it’s that time of the year again—Amazon Prime Day 2026 is officially here! The mid-summer mega sale is rolling out across the globe, and for those of us whose Prime subscriptions have been quietly ticking over all year, […]
UGREEN has listed two new high-end NAS systems in China: the 6-bay DXP6800 Ultra and the 8-bay DXP8800 Ultra. These are not minor updates to the existing NASync range. They push UGREEN’s desktop NAS line into a much more performance-focused category, with Intel Core 5 / Core 7 U-series processors, dual 10GbE, dual Thunderbolt 4, […]
ZimaCube 2 NAS Review – The Difficult ‘Second Album’… The ZimaCube 2 is IceWhale’s latest desktop NAS and self-hosting system, and this review is focused specifically on the standard non-Pro model priced at $799. It follows on from the original ZimaCube and ZimaCube Pro, but it arrives in a very different context. IceWhale is no […]
[Deal du jour] Pour protéger votre portefeuille sans l'encombrer, ce traceur d'Ugreen se pose en alternative idéale à l'AirTag grâce à son format carte de crédit. Pratique et compatible avec le réseau Apple Find My, il profite actuellement d'une bonne réduction sur Amazon.
Ugreen vient de dévoilé un nouveau NAS et nous vous proposons de découvrir notre test du modèle 4 baies : UGREEN NASync DXP4800 GT. Après le DXP4800 Plus de l’an dernier et DXP4800 Pro en début d’année, nous avons pu passer plusieurs jours avec le modèle GT, une version revisité pensée pour les usages multitâches intensif et des environnements exigeants sans compromis sur la simplicité d’utilisation. Si on peut se poser des questions sur le positionnement de ce nouveau NAS, découvrons le dans le détail…
UGREEN DXP4800 GT
Là où les précédents produit (Plus et Pro) s’appuyait sur un processeur Intel, le DXP4800 GT passe sur un processeur AMD Ryzen R2514, offrant moins de puissance brute… mais un flexibilité avec les applications : transcodage multimédia, Docker…
Contenu de la boîte
À l’ouverture de la boite, on retrouve :
Le DXP4800 GT en lui-même ;
2 câble réseau RJ45 Cat. 7 ;
L’alimentation externe et son câble ;
Des vis pour les SSD avec un tournevis ;
2 blocs de pâte thermique pour les SSD NVMe ;
Un câble HDMI certifié compatible 8K ;
Un guide de démarrage rapide ;
Une feuille sur la garantie de 2 ans.
Comme pour les autres modèles du fabricant, l’emballage est soigné avec plusieurs niveaux de protection. On note les efforts du fabricant…
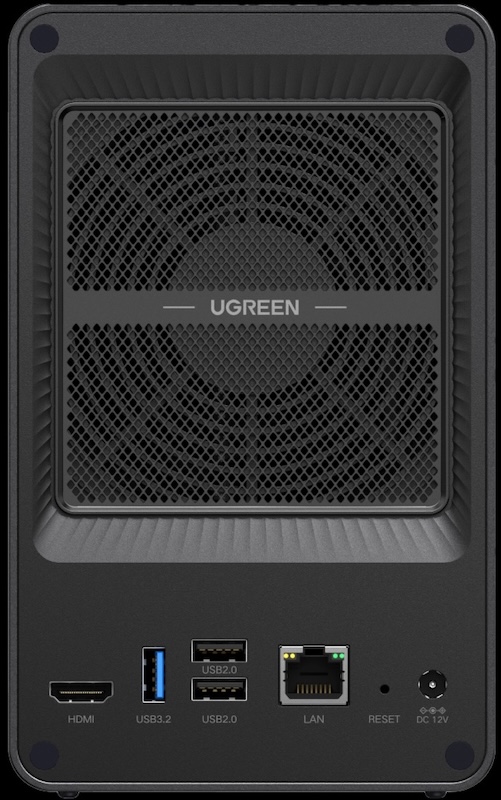
Design et connectivité
Extérieurement, il ressemble beaucoup aux versions Pro ou Plus avec quelques modifications. Nous avons un NAS toujours bien solide en aluminium noir. On note la présence de petites touches dorées plutôt sympathique. Son poids sur la balance affiche 4,1 kg. À l’arrière, nous avons toujours le ventilateur de 140 mm. Seul le nom en façade (en bas) diffère…
Du côté de la connectique, ce NAS dispose de :
2 ports USB 3.2 Gen 2 Type-A ;
1 ports USB 3.2 Gen 2 Type-C ;
2 ports USB 2.0 Type-A ;
1 lecteur de carte SD ;
1 sortie HDMI 4K@60 ;
2 port RJ45 10 Gb/s.
Cela change des modèles précédents. La connectique est plus cohérente et offre 2 ports 10 Gb/s. On ne peut que féliciter le fabricant qui fourni ici une connectivité bien pensée et complète.
Intérieur du DXP4800 GT
Là aussi, il y a du changement ! Le DXP4800 GT est animé par un processeur AMD Ryzen R2514 cadencé à 2,1 GHz (mode boost jusqu’à 3,7 GHz). Il est doté de 4 cœurs / 8 threads et un GPU intégré (Radeon Vega 8). Il est épaulé par 8 Go de RAM DDR4 (extensibles à 64 Go). A noter que les emplacements pour la mémoire sont compatible avec de la mémoire ECC. Celle livré ne l’est pas. Le score PassMark est de 6 829 points. Il est dans la moyenne haute par rapport au NAS que l’on a l’habitude de voir… mais en retrait face au DXP4800 Plus et DXP4800 Pro.
Vous aurez noté la présente d’une mémoire du fabricant chinois Kimtigo, qui se fournit notamment auprès de CXMT (ChangXin Memory Technologies) qui a fait récemment beaucoup parlé d’elle. Attention, cela ne remet pas en question la qualité ou la fiabilité du produit.
Installation des disques et SSD
Les disques durs 3,5 pouces s’installent assez facilement, sans outils. Les chariots sont différents de ceux de Synology ou QNAP, mais ils sont fonctionnels.
Pour installer un SSD au format SATA, il faut retirer une fixation en plastique (en bas à droite sur la photo ci-dessus) via un outil fourni. Il ne faut pas trop forcer au risque d’abimer la pièce.Il est important de noter que les 2 emplacements les plus à gauche (numérotés 1 et 2) sont compatibles avec le format U.2 (interface PCIe/U.2 dans un format 2,5 pouces), offrant des performances bien supérieures au SATA… que l’on retrouve principalement dans les entreprises.
Le NAS dispose de 2 emplacements pour SSD NVMe, accessibles via une trappe sous l’appareil. C’est également ici que vous pourrez augmenter la RAM. L’ajout de pâte thermique (fournie) et le rôle de dissipateur thermique du capot en aluminium sont des points positifs.
Encore ici, le NAS n’est pas suffisamment surélevé. Les patins sous l’appareil ne sont pas assez haut, ce qui limite la circulation de l’air et favorise les vibrations. De nombreux utilisateurs recommandent l’ajout de petits amortisseurs en élastomère pour corriger ce léger défaut. Nous validons ce choix.
UGOS Pro
Nous l’avons présenté à plusieurs reprise, UGOS est le système embarqué dans les NAS Ugreen. Même si ce dernier est encore jeune, il est complet et évolue régulièrement. Il reste en retrait par rapport aux ténors du marché… mais il n’a pas à rougir. Il sait déjà répondre à de nombreux usages…
Installation d’UGOS
L’utilisateur doit taper dans son navigateur find.ugnas.com pour trouver son NAS sur le réseau. L’installation se fait en 4 étapes très simple…
L’interface est en français et le guide permet de démarrer sereinement son NAS.
Note importante : Le service SMB (partage réseau) est désactivé par défaut. Si vous ne faites rien, le NAS n’est pas accessible par le réseau (Windows, macOS et Linux).
Usage au quotidien
UGOS est un système basé sur Linux optimisé pour le stockage en réseau. Il propose un ensemble de paramètres et propose d’ajouter des fonctionnalités grâce à son Centre d’applications : Antivirus, Download Center, Text Edit, etc. Ugreen a fait le choix de privilégier Docker pour compléter son environnement applicatif.
Le fabricant propose une application mobile tout-en-un qui permet de profiter d’accéder vos données à distance ou sur son réseau local. Il faut avouer qu’elle est très complète et relativement bien pensée. Ugreen propose également une application de bureau (Windows et macOS), ainsi qu’une adaptation pour Apple TV et Android TV. Elles permettent d’accéder aux fichiers, au statut du NAS, aux notifications… mais aussi au visionnage de vidéo, etc. Tout y est, un véritable couteau suisse !
Nouvel entrant et tolérance
Ugreen est nouveau sur le marché des NAS. L’entreprise possède une solide expérience industrielle et maîtrise déjà la conception matérielle et logicielle. Le fabricant connait bien le secteur des NAS, dominé par des acteurs comme Synology et QNAP. Côté matériel, ce produit tient la route…
Sur la partie logicielle, UGOS reste limité pour un usage avancé. S’il répond à 90% des particuliers, certains pourraient être déçus. Nul doute que le fabricant proposera de nouvelles fonctionnalités prochainement via des mises à jour.
L’essentiel est là : une base matérielle fiable et une volonté claire d’évoluer.
Performances du DXP4800 GT
Dans la première partie des tests, nous allons évaluer les performances des transferts à travers un réseau 10 Gb/s (entre le NAS et des ordinateurs). Ensuite, nous regarderons les capacités du processeur, en analysant ses performances globales…
Vitesses dans les transferts
Depuis plusieurs années, nous avons mis en place un protocole de tests rigoureux fournissant des données fiables et comparables avec les performances des autres NAS. Pour cela, nous utilisons 4 applications de mesure différentes (2 sous macOS et 2 sous Windows) et réalisons en plus des transferts de fichiers de tailles variées dans les deux sens (NAS -> Ordinateur puis Ordinateur -> NAS) :
Petites tailles : 100 fichiers de 500 Ko à 12 Mo (MP3, photos, documents Office)
Tailles moyennes : 30 fichiers de 12 à 350 Mo (DivX, images RAW, archives ZIP)
Fichiers volumineux : 10 fichiers avec une taille comprise entre 4 et 10 Go (MKV, ISO)
À la suite des tests, une moyenne des transferts est calculée et nous la représentons sous forme de graphiques exprimée en mégaoctets par seconde (Mo/s). Plus le nombre est élevé, plus le NAS est rapide. Pour notre évaluation du DXP4800 GT, nous avons configuré un premier volume avec 2 SSD NVMe en RAID 0 et un second avec 3 SSD SATA en RAID 5.
RAID 0
Comme on peut le constater, les performances sont au rendez-vous. Le NAS ne souffre d’aucun ralentissement. Il arrive même à dépasser le DXP4800 Pro !
RAID 5
Le RAID 5 amène un peu de complexité dans le traitement des données. Si l’impact est faible en lecture, il est plus important en écriture.
Performances générales
Avec son nouveau processeur, Ugreen propose un NAS offrant des capacités différentes. Comparons rapidement celui-ci avec les autres NAS :
UGREEN
DXP4800 GT
UGREEN
DXP4800 Pro
UGREEN DXP4800 Plus
Processeur
AMD Ryzen
R2514
Intel Core
i3-1315U
Intel Pentium
Gold
iGPU intégré
Radeon
(Vega8)
Intel UHD Graphics
(13th Gen)
Intel UHD Graphics
(12th Gen)
Score Passmark
(CPU)
6 828
11 182
9 080
Score Single Thread
2 026
3 315
3 226
TDP
15 W
15 W
15 W
RAM max supportée
64 Go DDR4
96 Go DDR5
64 Go DDR5
C’est un changement stratégique pour Ugreen. Si le processeur se situe dans la moyenne haute de ce que l’on a l’habitude de voir, ce dernier reste en retrait par rapport au version Plus et Pro.
Consommation électrique et nuisance sonore
Le ventilateur arrière est peut-être un peu mois discret que ses grand-frères. On l’entend légèrement souffler. Côté consommation électrique, le NAS affiche environ 27 W en usage normal (avec 2 SSD NVMe et 3 SSD SATA) et jusqu’à 50 W en charge plus soutenue.
Promotion
Pour le lancement Ugreen propose une remise de 20% sur les modèles 2 et 4 baies
Boutique officielle (2 baies / 4 baies) avec le code NASGTPR26
Le UGREEN DXP4800 GT marque un tournant avec un processeur AMD.
Avec ce NAS, le fabricant continue de surprendre. Le matériel est toujours maîtrisé, le logiciel reste perfectible mais en évolution constante. Les performances sont au rendez-vous ! Ugreen propose une véritable alternative face aux ténors du marché, à condition d’accepter sa jeunesse logicielle.
A More Focused 4-Bay NAS From UGREEN – the DXP4800GT Review UGREEN has moved quickly in the NAS market, and the DXP4800GT is one of the clearer examples of that. I first looked at this model when it appeared through UGREEN’s China-facing material, then again around Computex 2026 when it became clear that it was […]
UGREEN annonce l’arrivée de 2 nouveaux NAS : DXP2800 GT et DXP4800 GT. Ces nouveaux boitiers (respectivement 2 et 4 baies) sont animés par un processeur AMD Ryzen R2514. Aussi, chacun dispose de 2 ports réseau 10 Gb/s et 2 ports USB-A 3.2 Gen2, mais ce n’est pas tout…
DXP2800 GT & DXP4800 GT
Les nouveaux NAS DXP2800 GT et DXP4800 GT cachent plusieurs nouveautés. Tout d’abord, le boitier évolue légèrement. On constatera l’arrivée d’une pointe de couleur dorée (contours, numéro d’emplacement des disques…). Ces nouveaux boitiers disposent de 2 baies compatibles U.2 (interface PCIe/U.2 dans un format 2,5 pouces) et 2 baies SATA supplémentaire pour le 4 baies. Le format U.2 offre de très bonne performance et il est généralement destiné aux entreprises. On le trouve rarement dans les produits grand public. À l’intérieur, les NAS disposent également de 2 emplacements pour des SSD NVMe 2280.
Note : Il n’y a pas de SSD pour le système dans ces modèles, ce dernier est logé dans une mémoire eMMC de 64 Go.
Les NAS sont construits autour d’un processeur Quad Core AMD Ryzen R2514 cadencé à 2,1 GHz (mode boost jusqu’à 3,7 GHz), épaulé par un GPU intégré (Radeon Vega 8). Le fabricant met en avant que ce processeur n’aura aucune difficulté à gérer plusieurs tâches simultanées grâce 4 Cores/8 Threads. Les NAS sont livrés avec 8 Go de RAM en DDR4 (extensible jusqu’à 64) et acceptent de la mémoire ECC. À noter que ce processeur a obtenu un score de 6 829 points selon PassMark.
Connectique
La connectique du DXP2800 GT et DXP4800 GT diffère légèrement.Voici ce qu’il y a en commun :
2 ports USB 2.0 (type-A)
2 ports USB 3.2 Gen 2×2 (type-A)
1 port USB 3.2 Gen 2×1 (type-C)
1 sortie audio-vidéo 4K@60
2 ports 10 Gb/s en RJ45
À noter que le DXP4800 GT dispose d’un port SD supplémentaire en façade.
Prix et disponibilité
Les 2 NAS sont d’ores et disponibles à la commande. Les prix conseillés sont :
Le DXP2800 GT est à 509,99€
Le DXP4800 GT est à 659,99€
Une remise de lancement de 20% est disponible sur les deux modèles, aussi bien sur la boutique officielle (2 baies / 4 baies) avec le code NASGTPR26 et sur Amazon (2 baies / 4 baies) avec le code NASGTMEDIA.
Tellement de produits UGREEN passent entre mes mains que c'en est devenu une blague. Plus j'en kiffe un, plus ils m'en envoient un autre. Et à chaque fois, je craque pareil. Mais là je dois avouer que sur celui-là je suis complètement en phase (mais vous le savez, j'adore les chargeurs ha ha).
Le petit dernier donc, c'est ce
Nexode Air 65W
, qui m'a eu avant même que je le branche. Juste en le sortant du carton. Il est minuscule.
À côté du chargeur Apple 30W, celui qu'on connaît tous, la comparaison fait mal. Non seulement le UGREEN est minuscule à côté, mais il crache deux fois plus de watts. Mon Belkin 45W ? Même encombrement, et lui plafonne 20W plus bas. Et quand je le pose près d'un vieux UGREEN 65W d'il y a deux ou trois ans, on voit bien les progrès sur ce genre de produits.
Screenshot
Le tour de magie porte un nom, vous le connaissez, c'est le GaN, pour nitrure de gallium, un matériau qui pique peu à peu la place du bon vieux silicium dans nos chargeurs et qui permet de faire tenir beaucoup de puissance dans un tout petit boîtier sans que ça chauffe comme un radiateur. UGREEN sert sa recette maison sous le nom de GaNInfinity, annonce un rendement dans les 93% et un format réduit de presque trois quarts face à un 65W d'ancienne école, et de toutes manières plus réduit que les chargeurs GaN d'il y a quelques années.
Dans la vraie vie, ces 65W encaissent tout. L'iPhone qui repart d'à plat aux deux tiers en une demi-heure. Le MacBook Air qui passe la moitié dans le même temps. Le MacBook Pro qui se recharge sans mal. Franchement rien à dire, et sans chauffe problématique.
Il parle au passage tous les dialectes de la charge rapide, du Power Delivery au PPS, garde un oeil sur sa température et dose le courant pour épargner les batteries. On ne le voit pas, on ne le sent pas, mais c'est ça, un bon chargeur.
Bonus appréciable, le câble USB-C de 100W est fourni dans la boîte, tressé, donné pour 10 000 pliages. C'est con mais ça se fait rare.
Du coup il a élu domicile dans ma pochette et n'en bouge plus. Je le préfère même au
modèle 45W d'Anker et son petit écran
, parce que sur un truc grand comme un briquet, l'écran, je ne vois pas forcément l'intérêt (même s'il est très chou).
J'ai reçu et testé pendant quelques jours la nouvelle série FineTrack 2.0 d'UGREEN, trois petits traceurs d'objets pensés pour ne plus jamais perdre ses clés, son sac ou son vélo.
Premier truc qui saute aux yeux, aucun des trois ne ressemble à un AirTag. Et c'est tant mieux. Le galet blanc d'Apple, un voleur ou un curieux le repère en une seconde, alors qu'ici on passe beaucoup plus inaperçu. Discrétion, donc.
La gamme compte trois modèles. Le FineTrack Mini 2, un carré ultra-compact de 36 millimètres de côté pour 10,7 d'épaisseur, livré avec une coque en silicone et un porte-clés. Le FineTrack 2, une boule de 34 millimètres avec sa petite dragonne déjà fixée. Et le FineTrack Duo, au format carré.
Les deux premiers embarquent une batterie ni rechargeable ni remplaçable, donnée pour 5 à 7 ans. Impossible évidemment de vérifier une durée pareille en quelques jours, mais sur le principe, ça change tout.
Parce qu'avec une batterie qui tient cinq à sept ans, vous pouvez carrément planquer le traceur et l'oublier. Dans une voiture, sous la selle d'un vélo, dans une valise, sur n'importe quel objet dont vous ne voulez plus vous soucier, sans jamais penser à le recharger. Le jour où la batterie rendra l'âme, dans plusieurs années, vous changerez simplement de traceur. Alors certes c'est du jetable, mais 5 à 7 ans, c'est large…
On se dit forcément qu'avec une batterie rechargeable ils auraient été un peu plus gros, ou moins endurants. Mais bref, à ce niveau d'autonomie, la question ne se pose même plus.
Les deux partagent la même fiche : certification officielle Apple Find My (le réseau Localiser d'Apple, qui se sert des iPhone des autres passants pour retrouver vos affaires), un haut-parleur de 110 décibels pour les faire hurler même enfouis au fond d'un sac, une étanchéité IP68 qui encaisse la poussière comme l'immersion, et des petites notes fluorescentes pour les repérer dans le noir.
Mon préféré, c'est clairement la boule de type ballon de foot, le FineTrack 2. Avec sa dragonne, elle fait un porte-clés vraiment chouette, et je la verrais bien aussi accrochée au sac ou au manteau d'un enfant pour garder un œil dessus.
Si vous tenez à la recharge, le troisième modèle est fait pour ça. Le FineTrack Duo se recharge en USB-C, annonce environ 12 mois d'autonomie pour deux heures de charge, et surtout il fonctionne aussi bien sur iOS que sur Android grâce à sa double compatibilité Apple Find My et Google Find Hub, l'équivalent côté Google. L'idéal pour un foyer où cohabitent iPhone et téléphones Android. Son haut-parleur tape un peu moins fort, 80 décibels, et il embarque une certification de sécurité enfants contre l'ingestion.
Bref, trois traceurs intéressants, discrets et bien finis. Je recommande.
Découvrez le NAS UGREEN DXP4800 Pro, un modèle avec un processeur Intel Core i3, 8 Go de RAM DDR5, double réseau (2.5 GbE et 10 GbE), et d'autres surprises.
UGREEN NASync Celebrates 2 Years – But Is UGREEN Ready for the Big Leagues? Two years ago, the popular battery and PC accessory company UGREEN, launched their Kickstarter campaign for the NASync personal NAS series of devices. The brand already had a steadily growing foothold in China with their DX series of NAS devices, but […]
Update on the ZimaCube 2 NAS + Your Questions Answered
Following the original ZimaCube and ZimaCube Pro, IceWhale is now preparing the ZimaCube 2 range as a more mature follow-up to its first desktop NAS platform, combining the same broad idea of a compact, open, software-defined personal cloud with clearer attention paid to refinement, validation, and retail readiness. Based on the specifications revealed so far, the standard $799 ZimaCube 2, the $1,299 ZimaCube 2 Pro, and the $2,499 Creator Pack continue to target users who want a turnkey system that still leaves room for alternative operating systems, PCIe expansion, direct Thunderbolt 4 or USB4 connectivity, and mixed storage workloads, but the second generation also arrives in the shadow of the first model’s early issues around cooling, power handling, and hardware compatibility, all of which IceWhale now says informed the redesign. Rather than presenting the ZimaCube 2 as a radically different product category, the company appears to be positioning it as a more stable and better validated version of the same formula, with a stronger base model, revised cooling, closer hardware and software integration, and a retail launch path instead of another crowdfunding campaign.
Remember to use the NASCompares Channel Discount Code: ‘NASCOMPARES50’
Zimacube 2 First Look at the Design
In physical terms, the ZimaCube 2 remains very close to the original system. The listed chassis dimensions are still 240 x 221 x 220 mm, and the overall layout continues to center on a compact desktop enclosure with 6 front-facing drive bays, a removable front panel, and a secondary internal sled for the 7th-bay M.2 storage section. That means this is not a major departure in footprint or format, but rather a continuation of the same small-tower NAS concept that IceWhale introduced with the first ZimaCube generation.
The external build also keeps the same broad industrial approach, with an all-metal enclosure and a design that is intended to be visible on a desk rather than hidden away. Based on the Shenzhen hands-on material, the finish has been revised to a silver tone rather than the darker look associated with earlier models, and there are still decorative touches such as copper-coloured screws and RGB lighting. The magnetic front cover also remains part of the design language, although the hands-on notes suggest that removability is still not especially refined, with no obvious front handle to make access easier.
Internally, the most significant design revision appears to be in thermals rather than structure. The original ZimaCube family drew recurring criticism over cooling behaviour and fan noise, and IceWhale itself later issued optimisation guidance and revised cooling components for early units. On the ZimaCube 2, the cooling assembly appears to have been reworked substantially, with a much larger vapor-chamber style module, extended heatpipe routing, and a direct airflow path toward a rear-mounted fan. In practical terms, this is one of the clearest visible signs that the company is treating thermal control as a first-order design issue rather than a secondary adjustment.
The storage layout remains one of the most recognisable elements of the platform. At the front are 6 SATA bays for 3.5-inch and 2.5-inch drives, while the separate 7th-bay board carries 4 M.2 slots. What has changed is the clarification around performance tiers. Following the post-video corrections, both the standard and Pro use PCIe Gen 4 for the 7th-bay architecture, but the actual throughput differs because of the ASMedia bridge hardware: the standard model is rated for 800MB/s R/W, while the Pro and Creator Pack are rated for 3200MB/s R/W. So although the physical design remains familiar, the storage subsystem is now segmented more clearly by model.
Taken together, the ZimaCube 2’s design changes are best understood as a revision rather than a clean-sheet rethink. The enclosure, bay structure, general scale, and visual concept are all recognisably derived from the earlier ZimaCube, but the thermal hardware, finish, and some of the internal implementation details suggest a product that has been adjusted in response to first-generation feedback. From a design perspective, the main story is not reinvention. It is that IceWhale appears to have revisited the same chassis idea with greater emphasis on cooling headroom, validation, and long-term use as a retail product rather than a first-wave crowdfunded device.
Zimacube 2 Internal Hardware Confirmation
The internal hardware changes are more substantial than the exterior suggests, particularly at the lower end of the range. The standard ZimaCube 2 now moves from the original ZimaCube’s Intel N100 to a 12th Gen Intel Core i3-1215U, giving the base model 6 cores, 8 threads, and a much stronger starting point for mixed storage and application workloads.
The ZimaCube 2 Pro and Creator Pack both use the 12th Gen Intel Core i5-1235U with 10 cores and 12 threads, which keeps the Pro class in the same broad processor tier as the earlier ZimaCube Pro, but still gives the second-generation lineup a more balanced split between entry and higher-tier models. Memory has also shifted upward in platform terms, with DDR5 SODIMM support and upgradeable slots rather than fixed memory, allowing the standard model to start at 8GB, the Pro at 16GB, and the Creator Pack at 64GB.
One of the more important details here is that IceWhale is not presenting the hardware purely as a NAS board with attached storage, but as a compact compute platform that also happens to handle large-scale local storage. The system still uses an internal NVMe SSD for the operating system, with 256GB on the standard and Pro and 1TB on the Creator Pack, while retaining dual PCIe slots on a Mini-ITX based custom board. That means the core platform is still built around expandability, and not just in a theoretical sense. IceWhale continues to point toward GPU cards, AI accelerators, network cards, and SSD-focused upgrades as intended use cases, which places the ZimaCube 2 somewhere between a traditional NAS, a compact home server, and a turnkey prosumer workstation-style storage appliance.
At the same time, the scale of the internal upgrade depends on which earlier model is being used as the reference point. Against the original non-Pro ZimaCube, the jump is obvious: newer CPU class, higher memory ceiling, improved internal segmentation, and a platform that appears better prepared for virtualization, media handling, and direct-attached workloads. Against the original ZimaCube Pro, however, the advance is more limited, because the Pro remains on the same Core i5-1235U family and much of the underlying capability was already present in some form. So while the internal hardware is clearly stronger overall, especially in the standard model, this still reads more as a focused revision of the existing architecture than a complete hardware reset.
Zimacube 2 Final Ports and Connectivity
Externally, the ZimaCube 2 continues to position itself as something broader than a conventional NAS, and the port layout reflects that. On the rear, the standard model includes 2 x 2.5GbE network ports alongside 2 x Thunderbolt 4 or USB4-capable USB-C connections, which gives it both networked and direct-attached workflow options. That matters because IceWhale is still treating direct host connection as one of the platform’s defining features, particularly for users who want local high-speed access without routing everything through standard Ethernet alone. It also keeps the ZimaCube 2 distinct from many turnkey NAS systems that rely almost entirely on network connectivity as the primary access path.
The separation between the standard and Pro models is more visible in networking than in external appearance. The standard ZimaCube 2 is limited to 2 x 2.5GbE, while the ZimaCube 2 Pro adds an additional 10GbE port. That makes the Pro the more complete option for users intending to deploy the system as shared high-speed network storage, while the standard model leans more heavily on its direct-connect Thunderbolt 4 or USB4 story to offset the absence of 10GbE. In practical terms, this is an important distinction, because although both systems look closely related on paper, the network capabilities create a clear difference in how they are likely to be used in creative or multi-user environments.
The rest of the I/O remains relatively conventional but still useful for a system of this class. IceWhale lists 4 x USB-A 3.0 ports, 1 x USB-C 3.0 port, DisplayPort 1.4, HDMI 2.0, and a 3.5mm audio jack, while the internal platform also keeps 2 PCIe expansion slots available for broader configuration. None of these ports alone are unusual, but taken together they reinforce the same point as the rest of the hardware: this is not being framed as a sealed appliance. It is being framed as a turnkey system with room for local expansion, direct attachment, and mixed workload deployment, even if the actual value of that depends on whether the buyer is choosing the standard model’s lower-cost balance or the Pro model’s more complete network specification.
Next, I spent some time with the founder of Icewhale (the company behind the Zimacube and ZimaOS, as well as the popular Zimaboard and Zimablade) and put forward a few questions about the current development of Zimacube 2 and their recent pricing changes to ZimaOS.
What is the ZimaCube 2 bringing to the market that your previous ZimaCube/ZimaCube Pro does not?
Based on the hands-on session and Lauren Pan’s comments, IceWhale is not presenting the ZimaCube 2 as a completely new product category, but rather as a more refined and better balanced version of the same idea. The biggest practical difference is that the standard model is no longer a clearly compromised entry point in the way the original N100-based ZimaCube often appeared next to the first Pro. The move to a Core i3-1215U, DDR5 memory, dual Thunderbolt 4 or USB4, 6 SATA bays, 4 M.2 slots, 2 PCIe slots, and upgradeable SODIMM memory means the base model now looks much closer to the wider prosumer NAS and compact server market, instead of acting mainly as the cheaper route into the ecosystem. That gives the range a stronger starting point and makes the standard unit a more serious option in its own right.
The second major difference is maturity rather than raw specification. IceWhale is tying the ZimaCube 2 more directly to the lessons learned from the first generation, especially around cooling, stability, hardware validation, and closer coordination between hardware and software development. The revised thermal module, the stronger emphasis on compatibility testing, the claim of more OS-level control over system parameters such as fans, and the move away from crowdfunding toward direct retail all suggest that the ZimaCube 2 is intended to arrive as a more settled product. So while the overall concept remains familiar, what IceWhale appears to be bringing to market this time is a more fully developed turnkey platform, not just in hardware terms, but in how the product is being prepared, sold, and supported.
What lessons were learnt in the development of the original ZimaCube that are going to be applied in the development of ZimaCube 2?
The clearest lesson appears to have been that the original ZimaCube needed tighter coordination between hardware and software from the outset. According to Lauren Pan, one of the main internal changes for the second generation is that both teams now work far more closely together, discussing hardware and software details in the same development cycle rather than treating them as separate tracks. In practical terms, that matters because the first-generation platform showed that a NAS or personal cloud product is not defined by hardware alone. It also depends heavily on how well thermals, fan control, storage behaviour, connectivity, and OS-level management are integrated into a single system.
A second lesson concerns validation and first-batch readiness. The original ZimaCube attracted feedback around cooling, fan behaviour, drive compatibility, and power-related issues, and IceWhale now appears to be treating those areas much more seriously in the ZimaCube 2. Pan specifically pointed to a redesigned thermal module, more extensive compatibility testing, and additional work with drive manufacturers such as Seagate and Western Digital after earlier issues emerged. The broader implication is that ZimaCube 2 is being developed less like an experimental first-generation product and more like a revision intended to reduce the kind of early hardware and integration problems that affected the first release.
What was the biggest challenge that you have faced in the development of ZimaCube 2?
According to Lauren Pan, the biggest challenge in developing the ZimaCube 2 was production cost. That answer fits the wider context of the current hardware market, where CPU, memory, SSD, and other component pricing has remained a significant pressure on system builders. In the case of the ZimaCube 2, IceWhale appears to have been trying to hold onto several features that are often reduced or removed in competing products at this price level, including upgradeable SODIMM memory, bundled system storage, dual Thunderbolt 4 or USB4 connectivity, PCIe expansion, and a more substantial cooling solution. So the challenge was not simply making a new box, but doing so while keeping the product within a price band that still looked competitive against other turnkey and semi-DIY NAS systems in 2026.
That issue appears especially relevant to the standard model. IceWhale is trying to position the $799 ZimaCube 2 as a stronger base platform than the original non-Pro unit, while still including a Core i3-1215U, 8GB of DDR5, 256GB of NVMe storage, 6 SATA bays, 4 M.2 slots, and full ZimaOS licensing as part of the package. In that respect, the development challenge seems to have been balancing specification, manufacturability, and margin without moving the product out of reach of the same buyers it is trying to attract. The result is that cost control appears to have shaped not just pricing, but also the way IceWhale talks about the ZimaCube 2 as a price versus performance compromise rather than an attempt to maximise specifications at any cost.
What has the user response been to your switch towards a free/paid $29 model of your ZimaOS software since the announcement?
According to Lauren Pan, the response to the move from a fully free model to the current free tier plus $29 lifetime ZimaOS+ model has been mixed, but not unexpected. Some community members were confused by the change or felt the software should have remained fully free, while others accepted that the platform needed a sustainable business model if development was going to continue over the long term.
That split is fairly typical for software that begins as a no-cost offering and later introduces paid licensing, particularly when it has built much of its reputation through community use, testing, and feedback. In IceWhale’s case, the company’s position is that the low-cost lifetime fee is intended to make the software commercially sustainable without undermining its accessibility.
IceWhale has also tried to frame the pricing change as part of a broader community model rather than just a revenue switch. Pan said the company had explained the reasoning publicly in late 2025 and described a plan under which 33% of license revenue would be directed back toward community contributors, including moderators, app maintainers, and users helping support the wider ZimaOS and CasaOS ecosystem.
Whether that model proves sustainable over time remains to be seen, but the immediate point is that IceWhale does not appear to be treating the $29 fee as a traditional software upsell. Instead, it is presenting it as a low-cost, lifetime contribution intended to keep development active while maintaining a relatively low barrier to entry compared with other paid NAS software platforms.
Will ZimaCube 2 be headed for crowdfunding, or direct to traditional retail?
IceWhale says the ZimaCube 2 is going direct to traditional retail rather than returning to crowdfunding. In Lauren Pan’s explanation, Kickstarter is something the company now sees as useful in 2 specific cases: either when a product concept still needs market validation, or when production costs are high enough that outside funding is needed to get the first batch built. IceWhale’s position is that the original ZimaCube fit that earlier stage of the company, when the product was more expensive to bring to market and the business itself was still proving demand for this kind of home server and personal cloud hardware. With the ZimaCube 2, the company appears to believe it no longer needs crowdfunding for either of those reasons.
That change is also part of the wider message around the second generation. Moving straight to store-based pre-orders gives the impression that IceWhale wants the ZimaCube 2 to be seen less as an experimental or community-funded device and more as a normal retail product. Pan also described the early response as active, with roughly 200 to 300 community applications tied to testing and usage scenarios, suggesting that demand discovery is now happening around a product that already exists, rather than one still needing crowdfunding to justify its creation. In practical terms, the retail-first approach supports IceWhale’s broader attempt to position the ZimaCube 2 as a more mature follow-up to the first generation.
The NASCompares Conclusion and Verdict so Far on ZimaCube 2
Taken as a whole, the ZimaCube 2 looks less like a dramatic reinvention of the original platform and more like a deliberate correction and refinement of it. The overall chassis concept, storage layout, and broader product identity remain familiar, but IceWhale appears to have focused this second generation on the areas that mattered most after the first release: a stronger base model, revised thermals, closer hardware and software coordination, more validation around compatibility, and a direct retail launch rather than another crowdfunding cycle. That means the scale of change is uneven depending on which earlier model it is compared against, but the direction is clear enough. The ZimaCube 2 does not appear to be trying to replace the original with a wholly different vision. Instead, it looks like IceWhale is trying to turn the ZimaCube formula into a more complete and commercially mature turnkey platform, with ZimaOS, direct Thunderbolt 4 or USB4 connectivity, PCIe expansion, and hybrid storage still forming the core of its appeal.
Remember to use the NASCompares Channel Discount Code: ‘NASCOMPARES50’
This description contains links to Amazon. These links will take you to some of the products mentioned in today's content. As an Amazon Associate, I earn from qualifying purchases. Visit the NASCompares Deal Finder to find the best place to buy this device in your region, based on Service, Support and Reputation - Just Search for your NAS Drive in the Box Below
Need Advice on Data Storage from an Expert?
Finally, for free advice about your setup, just leave a message in the comments below here at NASCompares.com and we will get back to you.Need Help?
Where possible (and where appropriate) please provide as much information about your requirements, as then I can arrange the best answer and solution to your needs. Do not worry about your e-mail address being required, it will NOT be used in a mailing list and will NOT be used in any way other than to respond to your enquiry.
[contact-form-7]
TRY CHAT Terms and Conditions
If you like this service, please consider supporting us.
We use affiliate links on the blog allowing NAScompares information and advice service to be free of charge to you.Anything you purchase on the day you click on our links will generate a small commission which isused to run the website. Here is a link for Amazon and B&H.You can also get me a Ko-fi or old school Paypal. Thanks!To find out more about how to support this advice service checkHEREIf you need to fix or configure a NAS, check FiverHave you thought about helping others with your knowledge? Find Instructions Here
Or support us by using our affiliate links on Amazon UK and Amazon US
Alternatively, why not ask me on the ASK NASCompares forum, by clicking the button below. This is a community hub that serves as a place that I can answer your question, chew the fat, share new release information and even get corrections posted. I will always get around to answering ALL queries, but as a one-man operation, I cannot promise speed! So by sharing your query in the ASK NASCompares section below, you can get a better range of solutions and suggestions, alongside my own.
100 Reasons DIY NAS (TrueNAS, UnRAID, Proxmox) are BETTER than Turnkey (Synology/QNAP/etc)
Plenty of people who start with Synology, QNAP or other turnkey NAS boxes will quietly admit that they keep hearing the siren call of DIY platforms like TrueNAS, Unraid, Proxmox, OpenMediaVault and ZimaOS. They see the videos, the benchmarks and the insane builds that squeeze every last drop out of consumer and ex-enterprise hardware. No one is pretending that turnkey systems are not convenient or polished, but more and more users are realising that the raw control, scalability and flexibility you get from rolling your own NAS can be worth the extra effort. In 2025 it is easier than ever to grab a used server, a pile of drives and a USB stick and end up with something that outperforms many branded appliances, both in speed and long term value. So, below are 100 reasons why users decide to jump ship from the safe, curated and sometimes expensive world of turnkey NAS, and instead join the more open, powerful and endlessly customisable world of DIY storage. Some points are very homelab focused, others are about cost and longevity, and some are specific to individual platforms such as TrueNAS ZFS, Unraid parity arrays or Proxmox clustering.
IMPORTANT DISCLAIMER – Different tools suit different tasks! I use both DIY and Turnkey Solutions in my own personal/work data storage environments (as well as a little bit of DAS and even some off site cloud!),. This article is not designed to ‘attack’ or ‘slag off’ one side of the home server market over another! It is to help understand why users might choose one over the other. Not disimilar in some ways to how some people prefer PC gaming vs Console gaming (or even exclusively mobile, though even struggle to wrap my head around that one!).
1. Full control over your hardware
With TrueNAS, Unraid, ZimaOS, Proxmox or OMV you choose everything yourself, from CPU and RAM to motherboard, HBA, NIC, case and power supply. You are not restricted to a small list of approved chassis and expansion units, so you can build around quiet small form factor systems, big tower rigs, or used rack servers depending on your needs and budget.
2. No vendor lock on drives
DIY NAS platforms let you use almost any SATA or SAS drive you like, including shucked external drives and mixed brands. There are no vendor media lists, no compatibility warnings that nag you for using third party disks, and no artificial limits that push you toward expensive branded drives.
3. Advanced file system features
TrueNAS and some other DIY platforms give you direct access to ZFS features such as copy on write integrity, end to end checksums, compression, snapshots, clones and send or receive replication. You can design datasets and snapshot schedules exactly as you want rather than relying on simplified abstractions.
4. Flexible storage layouts and mixed disk sizes
Unraid and ZFS based DIY stacks allow non traditional layouts, with mixed disk sizes, parity only arrays, mirror vdevs, striped vdevs and multiple pools. You can start small and grow over time without following the fixed bay patterns or limited RAID options of many turnkey systems.
5. Deep performance tuning
DIY NAS operating systems usually expose more dials for memory usage, cache behaviour, record sizes, sync policy, queue depths and network stack tuning. Power users can squeeze more throughput or lower latency from the same hardware by testing and adjusting these settings, something appliance firmware often hides.
6. Multi role server in one box
A DIY NAS can be more than just storage. With Proxmox, Unraid, ZimaOS or OMV plus a hypervisor you can run VMs, containers, network services and lab workloads on the same system. This suits homelab users who want their storage server to double as a general purpose compute node.
7. Better use of high end or unusual components
If you invest in many core CPUs, large amounts of RAM, enterprise NVMe or special purpose HBAs, DIY platforms can take full advantage of them. You are not limited by a turnkey vendor firmware that assumes mid range hardware and sometimes underuses powerful components.
8. Lower cost at large scale
Once you move beyond a handful of bays, appliance NAS pricing climbs quickly. Building a DIY NAS with commodity parts or refurbished enterprise gear often gives you a much lower cost per bay and a cheaper upgrade path over five to ten years, especially for media servers and backup targets.
9. Reuse of existing hardware
Many people already have a spare gaming PC, workstation or decommissioned server. DIY NAS software lets you repurpose that hardware rather than buying a completely new appliance. You can then gradually replace parts over time without throwing the whole system away.
10. Independence from vendor roadmaps
With TrueNAS, Unraid, Proxmox or OMV you are not tied to one company product line or release schedule. If a vendor drops a feature, changes licensing, or stops making a class of device, your DIY stack keeps going and you can add or swap components as you see fit.
11. Open source transparency and auditability
Many DIY NAS platforms are open source or based on open distributions. You can inspect the code, follow public issue trackers, and see exactly how data path and management components behave. For organisations with strong security requirements this transparency can be more attractive than opaque appliance firmware.
12. Rich community plugin and container ecosystem
TrueNAS, Unraid, Proxmox and OMV all have active communities that publish templates, stacks and guides for a huge range of self hosted services. New applications usually appear first as containers or community charts, so you can experiment with cutting edge projects long before they arrive in any vendor app store.
13. Clean integration with existing homelab tools
If you already use tools such as Ansible, Terraform, Salt, Proxmox clusters, or Kubernetes, a DIY NAS fits into that world more naturally. It behaves like another Linux or BSD server, so you can reuse automation, monitoring, and configuration patterns that you already trust.
14. Freedom from feature based licensing
DIY platforms generally do not charge extra for adding more cameras, shares, users or applications. If your hardware can handle twenty containers or twenty camera streams, you can run them without buying more licences. That is very different from some turnkey systems where extra features are tightly controlled.
15. Strong privacy control and no enforced cloud accounts
TrueNAS, Unraid, ZimaOS, Proxmox and OMV can all run fully local with no requirement to create cloud accounts or sign in to a vendor portal. You choose if you want remote access and which VPN or reverse proxy you trust, so it is easier to keep storage isolated from external services.
16. Powerful scripting and automation options
Because DIY NAS software sits on standard Linux or BSD layers, you can use cron, systemd timers, full shell scripting and language runtimes such as Python or Go. Backup pipelines, integrity checks, archiving rules and housekeeping tasks can be scripted exactly as you need them.
17. Better fit for larger and denser builds
If you want twenty four, thirty six or more bays, DIY approaches scale more smoothly. You can use dedicated JBOD shelves, fibre or SAS expanders, and multiple HBAs, with TrueNAS or Proxmox managing pools across them. Many consumer appliances run out of official options long before that point.
18. Easier experimentation with new technologies
DIY platforms are ideal for lab work with new storage ideas, for example experimental ZFS features, new compression algorithms, alternative filesystems or clustered storage layers such as Ceph and Gluster. You can try these on real hardware without waiting for a turnkey vendor to embrace them.
19. Ability to virtualise the NAS itself
A DIY NAS stack can sit inside a virtual machine on top of Proxmox, VMware or another hypervisor. That makes it easier to move the entire storage system between hosts, snapshot the system disk, test upgrades in clones, or run multiple separate NAS instances on the same physical hardware.
21. Alignment with strict open source or compliance policies
Some companies and institutions prefer or require that core infrastructure runs on software with open licensing and source availability. DIY NAS stacks based on standard Linux or BSD distributions make it easier to satisfy those policies than closed vendor operating systems.
22. Efficient use of decommissioned enterprise hardware
The secondary market is full of cheap rack servers, HBAs and SAS shelves that are no longer wanted in data centres but are perfect for home or small business storage. TrueNAS, Proxmox and OMV can run happily on this hardware and give you enterprise level resilience for a fraction of the original cost.
23. Custom network roles on the same machine
A DIY NAS can also act as router, firewall, VPN concentrator or reverse proxy if you want to consolidate equipment. Proxmox or Unraid can host a firewall VM, DNS resolver and other network tools right next to your storage, which is not how most turnkey NAS devices are designed to be used.
24. Fine grained control of encryption and keys
DIY platforms usually let you decide exactly how encryption is applied, how keys are stored, how passphrases are entered and how this interacts with snapshots and replication. You can integrate with external key managers or strict manual processes rather than using a one size fits all wizard.
25. Easier avoidance of telemetry and phone home behaviour
If you want a storage stack that never connects to any remote service unless you deliberately configure it, DIY software is easier to keep quiet. You can review services, outgoing connections and packages yourself, instead of relying on a vendor to document what their appliance firmware does.
26. Flexible data retention and tiering schemes
Because you control the hierarchy of datasets, shares and pools, you can implement very detailed retention rules and archiving flows. Cold data can move to slower and cheaper disks, hot data can live on SSD pools, and you can enforce lifecycles with your own scripts instead of fixed vendor policies.
27. Shared skillset across storage and compute
When your storage servers and application servers all run similar bases, for example Debian or FreeBSD, the same administration knowledge applies everywhere. Teams do not need to learn a unique vendor interface for one box and a completely different approach for the rest of the estate.
28. Support for niche and emerging services
DIY NAS ecosystems often adopt new projects quickly, whether that is a young media server, a fresh photo tool, or an unusual database. Community templates for Unraid or Proxmox arrive much faster than official packages on proprietary platforms, so you can explore niche services early.
29. Long term reuse of hardware for other roles
If your storage needs change, a DIY NAS box can become a general server, a lab hypervisor or a test bench machine simply by reinstalling or repurposing the disks. You are not stuck with a chassis that only really makes sense as a proprietary NAS.
30. Lean installations without extra bloat
DIY stacks can be installed in a minimal way with only the services you actually need. There is no requirement to run vendor photo portals, cloud connectors or bundled office tools if you do not want them, which keeps resource use low and reduces the attack surface.
31. Granular control over updates and versions
DIY NAS platforms usually let you decide exactly when to update the core system, plugins and containers. You can hold a known good version for months, run a newer kernel only on a test VM, or pin specific containers while the rest of the stack moves forward, instead of accepting a single vendor update cadence across everything.
32. Ability to run several NAS platforms on one machine
With Proxmox or similar hypervisors you can run TrueNAS in one VM, Unraid in another and maybe a plain Linux storage stack beside them, all on the same hardware. This lets you compare platforms, migrate gradually or dedicate different virtual NAS instances to different clients without buying multiple appliances.
33. Deep visibility for troubleshooting and performance analysis
DIY systems expose full system logs, kernel messages, packet captures and low level profiling tools. When you hit a strange performance issue or network glitch you can drill right down into iostat, tcpdump or perf, rather than relying only on a high level vendor dashboard that may not reveal the root cause.
34. Configuration managed like code in Git
Because most DIY NAS configurations live in text or structured files, you can store them in Git, review changes, roll back to older commits and clone the same setup onto another node. This aligns your storage servers with modern configuration management practices instead of keeping all changes on a single vendor GUI.
35. Option to extend or maintain abandoned components
If a plugin, driver or feature you rely on is dropped by its original maintainer, an open DIY stack at least gives you the option to fork and maintain it or hire someone to do so. With a closed appliance firmware, once the vendor removes or changes a feature you generally have no way to bring it back.
36. Freedom to fully rebrand or white label
Service providers that build solutions for clients can install TrueNAS, Proxmox or OMV on standard hardware and theme the interfaces, hostnames and portals to match their own brand. There is no prominent third party logo on the front of the GUI, which is often preferable when you are selling a complete solution.
37. Direct choice of monitoring and alerting stack
DIY NAS servers can run native agents for Prometheus, Zabbix, Checkmk, commercial monitoring suites and whatever log pipeline you already use. You do not have to rely on a vendor specific cloud portal or proprietary alert format, so storage monitoring fits seamlessly into the rest of your infrastructure.
38. Support for unusual hardware form factors
Because you can install DIY NAS software on almost anything that runs a suitable kernel, it is easier to use very compact systems, blade servers, dense JBOD trays or custom builds that no turnkey NAS vendor offers. This flexibility is valuable when you have physical constraints or leftover hardware that does not match appliance shapes.
39. Full control over repositories and software sources
On a DIY stack you decide which package repositories are trusted, whether you mirror them locally and which versions are allowed. This is useful in secure environments that need all software to come from internal mirrors and want to block any unapproved external package feeds.
40. Faster access to new kernel and protocol features
New SMB or NFS versions, fresh filesystems, driver updates and network features typically land on general purpose Linux or BSD first. DIY platforms that stay close to upstream can adopt these improvements long before a NAS vendor ships them in a future firmware for a specific appliance.
41. Stronger learning value and career skills
Running TrueNAS, Unraid, Proxmox or OMV teaches real storage, networking and operating system concepts. Many homelab users treat their DIY NAS as a training ground, and the knowledge they gain with ZFS, KVM, Docker and Linux often translates directly into professional roles in IT and DevOps.
42. Better use of GPUs and accelerators
DIY NAS systems can use almost any supported GPU or accelerator card for tasks such as Plex transcoding, AI workloads, video processing or scientific computing. You can pass devices through to VMs or containers and tune them as you like, instead of being restricted to a short list of vendor approved cards.
43. True multi tenant storage on a single chassis
With Proxmox or other hypervisors you can run several separate NAS VMs for different customers or departments on one physical box, each with its own web UI, users and policies. This multi tenant approach is attractive for managed service providers and is harder to implement cleanly on a single turnkey NAS.
44. Custom identity and multifactor authentication integration
DIY NAS environments can tie directly into whatever identity stack you prefer, from simple LDAP through to complex single sign on with custom multifactor rules. You can adopt advanced access controls or experiment with new identity providers without waiting for a NAS vendor to support them.
45. Alignment with strict internal security tooling
Organisations that already use SELinux, AppArmor, central audit frameworks or host based intrusion detection can apply the same policies to DIY storage nodes. A TrueNAS or Proxmox box that runs on a standard distribution can join existing security baselines, which is much harder with proprietary NAS firmware.
46. Support for exotic and high performance networking
DIY NAS stacks can use specialist network cards such as Infiniband, RoCE capable adapters or unusual fibre interfaces as long as the drivers exist. This allows you to experiment with very high throughput or low latency technologies that are rarely supported on commodity appliance NAS hardware.
47. Custom backup and replication pipelines
With tools like ZFS send and receive, rclone, Restic or Borg you can build very specific backup and replication flows. You can script encryption, throttling, snapshot selection and multiple targets in a way that fits your environment instead of being limited to the fixed policies of one vendor backup tool.
48. Colocation friendly and data center ready
DIY NAS builds can follow data center norms such as using standard rack servers, redundant power supplies, remote management controllers and IPv6 heavy networks. Colocation providers expect this type of hardware, and DIY software lets your storage blend into a standard server fleet rather than being an odd office appliance.
49. Fine grained admin delegation at operating system level
On a DIY NAS you can use normal user, group and sudo rules with SSH keys to control who can run which commands. One person can manage pools, another can manage virtual machines, another can handle monitoring agents, all with precise restrictions that go beyond the coarse admin or user split of many appliances.
50. Integration with dynamic energy and solar setups
Because DIY NAS software can talk to external APIs and home automation systems, you can schedule heavy tasks such as scrubs, backups or transcoding to run when solar output is high or electricity tariffs are low. This kind of energy aware behaviour is difficult to achieve with fixed vendor power schedules.
51. Deep home automation and MQTT integration
DIY storage nodes can publish events into MQTT, Node Red or Home Assistant whenever backups finish, disks fail or space runs low, and can also respond to automation signals from the rest of the house. This lets your NAS participate in a wider automation fabric rather than living as an isolated appliance.
52. Use of enterprise secrets management for keys and passwords
DIY NAS servers can fetch encryption keys, passwords and API tokens from systems such as HashiCorp Vault or other corporate secret stores. That allows central management and rotation of sensitive data instead of keeping secrets inside a proprietary NAS configuration database.
53. Network boot and golden image strategies
You can build a standard disk image or network boot environment for your DIY NAS with all tooling and configuration baked in. If the system disk fails or you want to spin up a second node, you simply redeploy the image and reattach the existing storage pools, which is a very different model from appliance firmware.
54. Validation of changes through continuous integration
When configuration lives in files managed in Git, you can run linting and simulation jobs in a CI pipeline before applying changes to your DIY NAS servers. This allows you to catch syntax errors or bad parameters automatically, which is impossible when all edits happen only through a click driven vendor interface.
55. Custom user interfaces and portals on top of APIs
DIY stacks expose command line tools and often REST APIs that allow you to build your own lightweight dashboards for particular users or teams. You can present a simplified view for media editors, a different one for backup operators, and keep the full complexity of the base system hidden in the background.
56. Tailored localisation and language choices
If the default language or terminology of the platform does not suit your users, you can adjust translation files or web templates on a DIY system. Community contributions in minority languages are also easier to ship and maintain than on a closed vendor NAS where only official translations exist.
57. Customised drive qualification and burn in workflows
You can design a strict process for testing new disks, for example running multi day read and write passes, specific SMART tests and temperature checks before a drive ever joins a pool. Scripts and reports can enforce this burn in policy across all your DIY NAS nodes, something turnkey platforms rarely expose in detail.
58. Robust behaviour in extreme or niche environments
In vehicles, ships, remote cabins or unstable power conditions you may need unusual behaviours such as aggressive throttling at certain temperatures, logging to serial consoles or special shutdown routines. DIY software gives you the hooks to script and tune these reactions in ways that appliance firmware does not anticipate.
59. Clean integration with formal change management processes
Organisations with strict change control can insist that all NAS configuration changes arrive through reviewed pull requests and automated deployment tools. A DIY NAS whose configuration is driven by code fits smoothly into this world, whereas an appliance managed only through a browser is harder to audit and control.
60. Easy experimentation with clustered storage technologies
If you want to explore scale out storage such as Ceph, Gluster or other distributed systems, DIY hardware and open platforms are the most practical route. You can repurpose existing nodes into a cluster, test resilience and performance characteristics, and later reuse those machines for other lab work if requirements change.
61. Easier long term data salvage and portability
With DIY platforms such as TrueNAS, Unraid, ZimaOS, Proxmox and OMV, the on disk formats and pool layouts are widely documented and used in many contexts. If a motherboard dies in several years, you can move the disks to new hardware, reinstall the same software and import the pools, instead of hunting for an identical appliance or vendor recovery tool.
62. Broader protocol support and deeper tuning
DIY NAS software lets you expose storage over SMB, NFS, iSCSI, rsync modules, sometimes NVMe over TCP and more, with detailed control of versions, encryption, timeouts and caching. You can tune each protocol for a specific workload instead of accepting whatever subset and presets a turnkey vendor offers.
63. Custom hooks on file and dataset operations
Because you control the base system, you can attach your own scripts when files are written, moved or deleted in particular locations. That allows automatic virus scanning, metadata extraction, indexing, transcoding or business workflows that trigger whenever content changes, rather than relying only on built in features.
64. Comfortable operation with serial console and no local screen
DIY NAS platforms are happy on machines that have only serial console or out of band management with no HDMI or local keyboard. This matches how many server rooms and colocation racks actually work and lets you manage storage over low bandwidth links without any graphical tools if needed.
65. More compression and deduplication options per dataset
ZFS based DIY systems allow you to choose different compression algorithms and record sizes per dataset and to enable or disable deduplication only where it makes sense. You can optimise for databases, media archives or virtual machines individually rather than living with a single vendor setting for an entire volume.
66. Clear separation of storage and management planes
On a DIY NAS you can keep the storage node lean and run most of the management logic on other servers through SSH, APIs or orchestration tools. The storage device can behave as a focused data plane while the control plane lives elsewhere, which is attractive in environments that want very thin appliances.
67. Community culture that embraces experimentation
The forums and communities around TrueNAS, Unraid, Proxmox and OMV are full of people who enjoy deep technical dives, benchmarks and off label use cases. For homelab users and engineers that culture can feel more welcoming than vendor moderated communities that discourage unsupported combinations.
68. Reuse of one reference design across home, lab and office
Once you settle on a particular DIY stack and layout, you can repeat the same design at home, at work and in test environments with only minor changes. Automation scripts, monitoring templates and backup strategies can be shared almost unchanged between all these machines.
69. Neutral target for testing third party backup strategies
A DIY NAS can act as a neutral storage target for many different backup products and appliances from other vendors. You can point various commercial systems at the same TrueNAS or Proxmox storage, then compare how they behave for restore, versioning and verification, something that is harder when your main storage is itself a fixed vendor appliance.
70. No hard limits on shares, datasets or exports
DIY platforms rarely impose artificial limits on the number of datasets, snapshots, exports or shares you can create. As long as the underlying system can handle it, you can build very granular layouts for different teams, applications and projects without hitting a model based cap.
71. Better fit for reproducible research environments
In academic or scientific work, it is often important that another team can rebuild the same stack years later. A DIY NAS with configuration stored in code and based on standard distributions can be recreated on any suitable hardware, which supports reproducible experiments and shared lab setups.
72. Combination of storage and high performance computing
In some labs and studios the same physical machines are used both for heavy compute work and for fast local storage. DIY NAS software can happily coexist with HPC toolchains and schedulers on the same hardware, allowing you to run compute workloads close to the data without separate appliances.
73. Precise control of time and clock integration
DIY platforms give full access to NTP, Precision Time Protocol and kernel timing controls. For environments where consistent timing is critical, such as finance, measurement systems or some industrial setups, the storage node can participate in the same strict time hierarchy as the rest of the infrastructure.
74. Better support for unusual backup and archival devices
If you need to attach tape libraries, optical jukeboxes or rare archival devices, a DIY NAS running a general purpose operating system is more likely to support them. You can install the required drivers and tools for these devices rather than waiting for a turnkey vendor to recognise them.
75. Ideal for storage that is a pure backend service
Some administrators want their storage nodes to be invisible to end users and to present only block or file protocols to other systems. DIY NAS installations can be trimmed down to offer only SMB, NFS, iSCSI or object storage with no media portals or user apps, which suits this backend only role very well.
76. Flexible data transformation and ingestion pipelines
Because you can run whatever tools and containers you like, a DIY NAS can also host data transformation jobs. For example, you can receive raw data, clean it, compress it, encrypt it and then push it to cloud storage or another site, all driven by your own scripts and schedules.
77. Reduced reliance on any single vendor decision
With DIY platforms you are not waiting for one company to decide which media codecs, hardware accelerators or remote access features are allowed. If a particular vendor chooses a direction you dislike, you can still adopt the tools and configurations that suit you within your own stack.
78. No forced hardware replacement at support end dates
When a commercial NAS model reaches the vendor end of support, users are often encouraged to buy a new box even if the hardware is still reliable. With DIY storage you can keep updating the operating system on the same machine for as long as the components remain healthy, decoupling software support from hardware marketing cycles.
79. Good fit for very lean remote management
In remote or bandwidth constrained locations, being able to manage the NAS entirely with text tools and small configuration files is valuable. DIY platforms let you perform upgrades, configuration changes and even troubleshooting over slow links without relying on heavy web interfaces.
80. Custom quality of service tied to processes and containers
On DIY systems you can use native resource controllers to limit bandwidth, CPU time or IOPS per container, process group or user. This makes it possible to enforce complex quality of service rules that prioritise critical workloads while still allowing experimental services to run in the background.
81. Strong separation between data layout and hardware chassis
With pools and datasets defined at the software level, you can move storage from one chassis to another or rebalance between servers without changing how applications see their paths. This separation makes it easier to evolve the physical layer over time while keeping logical layout stable.
82. Use as a standard test bench for vendor devices
A DIY NAS environment can act as a standard reference platform when you test routers, backup appliances or other network gear. Because it is not tied to one brand, it is easier to observe how third party devices behave when they read and write to a known stable storage backend.
83. Ability to layer multiple security models
DIY stacks allow you to combine filesystem permissions, network firewalls, container isolation, mandatory access control frameworks and external identity providers in creative ways. You are not limited to the single security model that a turnkey NAS interface exposes, which allows more nuanced defence in depth.
84. Fine control over logging and audit detail
You can configure exactly what is logged, where logs are stored and how long they are kept, from kernel messages to application events. Logs can be shipped to central collectors in formats that match your existing observability stack, making compliance and forensic analysis simpler.
85. Tailored behaviour for backup and disaster drills
DIY platforms can be wired into automated disaster simulations, where systems are repeatedly torn down and rebuilt to prove that recovery works. Storage configurations can be recreated from code, pools imported and test data restored on a schedule, instead of relying on manual wizard driven tests.
86. Ability to swap out components in the software stack over time
Over the lifetime of a DIY NAS, you can replace almost every layer: change the init system, switch to a different web interface, adopt a new container engine or even move from one DIY distribution to another while keeping the same pools. This modularity keeps the platform adaptable as tastes and technology change.
87. Better fit for organisations that avoid proprietary formats
Some organisations have policies against storing important data in formats that depend on closed code or single vendor tools. DIY NAS solutions using standard filesystems and open source utilities are easier to justify under these rules than appliances that use proprietary volume managers and configuration stores.
88. Helpful for education and training labs
Training providers and universities can deploy DIY NAS stacks inside virtual environments so that students can break, repair and rebuild storage systems without touching production gear. The same images can be reset between classes, giving learners realistic hands on experience at low cost.
89. Capacity to follow very specific legal or regulatory rules
In some jurisdictions or industries, unusual requirements appear, such as special retention schedules, local encryption standards or niche logging rules. DIY NAS environments can be scripted to satisfy these specific requirements even when no turnkey NAS vendor has considered them.
90. Natural choice when mixing many self hosted applications
If you already run a wide range of self hosted tools in containers or VMs, adding storage duties to that world with DIY software keeps everything consistent. The NAS simply becomes another service in the same orchestration fabric rather than a separate product with its own way of doing things.
91. Easier experimentation with new network filesystems
When new network filesystem projects appear, such as experimental user space protocols or research systems, they nearly always target Linux and BSD first. A DIY NAS gives you a platform to test these technologies for specific problems, long before any commercial vendor would consider supporting them.
92. Ability to enforce very conservative update policies
Some organisations prefer to update only once or twice a year after extensive internal testing. DIY NAS stacks allow you to freeze versions and postpone upgrades until you have validated them, instead of accepting automatic firmware updates that may change behaviour on the vendor schedule.
93. Better suitability for mixed licence environments
If you already pay for certain commercial tools but want the storage layer to stay licence free, DIY approaches give you that mix. You can run proprietary database or backup software while keeping the underlying storage platform open and under your control.
94. Simple way to expose standard development environments next to data
With Proxmox or similar platforms you can spin up development VMs or containers right next to the storage that holds source code and artefacts. Developers can work close to large repositories and test data without hauling everything over the network, using the NAS as both storage and dev host.
95. Easier to integrate with custom dashboards and reporting systems
Because DIY NAS boxes export metrics in standard ways or can run your own collectors, it is straightforward to feed storage statistics into company specific dashboards and reports. You can show exactly the charts and summaries that matter for your audience instead of relying on whatever reporting screens a vendor includes.
96. Straightforward reuse of disks in other systems if needed
If your plans change, you can remove disks from a DIY NAS, wipe or repurpose them in other servers without dealing with vendor specific metadata or compatibility warnings. The drives are just drives, not part of an opaque appliance ecosystem that expects to keep them forever.
97. Good platform for testing security tools and hardening guides
A DIY NAS can serve as a lab for experimenting with new security scanners, vulnerability assessment tools and hardening recommendations before you roll them out to production servers. You can observe how these changes affect a real storage workload and adjust accordingly.
98. Realistic environment for practising incident response
Because you control every part of the stack, you can simulate failures, intrusions or misconfigurations on a DIY NAS and then practise your incident response procedure. This kind of training is harder with commercial appliances where you cannot fully control or inspect all layers.
99. Freedom to keep legacy protocols alive while you migrate
In some environments you still need to support older protocols for a while, for example legacy SMB dialects or older NFS versions. DIY NAS systems let you keep these services available during migration while still offering modern protocols to new clients, with careful isolation where needed.
100. Serves as a long lived foundation independent of brand trends
Vendors come and go, change direction or pivot to new markets, but the core technologies behind DIY NAS platforms have existed for decades and are used in many places beyond home storage. Building on that foundation means your data and workflows are less tied to the fashion of any particular hardware brand.
This description contains links to Amazon. These links will take you to some of the products mentioned in today's content. As an Amazon Associate, I earn from qualifying purchases. Visit the NASCompares Deal Finder to find the best place to buy this device in your region, based on Service, Support and Reputation - Just Search for your NAS Drive in the Box Below
Need Advice on Data Storage from an Expert?
Finally, for free advice about your setup, just leave a message in the comments below here at NASCompares.com and we will get back to you.Need Help?
Where possible (and where appropriate) please provide as much information about your requirements, as then I can arrange the best answer and solution to your needs. Do not worry about your e-mail address being required, it will NOT be used in a mailing list and will NOT be used in any way other than to respond to your enquiry.
[contact-form-7]
TRY CHAT Terms and Conditions
If you like this service, please consider supporting us.
We use affiliate links on the blog allowing NAScompares information and advice service to be free of charge to you.Anything you purchase on the day you click on our links will generate a small commission which isused to run the website. Here is a link for Amazon and B&H.You can also get me a Ko-fi or old school Paypal. Thanks!To find out more about how to support this advice service checkHEREIf you need to fix or configure a NAS, check FiverHave you thought about helping others with your knowledge? Find Instructions Here
Or support us by using our affiliate links on Amazon UK and Amazon US
Alternatively, why not ask me on the ASK NASCompares forum, by clicking the button below. This is a community hub that serves as a place that I can answer your question, chew the fat, share new release information and even get corrections posted. I will always get around to answering ALL queries, but as a one-man operation, I cannot promise speed! So by sharing your query in the ASK NASCompares section below, you can get a better range of solutions and suggestions, alongside my own.
ZimaCube 2 NAS Announced – Bigger? Better? The Same?
IceWhale’s original ZimaCube and ZimaCube Pro established the company’s move beyond compact single-board servers and into desktop NAS hardware aimed at prosumers, creators, and home lab users. The standard ZimaCube launched at $699 with an Intel N100, while the ZimaCube Pro raised the ceiling with an Intel Core i5-1235U, 10GbE, Thunderbolt 4, faster 7th-bay M.2 performance, and broader appeal for heavier workloads. Both systems were positioned less as closed NAS appliances and more as flexible personal cloud platforms, with ZimaOS pre-installed and support for alternative operating systems such as TrueNAS, Unraid, Proxmox, pfSense, and Linux distributions. As with many crowdfunded hardware products, the first generation also required some early post-launch refinement, particularly around areas such as fan behaviour, thermal tuning, and broader system optimisation, which was reflected in community support discussions and early optimisation guidance from IceWhale.
Remember to use the NASCompares Channel Discount Code: ‘NASCOMPARES50’
The newly revealed ZimaCube 2 family builds directly on that same idea, but with a clearer emphasis on higher-performance local storage, hybrid workloads, and hardware expansion. The new range starts with the $799 ZimaCube 2 Standard, moves to the $1,299 ZimaCube 2 Pro, and extends to a $2,499 Creator Pack that adds 64GB of memory, 1TB of SSD storage, and an NVIDIA RTX Pro 2000 GPU. Based on the specifications revealed so far, IceWhale is positioning this generation as a more capable platform for media serving, virtualization, containers, AI-assisted workloads, and direct-attached creative workflows, while continuing to stress open hardware, multi-OS support, and the absence of ecosystem lock-in. Unlike the first ZimaCube generation, which began as a Kickstarter-era product, the ZimaCube 2 line is already being presented through standard pre-order retail channels ahead of its expected March 30 shipment window.
ZimaCube 2 – Design & Storage
From a design standpoint, the ZimaCube 2 family appears to retain the same broad desktop form factor as the earlier models, with listed dimensions of 240 x 221 x 220 mm. IceWhale is continuing with the same general visual approach: a compact metal chassis, magnetic front panel, and a visible RGB lighting element rather than the more utilitarian styling used by many conventional NAS systems. The company is also still presenting the system as something intended to sit on a desk rather than be hidden away, which places equal weight on appearance, acoustics, and accessibility alongside storage capacity.
The storage layout remains one of the more distinctive parts of the design. As before, the system uses a 6-bay SATA arrangement for 3.5-inch and 2.5-inch drives, but it is paired with a separate 7th-bay expansion structure built around 4 M.2 slots.
IceWhale continues to frame this as a hybrid storage design, separating bulk-capacity HDD storage from faster solid-state tiers for cache, active project data, applications, or virtualised workloads. In practical terms, that gives the ZimaCube 2 a broader remit than a basic backup NAS, since it is being positioned to handle both long-term storage and higher-speed local workloads within the same enclosure.
What is different in this generation is less the physical layout itself and more the way IceWhale is defining its purpose. The company is now pushing the 6+4 architecture more explicitly as a tiered storage platform for creators, self-hosters, and home lab users, with references to 164TB+ capacity, active “hot zone” NVMe storage, and room for long-term archive duties. That said, the overall storage philosophy is still familiar rather than radically new: the ZimaCube 2 appears to refine and repackage an existing concept instead of introducing a fundamentally different chassis or bay arrangement. The main change is that IceWhale is placing greater emphasis on workflow separation, SSD acceleration, and long-term expandability than it did with the original launch material.
ZimaCube 2 – Internal Hardware
Internally, the ZimaCube 2 range is split more clearly than the first generation. The base ZimaCube 2 moves to an Intel Core i3-1215U with 8GB of DDR5 memory, while the ZimaCube 2 Pro uses an Intel Core i5-1235U with 16GB of DDR5. At the top end, the Creator Pack keeps the same Core i5 platform but adds 64GB of memory, 1TB of NVMe storage, and a discrete NVIDIA RTX Pro 2000. That gives IceWhale a broader spread than before, from an entry configuration that is still positioned above the original N100-based ZimaCube to a much more workstation-like variant aimed at GPU-assisted workloads.
The wider platform also reflects a shift in how IceWhale wants these systems to be used. The first ZimaCube family already supported alternative operating systems, containers, media serving, and some expansion, but the ZimaCube 2 line places far more emphasis on concurrent mixed workloads. IceWhale is explicitly framing the hardware around virtual machines, Docker containers, AI tools, real-time media handling, and direct high-speed project access, which explains the move to newer mobile Intel processors, DDR5 memory, and a more aggressive expansion story. In that sense, the second generation is less a conventional NAS refresh and more an attempt to position the product as a compact storage server with broader compute utility.
CPU spec
ZimaCube 2
ZimaCube 2 Pro
Processor
Intel Core i3-1215U
Intel Core i5-1235U
Generation
12th Gen Intel Core U-series
12th Gen Intel Core U-series
Total cores
6
10
Performance cores
2
2
Efficient cores
4
8
Threads
8
12
Max turbo frequency
4.40GHz
4.40GHz
P-core max turbo
4.40GHz
4.40GHz
E-core max turbo
3.30GHz
3.30GHz
Intel Smart Cache
10MB
12MB
Processor base power
15W
15W
Maximum turbo power
55W
55W
Integrated graphics
Intel UHD Graphics
Intel Iris Xe Graphics
In practical terms, the main difference is not clock speed, since both chips top out at 4.40GHz, but core count and thread count. The i5-1235U adds 4 more Efficient cores, 4 more threads, and 2MB more cache, which should make it noticeably better suited to heavier multitasking, containers, background services, and mixed NAS plus VM workloads.
Model
CPU
Key CPU difference
ZimaCube 2
Intel Core i3-1215U
Lower-tier chip with 6 cores and 8 threads
ZimaCube 2 Pro
Intel Core i5-1235U
Higher-tier chip with 10 cores and 12 threads, better suited to heavier parallel workloads
At the same time, the headline changes need to be read carefully. The ZimaCube 2 Pro remains on the same Core i5-1235U class processor as the previous ZimaCube Pro, so not every model represents a major CPU leap. The more meaningful changes are in how the range is tiered, the addition of a pre-configured GPU-equipped Creator Pack, and the clearer effort to make higher-end use cases part of the official positioning rather than secondary possibilities. For buyers comparing model to model, the internal hardware story is therefore partly about real platform flexibility and partly about IceWhale packaging familiar capabilities into more defined product tiers.
Specification
ZimaCube 2
ZimaCube 2 Pro
ZimaCube 2 Creator Pack
Processor
Intel Core i3-1215U
Intel Core i5-1235U
Intel Core i5-1235U
CPU cores / threads
6 cores
10 cores / 12 threads
10 cores / 12 threads
Max clock
Up to 4.4GHz
Up to 4.4GHz
Up to 4.4GHz
GPU
Integrated graphics
Intel Iris Xe
NVIDIA RTX Pro 2000
Memory
8GB DDR5-4800
16GB DDR5-4800
64GB DDR5-4800
Max memory
64GB
64GB
64GB
System storage
256GB NVMe SSD
256GB NVMe SSD
1TB NVMe SSD
PCIe expansion
PCIe 4.0 x4 + PCIe 3.0 x2
PCIe 4.0 x4 + PCIe 3.0 x2
PCIe 4.0 x4 + PCIe 3.0 x2
M.2 support
1 onboard + 4 in 7th bay
1 onboard + 4 in 7th bay
1 onboard + 4 in 7th bay
SATA drive support
6 bays
6 bays
6 bays
Rated power
247W
247W
247W
ZimaCube 2 – Ports & Connections
The connectivity story is one of the clearer areas where IceWhale is trying to separate the ZimaCube 2 family from entry-level NAS hardware. Across the new range, the headline feature is the inclusion of 2 rear Thunderbolt 4 or USB4-class USB-C connections rated at 40Gbps on both the standard and Pro tier, which IceWhale is positioning for direct Mac or PC attachment as well as high-speed external expansion. That is a notable distinction from many mainstream NAS products, which typically rely on Ethernet alone for primary high-speed access. Here, IceWhale is clearly trying to support both networked storage use and direct-attached workflow scenarios from the same box.
Networking is also relatively strong on paper. Based on the revealed specifications, the ZimaCube 2 family includes 2 x Intel i226 2.5GbE ports and 1 x Marvell AQC113 10GbE port exclusively on the Pro model. In practical terms, that allows for several deployment options, including direct multi-gig connections, use as a higher-speed shared storage node, or separation of management and data traffic. For users comparing it with the previous generation, the main point is that higher-end network capability now appears to be treated as a core part of the wider ZimaCube 2 platform rather than something reserved only for the Pro model.
The rest of the external I/O is fairly conventional but functional. IceWhale lists 4 x USB-A 3.0 ports, 1 x USB-C 3.0 port, DisplayPort 1.4, HDMI 2.0, and a 3.5mm audio jack. Combined with the PCIe expansion support inside the chassis, that gives the platform a broader connection profile than a typical sealed NAS appliance. Even so, the real significance here is not any single port in isolation, but the fact that IceWhale continues to present the ZimaCube 2 as a hybrid device that sits somewhere between a NAS, a small server, and a compact workstation-class storage platform.
Connection
ZimaCube 2 family
Ethernet
2 x Intel i226 2.5GbE, 1 x Marvell AQC113 10GbE (Pro Only)
Thunderbolt / USB4
2 x rear USB-C, up to 40Gbps
USB-A
4 x USB-A 3.0
USB-C
1 x USB-C 3.0
Display outputs
1 x DisplayPort 1.4, 1 x HDMI 2.0
Audio
1 x 3.5mm audio jack
PCIe expansion support
PCIe 4.0 x4 in physical x16, PCIe 3.0 x2 in physical x8
ZimaCube 2 vs ZimaCube 1 – What Has Changed?
The biggest change is at the bottom of the range. The original ZimaCube was built around Intel’s N100, DDR4 memory, Gen 3 expansion, and 2 x 2.5GbE, which made it the more basic model in the lineup. By contrast, the new ZimaCube 2 raises the baseline to a Core i3-1215U with DDR5 memory, while keeping the same overall 6-bay chassis concept and hybrid storage approach. That is a meaningful improvement in entry-level compute capability, but it does not completely remove the gap between standard and Pro variants, since the non-Pro ZimaCube 2 still stops at 2 x 2.5GbE and does not gain the extra 10GbE port.
The Pro side is a more mixed story. The original ZimaCube Pro already offered a Core i5-1235U, DDR5, 10GbE, Thunderbolt 4, and faster M.2 performance in the 7th bay, so the ZimaCube 2 Pro does not represent the same kind of obvious jump seen on the standard model. In CPU terms, it appears to stay in essentially the same class, which makes this look more like a product refinement than a full hardware reset. IceWhale is clearly pushing the second generation more aggressively toward creator workflows, virtualization, AI-related use cases, and direct-attached high-speed storage, but that broader messaging should not be mistaken for a major leap in every core hardware area.
That leaves the ZimaCube 2 generation looking unevenly improved depending on which model is being compared. The standard ZimaCube 2 is substantially more capable than the first non-Pro system, while the ZimaCube 2 Pro looks more like a cleaner, more retail-ready continuation of what the first Pro already set out to do. The new Creator Pack is the main addition that materially changes the shape of the lineup, since it introduces a pre-configured GPU-equipped option rather than leaving that path entirely to user expansion. So while IceWhale is presenting the ZimaCube 2 family as a broader second-generation platform, the actual extent of change varies quite sharply between the base and Pro tiers.
Specification
ZimaCube
ZimaCube 2
ZimaCube Pro
ZimaCube 2 Pro
Launch price
$699
$799
$1,099
$1,299
Processor
Intel N100
Intel Core i3-1215U
Intel Core i5-1235U
Intel Core i5-1235U
CPU class change
Baseline
Clear upgrade over ZimaCube
Higher-end original model
Largely same CPU tier as ZimaCube Pro
Memory
8GB DDR4-3200
8GB DDR5-4800
16GB DDR5-4800
16GB DDR5-4800
Max memory
16GB
64GB
32GB
64GB
System storage
256GB NVMe SSD
256GB NVMe SSD
256GB NVMe SSD
256GB NVMe SSD
6-bay SATA storage
Yes
Yes
Yes
Yes
7th bay
4 x M.2
4 x M.2
4 x M.2
4 x M.2
7th-bay speed
800MB/s R/W
800MB/s R/W listed
3200MB/s R/W
3200MB/s R/W listed
PCIe expansion
Gen 3
PCIe 4.0 x4 + PCIe 3.0 x2
Gen 4 + Gen 3
PCIe 4.0 x4 + PCIe 3.0 x2
Networking
2 x 2.5GbE
2 x 2.5GbE
2 x 2.5GbE + 1 x 10GbE
2 x 2.5GbE + 1 x 10GbE
Thunderbolt 4 / USB4
No
2 x rear USB-C
2 x rear USB-C
2 x rear USB-C
USB
More limited
4 x USB-A 3.0, 1 x USB-C 3.0
4 x USB-A 3.0, 1 x USB-C 3.0
4 x USB-A 3.0, 1 x USB-C 3.0
Display outputs
DP 1.4, HDMI 2.0
DP 1.4, HDMI 2.0
DP 1.4, HDMI 2.0
DP 1.4, HDMI 2.0
Dimensions
240 x 221 x 220 mm
240 x 221 x 220 mm
240 x 221 x 220 mm
240 x 221 x 220 mm
ZimaOS – The Software that is included with the ZimaCube 2 (Is it actually any good?)
ZimaOS is IceWhale’s Linux-based NAS operating system, developed out of the earlier CasaOS foundation and originally tied closely to the ZimaCube hardware before becoming available more broadly as a standalone platform. In practical terms, its main appeal is that it tries to lower the barrier to entry for first-time NAS users without stripping away too much of the flexibility expected from a self-hosted system. Based on the information provided, the software combines a browser-based management interface with a dedicated Zima Client application for desktop and mobile, giving it a more guided and consumer-facing feel than many free NAS operating systems.
Installation appears relatively straightforward, using a standard image-writing process and USB boot method, and the platform is light enough to run on modest boot media rather than requiring a large dedicated SSD. The interface focuses heavily on accessibility: native file browsing, straightforward share creation, basic RAID setup, network management, cloud and LAN storage integration, drive mapping, local backup jobs, and remote access are all presented in a simplified GUI rather than being heavily dependent on command line work. That simplicity is one of its clearest points of distinction from platforms such as TrueNAS and OpenMediaVault, which can offer deeper storage control but are often more intimidating to less experienced users.
At the same time, ZimaOS is not being positioned as a stripped-down toy platform. IceWhale is clearly treating it as a full software layer for a turnkey NAS or personal cloud deployment, with support for app containers, developer mode, SSH access, SMB sharing, Time Machine compatibility, AI-assisted semantic search, and direct Thunderbolt connectivity on supported hardware. The client application is also an important part of the package, since it extends the platform beyond simple browser access by adding local discovery, mapped access, backup synchronisation, and peer-to-peer file transfer in a way that many free NAS platforms do not include by default.
However, the software still has some visible limits: configuration depth remains lighter than enterprise-oriented rivals, some features appear to be more polished than others, and direct Thunderbolt or USB4 support may still depend heavily on driver compatibility and the exact hardware being used. Its RAID tools are deliberately simple, but do not currently match the flexibility of more mature systems in areas such as mixed-drive storage schemes.
Pricing also shows how IceWhale is segmenting the platform in 2026: the base ZimaOS Free tier includes core features, the Zima Client for mobile and PC, Thunderbolt support, developer mode, support for up to 4 disks, and 3 members, while ZimaOS+ adds unlimited disks and unlimited users for a $29 lifetime license (to confirm, any ZimaCube, Zimaboard and ZimaBlade device includes the lifetime license). Taken together, ZimaOS appears to sit in a useful middle ground: more approachable than many traditional NAS operating systems, more complete than many lightweight hobbyist options, and increasingly viable both as bundled software for ZimaCube hardware and as a standalone OS for low-cost custom systems.
ZimaCube 2 – Worth it? Price and Release Date?
Taken at face value, the ZimaCube 2 family looks more like a measured revision of the original concept than a major generational leap. Compared with the first ZimaCube, there are clear upgrades in entry-level processor choice, memory platform, expansion framing, and product segmentation, but the broader structure remains very familiar. The unchanged chassis dimensions, continued 6-bay plus 7th-bay layout, and the fact that the Pro model remains in essentially the same CPU class as before all make this feel closer to the kind of 2 to 3 year refresh cycle often seen from established turnkey NAS vendors such as Synology and QNAP, rather than a wholly new platform that significantly expands the portfolio or redefines what the product is.
That said, this does not make the ZimaCube 2 underwhelming in absolute terms. Even if the scale of change appears evolutionary rather than transformative, it is still a notably well-equipped system on paper, with ZimaOS included, direct Thunderbolt 4 or USB4 connectivity, PCIe expansion, hybrid storage flexibility, and a full hardware and software turnkey approach that many DIY alternatives do not offer in one package. The result is a platform that may not radically depart from the first ZimaCube’s formula, but still presents a relatively complete and capable storage server solution for users who want open deployment options without having to assemble and integrate everything themselves.
In pricing terms, IceWhale is placing the ZimaCube 2 range above the original entry model but still within the upper end of the prosumer NAS and compact server market. The ZimaCube 2 starts at $799, the ZimaCube 2 Pro rises to $1,299, and the Creator Pack reaches $2,499 with its added GPU, memory, and larger SSD allocation. That means the new range is not being introduced as a low-cost disruption, but rather as a more fully specified turnkey platform aimed at users who want performance, flexibility, and direct connectivity in a single package. IceWhale is currently listing the systems as pre-orders, with shipping expected to begin from March 30, suggesting that the second generation is being brought to market through a more conventional retail path than the original crowdfunding-led launch.
Remember to use the NASCompares Channel Discount Code: ‘NASCOMPARES50’
This description contains links to Amazon. These links will take you to some of the products mentioned in today's content. As an Amazon Associate, I earn from qualifying purchases. Visit the NASCompares Deal Finder to find the best place to buy this device in your region, based on Service, Support and Reputation - Just Search for your NAS Drive in the Box Below
Need Advice on Data Storage from an Expert?
Finally, for free advice about your setup, just leave a message in the comments below here at NASCompares.com and we will get back to you.Need Help?
Where possible (and where appropriate) please provide as much information about your requirements, as then I can arrange the best answer and solution to your needs. Do not worry about your e-mail address being required, it will NOT be used in a mailing list and will NOT be used in any way other than to respond to your enquiry.
[contact-form-7]
TRY CHAT Terms and Conditions
If you like this service, please consider supporting us.
We use affiliate links on the blog allowing NAScompares information and advice service to be free of charge to you.Anything you purchase on the day you click on our links will generate a small commission which isused to run the website. Here is a link for Amazon and B&H.You can also get me a Ko-fi or old school Paypal. Thanks!To find out more about how to support this advice service checkHEREIf you need to fix or configure a NAS, check FiverHave you thought about helping others with your knowledge? Find Instructions Here
Or support us by using our affiliate links on Amazon UK and Amazon US
Alternatively, why not ask me on the ASK NASCompares forum, by clicking the button below. This is a community hub that serves as a place that I can answer your question, chew the fat, share new release information and even get corrections posted. I will always get around to answering ALL queries, but as a one-man operation, I cannot promise speed! So by sharing your query in the ASK NASCompares section below, you can get a better range of solutions and suggestions, alongside my own.
If you like this service, please consider supporting us. We use affiliate links on the blog allowing NAScompares information and advice service to be free of charge to you.Anything you purchase on the day you click on our links will generate a small commission which isused to run the website. Here is a link for Amazon and B&H.You can also get me a Ko-fi or old school Paypal. Thanks!To find out more about how to support this advice service checkHERE
Ugreen continue son offensive sur le marché des NAS avec un nouveau 4 baies ambitieux : UGREEN NASync DXP4800 Pro. Après le DXP4800 Plus de l’an dernier, nous avons pu passer plusieurs jours avec le modèle Pro, une version musclée pensée pour les usages avancés, le multitâches intensif et les environnements exigeants sans compromis sur la simplicité d’utilisation. Sur le papier, la promesse est solide. En pratique, tout n’est cependant pas parfait…
UGREEN NASync DXP4800 Pro
Là où le DXP4800 Plus s’appuie sur un Intel Pentium Gold 8505, le DXP4800 Pro passe sur un processeur Intel Core i3-1315U, offrant plus de puissance brute et une meilleure capacité de traitement pour des charges lourdes : virtualisation, transcodage multimédia, IA, Docker…
Contenu de la boîte
À l’ouverture, on retrouve :
Le DXP4800 Pro en lui-même ;
2 câble réseau RJ45 Cat. 7 ;
L’alimentation externe et son câble ;
Des vis pour les SSD avec un tournevis ;
2 blocs de pâte thermique pour les SSD NVMe ;
Un guide de démarrage rapide en anglais, allemand et chinois ;
Une feuille sur la garantie de 2 ans.
Comme pour son grand frère, l’emballage reste soigné, avec plusieurs niveaux de protection. On note les efforts du fabricant…
Design et connectivité
Extérieurement, il ressemble comme 2 gouttes d »eau aux DXP4800 Plus. Nous avons un NAS bien lourd avec un boîtier en aluminium bleu-gris. Son poids sur la balance affiche 4,1 kg. À l’arrière, nous avons toujours un ventilateur de 140 mm. Seul le nom en façade (en bas) diffère…
Du côté de la connectique, ce NAS dispose de :
2 ports USB 3.2 Gen 2 (dont 1 Type-C) ;
1 port USB 3.0 Type-A ;
2 ports USB 2.0 Type-A ;
1 lecteur de carte SD ;
1 sortie HDMI 2.1 ;
1 port RJ45 2,5 Gb/s ;
1 port RJ45 10 Gb/s.
Une connectivité bien pensée et complète.
Intérieur du DXP4800 Pro
C’est là que les choses changent ! Le DXP4800 Pro est animé par un processeur Intel Core i3-1315U capable d’atteindre 4,50 GHz (6 cœurs, 8 threads) avec iGPU intégré. Il est épaulé par 8 Go de RAM DDR5 (extensibles à 96 Go). On aurait préféré voir 16 Go pour ce modèle Pro. Le score PassMark est de 11 183 points ! Pour ce tarif, il largue tous les concurrents…
Installation des disques et SSD
Les disques durs 3,5 pouces s’installent assez facilement, sans outils. Les chariots sont différents de ceux de Synology ou QNAP, mais ils sont fonctionnels.
Pour installer un SSD SATA, il faut retirer une fixation en plastique (en bas à droite sur la photo ci-dessus) via un outil fourni. Attention à ne pas forcer trop fort au risque d’abimer la pièce. Le NAS dispose de 2 emplacements pour SSD NVMe, accessibles via une trappe sous l’appareil. C’est également ici que vous pourrez augmenter la RAM. L’ajout de pâte thermique (fournie) et le rôle de dissipateur thermique du capot en aluminium sont des points positifs.
De notre point de vue, le NAS n’est pas suffisamment surélevé. Les patins sous l’appareil ne sont peu assez haut, ce qui limite la circulation de l’air et favorise les vibrations. De nombreux utilisateurs recommandent l’ajout de petits amortisseurs en élastomère pour corriger ce léger défaut. Nous validons ce choix.
UGOS
Nous vous avons déjà présenté le système embarqué UGOS précédemment. Nous avons bien conscience que Ugreen est encore jeune sur le marché et il faut savoir être indulgent. Le système évolue régulièrement sans rivaliser pour le moment avec les ténors du marché. Cependant, il n’a pas à rougir, car il sait déjà répondre à de nombreux usages.
Installation d’UGOS
L’utilisateur doit taper dans son navigateur find.ugnas.com pour trouver son NAS sur le réseau. L’installation se fait en 4 étapes (voire ci-dessous) :
Par rapport à notre précédent test, l’interface est désormais bien en français.
Une fois l’installation terminée, le NAS redémarre… il ne reste plus qu’à se connecter avec l’identifiant et le mot de passe saisis précédemment. Un nouveau guide se lance pour accompagner l’utilisateur dans les premières étapes :
Découverte de l’interface ;
Création d’un volume de stockage ;
Premier dossier partagé ;
Découverte d’UGREENlink pour l’accès à distance.
Note importante : lors du test précédent, nous pensions avoir commis une erreur, mais non… le service SMB (partage réseau) est désactivé par défaut. Cela veut dire que si vous ne faites rien, le NAS n’est pas accessible par le réseau (Windows, macOS ou Linux).
Usage au quotidien
UGOS est un système Linux optimisé pour le stockage en réseau. Il propose un ensemble de paramètres, auquel on peut ajouter des fonctionnalités via le Centre d’applications : Antivirus, Download Center, Text Edit, etc. Ugreen a fait le choix de privilégier Docker pour compléter son environnement applicatif.
Le fabricant propose une application mobile tout-en-un qui permet de profiter de son NAS à distance ou sur son réseau local. Il faut avouer qu’elle est complète et bien pensée. Ugreen propose également une application de bureau (Windows et macOS), ainsi qu’une adapté à Apple TV et Android TV. Elles permettent d’accéder aux fichiers, au statut du NAS, aux notifications… mais aussi au visionnage de vidéo, etc. Tout y est, un véritable couteau suisse !
Ugreen déploie fréquemment des mises à jour pour corriger des bugs et soucis de traductions, mais aussi pour améliorer les performances et ajouter des fonctionnalités. Un NAS, c’est un investissement sur le long terme. Aujourd’hui, les NAS sont régulièrement mis à jour… et surtout pendant de nombreuses années.
Nouvel entrant et tolérance
Ugreen est nouveau sur le marché des NAS, mais ce n’est pas un novice. L’entreprise possède une solide expérience industrielle et maîtrise déjà la conception matérielle et logicielle. Le fabricant connait également très bien ce secteur exigeant, dominé par des acteurs comme Synology et QNAP. Côté matériel, le produit tient la route…
Sur la partie logicielle, UGOS reste limité pour un usage avancé. S’il répond à 90% des particuliers, certains pourraient être déçus. La majorité des utilisateurs parient sur des mises à jour futures pour corriger le tir dans les prochains mois. Ugreen en a bien conscience… À noter qu’il propose également la possibilité d’installer de systèmes alternatifs comme OMV, TrueNAS, Unraid, etc. Une approche ouverte, que beaucoup apprécient.
L’essentiel est là : une base matérielle fiable et une volonté claire d’évoluer.
Performances du DXP4800 Pro
Dans la première partie des tests, nous allons évaluer les performances des transferts à travers un réseau 10 Gb/s (entre le NAS et des ordinateurs). Ensuite, nous regarderons les capacités du processeur, en analysant ses performances globales…
Vitesses dans les transferts
Depuis plusieurs années, nous avons mis en place un protocole de tests rigoureux fournissant des données fiables et comparables avec les performances des autres NAS. Pour cela, nous utilisons 4 applications de mesure différentes (2 sous macOS et 2 sous Windows) et réalisons en plus des transferts de fichiers de tailles variées dans les deux sens (NAS -> Ordinateur puis Ordinateur -> NAS) :
Petites tailles : 100 fichiers de 500 Ko à 12 Mo (MP3, photos, documents Office)
Tailles moyennes : 30 fichiers de 12 à 350 Mo (DivX, images RAW, archives ZIP)
Fichiers volumineux : 10 fichiers avec une taille comprise entre 4 et 10 Go (MKV, ISO)
À la suite des tests, une moyenne des transferts est calculée et nous la représentons sous forme de graphiques exprimée en mégaoctets par seconde (Mo/s). Plus le nombre est élevé, plus le NAS est rapide. Pour notre évaluation du DXP4800 Plus, nous avons configuré un premier volume avec 2 SSD NVMe en RAID 0, puis un second volume avec 3 SSD SATA en RAID 5.
RAID 0
Le NAS propose d’excellentes performances en lecture. Le système est réactif et les transferts solides. On voit tout de suite le gain offert par le nouveau processeur. Si les performances en écriture progressent (par rapport au DXP 4800 Plus), nous restons un peu sur notre faim.
RAID 5
Les débits vous surprennent… nous aussi. En lecture, le RAID 5 SATA assure et nous sommes sur des performances proches du RAID 0 NVMe. En écriture, les SSD SATA font même mieux sur les petits fichiers et ceux de taille moyenne. Par contre, sur les gros fichiers, les choses sont différentes.
Performances générales
Avec son nouveau processeur, Ugreen propose un NAS offrant des capacités bien plus étendues. Comparons rapidement celui-ci
UGREEN
DXP4800 Pro
UGREEN DXP4800 Plus
ASUSTOR FS6806X
Synology DS925+
Processeur
Intel Core
i3-1315U
Intel Pentium
Gold
AMD Ryzen Embedded V3C14
AMD Ryzen Embedded V1500B
iGPU intégré
Intel UHD Graphics
(13th Gen)
Intel UHD Graphics
(12th Gen)
Aucun
Aucun
Score Passmark
(CPU)
11 182
9 080
11 882
4 513
Score Single Thread
3 315
3 226
2 800
1 136
TDP
15 W
(55 W burst)
15 W
15 W
16 W
RAM max supportée
96 Go DDR5
64 Go DDR5
64 Go DDR5
32 Go DDR4 ECC
Vous l’aurez compris, le changement opéré par Ugreen n’est pas anodin. On se retrouve avec un processeur taillé pour les tâches complexes ou il n’aura pas de difficulté : chiffrement des données, virtualisation, conteneurisation ou encore le transcodage vidéo. Il sera difficile de le mettre en difficulté. Seul regret, la présence de seulement 8 Go de RAM par défaut. On ne va pas se mentir, c’est un peu juste pour exploiter pleinement le potentiel de ce NAS : 16 Go auraient été préférables.
IA & DXP 4800 Pro
Ugreen a été intégré ici et là quelques touches d’IA dans ses applications maisons (notamment dans son application pour les photos). Mais nous avons voulu aller plus loin et tenté l’expérience des modèles Qwen2.5:3B et Gemma2:2B avec Ollama. Ils fonctionnent très bien avec ce NAS et répondent en quelques secondes. Attention, l’IA consomme beaucoup de ressources : processeur et RAM. Aussi, nous avons constaté une certaine limitation dans la gestion des ressources avec Docker, certainement pour protéger les fonctions de base du NAS.
Consommation électrique et nuisance sonore
Le ventilateur arrière est relativement discret. Côté consommation électrique, le NAS affiche environ 27 W en usage normal (avec 2 SSD NVMe et 3 SSD SATA) et jusqu’à 45 W en charge plus soutenue.
CONCLUSION
Le UGREEN NASync DXP4800 Pro marque un vrai tournant pour la marque avec une base matérielle puissante et cohérente. Son Intel Core i3 et le 10 GbE natif en font un NAS taillé pour les usages avancés. Les performances sont au rendez-vous !!! En revanche, les 8 Go de RAM par défaut et un UGOS encore en maturation tempèrent légèrement l’ensemble.
Ugreen propose ici une alternative crédible face aux leaders, à condition d’accepter sa jeunesse logicielle.
L’IT Partner est un événement high-tech que j’apprécie particulièrement. Pour cette 20e édition, le salon se tenait une nouvelle fois à l’Arena de La Défense. C’est un rendez-vous unique qui permet de rencontrer, sur un même site, plusieurs fabricants de NAS… mais pas seulement. En effet, au-delà du stockage, l’événement couvre l’ensemble de l’écosystème IT : infrastructures, cybersécurité, réseaux, cloud, services managés, distribution et intégration. Un concentré du marché en deux jours.
Un passage express, mais ciblé
Pendant ces 2 jours, pas moins de 230 exposants étaient présents. Cette année, mon agenda était particulièrement contraint. Malheureusement, je n’ai pu passer qu’un peu moins de deux heures sur le salon, et uniquement le second jour.
J’avais donc préparé en amont la liste des acteurs que je souhaitais absolument rencontrer. Résultat : un parcours optimisé, au pas de course, mais efficace.
Synology, Asustor et Ugreen : focus NAS
Ugreen : une première remarquée
Ugreen participait pour la première fois au salon avec son propre stand (et il ne désemplissait pas). La marque attire clairement la curiosité sur le marché du NAS. J’ai pu échanger longuement avec Gaëlle, France Business Development Manager, au sujet de l’arrivée d’Ugreen sur ce segment et des opportunités à venir pour le fabricant. La stratégie est ambitieuse et le positionnement mérite d’être suivi de près.
Asustor : montée en puissance en France
Asustor participait à son premier salon en France. Le constructeur était présent sur le stand du grossiste ALSO. La France (et plus largement l’Europe) représente un marché stratégique pour la marque. La présence de Mehdi, Sales Manager, a permis un échange constructif sur la situation actuelle du secteur et sur la stratégie de développement d’Asustor. Petite déception toutefois : Damien, bien connu de la communauté, n’était pas présent cette année. Ce sera pour une prochaine édition.
Synology : présence solide, peu de nouveautés
Comme toujours, Synology était au rendez-vous, avec une présence sur deux corners distincts via deux grossistes. Beaucoup de monde sur les espaces dédiés, preuve de l’intérêt constant pour la marque. En revanche, peu de nouveautés majeures à découvrir sur place cette année.
QNAP : une absence remarquée
On notera l’absence de stand pour QNAP. Même si j’ai croisé deux membres de l’équipe, le constructeur ne disposait ni de stand dédié ni de corner partagé. Un choix compréhensible au regard de leur actualité chargée (déménagement, nouveaux produits, roadshow…), mais une présence officielle aurait été appréciée.
Un événement incontournable pour les professionnels IT
L’IT Partners reste un rendez-vous clé pour les professionnels du secteur. Le salon offre un cadre efficace pour échanger avec les fabricants et les distributeurs, découvrir de nouvelles solutions et renforcer son réseau.
Même en passage rapide, la valeur ajoutée est bien réelle. Pour tous les acteurs de l’écosystème IT (intégrateurs, revendeurs, MSP ou éditeurs) c’est un événement à inscrire dans l’agenda.