How to Upgrade the RAM in your Synology DS723+ to 32GB and 64GB RAM Officially/Unofficially
The Synology DS723+ NAS is a NAS system that arrives with an impressive middle ground between Power, Efficiency and Price, thanks to that AMD Ryzen R1600 CPU, flexibility in a 10GbE upgrade, storage expandability and (of course) arriving with ECC memory. The DS723+ is one of the latest generation of Diskstation devices (in the 2022/2023 series) that seems to be targeting the more advanced SMB user, prioritizing throughput and performance, whilst also doubling down on data integrity with things like BTRFS and ECC memory. However, the system arrives with 2GB, but can be upgraded officially to a very impressive 32GB (for the scale of the system)! So, there are users that might want to upgrade that memory on Day 1 in order to remove any kind of potential bottleneck down the line (VMs, Databases, Surveillance, etc) or even just users that have set up the device to their own unique setup – but noticed that Memory usage is constantly hovering at the 60-70%. Synology NAS systems use quite proficient intelligent background memory use and flushing, but nevertheless, there are still plenty of users who want to scale up the base-level memory. In this article, I will show you how to upgrade the memory on your Synology DS723+ NAS, but also I will show several 3rd party (i.e Unofficial modules) that I have tested in this NAS.
Upgrading your Synology DS723+ with Unofficial Memory – Pay Attention
Before we continue with the guide, it is worth highlighting that the DS723+ manufacturer, Synology, stronglyrecommends that you do not exceed the stated memory limit on their specifications page. They also highlight that using non-official memory in your Synology DS723+ may well result in them being unable to provide technical support, as this would be an unsupported setup. We at NASCompares cannot be held accountable for how you use this guide. However, below I will show you where to buy the individual memory and Synology DS723+ NAS device you will need. ONLY attempt this upgrade if you are comfortable with the terms laid out above by the manufacturer. Finally, it is also worth remembering that just because a system can SEE more than the official maximum memory, there is no guarantee that you will be able to utilize the full visible memory at once. Synology’s recommendations on the maximum memory supported by their NAS systems are often governed by three factors:
The Recommended Maximum Supported Memory detailed by the CPU Manufacturer (e.g. Intel or AMD), which can also be a case of lanes and bandwidth allocation/availability
The number of memory slots that Synology add to the system. This can be a case of a NAS only having 2 slots (with only 32GB modules supported by the brand) but the CPU supporting more than that being a physical conflict
The Synology NAS might arrive with fixed/soldered memory for it’s default memory (e.g. the 2GB in the DS423+ or 4GB in the DS920+) but might also have a free memory upgrade slot – this leads to unusual memory caps such as the 6GB Maximum on the DS423+, despite it’s CPU supporting upto 8GB.
If you choose to go ahead with unofficial memory, afterwards, it is highly recommended to test the full quantity available with VM testing (assigning bulk memory to each virtual image) and running at the same time to see if it is utilized.
Synology Official Memory vs Unofficial Memory from Crucial, Kingston, Sabrent, etc?
Luckily Synology provides a wide range of official memory upgrades that can be purchased from numerous retailers online, however, they are generally more expensive than the 3rd party equivalents (see example above). Now, there could be a few good reasons for this. Firstly, these memory sticks are first-party and specifically selected to work on the Synology NAS systems (taking alot of the searching out of it for people in researching speeds, frequencies and supported PIN numbers), and officially branded components for any hardware manufacturer are always pricier.
Next, they do not have the rotation of stock that Crucial or Kingston has and therefore, the flexibility in pricing they might have is not available. Lastly, the Synology memory will often be ECC memory (especially in recent released NAS systems by them) and ECC memory always commands a higher price. However, given this memory is likely manufactured by a 3rd party, that does make it a little painful sometimes for smaller Synology NAS users who look at official memory and its often 2-3x pricepoint of equivalent modules from Kingston, Crucial and Samsung. So, in this guide we talk about upgrading your memory with both official and unofficial memory, what happens when you do and if there are risks to factor in. If you are a little unsure about whether you need to use ECC memory in your specific Synology NAS setup, you can watch the video below detailing the pros, cons and more:
1/2x Memory Upgrade Modules (Ranging from 4GB to 16GB and 32GB Individual Modules – Link below for Tested RAM modules from Crucial, Kingston, Samsung, Timtec and Synology Official Memory too:
VERY IMPORTANT – The Links used in the article below towards the correct unofficial memory are occasionally changed (beyond my control) as it will direct you to the site in your own region/country. MAKE SURE to check that the memory module (especially 16 and 32GB SODIMM modules) are DUAL RANK or ‘DR‘, as Synology NAS typically have trouble with SR/SINGLE RANK modules.
(OPTIONAL) Anti-static gloves and Envelope – useful to eliminate static charges and also to store the removed older official memory sticks):
First, we need to ensure the Synology DS723+ is completely powered down/off and the mains power has been disconnected. It is recommended that you remove the Hard Drive or SSD that you have installed before accessing the RAM as it may block the slots. Additionally, you should remove the hard drive media as the unit will be moved around a lot during the memory installation and this could damage the drives. Be sure to keep a note of the drives that you remove and the order they were installed (HDD Bay 1, HDD Bay 2, etc) as installing the drives in the wrong slots could damage any existing RAID you have setup internally.
Next, we need to access the memory upgrade panel. Now, if you are just adding the existing memory, you can just add the additional module to the available SODIMM slot. However, if you are upgrading the system’s memory with new pairs of memory sticks (eg upgrading from the default 2GB to 32GB with 2x16GB), you will need to remove the old memory (remember to store it in an antistatic bag afterwards)
If you are removing the original memory, be sure you eject the official memory sticks using the clips on either side of the slot, as well as only holding the memory sticks by the narrow side edges, never touching the chips or board of the money or NAS.
Once you have removed them, they can either be stored away for a later project, installed in a compatible laptop or sold on eBay etc to make a little cash back!
Once they are clear, install one or both of your chosen unofficial DDR4 SODIMM memory modules in the available slots, making sure that you click them both in with the clips on either side.
Synology DS723+ Official/Unofficial Memory Upgrade – Step 2, Checking the Unofficial Memory is Recognized
What you will need:
A web browser (Chrome, Safari, Firefox, etc) on a Windows, Mac or Android Machine) accessing the Synology DS723+ user-interface as you normally would.
Next, you need to power up your Synology DS723+ NAS and access it as you normally would. If you are buying this NAS first time and have yet to set it up, there are numerous first-time set-up guides and tips on the YouTube channel here – that will get you from the hardware installation to set up the Synology DS723+ NAS for use. Once the NAS user interface (UI) is ready to go, head over to the hardware specification page shown here:
As you can see in the image above, the Synology has recognized the increased memory. It is still recommended to head to Step 4 below to see how to use the official memory test feature of the system.
As mentioned earlier, Synology is pretty clear about its position on users opting for non-Synology memory in their systems or exceeding the officially stated maximum capacity of the DS723+. They feel this is using the system in a configuration that is outside of the guaranteed performance and stability that they advertise. This means that if your system encounters issues as a result of these unsupported configurations, they (at best) will have difficulty recreating this configuration to provide support or (at worst) refuse to provide support as they have been pretty clear on the setups that they state the DS723+ can run with. However, there is no avoiding that there have been countless examples of Synology NAS systems functioning perfectly well with 3rd party memory (YouTube Playlist of Synology NAS 3rd Party memory Tests HERE), so here are some examples of memory modules we tested on the Synology DS723+ NAS (including model ID and links as needed – again, DOUBLE CHECK THE MODEL ID before you buy, as retailers will check page links):
Synology DS723+ NAS + with 2x Sabrent Rocket 8GB 3200Mhz DDR4 SODIMM (16GB & 32GB also tested)
After installation, I checked the Synology Resource Monitor and the Sabrent memory was recognized:
Heading into the system information, once again, the 16GB Memory was recognized as recognised in total available physical memory:
Heading into the Virtual Machine Manager and assigned a massive chunk of the available memory to an Ubuntu VM to see if the system would have any issue with assigning it. No barriers or hurdles were raised.
Booting the VM, We were able to head into the Ubuntu System Monitor and see that the memory quantity was successfully allocated to the Virtual Machine:
Synology DS723+ NAS + with 2x Crucial 16GB 3200Mhz DDR4 SODIMM
After installation, I checked the Synology Resource Monitor and the Crucial memory was recognized:
Heading into the system information, once again, the 32GB Memory was recognized as recognised in total available physical memory:
Heading into the Virtual Machine Manager and assigned a massive chunk of the available memory to an Ubuntu VM to see if the system would have any issue with assigning it. No barriers or hurdles were raised.
Booting the VM, We were able to head into the Ubuntu System Monitor and see that the memory quantity was successfully allocated to the Virtual Machine:
Synology DS723+ NAS + with 2x Kingston 32GB 3200Mhz DDR4 SODIMM
After installation, I checked the Synology Resource Monitor and the Kingston memory was recognized:
Heading into the system information, once again, the 64GB Memory was recognized as recognised in total available physical memory:
Heading into the Virtual Machine Manager and assigned a massive chunk of the available memory to an Ubuntu VM to see if the system would have any issue with assigning it. No barriers or hurdles were raised.
Booting the VM, We were able to head into the Ubuntu System Monitor and see that the memory quantity was successfully allocated to the Virtual Machine:
So, those were the three unofficial memory types that I tested on the Synology DS723+ NAS. However, it is VERY important that (regardless of whether you choose official or unofficial memory for your NAS upgrade) you check that your memory is working perfectly. Do check this; you should use the built-in Memory Testing facility of Synology Assistant for PC/Mac. Below is how to conduct the test.
Synology DS723+ Official/Unofficial Memory Upgrade – Step 4, Checking the Memory is Usable
There are several ways to check the memory is working on your Synology DS723+ correctly. One easy method that can be done very quickly is using the Synology Memory Test tool.
To run a memory test:
Download and install the Synology Assistant, where you can find the memory test function. The application is available at Download Center.
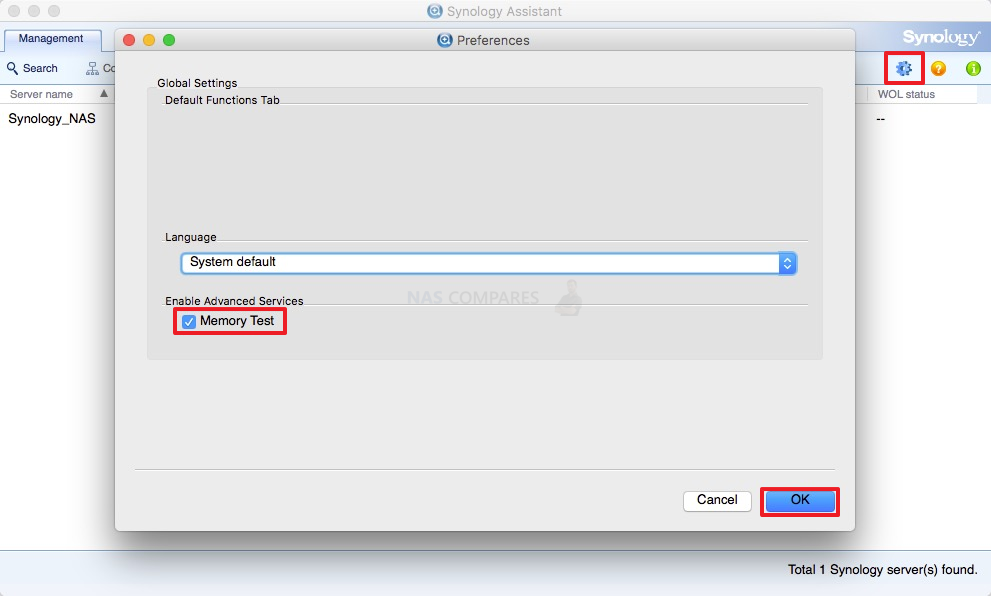
Open Synology Assistant, click and enable the memory test service.
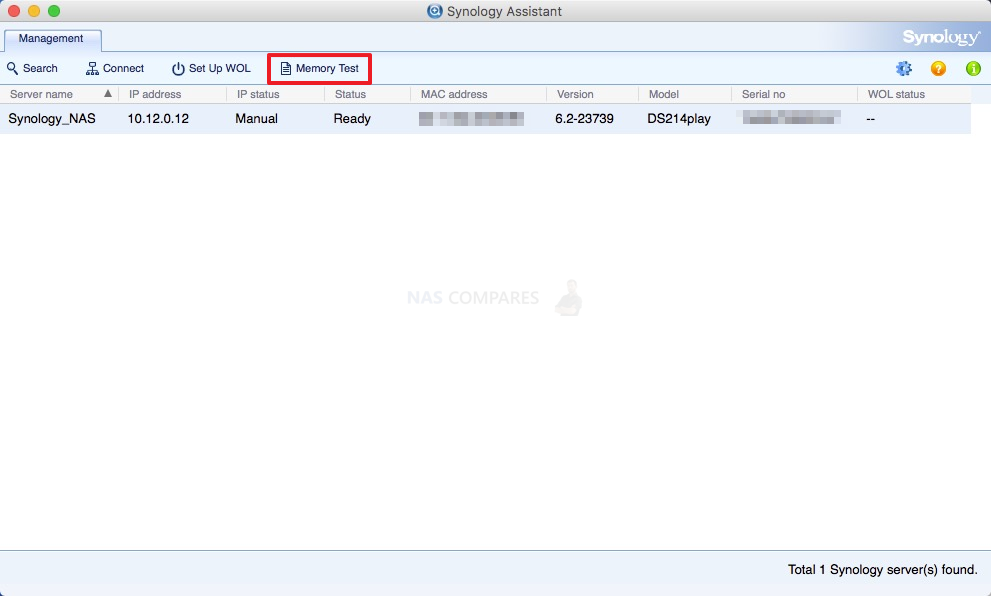
Select the device where you wish to run the test and click Memory Test.
During the memory test, your Synology NAS will be rebooted. It will recover after another reboot if its memory is normal and passes the test. However, if the memory test fails to finish or shows that there is an error, the memory may be faulty. In this case, you are strongly recommended to return your Synology NAS for repair. Just in case you have installed a non-Synology memory module, please remove it and rerun the memory test.
Though once again you should remember that Synology do not recommend using memory modules that are not from Synology themselves, so this test may not be indicative of the health of unofficial memory in your Synology NAS. Alternatively, you can perform as many actions and processes as possible (scans, copy/pastes, thumbnail generation, transcode a 4K file, RAID changes, synchronisation, etc) at once to see how the task manager and resource monitor behaves in the Synology DS723+. It should spike each time and at a greater height as you do more and more and once it exceeds the memory you had previously installed, this is a good confirmation that the installation is working fine. Alternatively, you can temporarily allocate chunks of memory and then that is a much more reliable test. Install the virtual machine application for the Synology DS723+ (P.S. for Synology users it is the Virtual Machine Manager and for QNAP it is the Virtualisation station). Then you can create individual VMs (it is alot easier than it sounds and the Synology DS723+ VM software is very user-friendly) then allocate a large number of GBs (Gigabytes) of memory to each one. When you have created 3 or 4 individual virtual machine containers on the Synology DS723+ software, then you can run them all at once and that will immediately use almost all the memory at once! If there are any issues with the memory, it will show here almost immediately. If no problems, then you know the Synology DS723+ unofficial Crucial/Kingston memory installation as successful. You can then delete the VMs in the virtual machine software and then free up all that memory again.
And there you go. You have now installed your unofficial memory in your Synology DS723+ NAS system. Remember, you are going to using an unsupported Synology setup, so regularly BACKUP to another NAS, a cloud platform, or even just a USB drive using the dedicated first-party software inside your NAS system. Thanks for reading this guide. Still need help? Use the NASCompares Free Advice section below. It is my free, unbias community support system that allows you to ask me questions about your ideal setup. It is NOT a sales platform, NOT a way to push hardware you don’t need and, although it is just manned by me and might take a day or two for me to reply, I will help you any way I can.
Link below for Tested RAM modules from Crucial, Kingston, Samsung, Timtec and Synology Official Memory too:
VERY IMPORTANT – The Links used in the article below towards the correct unofficial memory are occasionally changed (beyond my control) as it will direct you to the site in your own region/country. MAKE SURE to check that the memory module (especially 16 and 32GB SODIMM modules) are DUAL RANK or ‘DR‘, as Synology NAS typically have trouble with SR/SINGLE RANK modules.
This description contains links to Amazon. These links will take you to some of the products mentioned in today's content. As an Amazon Associate, I earn from qualifying purchases. Visit the NASCompares Deal Finder to find the best place to buy this device in your region, based on Service, Support and Reputation - Just Search for your NAS Drive in the Box Below
Need Advice on Data Storage from an Expert?
Finally, for free advice about your setup, just leave a message in the comments below here at NASCompares.com and we will get back to you.Need Help?
Where possible (and where appropriate) please provide as much information about your requirements, as then I can arrange the best answer and solution to your needs. Do not worry about your e-mail address being required, it will NOT be used in a mailing list and will NOT be used in any way other than to respond to your enquiry.
[contact-form-7]
TRY CHAT Terms and Conditions
If you like this service, please consider supporting us.
We use affiliate links on the blog allowing NAScompares information and advice service to be free of charge to you.Anything you purchase on the day you click on our links will generate a small commission which isused to run the website. Here is a link for Amazon and B&H.You can also get me a Ko-fi or old school Paypal. Thanks!To find out more about how to support this advice service checkHEREIf you need to fix or configure a NAS, check FiverHave you thought about helping others with your knowledge? Find Instructions Here
Or support us by using our affiliate links on Amazon UK and Amazon US
Alternatively, why not ask me on the ASK NASCompares forum, by clicking the button below. This is a community hub that serves as a place that I can answer your question, chew the fat, share new release information and even get corrections posted. I will always get around to answering ALL queries, but as a one-man operation, I cannot promise speed! So by sharing your query in the ASK NASCompares section below, you can get a better range of solutions and suggestions, alongside my own.
In an era characterized by the exponential growth of digital data and the ongoing demand for reliable storage solutions, Network Attached Storage (NAS) enclosures have emerged as essential devices for both personal and professional data management. They offer centralized data storage, accessibility, and data protection, making them an integral part of modern computing environments. In this review, we undertake a comprehensive analysis of the U-NAS NSC-410 NAS Enclosure, a versatile solution that has garnered attention in the storage technology landscape. The U-NAS NSC-410 is notable for its functional design and its potential to address a range of storage needs across various use cases. It blends practicality and aesthetics while accommodating the latest storage technologies. Throughout this review, we will closely examine the NSC-410’s external design, internal components, usability, performance capabilities, and potential applications.
Whether you are a technology enthusiast in search of a reliable home storage solution, a professional seeking to streamline data management for your organization, or an individual looking to secure and manage digital assets, this review aims to provide an impartial assessment of the U-NAS NSC-410 NAS Enclosure. Our objective is to offer you valuable insights to help you determine whether this enclosure aligns with your unique storage requirements and expectations. Join us as we navigate the intricacies of the U-NAS NSC-410, dissecting its features and capabilities to assist you in making an informed decision within today’s data-driven landscape.
Expansion: 4 x Hot-Swap Drive Bays (2.5″/3.5” SATA/SAS), Up to 3 x Internal Drive Bays (2.5” HDD/SSD), 1 x Full Size PCI/PCI Express
Dimensions: 263mm x 195mm x 197mm (feet not included)
Net Weight: 4.1 KG
U-NAS NSC-410 NAS Case Review – Quick Conclusion
The U-NAS NSC-410 NAS Enclosure combines practicality and functionality, making it a reliable choice for various storage requirements. While its design may appear somewhat dated, its sturdy build, user-friendly features, and expandability options stand out. However, the unconventional motherboard placement can limit CPU fan choices and airflow. Consider compatibility and specific use cases, especially for CPUs with higher cooling demands. Overall, the NSC-410 offers a solid storage solution with a few trade-offs but remains a practical choice within its design parameters.
Compact Design: The NSC-410 boasts a compact and space-saving design, making it suitable for small-scale storage needs and fitting well in confined spaces.
Pre-configured Connections: This case comes with pre-connected SATA data cables and power connectors, streamlining the installation process.
Ample Ventilation: The individual storage bays within the NSC-410 are equipped with generous ventilation, promoting effective cooling for your drives.
Simplicity: Its straightforward layout and design make it a user-friendly option for those new to NAS setups.
Budget-Friendly: The NSC-410 offers a cost-effective storage solution without compromising on essential features.
Durable Build: With its metal external lid and sturdy construction, the NSC-410 is built to last, ensuring long-term reliability.
Limited Capacity: The NSC-410’s 4-Bay capacity may be insufficient for users with extensive storage requirements.
Horizontal Motherboard Placement: The horizontal orientation of the motherboard may limit the availability of CPU cooling options and airflow.
Single Fan Cooling: It relies on a single 120mm fan for cooling, potentially leading to thermal challenges with high-performance setups.
PCIe Card Constraints: Due to its compact size, installing larger PCIe cards may be challenging, and users may need to prioritize space-efficient components.
U-NAS NSC-410 NAS Case Review – Packaging
The packaging for the U-NAS NSC-410 NAS case is quite straightforward. It arrives in a standard brown box, which can be described as rather generic in appearance.
Upon opening the box, you’ll find that the NSC-410 4-Bay enclosure is very well protected, nestled within white hard foam that effectively safeguards it during transit.
The included accessories are neatly organized within their dedicated kit box. Inside, you’ll discover practical items such as cable ties, a molex power splitter, screws designed for both 2.5” and 3.5” HDDs, and a SATA 2.5” plate for securing a drive.
Additionally, it’s worth noting that the brand offers optional accessories for purchase separately, including SAS rear-connected backplanes and a PCIe EXTENSION KIT.
For those who prefer a more streamlined approach, there’s an option to acquire the NAS case prepopulated with an Intel Celeron NAS built configuration for $179. This configuration features an Intel J3455 processor and 2GB SODIMM Memory, known as the U-NAS NS-410.
The power supply unit (PSU) arrives pre-installed, with the 2x molex power connectors already pre-connected to the storage backboard. In summary, the accessories kit provided with the U-NAS NSC-410 NAS case is comprehensive and adequately protects the contents. While the packaging may be somewhat generic in appearance, it offers good value for its price point and includes all the necessary components for setup and use.
U-NAS NSC-410 NAS Case Review – Design
This particular case may seem familiar to some, as it has been available under various brand names on online marketplaces like Aliexpress and Amazon. However, it comes bearing the U-NAS logo prominently displayed at the top, establishing its origin.
The chassis of the NSC-410 is predominantly characterized by its metal external lid, which envelops three sides of the case. In terms of dimensions, it measures 263mm x 195mm x 197mm, aligning with a desktop-style 4-Bay enclosure.
Upon unboxing, the case’s metal slides are found protected by a layer of plastic, a feature that can be effortlessly removed. It’s worth noting that while the metal casing might be considered somewhat thin, it imparts a sense of solidity and durability.
The external lid showcases a brushed and smooth metal finish, contributing to its overall appearance. Ventilation is concentrated on one side of the case, primarily where the motherboard and CPU are typically positioned, and notably absent on the top, right side, and base of the chassis.
Examining the front panel, it is constructed from plastic and lacks a dedicated cavity for an LCD panel. This design choice results in a conspicuous and relatively large vacant space on the front panel. However, it includes a clearly visible USB Type-A USB 3.2 Gen 1 (5Gb/s) port, in addition to robustly designed power on/off and reset buttons.
A distinctive feature can be found at the corner edge of the front panel, where 2x additional USB 2.0 Type-A ports and sound (audio In/Out) ports are located. This uncommon addition enhances the case’s functionality.
The individual storage bays within the case are not equipped with locking mechanisms but feature ample ventilation. Each storage tray is designed for easy removal and includes a spring-loaded handle for added convenience. Inside, each bay incorporates combined SAS/SATA connectors, facilitating connectivity.
Moving to the rear panel, a single large 120mm fan is included to manage cooling. Notably, there is a clear M-ITX backplane panel, although its vertical placement may deviate from the horizontal orientation commonly seen in most compact NAS cases.
In terms of aesthetics, it’s essential to acknowledge that the case may appear somewhat dated by the standards of 2023/2024. Nevertheless, it compensates for this with its robust construction, signifying durability as a primary attribute.
U-NAS NSC-410 NAS Case Review – Inside
The U-NAS NSC-410 NAS case features an internal 1U FLEX PSU. It can be purchased with a choice of a 150W PSU included for $157.99 or a 250W PSU for $169.
However, it’s worth noting that some users might prefer a standard SFX PSU, which tends to be easier to source in physical retail shops, unlike the less common 1U FLEX PSU. The provided PSU includes a main 20 PIN connector, 2x SATA power connectors, and 2 additional smaller motherboard port connectors.
Within the case, you’ll find that the SATA data cables are pre-connected to the rear backboard, streamlining the setup process. Furthermore, the power for the SATA backboard comes pre-attached, facilitated by 2x molex power cables.
The internal fan is a silent 120mm GELID fan, contributing to noise reduction. The front panel cables are well-organized, ensuring a neat interior layout. These front panel connectors encompass a USB 3.2 Gen 1 Port, Power, Reset, LEDs, Audio In/Out, and 2x USB connectors.
It’s important to note that the M-ITX motherboard is mounted on its side within the case, a configuration that some may find unconventional. The PCIe slot is full-width but of ¾ length, accommodating single-card height expansions.
One notable consideration is that the CPU fan height cannot exceed 60mm, and possibly even less for optimal cooling. This limitation could pose challenges for more high-performance CPUs like Intel Core i5 and above or serious AMD Ryzen processors unless users are willing to invest in integrated and compact copper-piped CPU heatsinks and fans.
For those seeking a SAS backplane, U-NAS offers a replacement rear backplane version. Additionally, there is room for a 2.5” SATA SSD drive, and an additional SATA cable is included for this purpose.
In summary, the U-NAS NSC-410 is a compact case with practical features. However, the placement of the motherboard in close proximity to the 4-Bay SATA drive cage at an angle may significantly limit CPU fan options and potentially obstruct horizontal airflow, making it important to carefully consider component compatibility.
U-NAS NSC-410 NAS Case Review – Conclusion and Verdict
So what do I think of the U-NAS NSC-410 NAS Enclosure? It’s clear that this device try to bring a blend of practicality and functionality to the realm of network-attached storage solutions. While not without its limitations, the NSC-410 showcases several notable features that cater to a range of storage requirements. The enclosure’s design, with its metal external lid and compact footprint, offers a sturdy build, though it may appear somewhat dated in the context of contemporary aesthetics. The inclusion of a 120mm GELID fan for cooling, pre-connected SATA data cables, and well-organized front panel connectors contributes to an overall user-friendly experience.
One noteworthy aspect is the placement of the M-ITX motherboard, which, while unconventional, enables space-efficient design. However, this placement may restrict CPU fan choices and potentially affect airflow. The availability of alternative power supply units, SAS backplane options, and additional storage expandability via the 2.5″ SATA SSD drive slot enhances the enclosure’s versatility. It is important to consider the specific use case and compatibility requirements when assessing the suitability of the NSC-410, particularly for CPUs with more demanding cooling needs.
The U-NAS NSC-410 NAS Enclosure offers a pragmatic storage solution. Its practical features and solid construction make it a viable choice for those seeking a reliable network-attached storage solution, although some trade-offs exist. Ultimately, it is a product that can fulfill various storage needs within its design parameters.
Compact Design: The NSC-410 boasts a compact and space-saving design, making it suitable for small-scale storage needs and fitting well in confined spaces.
Pre-configured Connections: This case comes with pre-connected SATA data cables and power connectors, streamlining the installation process.
Ample Ventilation: The individual storage bays within the NSC-410 are equipped with generous ventilation, promoting effective cooling for your drives.
Simplicity: Its straightforward layout and design make it a user-friendly option for those new to NAS setups.
Budget-Friendly: The NSC-410 offers a cost-effective storage solution without compromising on essential features.
Durable Build: With its metal external lid and sturdy construction, the NSC-410 is built to last, ensuring long-term reliability.
Limited Capacity: The NSC-410’s 4-Bay capacity may be insufficient for users with extensive storage requirements.
Horizontal Motherboard Placement: The horizontal orientation of the motherboard may limit the availability of CPU cooling options and airflow.
Single Fan Cooling: It relies on a single 120mm fan for cooling, potentially leading to thermal challenges with high-performance setups.
PCIe Card Constraints: Due to its compact size, installing larger PCIe cards may be challenging, and users may need to prioritize space-efficient components.
This description contains links to Amazon. These links will take you to some of the products mentioned in today's content. As an Amazon Associate, I earn from qualifying purchases. Visit the NASCompares Deal Finder to find the best place to buy this device in your region, based on Service, Support and Reputation - Just Search for your NAS Drive in the Box Below
Need Advice on Data Storage from an Expert?
Finally, for free advice about your setup, just leave a message in the comments below here at NASCompares.com and we will get back to you.Need Help?
Where possible (and where appropriate) please provide as much information about your requirements, as then I can arrange the best answer and solution to your needs. Do not worry about your e-mail address being required, it will NOT be used in a mailing list and will NOT be used in any way other than to respond to your enquiry.
[contact-form-7]
TRY CHAT Terms and Conditions
If you like this service, please consider supporting us.
We use affiliate links on the blog allowing NAScompares information and advice service to be free of charge to you.Anything you purchase on the day you click on our links will generate a small commission which isused to run the website. Here is a link for Amazon and B&H.You can also get me a Ko-fi or old school Paypal. Thanks!To find out more about how to support this advice service checkHEREIf you need to fix or configure a NAS, check FiverHave you thought about helping others with your knowledge? Find Instructions Here
Or support us by using our affiliate links on Amazon UK and Amazon US
Alternatively, why not ask me on the ASK NASCompares forum, by clicking the button below. This is a community hub that serves as a place that I can answer your question, chew the fat, share new release information and even get corrections posted. I will always get around to answering ALL queries, but as a one-man operation, I cannot promise speed! So by sharing your query in the ASK NASCompares section below, you can get a better range of solutions and suggestions, alongside my own.
Data continues to grow exponentially, with everyday devices generating substantial amounts of data. High-resolution photos, 4K Ultra HD HDR movies, and internet connections surpassing gigabit speeds have become the norm. This surge in data creation and transfer has highlighted the limitations of the traditional 1GbE (RJ45) LAN/WAN ports, often causing network bottlenecks. In the past year, client hardware like phones, laptops, TVs, and tablets have adapted to this challenge, increasingly incorporating advanced WiFi protocols such as WiFi 6 (802.11ax). Similarly, in the realm of Network Attached Storage (NAS), addressing bandwidth limitations has been a focus for several years, with one of the key solutions being the adoption of 10GbE technology. 10GbE, offering ten times the bandwidth of the conventional 1GbE, enables network transmissions to exceed 1,000MB/s. Although 10G technology has been around for a while, it’s only in the last few years, particularly in 2023, that it has become significantly more affordable. This price reduction has made it feasible for both home and business users to upgrade. The cost of 10G adapter cards has dropped to under £100, and network switches are now priced only slightly higher than their 1G counterparts. Furthermore, in some instances, the physical compatibility of 1G and 10G is identical (Copper RJ45), simplifying upgrades and allowing for considerable hardware reuse.
10GbE has become much more accessible than previously anticipated. To assist in your decision-making process, below is a video detailing numerous reasons to upgrade to or opt out of 10GbE, which could be helpful in your search for the best 10GbE NAS to buy in 2023.
When exploring the various 10GbE NAS drives available, it’s crucial to recognize that they are not all created equal. Despite the temptation of lower-priced models from emerging brands, these often lack durability and comprehensive features. Here are the essential features that the best 10GbE NAS drives, regardless of brand, should include:
Integrated Hardware and Software: Includes a web browser interface, mobile and desktop apps for backup, media streaming, surveillance, and file management.
Multi-OS Compatibility: Accessible via Windows, Mac, Android, and Linux.
Warranty: Typically 2-3 years, extendable to 5 years.
Network and Remote Access: Local network access and secure remote access with brand-supported services at no extra cost.
Support for Latest Hard Drives: Compatibility with the latest 20TB NAS hard drives.
RAID Support: Multiple drive configurations for data protection and performance.
Regular Updates: Frequent updates for security, features, and services.
Cloud and Enterprise Service Integration: Syncing capabilities with cloud services like Google Drive, Dropbox, and OneDrive, and enterprise services such as AWS and Azure.
Shared Drive Hosting: Ability to host a synchronized drive on your device, visible in the native file manager.
Direct Network Connectivity: Access via ethernet for 100MB/s or higher connectivity.
Backup and Sync Tools: Client-side tools for regular backups of files and system data.
Ensure any 10GbE NAS you consider, beyond the top recommendations, includes these features. These aspects are often compromised in cheaper models, resulting in less proficient NAS servers. Let’s now look at the best 10GbE NAS drives to buy in 2023.
Honourable Mention, Good Value 10GbE – Terramaster T9-450 NAS
Terramaster has really changed the playing field with the T9-450 NAS. I was already a big fan of their latest generation of 6-Bay, 9-Bay and 12-Bay desktop chassis – providing a pretty substantial amount of storage in a tower design that borrows ventilation methodology traditionally found in rackmounts, but the T9-450 takes this logic and doubles down on it hard. The dual 10GbE on the system means that, despite it’s comparatively modest price point (when comparing against similar scale solutions from Synology and QNAP) you genuinely have a solution with the potential to allow you to enjoy every single MB/s or GB/s of your RAID externally. This is further bolstered with additional 2.5GbE ports, m.2 NVMe bays, uncomplicated support of HDDs/SSDs and just generally a very sensible system that shows how much Terramaster has matured as a brand. The TOS software is still not quite up there with Synology’s DSM or QNAP’s QTS in terms of ease of use and AAA+ features, but it is definitely a great entry point OS that has tighted it’s security since the brand was targetted by a ransomware group (along with other brands, they were affected by Deadbolt attacks) – it certainly lacks some of the background optimization of it’s competitors, but then this is reflected in the budget of the system too.
The internal PCIe slot that has been largely ignored is a bit of a missed opportunity and I am not a big fan of how they have addressed memory compatibility, but overall it is very, very tough to criticise the T9-450 NAS when you factor in the value of the package here. Factor in that you can very easily swap out the OS for many others, and it largely silences alot of the negatives here too. Overall, the T9-450 could potentially be the best NAS that Terramster has ever released and if they continue to address later releases with the same level of hardware value, this could definitely give the bigger names in the industry something of a headache down the road. I highly recommend this system for its value and performance potential!
SOFTWARE - 7/10
HARDWARE - 10/10
PERFORMANCE - 8/10
PRICE - 9/10
VALUE - 10/10
8.8
PROS
Surprisingly compact for 9 Bays of Storage Good Middle ground between a Rackmount and Desktop System Dual 10GbE - LOVELY STUFF! Also has support of SMB MultiChannel and an extra 2x 2.5GbE Decent throughput Capable CPU Great RAID Options Snapshot Replication BTRFS/EXT4 Support as preferred A large amount of maximum memory supported (16-32GB - TBC) M.2 SSD Bay inside for caching/storage TOS 5.1 is genuinely good, if not quite as polished/evolved as it\\\'s competitors VERY easy to install TrueNAS, UnRAID, Proxmox, OpenMediaVault, etc (and also easy to reverse)
CONS
Secret PCIe Slot - Unused?! Supports ECC Mmeory, but not included (might annoy some) NOT QUIET!
DEAL WATCH – Is It On Offer Right Now?
These Offers are Checked Daily
Best All Round 10GbE NAS for HW and SW – Synology DS1823xs+ NAS
If you are looking for a solid and confident move away from expensive long-term cloud subscription services, away from your defunct Drobo system or simply looking for a Synology NAS that has good hardware inside, outside and with DSM all over it – the DS1823xs+ NAS is a very solid choice indeed! With a huge degree of expandability and upgradability open to the end user to scale with later in the system’s life, extensive long-term committed software support and that 5yrs hardware warranty out the box – this is a system that is clearly designed for the long-haul and as soon as you factor in the complete hardware+software nature of this purchase with DSM included, it’s a very tasty box! There are a few odd choices here or there (e.g M.2 NVMe Pools not presented in the way some might like and HDD/SSD compatibility that clearly favours the enterprise tier), this is still easily the most powerful and capable 8-Bay system that Synology has ever produced. Whether you are a small, medium or large business user, this system has a large amount of potential for your data and has the horsepower for multiple VMs, large-scale surveillance, widespread backups, broad multi-user access and all of these running at the same time in a remarkably compact package.
That said, the DS1823xs+ NAS has a little bit of an identity crisis when you scale it up with the rest of the larger tiers of the Synology portfolio and, although I genuinely like it, seems to be a system that exists BETWEEN the Synology PLUS and XS series (see my points about the RS2423+) and when you look at it in that context, it sees the tiniest bit more expensive than it should be. If you are looking at the DS1823xs+ NAS and fully intend to scale up the storage, external bandwidth or memory in the next two years, I would recommend skipping this and opting for the DS3622xs+ instead. However, the base model of the DS1823xs+ has alot of ‘umpf’ under the bonnet and short of those hurdles for some on compatibility, the DS1823xs+ seemingly lives up to alot of it’s expectations!
SOFTWARE - 10/10
HARDWARE - 8/10
PERFORMANCE - 9/10
PRICE - 8/10
VALUE - 8/10
8.6
PROS
Supports ALL of the Synology App Suite Huge Amount of Expandability High Capacity / Low Impact 10/10 Chassis Design M.2 NVMe SSD Storage Pools Balanced/Powerful CPU 5yr H/W Warranty & Long S/W Support Tier Storage Ready ECC Memory and 8GB Day 1 Hugely User-Friendly GUI 10GbE x86 8-Bay Expandable Synology......FINALLY!
CONS
HDD/SSD Compatibility is going to Annoy some M.2 NVMe SSD Lane Limits Lack of SHR DS3622xs+ is £1000+ more, but significantly upscaled on almost everything
DEAL WATCH – Is It On Offer Right Now?
These Offers are Checked Daily
Best Storage 10GbE NAS – QNAP Triple Tier TS-855X Server
0-130TB SATA HDDs, 0-16TB SATA SSDs, 0-16TB 3×4 M.2 NVMes, 6+2+2-Bays, C5125 8-Core Atom CPU, 8-128GB Memory, 1x 10GbE and 2x 2.5GbE Ports, 2x PCIe 3×8 Slots, 3yr Warranty
I have to say, I am INSANELY impressed by how much bang for buck is being included in the TS-855X and although it is not the most powerful device in the market (arguably intentionally, as it favours the more affordable Atom over a xeon), it is a sensible workhorse of a NAS. On the positive side, the QNAP TS-855X NAS comes with numerous strong selling points. The device offers large storage potential, especially with the ZFS file system, making it a powerhouse for data management. The choice of CPU is also sensible, providing a balance between performance and cost-effectiveness. The inclusion of the QTier tool is particularly appealing, adding a layer of efficiency to the storage management. Another big plus is the user-friendly GUI for ZFS in QuTS, making it accessible for users with varying levels of technical expertise. The three-tier storage options and support of ECC memory with a maximum of 128GB further enhance the device’s versatility and potential. Moreover, the TS-855X provides a wealth of expansion options and comes with 8 camera licenses with QVR Pro/QTS. The well-ventilated design contributes to thermal efficiency, ensuring optimal performance, while its support for the latest 22TB and soon-to-be-released 24TB drives future-proofs your investment.
However, the TS-855X is not without its drawbacks. While the two SATA SSD bays provide extra storage options, they would have been better if they were U.2 slots, which offer faster speeds. Although the device supports ECC memory, the initial 8GB memory in the base model is non-ECC, which might not be optimal for all ZFS services. The memory capacity might also be somewhat low for users with intensive data needs. Furthermore, the software can sometimes be inconsistent under heavy use, and it has a steeper learning curve compared to competitors like Synology. Finally, the pricing structure for the TS-855X is a mixed bag. While some users may find the cost reasonable given its features, others might feel it’s a bit steep for what it offers. Therefore, while the QNAP TS-855X NAS offers a plethora of attractive features and strong performance, it’s worth keeping in mind that a spend of a few hundred more dollars opens the door to Intel Core-powered NAS in the TVS-hx74 series or more powerful Xeon triple-tiered systems such as the TVS-h1288X. If you want power, but on a budget, it’s a great choice!
SOFTWARE - 8/10
HARDWARE - 8/10
PERFORMANCE - 9/10
PRICE - 8/10
VALUE - 8/10
8.2
PROS
Large Storage Potential (Especially in ZFS) Sensible Choice of CPU QTier Tool is VERY Appealing ZFS in QuTS but with a User Friendly GUI Three Tier Storage Opts Support of ECC Memory & 128GB Max Tonnes of Expansion Options 8 Camera Licenses with QVR Pro/QTS Well Ventilated Design Supports Latest 22TB and 24TB (soon)
CONS
2x SATA SSD Bays Would Hva ebeen Better if U.2 Initial 8GB Memory is low for all ZFS services + is not ECC in default/Base Model Software can be a little inconsistent under excessive use Features a steeper learning curve than Synology Early Pricing is a Mixed Bag
DEAL WATCH – Is It On Offer Right Now?
These Offers are Checked Daily
Best Value 10GbE NVMe NAS – The Asustor Flashstor 12 Pro NVMe Flash Server
I cannot stress enough how impressed I am that the Flashstor 6 and Flashstor 12 Pro are priced at $499 and $860, respectively, given the level of hardware on offer here. These are by no means enterprise-grade NAS server solutions, nor should they be thought of as such. However, given the cost of typical fully featured 4x HDD solutions from their competitors and the brand themselves, which often start at $550 and above, it is quite remarkable that the six M.2 SSD system with comparable internal hardware comes in at $499. As long as a user keeps their expectations in line with what this cost versus its capabilities, it’s really tough to argue with the price point that these two devices have arrived at on the market. The Asustor FS6712X Flashstor 12 Pro NAS presents a unique offering in the NAS market, leveraging NVMe technology to provide high-capacity, ultra-high-performance storage. The device’s design, with its rhombus-shaped enclosure and twelve M.2 NVMe slots, sets it apart from traditional NAS devices and offers a sleek and modern aesthetic.
The tool-less drive installation mechanism makes it easy to set up and expand the storage capacity. However, there are some considerations to keep in mind. The limited number of PCIe lanes provided by the Intel Celeron N5105 processor may restrict the performance of high-speed NVMe drives. The single 10GbE LAN port also presents a potential network bottleneck, limiting the device’s overall network performance. Users seeking maximum performance and network throughput may find alternative solutions better suited to their needs. Despite these limitations, the FS6712X shines as a storage solution for users who prioritize high-capacity storage, quiet operation, and low power consumption. The device’s ability to directly output 4K video, along with its range of Asustor-approved apps, makes it an excellent choice for media distribution and presentation. In terms of pricing, the FS6712X comes with a price tag of $850+. While this may appear high at first glance, it is comparable to 8 bay drive NAS SATA devices and many of those do not even include NVMe slots or 10GbE. Users looking for a more cost-effective option can consider the Flashstor 6, which offers half the number of slots and 2x 2.5GbE enabled ports for $499.
As the cost of flash modules continues to drop, and larger capacity drives become available all the way up to 8TB (even without QLC), the FS6712X provides an attractive solution for those seeking high-capacity and high-performance NAS storage. While some underlying performance relativity by the end user needs to be factored in and hardware limitations exist thanks to the use of that Celeron to remain budget-friendly, the FS6712X is a tremendously smart move by Asustor. A well-designed NAS that presents a much more confident solution demonstrating the benefits of NVMe-focused NAS devices to an audience that would have assumed such things are way, WAY outside the realms of affordability!
SOFTWARE - 7/10
HARDWARE - 9/10
PERFORMANCE - 7/10
PRICE - 10/10
VALUE - 10/10
8.6
PROS
6x NVMe SSD Flash NAS for under $500 - COME ON! Low Power Use Full 1st Party NAS OS Included USB 3.2 Gen 2 10G Connectivity and wide USB Support/Compatibility Very Slick and compact design SP/DIF and HDMI 2.0b Outputs will hugely please the multimedia user community Likewise, Plex Performance is very good for 4K and 1080p conversions
CONS
6x NVMe Performance will never be realised because of the Intel Celeron CPU inside and 3x1 Limits 2.5GbE x2 is good.. but its still hugely limiting for those NVMes Lack of ECC memory (cost prohibitive of course) will put some serious users off
DEAL WATCH – Is It On Offer Right Now?
These Offers are Checked Daily
Need More Help Choosing the right NAS?
Choosing the right data storage solution for your needs can be very intimidating and it’s never too late to ask for help. With options ranging from NAS to DAS, Thunderbolt to SAS and connecting everything up so you can access all your lovely data at the touch of a button can be a lot simpler than you think. If you want some tips, guidance or help with everything from compatibility to suitability of a solution for you, why not drop me a message below and I will get back to you as soon as possible with what you should go for, its suitability and the best place to get it. This service is designed without profit in mind and in order to help you with your data storage needs, so I will try to answer your questions as soon as possible. Just enter in a few details of your setup, storage requirements and (in the case of buying a new solution) your budget – then me and Eddie the Web guy can help you with your question. This is a completely free service, is NOT provided with profit in mind and is manned by two humans (no bots, no automated replies, etc). Assistance might take an extra day or two (the service gets a lot of visitors) but we do try to answer every message. If you want to support this service, you can find out how to donate HERE. Otherwise, you can still just message us for free advice anyway!
This description contains links to Amazon. These links will take you to some of the products mentioned in today's content. As an Amazon Associate, I earn from qualifying purchases. Visit the NASCompares Deal Finder to find the best place to buy this device in your region, based on Service, Support and Reputation - Just Search for your NAS Drive in the Box Below
Need Advice on Data Storage from an Expert?
Finally, for free advice about your setup, just leave a message in the comments below here at NASCompares.com and we will get back to you.Need Help?
Where possible (and where appropriate) please provide as much information about your requirements, as then I can arrange the best answer and solution to your needs. Do not worry about your e-mail address being required, it will NOT be used in a mailing list and will NOT be used in any way other than to respond to your enquiry.
[contact-form-7]
TRY CHAT Terms and Conditions
If you like this service, please consider supporting us.
We use affiliate links on the blog allowing NAScompares information and advice service to be free of charge to you.Anything you purchase on the day you click on our links will generate a small commission which isused to run the website. Here is a link for Amazon and B&H.You can also get me a Ko-fi or old school Paypal. Thanks!To find out more about how to support this advice service checkHEREIf you need to fix or configure a NAS, check FiverHave you thought about helping others with your knowledge? Find Instructions Here
Or support us by using our affiliate links on Amazon UK and Amazon US
Alternatively, why not ask me on the ASK NASCompares forum, by clicking the button below. This is a community hub that serves as a place that I can answer your question, chew the fat, share new release information and even get corrections posted. I will always get around to answering ALL queries, but as a one-man operation, I cannot promise speed! So by sharing your query in the ASK NASCompares section below, you can get a better range of solutions and suggestions, alongside my own.
The Crucial T700 vs Seagate Firecuda 540 Gen5 SSD – Which Should You Buy?
After a wait, Gen 5 m.2 NVMe SSDs are increasingly accessible and affordable, with key players in the SSD market now introducing them. The delayed introduction of Gen 5 in the realm of solid-state drives is partly due to the repercussions of the 2020 pandemic on its production. The shift and assimilation of these drives into motherboards, especially from Gen 4 to Gen 5, has been gradual. With Gen 5, there’s an anticipation of superior performance, backed by upgraded controllers from top-tier manufacturers. Yet, there has been a slight delay in its full adoption at both motherboard and system levels. While it’s possible to acquire a Gen 5 SSD now, the extent of its optimal performance utilization remains a topic of debate. However, for those considering a purchase meant to last the next half-decade, it’s prudent to think ahead and select a future-compatible drive. As Gen 5’s affordability and prowess grow, it’s set to outshine and phase out Gen 4. So, for anyone seeking a top-tier SSD for upcoming years, a Gen 5 SSD is a wise long-term investment. In this piece, we’ll be exploring two prominent Gen 5 SSD contenders: the Seagate Firecuda 540 and the Crucial T700. At a cursory look, their similarities due to the early stage of Gen 5 might be evident, but they offer distinct advantages. Let’s delve into a detailed comparison of these two models.
Seagate Firecuda 540 NVMe SSD
Crucial T700 NVMe SSD
Check Amazon
Check Amazon
Comparing Seagate Firecuda 540 and Crucial T700 Hardware Specifications
As the world of Solid State Drives (SSDs) continually evolves, top-tier manufacturers are in a race to produce drives that offer the best balance of speed, durability, and affordability. The Seagate Firecuda 540 and the Crucial T700 are no exceptions to this trend. Both SSDs belong to the latest PCIe Gen 5×4 category and seem poised to elevate your computing experience. But which one should be your next purchase? Let’s dive deep into their specifications to help you decide. From the perspective of the average consumer, Gen 5 has been in the market for roughly 2 years, but more precisely about 18 months when considering its actual online purchase availability. Meanwhile, in the spheres of data centers and enterprise operations, Gen 5 made its debut almost 3 years ago. This extended timeline has paved the way for continuous research, refinement, and breakthroughs. As is often the case in the SSD industry, Phison was quick off the mark, revealing a Gen 5 controller in the form of the E26. This was succeeded by a couple of models aimed at enterprise needs and efficiency, including the DRAMless E31. Other industry players like Integrate and Silicon Motion weren’t far behind. This evolutionary trajectory saw many SSD manufacturers determining their Gen 5 strategies quite early, not to mention the in-house productions from giants like Samsung and WD. Alongside these developments, advancements in storage efficacy and flash technology emerged, facilitating higher layer counts and offering denser storage capacities without compromising Gen 5’s lofty performance, durability, and endurance benchmarks. Given that the Seagate Firecuda 540 and Crucial T700 are part of the initial batch of Gen 5 SSDs in the market, their performance metrics are understandably similar. Yet, when analyzing I/O measurements and robustness, certain nuances might give one an edge over the other in a direct comparison. Here’s a closer look at how the two SSDs compare in terms of hardware:
If terms like DWPD, IOPS, and TBW sound foreign to you, the video below will be invaluable. It provides a clear breakdown of common SSD terminologies, helping you better understand the subtle contrasts between the Seagate Firecuda 540 and the Crucial T700.
Choosing between the Seagate Firecuda 540 and the Crucial T700 is no easy task. Both SSDs manifest themselves as the embodiment of cutting-edge technology, exhibiting attributes that cater to diverse preferences and purposes. Let’s break it down further to give you a clearer picture:
1. Performance: The Crucial T700 takes the lead here. Boasting faster sequential read and write speeds across the 1TB and 2TB models, users might witness marginally quicker load times, faster data transfers, and an overall enhanced performance. Especially for those involved in data-heavy tasks like video editing or large-scale simulations, those extra speeds could translate to noticeable improvements.
2. Cost-Effectiveness: For the budget-conscious consumer, the Firecuda 540 shines brighter. The attractive price per TB, particularly for the 2TB model, offers great value, allowing users to get a high-performing SSD without breaking the bank. Over time, this price difference can become significant, especially for those looking to upgrade multiple systems.
3. Durability & Reliability: Delving deeper into longevity, the Firecuda 540 edges out its competitor. A higher TBW suggests it can handle more data writes over its lifespan. Furthermore, the longer MTBF and the unique addition of a 3-year data recovery warranty underline Seagate’s confidence in its product’s durability. For users whose primary concern is a lasting investment, this might tilt the scales in Seagate’s favor.
4. Cooling Solutions: Thermal management is vital in ensuring consistent performance and prolonging the SSD’s life. While the Firecuda 540 incorporates a heat shield, the Crucial T700 offers an optional heatsink. For enthusiasts or professionals who might push their SSDs to the limit, having a dedicated cooling solution, as in the T700, could be beneficial.
5. Future Expansion: Both SSDs provide a range of capacities up to 4TB. However, it’s worth noting that, as of the data provided, Seagate hasn’t released the specifications for a 4TB model. This could be a limitation for users seeking maximum storage from the Firecuda series.
In sum, the Seagate Firecuda 540 and Crucial T700 represent the pinnacle of current SSD technology, each with its strengths. The Firecuda seems tailored for those who value durability and cost-effectiveness, while the T700 might appeal more to performance enthusiasts and those keen on optimal cooling solutions. Your final choice should align with what you prioritize most in an SSD, whether that’s speed, longevity, cooling efficiency, or cost.
This description contains links to Amazon. These links will take you to some of the products mentioned in today's content. As an Amazon Associate, I earn from qualifying purchases. Visit the NASCompares Deal Finder to find the best place to buy this device in your region, based on Service, Support and Reputation - Just Search for your NAS Drive in the Box Below
Need Advice on Data Storage from an Expert?
Finally, for free advice about your setup, just leave a message in the comments below here at NASCompares.com and we will get back to you.Need Help?
Where possible (and where appropriate) please provide as much information about your requirements, as then I can arrange the best answer and solution to your needs. Do not worry about your e-mail address being required, it will NOT be used in a mailing list and will NOT be used in any way other than to respond to your enquiry.
[contact-form-7]
TRY CHAT Terms and Conditions
If you like this service, please consider supporting us.
We use affiliate links on the blog allowing NAScompares information and advice service to be free of charge to you.Anything you purchase on the day you click on our links will generate a small commission which isused to run the website. Here is a link for Amazon and B&H.You can also get me a Ko-fi or old school Paypal. Thanks!To find out more about how to support this advice service checkHEREIf you need to fix or configure a NAS, check FiverHave you thought about helping others with your knowledge? Find Instructions Here
Or support us by using our affiliate links on Amazon UK and Amazon US
Alternatively, why not ask me on the ASK NASCompares forum, by clicking the button below. This is a community hub that serves as a place that I can answer your question, chew the fat, share new release information and even get corrections posted. I will always get around to answering ALL queries, but as a one-man operation, I cannot promise speed! So by sharing your query in the ASK NASCompares section below, you can get a better range of solutions and suggestions, alongside my own.
Storaxa NAS – What Has Happened in the First 12 Months?
The Storaxa NAS Kickstarter campaign, initiated by Arrowtrack in 2023, marked its first year as a significant entry in the realm of crowdfunding projects. This article aims to methodically dissect the unfolding events and key developments of this period, maintaining a neutral and factual stance throughout. Over these 12 months, the campaign navigated through various challenges and milestones, characteristic of many crowdfunded endeavors. Central to the whole campaigns woes were the reported financial difficulties encountered, notably the withholding of funds by the payment processor Stripe. This situation precipitated a series of delays in production and delivery, directly impacting the campaign’s trajectory. Concurrently, communication between Arrowtrack and its backers was a focal point, with periods of minimal updates and responses raising questions among the project’s supporters. Arrowtrack’s efforts to keep backers informed included regular updates on the production process, supplier negotiations, and hardware design adjustments. Despite these attempts at transparency, there remained an undercurrent of concern among backers regarding the campaign’s financial management and documentation.
This article attempts to present an unbiased chronicle of the Storaxa NAS Kickstarter campaign’s first year, tracing its highs and lows. It seeks to provide readers with a clear, unvarnished understanding of the events as they unfolded, reflecting the complexities and challenges inherent in the world of crowdfunding technology projects.
Currently, at the time of writing (Jan 5th 2024) the status of the Storaxa Kickstarter campaign is not entirely clear. Updates are arriving on average twice a month (based on an annual average). Delivery/fulfillment timelines are still tremendously vague, and communication between the campaign organization Arrowtrak/Storaxa and the 4,900+ backers has slowed down significantly with self-imposed deadlines and schedules being regularly broken. This campaign is still showing life and there is still more than enough evidence to backup that this is NOT a scam. However, long-running silence periods from the company, poor timekeeping and comparisons that are being drawn to other projects that have arisen in 2023 (both crowdfunded and straight to retail) have resulted in questions being asked and no answers being given. Let’s start right at the beginning and discussing what the Sotraxa IS/WAS and how the campaign started.
The Storaxa NAS Kickstarter from Feb 2023 – What is/was it?
What is the Storaxa Kickstarter NAS and why is it a big deal to alot of potential storage buyers? Well, let’s rewind a bit. If you want to own a private network attached storage (NAS) solution in your home or office, until relatively recently, you only really had two options. The easiest, but more expensive option is to buy a ready-to-go NAS solution from the likes of Synology or QNAP, which is a ready-to-go out-the-box, arriving with its own software and services included (more often referred to as a ‘turnkey’ solution). Alternatively, the more affordable option, but more technically challenging, is to build your own server (or repurpose old tech) and then install open-source software onboard, such as TrueNAS or UnRAID. One option easy but expensive, the other way is cheaper but features a substantially higher learning curve. So, what is the solution? Well, in the last year or two we have seen big increases in a 3rd option, a middle ground between Turnkey NAS and FULL DiY, in the form of NAS servers from companies such as Topton and CWWK (we reviewed one here), which are ready-built desktop NAS devices (CPU, Memory, OS SSD, etc), but either arriving completely OS-free or include popular Open-Source software preinstalled. These solutions not only arrive at an overall price point lower than turnkey NAS (which needs to factor in the software costs and continued technical/software support), but they more often than not arrive with even better hardware too. Better CPU choices, better default connectivity and all of this whilst allowing OpenSource software users to skip the whole ‘build the thing from scratch’ element and get thermal paste under their fingernails! So, what has the Storaxa Kickstarter got to do with this?
Well, because it arrives as one of the most compelling examples of this growing 3rd option open to potential NAS buyers that we have seen. With the Kickstarter campaign arriving at frankly incredibly low price points, even when compared against the numerous alternatives available on Aliexpress etc, as well as a dual OS (proxmox) and Dual network management/NAS architecture too thanks to WiFi antenna, few NAS solutions have promised to delivery so much for so little. So, what’s the catch? Well, Kickstarter! Like any crowdfunded project, the solution is a crowd-funded project that lacks the guarantee of a refund if the campaign is unsuccessful or suitable recompense if the eventual product does not meet its promises. So, thanks to alot of regular subscribers to the YouTube channel highlighting this project, doubts in the air around pricing, all alongside some interesting back-and-forth with the creators, I want to follow the progress of the Storaxa Kickstarter NAS right to when/if it crosses the finish line. Maybe it will be the breaking point for a new kind of solution that established names in the industry wake up and smell the coffee over? Maybe it will not and these videos and paragraphs will simply form a record of what when right and what went wrong. Regardless, it will be interesting to find out!
Storaxa NAS – Too Good to be True? The Initial Pitch
The initial campaign from the Storaxa group for this NAS was made up of several elements. It arrived with a production video that made the system look easy to use and access, not uncommon in this kind of kickstart project presentation. The initial general outlined specifications were:
Base/Entry Storaxa NAS Specifications
Linux OS (Promox Base, TrueNAS Scale & OpenWRT VMs)
Max 142TB Storage
5xHDD
4xSSD
TrueNAS
WiFi 6E
2x 10GbE + 4x 2.5GbE
Intel & AMD CPU
SD + MicroSD Card Reader
The design is pretty much the main thing that stood out. The actual casing, at least as far as a 5x SATA bay chassis) is fairly standard, but it is only when you factor in the additional 4x M.2 NVMe 2280 SSD bays and twin rear dual band antenna that the unique design that is being proposed here standards out notably.
Sketches and 3D plans of the Stroaxa NAS chassis were shown, as well as a breakdown of the main component placement on the internal motherboard were also shown. This was one area where questions arose around PCIe lane distribution and potential heat concerns around the project. Some of these concerns were answered in the comments section, whilst others were approached in the backers-only section. Kind of odd that
Here is the breakdown of the hardware in the base line Storaxa NAS (further configurations were rolled out later on after a backer poll was conducted):
Hardware Specifications of Initially Proposed System:
WiFi 6 (802.11ax), Twin External Antenna and Dual Band
4x 2.5GbE Network Connections
HDMI 2.0 4K 60FPS (+DP)
3x USB 3.2 Gen 2 (10Gb/s) Type A/C and 2x USB 2.0 Type A
20cm x 18cm x 26cm Chassis
Twin Rear Cooling Fans and Heat dissipating casing
Here is a similar board below, from the Storaxa pages:
Now, as mentioned, Storaxa has stated that they are using an existing hardware architecture for the internals of the Storaxa, providing a few examples of the architecture and references deep in the comments section. Long before this though, blogs and forums (once again, I have to give props to Redditand STH here) had already called out that it was likely the boards used in Mini PCs under the TopTon and CWWK branding. An example of which we reviewed – CWWK AIO-T6 6-Bay NAS Review. Bang For Buck? (Massive Review and Hardware Breakdown) HERE on NASCompares
For a closer look at how the CWWK AIO-TT6 NAS looks, you can use the gallery below.
Alternatively, you can watch the video review below (SELF PLUG ALERT!!!):
Following repeated questions by some users about the background of the team,, the team appeared on a video published on a backer-only update on the 9th Feb ’23:
Additionally, It is worth highlighting that they had already detailed their key members in the initial Kickstarter presentation (repeated below):
The Storaxa NAS Team Members:
Marvin Heis responsible for the industrial design. He made use of a 3D printer to print the structure and design from CAD. He printed and tested all the parts, and made sure the assembly is feasible and easy.
Matt Wangis our electrical engineer. He is responsible for two parts in the development of Storaxa. Firstly, he communicates with the PCB supplier and solve related technical issues. Secondly, he confirms all the specifications and design of the PCB that connects with the SSDs.
Keith Zhouis our procurement and logistics executive. When there is shortage for different parts in making Storaxa, he will find substitutes for engineers and PCB suppliers. He is also familiar with VAT for importing and exporting, as he worked in an international logistics company for the past year.
Thomas Li is our system engineer. All of Storaxa’s software development is created by him. For example, he decides which Linux distribution to pre-install, and test the compatibility and reliability between software and hardware
Li-Sau Man (Karen)is responsible for PR and customer service. Alongside strong writing and editing skills, she has a good understanding of digital communication channels and tools. She is effective in circulation of internal and external communications including newsletters, campaigns, speeches.
In a backers-only update, there was further information on the Plex Media server performance of the Soraxa, in an unlisted YouTube video. Again, it is good to see some test benchmarks and user case information to relate with, but these videos being unlisted still seemed unnecessary. Original text below from Feb 3rd:
Testing Plex with AMD 5825U
The easiest way to run Plex on Storaxa, is to install the Plex app in the Truenas-SCALE official app catalog. To ensure the system is not constrained by memory, we installed 64GB of RAM, and assigned 50+ to the TrueNAS-SCALE VM. We prepared H.264 30fps 1080p videos, and stream at 720p so as to force Plex to transcode. The streaming client is a MacBook pro connected via an ethernet cable. We managed to run six player instances simultaneously, each playing a different video, without noticeable stutter.
It is worth remembering that alot of the information above was to only backers, which is still rather odd and only reasons of patent/IP protection might cover this – but it would be an odd stance to take on only the smaller % of the details. Nevertheless, I want to remain optimistic. It is not impossible that the Storaxa can be released and be a good product for the price point, but we are still talking pretty thin margins! For example, a similar Topton/CWWK/etc board can be purchased with the same N6005 CPU, SSD and 8GB of memory for £246 (so, approx $339) on Aliexpress. There are lots of differing examples under different brand names, but here is an example:
And the baseline Storaxa NAS (no add-ons, just the Intel Pentium N6005, 120/128GB NVMe, WiFi 6 module and 16GB of memory) comes in at $274. And that also has to include the casing, antenna, testing, time spent with software installation and testing/Q.C (PLus that free 32GB Memory card too now). Even if you factor in the profit margin that sellers on AliExpress need to factor in per sale vs the savings made possible by bulk buying by Storaxa team at the production level – that still leaves a remarkably narrow profit margin. It was this, plus the comments sent my way, odd presentation inconsistencies (nothing big, but blips here and there) that led to the video below:
Storaxa NAS – Late Feb ’23 Update
When the Kickstarter concluded, it passed all stretch goals and at the time of writing, the stats are:
“5,917 backers pledged $1,924,001 to help bring this project to life.”
Regarding the Pledge Manager (for users to customize/confirm their order), it arrived a week later than expected, as Storaxa stated Pledgebox recommended aiming for the 25th Feb, so funds would be appropriately wired over and to eliminate errors when exporting backer pledges from Kickstarter to PledgeBox). Additionally, there were further breakdowns on the Storaxa page regarding the Schematics and Main board/layout of each configuration, detailed as follows:
Before we start, here is a schematic diagram of the main board with the key components. Please click on the image to view the diagrams for all the other CPU configurations. You can refer to these diagrams to help you choose your options. For experts and backers with advanced knowledge on NAS, these may be enough.
After several requests for updated videos of the system being connected and from multiple angles, the following was provided in the backers-only area and via unlisted videos:
Uncut, Unedited Demo
Here is the uncut unedited demos as requested. We included a different angle to show all the cables and you can see that WiFi is disconnected and nothing is under the Storaxa. It can be viewed in 4K so you can see everything clearly.
As per further updates and details on the stretch goals that were hit during the progression of the campaign, they proposed that they would include an additional 32GB SD Card with all Sotraxa purchases after the campaign hits $1.9 Million (which it did). Their original update:
Also we have decided on the Stretch Goal #5. For the final stretch goal, we want to add something that won’t increase the SKU and something that everyone can benefit from. Once we hit $1.9 million, we will include one 32GB microSD card with the recovery image for all Storaxa units. You can use it to store snapshots and since you can always leave it in the slot, it won’t be easy to lose.
Regrding shipping, Staraxa state that they worked with a backer volunteer to test ship an item as a demonstration of the means of shipping to the EU and that it was received without any additional tax/customs payments being required:
One of the most asked questions was about extra VAT, customs and taxes that backers will need to pay regarding shipment to the EU. We have already explained that our forwarder has included all customs and taxes in their quotation and they will send it in a way to avoid extra charges to the recipient. During one of these discussions, a backer volunteered to help us test this shipping method to see if any additional VAT was charged. We were contacted by that backer yesterday after she received the package without any extra VAT.
Storaxa NAS – March Updates
The Storaxa timeline has now shifted forward, with pledges stated at 82% of completion as of 27/03. Likewise, the timeline has now been updated on the project by the Storaxa team:
Users who had access to the Pledge manager were given a considerable number of options with regard to customizing their Storaxa, with detailed pricing throughout. There were reported payment issues and bank authentication issues, but these were PlexBox/PlegeManager related. If a user wanted to stick with the default configuration (Intel N6005, 16GB DDR4, WiFi6, 120GB SSD, 2.5Gx4), The Lowest Priced Storaxa NAS Configuration remained at $274:
However, the range of configurations was surprisingly diverse.
If you wanted to scale the Storaxa up to the maximum configuration of the system (Intel i7-1265U, 64GB DDR4, WiFi6e, 2TB SSD, 10Gx2, 2.5Gx2), that increased the price by $390, making the Highest Priced Storaxa NAS Configuration at $664:
There were also additional options for adding additional Storaxa NAS systems, storage media, spare PSUs and drive adapters.
The Optional Add ons and Media Choices Available:
So, if you wanted to opt for the Storaxa system with 20TB Seagate Ironwolf Pro’, 4TB WD Black SN850X PCIe4 SSDs and spare Boot disk, the Maximum Specification Storaxa System was priced at $2899.
For perspecitve, the QNAP TVS-h874 8-Bay NAS (no media included, 32GB, no 10GbE) is currently priced at approx at $2498 (one example below):
That is a huge saving indeed. This once again makes me want to hope that devices like this can/do happen and can give biggest/etablished names in the NAS industry pause for thought!
Elsewhere. there was continued back and forth regarding concerns about the CWWK board and the diminished SATA speed potential vs the bandwidth/lane allocation across the system (Most detailed example HERE). The Storaxa Team responded 5 hours later, highlighting that the default/baseline configuration will have these more limited bandwidth issues. This is something that many more experience tech users/builders had postulated earlier in the crowdfunding stages, but less experienced users or those less familiar with CWWK/Topton systems seen online might have been less aware. This is another one of those points of presentation where the simplicity of the solution in the initial Kickstarter videos and bullet points have glossed over the capabilities of a system at this pricepoint:
Below was our March update that goes into more detail about the pledge manager and pricing comparisons:
The March/April period also saw the Arrotrack/Storaxa site go live. Though in an early skeleton form that largely copied the content of the Kickstarter campaign (though the March 31st update was now publically visible)
The domain ownership appears to be alot older, but according to waybackmachine the site has only really seen active changes in the last month or so (understandable).
One notable thing is that although the number of unique and available pages was limited, the Fulfillment and Returns page is completed. This is quite surprising, given that the device has yet to or even finished production. This might seem a bit ‘cart before the horse has bolted’, but one could also argue that this is a further positive move by them that underlines that they intend to fulfill, but are also aware of the thin-ness of their profit margins to withstand cancellations at the 11th hour.
April 2023 Storaxa NAS Updates
April (and very late March) saw two main updates to the Storaxa Kickstarter campaign, as well as two updates to the project timeline. This was also combined with a few questions surrounding the business address of Arrotrack (the company that Storaxa creators are trading under).
There have been several references to the project being slightly delayed (not unusual with Kickstarters) and also a few extra details surrounding the regional delivery plans. The key updates from Storaxa though surrounded confirmation of the AMD layout and changes to the Intel schemes.
Free DDR5 Upgrades
Due to a change in the Intel Storaxa board layouts and specification support, Storaxa confirmed that those opting for the higher-end configurations would have an upgrade from DDR4 to DDR5 Memory. This was largely down to these boards not supporting DDR4 memory, but nonetheless, a welcome bonus for those affected.
Future of Storaxa NAS, Post Crowdfunding?
There was also a discussion of Storaxa plans post-fulfilment, with Storaxa clearly indicating that they plan on continuing production after fulfilment of Storaxa Kickstarter units concludes. Hopefully, this occurs after ALL backers have been satisfied, as it is not unheard of for some Kickstarter campaigns to introduce late-stage outside retail options in order to financially support the initial Kickstarter pledges, which might have been priced incorrectly. Again, there is NO INDICATION of this and it is perfectly normal/sensible for them to keep an eye on the future. Indeed, its actually a positive sign in many respects that they are thinking long term.
Talking of long-term thinking and planning, I have to give them credit for sharing some of the background finance matters of the project with backers. As the initial pledges and additional sums garnered by the dynamic pledgebox have rapidly increased the campaign total, Stripe (the financial management in the middle) has opted to hold 50% of the collected funds until the fulfilment of orders begins (for reasons of product and backer satisfaction). This is not unusual and quite a useful safeguard when followed correctly by the intermediary parties, but it is good that Storaxa showed this exchange. I would still have preferred these to not be behind ‘backer only updates’ and it doesn’t change anything regarding fulfilment commitments, beyond the 2nd 50% of collected funds – but it’s still a positive move by them to share this.
There is, of course, the argument that they lose nothing by sharing this and gain goodwill by doing so, but it’s still a net positive. This is what they had to share:
“The result of the review is that Stripe will hold 50% of the funds from PledgeBox until fulfillment begins. Based on the payment terms outlined in the supplier contract, Stripe will distribute payments in the following manner: 50%, 35%, and 15%. We will keep Stripe updated with our mass production status in order to release the funds. For different components, we have to pay a deposit of 60% to 80%. For the main board we only need to pay a 50% deposit for mass production. Although we didn’t expect any funds to be held by Stripe when they asked for the review, the total funds from Kickstarter (100%) and Pledgebox (50%) is enough for all deposits.” – Storaxa, April 12th Update
Storaxa also showed the current balance of funds collected at the time of writing:
Lots of positive reception to this move (with merit) and high praise for this transparent move.
AMD 5825U Layout Detailed
The manufacturer had completed the CAD of the main board for the pre-production sample.
Intel Component Changes Highlighted
As previously mentioned, there layouts for the internal boards for the Storaxa for each configuration have started arriving and they stated that due to hardware shortages, there would need to be component changes:
“There is a delay for the upgraded Intel CPU schematic. The manufacturer discovered that there is a shortage for some of the parts in the design. So they need to change to parts with a more stable supply. All main features remain unchanged. It will be ready after April 3. We will publish an update once that is ready. This does not delay mass production. Backers who wish to see the schematics before finalizing their choices can rest easy, because the survey deadline is extended to end of April. ” – Storaxa, March 31 Update
Later in a 2nd April 2023 update, they went on to show the system block diagram that factored in these component changes. These included upgrades to a DDR5 memory channel (which would lead to the free DDR5 upgrades mentioned above).
(later in the April 19th Update)
Business Address Changes
One slight fly in the ointment during the campaign this last month or so arose regarding the business address of Storaxa/Arrotrack. The campaign creators sharted a draft of the invoice that they would be using for finished order fulfilment and the address for this China/HK-based company had changed to a U.S/Denver address:
To confirm, the invoice stated ‘360 S Quitman StreetDenver CO, 80219 US’ and the original Arrotrack company was Unit 1113, 11/F, Global Gateway Tower, 63 Wing Hong Street, Cheung Sha Wan, Kowloon, Hong Kong. This was confirmed in their own company documentation provided below:
A quick Google of the new U.S register address showed a slightly underwhelming business location:
This did raise a few concerns in the comments section and (far play) to Storaxa; they were not being secretive about this address/location. Answering direct questions about this in the comments:
They did go on to further clarify reasoning for this, stating that it was needed in order to proceed with a crowdfunding campaign, due to local restrictions imposed on Chinese companies. The duality of the registered addresses was for reasons of finance and handling returns/shipping.
Below is the timeline for the first half of April and everything, bar the pre-production samples being shared directly with backers (direct images and real-world examples) was correct.
At the start of April 2023, we asked Tom @Lawrence Systems for his perspective on the project, it’s viability and his initial thoughts. It is worth highlighting that this was presented his immediate perspective and without any additional research on his part.
May 2023 Storaxa NAS Updates
May 2023 saw 4 official Updates by the Storaxa team on their Kickstarter campaign, mainly focusing on the changing of the system PSU from an external model to an external one, and the Pledgebox credit/payment issues.
Changes from an Internal PSU to an External PSU
This goes into a lot more detail for the reasons for/against, as well as the logic they outline in their decision, but this quote below summarizes it best:
“After careful consideration and evaluation, we have decided to use an external GaN power supply with a 5.5*2.5 barrel jack in 140W/180W/200W depending on the chosen CPU (N6005/5825U/1235U,1256U). GaN (gallium nitride) is a new technology that allows for smaller, more efficient, and cooler power supplies. It has several advantages over traditional silicon-based power supplies, including higher efficiency, faster switching speeds, and smaller size. A Type-C PD power supply was not chosen because of the higher cost we couldn’t fit into our budget. The power supply will be external, which will allow for more space in the case for better thermal management and air circulation for heat dissipation. This also gives users more space for customization inside the case. And it is easier to replace the power supply if needed. We have several suppliers lined up and will decide on the final one soon. Here are some images of the potential power supply. It is meant to plug directly into a power socket. It has a C6 socket, so you can also choose to use it like a power brick by using it with standard C5 cable (not included). The power supply will only come with the plug suitable for your delivery location.” – Storaxa Team, Update 19, May 25th 2023
They also supplied an updated system build graphic to detail the case in progress and adjusted layouts:
May 22nd also saw an update on the motherboard that is intended for the baseline N6005 Pentium models, with the stated arrival of the production sample for testing and assessment. See below:
Storaxa NAS Case Changes
As pleasing as this way, I was more concerned with the production and information on the casing for the Storaxa system, as that is one fo the truly unique elements of this system. How the change to an external PSU and the difference in architecture between the configurations impacting the case cooling/shape was also addressed in this same May 2023 update:
“Getting the first sample is a critical milestone because it lets us finalize the case design. The case sample will be ready in the week of June 5, 2023. Our plan has always been to use the same case for all the different versions of Storaxa. This is so that all units have a uniform appearance and also it will help save on production costs. However, with the introduction of the higher-performance versions, the power supply unit had to increase. And with the increased wattage, we also struggled with thermal management. Moving the power supply outside was the best solution. We thought about keeping it inside for the basic model, but decided against it because it will be easier to have the same case and it will be easier for assembly and repair. The external power supply has many positives. There is more room inside for air circulation for heat dissipation and also gives users more space for customization inside. It can also be replaced more easily.” – Storaxa Team, Update 18, May 22nd 2023
The Storaxa Group continue:
“The new case has three easy-access openings, two on top and one at the bottom. The top ones are for the 4 M.2 slots and the boot drive. The bottom is for access to the main board with the DDR RAM and the 2 onboard M.2 slots. The side air vents are also larger for better air flow. Since the power supply has moved, the main board is also raised, leaving more space for personalization and airflow. This means the ports in the back are all raised higher.” – Storaxa Team, Update 18, May 22nd 2023
They have updated their current projected timeline with the shipping of the first wave of solutions in the 2nd half of July (see blow):
The last 30 Days or so of the Storaxa NAS Kickstarter campaign (going into the 15th May) have been a fantastic mix of good news, bad news and just plain odd news. Although the Storaxa team have continued to respond to comments and enquiries, they have certainly been a little less prompt. That said, between the evolution of the campaign as it moves through the proposed production timeline and a couple of the hurdles that will be covered in this May update, there might be reason enough for these. Let’s go through all the updates (both project-published ones and those made in the comments).
PledgeBox Issues
Pretty much the big topic that has been bubbling around the Storaxa Kickstarter in this period was the Pledgebox manager not factoring in payments previously made to people’s existing backing sums. In short, a % of users found that their initial payments had been ignored and new ‘balance due’ messages had appeared. It is still not certain how many users were affected by this out of the 5,917 backers of the project (though some backers took to reddit to try and poll the numbers of those affected/unaffected), but clearly, this issue was big enough to be raised and referred to a decent amount in the comments. This is the image provided by Storaxa in their update to denote how the issue appeared to those affected users:
What caused this issue in the Pledge manager is still unclear, but Storaxa/Arrotrack did address this in their project update on May 2nd:
“We apologize for a new issue on PledgeBox that crossed out the bonus amounts of backers’ pledges from Kickstarter. If you are experiencing this issue, please wait patiently as we try to fix all the affected accounts within one week. There is no magic button to fix all the accounts at once, so we need to do it individually. Please understand that we may not be able to reply to all your messages, emails, and comments, as we are focused on resolving this issue. This issue does not affect how we will fulfill your rewards so we kindly ask for your patience as we fix this.” – Storaxa Update #16HERE
This seemingly continued to be raised in the comments section and although individual queries were addressed by the group in the general comments section, it wasn’t until May 15th that we saw the issue fully confirmed as resolved by Storaxa in a full backers only update:
“The issue with the subtracted Kickstarter bonus has been resolved. Thank you backers for your patience as we fixed the problem. If we missed anyone with this issue, please don’t hesitate to reach us so we can fix it.” – Sroaxa Update #17 HERE
Initial Motherboard Errors and Changes
The board that is to be used inside the Storaxa (though differing fractionally in each CPU Config) had only really been shown in schematic, Diagram and CAD form up to this point and understandably, many users had been chasing for updates on this. Although already volunteered by Storaxa that the board use was being produced by the same manufacturer as the likes of Topton/CWWK NAS systems, real world examples of the mainboard for the Storaxa were still ‘coming soon’. So, with that in mind, the initial update for this on May 2nd was a little bitter-sweet.
Although they showed a board in the update (which had been promised already), it was highlighted that mistakes in the layout had been recognized and therefore more work/time was needed for completion:
“The manufacturer tested the first print of the mainboard last week and discovered that there were some mistakes in the layout. Since it is Golden Week holiday here, the factory will be on break this week. The new samples for testing will be ready next week. We will continue monitoring their work and update you about the progress” – Storaxa Update #16HERE
Fast forward two weeks and we saw the next update, which included images of the ready-soldered and prepared board for the default N6005 board. Arriving somewhere between the design of the N6005 board HEREand J6412 board HEREon Aliexpress, the photos are a little oblique. I appreciate that Storaxa state the manufacturer has supplied these, but a top-down angle would have been nice. Still, better something than nothing:
There is no avoiding that there has been contention in the response to this update regarding the main board of the storaxa NAS. The first issue for many was that the Intel N6005 model is the entry-level device and many of the much higher configurations (who have paid considerably more into this project since the Pledgebox option appeared) have been left to wait. Now, on the one hand, given that the Kickstarter began with pledging on the initial N6005 configuration, it makes sense that chronologically that would be the first thing to be on the timeline for production. But given the scale of the upgraded components (significantly more power-hungry processors, 10GbE, Gen 4 SSDs, etc) in this compact chassis on boards that are not available right now on AliExpress etc right now, it’s understandable why users opting for these more unique configurations are wondering about their system delivery window.
The other hardware change that has occured in the recent project update was one that many had already raised early in the campaign (myself included), regarding the PSU. Storaxa have opted to remove the PSU from the internal casing of the device and opting for an external PSU (with a promise to elaborate more on this in the next project update). Now, on the face of it, I have always been a fan of external PSUs. They are easier to replace and in some cases, can remove internal heat generation and/or restrictive airflow blocking in more compact systems (more in the case of bare-PSUs, not blocks). However, in the case of the more aggressive system configurations, this might well result in quite large PSUs and add this also raises the question of external PSU quality. That was always a factor in ANY PSU, but ask anyone who has ever purchased a cheap PSU for their GFX-Card laptop or external PCIe Box on eBay/Ali and they will discuss ‘noisy’ PSUs or those that just feel ‘unsafe’. This is pure conjecture right now of course and until the PSU in question is shared in an update, it’s way to early to complain. But some users are definitely less keen on external power bricks in bigger NAS systems, as that can also result in an easy-to-disconnect power connection or extra part to lose!
Delay in Order Shipping and Fulfilment Warned
The above changes regarding the system board and possibly due to the impact of the Pledge Manager issues requiring attention (again, an assumption on my part) have led to Storaxa highlighting delays to shipping an order fulfilment in this campaign. Initially, shipping was timeline’d to start in Mid-June, but now looks like the end of July:
“We have been working diligently with our manufacturer to complete the designs and samples of the main boards. Even though our manufacturer started work earlier than scheduled, not all the pre-production samples will be completed on time within the 45 days stated in our contract. They have explained to us that ever since our campaign, they have become more busy and received even more orders. The estimated dates were accurate but due to not enough man power, any mistakes and redesign delayed the samples. The production time of assembling the units will not be affected. They have been very accommodating during this whole process, so we believe that they are sincere and tried their best to keep to our schedule. Due to the bottleneck in completing the pre-production samples, the shipping date will be delayed for 30 days. We apologize for this inconvenience and we thank you for your patience and understanding.” – Storaxa Update #17HERE
Delays in Kickstarter campaigns are hardly unusual and fair play to them for, at the very least, raising it now. It’s still going to be disappointing for many, but after many users quering the shipment date, this is something to go on.
Arrotrack / Storaxa Domain Ownership Expiry?
A rather odd point and one that was raised in the comments of the Kickstarter comments for the Storaxa was that the domain for the Arrotrack company (the group producing the Storaxa) had a very, very short domain registration time remaining. In my last update (in the April Update below) I highlighted that Arrotrack and Storaxa has a website up and running that had further information on the updates made available to non-backers, details of the company (something of a debate there that was discussed) and information regarding terms of returns and support. Well, that domain was registered on 23/05/20 but seemingly is going to expire on 23/05/23.
Now, this in itself is not the end of the world. Notwithstanding that this is not directly connected to the Kickstarter campaign, the company could be moving to a new domain and letting this expire (since realizing a new domain and site was needed). Likewise, they could be running the clock out on it to exchange it’s ownership to a new party. Nevertheless, it’s an odd little thing.
Potential Refunds to Customers of HDD/SSD Storage Bundles
One matter that increased in the comments of the Kickstarter campaign comments of the Storaxa over the last couple of months was to do with the price of storage media. When the Pledgebox manager for Storaxa NAS went live, one of the additional configuration options included adding SATA HDD/SSD media and PCIe Gen 3/4 m.2 NVMe SSD Media. However, since these options were first made available and priced, the general cost of alot of these drives (and other alternative drives that were not included in the Pledgebox from 3rd parties, location dependant) have seen noticeable decreases. So, many users wanted to know if reductions in the cost of drives would be reflected in their purchases (i.e. partial refunds?). Storaxa addressed this in their mid-May update:
“Due to the delay in completing the main boards, the delivery of the accessories such as SSD and HDD will also be delayed. Although we already paid the deposit, we were able to renegotiated with our supplier to give us a discount on the drives if the prices drop. In the event that market prices drop lower than our previous negotiated price, we will receive a discount. In turn, we will offer that same discount to backers who have added the drives to their pledges and refund the difference to you.” – Storaxa Update #17HERE
Now, fair play to Storaxa. very few would have expected them to refund these savings. Mainly as the quantity of HDDs and SSDs would have likely been quoted and paid partially/fully at Distribution shortly after the closing of the Pledgebox. These are all still promises and considerations that are being outlined on a crowdfunding project that has still not (at the time of writing) shown details on money in/out on the media ordered, or final shipping devices. But this is nonetheless a positive stance to take in this update and one that I wanted to highlight in my updates.
Here is my round-up of the updates above (and a few of the April updates), all in one video. Enjoy!
June 2023 Storaxa NAS Updates
June saw three updates from Storaxa on the production of their system (the first larger than the two that followed, but all three addressed new information). The main subjects covered with the new intended Shipping Test, are fulfilment of the SD Card stretch goal (part of the shipping test), errors and issues encountered at production and planned tutorials and guides. There was also updated information on the GaN external Power Supplier, it’s a 19V supply with a 5.5*2.5 barrel jack in 140W/180W/200W depending on the chosen CPU (N6005/5825U/1235U,1256U).
“It is meant to plug directly into a power socket. It has a C6 socket, so you can also choose to use it like a power brick by using it with standard C5 cable. The power supply will only come with the plug suitable for your delivery location. After getting your feedback from the last update, we will include the C5 cable for your convenience.” – Storaxa Team, Update 19, June 7th 2023
Board for the 5825 CPU Storaxa NAS, Good and Bad News
The early June update started on a positive note, with the announcement that the production samples of the AMD 5825 controller board on their #20 update. This was a little soured for some by the additional note that the Intel board configuration systems had fallen behind schedule:
“We are proceeding with production now. However, the upgraded Intel main boards are behind schedule. By starting with two versions first, we can avoid delayed production overall. As long as the upgraded Intel board samples are ready within two weeks, we can stay on the delivery schedule for end of July.” – Storaxa Team, Update 20, June 7th 2023
Still, this was good news for those backers who had opted for one fo those AMD config choices. However, this was a little short-lived, when comments from the Storaxa group highlighted that they had hit a tech roadblock pertaining to the detection of the M.2 NVMe.
Twelve days later, in the June 19th Update, the Storaxa team highlighted that an issue was recognized in the AMD 5825 board:
“During testing of the AMD 5825 main board, the 4 top M.2 slots could not be read or detected. After further testing, we discovered that something went wrong during SMT and there was a problem with one of the resistors on the main board that affected the recognition of the ASM2812X chip PCB. We are fixing this now. This is not a big problem and it will be fixed in a week. Once it is complete, we can continue with testing and production.”– Storaxa Team, Update 20, June 7th 2023
Later in their final update of June, they did state that the SMT issue had been resolved:
“The AMD 5825 main board has finished SMT. The problem with the unrecognized ASM2812X chip has been fixed and testing and production can continue. The upgraded Intel versions can proceed after this.” – Storaxa Team, Update 21, June 30th 2023
The Storaxa SD Card Shipping Tests and System Recovery Images
In the early stages of the kickstart campaign, when alternative versions of the Storaxa configuration, rewards and stretch goals were being shared, one thing that was discussed was an SD card for every backer that contained the system recovery image (dependent on the OS choices across both elements of the system).
Although it became quickly clear that providing an ‘one for all’ system image for the SD card become untenable, they stated that they will provide the means to download these at launch, but use the SD cards for every backer as a means to test shipping:
“Since before our campaign started we tried our best to quote the lowest price for shipping to keep the price of Storaxa as low as possible. We didn’t give up that search even until after the campaign so we can keep the add-on and extra units shipping cost low too. We found a logistics company that quoted prices that we couldn’t believe. This would be very good for us because we can save some costs, but we didn’t think it was safe enough to entrust them with your rewards which ranges from hundreds to thousands of dollars. However, they assured us they have global coverage and can ensure the safe delivery of all rewards. To back up their proposal, they are willing to do a shipping test to show us they can handle all our orders. Due to this, we are happy to announce we will conduct a shipping test by sending you the free 32GB microSD unlocked in the final stretch goal ahead of schedule. This test will show us the reliability of this new service and also serve as a practice run of fulfillment. We will start sending it out on June 15. It will take around 7 – 14 business days to be delivered. – Storaxa Team, Update 20, June 7th 2023
This still led to the question of less experienced users who wanted to have a recovery/initial-boot SD Card for this system, two of which Storaxa stated the following:
“We originally stated that the microSD card will come with a system recovery image for your Storaxa. However, after careful consideration, due to the fully customization feature of the Storaxa, no single image will fit everyone’s purposes. Therefore, we will send you a blank card so you can create the image right for you with the instructions below. (We will post the instructions again after you receive your Storaxas). We are starting to make the tutorial videos this week. We will film some demos to teach the basics on how to install and run the software for the Storaxa. The videos will be posted on our Youtube channel. We will start with some simple videos first and ask for your feedback before we move on to tutorials for the more advanced uses of Storaxa.” – Storaxa Team, Update 21, June 19th 2023
Storaxa is stated to arrive with the system pre-installed and pre-configured, so you can plug in the network/power cables and drives, and start using it. Storaxa boots to Proxmox VE, which hosts 2 virtual machines, which respectively has TrueNAS-SCALE, and OpenWRT installed.
We cover this and more in our June Update video below:
July 2023 Storaxa NAS Updates
Right at the tail end of the month (31st July to be precise), Storaxa rolled out an update that was largely centered around 4 videos of the system (in a component-out state) being demo’d. The specifications for the unit and client machine they state are the testing system are:
AMD Board
64GB Memory
1TB Samsung 970 Pro Boot SSD
WiFi 6 Card (via an M.2 riser adapter card)
10GbE (Via TB3 adapter)
5x 16TB HDD (unconfirmed, but not hugely important for these tests)
3x WD Black SN750 SSDs
Connected to Macbook Pro
The system board seemed to be connected via a standard multilane to SATA adapter, though I couldn’t quite 100% confirm the means that the 3x m.2 NVMe bays were connected (clear cable type there though). The testing Mac book was connected via a Thunderbolt3-to-10GbE adapter. The first test was a 10GbE transfer test (video here):
Next, there was a straightforward copy/paste into a RAIDZ1 (i.e comparable ZFS alternative to RAID 5). Video HERE, but result screen below:
Finally, there was a session of Plex testing, with three videos being streamed at once in H.265 and H.264. Again, the video is HERE.
Also, the Memory cards that formed one of the stretch goals from the initial Kickstarter campaign (more on that shortly) have started to arrive in Europe. The card from my pledge arrived on July 31st via Royal Mail, no signature was required but was trackable from Hong Kong onwards.
Rewinding back to the very start of the month, July started quiet – REAL quiet! In fact, it was unusually quiet times for Storaxa, with a period of over 2 weeks of Storaxa no longer responding to public comments or producing any updates. This was eventually addressed in the comments, backers section, on Reddit and more by concerned users who had noticed the sudden gear change.
That said, things seemingly returned to normal in the 2nd half of 2023, returning to a lot of those older comments, including my own (shown before/after), with apologies and highlights that a bigger update will be coming at the end of the month:
Backer SD Cards Arriving
Last month, Storaxa detailed that as a move to test shipping fulfilment in preparation for the eventual full Storaxa shipment and test the company shipping companies’ rather impressive delivery quotation, they would send backers their stretch goal included 32GB SSD Card (quote below from the June Update).
“We are starting the shipping test this week. Please expect to receive the package in 10 to 20 days. We will email you the tracking number through the PledgBox system within one week of sending out. This test will help us as a test run for when when we ship your Storaxas and also help us test the flexibility of shipping your rewards in different patches. We received mixed feedback about this test, but we feel this will help us to ensure you receive your rewards safely without additional costs.” Storaxa Team, Update 21, June 19th 2023
Cards began arriving in mid-July and it quickly became clear that these were being shipped by region/country/continent, with the U.S (likely the largest % of backers being located) being the first to state they had received the cards:
That said, not everyone (at the time of Writing, July 30th 2023) has received their SD card and it looks like Europe has been one of the last in the list of regions shipped to. Again, most likely a % based staged shipping method based on the locations of backers.
Now, on the face of it, we are talking about an SD card here… with an exceptionally low value. Although in itself a very low-value item, it’s worth remembering that these cards were shipped as a test of the shipping company and prospected fulfilment. Also, several users highlighted that the SD cards had tracking information indicating that they were received in Hong Kong in the last full week of July.
At the time of writing, the SD cards for the UK/Europe have started to be trackable and users might well see their cards arriving during the course of this week (31/07 – 4/08), as indicated by the tacking below.
Production and Shipment of Storaxa Now Delayed till September 2023
Another point worth touching on, and one that was certainly anticipated by many, was the officially stated delay of the Storaxa first fulfilment from 2nd Half of July to the 2nd Half of September. How this will impact users based on their configuration choice and global location is yet to be elaborated upon (there IS an update stated to arrive on July 31st, which might address this), but for now, the project is now slated for later in 2023. Not a huge surprise and not unusual for Kickstarter.
The final statement from Storaxa regarding the updated timeline was as follows:
“The production timeline is the same as last update. Mass production will begin in September and shipping will start in the second half of September. All major parts and components have been ordered and will arrive before that time. The case and chassis sample is arriving at the end of this week so we can show that to you soon too.” – Storaxa Team, Update #24, 1st Aug
Aug/Sept 2023 Storaxa NAS Updates
In recent developments regarding the Storaxa NAS by Arrowtrack, a series of unexpected challenges have emerged, primarily involving financial delays and fund withholding by the payment processor, Stripe. As backers eagerly await the product’s release, Arrowtrack has been surprisingly transparent about the situation, providing updates on every facet from supplier negotiations to production adjustments. Here’s a quick breakdown of the key points from their latest updates.
Situation Affecting the Storaxa NAS by Arrowtrack (Updates #27 and #28 Summary)
Funds Withholding by Stripe:
After successfully raising funds on Kickstarter, Arrowtrack encountered issues with their payment processor, Stripe. Due to the sudden large transaction amount from their campaign, Stripe withheld a significant portion of their funds.
Initially, Stripe released only 50% of the funds after Arrowtrack provided all the necessary documents. The rest of the funds were expected to be released during production time.
Instead of releasing the funds as expected in June, Stripe extended the payout date to August 31.
Just a week after confirming that the funds would be released on time, Stripe decided to hold the funds for another 60 days (until November 7). The primary reason was a high rate of refunds, which triggered their system for a further review. Arrowtrack believed these refunds were due to backers changing their minds about options before the delivery date.
Stripe had previously disabled the chat function on Arrowtrack’s account dashboard, limiting their communication. In Update #28, this function was re-enabled, which Arrowtrack took as a positive sign.
Financial Details:
Kickstarter funds raised: $1,688,332.29.
Pledgebox funds: $950,257.09, with $982,864.57 being held by Stripe.
Deposit for mass production and ODM: $2,116,258 of $3,074,638.
Account Balance (as of Sept 4th): $480,874.
Arrowtrack has paid around 70% deposit for all manufacturing costs, including materials, parts, setup costs, and ODM/OEM costs. However, the current balance is insufficient for completing production.
Production and Delivery Delays:
The delays in Stripe’s payout affected Arrowtrack’s ability to maintain their original schedule.
Production was initially postponed until September, and after the latest delay, the shipping has been rescheduled to start in the second half of November.
Negotiations with Suppliers and Manufacturers:
Arrowtrack has been in negotiations to extend payment deadlines to ensure deposits aren’t forfeited.
In the wake of extreme weather conditions in southern China, meetings with some suppliers were postponed. Still, Arrowtrack managed to renegotiate with all but two suppliers for a 3-month extension on final payment.
Production of the upgraded Intel boards was paused due to payment uncertainties but is set to resume in two weeks.
Review Sample and Refunds:
There was a delay in sending out a review sample to NASCompares, but Arrowtrack hopes to use this time to gather feedback from the review.
Arrowtrack has received 20 refund requests so far and is appreciative of their backers’ patience and understanding.
General Backer Support:
Arrowtrack expressed deep gratitude to their backers for their understanding and support during this difficult time. They highlighted the importance of their backers’ continued faith in the project’s success.
Arrowtrack’s Storaxa NAS project faced significant challenges primarily due to Stripe withholding funds. This caused delays in production, requiring renegotiations with suppliers and adjustments in their delivery schedule. Despite these hurdles, the company remains committed to delivering the product, and backers have shown substantial support and understanding. Of course, we also need to remain grounded and remember that we are only seeing half the story here. Additionally, although Storaxa has been forthcoming with its updates, these updates and regular comments have reduced in frequency in the last few months. Additionally, lack of further documentation of suppliers being used, further communication with Stripe being shared, the recent update arriving later than stated and many users (myself included) reporting that these last two updates did not result in email notifications to users (yet all others did) – these are all matters that remain pertinent to many users following this campaign. These are mostly small potato arguments in the grand scheme of things, but it is important to remain as objective as possible. Users who have invested thousands of dollars towards the system in an upgraded state + storage media purchased now a considerable time ago might well be having understandably cold feet.
Reactions to the Storaxa’s updates on the issues with Stripe by the backers of the campaign were mostly positive, save for a few users highlighting that update #28 arrived late and that proactive email notifications appeared to be disabled (still unconfirmed, but certainly noted online). One user (@Ruan) did take the time to do a breakdown of the finances as stated and made efforts to highlight potential issues of finance in the numbers reported, but this had to be built on only partial by partial numbers related to finances and stock procured by Storaxa, and therefore open to error. Neverthless, even at a casual glance and only using the barebone numbers provided by the campaign creators, the margins do seem rather thin. I wanted to share it here (linked below, just click the image) as I think it’s worth keeping in mind about the scale of this project, once you factor in multiple base configurations and the storage upgrades that have been added:
The post examines the finances of the Storaxa Kickstarter NAS campaign in light of potential delays, as half of the funds are being held by the payment provider, Stripe.
The total funds raised on Kickstarter and PledgeBox combined is $3,621,444.95.
A deposit of $3,074,638.00 was made for mass production and ODM, leaving a balance of $546,806.95.
Using a breakdown of addons, including HDDs, NVMes, SSDs, and Samsung 980 Pro 2TB NVMes, the post calculates the total estimated addon cost at $537,600.
This leaves just $9,206.95 for global shipping of at least 5,000 packages, and other costs like SD cards, which is viewed as unrealistic.
Analyzing the base Storaxa unit costs, the post estimates that at least 8,000 units were necessary from the original pledge, and there may be a discrepancy in the number of additional units backed versus those being produced.
Three hypotheses are proposed:
The creators got an exceptional deal on addons.
The creators won’t profit and are primarily pushing their brand.
More funds than expected were used for non-Storaxa addons, which might hinder the actual Storaxa product development.
The post concludes by asking for an update on the actual numbers of non-Storaxa Addons and clarity on why the production costs appear so high, emphasizing concerns about delivery costs. From the information provided, there are several points to consider:
Funds Being Held: Storaxa mentioned that Stripe is holding onto 50% of the funds raised from the campaign. If this is accurate, it would indeed create a liquidity issue for the company.
Discrepancy in Costs: Based on the post’s calculations, the funds left after accounting for production costs and the estimated addon costs appear insufficient to cover worldwide shipping of at least 5,000 packages, plus other ancillary costs. This raises concerns about whether all the promised items can be delivered without additional funding.
Estimated Addon Costs: The calculations for the addon costs are based on minimum values, and as mentioned in the post, if backers ordered more than one of an item, these costs would rise. Moreover, the post speculates that many might have chosen higher-priced items, which would further strain the finances.
Unit Discrepancy: The analysis suggests a potential discrepancy between the number of Storaxa units backed and those being produced, pointing to possible over-production or an underestimation of the number of units required.
Three Hypotheses: The post’s hypotheses suggest that Storaxa either secured an incredibly good deal on addons, isn’t looking to profit and is pushing their brand, or has used more funds for non-Storaxa addons than projected, potentially hindering Storaxa product development. The validity of any of these hypotheses would significantly affect the interpretation of Storaxa’s financial situation.
The BIG takeaway here is that Storaxa will need to start engaging with its audience more regularly. There are many in the comments who would point out that this project has seen more updates than many other campaigns on the Kickstarter platform. However, we are still talking about a campaign with $1.8 Million raised in the initial campaign and a further $2 Million in pledge upgrades – these are bot atypical numbers for an average Kickstarter campaign on average (it happens, but most polished campaigns will live in the 5-6 figures in $). Given the reported change in work on their side related to negotiating with suppliers for later deadlines on payments and maintaining the project through this relative period of ‘hand-on’ inactivity, many would like to see higher engagement with their audience in the comments, further updates, tests/demonstrations in-house with the units that they have, further details of the communications with Stripe (share those conversations in greater details to well further refunds perhaps?) and just generally make their activity and presence felt more than it is. Kickstarter is NOT Amazon or eBay, but it does thing on communication and transparency, something that Storaxa was good on and now arguably becoming weaker on during this period of flux. As always, I will continue to follow this evolving crowdfunded NAS campaign.
Sept / Oct 2023 Storaxa NAS Updates
If I had to describe the Storaxa NAS Kickstater campaign throughout October and at the very start of November 2023 in one word, it would be….quiet! In updates the previous month (#27 and #28), the Storaxa group stated that production was not possible due to delays in finances arriving from the payment handler ‘Stripe’. Nevertheless, it did/does seem very quiet on storaxas side throughout all of this and no comments by backers were responded too and the update that was slated for October 12th ended up being late (with virtually no explanation or indication), leading to a lot of user debate about the health of the campaign, the validity of the Stripe funds statements and the information provided up to this point in the official campaign updates. Indeed, in terms of actual milestone events in the last calendar month, there was only really four to speak of. The first was the comment that Storaxa made in response to weeks of silence, which was as follows:
Again, the above comment was after weeks of silence and no replies from users. Equally, this was the only comment on the campaign by Storaxa in that time and although a lot of comments/responses followed, they did not engage with them. Questions surrounding the state of the campaign, further verification of the stripe matters, where the existing funds were being spent, further information on suppliers and more. At the same time as this, there was also the public zoom discussion that I had arranged with Storaxa NAS backers (posted several times on the comments thread, with one of the last ones HERE). It did seem rather coincidental that Storaxa had not been replying to users for an extended period of time, but opted to do so on the day of the public zoom with the post discussed above). This was an organized zoom discussion for backers of the Storaxa NAS Kickstarter campaign, organized by Robbie @ NASCompares. This is NOT an official zoom organized by/in conjunction with the Storaxa/Arrowtrack group. Below you can watch the full zoom call:
There is of course the question of why I did not just host a zoom with Storaxa/Arrowtrak instead, putting users’ questions directly to them? This was asked a few times and (as I discuss in the comment below), I HAD reached out to Storaxa previously for a zoom Q&A session, but they declined to reply.
When Sotraxa did reveal an official update (update #29), it was rather small and largely repeated similar to what the singular comment a few days before had said, but adding a pinch more on production and showing a change that was going to be implemented to the hardware design:
03:57:22 – Update Frequency 04:00:33 – Early Rewards and Address Changes 04:02:28 – Cat Issues 04:03:00 – Is the Storaxa AMD Module using an Aoostar Motherboard? 04:05:20 – Backer Zoom on Jan 30th 2024
The component change related to the internal cage, here:
Now, I AM pleased that they are providing more information! But as discussed in the video, there seems to be a lot of information that they could be supplying that could calm a lot of people’s concerns, yet for one reason or another do not. Such as:
Information about the existing orders they have with production suppliers (Pro forma invoices, names of the suppliers if possible, images of any hardware that has been delivered at all – and if not due to reasons of deposits/credit agreements needing conclusion, supply further information on this
More information on the back and forth with Stripe. More of the emails, more of the correspondence. Only 2 images have been shown regarding communication and have been cropped significantly
Further images on the existing hardware they have an how this new bay/cage component is better/worse than what was in the prototypes and AMD samples
Clarification on the sourcing and reasoning behind the design change, as many have raised question marks about it’s origin
Further clarification on how, if the stripe money holding will cease on Nov 7th, how production resuming on 13th Nov will happen so fast. it’s impact on fulfilment?
Finally, storaxa got in touch after Update #29 to state that they still wish to send a review prototype. Of course, I will continue to oblige with this, but nevertheless that campaign still moves forward with a lot of unanswered questions by backers and the current state of the campaign. If/when this unit arrives, I will let backers know and proceed with the original testing as discussed. I hope I have more positive news to share with you in the next update.
Unfortunately, at the time of writing this article (Jan 5th 2024), there has not been any further communication from the brand about this review unit, originally sent on 31st October 2023.
December 2023 Update
Which leads to the December 2023 update. Sadly, very little has changed and is covered in greater detail i nthe video linked below (I have linked to the specific part, just click play. However, the TLDR is:
03:57:22 – Update Frequency – Storaxa assured users that they would maintain updates every 7-10 days, but then unfortunately only maintained this for a week and have now been largely silent since December 7th 2023 (29 Days since the date of this article’s publication)
04:00:33 – Early Rewards and Address Changes – Storaxa/Arrowtrak DID respond to users address change requests
04:03:00 – Is the Storaxa AMD Module using an Aoostar Motherboard? – There were questions being raised on Reddit regarding a very similar motherboard being used on the Aoostar NVMe NAS system and claims that the motherboard inside the Storaxa is the Aoostar model.
This is the system to which they are referring – LINK TO VIDEO
04:05:20 – Backer Zoom on Jan 30th 2024 – I/NASCompares have raised the idea of a backer zoom (not anyway officially endorsed by Stooraxa to discuss the campaign so far)
Video:
Why Did I Back the Storaxa NAS on Kickstarter? (IMPORTANT!!!!!)
Originally, I had no real intention of backing the Storaxa NAS Kickstarter project. As a long-time follower of channels such as Slope’s Game Room and his Kickscammer series, as well as only backing a tremendously small number of projects on the platform (and even then, for small sums comparatively) I have always had an especially sceptical mindset for alot of crowdfunding projects that have tremendously small profit margins early doors. Additionally, I was not in the market to buy a new NAS solution, as I cover plenty on my YouTube channel and (though contrary to popular belief, I rarely get to keep them and the ones that I do, go into channel content) I already have two personal servers up and running that I am in no rush to replace.
However, after I was contacted by several existing backers of this project and potential backers looking for a 2nd opinion, I started looking into the Storaxa a little more, contacting the organizers about a future review. After this point, a few different things happened. The campaign was nearing conclusion and more backers had been in touch that weekend to express further concern (alongside rising questions on the usual public forums, such as Reddit and STH). So, I made a video on the campaign, my initial impressions, my own questions about the price point vs distribution, and further questions surrounding heat dissipation. This resulted in my original message to the Storaxa group regarding reviews being screenshotted and shared to the comments section of the official page by the organizers themselves, with many points being highlighted (but not all) in my video being addressed.
The odd thing was that I never got a reply to that message personally, only hearing about this from other backers, who too thought the way it had been handled rather odd. So, I sent a follow-up message, with further questions, explaining my position, the methodology behind my video and my intentions in greater detail. The response came two days later, stating that I was playing media games and did not address my questions (stating that the answers were in the comments section – of which only 2/6 were, with 1 other in the backers only area and 3 others surrounding the team, Opensource distribution and production fulfilment waves not answered). Needless to say, I replied with my questions once again (with a few new points) and sadly have never received a reply to that one to date. So, why, after all that, did I back the project?
Now, one hurdle that is part kickstarter’s design and part campaign presentation choice is/was to do with how information is relayed to potential/existing backers. There needs to be a central framework that can be adapted to all projects of all types – there is no ‘one shape fits all’ campaign mould that can be used. This proved especially true when (at that time of writing) the comments section comprised around 2,000 comments (now at more than 6,000 – without a search function too!) and many comments were broken into sub-conversations (and the Kickstarter framework only allows X number loaded in), a long thread of hundreds of voices with the facts getting soon mixed with assumptions and contradiction in places, potentially leading to an echo chamber effect. Again, this is the framework that Kickstarter has for its central conversation thread and not the design of the project organizers. Nonetheless, this did lead to an issue. The bulk of the main information was published behind the main update section, which was set to only be visible to backers and shared videos for the project were made unlisted and shared with backers online.
At this point, I was intrigued enough by the campaign conclusion, the subject of OS-free NAS solutions rolling out from the east more and more, keen to see if/how it could deliver, as well s wanting to ensure an element of accountability and reference for the future. So, I decided to back the project in order to update users on the progress of this unusual NAS regularly. What follows are my monthly updates on the Storaxa Kickstarter NAS. Starting with that initial video from February 6th 2023 and with information, screen grabs and important milestones/changes in the campaign as time moves on. Hopefully, this article will end with high-order fulfilment, everyone getting their Storaxa system, a new kind of NAS solution entering the market and this growing 3rd choice between the Turnkey solutions and full DiY Opensource builds getting bigger and better, but we will have to wait till Summer 2023 to find out.
Note – I have broken all the information below into monthly chunks (with the 2x Feb chunks being an exception, as the campaign concluded at the end of that month and a volley of updates happened at the end). I am writing the February coverage retroactively, so I apologise in advance if my tenses on some parts are incorrect. I did not even realise at that time that I would be making this article and therefore, it’s been a case of catching up with myself! Additionally, I am composing this with the most recent information FIRST (eg months in reverse order), and updating it each month, so those following this article can get notifications about the updates with the Storaxa NAS summarized. Alternatively, you can browse the comments section HERE or if you are a backer, use the page’s own official updates HERE.
This description contains links to Amazon. These links will take you to some of the products mentioned in today's content. As an Amazon Associate, I earn from qualifying purchases. Visit the NASCompares Deal Finder to find the best place to buy this device in your region, based on Service, Support and Reputation - Just Search for your NAS Drive in the Box Below
Need Advice on Data Storage from an Expert?
Finally, for free advice about your setup, just leave a message in the comments below here at NASCompares.com and we will get back to you.Need Help?
Where possible (and where appropriate) please provide as much information about your requirements, as then I can arrange the best answer and solution to your needs. Do not worry about your e-mail address being required, it will NOT be used in a mailing list and will NOT be used in any way other than to respond to your enquiry.
[contact-form-7]
TRY CHAT Terms and Conditions
If you like this service, please consider supporting us.
We use affiliate links on the blog allowing NAScompares information and advice service to be free of charge to you.Anything you purchase on the day you click on our links will generate a small commission which isused to run the website. Here is a link for Amazon and B&H.You can also get me a Ko-fi or old school Paypal. Thanks!To find out more about how to support this advice service checkHEREIf you need to fix or configure a NAS, check FiverHave you thought about helping others with your knowledge? Find Instructions Here
Or support us by using our affiliate links on Amazon UK and Amazon US
Alternatively, why not ask me on the ASK NASCompares forum, by clicking the button below. This is a community hub that serves as a place that I can answer your question, chew the fat, share new release information and even get corrections posted. I will always get around to answering ALL queries, but as a one-man operation, I cannot promise speed! So by sharing your query in the ASK NASCompares section below, you can get a better range of solutions and suggestions, alongside my own.
If you like this service, please consider supporting us. We use affiliate links on the blog allowing NAScompares information and advice service to be free of charge to you.Anything you purchase on the day you click on our links will generate a small commission which isused to run the website. Here is a link for Amazon and B&H.You can also get me a Ko-fi or old school Paypal. Thanks!To find out more about how to support this advice service checkHEREIf you need to fix or configure a NAS, check FiverHave you thought about helping others with your knowledge? Find Instructions Here
How to Install Proxmox on an Asustor NAS Drive – Step By Step Guide
There is no denying that when it comes to ‘turn-key’ NAS solutions, that Asustor NAS are still easily the best bang for buck out there! Arriving with a hardware price point that is often 20% or more lower than comparable solutions from Synology or QNAP, they allow users who don’t want to build or don’t know/want to build their own server to have a ready-built solution that also includes the ADM NAS software platform. However, when it comes to virtualization and VM tools, they do not supply their own premium software (but do support others from within ADM) and for those looking to run a handful of VMs or Containers in their homelab setup, that can be a little bit of a barrier. If you have been looking into server-based virtualization or high-efficiency container deployment, then there is every chance that you are well aware of Promox, the open-source alternative to enterprise/premium VM platforms such as VMware, Citrix or Redhat hypervisors. A hypervisor is a layer of software that lives on top of bare metal server hardware and/or lives as an executional package from within an operating system. Although Asustor NAS systems already arrive with a very good virtual machine hypervisor, VirtualBox, many users would still like the option to run a VM Hypervisor software directly from the bare metal (eg, remove a multipurpose OS and have the system immediately boot into the Hypervisor software). VirtualBox has a huge range of software options (including downloading ready-made VM images from marketplaces, huge customization supported, integration with the backup/sync services in QuTS/ADM and in a new update High-Availability support). Still, some users might have an Asustor NAS that is outside of hardware warranty or is relatively modest that will possibly run VMs better without the host OS in place, hence why some users think about installing Proxmox in its place on their Asustor NAS. Proxmox provides pretty much all the abilities and services of those bigger premium VM hypervisors, however in those premium platforms (VMware, Citrix, HyperV, etc) there are additional charges and tiers to their use – whereas Proxmox includes them all in a free, open-source package. So, there are plenty of reasons why you might want to repurpose your old NAS with this bare metal hypervisor software, and today I want to guide you through the process of installing Proxmox on your Asustor NAS.
IMPORTANT– It’s important to note that Proxmox is NOWHERE NEAR as user-friendly as Asustor ADM with VirtualBox and before making any switch to a new NAS OS, it is important that you understand the process, risks and differences in the platforms. This guide is designed to help you use your Asustor NAS to run Proxmox as it’s primary OS. If you go ahead with this and use the same HDD/SSDs in the system that you are currently using in the Asustor ADM Setup, it will likely format them, so IF you want to reverse your Asustor NAS back to its ADM set up with all your data/drives the same, you will need to remove them before using the Proxmox setup, put them to one side safely and use new HDD/SSDs for your Proxmox installation. Lastly, although this whole process is reversible, you are technically using the Asustor in a means that the brand does not state as ‘intended use’ and this MIGHT lead to support/warranty problems down the line if a fault appears in the Asustor or the software installation that was the result of the Proxmox installation (the bios records everything!). This is HIGHLY UNLIKELY but not impossible that you could make the system inoperable (e.g. you work a Proxmox server so hard and/or push the CPU to breaking point running particularly aggressive Proxmox VMs/Containers and/or amend the BIOS to a state where you cannot access it) – this would not be covered by your Asustor NAS support, as they did not certify that the system can handle this or be used in this way under the warranty.
Proxmox Software on Asustor NAS Hardware – What You Need?
It is worth highlighting that having just an Asustor NAS is not quite enough and in order to get Proxmox up and running on an Asustor NAS requires a few extra checks and use of a few items you might have already in the home/office, or a quick $10-20 shop online at most. In order to upgrade your system to Proxmox, you will need to consider/have the following:
an Asustor NAS Drive with (minimum) an Intel 64bit x86 CPU and a minimum 4GB of Memory (recommended 8GB+)
Download the latest stable release of Proxmox here as a system image (you will be converting this to USB later on) – DOWNLOAD
Any Data that is currently on the Asustor NAS RAID that is mission critical to be backed up or moved (as it will be completely formatted)
I recommend not using a USB larger than 32GB, due to the constraints of 1st party software to format larger than this in FAT32 (though you can use the Rufus software to format larger than 32GB drives to FAT32). Don’t be tempted to spend like $2 more for a 64GB, as the Proxmox installation will occupy the full USB space (as you will create a system-image-USB) and space is utterly irrelevant when the Proxmox installation is so small
A Disk Image to USB conversion too. I recommend ‘Rufus’, currently in ver 3.19 and can be run in a portable .exe form that doesn’t require installation – DOWNLOAD
A basic USB Keyboard (example HERE but really, any will do) and an HDMI Monitor (or simply any device that has an HDMI input – NOT output) such as a TV or Capture card
Hard Drive and/or SSD media (you should already have these, but just in case) for your storage Pool / RAID
Optional M.2 NVMe SSD of at least 120GB, but highly recommended – Installing Proxmox is not unlike installing a Windows OS on a new PC, as you are connecting a USB to run the installer, but you need to target a drive in the Asustor NAS to install Proxmox onto. Whichever drive you use, it will make that drive largely inaccessible for anything but the Proxmox operating system. Therefore IF you are running an Asustor NAS that has internal m.2 NVMe SSD bays OR one with dedicated 2.5″ SSD bays, I highly recommend getting a low-capacity drive of between 60-120GB (these will be very cheap compared with larger HDDs that start in the Terabyte scales) and then use this for the Proxmox software. This means that ALL of the main SATA storage bays of the Asustor are then used for your storage pool(s) (aka the RAID). Do NOT install Proxmox on another USB drive during installation, as this is less stable.
Optional – Download Advanced IP Scanner HERE, as it is a really useful tool for analyzing your network and finding your new Proxmox NAS for remote access
That is about it. Most of these are devices are that you will almost certainly already have to hand.
Can I Reverse the Proxmox Installation and go back to Asustor ADM?
Almost certainly YES! I say ‘almost certainly’, as there is one small caveat. When you make the change from Asustor ADM to Proxmox on the NAS hardware, the drives (HDD and/or SSD) inside used in Proxmox pools used in the new system software architecture. This works both ways if you want to revert back to ADM on the NAS too. You CANNOT use the Storage Pool, Volume structure, Folders etc of drives from an Asustor NAS in a Proxmox setup (you will need to format these in Proxmox). So, although the act of reinitializing the NAS to its original software is very easy (you just need to go into the BIOS of the Asustor using the same method in the guide below, then change the boot drive order BACK to the Asustor OS internal SSD), it will mean that any data that resides on the disks inside will be formatted. So, if you are choosing to make a change from one NAS OS to another, make sure you have your data appropriately backed up elsewhere OR move the drives that were in your Asustor (with their ADM Storage structure) to one side safely and install new 3.5″ storage media for the Proxmox pools etc. So, let’s begin the installation of Proxmox on the Asustor NAS.
Proxmox on an Asustor NAS – Step 1, Download Proxmox
Head to the Proxmox website HERE and download the latest stable release of the software to your local PC, Linux or Mac system. Make sure to remember where you downloaded it to.
Proxmox on an Asustor NAS – Step 2, Download Rufus USB Image Tool
Head to the Rufus website and download the latest version of that tool – I recommend downloading the standalone executable file here, as then it will immediately run when you double-click the file, without installation etc. It may redirect you to Github, but it will be the same executable file. Once again, remember where you downloaded it.
Proxmox on an Asustor NAS – Step 3, Preparing the USB
Connect the small form factor USB Drive to your system (again, this is the one I used from Sandisk) and after a few seconds, it should appear as an available USB Drive. The drive MAY need formatting (you will be prompted to do so), if that is the case, then you can format it via the system prompts and by default, it will format it to FAT32 (as long as your USB is less than 32GB). If you are not presented with a system prompt to format your USB, then you can head into My PC, or My Computer via a windows computer and right-click the drive, select ‘format’ and format it that way.
If you have used the USB for other things previously, there is a chance that the drive has existing partitions in place. For that, the quickest way to completely remove any partitions is to open up the bottom-left windows system menu as normal, and then just type diskpart and open the command-line GUI tool. From there, use the command list disk to show the available drives that are connected, you will see your USB (normally disk 1 or 2, but can differ depending on your system layout and can be spotted by the storage amount). From there, type select disk # (where # is the drive number that your USB is shown as) and then type clean, which will then remove any index structure for the drive (i.e the partitions and existing format) and then you can go back to the My Computer/My PC page and format the drive to FAT 32 as normal.
Proxmox on an Asustor NAS – Step 4, Creating a USB Installer Image of Proxmox
Open the Rufus application and from there you will see the USB Drive (listed as NO NAME, or ‘UNTITLED’, ETC) at the top. From there, look to the select image/find image option (depending on the ver. of Rufus or your USB Image Creator tool of choice) and find the Proxmox disk image you downloaded earlier). If the drive is not listed, it may have downloaded as a compressed/archive file. If that is the case, head to the location of where you downloaded Proxmox (in your file explorer, not in Rufus) and right-click the file you downloaded. If the option to ‘extract‘ is visible, then you can extract it (i.e unpack it to the original form) in that same download directory. From there, head back into RUFUS and then the Proxmox system image should be visible. Select it, then run the Rufus System image creator tool and create your USB bootable Proxmox disk image.
REMEMBER! This will completely format your USB drive and any files that are on that USB will be destroyed. The system image creator tool will turn the USB into a pure boot image tool – the USB will not be usable for traditional storage again unless you completely format it again.
Proxmox on an Asustor NAS – Step 5, REMOVE THE USB FROM YOUR PC!!!!!!!!!
Really, really important and sometimes overlooked. Once the USB creation is completed, you need to remove the USB (using the eject hardware safely option at the bottom right of your windows machine taskbar as normal). DO NOT accidentally leave the USB in your USB Ports for any longer than necessary. If you leave it in and your system reboots at any point (eg in a normal ‘end of day shut down, go home, reboot tomorrow’ scenario), then the system might boot directly into the Proxmox installation and although it is easy to exit from, it can change your system default boot preferences, maybe even remove your primary boot drive as the OS drive – requiring a little messing with a windows installation disk to change it back. The odds of this are very small, but not zero, so make sure to safely remove your USB drive when the Proxmox system image creator tool is completed.
Proxmox on an Asustor NAS – Step 6, (OPTIONAL) – Install an NVMe SSD
This is an optional step, but one I would certainly recommend for newer-generation Asustor NAS devices. Proxmox is a lot like a traditional computer operating system (eg Windows or macOS) in it’s architecture and will run at its best when the necessary boot files are located on a seperate, smaller and faster area of SSD/flash storage away from the general bulk storage. So, if possible/available in your Asustor NAS, I would recommend installing a smaller m.2 NVMe SSD drive and then using that as the target/location for your Proxmox installation. This is not compulsory and you can also use a single HDD or SSD in one of the main storage bays of your Asustor, however, it means that this drive will unusable for general storage (i.e in any RAID configuration or storage pool). This CAN be negated with some creative partiton creation, but I wouldn’t recommend it. Additionally, do NOT try to install Proxmox on another USB drive that is connected to the system – this isn’t particularly stable and tends to result in a poorer Proxmox experience. M.2 NVMe bays and their location in the Asustor NAS changes depending on the system. Some allow you to access these bays via the main HDD 3.5″ bays, whilst others (the majority) require you to remove the external chassis casing to access these bays (eg the TS-453E, TVS-872X, TS-873A, etc).
Reminder – Proxmox is NOT a big program and you can use an SSD as small as 32GB and still have a tonne of provision for future storage space. However, M.2 NVMe SSDs are not available in smaller sizes than 120GB. Lower size than this and you will generally only find 2240 SSDs and/or SATA M.2 SSDs. These are still perfectly fine to use, but the performance difference between SATA and NVMe (PCIe) is HUGE! You can find many SSD options here on amazon for as little as $30 – Find Low Capacitiy and Low Price M.2 NVMe SSDs HERE on Amazon (already filtered the results)
NOTE – If you plan on upgrading the memory of your NAS to 4GB-8GB-16GB or higher (in order to use ALL of the features of Proxmox to their fullest extent), I would recommend doing so at this point before rebuilding the physical chassis again, as many Asustor NAS have the 2nd SODIMM memory slot in really tight locations.
Proxmox on an Asustor NAS – Step 7, Connecting the USB, Keyboard and HDMI Monitor
Next, we need to connect the external means to install Proxmox on the Asustor NAS. Unlike when you set up your Asustor NAS for the first time, Proxmox cannot typically be installed via the network like ADM. Proxmox requires you to use a KVM (keyboard, Video Mouse – though you won’t need a mouse!) and go through the installation using a low-res graphical user interface. Now you will ONLY need this setup/items for the installation and initialization of your Proxmox server and after that, you will be able to use the server over the network/internet as normal. You are going to need a basic USB Keyboard (not a Bluetooth or wireless one, as these may need drivers to run and you cannot install drivers at this point) and an HDMI Monitor/TV. You CAN use a mouse, but it is not hugely necessary and 99% of the choices in the setup of Proxmox can/will be via keyboard input. Also, I would also recommend connecting the NAS to the network during setup as this will allow the system to assume certain network values during setup that will save a tonne of time later. Once that is all connected, do NOT turn the NAS on yet – there is one small and slightly time-sensitive thing to do.
Proxmox on an Asustor NAS – Step 8, Accessing the BIOS Menu of your Asustor NAS
Now that your Asustor NAS is all connected and you are ready at your keyboard/Monitor, turn the NAS on and wait till you hear a beep (should take between 5-15secs depending on the Asustor NAS). As soon as your hear that noise (and likely see a flashing character or underscore on the monitor screen), you need to continuously hit the ESC / F12 / F2 and/or DEL keys (not at the same time, just back and forth). One of these will result in the system displaying the blue BIOS menu (it changes between motherboards and Asustor uses a mixture of mobos in their Intel and AMD-powered systems). You need to be quick, as you only have about 3 seconds to do this before the Asustor will automatically boot from the small internal 4GB/5GB flash OS module that boots into Asustor.
Proxmox on an Asustor NAS – Step 9, Booting from the New Proxmox Installer USB
Next, you need to tap ‘RIGHT‘ on the keyboard and head to the ‘Save & Exit’ option. At the bottom, you should see, under the ‘boot override‘ option, your USB Drive. Tap ‘DOWN‘ until you are highlighting the USB and then tap ‘Enter‘ or ‘Return‘ on your keyboard, as this will push the Asustor to boot from that USB and begin the Proxmox installation. For now, we just need it to read from this USB this one time. If you already know the internal drive you plan on installing Proxmox onto (eg an M.2 NVMe SSD or a SATA SSD) that is already inside the system, make sure to change the boot priority of option #2 to THAT drive. As then, later on after the USB is removed, the system will automatically switch to the proxmox installed drive for the future.
Proxmox on an Asustor NAS – Step 10, Rebooting and Starting the Proxmox Installer
This next step is a bit of a quick one. Around 5-15 seconds after you selected the USB Drive in BIOS, the screen will display the Proxmox Installer option page and all you need to do is navigate the config choices to set up your Proxmox NAS the first time. Select ‘Install Proxmox VE‘.
Next, the Terms and Conditions will be displayed. Scroll through as appropriate, and either use the mouse or ‘tab’ key to make your way to ‘Agree’ and click enter.
Next enter your location, timezone and keyboard layout, then click ‘Next’.
Enter the password you wish to use for the ‘root’ account. This is the super-user (i.e All Access admin), which you can amend later on if you choose to. Additionally, add your email address for use in notifications, system alerts and abnormal behaviour reports. Then click ‘Next’.
Next, you need to configure your network connectivity. If your Asustor NAS has multiple ethernet ports, select which one you want to use as the Management Interface, for system software access. In the Hostname area, if you plan on only using this system on the local area network (you can change this later), just put ‘pve.lan’. The system will preselect an IP dynamically and arrange the DNS/Gateway, but again you can change all this later. You should DEFINITELY amend this si you are going to start giving Proxmox/VMs external access points. When you are satisfied with your setup, click next.
The system setuP will display a summary of the choices and configs you hav made and invite you to confirm and install the Proxmox software. Make sure to uncheck the box that suggests a reboot after the installation is complete. This is optional step and I only suggest it because it will allow you to remove the USB between the installation and first-time boot, ensuring the system doesn’t boot back into the USB installer afterwards, but recent versions of Proxmox actually take this into account and will go straight into the Proxmox boot disk – still, I would nevertheless factor in chance to remove the USB in the middle nonetheless. When you are ready, click ‘Install’ on the bottom right.
Installation of Proxmox will be quite quick, around 3-5 minutes. The system will let you know when the installation is done and, if you unchecked the box for auto reboot, you will be presented with your system’s local IP and port config.
You can now power down / reboot the system. Be sure to make a note of that IP that IP and Port number for when you want to access the Proxmox Asustor NAS server after it reboots – there is a small % chance that the IP might have dynamically changed (based your own network architecture), but there is another way to find the device on your network. Select Shutdown or Reboot as appropriate.
The system (via the HDMI interface) during the reboot cycle will give you a heads up when to remove the USB drive. Next time the system boots up, it should access the newly created Proxmox boot drive.
If the Promox boot drive boots fine, skip ahead to step 9. Otherwise, read below how to chance the boot drive arrangement again.
Proxmox on an Asustor NAS – Step 8, Remove the Boot USB Drive AND CHANGE BIOS!!!
Once your Asustor NAS has fully powered down, you need to disconnect the USB drive you installed earlier with Proxmox boot loader on it. You need to do this otherwise, when you reboot the Asustor NAS, it can potentially reboot into the bootloader again. You can skip past this and/or it will not action a reinitialization without your input, but better to remove the USB and therefore allow the system to always immediately boot into the Proxmox system you just created. Next, you need to head back into the BIOS from earlier. Keep the Keyboard and HDMI Monitor connected and use the same method you used earlier during the initial boot of the Asustor (pressing F12 /F2/ESC/Delete repeatedly when you hear the first Asustor beep after about 10-15 secs) and as soon as you are greeted with the familiar blue BIOS screen. From here, tap right a few times to highlight the ‘Boot’ option and change the option for Boot Priority #1. The default is Asustor OS, you need to change it to the drive you installed Proxmox on (whether that is a SATA/NVMe SSD or one of the main storage bays).
This will change the boot order to allow the system when it is first powered on to always boot into Proxmox. After this, you can click right again in the BIOS menu to select the option to Save and restart. The system will then boot into the Proxmox initialization (first-time setup).
Proxmox on an Asustor NAS – Step 9, Reboot the NAS
Upon rebooting the Asustor into Proxmox (can take up to 5 mins, but usually much quicker). You have two options with how to access the configuration and controls. You can use the HDMI+Keyboard if you choose for console/command level access.
Alternatively (much more recommended), use a program such as Advanced IP Scanner, which is free and VERY useful anyway, or even network command prompt) to scan your local area network and find where the Asustor with Proxmox is located (i.e it’s IP). This IP (eg 192.168.100.2) is what you put into the URL bar ofay web browser and it will load into the login GUI for Proxmox. From here you will need to use the username ‘root’ in combination with the password that you created during initialization.
And that is about it. You now have Proxmox installed as the default OS of your Asustor NAS. From here you can do anything and everything that his highly regarded virtualization server software offers.
EXTRA – How to Reverse Your Asustor NAS from Proxmox to Asustor ADM / ADM Software Again
Now, it is worth remembering that switching your Asustor NAS to run Proxmox instead of ADM is not a one-way street and you can reverse this relatively easily. Do remember first though that:
Any data on the HDD/SSDs inside the Asustor that were used in Proxmox server setup will not be accessible/usable with the Asustor NAS system and will likely be flashed/formatted during the Asustor ADM reinitialization
You will need your Keyboard and HDMI Monitor again in order to get back into BIOS
If you kept your original Asustor RAID Pool on HDDs etc to one side (i.e you removed the already configured storage media in their RAID from the Asustor when you changed to Proxmox and put these drives safely to one side), you should be able to migrate this data back into the Asustor NAS during re-initialization with ease. That said, YOU SHOULD ALWAYS HAVE A BACKUP FOR THIS DATA REGARDLESS
In order to reverse the Asustor NAS from Proxmox back to Asustor ADM Software, you need to (from a cold boot) access the BIOS menu again (so, at boot, with your Keyboard and monitor connected, press the DEL and/or F12 key over and over when the Asustor beeps, like before) and when you reach the BIOS menu, tap RIGHT until you reach the ‘Boot page. Then change the ‘Boot Option #1’ option from the Proxmox installation drive back to the Asustor OS (internal flash 5GB module). Once that is done, head into the ‘Save & Exit‘ and then select ‘Save Changes and Restart‘. Doing this will restart the Asustor NAS and it will automatically boot into the Asustor ADM boot sequence. From here your NAS will either automatically boot into the Asustor Setup page OR (if you have your original Asustor NAS RAID drives, with their Pools, Volumes, etc) it will just boot into the Asustor NAS software as normal.
Thanks for reading! I hope you found this helpful and that it really helped you to make the most of your storage. Want to help me continue to make more guides, reviews and tutorials on the subject of NAS? Then you can do so in a few different ways (any of which I will be eternally grateful for if you choose to!). You can visit the ‘Support NAS Passion’ page HERE and see a few different ways that you can help us keep the lights on. Alternatively, you can use one of the links below to shop for your hardware today or in future (visiting those sites via the link below ensures that we get a mall commission on absolutely anything you purchase – and doesn’t cost you anything extra). Finally, if you want to support us in spirit rather than financially, recommend our blog to a friend or professional colleague or share a link on your social media site of choice. Thank you for reading and have a fantastic week!
This description contains links to Amazon. These links will take you to some of the products mentioned in today's content. As an Amazon Associate, I earn from qualifying purchases. Visit the NASCompares Deal Finder to find the best place to buy this device in your region, based on Service, Support and Reputation - Just Search for your NAS Drive in the Box Below
Need Advice on Data Storage from an Expert?
Finally, for free advice about your setup, just leave a message in the comments below here at NASCompares.com and we will get back to you.Need Help?
Where possible (and where appropriate) please provide as much information about your requirements, as then I can arrange the best answer and solution to your needs. Do not worry about your e-mail address being required, it will NOT be used in a mailing list and will NOT be used in any way other than to respond to your enquiry.
[contact-form-7]
TRY CHAT Terms and Conditions
If you like this service, please consider supporting us.
We use affiliate links on the blog allowing NAScompares information and advice service to be free of charge to you.Anything you purchase on the day you click on our links will generate a small commission which isused to run the website. Here is a link for Amazon and B&H.You can also get me a Ko-fi or old school Paypal. Thanks!To find out more about how to support this advice service checkHEREIf you need to fix or configure a NAS, check FiverHave you thought about helping others with your knowledge? Find Instructions Here
Or support us by using our affiliate links on Amazon UK and Amazon US
Alternatively, why not ask me on the ASK NASCompares forum, by clicking the button below. This is a community hub that serves as a place that I can answer your question, chew the fat, share new release information and even get corrections posted. I will always get around to answering ALL queries, but as a one-man operation, I cannot promise speed! So by sharing your query in the ASK NASCompares section below, you can get a better range of solutions and suggestions, alongside my own.
In this review, we take a closer look at the U-NAS NSC-810A NAS Case, a compact storage enclosure designed to address the storage needs of various users. Our evaluation will provide a detailed examination of its design, features, and overall performance, offering a fact-based assessment to assist you in making an informed decision regarding its compatibility with your specific storage requirements. Whether you are a professional seeking reliable data storage solutions or an enthusiast embarking on a home NAS build, our analysis aims to provide a balanced and factual perspective on the U-NAS NSC-810A.
Front Ports: 1 x USB 3.0, 2 x USB 2.0, Audio (mic & headphone).
Cooling: 2 x 120mm Gelid Ultra Quiet Fans (variable speed).
Expansion:
Hot-Swap Drive Bays: 8 x 3.5” SATA/SAS.
Internal Drive Bay: 1 x 2.5” HDD/SSD.
Expansion Slots: 2 x PCI / PCI Express.
Dimensions (L x W x H): 315mm x 275mm x 197mm (feet not included).
Net Weight: 5.6KG.
U-NAS NSC-810A NAS Case Review – Quick Conclusion
The U-NAS NSC-810A NAS Case provides a compact and well-organized storage solution with several advantages. It offers 8-Bay storage capacity and a user-friendly internal layout, including pre-connected SATA cables and effective cooling options. The option to replace the rear backplane and space for a 2.5” SATA SSD drive add to its versatility. However, some limitations include the non-standard PSU, potential constraints for M-ATX motherboards, and interference issues with larger PCIe cards. Despite these considerations, the NSC-810A remains a practical choice for specific storage needs, provided users account for its unique features and limitations.
Organized internal layout with pre-connected SATA cables and tidy front panel connectors.
Generous CPU fan height allowance and an additional internal fan for adequate cooling.
Option to replace the SATA/SAS rear backplane with a SAS version.
Inclusion of space for a 2.5” SATA SSD drive.
Durable construction and metal exterior.
Non-standard 1U FLEX PSU, which may inconvenience some users.
Requirement for PCIe risers/extenders due to horizontal motherboard placement.
Limited space for M-ATX motherboards, particularly with additional cables and risers.
The internal 80mm fan’s positioning may interfere with large PCIe cards.
Potential thermal challenges with high-end CPUs, necessitating specialized cooling solutions.
U-NAS NSC-810A NAS Case Review – Packaging
The U-NAS NSC-810A NAS case arrives in a standard brown box, which can be described as rather generic in appearance. However, within this unassuming packaging, you’ll find a well-protected 8-Bay enclosure encased in sturdy black hard foam.
The accessories accompanying the enclosure come neatly organized within their dedicated kit box. This accessory box contains essential items such as cable ties, a molex power splitter, screws suitable for 2.5” and 3.5” HDDs, and a SATA 2.5” plate designed to accommodate a drive.
It’s worth noting that U-NAS offers additional accessories separately, allowing users to customize their NAS setup. These optional extras include SAS rear-connected backplanes and a PCIe EXTENSION KIT.
For those seeking a complete package, U-NAS provides the option to purchase the NAS case prepopulated with a 1U Flex 350W PSU included, priced at $329, or without any PSU included at a cost of $219. In the PSU-included configuration, the power supply unit arrives pre-installed, alongside the presence of 2x molex power connectors pre-connected to the storage backboard.
In summation, the accessories kit provided with the U-NAS NSC-810A NAS case offers practicality and organization. While the packaging and accessories might be characterized as somewhat generic, they nonetheless offer good value for the price, ensuring that users receive a comprehensive package equipped with essential components for their NAS setup.
U-NAS NSC-810A NAS Case Review – Design
This NAS case, while not unique to the U-NAS brand, does arrive bearing the U-NAS logo prominently displayed at the top, distinguishing it from similar cases available on Aliexpress and Amazon.
The chassis of the NSC-810A is characterized by its metal external lid, enveloping three sides of the enclosure. Its dimensions measure 315mm x 275mm x 197mm, presenting a desktop-style 8-Bay design.
Upon unboxing, the case’s metal slides are found protected by a layer of plastic, which can be easily peeled off to reveal the pristine surfaces. While the metal casing may be considered somewhat thin, it provides a reassuring level of sturdiness.
The external lid features a brushed and smooth metal finish, contributing to its overall aesthetics. Ventilation is concentrated on one side of the case, where the motherboard and CPU are typically located. Here, an internally mounted 80mm Geild silent fan ensures airflow.
On the opposite side of the case, three smaller ventilation panels are present, contributing to cooling efforts. However, it’s important to note that there is no further ventilation on the top or base of the chassis.
The front panel of the case is constructed from plastic and lacks a dedicated cavity for an LCD panel. While not a glaring issue, it results in a noticeable and somewhat unconventional space on the front panel. It includes a clearly visible USB Type-A USB 3.2 Gen 1 (5Gb/s) port, as well as sturdy power on/off and reset buttons.
One distinctive feature is found at the corner edge of the front panel, where 2x additional USB 2.0 Type-A ports and sound (audio In/Out) ports are located. This addition enhances the case’s functionality and connectivity options.
While the individual storage bays within the case are not lockable, they feature ample ventilation to support cooling. Each storage tray is designed for easy removal and includes a spring-loaded handle for user convenience. Inside each bay, combined SAS/SATA connectors facilitate connectivity.
Turning to the rear panel, it features two large 120mm fans to manage cooling efficiently. The case includes a clear M-ITX, DTX, or M-ATX-ready backplane panel, with the board placed horizontally at the top left of the casing. However, this orientation results in an issue with PCIe card deployment, which will be elaborated on later in the review.
In terms of aesthetics, it’s important to acknowledge that the case may appear somewhat dated by the standards of 2023/2024. Nonetheless, it compensates for this with its robust construction, signifying durability as a primary attribute.
U-NAS NSC-810A NAS Case Review – Inside
Inside the U-NAS NSC-810A, you’ll find an internal 1U FLEX PSU cavity. However, it’s worth noting that some users may prefer a standard SFX PSU due to its wider availability in retail shops.
The included PSU comes with a main 20 PIN connector, 2x SATA power connectors, and 2 additional smaller motherboard port connectors, ensuring adequate power distribution.
The case comes equipped with pre-connected SATA data cables, offering convenience during setup. These SATA cables are pre-attached to the rear backboard, streamlining cable management. Power for the SATA backboard is also pre-attached via 2x molex power cables, contributing to a tidy and organized internal layout.
Front panel cables are neatly arranged, maintaining an organized appearance. The front panel connectors encompass a USB 3.2 Gen 1 port, power and reset buttons, LED indicators, audio In/Out ports, and 2x USB connectors, enhancing the case’s connectivity options.
The M-ITX or M-ATX motherboard is mounted horizontally at the top of the case, which accommodates 2x PCIe slots with full width and ¾ length cavities. However, due to the motherboard’s horizontal placement, the installation of PCIe cards necessitates the use of a PCIe riser or extender, which further occupies the limited internal space, mainly already occupied by cables.
M-ATX motherboards, in particular, may fit quite snugly, especially with the presence of cables and a riser, potentially impacting airflow and components’ accessibility.
The CPU fan height allowance within the case is relatively generous, especially when compared to the NSC-410 4-Bay model. Additionally, the presence of an internal fan ensures active airflow over the motherboard and CPU cooler.
However, the internal 80mm fan is positioned in the pathway of the PCIe cards. Consequently, exceptionally large PCIe cards may obstruct this fan. An alternate placement on the other side of the casing might have mitigated this issue.
It’s important to note that more powerful CPUs, such as Intel Core i5 and above or high-end AMD Ryzens, may encounter thermal challenges in this configuration. To address potential overheating concerns, users may need to invest in integrated and compact copper-piped CPU heatsinks and fans.
The rear backplane responsible for SATA/SAS connections can be replaced with a SAS backplane version, an option available from U-NAS. Furthermore, the case offers space for a 2.5” SATA SSD drive, and an additional SATA cable is included to facilitate this.
The U-NAS NSC-810A represents a compact case with certain design considerations. While it allows for an organized interior layout, the placement of the motherboard in close proximity to the 8-Bay SATA drive cage at an angle may limit CPU fan options and potentially obstruct horizontal airflow. Other cases, such as the Audhied K7, have addressed motherboard placement differently, providing more space for CPU fans and eliminating the need for PCIe risers/extenders.
U-NAS NSC-810A vs NSC-410 NAS Case Comparison
The U-NAS NSC-410 and NSC-810A NAS cases, both offering storage solutions, exhibit distinct differences while sharing some common traits. In terms of size, the NSC-410 is a smaller 4-Bay enclosure, whereas the NSC-810A boasts a more extensive 8-Bay capacity. This difference in capacity makes the NSC-810A a preferable choice for users with larger storage needs, while the NSC-410 caters to more modest requirements. While both cases maintain an organized internal layout with pre-connected SATA cables and tidy front panel connectors, they differ in the placement of motherboards. The NSC-410 positions motherboards vertically, while the NSC-810A opts for a horizontal placement. This design choice impacts CPU fan options and airflow considerations, with the NSC-810A potentially limiting the space available for CPU cooling solutions. Additionally, the NSC-810A features two large 120mm fans on its rear panel, enhancing cooling capabilities, whereas the NSC-410 relies on a single 120mm fan for airflow.
Key Differences:
Compatibility: The NSC-810A supports both M-ITX and M-ATX Motherboards, whereas the NSC-410 only supports M-ITX
Motherboard Placement: NSC-410 positions motherboards vertically, while NSC-810A mounts them horizontally.
Cooling: NSC-810A incorporates two large 120mm fans for enhanced cooling, while NSC-410 relies on a single 120mm fan.
Size: NSC-810A is larger with dimensions of 315mm x 275mm x 197mm, while NSC-410 is more compact at 263mm x 195mm x 197mm.
Storage Bay Trays: The NSC-810A may accommodate larger PCIe cards due to its additional size, while the NSC-410 may have constraints in this regard.
U-NAS NSC-810A NAS Case Review – Verdict and Conclusion
The U-NAS NSC-810A NAS Case presents a practical solution for those seeking a compact and well-organized storage enclosure. While it offers several notable advantages, there are certain considerations to bear in mind. On the positive side, the case’s compact design with 8-Bay storage capacity makes it suitable for various storage needs. The organized internal layout, including pre-connected SATA cables and tidy front panel connectors, streamlines the installation process. Additionally, the generous CPU fan height allowance and the presence of an internal fan contribute to effective cooling solutions. The option to replace the rear backplane with a SAS version enhances the case’s versatility, and the provision of space for a 2.5” SATA SSD drive is a practical inclusion. The case’s overall construction, with a durable metal exterior, underscores its longevity. However, it’s important to acknowledge certain limitations, such as the non-standard 1U FLEX PSU, which may require some users to adapt their power supply configuration. The motherboard’s close proximity to the SATA drive cage may restrict CPU fan choices and impact airflow, necessitating PCIe risers or extenders.
Furthermore, the case’s suitability for M-ATX motherboards, particularly with additional cables and risers, may be constrained. The internal 80mm fan’s position can interfere with larger PCIe cards, requiring careful consideration during component selection. Finally, users with more demanding CPUs may need to invest in specialized cooling solutions. The NSC-810A NAS Case offers a practical and compact storage solution, complemented by an organized interior and robust construction. While it has certain design considerations, its overall positive attributes make it a viable choice for those with specific storage requirements, provided they align with the case’s unique features and limitations.
This description contains links to Amazon. These links will take you to some of the products mentioned in today's content. As an Amazon Associate, I earn from qualifying purchases. Visit the NASCompares Deal Finder to find the best place to buy this device in your region, based on Service, Support and Reputation - Just Search for your NAS Drive in the Box Below
Need Advice on Data Storage from an Expert?
Finally, for free advice about your setup, just leave a message in the comments below here at NASCompares.com and we will get back to you.Need Help?
Where possible (and where appropriate) please provide as much information about your requirements, as then I can arrange the best answer and solution to your needs. Do not worry about your e-mail address being required, it will NOT be used in a mailing list and will NOT be used in any way other than to respond to your enquiry.
[contact-form-7]
TRY CHAT Terms and Conditions
If you like this service, please consider supporting us.
We use affiliate links on the blog allowing NAScompares information and advice service to be free of charge to you.Anything you purchase on the day you click on our links will generate a small commission which isused to run the website. Here is a link for Amazon and B&H.You can also get me a Ko-fi or old school Paypal. Thanks!To find out more about how to support this advice service checkHEREIf you need to fix or configure a NAS, check FiverHave you thought about helping others with your knowledge? Find Instructions Here
Or support us by using our affiliate links on Amazon UK and Amazon US
Alternatively, why not ask me on the ASK NASCompares forum, by clicking the button below. This is a community hub that serves as a place that I can answer your question, chew the fat, share new release information and even get corrections posted. I will always get around to answering ALL queries, but as a one-man operation, I cannot promise speed! So by sharing your query in the ASK NASCompares section below, you can get a better range of solutions and suggestions, alongside my own.
Are DRAM free SSDs Worth Your Money and Your Data?
Solid-State Drives (SSDs) have revolutionized data storage with their speed and reliability. Among these, DRAMless SSDs have carved a niche, offering unique advantages and disadvantages. With the emergence of models like the Samsung 990 EVO, the Phison E31T controller-based SSDs, and the WD Black SN770, the landscape of DRAMless SSDs is expanding. This assessment delves into the pros and cons of DRAMless SSDs, offering an unbiased perspective on their place in the storage market.
What Are the Advantages of DRAMless SSDs?
Choosing to opt for an SSD inside your client desktop or portable system that does not feature it’s own on-board DRAM/Memory actually opens the door to a lot of benefits that extend way beyond just buying an SSD that has a lower price per TB/GB. Here are a whole bunch of benefits to using DRAMless SSDs, like the Samsung 990 EVO, WD Black SN770 and more in 2024 onwards:
Cost-Effectiveness
The absence of DRAM chips in SSDs like the Samsung 990 EVO and WD Black SN770 makes them more affordable, offering solid-state speed at a lower price point. This is due to reduced manufacturing costs, making these drives a budget-friendly option for consumers.
Energy Efficiency
DRAMless SSDs, including those with the Phison E31T controller, are known for lower power consumption compared to DRAM SSDs. This feature is particularly beneficial in battery-powered devices, extending their battery life.
Compact and Lightweight Design
The elimination of DRAM chips allows for a more compact form factor. This design aspect is crucial in devices where space is limited, such as ultra-thin laptops or compact embedded systems.
Simplicity and Increased Reliability
Fewer components mean a simpler design, which could lead to increased reliability. DRAMless SSDs, by virtue of their simplicity, might have fewer points of failure compared to their DRAM counterparts.
Security Advantages
The volatile nature of DRAM means it can retain data temporarily. In DRAMless SSDs, like the Samsung 990 EVO, the lack of this component might reduce the risk of data recovery after power loss, enhancing data security.
Suitability for Certain Workloads
For applications that are read-intensive and don’t require high write performance, a DRAMless SSD can be a suitable choice. These drives can handle basic tasks and typical consumer workloads effectively. However, it’s important to note that DRAMless SSDs may have limitations in terms of performance, particularly in write speeds and handling large or intensive workloads, compared to SSDs with dedicated DRAM. As such, their benefits are most realized in specific use cases where the cost and power efficiency are prioritized over peak performance.
What Are the Disadvantages of DRAMless SSDs?
Commonly recognized negatives/disadvantages of SSDs that lack onboard DRAM/Memory are:
Compromised Performance
A major drawback, seen in models like the WD Black SN770, is slower write speeds and increased latency due to the absence of a DRAM cache. This impacts performance, especially in write-intensive tasks.
Limited Multitasking Efficiency
Without a high-speed buffer, DRAMless SSDs struggle with multitasking. This limitation affects their ability to handle multiple simultaneous read/write operations effectively.
Dependency on System Memory
Some DRAMless SSDs, including those using the Phison E31T controller, rely on the system’s RAM (Host Memory Buffer) for data management, which could impact overall system performance, especially in RAM-constrained environments.
Reduced Endurance and Longevity
Continuous write operations directly to NAND can accelerate wear, potentially reducing the SSD’s lifespan. This is a concern in DRAMless SSDs where direct NAND writes are more frequent.
Inadequacy for High-End Tasks
High-performance tasks like gaming or video editing may not be ideally suited for DRAMless SSDs due to their limited speed and multitasking capabilities.
DRAMless SSDs – The Verdict?
In conclusion, DRAMless SSDs like the Samsung 990 EVO, Phison E31T-based drives, and the WD Black SN770 offer a cost-effective and energy-efficient solution for basic storage needs. They are particularly well-suited for devices where space and power consumption are key considerations. However, their reduced performance and endurance make them less ideal for high-performance computing or heavy workloads. These SSDs represent a compromise, balancing affordability and efficiency against top-tier performance, making them a viable option for certain consumer segments but not a one-size-fits-all solution.
Here are Three of the leading DRAMless m.2 NVMes in the SSD market right now:
This description contains links to Amazon. These links will take you to some of the products mentioned in today's content. As an Amazon Associate, I earn from qualifying purchases. Visit the NASCompares Deal Finder to find the best place to buy this device in your region, based on Service, Support and Reputation - Just Search for your NAS Drive in the Box Below
Need Advice on Data Storage from an Expert?
Finally, for free advice about your setup, just leave a message in the comments below here at NASCompares.com and we will get back to you.Need Help?
Where possible (and where appropriate) please provide as much information about your requirements, as then I can arrange the best answer and solution to your needs. Do not worry about your e-mail address being required, it will NOT be used in a mailing list and will NOT be used in any way other than to respond to your enquiry.
[contact-form-7]
TRY CHAT Terms and Conditions
If you like this service, please consider supporting us.
We use affiliate links on the blog allowing NAScompares information and advice service to be free of charge to you.Anything you purchase on the day you click on our links will generate a small commission which isused to run the website. Here is a link for Amazon and B&H.You can also get me a Ko-fi or old school Paypal. Thanks!To find out more about how to support this advice service checkHEREIf you need to fix or configure a NAS, check FiverHave you thought about helping others with your knowledge? Find Instructions Here
Or support us by using our affiliate links on Amazon UK and Amazon US
Alternatively, why not ask me on the ASK NASCompares forum, by clicking the button below. This is a community hub that serves as a place that I can answer your question, chew the fat, share new release information and even get corrections posted. I will always get around to answering ALL queries, but as a one-man operation, I cannot promise speed! So by sharing your query in the ASK NASCompares section below, you can get a better range of solutions and suggestions, alongside my own.
Thunderbolt 4 DAS vs Thunderbolt 4 NAS? What Is The Difference?
The ascent of NAS has grown in popularity, largely due to video editing suites requiring a large amount of storage accessible by multiple users simultaneously. Even in the early days of Thunderbolt NAS, around 2017 and 2018, one of the key advantages over traditional Thunderbolt DAS storage was the facilitation of a much less complicated workflow. A NAS could be accessed by hundreds, if not thousands, of users at any given time via the internet or a local area network. The system could be used to package projects, distribute and archive them in a single system, as well as managing and facilitating multi-site backups, thanks to intelligent software that has evolved over the years from most NAS brands. Adding to this, editors could directly interface with a QNAP NAS over Thunderbolt and/or 10GbE with the appropriate interfaces, meaning this single storage system could house, manage, distribute, and orchestrate multi-tier backups for an entire photo/video production company. Whereas traditional Thunderbolt DAS can only be accessed by a single user at any given time and lacks the software management and automation that a NAS offers. However, there are definitely times when a Thunderbolt DAS is better than a Thunderbolt NAS too!
What is DAS? – In the context of Thunderbolt technology, DAS (Direct Attached Storage) refers to a storage device that is connected directly to a computer or server via a Thunderbolt interface. This setup offers high-speed data transfer and access for a single user, making it ideal for tasks that require rapid, individual access to large amounts of data. Occasionally referred to as ‘LAS’, or Local Access Storage.
And What is NAS? – In the context of Thunderbolt technology, NAS (Network Attached Storage) is a storage system connected to a network, allowing multiple users and devices to access and share data simultaneously. Unlike DAS, NAS provides broader scalability, remote access capabilities, and supports various data management features, making it suitable for collaborative and multi-user environments.
Clearly, there are significant differences between them:
Thunderbolt NAS vs Thunderbolt DAS – PERFORMANCE?
Thunderbolt DAS utilizes simple direct storage access for a single user and does not need to facilitate the use of a system operating system or be built on an architecture that needs to service multiple users at once. Thunderbolt NAS, however, operates on IP architecture and because it needs to run its own internal operating system, as well as have its data in its own file system that is not locked into any external file system of an operating system like Windows or Mac, performance is noticeably lower than that of DAS when utilizing exactly the same storage media. So, if you are a single access user and performance is what matters, Thunderbolt NAS might not be for you.
Thunderbolt NAS vs Thunderbolt DAS – Plug n Play?
There is also no avoiding that because a Thunderbolt NAS system like the QNAP TVS-h874 has its own operating system, software, appliances, and protocols, it is nowhere near as straightforward and simplistic to connect with as a traditional Thunderbolt direct attached storage device. Most of the initial work in connecting with the QNAP will be done at the beginning, and after that, the system will be automatically connected with your client machine, but if you are hoping that the TVS-h874 is as straightforward and plug-and-play as a Thunderbolt LaCie or G-Technology box, you are going to be disappointed!
Thunderbolt NAS vs Thunderbolt DAS – Fast Network/Remote Access?
Another advantage of utilizing Thunderbolt NAS systems over traditional Thunderbolt storage devices is the ability to use 10GbE passthrough. If your home or office uses larger bandwidth network connections such as 2.5GbE or 10GbE, you can use a direct connection with the NAS over Thunderbolt from your Mac or Windows system to also connect to that larger and higher bandwidth network. Additional Thunderbolt DAS storage will only provide you storage while using up that Thunderbolt port for little else.
Thunderbolt NAS vs Thunderbolt DAS – Expandability?
Expanding a traditional RAID storage device can often be quite tricky. Some Thunderbolt solutions, like the Areca series, allow users to use software RAID to attach their own series of expansion devices and add further drives to your ever-growing storage area. However, they are very much in the minority, as most Thunderbolt plug-and-play DAS solutions do not allow any kind of external expandability. Once the storage media inside the system has filled up, you either have to buy new, larger hard drives and gradually replace all of the drives, which can take weeks, or you need to buy a new Thunderbolt box and start over, adding to growing storage piles.
Thunderbolt NAS, on the other hand, allows several means to expand and upgrade your storage very efficiently over the system’s lifespan. The system arrives with two internal M.2 NVMe slots that allow you to install further, faster SSDs which can be used for additional storage or pooled together with the existing larger hard drive storage. Moreover, the system features multiple USB ports that allow you to attach one of the many official QNAP expansion devices that increase the size of your storage pool – this is especially fast if you utilize the ZFS QuTS software that now supports ZFS expansions. The QNAP TVS-h874 system also allows you to attach fast USB drives with USB 3.2 Gen 2 architecture, which will then become available via the Thunderbolt and remotely via network and internet connections. The QNAP NAS allows you to create multiple smaller storage areas both inside and outside of the system, and all of these are accessible via a single Thunderbolt port or via the network. This pales in comparison to the majority of other Thunderbolt DAS systems that only provide a single large block of storage to work with.
Thunderbolt NAS vs Thunderbolt DAS – File System Considerations?
File System Locks – Connecting a storage device via Thunderbolt to your Mac or Windows system does not always immediately make the storage available. One significant difference that many users overlook is that multiple operating systems use very different file systems, from an old USB drive all the way up to a LaCie 6big, for example. This can often result in a drive that works fine on a Mac being completely unusable on a Windows system. This has always been a challenge for editing suites with mixed Windows, Mac, and Linux OS systems in-house, preventing a single Thunderbolt device from being usable between one system and another without appropriate formatting or future provisioning during initial file system creation.
A Thunderbolt NAS, on the other hand, utilizes the system’s own EXT4 or ZFS file system during the initialization of the NAS and, after that, can be communicated with remotely via the network, internet, or over Thunderbolt by practically any operating system, as well as multiple client applications available from the brand, with third-party tools also supported. In terms of cross-platform file sharing, a Thunderbolt NAS is significantly more convenient.
Thunderbolt NAS vs Thunderbolt DAS – Costs, Price and Value?
The Price – Something a lot of you may have already noticed is that a Thunderbolt NAS like the TVS-h874 is much more expensive than a similarly scaled direct attached storage RAID box from OWC, G-Technology, or LaCie. This is because, in order for the NAS system to provide support for all of its features and services, it needs to utilize significantly more powerful hardware in terms of the CPU, memory, and general system internal cooling systems. A traditional Thunderbolt RAID DAS system does not have any of these extra features and therefore often runs on very modest SoC (Software on Chip) or RoC (RAID on Chip) processors with minimal RAM. All of this extra hardware results in a Thunderbolt NAS system being significantly more expensive than traditional plug-and-play Thunderbolt storage.
Thunderbolt 4 DAS vs. Thunderbolt 4 NAS? Which Should You Use?
Understanding the distinctions between Thunderbolt 4 DAS and Thunderbolt 4 NAS is crucial, especially when considering devices like the QNAP TVS-h874. This NAS device stands out for its versatility and future-proofing capabilities. Supporting both Thunderbolt 4 and 3, it offers an excellent long-term storage solution, adaptable to evolving client devices. While both Thunderbolt 3 and 4 deliver 40 gigabits per second bandwidth, Thunderbolt 4 excels with enhanced security, power delivery, and improved internal management. The file system flexibility of the Thunderbolt NAS, like the QNAP TVS-h874, is a significant advantage, particularly in multi-OS environments commonly found in editing suites. It overcomes the limitations of traditional DAS systems, which often face compatibility issues across different operating systems. The NAS’s ability to be communicated with remotely, regardless of the OS, streamlines cross-platform file sharing.
However, it’s important to consider the price and performance aspects. While Thunderbolt NAS offers more features, it comes at a higher cost due to its more powerful hardware. In terms of performance, Thunderbolt DAS provides straightforward, high-speed access for individual users, whereas Thunderbolt NAS excels in multi-user environments and offers greater expandability. Each system has its strengths, and the choice ultimately depends on your specific needs. If you prioritize ease of use, single-user access, and maximum performance with the right storage media, Thunderbolt DAS could be more suitable. On the other hand, if your focus is on versatility, expandability, and multi-user access in a cross-platform setting, a Thunderbolt NAS like the QNAP TVS-h874 would be an excellent investment. Remember, Thunderbolt is just the conduit; the type of system you choose should align with your specific workflow requirements and future scalability needs.
This description contains links to Amazon. These links will take you to some of the products mentioned in today's content. As an Amazon Associate, I earn from qualifying purchases. Visit the NASCompares Deal Finder to find the best place to buy this device in your region, based on Service, Support and Reputation - Just Search for your NAS Drive in the Box Below
Need Advice on Data Storage from an Expert?
Finally, for free advice about your setup, just leave a message in the comments below here at NASCompares.com and we will get back to you.Need Help?
Where possible (and where appropriate) please provide as much information about your requirements, as then I can arrange the best answer and solution to your needs. Do not worry about your e-mail address being required, it will NOT be used in a mailing list and will NOT be used in any way other than to respond to your enquiry.
[contact-form-7]
TRY CHAT Terms and Conditions
If you like this service, please consider supporting us.
We use affiliate links on the blog allowing NAScompares information and advice service to be free of charge to you.Anything you purchase on the day you click on our links will generate a small commission which isused to run the website. Here is a link for Amazon and B&H.You can also get me a Ko-fi or old school Paypal. Thanks!To find out more about how to support this advice service checkHEREIf you need to fix or configure a NAS, check FiverHave you thought about helping others with your knowledge? Find Instructions Here
Or support us by using our affiliate links on Amazon UK and Amazon US
Alternatively, why not ask me on the ASK NASCompares forum, by clicking the button below. This is a community hub that serves as a place that I can answer your question, chew the fat, share new release information and even get corrections posted. I will always get around to answering ALL queries, but as a one-man operation, I cannot promise speed! So by sharing your query in the ASK NASCompares section below, you can get a better range of solutions and suggestions, alongside my own.
The Best CPU and Motherboard Bundle to Build a DiY NAS (UPDATED)
I think it would be an understatement to say that building your own NAS system from scratch has gotten easier every year for about the last decade! From custom cases that have rolled out from numerous brands that allow you to genuinely build a compact personal cloud, to more efficient processes and compact ITX motherboards arriving as bundles that really simplify the entire build process, it really has never been easier to build your own NAS than right now! However, there is also still no avoiding that it’s hardly a turnkey process and as easy as the physical work is to build the device these days, the complexity that goes into choosing the right components and making sure they work together is as frustrating and tech deep speak covered as always! So today I want to recommend several CPU plus motherboard to your perfect type performance NAS server. Each one focuses on a different priority of user for their own personal NAS server, from performance to Plex, or from business to pleasure! Here are Four NAS motherboard and CPU combos that I recommend for your BYO NAS project!
In a rush? Let’s Cut to the chase!
If you’re in a rush and simply want to know about the best CPU and motherboard combo to build your best DIY NAS system, below, you can find direct links to each of these bundles that can be purchased predominantly on AliExpress, but some of these options are also available on retailers such as Amazon and Newegg. If you were going to shop at these retailers anyway, why not use the links below as it will ensure that we act as comparers could earn a small fee from these shops. It allows us to keep doing what we do.
Here are ALL the Motherboard+CPU Combos that we cover in this article:
(The Best) i3-N305 M-ITX BoardCheck AliExpress ($289-349 with Memory) HERE and Amazon HERE
(x4 m.2 @ Gen 4×4) The Minisforum AR900i CPU + M-ITX Motherboard Combo ($399)Amazon HERE
(Best for PLEX) Erying 13th Gen i9 Combo 14C / 20T $459 HERE
(Gen 5 M-ITX) MINISFORUM BD770i ITX Motherboard $489 (AliExpress) HERE and $399 (Amazon)HERE
(Plex Alternative #1) Erying 12th Gen I9 Combo 14C / 20T $389 HERE
Best Gen 5 CPU+Motherboard Combo – MINISFORUM BD770i ITX Motherboard
Spec Highlights – BD770i-AMD Ryzen 7 7745HX, 8 Cores/16 Threads (5.1 GHz) OR BD790i-AMD Ryzen 9 7945HX, 16 Cores/32 Threads (up to 5.4 GHz), SODIMM DDR5 Slots×2 Max 64GB, 2×M.2 2280 PCIe5.0 SSD Slots, PCIe 5.0 X16 connector, 1x 2.5GbE and Lack of SATA! –$489 on AliExpress and $399 on Amazon
The Minisforum BD770i and BD790i motherboard and CPU combo represents a cutting-edge solution for enthusiasts and professionals seeking powerful performance in a small footprint. With the BD770i featuring the AMD Ryzen 7 7745HX and the BD790i equipped with the AMD Ryzen 9 7945HX, these systems offer unparalleled processing power that caters to a wide range of demanding tasks, from advanced computational workloads to intensive multitasking scenarios. The AMD Radeon 610M GPU, integrated into both models, while not designed for high-end gaming, capably supports everyday graphics needs, including casual gaming, video streaming, and content creation, making this combo a versatile choice for various computing needs.
The inclusion of PCIe 5.0 support stands out as a significant advantage, offering double the bandwidth of its predecessor, PCIe 4.0. This enhancement ensures that users can take advantage of the fastest available SSDs and expansion cards, dramatically reducing load times and facilitating quicker data access. This forward-thinking feature ensures that the system is prepared to handle future technological advancements, making it a wise investment for tech enthusiasts looking to stay ahead of the curve. However, it’s important to note the absence of traditional SATA ports, which means users with SATA drives will need to consider alternatives such as SATA M.2 adapters or adding a PCIe card to accommodate these devices. This requirement might necessitate additional planning and investment for those who wish to integrate existing storage solutions into their new setup.
Specification
BD770i
BD790i
Processor
AMD Ryzen 7 7745HX, 8 Cores/16 Threads<br>(32M Cache, up to 5.1 GHz)
AMD Ryzen 9 7945HX, 16 Cores/32 Threads<br>(64M Cache, up to 5.4 GHz)
GPU
AMD Radeon 610M
AMD Radeon 610M
Memory
DDR5 Dual channel<br>(SODIMM Slots×2, up to 5200 MT/s, Max 64GB)
DDR5 Dual channel<br>(SODIMM Slots×2, up to 5200 MT/s, Max 64GB)
Storage
2×M.2 2280 PCIe5.0 SSD Slots
2×M.2 2280 PCIe5.0 SSD Slots
Expansion Slot
PCIe 5.0 X16 connector ×1
PCIe 5.0 X16 connector ×1
Wireless Connectivity
M.2 2230 Key E Slot
M.2 2230 Key E Slot
Video Output
HDMI2.0 ×1<br>DisplayPort1.4 ×1<br>USB-C ×1
HDMI2.0 ×1<br>DisplayPort1.4 ×1<br>USB-C ×1
Audio Output
HDMI2.0 ×1<br>DisplayPort1.4 ×1<br>USB-C ×1<br>Line Out ×1
HDMI2.0 ×1<br>DisplayPort1.4 ×1<br>USB-C ×1<br>Line Out ×1
Ethernet
RJ45 2.5G Ethernet Port×1
RJ45 2.5G Ethernet Port×1
USB Ports
USB3.2 Gen2 Type-C Port ×1 (Alt DP)<br>USB3.2 Gen1 Type-A Port ×2<br>USB2.0 Type-A Port ×2
USB3.2 Gen2 Type-C Port ×1 (Alt DP)<br>USB3.2 Gen1 Type-A Port ×2<br>USB2.0 Type-A Port ×2
I/O Ports
4-pin CPU Fan header ×1<br>4-pin System Fan header ×2<br>4-pin SSD Fan header ×1<br>USB 3.2 Gen 1 header ×1<br>Front Panel Audio header ×1<br>System Panel header ×1
4-pin CPU Fan header ×1<br>4-pin System Fan header ×2<br>4-pin SSD Fan header ×1<br>USB 3.2 Gen 1 header ×1<br>Front Panel Audio header ×1<br>System Panel header ×1
Form Factor
Mini-ITX Form Factor (170x170x1.6mm)
Mini-ITX Form Factor (170x170x1.6mm)
A notable constraint in this powerful combo is the provision of a single RJ45 2.5G Ethernet port. While this port offers a solid network connection suitable for most applications, users with specialized networking needs or those looking to expand their network connectivity may find this limitation challenging. The necessity to potentially use the high-speed PCIe 5.0 slot for a network interface card upgrade, just to augment networking capabilities, could be seen as an inefficient use of this high-bandwidth resource. This situation highlights a trade-off between the advanced PCIe support and the flexibility in networking expansion, prompting users to carefully consider their priorities when planning their system configuration.
Despite these considerations, the overall package offered by the Minisforum BD770i and BD790i is compelling. The combination of cutting-edge CPU performance, robust PCIe 5.0 support, and a variety of connectivity options, including USB 3.2 ports and multiple video outputs, provides a solid foundation for a high-performance, compact computing solution. #
Furthermore, the support for up to 64GB of DDR5 memory and the inclusion of two M.2 2280 PCIe 5.0 SSD slots offer ample room for memory and storage expansion, enhancing the system’s capability to handle future needs. This blend of high-end features, coupled with the Mini-ITX form factor’s space efficiency, makes the BD770i and BD790i an attractive option for users seeking a powerful, yet manageable, computing platform.
Where to Buy the MINISFORUM BD770i ITX Motherboard Combo:
Currently, the “build your own” favorite across many forums, the new Intel N305 processor, an 8-core, eight-thread i3 processor, comes pre-installed on a Mini-ITX board. It not only provides a remarkably low 7-watt TDP when needed but also offers significant scalability in terms of both clock speed and power efficiency. The $289 N305 version of the CPU and Motherboard combo presents a practical and economical choice for commercial use (making it the perfect upgrade/alternative to the Topton N6005 / N5105 that was so popular last year for first time NAS DiY’ers). It is equipped with the Intel® Core i3-N305 Processor, which is a part of the Alder Lake-N series. This processor boasts eight cores and eight threads, with a max turbo frequency of 3.80 GHz, offering ample computing power for everyday tasks and certain commercial applications. The processor is fabricated using Intel 7 lithography technology, which is indicative of its advanced and efficient design.
Memory support on this combination is versatile, with the motherboard supporting a SO-DIMM DDR5 memory slot, compatible with frequencies of 4800/5200/5600MHz. Although the processor supports a maximum memory size of 16 GB, which is a consideration to keep in mind, the motherboard can handle up to 32 GB, potentially allowing for future upgrades if the board’s capacity is indeed supported by later CPU models or firmware updates.
The integrated graphics, Intel® UHD Graphics with 32 Execution Units, can dynamically operate at up to 1.25 GHz and support 4K content at 60Hz, making it suitable for high-definition displays and basic graphical tasks. Here’s the specification of the $289 N305 version of the CPU+Motherboard combo:
Specification
Detail
Model Number
NAS-N100-N305
Processor Brand
Intel
Processor Models
Intel® Alder Lake-N i3-N305 (up to 3.8 GHz)
Type
MINI PC / PC Stick
Origin
Mainland China
Brand Name
YSJMNPC
Use
Commercial
Memory
– Support notebook DDR5 technology
– 1 SO-DIMM DDR5 slot
– Compatible with 4800/5200/5600MHz
– Max capacity: 32GB
Storage
– 6 x SATA3.0 6Gb/s interface
– 2 x M.2 NVMe 2280
Graphics Card
Integrated Card (depending on processor model)
Network Card
4 x Intel i226-V 2.5G RJ45 network port
I/O Panel
– 2 x USB 2.0
– 1 x USB 3.0
– 1 x Type-C (2.0 rate)
– 1 x HDMI
– 1 x DP
– 4 x RJ45 2.5G network port
– 1 x AUDIO 3.5mm interface
Motherboard Features
– Matte black PCB
– Moisture-free fiber 8-layer circuit
– Full protection (USB, audio, network)
TDP
9-15W
Structure
MINI-ITX (17.0cm x 17.0cm)
Capacitor Design
All solid capacitor
Expansion Slots
1 PCIe x1 (shared with 2nd M.2)
Onboard Interface
– F_PANEL pin
– TPM pin (compatible with ASUS TPM module)
– USB2.0 pin
– CPU_FAN 4-pin (temperature control)
– SYS_FAN 4-pin (temperature control)
– 24+4 ATX power interface
Cooling
– Compatible with 115X radiators
– Silent temperature-controlled radiator
– Support for two high-performance radiators
In terms of connectivity, the combo is well-equipped with a variety of interfaces, including multiple USB ports with different standards, HDMI 2.1, and DisplayPort 1.4 for video output, and an Intel i226-V 2.5G RJ45 network port for fast wired internet connections.
The inclusion of PCIe lanes and M.2 slots provides additional expansion capabilities, allowing for further customization and the addition of peripherals or storage solutions. The motherboard’s MINI-ITX form factor makes it a compact solution that can fit into small cases, suitable for workspaces with limited room. EASILY the easiest choice of all the NAS Mobo+CPU options on this list, as one of the newest, lowest in price – yet impressively powerful, despite its lower TDP.
Where to Buy the i3-N305 CPU + M-ITX Motherboard Combo:
Spec Highlights – 4x AMD MobileRyzen Options, SODIMM DDR5 Slots×2, ECC Supported, 2×M.2 2280 4×2 SSD Slots, PCIe 4×8 connector ×1 (x16 Physical), SFF-8643 x2 Connectors for SATA III, 4x 2.5GbE, USB 4 (20Gbs Limits) , Internal USB 2.0–$489 on AliExpress and Check on Amazon
The combination of the AMD “Zen 4” architecture Ryzen 5/7/9 series processors with the Minisforum motherboard offers a high-performance platform that is particularly suitable for building a Network Attached Storage (NAS) server. The Mini-ITX form factor of the motherboard, compatible with 1700 series CPU coolers, ensures that it can fit into compact NAS cases while providing adequate cooling for the powerful processors housed within. In the realm of NAS servers, storage options and connectivity are key. The motherboard’s two M.2 NVMe (PCIe 4.0 x2) slots are ideal for high-speed storage drives that can handle intense read and write operations typical in a NAS environment. The inclusion of 2 * SFF-8643 sockets, which support up to four connections each and a total of 9 SATA 3.0, is an advanced feature that provides flexibility and scalability for storage expansion. This is particularly beneficial for NAS setups where large storage pools and redundancy (such as RAID configurations) are important.
Network connectivity is another critical aspect of NAS servers, and this motherboard delivers with its 4 * Intel i226-V 2.5G RJ45 UDE network ports, allowing for high-speed data transfer and network redundancy or link aggregation if required. However, the lack of 10GbE port might limit the network throughput if higher speeds are needed, in which case the PCIe Gen 5×16 slot could be employed for an additional network interface card, although this might be considered an inefficient use of this high-bandwidth expansion slot. Lastly, the wide array of USB ports, including USB3.2 Gen2 Type-C with a 20Gbps rate and additional USB3.2 and USB2.0 ports, adds to the versatility of this motherboard. The built-in set of USB3.2 pin sockets also allow for further expansion and connectivity options, essential for a NAS that may need to accommodate a variety of peripherals or provide additional data transfer interfaces.
Feature Category
Specifications
Processor Support
Equipped with AMD “Zen 4” architecture Ryzen 5/7/9 series high-performance processors
Form Factor
17×17 standard Mini-ITX form factor compatible with 1700 series CPU coolers
Expansion Slots
1 PCI-E x16 slot PCIe 4.0 x8 signal supports expansion of graphics card/network card, etc.
Storage
2 * M.2 NVMe (PCIe 4.0 x2) slots 2280 size
SATA Support
2 * SFF-8643 sockets support one to four via cable and support 9 SATA 3.0
3 * USB3.2+1 Type-C (USB4) interface 20Gbps rate<br>Built-in set of USB3.2 pin sockets can be connected to the panel through connecting cables<br>Built-in two USB2.0 sockets support U disk encryption and other applications and partial system boot
Given these specifications, the Minisforum motherboard with an AMD Ryzen processor is well-equipped for a NAS server build, offering a balance of processing power, high-speed storage capabilities, and robust connectivity options.
Where to Buy the CWWK 8-Bay / 9-Bay Board AMD-7735HS/7840HS/8845HS/7940HS Motherboard Combo:
Best CPU+ Motherboard+ Memory Combo for a Business File Server – The X99 Motherboard Kit (ITX)
Spec Highlights – Business X99 Motherboard Combo ITX LGA2011, C612 for NAS Router+File Server, 6×2.5GbE I226, 10xSATA, 1x M.2 (OS), 14Core / 28 Thread Intel Xeon E5-V3 V4-$176 on AliExpress
This combination is ideal for business users needing power and scalability. The X99 motherboard with an older Xeon CPU balances performance, connectivity, and storage expansion. It supports 10 SATA drives and a M.2 NVMe slot, alongside 15 gigabits of network bandwidth across six 2.5G Ethernet ports. The NAS CPU+Memory combo anchored by the Intel Xeon E5-2680 v4 is a robust solution for a NAS file server. The CPU’s 14 cores and 28 threads are engineered for multitasking and can efficiently manage the demands of multiple simultaneous data transactions, which is a common requirement in NAS setups. The motherboard’s ten SATA ports and an M.2 NVMe slot offer versatile and ample storage options, facilitating both high-capacity and high-speed data storage solutions. This combination of CPU power and storage flexibility makes it an excellent choice for a NAS system.
owever, the Intel Xeon E5-2680 v4 processor’s launch date in Q1’16 might give pause to some users considering the latest advancements in processor technology. While newer CPUs may offer improved power efficiency and the benefit of ongoing support from Intel, the E5-2680 v4 still holds its ground as a reliable workhorse. Its architecture, although not the newest, delivers steadfast performance which, alongside its competitive pricing, presents an exceptional value proposition for budget-conscious setups or where cutting-edge efficiency is not the primary concern.
Specification
Details
Processor
Intel Xeon E5-2680 v4, 14 cores, up to 3.30 GHz Turbo
Chipset
Intel C612
Memory Support
2x DDR4 DIMM slots, up to 64 GB, supports ECC
Storage Options
1x M.2 NVMe, 10x SATA Ports
Expansion
1x PCIe 3.0 x16
Network
6x Intel i226 2.5 Gigabit Ethernet
Power Supply
ATX 24 Pin + 8 Pin
Video Output
VGA
RAID Support
RAID 0/1/5/10
Form Factor
Mini-ITX, CEB
Socket Type
LGA 2011-3
Launch Date
2013
LAN Speed
Up to 2500Mbps
Audio
2.1 Channels
In essence, for organizations or users seeking a cost-effective yet powerful NAS solution, this CPU and motherboard combo remains compelling. The Intel Xeon E5-2680 v4, despite its age, is a testament to enduring performance in server environments. Users leveraging this processor for a NAS will find it to be a cost-effective solution that capably handles storage demands, making it an excellent value for its price point. To explore more about this processor’s capabilities and see how it might fit into your NAS plans, you can visit the Intel specifications page.
Where to Buy the X99 ITX Motherboard Combo in 3 Configs Here:
X99 Motherboard + E5-2680 V.4 CPU + 32GB RAM = $176 HERE
Best CPU+ Motherboard for High Speed M.2 NVMe Slots + PLEX – The Erying 13900HK CPU+Mobo Combo
Spec Highlights – ERYING DIY ITX Desktop Motherboard Set with Onboard 14 Core / 20 Thread CPU i9-13900HK, 3x M.2 NVMe (Gen 4 and Gen 3), PCIe 4×8 Slot, 2.5G+1G Port, USB-C, DDR5 Memory$419 on AliExpress
Designed for NAS builders focusing on media servers or intensive computing tasks. The Erying i9 combo, equipped with a 13th Gen Intel Core processor and a Mini-ITX motherboard, features three M.2 NVMe slots and is optimized for graphic-intensive operations. It’s ideal for Plex servers and virtualization.
The Intel Core i9-13900HK processor bundled with this motherboard is a top-tier choice for a NAS setup, especially for a Plex Media Server. Its high-speed multi-core performance, reaching up to 5.40 GHz with Intel’s Turbo Boost Technology, is ideal for on-the-fly transcoding, ensuring seamless media streaming across devices. This is particularly beneficial for users who require their NAS to handle high-resolution video transcoding, a task that the i9-13900HK can manage with ease due to its robust processing capabilities and advanced integrated graphics.
The motherboard’s triple M.2 NVMe slots are a game-changer for NAS configurations, offering not just ample storage potential but also blistering data access speeds. NVMe technology excels in high-demand scenarios, such as multiple simultaneous accesses to the NAS, which is common in VM / Container environments. Users can leverage these slots to set up a RAID configuration, allowing for either performance enhancement through striping or data redundancy for added security.
Moreover, the Intel Core i9-13900HK comes with Intel’s UHD Graphics, which supports 4K resolution at 60Hz over HDMI and DisplayPort outputs. This graphical prowess, in combination with the processor’s ability to support fast memory, adds to the NAS’s capability as a potent media server that can handle 4K content playback and transcoding without breaking a sweat.
Specification
Detail
Processor
13th Gen Intel Core i9-13900HK, up to 5.40 GHz
Graphics
Integrated Intel Iris Xe Graphics
Memory Support
DDR5, 2 slots, up to 96GB
Storage Options
3x M.2 slots (NVMe), 2x SATA 3 Ports
Expansion Slots
1x PCIe 4.0 x4, 1x PCIe 4.0 x8
Network
2x Onboard RJ45, WiFi
Audio
5.1 Channels
Back I/O Ports
2x USB 3.2/3.1 Gen 1, DisplayPort, 4x USB 2.0, HDMI 2.0, 3x Audio Jacks
USB Support
USB 2.0, USB 3.0
RAID Support
No
Form Factor
Mini-ITX
Chipset
Intel Others
Socket Type
Onboard CPU
Brand Name
ERYING
Origin
Mainland China
Certifications
RoHS, FCC, CE
Finally, while this CPU+Motherboard combo is positioned as an advanced solution for NAS setups, its high-end specifications suggest that it is overqualified for just storage purposes. The presence of the latest connectivity options, robust I/O support, and high-bandwidth LAN ports make it well-suited for a variety of other intensive applications, including gaming, content creation, and design. This versatility ensures that the investment in such a setup can be justified across multiple use cases beyond a typical NAS. For detailed processor specifications and capabilities, further information can be explored on Intel’s official product specifications page.
Bottom Line, there are going to be users who are looking at how expensive ‘turnkey’ NAS solutions can cost, then see what just the hardware parts would cost in a DiY alternative. For example, below is the cost of a fully specced out QNAP Intel Core build vs the cost fo JUST the CPU and Motherboard in the Erying board:
Needless to say, this is not a completely fair comparison. The QNAP includes all the building, the software, the PSU, cables, case, testing and all under a single warranty. Still, it IS food for thought for those that are happy to build their own NAS and save some $$$s.
Where to Buy the Erying Intel Mobo Combo (3 Versions):
Best POWER + Storage CPU+Motherboard M-ITX Combo – The Intel 13th Gen The Minisforum AR900i (4x M.2 4×4 and 5×16 PCIe)
Spec Highlights – Intel® Core i9-13900HX Processor, 24 C/32 T (36M Cache, up to 5.4 GHz) Intel® UHD Graphics for 13th Gen Intel® Processors, SODIMM DDR5 Slots×2, up to 5600 MT/s, Max 64GB, 4×M.2 2280 PCIe4.0 x4, SSD Slots PCIe 5.0 X16 connector, 1x 2.5GbE and Lack of SATA AGAIN! –Check on AliExpress and $399 on Amazon
The Minisforum AR900i motherboard, in combination with the potent Intel® Core i9-13900HX CPU, forms a formidable base for power users. The AR900i is a Mobile Desktop (MoDT) motherboard that leverages the might of the 13th Gen Intel® flagship CPU, providing an exceptional 24 cores and 32 threads for heavy multitasking and demanding applications. Notably, the four M.2 2280 PCIe4.0 SSD slots are designed for rapid storage with RAID capabilities, reflecting a setup intended for high-speed operations and data security. The motherboard’s inclusion of SFF-8643 connectors represents an innovative shift away from static SATA ports, offering a dynamic and scalable solution for storage expansion. This approach is particularly beneficial for custom builds that require a neat cable management system and the flexibility to adjust storage configurations with ease. The PCIe 5.0 X16 slot on this motherboard is a forward-thinking feature, catering to the latest and most powerful GPUs and ensuring that the system is ready for the next generation of graphics and expansion cards.
However, it’s important to consider the networking capabilities of the AR900i. With only a single RJ45 2.5G Ethernet port, users who need enhanced networking may have to invest in a PCIe 5.0 compatible NIC, potentially sacrificing the valuable high-speed slot that could be used for other high-performance components. This choice underscores the need to balance the motherboard’s impressive storage and expansion capabilities with networking needs. The AR900i represents Minisforum’s dedication to compact, high-performance computing solutions. With support for triple-screen displays up to 8K, built-in AX210 wireless card for WiFi 6E, and Bluetooth 5.3, this motherboard offers comprehensive connectivity options for a variety of uses, from gaming to professional creative workstations.
Specification Category
Details
Processor
Intel® Core i9-13900HX, 24 Cores/32 Threads (36M Cache, up to 5.4 GHz)
GPU
Intel® UHD Graphics for 13th Gen Intel® Processors
Chipset
Intel® HM770 Chipset
Memory
DDR5 Dual channel (SODIMM Slots×2, up to 5600 MT/s, Max 64GB)
Storage
4×M.2 2280 PCIe4.0 SSD Slots
Expansion Slot
PCIe 5.0 X16 connector ×1
Wireless Connectivity
M.2 2230 Key E Slot
Video Output
HDMI2.0 ×1, DisplayPort1.4 ×1, USB-C ×1
Audio Output
HDMI2.0 ×1, DisplayPort1.4 ×1, USB-C ×1, Line Out ×1
Ethernet
RJ45 2.5G Ethernet Port×1
USB Ports
USB3.2 Gen2 Type-C Port ×1 (Alt DP), USB3.2 Gen2 Type-A Port ×2, USB2.0 Type-A Port ×2
I/O Ports
4-pin CPU Fan header ×1, 4-pin System Fan header ×2, 4-pin SSD Fan header ×1, USB 3.2 Gen 2 header ×1, Front Panel Audio header ×1, System Panel header ×1
Form Factor
Mini-ITX Form Factor (170x170mm)
The Intel® Core i9-13900HX processor, with its 24 cores and 32 threads, is a powerhouse suitable for a DIY NAS setup geared towards enthusiasts and professionals requiring robust performance for tasks such as media transcoding, file serving, and hosting complex databases. The processor’s 36M cache and peak speeds of up to 5.4 GHz ensure that multiple operations can be handled efficiently, supporting a smooth and responsive network storage experience. The addition of Intel UHD Graphics for 13th Gen Intel® Processors also allows for hardware-accelerated video encoding and decoding, which can be a significant advantage for a NAS serving as a media server. In terms of memory, the system’s support for DDR5 dual-channel RAM, with speeds up to 5600 MT/s and a maximum capacity of 64GB, provides ample bandwidth and storage for running a NAS operating system along with any additional services. This is particularly important for a NAS that may be handling simultaneous data-intensive tasks. The four M.2 2280 PCIe4.0 SSD slots offer high-speed storage options, ideal for caching or fast data access needs, enhancing the overall performance and speed of the NAS.
The connectivity options of this setup are also noteworthy. The motherboard’s Mini-ITX form factor is well-suited for NAS builds, where space efficiency is often a priority. The inclusion of a PCIe 5.0 X16 expansion slot allows for additional upgrades, such as adding a dedicated network interface card for improved network throughput or additional storage controllers if the four M.2 slots are insufficient. The onboard 2.5G Ethernet port provides a faster-than-gigabit connection, beneficial for transferring large files over the network. With a comprehensive range of I/O ports, including USB3.2 Gen2 and USB-C, the system can accommodate a variety of peripherals and external drives, making it a versatile choice for a DIY NAS setup.
Where to Buy the Intel 13th Gen i9 The Minisforum AR900i CPU + M-ITX Motherboard Combo:
Best Cheap CPU+MoBo+SSD+RAM Combo – The Topton N6005 CPU+Mobo Combo
Spec Highlights – Topton NAS Motherboard N6005, 4x Intel i226-V 2.5G Nics, Dual M.2 NVMe, Six SATA3.0, 2*DDR4 SODIMM, HDMI2.0, Mini ITX / M-ITX-$261 on AliExpress ($399 for 32GB DDR4 RAM and 1TB M.2 NVMe Included – see image below)
The Topton N6005 combo offers excellent value, combining an Intel Pentium N6005 processor, motherboard, 16GB RAM, and an NVMe OS SSD. Its popularity stems from its low cost and high performance, suitable for a variety of DIY NAS builds.
Component
Specification
CPU
Integrated Jasper Lake Intel Celeron N6005
RAM
2x SO-DIMM DDR4 slots, up to 64GB (2400/2666/2933MHz)
– Full protection (USB, audio source, network interface)
GPU
Integrated Intel UHD Graphics (24EUs for N5105, 32EUs for N6005)
IO Ports
2x USB 3.0, 4x USB 2.0, 1x HDMI, 1x DP
LAN
4x RJ-45 2.5G NET
Additional Features
– Auto power-on, Wake-On-LAN, PXE support
Structure
Solid Capacitor Design
Priced at $261 on AliExpress, and $399 when bundled with 32GB DDR4 RAM and a 1TB M.2 NVMe SSD, the Topton N6005 motherboard combo stands out for its affordability. This price point makes it an accessible entry for enthusiasts and professionals alike who are looking to build a high-performance NAS without incurring exorbitant costs. The inclusion of substantial RAM and fast NVMe storage in the bundle further adds to the value, offering what one might need for a robust NAS setup at a price that challenges many competitors in the market.
The CPU, an Intel Celeron N6005, is a Jasper Lake processor that strikes a balance between efficiency and capability. With a base frequency of 2.0 GHz and a burst frequency of up to 2.9 GHz across its four cores, it’s engineered to handle the multitasking demands of a NAS system. The 10W TDP reflects a design optimized for low power consumption, making it an economical choice for 24/7 operation, a critical consideration for NAS systems which are expected to be always on.
On the storage front, the Topton N6005 shines with two M.2 NVMe PCIe 3.0 x1 2280 slots for high-speed data transfer and six SATA3 6Gb/s ports for ample storage capacity. This allows users to install fast NVMe drives for the operating system and frequently accessed files, while the SATA ports can host larger hard drives for bulk storage. Such a combination is perfect for a NAS system, providing quick access to data and large storage pools for backup, media libraries, or network file sharing. If you are considering the Topton N6005 CPU+Motherboard combination for PLEX Media Server, I made a dedicated video on this using this CPU/Mobo in the Jobsno N2 NAS Case below, testing 4K Multimedia:
The Topton N6005 has garnered popularity among NAS builders for several reasons. It offers a mini-ITX form factor, which is ideal for compact builds, and includes four 2.5Gbps Intel i226-V network interfaces, enhancing its functionality as a home or small office server. Additionally, the CPU’s support for up to 64GB of DDR4 RAM means it can handle more demanding NAS tasks, such as running virtual machines or hosting databases. These features, coupled with its energy efficiency and expandability, make the Topton N6005 a sought-after component for building versatile and powerful NAS systems.
Disclaimer – The Jonsbo N1, N2 and N3 are STILL the Best NAS Enclosures
Jonsbo’s range of NAS enclosures stands out as an industry benchmark for those keen on custom desktop NAS builds. These enclosures seamlessly blend aesthetics with functionality, showcasing a meticulous design ethos that addresses both the visual and technical demands of modern users. The build quality is exceptional, employing high-grade materials that not only ensure durability but also aid in efficient heat dissipation, a critical factor for continuous NAS operations. Furthermore, Jonsbo has consistently demonstrated a forward-thinking approach by incorporating features that cater to future expansion and adaptability. Their user-friendly design ensures easy installation and maintenance, making them a preferred choice for both novices and seasoned builders. Backed by positive user reviews and a reputation for reliability, Jonsbo NAS enclosures are, without a doubt, one of the best investments for those aiming to craft a high-performance, custom desktop NAS system.
Recommended Add-ons and Extras to Remember for Your DiY NAS Build
Building a NAS involves more than just the CPU and motherboard; enclosures, memory, PSUs, and other accessories are essential. Future guides will detail these components, alongside recommendations for smaller, crucial accessories to enhance your DIY NAS server’s functionality.
Here is our article on the BEST (and worst) NAS Enclosures and Cases you can find on AliExpress for your DiY NAS Build. Click the banner below to read the article, alternatively, you can watch the detailed video HERE. Alternatively, you can watch a video on the best and worst NAS enclosures on Amazon here instead.
This description contains links to Amazon. These links will take you to some of the products mentioned in today's content. As an Amazon Associate, I earn from qualifying purchases. Visit the NASCompares Deal Finder to find the best place to buy this device in your region, based on Service, Support and Reputation - Just Search for your NAS Drive in the Box Below
Need Advice on Data Storage from an Expert?
Finally, for free advice about your setup, just leave a message in the comments below here at NASCompares.com and we will get back to you.Need Help?
Where possible (and where appropriate) please provide as much information about your requirements, as then I can arrange the best answer and solution to your needs. Do not worry about your e-mail address being required, it will NOT be used in a mailing list and will NOT be used in any way other than to respond to your enquiry.
[contact-form-7]
TRY CHAT Terms and Conditions
If you like this service, please consider supporting us.
We use affiliate links on the blog allowing NAScompares information and advice service to be free of charge to you.Anything you purchase on the day you click on our links will generate a small commission which isused to run the website. Here is a link for Amazon and B&H.You can also get me a Ko-fi or old school Paypal. Thanks!To find out more about how to support this advice service checkHEREIf you need to fix or configure a NAS, check FiverHave you thought about helping others with your knowledge? Find Instructions Here
Or support us by using our affiliate links on Amazon UK and Amazon US
Alternatively, why not ask me on the ASK NASCompares forum, by clicking the button below. This is a community hub that serves as a place that I can answer your question, chew the fat, share new release information and even get corrections posted. I will always get around to answering ALL queries, but as a one-man operation, I cannot promise speed! So by sharing your query in the ASK NASCompares section below, you can get a better range of solutions and suggestions, alongside my own.
Choosing a NAS for Video Editing – Get It Right, FIRST TIME!
No doubt, you’ve got friends and professional colleagues working in the world of post-production and content creation who have staunchly recommended that you start editing your big projects on a NAS! Sounds simple, right? You’ve spent the best part of the last couple of decades editing and backing up projects onto a USB or Thunderbolt-connected drive. Yet now, with the influx of cloud services and the sheer size of projects these days, the appeal of moving your production over to your own private cloud NAS, with plenty of benefits in scale and performance possible, does sound remarkably appealing! However, the reality is not quite so simple, and unlike when you might have made the jump from a basic USB drive to an external Thunderbolt-connected SSD, network-attached storage has a little bit more of a learning curve, and novice users to this ever-growing storage alternative have got quite a lot of new things to learn. This is made even tougher when, as a content creator and video editor, you are far more concerned with media resolution, picture quality, and production factors than you are in just how many gigabytes and terabytes of space it takes up! So today, I want to go through the most important aspects that a video editor needs to factor in when considering a NAS device for use in video editing. At the end of this article, I will make recommendations based on different budgets, scale, and production levels. But for now, let’s crack on and go through each of the most important factors for those of you considering making the switch over to NAS in your post-production workflow.
This is probably one of the most overlooked factors when it comes to users editing on a NAS. Just because a system boasts a certain number of terabytes of storage, it does not necessarily mean that each is just as good as an identical system with the same number of terabytes that happens to be larger. What do I mean by that? Well, I am talking about the benefits of Redundant Array of Independent Disks, also called RAID. Originally, this was developed as a means of ensuring that if you had a large area of storage comprised of multiple drives, if one failed, you would not lose your data, as RAID provided a safety net in the form of a single drive (or two, in some RAID configurations) of failure protection. However, over the years, other inherent benefits of RAID have presented themselves, and a few of these are going to be massively desirable to video editors. The first advantage is performance. In almost all cases of RAID configuration, the more drives you have in a single storage array (e.g., the more hard drives you have in the box), the higher the performance! This is because the more drives you have, the more drives are going to be simultaneously read from and written to as you edit. That is why the more powerful video editing NAS systems tend to have more bays for drives, as this allows you to multiply the performance. So, sometimes if you see a NAS server with the same internal hardware in either a 4-bay or 8-bay form, it is always worth spending a fraction more on the larger system as it will allow more drives and therefore higher performance, which translates into a much smoother editing experience on your connected Mac or Windows machine.
Here is a Guide to Understanding Each of the Main RAID Types (Click Below to read in a new tab)
Next, there is scalability. Although you might be looking at 10TB of storage for your projects right now, that is going to multiply over time as your range of stock footage and completed projects increases over the years. You need to know that you can scale up the NAS system fluidly and easily over that time. Therefore, it is always worth purchasing a NAS with a bunch of empty bays inside it to add drives later or a NAS system that supports expansion devices (i.e., connected smaller boxes that add storage later down the line). All NAS boxes can run on just a single hard drive or SSD, so don’t be afraid to only partially populate a NAS rather than fully populating every single available bay on day one. Adding drives gradually over time will not only allow you to spread the cost of your expanding storage as the years go by, but it will also allow you to gradually increase the performance of your system over time too, and therefore allow you to know just the right performance level that you’re going to need for your video editing tasks in the long term.
Finally, a massively overlooked element of RAID is that it allows you to achieve much better value in terms of your storage. Commonly referred to as ‘price per terabyte,’ thanks to the balance between safety net and storage provided by RAID, it’s genuinely possible to achieve high capacity levels and save money easily. For example, if you buy 2x 10TB hard drives (so, technically 20TB data storage) in a RAID 1 in order to achieve one drive of safety net, you will lose 10TB of storage. However, if you buy 4x 4TB hard drives and put them in a RAID 5 (still one drive of safety net), you will achieve 12TB available storage, and you will have spent less on these four smaller drives than the two bigger drives, and you still get to have increased performance too! Although this logic is not foolproof on all drives, you generally find that this can ring true across the majority of different capacities, so never be afraid to weigh up the cost, benefits, and performance benefits of going for smaller drives in larger quantities.
In most cases, the price per terabyte on both sides will remain largely consistent at each capacity. HOWEVER, when you start putting these drives into a NAS/DAS enclosure and acting in the RAID configuration, it soon becomes apparent that the ben efits in Drive #s in a RAID 1 vs a RAID 5 immediately show a saving in almost every single capacity the smaller you go! Below are two examples of achieving 12TB in a NAS enclosure using RAID 1 vs using RAID 5 (so, still maintaining 1 disk drive failure protection and having 12TB of storage to use):
12TB Storage in a RAID 1 MIRROR
12TB Storage in a RAID 5
Why is Network Connectivity SO Important?
One of the things people often do not realize about the difference between using a NAS and previous experience with cloud storage such as Dropbox, iCloud, or Google Drive, is the performance benefits of connecting via network versus connecting via the internet. Those subscription cloud drives are heavily dependent on your internet speeds, and even if you choose to use high-end internet connections such as fiber optic and gigabit internet, the reality is that you simply will not get the same level of performance as is possible via your local area network. All the devices in a single office or business environment that are utilizing the same internet/router are typically on the same network. Think of all of the devices in your home/office as houses on the same street, whereas think of communicating over the internet as communicating with completely different towns and cities! Devices on the network (also referred to as the LAN or Ethernet) have much higher speeds possible, starting at 109 megabytes per second, and this can be scaled up substantially towards 1000 megabytes, 2000 megabytes, and more, thanks to bonding technology that harnesses and combines multiple network connections.
Different NAS devices will arrive with different network connections, as well as the option to increase and upgrade those network connections in the systems via USB adapters and PCIE upgrades. Equally, most PC or Mac systems provide the means to upgrade their network connections in the same way via simple, affordable USB upgrades, slightly more expensive PCIE upgrade cards, and even Thunderbolt-connected adapters that allow you to connect your PC or Mac directly (no switch or router in between) to allow much larger performance benefits for video editors that want to edit 1080p or 4K directly on the NAS. It is really important when considering a NAS for video editing that you factor in the network connections on the device, as well as the ability to scale them up accordingly throughout the system’s life and as your video editing demands increase over the years. Equally, you need to make sure that your editing machine has similar levels of network connectivity available, as your total maximum performance will always be dictated by the lowest speed device in the network. i.e., You cannot connect a 10-gigabit NAS to a 1-gigabit MacBook, as you will only achieve 109 megabytes (i.e., a Gigabit).
Why the CPU inside a NAS is MASSIVELY Important for Video Editing?
You may have already noticed when considering one NAS over another that although some systems seem very similar in size, their price tags can be wildly different! Although there are a lot of factors that make up the cost of a NAS, the CPU that the system arrives with is extraordinarily important. Much like the Mac or PC that you choose to edit your video on, a more powerful or more task-designed CPU is going to achieve the best results, and that is because of efficiency and having the tools built in to perform those certain tasks. More affordable and lower-end NAS systems tend to arrive with ARM-based CPUs. These are the kind of CPUs more generally found inside mobile devices, tablets, and pretty much anything that is designed to be on a limited power supply for long periods of time (as these are designed to compress commands given to and from the CPU to the rest of the system and that results in lower power consumption but also lower capabilities, as you have to factor in the shrinking of those commands by the processor). More capable and higher-priced NAS systems arrive with x86 processors, which are far more capable processors and will result in a larger frequency and higher complexity of commands handled inside the system. When you are editing data of any kind, the number and complexity of the instructions handled by the system will always govern the overall best performance possible, and in the case of video editing, which has exceedingly dense file sizes and formats, a much more capable CPU is going to make all the difference in terms of ensuring that the multiple files that you are editing at any given time in a single project are managed quickly and efficiently.
However, things get even more powerful when you start looking at CPUs that are either industrially designed for high-frequency file transmission or have integrated graphics. Generally, you find a more industrial component in servers to be a Xeon or AMD EPYC processor. These are designed for server use and enormously high-frequency transmission of data. But integrated graphics are a little different. This is a dedicated component of the processor that is designed to handle and manipulate graphical data. So, high-end video data definitely comes under the classification of graphical data! This is particularly true if you are running dense or lesser-supported formats. So, raw video that is uncompressed or files that are compressed with licensed formats such as HEVC will be made that bit easier with integrated graphics. The importance of the processor inside the NAS you choose to use for video editing is enormously important, and although it’s easy to overlook (as we are talking about one of the significantly more technical aspects and something you have to dig into the spec sheets to learn), it is definitely worth spending a bit of extra time to check the processor inside your NAS before you spend your money on a video editing solution.
Is Thunderbolt NAS Any Good?
Using Thunderbolt to connect with a NAS is something that has grown in popularity over the last 5 years or so. As mentioned earlier, you can purchase Thunderbolt to 10G adapters that allow you to connect directly with a NAS over 10G via an available Thunderbolt port directly on your video editing machine. However, a Thunderbolt NAS takes things further and actually features at least two Thunderbolt ports on your NAS that allow you to directly connect at least two video editing machines to the NAS system. This sets it apart from traditional Thunderbolt-attached storage (referred to as DAS, Direct Attached Storage) as it allows you to have multiple video editors connecting to the same storage device at the same time. But equally, it allows you to access all of the NAS features both via Thunderbolt and via the network, so you’re still able to utilize the device for multi-site backups, multimedia, surveillance, and anything else that you were considering buying a NAS for to maximize your investment in this purchase. Also, if your larger network has factored in some 10G appliances, you can utilize the Thunderbolt NAS as its very own Thunderbolt to 10G adapter, with the NAS connected via 10GBE to your local network. If you connect your Mac or Windows system via Thunderbolt to the NAS, you then instantly have access to the rest of the 10G network via it (known as T2E protocol).
Sounds great, right? Highlighting the advantages of a Thunderbolt NAS does come with disadvantages that are often overlooked or simply not known by a lot of video editors. For a start, Thunderbolt NAS is not a particularly common product and is widely only available from one brand, QNAP. They largely dominate the market for this product, and pricing can be quite high due to the lack of broader competition as found in the rest of the NAS industry. Equally, as mentioned earlier when I touched on the importance of CPU in a video editing NAS, most Thunderbolt NAS systems have particularly high-end internal hardware compared with most other NAS systems of a similar scale, and the CPU choices tend to result in much higher price points on Thunderbolt NAS systems. Finally, it is worth highlighting that, although Thunderbolt NAS allows you to still enjoy the user abilities and software features of a traditional NAS but using Thunderbolt, this does result in a drop in performance compared with connecting a normal Thunderbolt DAS system. Thunderbolt NAS is connected over a protocol known as IP over Thunderbolt/Thunderbolt over IP – which results in a heavier overhead for the system to manage these connections. The result is that you tend to see a drop in performance of around 20% to 30% in a Thunderbolt NAS compared with a similar storage scale Thunderbolt DAS. You can mitigate this in a number of ways, such as getting NAS systems with more bays, utilizing SSD instead of slower hard drives, increasing the memory, or utilizing combined SSD and hard drive storage pools such as caching or QTier. Nevertheless, if you’re running a multi-editor suite and need all of your editors to work from a single storage area with much higher speed overall than in most other cases, a Thunderbolt NAS can be a remarkably attractive proposition. Just be aware that it requires a little bit more set up and a learning curve than found in normal Thunderbolt plug-and-play storage.
Do ALL NAS Support Mac OS and iOS?
It is a common question when looking at a NAS for video editing, given the larger number of Mac-based video editors versus that of Windows users, but all NAS systems these days tend to support both Windows and Mac! Indeed, many users choose to use a NAS system because it can act as a cross-platform file system that can be accessed by both Windows and Mac systems simultaneously and allow users to much more smoothly exchange files across these two different OSes. That said, where in-system apps and connections are supported on both Windows and Mac, the individual client applications that you may wish to download for Windows, macOS, Android, or iOS may have varying levels of support in their individual tools on different app platforms. That is because the individual client operating systems provide their own toolkits which have their own updates, features, and restrictions that are only available on one operating system and not the others. A big part of this is why you tend to find that the newest features promised by a NAS brand are typically available on Android and Windows first, with a slight delay before they arrive for Mac and iOS. This is because macOS and iOS do fewer but much larger software updates, whereas Windows and Android tend to release many more subversions of this software and granularly roll out their new features. So just bear in mind that although the bulk of the features you may have heard about on a NAS will be possible and available on your operating system, it never hurts to check the release notes for any specific tools that you are interested in to edit video on the NAS.
NAS Video Editing – Mapped Drives, Synced Drives, and iSCSI SAN, What is Best?
This is where we get into the reeds somewhat! Most video editors in their career grow quite dependent on a handful of premium editing suites and packages in order to create those wonderful pieces of work! Most of the time this has been done with the PC or Mac system you are using editing on a storage drive inside your host editing machine or via a connected USB/thunderbolt storage drive, right? Well, almost all video editing suite software can edit this way as this storage drive is seen as a local (also known as logical) attached drive. This means that the software can treat this drive as immediately accessible and run the footage you are editing directly from the drive and in the system’s memory simultaneously. Editing on a NAS is slightly different, and the protocol that your system uses to communicate with a network/remote storage drive (often referred to as IP) is different enough that some video editing software will not work with it. This is because a lot of premium video editing software takes stability and smooth editing exceptionally seriously. Therefore, many video editing software packages will not allow you to edit on a NAS out of the box. Connecting a NAS to your PC/Mac system in terms of video editing is predominantly done in two main ways.
The first way is known as mapping network drives and is supported on all operating systems. Equally, a mapped network drive appears as another available drive in your list of available storage devices, but it’s clearly defined as a remote lead connected storage device, and whereas normal storage drives have a name/letter to define their identity (such as your operating system drive being listed as C:/ or a connected optical disc drive as D:/), remote drives will be connected via an identifying number on the network (e.g., 192.168.1.5). This means your video editing software will know it is a remotely connected drive, and in the case of some premium video editing software, it will not work with this NAS for video editing. This is why you need to consider the second method of remote connecting a NAS to your video editing.
The second method is a little more complex and depending on your operating system, is connected in slightly different ways. Referred to as iSCSI or IP SAN based connectivity, this creates a completely separate area of storage inside your NAS that has been designed for specific remote-only connectivity and cannot be interacted with from within the NAS software. On the face of it, this sounds kind of illogical to create an area of storage that you cannot access from within the NAS operating system, but the reason for this is you are creating an area of storage that will purely be used outside of the NAS and therefore allows you to craft it in a very specific way. From here, you need to use something called iSCSI protocol, using one of several applications for PC or Mac. Sadly, although you can use an iSCSI initiator for Windows systems that is completely free and available from within Windows, macOS needs you to use third-party peripherals to contact with iSCSI talkative storage area (also known as a LUN). However, once you have created this LUN and iSCSI target inside the NAS, you can then connect to it on your Windows or Mac system, and it effectively tricks your video editing workstation into believing the remote-connected NAS storage is, in fact, a locally attached drive. You can assign it a name or a letter (depending on your operating system), and from there have all of the benefits of fluid and instant connectivity that you would find when video editing on your locally connected drive. I know this all sounds quite complex, and I have already created both a video and an article on this. So if you want to learn more about this very specific process of editing on a NAS on certain video editing suite software, use the article and video below.
It is also worth highlighting that there is, kind of, a third option in the form of drive sync protocol. Known as Synology Drive on their platform, or QNAP Qsync on theirs, these allow you to create a synchronized folder (or folders) on your local PC/Mac system that is constantly mirroring a drive on your NAS. As good as they sound, and they are terrifically user-friendly, it is worth highlighting that this doesn’t necessarily synchronize all of the data between the two platforms. And unless you also want to use up an area of space on your local PC/Mac to mirror with the NAS fully. This means that it ever so slightly undermines the need for editing on a NAS if what the NAS is doing is synchronizing live data between it and your video editing operating system. However, this has been somewhat mitigated in recent years, thanks to processes known as file pinning, metadata pinning, and file streaming on demand. These allow you to see the contents of the NAS (complete file layout, folders, and structure – just not taking up any space, just think of it as a blueprint) in this synchronized folder via your operating system’s native file manager and allows you to pick and choose which files you want to live fully on the local OS without needing to download the whole thing. That is why this is more of a hybrid option and not recommended for everyone.
The Best NAS for Video Editing – Recommended Devices
Choosing the right NAS for video editing, even now that you know the importance of NAS hardware, software, and bandwidth to consider, is still no easy task. As mentioned earlier in this article, there are literally hundreds if not thousands of different NAS options available to you, and you don’t really want to get it wrong first time. These make an enormous difference! In order to help you out, below, I’ve detailed several of the current available NAS solutions available in 2023/2024 that best suit a wide range of video editing needs. Keep in mind that although I have detailed several solutions below, other newer options may have arrived since this article was written, which may be even better suited to your video editing needs. So don’t be afraid to use the free advice section on NASCompares at the bottom of the article, the free community forum AskNASCompares.com, getting in touch with other members of our community in the discord or me or at personally consult on the right video editing storage solution for your own very specific setup.
Business NAS Editing Solution – The QNAP TVS-h874
0-176TB, 8-Bays, 2x PCIe 4 M.2 NVMe 2280, PCIe Gen 4×16 Upgrade Slot, Intel Core 12th Gen i5/i7/i9 CPU, 16-64GB DDR4 Memory, 2.5Gbe Port, 10Gb x2 Prots (Intel i9 Version), KVM, ZFS or EXT4 Setup, 3-5yr Warranty, TrueNAS/UnRAID Support
The QNAP TVS-h874 NAS is easily one of the most hardware-capable desktop NAS systems that I have ever seen (as you would expect for £2500+) and has clearly been designed with phenomenal future proofing in mind! If you are concerned about the longevity of this NAS, this hardware architecture will still be top tier 5 years from now, with the added support of PCIe 4 meaning that high capacity and performing micro upgrades throughout its life also ensuring it remains relevant long after. It’s price tag clearly moves this purchase out of the home and squarely into the business market (though likely those that take their media seriously will add it to the cart) and the TVS-h874 will function as a solid solution for Video editing (even at 8K), high frequency and performing VMs, large scale AI powered Surveillance setup, hybrid cloud/on-prem alternative to Office 365/Google Workspace services and as the center point for all your data storage operations. Crucially though, it is that the hardware on offer here will be able to do ALL of these at the same time, therefore maximising the investment for most businesses that want to move aware from their cloud dependant ops. In terms of software,t things are a little less absolute, with QTS and QuTS still getting a little busy at times, with a steeper learning curve than its big rival DSM from Synology. That said, die-hard fans of ZFS (Zettabyte File System) will adore the inclusion of benefits in RAID handling, management and recovery that are exclusive to that platform, whilst enjoying the wide range of applications and service benefits in QuTS that are often restricted to Linux platforms.
The slightly conveluded approach to release hardware that does complicate the selection process (different CPUs in the Intel 12th Gen family changing the rest of the system architecture) is something that I hoped this brand would graduate from (for the sake of simplicity), but for many, this level of choice in hardware and budget will be welcome. As is QNAP’s position on the support of 3rd party hardware (drives, PCIe upgrades, etc) and software, something that we have seen a worrying trend in the last few years against elsewhere in the industry but some other brands, to err towards 1st party/proprietary compatibility more and more. There are still lingering doubts by some on the security of NAS, with ransomware attacks on the rise and ALL brands and ALL platforms being targetted (NAS, Cloud ,etc), finding a middle ground between ease of use and depth of security being a tricky tie rope walk indeed. The TVS-h874 arrives with a wide range of Day 1 tools, further rigid defaults in QTS/QuTS in 2022/2023, considerable security settings to configure and multiple system scan tools for recommendations & preventative measures available. The QNAP TVS-h874 is probably the most powerful desktop/tower NAS drive I have ever reviewed and if you are looking for a system that can legitimately do anything server-side, but you are also willing to put in the time to configure it correctly – you will genuinely be hard pushed to find a better system in 2022, 2023 and likely 2024 at this price point and scale.
SOFTWARE - 8/10
HARDWARE - 10/10
PERFORMANCE - 10/10
PRICE - 8/10
VALUE - 9/10
9.0
PROS
First Commercial Intel Core 12th Gen i5, i7 and i9 NAS Drive Upto 20 Cores, 24 Threads and High End Integrated Graphics PCIe Gen 4 x16 Upgrade Slot for 10/25/100GbE Cards and 2x PCIe Gen 4 x4 M.2 NVMe Slots for 7GB SSDs No Obstinant 3rd Party Hardware Limitations on Support or Compatibility Much larger support of 3rd Party Software Services than most other NAS Brands 10Gb/s USB Connectivity, in Type A and Type C Upto 64GB of Memory and Potential for 128GB ZFS or EXT 4 File System Choice M.2 NVMe SSD Bays can be used for Storage or Caching Volume Encryption, SED SSD Support and WORM Enhanced AI Surveillance Services, with opt to upgrade with $30 Google TPU AI Photo Management Tool (QuMagie) Includes Thing Recognition and works offline ALL the ZFS Benefits, whilst also the GUI and App benefits of a Linux Software Platform in one
CONS
Available Versions/Configs of the 4/6/8-Bay are confusing QVR Elite (not QVR Pro) only has 2 Cam Licences HDMI Output is 1.4b 10Gbe is ONLY included with the most expensive Intel i9 Model Noisy when in operation when fully populated Too Many licenses on Enterprise Tools (Drive Analyzer, Face Tiger, etc) with too few free licenses
Best Compact Video Editing NAS – Synology DS923+ NAS (with 10GbE Adapter)
Synology has clearly made something of a gamble in the release of the Synology DS923+ NAS. There is no avoiding that making the switch from the Intel Celeron that has historically been the build choice of this product family and opting for the AMD Emb.Ryzen has ruffled some feathers! On the face of it, the R1600 here has a heck of alot of going for it over the previous generation! Higher clock speed, greater PCIe Gen 3 Support throughout, that 4-32GB of DDR4 memory in such a compact system and just generally giving you a lot more horsepower to play with, as well as better bandwidth potential inside and out! But at what cost? The 1GbE standard connectivity in the base model leaves alot to be desired, the proprietary 10Gb upgrade (though incredibly handy) limits the upgradability a tad and the lack of an integrated graphics processor is likely going to result in many long-term Synology advocates to skip this generation. Synology Diskstation Manager (DSM 7.1 at the time of writing) still continues to impress and although the brand still continues to heavily push their 1st party priorities, they have left a little more wriggle room in DSM 7.1 than DSM 7 before it in terms of media compatibility.
In terms of design, I cannot fault Synology on this as the DS923+ chassis still arrives as one of the best-looking and still exceptionally well-structured devices at this physical scale and storage level. As always, a Synology NAS is more about the software than the hardware (and the DS923+ delivers in spades on the software side!) and with DSM 7.2 around the corner improving things. Just always keep in mind that the Synology DS923+ NAS is a system that arrives with the slight emphasis on having to do many things ‘their way’. If you are less technically versed, then you will definitely appreciate this level of user-friendly design and assistance, but more technically minded admins’ main strain a pinch! In short, the DS923+ IS a good NAS drive, but its focus has certainly ebbed more towards the business user this generation than the home.
SOFTWARE - 10/10
HARDWARE - 7/10
PERFORMANCE - 9/10
PRICE - 8/10
VALUE - 9/10
8.6
PROS
DSM 7/7.1 (and DSM7.2 Around the corner) still continues to be an absolute tour-de-force of NAS Software This latest generation expandable 4-Bay arriving with a 10G Upgrade Option is fantastic ECC Memory Support and scalability to 32GB is completely unparallel at this price point The design of the DS923+ NAS still continues to be market-leading The New CPU architecture allows great PCIe3 bandwidth to be afforded to the rest of the hardware, inside and out Low Noise, Low Physical Impact and Intelligent Automatic Power Use Adjustment Settings Increased Support for macOS in Synology Drive and Active Backup Suite (DSM 7.2) Synology C2 Cloud Services, 1st Party Backup/Sync Tools and Collaboration Suite App = Complete 1st Party Eco-system that can rival Office365 and Google Workspace PCIe Gen 3 M.2 NVMe SSD Support as Storage Pools!!! FINALLY! Tremendously User-Friendly!!!
CONS
The AMD Emb.Ryzen instead of a Intel Celeron (with Integrated Graphics) will be a dealbreaker for alot of users The default 1GbE ports that the system arrives with are tremendously dated The USB ports on the system are older gen USB 3.2 Gen 1 (5Gb/s) and their support/usability have been quite pared back in recent DSM releases The continued moves by Synology to prioritize 1st party hardware and software services may put some users off Plex Support on the Synology DS923+ is still great for native playback, client-side handling and client devices with relevant multimedia licenses in place, but if server-side media conversions are needed - this system will struggle in comparison with the DS920+ before it
DEAL WATCH – Is It On Offer Right Now?
Synology DS923+ 4 Bay NAS enclosure Amazon UK 20.87 OFF (WAS 601) [LINK] Synology DS923+ 4 Bay Desktop NAS Including Warranty Extension to 5 Years Amazon UK 21.81 OFF (WAS 893) [LINK]
These Offers are Checked Daily
Thunderbolt Ready Professional Editing NAS – The QNAP TVS-h874T Thunderbolt4 Server
In summarizing the capabilities and potential of the QNAP TVS-h874T NAS, released as a late 2023 update to its predecessor, it’s clear that this system represents a significant leap forward in desktop NAS technology. Priced over £2500, it’s a substantial investment, designed with future-proofing in mind. The TVS-h874T not only maintains the longevity and high-end status of the TVS-h874 but also brings to the table enhanced direct data access through Thunderbolt 4 integration. This advancement, supporting IP over Thunderbolt protocol, significantly boosts connectivity and speed, making the system an ideal choice for demanding tasks such as 8K video editing and high-performance computing needs in business environments. However, the question of whether Thunderbolt NAS is the right fit for all users remains. For those requiring high-speed, multi-user access and scalability, the TVS-h874T is a strong contender. Its support for the latest PCIe 4 standards ensures compatibility with high-performance upgrades, reinforcing its position as a future-proof investment. The software, featuring QTS and QuTS, might require some acclimatization, particularly for those familiar with simpler systems like Synology’s DSM. Yet, the benefits, especially for ZFS enthusiasts, are undeniable, offering advanced RAID management and a plethora of applications and services.
The TVS-h874T’s stance on open hardware and software compatibility is a significant plus in an industry increasingly leaning towards proprietary systems. It accommodates a range of third-party hardware and software, adding to its versatility. In the face of growing concerns over NAS security, the system is well-equipped with comprehensive tools and settings for enhanced security and data protection, addressing the pressing issue of ransomware attacks. In conclusion, the QNAP TVS-h874T stands out as an exceptional choice for businesses and power users who require a robust, scalable, and secure NAS solution. It offers an excellent balance of price, performance, and features, making it a worthy investment for those seeking top-tier server-side capabilities. However, for users with simpler storage needs or those not requiring the advanced features of Thunderbolt NAS, traditional Thunderbolt DAS devices might be a more suitable and cost-effective option. The TVS-h874T, with its advanced capabilities, is undoubtedly a powerhouse in NAS technology, but its full benefits will be best realized by those whose requirements align closely with what this advanced system has to offer.
SOFTWARE - 9/10
HARDWARE - 10/10
PERFORMANCE - 10/10
PRICE - 7/10
VALUE - 7/10
8.6
PROS
Only brand rolling out i9 Turnkey NAS Only NAS Rolling out Thundebrolt4 NAS (for now!) Upto 20 Cores, 24 Threads and High End Integrated Graphics PCIe Gen 4 x16 Upgrade Slot for 10/25/100GbE Cards and 2x PCIe Gen 4 x4 M.2 NVMe Slots for 7GB SSDs No Obstinant 3rd Party Hardware Limitations on Support or Compatibility Much larger support of 3rd Party Software Services than most other NAS Brands 10Gb/s USB Connectivity, in Type A and Type C Upto 64GB of Memory ZFS or EXT 4 File System Choice M.2 NVMe SSD Bays can be used for Storage or Caching Volume Encryption, SED SSD Support and WORM Enhanced AI Surveillance Services, with opt to upgrade with $30 Google TPU AI Photo Management Tool (QuMagie) Includes Thing Recognition and works offline ALL the ZFS Benefits, whilst also the GUI and App benefits of a Linux Software Platform in one
CONS
No Smaller 4-Bay Version QVR Elite (not QVR Pro) only has 2 Cam Licences Lack of ECC Memory will annoy some users 10Gbe is Missing (so no TB-TO-10GbE Pass-through) Too Many licenses on Enterprise Tools (Drive Analyzer, Face Tiger, etc) with too few free licenses
DEAL WATCH – Is It On Offer Right Now?
These Offers are Checked Daily
Low Price and Good Value 10GbE Editing NAS – Terramaster T9-450 Tower
Terramaster has really changed the playing field with the T9-450 NAS. I was already a big fan of their latest generation of 6-Bay, 9-Bay and 12-Bay desktop chassis – providing a pretty substantial amount of storage in a tower design that borrows ventilation methodology traditionally found in rackmounts, but the T9-450 takes this logic and doubles down on it hard. The dual 10GbE on the system means that, despite it’s comparatively modest price point (when comparing against similar scale solutions from Synology and QNAP) you genuinely have a solution with the potential to allow you to enjoy every single MB/s or GB/s of your RAID externally. This is further bolstered with additional 2.5GbE ports, m.2 NVMe bays, uncomplicated support of HDDs/SSDs and just generally a very sensible system that shows how much Terramaster has matured as a brand. The TOS software is still not quite up there with Synology’s DSM or QNAP’s QTS in terms of ease of use and AAA+ features, but it is definitely a great entry point OS that has tighted it’s security since the brand was targetted by a ransomware group (along with other brands, they were affected by Deadbolt attacks) – it certainly lacks some of the background optimization of it’s competitors, but then this is reflected in the budget of the system too.
The internal PCIe slot that has been largely ignored is a bit of a missed opportunity and I am not a big fan of how they have addressed memory compatibility, but overall it is very, very tough to criticise the T9-450 NAS when you factor in the value of the package here. Factor in that you can very easily swap out the OS for many others, and it largely silences alot of the negatives here too. Overall, the T9-450 could potentially be the best NAS that Terramster has ever released and if they continue to address later releases with the same level of hardware value, this could definitely give the bigger names in the industry something of a headache down the road. I highly recommend this system for its value and performance potential!
SOFTWARE - 7/10
HARDWARE - 10/10
PERFORMANCE - 8/10
PRICE - 9/10
VALUE - 10/10
8.8
PROS
Surprisingly compact for 9 Bays of Storage Good Middle ground between a Rackmount and Desktop System Dual 10GbE - LOVELY STUFF! Also has support of SMB MultiChannel and an extra 2x 2.5GbE Decent throughput Capable CPU Great RAID Options Snapshot Replication BTRFS/EXT4 Support as preferred A large amount of maximum memory supported (16-32GB - TBC) M.2 SSD Bay inside for caching/storage TOS 5.1 is genuinely good, if not quite as polished/evolved as it\\\'s competitors VERY easy to install TrueNAS, UnRAID, Proxmox, OpenMediaVault, etc (and also easy to reverse)
CONS
Secret PCIe Slot - Unused?! Supports ECC Mmeory, but not included (might annoy some) NOT QUIET!
This description contains links to Amazon. These links will take you to some of the products mentioned in today's content. As an Amazon Associate, I earn from qualifying purchases. Visit the NASCompares Deal Finder to find the best place to buy this device in your region, based on Service, Support and Reputation - Just Search for your NAS Drive in the Box Below
Need Advice on Data Storage from an Expert?
Finally, for free advice about your setup, just leave a message in the comments below here at NASCompares.com and we will get back to you.Need Help?
Where possible (and where appropriate) please provide as much information about your requirements, as then I can arrange the best answer and solution to your needs. Do not worry about your e-mail address being required, it will NOT be used in a mailing list and will NOT be used in any way other than to respond to your enquiry.
[contact-form-7]
TRY CHAT Terms and Conditions
If you like this service, please consider supporting us.
We use affiliate links on the blog allowing NAScompares information and advice service to be free of charge to you.Anything you purchase on the day you click on our links will generate a small commission which isused to run the website. Here is a link for Amazon and B&H.You can also get me a Ko-fi or old school Paypal. Thanks!To find out more about how to support this advice service checkHEREIf you need to fix or configure a NAS, check FiverHave you thought about helping others with your knowledge? Find Instructions Here
Or support us by using our affiliate links on Amazon UK and Amazon US
Alternatively, why not ask me on the ASK NASCompares forum, by clicking the button below. This is a community hub that serves as a place that I can answer your question, chew the fat, share new release information and even get corrections posted. I will always get around to answering ALL queries, but as a one-man operation, I cannot promise speed! So by sharing your query in the ASK NASCompares section below, you can get a better range of solutions and suggestions, alongside my own.
Taking the Synology Beestation Apart to See What is Inside…
Synology is approaching a whole new kind of user with the release of the new BeeStation personal cloud simplified NAS system. For all of the years that we have discussed the Synology NAS platform, very few solutions from the brand have been this hassle-free and easy to use. A lot of this simplification by Synology in BeeStation, DSM, and the system’s approach to storage stems from the system being a far more closed platform than previous DiskStation and rackmount solutions that have come before it. Many more experienced storage veterans and IT specialists wonder about how the Synology BeeStation is put together, how its internal hardware and components differ from traditional DiskStation alternatives, and how exactly the system is managing that inclusive 4TB of storage. So in today’s video, I got my screwdriver out and decided to take apart and completely disassemble the Synology BeeStation 4TB model. If you are reading this article, that is likely because you are either a user on the fence who is considering buying this system and wants to know about how to take it apart in the event of maintenance, or you are a fellow reviewer or tech specialist who wants to use this guide as the means to understand how to take the BeeStation apart. Regardless of who you are, I hope you enjoy this guide and attribute and share it if you find it helpful. Before we delve further, we need to discuss a few disclaimers.
Synology Beestation Disasembly – IMPORTANT WARNING!
This is a really, really important point. Taking apart the Synology BeeStation runs a significant risk of not only damaging your data but also completely nullifying any hardware or software support that Synology will provide you. The BeeStation was designed to be a closed system and not targeted towards higher-end tech enthusiasts, and therefore does not allow the same easy dismantle procedure that you find in the DiskStation range. This Synology BeeStation was provided to me by Synology UK, and I am dismantling the system without their assurance or without their authorization to do so; the same needs to be applied to your own BeeStation system if you intend to follow the steps in this guide to tear down and dismantle it. This system was not designed to be taken apart, and taking it apart may result in the following:
You might cause damage to the hard drive inside via static electricity, motion, or physical pressure.
The BeeStation casing is an exceptionally tight-fitting enclosure, and dismantling it will almost certainly leave marks and clear indications that you have done so, which will invalidate any hardware support available to you as you have tampered with the system and performed actions that are not covered by the hardware warranty.
You run the risk of scratching the internal motherboard, PCB, or delicate components during the dismantling of the BeeStation, which will result in complete system failure at worst and detrimental performance drops at best if this occurs.
Do not proceed with dismantling your Synology BeeStation unless you are happy to run the risk that it may be deemed inoperable or that your support by Synology may cease as a result.
Additionally, the Synology BeeStation includes numerous measures to back up the content of the system’s data and set up to the Synology C2 cloud, a connected USB drive, or at an object file/folder level to third-party cloud services. It is extremely recommended that you have an up-to-the-second backup in place before you attempt any of the steps in this guide. Any data loss resulting from following the steps in this guide is purely at your own discretion, and myself and NAS Compares cannot be held accountable. Bottom line, be aware that what you are doing right now is outside of what this system was supposed to do, and that you are doing so at your own risk. Understand? Good. Let’s get on with dismantling the BeeStation and tear down this cost-effective NAS.
Also, it is HIGHLY RECOMMENDED that you read through the steps completely first, before you begin dismantling your BeeStation NAS, as it’s decent bits more layered in the access compared with a normal Diskstation NAS system.
Dismantling the Synology BeeStation Persona Cloud – A Step By Step Guide
First thing you need to do is disconnect all ethernet (LAN), power cables and USB devices and give the system sufficient time to allow the HDD inside to spin down. Then carefully turn the device up and have the base vent panel face up. Again, be CAREFUL as this system features a mechanical HDD inside and that can be susceptible to shock/motion damage.
Next you need to slowly and carefully peel back the rubber foot panel located at the base, at the front of the Beestation (i.e the single LED light side). It is held in place with strong adhesive, but you can replace it back after opening the case up later, as the rubber foot sits in a grooved panel and the adhesive has plenty of reuse!
Under the rubber panel are two Phillips/cross-head screws. There are the ONLY external means to open up the enclosure/casing of the BeeStation.
Remove each of these screws (keep them to one side and make sure to remember they are the base screws, as the system has 2 kinds of screws in it’s construction and mixing them up with rip the screw holes to pieces!
Removing these two scews will allow you to apply a small above of pressure to leverage the front panel of the BeeStation NAS to be removed. Important – do this carefully (that word again!) as the entire casing is made up of 2 pieces and its super easy to crack it in two!
The top part of the front panel is actually an L-shaped panel that has the fully ventilated dust panel attached. Mkae sure that your ease the panel off carefully enough not to break those 4 hooks at the top, as these are what align the top panel with the rest of the casing.
Slight side note, but for those that care about dust build up on 24×7 systems like the BeeStation, this can be quite useful to perform cleaning. Anyway, carrying on!
Next up os removing the Hard Drive that the Beestation Personal Cloud arrives with. The first thing you need to remove is the 2 smaller screws located around the edge of the casing. DO NOT REMOVE THE 2 LARGER SCREWS IN THE MIDDLE!!! These larger screws hold the HDD in place and you need to do this much later, or else risk the drive moving around during the dismantling.
Each screw will be easy to remove, however there are actually 3 more screw located around the base of the framework. They are tricky to reach, and a longer screwdriver would be recommended, but it can be done with an ordinary 15cm + screwdriver will get the job done.
At the front base area, you can find two black Phillips/cross-head screws that you need to remove. You will need to come at there from a slight angle if you only have a short screwdriver. Important – DO NOT USE AN ELECTRIC/AUTOMATIC SCREWDRIVER!!! Notwithstanding that you will tear the soft screw to pieces, you might cause vibration that will be damaging to the HDD next to the screw! Do it the OLD SKOOL way!
The last screw is much harder to spot and reach, it is located at the bottom-back of the enclosure, on the NON-Motherboard side. You will need to come at it from a slight angle, even with a longer screwdriver. Note, you COULD have removed the top panel attached to the HDD in order to get to the screw a little easier, but I personally would rather the HDD remains in an immobile cage throughout this part of the Beestaion teardown. It’s your call!
That is the last screw that you need to remove and , once it is done, you can begin the removal of the HDD clip/cage.
The HDD Clip/cage will slide out sideways (with a little resistance). BE CAREFUL with the removal of the HDD cage/clips, as the right-hand side will have the controller board (which has the heatsink on top of the CPU, and a bare PCB – which can be super susceptible to static and moisture!
One you have removed the HDD Cage tray, you will now have three components on the table:
The one we want to focus on is the HDD tray/cage. Carefully turn it around and lay the drive facedown on the table.
Once the drive is ‘face down’, you need to carefully (yes, THAT word again! Take a drink) remove the two silver screws, Try to touch the blue PCB controller board as little as possible.
Once you have removed those two screws, you need to either slide the controller board away from the Hard drive, or slide the hard drive away. You are doing this to disconnect the SATA connector that is soldered to the controller board. Do NOT leverage the hard drive upwards/downwards, as you run the risk of breaking the connector.
The controller PCB should come away very easily and with little resistance. But before we move forward, it’s worth checking the SATA connector is unharmed.
Take a closer look at the SATA connector. It should look like this:
This is what the storage side of the Synology Beestation BST150 looks like:
The underside of the controller board is where we find a large black heatsink panel that covers the HDD and 1GB DDR4 memory. IMPORTANT – I still have numerous tests to perform on this device for the review, comparison videos and guides for this device. Therefore I am not going to remove this heatsink, as it might result in detrimental performance that will undermine future content.
However, for those that want to know, underneath this heating panel is the Realtek RTD1619b quad core 64bit ARM processor that runs the Synology Beetstation and BSM services, as well as 1GB of DDR4 memory that arrives in presoldered modules on the main PCB. Ther is NOT an kind of SODIMM slot and, given the price and CPU choice in terms of efficiency, this is not a huge surprise.Therefore, memory upgrades on the Synology BeeStation are not possible.
The system software package is delivered via a smaller component that arrives pre-labeled at the factory with the software revision that the BeeStation arrives with. It is worth noting that, as time rolls on, Synology are going to be rolling out numerous firmware updates and (as is the case with the Synology Diskstation/DSM systems) it will update the installer and bootloader package on this chip no doubt.
Each of the physical connections (1GbE RJ45, Power delivery, USB Type A+C and physical buttons) are soldered to the PCB and are not provided on any kid of sister board.
Interesting, Synology have not just cloned and reused the DS124 hardware configuration here (though there are certainly areas of cross over) and instead have designed a whole new PCB layout and scale. The board (model ID and serial identification below) need to factor in the absence of any active cooling system (i.e a fan) on the Beestation, that was present on Diskstation systems like the DS124 and DS223j that arrive with a similar hardware configuration. Equally, this system changes one of the USB ports to Type C and has a very different back port arrangement to spread out.
Next, removing the Hard Drive from itsplastic handles. The HDD is held in place by 4 screws that go directly into the same four screw holes that are usually used by HDD bays on Diskstastion NAS that utilize trays. Ther are four screw in each corner. Important note for later – Make a note of the clips and direction that are on either side of the HDD – whether you want to reassemble this Beestation to the factory build OR you are considering exploring larger HDDs, getting these clips the wrong way around or in the wrong direction will, at best, mean it won’t for back together and you need to redo them, or at WORST, you end up damaging the controller board and casing as you attempt to re-insert the drive.
Each screw uses a counter-sunk system and also arrives with a rubber washer between the screw head and the plastic. This means that you do not need to fully remove the screw, as there is a small % of space left. Regardless, just remove the four screws and each of the side panels should come off very easily.
Once again, make sure you keep track of which panel goes with each side of the HDD – As this will be a right pain during reassembly. An important area of note here is that IF you are considering adding larger/alternative drives to the Beestation and you have your heart set on an SSD, you are going to need a 2.5″ to 3.5″ HDD adapter, as the screw holes that the tray clips AND the PCB Backboard are not available on a 2.5″ SSD. This does also open the door to the potential for a Dual 2.5″ SATA SSD to 3.5″ SATA Adapter case, which would provide the performance benefits of 2x SATA SSD in a RAID 0, or the redundancy benefits of 2x SATA SSDs in a RAID 1, if the case supports internal RAID 0/1). Here are two options:
However, there is considerably more to adding a new hard drive to the BeeStation than just the physical injection!
This reveals the drive in all it’s glory (in this case, a Synology HAT3300 which is a Seagate Ironwolf NAS HDD with Synology Firmware, but yours might well be the HAT3310, which is a Toshiba N300 drive with Synology FW). At launch, the Synology BeeStation arrived with just a single 4TB option, but no doubt in the further (perhaps when you are reading this) Synology have rolled out bigger HDD options or RAID equipped multi-bay versions.
But, there you go! That is the disassembly of the Synology BeeStation. I hope you enjoyed this guide and found in useful/informative! REMEMBER, I did this to show you what the inside of your BeeStation Personal Cloud looks like, so YOU DON’T HAVE TO! If you have any further questions, you can reach out to me on robbie ( at ) nascompares.com, or use our free advice section located on the right hand side of the page. Alternatively, you can reach us on our Discord HERE, our community forum HERE, or for faster and more personal support over on KoFi Commissions HERE. If you use and/or share the content of this guide online, please help us spread awareness of our platform and the work we do by backlinking us appropriately! Thanks for reading!
Synology BeeStation Personal Cloud Review – Quick Conclusion
Synology has clearly done their homework on the development and presentation of the BeeStation private cloud. They are targeting a whole new audience with this system, and therefore, criticisms based on experiences with their other hardware are likely to fall on deaf ears. The BeeStation is probably one of the best middle grounds I have ever seen between an easy-to-use and exceptionally easy-to-set-up private cloud system, while still managing to provide smooth and seamless features for accessing and sharing your private cloud’s storage securely. Looking at this system with a more network-savvy microscope kind of defeats the point, and I’ve tried to be fair in my assessment. The lack of LAN access by default seems a little odd, and launching the BeeStation series in this single-bay, 4TB-only fashion may be a bit of a marketing misstep, but overall, what you’re seeing here is an effectively priced and scaled private cloud system. It’s a fantastic alternative to third-party clouds and existing simplified NAS systems. With many users keeping an eye on their budgets and tightening costs, Synology, known for its premium position in the market, had a challenge scaling down to this kind of user. However, I have to applaud Synology’s R&D for creating a simple and easy-to-use personal cloud solution that still carries a lot of their charm and great software reputation. It may not be as feature-rich as DSM, but BSM does exactly what it says it will do, and I think the target audience it’s designed for will enjoy the BeeStation a great deal!
SOFTWARE - 7/10
HARDWARE - 8/10
PERFORMANCE - 7/10
PRICE - 10/10
VALUE - 10/10
8.4
PROS
User-friendly setup, ideal for beginners or those seeking a simple cloud solution. Secure data handling with encrypted data transmission. Comes with 4TB of storage included, offering good value. Compact and lightweight design, enhancing portability. Quiet operation, suitable for home or office environments. Integrates seamlessly with popular cloud services like Google Drive and OneDrive. Affordable pricing at $199, a cost-effective alternative to third-party cloud services. Supports remote access, allowing data management from anywhere and across client devices/OS Synologys reputation for quality and reliability is still clear on this smaller scale. Several client tools (BeeFiles, BeePhotos and Desktop sync tool) for Windows, Mac, iOS and Android available for tailored access System configuration backup option to USB/C2 (Often absent in budget cloud solutions) AI Photo Recognition in BeePhotos for faces, Objects and geo data scraping + Advanced filter/search
CONS
Lacks the extensive app support and customization found in Synology\'s DSM platform. Only available in a single-bay, 4TB configuration at launch, limiting expandability. Single 5400RPM HDD running everything leads to slowdown more than you think! LAN access is disabled by default, which may not suit all users. Designed for a specific user base, may not meet the needs of more advanced users.
This description contains links to Amazon. These links will take you to some of the products mentioned in today's content. As an Amazon Associate, I earn from qualifying purchases. Visit the NASCompares Deal Finder to find the best place to buy this device in your region, based on Service, Support and Reputation - Just Search for your NAS Drive in the Box Below
Need Advice on Data Storage from an Expert?
Finally, for free advice about your setup, just leave a message in the comments below here at NASCompares.com and we will get back to you.Need Help?
Where possible (and where appropriate) please provide as much information about your requirements, as then I can arrange the best answer and solution to your needs. Do not worry about your e-mail address being required, it will NOT be used in a mailing list and will NOT be used in any way other than to respond to your enquiry.
[contact-form-7]
TRY CHAT Terms and Conditions
If you like this service, please consider supporting us.
We use affiliate links on the blog allowing NAScompares information and advice service to be free of charge to you.Anything you purchase on the day you click on our links will generate a small commission which isused to run the website. Here is a link for Amazon and B&H.You can also get me a Ko-fi or old school Paypal. Thanks!To find out more about how to support this advice service checkHEREIf you need to fix or configure a NAS, check FiverHave you thought about helping others with your knowledge? Find Instructions Here
Or support us by using our affiliate links on Amazon UK and Amazon US
Alternatively, why not ask me on the ASK NASCompares forum, by clicking the button below. This is a community hub that serves as a place that I can answer your question, chew the fat, share new release information and even get corrections posted. I will always get around to answering ALL queries, but as a one-man operation, I cannot promise speed! So by sharing your query in the ASK NASCompares section below, you can get a better range of solutions and suggestions, alongside my own.
Video Editing over 10Gbe or Thunderbolt with a NAS Drive – The Easy Way in 2024
Video editing and production, as of 2024, continues to be one of the largest generators of unique and large-scale data. From various sectors like wildlife photography to large-scale movie production, video editing has evolved into a significant business requiring power, speed, and efficiency from its hardware environment. In the past, editing with software like Final Cut, Adobe Premiere, DaVinci, etc., was manageable on local HDD/SSDs or external drives. However, in recent years, the demand for performance due to the size of 4K and 1080p footage has outstripped the capabilities of most internal SATA SSDs and external drives. The industry has since moved to NVMe SSD and Thunderbolt DAS RAID external storage.
In a Rush? Here are the Best NAS Systems for Video Editing that I Recommend:
Despite their effectiveness, the cost of NVMe, its limited capacities, and the impracticality of Thunderbolt RAID DAS in field settings make them less than ideal. This leads us to the adoption of 10Gbe and/or Thunderbolt NAS for video editing, which offers several advantages:
Editing on a NAS over 10Gbe can provide up to 1000MB/s performance, potentially increased with link aggregation or network interface port upgrades.
Editing over Thunderbolt NAS can reach up to 1600MB/s, depending on the chosen storage media and NAS model.
Using a NAS allows you to upgrade the connection over its lifespan, enhancing performance significantly.
A NAS improves the workflow in video editing with multiple users, allowing simultaneous access with different priorities based on task needs.
Incorporating a NAS into your backup strategy significantly reduces the risk of data loss, using NAS backup software for scheduled or live duplications.
Remote uploading of raw/pre-production footage to a NAS enables efficient off-site work, ready for editing when you return to the desk.
Editing on a NAS drive, while not as straightforward as traditional USB and Thunderbolt DAS, offers several advantages to network hardware environments and improves the overall workflow. Let’s explore setting up a 10Gbe or Thunderbolt NAS for video editing, but first, some important considerations for 2024.
How to Edit Video on a Synology NAS
Video Editing on a NAS Drive – Important Things to Remember in 2024
Editing on a NAS in 2024 offers more space and potential speed over local/internal SSDs, but there are additional considerations when switching to NAS-based editing:
This guide simplifies the NAS setup for easy video editing, but other methods are available for those needing more technical setups.
For hard drive use, at least 4 drives in RAID 5 are needed to match single SSD speeds – more drives equal better performance.
10Gbe NAS devices are affordable, with the best rates from NAS with Intel/AMD CPUs (64bit x86) and at least 2GB of memory.
Installing NAS-brand setup software (like Synology Assistant, QNAP QVR Pro, etc.) on at least one PC/Mac system is recommended for easier setup.
NAS systems for video editing should ideally be 5Gbe, 10Gbe, or above.
Direct Mac/PC-to-NAS connections over 10Gbe, or through a 10Gbe network switch, are options, though they may affect the NAS’s media speed if multiple users connect simultaneously.
For Thunderbolt 3 Mac/PC Systems, simple Thunderbolt powered 10Gbe-to-TB3 adapters are available.
If NAS-based editing sounds like a fit for your workflow and productivity in 2024, proceed with the guide.
How to Edit Video on a QNAP NAS
Video Editing on NAS Drives Guide – What You Need to Do
These steps will guide you through how to setup editing on your NAS with software such as DaVinci Resolve, Adobe Elements, PowerDirector and more, as well as be applicable to NAS brands such as Synology, QNAP, Asustor and Terramaster. I will try to keep as many of the steps as ‘universal’ as possible, ut there might be the odd difference between one software brand and another. If you have any questions, scroll to the bottom of the page and content me directly on the ‘Free Advice’ section. It is all genuinely free advice, manned by me (so I apologise if I am not ‘lightning-fast’) and I will help get you all setup to the best of my ability. Let’s get the guide started.
Step 1 – Set Your NAS Up for Storage
Right so, this is probably the BIGGEST STEP! This guide is largely useless if your NAS system is not already set up – setting up a NAS (eg have it plugged in and ready to interact with, etc) is a whole guide in itself. Luckily I have made several of those in both written and video form. It is important that your NAS system has the following things done:
Latest Firmware Installed (generally this is done when the system is first set up automatically, but always check)
In the NAS User Setup, create a new ‘user’ for the video-editing with access to the folders in the NAS that are going to be used in your editing. You don’t HAVE to do this, but it’s best to leave the ‘admin’ account separate from this kind of thing, as you want that to be your ‘recovery’ if needed.
Have your Storage Pool (the RAID) setup and a Volume created. The guides will go into more detail about this for each NAS platform, but I recommend a RAID configuration with at least 1 disk of redundancy (so, 1 disk safety net if a drive breaks/fails) across at least drives. The Volume setup will ask you lots of questions about file systems and Encryption – those can largely be set to ‘default’ or as your own storage preference dictates.
Depending on your NAS Brand of choice, you can find a guide to setting up your desired system below:
From here you should be ready to start setting up your Mac/PC with your NAS system for video editing over 10Gbe and/or Thunderbolt.
Step 2 – Create a Shared Folder to Access Remotely as a Mounted Network Drive
Next, you need to create an area of storage on your NAS system that can be accessed by your Mac/PC system and in-turrn, the video editing software you are using. Remember, these steps will differ depending on the NAS brand you choose. First, you need to open up the NAS File Management tool (it will be called File Manager or File Browser).
From here, somewhere at the top, you will find an option listed as ‘create a shared folder’ or simple ‘Shared Folder Options’.
You need to give this new shared folder a name. It is recommended that you should not use spaces or special characters in this name, as some software might have conflicts with it. Additionally, you will be asked about which volume on the NAS you want the shared folder to be within. Be sure to select the volume where your best-performing media (HDD/SSD) are based.
After this, you will be asked several options (depending on the brand. These will include 1) If you want to encrypt the shared folder (which will lock it to only be accessed within the NAS, but can lower performance a pinch), 2) Do you want to create a task of periodic data health checks (up to you), 3) Do you want to set a storage quota (maximum space this shared folder can accumulate) and 4) Do you want to create storage snapshots of the shared folder to revert to later if needed (again, personal preference).
After this, you will then be asked which users on your NAS can access the shared folder. Be sure to allow both Read and Write access to both the Admin account and the one you created for your Video editing account.
From here, open up the client tool (Synology Assistant / Qfinder Pro, etc) and ensuring that the PC/Mac you are using to interact with your NAS so far is on the same network/10Gbe/TB3, Right-click on the NAS on the available and select the option labelled ‘Map Network Drive’
From here, you will be asked to provide the login details you created for the NAS. Here you will need to enter the video editing account details you created (or the Admin account), which will then show you the list of available network drives on the NAS
Select the shared folder that you created earlier, then you will be asked to give the NAS folder/drive a letter to assign on your Mac / PC (EG C:/ is the OS drive typically and D:/ is the CD/DVD/BD drive. Just give the drive a letter and then click confirm.
The new shared folder and Drive will now be available and visible on your My Computer / Finder and this is the drive that you will be editing your work on. As long as you connected to this drive via 10Gbe or Thunderbolt, it will allow considerably faster speeds than typical network/gigabit NAS connectivity.
Step 3 – Copy/Move your Asset Library to the NAS
The next step is quite straight forward. You need to copy or move your existing library of work over to the NAS. This can be done in numerous ways:
Method 1 – Simply Drag and Drop / Copy and Paste into the Mapped network drive
Method 2- Go into the NAS via your web Browser and Upload directly from the File Manager
Method 3 – Create a Sync Jobbetweena folder on your PC/Mac and the NAS using the free first-party tools (Synology Drive or QSync)
You will need to make sure that the bulk of the stock footage, music, photos and more that you use on a regular basis are on the NAS.
Step 4 – If Necessary, Change The Default Media Directory on your Editing Software
When you make the switch from editing video locally on your PC/Mac system and moving onto NAS based editing, the editing software you use (Adobe Premiere, Final Cut Pro, DaVinci Resolve, etc) will still have background actions and preferences that will be targeting your main system when in use. Typically these will be the default directories of when shadow files are created, the default location of where project assets are found and/or where temp files are saved.Each video editing software differs, so the options will be different from software to software. But it is recommended you change these to the NAS, as then the internal SATA SSD in your system, that will typically perform at 350-450MB/s (reported 550MB/s speed reports are based on ideal usage scenarios), will not present a bottleneck when your NAS can get up to 1,000MB/s on 10Gbe and more on a Thunderbolt-enabled NAS.
Adobe Premiere Essentials 2020
DaVinci Resolve
Step 5 – Optional BUT Important, Create a Job/Task on your NAS for Backing Up your Work Elsewhere
This one is not strictly essential, but I would recommend it. As you work on the NAS with your video editing, you are going to be creating both alot of files. Unlike when you were previously editing on a PC/Mac system and it’s internal SSD/HDD (whereupon you could then make a backup onto a USB drive or NAS), the video files you create will be living on the NAS drive ONLY. THAT is a big risk and means you do NOT have a backup. So, I recommend at least a 2 stage backup. That means that your data is in 1 location and then you have 2 more copies of ALL the important data in two more hardware and/or physical locations. Luckily, most NAS devices arrive with numerous multi-tiered backup software options included. In terms of backup options, I recommend one/two/all of the following (methods will differ between brands, but all of the top-tier NAS brands support these):
Backup the NAS Drive to a USB Drive
Backup the NAS Drive to another NAS Drive
Backup the NAS Drive to a Cloud Service
Recommended NAS Systems for Vdieo Editors?
There are ALOT of different NAS options for editing video, but some are more suitable than others. Having a 10Gbe port and/or Thunderbolt is not enough and in order to avoid you spending month unnecessarily, I have listed a few options below that suit different personal budgets and the extent that you wish to edit. Take a look and if you are still in doubt, you can contact me directly for FREE and impartial advice at the bottom in my free support section or on the right-hand side of the page.
Best Software and Features Video Editing NAS – The Synology DS1522+
0-110TB (90TB with Syn HAT5300s) , 5x SATA Bays, 2x M.2 NVMe 2280 (Pools and Caching), AMD R1600 2-Core / 4-Thread CPU, 8-32GB ECC DDR4 Memory, 4x 1Gbe Port, Optional 10GbE Upgrade, 2x Expansion Port, 3-5yr Warranty
YouTube Video Review – Watch , Before You Buy Video – Watch
What I said in my review June ’22:
The Synology DS1522+ is a good NAS drive and most business-focused users are going to appreciate what this newer configuration of hardware is able to provide. There was never any doubt in the extent to which this new NAS would support DSM7, and given its architecture, there is virtually nothing in the popular NAS software that this system cannot do. Likewise, having the option of 10GbE on a Diskstation of this scale will be hugely attractive to some, though the proprietary means with which you need to upgrade is arguably less desirable.
The R1600 CPU is a good choice of processor for file handling and simultaneous tasks, as is the 8GB of memory that this system arrives with, plus the potential to ramp it up to 32GB. After that though, the desirability of this system to home users and multimedia users is a little less compelling and with such a large audience of users who look at NAS for their media streaming, the DS1522+ not featuring a more graphically enabled chip will leave them somewhat underwhelmed. Bottom line, the DS1522+ is a solid and full DSM7 supporting system here and you cannot fault the design, internal/external performance and ease of use of this Synology NAS. However, there will always be users wondering why this NAS never arrived with an Intel chip.
SOFTWARE - 10/10
HARDWARE - 8/10
PERFORMANCE - 8/10
PRICE - 8/10
VALUE - 8/10
8.4
PROS
8GB of ECC Memory that can be scaled to 32GB – LOVELY STUFF Optional 10GbE Upgrade Continued Support of Synology Hybrid RAID on this scale 4x LAN Ports by default Expandable with another 10 Drives down the line (2x DS517) NVMe SSD Bays for Caching will be very useful with this 5-Bay RAID Storage DSM 7.1 is hands down the best NAS software and services in the market right now 3 years base warranty, with optional extra 2yrs Numerous storage service advantages inc. BTRFS, Fast RAID Rebuild and Auto-Repair First Party Hybrid Cloud services with Synology C2 Exceptionally good surveillance software included
CONS
That CPU is going to divide opinion HDD & SSD Compatibility list is a little thinner than I expected Optional 10GbE upgrade is via a heavily proprietary route
DEAL WATCH – Is It On Offer Right Now?
Synology 5-bay DiskStation DS1522+ (Diskless),Black https://www.amazon.com/b/ref=dp_bc_aui_C_5?ie=UTF8&node=20941687011 USA 15% Off [LINK]
These Offers are Checked Daily
Best Value SSD Video Editing NAS – The Asustor Flashstor 12 Pro NVMe Flash Server
I cannot stress enough how impressed I am that the Flashstor 6 and Flashstor 12 Pro are priced at $499 and $860, respectively, given the level of hardware on offer here. These are by no means enterprise-grade NAS server solutions, nor should they be thought of as such. However, given the cost of typical fully featured 4x HDD solutions from their competitors and the brand themselves, which often start at $550 and above, it is quite remarkable that the six M.2 SSD system with comparable internal hardware comes in at $499. As long as a user keeps their expectations in line with what this cost versus its capabilities, it’s really tough to argue with the price point that these two devices have arrived at on the market. The Asustor FS6712X Flashstor 12 Pro NAS presents a unique offering in the NAS market, leveraging NVMe technology to provide high-capacity, ultra-high-performance storage. The device’s design, with its rhombus-shaped enclosure and twelve M.2 NVMe slots, sets it apart from traditional NAS devices and offers a sleek and modern aesthetic.
The tool-less drive installation mechanism makes it easy to set up and expand the storage capacity. However, there are some considerations to keep in mind. The limited number of PCIe lanes provided by the Intel Celeron N5105 processor may restrict the performance of high-speed NVMe drives. The single 10GbE LAN port also presents a potential network bottleneck, limiting the device’s overall network performance. Users seeking maximum performance and network throughput may find alternative solutions better suited to their needs. Despite these limitations, the FS6712X shines as a storage solution for users who prioritize high-capacity storage, quiet operation, and low power consumption. The device’s ability to directly output 4K video, along with its range of Asustor-approved apps, makes it an excellent choice for media distribution and presentation. In terms of pricing, the FS6712X comes with a price tag of $850+. While this may appear high at first glance, it is comparable to 8 bay drive NAS SATA devices and many of those do not even include NVMe slots or 10GbE. Users looking for a more cost-effective option can consider the Flashstor 6, which offers half the number of slots and 2x 2.5GbE enabled ports for $499.
As the cost of flash modules continues to drop, and larger capacity drives become available all the way up to 8TB (even without QLC), the FS6712X provides an attractive solution for those seeking high-capacity and high-performance NAS storage. While some underlying performance relativity by the end user needs to be factored in and hardware limitations exist thanks to the use of that Celeron to remain budget-friendly, the FS6712X is a tremendously smart move by Asustor. A well-designed NAS that presents a much more confident solution demonstrating the benefits of NVMe-focused NAS devices to an audience that would have assumed such things are way, WAY outside the realms of affordability!
SOFTWARE - 7/10
HARDWARE - 9/10
PERFORMANCE - 7/10
PRICE - 10/10
VALUE - 10/10
8.6
PROS
6x NVMe SSD Flash NAS for under $500 - COME ON! Low Power Use Full 1st Party NAS OS Included USB 3.2 Gen 2 10G Connectivity and wide USB Support/Compatibility Very Slick and compact design SP/DIF and HDMI 2.0b Outputs will hugely please the multimedia user community Likewise, Plex Performance is very good for 4K and 1080p conversions
CONS
6x NVMe Performance will never be realised because of the Intel Celeron CPU inside and 3x1 Limits 2.5GbE x2 is good.. but its still hugely limiting for those NVMes Lack of ECC memory (cost prohibitive of course) will put some serious users off
DEAL WATCH – Is It On Offer Right Now?
ASUSTOR FLASHSTOR 6 Network Storage (FS6706T) Amazon UK 48.65 OFF (WAS 796) [LINK]
These Offers are Checked Daily
Best Value Hard Drive Video Editing NAS – Terramaster T9-450 Tower
Terramaster has really changed the playing field with the T9-450 NAS. I was already a big fan of their latest generation of 6-Bay, 9-Bay and 12-Bay desktop chassis – providing a pretty substantial amount of storage in a tower design that borrows ventilation methodology traditionally found in rackmounts, but the T9-450 takes this logic and doubles down on it hard. The dual 10GbE on the system means that, despite it’s comparatively modest price point (when comparing against similar scale solutions from Synology and QNAP) you genuinely have a solution with the potential to allow you to enjoy every single MB/s or GB/s of your RAID externally. This is further bolstered with additional 2.5GbE ports, m.2 NVMe bays, uncomplicated support of HDDs/SSDs and just generally a very sensible system that shows how much Terramaster has matured as a brand. The TOS software is still not quite up there with Synology’s DSM or QNAP’s QTS in terms of ease of use and AAA+ features, but it is definitely a great entry point OS that has tighted it’s security since the brand was targetted by a ransomware group (along with other brands, they were affected by Deadbolt attacks) – it certainly lacks some of the background optimization of it’s competitors, but then this is reflected in the budget of the system too.
The internal PCIe slot that has been largely ignored is a bit of a missed opportunity and I am not a big fan of how they have addressed memory compatibility, but overall it is very, very tough to criticise the T9-450 NAS when you factor in the value of the package here. Factor in that you can very easily swap out the OS for many others, and it largely silences alot of the negatives here too. Overall, the T9-450 could potentially be the best NAS that Terramster has ever released and if they continue to address later releases with the same level of hardware value, this could definitely give the bigger names in the industry something of a headache down the road. I highly recommend this system for its value and performance potential!
SOFTWARE - 7/10
HARDWARE - 10/10
PERFORMANCE - 8/10
PRICE - 9/10
VALUE - 10/10
8.8
PROS
Surprisingly compact for 9 Bays of Storage Good Middle ground between a Rackmount and Desktop System Dual 10GbE - LOVELY STUFF! Also has support of SMB MultiChannel and an extra 2x 2.5GbE Decent throughput Capable CPU Great RAID Options Snapshot Replication BTRFS/EXT4 Support as preferred A large amount of maximum memory supported (16-32GB - TBC) M.2 SSD Bay inside for caching/storage TOS 5.1 is genuinely good, if not quite as polished/evolved as it\\\'s competitors VERY easy to install TrueNAS, UnRAID, Proxmox, OpenMediaVault, etc (and also easy to reverse)
CONS
Secret PCIe Slot - Unused?! Supports ECC Mmeory, but not included (might annoy some) NOT QUIET!
DEAL WATCH – Is It On Offer Right Now?
These Offers are Checked Daily
Best Multi-Editor NAS Solution – The QNAP TVS-h874T Thunderbolt4 Server
In summarizing the capabilities and potential of the QNAP TVS-h874T NAS, released as a late 2023 update to its predecessor, it’s clear that this system represents a significant leap forward in desktop NAS technology. Priced over £2500, it’s a substantial investment, designed with future-proofing in mind. The TVS-h874T not only maintains the longevity and high-end status of the TVS-h874 but also brings to the table enhanced direct data access through Thunderbolt 4 integration. This advancement, supporting IP over Thunderbolt protocol, significantly boosts connectivity and speed, making the system an ideal choice for demanding tasks such as 8K video editing and high-performance computing needs in business environments. However, the question of whether Thunderbolt NAS is the right fit for all users remains. For those requiring high-speed, multi-user access and scalability, the TVS-h874T is a strong contender. Its support for the latest PCIe 4 standards ensures compatibility with high-performance upgrades, reinforcing its position as a future-proof investment. The software, featuring QTS and QuTS, might require some acclimatization, particularly for those familiar with simpler systems like Synology’s DSM. Yet, the benefits, especially for ZFS enthusiasts, are undeniable, offering advanced RAID management and a plethora of applications and services.
The TVS-h874T’s stance on open hardware and software compatibility is a significant plus in an industry increasingly leaning towards proprietary systems. It accommodates a range of third-party hardware and software, adding to its versatility. In the face of growing concerns over NAS security, the system is well-equipped with comprehensive tools and settings for enhanced security and data protection, addressing the pressing issue of ransomware attacks. In conclusion, the QNAP TVS-h874T stands out as an exceptional choice for businesses and power users who require a robust, scalable, and secure NAS solution. It offers an excellent balance of price, performance, and features, making it a worthy investment for those seeking top-tier server-side capabilities. However, for users with simpler storage needs or those not requiring the advanced features of Thunderbolt NAS, traditional Thunderbolt DAS devices might be a more suitable and cost-effective option. The TVS-h874T, with its advanced capabilities, is undoubtedly a powerhouse in NAS technology, but its full benefits will be best realized by those whose requirements align closely with what this advanced system has to offer.
SOFTWARE - 9/10
HARDWARE - 10/10
PERFORMANCE - 10/10
PRICE - 7/10
VALUE - 7/10
8.6
PROS
Only brand rolling out i9 Turnkey NAS Only NAS Rolling out Thundebrolt4 NAS (for now!) Upto 20 Cores, 24 Threads and High End Integrated Graphics PCIe Gen 4 x16 Upgrade Slot for 10/25/100GbE Cards and 2x PCIe Gen 4 x4 M.2 NVMe Slots for 7GB SSDs No Obstinant 3rd Party Hardware Limitations on Support or Compatibility Much larger support of 3rd Party Software Services than most other NAS Brands 10Gb/s USB Connectivity, in Type A and Type C Upto 64GB of Memory ZFS or EXT 4 File System Choice M.2 NVMe SSD Bays can be used for Storage or Caching Volume Encryption, SED SSD Support and WORM Enhanced AI Surveillance Services, with opt to upgrade with $30 Google TPU AI Photo Management Tool (QuMagie) Includes Thing Recognition and works offline ALL the ZFS Benefits, whilst also the GUI and App benefits of a Linux Software Platform in one
CONS
No Smaller 4-Bay Version QVR Elite (not QVR Pro) only has 2 Cam Licences Lack of ECC Memory will annoy some users 10Gbe is Missing (so no TB-TO-10GbE Pass-through) Too Many licenses on Enterprise Tools (Drive Analyzer, Face Tiger, etc) with too few free licenses
This description contains links to Amazon. These links will take you to some of the products mentioned in today's content. As an Amazon Associate, I earn from qualifying purchases. Visit the NASCompares Deal Finder to find the best place to buy this device in your region, based on Service, Support and Reputation - Just Search for your NAS Drive in the Box Below
Need Advice on Data Storage from an Expert?
Finally, for free advice about your setup, just leave a message in the comments below here at NASCompares.com and we will get back to you.Need Help?
Where possible (and where appropriate) please provide as much information about your requirements, as then I can arrange the best answer and solution to your needs. Do not worry about your e-mail address being required, it will NOT be used in a mailing list and will NOT be used in any way other than to respond to your enquiry.
[contact-form-7]
TRY CHAT Terms and Conditions
If you like this service, please consider supporting us.
We use affiliate links on the blog allowing NAScompares information and advice service to be free of charge to you.Anything you purchase on the day you click on our links will generate a small commission which isused to run the website. Here is a link for Amazon and B&H.You can also get me a Ko-fi or old school Paypal. Thanks!To find out more about how to support this advice service checkHEREIf you need to fix or configure a NAS, check FiverHave you thought about helping others with your knowledge? Find Instructions Here
Or support us by using our affiliate links on Amazon UK and Amazon US
Alternatively, why not ask me on the ASK NASCompares forum, by clicking the button below. This is a community hub that serves as a place that I can answer your question, chew the fat, share new release information and even get corrections posted. I will always get around to answering ALL queries, but as a one-man operation, I cannot promise speed! So by sharing your query in the ASK NASCompares section below, you can get a better range of solutions and suggestions, alongside my own.
CPU and Motherboard Bundles to Build a DiY NAS (UPDATED)
It’s fair to say that the DIY NAS construction journey has seen remarkable simplification over the past ten years. With a variety of custom cases hitting the market, designed to help you create a streamlined personal cloud, and the advent of bundled compact ITX motherboards that streamline the assembly, crafting your own NAS is more accessible than ever. Nonetheless, it’s not entirely plug-and-play; while assembling the hardware has become more straightforward, selecting compatible components remains a technical challenge, often mired in jargon. For those looking to build a NAS tailored to specific needs, whether it’s high performance, media hosting with Plex, business applications, or personal use, I have a few CPU and motherboard pairings to suggest. These combinations are chosen with different user priorities in mind, ensuring that your build-your-own NAS project aligns with your intended use.
In a rush? Let’s Cut to the chase!
If you’re in a rush and simply want to know about the best CPU and motherboard combo to build your best DIY NAS system, below, you can find direct links to each of these bundles that can be purchased predominantly on AliExpress, but some of these options are also available on retailers such as Amazon and Newegg. If you were going to shop at these retailers anyway, why not use the links below as it will ensure that we act as comparers could earn a small fee from these shops. It allows us to keep doing what we do.
Here are ALL the Motherboard+CPU Combos that we cover in this article:
(The Best) i3-N305 M-ITX BoardCheck AliExpress ($289-349 with Memory) HERE and Amazon HERE
(x4 m.2 @ Gen 4×4) The Minisforum AR900i CPU + M-ITX Motherboard Combo ($399)Amazon HERE
(Best for PLEX) Erying 13th Gen i9 Combo 14C / 20T $459 HERE
(Gen 5 M-ITX) MINISFORUM BD770i ITX Motherboard $489 (AliExpress) HERE and $399 (Amazon)HERE
(Plex Alternative #1) Erying 12th Gen I9 Combo 14C / 20T $389 HERE
The combination of the AMD “Zen 4” architecture Ryzen 5/7/9 series processors with the Minisforum motherboard offers a high-performance platform that is particularly suitable for building a Network Attached Storage (NAS) server. The Mini-ITX form factor of the motherboard, compatible with 1700 series CPU coolers, ensures that it can fit into compact NAS cases while providing adequate cooling for the powerful processors housed within. In the realm of NAS servers, storage options and connectivity are key. The motherboard’s two M.2 NVMe (PCIe 4.0 x2) slots are ideal for high-speed storage drives that can handle intense read and write operations typical in a NAS environment. The inclusion of 2 * SFF-8643 sockets, which support up to four connections each and a total of 9 SATA 3.0, is an advanced feature that provides flexibility and scalability for storage expansion. This is particularly beneficial for NAS setups where large storage pools and redundancy (such as RAID configurations) are important.
Network connectivity is another critical aspect of NAS servers, and this motherboard delivers with its 4 * Intel i226-V 2.5G RJ45 UDE network ports, allowing for high-speed data transfer and network redundancy or link aggregation if required. However, the lack of 10GbE port might limit the network throughput if higher speeds are needed, in which case the PCIe Gen 5×16 slot could be employed for an additional network interface card, although this might be considered an inefficient use of this high-bandwidth expansion slot. Lastly, the wide array of USB ports, including USB3.2 Gen2 Type-C with a 20Gbps rate and additional USB3.2 and USB2.0 ports, adds to the versatility of this motherboard. The built-in set of USB3.2 pin sockets also allow for further expansion and connectivity options, essential for a NAS that may need to accommodate a variety of peripherals or provide additional data transfer interfaces.
Feature Category
Specifications
Processor Support
Equipped with AMD “Zen 4” architecture Ryzen 5/7/9 series high-performance processors
Form Factor
17×17 standard Mini-ITX form factor compatible with 1700 series CPU coolers
Expansion Slots
1 PCI-E x16 slot PCIe 4.0 x8 signal supports expansion of graphics card/network card, etc.
Storage
2 * M.2 NVMe (PCIe 4.0 x2) slots 2280 size
SATA Support
2 * SFF-8643 sockets support one to four via cable and support 9 SATA 3.0
3 * USB3.2+1 Type-C (USB4) interface 20Gbps rate<br>Built-in set of USB3.2 pin sockets can be connected to the panel through connecting cables<br>Built-in two USB2.0 sockets support U disk encryption and other applications and partial system boot
Given these specifications, the Minisforum motherboard with an AMD Ryzen processor is well-equipped for a NAS server build, offering a balance of processing power, high-speed storage capabilities, and robust connectivity options.
Where to Buy the CWWK 8-Bay / 9-Bay Board AMD-7735HS/7840HS/8845HS/7940HS Motherboard Combo:
Best Gen 5 CPU+Motherboard Combo – MINISFORUM BD770i ITX Motherboard
Spec Highlights – BD770i-AMD Ryzen 7 7745HX, 8 Cores/16 Threads (5.1 GHz) OR BD790i-AMD Ryzen 9 7945HX, 16 Cores/32 Threads (up to 5.4 GHz), SODIMM DDR5 Slots×2 Max 64GB, 2×M.2 2280 PCIe5.0 SSD Slots, PCIe 5.0 X16 connector, 1x 2.5GbE and Lack of SATA! –$489 on AliExpress and $399 on Amazon
The Minisforum BD770i and BD790i motherboard and CPU combo represents a cutting-edge solution for enthusiasts and professionals seeking powerful performance in a small footprint. With the BD770i featuring the AMD Ryzen 7 7745HX and the BD790i equipped with the AMD Ryzen 9 7945HX, these systems offer unparalleled processing power that caters to a wide range of demanding tasks, from advanced computational workloads to intensive multitasking scenarios. The AMD Radeon 610M GPU, integrated into both models, while not designed for high-end gaming, capably supports everyday graphics needs, including casual gaming, video streaming, and content creation, making this combo a versatile choice for various computing needs.
The inclusion of PCIe 5.0 support stands out as a significant advantage, offering double the bandwidth of its predecessor, PCIe 4.0. This enhancement ensures that users can take advantage of the fastest available SSDs and expansion cards, dramatically reducing load times and facilitating quicker data access. This forward-thinking feature ensures that the system is prepared to handle future technological advancements, making it a wise investment for tech enthusiasts looking to stay ahead of the curve. However, it’s important to note the absence of traditional SATA ports, which means users with SATA drives will need to consider alternatives such as SATA M.2 adapters or adding a PCIe card to accommodate these devices. This requirement might necessitate additional planning and investment for those who wish to integrate existing storage solutions into their new setup.
Specification
BD770i
BD790i
Processor
AMD Ryzen 7 7745HX, 8 Cores/16 Threads<br>(32M Cache, up to 5.1 GHz)
AMD Ryzen 9 7945HX, 16 Cores/32 Threads<br>(64M Cache, up to 5.4 GHz)
GPU
AMD Radeon 610M
AMD Radeon 610M
Memory
DDR5 Dual channel<br>(SODIMM Slots×2, up to 5200 MT/s, Max 64GB)
DDR5 Dual channel<br>(SODIMM Slots×2, up to 5200 MT/s, Max 64GB)
Storage
2×M.2 2280 PCIe5.0 SSD Slots
2×M.2 2280 PCIe5.0 SSD Slots
Expansion Slot
PCIe 5.0 X16 connector ×1
PCIe 5.0 X16 connector ×1
Wireless Connectivity
M.2 2230 Key E Slot
M.2 2230 Key E Slot
Video Output
HDMI2.0 ×1<br>DisplayPort1.4 ×1<br>USB-C ×1
HDMI2.0 ×1<br>DisplayPort1.4 ×1<br>USB-C ×1
Audio Output
HDMI2.0 ×1<br>DisplayPort1.4 ×1<br>USB-C ×1<br>Line Out ×1
HDMI2.0 ×1<br>DisplayPort1.4 ×1<br>USB-C ×1<br>Line Out ×1
Ethernet
RJ45 2.5G Ethernet Port×1
RJ45 2.5G Ethernet Port×1
USB Ports
USB3.2 Gen2 Type-C Port ×1 (Alt DP)<br>USB3.2 Gen1 Type-A Port ×2<br>USB2.0 Type-A Port ×2
USB3.2 Gen2 Type-C Port ×1 (Alt DP)<br>USB3.2 Gen1 Type-A Port ×2<br>USB2.0 Type-A Port ×2
I/O Ports
4-pin CPU Fan header ×1<br>4-pin System Fan header ×2<br>4-pin SSD Fan header ×1<br>USB 3.2 Gen 1 header ×1<br>Front Panel Audio header ×1<br>System Panel header ×1
4-pin CPU Fan header ×1<br>4-pin System Fan header ×2<br>4-pin SSD Fan header ×1<br>USB 3.2 Gen 1 header ×1<br>Front Panel Audio header ×1<br>System Panel header ×1
Form Factor
Mini-ITX Form Factor (170x170x1.6mm)
Mini-ITX Form Factor (170x170x1.6mm)
A notable constraint in this powerful combo is the provision of a single RJ45 2.5G Ethernet port. While this port offers a solid network connection suitable for most applications, users with specialized networking needs or those looking to expand their network connectivity may find this limitation challenging. The necessity to potentially use the high-speed PCIe 5.0 slot for a network interface card upgrade, just to augment networking capabilities, could be seen as an inefficient use of this high-bandwidth resource. This situation highlights a trade-off between the advanced PCIe support and the flexibility in networking expansion, prompting users to carefully consider their priorities when planning their system configuration.
Despite these considerations, the overall package offered by the Minisforum BD770i and BD790i is compelling. The combination of cutting-edge CPU performance, robust PCIe 5.0 support, and a variety of connectivity options, including USB 3.2 ports and multiple video outputs, provides a solid foundation for a high-performance, compact computing solution. #
Furthermore, the support for up to 64GB of DDR5 memory and the inclusion of two M.2 2280 PCIe 5.0 SSD slots offer ample room for memory and storage expansion, enhancing the system’s capability to handle future needs. This blend of high-end features, coupled with the Mini-ITX form factor’s space efficiency, makes the BD770i and BD790i an attractive option for users seeking a powerful, yet manageable, computing platform.
Where to Buy the MINISFORUM BD770i ITX Motherboard Combo:
Currently, the “build your own” favorite across many forums, the new Intel N305 processor, an 8-core, eight-thread i3 processor, comes pre-installed on a Mini-ITX board. It not only provides a remarkably low 7-watt TDP when needed but also offers significant scalability in terms of both clock speed and power efficiency. The $289 N305 version of the CPU and Motherboard combo presents a practical and economical choice for commercial use (making it the perfect upgrade/alternative to the Topton N6005 / N5105 that was so popular last year for first time NAS DiY’ers). It is equipped with the Intel® Core i3-N305 Processor, which is a part of the Alder Lake-N series. This processor boasts eight cores and eight threads, with a max turbo frequency of 3.80 GHz, offering ample computing power for everyday tasks and certain commercial applications. The processor is fabricated using Intel 7 lithography technology, which is indicative of its advanced and efficient design.
Memory support on this combination is versatile, with the motherboard supporting a SO-DIMM DDR5 memory slot, compatible with frequencies of 4800/5200/5600MHz. Although the processor supports a maximum memory size of 16 GB, which is a consideration to keep in mind, the motherboard can handle up to 32 GB, potentially allowing for future upgrades if the board’s capacity is indeed supported by later CPU models or firmware updates.
The integrated graphics, Intel® UHD Graphics with 32 Execution Units, can dynamically operate at up to 1.25 GHz and support 4K content at 60Hz, making it suitable for high-definition displays and basic graphical tasks. Here’s the specification of the $289 N305 version of the CPU+Motherboard combo:
Specification
Detail
Model Number
NAS-N100-N305
Processor Brand
Intel
Processor Models
Intel® Alder Lake-N i3-N305 (up to 3.8 GHz)
Type
MINI PC / PC Stick
Origin
Mainland China
Brand Name
YSJMNPC
Use
Commercial
Memory
– Support notebook DDR5 technology
– 1 SO-DIMM DDR5 slot
– Compatible with 4800/5200/5600MHz
– Max capacity: 32GB
Storage
– 6 x SATA3.0 6Gb/s interface
– 2 x M.2 NVMe 2280
Graphics Card
Integrated Card (depending on processor model)
Network Card
4 x Intel i226-V 2.5G RJ45 network port
I/O Panel
– 2 x USB 2.0
– 1 x USB 3.0
– 1 x Type-C (2.0 rate)
– 1 x HDMI
– 1 x DP
– 4 x RJ45 2.5G network port
– 1 x AUDIO 3.5mm interface
Motherboard Features
– Matte black PCB
– Moisture-free fiber 8-layer circuit
– Full protection (USB, audio, network)
TDP
9-15W
Structure
MINI-ITX (17.0cm x 17.0cm)
Capacitor Design
All solid capacitor
Expansion Slots
1 PCIe x1 (shared with 2nd M.2)
Onboard Interface
– F_PANEL pin
– TPM pin (compatible with ASUS TPM module)
– USB2.0 pin
– CPU_FAN 4-pin (temperature control)
– SYS_FAN 4-pin (temperature control)
– 24+4 ATX power interface
Cooling
– Compatible with 115X radiators
– Silent temperature-controlled radiator
– Support for two high-performance radiators
In terms of connectivity, the combo is well-equipped with a variety of interfaces, including multiple USB ports with different standards, HDMI 2.1, and DisplayPort 1.4 for video output, and an Intel i226-V 2.5G RJ45 network port for fast wired internet connections.
The inclusion of PCIe lanes and M.2 slots provides additional expansion capabilities, allowing for further customization and the addition of peripherals or storage solutions. The motherboard’s MINI-ITX form factor makes it a compact solution that can fit into small cases, suitable for workspaces with limited room. EASILY the easiest choice of all the NAS Mobo+CPU options on this list, as one of the newest, lowest in price – yet impressively powerful, despite its lower TDP.
Where to Buy the i3-N305 CPU + M-ITX Motherboard Combo:
Best CPU+ Motherboard+ Memory Combo for a Business File Server – The X99 Motherboard Kit (ITX)
Spec Highlights – Business X99 Motherboard Combo ITX LGA2011, C612 for NAS Router+File Server, 6×2.5GbE I226, 10xSATA, 1x M.2 (OS), 14Core / 28 Thread Intel Xeon E5-V3 V4-$176 on AliExpress
This combination is ideal for business users needing power and scalability. The X99 motherboard with an older Xeon CPU balances performance, connectivity, and storage expansion. It supports 10 SATA drives and a M.2 NVMe slot, alongside 15 gigabits of network bandwidth across six 2.5G Ethernet ports. The NAS CPU+Memory combo anchored by the Intel Xeon E5-2680 v4 is a robust solution for a NAS file server. The CPU’s 14 cores and 28 threads are engineered for multitasking and can efficiently manage the demands of multiple simultaneous data transactions, which is a common requirement in NAS setups. The motherboard’s ten SATA ports and an M.2 NVMe slot offer versatile and ample storage options, facilitating both high-capacity and high-speed data storage solutions. This combination of CPU power and storage flexibility makes it an excellent choice for a NAS system.
owever, the Intel Xeon E5-2680 v4 processor’s launch date in Q1’16 might give pause to some users considering the latest advancements in processor technology. While newer CPUs may offer improved power efficiency and the benefit of ongoing support from Intel, the E5-2680 v4 still holds its ground as a reliable workhorse. Its architecture, although not the newest, delivers steadfast performance which, alongside its competitive pricing, presents an exceptional value proposition for budget-conscious setups or where cutting-edge efficiency is not the primary concern.
Specification
Details
Processor
Intel Xeon E5-2680 v4, 14 cores, up to 3.30 GHz Turbo
Chipset
Intel C612
Memory Support
2x DDR4 DIMM slots, up to 64 GB, supports ECC
Storage Options
1x M.2 NVMe, 10x SATA Ports
Expansion
1x PCIe 3.0 x16
Network
6x Intel i226 2.5 Gigabit Ethernet
Power Supply
ATX 24 Pin + 8 Pin
Video Output
VGA
RAID Support
RAID 0/1/5/10
Form Factor
Mini-ITX, CEB
Socket Type
LGA 2011-3
Launch Date
2013
LAN Speed
Up to 2500Mbps
Audio
2.1 Channels
In essence, for organizations or users seeking a cost-effective yet powerful NAS solution, this CPU and motherboard combo remains compelling. The Intel Xeon E5-2680 v4, despite its age, is a testament to enduring performance in server environments. Users leveraging this processor for a NAS will find it to be a cost-effective solution that capably handles storage demands, making it an excellent value for its price point. To explore more about this processor’s capabilities and see how it might fit into your NAS plans, you can visit the Intel specifications page.
Where to Buy the X99 ITX Motherboard Combo in 3 Configs Here:
X99 Motherboard + E5-2680 V.4 CPU + 32GB RAM = $176 HERE
Best CPU+ Motherboard for High Speed M.2 NVMe Slots + PLEX – The Erying 13900HK CPU+Mobo Combo
Spec Highlights – ERYING DIY ITX Desktop Motherboard Set with Onboard 14 Core / 20 Thread CPU i9-13900HK, 3x M.2 NVMe (Gen 4 and Gen 3), PCIe 4×8 Slot, 2.5G+1G Port, USB-C, DDR5 Memory$419 on AliExpress
Designed for NAS builders focusing on media servers or intensive computing tasks. The Erying i9 combo, equipped with a 13th Gen Intel Core processor and a Mini-ITX motherboard, features three M.2 NVMe slots and is optimized for graphic-intensive operations. It’s ideal for Plex servers and virtualization.
The Intel Core i9-13900HK processor bundled with this motherboard is a top-tier choice for a NAS setup, especially for a Plex Media Server. Its high-speed multi-core performance, reaching up to 5.40 GHz with Intel’s Turbo Boost Technology, is ideal for on-the-fly transcoding, ensuring seamless media streaming across devices. This is particularly beneficial for users who require their NAS to handle high-resolution video transcoding, a task that the i9-13900HK can manage with ease due to its robust processing capabilities and advanced integrated graphics.
The motherboard’s triple M.2 NVMe slots are a game-changer for NAS configurations, offering not just ample storage potential but also blistering data access speeds. NVMe technology excels in high-demand scenarios, such as multiple simultaneous accesses to the NAS, which is common in VM / Container environments. Users can leverage these slots to set up a RAID configuration, allowing for either performance enhancement through striping or data redundancy for added security.
Moreover, the Intel Core i9-13900HK comes with Intel’s UHD Graphics, which supports 4K resolution at 60Hz over HDMI and DisplayPort outputs. This graphical prowess, in combination with the processor’s ability to support fast memory, adds to the NAS’s capability as a potent media server that can handle 4K content playback and transcoding without breaking a sweat.
Specification
Detail
Processor
13th Gen Intel Core i9-13900HK, up to 5.40 GHz
Graphics
Integrated Intel Iris Xe Graphics
Memory Support
DDR5, 2 slots, up to 96GB
Storage Options
3x M.2 slots (NVMe), 2x SATA 3 Ports
Expansion Slots
1x PCIe 4.0 x4, 1x PCIe 4.0 x8
Network
2x Onboard RJ45, WiFi
Audio
5.1 Channels
Back I/O Ports
2x USB 3.2/3.1 Gen 1, DisplayPort, 4x USB 2.0, HDMI 2.0, 3x Audio Jacks
USB Support
USB 2.0, USB 3.0
RAID Support
No
Form Factor
Mini-ITX
Chipset
Intel Others
Socket Type
Onboard CPU
Brand Name
ERYING
Origin
Mainland China
Certifications
RoHS, FCC, CE
Finally, while this CPU+Motherboard combo is positioned as an advanced solution for NAS setups, its high-end specifications suggest that it is overqualified for just storage purposes. The presence of the latest connectivity options, robust I/O support, and high-bandwidth LAN ports make it well-suited for a variety of other intensive applications, including gaming, content creation, and design. This versatility ensures that the investment in such a setup can be justified across multiple use cases beyond a typical NAS. For detailed processor specifications and capabilities, further information can be explored on Intel’s official product specifications page.
Bottom Line, there are going to be users who are looking at how expensive ‘turnkey’ NAS solutions can cost, then see what just the hardware parts would cost in a DiY alternative. For example, below is the cost of a fully specced out QNAP Intel Core build vs the cost fo JUST the CPU and Motherboard in the Erying board:
Needless to say, this is not a completely fair comparison. The QNAP includes all the building, the software, the PSU, cables, case, testing and all under a single warranty. Still, it IS food for thought for those that are happy to build their own NAS and save some $$$s.
Where to Buy the Erying Intel Mobo Combo (3 Versions):
Best POWER + Storage CPU+Motherboard M-ITX Combo – The Intel 13th Gen The Minisforum AR900i (4x M.2 4×4 and 5×16 PCIe)
Spec Highlights – Intel® Core i9-13900HX Processor, 24 C/32 T (36M Cache, up to 5.4 GHz) Intel® UHD Graphics for 13th Gen Intel® Processors, SODIMM DDR5 Slots×2, up to 5600 MT/s, Max 64GB, 4×M.2 2280 PCIe4.0 x4, SSD Slots PCIe 5.0 X16 connector, 1x 2.5GbE and Lack of SATA AGAIN! –Check on AliExpress and $399 on Amazon
The Minisforum AR900i motherboard, in combination with the potent Intel® Core i9-13900HX CPU, forms a formidable base for power users. The AR900i is a Mobile Desktop (MoDT) motherboard that leverages the might of the 13th Gen Intel® flagship CPU, providing an exceptional 24 cores and 32 threads for heavy multitasking and demanding applications. Notably, the four M.2 2280 PCIe4.0 SSD slots are designed for rapid storage with RAID capabilities, reflecting a setup intended for high-speed operations and data security. The motherboard’s inclusion of SFF-8643 connectors represents an innovative shift away from static SATA ports, offering a dynamic and scalable solution for storage expansion. This approach is particularly beneficial for custom builds that require a neat cable management system and the flexibility to adjust storage configurations with ease. The PCIe 5.0 X16 slot on this motherboard is a forward-thinking feature, catering to the latest and most powerful GPUs and ensuring that the system is ready for the next generation of graphics and expansion cards.
However, it’s important to consider the networking capabilities of the AR900i. With only a single RJ45 2.5G Ethernet port, users who need enhanced networking may have to invest in a PCIe 5.0 compatible NIC, potentially sacrificing the valuable high-speed slot that could be used for other high-performance components. This choice underscores the need to balance the motherboard’s impressive storage and expansion capabilities with networking needs. The AR900i represents Minisforum’s dedication to compact, high-performance computing solutions. With support for triple-screen displays up to 8K, built-in AX210 wireless card for WiFi 6E, and Bluetooth 5.3, this motherboard offers comprehensive connectivity options for a variety of uses, from gaming to professional creative workstations.
Specification Category
Details
Processor
Intel® Core i9-13900HX, 24 Cores/32 Threads (36M Cache, up to 5.4 GHz)
GPU
Intel® UHD Graphics for 13th Gen Intel® Processors
Chipset
Intel® HM770 Chipset
Memory
DDR5 Dual channel (SODIMM Slots×2, up to 5600 MT/s, Max 64GB)
Storage
4×M.2 2280 PCIe4.0 SSD Slots
Expansion Slot
PCIe 5.0 X16 connector ×1
Wireless Connectivity
M.2 2230 Key E Slot
Video Output
HDMI2.0 ×1, DisplayPort1.4 ×1, USB-C ×1
Audio Output
HDMI2.0 ×1, DisplayPort1.4 ×1, USB-C ×1, Line Out ×1
Ethernet
RJ45 2.5G Ethernet Port×1
USB Ports
USB3.2 Gen2 Type-C Port ×1 (Alt DP), USB3.2 Gen2 Type-A Port ×2, USB2.0 Type-A Port ×2
I/O Ports
4-pin CPU Fan header ×1, 4-pin System Fan header ×2, 4-pin SSD Fan header ×1, USB 3.2 Gen 2 header ×1, Front Panel Audio header ×1, System Panel header ×1
Form Factor
Mini-ITX Form Factor (170x170mm)
The Intel® Core i9-13900HX processor, with its 24 cores and 32 threads, is a powerhouse suitable for a DIY NAS setup geared towards enthusiasts and professionals requiring robust performance for tasks such as media transcoding, file serving, and hosting complex databases. The processor’s 36M cache and peak speeds of up to 5.4 GHz ensure that multiple operations can be handled efficiently, supporting a smooth and responsive network storage experience. The addition of Intel UHD Graphics for 13th Gen Intel® Processors also allows for hardware-accelerated video encoding and decoding, which can be a significant advantage for a NAS serving as a media server. In terms of memory, the system’s support for DDR5 dual-channel RAM, with speeds up to 5600 MT/s and a maximum capacity of 64GB, provides ample bandwidth and storage for running a NAS operating system along with any additional services. This is particularly important for a NAS that may be handling simultaneous data-intensive tasks. The four M.2 2280 PCIe4.0 SSD slots offer high-speed storage options, ideal for caching or fast data access needs, enhancing the overall performance and speed of the NAS.
The connectivity options of this setup are also noteworthy. The motherboard’s Mini-ITX form factor is well-suited for NAS builds, where space efficiency is often a priority. The inclusion of a PCIe 5.0 X16 expansion slot allows for additional upgrades, such as adding a dedicated network interface card for improved network throughput or additional storage controllers if the four M.2 slots are insufficient. The onboard 2.5G Ethernet port provides a faster-than-gigabit connection, beneficial for transferring large files over the network. With a comprehensive range of I/O ports, including USB3.2 Gen2 and USB-C, the system can accommodate a variety of peripherals and external drives, making it a versatile choice for a DIY NAS setup.
Where to Buy the Intel 13th Gen i9 The Minisforum AR900i CPU + M-ITX Motherboard Combo:
Best Cheap CPU+MoBo+SSD+RAM Combo – The Topton N6005 CPU+Mobo Combo
Spec Highlights – Topton NAS Motherboard N6005, 4x Intel i226-V 2.5G Nics, Dual M.2 NVMe, Six SATA3.0, 2*DDR4 SODIMM, HDMI2.0, Mini ITX / M-ITX-$261 on AliExpress ($399 for 32GB DDR4 RAM and 1TB M.2 NVMe Included – see image below)
The Topton N6005 combo offers excellent value, combining an Intel Pentium N6005 processor, motherboard, 16GB RAM, and an NVMe OS SSD. Its popularity stems from its low cost and high performance, suitable for a variety of DIY NAS builds.
Component
Specification
CPU
Integrated Jasper Lake Intel Celeron N6005
RAM
2x SO-DIMM DDR4 slots, up to 64GB (2400/2666/2933MHz)
– Full protection (USB, audio source, network interface)
GPU
Integrated Intel UHD Graphics (24EUs for N5105, 32EUs for N6005)
IO Ports
2x USB 3.0, 4x USB 2.0, 1x HDMI, 1x DP
LAN
4x RJ-45 2.5G NET
Additional Features
– Auto power-on, Wake-On-LAN, PXE support
Structure
Solid Capacitor Design
Priced at $261 on AliExpress, and $399 when bundled with 32GB DDR4 RAM and a 1TB M.2 NVMe SSD, the Topton N6005 motherboard combo stands out for its affordability. This price point makes it an accessible entry for enthusiasts and professionals alike who are looking to build a high-performance NAS without incurring exorbitant costs. The inclusion of substantial RAM and fast NVMe storage in the bundle further adds to the value, offering what one might need for a robust NAS setup at a price that challenges many competitors in the market.
The CPU, an Intel Celeron N6005, is a Jasper Lake processor that strikes a balance between efficiency and capability. With a base frequency of 2.0 GHz and a burst frequency of up to 2.9 GHz across its four cores, it’s engineered to handle the multitasking demands of a NAS system. The 10W TDP reflects a design optimized for low power consumption, making it an economical choice for 24/7 operation, a critical consideration for NAS systems which are expected to be always on.
On the storage front, the Topton N6005 shines with two M.2 NVMe PCIe 3.0 x1 2280 slots for high-speed data transfer and six SATA3 6Gb/s ports for ample storage capacity. This allows users to install fast NVMe drives for the operating system and frequently accessed files, while the SATA ports can host larger hard drives for bulk storage. Such a combination is perfect for a NAS system, providing quick access to data and large storage pools for backup, media libraries, or network file sharing. If you are considering the Topton N6005 CPU+Motherboard combination for PLEX Media Server, I made a dedicated video on this using this CPU/Mobo in the Jobsno N2 NAS Case below, testing 4K Multimedia:
The Topton N6005 has garnered popularity among NAS builders for several reasons. It offers a mini-ITX form factor, which is ideal for compact builds, and includes four 2.5Gbps Intel i226-V network interfaces, enhancing its functionality as a home or small office server. Additionally, the CPU’s support for up to 64GB of DDR4 RAM means it can handle more demanding NAS tasks, such as running virtual machines or hosting databases. These features, coupled with its energy efficiency and expandability, make the Topton N6005 a sought-after component for building versatile and powerful NAS systems.
Disclaimer – The Jonsbo N1, N2 and N3 are STILL the Best NAS Enclosures
Jonsbo’s range of NAS enclosures stands out as an industry benchmark for those keen on custom desktop NAS builds. These enclosures seamlessly blend aesthetics with functionality, showcasing a meticulous design ethos that addresses both the visual and technical demands of modern users. The build quality is exceptional, employing high-grade materials that not only ensure durability but also aid in efficient heat dissipation, a critical factor for continuous NAS operations. Furthermore, Jonsbo has consistently demonstrated a forward-thinking approach by incorporating features that cater to future expansion and adaptability. Their user-friendly design ensures easy installation and maintenance, making them a preferred choice for both novices and seasoned builders. Backed by positive user reviews and a reputation for reliability, Jonsbo NAS enclosures are, without a doubt, one of the best investments for those aiming to craft a high-performance, custom desktop NAS system.
Recommended Add-ons and Extras to Remember for Your DiY NAS Build
Building a NAS involves more than just the CPU and motherboard; enclosures, memory, PSUs, and other accessories are essential. Future guides will detail these components, alongside recommendations for smaller, crucial accessories to enhance your DIY NAS server’s functionality.
Here is our article on the BEST (and worst) NAS Enclosures and Cases you can find on AliExpress for your DiY NAS Build. Click the banner below to read the article, alternatively, you can watch the detailed video HERE. Alternatively, you can watch a video on the best and worst NAS enclosures on Amazon here instead.
This description contains links to Amazon. These links will take you to some of the products mentioned in today's content. As an Amazon Associate, I earn from qualifying purchases. Visit the NASCompares Deal Finder to find the best place to buy this device in your region, based on Service, Support and Reputation - Just Search for your NAS Drive in the Box Below
Need Advice on Data Storage from an Expert?
Finally, for free advice about your setup, just leave a message in the comments below here at NASCompares.com and we will get back to you.Need Help?
Where possible (and where appropriate) please provide as much information about your requirements, as then I can arrange the best answer and solution to your needs. Do not worry about your e-mail address being required, it will NOT be used in a mailing list and will NOT be used in any way other than to respond to your enquiry.
[contact-form-7]
TRY CHAT Terms and Conditions
If you like this service, please consider supporting us.
We use affiliate links on the blog allowing NAScompares information and advice service to be free of charge to you.Anything you purchase on the day you click on our links will generate a small commission which isused to run the website. Here is a link for Amazon and B&H.You can also get me a Ko-fi or old school Paypal. Thanks!To find out more about how to support this advice service checkHEREIf you need to fix or configure a NAS, check FiverHave you thought about helping others with your knowledge? Find Instructions Here
Or support us by using our affiliate links on Amazon UK and Amazon US
Alternatively, why not ask me on the ASK NASCompares forum, by clicking the button below. This is a community hub that serves as a place that I can answer your question, chew the fat, share new release information and even get corrections posted. I will always get around to answering ALL queries, but as a one-man operation, I cannot promise speed! So by sharing your query in the ASK NASCompares section below, you can get a better range of solutions and suggestions, alongside my own.
If you have been in the market for building your own NAS from scratch on a budget, then if you push past all the Intel Celeron, Pentium and Core CPU+Mobo combos that are flooded in the market, you might well come across this recently revealed AMD powered monster of a CPU+Motherbaord combination – The CWWK AMD-7840HS board. Arriving under several retailer brand (including Topton), this board arrives with an 8 Core CPU that can burst up to 5.1 Ghz, 2.7Ghz int. Gfx, 4x 2.5GbE, a PCIe Gen 4×8 slot, USB 4, 2x Gen 4×2 M,.2 slots an d support for up to 9 SATA drives. I mean.. WOW. The TDP is a little higher than some might like, the ECC support is up for debate (more on that later) and the 20 Lane CPU is definitely being spread out pretty wide – but there is no denying that this is a serious bot of kit. So, what exactly do you get when you pay $499+ for this SoC Mobile CPU and Motherboard combo? What’s the design like? And should you be considering this for your next TrueNAS Build? Let’s take a closer look at the AMD-7840HS NAS board.
Here are a few examples of where you can get this board online:
(Topton) 8-Bay / 9-Bay Board AMD-7940HS $489 (AliExpress) HERE
(Topton) The AMD-7940HS CPU+Board + 1TB NVMe + 32GB DDR5 + SFF Cables + CPU HS$729 (AliExpress) HERE
(KingNovy) Complete Board + AMD-7940HS $509 (AliExpress) HERE
Note – Performance Testing and NAS Building are still ‘WiP’ on this board as I wait for the last few components to arrive for YouTube. I will update this article with additional information resources after testing is concluded
Specification
Detail
Architecture
Zen 4 (Phoenix)
Cores / Threads
8 / 16
Base / Boost Frequency
3.8 GHz / 5.1 GHz
TDP (Thermal Design Power)
35 W (Configurable 35-54 W)
Memory Support
DDR5, LPDDR5x up to 7500 MT/s; Dual-channel; ECC support (in specific configurations of CPU)
The CWWK 7840HS CPU+Motherboard combo represents a significant leap in compact computing, catering to a wide range of users from enthusiasts to professionals requiring high-performance systems in small form factors.
This combination of AMD’s Ryzen 7 7840HS processor and a feature-rich Mini-ITX motherboard offers an intriguing blend of power, efficiency, and expansion capabilities, making it an ideal choice for various applications, including gaming, content creation, and server use.
The motherboard itself is a lovely bit of engineering, designed with a matte black PCB and a high-density, moisture-free fiber 10-layer circuit board, ensuring both aesthetic appeal and durability. This design philosophy extends to the motherboard’s support for AMD’s “Zen 4” architecture Ryzen 5/7/9 series processors, providing users with the ability to choose a CPU that best fits their performance needs without compromising on form factor.
One of the standout features of this motherboard is its expansion capabilities, particularly notable given its 17×17 standard Mini-ITX form factor. It includes a PCI-E x16 slot (PCle4.0 x8 signal) for graphics or network card expansions, two M.2 NVMe (PCle4.0 x2) slots for high-speed storage, and SFF-8643 sockets that support up to four SATA 3.0 connections via cable.
This level of expandability is uncommon in Mini-ITX motherboards, offering users the flexibility to build a compact yet powerful system that can handle demanding applications and storage needs.
Memory support is another area where the 7840HS CPU+Motherboard combo shines. With dual-channel SO-DIMM DDR5 slots supporting up to 5600MHz (and backward compatibility for server-grade ECC notebook memory), it allows for high-speed, reliable memory configurations up to 64GB. This capability is crucial for application ons requiring fast data access and processing, such as video editing and 3D rendering.
HOWEVER, there is definitely a debate as to whether you can actually use ECC memory! CWWK lists 4 different CPU SKUs for this mobo and only 1 of them (the 7735HS) actually supports ECC. So, in order to investigate, I installed 1x 16GB Kingston ECC SODIMM 4800Mhz module and ran some SSH commands. Sadly, it appears that the default 7840HS version of this motherboard combo does NOT support ECC (SEE VIDEO ABOVE)
The combo’s connectivity options are equally impressive, featuring four Intel i226-V 2.5G RJ45 UDE network ports, HDMI+DP+Type-C triple display outputs supporting 4K@60Hz, and multiple USB 3.2 and Type-C interfaces. Such comprehensive connectivity ensures that users can connect a wide array of peripherals, displays, and network connections, making the system versatile for different setups and applications.
The CWWK 7840HS CPU+Motherboard combo is a great example of modern computing’s direction towards more efficient, powerful, and versatile systems within increasingly compact form factors. Whether for gaming, professional work, or server applications, this combo offers a compelling option for those seeking the pinnacle of performance and flexibility in a small package.
Its combination of a high-performance processor, expansive memory and storage options, and robust connectivity makes it a standout choice for enthusiasts and professionals alike.
The CWWK 7840HS CPU+Motherboard combo features ASMedia SATA controllers, specifically the ASM1166 and ASM1164 chips, which are central to its enhanced SATA connectivity. These chips enable the motherboard to efficiently manage SATA connections, ensuring stable and rapid data transfer rates for a range of storage devices.
The inclusion of two SFF-8643 connectors, influenced by these ASMedia components, significantly boosts the motherboard’s storage expansion capabilities. These connectors allow for up to eight SATA devices to be connected through breakout cables, optimizing storage scalability within a compact form factor. However, it’s important to highlight that these connectors do not support NVMe drives, focusing instead on maximizing SATA device compatibility.
This motherboard also boasts a single standard SATA port, complementing the SFF-8643 connectors to offer comprehensive support for SATA-based storage configurations. The strategic integration of ASMedia SATA controllers underscores a commitment to providing versatile and reliable storage solutions, tailored for users prioritizing a balance of speed, capacity, and efficiency in their builds.
The AMD Ryzen 7 7840HS is a notable entry in AMD’s mobile processor lineup, launched in January 2023. Part of the Ryzen 7 series and built on the advanced Zen 4 (Phoenix) architecture, this chip is designed to deliver high performance for laptops and portable devices. With 8 cores and 16 threads thanks to AMD’s Simultaneous Multithreading (SMT), the 7840HS offers substantial multitasking capabilities. Operating at a base frequency of 3.8 GHz with the ability to boost up to 5.1 GHz, it combines speed with efficiency, all within a 35W thermal design power (TDP). This processor also supports DDR5 memory and has integrated Radeon 780M graphics, making it well-suited for both productivity tasks and gaming.
Physically, the Ryzen 7 7840HS is manufactured using TSMC’s 4 nm process technology, which houses 25,000 million transistors on a 178 mm² die. This compact yet powerful CPU is designed for AMD’s Socket FP8, underscoring its mobile-oriented design with a configurable TDP range of 35-54W. It supports a wide range of features, including ECC memory for data integrity and PCI-Express Gen 4 for high-speed component communication. The Ryzen 7 7840HS stands out with its inclusion of the latest Ryzen AI technology, aimed at enhancing generative AI applications, and its leading-edge Radeon 780M integrated graphics. This combination not only boosts traditional computing tasks but also opens up new possibilities in AI and gaming. The processor’s architecture enables significant improvements in instructions per cycle (IPC), benefiting from larger caches and faster memory support up to LPDDR5x-7500. Its performance is competitive with top-tier processors in its category, reflecting AMD’s commitment to delivering powerful computing solutions.
The discussion around ECC (Error-Correcting Code) memory support on the CWWK 7840HS CPU+Motherboard combo reveals a nuanced landscape of compatibility and performance considerations. While the motherboard touts support for “server-grade ECC” memory, indicating an ability to correct data corruption on-the-fly and enhance system reliability, the reality of ECC support is more complex. It requires alignment across the CPU, motherboard, and the memory itself. The AMD Ryzen 7 7840HS processor, integral to this combo, along with other CPUs offered by CWWK, presents a mixed picture regarding ECC compatibility. Despite AMD’s general support for ECC across many of its CPUs, the specific models available with this motherboard, including the 7840HS, do not officially support ECC, highlighting a disconnect between processor capabilities and motherboard features. This discrepancy underscores the importance of thorough compatibility checks for users who prioritize ECC for its error-correcting capabilities, especially in environments where data integrity is paramount.4
The situation is further complicated by the motherboard’s design and the marketing of DDR5 memory with “on-die ECC,” which does not equate to traditional ECC memory’s error-correcting functionality. This type of ECC, often referred to as a marketing gimmick, fails to provide the same level of error correction and data integrity assurance as server-grade ECC memory. As enthusiasts and professionals debate the motherboard’s ECC support, it becomes evident that while the hardware may technically support ECC, the practical benefits and implementation may fall short without the full cooperation of the CPU and explicit support from the motherboard’s firmware. This scenario leaves users in a precarious position, needing to navigate between marketing claims and technical specifications to determine the true extent of ECC support and its relevance to their specific use cases.
Given the technical details and specifications of the CWWK 7840HS CPU+Motherboard combo, we can infer some positive and negative points about this hardware combination despite the inability to access the specific Reddit page for user insights.
===== Further Testing – COMING SOON =====
Check our YouTube channelfor further videos on the AMD-7840HS NAS Motherboard for testing first (such as the video below):
CWWK AMD 7840HS NAS Motherboard Review Conclusion – Pros and Cons
Spec Highlights – 4x AMD MobileRyzen Options, SODIMM DDR5 Slots×2, ECC Supported, 2×M.2 2280 4×2 SSD Slots, PCIe 4×8 connector ×1 (x16 Physical), SFF-8643 x2 Connectors for SATA III, 4x 2.5GbE, USB 4 (20Gbs Limits) , Internal USB 2.0–$489 on AliExpress and Check on Amazon
The combination of the AMD “Zen 4” architecture Ryzen 5/7/9 series processors with a very unique motherboard offers a high-performance platform that is particularly suitable for building a low scale, but HIGH POWER Network Attached Storage (NAS) server. The Mini-ITX form factor of the motherboard, compatible with 1700 series CPU coolers, ensures that it can fit into compact NAS cases while providing adequate cooling for the powerful processors housed within. In the realm of NAS servers, storage options and connectivity are key. The motherboard’s two M.2 NVMe (PCIe 4.0 x2) slots are ideal for high-speed storage drives that can handle intense read and write operations typical in a NAS environment. The inclusion of 2 * SFF-8643 sockets, which support up to four connections each and a total of 9 SATA 3.0, is an advanced feature that provides flexibility and scalability for storage expansion. This is particularly beneficial for NAS setups where large storage pools and redundancy (such as RAID configurations) are important. Network connectivity is another critical aspect of NAS servers, and this motherboard delivers with its 4 * Intel i226-V 2.5G RJ45 UDE network ports, allowing for high-speed data transfer and network redundancy or link aggregation if required. However, the lack of 10GbE port might limit the network throughput if higher speeds are needed, in which case the PCIe Gen 5×16 slot could be employed for an additional network interface card, although this might be considered an inefficient use of this high-bandwidth expansion slot. Lastly, the wide array of USB ports, including USB3.2 Gen2 Type-C with a 20Gbps rate and additional USB3.2 and USB2.0 ports, adds to the versatility of this motherboard. The built-in set of USB3.2 pin sockets also allow for further expansion and connectivity options, essential for a NAS that may need to accommodate a variety of peripherals or provide additional data transfer interfaces.
PROS
High-Performance CPU: The AMD Ryzen 7 7840HS processor, with 8 cores and 16 threads capable of reaching up to 5.1GHz, offers excellent performance for demanding applications and multitasking. This makes the combo suitable for high-end gaming, content creation, and computational tasks.
Comprehensive Connectivity and Expansion: The motherboard’s design, featuring a PCI-E x16 slot (physically, in reality it is x8 operational), dual M.2 NVMe slots, multiple SATA3.0 connections, and 2.5G RJ45 network ports, provides a wide range of connectivity options. This allows for extensive storage solutions, high-speed internet connectivity, and the possibility of graphics or network card expansions, making it versatile for various use cases.
Advanced Memory Support: With dual-channel SO-DIMM DDR5 slots supporting up to 5600MHz and server-grade ECC notebook memory (still being investigated about it’s compatibility in Mobo vs CPU in the 7840HS), the combo offers cutting-edge memory technology with high-speed and reliable memory options, beneficial for workstations and servers requiring error correction for stability.
Efficient Power Consumption: The TDP rating of 35-54W for the CPU indicates efficient power usage, which is crucial for keeping the system cool and reducing energy costs, particularly in environments where the system might be running continuously, such as servers or media centers.
Compact and Durable Design: The Mini-ITX form factor is ideal for users looking to build small, space-efficient systems without compromising on performance. Additionally, the high-quality, moisture-free fiber circuit board with full protection enhances the durability and longevity of the motherboard.
CONS
Power Supply Requirements: The recommendation to use a power supply of more than 500W with 9 disks may necessitate a higher initial investment for users aiming to fully utilize the motherboard’s storage capabilities, especially in compact builds where space and cooling for large power supplies can be a concern.
Complexity for Beginners: The wealth of features and expansion options, while beneficial for experienced users, may overwhelm beginners. The technical nature of managing multiple storage devices, optimizing memory configurations, and ensuring compatibility with various components requires a certain level of expertise.
Limited PCI-E Bandwidth: The single PCI-E x16 slot operating at x8 signal might limit the performance of high-end graphics cards or other PCI-E devices. This could be a bottleneck for users aiming to achieve maximum graphical performance or looking to install multiple high-bandwidth PCI-E cards.
Cost: Given the high-end specifications and features, the CWWK 7840HS combo is likely to carry a premium price tag. This cost might be prohibitive for budget-conscious builders or those who do not require the advanced features offered by this combo.
Cooling Considerations: The compact Mini-ITX form factor, while advantageous for space-saving, may present challenges in terms of cooling, especially when housing high-performance components like the Ryzen 7840HS. Users will need to carefully consider cooling solutions to maintain optimal temperatures and prevent thermal throttling.
Here are a few examples of where you can get this board online:
(Topton) 8-Bay / 9-Bay Board AMD-7940HS $489 (AliExpress) HERE
(Topton) The AMD-7940HS CPU+Board + 1TB NVMe + 32GB DDR5 + SFF Cables + CPU HS$729 (AliExpress) HERE
(KingNovy) Complete Board + AMD-7940HS $509 (AliExpress) HERE
This description contains links to Amazon. These links will take you to some of the products mentioned in today's content. As an Amazon Associate, I earn from qualifying purchases. Visit the NASCompares Deal Finder to find the best place to buy this device in your region, based on Service, Support and Reputation - Just Search for your NAS Drive in the Box Below
Need Advice on Data Storage from an Expert?
Finally, for free advice about your setup, just leave a message in the comments below here at NASCompares.com and we will get back to you.Need Help?
Where possible (and where appropriate) please provide as much information about your requirements, as then I can arrange the best answer and solution to your needs. Do not worry about your e-mail address being required, it will NOT be used in a mailing list and will NOT be used in any way other than to respond to your enquiry.
[contact-form-7]
TRY CHAT Terms and Conditions
If you like this service, please consider supporting us.
We use affiliate links on the blog allowing NAScompares information and advice service to be free of charge to you.Anything you purchase on the day you click on our links will generate a small commission which isused to run the website. Here is a link for Amazon and B&H.You can also get me a Ko-fi or old school Paypal. Thanks!To find out more about how to support this advice service checkHEREIf you need to fix or configure a NAS, check FiverHave you thought about helping others with your knowledge? Find Instructions Here
Or support us by using our affiliate links on Amazon UK and Amazon US
Alternatively, why not ask me on the ASK NASCompares forum, by clicking the button below. This is a community hub that serves as a place that I can answer your question, chew the fat, share new release information and even get corrections posted. I will always get around to answering ALL queries, but as a one-man operation, I cannot promise speed! So by sharing your query in the ASK NASCompares section below, you can get a better range of solutions and suggestions, alongside my own.
An Easy Guide to Buying the Right UPS for your NAS System
The popularity of uninterruptible power supplies (UPS) has risen significantly in recent years. Not just for businesses, but for home users as well, who often have limited power setups such as houseboats, pop-up offices, and mobile homes. The value of having a safety net for your power-consuming devices is undeniable. Additionally, for those whose data is critical and whose business or personal life relies on constant access and read/write operations, a UPS can provide peace of mind. In the past, power failure solutions were only accessible to large enterprises and high-level businesses, with prices starting in the five figures. However, with the rise of network-attached storage (NAS) in homes and the increased efficiency of mass production techniques, owning a UPS device to protect data in both homes and businesses has become more affordable. However, choosing the right UPS for your NAS device, such as a QNAP or Synology, and finding one that fits within your budget can be challenging. In this guide, we will address the three commonly asked questions by users considering a UPS but unsure of which device to choose: 1) How does a UPS work and how will I benefit? 2) How do I determine the right Watts, Volts, and Amps to choose the best UPS? 3) How much will a UPS cost? We hope this guide is helpful for NAS buyers looking at brands such as Synology, QNAP, Asustor, Terramaster, and others, and also for anyone looking to choose the right UPS for other devices.
Click HERE to Skip ahead to the Recommended UPS for different NAS drives
What Are the Factors I need to consider when buying a UPS for my NAS?
Choosing the right UPS (uninterruptible power supply) for your Synology or QNAP NAS (network-attached storage) can be a complex task, as there are many factors to consider. However, by following a few key guidelines, you can ensure that your NAS is protected against power outages and other issues that could cause data loss or corruption. The first thing to consider when choosing a UPS for your NAS is the amount of power that your NAS requires. Desktop NAS devices with external PSUs typically have a power consumption of around 60-120 watts and rackmounts generally 250W and above, although this can vary depending on the specific model and the number of hard drives that are installed. It is important to choose a UPS that can provide at least this much power, as well as a bit extra to account for any other devices that may be connected to the NAS. Another important factor to consider is the runtime of the UPS. This is the amount of time that the UPS can keep your NAS running in the event of a power outage. The runtime of a UPS is typically measured in minutes, and you should choose a UPS that has a runtime that is long enough to allow you to properly shut down your NAS in the event of a power outage.
Another important feature to look for when choosing a UPS is the ability to communicate with the NAS. Some UPS’ have built-in USB or serial ports that allow them to communicate with the NAS and provide status information. This can be very useful in case of power outage, as it can allow you to monitor the status of the UPS and take appropriate action. Finally, you should also consider the size and weight of the UPS, as well as its overall design. A UPS that is smaller and lighter may be more convenient to deploy, but you should also make sure that it is well-designed and built to last. When choosing a UPS for your NAS, it is important to consider the amount of power that your NAS requires, the runtime of the UPS, the ability to communicate with the NAS, compatibility and the size and weight of the UPS. By following these guidelines, you can ensure that your NAS is protected against power outages and other issues that could cause data loss or corruption.
What is a UPS and Why Should I Buy One for my NAS?
The most frequently asked question about UPS is typically “What exactly is a UPS and what does it do?” UPS stands for Uninterruptible Power Supply and many users believe that purchasing a UPS means they can run their devices and access data from their NAS, DAS, or SAN for hours after a power failure. While this is technically true, it would require a significant financial investment in the form of a 5-figure sum. In reality, most users do not require hours of protection for their read/write data operations on HDD media. Instead, what is often needed is enough time to safely shut down the server or RAID storage. This can be achieved by spending only hundreds of pounds, not thousands, as it depends on the number of devices drawing power, their specific needs, and the efficiency of the chosen UPS. For more information on UPS and how to choose one, please watch the video below.
How Does a UPS Draw Power and How Do I Connect My Devices?
This topic can be challenging for some, so we will break it down and explain it in a simple way. Before delving into technical terms like Watts, Volts, and Power, let’s use an analogy that’s easy to understand. Imagine receiving electricity to your device as drawing water from a tap.
To understand this concept, we can use an analogy of a tap and water. Just like a tap needs water and pressure to deliver it through the pipe, an electrical circuit needs electrons and voltage to deliver electricity to a device. The water represents the electrons that carry electricity from the power source to the destination device, like a NAS, DAS, or PC. The tap represents the destination device and the water/electrons are going around in a circuit back to the water/power source, which is mostly unseen in the cables.
The pressure in the analogy represents the VOLTAGE, which is the strength of the electricity being pushed by the electrons in the circuit. It’s important to measure this as some devices are designed to only accept a specific amount of voltage. If the voltage is too high or too low, the device will not function correctly.
AMPS represent the amount of electrical charge that passes a given point in a second, similar to how much water passes through the pipe per second.
So, now we need to know the WATTS of the device. This is compiled with the following equation:
AMPS x VOLTS = WATTS
or
Water Volume x Water Pressure = Water Power
If you’ve ever experienced weak water pressure in a shower while living in an apartment on a higher floor, this is likely due to the water pressure not being strong enough to deliver the water to the destination device. Similarly, a smaller battery pack is often measured in milliampere-hours (mAh), which represents the amount of charge available, rather than time. Using the analogy of water, this would be like a large drum of water. The amount of water and how fast it travels from the drum is not as important as the available water that can be carried over to the tap. The output and result is heavily affected by the AMPS and VOLTS, similar to the pressure of water and the maximum or minimum amount of water the tap can receive.
Choosing the right UPS Battery for your Home or Office
The majority of UPS devices have a similar setup. You connect one end to your main power outlet (3 Pin, 2 Pin, etc) and the UPS has multiple ports for connecting your destination devices (PC, NAS, etc). Inside the UPS chassis, there is one or more batteries that are charged from the wall plug, while your devices are powered directly from the wall and not drawing from the batteries unless there is a power failure. In the event of a power failure in your home or business, the destination devices will switch to drawing power from the batteries, giving you time to save your data and shut down your devices safely, protecting your digital storage from corruption or loss. It’s worth noting that when buying a UPS, there are many figures to consider, but the power drawn by computing equipment is typically measured in Watts or Volt-Amps(VA).
BUT
The power in Wattsis the real power drawn by the equipment.Volt-Amps are called the “apparent power” and are the product of the voltage applied to the equipment times the current drawn by the equipment.
Inexpensive UPS devices typically have a shorter running time because they don’t provide as much charge. Mid-range UPS devices, on the other hand, offer longer charge times, more features, and additional functionality such as network alerts, internet alerts via SMS or email, an LCD display, USB connectivity for maintenance, and the ability to automatically save or shut down certain NAS or PC machines in the event of a power failure, eliminating the need for manual intervention.
There is more to choosing the right UPS than matching the WATTS of your destination device and that of the UPS
UPS capacities are giving in VOLT-AMPS , not WATTS
Remember again,
VOLTS x AMPS = WATTS
Well, Resistance present in electrical load means that the WATTS cannot be matched Like for Like. So:
How do I Choose the Correct VA for the Watts on my NAS, PC and more?
You will need to consider a UPS with a VOLT-AMP 50-70% higher than the WATTS present on your destination device. Don’t forget to factor into your consumption any other devices that are drawing from the UPS, as this consumption is not per device, but TOTAL.
What is Line Interaction on a UPS?
Some UPS devices have a “Line Interactive” feature that can strengthen a weak or inconsistent power supply, particularly useful for those in remote areas where maintenance may be less frequent. When it comes to sizing a UPS, it’s important to note that equipment nameplate ratings are often in VA which can make it difficult to determine the Watt rating. To avoid oversizing the UPS, it’s recommended to configure the system such that the VA rating of the load is no greater than 60% of the UPS VA rating. This will prevent exceeding the Watt rating of the UPS. However, this approach may result in an oversized UPS and a longer run time than expected.
– Battery Packs, Listed in VOLTS and can be added to an existing UPS
– Replacement Battery Cartridges, an Internal Upgrade, RANGE specific
– Available in Desktop or Rack mount
What Are the most popular brands in the UPS Market?
There are many brands that provide UPS (uninterruptible power supply) devices in the market, but some of the most popular ones include:
APC (American Power Conversion) – APC is a well-known brand that has been providing UPS devices for many years. They offer a wide range of UPS devices, including standalone units, rack-mount units, and network-grade units. They also offer a variety of software and accessories to help manage and monitor their UPS devices.
Tripp Lite – Tripp Lite is another well-known brand that provides UPS devices. They offer a wide range of UPS devices, including standalone units, rack-mount units, and network-grade units. They also offer a variety of software and accessories to help manage and monitor their UPS devices.
Eaton – Eaton is a well-established brand that provides UPS devices. They offer a wide range of UPS devices, including standalone units, rack-mount units, and network-grade units. They also offer a variety of software and accessories to help manage and monitor their UPS devices.
CyberPower – CyberPower is a brand that provides a wide range of UPS devices, including standalone units, rack-mount units, and network-grade units. They also offer a variety of software and accessories to help manage and monitor their UPS devices.
Schneider Electric – Schneider Electric is a brand that provides a wide range of UPS devices, including standalone units, rack-mount units, and network-grade units. They also offer a variety of software and accessories to help manage and monitor their UPS devices.
Liebert – Liebert is a brand that provides a wide range of UPS devices, including standalone units, rack-mount units, and network-grade units. They also offer a variety of software and accessories to help manage and monitor their UPS devices.
These are just a few examples of the many brands that provide UPS devices in the market. There are many other brands available, each with their own set of features, specifications, and pricing options, so it is worth researching different options to find the one that best suits your needs.
How Do Synology, QNAP, Asustor and Terramaster NAS work with a UPS?
Almost all NAS drive brands support the use of a smart UPS, connected via USB for monitoring or via the network. That said, how each NAS system reacts to a power cut and switching to the UPS battery does differ. I recently tested the CyberPower 1500 system with a selection of 4-Bay UPS systems to see how each NAS brand’s hardware and software react. Below is the video for each brand. Just click the video, or you can open them up in a separate tab by clicking the title.
Below are a number of tiered UPS systems for your individual power needs and budget. These are based on the Watts you need to cover and based on a single NAS of different size each. This, of course, is just the tip of the iceberg and for more precise advice based on a whole office or server room of hardware, we recommend getting in touch with us directly using the Free Advice section (no commitment and the advice is totally impartial) so we can save you money as well as provide you with a solution that will help you sleep at night! All solutions that I recommend below have to arrive with at least 2 Years of Manufacturers’ Warranty, 2 Years of Battery Warranty/Replacement Coverage, USB and/or Network Support, NAS compatibility, provides at least 10-20mins of continued client operation in a power-cut, support of line interaction and AT LEAST 6x mains power points for devices
Budget/Basic UPS (No Frills!) for Value and/or ARM-Based NAS
For much more modest Synology or QNAP NAS setups, as well as factoring in additional home/office equipment I would recommend the following UPS Device.
1-4 HDD NAS Drive with 90-120w PSU
1x Desktop PC with 250W PSU and Laptops/tablets
1x Router 30W internal PSU
+ Misc Other Office Equipment (50W avg)
Floor or Tower Versions
No LCD available
Option – The Amazon Basics UPS, Available in different versions that cover 400VA to 1500VA, 6-8 Ports – Starts at $49
Option – The CyberPower CP1500PFCLCD PFC Sinewave UPS System, Available in different versions that cover 850-1500VA (1000W), 10-12 Ports – Starts at $389
The lifespan of a UPS (uninterruptible power supply) battery can vary depending on several factors, including the type of battery, the quality of the battery, the usage, and the environment in which the UPS is used. However, on average, a UPS battery should last between 3-5 years with proper usage and maintenance. Lead-acid batteries, which are commonly used in UPS systems, have a typical lifespan of 3-5 years. However, this lifespan can be shortened or extended depending on the usage and maintenance of the battery. For example, if the battery is frequently discharged to a low level, this can shorten its lifespan, whereas proper charging and maintenance can prolong it.
It’s important to note that the lifespan of UPS batteries can also be affected by environmental factors such as temperature, humidity and the amount of use. High temperatures and humidity can shorten the battery life, while keeping the UPS in a cool and dry environment can extend it. It’s also worth noting that most of the UPS batteries have an end-of-life indicator, which will alert you when the battery is no longer performing as well as it should. This will give you an idea of when the battery needs to be replaced.
In conclusion, the lifespan of a UPS battery can vary depending on several factors, including the type of battery, the quality of the battery, the usage, and the environment in which the UPS is used. On average, a UPS battery should last between 3-5 years with proper usage and maintenance. Keeping an eye on the end-of-life indicator and maintaining the battery in a cool and dry environment can help to extend the battery’s lifespan.
This description contains links to Amazon. These links will take you to some of the products mentioned in today's content. As an Amazon Associate, I earn from qualifying purchases. Visit the NASCompares Deal Finder to find the best place to buy this device in your region, based on Service, Support and Reputation - Just Search for your NAS Drive in the Box Below
Need Advice on Data Storage from an Expert?
Finally, for free advice about your setup, just leave a message in the comments below here at NASCompares.com and we will get back to you.Need Help?
Where possible (and where appropriate) please provide as much information about your requirements, as then I can arrange the best answer and solution to your needs. Do not worry about your e-mail address being required, it will NOT be used in a mailing list and will NOT be used in any way other than to respond to your enquiry.
[contact-form-7]
TRY CHAT Terms and Conditions
If you like this service, please consider supporting us.
We use affiliate links on the blog allowing NAScompares information and advice service to be free of charge to you.Anything you purchase on the day you click on our links will generate a small commission which isused to run the website. Here is a link for Amazon and B&H.You can also get me a Ko-fi or old school Paypal. Thanks!To find out more about how to support this advice service checkHEREIf you need to fix or configure a NAS, check FiverHave you thought about helping others with your knowledge? Find Instructions Here
Or support us by using our affiliate links on Amazon UK and Amazon US
Alternatively, why not ask me on the ASK NASCompares forum, by clicking the button below. This is a community hub that serves as a place that I can answer your question, chew the fat, share new release information and even get corrections posted. I will always get around to answering ALL queries, but as a one-man operation, I cannot promise speed! So by sharing your query in the ASK NASCompares section below, you can get a better range of solutions and suggestions, alongside my own.
The Jonsbo N4 6/8-Bay NAS Enclosure has been Revealed
The Jonsbo N4 NAS Enclosure marks an addition to the brand’s lineup, featuring cube-shaped Micro-ATX cases designed specifically for DIY NAS server builds. These enclosures are available in two colours: black and white, each incorporating a distinctive design that includes a classy wood embellishment on the front side of the upper compartment.
The case supports a Micro-ATX motherboard tray, low-profile expansion cards, and offers compatibility for CPU coolers up to 70 mm in height. The inclusion of eight drive caddies, with six designated for 3.5-inch drives and two for 2.5-inch drives, all equipped with SATA 6 Gbps backplanes for hot-plugging, underlines its focus on storage flexibility.
One of the key features of the N4 series is its storage capacity, which includes eight drive bays in total. This comprises six 3.5-inch bays and two 2.5-inch bays, all equipped with SATA 6 Gbps backplanes for hot-plugging capabilities. This configuration allows for a versatile setup of storage drives, meeting the demands for high storage capacity in NAS applications. The design ensures that these drive bays are easily accessible and maintained, promoting a user-friendly experience for installing and upgrading storage devices.
Cooling is managed within the enclosure by a single, built-in 120mm fan located at the rear, aimed at providing sufficient airflow to maintain optimal operating temperatures for the drives and other internal components. The enclosure’s cooling system is further supported by its design, which includes a perforated front panel for the lower compartment housing the drive bays and additional perforations along the sides and top of the upper compartment. This design choice aids in effective cooling, crucial for the reliability and longevity of the NAS server built within.
Jonsbo N4 NAS Case Connections
For connectivity and external interfaces, the N4 NAS Enclosure is equipped with a type-A USB 3.2 port and a USB 3.2 type-C port, conveniently located on the classy wood embellishment at the front side of the upper compartment. This choice of materials and placement not only adds to the aesthetic appeal of the case but also ensures easy access to the ports for quick connections. The inclusion of these modern USB standards caters to the need for high-speed data transfer, a significant aspect for NAS systems that handle large volumes of data.
In terms of compatibility, the N4 series supports MicroATX and Mini-ITX motherboard form factors, with accommodation for up to four low-profile expansion slots. It allows for the installation of graphics cards up to 230 mm in length and CPU coolers up to 70 mm in height, as well as SFX power supplies with a maximum depth of 125 mm. While these specifications may limit some options for high-end components, they are adequate for building a compact and efficient NAS system.
The Jonsbo N4 NAS Enclosure provides a balanced solution for users looking to assemble a NAS server with a focus on storage capacity, cooling efficiency, and a compact footprint.
When Will the Jonsbo N4 NAS Case Be Released and the Price?
Regarding price and availability, the cost of the Jonsbo N4 NAS Enclosure is yet to be confirmed (TBC), but potential buyers can anticipate a price point similar to the previously released Jonsbo N3 model. The initial release is expected to be available through popular online platforms such as Aliexpressand Amazon, which are often the first to stock new products from Jonsbo. This approach allows for wider availability and accessibility to a global audience eagerly awaiting new NAS solutions. The full release and widespread availability of the Jonsbo N4 NAS Enclosure are projected for Spring 2024, aligning with the company’s strategy to introduce innovative products in a timely manner. As anticipation builds, NASCompares plans to conduct a thorough review of the enclosure, offering insights and evaluations to potential users. This forthcoming review will provide valuable information on the N4’s performance, build quality, and overall value, assisting in informed decision-making for those considering this enclosure for their NAS server builds.
This description contains links to Amazon. These links will take you to some of the products mentioned in today's content. As an Amazon Associate, I earn from qualifying purchases. Visit the NASCompares Deal Finder to find the best place to buy this device in your region, based on Service, Support and Reputation - Just Search for your NAS Drive in the Box Below
Need Advice on Data Storage from an Expert?
Finally, for free advice about your setup, just leave a message in the comments below here at NASCompares.com and we will get back to you.Need Help?
Where possible (and where appropriate) please provide as much information about your requirements, as then I can arrange the best answer and solution to your needs. Do not worry about your e-mail address being required, it will NOT be used in a mailing list and will NOT be used in any way other than to respond to your enquiry.
[contact-form-7]
TRY CHAT Terms and Conditions
If you like this service, please consider supporting us.
We use affiliate links on the blog allowing NAScompares information and advice service to be free of charge to you.Anything you purchase on the day you click on our links will generate a small commission which isused to run the website. Here is a link for Amazon and B&H.You can also get me a Ko-fi or old school Paypal. Thanks!To find out more about how to support this advice service checkHEREIf you need to fix or configure a NAS, check FiverHave you thought about helping others with your knowledge? Find Instructions Here
Or support us by using our affiliate links on Amazon UK and Amazon US
Alternatively, why not ask me on the ASK NASCompares forum, by clicking the button below. This is a community hub that serves as a place that I can answer your question, chew the fat, share new release information and even get corrections posted. I will always get around to answering ALL queries, but as a one-man operation, I cannot promise speed! So by sharing your query in the ASK NASCompares section below, you can get a better range of solutions and suggestions, alongside my own.
Why Would You want to change the hard drive in the Synology Beestation? Whether you are an existing owner of the Synology Beestation or a potential NAS buyer who is considering moving away from public cloud services onto your own personal cloud, the Beestastion and BSM provide a fantastically user-friendly alternative to the Synology Diskstation and DSM solutions that the brand has been releasing for almost 25 years. The Beestation can be set up in minutes, sets up all the apps, storage and services in 3 clicks and is BY FAR the most user-friendly NAS system I have ever used! However, it DOES have 1 weakness… one rather sizable Achilles heel… THAT 4TB hard drive inside! The Synology Beestation (At launch – so that might change as time goes on) arrives with a single 4TB Synology HAT3300/3310 5400RPM Hard Drive for storing all your data. This can lead to a lower glass ceiling when it comes to your long-term storage – fun fact, The latest iPhone Pro models supports upto 48MP Apple ProRAW images, which captures more dynamic range at the cost of much larger files, around 75MB for each image. That would still allow just under 60,000 images on a 4TB drives – but once you factor in video backups, PC backups and more, 4TB of capacity is actually going to run out quicker than you think, especially if you connect the maximum 8 supported users. Then there is the performance barrier of a single 5400RPM HDD. Hardware are not great for larger simultaneous input/outputs (e.g lots of individual write operation tasks happening at the same time) and the response times and smoothness of the BSM/BeeStation experience will be diminished. You are also losing out on RAID failover, something that is largely unavailable in a 1 bay, but short of using a dual drive cage adapter (more on that later on) this is unavoidable.
This brings us neatly back around to the subject of changing the HDD inside the Synology Beestation to something with a higher capacity, maybe a Pro series drive with 7200RPM and more cache. or perhaps even a faster SSD instead of an HDD? Synology has not allowed this system to support hot swapping or easy accessibility to the drive media (understandable, as a 1 Bay system). Synology have released this device as an entry-level product that is not designed for more specialized use, so providing the means to upgrade the media and migrate system processes over to a new drive is NOT a straightforward process. Additionally, we should also take some time to discuss the risks and Synology’s position on this.
IMPORTANT WARNING!
This is a really, really important point. Taking apart the Synology BeeStation runs a significant risk of not only damaging your data but also completely nullifying any hardware or software support that Synology will provide you. The BeeStation was designed to be a closed system and not targeted towards higher-end tech enthusiasts, and therefore does not allow the same easy dismantle procedure that you find in the DiskStation range. This Synology BeeStation was provided to me by Synology UK, and I am dismantling the system without their assurance or without their authorization to do so; the same needs to be applied to your own BeeStation system if you intend to follow the steps in this guide to tear down and dismantle it. This system was not designed to be taken apart, and taking it apart may result in the following:
You might cause damage to the hard drive inside via static electricity, motion, or physical pressure
The Beestation uses a passive cooling system and strategic heatsinks around the internal components, allowing the system to be low noise thanks to a lack of active cooling fan. But changing the storage media inside might compromise this passive cooling system and therefore lead to unpredictable internal system temps or a detrimental effect of the system as a whole.
The BeeStation casing is an exceptionally tight-fitting enclosure, and dismantling it will almost certainly leave marks and clear indications that you have done so, which will invalidate any hardware support available to you as you have tampered with the system and performed actions that are not covered by the hardware warranty.
You run the risk of scratching the internal motherboard, PCB, or delicate components during the dismantling of the BeeStation, which will result in complete system failure at worst and detrimental performance drops at best if this occurs.
Do not proceed with dismantling your Synology BeeStation unless you are happy to run the risk that it may be deemed inoperable or that your support by Synology may cease as a result.
Additionally, the Synology BeeStation includes numerous measures to back up the content of the system’s data and set up to the Synology C2 cloud, a connected USB drive, or at an object file/folder level to third-party cloud services. It is extremely recommended that you have an up-to-the-second backup in place before you attempt any of the steps in this guide. Any data loss resulting from following the steps in this guide is purely at your own discretion, and myself and NAS Compares cannot be held accountable. Bottom line, be aware that what you are doing right now is outside of what this system was supposed to do, and that you are doing so at your own risk. Understand? Good. Let’s get on with dismantling the BeeStation and tear down this cost-effective NAS.
Also, it is HIGHLY RECOMMENDED that you read through the steps completely first, before you begin dismantling your BeeStation NAS, as it’s decent bits more layered in the access compared with a normal Diskstation NAS system.
What Do You Need for this Guide
There are actually not too many things needed for upgrading your Synology BeeStation Drive. I recommend the following:
A Synology BeeStation (duh?)
A SATA HDD (or SATA 2.5″ SSD with 3.5″ physical Adapter – EXAMPLE)
A crosshead Phillip screw driver – the longer the better!
The Synology Assistant Client Tool for Windows, Mac or Linux (installed on a system that is on the same local area network as the Beestation) – HERE
A downloaded copy of the latest Synology BSM Software .pat file – Download it HERE
The Firmware is optional, as it depends on the upgrade path you choose, but it doesn’t hurt to have it downloaded and ready.
BACKUP YOUR DATA FIRST – How To Backup Your Beestation Personal Cloud NAS
It is INCREDIBLY important that you backup any important data that is already on your Synology Beestation, as the process of installing a new HDD or SSD into the system will result in it replacing the original 4TB HDD. Luckily, there are a couple of great options for backing up your data for restoration when your new HDD/SSD is up and running. The most extensive (and large) one that will ultimately save you time later re-creating shares and folder structure is using the system backup in the System Configuration menu. This allows you to create a full system backup to either the Synology C2 Cloud (subscription cloud service, but does include a trial period) or to a connected USB drive. Later in the guide, I will explain how to restore a full USB backup.
Alternatively, if you are not especially fussed about the system configuration and want a more file/folder-specific backup that only backs up the core/important data (ie you don’t have/want a 4TB backup, but just want some select files/folders), you can use the USB Backup or Cloud Backup options in Beefiles. These are chiefly designed to backup an area of storage from a 3rd Party Cloud (Google Drive, Dropbox or OneDrive) or USB with a specific BeeFiles Folder (you can create multiple). This also has the feature of ensuring the data is 2 way synchronized, which means you CAN use this to copy data form the NAS to the Cloud/USB automatically.
Personally, I would recommend using the System level backup if you can ensure you have a large enough C2 Storage/USB. But also, you should have at least TWO copies of your data, as the system level backup will be in a Synology BSM/Beestation format and will only work in another Beestation system – it won’t be visible via a traditional DAS/Direct connect method.
The last thing to discuss before we begin the Hardware portion of this guide is how you wish to disconnect from the BeeStation system. Installing a new HDD/SSD will also require the system to be formatted. This will happen during the re-initialization when you install a new drive, so you have two options before this. The first is to unlink the Beestation from your Synology Account (as the system is connected via a serial number to your synology account). You will then reconnect with it later on during re-initialization. The main benefit of this method is that Unlinking with the system will KEEP your data on the 4TB hard drive inside – which means if you need to reverse all this (or even just want the old data as a OS-level backup of sorts), this process will be easier and ensure your data is still in place.
Alternatively, you can opt to just fully factory reset the whole device, which will not only disconnect your Synology Account but also delete all the data from the 4TB Hard Drive. After you have chosen the option that suits your needs. Safely power down the device via the GUI or after the system restore. Then you need to leave the system alone for a few minutes (to allow the 4TB HDD to spin down) and then disconnect all USB, Ethernet and power cables.
How To Upgrade Your Beestation HDD – The Start
First thing you need to do is disconnect all ethernet (LAN), power cables and USB devices and give the system sufficient time to allow the HDD inside to spin down. Then carefully turn the device up and have the base vent panel face up. Again, be CAREFUL as this system features a mechanical HDD inside and that can be susceptible to shock/motion damage.
Next you need to slowly and carefully peel back the rubber foot panel located at the base, at the front of the Beestation (i.e the single LED light side). It is held in place with strong adhesive, but you can replace it back after opening the case up later, as the rubber foot sits in a grooved panel and the adhesive has plenty of reuse!
Under the rubber panel are two Phillips/cross-head screws. There are the ONLY external means to open up the enclosure/casing of the BeeStation.
Remove each of these screws (keep them to one side and make sure to remember they are the base screws, as the system has 2 kinds of screws in it’s construction and mixing them up with rip the screw holes to pieces!
Removing these two screws will allow you to apply a small above of pressure to leverage the front panel of the BeeStation NAS to be removed. Important – do this carefully (that word again!) as the entire casing is made up of 2 pieces and it’s super easy to crack it in two!
The top part of the front panel is actually an L-shaped panel that has the fully ventilated dust panel attached. Mkae sure that your ease the panel off carefully enough not to break those 4 hooks at the top, as these are what align the top panel with the rest of the casing.
Slight side note, but for those that care about dust build up on 24×7 systems like the BeeStation, this can be quite useful to perform cleaning. Anyway, carrying on!
Next up os removing the Hard Drive that the Beestation Personal Cloud arrives with. The first thing you need to remove is the 2 smaller screws located around the edge of the casing. DO NOT REMOVE THE 2 LARGER SCREWS IN THE MIDDLE!!! These larger screws hold the HDD in place and you need to do this much later, or else risk the drive moving around during the dismantling.
Each screw will be easy to remove, however there are actually 3 more screw located around the base of the framework. They are tricky to reach, and a longer screwdriver would be recommended, but it can be done with an ordinary 15cm + screwdriver will get the job done.
At the front base area, you can find two black Phillips/cross-head screws that you need to remove. You will need to come at there from a slight angle if you only have a short screwdriver. Important – DO NOT USE AN ELECTRIC/AUTOMATIC SCREWDRIVER!!! Notwithstanding that you will tear the soft screw to pieces, you might cause vibration that will be damaging to the HDD next to the screw! Do it the OLD SKOOL way!
The last screw is much harder to spot and reach, it is located at the bottom-back of the enclosure, on the NON-Motherboard side. You will need to come at it from a slight angle, even with a longer screwdriver. Note, you COULD have removed the top panel attached to the HDD in order to get to the screw a little easier, but I personally would rather the HDD remains in an immobile cage throughout this part of the Beestaion teardown. It’s your call!
That is the last screw that you need to remove and , once it is done, you can begin the removal of the HDD clip/cage.
The HDD Clip/cage will slide out sideways (with a little resistance). BE CAREFUL with the removal of the HDD cage/clips, as the right-hand side will have the controller board (which has the heatsink on top of the CPU, and a bare PCB – which can be super susceptible to static and moisture!
One you have removed the HDD Cage tray, you will now have three components on the table:
Next, removing the Hard Drive from its plastic handles. The HDD is held in place by 4 screws that go directly into the same four screw holes that are usually used by HDD bays on Diskstastion NAS that utilize trays. Ther are four screw in each corner. Important note for later – Make a note of the clips and direction that are on either side of the HDD – whether you want to reassemble this Beestation to the factory build OR you are considering exploring larger HDDs, getting these clips the wrong way around or in the wrong direction will, at best, mean it won’t for back together and you need to redo them, or at WORST, you end up damaging the controller board and casing as you attempt to re-insert the drive.
Each screw uses a counter-sunk system and also arrives with a rubber washer between the screw head and the plastic. This means that you do not need to fully remove the screw, as there is a small % of space left. Regardless, just remove the four screws and each of the side panels should come off very easily.
Once again, make sure you keep track of which panel goes with each side of the HDD – As this will be a right pain during reassembly. An important area of note here is that IF you are considering adding larger/alternative drives to the Beestation and you have your heart set on an SSD, you are going to need a 2.5″ to 3.5″ HDD adapter, as the screw holes that the tray clips AND the PCB Backboard are not available on a 2.5″ SSD. This does also open the door to the potential for a Dual 2.5″ SATA SSD to 3.5″ SATA Adapter case, which would provide the performance benefits of 2x SATA SSD in a RAID 0, or the redundancy benefits of 2x SATA SSDs in a RAID 1, if the case supports internal RAID 0/1). Here are two options:
However, there is considerably more to adding a new hard drive to the BeeStation than just the physical injection!
The one we want to focus on is the HDD tray/cage. Carefully turn it around and lay the drive facedown on the table.
Once the drive is ‘face down’, you need to carefully (yes, THAT word again! Take a drink) remove the two silver screws, Try to touch the blue PCB controller board as little as possible.
Once you have removed those two screws, you need to either slide the controller board away from the Hard drive, or slide the hard drive away. You are doing this to disconnect the SATA connector that is soldered to the controller board. Do NOT leverage the hard drive upwards/downwards, as you run the risk of breaking the connector.
The controller PCB should come away very easily and with little resistance. But before we move forward, it’s worth checking the SATA connector is unharmed.
Place the controller PCB delicately to one side and then get your new storage media drive (your new HDD or SSD) unpacked and ready
Slot the new SATA drive into the PCB via the SATA slot.
Then flip the drive and board over, then screw in the two silver screws to attached the PCB to the HDD. Next, reattached the two tray clips to either side of the new HDD – gain, make sure you select the correct clips for either side and in the correct direction.
Then slot the drive cage back into the base Beestastion black plastic casing. It will be a very specific alignment and you will know it is correct, as the back ports will be completely flush with the rear port cavities on the casing
Screw the 3 base screws in place once again. plus then re-screw the two top placement screws
Then slide back into place the L-shaped top panel. Ensure the 4 hooks at the top slide in neatly and the LED cover at the front/base will meet flush with the other plastic panel.
Re-screw the two silver screws that hold the L-shaped panel in place and then re-attached the rubber foot panel.
Reconnect the local area network/internet connection, as well as the USB drive (if you have a USB backup) and finally the power cable. Then press the power button and now move over to your network connection PC/Mac/Linux desktop and we can start the reinitialization.
Re-Installing BSM on your BeeStation
When the device begins booting, after a few minutes you will hear the system beep. However, instead of heading to the usual Synology Bee Portal site page, you need to open up the Synology Assistant tool. It will scan the local area network and it will find the Synology BeeStation, but it will say that it is in the process of ‘Upgrading’
Now the amount of time this takes will depend on a lot of factors (drive size, download speed if the system is collecting the BSM software online. After some time has passed (10-20 mins tops), the system will reboot ( you will hear the drive spin down and the light on the system will change from a flashing orange light to a slow white light.
1 – UPGRADING
2 – REINITIALIZING
After a few minutes, the synology assistant should now show the message ‘Starting Services’. Don’t forget to click the ‘search’ button at the top left to rescan to see any new changes to the system status.
After a period of time, the system will now show a new message that indicates that the system needs configuration in the synology assistant:
Now you just need to double-click the Beestation listing on the Synology Assistant tool, and it will open up a new tab on your web browser that will guide you through the original BSM installation process, via the Synology Beestation Portal web site:
When you have logged into your Synology Account and have gone through the first 4 steps of the installation, you will be asked if the system is showing an orange light. If it does not, you will need to follow to on-screen restart prompts using the reset button, which will all the system to reboot into ‘find’ mode. Once you have the On-screen serial number prompt and the light on the BeeStation is Solid orange (not flashing) you can go through the usual system setup prompts and connect the BeeStation with your Synology account as normal and log in as you would have before.
What if my Synology BeeStation does not boot into the usual installer?
There IS a chance that your BeeStation will instead display a message saying ‘Not Configured’ upon the first power on after installing your new drive, typically caused by a lack of facility to download the latest firmware (i.e the network connection is not present or restricted on your network). This will result in the system booting into a similar system setup window as found on the Synology Diskstation/DSM devices.
If this occurs, double-click the BeeStation listing on the Synology Assistant tool, and it will open a new tab on your web browser that shows the manual installation steps for BSM on your BeeStation system via the LAN. Just follow the steps on the screen to select the downloaded BSM image you have on your PC/Mac machine, as well as begin the installation to the new HDD/SSD – This will wipe the contents of the drive, but that is normal and you should be using a new/blank drive anyway.
This will install the latest BSM software and the system will restart after 10 mins and you can follow the steps outlined in the previous section to setup the Beestation with your new HDD/SSD for the first time.
How to Restore Your Data to the Upgraded Drive BeeStation?
Now that your BeeStation is up and running, with your new HDD/SSD, you might have a backup of your data on USB or on the Cloud that you want to restore. If you want to use the BeeFiles Backup services for USB/Cloud, you can do this easily with the options in the BeeFiles tool and your cloud sync or USB that you created earlier can be re-connected and the data will be sent back to the Beestation. However, if you have opted to do the system-wide backup in the System settings menu, you will need to head in the system config page and select the Restore Tab on the left hand side of the page:
Next, select the Restore option, ensuring that you either have the USB Backup drive you used connected to the BeeStation system, or you have established a connection with your appropriate Synology C2 account.
Next, you need to go through the list of Backup Images (if you have multiple) and select the appropriate system backup image you want Then you need to select the backup and proceed with restoring this system image
It is worth noting that this process can take a great deal of time (depending on the size of the backup, whether it is cloud/local based and the filled % of the capacity that back was of the original 4TB drive. In my tests, it took 35 mins to restore the system that had 300-400GB of data – it is a slow by methodical process.
Once that is done, the system will reboot and when it has finished, you will need to re-enter and connect your Synology Account. After you log back into the system, you can go into the system setting and BeeFiles again, and you will see that not only is all the data restored, but also that the Synology BSM software has resized the partition to ensure that you are not losing any of the extra space that is available on your new possibly larger HDD (i.e it does not reinstall the 4TB system image, then ignore the extra HDD space – it expands the volume to the full available space of the drive)
And there you go! You have now installed a new HDD or SSD in your Synology BeeStation. REMEMBER, this is NOT authorized by Synology as use for the BeeStation system and will result in the brand not supporting you in the event of issues encountered as a result of installing non-recommended configurations such as this. The Beestation is a simplified cloud alternative to Synology DSM systems. If you want to experiment with more complex configurations, larger storage and faster systems, you should look at the Synology Rackstation and Diskstation systems.
I hope you enjoyed this guide and found in useful/informative! REMEMBER, I did this to show you what the inside of your BeeStation Personal Cloud looks like, so YOU DON’T HAVE TO! If you have any further questions, you can reach out to me on robbie ( at ) nascompares.com, or use our free advice section located on the right hand side of the page. Alternatively, you can reach us on our Discord HERE, our community forum HERE, or for faster and more personal support over on KoFi Commissions HERE. If you use and/or share the content of this guide online, please help us spread awareness of our platform and the work we do by backlinking us appropriately! Thanks for reading!
Synology BeeStation Personal Cloud Review – Quick Conclusion
Synology has clearly done their homework on the development and presentation of the BeeStation private cloud. They are targeting a whole new audience with this system, and therefore, criticisms based on experiences with their other hardware are likely to fall on deaf ears. The BeeStation is probably one of the best middle grounds I have ever seen between an easy-to-use and exceptionally easy-to-set-up private cloud system, while still managing to provide smooth and seamless features for accessing and sharing your private cloud’s storage securely. Looking at this system with a more network-savvy microscope kind of defeats the point, and I’ve tried to be fair in my assessment. The lack of LAN access by default seems a little odd, and launching the BeeStation series in this single-bay, 4TB-only fashion may be a bit of a marketing misstep, but overall, what you’re seeing here is an effectively priced and scaled private cloud system. It’s a fantastic alternative to third-party clouds and existing simplified NAS systems. With many users keeping an eye on their budgets and tightening costs, Synology, known for its premium position in the market, had a challenge scaling down to this kind of user. However, I have to applaud Synology’s R&D for creating a simple and easy-to-use personal cloud solution that still carries a lot of their charm and great software reputation. It may not be as feature-rich as DSM, but BSM does exactly what it says it will do, and I think the target audience it’s designed for will enjoy the BeeStation a great deal!
SOFTWARE - 7/10
HARDWARE - 8/10
PERFORMANCE - 7/10
PRICE - 10/10
VALUE - 10/10
8.4
PROS
User-friendly setup, ideal for beginners or those seeking a simple cloud solution. Secure data handling with encrypted data transmission. Comes with 4TB of storage included, offering good value. Compact and lightweight design, enhancing portability. Quiet operation, suitable for home or office environments. Integrates seamlessly with popular cloud services like Google Drive and OneDrive. Affordable pricing at $199, a cost-effective alternative to third-party cloud services. Supports remote access, allowing data management from anywhere and across client devices/OS Synologys reputation for quality and reliability is still clear on this smaller scale. Several client tools (BeeFiles, BeePhotos and Desktop sync tool) for Windows, Mac, iOS and Android available for tailored access System configuration backup option to USB/C2 (Often absent in budget cloud solutions) AI Photo Recognition in BeePhotos for faces, Objects and geo data scraping + Advanced filter/search
CONS
Lacks the extensive app support and customization found in Synology\'s DSM platform. Only available in a single-bay, 4TB configuration at launch, limiting expandability. Single 5400RPM HDD running everything leads to slowdown more than you think! LAN access is disabled by default, which may not suit all users. Designed for a specific user base, may not meet the needs of more advanced users.
This description contains links to Amazon. These links will take you to some of the products mentioned in today's content. As an Amazon Associate, I earn from qualifying purchases. Visit the NASCompares Deal Finder to find the best place to buy this device in your region, based on Service, Support and Reputation - Just Search for your NAS Drive in the Box Below
Need Advice on Data Storage from an Expert?
Finally, for free advice about your setup, just leave a message in the comments below here at NASCompares.com and we will get back to you.Need Help?
Where possible (and where appropriate) please provide as much information about your requirements, as then I can arrange the best answer and solution to your needs. Do not worry about your e-mail address being required, it will NOT be used in a mailing list and will NOT be used in any way other than to respond to your enquiry.
[contact-form-7]
TRY CHAT Terms and Conditions
If you like this service, please consider supporting us.
We use affiliate links on the blog allowing NAScompares information and advice service to be free of charge to you.Anything you purchase on the day you click on our links will generate a small commission which isused to run the website. Here is a link for Amazon and B&H.You can also get me a Ko-fi or old school Paypal. Thanks!To find out more about how to support this advice service checkHEREIf you need to fix or configure a NAS, check FiverHave you thought about helping others with your knowledge? Find Instructions Here
Or support us by using our affiliate links on Amazon UK and Amazon US
Alternatively, why not ask me on the ASK NASCompares forum, by clicking the button below. This is a community hub that serves as a place that I can answer your question, chew the fat, share new release information and even get corrections posted. I will always get around to answering ALL queries, but as a one-man operation, I cannot promise speed! So by sharing your query in the ASK NASCompares section below, you can get a better range of solutions and suggestions, alongside my own.
Plex Media Server Vs Synology Video Station on a NAS
One of the most popular reasons that users choose to buy a network-attached storage (NAS) device is for use as a media server. The appeal is pretty clear. With most users now owning decades of media (either in digital form or ripped from optical media at home), the ability to enjoy these box sets and Movies on the latest devices can be complicated. Despite this, streaming all of your multimedia from a NAS to all of your TVs, phones, tablets and other devices are growing increasingly popular and a lot of this is thanks to the increasing affordability of NAS from brands like Synology and QNAP and free software from companies like Plex and Emby. The most popular NAS for home media tends to be Synology, with its support of numerous media server applications and its own premium video service app too. This combined with the oversaturation of third-party online streaming services that ask you to pay a subscription (such as Netflix) with little control or right to ownership of the media you watch means that many users just want to enjoy their own unique media collections. So now that a lot of users are choosing to switch from the likes of Netflix and Prime Video towards an in-house media server, the next question is which piece of software they should choose.
The most popular private media server app right now worldwide to counter the likes of Netflix is Plex Media Server, software available in host and client form that allows you to transform your media collection into a glossy, slick and informative UI that genuinely rivals big online streaming platforms. Synology on the other hand would likely prefer users to stick with their own fully-featured media server application, Synology Video Station, which they have invested well in and developed to an impressive standard that easily rivals that of Plex. So today I want to compare these two media server choices and help you decide which one is the ideal media server choice for you.
Important – ‘Free’ Vs Paid Media Server Services on a NAS
Before going any further, it is worth addressing the elephant in the room, namely that a number of key media server services that are included with Plex Media Server are locked behind a paid subscription service known as Plex Pass. Whereas Synology Video Station is an application that is included with your NAS on Day 1 at no additional cost. All that said, neither service can technically be called free, as both still require you to purchase a Synology NAS. Additionally, it is still worth highlighting that some more recent Innovations in Plex online services and utilisation of hardware transcoding (the ability to use the CPU’s embedded graphics or an available graphics card to adapt files on the fly to make them better suited to a client) is not available on the free tier of Plex, but ARE available by default in the Synology Video Station application. You can still utilise software transcoding on Plex for free and this will deal with a large degree of transcoding requirements, but the fact that you have to pay extra within the Plex app to utilise the hardware already available on your NAS is something a number of users find difficult to accept. Throughout this article, any feature that is only available as a paid Plex Pass feature will be highlighted as such.
Plex VS Synology Video Station – Installation and First Time Setup
Installation of either the Synology Video Station or Plex Media Server application is near enough identical. Both are readily available in the Synology app centre and can be installed within two clicks. Both media server applications do not require your multimedia files to be stored in a pre-designated/directory location and the sources for TV shows, Movies and more can be scanned and indexed by each media server application after they are installed. In fact, the initial installation on both is incredibly straightforward and there is really only one main difference between them. That difference is that whereas the Synology Media application uses your original NAS login credentials, Plex will require you to set up an account with them online in order to use the software, even if you only intend to use your Plex Media Server on the local network/DLNA. As Plex is a third-party application, this is a little understandable if a tiny bit annoying for some.
It is also worth highlighting that both media server applications will receive regular updates during their lifespan and this is treated slightly differently too. As Synology Video Station is a first-party app, as soon as an update is available, you will be notified immediately in the app centre and even have the opportunity to apply these firmware updates automatically. Plex updates on the other hand will almost always need to be installed manually, as the available default Plex application on the Synology app centre is updated considerably less frequently and as soon as you setup Plex for the first time, it will ALWAYS inform you that there is a new update available straight away. The Plex Media Server application itself will tell you when an update is available regularly at the top right and in the settings menu, but requires you to download the latest Plex server update to a connected computer and then you need to upload this update directly to the Synology NAS app centre manually. It is only a small inconvenience really, but does mean that regular updates on your media server of choice are handled more easily and with likely more frequency on Synology Video Station rather than Plex.
Plex VS Synology Video Station – GUI, Media Support and Browsing
The user interface of Synology Video Station and Plex Media Server are quite similar when viewed on a client device, such as a console, TV and Amazon Fire TV stick. With all of your available Movies and Boxsets clearly shown and the metadata collected by each media server application creating a great user interface for your connected users.
However the back end/server view of each media server application is considerably different and where the Synology Video Station application is designed exclusively around video media options and configuration (as Synology have a wide range of applications for different Media types and general NAS server maintenance already available), Plex, on the other hand, is a far better equipped tool for a complete server, with the bulk of server maintenance and customisation options built into the single Plex GUI. If you are something of an IT novice, the wide range of options that Plex Media Server throws at you for system maintenance can be a touch intimidating and because Plex is designed around many different kinds of media support (something we will touch on later) it’s configuration needs to be noticeably broader than the video-centric options in the Synology official video application. These additional options, if you take the time to go through them, will definitely lead to a better media server user experience and a far better multimedia streaming system overall, it’s just a question of how bespoke and how elaborate you want your media server to be.
As mentioned, there is a clear difference in the multimedia types supported in Plex Media Server or Synology Video Station. In terms of handling of video Media, they are near enough identical with some exceptions with regard to specialist audio handling for certain dense Media. However, much like the back-end server control mentioned earlier, Synology Video Station only handles video media and relies on alternative applications such as Synology moments, photo station, Synology photos, audio station and download station to play and obtain other kinds of multimedia. Plex Media Server is a much more diverse multimedia tool with support of your photo collections (AI-assisted too), album collections, podcast streaming and several online video streaming services included. In both cases, it makes a lot of sense why they are designed this way, but some users may prefer their media server to be more of a Swiss army knife and others may want their video streaming, music streaming and photo streaming to be different services for different devices and clients. Neither Plex or Synology Video Station really gain any advantage here but simply show how they are different in their architecture. If you want simplicity in the user interface, go with Synology Video Station. If you want simplicity in your media server as a whole, go with Plex Media Server.
Plex VS Synology Video Station – Meta Data Scraping
The scraping of metadata in a media server is precisely what separates a bog-standard selection of files and folders on your screen from a slick graphical user interface that is engaging, informative and a joy to use. When we talk about metadata, we are talking about thumbnails, box art, media descriptions, cast listings, review scores, trailers and more. When we say scraping, that is the process of the software accessing numerous online databases to retrieve and store this information locally to the NAS. The result is your years of TV and movie collection being transformed into something near identical to Netflix and Amazon Prime video in presentation. Metadata ultimately benefits connected users and their client hardware devices, with both Plex and Video Station being very similar in how they look to a client device, albeit with a few branded differences in colour and config.
However, on the server-side, both Synology Video Station and Plex have gone a different way with metadata scraping at a setup level. Of the two, Synology Video Station is definitely the less option-heavy and although this is thanks in many ways to a lot of key options being found in the general server GUI outside of the app, it is still pretty thin on the ground for configuration of your video media server. This is not an enormous surprise given how Synology have generally erred towards keeping things as user-friendly as possible and this is often done by simplifying configurations and sitting numerous settings to system default. The options for scraping metadata on the Synology are surprisingly thin on the ground and some more advanced options require you to sign up to some resource database websites to obtain a two-way key. Despite this, Synology still manages to scrape a tremendous amount of metadata without this key and resource linking. Indeed, although the number of supported databases for metadata listed on the Synology Video Station app is few and far between, it was still able to find the same level of metadata found on the Plex Media Server application and displayed all of the test media perfectly.
Plex Media Server has access to significantly more online databases and although the system will generally ask you to select which one individually you wish to scrape for metadata in each library, it does do it with a high degree of accuracy. It also manages to scrape this metadata for more than just your Movies and applies this also to your music collection and podcast collection too within the app. Metadata scraping via Plex Media Server also does not require any kind of log-in to these individual databases and is largely automated off the bat, with users being able to switch designated databases for each Media type and folder on the fly. Of course, this all doesn’t guarantee accuracy and will still always be based on the format and layout of your Media in many cases (tv shows listed as S01E01 for season 1, episode 1, etc), but nevertheless, it has to be said that with more available resources and less configuration required for each of them, that Plex Media Server has the broader and more likely to succeed position on metadata scraping.
Plex VS Synology Video Station – Playback and Transcoding
This is one of the most important parts of any media server in the grand scheme of things – multimedia playback and transcoding. This is typically the action of changing a media file into a version that is more acceptable to the client device that you are enjoying it on (TV, Phone, Console, etc). This extends to but is not limited to, changing the resolution, changing the bitrate, changing the file format and ultimately compressing a file into a smaller version in most cases. Because Plex and Synology Video Station are available on the same NAS system, it means that media variations with regard to codecs, compressions and file types will be equally supported at the default level. If a file can be played back in its original version on Plex, it can be played back on Synology Video Station. However, it is when these files need to be adapted with transcoding that we see clear distinctions between each of them. Transcoding is something that remote accessing client users will likely use without even realising it, as they might well be on a limited data connection (speed or coverage at the time) or using a smaller device (such as a phone) to playback a monster 4K 60FPS movie that is overkill on that hardware. So, transcoding is at its best when you do not notice it is being done OR it is adaptable in as many ways as possible to cover all your likely scenarios.
When the NAS needs to perform a transcode on a file on the fly (eg, so you need to convert a video file into a better-suited version for the client watching device upon request and without delay) it will typically do it with software transcoding or hardware transcoding. Software transcoding is when the system uses the raw resources of the CPU and memory inside the NAS to convert the file. Hardware transcoding is when the NAS system features a graphical component (such as embedded graphics featured on a CPU) or an available graphics card that is installed – as these are designed for handling video files and/or graphical manipulation tasks, and will therefore utilise considerably fewer resources. Plex Media Server only provides hardware transcoding in the paid subscription service Plex Pass and then needs to be enabled in the encoding section by selecting the option ‘make my CPU hurt’. Software transcoding is available for the free version of Plex Media Server but is far less efficient and will result in much higher-end Media in 4K and 1080p playback consuming the majority of hardware resources to transcode or will simply not play at all.
Synology Video Station on the other hand, because it is a native first-party app, has full access to the hardware transcoding element of the NAS and therefore allows users to take advantage of it easily and immediately, and at no additional cost. This has been one of the driving forces behind the popularity of Synology Video Station application, as although the majority of NAS brands have their own video player, Synology is the only one that manages to merge the slick meta-data supported graphical user interface found in Plex but still manages to provide the free and unlimited limited access to the hardware resources you would expect after spending several $100s on a NAS. That said, the way that Synology handles the subject of transcoding in its user interface is a little peculiar, especially for users who are trying to balance the best possible playback vs the most appropriate transcoding level on the fly/manually.
When you wish for the NAS system to transcode a file in the Video Station user interface, you are presented with the options for adjusting the picture quality to high, medium, low, very low, etc. This is exactly what one might expect from a brand that wants to consistently keep things as simple as possible, however, for those who want to select a specific quality level to playback the file or want a better idea of the best quality level in future should be for other files, this will be extraordinarily limiting. Plex Media Server on the other hand allows you to switch between an automatic transcode option that changes the file to the recommended quality level for the client and connection, or you can specifically switch one of numerous video quality levels that break down into both resolution and bitrate in several places. Overall, the ability for Video Station to be able to take advantage of hardware transcoding at no additional cost and with little or no intervention from the end-user is still ultimately the best thing here. I just wish they gave uses a better degree of control and choice as found in Plex Media Server.
Plex VS Synology Video Station – Client Support
Having a slick and well-performing media server is always good, but if you cannot watch the media inside it on the devices you regularly use, then it’s all a bit pointless. Most people are already well aware that the multimedia collections they have on a NAS can easily be streamed over the local area network via popular methods such as DLNA and UPnP (digital living network alliance and universal plug and play). However, they are much more file and folder, breadcrumb level streaming and in order to enjoy the pretty GUI of Plex and Synology Video Station, an official client app needs to be available on the respective app centre or made unofficially and manually installed. This is an area where Plex Media Server almost completely wins over Synology Video Station, as it simply cannot compete with the variety and accessibility of the Plex client availability in popular app centres.
Full credit to Plex, they have really taken the time to make sure their platform is available on pretty much any modern device, in what multiple client or media server application forms. They also take the time after an official update of services and then push these updates across each available downloadable client. This is largely impossible for Synology to compete with and they instead opt for a much more targeted client support regime, supporting all modern mobile phone OS’, desktop operating systems and some of the major sofa accessible app centres on TVs and streamers like Amazon fire TV. In 8 out of 10 cases, your device will support both Plex and Synology Video Station, but this is by no means total and sometimes a hardware client (such as an off-brand Android phone, tablet or media box) that you hope to support Video Station will sadly not.
It is once again worth mentioning that Synology separates different multimedia types towards their own individual client apps, for example, DS Audio or Audio Station for music and DS Photo for photography. Indeed, some of these apps are quite advanced with practically unique connectivity to the likes of Amazon Alexa (something currently impossible on any other NAS platform without a 3rd party application like ‘my-media’ Alexa skill. But this, unfortunately, does not make up for being truly overshadowed by the wider degree of support available on Plex across numerous clients and smart Home devices – though the latter does require a Plex Pass. For sheer volume of connectivity on the clients, Plex wins by an absolute landslide.
Plex VS Synology Video Station – Conclusion
Throughout this comparison of Plex Media Server and Synology Video Station, it has become abundantly clear that one tool is designed around being a Swiss army knife of features and functions, whilst the other performs a smaller but key range of services exceptionally well. Those who have been using Plex Media Server for a number of years are highly unlikely to make the jump to Synology Video Station, as it may feel less feature-rich and perhaps a tad bare-bones. However, those users who are new to the idea of private NAS based multimedia streaming would do very well to try out Synology Video Station first, as I genuinely believe when it comes to concentrating on video streaming services, it is genuinely one of the best platforms out there – albeit clearly restricted to just Synology NAS devices. Plex Media Server attempts to do many things in its pursuit of being the go-to media server of choice for those jumping ship from Netflix and succeeds in most cases, it is just worth remembering that in recent years the platform has perhaps tried to diversify a tad too much.
PLEX MEDIA SERVER
Synology Video Station
Best for Mixed Media
Best for Ease of Access on Client Hardware
Best for Transcoding Control
Best for Add On Services
Best for Metadata Sources
Best for Price
Best Performance for Transcoding
Best for Ease of Use
Best for Ease Setup
Best for Updates & Firmware Revs
Thanks for reading and I hope this guide helps you choose the perfect multimedia server for streaming with your friends, family and colleagues. If you are still lost on the right NAS, multimedia software or ideal backup system for your needs, then take advantage of the free advice section below. This is a completely free and unbias service to help work out their ideal data storage solution for you. It is manned by my myself and EddieTheWebGuy, so although replies may take an extra day or so, we will answer your email and have your best interests in mind! Have a great week.
If you are thinking of buying a NAS for Multimedia, Please use the links below:
This description contains links to Amazon. These links will take you to some of the products mentioned in today's content. As an Amazon Associate, I earn from qualifying purchases. Visit the NASCompares Deal Finder to find the best place to buy this device in your region, based on Service, Support and Reputation - Just Search for your NAS Drive in the Box Below
Need Advice on Data Storage from an Expert?
Finally, for free advice about your setup, just leave a message in the comments below here at NASCompares.com and we will get back to you.Need Help?
Where possible (and where appropriate) please provide as much information about your requirements, as then I can arrange the best answer and solution to your needs. Do not worry about your e-mail address being required, it will NOT be used in a mailing list and will NOT be used in any way other than to respond to your enquiry.
[contact-form-7]
TRY CHAT Terms and Conditions
If you like this service, please consider supporting us.
We use affiliate links on the blog allowing NAScompares information and advice service to be free of charge to you.Anything you purchase on the day you click on our links will generate a small commission which isused to run the website. Here is a link for Amazon and B&H.You can also get me a Ko-fi or old school Paypal. Thanks!To find out more about how to support this advice service checkHEREIf you need to fix or configure a NAS, check FiverHave you thought about helping others with your knowledge? Find Instructions Here
Or support us by using our affiliate links on Amazon UK and Amazon US
Alternatively, why not ask me on the ASK NASCompares forum, by clicking the button below. This is a community hub that serves as a place that I can answer your question, chew the fat, share new release information and even get corrections posted. I will always get around to answering ALL queries, but as a one-man operation, I cannot promise speed! So by sharing your query in the ASK NASCompares section below, you can get a better range of solutions and suggestions, alongside my own.