As TerraMaster continues to push the boundaries of affordable yet high-performance NAS devices, the F6-424 Max stands out as a flagship model designed to cater to the needs of power users, small businesses, and home lab enthusiasts. Released in September 2024 at a price point of $999.99, the F6-424 Max builds upon TerraMaster’s reputation for offering hardware that rivals premium competitors like Synology and QNAP but at a more accessible price. At the heart of this NAS is an Intel Core i5-1235U, a 10-core, 12-thread CPU that promises to handle everything from virtualization to media transcoding with ease. Coupled with dual M.2 NVMe slots, two 10GbE network ports, and support for up to 64GB of DDR5 memory, the F6-424 Max is aimed at users who require not just storage but also serious compute power.
Before diving into the detailed review of the F6-424 Max, it’s essential to understand how this model compares to its siblings, the smaller capacity F6-424,F4-424 and the F4-424 Pro. Each of these NAS units targets different segments of the market, from home users and enthusiasts to businesses requiring more power. Let’s take a closer look at the key differences between the F6-424, F6-424 Pro, and F6-424 Max.
TerraMaster F6-424 Max NAS Review – Quick Conclusion
The TerraMaster F6-424 Max is a robust 6-bay NAS system that offers a powerful mix of features and flexibility for a wide range of tasks. Powered by the Intel i5-1235U CPU with 10 cores and 12 threads, the F6-424 Max excels at resource-intensive applications such as Plex media streaming, 4K hardware transcoding, and virtual machine hosting. Its dual M.2 NVMe slots running at PCIe Gen 4 speeds significantly improve storage performance, especially when used for caching, while the two 10GbE ports offer high-speed networking environments, allowing for 20Gbps throughput via link aggregation.
In terms of software, TOS 6 brings notable improvements, although it still lags behind the more polished ecosystems of Synology DSM and QNAP QTS. That said, TerraMaster’s continuous software evolution with each new version of TOS ensures that users have access to more robust tools and security features. For its price point of $999, the F6-424 Max is a compelling option for those seeking high-performance NAS solutions with scalability in mind. While the Pro model offers competitive performance, the Max takes it a step further with advanced networking, making it ideal for environments where speed is a priority.
SOFTWARE - 6/10
HARDWARE - 8/10
PERFORMANCE - 8/10
PRICE - 9/10
VALUE - 9/10
8.0
PROS
Powerful Hardware: Intel i5-1235U with 10 cores and 12 threads for resource-heavy tasks. Dual 10GbE Ports: High-speed networking capabilities with link aggregation for up to 20Gbps, ideal for large file transfers. PCIe Gen 4 NVMe Support: Two M.2 NVMe slots offering exceptional performance for caching or additional high-speed storage. Efficient Cooling: The large 120mm fan ensures quiet and effective cooling, making it suitable for home and office environments. Improved TOS 6 Software: Enhancements in GUI, backup tools, and overall security bring TOS closer to its competitors.
CONS
Higher Price Tag: At just under $1K, it’s more expensive than TerraMaster’s other models, which may deter budget-conscious buyers. No PCIe Expansion: Lack of a PCIe slot limits potential for future upgrades, such as adding 10GbE cards or more M.2 drives. Presentation: The software has improved a lot, but still feels inconsistent in places compared with alternatives from brands such as Synology and QNAP.
Terramaster F6-424 Max ($899 Amazon) – HERETerramaster F6-424 Max ($799 Aliexpress) – HERE
TerraMaster F6-424 Max NAS Review – Hardware TL;DR
The F6-424 Max is equipped with some of the most powerful hardware seen in a domestic 6-bay NAS from TerraMaster. Here’s a detailed breakdown of the key hardware components:
6x 3.5”/2.5” SATA (hot-swappable, up to 144TB total)
M.2 NVMe Slots
2x PCIe Gen 4 x4 (for caching or additional storage)
Networking
2x 10GbE RJ45 (supports link aggregation)
USB Ports
2x USB 3.2 Gen 2 Type-A, 1x USB 3.2 Gen 2 Type-C
HDMI
1x HDMI 2.0 (4K at 60Hz)
Cooling
1x 120mm fan (smart cooling system with multiple speeds)
Power Consumption
35W (idle), 70W (under full load)
Chassis Dimensions
222 x 179 x 154 mm
Weight
3.6 kg
The Intel i5-1235U is the real powerhouse of the F6-424 Max, combining two performance cores with eight efficiency cores for excellent multi-threaded performance. Whether you’re running virtual machines, AI workloads, or 4K Plex streams, this processor handles it all with ease. The 8GB of DDR5 memory is a solid starting point, but the system can support up to 64GB for users with more demanding needs.
Another key hardware feature is the dual 10GbE network ports, which offer more than just fast networking—they enable link aggregation to provide up to 20Gbps of network throughput. This makes the F6-424 Max perfect for video editing teams, large backups, or any environment requiring high-speed network transfers.
TerraMaster F6-424 Max NAS Review – Chassis Design
The F6-424 Max arrives in a sleek, modern chassis that is not only visually appealing but also highly functional. The design has evolved significantly from TerraMaster’s older NAS models, taking cues from premium brands like Synology and QNAP. The brushed matte black plastic gives it a professional look while the ventilation design has been carefully optimized to improve airflow.
One of the standout features of the chassis is the dual 80mm fans at the rear of the unit. This fan works in tandem with the ventilated side panels, which are adorned with the TerraMaster logo, to ensure that the system remains cool even under heavy loads. The fans operate quietly, thanks to its smart cooling system, which adjusts fan speeds based on the internal temperature of the NAS.
The drive bays are hot-swappable and feature tool-less installation, making it incredibly easy to add or replace drives. The drive trays are constructed from durable plastic, and while they may feel a bit less premium compared to metal trays, they securely hold both 3.5” and 2.5” SATA drives. The trays slide effortlessly into the SATA connectors, and an intuitive push-to-lock mechanism prevents accidental ejection during operation.
On the front of the NAS, the LED indicators for system status, drive health, and network activity are discreet but easy to read. However, one minor complaint is the absence of a front-facing USB port, which could have made external drive backups or peripheral connections more convenient.
TerraMaster F6-424 Max NAS Review – Ports and Connections
The F6-424 Max comes packed with a variety of ports that make it a versatile system for both high-speed networking and peripheral connections. The most significant feature is the dual 10GbE ports, which allow for link aggregation, effectively doubling your network bandwidth to 20Gbps when connected to a compatible switch. This level of networking is particularly useful for users handling large data transfers, 4K video editing, or multiple virtual machines.
In addition to the 10GbE ports, the NAS includes three USB 3.2 Gen 2 ports, two of which are Type-A and one Type-C. These ports provide data transfer speeds of up to 10Gbps, making them perfect for connecting external storage devices or peripherals like printers or USB drives. One of the notable improvements in this model is the inclusion of the USB Type-C port, which adds an extra layer of versatility for modern devices.
The HDMI 2.0 port supports 4K video output at 60Hz, which is ideal for users who wish to use the NAS for multimedia purposes or need a direct console for diagnostics and maintenance. However, it’s important to note that TerraMaster still hasn’t implemented a local GUI platform like QNAP’s HD Station or Asustor Portal, so the HDMI port is mostly useful for users running third-party operating systems like UnRAID or TrueNAS.
Overall, the port layout of the F6-424 Max is well-suited for high-performance environments but lacks some of the extra features—such as PCIe expansion or additional USB ports—that would make it even more versatile for advanced users.
TerraMaster F6-424 Max NAS Review – Internal Hardware and PCIe Lanes
Opening up the F6-424 Max reveals a well-organized internal layout with some serious hardware under the hood. One of the most impressive aspects of the design is the integration of PCIe Gen 4 lanes, which significantly boosts the performance potential of the system. The Intel i5-1235U processor comes equipped with 20 PCIe lanes, and TerraMaster has used these lanes effectively to ensure that the NAS delivers exceptional I/O performance.
The two M.2 NVMe slots are directly connected via PCIe Gen 4 x4, which means that each slot can support full Gen 4 speeds of up to 8GB/s per drive. This is a massive improvement over the previous Gen 3 models, which were limited to 4GB/s. These NVMe slots can be used for caching, allowing users to speed up read/write operations when using slower mechanical drives in the main six bays, or they can be used as standalone storage pools for data-intensive tasks.
However, TerraMaster could have taken the hardware to the next level by offering a PCIe expansion slot. Many competitors in this price range, such as QNAP and Asustor, include a PCIe slot for adding additional network cards, SSDs, or Thunderbolt expansion cards. While the F6-424 Max is already a strong performer, the lack of expansion options could be a limiting factor for users who require more versatility from their NAS.
In terms of power efficiency, the F6-424 Max is highly optimized for its hardware class. Under full load, it draws around 70W, which is impressive considering the performance it delivers. The passive cooling on the Intel i5 CPU, combined with the large rear fan, ensures that the system remains cool without excessive noise or power consumption.
With the release of TOS 6, TerraMaster has made great strides in enhancing the functionality and usability of its NAS systems. TOS 6 offers improved snapshot capabilities, better backup management, and enhanced support for cloud synchronization services like Google Drive, Dropbox, and Amazon S3. This means users can seamlessly synchronize their local NAS data with cloud storage, providing a layer of protection against data loss.
Another notable feature of TOS 6 is TRAID, TerraMaster’s flexible RAID configuration system, which allows users to combine disks of different sizes while still benefiting from redundancy. This is comparable to Synology’s Hybrid RAID (SHR), making it easier to expand storage in the future without being tied to identical drives. Additionally, TOS 6 supports AES 256-bit encryption, ensuring that sensitive data is protected both in transit and at rest.
However, while TOS 6 has seen significant improvements, it still lacks some of the advanced features found in Synology DSM or QNAP QTS. For example, TerraMaster’s photo management app (Terra Photos) is still in its beta phase and lacks the advanced AI-driven organization features of Synology Moments or QNAP QuMagie. Additionally, while Plex Media Server runs smoothly on the F6-424 Max, TerraMaster’s native multimedia tools are not as polished, making it less appealing for users who rely heavily on NAS-based multimedia management.
TerraMaster F6-424 Max NAS Review – Conclusion and Verdict
The TerraMaster F6-424 Max is a standout NAS system in TerraMaster’s lineup, offering impressive hardware specifications and solid performance at a price point of $999.99. For users who need high-speed data transfers, intensive compute power, and flexibility in storage configurations, the F6-424 Max is an excellent option. The combination of the Intel i5-1235U CPU, dual 10GbE ports, and PCIe Gen 4 NVMe support ensures that the NAS can handle even the most demanding tasks, whether it’s virtualization, media transcoding, or large-scale backups.
That said, when compared to the F4-424 Max, which is priced at $799.99, the Max model offers significantly more networking power and potential for speed. However, the Pro model still provides fantastic performance for most home and small office users, making it a more budget-friendly alternative for those who don’t require 10GbE or advanced NVMe functionality.
In terms of software, Synology DSM and QNAP QTS are still more evolved, offering richer multimedia experiences and better integration for business applications. However, TOS 6 continues to improve with every iteration, closing the gap between TerraMaster and these larger players. With new features like TRAID, cloud sync, and improved snapshot management, TOS is becoming more user-friendly and robust. For users prioritizing performance, flexibility, and future-proofing, the F6-424 Max is a strong contender and offers excellent value for money. While there are areas where TerraMaster could improve, such as the lack of PCIe expansion and front-facing USB ports, the F6-424 Max delivers on its promise of high performance and scalable storage solutions.
PROS
CONS
Powerful Hardware: Intel i5-1235U with 10 cores and 12 threads for resource-heavy tasks.
Dual 10GbE Ports: High-speed networking capabilities with link aggregation for up to 20Gbps, ideal for large file transfers.
PCIe Gen 4 NVMe Support: Two M.2 NVMe slots offering exceptional performance for caching or additional high-speed storage.
Efficient Cooling: The large 120mm fan ensures quiet and effective cooling, making it suitable for home and office environments.
Improved TOS 6 Software: Enhancements in GUI, backup tools, and overall security bring TOS closer to its competitors.
Higher Price Tag: At just under $1K, it’s more expensive than TerraMaster’s other models, which may deter budget-conscious buyers.
No PCIe Expansion: Lack of a PCIe slot limits potential for future upgrades, such as adding 10GbE cards or more M.2 drives.
Presentation: The software has improved a lot, but still feels inconsistent in places compared with alternatives from brands such as Synology and QNAP.
Click the link below to take you to your local Amazon store and where to buy the terramaster F6-424 Max NAS.
This description contains links to Amazon. These links will take you to some of the products mentioned in today's content. As an Amazon Associate, I earn from qualifying purchases. Visit the NASCompares Deal Finder to find the best place to buy this device in your region, based on Service, Support and Reputation - Just Search for your NAS Drive in the Box Below
Need Advice on Data Storage from an Expert?
Finally, for free advice about your setup, just leave a message in the comments below here at NASCompares.com and we will get back to you.Need Help?
Where possible (and where appropriate) please provide as much information about your requirements, as then I can arrange the best answer and solution to your needs. Do not worry about your e-mail address being required, it will NOT be used in a mailing list and will NOT be used in any way other than to respond to your enquiry.
[contact-form-7]
TRY CHAT Terms and Conditions
If you like this service, please consider supporting us.
We use affiliate links on the blog allowing NAScompares information and advice service to be free of charge to you.Anything you purchase on the day you click on our links will generate a small commission which isused to run the website. Here is a link for Amazon and B&H.You can also get me a Ko-fi or old school Paypal. Thanks!To find out more about how to support this advice service checkHEREIf you need to fix or configure a NAS, check FiverHave you thought about helping others with your knowledge? Find Instructions Here
Or support us by using our affiliate links on Amazon UK and Amazon US
Alternatively, why not ask me on the ASK NASCompares forum, by clicking the button below. This is a community hub that serves as a place that I can answer your question, chew the fat, share new release information and even get corrections posted. I will always get around to answering ALL queries, but as a one-man operation, I cannot promise speed! So by sharing your query in the ASK NASCompares section below, you can get a better range of solutions and suggestions, alongside my own.
Upgrading to 10GbE networking should, in theory, allow you to achieve 1GB/s (1000MB/s) network speeds, unlocking ultra-fast data transfers for large files, backups, and high-performance applications. However, many users find that real-world performance falls far short of these expectations. Instead of the seamless, high-speed experience they anticipated, they encounter slower-than-expected speeds, inconsistent performance, and unexplained bottlenecks that limit throughput.
Whether you’re using a NAS, a 10GbE switch, or a direct PC-to-NAS connection, numerous factors can influence network performance. These can range from hardware limitations (such as underpowered CPUs, slow storage, or limited PCIe lanes) to misconfigured network settings (like incorrect MTU sizes, VLAN issues, or outdated drivers). Even the quality of your network cables and transceivers can play a crucial role in determining whether you’re getting the full 10GbE bandwidth or suffering from hidden bottlenecks.
In this guide, we’ll explore TWENTY common reasons why your 10GbE network might not be delivering full speeds, along with detailed fixes and optimizations for each issue. Each point is carefully explained, ensuring that you can identify, diagnose, and resolve the specific problems affecting your network performance. Whether you’re dealing with a NAS that isn’t reaching expected speeds, a 10GbE adapter that’s underperforming, or a switch that isn’t behaving as expected, this guide will help you troubleshoot step by step, so you can fully unlock the potential of your 10GbE network.
1. (Obvious one) Your Storage is Too Slow to Keep Up with 10GbE Speeds
The Problem:
One of the biggest misconceptions about 10GbE networking is that simply having a 10GbE network adapter means you will automatically get 1GB/s speeds. However, your actual storage performance is often the bottleneck. Most traditional hard drives (HDDs) have a sequential read/write speed of only 160-280MB/s, meaning that a single drive cannot fully saturate a 10GbE connection. Even with multiple HDDs in a RAID array, performance may still fall short of 1GB/s due to RAID overhead and the limitations of mechanical disks.
For example, if you have a 4-bay NAS with standard 7200RPM hard drives in RAID 5, you may only reach 500-600MB/s, which is half the potential of your 10GbE network. The situation gets worse if you are using RAID 6, as the additional parity calculations introduce a write performance penalty.
The Fix:
Switch to SSDs: If you need consistent 10GbE performance, you will need SSDs instead of HDDs. Even four SATA SSDs in RAID 5 can saturate a 10GbE connection (~1GB/s read/write).
Use NVMe Storage for Maximum Speeds: If your NAS supports NVMe SSDs, using them will provide 3-5GB/s speeds, which far exceeds 10GbE bandwidth.
Optimize RAID Configuration:
RAID 0 offers maximum speed, but no redundancy.
RAID 5 or RAID 10 is the best balance for speed and data protection.
RAID 6 is great for redundancy but can severely impact write performance.
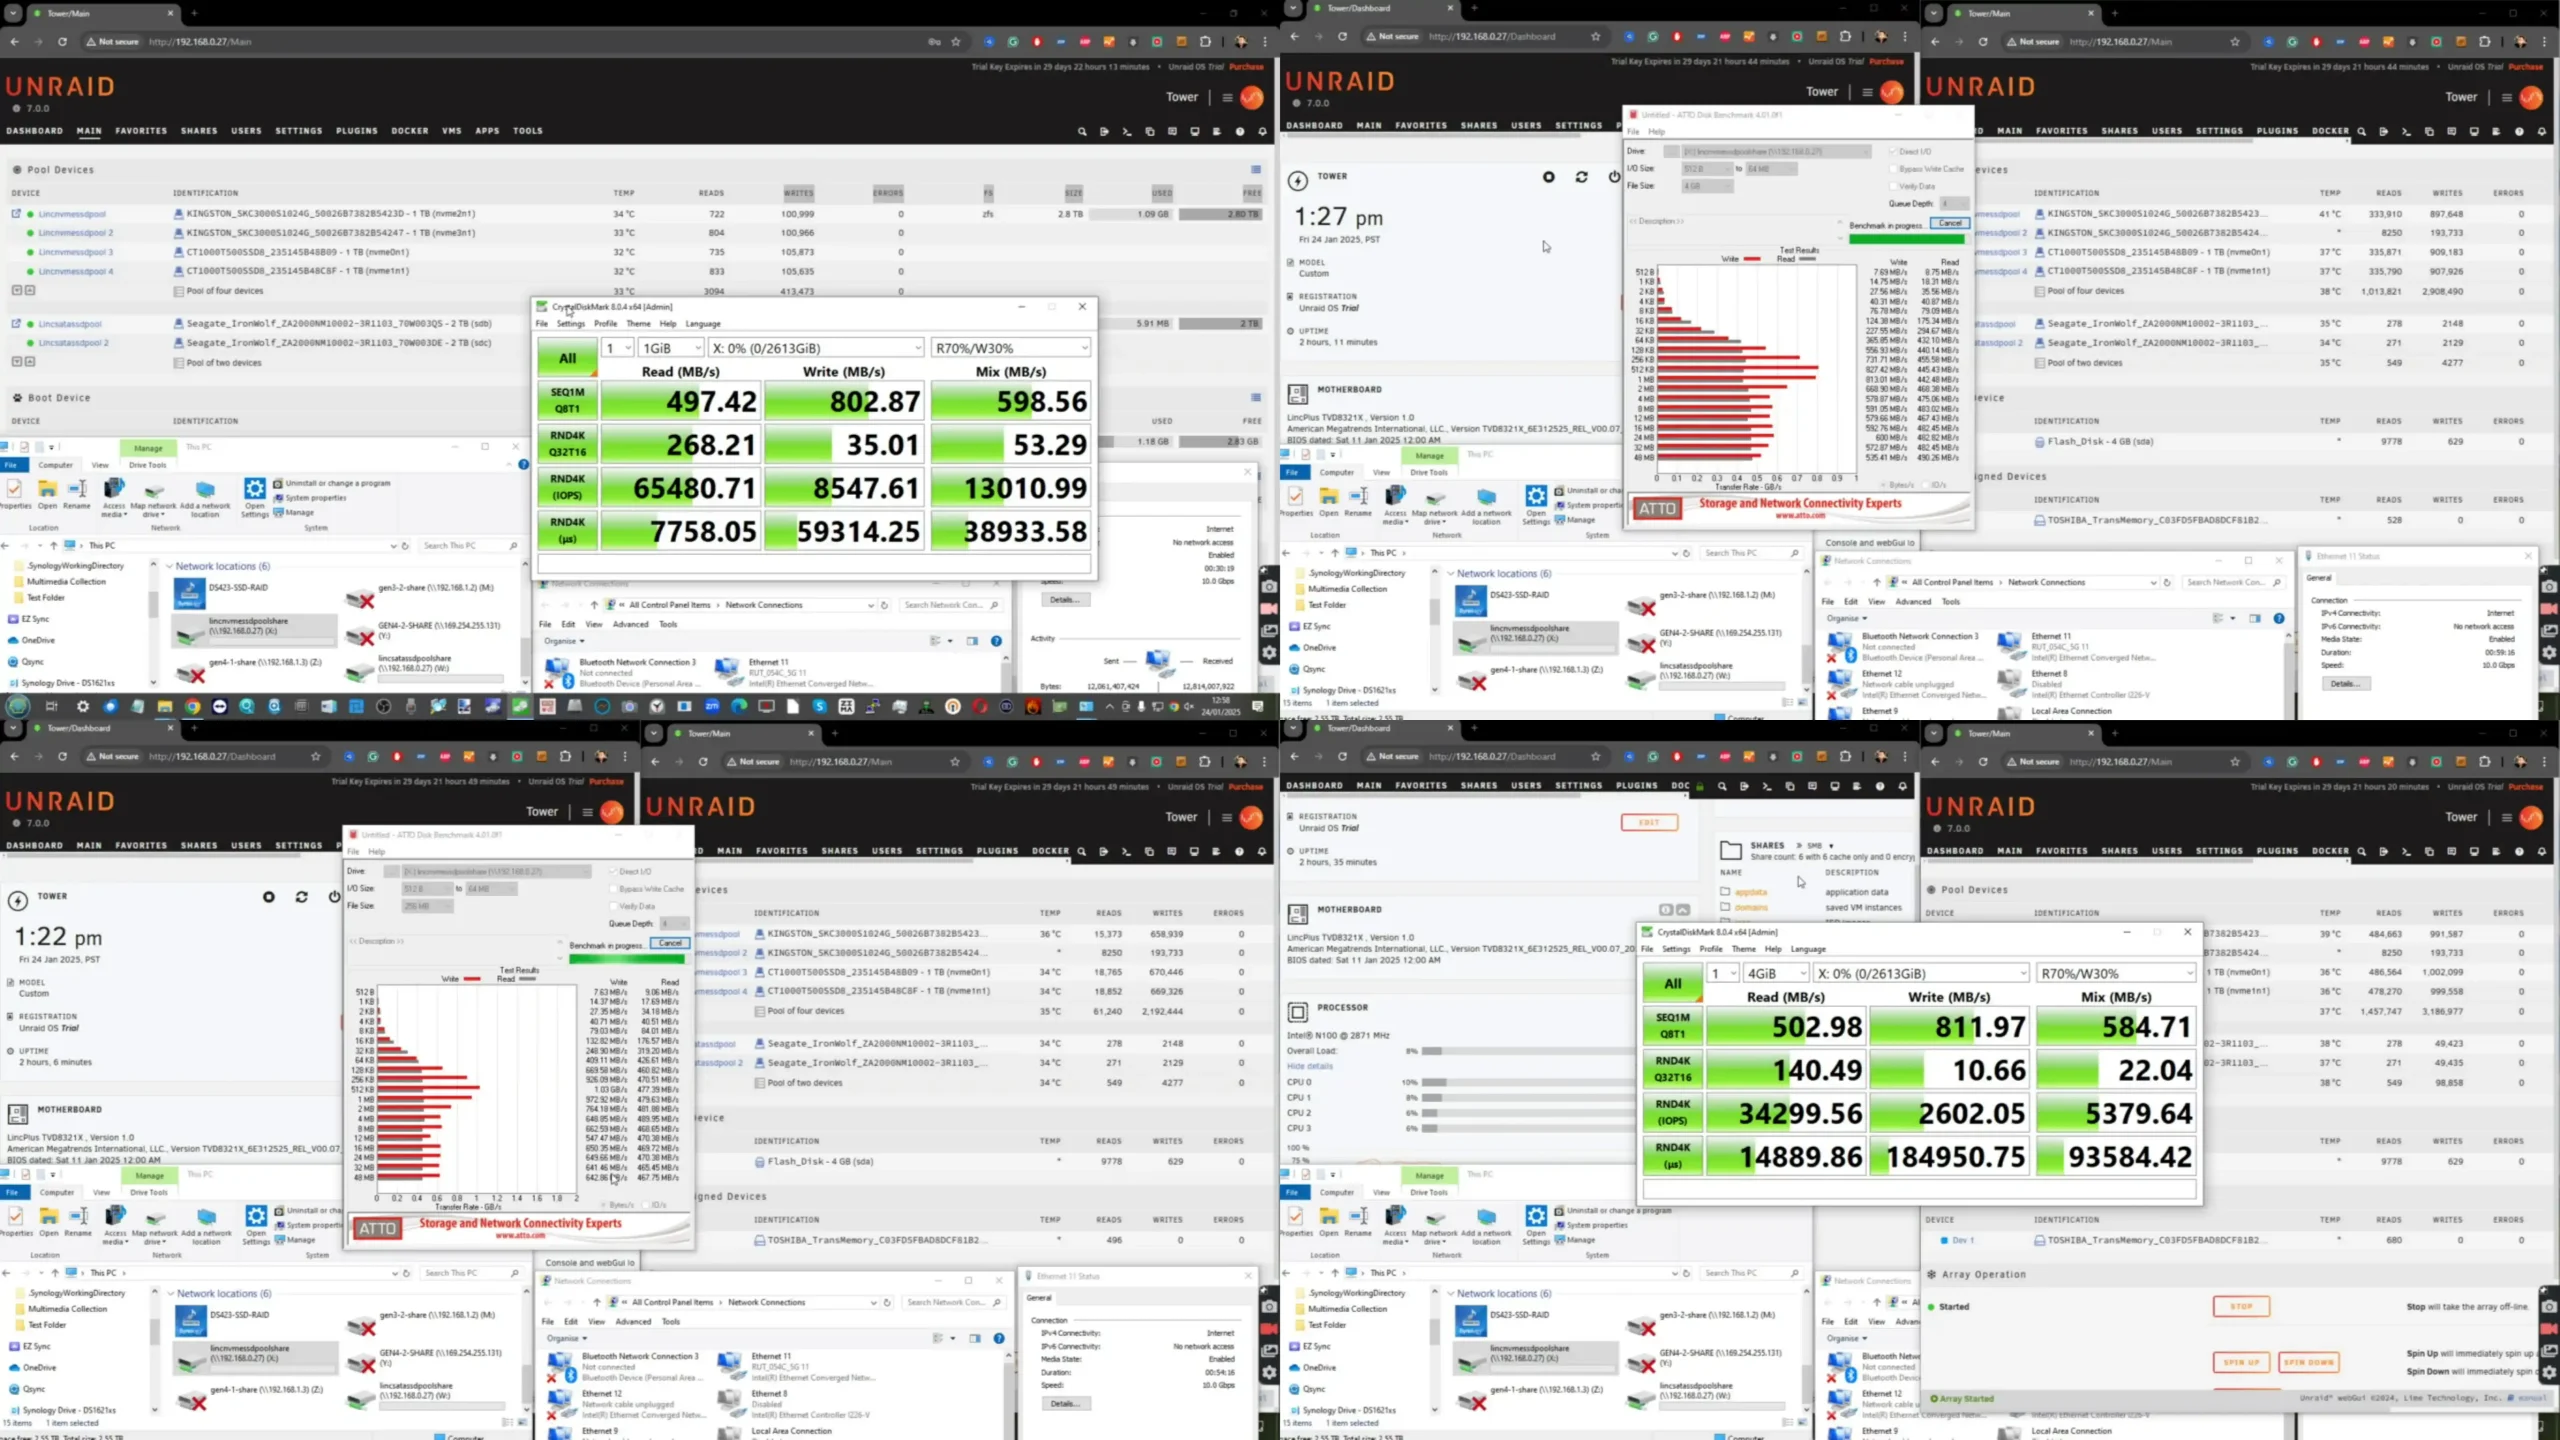
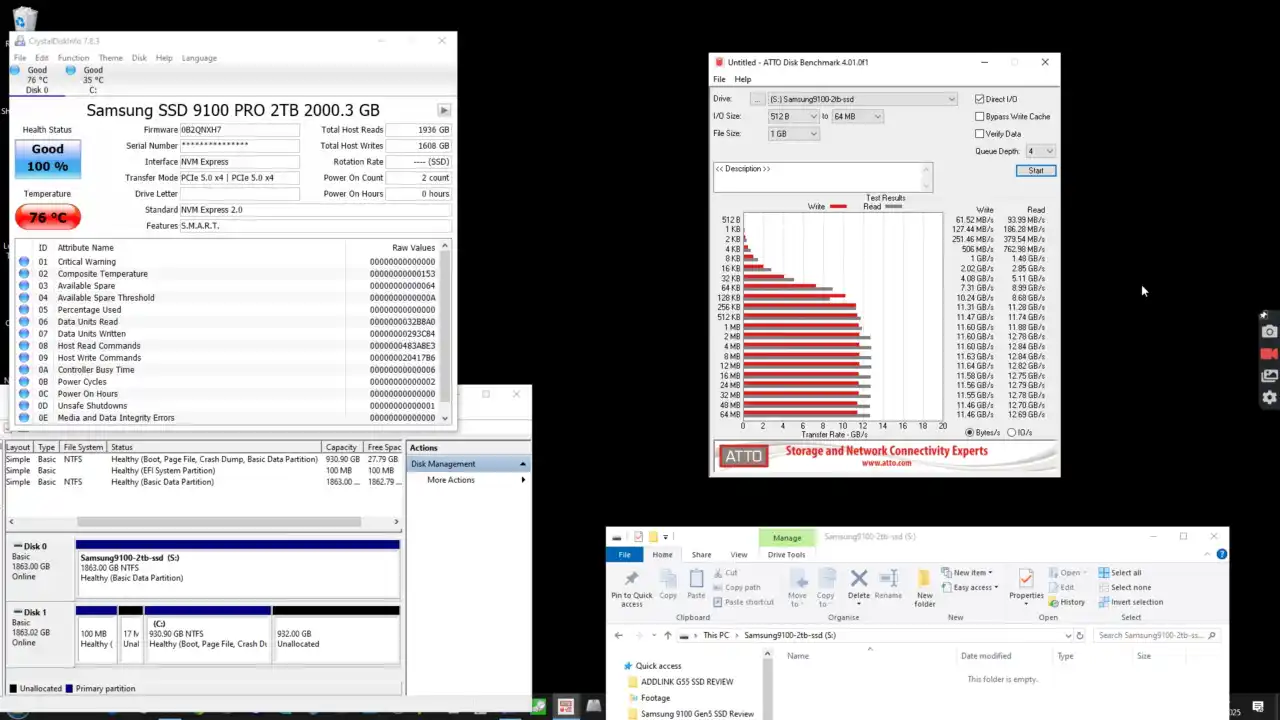
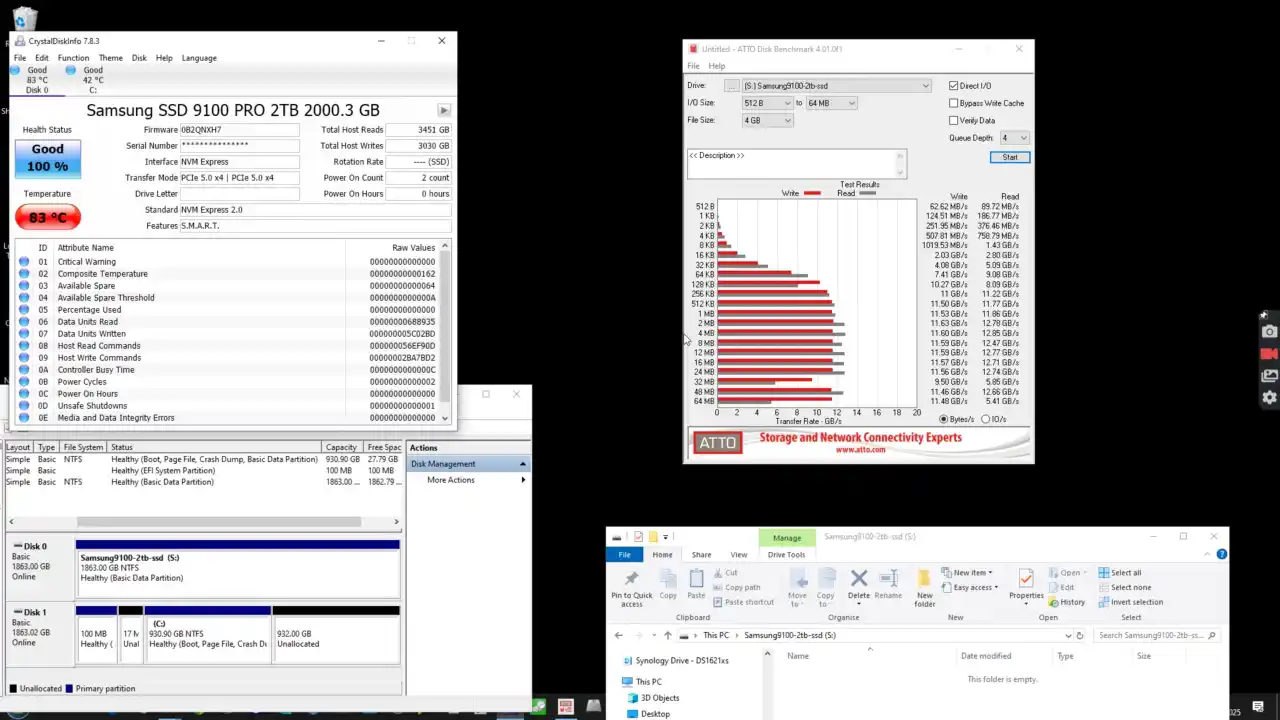
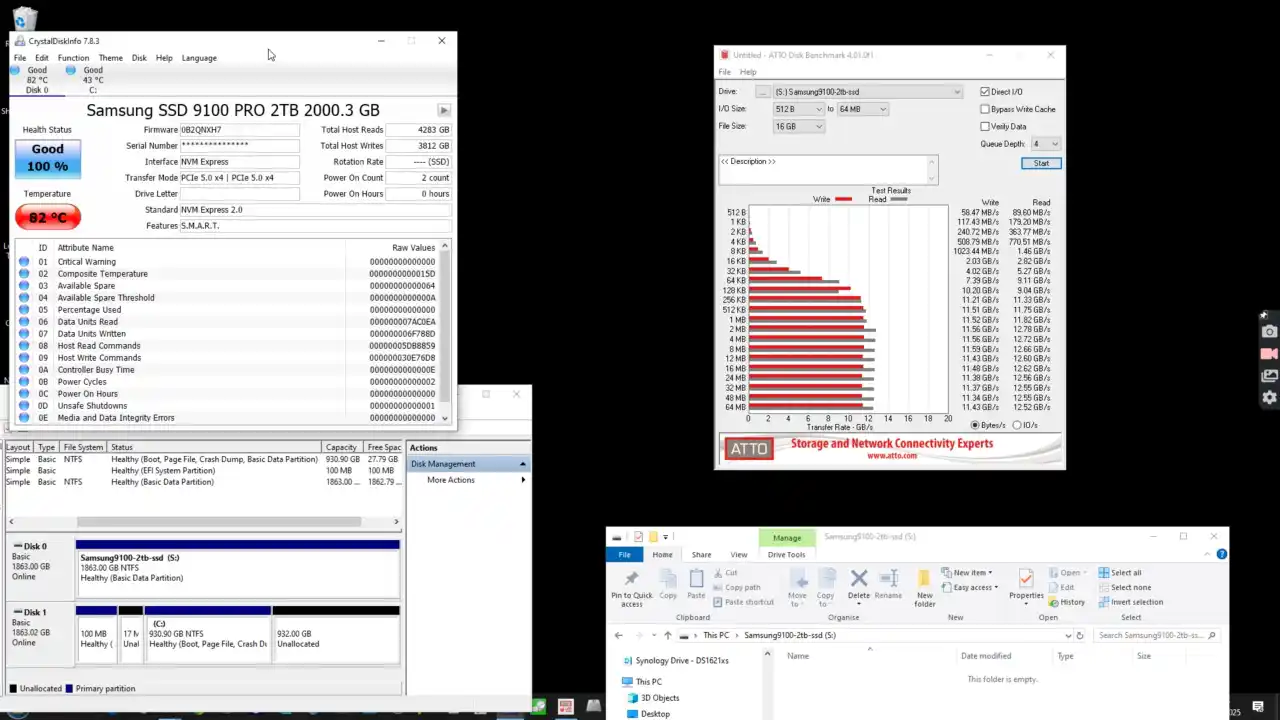
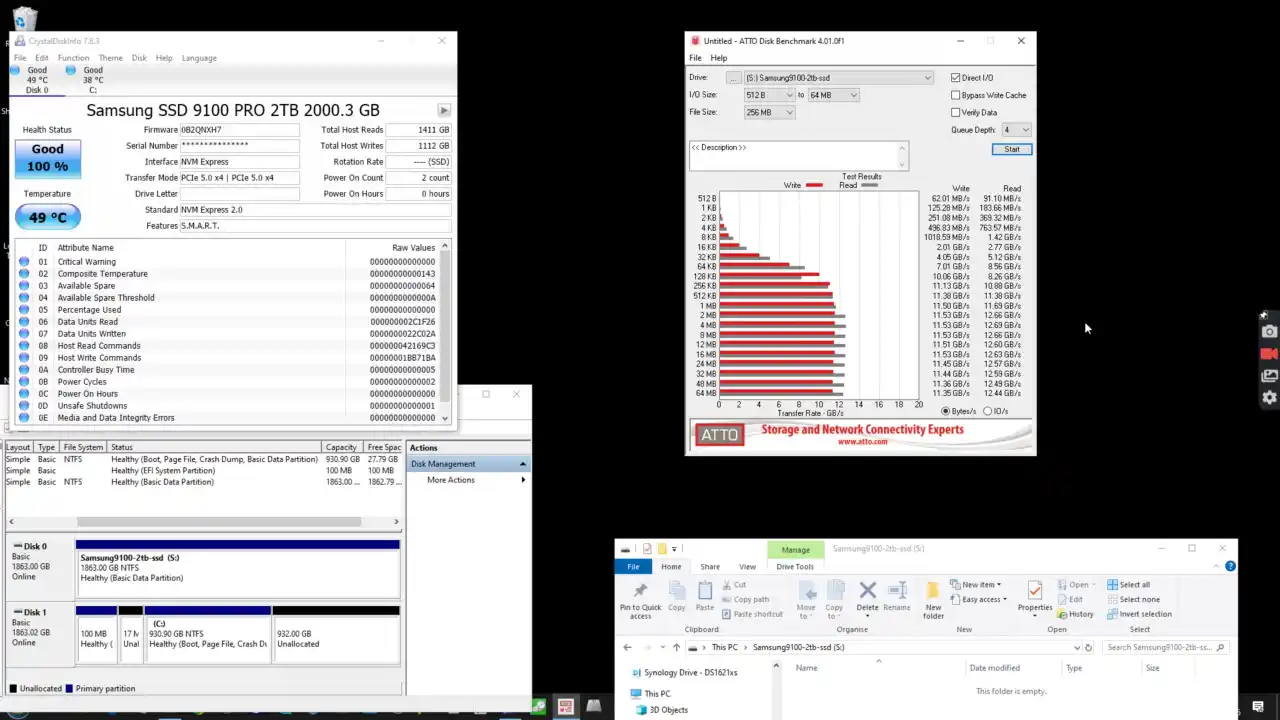
How to Check Disk Speeds:
Run a disk speed test to verify if storage is the issue:
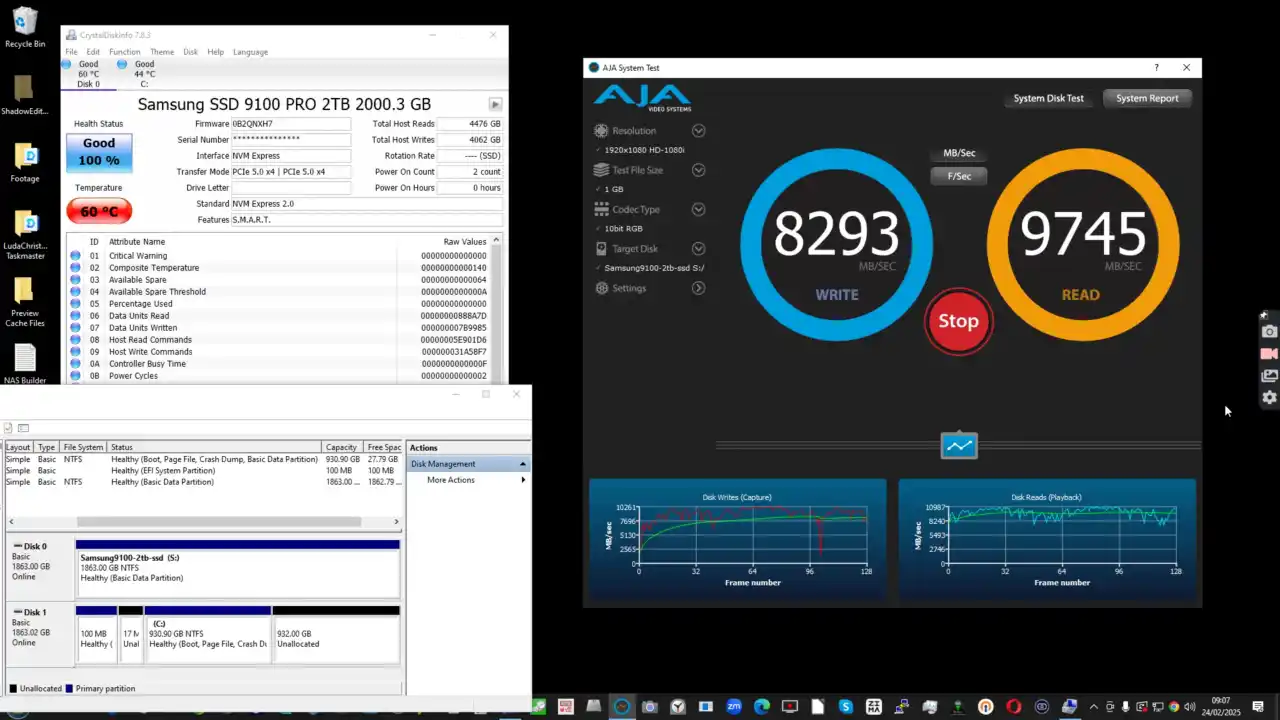
Windows (CrystalDiskMark)
Download and install CrystalDiskMark.
Select your storage volume (NAS drive, local SSD, etc.).
Run a sequential read/write test.
If speeds are below 1GB/s, your storage is the bottleneck.
This writes 5GB of data to test sequential write speeds.
Check the MB/s value after the test completes—if it’s below 1000MB/s, your storage is too slow.
2. Your SSDs or NVMe Drives Are Running at Lower PCIe Speeds
The Problem:
Even if your NAS or PC is using SSDs, you might not be getting full speeds due to PCIe lane limitations. Some NAS devices throttle M.2 NVMe SSDs to PCIe 3.0 x1 or x2, which caps speeds at 800-1600MB/s—not enough to fully saturate a 10GbE connection.
This issue is particularly common in budget-friendly NAS systems and motherboards where multiple M.2 slots share bandwidth with SATA ports or other PCIe devices. Even high-speed SSDs like the Samsung 980 Pro (7000MB/s rated speed) will be bottlenecked if placed in an underpowered slot.
The Fix:
Check PCIe Lane Assignments:
Some motherboards share PCIe lanes between M.2 slots and other components (e.g., GPU, SATA ports).
Move your NVMe SSD to a full x4 slot for maximum speed.
Linux/macOS (Check PCIe Speeds)
lspci -vvv | grep -i nvme
Look for PCIe x1 or PCIe x2—this means your SSDs are not running at full bandwidth.
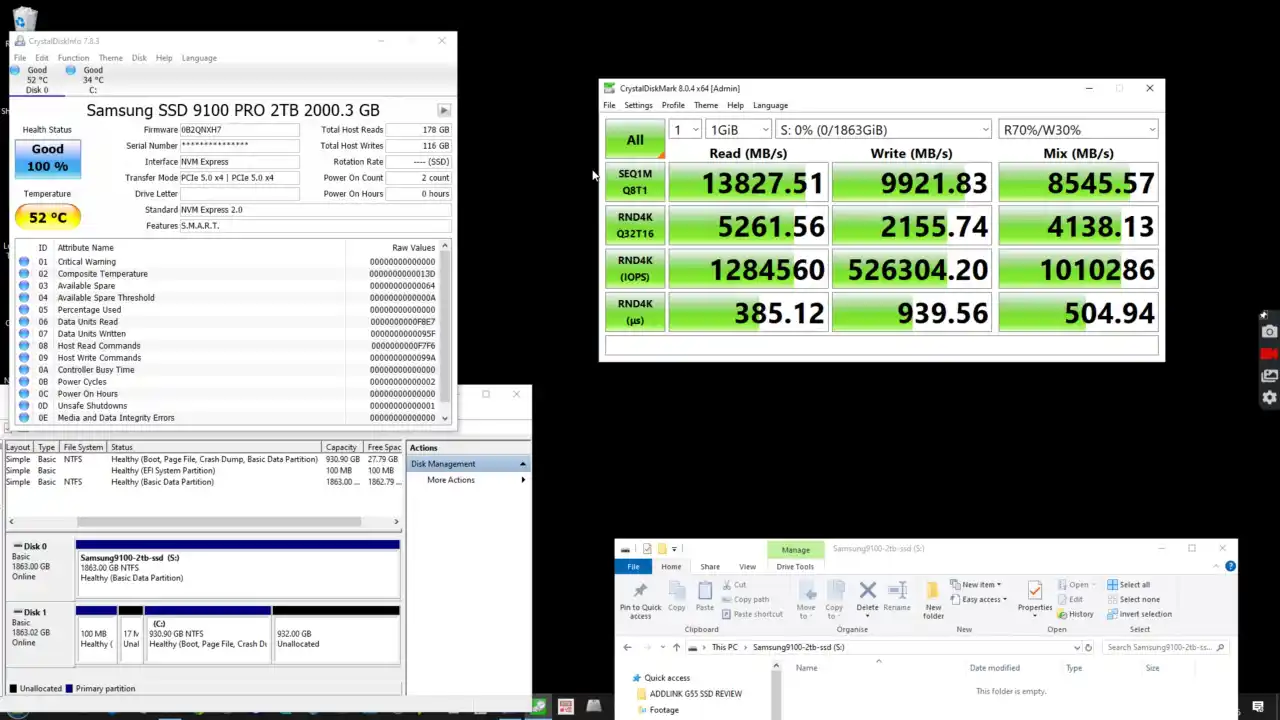
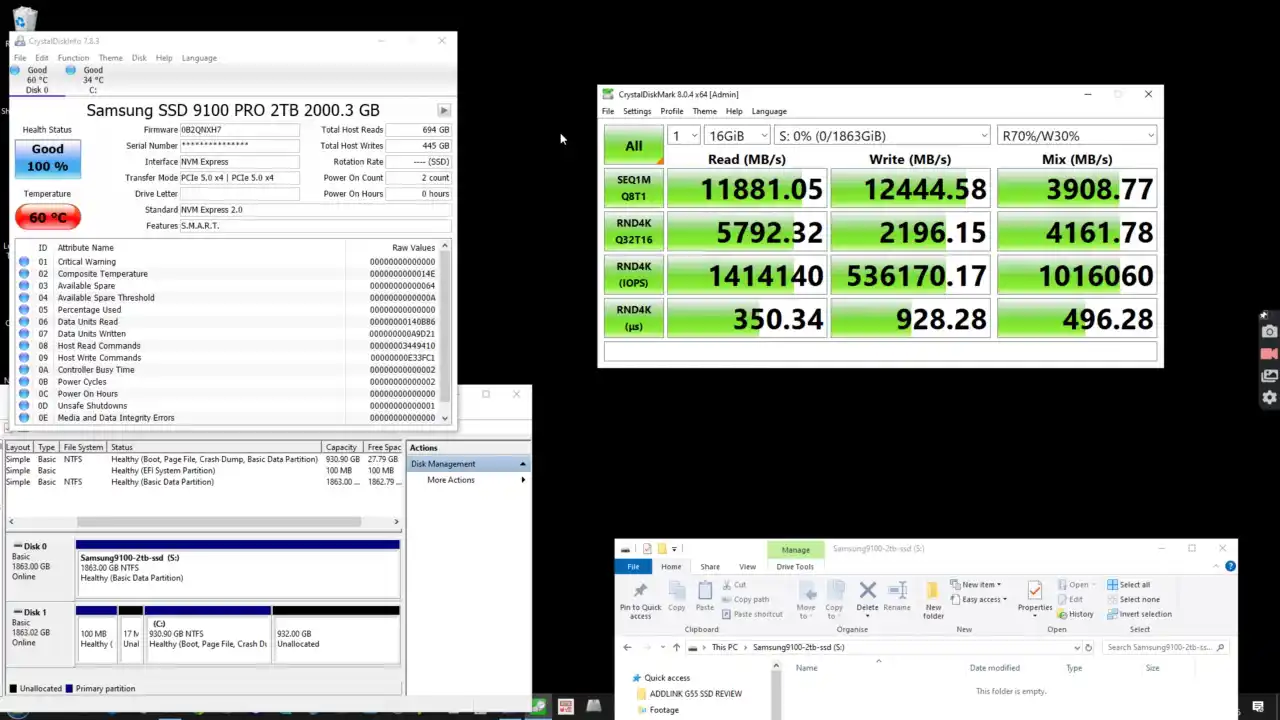
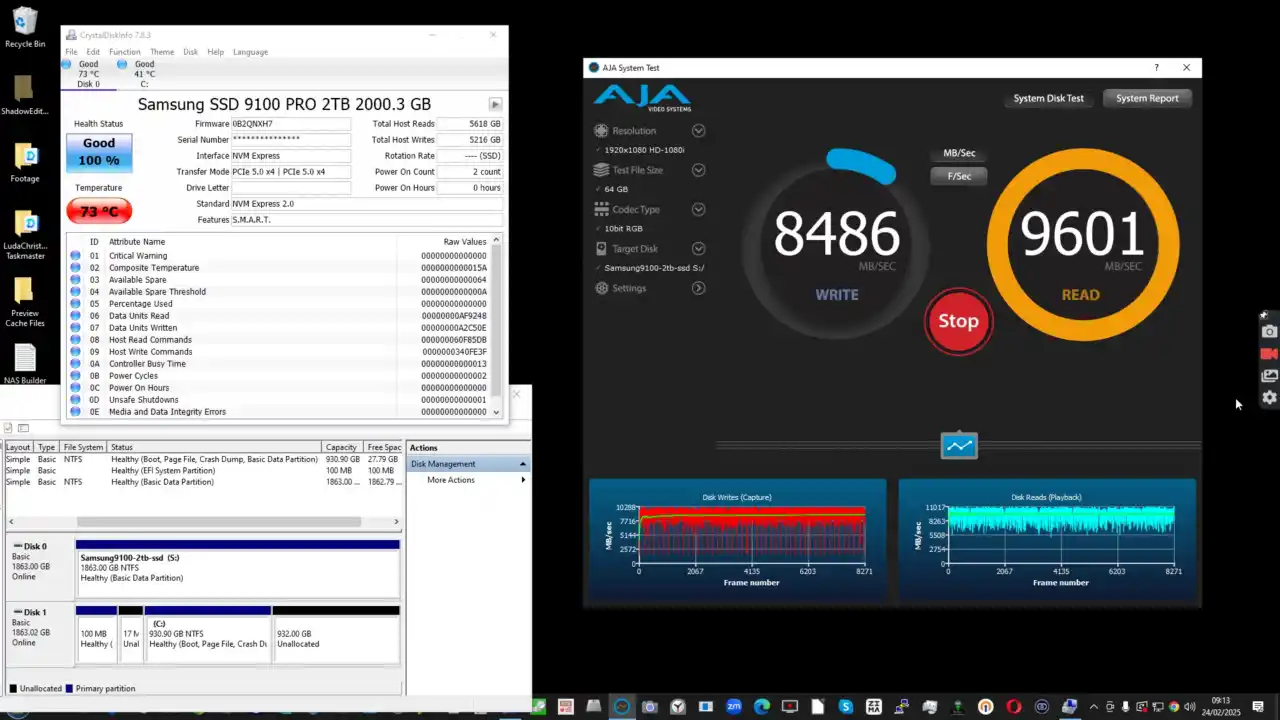
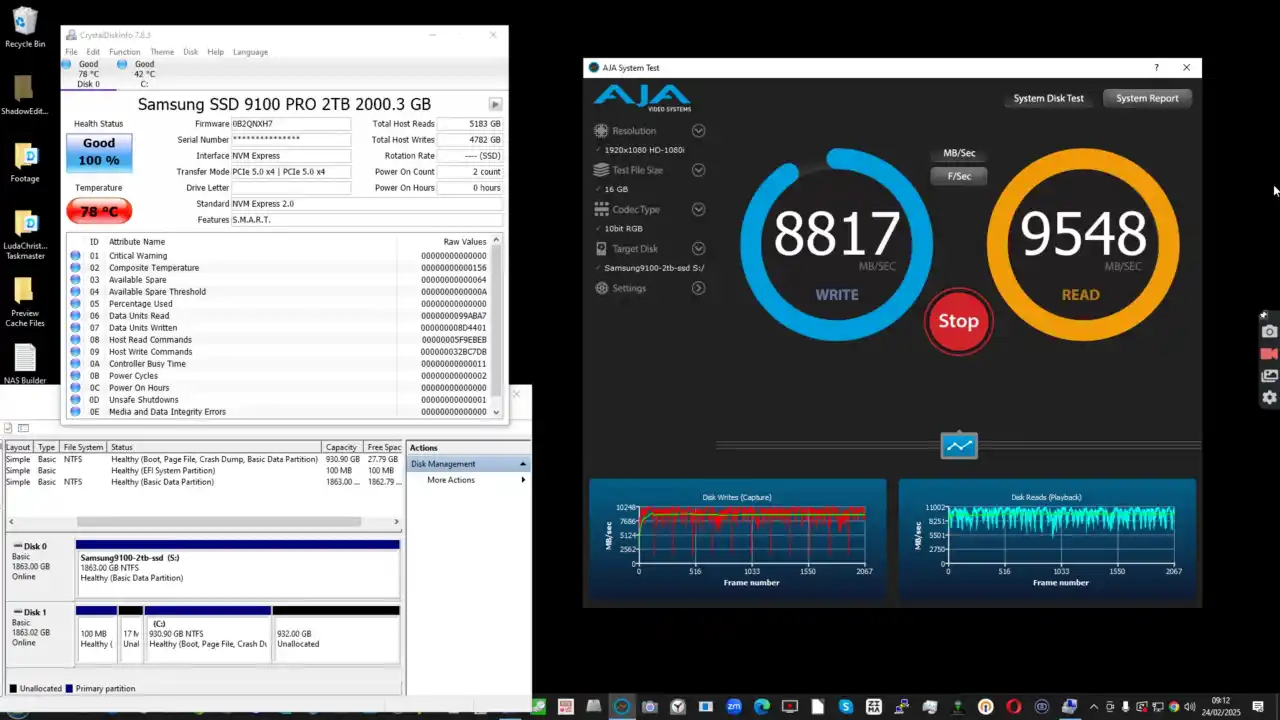
Windows (Check with CrystalDiskInfo)
Download CrystalDiskInfo.
Look for the PCIe link speed in the SSD details.
If speeds are lower than expected, try moving the SSD to a different M.2 slot or checking BIOS settings to enable full PCIe bandwidth.
3. You’re Using DRAM-less SSDs (HMB-Only SSDs Can Throttle Speeds)
The Problem:
Not all SSDs are created equal. Some budget SSDs lack DRAM cache and instead rely on Host Memory Buffer (HMB), which offloads caching duties to system RAM. While this design helps reduce costs, it also means significantly lower sustained write performance.
For a single SSD, this might not be an issue, but in a RAID configuration, the problem worsens as multiple drives compete for system memory. DRAM-less SSDs also tend to overheat faster, leading to thermal throttling, further reducing performance.
The Fix:
Use SSDs with DRAM cache: High-performance SSDs like the Samsung 970 EVO, WD Black SN850, and Crucial P5 Plus have dedicated DRAM to prevent slowdowns.
Monitor SSD temperatures:
If SSDs are overheating (above 70°C), use heatsinks or active cooling.
Check SSD type in Windows:
Open Device Manager → Expand Disk Drives.
Search your SSD model online—if it lacks DRAM, it could be a performance bottleneck.
4. Your Switch is Not Actually 10GbE (Misleading Switch Descriptions)
The Problem:
Many users unknowingly purchase “10GbE” switches that only have limited 10GbE ports. Some switches advertise 10GbE speeds, but only one or two ports support it, while the rest run at 1GbE.
It’s also possible that your NAS or PC is plugged into a non-10GbE port, creating an invisible bottleneck.
The Fix:
Check the switch model’s specifications to confirm the number of true 10GbE ports.
Log into your switch’s admin panel and confirm the port speeds:
If using Netgear, Ubiquiti, or Cisco, log in and check the port status.
If using a managed switch, run the following command via SSH:
show interfaces status
Look for 10G/10000M to confirm that the port is running at full speed.
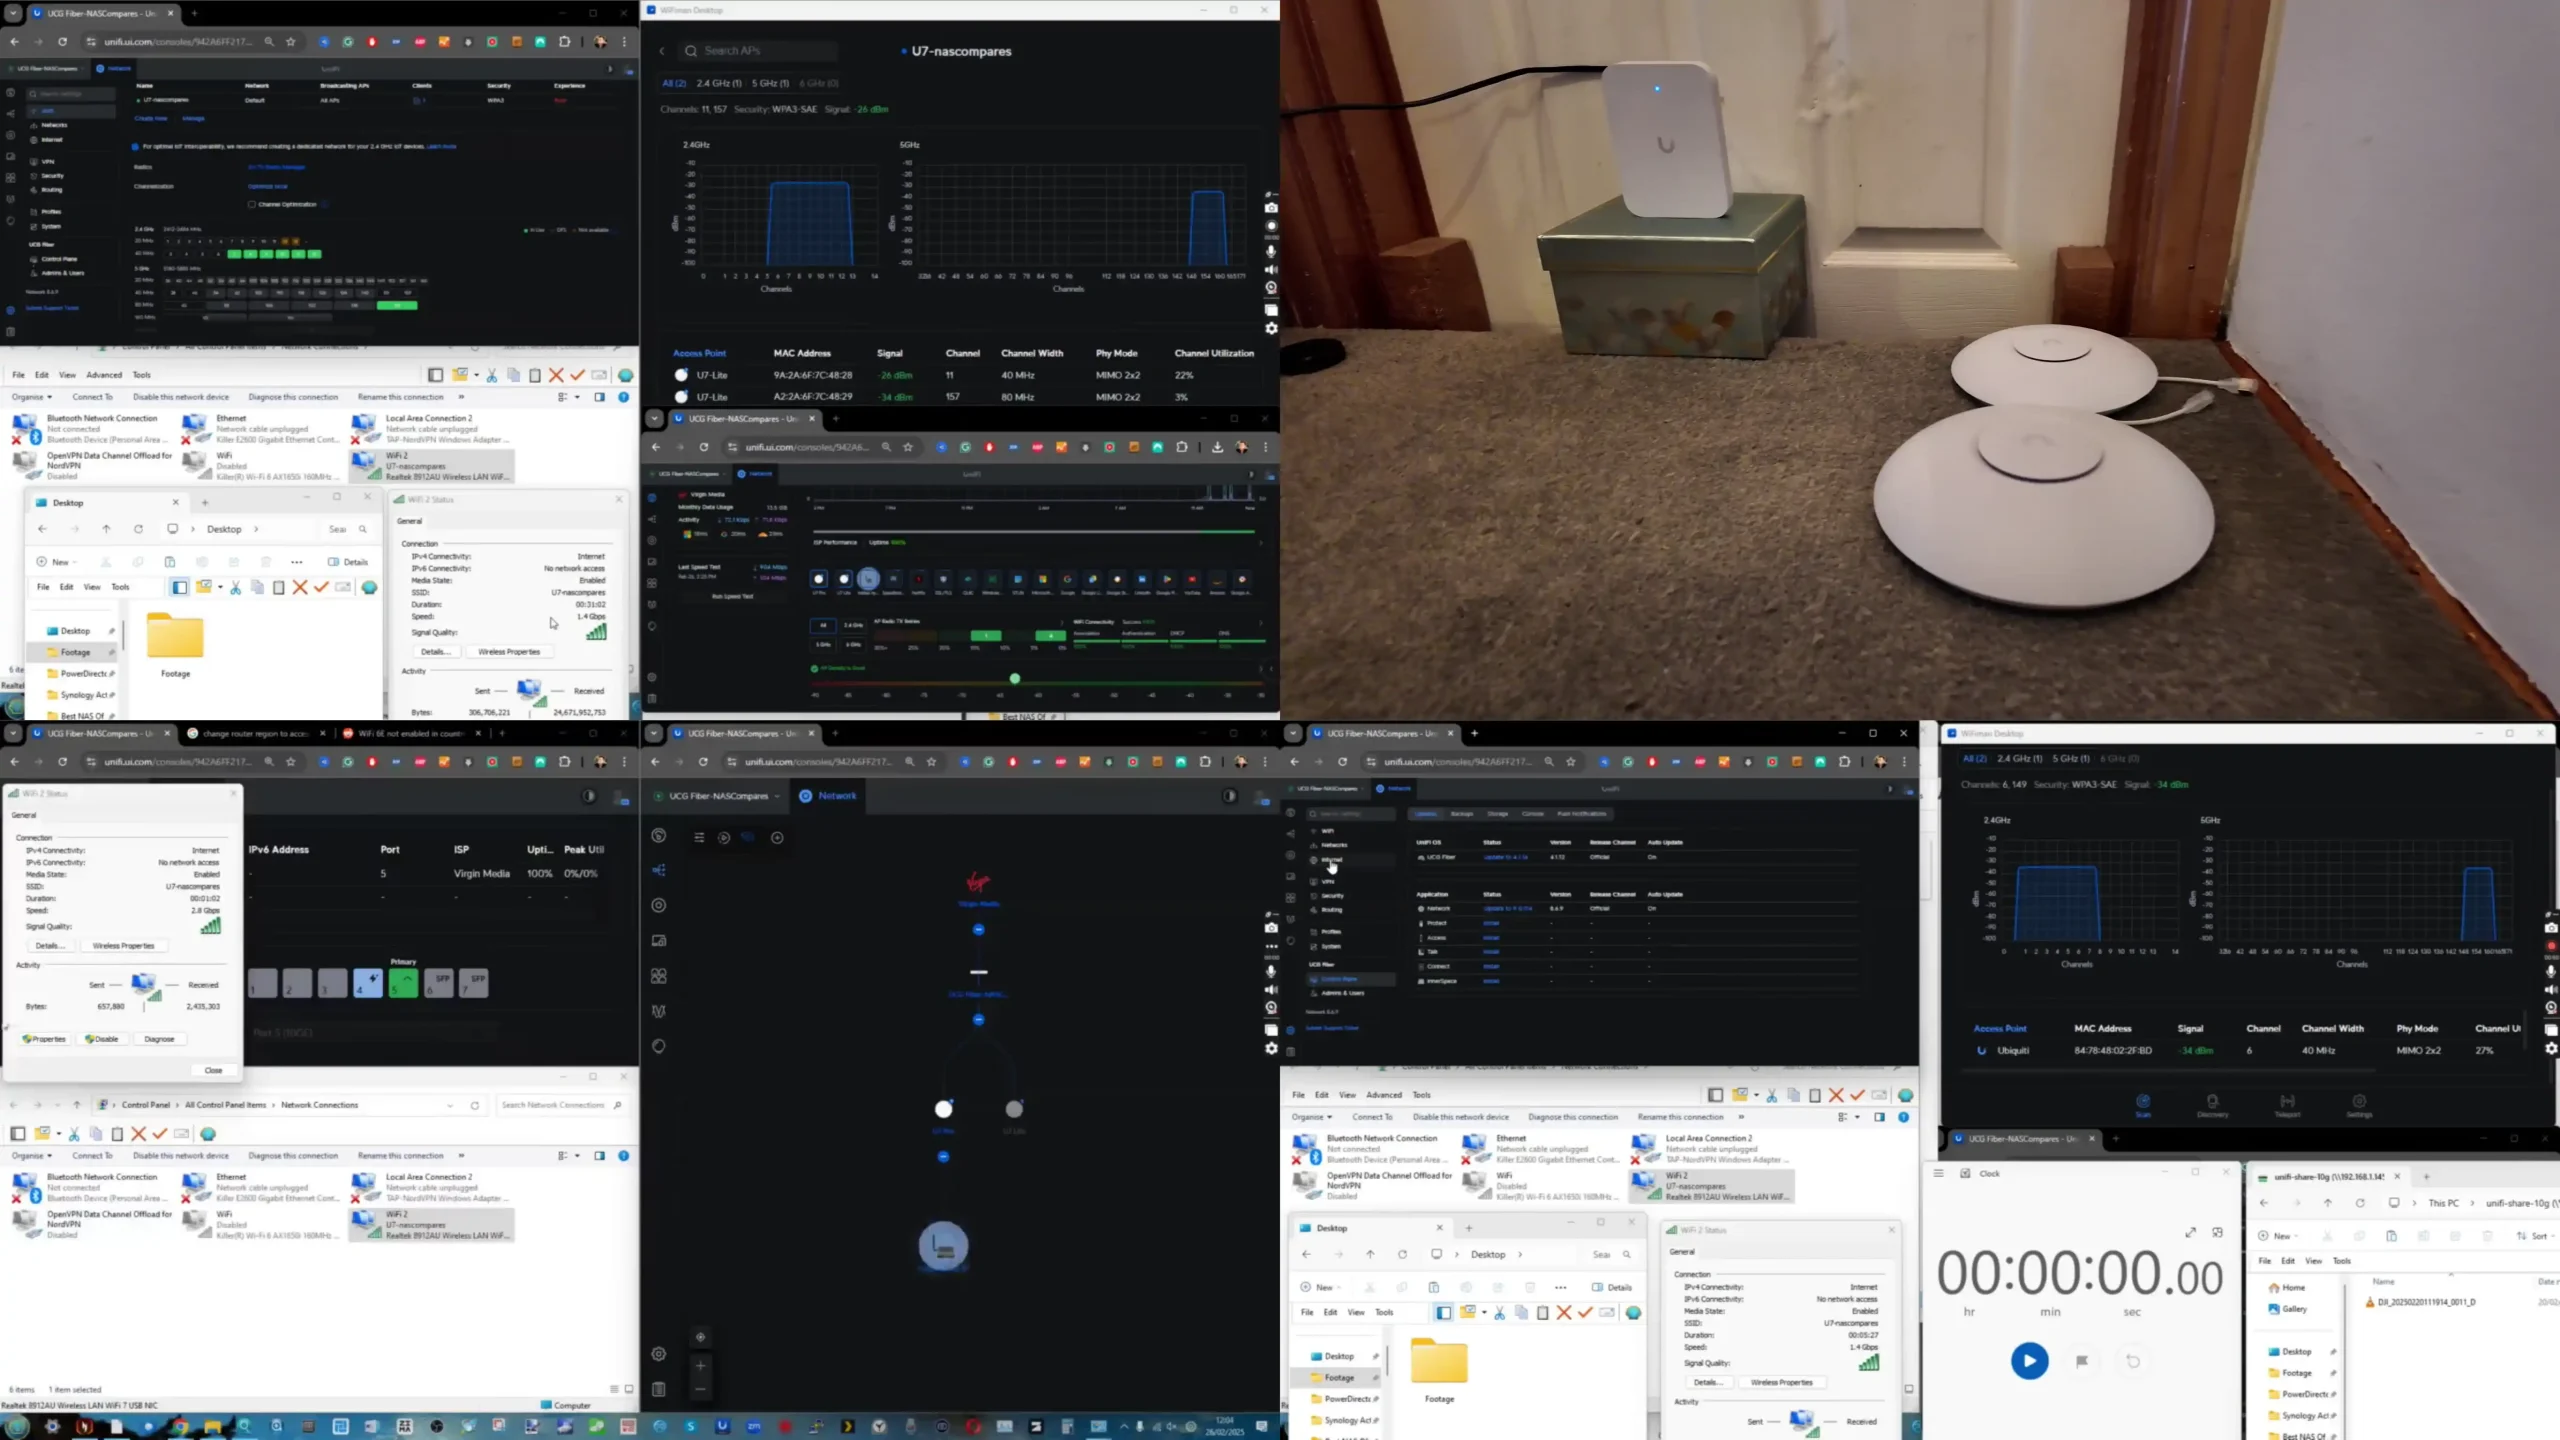
Windows (Check Network Speed)
Open Control Panel > Network and Sharing Center.
Click on your 10GbE adapter → Check Speed (should show 10.0Gbps).
If your switch only has 1-2 ports at 10GbE, you may need to reconfigure your network layout or upgrade to a full 10GbE switch.
5. You’re Using the Wrong Ethernet Cables (Cat5e vs. Cat6/Cat7)
The Problem:
Not all Ethernet cables can handle 10GbE speeds over long distances. If you’re using Cat5e, performance drops significantly after 10 meters.
The Fix:
Use at least Cat6 for short runs (up to 30 meters).
Use Cat6a or Cat7 for long runs (30m+).
Inspect cables—cheap or old cables may not be rated for 10GbE.
How to Check Your Cable Type
Look at the cable jacket—it should say Cat6, Cat6a, or Cat7.
If the cable does not specify, assume it’s Cat5e and replace it.
If using fiber, make sure your SFP+ transceivers are rated for 10GbE—many cheap adapters are 1GbE only.
6. Your Network Adapter is Using the Wrong Driver or Firmware
The Problem:
Even if you have a 10GbE network adapter installed, outdated or incorrect drivers can limit speeds or cause inconsistent performance. Many network cards rely on manufacturer-specific drivers for optimal performance, but some operating systems may install generic drivers that lack key optimizations.
This issue is common with Intel, Mellanox, Broadcom, and Aquantia/AQC NICs—especially if they were installed manually or came pre-installed with a NAS or prebuilt server.
The Fix:
Check your network adapter model:
Windows: Open Device Manager > Network Adapters and find your 10GbE NIC name.
Linux/macOS: Run the following command to list your installed NICs:
lspci | grep Ethernet
Update the driver manually:
Windows: Go to the manufacturer’s website (Intel, Broadcom, Mellanox, etc.) and download the latest driver.
Linux: Update using ethtool:
sudo ethtool -i ethX # Replace ethX with your network interface
Check and update NIC firmware: Some network cards require a firmware update for full 10GbE support. Many Aquantia NICs, for example, need firmware updates to fix link speed negotiation issues.
Ensure your OS isn’t using a generic driver:
In Windows, open Device Manager, right-click the NIC, and select Properties > Driver. If it says Microsoft Generic Adapter, update it manually.
In Linux, check driver details with:
ethtool -i ethX
If the driver is a generic kernel driver, install the manufacturer’s official driver.
7. MTU (Jumbo Frames) is Not Set Correctly
The Problem:
By default, most network devices use a 1500-byte MTU (Maximum Transmission Unit). However, 10GbE networks can benefit from larger packet sizes (9000 bytes, known as Jumbo Frames). If one device has Jumbo Frames enabled but another doesn’t, packets get fragmented, leading to lower speeds, higher latency, and increased CPU usage.
The Fix:
Enable Jumbo Frames (MTU 9000) on All Devices:
Windows:
Go to Control Panel > Network and Sharing Center > Change Adapter Settings.
Right-click your 10GbE adapter, select Properties > Configure > Advanced.
Set Jumbo Frame / MTU to 9000.
Linux/macOS:
sudo ifconfig ethX mtu 9000
NAS:
Synology: Go to Control Panel > Network > Interfaces > Edit and set MTU to 9000.
QNAP: Go to Network & Virtual Switch > Interfaces > Jumbo Frames.
Check MTU Settings on Your Switch:
If your switch does not support MTU 9000, disable Jumbo Frames or upgrade the switch.
Verify MTU Configuration:
Run a ping test with large packets:
ping -f -l 8972 NAS_IP
If the packets fragment, MTU isn’t properly configured.
8. Your NAS or PC CPU is Too Weak to Handle 10GbE Traffic
The Problem:
Even if you have fast storage and a 10GbE adapter, a low-power CPU can bottleneck network performance. Many NAS devices use ARM-based or low-end Intel CPUs (e.g., Celeron, Atom, or N-series processors) that struggle to handle high-speed transfers, encryption, or multi-user traffic.
For example, some budget NAS units advertise 10GbE connectivity, but their CPU is too weak to push consistent 1GB/s speeds—especially if multiple users are accessing data simultaneously.
The Fix:
Check NAS CPU specs:
If your NAS has a quad-core ARM or low-end Intel CPU, it may not be capable of full 10GbE speeds.
Monitor CPU Usage:
Windows: Open Task Manager > Performance and check if the CPU is maxed out during transfers.
Linux/macOS: Use:
top
Disable resource-heavy background tasks:
Stop or schedule RAID scrubbing, snapshots, virus scans, and indexing during off-hours.
Use an x86 NAS with a high-performance CPU:
Intel Core i3/i5, Ryzen, or Xeon-based NAS units handle 10GbE much better than Celeron/ARM-based models.
9. VLAN, QoS, or Network Prioritization is Throttling Your 10GbE Traffic
The Problem:
If you’re using a managed switch or router, incorrect VLAN (Virtual LAN) or QoS (Quality of Service) settings may be limiting your 10GbE speeds. Some switches automatically assign lower priority to high-bandwidth devices, throttling performance.
The Fix:
Check VLAN settings:
If your 10GbE NAS or PC is in a VLAN with limited bandwidth, remove it from that VLAN or adjust the priority settings.
Disable or Adjust QoS Settings:
Log into your switch’s admin panel and look for QoS (Quality of Service) settings.
If enabled, check if bandwidth limits are applied to your 10GbE ports.
In some switches (e.g., Ubiquiti, Netgear, Cisco), set QoS priority for 10GbE devices to “High”.
Run a Speed Test Without VLAN or QoS:
Temporarily disable VLAN/QoS, then test file transfer speeds again.
If speeds improve, your VLAN/QoS settings were throttling your network.
10. Background Processes or Other Network Devices Are Consuming Bandwidth
The Problem:
If you’re not getting full 10GbE speeds, it’s possible that another device is using the NAS at the same time. Even if your PC or NAS seems idle, background tasks like cloud syncing, automated backups, Plex transcoding, or surveillance camera recording can consume CPU, storage I/O, and network bandwidth.
The Fix:
Check if other devices are using the NAS:
Windows: Open Task Manager > Network and check if any background processes are consuming bandwidth.
Linux/macOS: Use:
iftop -i ethX
On your NAS, check if:
Plex or media servers are streaming.
Security cameras are recording to the NAS.
Backups/snapshots are running in the background.
Pause Background Tasks:
Temporarily disable cloud syncing, RAID scrubbing, and backups, then retest network speeds.
Run an IPerf Network Speed Test:
Windows/Linux:
On NAS:
iperf3 -s
On PC:
iperf3 -c NAS_IP -P 4
If IPerf shows 1GB/s speeds but file transfers don’t, then background processes or storage limitations are the issue.
11. Your SFP+ Transceiver or Media Converter is Bottlenecking Performance
The Problem:
If you’re using SFP+ transceivers or fiber-to-RJ45 media converters, they might not be running at full 10GbE speeds. Many budget-friendly SFP+ modules are actually 1GbE-only or have compatibility issues with certain switches and NICs. Additionally, some fiber-to-copper converters (e.g., cheap third-party models) overheat quickly, leading to throttling and slow speeds.
The Fix:
Check Your SFP+ Transceiver Rating:
Run the following command on a Linux-based NAS or switch:
ethtool ethX
If the output shows 1000Mbps instead of 10000Mbps, your SFP+ module is not running at full speed.
Use Verified SFP+ Modules:
Stick to brand-certified transceivers (e.g., Intel, Mellanox, Cisco, Ubiquiti, MikroTik).
Generic eBay/Amazon SFP+ transceivers may not properly negotiate at 10GbE.
Check for Overheating:
Touch the transceiver—if it’s too hot to hold, it may be thermal throttling.
Consider active cooling (small heatsinks or airflow near the module).
Verify Media Converters:
Some cheap SFP-to-RJ45 converters cap speeds at 5GbE or lower.
Try swapping the converter for a direct 10GbE-capable SFP+ transceiver.
12. Your PCIe Slot is Throttling Your 10GbE NIC
The Problem:
Your 10GbE network card (NIC) might be plugged into a PCIe slot that doesn’t provide full bandwidth. Some motherboards limit secondary PCIe slots to x1 or x2 speeds, which reduces network performance significantly.
For example:
A PCIe 2.0 x1 slot only supports 500MB/s, far below 10GbE speeds.
A PCIe 3.0 x4 slot is required for full 10GbE performance.
The Fix:
Check PCIe Slot Assignment:
Windows: Use HWiNFO64 or Device Manager to check PCIe link speed.
Linux/macOS: Run:
lspci -vvv | grep -i ethernet
If it says PCIe x1, your NIC is bottlenecked.
Move the 10GbE NIC to a Better Slot:
Use a PCIe 3.0/4.0 x4 or x8 slot for full bandwidth.
Avoid chipset-controlled PCIe slots, as they share bandwidth with SATA, USB, and other devices.
Enable Full PCIe Speed in BIOS:
Go to BIOS > Advanced Settings > PCIe Configuration.
Set the slot to “Gen 3” or “Gen 4” (depending on your motherboard).
13. SMB or NFS Protocol Overhead is Slowing Transfers
The Problem:
If you’re transferring files over a mapped network drive (SMB/NFS), protocol overhead can reduce real-world speeds. Windows SMB, in particular, can limit large file transfers due to encryption, signing, or buffer settings.
The Fix:
Enable SMB Multichannel for Faster Transfers (Windows):
Linux:
Add the following line to /etc/fstab when mounting an SMB share:
ini
vers=3.0,seal=no
Try NFS Instead of SMB (If Using Linux/macOS):
SMB can be slow for large sequential transfers.
NFS performs better for 10GbE direct-attached storage (NAS to PC).
Use iSCSI for Direct Storage Access:
If your NAS supports iSCSI, mount an iSCSI target for block-level access, which can be much faster than SMB/NFS.
14. Your Router or Network Switch is Blocking Full Speeds
The Problem:
Many consumer-grade routers and switches have built-in traffic management features that can throttle high-speed connections. Even some high-end managed switches may have bandwidth limits, VLAN misconfigurations, or QoS settings that restrict speeds.
The Fix:
Disable Traffic Shaping or QoS:
On a managed switch, log in and disable bandwidth limits on your 10GbE ports.
On a router, look for:
Smart QoS / Traffic Prioritization (disable it).
Bandwidth Limiting (set to unlimited).
Check VLAN Configuration:
If your NAS and PC are in different VLANs, traffic might be routed through the main router, slowing speeds.
Move both devices into the same VLAN for direct 10GbE connectivity.
Ensure Your Switch Supports Full 10GbE Throughput:
Some low-end 10GbE switches have an internal bandwidth cap.
Example: A switch with five 10GbE ports but only a 20Gbps internal backplane will throttle performance under heavy load.
15. Windows Power Management is Throttling Your 10GbE Card
The Problem:
Windows Power Management settings may be automatically throttling your 10GbE network adapter to save energy. This can cause inconsistent speeds and unexpected slowdowns.
The Fix:
Disable Energy-Efficient Ethernet (EEE):
Open Device Manager → Expand Network Adapters → Right-click your 10GbE adapter → Properties.
Under the Advanced tab, find “Energy-Efficient Ethernet” and set it to Disabled.
Set Windows Power Plan to High Performance:
Open Control Panel > Power Options.
Select High Performance (or Ultimate Performance if available).
Disable CPU Power Throttling:
Open PowerShell as Administrator and run:
powershell
powercfg -setactive SCHEME_MIN
This forces Windows to prioritize performance over power saving.
Check for Interrupt Moderation & Adaptive Inter-Frame Spacing:
In Device Manager, under the Advanced tab of your 10GbE adapter, disable:
Interrupt Moderation
Adaptive Inter-Frame Spacing
16. Your NAS or PC is Routing Traffic Through the Wrong Network (Subnet Mismatch)
The Problem:
Even if you have a direct 10GbE connection between your NAS and PC, your operating system might still route traffic through a slower network interface (e.g., a 1GbE connection or even Wi-Fi). This can happen if your system prioritizes the wrong network adapter, or if your NAS and PC are on different subnets, causing traffic to be routed through a slower router or switch instead of using the direct 10GbE link.
For example:
Your NAS has two network interfaces:
10GbE:192.168.2.10
1GbE:192.168.1.10
Your PC has two interfaces:
10GbE:192.168.2.20
Wi-Fi:192.168.1.50
If your PC is trying to reach the NAS using the 1GbE or Wi-Fi address, it may bypass the 10GbE connection entirely, leading to slow speeds.
The Fix:
Ensure Both Devices Are on the Same Subnet
Assign both 10GbE interfaces an IP in the same range (e.g., 192.168.2.x).
Set the 1GbE and Wi-Fi interfaces to a different subnet (e.g., 192.168.1.x).
Manually Set the 10GbE Network as the Preferred Route
Windows (CMD – Run as Administrator):
powershell
netsh interface ipv4 set interface "10GbE Adapter Name" metric=1
Linux/macOS:
sudo ip route add 192.168.2.0/24 dev ethX metric 10
A lower metric prioritizes the 10GbE connection over slower networks.
Check Active Routes to Ensure 10GbE is Being Used
Windows:
powershell
route print
Linux/macOS:
ip route show
Look for 192.168.2.xgoing through the 10GbE adapter. If another network is being used, adjust the routing table.
17. Your SATA Controller is Bottlenecking Multiple Drives
The Problem:
Even if you have fast SSDs or multiple hard drives in RAID, the SATA controller inside your NAS or PC might be the bottleneck. Some budget NAS units and lower-end PC motherboards use cheap SATA controllers (e.g., JMicron, ASMedia, Marvel) that bottleneck total disk throughput.
For example:
Your NAS or PC has six SATA ports, but they are all routed through a single PCIe 2.0 x1 controller (which has a max bandwidth of 500MB/s).
Even though each SSD is capable of 500MB/s, the total throughput is capped by the controller’s bandwidth.
The Fix:
Check the SATA Controller in Use:
Windows (Device Manager): Expand Storage Controllers and check the SATA controller manufacturer.
Linux/macOS:
lspci | grep SATA
If you see JMicron, ASMedia, or Marvel, you might have a bandwidth-limited controller.
Use an HBA (Host Bus Adapter) Instead
If your motherboard or NAS has limited SATA bandwidth, install a dedicated LSI/Broadcom HBA card (e.g., LSI 9211-8i, LSI 9300-8i) to get full-speed SATA connectivity.
Check the SATA Backplane in NAS Enclosures
Some NAS enclosures have a shared SATA controller for all drives, limiting total speed.
If possible, upgrade to a NAS with multiple SATA controllers or use NVMe SSDs instead.
18. Your System’s TCP/IP Stack is Not Optimized for High-Speed Transfers
The Problem:
By default, most operating systems have conservative TCP settings that are optimized for 1GbE networks, but not for high-speed 10GbE connections. Without proper tuning, TCP window size, congestion control, and buffer settings can limit data transfer rates over high-bandwidth connections.
The Fix:
Windows: Optimize TCP Settings via PowerShell
Enable TCP Window Auto-Tuning:
powershell
netsh int tcp set global autotuninglevel=normal
Enable Receive Side Scaling (RSS) to Use Multiple CPU Cores:
19. Antivirus or Firewall Software is Interfering with Network Speeds
The Problem:
Many antivirus and firewall programs scan all incoming and outgoing network traffic, which can significantly slow down 10GbE speeds. Some intrusion prevention systems (IPS), such as those in Sophos, Norton, Bitdefender, and Windows Defender, can introduce latency and CPU overhead when processing large file transfers.
The Fix:
Temporarily Disable Your Antivirus/Firewall and Run a File Transfer Test
If speeds improve, your security software is causing the slowdown.
Whitelist Your NAS or 10GbE Connection in Security Software
Add your NAS IP address as an exclusion in your antivirus or firewall settings.
Disable Real-Time Scanning for Large File Transfers
In Windows Defender:
Open Windows Security → Go to Virus & Threat Protection.
Under Exclusions, add your NAS drive or network adapter.
Check for Router-Level Security Features
Some routers have Deep Packet Inspection (DPI) or Intrusion Prevention (IPS) enabled, which can slow down traffic.
Log into your router’s admin panel and disable unnecessary security features for local transfers.
20. Your Network is Experiencing Microburst Congestion (Overloaded Buffers)
The Problem:
Some 10GbE switches have limited packet buffers, causing microburst congestion when multiple devices transfer data simultaneously. This results in random slowdowns, packet loss, and jitter, even if total traffic is well below 10GbE capacity.
The Fix:
Enable Flow Control on Your Switch
Log into the switch’s admin panel.
Enable 802.3x Flow Control on your 10GbE ports.
Use a Higher-Quality Switch with Larger Buffers
Some cheap 10GbE switches have small packet buffers, leading to congestion.
This description contains links to Amazon. These links will take you to some of the products mentioned in today's content. As an Amazon Associate, I earn from qualifying purchases. Visit the NASCompares Deal Finder to find the best place to buy this device in your region, based on Service, Support and Reputation - Just Search for your NAS Drive in the Box Below
Need Advice on Data Storage from an Expert?
Finally, for free advice about your setup, just leave a message in the comments below here at NASCompares.com and we will get back to you.Need Help?
Where possible (and where appropriate) please provide as much information about your requirements, as then I can arrange the best answer and solution to your needs. Do not worry about your e-mail address being required, it will NOT be used in a mailing list and will NOT be used in any way other than to respond to your enquiry.
[contact-form-7]
TRY CHAT Terms and Conditions
If you like this service, please consider supporting us.
We use affiliate links on the blog allowing NAScompares information and advice service to be free of charge to you.Anything you purchase on the day you click on our links will generate a small commission which isused to run the website. Here is a link for Amazon and B&H.You can also get me a Ko-fi or old school Paypal. Thanks!To find out more about how to support this advice service checkHEREIf you need to fix or configure a NAS, check FiverHave you thought about helping others with your knowledge? Find Instructions Here
Or support us by using our affiliate links on Amazon UK and Amazon US
Alternatively, why not ask me on the ASK NASCompares forum, by clicking the button below. This is a community hub that serves as a place that I can answer your question, chew the fat, share new release information and even get corrections posted. I will always get around to answering ALL queries, but as a one-man operation, I cannot promise speed! So by sharing your query in the ASK NASCompares section below, you can get a better range of solutions and suggestions, alongside my own.
‘Used Seagate EXOS HDDs Missold as ‘New – Other Drives Implicated
Now would be a very good time to check any hard drives you’ve purchased in the last 12 to 24 months! Recent reports from popular German news outlet Heise have raised increased reports of refurbished and modified SMART-reported drives being sold as brand new, leading to large concerns of widespread ex-cryptocurrency-burnt drives being sold through trusted business and domestic retailers. Although the scope of the issue seems to be largely focused on Seagate Exos data center-class drives, because of the wide-ranging drives that were used in Chia cryptocurrency mining several years ago, there is an increased likelihood that other large-capacity and high-durability drives should be considered, thanks to the relative ease of firmware modifications and larger quantities of HDDs being resold off the back of 5 year durabilities lines being crossed by the original coin miners!
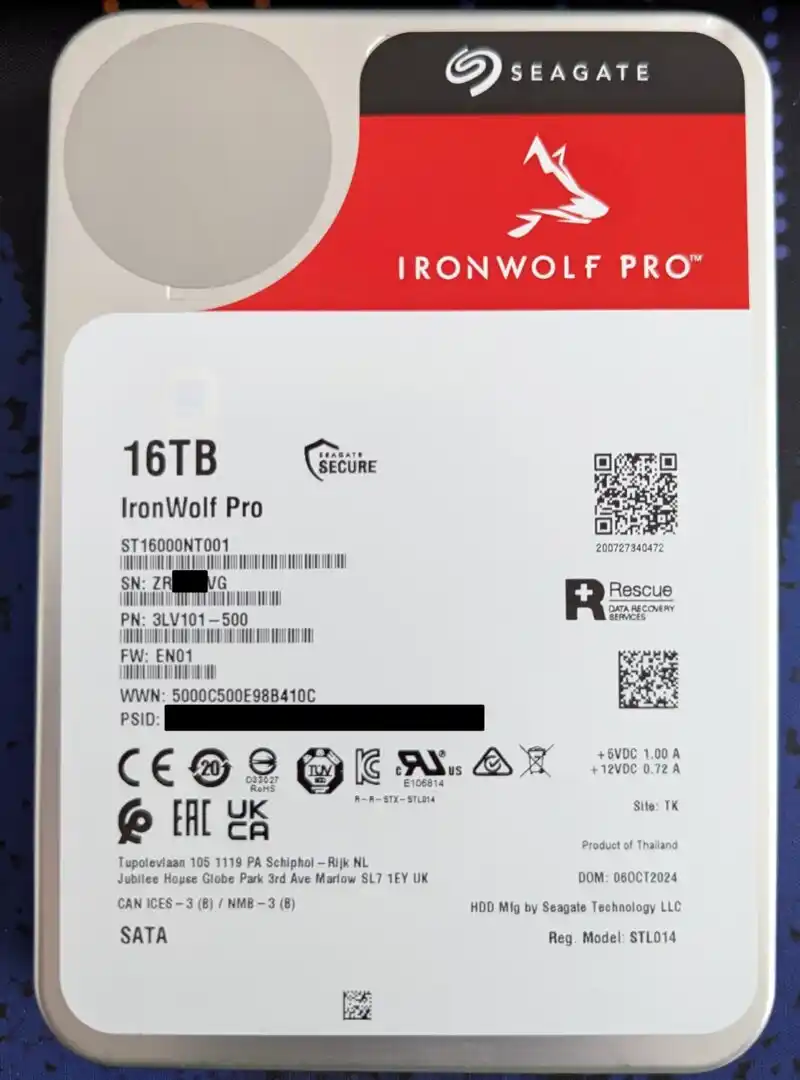
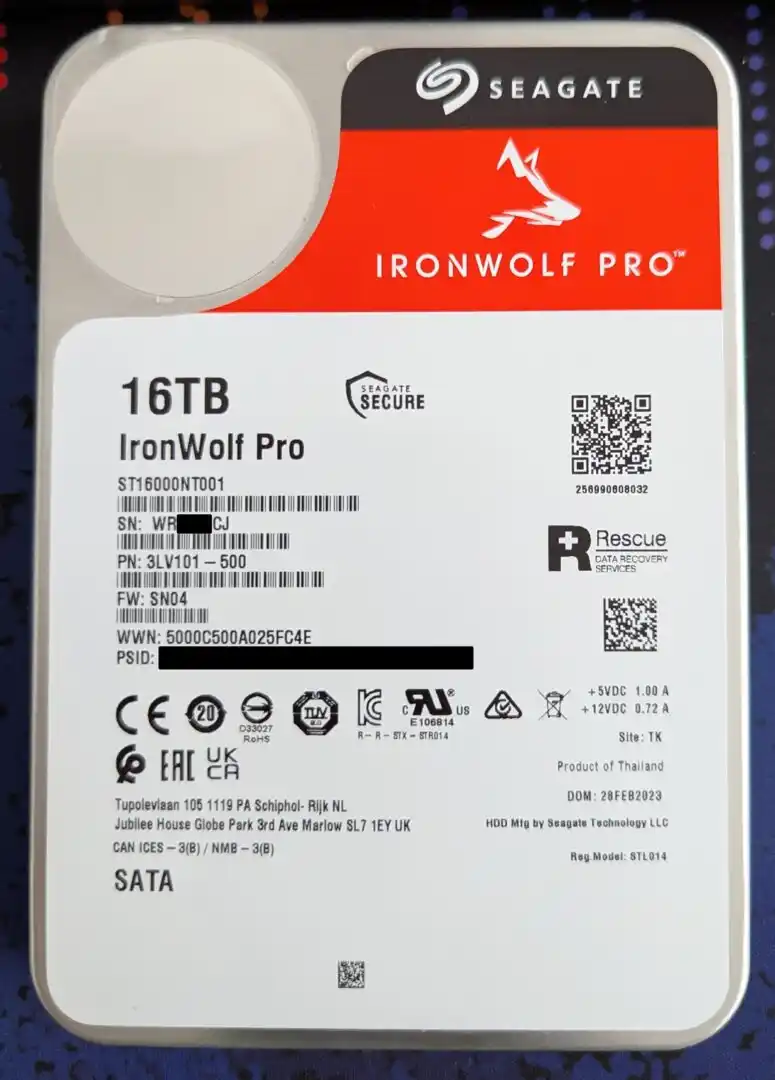
Reports are now arriving that Seagate Ironwolf and Ironwolf Pro modified/mis-sold HDDs are now also affected. The extent to this is still too early to confirm, but the latest reports from Heise indicate that 8TB and 16TB HDDs have been highlighted.
Further reports from ComputerBase via a community member fanatiXalpha provided further evidence and indications of this via the images from the original article here:
REAL HDD
FAKE HDD
In this video I discuss multiple ways to initially identify issues with a ‘new’ Seagate Ironwolf HDD that do not involve connecting the HDD to a system. Later in this article cover several more methods that require connecting the drive to a NAS or general client system.
Check Your HDDs – Reports indicate used Seagate Exos hard drives are being sold as new, particularly 12TB-18TB models.
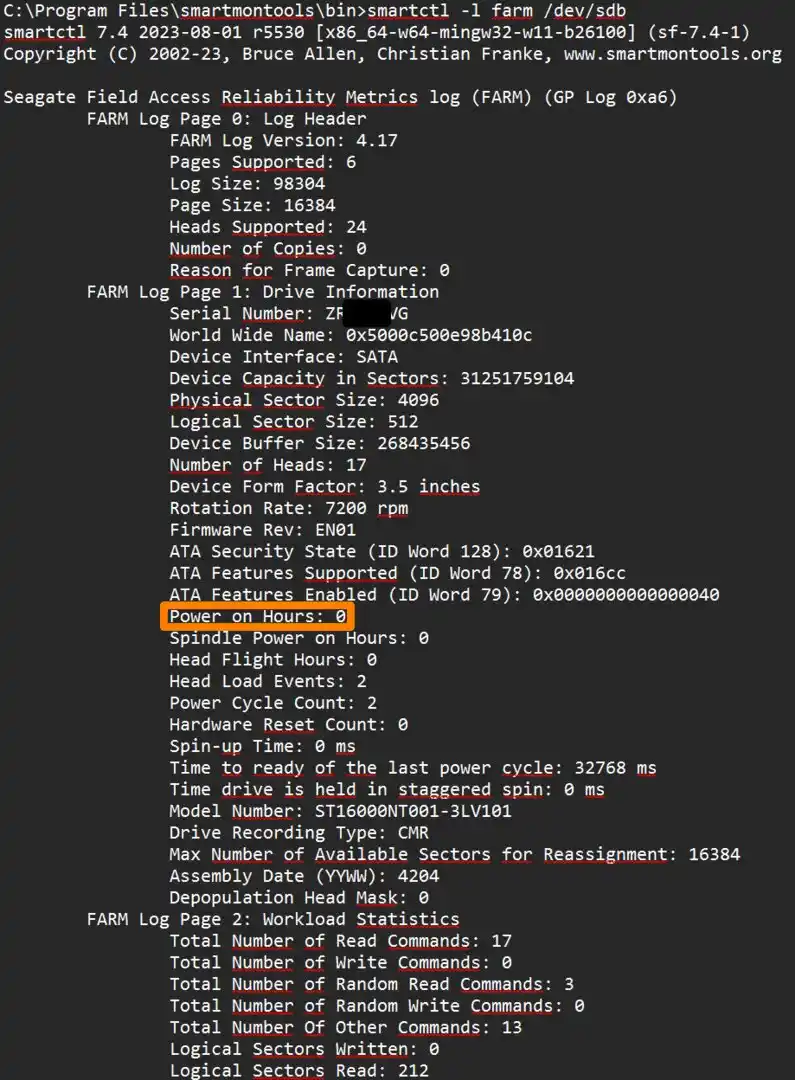
Firmware Manipulation – SMART data shows zero usage, but deeper FARM tests reveal 15,000-50,000 hours of prior use.
Widespread Issue – Over 200 reports from buyers in Germany, Japan, Australia, and other regions, spanning multiple retailers.
Crypto Mining Connection – Many affected drives likely came from Chia cryptocurrency farms (2018-2022) and re-entered the market fraudulently.
Tampering in Supply Chain – Drives may have been repackaged and resold by wholesalers and distributors, bypassing Seagate’s official channels.
Retailers & Seagate Respond – Some retailers are issuing refunds/exchanges. Seagate denies involvement and is investigating the supply chain breach.
Verify Your Drives – Use SMART, FARM, Seatools, and warranty checkers to confirm if your drive is genuine. Report suspicious drives to Seagate and your retailer.
What has been reported on the Seagate EXOS HDD Misselling
Earlier in the year, Heise reported that they had received dozens of reports from users who had purchased brand-new, enterprise-class Seagate Exos hard drives, only to find that when receiving the drives, they had scuffs and marks on them that suggested they were used—and used en masse. Further investigation of the hard drives using popular firmware tools initially showed that the drives’ SMART data was indicating little to no power-on usage. However, deeper investigation with deeper drive tools went on to reveal that the firmware had been manually adjusted to hide the tens of thousands of hours that these drives had already accrued in use.
Usage on drives has varied from between 15,000 hours and 50,000 hours, well over five years of deployment and well outside the warranty and workload rating on these drives in most cases. What is interesting though, is that retailers that have been impacted by this, and in fact a wide-ranging number of German retailers, have been highlighted as sources of these drives. However, reported issues span outside of Germany and include claims from purchases made in Japan, Australia, and other parts of Europe.
Fingers are initially being pointed at wholesalers, large-scale resellers, and distributors who supply the traditional retail and e-commerce websites that most users would be eligible to purchase from. Depending on the retailer, and several have already been highlighted in the now over 200 reports submitted to Heise, the returns and RMA process does differ from site to site, but this does appear to be a growing issue that most users will not even realize they have been hit by unless they take the time to investigate the usage data on their drives.
Primarily, Chia crypto farming has been highlighted as the origin of most of these drives, with huge quantities of large-capacity data center drives being purchased in 2018 to 2022, when this emerging and less GPU-centric form of cryptocurrency was being mined. Brands such as Seagate, WD, and Toshiba saw extraordinarily high sales numbers during this period for these drives, and equally, domestic users ended up being negatively impacted by supply shortages and price hikes. It seems that a lot of these drives that have either been abandoned from previously pursued cryptocurrency setups or just simply swapped out for ongoing farming have now made their way back into the supply chain under the guise of being regular, new, out-of-the-box drives!
The distribution channels, wholesalers, and affected e-commerce websites in order to ascertain how these drives have entered the supply chain and to what extent it has happened. They issued the following statement:
“We are taking this matter very seriously and are conducting a thorough investigation. As explained in the previous statement, Seagate did not sell or distribute these drives to retailers. We cannot provide details of the ongoing investigation, but we suspect that these drives are new products that Seagate sold to customers and were later resold by them on the used market. In this case, we believe that the drives were remarketed somewhere in the used market supply chain and resold as new. We recommend that retailers only purchase drives from certified Seagate distribution partners, as purchasing from certified Seagate distribution partners is the best way to ensure the authenticity of Seagate products for retailers and their customers.
Seagate has processes in place to investigate these types of cases, with teams working proactively with our vendors to take action where necessary. Our security team also regularly works with local authorities to take necessary action. Many investigations are initiated based on anonymous tips and reports from partners and customers. These measures are designed to protect Seagate partners and end customers in an increasingly global marketplace.
We encourage anyone who suspects they have received a used drive marketed as new to help with the investigation by reporting the incident to us directly at [email protected] . In addition, customers who have doubts about whether the products they purchased match the claims of the sellers can access our warranty checker tool . Suspicious drives and/or sellers can also be reported anonymously through our Ethics Hotline .
Currently, the bulk of aggregate reporting of this is going through the Heise website, and a lot of the submissions have been done via their anonymous reporting link, so exact model IDs are hard to track down right now. However, the bulk of the reported mis-sold drives appear to be Seagate Exos drives ranging from 12TB to 18TB. As mentioned earlier, however, the original reporting suggests that other drives have been highlighted by users. Realistically, it’s pretty unlikely that only Exos drives are going to be impacted as such. A wide-ranging procurement took place during the peak of Chia cryptocurrency farming, and pretty much any moderately durable, high-capacity hard drive was changing hands quickly at that time. This all does seemingly indicate right now that a lot of these drives are being offloaded with their firmware modified by one or a handful of bad actors, who likely are sitting on high quantities of the same hard drives. However, it would not surprise me whatsoever if over the coming months and years, we see spikes on affected drives outside of the Seagate Exos data center series.
How Can I Check If My Drives Were Mis-Sold as New?
There are multiple ways to check whether the hard drive inside your system, which you purchased as brand new, is actually new. However, the suitability of each tool will depend heavily on the system type and operating system your drive is running on. Seagate’s Seatools application allows you to check and validate multiple data points on your hard drives. However, it is only available as a Windows or Linux client, as well as a portable version. That means Mac users, or those less comfortable with command-line tools, may find it difficult to use—not to mention users who have multiple drives deployed in systems without a suitable GUI or command-line interface for validity checks. Below, I’ve broken down recommended tools and commands that you can use to verify your drives, their power-on hours, and other critical details.
How NAS users can Check and Verify the usage of the HDDs:
NAS users who suspect their drives may have been mis-sold as new can verify their SMART data and power-on hours using various tools. Most NAS operating systems, including Synology DSM, QNAP QTS, TrueNAS, and UnRAID, have built-in SMART monitoring tools within their storage manager or disk health sections. These tools provide essential SMART attributes, including Power-On Hours (POH), Reallocated Sectors, and Drive Temperature. However, in some cases, the SMART data may have been manipulated to show zero usage, making further verification necessary.
For deeper analysis, users can SSH into their NAS and install smartmontools, a command-line utility that provides detailed drive health reports. Running the command:
smartctl -a /dev/sdX
(where X is the drive identifier) will display all SMART attributes, including power-on hours. However, if the SMART data has been reset or manipulated, users can check the FARM (Field-Accessible Reliability Metrics) values for a more accurate picture of a drive’s actual usage history. To retrieve FARM values, NAS users can use:
smartctl -l farm /dev/sdX
This will reveal true power-on hours, drive usage patterns, and whether a drive has been extensively used before being reintroduced into the supply chain.
For those using QNAP or Synology NAS devices without direct access to smartmontools, Seagate’s Seatools (Windows/Linux) can be used by connecting the drives externally via a USB or SATA dock. Additionally, Seagate’s warranty checker tool allows users to verify if their drive was originally part of a multi-drive batch—a red flag that it may have been previously used in a server or data center environment.
How NAS Users Can Check SMART Data and Power-On Hours Over SSH (Including FARM Values for Verification & Integration with Smartmontools)
NAS users with SSH access can perform a deeper, more accurate verification of their hard drives’ SMART data and power-on hours to detect possible tampering. While many NAS systems, such as Synology DSM, QNAP QTS, TrueNAS, and UnRAID, provide built-in SMART monitoring via their web interface, these tools often rely on basic SMART queries, which may not reveal manipulated or reset power-on hours. By accessing the NAS via SSH, users can run Smartmontools directly, allowing them to extract FARM (Field-Accessible Reliability Metrics) values, which are not included in standard SMART logs.
To begin, users should SSH into their NAS and install Smartmontools if it is not already available. On Debian-based NAS systems (such as OpenMediaVault, TrueNAS SCALE, and some QNAP models running Debian Linux), install Smartmontools with:
sudo apt update && sudo apt install smartmontools
On Red Hat-based systems, use:
sudo yum install smartmontools
For NAS systems that do not allow package installations, users can still manually compile Smartmontools or install a Docker container that includes the tool.
Once Smartmontools is installed, running the command:
smartctl -a /dev/sdX
(replacing X with the correct drive identifier) will display SMART attributes, including Power-On Hours (POH). However, since bad actors can manipulate SMART data to show zero hours, users should perform an additional FARM query with:
smartctl -l farm /dev/sdX
Unlike SMART power-on hours, which can be reset, FARM values track long-term reliability metrics stored at a deeper firmware level, making them much harder to falsify. If there is a discrepancy between SMART-reported power-on hours and FARM-reported power-on hours, it strongly suggests that the drive has been used before but was manipulated to appear new.
Integrating Smartmontools into a NAS for Automated Checks
To automate drive health monitoring, NAS users can schedule periodic SMART and FARM scans using cron jobs or integrate them with the NAS system’s notification service.
Create a SMART Monitoring Script Users can create a simple script to check SMART and FARM values for all installed drives and log the results.
#!/bin/bash
LOGFILE=”/var/log/smart_check.log”
echo “SMART Check – $(date)” >> $LOGFILE
for DRIVE in /dev/sd[a-z]; do
echo “Checking $DRIVE…” >> $LOGFILE
smartctl -a $DRIVE >> $LOGFILE
smartctl -l farm $DRIVE >> $LOGFILE
done
Save this script as smart_check.sh and make it executable:
chmod +x smart_check.sh
2. Schedule Automated Checks with Cron Users can schedule the script to run daily or weekly using cron. Open the cron editor:
crontab -e
Add a line to run the script every day at 2 AM:
0 2 * * * /path/to/smart_check.sh
Set Up Email Alerts for Failures To receive email alerts if issues are detected, modify the script to check for critical SMART attributes and send an email if problems are found:
smartctl -a $DRIVE | tee -a $LOGFILE | grep -i “Pre-fail\|Reallocated_Sector_Ct\|Power_On_Hours”
smartctl -l farm $DRIVE >> $LOGFILE
done
# Email log if issues detected
if grep -q “Pre-fail\|Reallocated_Sector_Ct” $LOGFILE; then
mail -s “SMART Error Detected on NAS” $EMAIL < $LOGFILE
fi
By leveraging SSH, Smartmontools, and automated monitoring, NAS users can go beyond surface-level diagnostics and ensure they are not just scraping the same potentially manipulated data, but actually verifying their drives’ true usage history.
How Desktop Windows users can Check and Verify the usage of the HDDs:
Desktop users can verify the SMART information and power-on hours of their hard drives using several tools, including Smartmontools 7.4+, CrystalDiskInfo, and Seagate’s Seatools. The easiest method is using CrystalDiskInfo, a free GUI-based tool for Windows that displays critical SMART attributes, including Power-On Hours (POH), Reallocated Sectors, and Drive Health Status. However, if a drive has been tampered with, its SMART data may have been reset, making further verification necessary.
For deeper inspection, users can install Smartmontools 7.4 or later, which provides advanced diagnostics, including FARM (Field-Accessible Reliability Metrics) values, which can reveal the drive’s true runtime history. To check SMART data, open a command prompt (or terminal in Linux/macOS) and run:
smartctl -a /dev/sdX
(replacing X with the correct drive letter) to view detailed SMART attributes. If the reported power-on hours seem too low or suspiciously reset, users can retrieve FARM values by running:
smartctl -l farm /dev/sdX
This command will reveal the actual power-on hours and potential prior usage, even if the SMART data was modified.
Alternatively, Seagate’s Seatools (available for Windows and Linux) can run extended drive diagnostics, check SMART status, and validate warranty details. Users can also enter their drive’s serial number into Seagate’s warranty checker tool to confirm if the drive was originally sold as part of a batch, which may indicate prior data center or enterprise use.
How Mac users can Check and Verify the usage of the HDDs:
Mac users can verify SMART data and power-on hours using Smartmontools 7.4+, Seagate’s Seatools for Linux (via a bootable drive), and third-party macOS utilities like DriveDx. Since macOS does not provide built-in SMART monitoring tools, users need to install Smartmontools via Homebrew by running:
brew install smartmontools
Once installed, users can check SMART attributes, including power-on hours (POH), by opening Terminal and running:
smartctl -a /dev/diskX
(replacing X with the correct disk identifier, which can be found using diskutil list). If the reported power-on hours appear suspiciously low, users can retrieve FARM (Field-Accessible Reliability Metrics) values by running:
smartctl -l farm /dev/diskX
This will reveal the true runtime history of the drive, even if the SMART data was manipulated to show zero or low usage.
For users who prefer a graphical interface, DriveDx is a third-party macOS tool that provides SMART data, health status, and power-on hours. However, DriveDx does not display FARM values, so Smartmontools remains the best option for deeper diagnostics.
Since Seagate’s Seatools is not available for macOS, users can create a bootable USB drive with a Linux live environment (such as Ubuntu), run Seatools from there, and check the drive’s SMART health and warranty status. Additionally, Mac users can enter their drive’s serial number into Seagate’s online warranty checker to confirm if the drive was originally part of a batch sale, which may indicate prior enterprise use.
It’s important to note that depending on your system, the directory paths and identifiers for your drives will vary significantly. So, even if 100 users all had the same hard drive model, if they deployed them in different NAS brands, desktop OSs, or even external enclosures, the directory paths and device names would be different. Keep that in mind.
Are only Seagate EXOS Hard Drives Affected?
The Exos series drives appear to be taking the brunt of the reporting here. Realistically, if this flood of dubiously classified new drives is true, then the Exos series is definitely not going to be the only drives impacted by this. Moreover, Seagate was not the only hard drive manufacturer that was pumping out large-capacity hard drives at 12TB, 14TB, 16TB, and 18TB during the peak of this particular crypto-mining industry change! I think it is only now, thanks to the correlation of reports by Heise, that any kind of through-line has been found that specifically targets one hard drive brand or model series. At best, it really comes down to the bad actors who are modifying the firmware on these drives having the financial incentive to do so on a larger scale on a different hard drive series that they happen to have their hands on. The modification process of the onboard firmware and SMART data on Seagate drives is largely identical to that of the process on WD or Toshiba hard drives, and therefore, it really once again comes down to a question of correlating reports of these fake new drives all being collected together.
How Has This Happened? How Did Used Hard Drives Enter the Supply Chain?
You might not know, but when you purchase a hard drive from your local retailer, that retailer almost certainly does not directly receive their stock of hard drives from the hard drive manufacturer in question. Ordinarily, hard drives, like a lot of electrical components, have a pre-established supply chain that retailers and e-commerce websites have to follow when selling their goods. With the exception of OEM companies who can buy from further up the chain and cloud/data centers like AWS and Google who can even buy right from the top, there are technically four layers in the supply chain of hard drives.
The first part of the supply chain is the hard drive manufacturer itself, in this case, Seagate Technology, which manufactures the hard drives at one of its production facilities in numerous locations around the world.
The next step in the supply chain is the Regional Distribution Centers (RDCs). These are the hubs where the hard drive brand sends its manufactured goods to be distributed to numerous smaller distribution centers across different countries.
The next step is wholesalers and resellers. Sometimes resellers can also act as direct-to-end-user sales points, but the lines can get blurry depending on the quantity or device in question. Nevertheless, the majority of electronics and consumables (including hard drives) cannot be sold directly from this point to an end user and instead need to be funnelled to the final step in the chain—retail shops.
Which brings us to the final step in the chain—traditional retail outlets on the high street and the e-commerce websites you choose to purchase from. These are the ones you’ll be most familiar with, and unfortunately, a lot of these are the same retailers that end users impacted by these mis-sold hard drives have as their initial point of contact.
The issue is that these used hard drives, which are being falsely marketed as new, have been introduced into the supply chain somewhere between steps two and four. Seagate has not had any involvement in their reintroduction into the supply chain. Somewhere along the line, these used drives were inserted into the system, and that is what Seagate is currently investigating. The retail outlet where an affected user purchased the drive has more than likely been completely unaware that they have been selling used drives as new. In most cases, these drives would have arrived in sealed retail packaging, and the retailers would have been reluctant to open up supposedly new products for testing, as doing so would immediately devalue the product in the eyes of their consumer and business buyer base.
Therefore, it is going to take time for Seagate to find the smoking gun and pinpoint which wholesaler, reseller, or distributor allowed these used drives to re-enter the supply chain.
Is Selling Used/Refurbished Hard Drives Illegal?
The sale of used, data center-grade, refurbished, or officially recertified drives is completely legal. Although Seagate, WD, and Toshiba would probably prefer to see the used hard drive market disappear, selling used drives is not illegal.
Many online retailers, including Amazon and Newegg, actively sell recertified and renewed drives—just as easily as brand-new ones.
The problem here is that these were used drives that were fraudulently mis-sold as brand new—and that IS illegal. In short, this is fraud, and the people selling these drives could be pursued for damages if customers lose data due to these drives failing far sooner than expected. That’s why any drive that isn’t new is required to be labeled as recertified, refurbished, or renewed. This ensures clarity for the buyer when making a purchasing decision.
That said, some sellers intentionally make it hard to determine if a drive is refurbished. For example, a Seagate IronWolf 12TB hard drive sold on Amazon’s “previously owned” listings might clearly state that it’s used—but it won’t mention that it was originally manufactured in 2017, meaning it could be 8 years old and already have tens of thousands of hours of prior use. It wouldn’t be so bad if the manufacturing date was displayed at the top of the listing, but instead, it’s buried deep in the product details. Bottom line: Selling used drives is not illegal. Selling used drives under the guise of being brand new is fraud—and highly illegal.
Is This Seagate’s Fault?
In all honesty, one could argue that Seagate is responsible for selling large volumes of high-capacity, data center-class hard drives to the original cryptocurrency farmers. However, this would be no different than selling the drives to any regular SMB, just a question of large-scale volume. Seagate is not responsible or in any way officially authorizing the reselling of its hard drives under the classification of new storage media. Additionally, the official partners that Seagate chooses to sell its goods through have almost certainly sold these drives with as much authentication between them and the distributors/resellers as possible. It could be argued that Seagate should personally step in at the supply chain level further down the chain to periodically check the health and condition of drives—much like a hard drive secret shopper—but that’s really about it. Right now, as long as Seagate commits to investigating how this occurred and acts upon what they find to ensure that mis-sold drives don’t enter the supply chain again, that’s about as far as I think this can go in terms of blaming Seagate. Realistically, we can’t lose sight of the fact that it is the fault of the bad actors who modified these hard drives in an effort to recover the original money spent on them before Chia farming collapsed. Wherever the entry point was that allowed these drives to re-enter the supply chain, that is what needs to be identified and stopped.
What Should I Do if I Believe my HDD was Missold?
If you believe that the hard drive in your NAS, server, or storage system was mis-sold to you as a brand-new drive when in fact it was heavily used, you need to contact your point of sale immediately. Tools such as Seagate’s own warranty checkerallow you to enter the serial number of your hard drive into their database checker. Regardless of whether your hard drive is still under warranty, it will still highlight whether this is an official drive or not. Additionally, if you purchased a single drive that was sold as new, but upon entering the details into the warranty checker on Seagate’s website shows that this drive was part of a larger batch, this would imply that the drive you purchased was originally included in a larger server system previously—not unlike how a food or drink product is labeled as part of a multipack and not for individual resale. If a single drive that you purchased as brand-new is listed as originally part of a multi-drive system, it is highly recommended that you contact your retailer and/or raise this with Seagate directly for further investigation.
This description contains links to Amazon. These links will take you to some of the products mentioned in today's content. As an Amazon Associate, I earn from qualifying purchases. Visit the NASCompares Deal Finder to find the best place to buy this device in your region, based on Service, Support and Reputation - Just Search for your NAS Drive in the Box Below
Need Advice on Data Storage from an Expert?
Finally, for free advice about your setup, just leave a message in the comments below here at NASCompares.com and we will get back to you.Need Help?
Where possible (and where appropriate) please provide as much information about your requirements, as then I can arrange the best answer and solution to your needs. Do not worry about your e-mail address being required, it will NOT be used in a mailing list and will NOT be used in any way other than to respond to your enquiry.
[contact-form-7]
TRY CHAT Terms and Conditions
If you like this service, please consider supporting us.
We use affiliate links on the blog allowing NAScompares information and advice service to be free of charge to you.Anything you purchase on the day you click on our links will generate a small commission which isused to run the website. Here is a link for Amazon and B&H.You can also get me a Ko-fi or old school Paypal. Thanks!To find out more about how to support this advice service checkHEREIf you need to fix or configure a NAS, check FiverHave you thought about helping others with your knowledge? Find Instructions Here
Or support us by using our affiliate links on Amazon UK and Amazon US
Alternatively, why not ask me on the ASK NASCompares forum, by clicking the button below. This is a community hub that serves as a place that I can answer your question, chew the fat, share new release information and even get corrections posted. I will always get around to answering ALL queries, but as a one-man operation, I cannot promise speed! So by sharing your query in the ASK NASCompares section below, you can get a better range of solutions and suggestions, alongside my own.
The CWWK x86 P6 Pocket SSD NAS is a compact, all-flash server aimed at home lab enthusiasts and small businesses seeking high-speed storage in a small form factor. It features four M.2 NVMe slots, dual 2.5GbE ports, and support for up to 48GB DDR5 memory, offering impressive capabilities for its size. Available in two configurations, the quad-core Intel N150 model and the octa-core Intel N355 model, it aims to balance affordability and performance. This review covers the design, hardware, storage, performance tests, and overall value of the N355 model. Compact and highly portable, the P6 is marketed toward users who need a small but capable server for virtualization, containerized apps, and media streaming. With support for up to four M.2 NVMe drives, it caters to users focused on high-speed, flash-based storage rather than traditional hard drives. However, its PCIe 3.0 x1 lanes per M.2 slot and lack of 10GbE raise questions about its potential bottlenecks.
The P6 is priced competitively at $195 for the N150 version and $315 for the N355 version, placing it in a niche between DIY NAS solutions and more expensive pre-built systems. Despite its compact size, it promises a multi-core processor, virtualization support, and dual 2.5GbE connectivity, making it appealing to users with small-scale but demanding workloads. However, users should be prepared for some limitations typical of compact systems, such as limited expandability and port options. Let’s discuss the P6.
Component
Details
Processor (SoC)
Intel Twin Lake SoC (Two Options):
– Intel N150: Quad-core, up to 3.6 GHz (Turbo), 6MB cache, 24EU Intel UHD graphics (1.0 GHz), 6W TDP
– Intel N355: Octa-core, up to 3.9 GHz (Turbo), 6MB cache, 32EU Intel UHD graphics (1.35 GHz), 15W TDP
Memory
1x SO-DIMM DDR5 4800 MHz (up to 48GB, Non-ECC)
Storage Slots
4x M.2 M-Key 2280 NVMe SSD (PCIe 3.0 x1 per slot)
Additional Expansion
1x M.2 E-Key 2230 slot for Wi-Fi 6/7 modules
SATA Support
2x JFPC1 Ribbon Cable Connector (for SATA drives via adapter)
Video Output
2x HDMI 2.0 (4K@60Hz)
Networking
2x 2.5GbE RJ45 (Intel i226V controllers)
USB Ports
2x USB 3.2 Gen 2 (10 Gbps)
Power Supply
12V/5A via 5.5/2.5mm Barrel Connector (60W adapter included)
BIOS/UEFI Features
AMI BIOS/UEFI with Auto Power On, Wake-on-LAN (WoL), PXE Boot
Cooling
Integrated aluminum heat sink with base-level fan; Optional external top-mounted fan (USB-powered)
CWWK x86 P6 N355 SSD NAS Review – Quick Conclusion
he CWWK x86 P6 Pocket SSD NAS offers a compact and capable option for users seeking a small-scale, flash-based server with support for multiple VMs, containers, and media streaming. The Intel N355 model performs well under load, handling three VMs simultaneously while maintaining reasonable power consumption of 34–35W. SSD speeds were solid for a PCIe 3.0 x1 setup, reaching around 780 MB/s read and 690 MB/s write per drive, though aggregate speeds across four drives were limited to 450–520 MB/s. Cooling is generally effective, with CPU temperatures peaking at 40°C, but NVMe SSDs required improved thermal pads to keep below 55°C under load. Noise levels remained moderate, between 35–38 dBA depending on fan usage. The inclusion of SATA support via JFPC1 ribbon cables, while unconventional, offers an additional expansion route, though BIOS adjustments may be needed for full compatibility. Dual 2.5GbE ports support link aggregation but limit network throughput compared to 10GbE options, which can only be added via an M.2 to 10GbE adapter, sacrificing a storage slot. The two USB ports are restrictive for those needing additional connectivity. Overall, the P6 delivers good multi-purpose performance in a compact form factor, but its PCIe lane limitations, limited USB ports, and barrel power input may be drawbacks for some users. It is a suitable choice for those seeking a small, efficient, and configurable NAS, provided they understand its hardware constraints.
BUILD QUALITY - 9/10
HARDWARE - 8/10
PERFORMANCE - 8/10
PRICE - 9/10
VALUE - 10/10
8.8
PROS
Compact and portable design (100x100x58.5 mm, aluminum chassis) Good multi-VM performance (three VMs with under 50% CPU utilization) Dual 2.5GbE ports with link aggregation (~550 MB/s combined throughput) Reasonable power efficiency (18W idle, 34–35W under heavy load) Expandable via M.2 adapters (supports M.2 to PCIe, OCuLink, or 10GbE) Effective CPU cooling (40°C peak with aluminum heat sinks and fan) Smooth media streaming (1080p, 4K, and 8K playback on Plex) Supports up to 48GB DDR5 RAM (high capacity for VMs and containers)
CONS
Limited PCIe bandwidth (PCIe 3.0 x1 per M.2 slot) Only two USB ports (restricts peripheral and OS drive options) Barrel power input (no USB-C for power delivery) SATA support via JFPC1 cable requires adjustments and may need BIOS tweaks
The CWWK P6 is remarkably compact, measuring 100 x 100 x 58.5 mm, and built with an all-aluminum alloy chassis, which doubles as a heat sink. Weighing approximately 1.2 kg, the unit has a solid, durable feel.
The top panel functions as a large heat sink for the SSDs, while the bottom panel houses a CPU fan and aluminum heat sink.
The cooling system is effective but relies on passive dissipation for the SSDs unless the optional external fan, included in the package, is attached via USB.
The power input uses a 12V/5A barrel connector, which is disappointing for users expecting USB-C. Given the small size and relatively low power draw, USB-C with Power Delivery (PD) could have been a modern and convenient solution.
The barrel connector feels like an outdated choice and limits power supply flexibility. On a positive note, the included 60W power adapter is compact and efficient.
The port selection is limited, with only two USB 3.2 Gen 2 ports (10 Gbps) and two HDMI 2.0 outputs supporting up to 4K 60Hz displays. Users planning to use UnRAID or similar OSes via USB may quickly find the two ports insufficient, especially if they need one for a keyboard or KVM switch.
Additionally, the M.2 E-key slot for Wi-Fi 6 or 7 is present, but no antenna kit or Wi-Fi module is included, adding extra cost for wireless connectivity.
The included thermal pads for the M.2 drives are extremely thin, providing minimal heat dissipation.
During sustained workloads, SSD temperatures rose above 65°C, but using third-party thermal pads reduced peak temperatures by approximately 10°C, enhancing performance stability.
The optional external fan, which attaches to the top panel via USB, helps reduce SSD temperatures during sustained workloads but at the cost of a higher noise level.
Overall, the design feels solid but because they have had to cram a lot into a small space, the potential for airflow in key areas might be pretty poor (hence the included optional USB fan). While the cooling solution is effective, port limitations, poor-quality thermal pads, and the choice of barrel power input are significant drawbacks.
Despite these issues, the compact size and all-metal construction make it an attractive option for users needing a small yet powerful NAS.
CWWK x86 P6 NAS Review – Internal Hardware
The CWWK P6 is powered by Intel Twin Lake processors, offering two configurations: the quad-core N150 (up to 3.6 GHz, 6W TDP) and the octa-core N355 (up to 3.9 GHz, 15W TDP). The N355 version tested here features eight cores, 32EU Intel UHD graphics at 1.35 GHz, and a TDP of 15W, making it more suitable for virtualization, container workloads, and media streaming.
The system uses one SO-DIMM DDR5 slot, supporting up to 48GB of non-ECC DDR5 4800 MHz RAM. While the single-channel configuration may reduce memory performance, the high RAM ceiling is useful for running multiple VMs or containers. The absence of ECC memory support may be a concern for users seeking data integrity in a server environment, but again – at this price it is tough to be overly critical about this here.
For networking, the P6 includes two 2.5GbE ports, controlled by Intel i226V controllers, supporting SMB multichannel and link aggregation. During testing, the 2.5GbE ports achieved up to 550 MB/s combined throughput with link aggregation. However, the lack of 10GbE is a missed opportunity, given the PCIe limitations on M.2 throughput, which could benefit from faster networking.
A M.2 E-key slot is provided for Wi-Fi 6 or 7 modules, but no module or antenna is included. Additionally, while the motherboard supports auto power-on, Wake-on-LAN (WoL), and PXE boot, the BIOS lacks some advanced settings found on other DIY NAS boards – however the N355 CPU itself is already getting stretched pretty thin here, so the scope for modification is pretty slim anyway to be honest.
One notable advantage is the expandability of the M.2 slots, which can be used for more than just storage. Users can install M.2 to PCIe adapters for 10GbE network cards, PCIe expansion cards, or even OCuLink adapters for external storage enclosures. This flexibility allows the P6 to be tailored for different use cases, such as adding 10GbE for faster networking or expanding with a PCIe card for additional functions. This feature partially offsets the lack of built-in 10GbE and adds versatility to the system.
The CWWK P6 is built around four M.2 NVMe 2280 slots (PCIe 3.0 x1), supporting high-speed, flash-based storage. Each slot has a maximum theoretical throughput of around 800 MB/s, which is suitable for general NAS tasks but limits RAID performance.
The absence of screw holes for shorter M.2 sizes means users must use full-length 2280 drives.
The included thermal pads are surprisingly thin and for an all flash system, a little underwhelming, but given the 3×1 speed of each bay, just how hot each SSD will be getting is debatable.
The four M.2 NVMe SSD Bays are mounted on a a sister board that is connected on it’s underside with a 40 pin connector into ANOTHER m.2 NVMe PCB that is in a single m.2 2280 SSD slot on the lower micro motherboard.
The M.2’s profile is still being investigated, but it IS a novel way of getting around the limitations of the base N150/N355 PCU Lanes and physical distribution that a single board would have needed to counter/work-around.
During sustained workloads, SSD temperatures rose above 65°C, but using third-party thermal pads reduced peak temperatures by approximately 10°C, enhancing performance stability. The optional top-mounted fan offers additional cooling but increases noise levels.
The P6 includes an unusual SATA expansion option using JFPC1 ribbon cables connected to the motherboard. While the implementation is unconventional, it is understandable given the small internal space constraints.
During testing, these SATA drives were detected in the BIOS but not recognized by the OS, indicating possible BIOS or driver issues.
It is worth noting that the inclusion of SATA connectivity is a welcome option for users needing low-cost storage expansion, though it may require further configuration.
As mentioned earlier, the lack of an internal PCIe slot limits storage expansion of course. However, users can convert an M.2 slot to a 10GbE network card, PCIe expansion, or even OCuLink storage expansion using third-party adapters. This flexibility is a notable advantage but comes at the cost of losing an M.2 storage slot.
Overall, the storage system is functional but limited by PCIe lane bottlenecks and poor SATA support implementation. Users seeking high-speed RAID configurations may be disappointed, but for NVMe-based storage pools, virtualization, and caching, the P6 performs well within its hardware constraints.
CWWK x86 P6 NAS Review – Tests & Performance
In this section, we evaluate the CWWK x86 P6 Pocket SSD NAS based on its SSD speeds, power consumption, noise levels, and thermal performance. Using the N355 octa-core model with four M.2 NVMe SSDs, we tested its performance under different workloads, including file transfers, virtualization, and media streaming. Even initial VM testing was pretty promising, when I ran three Windows 10 VMs, at 1 Core and 2GB Memory – there was still plenty of H/WW remaining to play with and each VM ran well. Just keep in mind that you only have 8 threads (i.e 8 vCPU) to assign.
We also measured how efficiently the system manages power and heat under load. Our tests aim to give a clear, practical understanding of what users can expect from the P6, particularly for tasks like running small scale containers or virtual machines or acting as a domestic/home/family media server, while considering its design limitations, such as PCIe lane constraints and cooling efficiency.
SSD Performance:
In our tests with four M.2 NVMe SSDs (PCIe 3.0 x1):
Single SSD (Sequential): 780–790 MB/s (Read), 690 MB/s (Write)
Four SSDs Simultaneously: 450–520 MB/s aggregate throughput
The x1 PCIe lanes per slot are the primary bottleneck, but single-drive speeds are acceptable for general NAS usage. Performance drops significantly in RAID configurations due to lane sharing.
Power Consumption:
Measured during testing:
Idle (No Drives): 18W
All Four SSDs Under Load: 31–32W
Three VMs with Disk Activity: 34–35W
Power efficiency is reasonable, and the 15W TDP N355 processor delivers a good balance of performance and efficiency.
Noise Levels:
Base Fan Only (Peak): 35–36 dBA
With Optional Top Fan: 38 dBA (noticeable but not disruptive) The top fan is audibly louder, but effective for SSD cooling, especially during sustained workloads.
Temperature Measurements:
CPU Peak (VMs & SSD Reads): 40°C (with fan)
SSD Peak (Stock Thermal Pads): 65°C
SSD Peak (Improved Thermal Pads): 55°C
The large aluminum heat sinks and internal fan handle CPU heat effectively, but a lot of this comes down to the CPU being already low-powered to start with, as well as the speed limit of 3×1 on each bay – sorry to keep repeating this, but it’s important!). Early PLEX performance testing was very good! I tested the streaming of a 100Mb 1080p file, a 60Mb 4K HEVC File and an 8K File. I will be going into more detail on the PLEX performance (especially the hardware transcoding later on, via PLEX PASS) later on via the YouTube channel, but my early testing was very good and the CPU use on these single connections was very good (even with Software transcoding too).
CWWK x86 P6 NAS Review – Verdict & Conclusion
The CWWK x86 P6 Pocket SSD NAS offers a compact and efficient solution for flash-based storage, virtualization, and media streaming, with strong CPU performance and reasonable power consumption. It excels in scenarios such as running multiple VMs, hosting containers, and acting as a Plex server, thanks to its Intel N355 processor and dual 2.5GbE ports. However, it has notable drawbacks, including limited PCIe lanes, unconventional SATA expansion, and only two USB ports, which may restrict expandability. That said, the SATA implementation, while unusual, is understandable given the space limitations of the compact design, and it provides an option for low-cost storage expansion. Additionally, the barrel power input instead of USB-C feels outdated, and thermal pads provided for SSDs are insufficient, necessitating upgrades for long-term reliability.
The lack of 10GbE networking is a missed opportunity, but users can add 10GbE via M.2 adapters, albeit at the cost of an M.2 slot. The N355 version offers significantly better performance for multi-tasking and VMs compared to the N150 version, making it worth the additional cost for power users . In conclusion, the CWWK x86 P6 is best suited for tech-savvy users who are comfortable with DIY upgrades and minor hardware adjustments. It offers good value for VM hosting, containerization, and high-speed storage tasks, provided users are aware of its limitations and willing to work around them.
Pros
Cons
Compact and portable – Small 100x100x58.5 mm size with a durable aluminum chassis.
Limited PCIe bandwidth – PCIe 3.0 x1 per M.2 slot restricts maximum SSD performance.
Good multi-VM performance – Handled three VMs with low CPU utilization (under 50%) and stable performance.
Only two USB ports – Limited connectivity for peripherals and OS boot drives.
Dual 2.5GbE ports – Supports link aggregation for up to ~550 MB/s throughput.
Barrel power input – No USB-C for power delivery, limiting modern power supply options.
Reasonable power efficiency – 18W idle, 34–35W under heavy load with four SSDs and three VMs.
SATA support requires adjustments – JFPC1 cable solution is unconventional and may need BIOS tweaks.
Expandable via M.2 adapters – Supports M.2 to PCIe, OCuLink, or 10GbE adapters.
Effective cooling for CPU – Integrated aluminum heat sinks and internal fan kept CPU below 40°C under load.
Good media streaming performance – Smooth playback for 1080p, 4K, and 8K files during Plex tests.
Support for up to 48GB DDR5 RAM – High memory capacity for VMs and containers.
This description contains links to Amazon. These links will take you to some of the products mentioned in today's content. As an Amazon Associate, I earn from qualifying purchases. Visit the NASCompares Deal Finder to find the best place to buy this device in your region, based on Service, Support and Reputation - Just Search for your NAS Drive in the Box Below
Need Advice on Data Storage from an Expert?
Finally, for free advice about your setup, just leave a message in the comments below here at NASCompares.com and we will get back to you.Need Help?
Where possible (and where appropriate) please provide as much information about your requirements, as then I can arrange the best answer and solution to your needs. Do not worry about your e-mail address being required, it will NOT be used in a mailing list and will NOT be used in any way other than to respond to your enquiry.
[contact-form-7]
TRY CHAT Terms and Conditions
If you like this service, please consider supporting us.
We use affiliate links on the blog allowing NAScompares information and advice service to be free of charge to you.Anything you purchase on the day you click on our links will generate a small commission which isused to run the website. Here is a link for Amazon and B&H.You can also get me a Ko-fi or old school Paypal. Thanks!To find out more about how to support this advice service checkHEREIf you need to fix or configure a NAS, check FiverHave you thought about helping others with your knowledge? Find Instructions Here
Or support us by using our affiliate links on Amazon UK and Amazon US
Alternatively, why not ask me on the ASK NASCompares forum, by clicking the button below. This is a community hub that serves as a place that I can answer your question, chew the fat, share new release information and even get corrections posted. I will always get around to answering ALL queries, but as a one-man operation, I cannot promise speed! So by sharing your query in the ASK NASCompares section below, you can get a better range of solutions and suggestions, alongside my own.
The Lincstation N2 NAS is the successor to the Lincstation N1, a flash-focused NAS system that made waves in 2024. While the N1 was praised for its compact size and SSD-centric design, it had certain limitations, such as the lack of 10GbE connectivity and limited active cooling. Now, Lincplus has refined and upgraded its previous design, bringing the N2 to crowdfunding with a stronger CPU, better airflow management, and a built-in 10GbE port. But do these enhancements justify the upgrade, and is it a true alternative to other compact NAS systems from QNAP, Synology, or Asustor? Let’s take a deep dive into the new Lincstation N2 NAS and see how it stacks up.
SOFTWARE - 9/10
HARDWARE - 8/10
PERFORMANCE - 7/10
PRICE - 8/10
VALUE - 9/10
8.2
PROS
10GbE networking for high-speed transfers Compact, silent, and power-efficient Includes 1 Year UnRAID license for easy setup Supports four M.2 NVMe SSDs and two SATA SSDs Low power consumption and passive+active cooling Improved design over the N1 with better airflow
CONS
Limited PCIe lanes affecting 10GbE throughput Non-upgradeable RAM (fixed 16GB LPDDR5) N100 CPU has very recently seen a refresh towards the N150 Uses a barrel-type power adapter instead of USB-C
The Lincstation N2 is powered by an Intel Alder Lake-N N100 processor, a quad-core CPU designed for low power consumption and efficient performance. It comes pre-installed with 16GB of onboard LPDDR5 memory, which is non-upgradeable but maximized for the CPU’s capabilities. Storage options include four M.2 NVMe slots and two SATA SSD bays, allowing for a fast, all-flash storage configuration.
Connectivity sees a major boost with the inclusion of a single 10GbE port, a significant upgrade over the dual 2.5GbE ports found on the N1. Additional USB connectivity includes one USB Type-C 10Gbps, one USB 3.2 Gen 2 Type-A, and two USB 2.0 ports for peripherals. The external chassis has been redesigned with better ventilation, including a larger passive cooling panel and improved heat dissipation for long-term reliability.
Specification
Lincstation N2
Processor
Intel Alder Lake-N N100 (Quad-Core, up to 3.4GHz)
Memory
16GB LPDDR5 (Non-upgradeable)
Storage (OS)
128GB eMMC
Storage (SATA)
2 x 2.5″ SATA SSD bays
Storage (NVMe)
4 x M.2 NVMe 2280 SSD slots (PCIe Gen 3 x1)
Networking
1 x 10GbE RJ45
USB Ports
1 x USB Type-C 10Gbps, 1 x USB 3.2 Gen 2 Type-A, 2 x USB 2.0
Video Output
1 x HDMI 2.0 (4K 60Hz)
Cooling
Passive and Active Hybrid Cooling System
Power Supply
60W External PSU (Barrel-type Connector)
Operating System
UnRAID (Pre-installed, 1-year license included)
Chassis Material
Metal & Plastic Hybrid
Dimensions
Compact Desktop Form Factor
Weight
TBD
Lincstation N2 NAS – Packaging
Since the N2 is currently in prototype stage, its final retail packaging is yet to be confirmed. However, the unit received for review included the NAS unit, a 60W external power supply, a first-time setup guide, and an UnRAID activation scratch card. Unlike many NAS brands, the Lincstation N2 does not include an Ethernet cable, which is something users should prepare for.
The packaging is minimalist and protective, designed to keep the NAS unit secure during transit, ensuring it remains well-protected from impact or shifting during shipping. The outer packaging features clear branding and basic specifications, though additional documentation on first-time setup would be beneficial, particularly for new UnRAID users. The box itself is relatively compact, reducing unnecessary waste while maintaining effective protection for the unit.
One of the notable elements in the package is the UnRAID activation card, which includes a scratch-off code for license registration. This ensures that users can activate their UnRAID installation immediately, allowing them to set up their storage array and applications with minimal delay. Given that UnRAID is a key selling point of the N2, including physical licensing details within the packaging is a welcome touch. The activation process is straightforward, and the included instructions provide a step-by-step guide on how to register and enable the software.
The external PSU remains barrel-type rather than USB-C, a decision that may disappoint users accustomed to more modern power connectors. However, the power brick itself is high quality, ensuring stable and efficient energy delivery. Given the N2’s low overall power draw, the external PSU design makes sense to keep heat generation outside the NAS chassis. While USB-C would have been a more modern and convenient choice, this power adapter provides reliable and consistent power delivery.
Additionally, it would have been useful to see additional accessories included, such as a basic network cable or drive installation tools, which are often included in NAS packages from other brands. Having all essential setup components in the box would make the initial setup experience even smoother, particularly for users who may not have immediate access to spare cables or peripherals.
Lincstation N2 NAS – Design & Build
The Lincstation N2 follows a compact, minimalistic design, much like its predecessor, making it an ideal desktop or office NAS. The metallic cooling panel at the bottom has been improved, allowing better passive airflow to support the fanless cooling design.
The four M.2 NVMe bays are located on the underside, while two SATA SSD slots are positioned at the front for easy installation.
A set of front-facing LED indicators provides system status updates, while an integrated neon status light enhances visibility. The magnetic panel for SSD installation remains a standout feature, allowing quick access to drive bays without the need for tools. Although the N2 is nearly silent in operation, high-intensity workloads may cause the system to warm up, making the new airflow improvements crucial for long-term performance.
The new chassis design enhances durability, featuring a sturdier metal and plastic blend that reinforces the unit without adding excess weight. The minimalist aesthetic is well-suited for both home and professional environments, ensuring that the NAS fits seamlessly alongside existing equipment. Cooling remains a primary focus, with improved airflow pathways reducing heat buildup and ensuring stable performance even under extended workloads.
The ventilation improvements include an expanded airflow channel that spans the entire underside of the device. This design allows heat from the NVMe drives and CPU to dissipate more effectively, reducing the need for aggressive active cooling solutions. Combined with efficient heat sinking, the N2 is able to maintain performance without excessive noise.
The compact footprint ensures that desk space usage is minimal, making it an ideal option for users with limited workspace. Additionally, the stackable design means multiple units can be arranged efficiently for users with multiple NAS or networking devices. The thoughtful combination of passive and active cooling elements ensures the N2 delivers sustained performance without requiring frequent maintenance.
Lincstation N2 NAS – Ports & Connectivity
The Lincstation N2 improves on the N1 by introducing a single 10GbE network port, replacing the dual 2.5GbE ports seen in its predecessor. This upgrade allows users to achieve significantly higher transfer speeds, making the NAS ideal for large file transfers, media editing, and network virtualization. However, the 10GbE performance is somewhat limited due to PCIe lane constraints, meaning users may not fully saturate the bandwidth under all conditions.
In addition to the 10GbE port, the N2 includes a USB Type-C 10Gbps port, providing high-speed connectivity for external storage devices. There is also a USB 3.2 Gen 2 Type-A port, ensuring compatibility with a range of USB peripherals. The inclusion of two USB 2.0 ports allows users to connect basic accessories, such as keyboards and mice for local management.
The rear layout of the N2 is designed for easy cable management, ensuring tidy workspace integration. Users looking to expand network connectivity beyond 10GbE may need to rely on USB-to-Ethernet adapters, as the system does not support PCIe expansion. The limited expandability of networking options might disappoint users who were hoping for an additional slot for NIC upgrades, but the onboard 10GbE should suffice for most users in this category.
Given that USB ports are an essential component of any NAS setup, the N2 provides a good balance between speed and compatibility. The USB-C 10Gbps port is particularly useful for connecting external SSD enclosures, expanding fast-access storage options for users with additional high-speed media requirements. However, it is worth noting that additional expansion beyond USB is not available, making pre-planning your connectivity needs essential before setup.
Lincstation N2 NAS – Internal Hardware & Performance
The Lincstation N2 utilizes an Intel N100 CPU, a power-efficient quad-core processor capable of handling basic NAS tasks, virtualization, and container workloads. While not a high-end processor, it provides a good balance of power and efficiency. The 16GB LPDDR5 memory ensures smooth multitasking but cannot be expanded.
Storage performance is solid, with M.2 NVMe drives operating at PCIe Gen 3×1, delivering around 800MB/s read/write speeds. SATA SSDs achieve speeds of 500–600MB/s, making them suitable for RAID 1 or RAID-Z configurations. However, users looking to push extreme performance benchmarks will find the PCIe lane allocation slightly restrictive, especially for multi-drive simultaneous access scenarios.
(Click below to open in new tab in full size)
2x SATA SSD, BTRFS MIRROR, SMB SHARE, 1GB and 4GB TESTS
4x M.2 NVMe SSD, ZFS POOL, SMB SHARE, 1GB and 4GB TESTS
Power consumption is exceptionally low, with idle usage around 10–13W and peak operation at 18–22W. The external power adapter remains adequate, though a USB-C power option would be preferable. Energy efficiency remains one of the standout features of the N2, making it an excellent choice for users looking to build a long-term, low-cost NAS setup.
Heat dissipation has been improved significantly over the N1, with an upgraded passive cooling system featuring a larger vented bottom panel. Under full load, temperatures remain within acceptable limits, preventing thermal throttling or reduced drive longevity.
Given that flash-based NAS systems tend to generate more heat than HDD counterparts, these improvements help maintain reliability for continuous operation.
During real-world testing, the N2 performed admirably under multiple storage scenarios, including RAID-Z, traditional RAID configurations, and direct disk access. The optimized drive placement and airflow system allow the NAS to maintain consistent speeds without overheating, even under heavy sequential read/write workloads. While the N2 may not break records in enterprise performance metrics, it delivers stable and reliable performance for home and small-business users.
Lincstation N2 NAS – Software & UnRAID Integration
The N2 ships with UnRAID, providing a flexible NAS platform for storage pooling, Docker containers, and virtual machines. The included one-year UnRAID license ensures access to the latest features and security updates. Users can opt to renew their license or switch to other NAS OS options.
UnRAID’s intuitive UI allows for quick configuration, making it suitable for beginners and advanced users alike. Additional plugins may be required for full system monitoring, as Lincstation does not develop its own NAS OS. While UnRAID offers extensive community support, some users may prefer TrueNAS or OpenMediaVault, both of which are also compatible with the N2.
Given that UnRAID runs off a USB boot drive, users can easily swap out the OS if required, allowing greater flexibility in long-term system customization.
The inclusion of a 30-day trial before activating the license means users can test the system before committing to a paid software platform, a welcome addition for those considering different configurations.
Lincstation N2 NAS – Final Verdict
The Lincstation N2 NAS is a solid upgrade over its predecessor, the N1, offering better connectivity, improved cooling, and more efficient hardware. The inclusion of 10GbE networking makes it a more appealing option for users who require higher data transfer speeds, and the passive and active cooling improvements ensure better thermal regulation under sustained workloads. With support for four M.2 NVMe SSDs and two SATA SSDs, the N2 provides flexible storage options, allowing users to build a high-speed, all-flash NAS setup. The Intel N100 processor and 16GB LPDDR5 memory deliver decent performance for most home and small business NAS applications, but the non-upgradeable memory may be a limiting factor for more demanding users. The compact, efficient design makes it an ideal NAS for those looking for a balance between power efficiency and performance.
That being said, the N2 does have a few drawbacks that may impact users looking for greater expandability. The lack of PCIe expansion slots means users cannot add additional NICs or storage controllers, making it less versatile compared to some competing NAS solutions. Additionally, while the 10GbE port is a significant upgrade, it is limited by PCIe bandwidth constraints, meaning users may not be able to fully utilize its maximum throughput in all scenarios. The USB connectivity options are decent, but having only one high-speed USB-C 10Gbps port may feel restrictive for those wanting multiple fast external connections. Furthermore, the reliance on a barrel-type power connector instead of USB-C is another missed opportunity for modernization.
Overall, the Lincstation N2 NAS remains a good choice for UnRAID users looking for an affordable, high-speed, all-flash NAS solution. It provides great energy efficiency, a streamlined setup process, and a solid mix of connectivity options. While it lacks some scalability features, for most home and small business users, it offers a compelling blend of performance, efficiency, and ease of use. If Lincplus continues refining their NAS lineup, future iterations with more robust networking, storage expandability, and minor refinements to cooling and connectivity could make it a standout competitor in the small NAS market.
Pros and Cons of the Lincstation N2 NAS
Pros:
10GbE networking for high-speed transfers
Compact, silent, and power-efficient
Includes 1 Year UnRAID license for easy setup
Supports four M.2 NVMe SSDs and two SATA SSDs
Low power consumption and passive+active cooling
Improved design over the N1 with better airflow
Cons:
Limited PCIe lanes affecting 10GbE throughput
Non-upgradeable RAM (fixed 16GB LPDDR5)
N100 CPU has very recently seen a refresh towards the N150
This description contains links to Amazon. These links will take you to some of the products mentioned in today's content. As an Amazon Associate, I earn from qualifying purchases. Visit the NASCompares Deal Finder to find the best place to buy this device in your region, based on Service, Support and Reputation - Just Search for your NAS Drive in the Box Below
Need Advice on Data Storage from an Expert?
Finally, for free advice about your setup, just leave a message in the comments below here at NASCompares.com and we will get back to you.Need Help?
Where possible (and where appropriate) please provide as much information about your requirements, as then I can arrange the best answer and solution to your needs. Do not worry about your e-mail address being required, it will NOT be used in a mailing list and will NOT be used in any way other than to respond to your enquiry.
[contact-form-7]
TRY CHAT Terms and Conditions
If you like this service, please consider supporting us.
We use affiliate links on the blog allowing NAScompares information and advice service to be free of charge to you.Anything you purchase on the day you click on our links will generate a small commission which isused to run the website. Here is a link for Amazon and B&H.You can also get me a Ko-fi or old school Paypal. Thanks!To find out more about how to support this advice service checkHEREIf you need to fix or configure a NAS, check FiverHave you thought about helping others with your knowledge? Find Instructions Here
Or support us by using our affiliate links on Amazon UK and Amazon US
Alternatively, why not ask me on the ASK NASCompares forum, by clicking the button below. This is a community hub that serves as a place that I can answer your question, chew the fat, share new release information and even get corrections posted. I will always get around to answering ALL queries, but as a one-man operation, I cannot promise speed! So by sharing your query in the ASK NASCompares section below, you can get a better range of solutions and suggestions, alongside my own.
In today’s digital world, data storage plays a crucial role in both personal and professional environments. Many individuals and businesses rely on cloud storage for convenience, but it’s not always the best option. While cloud services provide accessibility and automation, they come with limitations, including long-term costs, security concerns, and restrictions on data ownership. For those who value control over their files, a Network Attached Storage (NAS) device offers a compelling alternative. This article explores five key reasons why a NAS can be a better choice for data management compared to cloud storage. From total data ownership to long-term cost savings, we examine how NAS devices provide more flexibility, security, and performance for those looking to store and access their data efficiently.
Disclaimer!
While NAS devices offer significant advantages in terms of data ownership, security, and long-term cost efficiency, they are not the ideal solution for everyone. Users with simpler storage needs, such as those requiring direct, high-speed access to a single device, may find that a Direct Attached Storage (DAS) setup better suits their requirements without the additional complexity of network management.
Additionally, cloud storage remains a convenient and accessible option, particularly for those who need a quick and automated solution without the upfront cost of dedicated hardware. Cloud services provide seamless access from anywhere and can be a great short-term or supplementary storage method. For many users, a hybrid approach—combining NAS with cloud storage—strikes the right balance. This setup allows users to enjoy the accessibility of the cloud while benefiting from the control and security of a NAS, particularly when implementing structured backup routines. Each storage solution has its strengths, and the best choice depends on individual needs and use cases.
1. A NAS Server = Total Data Ownership
Owning a NAS (Network Attached Storage) means complete control over your data, something that cloud storage simply cannot provide. When you use cloud services, you are essentially handing over your files to a third party, entrusting them to manage and store your data. While this is convenient, it also introduces several risks, including data breaches, sudden policy changes, or service discontinuations. Many cloud providers state in their terms of service that they reserve the right to scan, analyze, or even remove content that violates their policies, which can be vague and subject to interpretation. A NAS eliminates this uncertainty by giving you full ownership—your data resides physically in your home or office, and no one but you determines what happens to it.
Beyond ownership, NAS systems offer better control over data distribution. You decide where backups are stored, how often they occur, and who has access. This is especially important for photographers, videographers, and businesses that require compliance with strict data protection regulations, such as GDPR or HIPAA. For example, a small business handling client records can store sensitive customer data on an encrypted NAS, ensuring compliance without relying on cloud providers that may store files in different jurisdictions. Another key advantage is preventing data from being used to train AI models or sold to advertisers—something that is an increasing concern with major tech companies. Owning a NAS ensures that your data is truly private, unmonitored, and secure from external influences.
2. A NAS Means Bespoke Security Settings
Cloud providers implement security measures, but these are designed for general use, meaning they cannot be customized to fit specific needs. While cloud services offer encryption, user authentication, and basic access controls, they often lack advanced security features that enterprises or tech-savvy users require. With a NAS, you can tailor security settings at a granular level, ensuring that only the right people can access specific files and folders. You can configure user authentication with two-factor authentication (2FA), enforce strict password policies, and even limit access based on IP addresses or device types. For example, you can allow a work computer to access files but block access from unknown mobile devices, significantly reducing the risk of unauthorized entry.
Additionally, NAS security extends beyond simple user access. If you integrate a NAS with a managed switch and firewall, you can create network segmentation, restricting access to only certain parts of your infrastructure. Air-gapping—a security practice that physically or digitally isolates a device from external networks—can be used to create periods where the NAS is completely inaccessible, making data leaks or cyberattacks virtually impossible. Scheduled access times add another layer of protection, ensuring that even if credentials are compromised, unauthorized users cannot gain entry outside of designated periods. NAS devices also provide real-time security alerts that can be customized to notify administrators about unusual activity, such as multiple failed login attempts, unauthorized file transfers, or new device connections. This kind of tailored security is simply not possible with generic cloud services, making a NAS the superior choice for those who prioritize privacy and control.
3. A NAS Can Mean True Deletion When Needed
Deleting data from cloud storage is not as straightforward as it seems. Most cloud services use a soft-delete approach, meaning that when you delete a file, it isn’t immediately erased. Instead, it is moved to a trash folder where it remains for 30 to 90 days before being automatically purged. Even after this period, many cloud providers create multiple copies of your files across their servers for redundancy, making it difficult to ensure that your data is completely gone. In some cases, metadata or indexed portions of your files may still exist within the provider’s infrastructure, and depending on the terms of service, your data may even be retained for analytics or AI training.
With a NAS, true deletion is possible because you have full control over your data. When you delete a file, it is removed from your storage pool, and if you want absolute certainty, you can use secure erasure tools to overwrite the data multiple times, making recovery impossible. Many NAS systems include built-in data-wiping features that follow Department of Defense (DoD) 5220.22-M standards, ensuring complete removal of sensitive information. For highly sensitive data, you can physically destroy storage drives—a practice commonly used by corporations and government agencies. Some companies specialize in secure drive destruction, ensuring that data cannot be recovered by any means. For personal use, simply reformatting or physically damaging a hard drive provides an additional layer of security. This level of control over data deletion is something that cloud storage cannot match, making NAS the ideal choice for those who need true data removal capabilities.
4. NAS vs Cloud = Cost Savings in the Long Term
At first glance, cloud storage seems like an affordable option. Many services offer free storage up to a certain limit, and paid plans start as low as a few dollars per month. However, the long-term costs can quickly add up. Subscription-based storage models require continuous payments, meaning that over several years, you could spend far more on cloud storage than you would on a one-time NAS purchase. Additionally, most cloud providers offer tiered pricing, meaning that as your storage needs grow, your monthly fees increase significantly. Businesses and content creators with terabytes of data often find themselves paying hundreds of dollars annually just to store their files.
Another hidden cost of cloud storage is data retrieval, known as egress fees. Many cloud providers limit how much data you can download within a given timeframe, and if you exceed this limit, you are charged extra. For example, Amazon S3 and Google Cloud charge egress fees that can quickly add up when transferring large amounts of data. In contrast, a NAS has no such limitations—once you own the device, you can access and transfer files as much as you want without paying additional fees.
If you plan to store data for more than three to five years, a NAS will almost always be the more cost-effective choice. Even budget NAS devices with included hard drives, such as the $199 models with 4TB of storage, offer better long-term value than many cloud subscriptions. Investing in a NAS early ensures that you avoid rising costs while maintaining full control over your data.
5. A NAS (Almost Always) Means Performance and Speed Benefits
Cloud storage is convenient for remote access, but it is heavily dependent on internet speeds, network congestion, and provider limitations. Upload and download speeds are constrained by your ISP, meaning that large file transfers can take hours or even days. Most cloud services also impose bandwidth limits or throttling policies, reducing transfer speeds during peak hours. For users who need fast access to large files—such as video editors, photographers, or IT professionals—cloud performance is simply not sufficient.
A NAS, on the other hand, offers significantly better performance, particularly for local access. Even basic NAS systems with gigabit Ethernet can achieve speeds of 100 MB/s (megabytes per second), far exceeding most cloud transfer rates. Higher-end models support 2.5GbE, 5GbE, or even 10GbE connections, allowing speeds of up to 1,000 MB/s—nearly 100 times faster than standard cloud storage. For example, a team of video editors working with 4K footage can stream and edit files directly from a NAS without any noticeable lag, something that would be impossible with cloud storage due to latency issues. NAS devices also support SSD caching, RAID configurations for redundancy, and multiple simultaneous users, ensuring high performance even under heavy workloads.
Another advantage of NAS is its ability to function as a local media server. Unlike cloud services that require constant internet access and may throttle streaming quality, a NAS can store and stream high-resolution content locally without buffering. This makes it ideal for home theaters, Plex servers, and shared family storage. Businesses can also benefit from NAS performance by hosting internal file-sharing platforms, reducing reliance on slow or expensive cloud-based collaboration tools. In short, NAS outperforms cloud storage in every aspect of speed and efficiency, making it the best choice for users who demand high-speed, reliable access to their files.
While cloud storage remains a popular choice, it is not without drawbacks. Issues such as long-term expenses, limited security customization, and potential data retention concerns make it less than ideal for users who require full control over their files. A NAS, by contrast, provides a dedicated, high-performance storage solution that allows users to take ownership of their data, manage access securely, and benefit from predictable costs over time. Ultimately, whether a NAS or cloud storage is the right choice depends on individual needs. Those looking for convenience and automatic backups may still find value in cloud services, while users who prioritize security, cost efficiency, and local performance will likely benefit from investing in a NAS. Understanding these differences can help individuals and businesses make informed decisions about their data storage strategy.
Recommended NAS Solutions Based on Data Storage Needs:
Budget NAS for a Family or Small Data Storage Solution – The Synology BeeStation 4TB
Synology has clearly done their homework on the development and presentation of the BeeStation private cloud. They are targeting a whole new audience with this system, and therefore, criticisms based on experiences with their other hardware are likely to fall on deaf ears. The BeeStation is probably one of the best middle grounds I have ever seen between an easy-to-use and exceptionally easy-to-set-up private cloud system, while still managing to provide smooth and seamless features for accessing and sharing your private cloud’s storage securely. Looking at this system with a more network-savvy microscope kind of defeats the point, and I’ve tried to be fair in my assessment. The lack of LAN access by default seems a little odd, and launching the BeeStation series in this single-bay, 4TB-only fashion may be a bit of a marketing misstep, but overall, what you’re seeing here is an effectively priced and scaled private cloud system. It’s a fantastic alternative to third-party clouds and existing simplified NAS systems. With many users keeping an eye on their budgets and tightening costs, Synology, known for its premium position in the market, had a challenge scaling down to this kind of user. However, I have to applaud Synology’s R&D for creating a simple and easy-to-use personal cloud solution that still carries a lot of their charm and great software reputation. It may not be as feature-rich as DSM, but BSM does exactly what it says it will do, and I think the target audience it’s designed for will enjoy the BeeStation a great deal!
I feel like a bit of a broken record in this review, and I keep repeating the same two words in conjunction with the UniFi UNAS Pro—fundamentals and consistency! It’s pretty clear that UniFi has prioritized the need for this system to perfectly complement their existing UniFi ecosystem and make it a true part of their hardware portfolio. In doing so, it has resulted in them focusing considerably on the fundamental storage requirements of a NAS system and making sure that these are as good as they possibly can be out of the gate. To this end, I would say that UniFi has unquestionably succeeded. The cracks in the surface begin once you start comparing this system with other offerings in the market right now—which is inevitably what users are going to do and have been doing since the first indications of a UniFi NAS system were being rumored. It may seem tremendously unfair to compare the newly released UniFi NAS with solutions from vendors that have had more than 20 years of experience in this field, but for a business that wants to fully detach themselves from the cloud and wants true user-friendly but highly featured control of their network operations, comparison is inevitable!
A solid, reliable, and stable system that will inevitably grow into a significant part of most UniFi network users. The problem for many, however, is going to be how long it takes UniFi to reach that point where this system can be software competitive with its rivals. If you are a die-hard UniFi ecosystem user and you are looking for stable, familiar, easy-to-use, and single ecosystem personal/business storage, you are going to love everything about the UniFi UNAS Pro. But just be aware that this is a system that prioritizes storage and is seemingly at its best within an existing UniFi network architecture, and if removed from that network, you are going to find a system that at launch feels quite feature-light compared with alternatives in the market. Pricing for the system is surprisingly competitive, given its position as the launch NAS—unusual when you look at the pricing philosophy of numerous larger-scale systems like the UniFi Dream Machine and UNVR from the brand.
Hopefully, over time we are going to see UniFi build upon the solid fundamentals that they have designed here and create a more competitive solution on top of this. I have no doubt that UniFi will commit to software and security updates for this system, but it would be remiss of me to say that this is the best NAS solution for your network. Right now, it just happens to be the most user-friendly and most UniFi-ready one. Bottom line: this will probably tick a lot of boxes.
The TerraMaster F4-424 Max is a standout NAS system in TerraMaster’s lineup, offering impressive hardware specifications and solid performance at a price point of $899.99. For users who need high-speed data transfers, intensive compute power, and flexibility in storage configurations, the F4-424 Max is an excellent option. The combination of the Intel i5-1235U CPU, dual 10GbE ports, and PCIe Gen 4 NVMe support ensures that the NAS can handle even the most demanding tasks, whether it’s virtualization, media transcoding, or large-scale backups.
That said, when compared to the F4-424 Pro, which is priced at $699.99, the Max model offers significantly more networking power and potential for speed. However, the Pro model still provides fantastic performance for most home and small office users, making it a more budget-friendly alternative for those who don’t require 10GbE or advanced NVMe functionality.
In terms of software, Synology DSM and QNAP QTS are still more evolved, offering richer multimedia experiences and better integration for business applications. However, TOS 6 continues to improve with every iteration, closing the gap between TerraMaster and these larger players. With new features like TRAID, cloud sync, and improved snapshot management, TOS is becoming more user-friendly and robust. For users prioritizing performance, flexibility, and future-proofing, the F4-424 Max is a strong contender and offers excellent value for money. While there are areas where TerraMaster could improve, such as the lack of PCIe expansion and front-facing USB ports, the F4-424 Max delivers on its promise of high performance and scalable storage solutions.
In summarizing the capabilities and potential of the QNAP TVS-h874T NAS, released as a late 2023 update to its predecessor, it’s clear that this system represents a significant leap forward in desktop NAS technology. Priced over £2500, it’s a substantial investment, designed with future-proofing in mind. The TVS-h874T not only maintains the longevity and high-end status of the TVS-h874 but also brings to the table enhanced direct data access through Thunderbolt 4 integration. This advancement, supporting IP over Thunderbolt protocol, significantly boosts connectivity and speed, making the system an ideal choice for demanding tasks such as 8K video editing and high-performance computing needs in business environments. However, the question of whether Thunderbolt NAS is the right fit for all users remains. For those requiring high-speed, multi-user access and scalability, the TVS-h874T is a strong contender. Its support for the latest PCIe 4 standards ensures compatibility with high-performance upgrades, reinforcing its position as a future-proof investment. The software, featuring QTS and QuTS, might require some acclimatization, particularly for those familiar with simpler systems like Synology’s DSM. Yet, the benefits, especially for ZFS enthusiasts, are undeniable, offering advanced RAID management and a plethora of applications and services.
The TVS-h874T’s stance on open hardware and software compatibility is a significant plus in an industry increasingly leaning towards proprietary systems. It accommodates a range of third-party hardware and software, adding to its versatility. In the face of growing concerns over NAS security, the system is well-equipped with comprehensive tools and settings for enhanced security and data protection, addressing the pressing issue of ransomware attacks. In conclusion, the QNAP TVS-h874T stands out as an exceptional choice for businesses and power users who require a robust, scalable, and secure NAS solution. It offers an excellent balance of price, performance, and features, making it a worthy investment for those seeking top-tier server-side capabilities. However, for users with simpler storage needs or those not requiring the advanced features of Thunderbolt NAS, traditional Thunderbolt DAS devices might be a more suitable and cost-effective option. The TVS-h874T, with its advanced capabilities, is undoubtedly a powerhouse in NAS technology, but its full benefits will be best realized by those whose requirements align closely with what this advanced system has to offer.
The TerraMaster F4-424 Pro NAS is a powerful 4-bay turnkey NAS system that offers competitive pricing and robust hardware. With its Intel i3 N300 CPU, 32GB DDR5 memory, and 2x M.2 NVMe SSD bays, it provides excellent performance for various tasks, including Plex media streaming and hardware transcoding. In terms of design, the F4-424 Pro features a sleek and modern chassis with improved cooling and hot-swapping capabilities. It represents a significant step forward in design compared to TerraMaster’s older 4-bay models, aligning more closely with industry leaders like Synology and QNAP. The addition of TOS 5 software brings significant improvements in GUI clarity, backup tools, storage configurations, and security features. However, the absence of 10GbE support and limited scalability in this regard might disappoint advanced users. Additionally, while the hardware exceeds Intel’s memory limitations, full utilization of the 32GB DDR5 memory is reliant on Terramaster’s own SODIMM modules, and this could be a limitation for some users. Overall, the TerraMaster F4-424 Pro NAS offers excellent value for its price, with competitive hardware and software features. It positions itself as a strong contender in the 4-bay NAS market, particularly for those looking for an affordable yet capable private server solution.
This description contains links to Amazon. These links will take you to some of the products mentioned in today's content. As an Amazon Associate, I earn from qualifying purchases. Visit the NASCompares Deal Finder to find the best place to buy this device in your region, based on Service, Support and Reputation - Just Search for your NAS Drive in the Box Below
Need Advice on Data Storage from an Expert?
Finally, for free advice about your setup, just leave a message in the comments below here at NASCompares.com and we will get back to you.Need Help?
Where possible (and where appropriate) please provide as much information about your requirements, as then I can arrange the best answer and solution to your needs. Do not worry about your e-mail address being required, it will NOT be used in a mailing list and will NOT be used in any way other than to respond to your enquiry.
[contact-form-7]
TRY CHAT Terms and Conditions
If you like this service, please consider supporting us.
We use affiliate links on the blog allowing NAScompares information and advice service to be free of charge to you.Anything you purchase on the day you click on our links will generate a small commission which isused to run the website. Here is a link for Amazon and B&H.You can also get me a Ko-fi or old school Paypal. Thanks!To find out more about how to support this advice service checkHEREIf you need to fix or configure a NAS, check FiverHave you thought about helping others with your knowledge? Find Instructions Here
Or support us by using our affiliate links on Amazon UK and Amazon US
Alternatively, why not ask me on the ASK NASCompares forum, by clicking the button below. This is a community hub that serves as a place that I can answer your question, chew the fat, share new release information and even get corrections posted. I will always get around to answering ALL queries, but as a one-man operation, I cannot promise speed! So by sharing your query in the ASK NASCompares section below, you can get a better range of solutions and suggestions, alongside my own.
‘Used Seagate EXOS HDDs Missold as ‘New – Other Drives Implicated
Now would be a very good time to check any hard drives you’ve purchased in the last 12 to 24 months! Recent reports from popular German news outlet Heise have raised increased reports of refurbished and modified SMART-reported drives being sold as brand new, leading to large concerns of widespread ex-cryptocurrency-burnt drives being sold through trusted business and domestic retailers. Although the scope of the issue seems to be largely focused on Seagate Exos data center-class drives, because of the wide-ranging drives that were used in Chia cryptocurrency mining several years ago, there is an increased likelihood that other large-capacity and high-durability drives should be considered, thanks to the relative ease of firmware modifications and larger quantities of HDDs being resold off the back of 5 year durabilities lines being crossed by the original coin miners!
Reports are now arriving that Seagate Ironwolf and Ironwolf Pro modified/mis-sold HDDs are now also affected. The extent to this is still too early to confirm, but the latest reports from Heise indicate that 8TB and 16TB HDDs have been highlighted.
Further reports from ComputerBase via a community member fanatiXalpha provided further evidence and indications of this via the images from the original article here:
REAL HDD
FAKE HDD
In this video I discuss multiple ways to initially identify issues with a ‘new’ Seagate Ironwolf HDD that do not involve connecting the HDD to a system. Later in this article cover several more methods that require connecting the drive to a NAS or general client system.
Check Your HDDs – Reports indicate used Seagate Exos hard drives are being sold as new, particularly 12TB-18TB models.
Firmware Manipulation – SMART data shows zero usage, but deeper FARM tests reveal 15,000-50,000 hours of prior use.
Widespread Issue – Over 200 reports from buyers in Germany, Japan, Australia, and other regions, spanning multiple retailers.
Crypto Mining Connection – Many affected drives likely came from Chia cryptocurrency farms (2018-2022) and re-entered the market fraudulently.
Tampering in Supply Chain – Drives may have been repackaged and resold by wholesalers and distributors, bypassing Seagate’s official channels.
Retailers & Seagate Respond – Some retailers are issuing refunds/exchanges. Seagate denies involvement and is investigating the supply chain breach.
Verify Your Drives – Use SMART, FARM, Seatools, and warranty checkers to confirm if your drive is genuine. Report suspicious drives to Seagate and your retailer.
What has been reported on the Seagate EXOS HDD Misselling
Earlier in the year, Heise reported that they had received dozens of reports from users who had purchased brand-new, enterprise-class Seagate Exos hard drives, only to find that when receiving the drives, they had scuffs and marks on them that suggested they were used—and used en masse. Further investigation of the hard drives using popular firmware tools initially showed that the drives’ SMART data was indicating little to no power-on usage. However, deeper investigation with deeper drive tools went on to reveal that the firmware had been manually adjusted to hide the tens of thousands of hours that these drives had already accrued in use.
Usage on drives has varied from between 15,000 hours and 50,000 hours, well over five years of deployment and well outside the warranty and workload rating on these drives in most cases. What is interesting though, is that retailers that have been impacted by this, and in fact a wide-ranging number of German retailers, have been highlighted as sources of these drives. However, reported issues span outside of Germany and include claims from purchases made in Japan, Australia, and other parts of Europe.
Fingers are initially being pointed at wholesalers, large-scale resellers, and distributors who supply the traditional retail and e-commerce websites that most users would be eligible to purchase from. Depending on the retailer, and several have already been highlighted in the now over 200 reports submitted to Heise, the returns and RMA process does differ from site to site, but this does appear to be a growing issue that most users will not even realize they have been hit by unless they take the time to investigate the usage data on their drives.
Primarily, Chia crypto farming has been highlighted as the origin of most of these drives, with huge quantities of large-capacity data center drives being purchased in 2018 to 2022, when this emerging and less GPU-centric form of cryptocurrency was being mined. Brands such as Seagate, WD, and Toshiba saw extraordinarily high sales numbers during this period for these drives, and equally, domestic users ended up being negatively impacted by supply shortages and price hikes. It seems that a lot of these drives that have either been abandoned from previously pursued cryptocurrency setups or just simply swapped out for ongoing farming have now made their way back into the supply chain under the guise of being regular, new, out-of-the-box drives!
The distribution channels, wholesalers, and affected e-commerce websites in order to ascertain how these drives have entered the supply chain and to what extent it has happened. They issued the following statement:
“We are taking this matter very seriously and are conducting a thorough investigation. As explained in the previous statement, Seagate did not sell or distribute these drives to retailers. We cannot provide details of the ongoing investigation, but we suspect that these drives are new products that Seagate sold to customers and were later resold by them on the used market. In this case, we believe that the drives were remarketed somewhere in the used market supply chain and resold as new. We recommend that retailers only purchase drives from certified Seagate distribution partners, as purchasing from certified Seagate distribution partners is the best way to ensure the authenticity of Seagate products for retailers and their customers.
Seagate has processes in place to investigate these types of cases, with teams working proactively with our vendors to take action where necessary. Our security team also regularly works with local authorities to take necessary action. Many investigations are initiated based on anonymous tips and reports from partners and customers. These measures are designed to protect Seagate partners and end customers in an increasingly global marketplace.
We encourage anyone who suspects they have received a used drive marketed as new to help with the investigation by reporting the incident to us directly at [email protected] . In addition, customers who have doubts about whether the products they purchased match the claims of the sellers can access our warranty checker tool . Suspicious drives and/or sellers can also be reported anonymously through our Ethics Hotline .
Currently, the bulk of aggregate reporting of this is going through the Heise website, and a lot of the submissions have been done via their anonymous reporting link, so exact model IDs are hard to track down right now. However, the bulk of the reported mis-sold drives appear to be Seagate Exos drives ranging from 12TB to 18TB. As mentioned earlier, however, the original reporting suggests that other drives have been highlighted by users. Realistically, it’s pretty unlikely that only Exos drives are going to be impacted as such. A wide-ranging procurement took place during the peak of Chia cryptocurrency farming, and pretty much any moderately durable, high-capacity hard drive was changing hands quickly at that time. This all does seemingly indicate right now that a lot of these drives are being offloaded with their firmware modified by one or a handful of bad actors, who likely are sitting on high quantities of the same hard drives. However, it would not surprise me whatsoever if over the coming months and years, we see spikes on affected drives outside of the Seagate Exos data center series.
How Can I Check If My Drives Were Mis-Sold as New?
There are multiple ways to check whether the hard drive inside your system, which you purchased as brand new, is actually new. However, the suitability of each tool will depend heavily on the system type and operating system your drive is running on. Seagate’s Seatools application allows you to check and validate multiple data points on your hard drives. However, it is only available as a Windows or Linux client, as well as a portable version. That means Mac users, or those less comfortable with command-line tools, may find it difficult to use—not to mention users who have multiple drives deployed in systems without a suitable GUI or command-line interface for validity checks. Below, I’ve broken down recommended tools and commands that you can use to verify your drives, their power-on hours, and other critical details.
How NAS users can Check and Verify the usage of the HDDs:
NAS users who suspect their drives may have been mis-sold as new can verify their SMART data and power-on hours using various tools. Most NAS operating systems, including Synology DSM, QNAP QTS, TrueNAS, and UnRAID, have built-in SMART monitoring tools within their storage manager or disk health sections. These tools provide essential SMART attributes, including Power-On Hours (POH), Reallocated Sectors, and Drive Temperature. However, in some cases, the SMART data may have been manipulated to show zero usage, making further verification necessary.
For deeper analysis, users can SSH into their NAS and install smartmontools, a command-line utility that provides detailed drive health reports. Running the command:
smartctl -a /dev/sdX
(where X is the drive identifier) will display all SMART attributes, including power-on hours. However, if the SMART data has been reset or manipulated, users can check the FARM (Field-Accessible Reliability Metrics) values for a more accurate picture of a drive’s actual usage history. To retrieve FARM values, NAS users can use:
smartctl -l farm /dev/sdX
This will reveal true power-on hours, drive usage patterns, and whether a drive has been extensively used before being reintroduced into the supply chain.
For those using QNAP or Synology NAS devices without direct access to smartmontools, Seagate’s Seatools (Windows/Linux) can be used by connecting the drives externally via a USB or SATA dock. Additionally, Seagate’s warranty checker tool allows users to verify if their drive was originally part of a multi-drive batch—a red flag that it may have been previously used in a server or data center environment.
How NAS Users Can Check SMART Data and Power-On Hours Over SSH (Including FARM Values for Verification & Integration with Smartmontools)
NAS users with SSH access can perform a deeper, more accurate verification of their hard drives’ SMART data and power-on hours to detect possible tampering. While many NAS systems, such as Synology DSM, QNAP QTS, TrueNAS, and UnRAID, provide built-in SMART monitoring via their web interface, these tools often rely on basic SMART queries, which may not reveal manipulated or reset power-on hours. By accessing the NAS via SSH, users can run Smartmontools directly, allowing them to extract FARM (Field-Accessible Reliability Metrics) values, which are not included in standard SMART logs.
To begin, users should SSH into their NAS and install Smartmontools if it is not already available. On Debian-based NAS systems (such as OpenMediaVault, TrueNAS SCALE, and some QNAP models running Debian Linux), install Smartmontools with:
sudo apt update && sudo apt install smartmontools
On Red Hat-based systems, use:
sudo yum install smartmontools
For NAS systems that do not allow package installations, users can still manually compile Smartmontools or install a Docker container that includes the tool.
Once Smartmontools is installed, running the command:
smartctl -a /dev/sdX
(replacing X with the correct drive identifier) will display SMART attributes, including Power-On Hours (POH). However, since bad actors can manipulate SMART data to show zero hours, users should perform an additional FARM query with:
smartctl -l farm /dev/sdX
Unlike SMART power-on hours, which can be reset, FARM values track long-term reliability metrics stored at a deeper firmware level, making them much harder to falsify. If there is a discrepancy between SMART-reported power-on hours and FARM-reported power-on hours, it strongly suggests that the drive has been used before but was manipulated to appear new.
Integrating Smartmontools into a NAS for Automated Checks
To automate drive health monitoring, NAS users can schedule periodic SMART and FARM scans using cron jobs or integrate them with the NAS system’s notification service.
Create a SMART Monitoring Script Users can create a simple script to check SMART and FARM values for all installed drives and log the results.
#!/bin/bash
LOGFILE=”/var/log/smart_check.log”
echo “SMART Check – $(date)” >> $LOGFILE
for DRIVE in /dev/sd[a-z]; do
echo “Checking $DRIVE…” >> $LOGFILE
smartctl -a $DRIVE >> $LOGFILE
smartctl -l farm $DRIVE >> $LOGFILE
done
Save this script as smart_check.sh and make it executable:
chmod +x smart_check.sh
2. Schedule Automated Checks with Cron Users can schedule the script to run daily or weekly using cron. Open the cron editor:
crontab -e
Add a line to run the script every day at 2 AM:
0 2 * * * /path/to/smart_check.sh
Set Up Email Alerts for Failures To receive email alerts if issues are detected, modify the script to check for critical SMART attributes and send an email if problems are found:
smartctl -a $DRIVE | tee -a $LOGFILE | grep -i “Pre-fail\|Reallocated_Sector_Ct\|Power_On_Hours”
smartctl -l farm $DRIVE >> $LOGFILE
done
# Email log if issues detected
if grep -q “Pre-fail\|Reallocated_Sector_Ct” $LOGFILE; then
mail -s “SMART Error Detected on NAS” $EMAIL < $LOGFILE
fi
By leveraging SSH, Smartmontools, and automated monitoring, NAS users can go beyond surface-level diagnostics and ensure they are not just scraping the same potentially manipulated data, but actually verifying their drives’ true usage history.
How Desktop Windows users can Check and Verify the usage of the HDDs:
Desktop users can verify the SMART information and power-on hours of their hard drives using several tools, including Smartmontools 7.4+, CrystalDiskInfo, and Seagate’s Seatools. The easiest method is using CrystalDiskInfo, a free GUI-based tool for Windows that displays critical SMART attributes, including Power-On Hours (POH), Reallocated Sectors, and Drive Health Status. However, if a drive has been tampered with, its SMART data may have been reset, making further verification necessary.
For deeper inspection, users can install Smartmontools 7.4 or later, which provides advanced diagnostics, including FARM (Field-Accessible Reliability Metrics) values, which can reveal the drive’s true runtime history. To check SMART data, open a command prompt (or terminal in Linux/macOS) and run:
smartctl -a /dev/sdX
(replacing X with the correct drive letter) to view detailed SMART attributes. If the reported power-on hours seem too low or suspiciously reset, users can retrieve FARM values by running:
smartctl -l farm /dev/sdX
This command will reveal the actual power-on hours and potential prior usage, even if the SMART data was modified.
Alternatively, Seagate’s Seatools (available for Windows and Linux) can run extended drive diagnostics, check SMART status, and validate warranty details. Users can also enter their drive’s serial number into Seagate’s warranty checker tool to confirm if the drive was originally sold as part of a batch, which may indicate prior data center or enterprise use.
How Mac users can Check and Verify the usage of the HDDs:
Mac users can verify SMART data and power-on hours using Smartmontools 7.4+, Seagate’s Seatools for Linux (via a bootable drive), and third-party macOS utilities like DriveDx. Since macOS does not provide built-in SMART monitoring tools, users need to install Smartmontools via Homebrew by running:
brew install smartmontools
Once installed, users can check SMART attributes, including power-on hours (POH), by opening Terminal and running:
smartctl -a /dev/diskX
(replacing X with the correct disk identifier, which can be found using diskutil list). If the reported power-on hours appear suspiciously low, users can retrieve FARM (Field-Accessible Reliability Metrics) values by running:
smartctl -l farm /dev/diskX
This will reveal the true runtime history of the drive, even if the SMART data was manipulated to show zero or low usage.
For users who prefer a graphical interface, DriveDx is a third-party macOS tool that provides SMART data, health status, and power-on hours. However, DriveDx does not display FARM values, so Smartmontools remains the best option for deeper diagnostics.
Since Seagate’s Seatools is not available for macOS, users can create a bootable USB drive with a Linux live environment (such as Ubuntu), run Seatools from there, and check the drive’s SMART health and warranty status. Additionally, Mac users can enter their drive’s serial number into Seagate’s online warranty checker to confirm if the drive was originally part of a batch sale, which may indicate prior enterprise use.
It’s important to note that depending on your system, the directory paths and identifiers for your drives will vary significantly. So, even if 100 users all had the same hard drive model, if they deployed them in different NAS brands, desktop OSs, or even external enclosures, the directory paths and device names would be different. Keep that in mind.
Are only Seagate EXOS Hard Drives Affected?
The Exos series drives appear to be taking the brunt of the reporting here. Realistically, if this flood of dubiously classified new drives is true, then the Exos series is definitely not going to be the only drives impacted by this. Moreover, Seagate was not the only hard drive manufacturer that was pumping out large-capacity hard drives at 12TB, 14TB, 16TB, and 18TB during the peak of this particular crypto-mining industry change! I think it is only now, thanks to the correlation of reports by Heise, that any kind of through-line has been found that specifically targets one hard drive brand or model series. At best, it really comes down to the bad actors who are modifying the firmware on these drives having the financial incentive to do so on a larger scale on a different hard drive series that they happen to have their hands on. The modification process of the onboard firmware and SMART data on Seagate drives is largely identical to that of the process on WD or Toshiba hard drives, and therefore, it really once again comes down to a question of correlating reports of these fake new drives all being collected together.
How Has This Happened? How Did Used Hard Drives Enter the Supply Chain?
You might not know, but when you purchase a hard drive from your local retailer, that retailer almost certainly does not directly receive their stock of hard drives from the hard drive manufacturer in question. Ordinarily, hard drives, like a lot of electrical components, have a pre-established supply chain that retailers and e-commerce websites have to follow when selling their goods. With the exception of OEM companies who can buy from further up the chain and cloud/data centers like AWS and Google who can even buy right from the top, there are technically four layers in the supply chain of hard drives.
The first part of the supply chain is the hard drive manufacturer itself, in this case, Seagate Technology, which manufactures the hard drives at one of its production facilities in numerous locations around the world.
The next step in the supply chain is the Regional Distribution Centers (RDCs). These are the hubs where the hard drive brand sends its manufactured goods to be distributed to numerous smaller distribution centers across different countries.
The next step is wholesalers and resellers. Sometimes resellers can also act as direct-to-end-user sales points, but the lines can get blurry depending on the quantity or device in question. Nevertheless, the majority of electronics and consumables (including hard drives) cannot be sold directly from this point to an end user and instead need to be funnelled to the final step in the chain—retail shops.
Which brings us to the final step in the chain—traditional retail outlets on the high street and the e-commerce websites you choose to purchase from. These are the ones you’ll be most familiar with, and unfortunately, a lot of these are the same retailers that end users impacted by these mis-sold hard drives have as their initial point of contact.
The issue is that these used hard drives, which are being falsely marketed as new, have been introduced into the supply chain somewhere between steps two and four. Seagate has not had any involvement in their reintroduction into the supply chain. Somewhere along the line, these used drives were inserted into the system, and that is what Seagate is currently investigating. The retail outlet where an affected user purchased the drive has more than likely been completely unaware that they have been selling used drives as new. In most cases, these drives would have arrived in sealed retail packaging, and the retailers would have been reluctant to open up supposedly new products for testing, as doing so would immediately devalue the product in the eyes of their consumer and business buyer base.
Therefore, it is going to take time for Seagate to find the smoking gun and pinpoint which wholesaler, reseller, or distributor allowed these used drives to re-enter the supply chain.
Is Selling Used/Refurbished Hard Drives Illegal?
The sale of used, data center-grade, refurbished, or officially recertified drives is completely legal. Although Seagate, WD, and Toshiba would probably prefer to see the used hard drive market disappear, selling used drives is not illegal.
Many online retailers, including Amazon and Newegg, actively sell recertified and renewed drives—just as easily as brand-new ones.
The problem here is that these were used drives that were fraudulently mis-sold as brand new—and that IS illegal. In short, this is fraud, and the people selling these drives could be pursued for damages if customers lose data due to these drives failing far sooner than expected. That’s why any drive that isn’t new is required to be labeled as recertified, refurbished, or renewed. This ensures clarity for the buyer when making a purchasing decision.
That said, some sellers intentionally make it hard to determine if a drive is refurbished. For example, a Seagate IronWolf 12TB hard drive sold on Amazon’s “previously owned” listings might clearly state that it’s used—but it won’t mention that it was originally manufactured in 2017, meaning it could be 8 years old and already have tens of thousands of hours of prior use. It wouldn’t be so bad if the manufacturing date was displayed at the top of the listing, but instead, it’s buried deep in the product details. Bottom line: Selling used drives is not illegal. Selling used drives under the guise of being brand new is fraud—and highly illegal.
Is This Seagate’s Fault?
In all honesty, one could argue that Seagate is responsible for selling large volumes of high-capacity, data center-class hard drives to the original cryptocurrency farmers. However, this would be no different than selling the drives to any regular SMB, just a question of large-scale volume. Seagate is not responsible or in any way officially authorizing the reselling of its hard drives under the classification of new storage media. Additionally, the official partners that Seagate chooses to sell its goods through have almost certainly sold these drives with as much authentication between them and the distributors/resellers as possible. It could be argued that Seagate should personally step in at the supply chain level further down the chain to periodically check the health and condition of drives—much like a hard drive secret shopper—but that’s really about it. Right now, as long as Seagate commits to investigating how this occurred and acts upon what they find to ensure that mis-sold drives don’t enter the supply chain again, that’s about as far as I think this can go in terms of blaming Seagate. Realistically, we can’t lose sight of the fact that it is the fault of the bad actors who modified these hard drives in an effort to recover the original money spent on them before Chia farming collapsed. Wherever the entry point was that allowed these drives to re-enter the supply chain, that is what needs to be identified and stopped.
What Should I Do if I Believe my HDD was Missold?
If you believe that the hard drive in your NAS, server, or storage system was mis-sold to you as a brand-new drive when in fact it was heavily used, you need to contact your point of sale immediately. Tools such as Seagate’s own warranty checkerallow you to enter the serial number of your hard drive into their database checker. Regardless of whether your hard drive is still under warranty, it will still highlight whether this is an official drive or not. Additionally, if you purchased a single drive that was sold as new, but upon entering the details into the warranty checker on Seagate’s website shows that this drive was part of a larger batch, this would imply that the drive you purchased was originally included in a larger server system previously—not unlike how a food or drink product is labeled as part of a multipack and not for individual resale. If a single drive that you purchased as brand-new is listed as originally part of a multi-drive system, it is highly recommended that you contact your retailer and/or raise this with Seagate directly for further investigation.
This description contains links to Amazon. These links will take you to some of the products mentioned in today's content. As an Amazon Associate, I earn from qualifying purchases. Visit the NASCompares Deal Finder to find the best place to buy this device in your region, based on Service, Support and Reputation - Just Search for your NAS Drive in the Box Below
Need Advice on Data Storage from an Expert?
Finally, for free advice about your setup, just leave a message in the comments below here at NASCompares.com and we will get back to you.Need Help?
Where possible (and where appropriate) please provide as much information about your requirements, as then I can arrange the best answer and solution to your needs. Do not worry about your e-mail address being required, it will NOT be used in a mailing list and will NOT be used in any way other than to respond to your enquiry.
[contact-form-7]
TRY CHAT Terms and Conditions
If you like this service, please consider supporting us.
We use affiliate links on the blog allowing NAScompares information and advice service to be free of charge to you.Anything you purchase on the day you click on our links will generate a small commission which isused to run the website. Here is a link for Amazon and B&H.You can also get me a Ko-fi or old school Paypal. Thanks!To find out more about how to support this advice service checkHEREIf you need to fix or configure a NAS, check FiverHave you thought about helping others with your knowledge? Find Instructions Here
Or support us by using our affiliate links on Amazon UK and Amazon US
Alternatively, why not ask me on the ASK NASCompares forum, by clicking the button below. This is a community hub that serves as a place that I can answer your question, chew the fat, share new release information and even get corrections posted. I will always get around to answering ALL queries, but as a one-man operation, I cannot promise speed! So by sharing your query in the ASK NASCompares section below, you can get a better range of solutions and suggestions, alongside my own.
Why NAS Drives are NOT for Everyone – 5 Reasons You Do Not Need a NAS
Network Attached Storage (NAS) is often promoted as the ideal solution for data management, offering advantages like local control, redundancy, and flexible access. However, while NAS has many benefits, it is not the right choice for everyone. Depending on individual needs, alternatives such as cloud storage or Direct-Attached Storage (DAS) may provide a simpler, more cost-effective, or more practical solution. This article explores five key reasons why a NAS may not be the best choice for certain users. From the convenience of cloud storage to the high upfront costs of NAS devices, we will break down the potential drawbacks and alternative solutions that might better fit specific use cases. Understanding these factors can help users make an informed decision about their storage needs.
Disclaimer– NAS devices provide a robust and flexible storage solution, but they are not necessary for all users. Those with simpler storage needs—such as single-device backups or direct file access—may find that a Direct-Attached Storage (DAS) device better meets their requirements. External hard drives and SSDs offer straightforward, cost-effective alternatives without the complexity of network management. Cloud storage remains a convenient and accessible option, particularly for those who need remote access without dealing with hardware setup. While it comes with long-term costs and data security considerations, cloud services offer ease of use and automation that may be preferable for some users. Additionally, a hybrid NAS and cloud approach can provide the best of both worlds, allowing users to maintain local storage while leveraging cloud redundancy for added backup security and accessibility. Choosing the right storage solution depends on specific use cases, technical expertise, and long-term data management goals.
1. The Convenience of Cloud Storage is Unquestionable
One of the primary reasons a NAS may not be necessary for some users is the convenience of cloud storage. Services like Google Drive, Dropbox, OneDrive, and iCloud offer instant accessibility, making it easy to store, sync, and retrieve files from any internet-connected device. Unlike NAS, which requires setup, configuration, and ongoing maintenance, cloud storage is designed to be user-friendly. Users can simply sign up, upload files, and access them from anywhere, without needing to worry about network configurations, remote access tunnels, or firewall adjustments. This simplicity makes cloud storage an appealing option for users who want a hassle-free experience without managing hardware.
Beyond ease of use, cloud services are also optimized for redundancy and failover protection, ensuring that data remains safe and accessible even if hardware failures occur on the provider’s end. Large-scale cloud platforms have multiple data centers worldwide, meaning that even in the event of a regional outage, files remain available from alternative locations. Cloud storage is particularly advantageous for those who travel frequently or work remotely, as accessing a NAS over the internet can introduce latency, security challenges, and connectivity issues. For example, transferring large files to a NAS while on the road may require complex VPN configurations and reliable internet access, whereas cloud storage offers seamless access without any additional setup. This makes cloud storage a more practical choice for users who prioritize mobility and convenience over local ownership.
Example of the complexity of a NAS to Cloud Sync:
2. Simplicity of Direct-Attached Storage (DAS) for Single Users vs NAS is Indisputable
For individuals who primarily work from a single device, a NAS may be unnecessary and even overcomplicated. A Direct-Attached Storage (DAS) device—such as an external hard drive, SSD, or even a RAID-configured DAS—provides a more straightforward and often more cost-effective solution. Unlike NAS, which requires a network connection and some level of system administration, a DAS device simply connects directly to a computer via USB, Thunderbolt, or eSATA and is ready to use instantly. This plug-and-play functionality makes DAS ideal for users who just need additional storage or a backup solution without any complexity.
DAS also offers direct hardware integration with professional applications, making it a preferred choice for photographers, video editors, and graphic designers. Many creative professionals rely on high-speed DAS devices because they provide lower latency and faster data transfer rates than a network-based NAS. A high-speed Thunderbolt RAID array, for example, can provide much faster read and write speeds than a NAS connected via 1GbE or even 2.5GbE networking. Additionally, for users who need to transfer large amounts of data quickly, physically shipping an external drive remains a viable and often faster option than uploading terabytes of data to a NAS remotely. If a user primarily works from one computer and does not need network-based file access, a DAS setup can be a much more practical and efficient choice than investing in a NAS.
3. Cloud and DAS = Lower Power Consumption and Long-Term Operating Costs
One often overlooked factor when deciding on a NAS is its ongoing power consumption. Unlike DAS devices, which only require power when in use, a NAS typically runs 24/7, constantly consuming electricity even when idle. While modern NAS devices offer power-saving features such as scheduled shutdowns and sleep modes, they still draw more power than a simple external hard drive. This can be a concern for users in areas with high electricity costs, those who live in mobile homes, or people who rely on solar or backup power sources. Over the course of a year, the difference in power consumption between a NAS and a simple external drive can add up, making it an important consideration for budget-conscious users.
Example of Power Consumption of a 6-Bay NAS with 6x HDD and 2x SSD (Intel N305 i3 CPU):
Beyond electricity costs, there’s also the issue of long-term maintenance. Hard drives inside a NAS are designed to run continuously, meaning they wear out faster compared to drives that are powered on only when needed. Each mechanical hard drive has a limited number of operational hours before failure becomes more likely. In contrast, an external hard drive that is only used periodically for backups can last much longer. Additionally, NAS devices require ongoing software updates, security patches, and general monitoring to function optimally. For users who do not want to deal with the responsibility of maintaining a dedicated storage system, a NAS may be more trouble than it’s worth, especially when compared to simpler alternatives like external hard drives or cloud storage.
Example of Noise Level of a 4x HDD and 2x SSD NAS (Lincstation S1 NAS):
4. Cloud Mean Avoiding Vendor Lock-in and Data Migration Challenges
NAS systems operate as full-fledged computing devices with their own proprietary operating systems, which can make migrating data between different NAS brands or platforms a challenge. For example, if a user sets up a Synology NAS and later wants to switch to a QNAP or another brand, they may encounter significant roadblocks in moving their existing file structures, metadata, and system settings. Unlike traditional external storage solutions that use universal formats like NTFS, exFAT, or APFS, NAS devices often use specialized file systems optimized for their specific ecosystems. This means that simply swapping out drives between NAS brands is not always possible without extensive data transfers and reconfigurations.
In contrast, DAS devices and cloud storage solutions provide more flexibility for users who may need to migrate their data in the future. A USB hard drive can be connected to any computer with minimal effort, and cloud services typically offer built-in tools to migrate data between providers. Additionally, NAS users often rely on specific applications and configurations tied to their system, making it more difficult to transition to a different storage solution later. While there are workarounds—such as using standard file transfer protocols like SMB or FTP—these solutions require extra time and effort, which may not be practical for users who need a simple and easily portable storage option. For those who value long-term flexibility, avoiding NAS vendor lock-in may be a more prudent choice.
5. NAS = High Initial Costs and Uncertain Return on Investment for Some
Perhaps the most significant reason some users should avoid a NAS is the cost. Compared to external storage solutions, NAS devices are considerably more expensive, especially when factoring in the price of both the NAS enclosure and the hard drives required to populate it. Even budget NAS devices start at a few hundred dollars, and higher-end models with advanced features can cost well over $1,000, not including the drives. When comparing cost per terabyte, NAS drives are generally more expensive than external USB drives due to their enhanced durability and NAS-optimized firmware. For users who do not need advanced features like RAID redundancy, Docker applications, or network-wide accessibility, the extra cost of a NAS may not be justifiable.
Beyond the initial purchase, users must also consider the long-term costs associated with NAS ownership. Hard drives wear out over time and will eventually need to be replaced, adding to the overall expense. Additionally, while NAS devices provide a wide range of powerful features, many users may not fully utilize them. If someone only needs basic storage and backup capabilities, a NAS might be an unnecessary investment, and they may be better off with a simple DAS setup or cloud-based storage solution. Before committing to a NAS, potential buyers should carefully evaluate whether they will take full advantage of its features or if a more affordable and straightforward alternative would better suit their needs.
While NAS devices offer powerful features and advantages for data management, they are not always the most practical option. For users who prioritize convenience, cloud storage may be a better fit. Those who work primarily from a single device may find a Direct-Attached Storage (DAS) setup more efficient. Additionally, factors such as power consumption, vendor lock-in, and long-term costs should all be carefully considered before investing in a NAS. Ultimately, the best storage solution depends on individual requirements. A NAS can be a great investment for those who need centralized, multi-user access and advanced functionality, but it is not the only option. Evaluating storage needs based on cost, performance, and ease of use will help determine whether a NAS is the right fit or if an alternative solution would be more suitable.
Recommended NAS Solutions Based on Data Storage Needs:
Budget NAS for a Family or Small Data Storage Solution – The Synology BeeStation 4TB
Synology has clearly done their homework on the development and presentation of the BeeStation private cloud. They are targeting a whole new audience with this system, and therefore, criticisms based on experiences with their other hardware are likely to fall on deaf ears. The BeeStation is probably one of the best middle grounds I have ever seen between an easy-to-use and exceptionally easy-to-set-up private cloud system, while still managing to provide smooth and seamless features for accessing and sharing your private cloud’s storage securely. Looking at this system with a more network-savvy microscope kind of defeats the point, and I’ve tried to be fair in my assessment. The lack of LAN access by default seems a little odd, and launching the BeeStation series in this single-bay, 4TB-only fashion may be a bit of a marketing misstep, but overall, what you’re seeing here is an effectively priced and scaled private cloud system. It’s a fantastic alternative to third-party clouds and existing simplified NAS systems. With many users keeping an eye on their budgets and tightening costs, Synology, known for its premium position in the market, had a challenge scaling down to this kind of user. However, I have to applaud Synology’s R&D for creating a simple and easy-to-use personal cloud solution that still carries a lot of their charm and great software reputation. It may not be as feature-rich as DSM, but BSM does exactly what it says it will do, and I think the target audience it’s designed for will enjoy the BeeStation a great deal!
I feel like a bit of a broken record in this review, and I keep repeating the same two words in conjunction with the UniFi UNAS Pro—fundamentals and consistency! It’s pretty clear that UniFi has prioritized the need for this system to perfectly complement their existing UniFi ecosystem and make it a true part of their hardware portfolio. In doing so, it has resulted in them focusing considerably on the fundamental storage requirements of a NAS system and making sure that these are as good as they possibly can be out of the gate. To this end, I would say that UniFi has unquestionably succeeded. The cracks in the surface begin once you start comparing this system with other offerings in the market right now—which is inevitably what users are going to do and have been doing since the first indications of a UniFi NAS system were being rumored. It may seem tremendously unfair to compare the newly released UniFi NAS with solutions from vendors that have had more than 20 years of experience in this field, but for a business that wants to fully detach themselves from the cloud and wants true user-friendly but highly featured control of their network operations, comparison is inevitable!
A solid, reliable, and stable system that will inevitably grow into a significant part of most UniFi network users. The problem for many, however, is going to be how long it takes UniFi to reach that point where this system can be software competitive with its rivals. If you are a die-hard UniFi ecosystem user and you are looking for stable, familiar, easy-to-use, and single ecosystem personal/business storage, you are going to love everything about the UniFi UNAS Pro. But just be aware that this is a system that prioritizes storage and is seemingly at its best within an existing UniFi network architecture, and if removed from that network, you are going to find a system that at launch feels quite feature-light compared with alternatives in the market. Pricing for the system is surprisingly competitive, given its position as the launch NAS—unusual when you look at the pricing philosophy of numerous larger-scale systems like the UniFi Dream Machine and UNVR from the brand.
Hopefully, over time we are going to see UniFi build upon the solid fundamentals that they have designed here and create a more competitive solution on top of this. I have no doubt that UniFi will commit to software and security updates for this system, but it would be remiss of me to say that this is the best NAS solution for your network. Right now, it just happens to be the most user-friendly and most UniFi-ready one. Bottom line: this will probably tick a lot of boxes.
The TerraMaster F4-424 Max is a standout NAS system in TerraMaster’s lineup, offering impressive hardware specifications and solid performance at a price point of $899.99. For users who need high-speed data transfers, intensive compute power, and flexibility in storage configurations, the F4-424 Max is an excellent option. The combination of the Intel i5-1235U CPU, dual 10GbE ports, and PCIe Gen 4 NVMe support ensures that the NAS can handle even the most demanding tasks, whether it’s virtualization, media transcoding, or large-scale backups.
That said, when compared to the F4-424 Pro, which is priced at $699.99, the Max model offers significantly more networking power and potential for speed. However, the Pro model still provides fantastic performance for most home and small office users, making it a more budget-friendly alternative for those who don’t require 10GbE or advanced NVMe functionality.
In terms of software, Synology DSM and QNAP QTS are still more evolved, offering richer multimedia experiences and better integration for business applications. However, TOS 6 continues to improve with every iteration, closing the gap between TerraMaster and these larger players. With new features like TRAID, cloud sync, and improved snapshot management, TOS is becoming more user-friendly and robust. For users prioritizing performance, flexibility, and future-proofing, the F4-424 Max is a strong contender and offers excellent value for money. While there are areas where TerraMaster could improve, such as the lack of PCIe expansion and front-facing USB ports, the F4-424 Max delivers on its promise of high performance and scalable storage solutions.
In summarizing the capabilities and potential of the QNAP TVS-h874T NAS, released as a late 2023 update to its predecessor, it’s clear that this system represents a significant leap forward in desktop NAS technology. Priced over £2500, it’s a substantial investment, designed with future-proofing in mind. The TVS-h874T not only maintains the longevity and high-end status of the TVS-h874 but also brings to the table enhanced direct data access through Thunderbolt 4 integration. This advancement, supporting IP over Thunderbolt protocol, significantly boosts connectivity and speed, making the system an ideal choice for demanding tasks such as 8K video editing and high-performance computing needs in business environments. However, the question of whether Thunderbolt NAS is the right fit for all users remains. For those requiring high-speed, multi-user access and scalability, the TVS-h874T is a strong contender. Its support for the latest PCIe 4 standards ensures compatibility with high-performance upgrades, reinforcing its position as a future-proof investment. The software, featuring QTS and QuTS, might require some acclimatization, particularly for those familiar with simpler systems like Synology’s DSM. Yet, the benefits, especially for ZFS enthusiasts, are undeniable, offering advanced RAID management and a plethora of applications and services.
The TVS-h874T’s stance on open hardware and software compatibility is a significant plus in an industry increasingly leaning towards proprietary systems. It accommodates a range of third-party hardware and software, adding to its versatility. In the face of growing concerns over NAS security, the system is well-equipped with comprehensive tools and settings for enhanced security and data protection, addressing the pressing issue of ransomware attacks. In conclusion, the QNAP TVS-h874T stands out as an exceptional choice for businesses and power users who require a robust, scalable, and secure NAS solution. It offers an excellent balance of price, performance, and features, making it a worthy investment for those seeking top-tier server-side capabilities. However, for users with simpler storage needs or those not requiring the advanced features of Thunderbolt NAS, traditional Thunderbolt DAS devices might be a more suitable and cost-effective option. The TVS-h874T, with its advanced capabilities, is undoubtedly a powerhouse in NAS technology, but its full benefits will be best realized by those whose requirements align closely with what this advanced system has to offer.
The TerraMaster F4-424 Pro NAS is a powerful 4-bay turnkey NAS system that offers competitive pricing and robust hardware. With its Intel i3 N300 CPU, 32GB DDR5 memory, and 2x M.2 NVMe SSD bays, it provides excellent performance for various tasks, including Plex media streaming and hardware transcoding. In terms of design, the F4-424 Pro features a sleek and modern chassis with improved cooling and hot-swapping capabilities. It represents a significant step forward in design compared to TerraMaster’s older 4-bay models, aligning more closely with industry leaders like Synology and QNAP. The addition of TOS 5 software brings significant improvements in GUI clarity, backup tools, storage configurations, and security features. However, the absence of 10GbE support and limited scalability in this regard might disappoint advanced users. Additionally, while the hardware exceeds Intel’s memory limitations, full utilization of the 32GB DDR5 memory is reliant on Terramaster’s own SODIMM modules, and this could be a limitation for some users. Overall, the TerraMaster F4-424 Pro NAS offers excellent value for its price, with competitive hardware and software features. It positions itself as a strong contender in the 4-bay NAS market, particularly for those looking for an affordable yet capable private server solution.
This description contains links to Amazon. These links will take you to some of the products mentioned in today's content. As an Amazon Associate, I earn from qualifying purchases. Visit the NASCompares Deal Finder to find the best place to buy this device in your region, based on Service, Support and Reputation - Just Search for your NAS Drive in the Box Below
Need Advice on Data Storage from an Expert?
Finally, for free advice about your setup, just leave a message in the comments below here at NASCompares.com and we will get back to you.Need Help?
Where possible (and where appropriate) please provide as much information about your requirements, as then I can arrange the best answer and solution to your needs. Do not worry about your e-mail address being required, it will NOT be used in a mailing list and will NOT be used in any way other than to respond to your enquiry.
[contact-form-7]
TRY CHAT Terms and Conditions
If you like this service, please consider supporting us.
We use affiliate links on the blog allowing NAScompares information and advice service to be free of charge to you.Anything you purchase on the day you click on our links will generate a small commission which isused to run the website. Here is a link for Amazon and B&H.You can also get me a Ko-fi or old school Paypal. Thanks!To find out more about how to support this advice service checkHEREIf you need to fix or configure a NAS, check FiverHave you thought about helping others with your knowledge? Find Instructions Here
Or support us by using our affiliate links on Amazon UK and Amazon US
Alternatively, why not ask me on the ASK NASCompares forum, by clicking the button below. This is a community hub that serves as a place that I can answer your question, chew the fat, share new release information and even get corrections posted. I will always get around to answering ALL queries, but as a one-man operation, I cannot promise speed! So by sharing your query in the ASK NASCompares section below, you can get a better range of solutions and suggestions, alongside my own.
When it comes to the hardware in your network environment, UniFi has always been one of those companies where you are either fully invested in practically every network appliance in its ecosystem or have nothing to do with it. A UniFi ecosystem is designed to allow you to easily and efficiently manage your entire network environment. In recent years, the brand has expanded beyond simple network appliances into a lot more IoT and client-edge tech found in homes and offices, further expanding this ecosystem. In the last year alone, we’ve seen them double down on surveillance, introduce network-attached storage, open up third-party hardware integration, and more. Today, I want to discuss their latest router, the UniFi Dream Router 7 (UDR 7), a new scaled-up 10G and WiFi 7 refresh of their existing WiFi 6 desktop-style router. Arriving at the mid-range price of around $279, it sits comfortably between affordable entry-level WiFi 7 routers from the likes of TP-Link while significantly undercutting pricing of bigger network routers from Amazon, Netgear, and Asus. Arriving with the UniFi Network and Router operating systems, as well as support for numerous UniFi software appliances, the UDR 7 marks a significant step up for comparatively domestic routers as we enter the seventh generation of wireless connectivity. Can this router be used in your network alongside non-UniFi equipment? And will this router serve you long-term as your client hardware scales up in line with modern tech innovation? Let’s find out.
UniFi Dream Router 7 Review – Quick Conclusion
As appealing as the UniFi router and network software that this system is bundled with are, the main praise I have to give the UDR 7 is that everyone is going to feel the benefits of this router in their network at this price point. The small compromises it has compared to the previous UDR system (such as fewer PoE ports) are immediately outweighed by its versatility, which would be hard to find at a better price elsewhere. The fact that all LAN ports are 2.5G and that the two WAN/LAN ports are 2.5G and 10G SFP+ respectively puts this router massively ahead of most competitors in the sub-$300 market. Equally, support for the UniFi Protect surveillance software and the included WD Purple SD card storage are nice extras that you don’t commonly find elsewhere—let alone the inclusion of a PoE 2.5G port. The router and network management software is, of course, quintessentially UniFi in its presentation. Striking a balance between usability and information is a tough challenge, and the UniFi software almost succeeds. It excels in its presentation and management via the mobile app, though the desktop UI could be a touch more intuitive. How could you make wireless and wired network management truly user-friendly? That said, the UDR 7 is a genuinely WiFi 7-ready router, offering 2×2 6GHz coverage and taking advantage of all the frequency and bandwidth benefits afforded to true WiFi 7 6GHz clients. Add a simple $20 USB WiFi 7 adapter to your system, and you can immediately enjoy base-level 2.8Gbps wireless connectivity, scaling this up substantially with the right WiFi 7 wireless NICs. Even if you’re not in love with the UniFi software platform or handing management of your services over to Ubiquiti’s remote services, you can still set up the device without a UI.com account. You do not need to deploy it with UniFi Network equipment, and VPN and encrypted protocol services can still be managed via popular third-party options if preferred.
Buying a router for your home or business instead of relying on the one supplied by your ISP can often feel like an unnecessary expense. However, considering the price point and the network advantages the UDR 7 provides, I believe this system is worth it. Some of its services might require additional polish over time, and greater network capabilities on this router will be realized as technology progresses, but I wholeheartedly recommend the UDR 7 for the majority of setups.
BUILD QUALITY - 10/10
HARDWARE - 9/10
PERFORMANCE - 9/10
PRICE - 8/10
VALUE - 9/10
9.0
PROS
WiFi 7 Support – Offers Genuine 6GHz connectivity with 320MHz channels, enabling faster speeds and lower latency. Multi-Gig Networking – Includes three 2.5GbE LAN ports and a 10GbE SFP+ WAN/LAN port, making it highly future-proof. Comprehensive UniFi Software – Provides robust network management features, including VLANs, QoS, IDS/IPS security, and VPN support. Integrated UniFi Protect Support – Comes with a pre-installed 64GB WD Purple SD card, allowing local video storage for security cameras. Flexible WAN/LAN Configurations – Supports dual WAN for failover or load balancing, or repurposing the 10GbE SFP+ port as LAN. High Customization & Security – Offers advanced firewall controls, application-aware filtering, and in-depth traffic analytics. User-Friendly Mobile App – Easy setup and management via the UniFi mobile app, with intuitive controls and real-time monitoring. No UI.com Account Required – Can be set up locally without requiring an online UniFi account, providing more control over network privacy.
CONS
Limited PoE Support – Only includes one PoE-enabled 2.5GbE port, which may be a drawback for users looking to power multiple UniFi cameras or access points. 6GHz Band Availability Varies by Region – While WiFi 7 delivers significant improvements, the 6GHz spectrum and 320MHz channels may not be fully available in all areas, limiting real-world performance. Not the Most Budget-Friendly Option – Although competitively priced for a WiFi 7 router, there are still more cost-effective alternatives on the market, especially for users who don’t need UniFi’s ecosystem.
The UniFi Dream Router 7 arrives in the same pretty and aesthetically eye-catching packaging as most UniFi products do. The fold-out cardboard packaging does a great job of protecting the device in transit while still looking absolutely great.
The unit is held tightly in custom multi-part card plus foam, and the power cable and small accessory kit are located in their own compartment at the bottom. I say accessory kit, but what there is is simply a two-pin power connector, a small manufacturer’s warranty booklet, and a pin. That’s really it. The router is designed with the software already preloaded in the system and is pretty much good to go as soon as you plug it into the power and connect your existing internet connection into an SFP RJ45 WAN port.
It is very different in design to pretty much every other router in the market, although a touch similar to that of the Apple or Amazon routers. UniFi has bolstered the existing design of the previous router/capsule style of devices and has simply scaled things up a little bit here with improved cooling and venting. It’s actually surprisingly compact for the amount of connectivity it has to offer.
The front of the system is also remarkably understated, though it does feature a small LCD panel that gives real-time information about active traffic utilization on the system. This is not exactly groundbreaking, but it does add to the aesthetic style and is arguably more than a lot of routers give you in the market anyway.
Flipping the device around shows us a bevy of network connections, and I’ll be honest—what there is to see is (brackets mostly closed brackets) absolutely fantastic for a router at this price, but more on that in a bit. The base of the system features a WPS button for easy connections just like you would find on the majority of other routers, as well as additional ventilation to keep things cool when the system’s in operation. I’m not really in love with the idea of the router not featuring much in the way of LEDs, and I do wonder about the temperatures of this system when you’re utilizing all four 2.5G connections and the 10G at once (not to mention all of those antennas running 6GHz connections). Certainly, I might have my reservations about deploying a router like this in a closed cupboard or non-ventilated location.
Instead of individual LEDs that denote connection, health, and internet health, the system instead uses a rather attractive ring color system at the top of the router that denotes the health and connectivity of an internet connection. Again, I think I would much rather have a little bit more front-mounted visualization of what’s going on with the individual connections rather than the streamlined LCD and internet LED indicator at the top, but I also know that, as more of a network systems addict, I do not represent most users. All in all, the design is exactly what you would expect from a UniFi product and does manage to cram a lot in while still maintaining a very unique and appealing aesthetic. However, there is quite a lot of hardware packed under the bonnet here; let’s discuss the ports and connectivity on this system.
UniFi Dream Router 7 Review – Ports and Connections
The previous UniFi Dream Machine Router stood out from a number of other WiFi 6 routers in the market thanks to its affordable price point and support for 2.5G WAN and PoE network connections. Now, the new UDR 7 scales things up in almost every way—but the one area it doesn’t improve upon may annoy some. For now, though, let’s discuss the default network connectivity.
There are five physical ports on the rear of the UniFi Dream Router 7. There are four copper 2.5G connections and a 10G SFP connection. Three of the 2.5G connections are dedicated LAN ports, each of which supports up to 279MB per second active connectivity.
There is then a further 2.5G optional WAN or LAN port, also in copper, that can have its utilization configured in the UniFi router software as needed. With an increase in greater-than-gigabit speeds around the world, alongside traditional ISP routers arriving with 2.5G ports for these higher-speed services, the fact that the default is 2.5G is going to be hugely appealing.
However, the UDR 7 also benefits from the inclusion of a 10G SFP connection, much like a number of premium-priced WiFi 7 routers, but at more than half the price. This is particularly useful as it too can be set as needed as a WAN port or a LAN port. That means the user can decide whether they want to directly pipe a high-speed fiber connection straight into the router to be shared across the other four 2.5G connections (covering the bulk of that 10G input), or leave this port as a LAN port for 10G NAS connectivity. That’s pretty useful and definitely advantageous in terms of scalability and long-term future-proofing as internet services in your home or business increase over time and the network capability of the appliances you buy likewise improves. This is a fantastic base-level network connection setup on the UDR 7. Once again, at $279, it makes it particularly appealing.
However, a little bit of good news/bad news is that, although the UDR 7 features a PoE port, it only features a single PoE copper output compared to the two PoE connections of the previous generation router. As the UDR 7 supports the installation of the UniFi Protect surveillance software (something we’ll touch on later), there are definitely going to be users a little disappointed that the ease of deploying PoE cameras directly into the router has been effectively halved here. This is especially disappointing now that UniFi Protect supports third-party PoE cameras too. Likewise, with an increase in PoE-ready accessories and devices from UniFi being released, some may find it a bitter pill to swallow that this new router has diminished this rather unique selling point of the previous generation UniFi router.
One interesting extra feature of the UniFi Dream Router 7 is that it features a microSD slot that arrives pre-populated with a 64GB card. This card is used in conjunction with the previously mentioned surveillance services and means that this router serves adequately as an alternative to a UniFi Dream Machine Pro or UNVR (albeit on a much smaller storage scale) for recording domestic surveillance cameras and keeping your footage. Another small note here: no one would have blamed UniFi if they’d included domestic SD cards that just happened to have the UniFi logo on them. Indeed, I don’t think anyone would have judged UniFi harshly if they hadn’t included an SD card at all! Nevertheless, this WiFi 7 router not only includes an SD card at no additional cost, but it is a WD Purple surveillance-designed SD card. Fair play.
In terms of WiFi connectivity, the router arrives with support for the 2.4GHz, 5GHz, and WiFi 7-specific 6GHz bands at 2×2. Equally, thanks to the opening of the 320MHz frequency blocks and multi-stream capabilities of WiFi 7, individually connected WiFi 7-ready appliances have the potential to not only exceed legacy physical gigabit LAN connections but achieve multiple times that speed.
For example, utilizing a simple budget $20 USB 6GHz WiFi 7 adapter from AliExpress, I was immediately able to create a direct 2.8Gbps WiFi connection between my Windows 11 laptop and the UniFi Dream Router 7. That is even greater than the physical 2.5Gbps connections on the router.
Let’s dig a little deeper into the wireless capabilities of this router and what it can and cannot do.
UniFi Dream Router 7 Review – Internal Hardware
The UniFi Dream Router 7 is built with a quad-core ARM Cortex-A53 processor clocked at 1.5GHz, paired with 3GB of DDR4 memory. This hardware configuration supports advanced networking functions such as multi-gigabit data throughput, VLAN segmentation, and application-aware security features. The DDR4 memory ensures improved performance and energy efficiency compared to older memory standards, which is crucial for delivering consistent and reliable network performance under load. The router’s CPU architecture is well-suited for multitasking, enabling it to handle multiple operations simultaneously without significant performance bottlenecks. In terms of real-world performance, the quad-core processor and 3GB of memory enable the Dream Router 7 to meet the demands of modern home and small-business networks.
The processor handles resource-intensive tasks like VPN connections, quality-of-service (QoS) adjustments, and advanced intrusion detection systems (IDS) efficiently. The ample memory capacity supports features such as traffic segmentation, advanced firewall configurations, and a high number of concurrent devices, especially over WiFi 7, which allows for faster speeds and improved device management compared to previous wireless standards. When compared to the UniFi Dream Router with WiFi 6, the newer model provides notable hardware enhancements. The older version includes a dual-core processor and 2GB of DDR4 memory, which are sufficient for many home networks but may struggle with more complex setups or environments with multiple high-bandwidth devices. The Dream Router 7’s additional CPU cores and larger memory capacity ensure better scalability and smoother performance when running advanced networking tasks or handling a larger number of connected devices. This makes the newer model more suitable for users with high-performance requirements or future-proofing in mind.
Feature
UniFi Dream Router 7
UniFi Dream Router (WiFi 6)
Processor
Quad-Core ARM Cortex-A53, 1.5GHz
Dual-Core Processor
Memory
3GB DDR4
2GB DDR4
WiFi Standard
WiFi 7 (802.11a/b/g/n/ac/ax/be)
WiFi 6 (802.11a/b/g/n/ac/ax)
MIMO Configuration
2×2 (2.4GHz, 5GHz, 6GHz)
2×2 (2.4GHz, 5GHz)
Max Throughput
2.4GHz: 688Mbps
5GHz: 4.3Gbps
6GHz: 5.7Gbps
2.4GHz: 600Mbps
5GHz: 2.4Gbps
LAN Ports
3x 2.5GbE (1 PoE)
4x 1GbE
WAN Port
1x 2.5GbE / 1x 10GbE SFP+
1x 1GbE
Storage
64GB SD Card (included)
No pre-installed storage
The improvements in the UniFi Dream Router 7 align with the growing needs of users who demand robust network performance, advanced features, and support for emerging technologies like WiFi 7. Its enhanced CPU and memory configuration allows for better multitasking, improved throughput, and reliable operation in demanding environments. These hardware upgrades ensure the router is capable of handling both current and future network demands efficiently.
UniFi Dream Router 7 Review – Software and Controls
Realistically, no one should be spending inordinate amounts of time using the software that your router arrives with – that’s just a simple fact. Indeed, you want you router (or any network appliance) to just do it’s job! Therefore talking about just how good the UniFi network software is, and how the UniFi Dream Router 7 capitalized on it, is going get a mixed reaction depending on your own level of network knowledge and custom requirements. I will say straight away though that you will really, REALLY struggle to find a more capable and flexible router software at this price point. You will struggle to find ANY setting, config, adjustable parameter of control measure not included with the UDR7. First off, there is the mobile application. As the UDR7 hosts the UniFi network software, ALOT of the iOS and Android official UniFi applications are supported by the UDR7.
Firs time setup of the router using the mobile application (you can use a desktop machine with your web browser if you prefer of course) is incredibly straight forward. The Router can be found via the local area network or Bluetooth within 2 minutes of it’s first power-on. One big misconception (I was guilt of this too a while back) was that you have to register a UI.com account online in order to use UniFi appliances. This is NOT true. You can set the device up without a UI account (and even WITHOUT an internet connection) and doing so just needs to you create a local administrator account. It is recommended to use a UI account of course, as it allowed for easier comms and access for your larger Unifi network, but it is by no means compulsory. You can also create a system backup (with your config data of users, settings, SSIDs, etc) and backup online if you choose – and then easier pull this backup if you wish during initialization easily.
Upon creating local credentials or resisting an online account, the router performs an initial internet performance test and then goes about setting up your router. Much like other recent UniFi releases, the system has a ‘gamer’ style installation screen that shows tips and guides on how to get the most out of your router – very rare in a router I will say.
The setup process takes around 2-3 minutes and after that, you have pretty much FULL control and access to the Router’s configuration from your mobile phone. You can definitely tell that UNiFi have put the hours in with regard to the UX of the mobile application. Routers (and switches for that matter) are NOT easy systems to try and simplify – let along ocndence in a compact mobile UI. However they really have excelled in the latest version of their software.
Management of individual devices on the network are all presented intuitively in the app, and alongside their position/priority/bandwidth/consumption being presented, you can also use the app to institute controls and rules for 1, some or all devices on the fly – with instant implementation. Again, it’s no the fact that you can ‘do’ this that I am impressed by, it is the ease and intuitive way it is presented in a mobile app.
The same applies to the physical connections and wireless connections on the UDR7 itself, with full remote control with the app to bridge, negotiate, failover, vLAN, disable, etc any port easily – as well as create new SSIDs, assign channels and push client devices around on the router side in 3-4 clicks. All of this is performed responsively and easily in the app.
On the subject of client devices, let’s discuss that WiFi 7 support. WiFi 7 opens up ALOT of performance and general bandwidth advantages. WiFi routers and client devices have been around now for around 10-12 months, as well as the increase in availability globally of greater than Gigabit internet services. Most internet service providers have already a router with their services – but not many provide WiFi 7 routers with their services, even at greater than gigabit speeds. So, what is the advantage? For the quicker (ish) version, watch my video below.
Now, you might well not have any devices right now that are WiFi 7, but plan on upgrading to WiFi 7 at some point in the further over a PCIe upgrade card. Even if you are using a system that lacks a PCIe upgrade clot, you can get small m.2 upgrade cards for a WiFi 7 / 802.11be upgrade for as little as $15-20 here. Hell, you do not even need to open up your system, as you can now get WiFi 7 to USB adapter upgrades for as little as $25-30, which is exactly what used when testing the router with my Windows 11 laptop for the earlier testing of the UDR7.
The USB-to-WiFi 7 Adapter I used in my testing of the UDR7 was this one HERE on Aliexpress.
This USB to WiFi 7 adapter allowed for immediate 802.11be connectivity between my laptop and the UniFi Dream Router 7, over the now available 6Ghz band. Although there is more to WiFi 7 and this router than just that additional frequency. tHE udr7 SUPPORTS 2.4Ghz and 5ghz (just like all WiFi 6 and 6E routers), but crucially alongside the 6Ghz band allowing for more active concurrent connections, you are also able to take advantage of 320Mhz bandwidth (till now WiFi 6/6E only allowed for up to the 160Mhz connections). This means that you have a greater bandwidth per connection – though you can only have a finite amount of connections at 320Mhz at once. This is COMBINED with WiFi allowing for overlapping connections too and 1 device enjoying multiple connections at once.
This means that not only can you match the speed of a normal wired gigabit connection, but you can ABSOLUTELY SMASH IT! As you can see below, using this USB adapter on my regular windows laptop, connecting to the UniFi Dream Router 7 over the 6Hz band – I was able to hit 2.8Gb/s wireless connectivity!!! That is even faster than using one of the physical 2.5GbE connections on the UDR7.
It’s worth remembering though that WiFi 7 is NOT perfect and although it presents a lot of benefits for bandwidth improvements, reduced latency and increased encryption options, support of the wider frequencies and abilities of a larger WiFi 7 populated network are still a little ‘early days’.
By that, I mean that although you can hit high performance with 320Mhz connections, the actual radio frequency opened up right now (depending on your region) is pretty slim. The UDR7 router DOES show you the full radio spectrum, separated dynamically with each 20/40/80/160/320Mhz block that is spread across 2.4/5/6Ghz – but ALOT of it is still unavailable to use in many regions.
These limitations are likely going to reduce over time and, therefore you have to look at a decent % of the WiFi capabilities of the UniFi Dream Router 7 as ‘future proofing’ – but just keep in mind that although you can deploy ALOT of wireless (and wired) devices in a UDR7 managed environment, those peak 802.11be/WiFi 7 bandwidth improvements are going to be shared only by a few client devices – in reality the real benefits are going to be felt with the opening up of the 6Ghz frequency allowing for more devices to be spread over all three frequencies and bands at 80/160Mhz.
Anotehr note to keep in mind is that the 6Ghz band has a shorter area of effect than 5Ghz (which likewise has a shorter area than WiFi 5). So WiFi7 is at it’s best in closer proximity without walls – more as a cable alternative if you are in the same areas as your UniFi router. But when I connected to a 10GbE NAS (connected to the 10GbE port of my UDR7), I was able to hit 187MB/s write easily (though read performance was oddly inconsistent – possibly related to the NAS, still investigating – TBC) in CrystalDiskMark.
Likewise, similar testing with the WiFi 7 USB Adapter, through the UDR7 and at the 10GbE connected NAS hit 260MB/s+ easily. Once again, I would have easily respected this if I had been connecting with the NAS using the 2.5GbE ports – but I am hugely impressed that I was able to hit this benchmark over a WiFi connection (thanks to that 2.8Gbps 6Ghz setup). Respect!
Additionally it is very easy to monitor the position, WiFi coverage, Channel and performance of any device connected to the UDR7 controller software. Also allowing you to create rules o the fly to automatically manage them later as/when devices arrive.
These same controls also extend all the way down to the ISP input of the UDR7 AND IF YOU HAVE MULTIPLE uNIfI AP/Nodses in your setup, can control how/where bandwidth is allocated and the priority of devices/nodes that are unique to your own deployment.
The dashboard features a grouped UI and analytics overview that allows you to see the price traffic that is going into a physical LAN, grouped VLAN or just a single devices on the network – allowing you to see the sites/services/geo data in real time too!
And likewise as before, you can extent these analytics all the way to the root UDR7 router to see EVERYTHING happening in realtime in your network and internet connectivity.
Blacklisting (and whitelisting occasionally) or certain websites is also easy to action manually when needed too – or you can import an existing database of ‘bad’ site lists directly into the UDR7 to simplify the process.
Once rules, priorities, orders of services and limits have been created, you can then apply them to individual devices, networks, groups, vLANS, etc – even to a physical LAN port if needed. These rules are completely customizable and if 1 parameter is changed on the fly, it immediately actions across all selected devices.
It’s also worth highlighting that UniFi has its own enterprise user identity service (‘Identity Endpoint’) that you can apply to devices if you want to ensure that connected devices on the LAN or WAN are truly secure (client auth tools on each device) and this extends to the VPN and UniFi network client device access too.
I also should stress that although the UDR7 seems like a very, VERY proprietary router – UniFi do NOT lock you into having to create an account with them or use only their services. You can set the system up for LOCAL ONLY management and control if you choose. Or even hybrid the two and create 1 secure ‘Identity Endpoint sys admin’, but others are ‘local’ only – nice balance tbh.
And new users (super user or billy basic!) can be created, modified and deleted at any time!
Control and configuration of the UDR7 are very straight forward and there are pretty high end configuration options in the backend of the system to control both the local network setup, as well as WiFi connectivity out the box (or added later in the case of systems like the UCG Fiber via the U7/U7 Pro/U6).
And professional SI’s/Technicians can set the system to ‘truly open’ if they wish, and this can be securely controlled as needed. This allows for opening up frequencies in the case of a WiFi setup down the road and advanced settings related to antenna gain/adaption.
The system configuration and control are surprisingly extensive for a $279 router and puts it well, well into the realms of an enterprise-grade solution, despite its Prosumer/SMB price point.
Unsurprisingly, the UDR7 has internet speed test tools (either using the native web browser GUI or the WiFiman application for Android/iOS).
But its goes further, with the ability to monitor the packet management in your network (covered earlier) to such as extent that you can even block the server calls to specific sites/vendors that are going through the UniFi manager and block them SPECIFICALLY. Eg, want to keep google services, but NOT YouTube (either for work/professional reasons, or because of your kids homework deadline?) – you can do that REALLY easily.
And you can apply these rules easily and analytics with ease via the topographical network monitoring window. So you can visually see the devices in the network, then apply the rules, in case a new device gets sneakily added to circumnavigate any limits/restricts in palce.
And if you see a sudden spike in internet use, you can (in seconds) isolate the device that is causing it AND see what it is – allowing yo to block/monitor as needed.
Equally, you can set some pretty extensive security provisions to pre-emptively kick in when an unknown device arrives on the scene, or if an existing device in the network begins to be suspicious.
The same goes for creating day 1/100 rules for port forwarding, traffic management and Firewall rules. All of this is HUGELY customizable and most pages in the UniFi GUI feature both ‘simple/easy’ views, as well as much more complex advanced views as needed at the top of each page.
The multiple LAN ports can also be scaled up/down as needed if your existing network is not quite ready for the full network connectivity of the UDR7 too.
And thanks to the UDR7 featuring multiple WAN ports, you can decide how you want to handle multiple ISP services into your home/business, to separate/combine/balance between them with ease across your connected devices.
Additionally, each WAN port can be adjusted to a ‘WAN’ or ‘LAN’ roles as needed – even disabled. So, whether it is as a failover internet connection, or that you want to free up that 10GbE port for use as a LAN – The choice is yours!
Also, as mentioned earlier, as the system supported internal storage via the slot, you can go ahead and run UniFi Protect surveillance software too – as well as as an additional switch to the available LAN ports, for cameras or add a camera to the POE port.
There are actually several different surveillance, communications, display or smart appliances in the UniFi portfolio that can be installed on the internet storage drive + also means you have more scope for that POE ready port.
It gets to a point (perhaps) that there are TOO many security and configuration options, and people looking for just a router to ‘just do it’s job’ will be somewhat overwhelmed. Most of the important settings are already set pretty well, but I never the less recommend first time buyers take the time to explore the configuration options present in order to better understand what they are buying here in terms of it’s abilities to protect your network and internet services.
This extends right the way down to the more advanced prevention and intrusion protection measures (Dark Web blocking too). Again, pretty advanced for many, but take the time to look through them if you purchase the UDR7.
And if in doubt, you can use the UniFi Teleport VPN service to anonymize your site-to-site exchanges (again, very ‘first party’ and more about SD-WAN level stuff, but does form part of the purchase here).
Also, keep in mind that the UDR7 has the option to create Airgaps in it’s wired network AND WiFi connectivity (if you want to add that) that allows you to create automated access times – especially useful for businesses who want to lock down access outside of the usual 9-5 operational hours.
If you want to use WiFi services, yo can create multiple SSIDs of varying degrees of access – and yes, all the controls on security, speed, antenna, frequency, vLAN, etc are all present here too.
When creating those VLANS, you can add specific physical ports, IDs, WiFi APs etc to that vLAN to segregate your network as securely as possible.
And from there you can adjust the vLAN configuration in terms of it’s smooth operation and security directly from the network management panel (as well as view all active vLANS on one page if needed to see how they interact/clash + show each device you have moved in/out of them easily.
And again, all packet management/monitoring are available within the vLAN if you need.
If this all sounds tremendously intimidating, there is a much, MUCH easier 1 panel view in the ‘Insights’ tab that just shows each current network branch and it’s connections/clients in a list format.
Not good enough? How about a global view that shows the data packet exchange in real time with regard to each region (i.e worried that your data is being harvested to an overseas location, this will show you which countries are currently connected with on your UDR7 for upload/download (websites? server? It’s easy to check and find out here!).
Bottom line – the bulk of the UniFi Control Software here is available on the majority of UniFi Router, Express, Cloud Gateway and Dream Machine devices – but the EXTENT to which you can use it is heavily dependent on the device you buy. In the case of the UDR7, you have a fantastic balance of Day 1 control sure, but you have an even better management and scalability on the system for when your ISP services double/triple, as well as the number of devices in your network expand.
UniFi Dream Router 7 Review – Conclusion and Verdict
The UniFi Dream Router 7 (UDR 7) is a well-rounded offering that brings WiFi 7 connectivity, multi-gig networking, and UniFi’s robust software ecosystem into a single package. Its combination of 2.5GbE LAN ports, a 10GbE SFP+ WAN/LAN port, and built-in UniFi network management tools make it a compelling option for users looking to future-proof their network without stepping into enterprise pricing. Features such as VLAN segmentation, VPN support, and content filtering provide a high level of customization for both home and small business users. However, the router’s design choices—such as the removal of an additional PoE port from its predecessor—may limit its appeal for those heavily invested in UniFi’s surveillance ecosystem.
While the UDR 7 shines in many areas, it is not without drawbacks. The router’s software, while feature-rich and highly configurable, may be overwhelming for users who simply want a plug-and-play experience. The reliance on UniFi’s ecosystem means that those who prefer third-party integrations may not fully benefit from its capabilities. Additionally, despite its strong WiFi 7 performance, the real-world benefits of the 6GHz band will depend on device compatibility and regulatory limitations, which are still evolving. The absence of more detailed LED indicators and the reliance on a single PoE port may also be seen as minor inconveniences for users who expected more from this mid-range offering.
Overall, the UniFi Dream Router 7 offers an excellent balance of performance, features, and pricing, making it a solid choice for users looking to upgrade to WiFi 7 and multi-gig networking. Its strong hardware, extensive software options, and future-proofing potential make it a standout option in the sub-$300 price range. However, its best value is realized within a UniFi-centric network, and those seeking broader third-party compatibility or simpler setups may need to weigh their options carefully.
PROS
CONS
WiFi 7 Support – Offers 2×2 6GHz connectivity with 320MHz channels, enabling faster speeds and lower latency.
Multi-Gig Networking – Includes three 2.5GbE LAN ports and a 10GbE SFP+ WAN/LAN port, making it highly future-proof.
Comprehensive UniFi Software – Provides robust network management features, including VLANs, QoS, IDS/IPS security, and VPN support.
Integrated UniFi Protect Support – Comes with a pre-installed 64GB WD Purple SD card, allowing local video storage for security cameras.
Flexible WAN/LAN Configurations – Supports dual WAN for failover or load balancing, or repurposing the 10GbE SFP+ port as LAN.
High Customization & Security – Offers advanced firewall controls, application-aware filtering, and in-depth traffic analytics.
User-Friendly Mobile App – Easy setup and management via the UniFi mobile app, with intuitive controls and real-time monitoring.
No UI.com Account Required – Can be set up locally without requiring an online UniFi account, providing more control over network privacy.
Limited PoE Support – Only includes one PoE-enabled 2.5GbE port, which may be a drawback for users looking to power multiple UniFi cameras or access points.
6GHz Band Availability Varies by Region – While WiFi 7 delivers significant improvements, the 6GHz spectrum and 320MHz channels may not be fully available in all areas, limiting real-world performance.
Not the Most Budget-Friendly Option – Although competitively priced for a WiFi 7 router, there are still more cost-effective alternatives on the market, especially for users who don’t need UniFi’s ecosystem.
This description contains links to Amazon. These links will take you to some of the products mentioned in today's content. As an Amazon Associate, I earn from qualifying purchases. Visit the NASCompares Deal Finder to find the best place to buy this device in your region, based on Service, Support and Reputation - Just Search for your NAS Drive in the Box Below
Need Advice on Data Storage from an Expert?
Finally, for free advice about your setup, just leave a message in the comments below here at NASCompares.com and we will get back to you.Need Help?
Where possible (and where appropriate) please provide as much information about your requirements, as then I can arrange the best answer and solution to your needs. Do not worry about your e-mail address being required, it will NOT be used in a mailing list and will NOT be used in any way other than to respond to your enquiry.
[contact-form-7]
TRY CHAT Terms and Conditions
If you like this service, please consider supporting us.
We use affiliate links on the blog allowing NAScompares information and advice service to be free of charge to you.Anything you purchase on the day you click on our links will generate a small commission which isused to run the website. Here is a link for Amazon and B&H.You can also get me a Ko-fi or old school Paypal. Thanks!To find out more about how to support this advice service checkHEREIf you need to fix or configure a NAS, check FiverHave you thought about helping others with your knowledge? Find Instructions Here
Or support us by using our affiliate links on Amazon UK and Amazon US
Alternatively, why not ask me on the ASK NASCompares forum, by clicking the button below. This is a community hub that serves as a place that I can answer your question, chew the fat, share new release information and even get corrections posted. I will always get around to answering ALL queries, but as a one-man operation, I cannot promise speed! So by sharing your query in the ASK NASCompares section below, you can get a better range of solutions and suggestions, alongside my own.
Samsung has officially launched its 9100 PRO Series, marking its first full-fledged PCIe 5.0 NVMe SSD and its most powerful consumer storage solution to date. Designed to meet the growing demands of AI workloads, high-performance computing, 8K video editing, and gaming, this SSD delivers sequential read speeds of up to 14,800 MB/s, making it nearly twice as fast as its predecessor, the 990 PRO. The 9100 PRO lineup includes capacities of 1TB, 2TB, 4TB, and 8TB, catering to both professionals and power users requiring high-speed data access and extensive storage capacity. With the introduction of a more power-efficient 5nm controller, improved thermal management, and a choice between heatsink and non-heatsink versions, Samsung aims to push PCIe 5.0 adoption forward while setting a new benchmark for consumer SSDs.
Samsung 9100 Pro SSD Hardware and Specifications
The Samsung 9100 PRO is built using Samsung’s in-house PCIe 5.0 controller and V-NAND TLC (V8) flash memory, providing a significant increase in performance, reliability, and efficiency. Unlike its predecessors, the 9100 PRO utilizes the NVMe 2.0 protocol, enabling better optimizations for high-speed workloads. It is equipped with LPDDR4X DRAM-based caching to further enhance performance, ensuring that data retrieval and transfer speeds remain consistent under heavy loads. Power efficiency has been improved by 49% compared to the 990 PRO, allowing the drive to operate at lower power consumption levels, with an active power draw ranging from 7.6W to 9.0W depending on the model. For added security, the 9100 PRO supports AES 256-bit encryption, TCG Opal 2.0, and Microsoft eDrive, making it a viable option for enterprise-level security and personal data protection.
Samsung 9100 PRO Specifications
Specification
1TB
2TB
4TB
8TB
Interface
PCIe 5.0 x4, NVMe 2.0
Form Factor
M.2 (2280) / M.2 (2280 with Heatsink)
NAND
Samsung V-NAND TLC (V8)
Controller
Samsung In-House Controller
Cache Memory
1GB LPDDR4X
2GB LPDDR4X
4GB LPDDR4X
8GB LPDDR4X
Sequential Read/Write (MB/s)
14,700 / 13,300
14,700 / 13,400
14,800 / 13,400
14,800 / 13,400
Random Read/Write (IOPS, QD32)
1,850K / 2,600K
1,850K / 2,600K
2,200K / 2,600K
2,200K / 2,600K
Power Consumption (Active Read/Write, W)
7.6 / 7.2
8.1 / 7.9
9.0 / 8.2
TBD
Device Sleep (L1.2, mW)
4.0 / 3.3
4.8 / 4.0
6.5 / 5.7
TBD
Intelligent TurboWrite 2.0 Cache
114GB
226GB
442GB
TBD
Data Encryption
AES 256-bit, TCG Opal v2.0, MS eDrive (IEEE1667)
Total Bytes Written (TBW)
600
1,200
2,400
4,800
Warranty
Five (5) Year Limited Warranty
Samsung 9100 Pro vs Samsung 990 EVO and EVO Plus
The Samsung 9100 PRO SSD is a pretty big jump in storage performance, surpassing previous consumer SSDs like the 990 EVO and EVO Plus in nearly every metric. While the 990 EVO and EVO Plus were developed to meet the needs of mainstream users looking for a balance of performance and affordability, the 9100 PRO is engineered specifically for professionals, power users, and high-performance computing environments. One of the most significant differences is the interface upgrade, with the 9100 PRO utilizing PCIe 5.0 x4—a major step up from the 990 EVO’s PCIe 4.0 and the EVO Plus’s PCIe 3.0. This translates to dramatically higher sequential read and write speeds, where the 9100 PRO reaches up to 14,800 MB/s read and 13,400 MB/s write speeds, whereas the 990 EVO maxes out at 5,000 MB/s read and 4,800 MB/s write, and the EVO Plus is limited to 3,500 MB/s read and 3,200 MB/s write. These figures alone make the 9100 PRO nearly three times faster than the EVO Plus and close to three times faster than the 990 EVO, delivering unprecedented speed for workloads like 8K video editing, AI processing, and high-resolution content creation.
Beyond raw speed, the 9100 PRO also dominates in efficiency, endurance, and storage capacity, areas where Samsung has significantly improved upon its previous SSD lineup. The 9100 PRO features an endurance rating of up to 4,800 TBW (Total Bytes Written) for the 8TB model, whereas the 990 EVO and EVO Plus are capped at 600 TBW, meaning the 9100 PRO can handle up to eight times the write cycles before reaching its lifespan limit. This enhanced durability makes it ideal for workstations and AI applications where large datasets are continuously processed and rewritten. Furthermore, Samsung has introduced an 8TB model in the 9100 PRO lineup, a first for its consumer NVMe SSDs, whereas the 990 EVO is limited to 4TB and the EVO Plus maxes out at 2TB. Power efficiency has also been improved by up to 49%, thanks to the 5nm controller used in the 9100 PRO, allowing it to maintain higher performance while consuming less power per operation. These advancements make the 9100 PRO not just an incremental upgrade but a transformative SSD in Samsung’s lineup, aimed squarely at professionals who demand uncompromising speed, reliability, and storage capacity.
Specification
Samsung 9100 PRO
Samsung 990 EVO
Samsung 990 EVO PLUS
Interface
PCIe 5.0 x4, NVMe 2.0
PCIe 4.0 x4, NVMe 1.4
PCIe 3.0 x4, NVMe 1.3
Form Factor
M.2 (2280) / M.2 (2280 with Heatsink)
M.2 (2280)
M.2 (2280)
NAND
Samsung V-NAND TLC (V8)
Samsung V-NAND TLC
Samsung V-NAND TLC
Controller
Samsung In-House Controller
Samsung In-House Controller
Samsung In-House Controller
Cache Memory
1GB – 8GB LPDDR4X
1GB – 2GB LPDDR4
None
Sequential Read (MB/s)
14,700 – 14,800
5,000
3,500
Sequential Write (MB/s)
13,300 – 13,400
4,800
3,200
Random Read (IOPS, QD32)
1,850K – 2,200K
800K
600K
Random Write (IOPS, QD32)
2,600K
1,000K
550K
Power Consumption (Active, W)
7.6W – 9.0W
5.3W – 5.9W
4.5W – 5.0W
Device Sleep (L1.2, mW)
4.0mW – 6.5mW
5mW
5mW
Total Bytes Written (TBW)
600 – 4,800 TB
600TB
600TB
Warranty
5-Year Limited Warranty
5-Year Limited Warranty
5-Year Limited Warranty
TurboWrite – What is it?
The 9100 PRO Series introduces Samsung’s Intelligent TurboWrite 2.0, a highly optimized SLC caching system that significantly improves write speeds and overall performance consistency. amsung TurboWrite is a technology used in Samsung SSDs to make them faster. Think of it like a temporary speed boost for writing data.
Creates a Fast Cache – The SSD sets aside a small part of its storage as a high-speed buffer (like a VIP lane for data).
Speeds Up Writes – When you save files, they first go into this super-fast buffer, making it seem like the SSD is writing faster.
Moves Data in the Background – Later, when the SSD is idle, it moves the data from the fast cache to the main storage.
Faster file transfers (especially for small/medium-sized files). Better everyday performance (like booting Windows, opening apps, or saving documents). Slows down for big files – If you copy very large files that fill up the TurboWrite cache, the speed drops to the SSD’s normal (slower) write speed.
Unlike conventional SSDs, which experience a performance drop once the primary cache is exhausted, TurboWrite dynamically allocates NAND capacity as an extended cache, maintaining peak speeds for longer durations. The cache size is based on drive capacity, with 114GB allocated for 1TB models, 226GB for 2TB, and up to 442GB for 4TB variants. This feature ensures high-speed data transfers and minimizes write slowdowns, especially beneficial for video editors, software developers, and content creators working with large datasets.
Samsung 9100 Pro SSD Durability and Endurance
The Samsung 9100 PRO is designed with long-term endurance in mind, featuring Total Bytes Written (TBW) ratings of up to 4,800TB for the 8TB variant. This translates to 0.328 Drive Writes Per Day (DWPD), meaning users can rewrite roughly one-third of the drive’s full capacity daily for five years without exceeding its rated lifespan. This makes it ideal for sustained workloads, AI processing, and enterprise environments that require consistent, high-speed storage. Compared to previous-generation SSDs, the 9100 PRO offers significantly improved durability, reducing the risk of performance degradation over time.
Samsung 9100 Pro SSD Pricing and Release Information
The Samsung 9100 PRO SSD will launch in March 2025 with the following pricing:
1TB – $199.99
2TB – $299.99
4TB – $549.99
8TB – Coming in H2 2025 (pricing TBD)
The heatsink versions will be available for $20 more per model. Given its groundbreaking performance, improved efficiency, and increased storage capacity, the 9100 PRO is set to become one of the leading PCIe 5.0 SSDs in the market, competing with Seagate’s FireCuda 540 and Crucial’s T700.
This description contains links to Amazon. These links will take you to some of the products mentioned in today's content. As an Amazon Associate, I earn from qualifying purchases. Visit the NASCompares Deal Finder to find the best place to buy this device in your region, based on Service, Support and Reputation - Just Search for your NAS Drive in the Box Below
Need Advice on Data Storage from an Expert?
Finally, for free advice about your setup, just leave a message in the comments below here at NASCompares.com and we will get back to you.Need Help?
Where possible (and where appropriate) please provide as much information about your requirements, as then I can arrange the best answer and solution to your needs. Do not worry about your e-mail address being required, it will NOT be used in a mailing list and will NOT be used in any way other than to respond to your enquiry.
[contact-form-7]
TRY CHAT Terms and Conditions
If you like this service, please consider supporting us.
We use affiliate links on the blog allowing NAScompares information and advice service to be free of charge to you.Anything you purchase on the day you click on our links will generate a small commission which isused to run the website. Here is a link for Amazon and B&H.You can also get me a Ko-fi or old school Paypal. Thanks!To find out more about how to support this advice service checkHEREIf you need to fix or configure a NAS, check FiverHave you thought about helping others with your knowledge? Find Instructions Here
Or support us by using our affiliate links on Amazon UK and Amazon US
Alternatively, why not ask me on the ASK NASCompares forum, by clicking the button below. This is a community hub that serves as a place that I can answer your question, chew the fat, share new release information and even get corrections posted. I will always get around to answering ALL queries, but as a one-man operation, I cannot promise speed! So by sharing your query in the ASK NASCompares section below, you can get a better range of solutions and suggestions, alongside my own.
UniFi U7 Lite and U7 In-Wall WiFi7 Mesh APs Review
UniFi continues to flesh out its Wi-Fi 7 portfolio at the start of 2025, and, hot on the heels of the launch of their latest router and gateway devices, we see this brand start to roll out new Wi-Fi 7 access points intended to challenge both the price point and the hardware level of market alternatives for scaling out your Wi-Fi right now. UniFi has introduced the new compact Wi-Fi 7 U7 Lite access point, and at just $99, this is easily the best-value Wi-Fi 7 and 2.5GbE PoE-equipped mesh access point in the market—full stop! Alongside this, UniFi has upgraded the compact wall-deployed range with the new U7 In-Wall access point at $149, featuring three 2.5GbE ports, PoE power, and PoE pass-through network ports, as well as Wi-Fi 7 support. Needless to say, these are ideally designed for deployment in an existing UniFi network, but they are not strictly locked into that, and for some, they could be used for slow migration away from their existing wireless mesh setup via integration into third-party systems and eventually replacing it with a UniFi setup over time. But are these actually any good? How do they stack up against the current U7 Pro and U7 Pro Max Wi-Fi points? Ultimately, what have you lost in these due to this reduction in size that you may well be missing out on if you just go for the more established and available UniFi Wi-Fi 7 access points in their portfolio? Let’s discuss it in today’s review and testing.
UniFi U7 Lite & U7 In-Wall Review – Quick Conclusion
The UniFi U7 In-Wall and UniFi U7 Lite have clearly been designed for more modest and small-scale deployments, where the current range of UniFi Wi-Fi 7 APs may be overkill for some. You cannot fault the pricing strategy that UniFi has gone for here, especially when it comes to affordability. Notwithstanding the convenience of deploying PoE access points, that $99 price tag to scale up a Wi-Fi 7 AP that isn’t going to throttle the network bandwidth down to standard gigabit speeds is going to be hugely desirable. Equally, as UniFi has been upscaling a number of their PoE switches and gateway devices to feature 2.5GbE PoE, it is no coincidence that these Wi-Fi 7 PoE APs are rolling out at the same time. Power consumption seems pretty impressive, and whether you want to trust the UniFi Controller to manage your devices across individual bands and frequencies, or manually bind devices to specific frequencies, is totally at your disposal. This provides a neat balance between the novice user and the network enthusiast, allowing different levels of control based on user expertise. The only major downfall you can throw at either of these Wi-Fi AP devices is the lack of support for the 6 GHz frequency. It’s an important distinction for those who understand the benefits of Wi-Fi 7 and MLO, as the ability to access more available bandwidth is significantly reduced without the 6 GHz spectrum, resulting in less wireless sandbox to work with. That being said, these models are clearly designed to be as affordable as possible, and it could be argued that the less tech-savvy user might not even realize this feature is missing. However, if you are opting for either of these wireless AP devices or upgrading your Wi-Fi network to Wi-Fi 7 and truly want to maximize its potential, I would say spend the extra and get the U7 Pro or U7 Pro Max. For single-device Wi-Fi networks, the U7 Lite and U7 In-Wall are more than sufficient for these needs and are phenomenally great value.
BUILD QUALITY - 9/10
HARDWARE - 7/10
PERFORMANCE - 7/10
PRICE - 10/10
VALUE - 10/10
8.6
PROS
Affordable Pricing – The U7 Lite ($99) and U7 In-Wall ($149) provide excellent value for those looking to upgrade to Wi-Fi 7 without the premium cost. 2.5GbE PoE Support – Both APs support 2.5GbE uplink, ensuring faster network speeds without being throttled to 1GbE. Multi-Link Operation (MLO) – Allows better stability and throughput by utilizing multiple bands simultaneously, even without 6 GHz. Flexible Deployment – The U7 Lite is ideal for mesh expansions, while the U7 In-Wall adds extra wired connectivity with two additional 2.5GbE ports (one with PoE pass-through). Easy Network Management – The UniFi Controller software allows both automated and manual control, catering to both novices and power users. Efficient Power Consumption – These APs remain power-efficient, making them suitable for multiple deployments without excessive energy costs.
CONS
No 6 GHz Support – Without Wi-Fi 7\'s 6 GHz band, these models lack access to the full 320 MHz bandwidth, potentially leading to higher congestion in busy environments. Limited for High-Density Networks – While they support 200+ clients, they lack the higher spatial streams of the U7 Pro and Pro Max, making them less suitable for very crowded networks.
UniFi U7 Lite & U7 in-Wall Review – Design and Hardware
The UniFi U7 Lite and U7 In-Wall are the latest additions to UniFi’s Wi-Fi 7-enabled access points, offering more budget-friendly alternatives to the U7 Pro and Pro Max. While these new models lack 6 GHz support, they retain many of the advantages of Wi-Fi 7, such as Multi-Link Operation (MLO) and higher bandwidth options for improved connectivity. Wi-Fi 7 introduces several key improvements over its predecessors, including Multi-Link Operation (MLO), wider bandwidth support, and higher efficiency for multiple connected devices. However, one of its most significant advantages comes from its ability to use the 6 GHz band, allowing for 320 MHz channel widths and significantly lower interference. While the U7 Pro and Pro Max fully leverage these benefits, the U7 Lite and In-Wall models are limited to the 2.4 GHz and 5 GHz bands, making them less capable in high-density environments but still powerful for general use.
Despite lacking 6 GHz capabilities, the U7 Lite and U7 In-Wall can still take advantage of MLO, allowing them to combine multiple frequency bands for improved stability and speed. This means that in practical use, they can still offer impressive throughput and reliable performance, even though they cannot reach the peak speeds of their Pro counterparts. For users who do not yet have many Wi-Fi 7-enabled devices, or who primarily need strong 2.4 GHz and 5 GHz coverage, these models offer a cost-effective solution that integrates well into UniFi’s ecosystem. That said, users looking for future-proofing and high-performance networking should still consider the U7 Pro or Pro Max, as they provide higher spatial streams, full 6 GHz access, and better support for high-density Wi-Fi environments. These factors make the Pro models a better fit for large offices, multi-device households, and advanced networking setups, while the U7 Lite and In-Wall models are more suited for smaller deployments and cost-conscious expansions of existing UniFi networks.
UniFi U7 Lite Hardware
The U7 Lite is designed as a compact ceiling or wall-mounted AP, delivering 115 square meters (1,250 square feet) of coverage with dual-band 2.4 GHz and 5 GHz support. It features a 2.5GbE PoE-powered connection and requires 13W at full power draw. Unlike the In-Wall model, it lacks additional Ethernet ports but still provides Wi-Fi 7 capabilities with up to 4.3 Gbps (BW240) and an 8 dBi antenna gain.
While compact, the U7 Lite is optimized for general wireless expansion in homes, offices, and mesh network deployments. It supports Multi-Link Operation (MLO), allowing it to operate across multiple frequencies for more stable connections. The plastic enclosure makes it lightweight, and its ceiling-mountable design ensures broad, unobstructed coverage.
Below is a hardware comparison table summarizing key specifications of the U7 Lite:
Feature
UniFi U7 Lite
Wi-Fi Standard
Wi-Fi 7 (802.11be)
Bands
2.4 GHz / 5 GHz
MIMO 5Ghz
2×2
MIMO 2.4Ghz
2×2
Max Data Rate
4.3 Gbps (BW240)
PoE Support
Yes, 13W (Max)
Ethernet Ports
1x 2.5GbE
Antenna Gain
5 dBi / 4 dBi
Coverage
115 m² (1,250 ft²)
Mounting
Ceiling / Wall
SSID Count
8 Max per Radio
Enclosure Material
Plastic
UniFi U7 In-Wall Hardware
The U7 In-Wall, priced at $149, is a versatile Wi-Fi 7 access point designed for wall-mounted deployment, making it a great fit for structured networking setups. It provides 115 square meters (1,250 square feet) of coverage and supports over 200 clients simultaneously, making it suitable for home and office environments. Like the U7 Lite, it supports dual-band Wi-Fi 7 (2.4 GHz and 5 GHz) but offers three 2.5GbE ports, including PoE pass-through on one of the outputs. This feature is particularly useful for powering additional devices like VoIP phones or cameras directly from the AP, reducing the need for extra power adapters.
The U7 In-Wall is designed for both wired and wireless expansion, making it stand out from simpler access points. The PoE+ uplink port (13W max) ensures efficient power delivery while enabling a seamless connection to an existing UniFi network. The metal wall mount design adds durability and stability, making it ideal for multi-room home setups or business deployments. Additionally, with 8 SSID support, it allows for network segmentation, a crucial feature for separating guest, IoT, or business traffic without requiring additional hardware.
Feature
UniFi U7 In-Wall
Wi-Fi Standard
Wi-Fi 7 (802.11be)
Bands
2.4 GHz / 5 GHz
Max Data Rate
4.3 Gbps (BW240)
PoE Support
Yes, 13W
Ethernet Ports
3x 2.5GbE (1 PoE+)
PoE Pass-Through
Yes, on one 2.5GbE port
Antenna Gain
8 dBi
Coverage
115 m² (1,250 ft²)
Mounting
Wall-mounted
Enclosure Material
Metal & Polycarbonate
Compared to the U7 Lite, the In-Wall model offers significantly greater wired networking flexibility. The addition of two extra Ethernet ports—one with PoE pass-through—makes it ideal for deployments that require a mix of wired and wireless devices. The Lite, in contrast, is more focused on providing general Wi-Fi coverage in open spaces without built-in wired networking expansion. This means that while the Lite is well-suited for broad Wi-Fi coverage, the In-Wall excels in scenarios where wired device connectivity is necessary.
Both models share several core benefits, including Wi-Fi 7 support, 2×2 MIMO on both 2.4 GHz and 5 GHz, and Multi-Link Operation (MLO). However, their lack of 6 GHz support and 320 MHz channel width capabilities means they cannot take full advantage of Wi-Fi 7’s highest potential speeds. Unlike the U7 Lite, which primarily targets budget-conscious users looking for general wireless coverage, the In-Wall is geared toward users who need wired connectivity and centralized networking within a single unit. In contrast, the U7 Pro and U7 Pro Max offer full 6 GHz support, unlocking higher bandwidth, lower interference, and greater efficiency in high-density environments. These premium models also include higher spatial streams and the ability to support more than 500 clients, making them a better fit for large offices, high-traffic environments, or future-proof setups. While the U7 Lite and In-Wall deliver strong performance at a lower price, users with demanding Wi-Fi 7 use cases may still find the U7 Pro series to be a superior long-term investment.
The U7 In-Wall is a versatile Wi-Fi 7 access point designed for wall-mounted deployment, making it a great fit for structured networking setups. It provides 115 square meters (1,250 square feet) of coverage and supports over 200 clients simultaneously, making it suitable for home and office environments. Like the U7 Lite, it supports dual-band Wi-Fi 7 (2.4 GHz and 5 GHz), but it enhances flexibility with three 2.5GbE ports, including PoE pass-through on one of the outputs. This feature is particularly useful for powering additional devices like VoIP phones or cameras directly from the AP. Unlike the U7 Lite, the U7 In-Wall is optimized for wired networking expansion while maintaining strong wireless performance. The PoE+ uplink port (13W max) allows for efficient power delivery, ensuring seamless integration into existing UniFi networks. The metal wall mount design provides durability and stability, making it ideal for permanent installations in commercial or multi-room home setups. The 8 SSID support allows for network segmentation, an essential feature for businesses and shared environments.
While the U7 Lite and U7 In-Wall share several similarities, such as dual-band Wi-Fi 7 support and 4.3 Gbps max speeds on 5 GHz, the In-Wall model stands out due to its extra Ethernet ports and PoE pass-through. These additions make it the better choice for users who need both wireless and wired expansion in their setup. The Lite, on the other hand, is geared more towards general Wi-Fi coverage in open areas, lacking the physical networking enhancements of the In-Wall model. In terms of shared benefits, both models lack 6 GHz support, meaning they do not leverage the full 320 MHz bandwidth available in Wi-Fi 7. However, both utilize Multi-Link Operation (MLO) to improve connectivity stability, ensuring strong performance even without access to 6 GHz channels. Additionally, their MIMO configurations (2×2 on both 2.4 GHz and 5 GHz) allow for consistent speeds across multiple devices, making them solid choices for Wi-Fi 7-enabled networks.
When compared to the U7 Pro and U7 Pro Max, the In-Wall and Lite models are more budget-friendly but also less feature-rich. The Pro and Pro Max benefit from 6 GHz support, higher spatial streams, and greater client capacity, making them ideal for high-density environments with demanding workloads. While the Lite and In-Wall are excellent for general networking, users needing future-proofing, greater bandwidth, and larger-scale deployment capabilities will still find the U7 Pro and Pro Max to be the superior choices. The U7 In-Wall, priced at $149, is a step up from the Lite version, integrating additional networking flexibility. Like the Lite model, it offers Wi-Fi 7 support on the 2.4 GHz and 5 GHz bands, but it distinguishes itself with two additional 2.5GbE LAN ports, one of which supports PoE pass-through. This makes it ideal for users needing wired connections for additional devices. The metal wall mount design ensures a stable and durable setup, making it a great option for expanding mesh networks. Let’s start the tests!
UniFi U7 Lite & U7 In-Wall Review – Performance Tests
To put these devices to the test, I conducted a series of benchmarks comparing them directly against the UniFi U7 Pro. The tests included file transfer speeds, internet speed tests, and long-range performance in different real-world conditions, helping illustrate where each access point excels and where certain compromises arise.
IMPORTANT – In every test, I let the client Windows laptop have it’s frequency and band be dictated by the USB WiFi 7 adapter AND the UniFi AP. I ran the ‘optimization’ scan on each UniFi AP once up to the first connection, but after that I trusted the Access Point to manage the connection and frequency position. I KNOW I could have manually adjusted/bonded bands and frequencies to each device for the tests (and most likely improve the results of each device), but this likely would not represent the average novice user experience, who would want to ‘trust’ the AP to handle their connection. So remember, that if you are connected to a UniFi U7/U7 Pro/U7 Pro Max/UY Lite/U7 In-Wall AP and you are getting low speeds, it might serve you well to log into your UniFi controller and set your bands/frequencies manually for priority devices.
The U7 Pro benefits from 6 GHz support and 320 MHz bandwidth, enabling significantly higher throughput, especially at close range with minimal interference.
The U7 Lite comes surprisingly close to the Pro’s performance despite lacking 6 GHz, showing that its 5 GHz performance and MLO are still quite strong under optimal conditions.
The U7 In-Wall is slower than the U7 Lite by almost a whole minute, yet it remains competitive for most home or small office needs.
Internet Speed Tests (Ookla Speed Test – 10m, Clear Indoor)
U7 Pro: 689 Mbps Down / 79 Mbps Up
U7 In-Wall: 491 Mbps Down / 82 Mbps Up
U7 Lite: 479 Mbps Down / 88 Mbps Up
Analysis:
The U7 Pro again comes out on top, showcasing the advantage of 6 GHz in an environment where the internet connection can exceed typical 2.4/5 GHz bandwidth.
Both the U7 Lite and U7 In-Wall achieve around 500 Mbps, which is more than adequate for everyday use. Their slight gap compared to the Pro is expected given their lack of 6 GHz.
Upload speeds are fairly close among all three, indicating stable performance on the 2.4/5 GHz bands even without the Pro’s extra frequency options.
U7 In-Wall: 5 minutes 1 second (consistent 1.2-1.4 Gbps)
U7 Lite: 8 minutes 2 seconds (locked at 720 Mbps)
Analysis:
The U7 Pro suffers here because it constantly attempts to leverage 6 GHz and MLO. Thick walls and interior interference can cause frequent band-switching, disrupting throughput consistency. I still want to investigate this, as it seems unusually slow – TBC
The U7 In-Wall excels by settling quickly on a steady 5 GHz link, showing that fewer available bands can sometimes reduce overhead and yield consistent speeds.
The U7 Lite offers moderate performance; it didn’t dynamically switch to multiple bands, so its stable but lower throughput (720 Mbps) resulted in a middling transfer time.
U7 Lite: Maintained a single 5 GHz connection at 136 Mbps / 324 Mbps
Analysis:
U7 Pro’s 6 GHz signal offers high peak speeds, but 6 GHz can degrade faster over distance or through obstacles. Once it drops down, it’s still fast, yet its throughput can vary as it switches.
U7 In-Wall uses MLO to combine 2.4 and 5 GHz, prioritizing reliability over sheer speed, which makes it ideal for consistent coverage in multi-floor homes or offices.
U7 Lite sticks to 5 GHz, delivering a surprisingly solid signal at 20m and 30m. This approach prevents the frequent channel shifts seen on the Pro, resulting in smoother, if not top-tier, long-range performance.
Overall, these tests highlight the trade-offs each model makes:
U7 Pro or U7 Pro Max: Best raw performance and peak speeds, but can suffer from complex band-hopping in tricky environments.
U7 In-Wall: Balances wired flexibility with reliable 5 GHz coverage, ideal for consistent performance and versatile setups.
U7 Lite: Compact and cost-effective, with speeds that rival the Pro at shorter distances but without the Pro’s complexity—well-suited for simpler mesh expansions.
Whether you prioritize peak throughput (U7 Pro), flexible wired connectivity (U7 In-Wall), or affordability and easy placement (U7 Lite), each model has distinct strengths to suit different user needs.
UniFi U7 Lite & U7 in Wall Review – Verdict and Conclusion
The UniFi U7 In-Wall and UniFi U7 Lite are well-positioned as affordable, small-scale Wi-Fi 7 solutions, offering dual-band 2.4 GHz and 5 GHz connectivity, 2.5GbE PoE support, and Multi-Link Operation (MLO) for improved stability. At $149 for the In-Wall and $99 for the Lite, they provide a cost-effective way to expand a UniFi network while avoiding the higher price points of Pro-tier APs. The U7 In-Wall stands out with its two additional 2.5GbE ports, including PoE pass-through, making it particularly useful for wired and wireless networking in a single unit, ideal for structured setups. Meanwhile, the U7 Lite serves as a simple and efficient mesh expansion option, making it a great fit for users looking for broad Wi-Fi coverage at a low cost.
However, the most significant limitation of these models is their lack of 6 GHz support, meaning they cannot leverage the full 320 MHz bandwidth that Wi-Fi 7 is capable of, potentially leading to higher congestion in busier environments. While MLO helps compensate, users in high-density areas may find that spending extra on the U7 Pro or U7 Pro Max is the smarter choice for future-proofing and superior performance. Still, for budget-conscious users or those expanding a smaller network, both the U7 In-Wall and U7 Lite are exceptional value, providing strong performance, power efficiency, and seamless UniFi integration without the premium price tag.
Pros of the U7 Lite / U7 In-Wall AP
Cons of the U7 Lite / U7 In-Wall AP
Affordable Pricing – The U7 Lite ($99) and U7 In-Wall ($149) provide excellent value for those looking to upgrade to Wi-Fi 7 without the premium cost. 2.5GbE PoE Support – Both APs support 2.5GbE uplink, ensuring faster network speeds without being throttled to 1GbE. Multi-Link Operation (MLO) – Allows better stability and throughput by utilizing multiple bands simultaneously, even without 6 GHz. Flexible Deployment – The U7 Lite is ideal for mesh expansions, while the U7 In-Wall adds extra wired connectivity with two additional 2.5GbE ports (one with PoE pass-through). Easy Network Management – The UniFi Controller software allows both automated and manual control, catering to both novices and power users. Efficient Power Consumption – These APs remain power-efficient, making them suitable for multiple deployments without excessive energy costs.
No 6 GHz Support – Without Wi-Fi 7’s 6 GHz band, these models lack access to the full 320 MHz bandwidth, potentially leading to higher congestion in busy environments. Limited for High-Density Networks – While they support 200+ clients, they lack the higher spatial streams of the U7 Pro and Pro Max, making them less suitable for very crowded networks.
This description contains links to Amazon. These links will take you to some of the products mentioned in today's content. As an Amazon Associate, I earn from qualifying purchases. Visit the NASCompares Deal Finder to find the best place to buy this device in your region, based on Service, Support and Reputation - Just Search for your NAS Drive in the Box Below
Need Advice on Data Storage from an Expert?
Finally, for free advice about your setup, just leave a message in the comments below here at NASCompares.com and we will get back to you.Need Help?
Where possible (and where appropriate) please provide as much information about your requirements, as then I can arrange the best answer and solution to your needs. Do not worry about your e-mail address being required, it will NOT be used in a mailing list and will NOT be used in any way other than to respond to your enquiry.
[contact-form-7]
TRY CHAT Terms and Conditions
If you like this service, please consider supporting us.
We use affiliate links on the blog allowing NAScompares information and advice service to be free of charge to you.Anything you purchase on the day you click on our links will generate a small commission which isused to run the website. Here is a link for Amazon and B&H.You can also get me a Ko-fi or old school Paypal. Thanks!To find out more about how to support this advice service checkHEREIf you need to fix or configure a NAS, check FiverHave you thought about helping others with your knowledge? Find Instructions Here
Or support us by using our affiliate links on Amazon UK and Amazon US
Alternatively, why not ask me on the ASK NASCompares forum, by clicking the button below. This is a community hub that serves as a place that I can answer your question, chew the fat, share new release information and even get corrections posted. I will always get around to answering ALL queries, but as a one-man operation, I cannot promise speed! So by sharing your query in the ASK NASCompares section below, you can get a better range of solutions and suggestions, alongside my own.
The GL.iNet Slate 7 is the latest entry in the company’s expanding lineup of travel routers, bringing Wi-Fi 7 support, dual 2.5GbE ports, and a compact, portable design aimed at users who need reliable internet access on the go. Designed with remote workers, frequent travelers, and security-conscious users in mind, it includes built-in VPN support, an interactive touchscreen interface, and multiple failover options, making it a versatile networking solution for those moving between different public and private networks. However, while it is marketed as a Wi-Fi 7 device, it notably lacks support for the 6GHz band and 320MHz channel width, meaning it cannot take full advantage of some key Wi-Fi 7 improvements. This raises questions about whether its performance truly surpasses high-end Wi-Fi 6E routers or if it is more of an incremental upgrade over its predecessors. In this review, we will break down the Slate 7’s design, connectivity options, and real-world performance, ultimately determining if it is a standout travel networking device or simply a modest refinement of previous GL.iNet offerings.
UPDATE – the $96 super early bird price is now over, but the early bird price is still available at the time of writing (link here or via banner below)
Note, several times in the review I reference the Gl.iNet Puli AX SIM Tracvel Router. Find out more about that router in the full review HERE on YouTube and HERE on the blog.
Gl.iNet Slate 7 Router Review – Quick Conclusion
The GL.iNet Slate 7 is a versatile and security-focused travel router, offering Wi-Fi 7 support, dual 2.5GbE ports, built-in VPN capabilities, and a touchscreen interface in a compact, low-power design. While it excels at secure networking, multi-device connectivity, and WAN failover options, its lack of 6GHz and 320MHz channel width means it does not fully utilize Wi-Fi 7’s potential. Wireless performance is solid on 5GHz, reaching 2-2.1Gbps, but latency improvements and Multi-Link Operation (MLO) help stability rather than raw speed gains. Wired performance is strong, but USB storage speeds are capped at 130-140 MB/s, limiting its use as a high-speed file-sharing device. The touchscreen adds convenience for quick settings adjustments, and power consumption remains low (~7-8W), but the lack of a built-in battery reduces portability compared to SIM-enabled or battery-powered alternatives like the Puli AX. With pricing between $96-$149, it is a strong value for users needing a secure and flexible travel router, but those prioritizing top-tier Wi-Fi performance may prefer a Wi-Fi 6E router with 6GHz support. The Slate 7 is an iterative upgrade rather than a groundbreaking innovation, making it a reliable but not revolutionary choice for portable networking.
Gl.iNet Slate 7 Router Review – Design
The GL.iNet Slate 7 follows a familiar compact and lightweight form factor, measuring 130 x 91 x 34 mm and weighing 295 grams. This makes it highly portable, fitting easily into a backpack or even a pocket, which is essential for a travel-focused device. The matte black chassis gives it a more industrial and professional look compared to some of its predecessors, with foldable external antennas that can be adjusted to optimize signal reception.
Unlike the Puli AX, which includes a built-in battery, the Slate 7 requires USB-C power input, keeping it lightweight but also limiting its standalone functionality when an external power source isn’t available.
A major upgrade in this model is the touchscreen interface, a rare feature for travel routers.
The small LCD display allows users to scan QR codes for quick Wi-Fi access, toggle VPN connections, monitor real-time network speed, and check network status through color-coded indicators for different modes such as Ethernet, Repeater, and Tethering.
While not a full replacement for web-based or app-based management, it provides a quick and convenient way to adjust settings without needing to log into a separate interface.
The physical button on the device is another useful addition, allowing users to assign it to toggle VPN services or other networking functions. This means users can activate or deactivate a secure tunnel instantly, ensuring encrypted traffic without needing to open a mobile app or browser. The button’s customization adds another layer of convenience, particularly for those frequently switching between standard and VPN-protected connections.
Build quality is solid, with a sturdy plastic shell that feels durable enough for travel but lacks the ruggedized features found in some other portable routers. There are no IP-rated dust or water resistance claims, so users should be cautious when using it in more demanding outdoor environments.
The absence of a built-in battery and no SIM card slot means it relies entirely on external power and tethered internet sources, making it less versatile than some cellular-enabled competitors. However, for users who mainly rely on wired and wireless networks, the design choices make sense, keeping the device compact while offering practical features for on-the-go connectivity.
Yes – QR code scanning, VPN toggling, real-time monitoring
Physical Button
Customizable (VPN toggle or other functions)
Failover Support
WAN/LAN, Wi-Fi repeater, USB tethering
Power Input
USB-C (5V/3A, 9V/3A, 12V/2.5A, PD compatible)
Power Consumption
~6-8W (Peak: 8.2W)
Storage Features
Samba, DLNA, WebDAV, FTP
USB File Transfer Speed
~130-140 MB/s (Samba)
Security & Encryption
WPA3, OpenVPN, WireGuard, AdGuard Home, Tor
Software Features
VLAN, Multiple SSIDs, Firewall, Traffic Monitoring, OpenWrt App Store
Physical Dimensions
130 × 91 × 34 mm
Weight
295g
Price Range
$96 (Early Bird) – $149 (Retail)
Gl.iNet Slate 7 Router Review – Connections
The GL.iNet Slate 7 offers a versatile range of wired and wireless connectivity options, making it one of the most adaptable travel routers in its class. Its standout feature is the inclusion of two 2.5GbE Ethernet ports, which can be configured as either WAN or LAN. This flexibility allows users to connect to high-speed wired networks while also providing a multi-gigabit local network for devices that support it. Unlike previous models that typically included only one multi-gig port, the Slate 7 allows for higher-speed networking between wired devices without needing an additional switch.
On the wireless side, the router supports Wi-Fi 7 with dual-band functionality, offering speeds of 688 Mbps on 2.4GHz and 2.8 Gbps on 5GHz. However, despite its Wi-Fi 7 branding, it does not support the 6GHz band or 320MHz channel width, meaning it lacks two of the most significant advantages of the latest wireless standard.
This means performance improvements will be limited compared to full-featured Wi-Fi 7 routers, though Multi-Link Operation (MLO) support helps improve stability and throughput when using simultaneous band connections.
For users needing additional network redundancy, the Slate 7 supports multiple failover options. In addition to its WAN/LAN ports, it can also connect to the internet via Wi-Fi repeater mode or USB tethering.
The USB 3.0 port allows users to connect a smartphone for cellular tethering, effectively turning the router into a backup mobile hotspot. This is a valuable feature for travelers who may find themselves in locations without reliable wired or Wi-Fi access, ensuring they remain connected through a tethered mobile device.
The router’s software-based networking features further expand its connectivity potential. Users can configure WAN failover, ensuring a seamless switch between different internet sources when one becomes unavailable.
Additionally, it supports multiple SSIDs and VLAN segmentation, allowing for separate networks for guests or different device types. These features are particularly useful for users who frequently switch between public and private networks, ensuring that personal devices remain isolated from potentially unsecured connections.
Another key connectivity feature is the USB storage functionality, which allows the Slate 7 to act as a mini NAS. When a USB drive or external SSD is connected, it can be accessed over the network using Samba, DLNA, WebDAV, and FTP protocols.
However, performance testing showed that USB file transfer speeds over Samba maxed out at around 130-140 MB/s, meaning that while the feature is useful for basic file sharing or backups, it is not optimized for high-speed storage applications.
While the inclusion of USB-based storage sharing is a welcome addition, the performance bottleneck limits its full potential.
Category
Specifications
Operating System
OpenWrt 23.05 (Kernel 5.4.213)
User Interface
Web-based UI, Mobile App, Touchscreen LCD Panel
Touchscreen Functions
QR code scanning, VPN toggling, real-time speed monitoring, network status updates
AdGuard Home, ZeroTier, Tailscale, Custom Plugin Support
Remote Access & Control
SSH, Web UI, OpenVPN, WireGuard
Firmware Updates
Web-based & OTA (Over-the-Air) updates
Gl.iNet Slate 7 Router Review – Software
The GL.iNet Slate 7 runs a customized version of OpenWrt 23.05, providing a flexible and feature-rich networking environment. The web-based management interface is similar to previous GL.iNet routers, offering a mix of beginner-friendly controls and advanced networking settings.
Users can configure WAN failover, VLANs, multiple SSIDs, and port forwarding, making it adaptable for various networking scenarios. The addition of a touchscreen interface allows for quick network monitoring, Wi-Fi access via QR codes, and VPN toggling, reducing the need to log into the full web interface for basic tasks. However, while the core interface is functional, it lacks detailed guidance for advanced settings, which could be a challenge for less experienced users.
One of the key features of the Slate 7 is its VPN support, allowing users to configure over 30 VPN services, including OpenVPN and WireGuard. With WireGuard speeds reaching up to 540Mbps, it provides a fast and secure connection for users needing encrypted traffic on public networks. The physical VPN button is a welcome addition, enabling users to instantly toggle VPN protection without accessing the interface.
VPN failover support is also included, allowing users to switch between multiple VPN providers seamlessly. However, while basic VPN setup is straightforward, more advanced configurations—such as split tunneling and custom DNS settings—require manual setup with limited on-screen guidance.
The Slate 7 also features a built-in app store, allowing users to install additional networking tools such as AdGuard Home, ZeroTier, and Tailscale. This extends the router’s functionality beyond basic networking, enabling ad-blocking, remote access solutions, and encrypted tunneling services.
While the app store adds valuable features, its interface feels somewhat outdated, and the selection of available apps remains limited compared to broader OpenWrt repositories. Users comfortable with command-line customization can access root-level OpenWrt settings, unlocking more advanced network configurations for those with the expertise to fine-tune their setup.
In file-sharing and storage management, the Slate 7 supports Samba, DLNA, FTP, and WebDAV, allowing connected USB storage to function as a basic NAS for network file sharing. The setup process is fairly straightforward, with a step-by-step wizard to create shared folders and manage user permissions.
Framing things in terms of a mobile router vs a more aggressive desktop model with 6Ghz, the Slate 7 remains a capable software-driven router, offering a solid combination of security, customization, and network flexibility, albeit with some interface and performance limitations that may require firmware optimizations in future updates.
Gl.iNet Slate 7 Router Review – Testing
Performance testing on the GL.iNet Slate 7 revealed a mix of strengths and limitations, particularly in Wi-Fi speeds, wired throughput, and storage performance. In wireless performance tests, the 5GHz band consistently delivered 2-2.1Gbps throughput, aligning closely with its 2.8Gbps theoretical maximum when using a Wi-Fi 7 USB adapter. However, the absence of 6GHz and 320MHz channel width meant that it could not take full advantage of Wi-Fi 7’s higher bandwidth capabilities. In practical use, latency remained low, and Multi-Link Operation (MLO) improved overall network stability, but competing Wi-Fi 6E routers with 6GHz support may still offer better overall performance in less congested environments.
Wired performance testing was strong, with 2.5GbE Ethernet connections delivering 230-240 MB/s transfer speeds, which is within expected limits for a multi-gigabit network. However, in USB storage performance tests, speeds were notably lower than expected. Using Samba over a 2.5GbE connection, file transfers to a connected USB SSD capped at 130-140MB/s, well below the full bandwidth potential of USB 3.0 or 2.5GbE Ethernet. This suggests either a software bottleneck or an underutilized hardware controller, limiting its effectiveness as a high-speed portable NAS.
In power consumption tests, the Slate 7 remained highly efficient, idling at 6-7W and peaking at 8.1-8.2W under full load with multiple active connections. This makes it one of the lowest-power travel routers in its class, making it ideal for users who need to power it via a laptop, power bank, or low-power USB source.
However, the lack of an internal battery means it requires a power source at all times, reducing portability compared to battery-equipped alternatives like the Puli AX. Here is the power draw of the Slate 7 when I was running my iPerf3 Tests:
VPN performance was in line with expectations, with OpenVPN reaching speeds of ~100Mbps and WireGuard peaking at ~540Mbps. This makes it suitable for secure remote access and encrypted browsing, but users requiring gigabit-level VPN throughput will need a more powerful router or a dedicated VPN server.
The physical VPN toggle button proved highly useful, allowing for instant encryption activation without navigating the web or mobile interface. However, GL.iNet’s software interface lacks clear guidance on advanced VPN configurations, which could be a barrier for less experienced users.
The GL.iNet Slate 7 stands out as a compact, feature-rich travel router that brings together Wi-Fi 7 capabilities, dual 2.5GbE ports, and a touchscreen interface in a low-power, highly portable design. It is clearly aimed at travelers, remote workers, and security-conscious users who require flexible connectivity options and encrypted internet access while moving between different networks. With built-in VPN support, USB tethering, and multiple WAN failover options, it effectively serves as a secure gateway for multiple devices when using public Wi-Fi or mobile data connections. The inclusion of Multi-Link Operation (MLO) further enhances stability by allowing simultaneous band connections, while the physical VPN toggle button adds a convenient layer of security. However, the absence of 6GHz support and 320MHz channel width raises concerns about whether it truly takes full advantage of Wi-Fi 7 technology or simply refines the capabilities of existing Wi-Fi 6E travel routers.
In real-world performance, the Slate 7 delivers respectable wireless and wired speeds, but its Wi-Fi 7 implementation feels incomplete. While the 2.5GbE ports allow for high-speed wired networking, the lack of 6GHz means users won’t experience the full benefits of the latest wireless standard, particularly in low-interference, high-bandwidth environments. USB storage performance is another notable limitation, with Samba transfers capping at 130-140 MB/s, suggesting either a software bottleneck or underpowered hardware handling file transfers. The touchscreen interface, while useful for quick access to network settings and VPN controls, does not replace the depth of web or mobile-based configuration tools, which still require some technical knowledge to fully optimize the router’s capabilities. Additionally, while power consumption remains impressively low at around 7-8W under load, the lack of an internal battery means it must always be tethered to an external power source, reducing its portability compared to battery-powered alternatives like the Puli AX.
At a price range of $96 (early bird) to $149 (retail), the Slate 7 offers strong value for users prioritizing security, network flexibility, and multiple connection options over cutting-edge Wi-Fi performance. It is not the fastest travel router available, but it excels in delivering encrypted and stable internet access in a variety of challenging connectivity scenarios. For users who primarily require a portable router for VPN security, network redundancy, and secure multi-device management, the Slate 7 is one of the most capable options on the market. However, those seeking the absolute best wireless performance may find Wi-Fi 6E routers with 6GHz support to be a better choice for future-proofing. While GL.iNet has positioned the Slate 7 as a next-generation travel router, it ultimately feels more like an evolution rather than a revolution, making it a solid but not groundbreaking addition to the travel networking space.
This description contains links to Amazon. These links will take you to some of the products mentioned in today's content. As an Amazon Associate, I earn from qualifying purchases. Visit the NASCompares Deal Finder to find the best place to buy this device in your region, based on Service, Support and Reputation - Just Search for your NAS Drive in the Box Below
Need Advice on Data Storage from an Expert?
Finally, for free advice about your setup, just leave a message in the comments below here at NASCompares.com and we will get back to you.Need Help?
Where possible (and where appropriate) please provide as much information about your requirements, as then I can arrange the best answer and solution to your needs. Do not worry about your e-mail address being required, it will NOT be used in a mailing list and will NOT be used in any way other than to respond to your enquiry.
[contact-form-7]
TRY CHAT Terms and Conditions
If you like this service, please consider supporting us.
We use affiliate links on the blog allowing NAScompares information and advice service to be free of charge to you.Anything you purchase on the day you click on our links will generate a small commission which isused to run the website. Here is a link for Amazon and B&H.You can also get me a Ko-fi or old school Paypal. Thanks!To find out more about how to support this advice service checkHEREIf you need to fix or configure a NAS, check FiverHave you thought about helping others with your knowledge? Find Instructions Here
Or support us by using our affiliate links on Amazon UK and Amazon US
Alternatively, why not ask me on the ASK NASCompares forum, by clicking the button below. This is a community hub that serves as a place that I can answer your question, chew the fat, share new release information and even get corrections posted. I will always get around to answering ALL queries, but as a one-man operation, I cannot promise speed! So by sharing your query in the ASK NASCompares section below, you can get a better range of solutions and suggestions, alongside my own.
The Minisforum AI X1 Pro is a compact high-performance mini PC designed for users who require a balance of processing power, AI capabilities, and expandability. Featuring the AMD Ryzen AI 9 HX 370 processor, it integrates 12 cores, 24 threads, and an AI NPU capable of up to 80 TOPS, making it suitable for AI-assisted workloads, virtualization, and content creation. The inclusion of AMD Radeon 890M integrated graphics allows for moderate gaming and GPU-accelerated tasks, while OcuLink support provides the option to attach an external GPU for additional performance. The system features three M.2 NVMe slots, dual USB4 ports, and dual 2.5GbE Ethernet, offering flexible storage and connectivity options. With a 140W internal power supply, the AI X1 eliminates the need for an external power brick, reducing cable clutter. Cooling and power efficiency have been addressed, with idle power consumption averaging between 19W and 23W and higher workloads drawing around 60W at 50% – does this sound like a min PC hybrid to a desktop solution? Let’s discuss the X1’s hardware, performance, AI capabilities, and expansion potential, assessing how well it meets the needs of AI developers, content creators, and general users seeking a high-performance compact system.
Minisforum AI X1 Pro Review – Quick Conclusion
The Minisforum AI X1 Pro offers a strong balance of performance, expandability, and AI acceleration in a compact form factor. It is suitable for AI-driven workloads, mid-range gaming, video processing, and professional applications. The integrated Radeon 890M GPU provides acceptable performance for gaming and AI-assisted tasks, but for more demanding graphical workloads, the inclusion of OcuLink allows users to connect an external GPU for greater flexibility. While the system includes high-speed storage options and multiple connectivity features, the lack of 10GbE networking may limit its usefulness in high-bandwidth data transfer scenarios. However, users can leverage Wi-Fi 7 or OcuLink adapters to expand networking capabilities if necessary. Overall, the Minisforum AI X1 Pro is a versatile mini PC with a focus on AI performance, storage expandability, and modular GPU upgrades. It is best suited for users who require a compact but powerful system for workstation tasks, AI processing, and moderate gaming, with the potential for external GPU scaling if additional performance is needed.
BUILD QUALITY - 9/10
HARDWARE - 10/10
PERFORMANCE - 10/10
PRICE - 7/10
VALUE - 8/10
8.8
PROS
Powerful CPU especially for a mini PC– The Ryzen AI 9 HX 370 is fast and handles demanding tasks well. AI Acceleration – Built-in AI processor speeds up tasks like image recognition and automation. Expandable Storage – Three M.2 SSD slots for fast and flexible storage upgrades. External GPU Support – OCuLink allows for a full-sized GPU to boost graphics performance. Fast USB4 Ports – Two high-speed USB4 ports for fast storage and external devices. Good Cooling System – Dual fans and metal heatsinks keep temperatures in check. Strong Connectivity – Wi-Fi 7 and dual 2.5Gb Ethernet for fast networking. No External Power Brick – Built-in 140W power supply keeps cables minimal. Comes with Windows 11 – Ready to use out of the box. VESA Mount Included – Can be attached to the back of a monitor or wall for space-saving.
CONS
Only Features Microsoft Co-Pilot out the box – Hard/impossible to easily switch to ChatGPT or DeepSeek etc Limited OCuLink Compatibility – External GPU and storage upgrades require specific hardware. Weird PSU Placement – The power supply sits above the SSD slots, which might affect cooling. Price - Pricing is a little mixed at launch store-to-store
The initial specifications of the Minisforum AI X1 Pro Mini PC will differ slightly depending on where you buy and the configuration you choose (i.e the base level memory and storage). Additionally, the system will always arrive with Windows 11 (officially licenced) preinstalled on an SSD in one of the M.2 NVMe Gen 4×4 slots.
Component
Specification
Processor
AMD Ryzen AI 9 HX 370 (12 Cores / 24 Threads, Zen 5 + Zen 5c)
Base Clock
2.0 GHz (Zen 5), 2.0 GHz (Zen 5c)
Boost Clock
Up to 5.1 GHz (Zen 5), Up to 3.3 GHz (Zen 5c)
TDP
28W (Configurable 15-54W)
L2 Cache
12 MB
L3 Cache
24 MB
Memory
Dual-channel DDR5 (Up to 96GB at 5600MHz, 2 SODIMM Slots)
The Minisforum AI X1 Pro features a compact, square-shaped chassis, slightly more symmetrical than other models in its category. The metal and high-quality plastic construction provides a balance of durability and heat dissipation. Ventilation grilles are positioned along the sides and top to facilitate airflow. The system also includes a built-in 140W power supply unit (PSU), eliminating the need for an external power brick, reducing cable clutter, and making it easier to mount or position on a desk.
The front panel houses a power button with an integrated fingerprint sensor, allowing for biometric authentication. There is also a USB4 port, a USB 3.2 port, an audio jack, and an SD card slot for additional storage. The rear panel features multiple USB ports, dual 2.5GbE Ethernet ports, an HDMI output, a DisplayPort output, an OcuLink port, and a USB 2.0 port. These connectivity options provide compatibility with a range of peripherals, storage solutions, and external displays.
A key feature of the design is its internal 140W PSU, an uncommon inclusion in mini PCs. This allows for direct AC power input using a standard two-pin connector. While the PSU is custom-designed and not easily replaceable with off-the-shelf alternatives, it contributes to the unit’s compact and cable-free design.
The cooling system is designed to manage heat efficiently, with airflow distributed across the chassis. The fan noise varies based on workload, but the thermal management system keeps temperatures under control, even under sustained usage.
Power consumption varies depending on workload. In idle conditions, the system draws between 19W and 23W, which is higher than most entry-level mini PCs due to its high-performance hardware. Under moderate load, including CPU and GPU utilization, power usage rises to 59W to 63W. While this consumption is significant for a compact system, it aligns with the performance level it delivers. The internal PSU ensures stable power delivery without requiring an external adapter.
During extended testing, thermal performance remained stable. Heat distribution was well-managed, with no significant thermal spikes even under stress. When measured with a thermal camera, the heat output was lower than other nearby high-performance networking devices in the test environment. The fan system adjusts dynamically based on workload, ensuring consistent operation without excessive noise.
The retail package includes the Minisforum AI X1 Pro unit, a power cable, a VESA mounting bracket, and documentation. The VESA mount allows users to attach the system to the back of a monitor or a wall for space efficiency. The package does not include a keyboard, mouse, or pre-installed operating system, meaning users will need to supply their own peripherals and software. The combination of a built-in PSU, multiple I/O options, and compact design makes it a practical option for users seeking a high-performance mini PC with minimal cable clutter.
Minisforum AI X1 Pro Review – Ports and Connections
The Minisforum AI X1 Pro includes multiple high-speed and legacy connectivity options across its front and rear panels, catering to a variety of use cases. The system supports USB4, USB 3.2, USB 2.0, Ethernet, HDMI, DisplayPort, an SD card slot, and OcuLink, making it a versatile device for professional workloads, gaming, and AI-assisted tasks. These ports enable peripheral expansion, high-speed data transfers, networking, and external GPU connectivity, providing a range of possibilities for users who require flexible hardware configurations. The placement of these connections ensures easy access to frequently used ports on the front, while the rear panel accommodates more permanent connections for external monitors, networking, and high-bandwidth storage solutions.
The dual USB4 ports, located on the front and rear, are among the most notable features, delivering up to 40Gbps of bandwidth. This allows for high-speed external storage, video output, and docking station compatibility. During testing, a USB4 external SSD achieved over 3GB/s in read speeds, confirming that the system fully supports the high-bandwidth capabilities of USB4. Write speeds were more dependent on the SSD’s own specifications, averaging around 1.8GB/s, aligning with expected performance for a drive of that type. The USB4 ports also allow for eGPU expansion, enabling the connection of an external graphics card via an OcuLink-to-USB4 adapter, though performance in this configuration may not match that of a direct OcuLink connection.
For wired networking, the system includes dual 2.5GbE Ethernet ports, offering a step up from standard 1GbE connections. This provides improved network throughput, lower latency for online applications, and better support for local file transfers and virtualized environments.
Testing in a peer-to-peer direct connection resulted in speeds averaging 2.35Gbps, demonstrating reliable real-world performance. While 2.5GbE is sufficient for most users, it may not be ideal for those requiring higher bandwidth network-attached storage (NAS) solutions or extensive multi-user workloads.
Wireless connectivity is handled by Wi-Fi 7, which supports the 6GHz spectrum and 320MHz channel width, providing increased speeds and reduced interference compared to previous wireless standards. When paired with a compatible Wi-Fi 7 router, the system achieved peak throughput of over 2Gbps, depending on environmental factors such as network congestion and signal strength.
Wi-Fi 7 allows for low-latency wireless networking, making it a viable option for high-speed transfers in environments where wired networking is impractical. Wireless performance remained stable across multiple test scenarios, demonstrating consistent connectivity and minimal packet loss.
The video output options include HDMI 2.1 and DisplayPort 2.1, allowing for multi-monitor setups with support for up to four simultaneous displays. The system can handle 4K at 240Hz, 1440p at 480Hz, and 8K at 60Hz, ensuring compatibility with high-refresh-rate monitors and high-resolution displays. Adaptive Sync and HDR support improve overall display performance, reducing screen tearing and improving color accuracy. During testing, dual monitor configurations using DisplayPort and HDMI simultaneously worked without issue, delivering consistent video output with no visible latency.
A key expansion feature is the OcuLink port, which provides direct PCIe-based external device connectivity, offering low-latency, high-bandwidth expansion options. In testing, an OcuLink NVMe SSD enclosure was detected immediately, allowing for storage expansion without compromising performance. The system also supported an external GPU connected via OcuLink, which significantly improved gaming performance, particularly in titles utilizing ray tracing.
The external GPU used in testing was the Minisforum MGA1, an eGPU enclosure featuring a NVIDIA RTX 4090 GPU, PCIe Gen 4 connectivity, and dedicated cooling for high-performance graphics processing. With the MGA1 connected, games that previously struggled with ray tracing saw substantial performance improvements, demonstrating the viability of OcuLink as a direct GPU expansion solution.
The USB 3.2 Gen 2 and USB 2.0 ports serve as additional expansion options, providing 10Gbps and 480Mbps transfer speeds, respectively. While USB 3.2 Gen 2 offers sufficient bandwidth for external drives and accessories, the USB 2.0 port is more suited to lower-priority peripherals such as keyboards, mice, and older external devices that do not require high-speed connectivity. Testing showed that USB 3.2 Gen 2 ports delivered consistent performance when used with high-speed external storage, achieving expected speeds for 10Gbps-rated SSDs.
Overall, the port selection provides a balance between modern and legacy interfaces, ensuring compatibility with a range of peripherals and expansion options. The inclusion of USB4, OcuLink, dual Ethernet, and multiple display outputs allows for high-speed data transfer, wired and wireless networking, and scalable performance upgrades. The lack of 10GbE may be a limitation for certain users, but the OcuLink port compensates by allowing direct PCIe expansion. With reliable wired and wireless networking, flexible video output options, and full USB4 bandwidth support, the Minisforum AI X1 Pro provides strong connectivity for a range of professional and consumer use cases.
Minisforum AI X1 Pro Review – Internal Hardware
The Minisforum AI X1 Pro features a compact yet high-performance internal hardware configuration, designed to balance processing power, cooling efficiency, and storage scalability within a small form factor.
At its core, the system is powered by the AMD Ryzen AI 9 HX 370, a 12-core, 24-thread processor with a hybrid 4x Zen 5 and 8x Zen 5c architecture.
This CPU supports clock speeds up to 5.1GHz, with a default TDP of 28W and a configurable range of 15W to 54W, allowing users to adjust power consumption based on workload requirements. Integrated into the processor is the AMD Radeon 890M GPU, which operates at 2.9GHz and supports modern gaming, AI workloads, and media processing.
The system memory consists of two SODIMM slots, allowing for expandable RAM configurations. The reviewed model included 64GB of DDR5-5600MHz memory, with the option to upgrade to a maximum of 96GB.
Unlike some mini PCs, the RAM is user-replaceable rather than soldered to the motherboard, offering future-proofing for users who may require higher capacity memory. The lack of ECC (Error-Correcting Code) support is a limitation for users requiring data integrity features, particularly in professional environments such as virtualization or enterprise workloads.
Storage is handled via three M.2 NVMe slots, all operating on PCIe 4.0 architecture.
Two of these slots run at PCIe 4.0 x4, providing 8GB/s of potential bandwidth, while the third slot operates at PCIe 4.0 x1, limiting its performance to 2GB/s.
This configuration allows for a mix of high-speed and archival storage, with the x1 slot being more suited for less frequently accessed data. During testing, Gen 4 NVMe SSDs in the primary slots achieved full bandwidth speeds, while the third slot demonstrated the expected performance limitations.
Cooling is managed by an internal metal L-shaped cooling system, which integrates two silent operational fans. The primary fan is located above the piped CPU cooling solution, which consists of a metal heatsink with multiple heat vents to improve thermal dissipation.
This cooling system ensures sustained performance under load, preventing thermal throttling during intensive processing tasks. The second fan is positioned over the Wi-Fi card and adjacent to the internal PSU, ensuring airflow distribution across multiple components.
The internal PSU is located directly above the M.2 NVMe slots, an unconventional placement compared to traditional desktop designs. This layout reduces the need for an external power brick, making cable management more streamlined. The 140W internal power supply is a proprietary design, meaning replacement may be more complex than standard off-the-shelf units.
Despite this, the integration of an internal PSU contributes to a cleaner workspace, avoiding bulky external adapters typically associated with compact systems. Nevertheless, the PSU living DIRECTLY above the m.2 NVMe SSD bays is kinda weird. It further exacerbates the need for the SSD bays to need m.2 heatsinks to allow heat dissipation, into the fan 5-6cm away.
In terms of noise output, the cooling fans remained quiet during idle and low-power tasks, with only minor increases in noise levels under high-load scenarios. The thermal camera testing indicated that the system’s heat distribution was well-managed, with the warmest areas located around the CPU and PSU exhaust vents. The Wi-Fi card and SSD slots remained within safe temperature ranges, confirming the effectiveness of the airflow design.
The internal hardware design of the Minisforum AI X1 Pro prioritizes performance, efficient cooling, and storage flexibility. While the PSU placement above the NVMe drives is unusual, it does not appear to cause excessive heat accumulation. The combination of a high-performance processor, scalable RAM and storage, and a well-managed cooling solution ensures that the system is capable of handling a range of demanding workloads, from AI-assisted tasks to content creation and gaming.
Minisforum AI X1 Pro Review – Performance and Testing
The Minisforum AI X1 Pro integrates the AMD Radeon 890M GPU, which operates at 2.9GHz and features 16 compute units. While it lacks the power of a dedicated high-end GPU, it is capable of handling mid-tier gaming and graphical workloads. During testing, Call of Duty: Warzone was run on high settings, achieving playable frame rates without an external GPU. Performance remained stable, though demanding titles with ray tracing and high-resolution textures exhibited performance limitations. The system supports external GPU expansion via OCuLink, and testing with the Minisforum MGA1 eGPU—equipped with an AMD Radeon 7600M XT (32 compute units, 8GB GDDR6 memory, 120W TDP)—significantly enhanced graphical capabilities, particularly for ray tracing and high-resolution gaming.
The OCuLink expansion port enables a direct PCIe-level connection to external GPUs, providing higher bandwidth than Thunderbolt-based solutions. When using the MGA1 eGPU, performance improvements were immediately evident, with games running at higher frame rates and improved graphical fidelity.
This configuration allows users to scale graphical performance without replacing the base system, making it an efficient option for users requiring additional power for AI tasks, rendering, or high-end gaming.
However, OCuLink accessories are currently less common than standard eGPU enclosures, which may limit hardware compatibility options.
In terms of using the Minisforum X1 Pro in more NAS deployment utilities, the testing is still in progress (and I will make a separate video and article soon), but early testing has been very positive. Uutilized half of the available threads as vCPUs in 12 Windwos 11 VMs (each with 2GB Memory) and they ran great (at that point, my own recording machine and the UI itself became the only limitation.
Likewise, with PLEX Media server, I was able to stream 8x 1080p 100Mb (bitrate) video files at once without stressing the CPU, then 10x 4K 60Mb – still positive. Finally, I went into 8K media (something that PLEX itself is poorly optimized for) and streamed 5x 8K High end files at once (mixed native and on-the-fly conversions). In all cases, the Minisforum X1 Pro worked like a charm!
The rest of the performance benchmarks on the individual m.2 slots are still undergoing testing, as well as connecting a 4x M.2 NVMe SSD expansion device from Aoostar via Oculink.
AI processing is a core feature of the AMD Ryzen AI 9 HX 370 CPU, which boasts up to 80 TOPS (Tera Operations Per Second) and a dedicated 50 TOPS NPU (Neural Processing Unit) for AI-assisted tasks. Benchmarks using Geekbench AI indicated strong performance in OpenVINO-based workloads, with a 5024 overall AI score.
Image-related AI tasks, including image classification, object detection, and segmentation, demonstrated higher inference speeds on OpenVINO compared to ONNX, with quantized processing delivering the best overall efficiency. AI-driven tasks such as style transfer, depth estimation, and pose estimation showed notable acceleration compared to traditional CPU-only inference. Testing with ONNX-based AI models resulted in a lower AI benchmark score of 3614, reflecting reduced optimization for this framework. Despite this, the system still delivered usable performance for machine learning inference and AI-based enhancements, though OpenVINO remained the preferred framework for faster execution times and more efficient workload handling. AI-assisted image enhancement and real-time video analysis tasks performed well, making the system suitable for workflow acceleration in content creation and automated AI-based applications.
Category
Specification
Operating System
Windows 11 Pro (64-bit) (Linux support: Ubuntu, RHEL)
Limited without eGPU, decent with OcuLink external GPU
External GPU (OcuLink, eGPU tested with Minforum eGPU)
Massive improvement in ray tracing performance
Best Use Cases
AI-powered Video & Image Processing
Great for 4K upscaling, AI-style transfer, motion tracking
AI-assisted Creative Workflows
Optimized for Adobe AI tools, DaVinci Resolve AI features
Real-time AI Automation & Security
Object recognition, face detection, smart surveillance
AI-assisted Audio & Text Transcription
Speech-to-text, real-time subtitle generation
Gaming (Casual to AAA, with eGPU Support)
Decent native performance, great with eGPU via OcuLink
Limitations
✘ Not Ideal for LLM Model Training
Lacks high-end CUDA acceleration for AI model training
✘ ONNX Performance is Weaker
Better results using OpenVINO for AI inference
✘ No Built-in 10GbE
Only 2x 2.5GbE, no native 10GbE option
Connectivity & Expansion
eGPU Support
OcuLink, USB4 (Supports external RTX 4090 or similar GPUs)
Max Displays
4 Monitors (4K/8K multi-monitor setup)
External USB4 Storage
Achieved 3GB/s read speeds (USB4 SSD tested)
The X1 delivers capable performance in graphical processing, AI workloads, and high-speed storage applications. While the integrated GPU is suitable for mid-range tasks, external GPU expansion significantly enhances performance. AI capabilities, particularly with OpenVINO, demonstrate strong inference speeds for image processing, object detection, and machine learning inference. Storage performance meets expectations, with Gen 4 speeds available on the primary slots and USB4 providing high-speed external storage options. These features position the system as a versatile solution for power users, AI developers, and content creators. But keep your expectations realistic and in perspective for a mini PC nonetheless!!!
13/02/25 Update from Minisforum, re: AI local Deployment:
Our AI X1 Pro can support Deepseek local deployment.
Minisforum AI X1 Pro Review – Conclusion and Verdict
The Minisforum AI X1 Pro is a compact but powerful mini PC designed for users seeking a balance of CPU performance, AI acceleration, and expandability. It features the AMD Ryzen AI 9 HX 370 processor, which delivers strong multi-core performance with 12 cores, 24 threads, and a 50 TOPS NPU for AI workloads. The integrated AMD Radeon 890M GPU provides adequate graphical performance for mid-tier gaming and GPU-accelerated applications, though it benefits significantly from external GPU expansion via OCuLink. With support for up to three M.2 NVMe drives, dual USB4 ports, and dual 2.5GbE networking, the system is versatile in both storage and connectivity. While the lack of native 10GbE may be a drawback for high-bandwidth network users, the Wi-Fi 7 support provides a wireless alternative with high-speed connectivity options.
In terms of real-world performance, the system delivers strong results in AI-driven applications, particularly those optimized for the OpenVINO framework, where it achieved higher inference speeds compared to ONNX-based workloads. Gaming performance is reasonable on the integrated GPU, but ray tracing and high-end graphical tasks require an external GPU, such as the Minisforum MGA1 eGPU with an AMD Radeon 7600M XT, which was tested and demonstrated significant performance improvements. The internal 140W PSU eliminates cable clutter, but its placement above the M.2 slots is unconventional and may require additional SSD heatsinks for efficient cooling. Thermal management is well-executed, with a dual-fan system and metal heatsink design keeping temperatures stable during sustained workloads.
The Minisforum AI X1 Pro is best suited for AI developers, content creators, and users requiring a small yet powerful workstation. It provides AI acceleration, high-speed storage, and expandable graphics options, making it a versatile hybrid between a mini PC and a desktop-class solution. While not ideal for intensive LLM training or high-end gaming without an external GPU, it excels in AI-assisted workflows, video processing, and multi-tasking applications. The inclusion of OCuLink for PCIe expansion allows for long-term scalability, giving users the option to upgrade GPU or storage performance as needed. For those seeking a high-performance compact system with AI processing capabilities, the Minisforum AI X1 Pro is a capable and well-rounded option.
PROS of the Minisforum AI X1 Pro
CONS of the Minisforum AI X1 Pro
Powerful CPU especially for a mini PC– The Ryzen AI 9 HX 370 is fast and handles demanding tasks well.
AI Acceleration – Built-in AI processor speeds up tasks like image recognition and automation.
Expandable Storage – Three M.2 SSD slots for fast and flexible storage upgrades.
External GPU Support – OCuLink allows for a full-sized GPU to boost graphics performance.
Fast USB4 Ports – Two high-speed USB4 ports for fast storage and external devices.
Good Cooling System – Dual fans and metal heatsinks keep temperatures in check.
Strong Connectivity – Wi-Fi 7 and dual 2.5Gb Ethernet for fast networking.
No External Power Brick – Built-in 140W power supply keeps cables minimal.
Comes with Windows 11 – Ready to use out of the box.
VESA Mount Included – Can be attached to the back of a monitor or wall for space-saving.
Only Features Microsoft Co-Pilot out the box – Hard/impossible to easily switch to ChatGPT or DeepSeek etc
Limited OCuLink Compatibility – External GPU and storage upgrades require specific hardware.
Weird PSU Placement – The power supply sits above the SSD slots, which might affect cooling.
Price – Pricing is a little mixed at launch store-to-store
This description contains links to Amazon. These links will take you to some of the products mentioned in today's content. As an Amazon Associate, I earn from qualifying purchases. Visit the NASCompares Deal Finder to find the best place to buy this device in your region, based on Service, Support and Reputation - Just Search for your NAS Drive in the Box Below
Need Advice on Data Storage from an Expert?
Finally, for free advice about your setup, just leave a message in the comments below here at NASCompares.com and we will get back to you.Need Help?
Where possible (and where appropriate) please provide as much information about your requirements, as then I can arrange the best answer and solution to your needs. Do not worry about your e-mail address being required, it will NOT be used in a mailing list and will NOT be used in any way other than to respond to your enquiry.
[contact-form-7]
TRY CHAT Terms and Conditions
If you like this service, please consider supporting us.
We use affiliate links on the blog allowing NAScompares information and advice service to be free of charge to you.Anything you purchase on the day you click on our links will generate a small commission which isused to run the website. Here is a link for Amazon and B&H.You can also get me a Ko-fi or old school Paypal. Thanks!To find out more about how to support this advice service checkHEREIf you need to fix or configure a NAS, check FiverHave you thought about helping others with your knowledge? Find Instructions Here
Or support us by using our affiliate links on Amazon UK and Amazon US
Alternatively, why not ask me on the ASK NASCompares forum, by clicking the button below. This is a community hub that serves as a place that I can answer your question, chew the fat, share new release information and even get corrections posted. I will always get around to answering ALL queries, but as a one-man operation, I cannot promise speed! So by sharing your query in the ASK NASCompares section below, you can get a better range of solutions and suggestions, alongside my own.
UniFi Express 7 Review – The Affordable UniFi Gateway?
UniFi has seriously hammered the subject of Wi-Fi 7 into their existing portfolio at an alarming speed, but it’s easy to forget that just half a year ago, there wasn’t a single Wi-Fi 7 solution in their lineup. Fast forward to February 2025, and they’ve now established every single kind of Wi-Fi 7 home/business appliance you could ever need. The latest entry into this product range is the compact and expandable UniFi Express 7. Serving as a compact and affordable entry point into establishing your own UniFi network, this device removes many of the physical Ethernet connections found on a typical router and instead prioritizes a small but easily expandable wireless networking solution to grow your network ecosystem. Arriving at $199, the UX7 was launched alongside the UniFi Dream Router 7 (UDR7) and UniFi Cloud Gateway Fiber (UCG-Fiber)—three very similar devices designed to serve different kinds of Wi-Fi/wired network deployments, all offering a similar level of network control that, until now, was only really available in the UniFi Dream Machine series. However, the UniFi Express 7 is the most compact of the three new releases, and with that, it also scales back some of the feature sets found in those more powerful devices. So, is the UniFi Express 7 the best gateway device for your needs? And does its focus on gradual network expansion over out-of-the-box hardware features make it the right fit for your growing home or business network? Let’s find out in this UX7 review.
UniFi Express 7 Review – Quick Conclusion
Honestly, I kind of wish UniFi had launched the UX7 about six months ago. The UniFi Express 7 gateway is an impressive little device, and when you factor in the license-free architecture, alongside its $199 price tag for a fully Wi-Fi 7, 6 GHz-ready box, it’s hard to call this bad value. However, launching this device between the UniFi Dream Router 7 (UDR7) and the UniFi Cloud Gateway Fiber (UCG-Fiber) makes it look like the weaker option of the three. And while the UX7 certainly has network expandability and appeal, I strongly recommend anyone considering it to first check out the UDR7 or UCG-Fiber. That said, for its niche, highly scalable, and modular network appeal, the UX7 delivers exactly what UniFi promises. It’s certainly worth the $199 price tag, but keep in mind that it is designed first and foremost as a network gateway. You will struggle to fully unlock its potential without integrating a UniFi switch or expanding into an existing UniFi network.
BUILD QUALITY - 8/10
HARDWARE - 8/10
PERFORMANCE - 8/10
PRICE - 9/10
VALUE - 8/10
8.2
PROS
Affordable Entry Point – At $199, it’s one of the most budget-friendly ways to start a UniFi network with Wi-Fi 7 capabilities. Compact & Energy Efficient – Small footprint (11cm²), lightweight (422g), and low power consumption (22W max) make it ideal for home and office environments. Wi-Fi 7 & Tri-Band Support – 2.4GHz, 5GHz, and 6GHz bands with Multi-Link Operation (MLO) for better speed, lower latency, and improved reliability. 10GBASE-T WAN Port – Supports high-speed internet connections, making it future-proof for faster broadband rollouts. Scalable with UniFi Ecosystem – Easily integrates into an existing UniFi setup with mesh Wi-Fi, UniFi switches, and other devices. Powerful UniFi Software – Full UniFi Controller suite with advanced network management, security, VLANs, and traffic analytics. USB-C Power Input – Simple and universal power delivery, allowing for flexible placement and easy powering via third-party adapters.
CONS
Limited Wired Connectivity – Only one 2.5G LAN port (no PoE), making wired expansion less convenient compared to UDR7 or UCG-Fiber. No Built-in Storage – Cannot run UniFi Protect or other UniFi applications natively, requiring external UniFi hardware for advanced services.
Considering that this tiny device features tri-band Wi-Fi, 10G networking, and 2.5G networking, it’s kind of bonkers how small it is. Equipped with an internal quad-core ARM processor and 3GB of DDR4 memory, these modest yet highly capable internal components are more than enough to keep your data moving smoothly. The $199 launch price of the UX7 puts it slightly closer to the price of most Pro-sumer routers. While it’s not overpriced, some users may question whether there are better, more hardware-capable devices available at a similar price point in early 2025.
However, the main appeal of that price point is not exclusively about the hardware, and you have to factor in that this device is bundled with the UniFi software, offering full integration and utility of said hardware. This tiny box is able to host full control of a UniFi network, managing—via a single pane of glass interface—over 30 individual UniFi-connected/adopted devices and well over 300 clients at any given time. A big part of the appeal of UniFi products is that single ecosystem, and once you factor in that platform alongside the hardware, the $199 price tag starts to make a lot more sense.
Although the system features two copper connections on the rear, the priority of the device will always be Wi-Fi connectivity. This small box is able to cover up to 1,500 square feet of wireless connectivity, but do factor in walls and rooms—of course! A lot of this coverage depends on the antenna and frequencies your client devices choose to use, and in that regard, the UX7 continues to push the boundaries.
Scaling things up from the previous generation UniFi Express device, the UX7 supports Wi-Fi 7, Wi-Fi 6E, Wi-Fi 6, and traditional legacy Wi-Fi. Although the device has no external antenna, there are strategically placed antennas throughout the inside of this device. Thanks to the increased 6 GHz frequency access via the 2×2 6 GHz antennas inside and Wi-Fi 7’s utilization of 320 MHz channels, this opens the door to substantial performance increases in the UX7 over its predecessor.
Additionally, Wi-Fi 7 integrates Multi-Link Operation (MLO), which means Wi-Fi 7-supported client devices can create multiple simultaneous connections over different frequencies, drastically enhancing wireless performance—to the point where it dwarfs traditional wired connections.
The 6 GHz band has a shorter coverage distance than 5 GHz, and likewise 5 GHz has a shorter range than 2.4 GHz. Although Wi-Fi 7 certainly solves many issues related to maximizing available radio frequencies, keep in mind that distance will still be a factor. Because of the small scale of this device, there are questions about true distance coverage compared to a router with more antennas and external antennas. Depending on the number of simultaneous frequencies via MLO that your client device can utilize, the maximum performance potential of this device will differ. However, across all of the available bands, you can achieve:
688 Mbps maximum bandwidth on the 2.4 GHz frequency,
4.3 Gbps performance on the 5 GHz frequency,
A whopping 5.7 Gbps potential on the 6 GHz frequency.
Consider these more of a guideline to the larger shared bandwidth across multiple client devices, but nevertheless, they still indicate the performance potential of this tiny box once it’s integrated into your network. Although we will delve into more detail about security and encryption later in the review, it’s also worth highlighting that this system supports encrypted protocols all the way up to WPA3 for wireless transmissions. The UniFi Controller software provides an almost unrivaled level of network security management and troubleshooting, with controls extending down to individual devices, groups, VLANs, and MAC addresses.
This means that even if you begin integrating third-party hardware into your network environment or stick to UniFi client devices as you expand upon this gateway device, the lock-and-door approach to your ISP services will always be significantly tighter thanks to having the UX7 as your gateway. Moving over to the wired connections, the system features a 2.5G Ethernet port that is utilized as a LAN connection. This means you can integrate an existing switch and expand your UniFi network toward more wired devices, as well as creating multiple virtual LAN arms in your network environment.
Unfortunately, this 2.5G port does not support Power over Ethernet (PoE), which means any connected devices will need their own power source. This is a shame, because both the simultaneously released UDR7 and UCG-Fiber devices each include a PoE port, making wired expansion with UniFi switches much cleaner and more convenient.
Nevertheless, it’s good that standard Gigabit Ethernet is absent in favor of 2.5G Ethernet, allowing for 2.5 times the performance of traditional and legacy networks.
Interestingly, the UX7’s WAN port is a 10GBASE-T copper connection! Most users would have assumed that this compact device would arrive with 10G SFP+, as is common with most UniFi devices. However, opting for traditional copper 10G means that as ISP services globally begin to exceed Gigabit speeds, the UniFi Express 7 gateway will not create a bottleneck, allowing your network to fully enjoy those higher speeds as they become available. This also means that this tiny box is future-proofing your internet service gateway for a considerable length of time as better connectivity options arrive. Nevertheless, I’m a little disappointed that you cannot set the 2.5G port as your WAN, thereby allowing you to dedicate the 10G connection as a wider LAN connection. This would have been beneficial when using it alongside a traditional 10G NAS system or a larger switch that would take greater advantage of 10G network speeds. Very few users in the next few years will have internet speeds exceeding 2.5G (regardless of whether you are a home or business user), so fixing the 10G connection as the only WAN port feels like overkill for many. CORRECTION! You CAN set the 2.5G as a WAN port, but you need to manually change the initial 10G WAN port to LAN or Disabled FIRST, then the option to select 2.5G as a WAN will appear!
Impressively, the device is powered by a standard USB-C PSU, which is included in the kit. It’s probably no surprise that this device is quite power-efficient, factoring in the ARM CPU alongside the system’s prioritization of Wi-Fi connectivity out of the box rather than LAN/physical WAN connections. At peak Wi-Fi bandwidth utilization, with an active 10G connection, UniFi reports that the device draws just 22 watts at peak usage. Realistically, the device will spend 90% of its time operating at a fraction of this power consumption. Another major difference between the UX7 and other UniFi network management devices released in the last 12 months is that this system does not feature any internal storage or expandable storage via an SD card or USB port.
This means that the system is unable to host popular UniFi add-on applications for surveillance, in-house communication hardware, or dedicated UniFi hardware appliances. These features can still be added via an expanded UniFi network client installation over time, which is why this device is so affordable compared to other solutions. It is designed around gradually expanding your hardware network. That said, it’s a real shame that this device does not include any baseline storage out of the box, as many users would have wanted to utilize it as the base for a convenient and easy-to-deploy UniFi Protect surveillance device. As mentioned earlier, the UX7 is quite a niche device, making it difficult to compare against an already well-provisioned router or business gateway device. The hardware design and connectivity of the UX7 are optimized for a small, compact UniFi gateway deployment, but it also includes provisions for future scalability with wireless access points (for mesh networking) and UniFi switches for expanded connectivity later.
In that vein, let’s now discuss the UniFi Controller software and how the Express 7 takes advantage of it today—while also promising greater expansion capabilities in the future.
UniFi Express 7 Review – Software and Services
IMPORTANT !!!- Currently the Software review of the Ux7 is in progress, but I have already reviewed the UDR7 device which is very similar indeed. So, whilst I complete the UCG-Fiber and UX7 review, I have included the software review of the other 2 devices below, as they are running near identical services and features (but with differences with regard to port/wifi features. I will be amending the below text very soon, but include it here to give a better understanding of what this UniFi controller software can do. Apologies for this in the meantime.
Realistically, no one should be spending inordinate amounts of time using the software that your router arrives with – that’s just a simple fact. Indeed, you want you router (or any network appliance) to just do it’s job! Therefore talking about just how good the UniFi network software is, and how the UniFi Dream Router 7 capitalized on it, is going get a mixed reaction depending on your own level of network knowledge and custom requirements. I will say straight away though that you will really, REALLY struggle to find a more capable and flexible router software at this price point. You will struggle to find ANY setting, config, adjustable parameter of control measure not included with the UX7. First off, there is the mobile application. As the UX7 hosts the UniFi network software, ALOT of the iOS and Android official UniFi applications are supported by the UX7.
Firs time setup of the router using the mobile application (you can use a desktop machine with your web browser if you prefer of course) is incredibly straight forward. The Router can be found via the local area network or Bluetooth within 2 minutes of it’s first power-on. One big misconception (I was guilt of this too a while back) was that you have to register a UI.com account online in order to use UniFi appliances. This is NOT true. You can set the device up without a UI account (and even WITHOUT an internet connection) and doing so just needs to you create a local administrator account. It is recommended to use a UI account of course, as it allowed for easier comms and access for your larger Unifi network, but it is by no means compulsory. You can also create a system backup (with your config data of users, settings, SSIDs, etc) and backup online if you choose – and then easier pull this backup if you wish during initialization easily.
Upon creating local credentials or resisting an online account, the router performs an initial internet performance test and then goes about setting up your router. Much like other recent UniFi releases, the system has a ‘gamer’ style installation screen that shows tips and guides on how to get the most out of your router – very rare in a router I will say.
The setup process takes around 2-3 minutes and after that, you have pretty much FULL control and access to the Router’s configuration from your mobile phone. You can definitely tell that UNiFi have put the hours in with regard to the UX of the mobile application. Routers (and switches for that matter) are NOT easy systems to try and simplify – let along ocndence in a compact mobile UI. However they really have excelled in the latest version of their software.
Management of individual devices on the network are all presented intuitively in the app, and alongside their position/priority/bandwidth/consumption being presented, you can also use the app to institute controls and rules for 1, some or all devices on the fly – with instant implementation. Again, it’s no the fact that you can ‘do’ this that I am impressed by, it is the ease and intuitive way it is presented in a mobile app.
The same applies to the physical connections and wireless connections on the UX7 itself, with full remote control with the app to bridge, negotiate, failover, vLAN, disable, etc any port easily – as well as create new SSIDs, assign channels and push client devices around on the router side in 3-4 clicks. All of this is performed responsively and easily in the app.
On the subject of client devices, let’s discuss that WiFi 7 support. WiFi 7 opens up ALOT of performance and general bandwidth advantages. WiFi routers and client devices have been around now for around 10-12 months, as well as the increase in availability globally of greater than Gigabit internet services. Most internet service providers have already a router with their services – but not many provide WiFi 7 routers with their services, even at greater than gigabit speeds. So, what is the advantage? For the quicker (ish) version, watch my video below.
Now, you might well not have any devices right now that are WiFi 7, but plan on upgrading to WiFi 7 at some point in the further over a PCIe upgrade card. Even if you are using a system that lacks a PCIe upgrade clot, you can get small m.2 upgrade cards for a WiFi 7 / 802.11be upgrade for as little as $15-20 here. Hell, you do not even need to open up your system, as you can now get WiFi 7 to USB adapter upgrades for as little as $25-30, which is exactly what used when testing the router with my Windows 11 laptop for the earlier testing of the UDR7.
The USB-to-WiFi 7 Adapter I used in my testing of the UDR7 was this one HERE on Aliexpress.
This USB to WiFi 7 adapter allowed for immediate 802.11be connectivity between my laptop and the UniFi Dream Router 7, over the now available 6Ghz band. Although there is more to WiFi 7 and this router than just that additional frequency. The UX7 SUPPORTS 2.4Ghz and 5ghz (just like all WiFi 6 and 6E routers), but crucially alongside the 6Ghz band allowing for more active concurrent connections, you are also able to take advantage of 320Mhz bandwidth (till now WiFi 6/6E only allowed for up to the 160Mhz connections). This means that you have a greater bandwidth per connection – though you can only have a finite amount of connections at 320Mhz at once. This is COMBINED with WiFi allowing for overlapping connections too and 1 device enjoying multiple connections at once.
This means that not only can you match the speed of a normal wired gigabit connection, but you can ABSOLUTELY SMASH IT! As you can see below, using this USB adapter on my regular windows laptop, connecting to the UniFi Dream Router 7 over the 6Hz band – I was able to hit 2.8Gb/s wireless connectivity!!! That is even faster than using one of the physical 2.5GbE connections on the UX7.
It’s worth remembering though that WiFi 7 is NOT perfect and although it presents a lot of benefits for bandwidth improvements, reduced latency and increased encryption options, support of the wider frequencies and abilities of a larger WiFi 7 populated network are still a little ‘early days’.
By that, I mean that although you can hit high performance with 320Mhz connections, the actual radio frequency opened up right now (depending on your region) is pretty slim. The UX7 DOES show you the full radio spectrum, separated dynamically with each 20/40/80/160/320Mhz block that is spread across 2.4/5/6Ghz – but ALOT of it is still unavailable to use in many regions.
These limitations are likely going to reduce over time and, therefore you have to look at a decent % of the WiFi capabilities of the UniFi Dream Router 7 as ‘future proofing’ – but just keep in mind that although you can deploy ALOT of wireless (and wired) devices in a UX7 managed environment, those peak 802.11be/WiFi 7 bandwidth improvements are going to be shared only by a few client devices – in reality the real benefits are going to be felt with the opening up of the 6Ghz frequency allowing for more devices to be spread over all three frequencies and bands at 80/160Mhz.
Anotehr note to keep in mind is that the 6Ghz band has a shorter area of effect than 5Ghz (which likewise has a shorter area than WiFi 5). So WiFi7 is at it’s best in closer proximity without walls – more as a cable alternative if you are in the same areas as your UniFi router. But when I connected to a 10GbE NAS (connected to the 10GbE port of my UCG-Fiber), I was able to hit 187MB/s write easily (though read performance was oddly inconsistent – possibly related to the NAS, still investigating – TBC) in CrystalDiskMark.
Likewise, similar testing with the WiFi 7 USB Adapter, through the UX7 and at the 10GbE connected NAS hit 260MB/s+ easily. Once again, I would have easily respected this if I had been connecting with the NAS using the 2.5GbE ports – but I am hugely impressed that I was able to hit this benchmark over a WiFi connection (thanks to that 2.8Gbps 6Ghz setup). Respect!
Additionally, it is very easy to monitor the position, WiFi coverage, Channel and performance of any device connected to the UX7 controller software. Also allowing you to create rules on the fly to automatically manage them later as/when devices arrive.
These same controls also extend all the way down to the ISP input of the UX7 AND IF YOU HAVE MULTIPLE uNIfI AP/Nodes in your setup, can control how/where bandwidth is allocated and the priority of devices/nodes that are unique to your own deployment.
The dashboard features a grouped UI and analytics overview that allows you to see the price traffic that is going into a physical LAN, grouped VLAN or just a single devices on the network – allowing you to see the sites/services/geo data in real time too!
And likewise as before, you can extent these analytics all the way to the root UX7 router to see EVERYTHING happening in realtime in your network and internet connectivity.
Blacklisting (and whitelisting occasionally) or certain websites is also easy to action manually when needed too – or you can import an existing database of ‘bad’ site lists directly into the UX7 to simplify the process.
Once rules, priorities, orders of services and limits have been created, you can then apply them to individual devices, networks, groups, vLANS, etc – even to a physical LAN port if needed. These rules are completely customizable and if 1 parameter is changed on the fly, it immediately actions across all selected devices.
It’s also worth highlighting that UniFi has its own enterprise user identity service (‘Identity Endpoint’) that you can apply to devices if you want to ensure that connected devices on the LAN or WAN are truly secure (client auth tools on each device) and this extends to the VPN and UniFi network client device access too.
I also should stress that although the UX7 seems like a very, VERY proprietary router – UniFi do NOT lock you into having to create an account with them or use only their services. You can set the system up for LOCAL ONLY management and control if you choose. Or even hybrid the two and create 1 secure ‘Identity Endpoint sys admin’, but others are ‘local’ only – nice balance tbh.
And new users (super user or billy basic!) can be created, modified and deleted at any time!
Control and configuration of the UX7 are very straight forward and there are pretty high end configuration options in the backend of the system to control both the local network setup, as well as WiFi connectivity out the box (or added later in the case of systems like the UCG Fiber via the U7/U7 Pro/U6).
And professional SI’s/Technicians can set the system to ‘truly open’ if they wish, and this can be securely controlled as needed. This allows for opening up frequencies in the case of a WiFi setup down the road and advanced settings related to antenna gain/adaption.
The system configuration and control are surprisingly extensive for a $279 router and puts it well, well into the realms of an enterprise-grade solution, despite its Prosumer/SMB price point.
Unsurprisingly, the UX7 has internet speed test tools (either using the native web browser GUI or the WiFiman application for Android/iOS).
But its goes further, with the ability to monitor the packet management in your network (covered earlier) to such as extent that you can even block the server calls to specific sites/vendors that are going through the UniFi manager and block them SPECIFICALLY. Eg, want to keep google services, but NOT YouTube (either for work/professional reasons, or because of your kids homework deadline?) – you can do that REALLY easily.
And you can apply these rules easily and analytics with ease via the topographical network monitoring window. So you can visually see the devices in the network, then apply the rules, in case a new device gets sneakily added to circumnavigate any limits/restricts in palce.
And if you see a sudden spike in internet use, you can (in seconds) isolate the device that is causing it AND see what it is – allowing yo to block/monitor as needed.
Equally, you can set some pretty extensive security provisions to pre-emptively kick in when an unknown device arrives on the scene, or if an existing device in the network begins to be suspicious.
The same goes for creating day 1/100 rules for port forwarding, traffic management and Firewall rules. All of this is HUGELY customizable and most pages in the UniFi GUI feature both ‘simple/easy’ views, as well as much more complex advanced views as needed at the top of each page.
The multiple LAN ports can also be scaled up/down as needed if your existing network is not quite ready for the full network connectivity of the UCG-Fiber too.
And thanks to the UX7 featuring multiple WAN ports, you can decide how you want to handle multiple ISP services into your home/business, to separate/combine/balance between them with ease across your connected devices.
Additionally, each WAN port can be adjusted to a ‘WAN’ or ‘LAN’ roles as needed – even disabled. So, whether it is as a failover internet connection, or that you want to free up that 10GbE port for use as a LAN – The choice is yours!
Also, as mentioned earlier, as the system supported internal storage via the slot, you can go ahead and run UniFi Protect surveillance software too – as well as as an additional switch to the available LAN ports, for cameras or add a camera to the POE port.
There are actually several different surveillance, communications, display or smart appliances in the UniFi portfolio that can be installed on the internet storage drive + also means you have more scope for that POE ready port.
It gets to a point (perhaps) that there are TOO many security and configuration options, and people looking for just a router to ‘just do it’s job’ will be somewhat overwhelmed. Most of the important settings are already set pretty well, but I never the less recommend first time buyers take the time to explore the configuration options present in order to better understand what they are buying here in terms of it’s abilities to protect your network and internet services.
This extends right the way down to the more advanced prevention and intrusion protection measures (Dark Web blocking too). Again, pretty advanced for many, but take the time to look through them if you purchase the UX7.
And if in doubt, you can use the UniFi Teleport VPN service to anonymize your site-to-site exchanges (again, very ‘first party’ and more about SD-WAN level stuff, but does form part of the purchase here).
Also, keep in mind that the UX7 has the option to create Airgaps in it’s wired network AND WiFi connectivity (if you want to add that) that allows you to create automated access times – especially useful for businesses who want to lock down access outside of the usual 9-5 operational hours.
If you want to use WiFi services, yo can create multiple SSIDs of varying degrees of access – and yes, all the controls on security, speed, antenna, frequency, vLAN, etc are all present here too.
When creating those VLANS, you can add specific physical ports, IDs, WiFi APs etc to that vLAN to segregate your network as securely as possible.
And from there you can adjust the vLAN configuration in terms of it’s smooth operation and security directly from the network management panel (as well as view all active vLANS on one page if needed to see how they interact/clash + show each device you have moved in/out of them easily.
And again, all packet management/monitoring are available within the vLAN if you need.
If this all sounds tremendously intimidating, there is a much, MUCH easier 1 panel view in the ‘Insights’ tab that just shows each current network branch and it’s connections/clients in a list format.
Not good enough? How about a global view that shows the data packet exchange in real time with regard to each region (i.e worried that your data is being harvested to an overseas location, this will show you which countries are currently connected with on your UCG-Fiber for upload/download (websites? server? It’s easy to check and find out here!).
Bottom line – the bulk of the UniFi Control Software here is available on the majority of UniFi Router, Express, Cloud Gateway and Dream Machine devices – but the EXTENT to which you can use it is heavily dependent on the device you buy. In the case of the UX7, you have a fantastic balance of Day 1 control sure, but you have an even better management and scalability on the system for when your ISP services double/triple, as well as the number of devices in your network expand.
UniFi Express 7 Review – Verdict and Conclusion
If the UniFi Express 7 had been released about six months ago, I think it would stand out considerably more than it does right now. However, sandwiching its launch between the Wi-Fi 7 UDR7 and the highly LAN-capable UCG-Fiber device somewhat muddles the launch of the UX7. The UX7 is a highly capable and highly expandable appliance that serves as an affordable, low-footprint way for home and business users to begin integrating UniFi into their network. Had this cloud gateway device arrived before the Router 7 or Fiber device, I think its integration would have been hugely appealing. However, given the small $49–$79 price difference between the Router/Fiber devices that UniFi launched at the same time, the UX7 does feel a bit underwhelming by comparison. That isn’t to say that the UX7 is a bad device! It really isn’t. UniFi has crammed a huge amount of capability and expandability into an exceedingly small frame, at just 11 cm²!
This is by far the smallest tri-band Wi-Fi 7 fully capable router-style device that I’ve ever seen, and it arrives at a lower price point than Wi-Fi 7 alternatives from Amazon or Google right now. It is also substantially easier to expand into mesh networks, thanks to the U7, U7 Pro, U6, and U6 Wall devices. Equally, the ease of adoption and integration of UniFi switches into the UX7 down the road means that you can granularly and much more affordably expand your network of UniFi devices over the years. This is a great deal easier than having to spend more money upfront on hardware that you may not even fully utilize in your network for a few years to come. Future-proofing and expandability are once again the key selling points here, but just keep in mind that there are alternatives to this product (including from UniFi themselves) available right now. It would be wise to spend a little more time considering whether those slightly more hardware-rich devices—at less than $100 more from UniFi—might be better suited to your needs.
PROS
CONS
Affordable Entry Point – At $199, it’s one of the most budget-friendly ways to start a UniFi network with Wi-Fi 7 capabilities.
Compact & Energy Efficient – Small footprint (11cm²), lightweight (422g), and low power consumption (22W max) make it ideal for home and office environments.
Wi-Fi 7 & Tri-Band Support – 2.4GHz, 5GHz, and 6GHz bands with Multi-Link Operation (MLO) for better speed, lower latency, and improved reliability.
10GBASE-T WAN Port – Supports high-speed internet connections, making it future-proof for faster broadband rollouts.
Scalable with UniFi Ecosystem – Easily integrates into an existing UniFi setup with mesh Wi-Fi, UniFi switches, and other devices.
Powerful UniFi Software – Full UniFi Controller suite with advanced network management, security, VLANs, and traffic analytics.
USB-C Power Input – Simple and universal power delivery, allowing for flexible placement and easy powering via third-party adapters.
Limited Wired Connectivity – Only one 2.5G LAN port (no PoE), making wired expansion less convenient compared to UDR7 or UCG-Fiber.
No Built-in Storage – Cannot run UniFi Protect or other UniFi applications natively, requiring external UniFi hardware for advanced services.
This description contains links to Amazon. These links will take you to some of the products mentioned in today's content. As an Amazon Associate, I earn from qualifying purchases. Visit the NASCompares Deal Finder to find the best place to buy this device in your region, based on Service, Support and Reputation - Just Search for your NAS Drive in the Box Below
Need Advice on Data Storage from an Expert?
Finally, for free advice about your setup, just leave a message in the comments below here at NASCompares.com and we will get back to you.Need Help?
Where possible (and where appropriate) please provide as much information about your requirements, as then I can arrange the best answer and solution to your needs. Do not worry about your e-mail address being required, it will NOT be used in a mailing list and will NOT be used in any way other than to respond to your enquiry.
[contact-form-7]
TRY CHAT Terms and Conditions
If you like this service, please consider supporting us.
We use affiliate links on the blog allowing NAScompares information and advice service to be free of charge to you.Anything you purchase on the day you click on our links will generate a small commission which isused to run the website. Here is a link for Amazon and B&H.You can also get me a Ko-fi or old school Paypal. Thanks!To find out more about how to support this advice service checkHEREIf you need to fix or configure a NAS, check FiverHave you thought about helping others with your knowledge? Find Instructions Here
Or support us by using our affiliate links on Amazon UK and Amazon US
Alternatively, why not ask me on the ASK NASCompares forum, by clicking the button below. This is a community hub that serves as a place that I can answer your question, chew the fat, share new release information and even get corrections posted. I will always get around to answering ALL queries, but as a one-man operation, I cannot promise speed! So by sharing your query in the ASK NASCompares section below, you can get a better range of solutions and suggestions, alongside my own.
UniFi Launch a MASSIVE range of 10GbE PoE APs and Switches – The New XG/XGS Series
The UniFi U7 Pro XG and U7 Pro XGS is ANOTHER expansion of Ubiquiti’s WiFi 7 access point lineup (I swear, it’s like the 3rd/4th this year or something), bringing 10GbE Power over Ethernet (PoE) support to the series for the first time. These APs aim to address a major limitation of previous models—network bandwidth bottlenecks at the wired uplink—by allowing full utilization of multi-gigabit wireless speeds. The inclusion of 10GbE uplinks ensures that high-throughput devices, particularly those leveraging WiFi 7’s Multi-Link Operation (MLO) and wider channel support, are not constrained by a 2.5GbE or lower-speed connection to the wired network.
Accompanying the launch of these access points is a new range of UniFi XG series switches, designed to deliver PoE+ and PoE++ power while providing high-bandwidth connectivity across multiple wired and wireless clients.
The XG switch lineup includes four models: two high-capacity rackmount switches (24-port and 48-port) aimed at enterprise and data-heavy environments, a 10-port rackmount switch, and an 8-port desktop model designed for smaller-scale deployments. These switches not only ensure full 10GbE connectivity for the new APs but also introduce 25G uplink capabilities in the higher-end models, allowing for future network scalability and aggregation improvements.
With these new releases, Ubiquiti is targeting high-performance network environments, including businesses, prosumers, and enterprises that require low-latency, high-bandwidth connectivity across multiple access points. The transition from 2.5GbE to 10GbE in UniFi’s AP lineup reflects a broader industry shift toward higher-capacity wired backbones to match advancements in wireless technology. These products are particularly suited for scenarios involving high client densities, large-scale WiFi deployments, multi-gigabit internet connectivity, and demanding applications such as cloud computing, video conferencing, and real-time data transfer. By integrating 10GbE PoE APs with a full suite of supporting switches, UniFi is providing a comprehensive ecosystem for users looking to future-proof their network infrastructure. Whether deployed in corporate, hospitality, industrial, or high-end residential environments, these devices represent a step forward in ensuring WiFi 7 performance is not bottlenecked by wired limitations.
Update – The U7 Pro XG and U7 Pro XGS APs are NOW Available. The Pro XG Swtich Series is still TBC at time of writing
The UniFi U7 Pro XG and U7 Pro XGS 10GbE PoE WiFi 7 APs – Design and Connectivity
The UniFi U7 Pro XG and U7 Pro XGS maintain the familiar circular form factor that UniFi access points are known for, but with some notable refinements. The XGS model is slightly larger than the XG, a difference primarily due to its additional spatial streams and enhanced internal architecture. Both APs feature a polycarbonate outer shell with a metal internal frame, which serves to improve heat dissipation and ensures they remain fanless despite their higher performance. This passive cooling approach helps maintain silent operation while keeping temperatures within optimal ranges, even under heavy loads.
A qwerky (yet nonetheless requested!) design change in these models is the introduction of dual-color options for the first time in UniFi’s AP lineup – kinda blows me away that this is weirdly rare in these products in 2025. Users will have the choice between black and white, allowing for greater flexibility in deployments where aesthetic considerations are important, such as in modern office spaces, high-end homes, or retail environments.
Feature
U7 Pro XG
U7 Pro XGS
WiFi Standard
WiFi 7
WiFi 7
Spatial Streams
6
8
Coverage Area
140 m² (1,500 ft²)
160 m² (1,750 ft²)
Max Client Count
300+
500+
Uplink
10/5/2.5/1GbE
10/5/2.5/1GbE
Power Method
PoE+
PoE++
Max Power Consumption
22W
29W
MIMO Configuration
2×2 (2.4GHz, 5GHz, 6GHz)
2×2 (2.4GHz, 6GHz), 4×4 (5GHz)
Max Data Rate (6GHz)
5.7 Gbps
5.7 Gbps
Max Data Rate (5GHz)
4.3 Gbps
8.6 Gbps
Max Data Rate (2.4GHz)
688 Mbps
688 Mbps
Antenna Gain (6GHz)
6 dBi
6 dBi
Antenna Gain (5GHz)
5 dBi
6 dBi
Antenna Gain (2.4GHz)
4 dBi
4 dBi
Operating Temperature
-30 to 40°C (-22 to 104°F)
-30 to 50°C (-22 to 122°F)
Certifications
CE, FCC, IC
CE, FCC, IC
Additionally, UniFi has stickable interchangeable covers for other APs in their line up, though details on availability and customization remain unclear at launch if these will be available on the XG/XGS series
To accommodate higher power demands and increased performance, UniFi has optimized thermal efficiency in both models, leveraging passive cooling techniques to maintain stability under continuous high-load conditions. The metal internal frame aids in efficient heat dissipation, preventing thermal throttling and ensuring long-term reliability. While these APs have a higher power draw than previous UniFi models—22W for the XG and 29W for the XGS—this is a necessary tradeoff for their improved bandwidth and increased spatial streams. Given their fanless design, proper placement—such as ceiling or wall mounting in areas with adequate airflow—is recommended to maintain consistent performance over time.
The most important functional change in these APs is the 10GbE PoE uplink, replacing the 2.5GbE PoE standard found in previous UniFi WiFi 7 models. The addition of 10GbE PoE+ (XG) and PoE++ (XGS) allows these APs to fully utilize WiFi 7’s increased throughput potential without encountering a wired bottleneck. The shift to 10GbE connectivity makes these access points particularly suited for environments where high-bandwidth, multi-client performance is essential, such as large-scale office deployments, conference centers, and high-density public spaces.
With maximum power consumption rated at 22W for the XG and 29W for the XGS, both APs require PoE switches capable of delivering sufficient power at 10GbE speeds. This makes them best suited for deployment alongside UniFi’s new Pro XG series switches, which offer 10GbE PoE across multiple port configurations. For users without a 10GbE PoE switch, UniFi has also released a PoE to mains adapter a while back supporting 10GbE passthrough, allowing these APs to be powered while connected to a standard non-PoE 10GbE switch.
These refinements in design, thermal management, and connectivity demonstrate UniFi’s continued push toward enterprise-grade wireless networking, ensuring WiFi 7 devices can operate without artificial bottlenecks imposed by wired infrastructure.
The New U7 Pro XG/XGS APs vs the U7 Pro and U7 Pro Max APs
The U7 Pro XG and U7 Pro XGS build on the foundation of the U7 Pro and U7 Pro Max, but with a focus on eliminating wired bottlenecks. While all four models support WiFi 7, the key distinction between the Pro XG/XGS and the earlier U7 Pro models lies in their uplink capabilities. The U7 Pro and U7 Pro Max are limited to 2.5GbE PoE, which is adequate for most WiFi 7 workloads but can become a constraint when multiple high-bandwidth clients are connected simultaneously. The Pro XG and XGS, by contrast, introduce 10GbE PoE, ensuring that the wired infrastructure can keep pace with the wireless throughput.
The spatial stream configuration is another notable difference. The U7 Pro XG (6-stream) and U7 Pro XGS (8-stream) allow for higher simultaneous throughput across more devices, compared to the U7 Pro (4-stream) and U7 Pro Max (6-stream). This makes the XG and XGS models better suited for high-density deployments, particularly in offices, event spaces, and public environments where hundreds of devices may be connected at once. The Pro XGS, in particular, offers 4×4 MIMO on the 5GHz band, significantly improving performance and efficiency for mid-range frequencies compared to the U7 Pro Max.
Another area of distinction is power consumption. The Pro XG and XGS models require more power—22W for the XG and 29W for the XGS, compared to 21W for the U7 Pro and 25W for the U7 Pro Max. This is a necessary tradeoff for their higher performance and increased uplink capacity, though it does mean PoE+ or PoE++ switches are required. Additionally, the Pro XG/XGS feature an updated chassis design, a dual-color option (black or white), and interchangeable covers—features not found on the U7 Pro and Pro Max.
Feature
U7 Pro
U7 Pro Max
U7 Pro XG
U7 Pro XGS
WiFi Standard
WiFi 7
WiFi 7
WiFi 7
WiFi 7
Spatial Streams
4
6
6
8
Coverage Area
110 m² (1,200 ft²)
130 m² (1,400 ft²)
140 m² (1,500 ft²)
160 m² (1,750 ft²)
Max Client Count
200+
250+
300+
500+
Uplink
2.5GbE PoE+
2.5GbE PoE+
10GbE PoE+
10GbE PoE++
Power Method
PoE+
PoE+
PoE+
PoE++
Max Power Consumption
21W
25W
22W
29W
MIMO Configuration
2×2 (2.4GHz, 5GHz, 6GHz)
2×2 (2.4GHz, 5GHz), 4×4 (6GHz)
2×2 (2.4GHz, 5GHz, 6GHz)
2×2 (2.4GHz, 6GHz), 4×4 (5GHz)
Max Data Rate (6GHz)
2.4 Gbps
5.7 Gbps
5.7 Gbps
5.7 Gbps
Max Data Rate (5GHz)
2.4 Gbps
4.3 Gbps
4.3 Gbps
8.6 Gbps
Max Data Rate (2.4GHz)
688 Mbps
688 Mbps
688 Mbps
688 Mbps
Antenna Gain (6GHz)
5 dBi
6 dBi
6 dBi
6 dBi
Antenna Gain (5GHz)
4 dBi
5 dBi
5 dBi
6 dBi
Antenna Gain (2.4GHz)
3 dBi
4 dBi
4 dBi
4 dBi
Operating Temperature
-30 to 40°C
-30 to 40°C
-30 to 40°C
-30 to 50°C
Certifications
CE, FCC, IC
CE, FCC, IC
CE, FCC, IC
CE, FCC, IC
Color Options
White
White
Black/White
Black/White
Ultimately, the U7 Pro XG and XGS are designed for users who need 10GbE uplink support, either because they already have a 10GbE network or plan to upgrade to UniFi’s new 10GbE PoE switches. For users with a 2.5GbE or slower wired infrastructure, the U7 Pro and Pro Max remain viable choices at a slightly lower price point. However, as WiFi 7 adoption grows and multi-gig networks become more common, the Pro XG and XGS offer better long-term scalability.
The New Pro XG Switch Series – ProXG 8/10/24/48 Port L3 Switches
Alongside the U7 Pro XG and U7 Pro XGS, UniFi has introduced a new lineup of 10GbE PoE switches, designed to provide sufficient power and bandwidth for these high-performance access points. The Pro XG switch series consists of four models, each tailored for different network scales. These include two rackmount models (24-port and 48-port), a 10-port rackmount version, and a compact 8-port desktop model. Each switch is L3-capable, allowing for advanced network segmentation and routing, and includes PoE+ or PoE++ support, ensuring seamless integration with UniFi’s latest APs and other PoE-powered devices.
Pro XG 24 PoE Switch
The Pro XG 24 PoE Switch is a 1U rackmount switch designed for mid-sized network deployments that require a balance of high-speed wired connectivity and PoE power delivery. It features 16x 10GbE PoE+++ ports and 8x 2.5GbE PoE+++ ports, making it suitable for networks that mix WiFi 7 access points with multi-gigabit wired clients.
Additionally, it includes 2x 25G SFP28 ports for uplinks to higher-speed network infrastructure or aggregation switches. With a total PoE budget of 720W, it provides ample power for multiple APs, IP cameras, or other PoE devices without the risk of power limitations.
Pro XG 48 PoE Switch
For larger-scale environments, the Pro XG 48 PoE Switch offers a higher port density and greater PoE capacity. It includes 32x 10GbE PoE+++ ports and 16x 2.5GbE PoE+++ ports, making it a high-performance choice for dense enterprise networks. Like the 24-port version, it also features 4x 25G SFP28 uplinks, ensuring sufficient bandwidth for connecting to core switches or high-speed backbones.
The PoE budget is increased to 1080W, making it an ideal choice for deployments that include multiple high-power PoE devices such as security cameras, VoIP phones, and UniFi’s latest APs.
Pro XG 10 PoE Switch
The Pro XG 10 PoE Switch is a compact rackmount switch aimed at smaller business or prosumer setups that still require 10GbE PoE connectivity. It features 10x 10GbE PoE+++ ports and 2x 10G SFP+ uplink ports, providing a balance between port availability and high-speed connectivity.
With a total PoE budget of 400W, this switch is suitable for environments where a handful of high-performance APs and a small number of wired clients need reliable power and bandwidth. Its 1U form factor allows for easy integration into existing rack setups while maintaining L3 switching capabilities for network segmentation and security.
Pro XG 8 PoE Switch
For users who need 10GbE PoE in a desktop-friendly format, the Pro XG 8 PoE Switch provides high-speed connectivity without the bulk of a full rackmount switch. It includes 8x 10GbE PoE++ ports and 2x 10G SFP+ uplinks, making it a suitable choice for small offices, home labs, or network expansions where rack space is limited.
The 155W PoE budget is lower than its larger counterparts, but still sufficient for a few high-powered APs or other PoE devices. Unlike the rackmount models, this switch does not include an LCD control screen and is instead managed entirely through the UniFi software interface.
Feature
Pro XG 24 PoE
Pro XG 48 PoE
Pro XG 10 PoE
Pro XG 8 PoE
Form Factor
1U Rackmount
1U Rackmount
1U Rackmount
Desktop
Switch Type
L3
L3
L3
L3
LCD Screen
Yes (1.3″)
Yes (1.3″)
Yes (1.3″)
No
10GbE PoE+++ Ports
16
32
10
8
2.5GbE PoE+++ Ports
8
16
N/A
N/A
Uplink Ports
2x 25G SFP28
4x 25G SFP28
2x 10G SFP+
2x 10G SFP+
Total PoE Budget
720W
1080W
400W
155W
The UniFi XG switch lineup is designed to complement WiFi 7 APs by eliminating network bottlenecks at the wired infrastructure level. These switches provide a scalable, high-performance backbone for enterprise, business, and prosumer deployments, ensuring that wireless speeds are not limited by outdated switch technology.
Should You Care About the UniFi XG Series of WiFi APs and Switches? Verdict & Conclusion
The UniFi U7 Pro XG and U7 Pro XGS introduce 10GbE PoE to UniFi’s WiFi 7 lineup, resolving a key limitation of previous models by eliminating the wired uplink bottleneck. The Pro XG (6-stream) and Pro XGS (8-stream) offer higher client capacity, better multi-device performance, and a redesigned chassis that introduces dual-color options for more discreet deployments. Their fanless design and metal internal structure improve thermal management, making them suitable for continuous high-performance use. However, higher power consumption (22W for the XG, 29W for the XGS) means that PoE+ or PoE++ infrastructure is required, which could be a drawback for users with older PoE switches. Additionally, while the 10GbE uplink is a significant upgrade, users without 10GbE-capable networks may not see immediate benefits. Despite this, for those already investing in high-bandwidth networking, these APs offer superior long-term scalability compared to the U7 Pro and Pro Max.
The Pro XG series switches provide a much-needed 10GbE PoE solution to support UniFi’s latest APs and other high-power PoE devices. The lineup includes rackmount options (24-port and 48-port models) with 25G uplinks, a compact 10-port rackmount switch, and an 8-port desktop model for smaller deployments. Each switch is L3-capable, offering advanced routing and VLAN segmentation, and they provide substantial PoE budgets ranging from 155W (desktop model) to 1080W (48-port model). These switches solve the lack of 10GbE PoE options in the market but come with some trade-offs, including higher power draw and potential noise levels in larger models. The desktop version lacks an LCD screen, and pricing—though not yet finalized—will likely position these above existing UniFi multi-gig PoE switches. However, for those building a true high-performance wired and wireless network, these switches represent a genuinely unique step forward in the standard of PoE devices in the market – no really.
We are currently testing the U7 Pro XG/XGS access points and the XG switch series, gathering real-world performance data on throughput, power efficiency, and thermal management. A detailed review will follow soon, focusing on WiFi 7 performance under load, 10GbE PoE implementation, and compatibility with existing UniFi infrastructure. Our tests will also evaluate how well these APs handle multi-client environments and whether the 10GbE uplink translates to real-world advantages over 2.5GbE models. If you’re considering an upgrade to WiFi 7 or planning a 10GbE PoE deployment, stay tuned for our full analysis, where we’ll break down whether these new devices are truly worth the investment.
Pros of the UniFi Pro XG Series
Cons of the UniFi Pro XG Series
10GbE PoE Uplink – Eliminates the wired bottleneck found in previous UniFi WiFi 7 APs, ensuring full utilization of high-speed wireless capabilities.
WiFi 7 with Multi-Link Operation (MLO) – Supports faster speeds, lower latency, and improved stability by leveraging multiple frequency bands simultaneously.
Higher Client Capacity – U7 Pro XG supports 300+ devices, while the U7 Pro XGS handles 500+ clients, making them ideal for high-density environments.
Advanced MIMO Configurations – The 6-stream XG and 8-stream XGS improve throughput and efficiency, particularly for 5GHz and 6GHz bands.
Scalable 10GbE PoE Switches – The Pro XG switch lineup introduces rackmount and desktop models with PoE budgets ranging from 155W to 1080W, ensuring flexibility across different deployment sizes.
25G SFP28 Uplink Support (on 24/48-Port Models) – Enables future-proofing for users needing higher backbone bandwidth beyond 10GbE.
Fanless AP Design – Ensures silent operation while maintaining efficient passive cooling for long-term reliability.
Dual-Color Options & Interchangeable Covers – Adds more deployment flexibility, allowing APs to blend into different environments.
Higher Power Requirements – The U7 Pro XG requires PoE+ (22W), while the U7 Pro XGS requires PoE++ (29W), limiting compatibility with older PoE switches.
Premium Pricing Expected – While final pricing for the Pro XG switches isn’t confirmed, they are expected to be more expensive than existing UniFi multi-gig PoE options.
Potential Heat & Noise Concerns (for Switches) – The higher-powered rackmount switches may generate more heat and fan noise, especially under heavy load, making them less suitable for quiet environments.
This description contains links to Amazon. These links will take you to some of the products mentioned in today's content. As an Amazon Associate, I earn from qualifying purchases. Visit the NASCompares Deal Finder to find the best place to buy this device in your region, based on Service, Support and Reputation - Just Search for your NAS Drive in the Box Below
Need Advice on Data Storage from an Expert?
Finally, for free advice about your setup, just leave a message in the comments below here at NASCompares.com and we will get back to you.Need Help?
Where possible (and where appropriate) please provide as much information about your requirements, as then I can arrange the best answer and solution to your needs. Do not worry about your e-mail address being required, it will NOT be used in a mailing list and will NOT be used in any way other than to respond to your enquiry.
[contact-form-7]
TRY CHAT Terms and Conditions
If you like this service, please consider supporting us.
We use affiliate links on the blog allowing NAScompares information and advice service to be free of charge to you.Anything you purchase on the day you click on our links will generate a small commission which isused to run the website. Here is a link for Amazon and B&H.You can also get me a Ko-fi or old school Paypal. Thanks!To find out more about how to support this advice service checkHEREIf you need to fix or configure a NAS, check FiverHave you thought about helping others with your knowledge? Find Instructions Here
Or support us by using our affiliate links on Amazon UK and Amazon US
Alternatively, why not ask me on the ASK NASCompares forum, by clicking the button below. This is a community hub that serves as a place that I can answer your question, chew the fat, share new release information and even get corrections posted. I will always get around to answering ALL queries, but as a one-man operation, I cannot promise speed! So by sharing your query in the ASK NASCompares section below, you can get a better range of solutions and suggestions, alongside my own.
New Synology NAS for First Half of 2025 Revealed – DS925+, DS1825XS+, DS625Slim, DS1525+ and More
After what seems like quite a while for many, we have finally got pretty large confirmation that Synology are refreshing a large number of their Desktop (and a couple of Rackmount systems) devices – as well as launching a few new storage media options. This new information arrives via ChipHell user ‘nineeast‘ in a recent forum post. I am still in the process of identifying the event that the photo below was taken from, but given the preponderance of people taking photos, it won’t be long before this spreads further. This is of course the potential that this is a hoax… but (as you will see later in the article) the chiphell post is not the only source. Nevertheless, it looks like Synology are getting set to refresh a huge number of solutions, launching their DS925+, DS425+, DS225+, DS1525+, DS1825+, DS725+, DS625slim, DS1825xs+ and RS2825RP+ between now and Summer 2025. So, let’s discuss what these refreshed devices bring and whether they deserve your data.
*Update* In order to better track each of the new Synology NAS revealed at this event, I have made update pages for each device below. Additionally, as mentioned in the video, I am canvassing user feedback on these new releases (ideally existing Synology NAS users and/or SIs – system integrators) for a follow up video soon. put your feedback in the comments below or in the Reddit thread HERE
Which Synology Solutions were Revealed at the Synology Event?
The big deal here is that it is tremendously rare for Synology to reveal their roadmap of solutions, let alow share it with users in such a detailed fashion. Synology have always been tremendously restrained when it comes to revealing their product refreshes (and new product lines). That said, refreshes of products in their portfolio periodically is pretty normal, and most Synology solutions will see a refresh every 2.5-5years (depending on the product tier, with XS series devices generally having a longer refresh cycle), and many have been wondering about when a refresh to the x22/23 range of devices would arrive, and in what form it would take. The TLDR list of solutions shown were:
DESKTOP SOLUTIONS
RACKMOUNT SOLUTIONS
EXPANSIONS
MEDIA
DS1825+ – AMD V1500B, 2.5GbE ×2
DS1525+ – AMD V1500B, 2.5GbE ×2
DS925+ – AMD V1500B, 2.5GbE ×2
DS725+ – AMD R1600, 2.5GbE ×1
DS625slim – Intel J4125, 2.5GbE ×1
DS425+ – Intel J4125, 2.5GbE ×1
DS225+ – Intel J4125, 2.5GbE ×1
DS1825xs+ – AMD V1780B, 2.5GbE, 10GbE + OOB
RS2825RP+ – AMD V1780B, 10GbE
RX1225RP – Suitable for certain RS series devices
DX525 – Suitable for certain DS series devices
SNV5420 Series – M.2 2280 NVMe
SAT5221 Series – 2.5” SATA SSD
HAT5310-12T/16T – 3.5” SATA HDD
HAT5310-4T/8T – 3.5” SATA HDD
HAT3320-8T – 3.5” SATA HDD
The biggest takeaway in these shared images seems to be that the bulk of the solutions in this 2025 year refresh are going to remain largely the same, but with two main changes across the board.
Thise changes are 1GbE network interfaces will be upgraded to 2.5GbE interfaces universally, and expansion devices that would have previously used eSATA as a means of connectivity will now be USB-C (as well as a reshuffle of the CPUs in the product tiers/families around), but we will get onto that latter point in a moment. Further information and images have also been sharedby user ‘ERROR204‘ on imnks, another storage *& network related forum, as well as bringing further information on the expansion devices. The DS1525+, DS925+ and DS725+ will serve as refreshes of the DS923+, DS723+ and DS1522+ NAS. It’s unclear whether they will be using that mini PCIe upgrade card like the existing series (the E10G20-T1-MINI) as the slide below indicates that they will not, but the DS925+ and DS1525+ will see the R1600 Dual Core / 4 Thread Ryzen processor in their predecessor replaced with the v1500B 4 Core / 8 Thread CPU (previously used in the 6/8/12 Bay desktop NAS devices. The DS725+ however will remain as the R1600, but will see the 1GbE NICs upgraded to 2.5GbE.
Interestingly, the default memory on the DS725+ will increase to 4GB of ECC Memory (as opposed to the 2GB in the DS723+ predecessor). However the slide below also indicates that it will no longer support the mini PCIe 10GbE adapter. So it’s a mixed bag in the DS725+ refresh really. This slide also indicates that the USB-C connected expansion will seemingly remain at 6Gb/s transfer speeds – which is a little odd, given USB 3.2 Gen 1 is 5Gb/s and USB 3.2 Gen 2 is 10Gb/s – something to ponder.
Next is the ‘media’ series of devices and also a return of the Synology SLIM series. The DS625slim arrives (refreshing the DS620slim from 2020) and the DS425+ and DS225+ arrive as refreshes for the comparatively (for Synology’s MO) new DS224+ and DS423+ NAS. These will be continuing to use the existing Intel J4125 Quad Core Celeron CPU from 2019/2020 (something I know will not please everyone), but will also see upgrades to 2.5GbE from the 1GbE on their predecessors. Additioanlly, I think we can assume the DS425+ will have the 2x M.2 NVMe slots of it’s predecessor.
Now the DS925+ (a refresh of the DS923+) has the upgrade from the R1600 CPU to the V1500B CPU we mentioned earlier, alongside the new USB-C expansion support (the DX525) and 2.5GbE NICs, so I think we can assume the DS1525+ will be similarly reprofiled from the DS1522+, but I am unsure if it will have 2x USB-C ports instead of 2x eSATA (almost certainly, but not 100%). I think many user are going to have mixed feelings once again about the CPU choices present here in the bulk of these new refreshes.
Now onto those two 8 Bay devices, the DS1825+ and DS1825xs+ (serving as refreshes of the DS1821+ and DS1823xs+ respectively). As covered in my video in 2024 about previously leaked information on the DS1825+, it seems that both of these devices will have the same CPU as their predecessor devices, but will see upgrades from their 1GbE ports towards 2.5GbE (with the DS1825xs+ maintaining it’s 10GbE copper connection). All other specifications (M.2 slots, expandability, memory, etc) will all seemingly remain the same – though I think we can once again assume that expansion ports will be USB-C in line with the DX525 box.
For many, it will be a little disappointing that we did not see a 6-Bay model arrive and in fact there has not actually been a 6-Bay Synology NAS since 2020 (when the DS1621+ and DS1621xs+ were launched), increasing fears that Synology are eliminating that tier of their portfolio. However, there is ZERO confirmation on this and the 6 Bay option in the Synology store is still present for the DS1621+ and DS620slim, though the DS1621xs+ has disappeared (likely replaced internally with the 8 bay XS option).
Finally, there is the storage media that was listed. Some drives we already knew about. For example, the SAT5221 Series of SATA SSDs already appeared on vietcorp (HERE), but the HAT3320 is seemingly a refresh/new line in the Synology Plus series of hard drives – and there have been rumours circling for a while that these would be Seagate Ironwolf drives, but currently unconfirmed.
Finally, there is the Synology SNV5420 series – a new M.2 NVMe media drive range, but it is currently unclear if this is a complete refresh of the SNV3400/SNV3410, or as the naming convention seems to indicate, a higher performance/class of M.2 NVMe SSDs. This is something that has been LONG DEMANDED as Synology still have a solid insistence on their systems/add-on cards with M.2 NVMe Support HAVE TO be their own media drives if you want to use the slots of Storage pools, yet the SNV3400 range and it’s variations are comparatively low speed and high priced vs the rest of the M.2 NVMe SSD market as a whole.
So, that’s everything we know so far. Let’s now discuss what we think together in the comments!
The New Synology 2025 Product Line Up – What I Like and What I Don’t!
I have mixed feelings about the entire Synology refreshed line up – on the one hand I DO think there is a meaningful refresh here on the DS925+ and DS1525+ NAS. No one was expecting Synology to completely change this product family, as they have already made it pretty clear that these two system profiles are designed now more for the SMB user, small business, container deployer and those with file processing needs – i.e not multimedia as the focus. So, them upgrading this from the R1000 CPU in the x23 series to a V1000 CPU (doubling the cores and threads) will be tremendously welcome – as will 2.5GbE out the box (though I would like more clarification on the E10G22-T1-MINI 10GbE upgrade card support – as it looks like this is now not supported and that would be a real shame). Also, as much as its a bummer to see the V1500B CPU that Synology have already had on their products in 2020 in these 4 and 5 Bay solutions, they ARE good follow up CPUs over the R1600 in profile, and still have a length support time with AMD backing them up. All that said, the DS725+ seems pretty hard done by here, in fact the DS425+, DS225+ and DS725+ all seem to essentially be the same NAS, but with the 1GbE NICs swapped out with 2.5GbE. I mean, if the price remains exactly the same as the DS423+, DS224+ and DS723+ (and no other hardware surprises arrive in the form of no NVMe slots, etc), then these are…technically…refreshes. But more like a DS224+II, than a whole new DS225+.
Regarding the Intel Celeron devices, I am a little puzzled more than anything else. 2.5GbE on these is good (even if we overlook the fact that 2.5GbE has been fairly standard on ALL NAS systems in place of 1GbE since 2020 from everyone else), but the J4125 CPU is a CPU that has long since retired by Intel (indeed, Intel Celeron naming itself is long gone in favour of the Alder Lake and Twin Lake N processors). So unlike the strong support afforded to the AMD processors I mentioned above, the J4125 seems a remarkably dated choice right now. Still, better some kind of graphical capable CPU in the line up than none at all. Still, odd choice. As there are a lot of holes in these specifications, it’s tough to make a full list of what is good and bad, plus we have to acknowledge that things CAN change during development. So, I’ll hold off for now with anything concrete on my own thoughts, but again, I would love to chat in the comments here or on YouTube for your own thoughts.
Things we still need confirmation on!
As I just mentioned, there are still a lot of gaps in these specs and till we have the full picture, we can’t judge anything! So, here are the questions I still have about these new refreshes that remain unanswered for now:
HDD and SSD Compatibility, will it be largely the same as the existing 22/23/24 series devices (i.e largely Synology drives, but a few Seagate/WD/Toshiba drives), or will these new series be the first to arrive with strict Synology-only drive media and/or pre-population?
How is the USB-C 6Gb/s? Is it an adapter, or a USB-C Port on the old lane internally?
Where is the 6-Bay?
Ambiguity at best, complete removal at worst, of the 10GbE upgradability of the 2/4/5 Bay V1500B option NAS’. Is this for real?
Is the SNV5420 a new high performance M.2 NVMe?
Why refresh all of these at the same time? Some solutions like the DS1823xs+ or DS224+ are very early in their expected run, so a refresh so soon seems unnecessary. So why now?
This description contains links to Amazon. These links will take you to some of the products mentioned in today's content. As an Amazon Associate, I earn from qualifying purchases. Visit the NASCompares Deal Finder to find the best place to buy this device in your region, based on Service, Support and Reputation - Just Search for your NAS Drive in the Box Below
Need Advice on Data Storage from an Expert?
Finally, for free advice about your setup, just leave a message in the comments below here at NASCompares.com and we will get back to you.Need Help?
Where possible (and where appropriate) please provide as much information about your requirements, as then I can arrange the best answer and solution to your needs. Do not worry about your e-mail address being required, it will NOT be used in a mailing list and will NOT be used in any way other than to respond to your enquiry.
[contact-form-7]
TRY CHAT Terms and Conditions
If you like this service, please consider supporting us.
We use affiliate links on the blog allowing NAScompares information and advice service to be free of charge to you.Anything you purchase on the day you click on our links will generate a small commission which isused to run the website. Here is a link for Amazon and B&H.You can also get me a Ko-fi or old school Paypal. Thanks!To find out more about how to support this advice service checkHEREIf you need to fix or configure a NAS, check FiverHave you thought about helping others with your knowledge? Find Instructions Here
Or support us by using our affiliate links on Amazon UK and Amazon US
Alternatively, why not ask me on the ASK NASCompares forum, by clicking the button below. This is a community hub that serves as a place that I can answer your question, chew the fat, share new release information and even get corrections posted. I will always get around to answering ALL queries, but as a one-man operation, I cannot promise speed! So by sharing your query in the ASK NASCompares section below, you can get a better range of solutions and suggestions, alongside my own.
How to Install TrueNAS Scale/Core on a Terramaster NAS
If you’re new to private server storage, you’ve probably heard the phrase “everything runs on Linux.” While that’s not entirely true (many other platforms exist with their own foundations), Linux remains the dominant base for much of the software we use daily—including Network Attached Storage (NAS). When it comes to NAS, most new or less experienced users fall into two main categories:
DIY Enthusiasts – Those who prefer to build their own systems, optimizing costs and flexibility with open-source platforms like TrueNAS Scale (the Linux-based counterpart to the popular TrueNAS Core on FreeBSD).
Turnkey Buyers – Those willing to pay extra for a prebuilt system, even if it means dealing with some software limitations.
But what if you want the best of both worlds? Good news—you can have it! In this guide, I’ll show you how to transform TerraMaster’s highly affordable NAS solutions (arguably the best value on the market right now) into a TrueNAS -powered, ZFS-backed NAS system. Even the 2024/2025 models come well-equipped with multiple NVMe support (the F8 SSD PLUS as a particular stand out device), 2.5GbE networking, embedded graphics CPUs, and more, making them a fantastic base for a Linux NAS.
Best of all, setting this up is much easier than you might think, completely reversible, and provides you with the customization and flexibility of TrueNAS while still benefiting from a prebuilt 24/7 server at an unbeatable price. Sounds great, right? Let’s get started with the step-by-step guide!
Before you begin, it’s important to note that simply owning a TerraMaster NAS isn’t enough. To get TrueNAS up and running, you’ll need to complete a few preliminary checks and have a few extra items—many of which you may already have at home or in the office. If not, a quick $10 purchase online should cover it.
To upgrade your TerraMaster NAS to TrueNAS , make sure you have the following:
A Terramaster NAS Drive with (minimum) an Intel 64bit x86 CPU and a minimum 2GB of Memory (recommended 8GB+)
Download the latest stable release of TrueNAS here as a system image (you will be converting this to USB later on) – DOWNLOAD
Any Data that is currently on the Terramaster NAS RAID that is mission critical to be backed up or moved (as it will be completely formatted)
I recommend not using a USB larger than 32GB, due to the constraints of 1st party software to format larger than this in FAT32. Don’t be tempted to spend like $2 more for a 64GB, as the TrueNAS installation will occupy the full USB space (as you will create a system-image-USB) and space is utterly irrelevant when the TrueNAS installation is so small
A Disk Image to USB conversion too. I recommend ‘Rufus’, currently in ver 3.19 and can be run in a portable .exe form that doesn’t require installation – DOWNLOAD
A basic USB Keyboard (example HERE but really, any will do) and an HDMI Monitor (or simply any device that has an HDMI input – NOT output) such as a TV or Capture card
Hard Drive and/or SSD media (you should already have these, but just in case) for your storage
Optional – Download Advanced IP Scanner HERE, as it is a really useful tool for analyzing your network and finding your new TrueNAS NAS for remote access
That is about it. Most of these (maybe not the USB drive at that physical size) you will almost certainly already have to hand.
Can I Reverse the TrueNAS Installation back to Terramaster TOS?
Almost certainly, yes! However, there is one key consideration. When switching from TerraMaster’s TOS to TrueNAS , the internal drives (HDDs and/or SSDs) will be formatted to ZFS, meaning they won’t be recognized by TOS if you choose to switch back later.
The good news? Reverting back is incredibly easy—all you need to do is replace the internal USB drive and reboot the system. However, switching between NAS operating systems will wipe the data on the drives, so be sure to back up your important files elsewhere before proceeding.
Now that you’re ready, let’s move on to installing TrueNAS on your TerraMaster NAS!
TrueNAS on a Terramaster NAS – Step 1, Download TrueNAS
Head to the TrueNAS website HERE and download the latest stable release of the software to your local PC, Linux or Mac system. Make sure to remember where you downloaded it.
TrueNAS on a Terramaster NAS – Step 2, Download Rufus USB Image Tool
Head to the Rufus website and download the latest version of that tool – I recommend downloading the standalone executable file here, as then it will immediately run when you double click the file, without installation etc. It may redirect you to Github, but it will be the same executable file. Once again, remember where you downloaded it.
TrueNAS on a Terramaster NAS – Step 3, Preparing the USB
Connect the small form factor USB Drive to your system (again, this is the one I used from Sandisk) and after a few seconds, it should appear as an available USB Drive. The drive MAY need formatting (you will be prompted to do so), if that is the case, then you can format it via the system prompts and by default, it will format it to FAT32 (as long as your USB is less than 32GB). If you are not presented with a system prompt to format your USB, then you can head into My PC, or My Computer via a windows computer and right-click the drive, select ‘format’ and format it that way.
If you have used the USB for other things previously, there is a chance that the drive has existing partitions in place. For that, the quickest way to completely remove any partitions is to open up the bottom-left windows system menu as normal, and then just type diskpart and open the command-line GUI tool. From there, use the command list disk to show the available drives that are connected, you will see your USB (normally disk 1 or 2, but can differ depending on your system layout and can be spotted by the storage amount). From there, type select disk # (where # is the drive number that your USB is shown as) and then type clean, which which will then remove any index structure for the drive (i.e the partitions and existing format) and then you can go back to the My Computer/My PC page and format the drive to FAT 32 as normal.
TrueNAS on a Terramaster NAS – Step 4, Creating a USB Installer Image of TrueNAS
Open the Rufus application and from there you will see the USB Drive (listed as NO NAME, or ‘UNTITLED’, ETC) at the top. From there, look to the select image/find image option (depending on the ver. of Rufus or your USB Image Creator tool of choice) and find the TrueNAS disk image you downloaded earlier). If the drive is not listed, it may have downloaded as a compressed/archive file. If that is the case, head to the location of where you downloaded TrueNAS (in your file explorer, not in Rufus) and right-click the file you downloaded. If the option to ‘extract‘ is visible, then you can extract it (i.e unpack it to the original form) in that same download directory. From there, head back into RUFUS and then the TrueNAS system image should be visible. Select it, then run the Rufus System image creator tool and create your USB bootable TrueNAS disk image.
REMEMBER! This will completely format your USB drive and any files that are on that USB will be destroyed. The system image creator tool will turn the USB into a pure boot image tool – the USB will not be usable for traditional storage again unless you completely format it again.
TrueNAS on a Terramaster NAS – Step 5, REMOVE THE USB FROM YOUR PC!!!!!!!!!
Really, really important and sometimes overlooked. Once the USB creation is completed, you need to remove the USB (using the eject hardware safely option at the bottom right of your windows machine taskbar as normal). DO NOT accidentally leave the USB in your USB Ports for any longer than necessary. If you leave it in and your system reboots at any point (eg in a normal ‘end of day shut down, go home, reboot tomorrow’ scenario), then the system might boot directly into the TrueNAS installation and although it is easy to exit from, it can change your system default boot preferences, maybe even remove your primary boot drive as the OS drive – requiring a little messing with a windows installation disk to change it back. The odds of this are very small, but not zero, so make sure to safely remove your USB drive when the TrueNAS system image creator tool is completed.
TrueNAS on a Terramaster NAS – Step 6, Opening up your Terramaster NAS
This next step is going to differ depending on the Terramaster NAS Drive you are choosing to use. For this guide, I am using a 2022/2023 generation F4-423 4-Bay NAS, but the general steps are the same for any Terramaster NAS (though the location of the USB will differ) (the F8 SSD PLUS for example has a particularly secluded USB key internally). With the Terramaster NAS disconnected from the network and from any power source. From there you will need to remove the external casing. In the case of most Terramaster NAS, the chassis is held by 4-6 screws on the rear of the casing that, when removed, allow you to remove the rear pannel+fans and slide the internal framework out the front of the casing (be sure to check the fans are not disconnected accidentally in this process). IMPORTANT – Remove any HDD/SSD Media during the dismantling of the Terramaster NAS chassis, as it would be so, SO easy to harm these with accidentally dropping/motion damage. No need to remember the order of the drives when you re-install them, as they are going to be formatted during the TrueNAS installation.
Now, if you take a closer look at the main controller board of the Terramaster NAS (the one with network/USB ports attached, not the one that the HDD/SSD bays are on), you will spot a VERY small USB module in a tiny USB port. It should look something like this:
Now, THIS is where the default Terramaster TOS NAS software installation is kept. This is NOT where the OS actually runs from, but this is where the system checks in it’s BIOS when booting to find installation media (IF the system does not already have an active OS on the drives). Very delicately (as it IS a small USB and likely tucked in next to some other delicate components) remove the USB there is there, put it somewhere safe (as you will need this if you ever want to return the Terramster back to a TOS software system) and then replace it with the USB from earlier that has the TrueNAS system image you created in Rufus. THIS is why you needed a very small USB, as otherwise there is simply no way you would fit a traditional USB flash stick in the space provided.
That is pretty much it. This only other thing to factor in here is IF your Terramaster NAS does NOT have an external HDMI port. Most Terramsater NAS released in 2020-2025 have an HDMI port on the rear that although largely useless in TOS, is still accessible (something you will need for TrueNAS initialization. However, some Terramaster NAS with Intel Processors have the HDMI Port located INSIDE the main chassis (especially the older great box 2019-2020 gen devices). So, IF your NAS has an inside HDMI port, you are going to need to connect an HDMI monitor to it and run the initial installation (covering in a bit) with the chassis in this open state. After installation is complete, you can close the Terramaster NAS chassis up. Otherwise, if your NAS already has an external HDMI port, you can go ahead and reconstruct the NAS chassis. Essentially, if you NAS has integrated graphics (Intel Celeron, Pentium, N100, N305, Core, etc), you will have an HDMI output.
NOTE – If you plan on upgrading the memory of your NAS to 8GB-16GB (in order to use ALL of the features of TrueNAS to their fullest extent), I would recommend doing so at this point before rebuilding the physical chassis again, as many Terramaser NAS have the 2nd SODIMM memory slot in really tight locations.
TrueNAS on a Terramaster NAS – Step 7, Accessing the HDMI Port and Keyboard Control
Next, you need to start getting the system ready for Initialization and Setup. I would strongly recommend running the first-time installation via a direct interface with the Terramaster NAS. You will need to connect an HDMI Monitor/TV/Capture Card to the HDMI port of the NAS, a Keyboard (and/or mouse) to an available USB port) and then connect the power/network connections to the NAS and boot the device up.
After a few minutes, the TrueNAS GUI/Command will appear on your monitor and all you need to do is navigate the config choices to set up your TrueNAS NAS the first time.
Important – TrueNAS Scale/Core runs at its best when it is run on a separate drive from your storage. Much like an Operating System, you can install TrueNAS on an available SSD in a SATA or NVMe SSD slot in the Terramaster NAS, then (after initialization) you can go into the TrueNAS > Storage area and create a pool of storage using the available storage media bays,
It is NOT recommended that you install it on a USB drive, for reasons of speed and power-connections.
After you have completed the setup and are back at the initial TrueNAS boot menu, select the ‘SHUTDOWN‘ option (not reboot/restart, for reasons I will explain in a moment).
TrueNAS on a Terramaster NAS – Step 8, Remove the Boot USB Drive
Once your Terramaster NAS has fully powered down, you need to disconnect the storage, power and any other cables, then open up the Terramaster NAS again (if it was re-constructed from earlier) and then remove the USB drive you installed earlier with TrueNAS boot loader on it. You need to do this as otherwise, when you reboot the Terramaster NAS, it will reboot into the bootloader again. You can skip past this and/or it will not action a reinitialization without your input, but better to remove the USB and therefore allow the system to always immediately boot into the TrueNAS system. After you have reconstructed the terramaster NAS, you can go ahead and connect all the cables and power on the device.
Note – Do NOT replace the USB with the original Terramaster USB Drive that it arrived with, or the system will auto boot into the Terramaster TOS Installation setup.
TrueNAS on a Terramaster NAS – Step 9, Reboot the NAS
Upon rebooting the Terramaster into TrueNAS (can take up to 5 mins, but usually much quicker). You have two options with how to access the configuration and controls. You can use the HDMI+Keyboard if you choose for console/command level access, but it will be ALOT higher a learning curve than the network GUI.
Alternatively (much more recommended), use a program such as Advanced IP Scanner, which is free and VERY useful anyway, or even network command prompt) to scan your local area network and find where the Terramaster with TrueNAS is located (i.e it’s IP). This IP (eg 192.168.1.111) is what you put into the URL bar ofay web browser and it will load into the login GUI for TrueNAS . From here you will need to use the username ‘root’ in combination with the password that you created during initialization.
And that is about it. You now have TrueNAS installed as the default OS of your Terramaster NAS. From here you can do anything and everything that his highly regarded ZFS powered server software offers. Head into the Storage area and start creating pools, as well as areas for caching and lots more features.
TrueNAS Core was recently updated to ver.13 in a stable release of the FreeBSD format, as well as new improvements in the Linux-based version ‘TrueNAS ‘. The first thing you are going to need to do when setting up your TrueNAS > Terramaster NAS server is set up your storage. Do this by heading into the storage tab and following the handy steps on screen. After that, you can pretty much do anything on your new ZFS NAS!
You can find out more about TrueNAS in my full review below that covers everything I like and dislike about the platform:
Thanks for reading! I hope this guide has helped you make the most of your storage setup. If you’d like to support my work and help me create more guides, reviews, and tutorials on NAS and related topics, there are several ways to do so—I’d truly appreciate any support!
Visit the “Support NAS Passion” page [HERE] to explore different ways to contribute.
Use the links below when shopping for NAS hardware—purchasing through these links earns us a small commission (at no extra cost to you), which helps keep the site running.
Spread the word! If you found this guide useful, share it with friends, colleagues, or on your favorite social media platform.
Thank you again for your support, and have an amazing week!
This description contains links to Amazon. These links will take you to some of the products mentioned in today's content. As an Amazon Associate, I earn from qualifying purchases. Visit the NASCompares Deal Finder to find the best place to buy this device in your region, based on Service, Support and Reputation - Just Search for your NAS Drive in the Box Below
Need Advice on Data Storage from an Expert?
Finally, for free advice about your setup, just leave a message in the comments below here at NASCompares.com and we will get back to you.Need Help?
Where possible (and where appropriate) please provide as much information about your requirements, as then I can arrange the best answer and solution to your needs. Do not worry about your e-mail address being required, it will NOT be used in a mailing list and will NOT be used in any way other than to respond to your enquiry.
[contact-form-7]
TRY CHAT Terms and Conditions
If you like this service, please consider supporting us.
We use affiliate links on the blog allowing NAScompares information and advice service to be free of charge to you.Anything you purchase on the day you click on our links will generate a small commission which isused to run the website. Here is a link for Amazon and B&H.You can also get me a Ko-fi or old school Paypal. Thanks!To find out more about how to support this advice service checkHEREIf you need to fix or configure a NAS, check FiverHave you thought about helping others with your knowledge? Find Instructions Here
Or support us by using our affiliate links on Amazon UK and Amazon US
Alternatively, why not ask me on the ASK NASCompares forum, by clicking the button below. This is a community hub that serves as a place that I can answer your question, chew the fat, share new release information and even get corrections posted. I will always get around to answering ALL queries, but as a one-man operation, I cannot promise speed! So by sharing your query in the ASK NASCompares section below, you can get a better range of solutions and suggestions, alongside my own.
J’espère que vous allez bien. Aujourd’hui est un jour un peu particulier pour moi : je prends une année de plus et change de décennie. Si, pour certains, ce cap marque un tournant important dans leur vie ou leur état d’esprit, j’avoue que cela n’a jamais été mon cas. Bien sûr, j’ai évolué au fil des ans, mais le passage d’une dizaine n’a jamais eu d’impact significatif sur moi.
Je tiens également à vous remercier pour vos commentaires et encouragements. Certains me suivent depuis de nombreuses années, d’autres plus récemment, mais vos retours ont toujours été précieux dans la construction de Cachem. Vos derniers messages à propos du précédent édito m’ont rassuré, et sachez que chacun de vos conseils a été un véritable soutien. C’est avant tout la passion et l’envie de partager qui me motivent à écrire chaque jour.
Côté séries TV, j’ai poursuivi mon revisionnage de Kaamelott (Livre II), j’avais besoin d’un peu de légèreté. J’ai également découvert Paradise, avec Sterling K. Brown, que j’ai beaucoup apprécié. Enfin, j’ai enchaîné en une soirée la série Adolescence, une expérience assez bouleversante où l’on suit différents protagonistes en temps réel, sans interruption. Le concept et le scénario sont vraiment captivants. Enfin, je viens de démarrer Douglas Is Cancelled…
Sur ce, je vous souhaite une excellente journée !
FX
Samsung has officially entered the PCIe 5.0 market with the release of the 9100 PRO Series SSD, its first high-performance consumer Gen 5 NVMe SSD. Unlike previous Samsung SSD releases that focused on mainstream users, this drive is built for professionals, power users, and AI-driven workloads. Featuring sequential read speeds of up to 14,800 MB/s and write speeds reaching 13,400 MB/s, the 9100 PRO is aimed at content creators, data analysts, and enterprise users who require fast and reliable storage solutions. Available in 1TB, 2TB, 4TB, and an upcoming 8TB model, this SSD is one of the highest-capacity consumer NVMe drives ever released by Samsung. With Samsung’s in-house controller, V-NAND TLC (V8) flash memory, and LPDDR4X DRAM-based caching, the 9100 PRO is designed to offer both high-speed data transfer and long-term durability. Power efficiency has also been improved by up to 49% compared to its predecessor, the 990 PRO, making it a more energy-conscious choice for intensive applications. However, despite its impressive technical specifications, the 9100 PRO enters a market where PCIe 5.0 SSDs have been available for nearly two years from competitors such as Seagate and Crucial. This review will assess whether Samsung’s late entry to the Gen 5 SSD market delivers a significant performance advantage or whether its delayed release puts it at a competitive disadvantage. In this review, we will examine the hardware and design of the 9100 PRO, compare it against Samsung’s previous generation 990 EVO and EVO Plus SSDs, and analyze its performance across multiple benchmarks to determine if it truly offers a measurable advantage over existing PCIe 5.0 SSDs. Finally, we will consider its pricing and availability, and whether this drive is a worthwhile investment for users looking to upgrade their storage solutions in 2025.
Samsung 9100 SSD Review – Quick Conclusion
The Samsung 9100 PRO SSD is a true PCIe 5.0 Gen4x4 drive, delivering industry-leading speeds of up to 14,800 MB/s read and 13,400 MB/s write, making it one of the fastest consumer SSDs available. Unlike many competitors using third-party controllers from Phison and Micron NAND, the 9100 PRO is fully in-house, featuring Samsung’s Presto PCIe 5.0 controller and V-NAND TLC (V8) for tighter hardware-firmware integration, improved power efficiency (up to 49% better than earlier Gen5 SSDs), and high endurance (up to 4,800 TBW on the 8TB model). Random performance is excellent, reaching 2,200K IOPS read and 2,600K IOPS write, making it a strong choice for AI workloads, video production, and large-scale data processing. However, heat remains a challenge, as the drive can reach 81°C under sustained workloads, requiring active cooling or Samsung’s optional heatsink model. Pricing is premium, with some PCIe 5.0 competitors offering similar speeds at lower costs due to earlier releases. Additionally, while Samsung has a strong reputation for SSD reliability, firmware issues in past models like the 990 PRO and 980 PRO have left some users cautious. Despite these drawbacks, the 9100 PRO stands out as one of the most refined PCIe 5.0 SSDs, offering a high-endurance, fully in-house solution for demanding users.
BUILD QUALITY - 9/10
HARDWARE - 9/10
PERFORMANCE - 9/10
PRICE - 7/10
VALUE - 7/10
8.2
PROS
Industry-Leading Speed – Offers sequential read speeds up to 14,800 MB/s and write speeds up to 13,400 MB/s, making it one of the fastest consumer SSDs available. Fully In-House Design – Uses Samsung’s proprietary Presto PCIe 5.0 controller and V-NAND TLC (V8), avoiding reliance on third-party controllers like Phison and Micron NAND, ensuring better hardware-firmware integration. High Endurance Rating – Provides up to 4,800 TBW on the 8TB model, making it ideal for high-intensity workloads like AI computing, video editing, and large-scale data transfers. Improved Power Efficiency – Samsung claims 49% better power efficiency compared to previous PCIe 5.0 SSDs, reducing heat output and improving overall energy consumption. Strong Random Performance – With up to 2,200K IOPS random read and 2,600K IOPS random write, it excels in workloads that involve frequent small file transactions, such as databases, virtual machines, and AI training models. Multiple Capacity Options – Available in 1TB, 2TB, 4TB, and 8TB, making it one of the first consumer PCIe 5.0 SSDs with an 8TB variant. Heatsink Version Available – Samsung provides an optional D8-compliant heatsink, ensuring better thermal regulation for sustained performance, especially for gaming consoles like PlayStation 5. A True Gen 5 SSD – Unlike the safe and comparatively underwhelming Samsung 990 EVO Plus, which only utilized PCIe 5.0 x2 lanes, the 9100 PRO fully utilizes PCIe 5.0 x4, delivering real next-generation speeds.
CONS
High Thermal Output – Can reach 81°C under sustained workloads, requiring adequate cooling solutions, either through the heatsink model or third-party cooling options. Premium Pricing – Enters a PCIe 5.0 market where some competitors offer similar speeds at lower prices due to their earlier release, making it a costly investment for budget-conscious users. Samsung’s Firmware History – While Samsung has a strong reputation for SSD reliability, previous firmware issues in the 990 PRO and 980 PRO raised concerns, making some users cautious about potential long-term stability.
If you are thinking of buying the Samsung 9100 Pro SSD and this article helped? If so, please use the links below as it results in us at NASCompares receiving an affiliate fee from Amazon:
Samsung 9100 SSD Review – Design and Hardware
The Samsung 9100 PRO SSD follows a standard M.2 2280 form factor, making it compatible with most modern motherboards and laptops that support PCIe 5.0. The PCB layout varies by capacity, with the 1TB and 2TB models featuring NAND chips only on one side, while the 4TB and 8TB versions have NAND chips on both sides of the PCB. Unlike previous Samsung SSDs, such as the 990 EVO, which featured single-sided designs for improved compatibility in laptops, the higher-capacity 9100 PRO models require additional NAND space, making them better suited for desktops and high-performance workstations.
The drive also includes a thermal pad on the back, which assists in heat dissipation when used with compatible motherboard heatsinks. Samsung offers a pre-installed heatsink variant for improved temperature management, utilizing a PCI-SIG D8-compliant design for the 1TB, 2TB, and 4TB models, while the 8TB heatsink version features a thicker 11.25mm design for enhanced cooling, making it compatible with PlayStation 5 storage expansion requirements.
At the core of the 9100 PRO SSD is Samsung’s Presto PCIe 5.0 controller, which represents a significant advancement over previous controllers used in Samsung SSDs. This custom in-house design allows the 9100 PRO to achieve nearly full PCIe 5.0 bandwidth saturation, enabling up to 14,800 MB/s read and 13,400 MB/s write speeds. Unlike the 990 EVO, which used a more power-efficient but limited PCIe 4.0 controller, the 9100 PRO benefits from an advanced controller architecture that enhances throughput and reduces latency.
Specification
Samsung 9100 PRO
Interface
PCIe 5.0 x4, NVMe 2.0
Form Factor
M.2 (2280) / M.2 (2280 with Heatsink)
Controller
Samsung Presto PCIe 5.0 Controller
NAND Type
Samsung V-NAND TLC (V8, 3-bit MLC)
DRAM Cache
1GB – 8GB LPDDR4X (Varies by Capacity)
Sequential Read (MB/s)
Up to 14,800
Sequential Write (MB/s)
Up to 13,400
Random Read (IOPS, QD32)
Up to 2,200K
Random Write (IOPS, QD32)
Up to 2,600K
Power Consumption (Active, W)
7.6W – 9.0W
Idle Power Consumption (mW)
4.0mW – 6.5mW
Total Bytes Written (TBW)
600 TB (1TB) – 4,800 TB (8TB)
Warranty
5-Year Limited Warranty
Available Capacities
1TB, 2TB, 4TB, 8TB
Heatsink Option
Yes (D8-Compliant, 8TB is 11.25mm thick)
TurboWrite Cache Size
114GB (1TB), 226GB (2TB), 442GB (4TB), TBD (8TB)
Built on a 5nm process, this controller lowers power consumption compared to earlier PCIe 5.0 SSDs, improves thermal efficiency, and integrates advanced ECC and wear-leveling algorithms for better long-term reliability. Additionally, Samsung’s Presto controller features a larger DRAM buffer and optimized NAND channel management, allowing the 9100 PRO to deliver high sustained speeds under extended workloads.
Unlike the 990 EVO and 990 EVO Plus, which were DRAM-less SSDs relying on Host Memory Buffer (HMB) technology, the Samsung 9100 PRO integrates dedicated LPDDR4X DRAM, providing better caching and improved sustained write performance. The amount of DRAM scales with the drive’s capacity, with 1GB for 1TB models, 2GB for 2TB, 4GB for 4TB, and 8GB for 8TB.
This ensures that larger models handle large file transfers, database workloads, and AI-driven tasks more efficiently. The Presto controller’s enhanced memory mapping further improves the effectiveness of DRAM caching, ensuring lower latency and higher sustained write speeds. This is a notable advantage over competing PCIe 5.0 SSDs, many of which cut costs by removing DRAM and relying on slower caching solutions.
The 9100 PRO utilizes Samsung’s latest 3-bit MLC V-NAND (V8), which delivers higher density, improved durability, and greater efficiency compared to previous NAND generations. This 3-bit MLC (commonly referred to as TLC) enables faster read and write cycles, lower power consumption per operation, and improved reliability. Unlike older NAND designs used in PCIe 4.0 SSDs, the V8 NAND architecture allows for greater endurance and a more efficient distribution of read and write cycles, making it better suited for high-performance tasks such as video editing, AI computing, and professional content creation.
The 4TB and 8TB models benefit from additional NAND dies, increasing parallel processing capabilities and enabling higher performance under heavy workloads. Compared to Samsung’s previous consumer SSDs, the 9100 PRO’s NAND offers greater consistency in performance, reducing the risk of slowdowns due to write amplification and NAND wear over time.
Samsung rates the 9100 PRO with a Total Bytes Written (TBW) endurance rating of up to 4,800 TB for the 8TB model, with lower capacities following a scaled endurance pattern of 600 TB (1TB), 1,200 TB (2TB), and 2,400 TB (4TB). This results in a Drive Writes Per Day (DWPD) rating of approximately 0.328, meaning users can rewrite around one-third of the drive’s full capacity daily for five years before reaching the warranty limit.
Samsung claims on the 9100 PRO peak sequential read/write speeds (though based on hugely synthetic tests on an AMD Ryzen 9 7950x 16-Core Processor [email protected] system) make it one of the fastest PCIe 5.0 SSDs available in 2025. These speeds nearly double those of the 990 EVO (more on that shortly) released around 4-5 months before. Additionally, random read and write speeds exceeding 2.2M and 2.6M IOPS, which is a major improvement for workloads requiring frequent small file transactions, such as AI modeling, LLM training, and cloud storage applications. However, real-world performance may vary depending on factors such as cooling, system architecture, and workload type, which will be explored in the performance testing section of this review.
Samsung also emphasizes the power efficiency gains of the 9100 PRO, stating that the new controller and NAND design allow for up to 49% better efficiency than the previous generation 990 PRO. Power consumption during active operation is rated at 7.6W for the 1TB model, 8.1W for the 2TB, and 9.0W for the 4TB version, ensuring lower power draw compared to other PCIe 5.0 SSDs with similar performance ratings. This efficiency improvement helps reduce heat output and extends the lifespan of the drive, making it a more suitable option for professional and high-end workstation environments.
Samsung 9100 SSD vs the Samsung 990 EVO PLUS – Gen5 SSDs Compared
The Samsung 9100 PRO and Samsung 990 EVO Plus cater to different segments of the SSD market, with the 9100 PRO targeting high-performance workloads and the 990 EVO Plus designed for mainstream users seeking a balance between speed and efficiency. The most significant difference lies in interface and speed, as the 9100 PRO utilizes PCIe 5.0 x4, allowing for sequential read speeds up to 14,800 MB/s and write speeds up to 13,400 MB/s. In contrast, the 990 EVO Plus uses a PCIe 4.0 x4 / 5.0 x2 interface, capping its speeds at 7,250 MB/s read and 6,300 MB/s write.
While this makes the 990 EVO Plus one of the fastest PCIe 4.0 drives, it falls considerably behind the 9100 PRO, particularly in random performance, where the 9100 PRO achieves up to 2,200K IOPS read and 2,600K IOPS write, compared to the 990 EVO Plus’s 1,050K IOPS read and 1,400K IOPS write. The 9100 PRO also integrates LPDDR4X DRAM, ensuring smoother performance under heavy workloads, whereas the 990 EVO Plus relies on Host Memory Buffer (HMB) technology, which is dependent on system RAM and may lead to performance inconsistencies in extended write operations.
Specification
Samsung 9100 PRO
Samsung 990 EVO Plus
Interface
PCIe 5.0 x4, NVMe 2.0
PCIe 4.0 x4 / 5.0 x2, NVMe 2.0
Form Factor
M.2 (2280) / M.2 (2280 with Heatsink)
M.2 (2280)
Controller
Samsung Presto PCIe 5.0 Controller
Samsung Piccolo (S4LY022) Controller ARM 32-bit Cortex-R8
NAND Type
Samsung V-NAND TLC (V8, 3-bit MLC)
V-NAND V8 TLC NAND 236-layer
DRAM Cache
1GB – 8GB LPDDR4X (Varies by Capacity)
HMB (Host Memory Buffer)
Sequential Read (MB/s)
Up to 14,800
Up to 7,250
Sequential Write (MB/s)
Up to 13,400
Up to 6,300
Random Read (IOPS, QD32)
Up to 2,200K
Up to 1,050K
Random Write (IOPS, QD32)
Up to 2,600K
Up to 1,400K
Power Consumption (Read, W)
7.6W – 9.0W
4.3W – 5.5W
Power Consumption (Write, W)
7.6W – 9.0W
4.2W – 4.8W
Idle Power Consumption (mW)
4.0mW – 6.5mW
5mW
Total Bytes Written (TBW)
600 TB (1TB) – 4,800 TB (8TB)
600 TB (1TB) – 2,400 TB (4TB)
Warranty
5-Year Limited Warranty
5-Year Limited Warranty
Beyond speed, endurance and power efficiency also differ significantly between the two drives. The 9100 PRO offers a higher TBW rating, reaching 4,800 TB on the 8TB model, compared to the 990 EVO Plus’s maximum of 2,400 TBW for its 4TB version. This makes the 9100 PRO more suitable for AI computing, professional video editing, and enterprise applications where large amounts of data are written daily. Power consumption is another key factor, with the 9100 PRO consuming between 7.6W and 9.0W under active operation, while the 990 EVO Plus operates at a lower 4.3W to 5.5W during reads and 4.2W to 4.8W during writes.
While the 990 EVO Plus is more power-efficient, the 9100 PRO compensates with significantly higher performance and an improved energy efficiency rating, reducing power consumption by 49% compared to previous Samsung PCIe 5.0 drives. Overall, while the 990 EVO Plus is a strong option for users looking for a high-speed PCIe 4.0 SSD, the 9100 PRO is a better fit for professionals requiring the fastest speeds, highest endurance, and improved thermal performance.
Samsung 9100 SSD Review – Performance Tests
Performance testing for the Samsung 9100 PRO was conducted on a Windows 10 system with a 12th-generation Intel Core i5 processor, 16GB DDR5 RAM, and a PCIe 5.0-enabled motherboard. The operating system was installed on a separate PCIe 4.0 SSD, while the 9100 PRO was tested in an available PCIe 5.0 slot.
Benchmarking tools included ATTO Disk Benchmark, CrystalDiskMark, AJA System Test, and real-world file transfer tests to assess sequential and random performance under different workloads. The drive was tested in both bare PCB configuration and with a third-party heatsink, as the proprietary Samsung heatsink version was unavailable for this review.
In ATTO Disk Benchmark, which measures transfer speeds across different file sizes, the 9100 PRO achieved sequential read speeds of between 11.3 GB/s and 11.5 GB/s, with occasional peaks reaching 12.5 GB/s under optimal conditions. These results, while slightly lower than Samsung’s claimed 14.8 GB/s read speed, remain among the highest reported for consumer PCIe 5.0 SSDs. Write speeds in ATTO remained stable at approximately 11.0 GB/s to 12.0 GB/s, showing consistent performance across multiple test runs.
Meanwhile, CrystalDiskMark testing at a 16GB file size reported read speeds of up to 11,881 MB/s and write speeds of 12,444 MB/s, with random IOPS reaching up to 1.5 million under ideal conditions. While the drive’s performance fluctuated slightly depending on workload type, overall speeds remained close to manufacturer specifications, confirming its status as one of the fastest SSDs available in 2025.
For real-world testing, a 52GB mixed dataset comprising 1,711 files across 42 folders was transferred to the 9100 PRO from another PCIe 4.0 SSD. The transfer was completed in just over 34 seconds, with speeds sustaining well above 9,000 MB/s for most of the operation. These figures align with high-end PCIe 5.0 expectations, demonstrating the drive’s ability to maintain consistent performance under heavy workloads.
Additionally, AJA System Test, which simulates video production workloads, recorded sustained read speeds of nearly 10,000 MB/s, making the 9100 PRO a strong choice for video editing professionals working with large 8K or RAW footage files. Notably, write performance remained stable even during long transfers, likely due to Samsung’s expanded Intelligent TurboWrite 2.0 cache, which allocates up to 442GB of SLC cache on the 4TB model to handle large sequential writes without immediate slowdowns.
During testing, the 9100 PRO’s temperatures fluctuated between 45°C and 55°C at idle, while sustained workloads pushed temperatures above 81°C under extended high-speed transfers. While Samsung’s new 5nm Presto controller is more power-efficient than previous PCIe 5.0 designs, high-speed Gen 5 SSDs inherently produce significant heat, requiring adequate cooling solutions to prevent throttling. In testing with a third-party heatsink, thermal recovery was fast, and the drive quickly dropped back to safe temperature ranges within seconds after peak workloads ended. However, without a heatsink, performance throttling was observed after extended write operations, reinforcing the importance of active cooling for sustained performance in PCIe 5.0 SSDs.
Overall, the Samsung 9100 PRO delivers competitive and consistent performance across synthetic benchmarks and real-world testing. It consistently reaches 11.5 GB/s to 12.5 GB/s in most workloads, proving it to be among the fastest PCIe 5.0 SSDs available. Real-world file transfers confirm the drive’s ability to sustain high write speeds, while Samsung’s Intelligent TurboWrite 2.0 technology minimizes performance drops even under heavy loads. However, thermal management remains a key consideration, as sustained high-speed operations push temperatures close to throttling limits without a heatsink. Despite this, power efficiency is improved over previous PCIe 5.0 SSDs, making it a strong option for professionals requiring high-performance storage for AI, video production, and data-heavy workloads.
Samsung 9100 SSD Review – Verdict and Conclusion
The Samsung 9100 PRO SSD delivers top-tier PCIe 5.0 performance, offering sequential read speeds up to 14,800 MB/s and write speeds reaching 13,400 MB/s, making it one of the fastest consumer SSDs currently available. Unlike many PCIe 5.0 SSDs that rely on third-party controllers from Phison or NAND from Micron, the 9100 PRO benefits from Samsung’s fully in-house design, including its Presto PCIe 5.0 controller and V-NAND TLC (V8). This ensures better integration between hardware and firmware, resulting in more stable performance, improved power efficiency, and better overall optimization for workloads like AI computing, video production, and high-speed data processing. Additionally, Samsung claims 49% improved power efficiency over previous PCIe 5.0 SSDs, helping to reduce thermal output compared to some early PCIe 5.0 models. Its high endurance rating (up to 4,800 TBW on the 8TB model) also positions it as a strong choice for users who require reliable, long-term performance.
However, there are some key drawbacks to consider. Thermal performance remains a challenge, as the 9100 PRO can reach temperatures above 81°C under extended workloads, meaning a proper cooling solution is necessary to prevent thermal throttling. While Samsung offers a heatsink version, those using the bare PCB model may need to invest in additional cooling for sustained performance. Additionally, real-world speeds, while impressive, do not always match Samsung’s maximum advertised performance, particularly once the TurboWrite cache is exhausted. Furthermore, Samsung’s reputation for SSD reliability is generally strong, but firmware issues in previous models, such as the 990 PRO and 980 PRO, led to concerns over long-term stability. While Samsung has since addressed those problems, some users may remain cautious about potential firmware-related risks. Despite these concerns, the 9100 PRO still stands out as one of the best PCIe 5.0 SSDs available, offering fully in-house hardware, high endurance, and leading-edge performance for users who need the fastest storage available today.
PROS of the Samsung 9100 Pro SSD
Cons of the Samsung 9100 Pro SSD
Industry-Leading Speed – Offers sequential read speeds up to 14,800 MB/s and write speeds up to 13,400 MB/s, making it one of the fastest consumer SSDs available.
Fully In-House Design – Uses Samsung’s proprietary Presto PCIe 5.0 controller and V-NAND TLC (V8), avoiding reliance on third-party controllers like Phison and Micron NAND, ensuring better hardware-firmware integration.
High Endurance Rating – Provides up to 4,800 TBW on the 8TB model, making it ideal for high-intensity workloads like AI computing, video editing, and large-scale data transfers.
Improved Power Efficiency – Samsung claims 49% better power efficiency compared to previous PCIe 5.0 SSDs, reducing heat output and improving overall energy consumption.
Strong Random Performance – With up to 2,200K IOPS random read and 2,600K IOPS random write, it excels in workloads that involve frequent small file transactions, such as databases, virtual machines, and AI training models.
Multiple Capacity Options – Available in 1TB, 2TB, 4TB, and 8TB, making it one of the first consumer PCIe 5.0 SSDs with an 8TB variant.
Heatsink Version Available – Samsung provides an optional D8-compliant heatsink, ensuring better thermal regulation for sustained performance, especially for gaming consoles like PlayStation 5.
A True Gen 5 SSD – Unlike the safe and comparatively underwhelming Samsung 990 EVO Plus, which only utilized PCIe 5.0 x2 lanes, the 9100 PRO fully utilizes PCIe 5.0 x4, delivering real next-generation speeds.
High Thermal Output – Can reach 81°C under sustained workloads, requiring adequate cooling solutions, either through the heatsink model or third-party cooling options.
Premium Pricing – Enters a PCIe 5.0 market where some competitors offer similar speeds at lower prices due to their earlier release, making it a costly investment for budget-conscious users.
Samsung’s Firmware History – While Samsung has a strong reputation for SSD reliability, previous firmware issues in the 990 PRO and 980 PRO raised concerns, making some users cautious about potential long-term stability.
If you are thinking of buying storage, please use the links below as it results in us at NASCompares receiving an affiliate fee from Amazon:
Need More Help Choosing the Right Storage Solution?
Choosing the right data storage solution for your needs can be very intimidating and it’s never too late to ask for help. With options ranging from NAS to DAS, Thunderbolt to SAS and connecting everything up so you can access all your lovely data at the touch of a button can be a lot simpler than you think. If you want some tips, guidance or help with everything from compatibility to suitability of a solution for you, why not drop me a message below and I will get back to you as soon as possible with what you should go for, its suitability and the best place to get it. This service is designed without profit in mind and in order to help you with your data storage needs, so I will try to answer your questions as soon as possible.
This description contains links to Amazon. These links will take you to some of the products mentioned in today's content. As an Amazon Associate, I earn from qualifying purchases. Visit the NASCompares Deal Finder to find the best place to buy this device in your region, based on Service, Support and Reputation - Just Search for your NAS Drive in the Box Below
Need Advice on Data Storage from an Expert?
Finally, for free advice about your setup, just leave a message in the comments below here at NASCompares.com and we will get back to you.Need Help?
Where possible (and where appropriate) please provide as much information about your requirements, as then I can arrange the best answer and solution to your needs. Do not worry about your e-mail address being required, it will NOT be used in a mailing list and will NOT be used in any way other than to respond to your enquiry.
[contact-form-7]
TRY CHAT Terms and Conditions
If you like this service, please consider supporting us.
We use affiliate links on the blog allowing NAScompares information and advice service to be free of charge to you.Anything you purchase on the day you click on our links will generate a small commission which isused to run the website. Here is a link for Amazon and B&H.You can also get me a Ko-fi or old school Paypal. Thanks!To find out more about how to support this advice service checkHEREIf you need to fix or configure a NAS, check FiverHave you thought about helping others with your knowledge? Find Instructions Here
Or support us by using our affiliate links on Amazon UK and Amazon US
Alternatively, why not ask me on the ASK NASCompares forum, by clicking the button below. This is a community hub that serves as a place that I can answer your question, chew the fat, share new release information and even get corrections posted. I will always get around to answering ALL queries, but as a one-man operation, I cannot promise speed! So by sharing your query in the ASK NASCompares section below, you can get a better range of solutions and suggestions, alongside my own.