The Synology BeeStation BST151-4T is a 4 TB single drive personal cloud device that sits somewhere between an external hard drive and a traditional NAS, targeting users who want centralized storage, photo backup, file syncing, and remote access without dealing with a conventional multi bay server setup. It follows the original BST150-4T BeeStation, first released in February 2024, and appears to be a light refresh of that earlier model rather than a full redesign. As with the first version, the focus is on quick deployment, simple management, and a more consumer friendly software experience, using Synology’s BeeStation platform instead of the broader and more configurable DSM system found on the company’s standard NAS lineup.
At a hardware level, the BST151-4T remains a very compact single bay network storage appliance with a fixed 4 TB hard drive, built around the Realtek RTD1619B platform and a 1GbE network connection. Physical connectivity is unchanged from the earlier BeeStation, with 1 x USB-A 3.2 Gen 1 port, 1 x USB-C 3.2 Gen 1 port, and 1 x RJ-45 LAN port, all housed in the same 148.0 x 62.6 x 196.3 mm enclosure weighing 820 g.
That hardware profile makes clear where the BeeStation sits in Synology’s lineup. This is not a flexible NAS chassis with room for drive upgrades, SSD cache, multi bay expansion, or faster networking. The internal disk is part of the appliance design, so there is no meaningful path to RAID redundancy, easier drive level recovery, or long term capacity scaling in the way there is on a conventional 2 bay or 4 bay NAS.
Power and thermals are also modest, which is consistent with a low power, always on personal cloud device. Synology lists power consumption at about 7.85 W during access and 1.65 W in HDD hibernation, with a 36 W external power adapter. The system continues to use a single HAT3300-4T drive, and Synology’s current 4 TB HAT3300 model is a 5400 RPM class disk rather than a faster 7200 RPM unit.
The one specification that requires care is memory. Synology’s March 30, 2026 product specification PDF and the current BeeStation comparison page both list the BST151-4T with 1 GB DDR4, but Synology’s newer BST151-4T datasheet, published later in March 2026 and mirrored across multiple regional versions, lists 2 GB DDR4 instead. On balance, the later datasheet appears to reflect the intended refresh specification, but Synology’s own published material is not yet fully consistent. (UPDATE – RAM on the BST151-4T is CONFIRMED as 2GB)
Assuming the 2 GB figure in the later datasheet is the correct final spec, the BST151-4T is best understood as a minimal revision of the BST150-4T rather than a new hardware generation. The enclosure, CPU, ports, networking, and drive class are effectively the same, while the main change is the move from the predecessor’s 1 GB memory configuration to 2 GB. That could simply reflect practical component economics as much as performance tuning, since lower density memory packages can become less cost effective over time as supply shifts. In either case, this still appears to be fixed onboard memory, not a user upgradeable SO-DIMM arrangement, so the platform remains closed in the same way as the original model.
Specification
Synology BeeStation BST151-4T
Capacity
4 TB
Drive type
Synology HAT3300-4T
Processor
Realtek RTD1619B
Memory
2 GB DDR4 listed in the newer datasheet; 1 GB DDR4 still appears on some Synology product spec pages
LAN
1 x 1GbE RJ-45
USB
1 x USB-A 3.2 Gen 1, 1 x USB-C 3.2 Gen 1
Dimensions
148.0 x 62.6 x 196.3 mm
Weight
820 g
Power adapter
36 W
Power consumption
7.85 W access, 1.65 W HDD hibernation
Operating temperature
0°C to 35°C
Warranty
3 years
Synology BeeStation in 2026 – What can it do?
In 2026, the BeeStation platform is no longer limited to basic remote file access. Synology positions it as a consumer focused private cloud for storing, syncing, and sharing files and photos, with web, desktop, and mobile access, support for sign in via Google Account, Apple ID, or Synology Account, and shared access for up to 8 users on a single device. It is designed to pull together data from phones, computers, external drives, and selected cloud services into one managed location rather than acting only as a simple networked hard drive.
Photo handling is one of the more developed parts of the platform. Synology states that BeeStation can back up mobile photos, import content from sources such as Google Photos and iCloud Photos, and organize images with local AI based recognition for people, subjects, and places. The software also supports timeline and map based browsing, album creation, and controlled photo sharing, which places the BST151-4T closer to a private cloud photo hub than to a basic USB backup box.
Its data protection features have also expanded since launch. BeeStation now supports internal restore points based on snapshots, backups to BeeProtect, Synology NAS, and external drives, plus a 3 year Acronis True Image Essentials license for 1 computer. BeeStation OS 1.5 also added BeeCamera support, but Synology limits that feature to BeeStation Plus models rather than the standard 4 TB unit, so the BST151-4T does not currently gain the surveillance role that the higher tier model has started to take on.
Where the BeeStation still differs from a DSM based NAS such as the DS124 or DS223 is in breadth and flexibility. Synology’s DS124 and DS223 product pages explicitly advertise broader DSM functions including Synology Drive based private cloud workflows, Btrfs snapshot features, ShareSync between Synology systems, full Surveillance Station support, and the wider DSM application platform. By contrast, BeeStation remains a curated appliance with a narrower software stack, no general DSM Package Center environment, no broad package driven expansion path, and on the standard 4 TB model no BeeCamera surveillance support either. In other words, it can cover the main personal cloud tasks, but it still does not replace the wider role of even Synology’s entry level DSM NAS systems.
The BST151-4T looks like a modest revision of the original BeeStation rather than a substantially new product. Its appeal remains the same: a preconfigured, low friction private cloud for users who want basic file storage, photo backup, syncing, sharing, and remote access without moving into a full DSM based NAS environment. The hardware envelope is still narrow, with a fixed internal 4 TB drive, 1GbE networking, and no real upgrade path for storage expansion or RAID style redundancy, but that is consistent with its role as an entry level turnkey appliance rather than a general purpose NAS. Synology’s own later datasheet points to 2 GB of RAM on the new model, which would make the BST151-4T a small but practical refresh of the BST150-4T rather than a platform shift. Pricing is the main unknown at the time of writing. Synology’s support status page already lists the BST151-4T as generally available, but public retail pricing is still not clearly established. On that basis, the safest expectation is that it will land close to the earlier 4 TB BeeStation, which launched around $199 in the US and about £209 in the UK, while more recent BST150-4T retail listings have also appeared higher depending on seller and region, sat around $309 without TAX. That likely places the BST151-4T will land in excess of $300 and maybe closer to $350 when factoring the RAM increase.
This description contains links to Amazon. These links will take you to some of the products mentioned in today's content. As an Amazon Associate, I earn from qualifying purchases. Visit the NASCompares Deal Finder to find the best place to buy this device in your region, based on Service, Support and Reputation - Just Search for your NAS Drive in the Box Below
Need Advice on Data Storage from an Expert?
Finally, for free advice about your setup, just leave a message in the comments below here at NASCompares.com and we will get back to you.Need Help?
Where possible (and where appropriate) please provide as much information about your requirements, as then I can arrange the best answer and solution to your needs. Do not worry about your e-mail address being required, it will NOT be used in a mailing list and will NOT be used in any way other than to respond to your enquiry.
[contact-form-7]
TRY CHAT Terms and Conditions
If you like this service, please consider supporting us.
We use affiliate links on the blog allowing NAScompares information and advice service to be free of charge to you.Anything you purchase on the day you click on our links will generate a small commission which isused to run the website. Here is a link for Amazon and B&H.You can also get me a Ko-fi or old school Paypal. Thanks!To find out more about how to support this advice service checkHEREIf you need to fix or configure a NAS, check FiverHave you thought about helping others with your knowledge? Find Instructions Here
Or support us by using our affiliate links on Amazon UK and Amazon US
Alternatively, why not ask me on the ASK NASCompares forum, by clicking the button below. This is a community hub that serves as a place that I can answer your question, chew the fat, share new release information and even get corrections posted. I will always get around to answering ALL queries, but as a one-man operation, I cannot promise speed! So by sharing your query in the ASK NASCompares section below, you can get a better range of solutions and suggestions, alongside my own.
The LincStation E1 is a compact 2-bay NAS from LincPlus aimed at users who want a simple way to move file storage, backups, and basic media access off third-party cloud services and onto local hardware. It is built around an ARM platform and combines 2 x SATA drive bays with 2 x NVMe slots, which gives it a433 storage layout that is more flexible than many entry-level NAS units in this price class. Rather than targeting enthusiasts who want extensive customization from day 1, the E1 is positioned as a ready-to-use system with LincPlus’s own LincOS software, desktop and mobile apps, and a feature set focused on everyday tasks such as file sharing, photo backup, remote access, and media browsing. From a review perspective, the main appeal of the E1 is not that it competes directly with higher-end NAS systems on raw performance or software maturity, but that it tries to offer a broad hardware and feature package at a very low entry cost. The combination of 1GbE networking, dual NVMe support, and a compact chassis makes it an interesting option for first-time NAS buyers, light home users, or anyone looking for a secondary backup device with low power usage. At the same time, its value depends heavily on expectations, especially around software polish and the realities of buying storage media separately, so it is best evaluated as a budget-oriented turnkey NAS with clear strengths and equally clear limitations.
Want to Learn More about Lincplus Lincsation NAS Solutions? The N1, N2 and S1 all include an UnRAID Software License included:
Kickstarter Disclaimer!!! This is NOT traditional retail
At the time of review, the LincStation E1 is positioned as a crowdfunding product rather than a standard retail NAS, which means buyers should treat it differently from an item sold through normal retail channels with established return policies and support expectations. LincPlus is not an unknown brand and has released other NAS and computing products, but crowdfunding still carries delivery, software maturity, and post-launch support risks, so any purchase decision should factor in the reduced consumer protections compared with conventional retail.
Lincstation E1 NAS Review – Quick Conclusion
The LincStation E1 is a low-cost, compact 2-bay NAS that stands out mainly because it combines 2 x SATA bays and 2 x NVMe slots in a small ARM-based enclosure while still aiming to be a turnkey product rather than a DIY project, which makes it an appealing option for first-time NAS buyers or users who want a simple local backup/file server with low power draw and basic private cloud-style features; the hardware package is strong for the price category, the included accessories are unusually complete, and the overall design is practical for light home storage, media access, and phone backup use, but the key caveat is that the software experience (LincOS) is still developing, with the mobile app appearing more mature than the desktop and web interfaces and some expected security and usability features not yet fully in place in the reviewed build, so the E1 makes the most sense if it is judged as a budget-oriented NAS with good hardware value and a work-in-progress software platform rather than a polished replacement for established NAS ecosystems.
SOFTWARE - 5/10
HARDWARE - 7/10
PERFORMANCE - 7/10
PRICE - 10/10
VALUE - 9/10
7.6
PROS
Very low entry price (crowdfunding positioning) for a turnkey NAS-class device Compact chassis with a small desktop footprint and low overall weight Flexible storage layout with 2 x SATA bays + 2 x M.2 NVMe slots Low-power ARM platform that supports relatively modest power consumption in real use 2.5GbE-class networking referenced in review testing (strong value if confirmed in final retail spec) Front USB 3.2 Gen 2 Type-A port for faster external drive imports/backups Good in-box accessory bundle (cables, screwdriver, screws, thermal pads, PSU) LincOS includes a broad feature set for entry users (SMB sharing, backups, remote access, media features, mobile app control)
CONS
Software maturity is still a concern, especially desktop and web UI polish Crowdfunding purchase model adds risk compared with normal retail buying Single LAN port only, so no link aggregation or failover Some expected NAS security/admin features were missing or underdeveloped in the reviewed build (for example, 2FA)
The LincStation E1 uses a compact vertical desktop chassis with a plastic outer shell and a front panel that keeps visible hardware elements to a minimum. At 218.5 x 88 x 140 mm and 907 g, it is physically smaller and lighter than many conventional 2-bay NAS systems, which affects both placement and cooling design. The front panel includes status LEDs for the 2 SATA bays (S1, S2), 2 NVMe slots (M1, M2), network activity/status, and the power button LED, so users can check basic drive and network state at a glance without opening the software interface. There is no front display panel, and the clean exterior design is clearly focused on compactness and low manufacturing complexity rather than service indicators or advanced controls.
The primary storage section is built around 2 top-loading drive trays that support both 3.5-inch and 2.5-inch SATA HDD/SSD media. These trays are accessed from the top of the chassis and use integrated pull handles that sit relatively flush when closed, which helps reduce accidental snagging and keeps the top surface visually tidy. The supplied accessory pack includes mounting screws and a screwdriver, which is relevant here because 2.5-inch drives require screw mounting rather than tool-less insertion. The tray design is simple and functional, but there is no locking mechanism, no front latch key, and no hot-swap enterprise-style caddy system, so the emphasis is clearly on basic home use rather than secure or high-frequency drive replacement.
A secondary storage layer is provided by 2 underside M.2 ports, both supporting M.2 2280 NVMe SSDs. These slots are located under the bottom panel rather than on an internal motherboard tray accessed from the side, which means initial installation is straightforward but drive swaps are less convenient than the top SATA bays. The box contents include 2 thermal pads for SSDs of different thicknesses, which is a notable detail at this price point because it indicates the NVMe area was designed with at least basic thermal contact in mind rather than treating the slots as purely optional expansion. Functionally, these NVMe slots can be used for cache or as storage pools, which gives the system more deployment flexibility than a standard 2-bay HDD-only NAS.
The storage layout is technically more ambitious than many entry-level NAS devices because it combines 2 x SATA bays for bulk capacity with 2 x NVMe slots for faster storage tiers in a very small chassis. Based on the provided CPU/PCIe layout, the system is built around the RK3568 platform with PCIe and SATA resources split across NVMe and SATA connectivity, with the SATA side also involving a JMB575 SATA controller path for the drive bay implementation. In practical terms, this means the E1 is designed to support mixed workloads such as HDD-based backups plus SSD cache, or separate SSD-backed application/media indexing storage alongside larger mechanical drives. This is still a consumer NAS layout, but from a hardware planning perspective it gives more options than a basic ARM 2-bay design that only exposes SATA.
From a mechanical and thermal design perspective, the main compromise is internal space density, especially around the underside NVMe area and the airflow path shared across the enclosure. The chassis uses a single base-mounted fan and passive ventilation openings around multiple sides, with the SATA bays above and the NVMe slots below, so the internal airflow strategy is relatively simple and constrained by the compact dimensions. This approach is consistent with the low-power RK3568 platform and the intended use of 2 local drives plus optional NVMe, but it also means there is limited room for large heatsinks, cable routing, or internal upgrades beyond the defined storage slots. As a result, the E1 offers a technically flexible storage layout for its class, but it remains a tightly integrated, compact NAS design rather than a modular enclosure built for extensive hardware modification.
Lincstation E1 NAS Review – Internal Hardware
The LincStation E1 is built around the Rockchip RK3568, a quad-core ARM SoC (Cortex-A55 class) running at up to 2.0 GHz. This is a low-power embedded platform commonly used in compact network and edge devices, and it is a practical fit for a NAS that prioritizes basic file services, light media tasks, and low idle power over high parallel compute performance. In this system, the RK3568 is paired with 4 GB of embedded DDR4 memory, with no indication of user-upgradeable RAM, which places the E1 firmly in the entry-level category for multitasking and container-heavy workloads.
From an architecture standpoint, the E1’s hardware is more interesting than a typical low-cost 2-bay ARM NAS because it exposes both SATA and NVMe storage within a single compact design. The provided block layout shows the RK3568 distributing PCIe lanes across NVMe connectivity and additional controller paths, while the SATA bays are implemented through a JMB575 SATA controller stage. This matters because the system is not simply attaching 2 SATA drives directly to a minimal embedded board, but instead using a more layered I/O design to support 2 x SATA bays plus 2 x NVMe slots within the limits of the SoC’s available interfaces.
The hardware platform also includes a 1GbE network interface, HDMI 2.1 (TMDS) output, and a mix of USB connectivity, which indicates that the E1 is designed as more than a headless file box even if its primary role is NAS storage. The CPU/PHY layout also reflects the shared nature of resources in compact ARM systems, where PCIe, USB, and SATA connectivity are allocated carefully to balance cost and capability. In practical terms, the hardware specification is broad for the class, but users should still view it as a constrained embedded platform, not as a substitute for x86 NAS hardware with higher throughput ceilings or large virtualization headroom.
At a system design level, the internal hardware choices are clearly optimized around low power draw, compact thermals, and cost efficiency. The RK3568 platform, embedded memory, and compact board-level integration reduce complexity and help keep the device small, while the storage expansion is pushed into the defined SATA and M.2 bays rather than broader internal upgrade options. This makes the E1 a purpose-built appliance with a relatively fixed hardware profile: flexible in storage configuration, but limited in CPU and memory scalability once deployed.
Lincstation E1 NAS Review – Ports and Connections
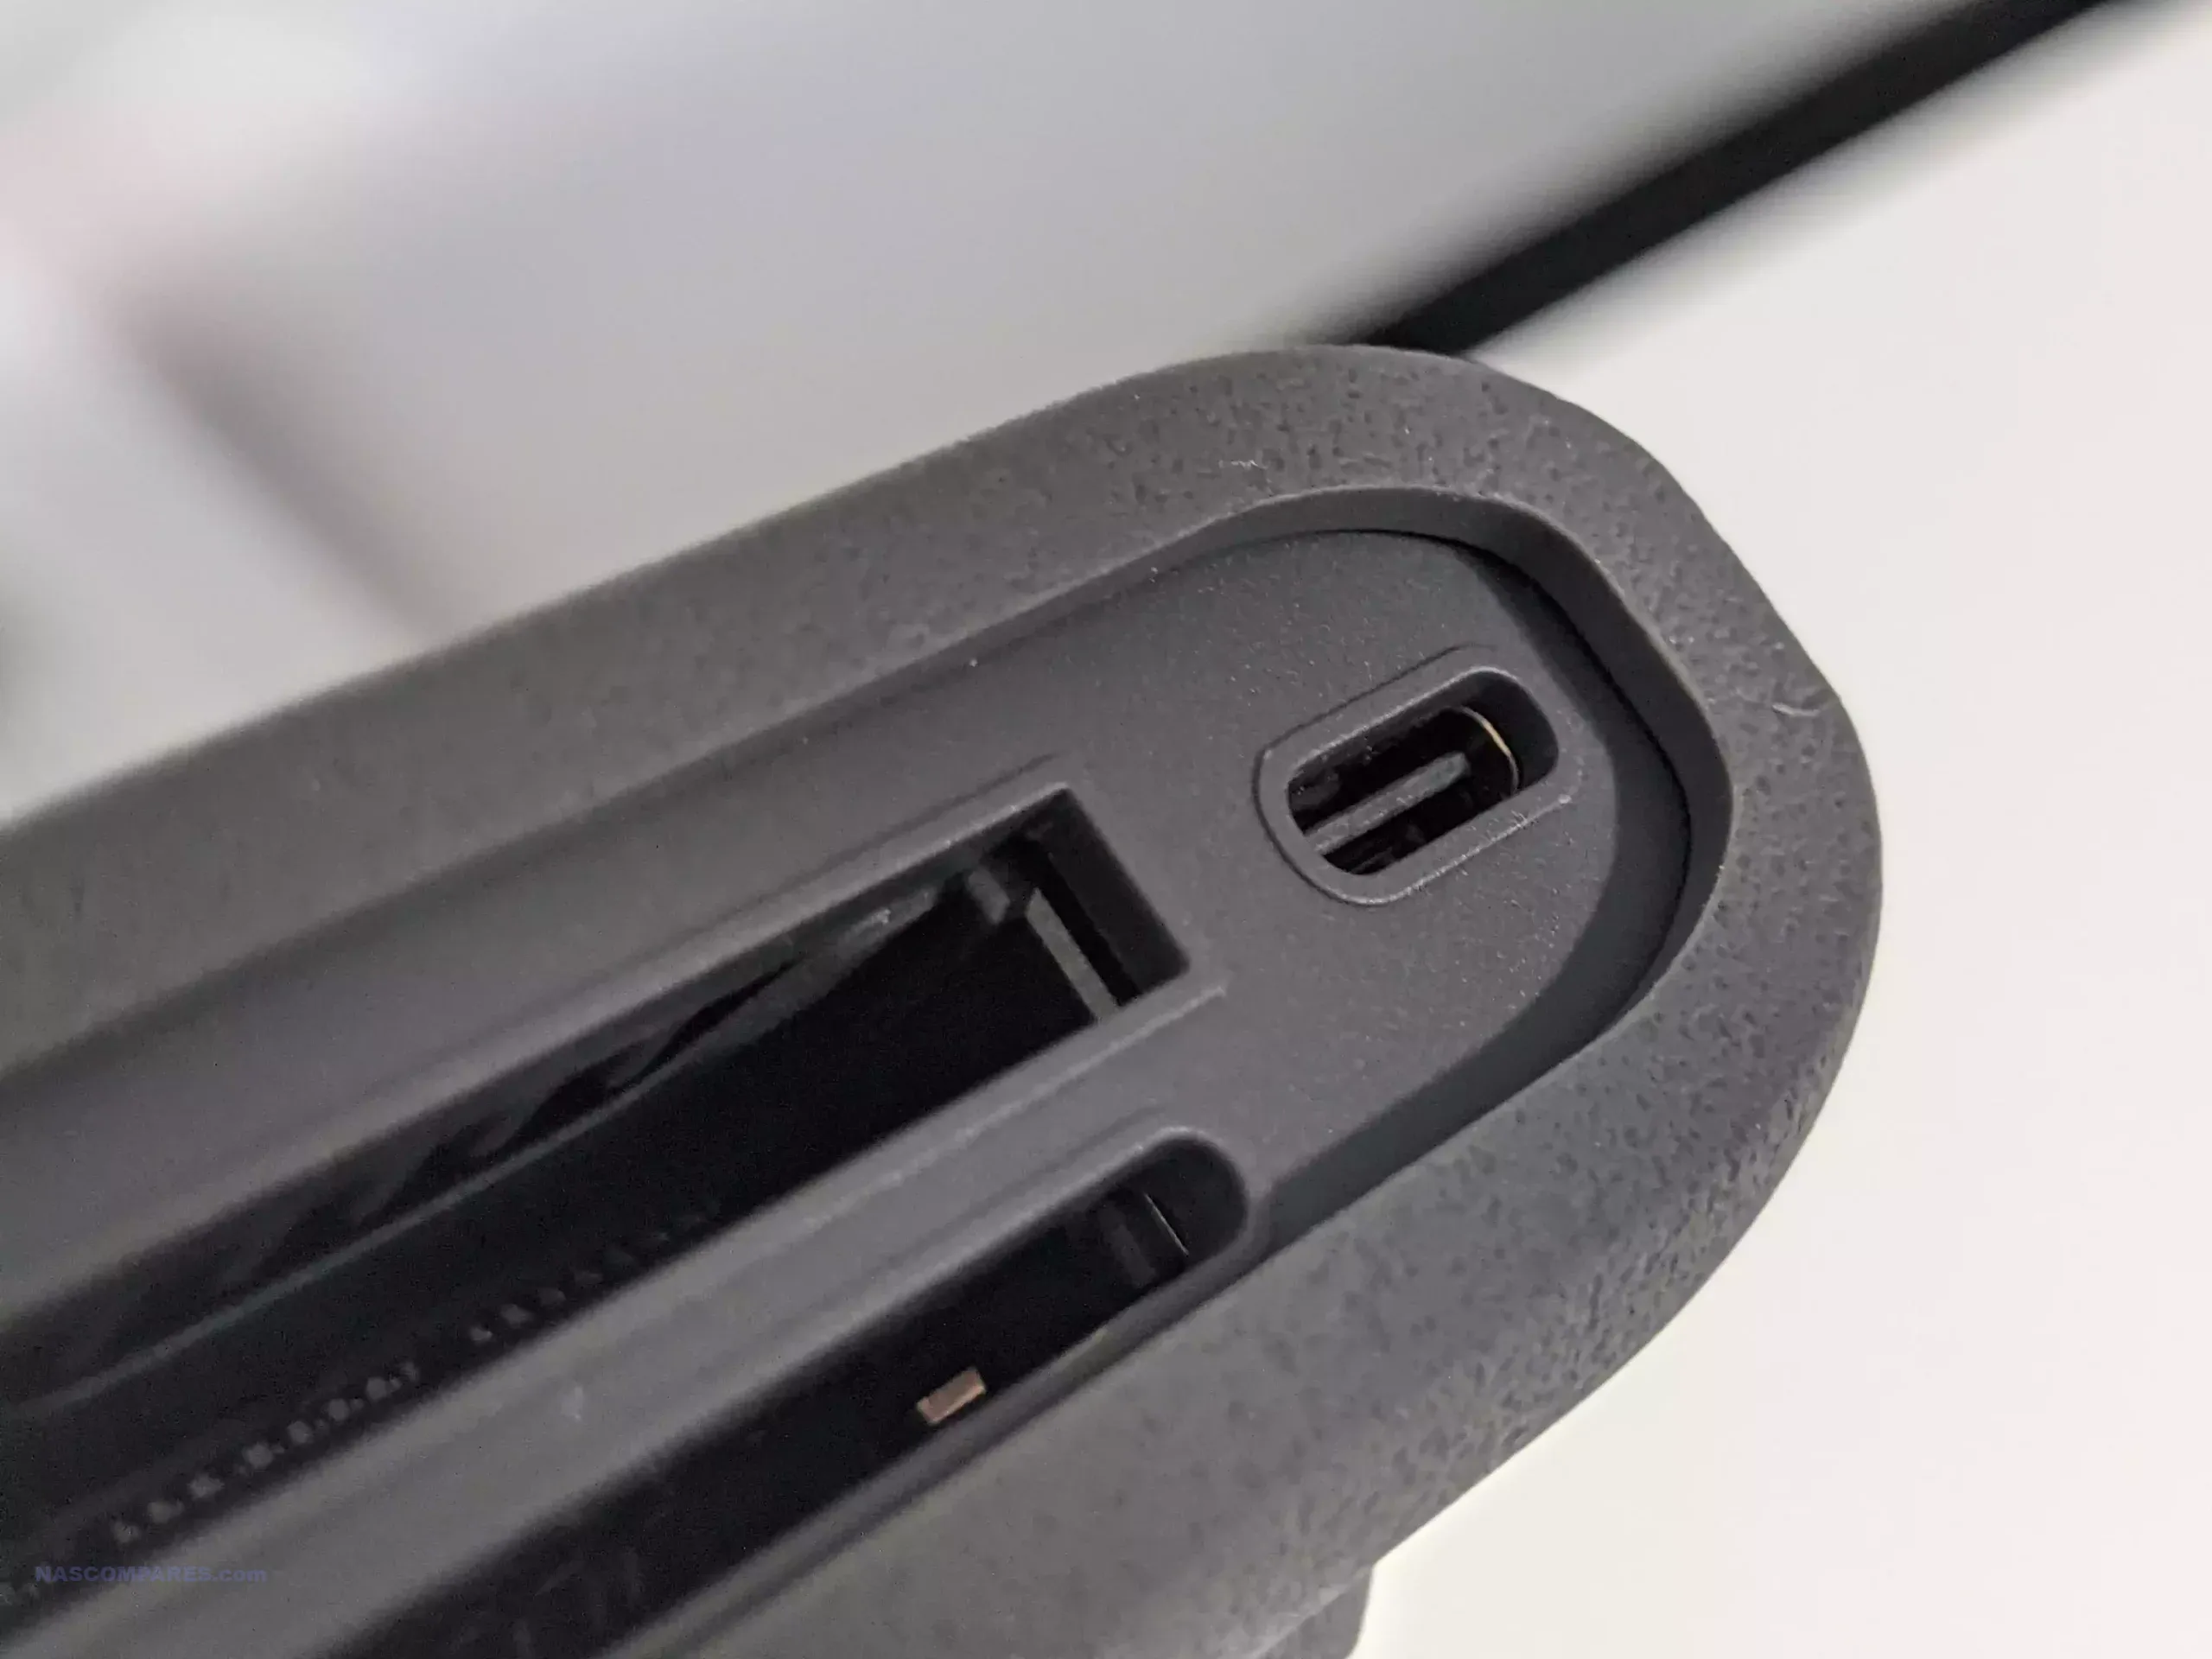
The LincStation E1 provides a basic but functional I/O layout split across the front and rear panels. On the front, there is 1 x USB 3.2 Gen 2 Type-A port, which is the highest-speed external USB connection on the unit and the most practical port for temporary storage imports, external backup drives, or direct file transfers. The front panel also includes the status LEDs for both SATA bays, both NVMe slots, network activity, and the power button with integrated LED, so operational state is visible from the main user-facing side of the device.
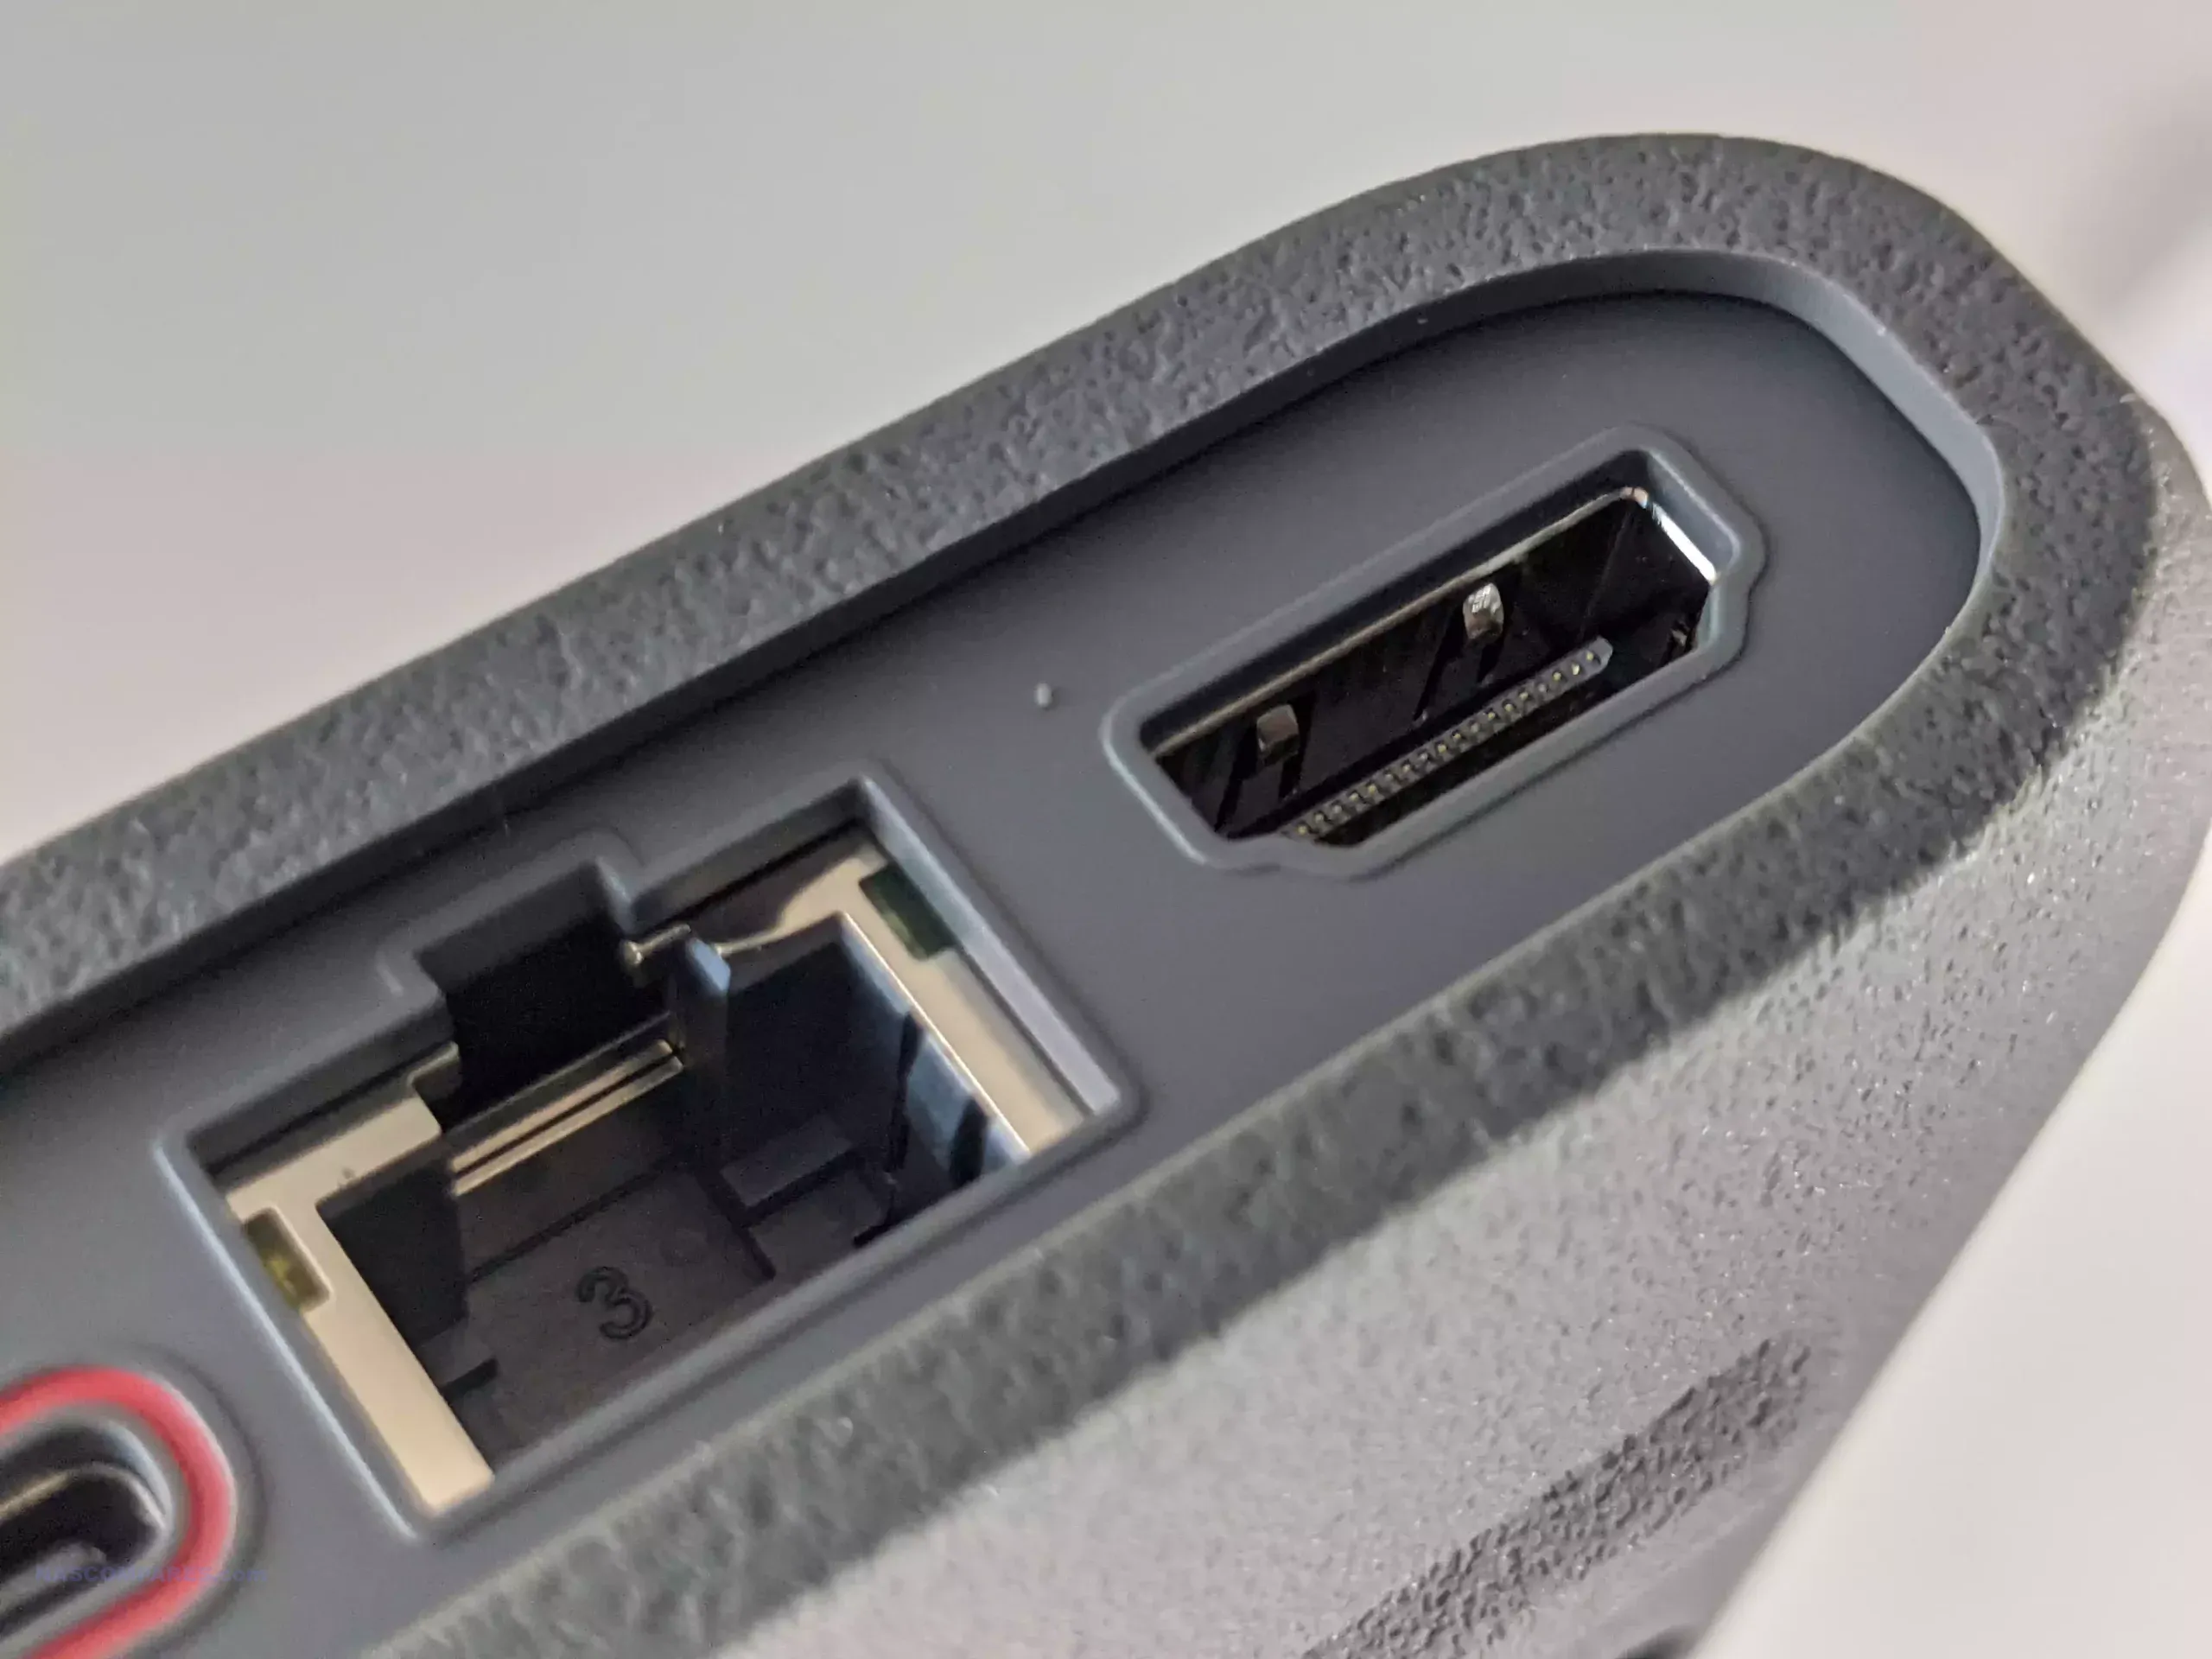
On the rear panel, the E1 includes 1 x RJ-45 LAN port, 2 x USB 2.0 Type-A ports, 1 x HDMI 2.1 (TMDS) port, a reset button, and a 12V/5A DC power input jack. The rear USB ports are limited to USB 2.0, which is sufficient for low-speed peripherals or occasional backup devices, but they are not ideal for sustained high-speed external storage workflows. The HDMI output is an important inclusion in specification terms because it expands potential use cases beyond standard NAS access, although the practical value of that port depends on software support and feature maturity.
In networking terms, the hardware specification lists 1 x Gigabit RJ-45, while the review transcript references 1GbE operation during testing and performance discussion, so this is an area where buyers should verify the final shipping specification and campaign listing before purchase. Regardless of the final Ethernet speed, the E1 only provides a single wired LAN port, which means no link aggregation, no failover path, and no dual-NIC network segmentation. The system does, however, also support Wi-Fi connectivity according to the review material, which may help with placement flexibility or initial setup, but wired Ethernet remains the primary connection for NAS use.
Lincstation E1 NAS Review – Software and Services
The LincStation E1 runs LincOS, which is positioned as an integrated NAS platform for file access, backup, remote connectivity, and media services rather than a bare system that requires users to install a third-party OS. Based on the provided feature overview, the core service set includes LincAccess for remote access without manual port forwarding, System Upgrade for background firmware updates, Secure Space for encrypted storage, Local Share over SMB, Backup Disk and Sync Disk for scheduled backup/sync tasks, Remote Download, Smart Album for local photo analysis/tagging, and Video Center for media browsing and playback. On paper, this gives the E1 a broad set of consumer NAS functions, especially for users who want a single interface for files, phone backups, and basic media management.
In practical use, the software experience appears to vary significantly depending on whether the system is accessed via desktop client, web browser, or mobile app. The review transcript describes the desktop client as functional but visually and structurally closer to a mobile-first interface, with some sections feeling sparse or less optimized for larger screens. The mobile application is described as the more mature experience, with better flow for common tasks such as file access, photo backup, service control, and SMB management. By contrast, the browser-based interface is described as much more limited, which is relevant because web UI access remains a standard workflow for many NAS users.
The main issue at the time of review is software maturity rather than feature absence alone. The transcript indicates that newer builds added functions that were missing in earlier testing, which suggests active development, but also confirms that the platform is still evolving and not yet fully polished. Specific concerns raised include weak desktop/web UX consistency, limited clarity in some backup/sync terminology for less experienced users, and missing or underdeveloped areas in security and administration workflows (for example, the absence of 2FA and other standard NAS security tooling in the tested build). As a result, the E1 software stack is best understood as a usable but still developing platform that may improve over time, but should not be evaluated as equivalent in maturity to long-established NAS operating systems.
Lincstation E1 NAS Review – Noise, Temp and Power Performance Tests
Testing in the review focused on real-world NAS usage with 2 x 4TB Seagate IronWolf HDDs installed in the SATA bays and 2 x 1TB NVMe SSDs in the M.2 slots. In this configuration, the unit was used for file transfers, mobile backups, and sustained read/write activity to observe behavior under load rather than synthetic benchmark-only results. The review also notes that the NVMe slots were constrained in practical throughput relative to full higher-lane NVMe operation, with observed expectations around a capped transfer range consistent with the platform and lane allocation.
Acoustically, the measured noise level was reported at around 41 to 43 dB at idle, and remained in a similar 42 to 43 dB range under heavier activity. That indicates a relatively stable acoustic profile during testing, likely due in part to the inability (at the time of recording) to directly tune fan behavior in the software build initially tested. The result is not silent, and the plastic chassis plus compact internal layout may contribute to audible drive and airflow presence, but the unit also did not show a major noise spike during CPU and storage activity in the tested setup.
Thermally, the system was run for about 4 hours under sustained read/write activity, including transfers involving attached USB storage and mobile device backup traffic. Reported external surface temperatures were around 38 to 41°C on the chassis sides, with perforated ventilation areas reaching about 43 to 44°C. The hottest areas were around the underside NVMe region and between the installed drives, which is consistent with the compact internal layout and base-mounted cooling approach. With the 4TB HDDs used in testing, the reported drive temperature was around 51°C during this sustained activity period, while other external port-side areas remained around the low-to-mid 40°C range.
Power consumption results were in line with a low-power ARM NAS platform. With low CPU utilization (below roughly 15%) and drives/SSDs in idle or light activity states, the measured draw was around 12 to 12.2 W. Under heavier use, with CPU utilization above roughly 75% and simultaneous HDD/NVMe read/write activity, reported power draw increased to about 19.4 to 19.7 W. SMB transfer performance over the network was reported at roughly 180 to 200 MB/s on HDD-based access, while NVMe-backed activity was described as saturating the available network path in testing, which is broadly consistent with the stated Ethernet and storage configuration constraints.
Lincstation E1 NAS Review – Conclusion & Verdict
The LincStation E1 presents a clear budget-focused NAS proposition: compact hardware, flexible storage options for its class, low-power ARM design, and a turnkey software stack that covers the main functions many entry-level users look for, including local sharing, backup, remote access, and media features. Its main hardware appeal is the combination of 2-bay SATA storage and 2 x NVMe support in a small enclosure, which is uncommon at this level. As a hardware platform for basic home storage and backup use, it is a practical design with a broader feature set than many similarly positioned entry NAS devices.
The main limitation is software maturity rather than core hardware capability. Based on the review material, LincOS is usable and actively improving, but the desktop and web experience still need refinement, and some security and usability expectations common in more established NAS ecosystems are not yet fully met. For that reason, the E1 is best evaluated as a low-cost NAS with strong hardware value and a developing software platform, rather than a fully polished alternative to long-established NAS brands at the time of review.
Want to Learn More about Lincplus Lincsation NAS Solutions? The N1, N2 and S1 all include an UnRAID Software License included:
This description contains links to Amazon. These links will take you to some of the products mentioned in today's content. As an Amazon Associate, I earn from qualifying purchases. Visit the NASCompares Deal Finder to find the best place to buy this device in your region, based on Service, Support and Reputation - Just Search for your NAS Drive in the Box Below
Need Advice on Data Storage from an Expert?
Finally, for free advice about your setup, just leave a message in the comments below here at NASCompares.com and we will get back to you.Need Help?
Where possible (and where appropriate) please provide as much information about your requirements, as then I can arrange the best answer and solution to your needs. Do not worry about your e-mail address being required, it will NOT be used in a mailing list and will NOT be used in any way other than to respond to your enquiry.
[contact-form-7]
TRY CHAT Terms and Conditions
If you like this service, please consider supporting us.
We use affiliate links on the blog allowing NAScompares information and advice service to be free of charge to you.Anything you purchase on the day you click on our links will generate a small commission which isused to run the website. Here is a link for Amazon and B&H.You can also get me a Ko-fi or old school Paypal. Thanks!To find out more about how to support this advice service checkHEREIf you need to fix or configure a NAS, check FiverHave you thought about helping others with your knowledge? Find Instructions Here
Or support us by using our affiliate links on Amazon UK and Amazon US
Alternatively, why not ask me on the ASK NASCompares forum, by clicking the button below. This is a community hub that serves as a place that I can answer your question, chew the fat, share new release information and even get corrections posted. I will always get around to answering ALL queries, but as a one-man operation, I cannot promise speed! So by sharing your query in the ASK NASCompares section below, you can get a better range of solutions and suggestions, alongside my own.
Best NAS You Can Buy Right Now for Under $499 at the end of 2025
By late 2025, the under 499 dollar NAS segment has become far more crowded, with multiple vendors offering systems that combine capable hardware, established operating systems, and multi bay storage at a relatively accessible price. Home users, prosumers, and small workgroups now have access to devices that can centralise files, manage routine backups, and handle local media streaming at performance levels that were previously limited to higher priced units. The range of available designs has also grown, with everything from compact solid state based units to entry level rackmount models appearing in this category. This guide looks at five (technically 6!) turnkey NAS platforms that can be purchased for 499 dollars or less. Each one focuses on a different balance of features, whether that is throughput, virtualisation, containers, or ease of use, yet all provide a practical path toward reliable self hosted storage without pushing the budget too far.
Important Disclaimer and Notes Before You Buy
Every NAS in this bracket is sold without drives, so users must provide their own storage, whether that is 3.5 inch HDDs, 2.5 inch SSDs, or M.2 NVMe modules for all flash builds. This directly influences total cost, particularly for NVMe based systems. Some models include small flash or eMMC for the operating system, but these are not suitable for general data storage. Buyers should account for drive costs, planned RAID layouts, and any needed accessories such as cables, heatsinks, or extra cooling. Software support also varies, with many devices using vendor platforms like DSM, TOS, or UGOS, while others permit alternatives such as TrueNAS or Unraid without affecting hardware support. Systems with less mature software may require more setup work for Plex, Docker, or SMB services, making these NAS units better suited to users who are comfortable handling basic network configuration or are willing to learn more advanced features over time.
UniFi UNAS Pro 7-Bay NAS
$499 – ARM Cortex-A57 – 8GB – 7x 3.5″ SATA – 1x 10GbE SFP+, 1x 1GbE – UniFi OS – BUY HERE
The UniFi UNAS Pro is a two unit rackmount NAS that focuses on high throughput storage rather than general purpose application hosting. It includes seven hot swappable SATA bays for either 2.5 inch or 3.5 inch drives and is built on a quad core ARM Cortex A57 processor at 1.7GHz with 8GB of DDR4 memory. The platform is intended for straightforward file storage and does not provide container services, multimedia features, or virtualisation. Network connectivity consists of one 10GbE SFP plus port and one 1GbE RJ45 port, which makes the system well suited to central backups, shared project storage, and high volume file transfers inside a UniFi managed network.
Management is handled through the Drive application within UniFi OS, with support for RAID zero, one, five, and six. Power redundancy is enabled through an internal 200 watt AC and DC power supply and optional USP RPS failover. A 1.3 inch front panel touchscreen provides system information and basic diagnostics. Although the feature set is narrower than that of a typical multimedia or container focused NAS, the system integrates cleanly with UniFi infrastructure or can operate on its own as a dedicated storage target.
Here are all the current UniFi NAS Solutions & Prices:
Since launching the original UNAS models in 2024, UniFi has expanded the range with new desktop units, including the UNAS two bay at 199 dollars and the UNAS four bay at 349 dollars, along with Pro series models in four bay and eight bay configurations at 499 dollars and 799 dollars. The UNAS Pro sits at the entry point of the Pro line and offers a hardware driven approach suited to users who want reliable multi bay storage with 10GbE connectivity and do not require wider software extensibility.
Component
Specification
CPU
Quad-Core ARM Cortex-A57 @ 1.7GHz
Memory
8GB DDR4
Drive Bays
7x 2.5″/3.5″ SATA HDD/SSD
Networking
1x 10GbE SFP+, 1x 1GbE
Power
200W internal PSU + USP-RPS redundancy
OS
UniFi OS / Drive App
Display
1.3″ touchscreen
Form Factor
2U Rackmount
Dimensions
442 x 325 x 87 mm
Weight
9.5 kg with brackets
UGREEN NASync DXP4800 NAS
$499– Intel N100 – 8GB – 4x 3.5″ SATA + 2x M.2 NVMe – 2x 2.5GbE – UGOS Pro – BUY HERE
The UGREEN NASync DXP4800 is a four bay desktop NAS that combines hybrid storage options with a growing set of software features. It uses an Intel N100 quad core processor from the twelfth generation Alder Lake N series and includes 8GB of DDR5 memory along with 32GB of onboard eMMC for the operating system. The system provides four SATA bays for hard drives or SSDs and two M.2 NVMe slots that can be used for caching or for creating faster all flash volumes. Network connectivity consists of two 2.5GbE ports with support for link aggregation to improve throughput or provide failover. Front and rear USB 3.2 ports, a USB C connector, and an SD 3.0 card reader add convenience for users who work with external media.
UGOS Pro serves as the software platform and offers RAID zero, one, five, six, and ten, along with Docker, Plex support, cloud sync tools, snapshots, and standard file sharing services. Although UGOS Pro is not as established as DSM or TrueNAS, it has gained stability and functionality over repeated updates and provides a straightforward browser based interface for managing storage and services. For users who want hybrid storage flexibility and a graphical setup process, the DXP4800 fits comfortably in the under 499 dollar category, particularly during sales.
UGREEN also sells a more cost effective alternative called the DH4300 Plus. That model uses an ARM processor with fixed memory and provides only a single 2.5GbE connection. It is suitable for simpler workloads, but users who want stronger performance and broader feature support will likely prefer the DXP4800.
Component
Specification
CPU
Intel N100 (4 cores, up to 3.4GHz)
Memory
8GB DDR5 (upgradable to 16GB)
Drive Bays
4x SATA (3.5″/2.5″) + 2x M.2 NVMe
Networking
2x 2.5GbE LAN
Ports
1x USB-C (10Gbps), 2x USB-A, SD Card Reader
Video Output
1x HDMI (4K)
OS
UGOS Pro
Power Consumption
35.18W (access), 15.43W (hibernation)
Dimensions
257 x 178 x 178 mm (approx.)
LincStation N2 NAS
$399 – Intel N100 – 16GB – 2x 2.5″ SATA + 4x M.2 NVMe – 1x 10GbE – Unraid OS – BUY HERE
The LincStation N2 is a compact solid state NAS that offers higher performance than most systems in this price tier. It uses an Intel N100 processor with 16GB of LPDDR5 memory and supports two 2.5 inch SATA SSDs alongside four M.2 2280 NVMe drives. This six bay layout is aimed at users who want higher IOPS, quieter operation, and lower power consumption than a hard drive based configuration. Network connectivity is provided through a single 10GbE RJ45 port, which is uncommon at this price level and useful for workstation links or scenarios involving multiple simultaneous clients.
The unit includes an Unraid Starter license, giving users access to Docker containers, virtual machines, hardware passthrough, and flexible storage management. Unraid requires some familiarity to use effectively, but it offers greater adaptability than fixed vendor operating systems. The N2 also includes HDMI output, USB C, USB 3.2, and several USB 2.0 ports, which allows it to function as a lightweight home server or media oriented workstation in addition to its NAS role. For users who place priority on SSD storage, 10GbE connectivity, and virtualisation features, the LincStation N2 provides a level of capability that is not common in the sub 499 dollar category.
Component
Specification
CPU
Intel N100 (4 cores, up to 3.4GHz)
Memory
16GB LPDDR5 (non-upgradable)
Drive Bays
2x 2.5″ SATA + 4x M.2 NVMe
Networking
1x 10GbE LAN
Ports
1x USB-C (10Gbps), 1x USB 3.2, 2x USB 2.0
Video/Audio
HDMI 2.0, 3.5mm audio out
OS
Unraid (Starter license included)
Dimensions
210 x 152 x 39.8 mm
Weight
800g
TerraMaster F4 SSD NAS
$399 – Intel N95 – 8GB – 4x M.2 NVMe – 1x 5GbE – TOS (TerraMaster OS) – BUY HERE
The TerraMaster F4 SSD is a four bay solid state NAS designed for users who want faster access speeds and quieter operation than traditional hard drive systems. It uses an Intel N95 processor from the Alder Lake N family together with 8GB of DDR5 memory in a single SODIMM slot. Storage is provided through four M.2 NVMe positions, with two operating at PCIe 3.0 x2 and two at PCIe 3.0 x1. The system is intended for SSDs only and does not support SATA based drives. Network connectivity is handled through one 5GbE port, which allows higher single link performance than dual 2.5GbE designs and can attach to 10GbE networks at reduced speed.
The device runs the TOS platform, which offers multimedia tools, photo management with local AI tagging, cloud sync, user account controls, and a range of backup options. The system supports Btrfs, TRAID for flexible capacity planning, remote access, and mobile applications for file sync and photo uploads. HDMI output, two USB A ports, one USB C port, and quiet fan operation make the F4 SSD suited to home environments that need a compact all flash NAS with minimal configuration.
Users who want more performance can step up to the F8 SSD Plus for roughly 200 to 250 dollars more. That model offers eight M.2 NVMe slots, an eight core N305 i3 class processor, 16GB of memory, and 10GbE networking. The F4 SSD remains the more cost conscious option, while the F8 SSD Plus targets workloads that need considerably more CPU and network headroom.
The Synology DS425 Plus is a four bay NAS positioned as an accessible way to enter the DSM ecosystem while still offering capable hardware for home and small office use. It is built on the Intel Celeron J4125, a quad core processor with a 2.0GHz base frequency and up to 2.7GHz under load. The system includes 2GB of DDR4 memory that can be expanded to 6GB and supports both 3.5 inch and 2.5 inch SATA drives. Two M.2 NVMe slots are available for cache use or for creating faster solid state storage volumes. Network connectivity consists of one 2.5GbE port and one 1GbE port, which gives users some flexibility depending on the switches in their setup.
DSM remains one of the more complete NAS operating systems, with integrated tools for file management, media serving, backup and sync, surveillance, and virtualisation. Synology Hybrid RAID is supported for flexible capacity planning, and the use of Btrfs provides access to snapshots and integrity checks. A notable change in late 2025 is Synology’s updated stance on drive compatibility. The Plus series no longer restricts or warns against the use of third party hard drives or SSDs, meaning users can now deploy Seagate, WD, and other manufacturers without any prompts or reduced functionality. This removes a previous concern for buyers who wanted to reuse existing disks or avoid Synology branded media. For users who want long term software support, a stable operating system, and a straightforward four bay design within the 499 dollar range, the DS425 Plus remains a practical option, now with fewer limitations on drive choice.
Component
Specification
CPU
Intel Celeron J4125 (4 cores, up to 2.7GHz)
Memory
2GB DDR4 (expandable to 6GB)
Drive Bays
4x 3.5″/2.5″ SATA + 2x M.2 NVMe
Networking
1x 2.5GbE LAN, 1x 1GbE LAN
Ports
2x USB 3.2 Gen 1
OS
Synology DSM 7.x
File System
Btrfs, EXT4
Dimensions
166 x 199 x 223 mm
Weight
2.18 kg
UnifyDrive UT2 Mobile NAS Drive
$399 –RK3588 8GB, LPDDR4X 1, 2.5GbE, 6TOPS NPU, 4K HDMI 2.1, WiFi 6 + AP Mode, DAS Mode, 2 Hour Mobile Battery – BUY HERE ( Get a further 5% OFF with this code: NASCOMPARES )
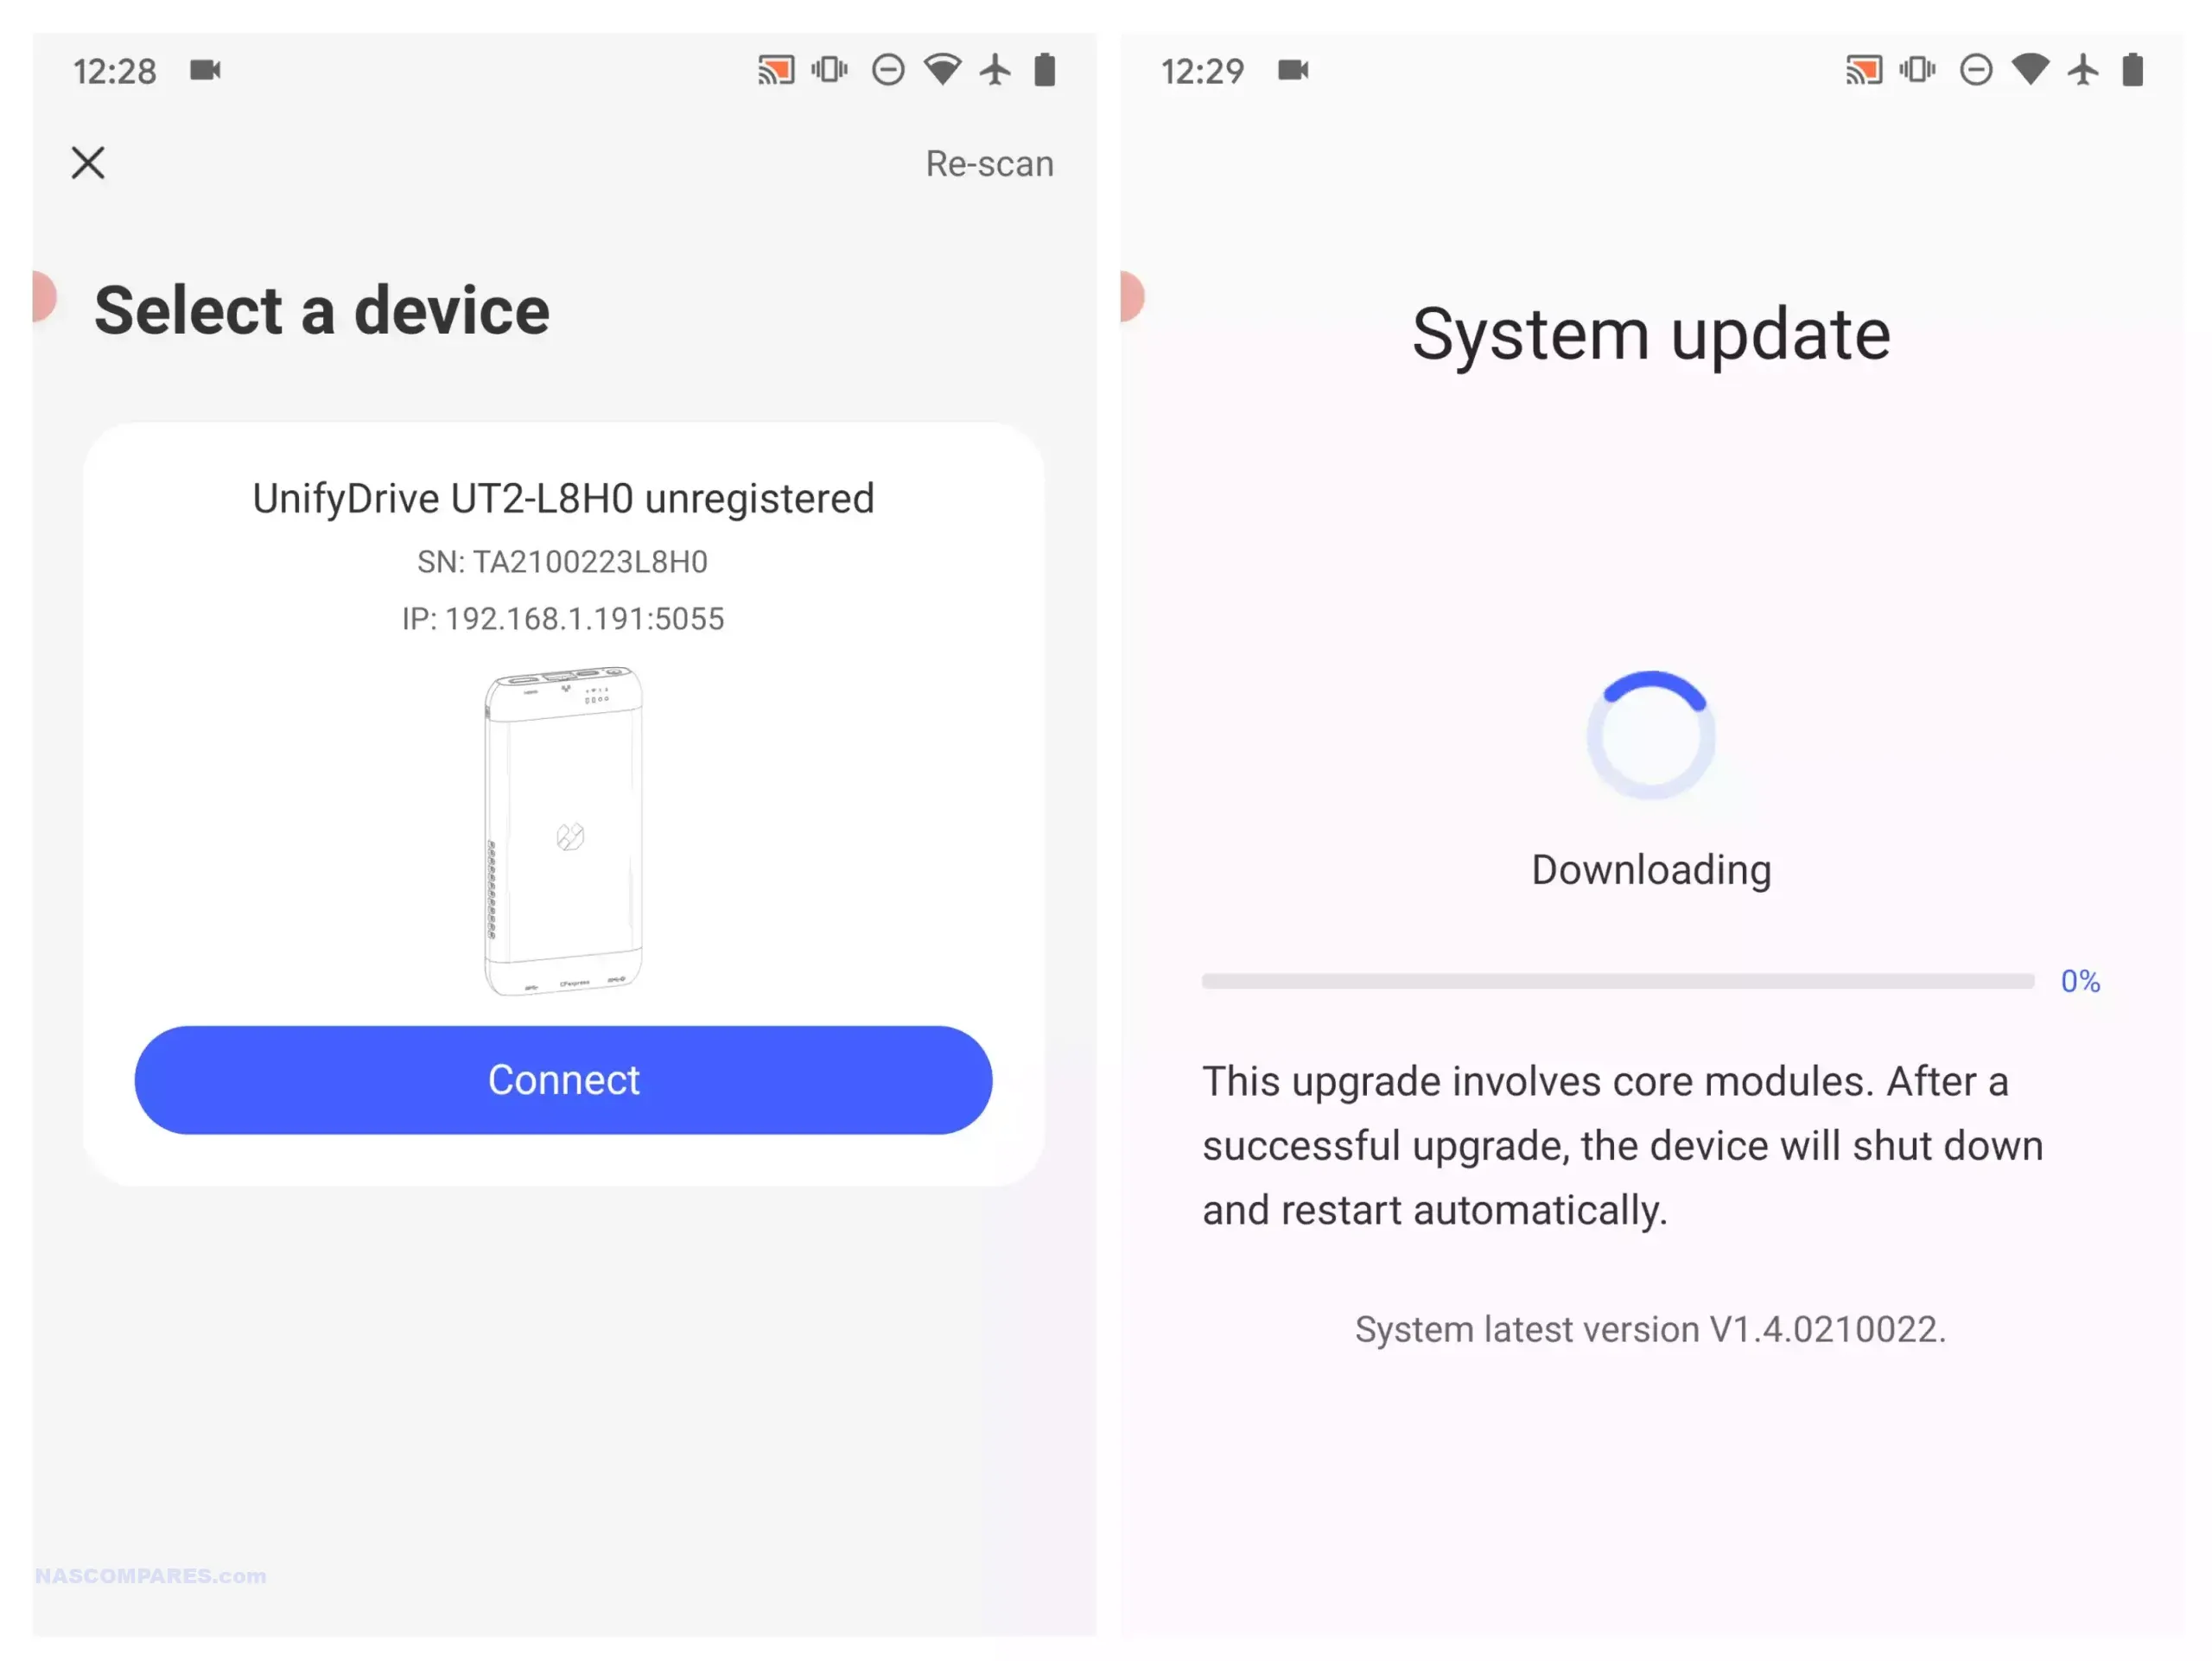
The UnifyDrive UT2 Portable NAS is now a fully released product rather than a crowdfunding prototype, and its design reflects a complete, ready to ship package. The system is compact, roughly the size of a thick smartphone, and weighs around 350g with its protective rubber sleeve. It includes a 32GB eMMC module for the operating system, two M.2 NVMe SSD slots for storage, active cooling, WiFi 6, Bluetooth, a 2.5GbE port, HDMI output, and an internal battery that provides around 30 to 60 minutes of runtime and basic UPS functionality. The retail kit includes multiple USB cables, a power adapter, a remote control for HDMI use, SD and CFe card backup support, and printed quick start materials. Although the fan is audible under load, overall noise levels remain low for a compact ARM based system, and the design allows users to run the NAS handheld, placed on a desk, or carried in a bag without difficulty.
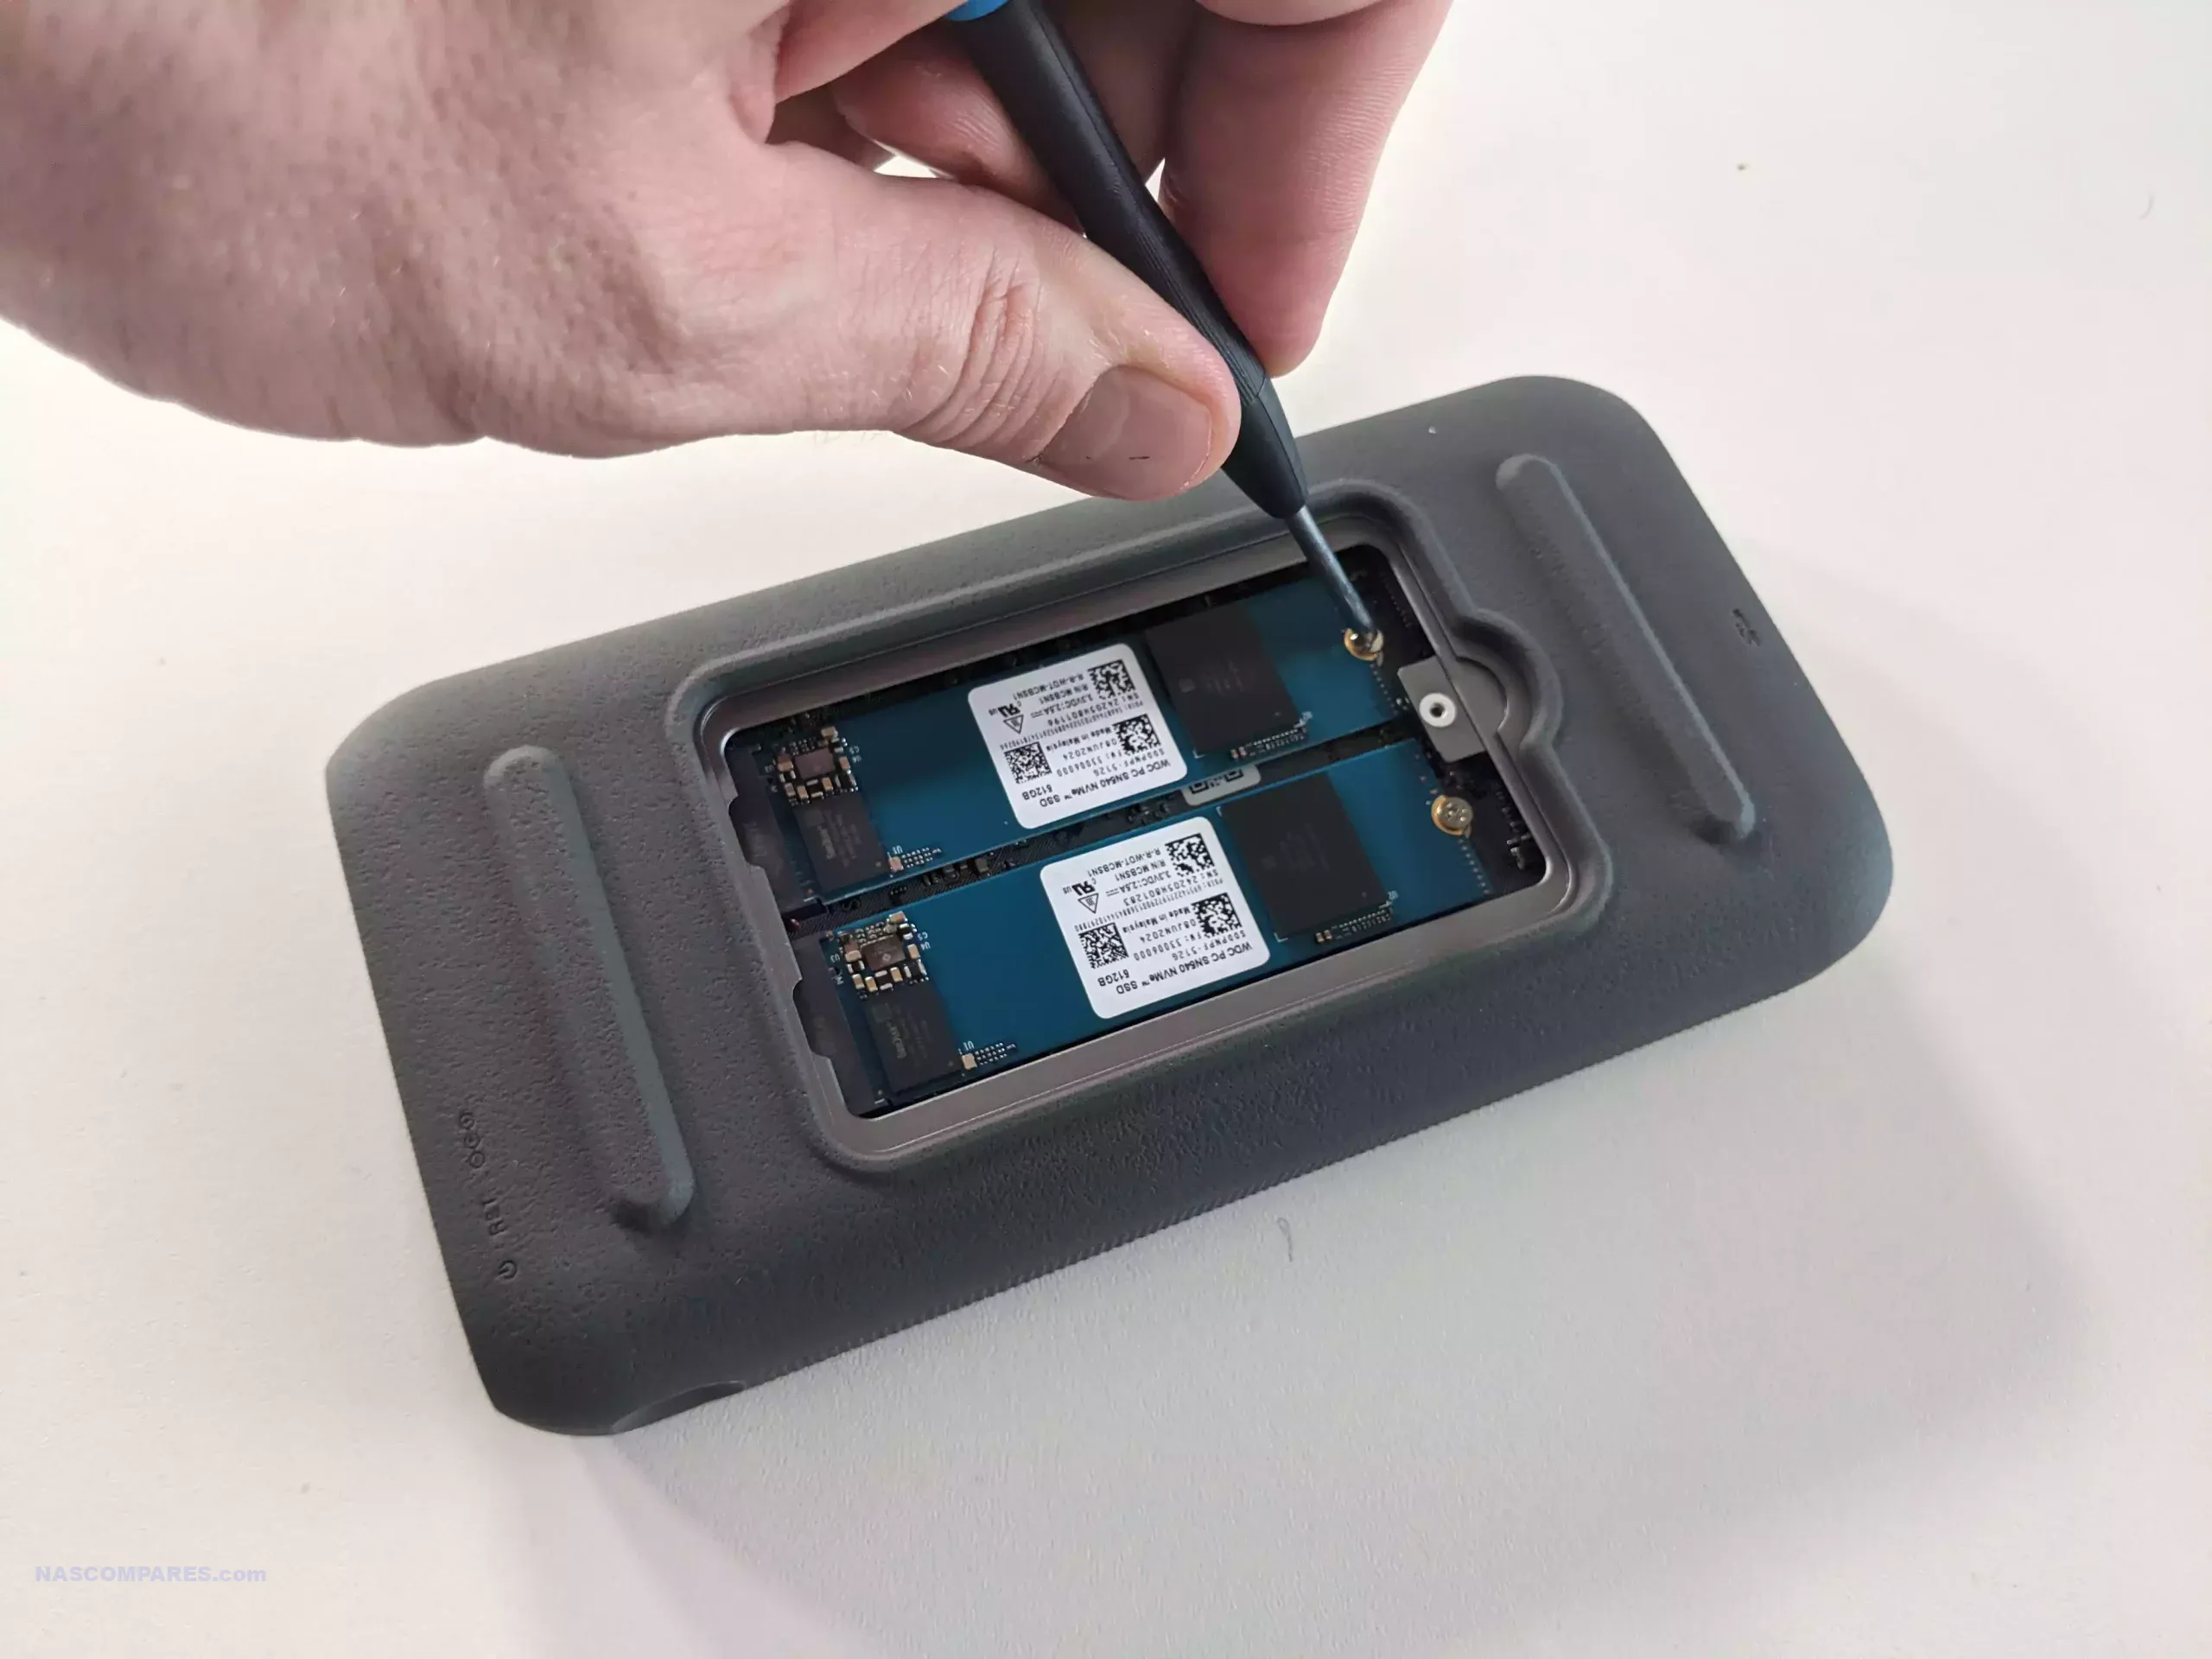
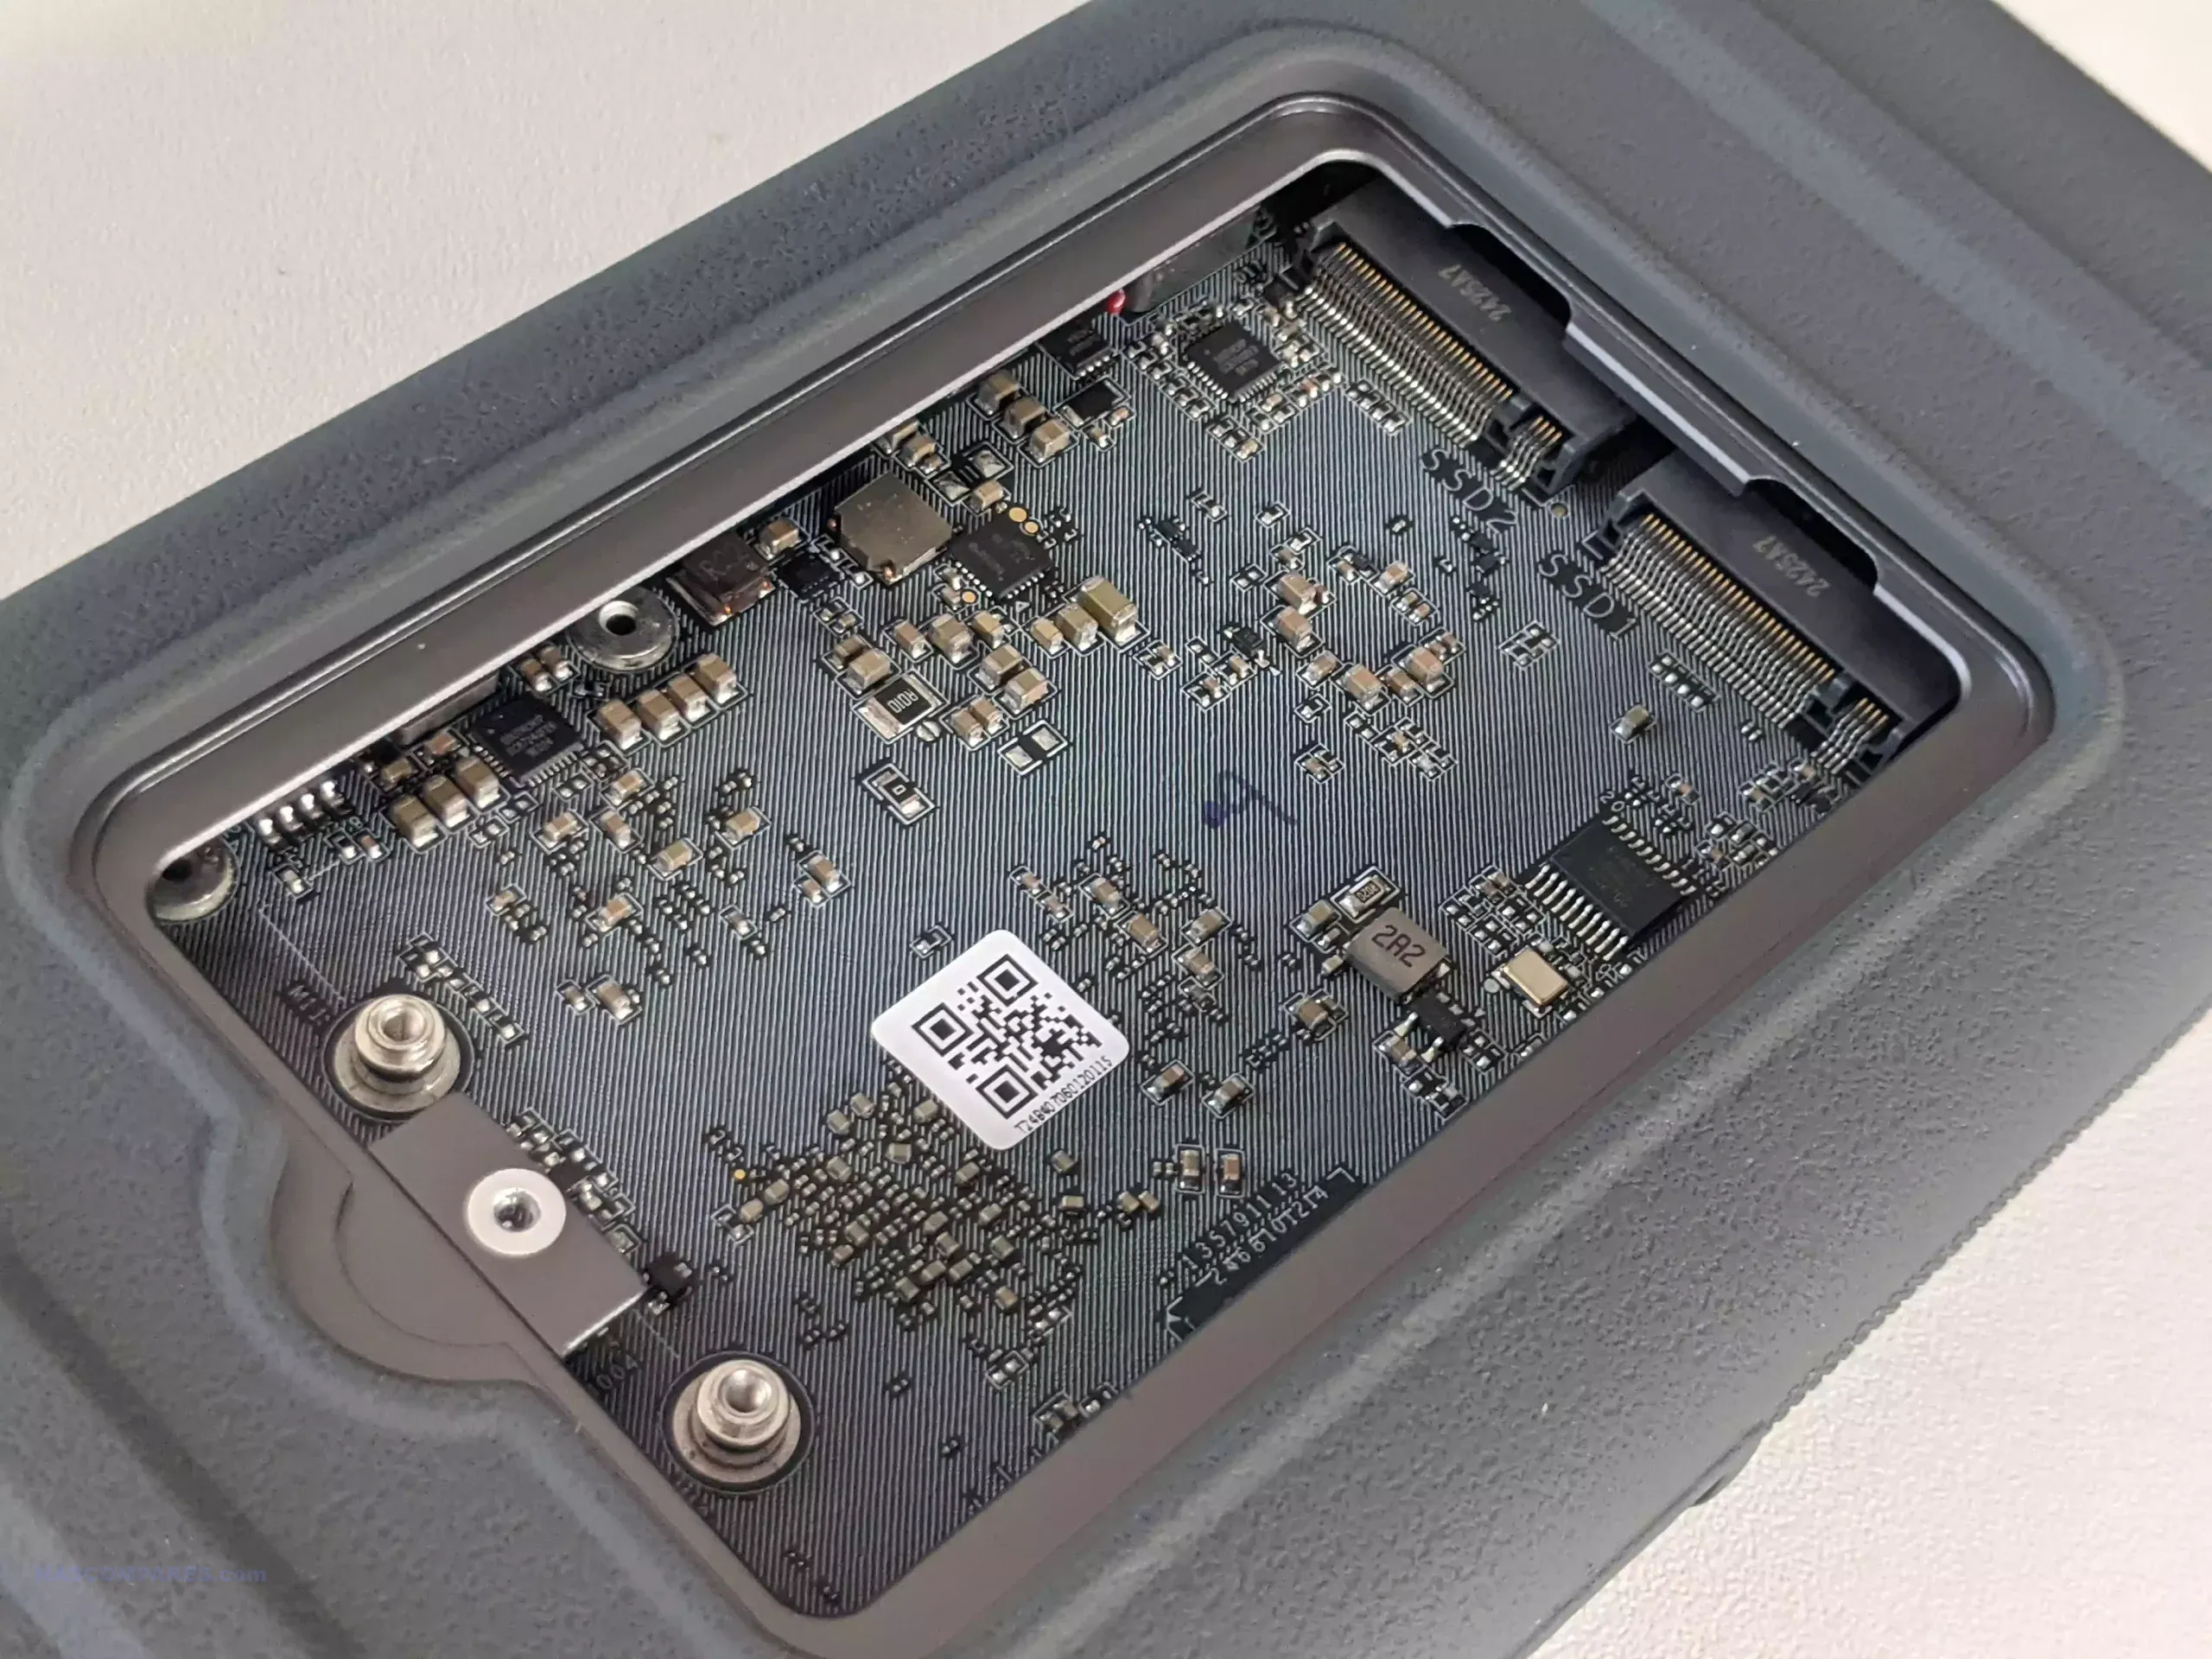
Connectivity is one of the UT2’s strongest aspects. Alongside its dual 5Gb USB ports, users can switch the device between network attached storage mode and direct attached storage mode. The two SD card slots support automated or one touch backups, and the 2.5GbE port gives the unit higher wired throughput than many portable or entry level NAS devices. HDMI output supports up to 4K60 and 8K playback, and media can be controlled either through the mobile application or the included remote. Internally, the UT2 uses a Rockchip RK3588C CPU with ARM Mali G610 graphics and 8GB of LPDDR4X memory. The two NVMe slots appear to operate at PCIe Gen 3 x1 speeds, which is adequate for saturating the wired and wireless interfaces. The memory is soldered and non upgradable, so users who intend to run more demanding workloads will need to account for that limit. Wireless access works through both client mode and the device’s own WiFi access point, enabling file sharing or backup without a pre existing network.
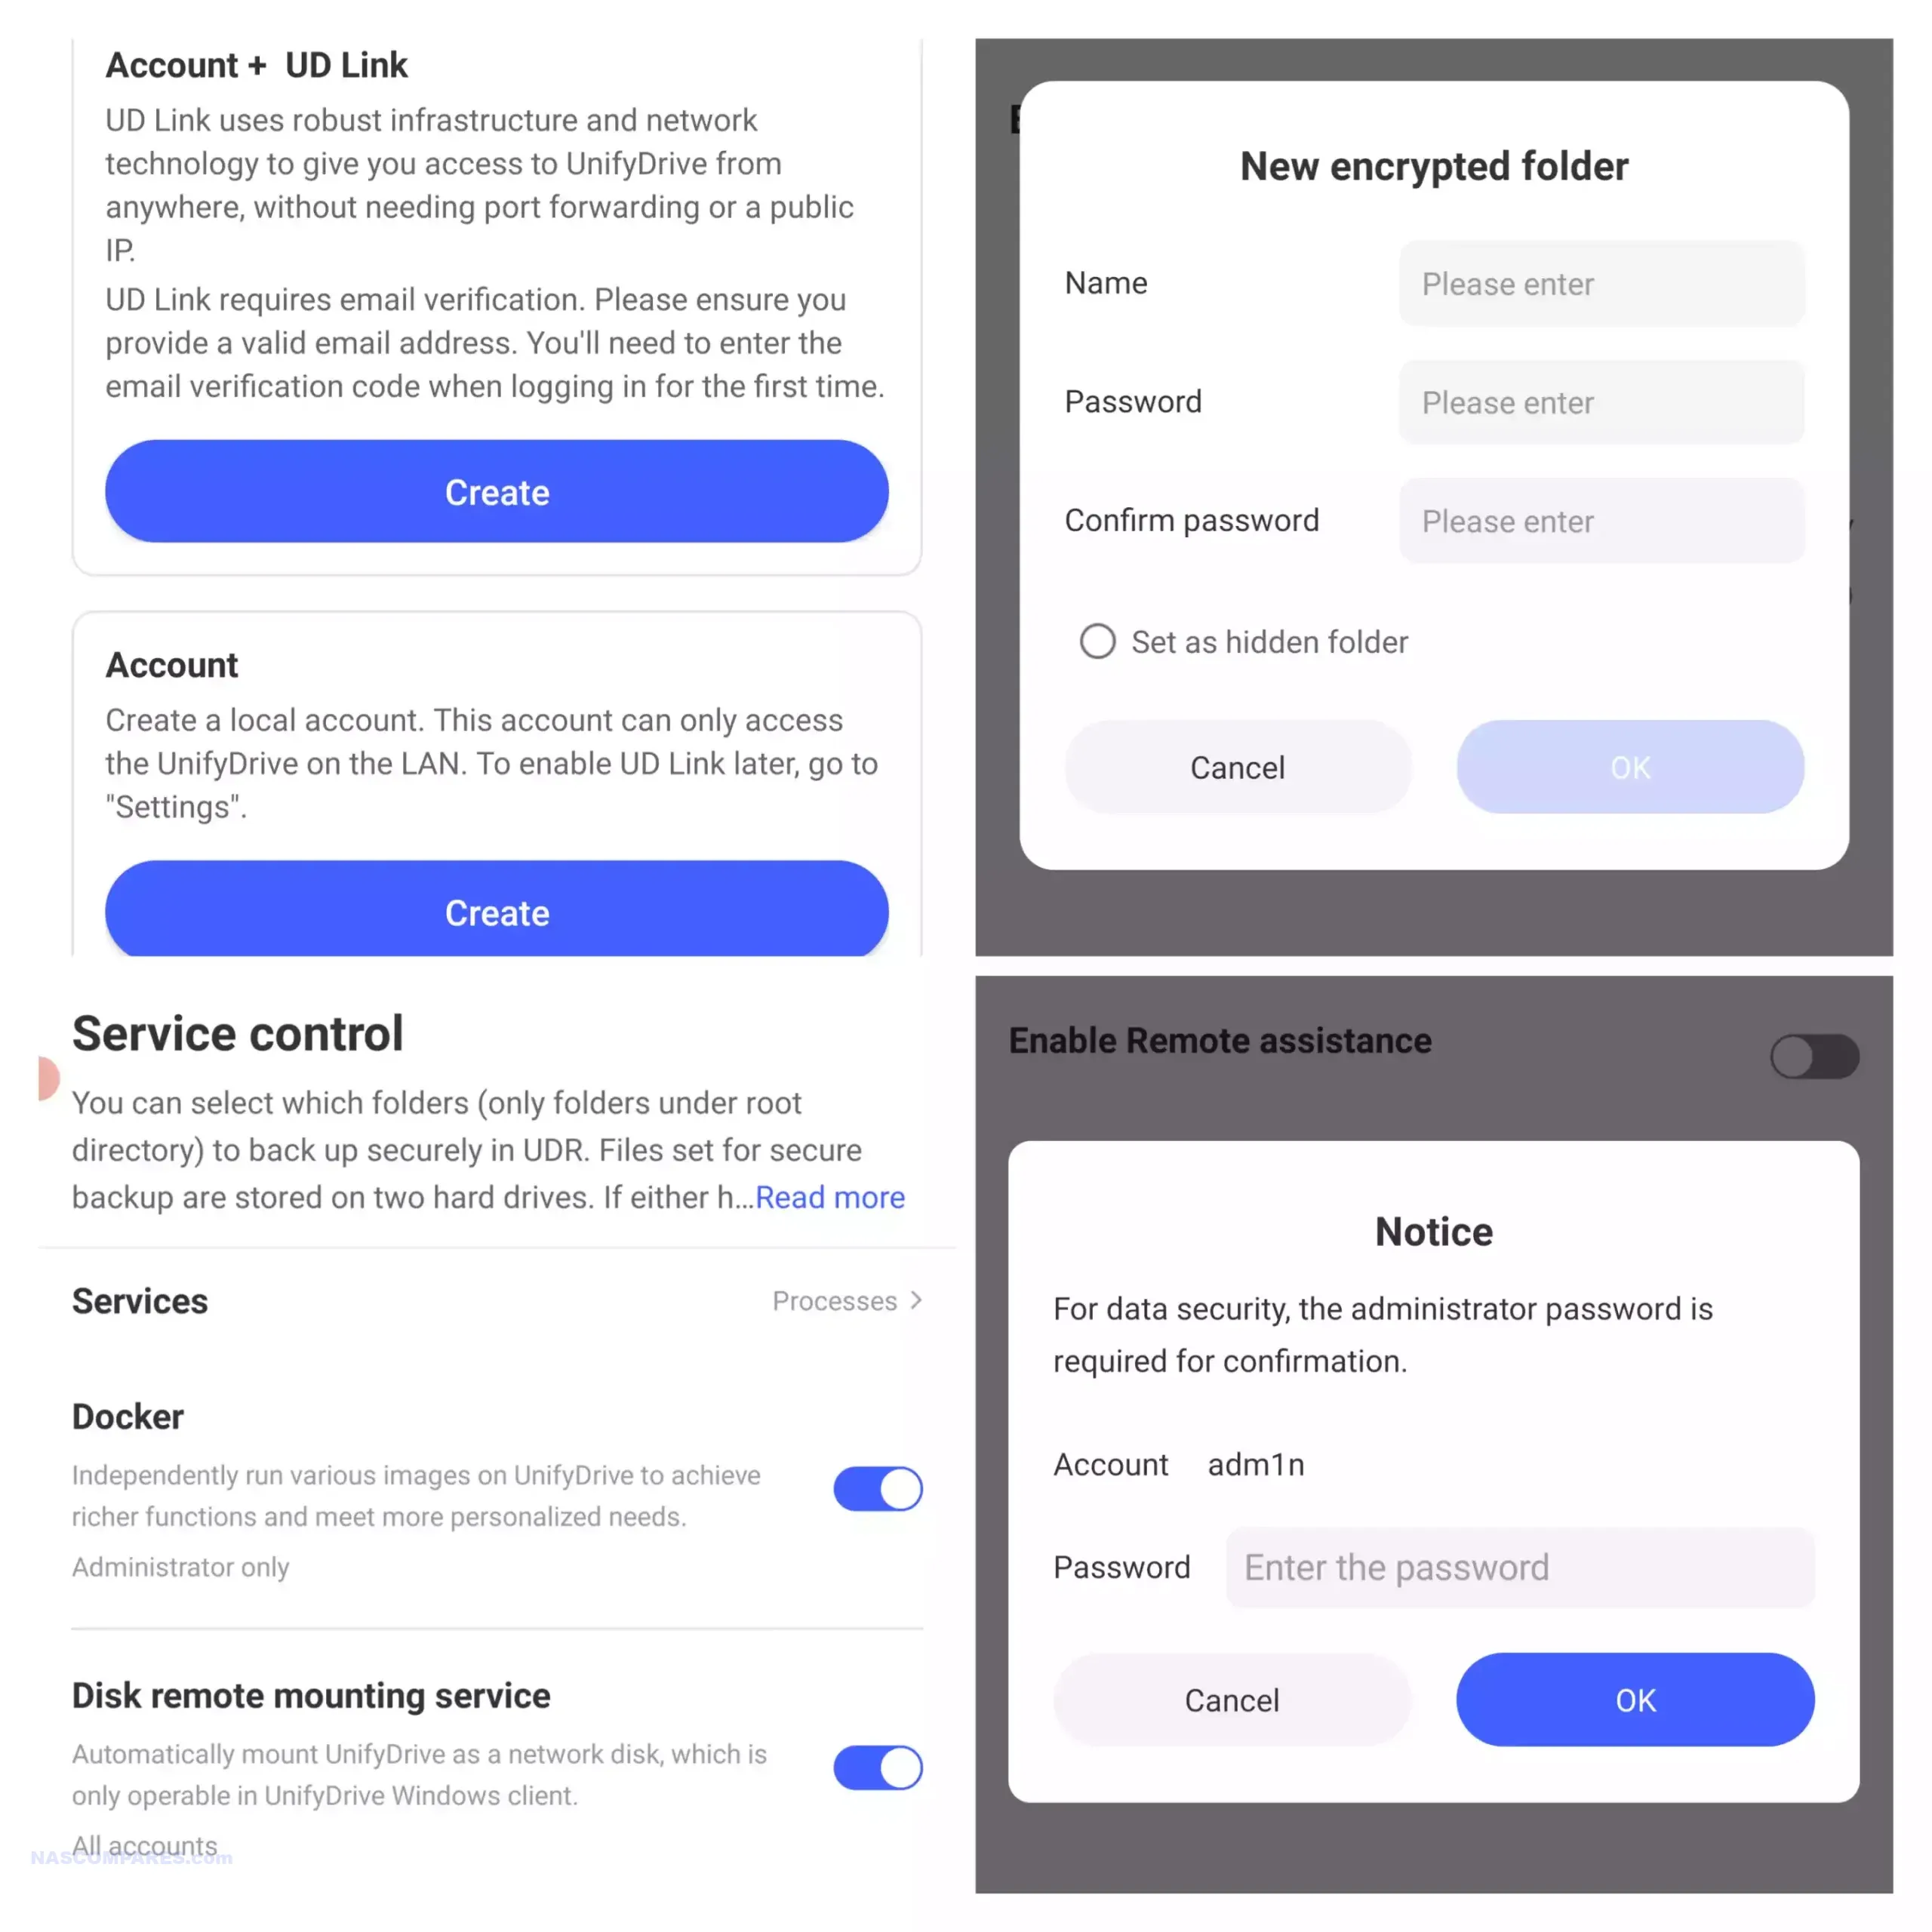
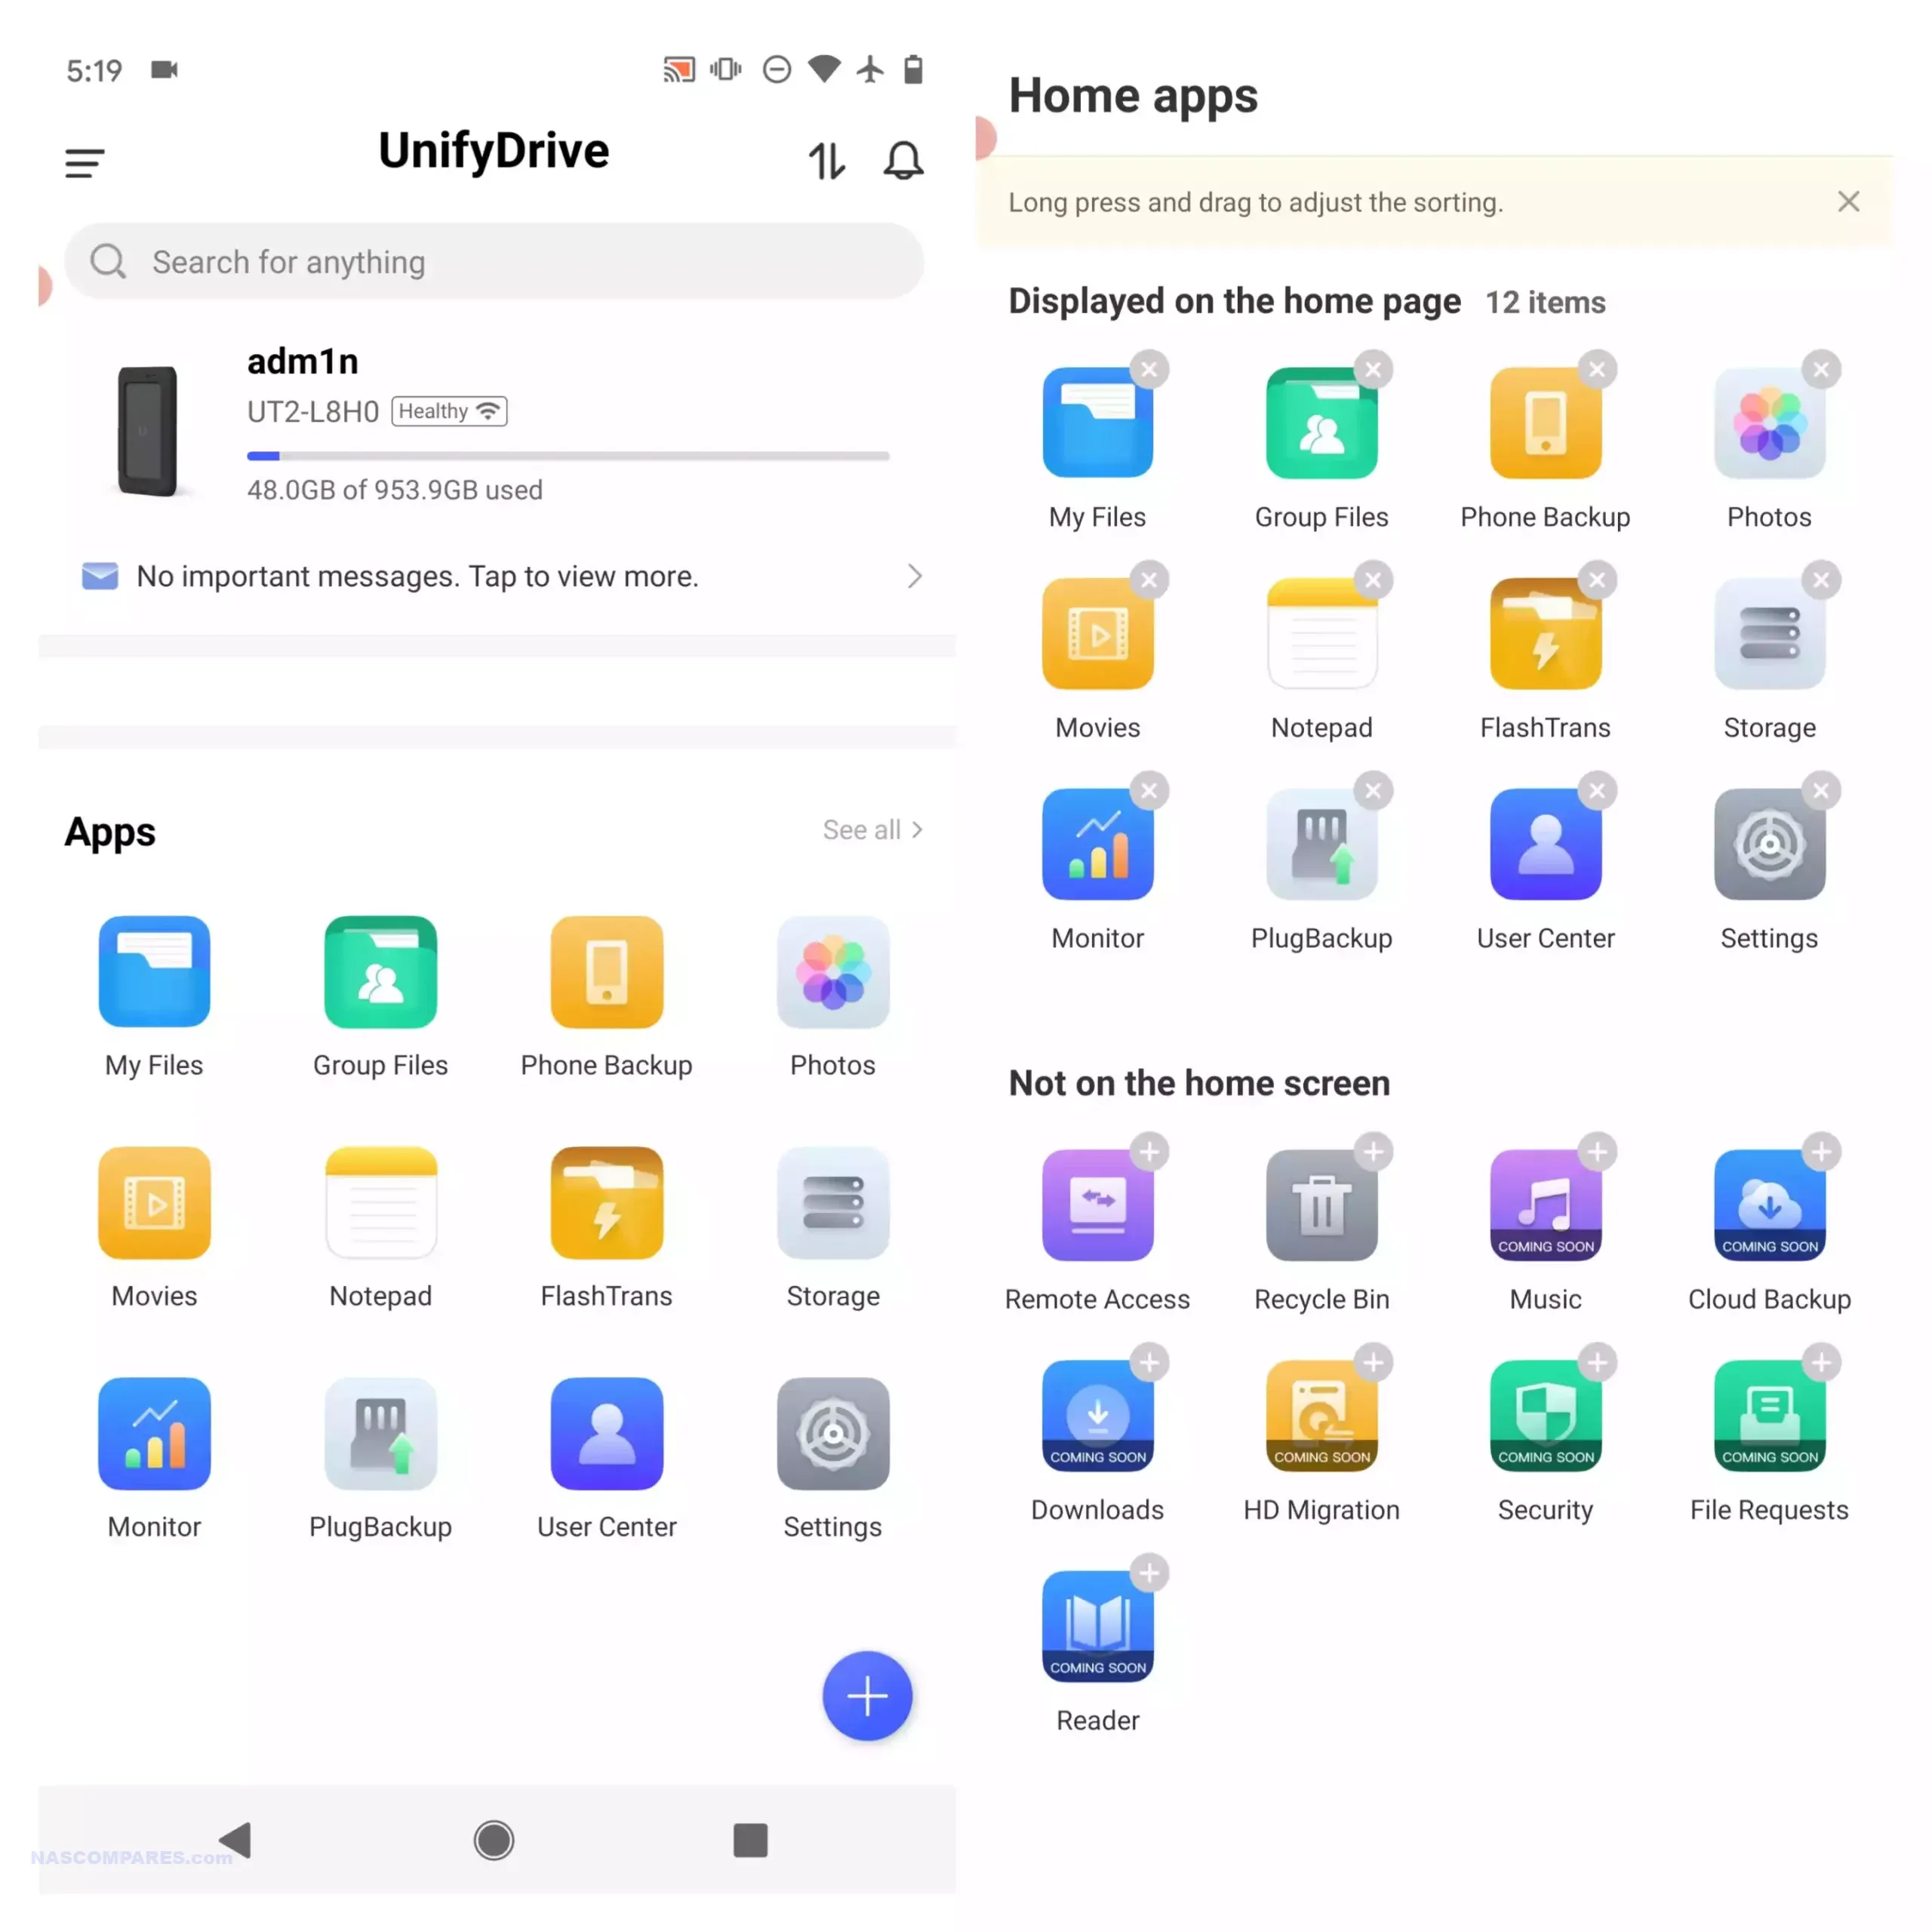
Software management centres on the UnifyDrive mobile application, which has expanded since the product first appeared and now includes RAID pool creation, the selective UDR RAID mode, SMB and FTP services, DLNA media streaming, direct HDMI output control, cloud sync, real time sharing, and device monitoring. Setup can be completed over LAN, WiFi, or Bluetooth, and firmware is updated over the air. The app provides tools for backups, encrypted folders, AI driven photo recognition, scheduled power controls, and general file management. Some advanced features such as additional downloader tools and container support remain under development, but the current software offers more control than most mobile focused NAS interfaces. Remote access is available through an integrated relay service, though support for third party VPN solutions is not yet included. With its combination of portability, NVMe storage, multi mode connectivity, and a growing software stack, the UT2 occupies a niche for users who want a personal cloud device that can be carried between locations while still supporting standard NAS workflows at its 399 to 599 dollar price point.
Use the LINK below + Get a further 5% OFF with this code: NASCOMPARES
The sub 499 dollar NAS segment in late 2025 offers a wide range of systems aimed at different performance levels and storage priorities. Buyers can choose between high capacity RAID focused platforms, SSD oriented designs, or systems built around established software ecosystems. The UniFi UNAS Pro remains a hardware driven storage appliance with 10GbE connectivity and seven bays, making it suitable for backup or archival workloads that require consistent throughput. The UGREEN DXP4800 and the LincStation N2 provide hybrid and all flash configurations, and both include support for containers, virtualisation, and the option to run alternative operating systems if required. Users who prefer a mature software stack with long term updates may gravitate toward the Synology DS425 Plus, which now supports third party drives without warnings or restrictions following Synology’s policy change in October 2025. The TerraMaster F4 SSD serves those who want a compact solid state platform with 5GbE networking and access to the expanding feature set of TOS, including local AI photo tools and multimedia functions. All of these NAS units require user supplied storage and may involve some degree of configuration depending on the software environment. The most suitable choice depends on whether you prioritise performance, software refinement, expansion options, or direct control over how the system is deployed within this price conscious category.
This description contains links to Amazon. These links will take you to some of the products mentioned in today's content. As an Amazon Associate, I earn from qualifying purchases. Visit the NASCompares Deal Finder to find the best place to buy this device in your region, based on Service, Support and Reputation - Just Search for your NAS Drive in the Box Below
Need Advice on Data Storage from an Expert?
Finally, for free advice about your setup, just leave a message in the comments below here at NASCompares.com and we will get back to you.Need Help?
Where possible (and where appropriate) please provide as much information about your requirements, as then I can arrange the best answer and solution to your needs. Do not worry about your e-mail address being required, it will NOT be used in a mailing list and will NOT be used in any way other than to respond to your enquiry.
[contact-form-7]
TRY CHAT Terms and Conditions
If you like this service, please consider supporting us.
We use affiliate links on the blog allowing NAScompares information and advice service to be free of charge to you.Anything you purchase on the day you click on our links will generate a small commission which isused to run the website. Here is a link for Amazon and B&H.You can also get me a Ko-fi or old school Paypal. Thanks!To find out more about how to support this advice service checkHEREIf you need to fix or configure a NAS, check FiverHave you thought about helping others with your knowledge? Find Instructions Here
Or support us by using our affiliate links on Amazon UK and Amazon US
Alternatively, why not ask me on the ASK NASCompares forum, by clicking the button below. This is a community hub that serves as a place that I can answer your question, chew the fat, share new release information and even get corrections posted. I will always get around to answering ALL queries, but as a one-man operation, I cannot promise speed! So by sharing your query in the ASK NASCompares section below, you can get a better range of solutions and suggestions, alongside my own.