New Synology NAS for First Half of 2025 Revealed – DS925+, DS1825XS+, DS625Slim, DS1525+ and More
After what seems like quite a while for many, we have finally got pretty large confirmation that Synology are refreshing a large number of their Desktop (and a couple of Rackmount systems) devices – as well as launching a few new storage media options. This new information arrives via ChipHell user ‘nineeast‘ in a recent forum post. I am still in the process of identifying the event that the photo below was taken from, but given the preponderance of people taking photos, it won’t be long before this spreads further. This is of course the potential that this is a hoax… but (as you will see later in the article) the chiphell post is not the only source. Nevertheless, it looks like Synology are getting set to refresh a huge number of solutions, launching their DS925+, DS425+, DS225+, DS1525+, DS1825+, DS725+, DS625slim, DS1825xs+ and RS2825RP+ between now and Summer 2025. So, let’s discuss what these refreshed devices bring and whether they deserve your data.
Which Synology Solutions were Revealed at the Synology Event?
The big deal here is that it is tremendously rare for Synology to reveal their roadmap of solutions, let alow share it with users in such a detailed fashion. Synology have always been tremendously restrained when it comes to revealing their product refreshes (and new product lines). That said, refreshes of products in their portfolio periodically is pretty normal, and most Synology solutions will see a refresh every 2.5-5years (depending on the product tier, with XS series devices generally having a longer refresh cycle), and many have been wondering about when a refresh to the x22/23 range of devices would arrive, and in what form it would take. The TLDR list of solutions shown were:
DESKTOP SOLUTIONS
RACKMOUNT SOLUTIONS
EXPANSIONS
MEDIA
DS1825+ – AMD V1500B, 2.5GbE ×2
DS1525+ – AMD V1500B, 2.5GbE ×2
DS925+ – AMD V1500B, 2.5GbE ×2
DS725+ – AMD R1600, 2.5GbE ×1
DS625slim – Intel J4125, 2.5GbE ×1
DS425+ – Intel J4125, 2.5GbE ×1
DS225+ – Intel J4125, 2.5GbE ×1
DS1825xs+ – AMD V1500B, 2.5GbE, 10GbE + OOB
RS2825RP+ – AMD V1780B, 10GbE
RX1225RP – Suitable for certain RS series devices
DX525 – Suitable for certain DS series devices
SNV5420 Series – M.2 2280 NVMe
SAT5221 Series – 2.5” SATA SSD
HAT5310-12T/16T – 3.5” SATA HDD
HAT5310-4T/8T – 3.5” SATA HDD
HAT3320-8T – 3.5” SATA HDD
The biggest takeaway in these shared images seems to be that the bulk of the solutions in this 2025 year refresh are going to remain largely the same, but with two main changes across the board.
Thise changes are 1GbE network interfaces will be upgraded to 2.5GbE interfaces universally, and expansion devices that would have previously used eSATA as a means of connectivity will now be USB-C (as well as a reshuffle of the CPUs in the product tiers/families around), but we will get onto that latter point in a moment. Further information and images have also been sharedby user ‘ERROR204‘ on imnks, another storage *& network related forum, as well as bringing further information on the expansion devices. The DS1525+, DS925+ and DS725+ will serve as refreshes of the DS923+, DS723+ and DS1522+ NAS. It’s unclear whether they will be using that mini PCIe upgrade card like the existing series (the E10G20-T1-MINI) as the slide below indicates that they will not, but the DS925+ and DS1525+ will see the R1600 Dual Core / 4 Thread Ryzen processor in their predecessor replaced with the v1500B 4 Core / 8 Thread CPU (previously used in the 6/8/12 Bay desktop NAS devices. The DS725+ however will remain as the R1600, but will see the 1GbE NICs upgraded to 2.5GbE.
Interestingly, the default memory on the DS725+ will increase to 4GB of ECC Memory (as opposed to the 2GB in the DS723+ predecessor). However the slide below also indicates that it will no longer support the mini PCIe 10GbE adapter. So it’s a mixed bag in the DS725+ refresh really. This slide also indicates that the USB-C connected expansion will seemingly remain at 6Gb/s transfer speeds – which is a little odd, given USB 3.2 Gen 1 is 5Gb/s and USB 3.2 Gen 2 is 10Gb/s – something to ponder.
Next is the ‘media’ series of devices and also a return of the Synology SLIM series. The DS625slim arrives (refreshing the DS620slim from 2020) and the DS425+ and DS225+ arrive as refreshes for the comparatively (for Synology’s MO) new DS224+ and DS423+ NAS. These will be continuing to use the existing Intel J4125 Quad Core Celeron CPU from 2019/2020 (something I know will not please everyone), but will also see upgrades to 2.5GbE from the 1GbE on their predecessors. Additioanlly, I think we can assume the DS425+ will have the 2x M.2 NVMe slots of it’s predecessor.
Now the DS925+ (a refresh of the DS923+) has the upgrade from the R1600 CPU to the V1500B CPU we mentioned earlier, alongside the new USB-C expansion support (the DX525) and 2.5GbE NICs, so I think we can assume the DS1525+ will be similarly reprofiled from the DS1522+, but I am unsure if it will have 2x USB-C ports instead of 2x eSATA (almost certainly, but not 100%). I think many user are going to have mixed feelings once again about the CPU choices present here in the bulk of these new refreshes.
Now onto those two 8 Bay devices, the DS1825+ and DS1825xs+ (serving as refreshes of the DS1821+ and DS1823xs+ respectively). As covered in my video in 2024 about previously leaked information on the DS1825+, it seems that both of these devices will have the same CPU as their predecessor devices, but will see upgrades from their 1GbE ports towards 2.5GbE (with the DS1825xs+ maintaining it’s 10GbE copper connection). All other specifications (M.2 slots, expandability, memory, etc) will all seemingly remain the same – though I think we can once again assume that expansion ports will be USB-C in line with the DX525 box.
For many, it will be a little disappointing that we did not see a 6-Bay model arrive and in fact there has not actually been a 6-Bay Synology NAS since 2020 (when the DS1621+ and DS1621xs+ were launched), increasing fears that Synology are eliminating that tier of their portfolio. However, there is ZERO confirmation on this and the 6 Bay option in the Synology store is still present for the DS1621+ and DS620slim, though the DS1621xs+ has disappeared (likely replaced internally with the 8 bay XS option).
Finally, there is the storage media that was listed. Some drives we already knew about. For example, the SAT5221 Series of SATA SSDs already appeared on vietcorp (HERE), but the HAT3320 is seemingly a refresh/new line in the Synology Plus series of hard drives – and there have been rumours circling for a while that these would be Seagate Ironwolf drives, but currently unconfirmed.
Finally, there is the Synology SNV5420 series – a new M.2 NVMe media drive range, but it is currently unclear if this is a complete refresh of the SNV3400/SNV3410, or as the naming convention seems to indicate, a higher performance/class of M.2 NVMe SSDs. This is something that has been LONG DEMANDED as Synology still have a solid insistence on their systems/add-on cards with M.2 NVMe Support HAVE TO be their own media drives if you want to use the slots of Storage pools, yet the SNV3400 range and it’s variations are comparatively low speed and high priced vs the rest of the M.2 NVMe SSD market as a whole.
So, that’s everything we know so far. Let’s now discuss what we think together in the comments!
The New Synology 2025 Product Line Up – What I Like and What I Don’t!
I have mixed feelings about the entire Synology refreshed line up – on the one hand I DO think there is a meaningful refresh here on the DS925+ and DS1525+ NAS. No one was expecting Synology to completely change this product family, as they have already made it pretty clear that these two system profiles are designed now more for the SMB user, small business, container deployer and those with file processing needs – i.e not multimedia as the focus. So, them upgrading this from the R1000 CPU in the x23 series to a V1000 CPU (doubling the cores and threads) will be tremendously welcome – as will 2.5GbE out the box (though I would like more clarification on the E10G22-T1-MINI 10GbE upgrade card support – as it looks like this is now not supported and that would be a real shame). Also, as much as its a bummer to see the V1500B CPU that Synology have already had on their products in 2020 in these 4 and 5 Bay solutions, they ARE good follow up CPUs over the R1600 in profile, and still have a length support time with AMD backing them up. All that said, the DS725+ seems pretty hard done by here, in fact the DS425+, DS225+ and DS725+ all seem to essentially be the same NAS, but with the 1GbE NICs swapped out with 2.5GbE. I mean, if the price remains exactly the same as the DS423+, DS224+ and DS723+ (and no other hardware surprises arrive in the form of no NVMe slots, etc), then these are…technically…refreshes. But more like a DS224+II, than a whole new DS225+.
Regarding the Intel Celeron devices, I am a little puzzled more than anything else. 2.5GbE on these is good (even if we overlook the fact that 2.5GbE has been fairly standard on ALL NAS systems in place of 1GbE since 2020 from everyone else), but the J4125 CPU is a CPU that has long since retired by Intel (indeed, Intel Celeron naming itself is long gone in favour of the Alder Lake and Twin Lake N processors). So unlike the strong support afforded to the AMD processors I mentioned above, the J4125 seems a remarkably dated choice right now. Still, better some kind of graphical capable CPU in the line up than none at all. Still, odd choice. As there are a lot of holes in these specifications, it’s tough to make a full list of what is good and bad, plus we have to acknowledge that things CAN change during development. So, I’ll hold off for now with anything concrete on my own thoughts, but again, I would love to chat in the comments here or on YouTube for your own thoughts.
Things we still need confirmation on!
As I just mentioned, there are still a lot of gaps in these specs and till we have the full picture, we can’t judge anything! So, here are the questions I still have about these new refreshes that remain unanswered for now:
HDD and SSD Compatibility, will it be largely the same as the existing 22/23/24 series devices (i.e largely Synology drives, but a few Seagate/WD/Toshiba drives), or will these new series be the first to arrive with strict Synology-only drive media and/or pre-population?
How is the USB-C 6Gb/s? Is it an adapter, or a USB-C Port on the old lane internally?
Where is the 6-Bay?
Ambiguity at best, complete removal at worst, of the 10GbE upgradability of the 2/4/5 Bay V1500B option NAS’. Is this for real?
Is the SNV5420 a new high performance M.2 NVMe?
Why refresh all of these at the same time? Some solutions like the DS1823xs+ or DS224+ are very early in their expected run, so a refresh so soon seems unnecessary. So why now?
This description contains links to Amazon. These links will take you to some of the products mentioned in today's content. As an Amazon Associate, I earn from qualifying purchases. Visit the NASCompares Deal Finder to find the best place to buy this device in your region, based on Service, Support and Reputation - Just Search for your NAS Drive in the Box Below
Need Advice on Data Storage from an Expert?
Finally, for free advice about your setup, just leave a message in the comments below here at NASCompares.com and we will get back to you.Need Help?
Where possible (and where appropriate) please provide as much information about your requirements, as then I can arrange the best answer and solution to your needs. Do not worry about your e-mail address being required, it will NOT be used in a mailing list and will NOT be used in any way other than to respond to your enquiry.
[contact-form-7]
TRY CHAT Terms and Conditions
If you like this service, please consider supporting us.
We use affiliate links on the blog allowing NAScompares information and advice service to be free of charge to you.Anything you purchase on the day you click on our links will generate a small commission which isused to run the website. Here is a link for Amazon and B&H.You can also get me a Ko-fi or old school Paypal. Thanks!To find out more about how to support this advice service checkHEREIf you need to fix or configure a NAS, check FiverHave you thought about helping others with your knowledge? Find Instructions Here
Or support us by using our affiliate links on Amazon UK and Amazon US
Alternatively, why not ask me on the ASK NASCompares forum, by clicking the button below. This is a community hub that serves as a place that I can answer your question, chew the fat, share new release information and even get corrections posted. I will always get around to answering ALL queries, but as a one-man operation, I cannot promise speed! So by sharing your query in the ASK NASCompares section below, you can get a better range of solutions and suggestions, alongside my own.
UniFi Launch a MASSIVE range of 10GbE PoE APs and Switches – The New XG/XGS Series
The UniFi U7 Pro XG and U7 Pro XGS is ANOTHER expansion of Ubiquiti’s WiFi 7 access point lineup (I swear, it’s like the 3rd/4th this year or something), bringing 10GbE Power over Ethernet (PoE) support to the series for the first time. These APs aim to address a major limitation of previous models—network bandwidth bottlenecks at the wired uplink—by allowing full utilization of multi-gigabit wireless speeds. The inclusion of 10GbE uplinks ensures that high-throughput devices, particularly those leveraging WiFi 7’s Multi-Link Operation (MLO) and wider channel support, are not constrained by a 2.5GbE or lower-speed connection to the wired network.
Accompanying the launch of these access points is a new range of UniFi XG series switches, designed to deliver PoE+ and PoE++ power while providing high-bandwidth connectivity across multiple wired and wireless clients.
The XG switch lineup includes four models: two high-capacity rackmount switches (24-port and 48-port) aimed at enterprise and data-heavy environments, a 10-port rackmount switch, and an 8-port desktop model designed for smaller-scale deployments. These switches not only ensure full 10GbE connectivity for the new APs but also introduce 25G uplink capabilities in the higher-end models, allowing for future network scalability and aggregation improvements.
With these new releases, Ubiquiti is targeting high-performance network environments, including businesses, prosumers, and enterprises that require low-latency, high-bandwidth connectivity across multiple access points. The transition from 2.5GbE to 10GbE in UniFi’s AP lineup reflects a broader industry shift toward higher-capacity wired backbones to match advancements in wireless technology. These products are particularly suited for scenarios involving high client densities, large-scale WiFi deployments, multi-gigabit internet connectivity, and demanding applications such as cloud computing, video conferencing, and real-time data transfer. By integrating 10GbE PoE APs with a full suite of supporting switches, UniFi is providing a comprehensive ecosystem for users looking to future-proof their network infrastructure. Whether deployed in corporate, hospitality, industrial, or high-end residential environments, these devices represent a step forward in ensuring WiFi 7 performance is not bottlenecked by wired limitations.
Update – The U7 Pro XG and U7 Pro XGS APs are NOW Available. The Pro XG Swtich Series is still TBC at time of writing
The UniFi U7 Pro XG and U7 Pro XGS 10GbE PoE WiFi 7 APs – Design and Connectivity
The UniFi U7 Pro XG and U7 Pro XGS maintain the familiar circular form factor that UniFi access points are known for, but with some notable refinements. The XGS model is slightly larger than the XG, a difference primarily due to its additional spatial streams and enhanced internal architecture. Both APs feature a polycarbonate outer shell with a metal internal frame, which serves to improve heat dissipation and ensures they remain fanless despite their higher performance. This passive cooling approach helps maintain silent operation while keeping temperatures within optimal ranges, even under heavy loads.
A qwerky (yet nonetheless requested!) design change in these models is the introduction of dual-color options for the first time in UniFi’s AP lineup – kinda blows me away that this is weirdly rare in these products in 2025. Users will have the choice between black and white, allowing for greater flexibility in deployments where aesthetic considerations are important, such as in modern office spaces, high-end homes, or retail environments.
Feature
U7 Pro XG
U7 Pro XGS
WiFi Standard
WiFi 7
WiFi 7
Spatial Streams
6
8
Coverage Area
140 m² (1,500 ft²)
160 m² (1,750 ft²)
Max Client Count
300+
500+
Uplink
10/5/2.5/1GbE
10/5/2.5/1GbE
Power Method
PoE+
PoE++
Max Power Consumption
22W
29W
MIMO Configuration
2×2 (2.4GHz, 5GHz, 6GHz)
2×2 (2.4GHz, 6GHz), 4×4 (5GHz)
Max Data Rate (6GHz)
5.7 Gbps
5.7 Gbps
Max Data Rate (5GHz)
4.3 Gbps
8.6 Gbps
Max Data Rate (2.4GHz)
688 Mbps
688 Mbps
Antenna Gain (6GHz)
6 dBi
6 dBi
Antenna Gain (5GHz)
5 dBi
6 dBi
Antenna Gain (2.4GHz)
4 dBi
4 dBi
Operating Temperature
-30 to 40°C (-22 to 104°F)
-30 to 50°C (-22 to 122°F)
Certifications
CE, FCC, IC
CE, FCC, IC
Additionally, UniFi has stickable interchangeable covers for other APs in their line up, though details on availability and customization remain unclear at launch if these will be available on the XG/XGS series
To accommodate higher power demands and increased performance, UniFi has optimized thermal efficiency in both models, leveraging passive cooling techniques to maintain stability under continuous high-load conditions. The metal internal frame aids in efficient heat dissipation, preventing thermal throttling and ensuring long-term reliability. While these APs have a higher power draw than previous UniFi models—22W for the XG and 29W for the XGS—this is a necessary tradeoff for their improved bandwidth and increased spatial streams. Given their fanless design, proper placement—such as ceiling or wall mounting in areas with adequate airflow—is recommended to maintain consistent performance over time.
The most important functional change in these APs is the 10GbE PoE uplink, replacing the 2.5GbE PoE standard found in previous UniFi WiFi 7 models. The addition of 10GbE PoE+ (XG) and PoE++ (XGS) allows these APs to fully utilize WiFi 7’s increased throughput potential without encountering a wired bottleneck. The shift to 10GbE connectivity makes these access points particularly suited for environments where high-bandwidth, multi-client performance is essential, such as large-scale office deployments, conference centers, and high-density public spaces.
With maximum power consumption rated at 22W for the XG and 29W for the XGS, both APs require PoE switches capable of delivering sufficient power at 10GbE speeds. This makes them best suited for deployment alongside UniFi’s new Pro XG series switches, which offer 10GbE PoE across multiple port configurations. For users without a 10GbE PoE switch, UniFi has also released a PoE to mains adapter a while back supporting 10GbE passthrough, allowing these APs to be powered while connected to a standard non-PoE 10GbE switch.
These refinements in design, thermal management, and connectivity demonstrate UniFi’s continued push toward enterprise-grade wireless networking, ensuring WiFi 7 devices can operate without artificial bottlenecks imposed by wired infrastructure.
The New U7 Pro XG/XGS APs vs the U7 Pro and U7 Pro Max APs
The U7 Pro XG and U7 Pro XGS build on the foundation of the U7 Pro and U7 Pro Max, but with a focus on eliminating wired bottlenecks. While all four models support WiFi 7, the key distinction between the Pro XG/XGS and the earlier U7 Pro models lies in their uplink capabilities. The U7 Pro and U7 Pro Max are limited to 2.5GbE PoE, which is adequate for most WiFi 7 workloads but can become a constraint when multiple high-bandwidth clients are connected simultaneously. The Pro XG and XGS, by contrast, introduce 10GbE PoE, ensuring that the wired infrastructure can keep pace with the wireless throughput.
The spatial stream configuration is another notable difference. The U7 Pro XG (6-stream) and U7 Pro XGS (8-stream) allow for higher simultaneous throughput across more devices, compared to the U7 Pro (4-stream) and U7 Pro Max (6-stream). This makes the XG and XGS models better suited for high-density deployments, particularly in offices, event spaces, and public environments where hundreds of devices may be connected at once. The Pro XGS, in particular, offers 4×4 MIMO on the 5GHz band, significantly improving performance and efficiency for mid-range frequencies compared to the U7 Pro Max.
Another area of distinction is power consumption. The Pro XG and XGS models require more power—22W for the XG and 29W for the XGS, compared to 21W for the U7 Pro and 25W for the U7 Pro Max. This is a necessary tradeoff for their higher performance and increased uplink capacity, though it does mean PoE+ or PoE++ switches are required. Additionally, the Pro XG/XGS feature an updated chassis design, a dual-color option (black or white), and interchangeable covers—features not found on the U7 Pro and Pro Max.
Feature
U7 Pro
U7 Pro Max
U7 Pro XG
U7 Pro XGS
WiFi Standard
WiFi 7
WiFi 7
WiFi 7
WiFi 7
Spatial Streams
4
6
6
8
Coverage Area
110 m² (1,200 ft²)
130 m² (1,400 ft²)
140 m² (1,500 ft²)
160 m² (1,750 ft²)
Max Client Count
200+
250+
300+
500+
Uplink
2.5GbE PoE+
2.5GbE PoE+
10GbE PoE+
10GbE PoE++
Power Method
PoE+
PoE+
PoE+
PoE++
Max Power Consumption
21W
25W
22W
29W
MIMO Configuration
2×2 (2.4GHz, 5GHz, 6GHz)
2×2 (2.4GHz, 5GHz), 4×4 (6GHz)
2×2 (2.4GHz, 5GHz, 6GHz)
2×2 (2.4GHz, 6GHz), 4×4 (5GHz)
Max Data Rate (6GHz)
2.4 Gbps
5.7 Gbps
5.7 Gbps
5.7 Gbps
Max Data Rate (5GHz)
2.4 Gbps
4.3 Gbps
4.3 Gbps
8.6 Gbps
Max Data Rate (2.4GHz)
688 Mbps
688 Mbps
688 Mbps
688 Mbps
Antenna Gain (6GHz)
5 dBi
6 dBi
6 dBi
6 dBi
Antenna Gain (5GHz)
4 dBi
5 dBi
5 dBi
6 dBi
Antenna Gain (2.4GHz)
3 dBi
4 dBi
4 dBi
4 dBi
Operating Temperature
-30 to 40°C
-30 to 40°C
-30 to 40°C
-30 to 50°C
Certifications
CE, FCC, IC
CE, FCC, IC
CE, FCC, IC
CE, FCC, IC
Color Options
White
White
Black/White
Black/White
Ultimately, the U7 Pro XG and XGS are designed for users who need 10GbE uplink support, either because they already have a 10GbE network or plan to upgrade to UniFi’s new 10GbE PoE switches. For users with a 2.5GbE or slower wired infrastructure, the U7 Pro and Pro Max remain viable choices at a slightly lower price point. However, as WiFi 7 adoption grows and multi-gig networks become more common, the Pro XG and XGS offer better long-term scalability.
The New Pro XG Switch Series – ProXG 8/10/24/48 Port L3 Switches
Alongside the U7 Pro XG and U7 Pro XGS, UniFi has introduced a new lineup of 10GbE PoE switches, designed to provide sufficient power and bandwidth for these high-performance access points. The Pro XG switch series consists of four models, each tailored for different network scales. These include two rackmount models (24-port and 48-port), a 10-port rackmount version, and a compact 8-port desktop model. Each switch is L3-capable, allowing for advanced network segmentation and routing, and includes PoE+ or PoE++ support, ensuring seamless integration with UniFi’s latest APs and other PoE-powered devices.
Pro XG 24 PoE Switch
The Pro XG 24 PoE Switch is a 1U rackmount switch designed for mid-sized network deployments that require a balance of high-speed wired connectivity and PoE power delivery. It features 16x 10GbE PoE+++ ports and 8x 2.5GbE PoE+++ ports, making it suitable for networks that mix WiFi 7 access points with multi-gigabit wired clients.
Additionally, it includes 2x 25G SFP28 ports for uplinks to higher-speed network infrastructure or aggregation switches. With a total PoE budget of 720W, it provides ample power for multiple APs, IP cameras, or other PoE devices without the risk of power limitations.
Pro XG 48 PoE Switch
For larger-scale environments, the Pro XG 48 PoE Switch offers a higher port density and greater PoE capacity. It includes 32x 10GbE PoE+++ ports and 16x 2.5GbE PoE+++ ports, making it a high-performance choice for dense enterprise networks. Like the 24-port version, it also features 4x 25G SFP28 uplinks, ensuring sufficient bandwidth for connecting to core switches or high-speed backbones.
The PoE budget is increased to 1080W, making it an ideal choice for deployments that include multiple high-power PoE devices such as security cameras, VoIP phones, and UniFi’s latest APs.
Pro XG 10 PoE Switch
The Pro XG 10 PoE Switch is a compact rackmount switch aimed at smaller business or prosumer setups that still require 10GbE PoE connectivity. It features 10x 10GbE PoE+++ ports and 2x 10G SFP+ uplink ports, providing a balance between port availability and high-speed connectivity.
With a total PoE budget of 400W, this switch is suitable for environments where a handful of high-performance APs and a small number of wired clients need reliable power and bandwidth. Its 1U form factor allows for easy integration into existing rack setups while maintaining L3 switching capabilities for network segmentation and security.
Pro XG 8 PoE Switch
For users who need 10GbE PoE in a desktop-friendly format, the Pro XG 8 PoE Switch provides high-speed connectivity without the bulk of a full rackmount switch. It includes 8x 10GbE PoE++ ports and 2x 10G SFP+ uplinks, making it a suitable choice for small offices, home labs, or network expansions where rack space is limited.
The 155W PoE budget is lower than its larger counterparts, but still sufficient for a few high-powered APs or other PoE devices. Unlike the rackmount models, this switch does not include an LCD control screen and is instead managed entirely through the UniFi software interface.
Feature
Pro XG 24 PoE
Pro XG 48 PoE
Pro XG 10 PoE
Pro XG 8 PoE
Form Factor
1U Rackmount
1U Rackmount
1U Rackmount
Desktop
Switch Type
L3
L3
L3
L3
LCD Screen
Yes (1.3″)
Yes (1.3″)
Yes (1.3″)
No
10GbE PoE+++ Ports
16
32
10
8
2.5GbE PoE+++ Ports
8
16
N/A
N/A
Uplink Ports
2x 25G SFP28
4x 25G SFP28
2x 10G SFP+
2x 10G SFP+
Total PoE Budget
720W
1080W
400W
155W
The UniFi XG switch lineup is designed to complement WiFi 7 APs by eliminating network bottlenecks at the wired infrastructure level. These switches provide a scalable, high-performance backbone for enterprise, business, and prosumer deployments, ensuring that wireless speeds are not limited by outdated switch technology.
Should You Care About the UniFi XG Series of WiFi APs and Switches? Verdict & Conclusion
The UniFi U7 Pro XG and U7 Pro XGS introduce 10GbE PoE to UniFi’s WiFi 7 lineup, resolving a key limitation of previous models by eliminating the wired uplink bottleneck. The Pro XG (6-stream) and Pro XGS (8-stream) offer higher client capacity, better multi-device performance, and a redesigned chassis that introduces dual-color options for more discreet deployments. Their fanless design and metal internal structure improve thermal management, making them suitable for continuous high-performance use. However, higher power consumption (22W for the XG, 29W for the XGS) means that PoE+ or PoE++ infrastructure is required, which could be a drawback for users with older PoE switches. Additionally, while the 10GbE uplink is a significant upgrade, users without 10GbE-capable networks may not see immediate benefits. Despite this, for those already investing in high-bandwidth networking, these APs offer superior long-term scalability compared to the U7 Pro and Pro Max.
The Pro XG series switches provide a much-needed 10GbE PoE solution to support UniFi’s latest APs and other high-power PoE devices. The lineup includes rackmount options (24-port and 48-port models) with 25G uplinks, a compact 10-port rackmount switch, and an 8-port desktop model for smaller deployments. Each switch is L3-capable, offering advanced routing and VLAN segmentation, and they provide substantial PoE budgets ranging from 155W (desktop model) to 1080W (48-port model). These switches solve the lack of 10GbE PoE options in the market but come with some trade-offs, including higher power draw and potential noise levels in larger models. The desktop version lacks an LCD screen, and pricing—though not yet finalized—will likely position these above existing UniFi multi-gig PoE switches. However, for those building a true high-performance wired and wireless network, these switches represent a genuinely unique step forward in the standard of PoE devices in the market – no really.
We are currently testing the U7 Pro XG/XGS access points and the XG switch series, gathering real-world performance data on throughput, power efficiency, and thermal management. A detailed review will follow soon, focusing on WiFi 7 performance under load, 10GbE PoE implementation, and compatibility with existing UniFi infrastructure. Our tests will also evaluate how well these APs handle multi-client environments and whether the 10GbE uplink translates to real-world advantages over 2.5GbE models. If you’re considering an upgrade to WiFi 7 or planning a 10GbE PoE deployment, stay tuned for our full analysis, where we’ll break down whether these new devices are truly worth the investment.
Pros of the UniFi Pro XG Series
Cons of the UniFi Pro XG Series
10GbE PoE Uplink – Eliminates the wired bottleneck found in previous UniFi WiFi 7 APs, ensuring full utilization of high-speed wireless capabilities.
WiFi 7 with Multi-Link Operation (MLO) – Supports faster speeds, lower latency, and improved stability by leveraging multiple frequency bands simultaneously.
Higher Client Capacity – U7 Pro XG supports 300+ devices, while the U7 Pro XGS handles 500+ clients, making them ideal for high-density environments.
Advanced MIMO Configurations – The 6-stream XG and 8-stream XGS improve throughput and efficiency, particularly for 5GHz and 6GHz bands.
Scalable 10GbE PoE Switches – The Pro XG switch lineup introduces rackmount and desktop models with PoE budgets ranging from 155W to 1080W, ensuring flexibility across different deployment sizes.
25G SFP28 Uplink Support (on 24/48-Port Models) – Enables future-proofing for users needing higher backbone bandwidth beyond 10GbE.
Fanless AP Design – Ensures silent operation while maintaining efficient passive cooling for long-term reliability.
Dual-Color Options & Interchangeable Covers – Adds more deployment flexibility, allowing APs to blend into different environments.
Higher Power Requirements – The U7 Pro XG requires PoE+ (22W), while the U7 Pro XGS requires PoE++ (29W), limiting compatibility with older PoE switches.
Premium Pricing Expected – While final pricing for the Pro XG switches isn’t confirmed, they are expected to be more expensive than existing UniFi multi-gig PoE options.
Potential Heat & Noise Concerns (for Switches) – The higher-powered rackmount switches may generate more heat and fan noise, especially under heavy load, making them less suitable for quiet environments.
This description contains links to Amazon. These links will take you to some of the products mentioned in today's content. As an Amazon Associate, I earn from qualifying purchases. Visit the NASCompares Deal Finder to find the best place to buy this device in your region, based on Service, Support and Reputation - Just Search for your NAS Drive in the Box Below
Need Advice on Data Storage from an Expert?
Finally, for free advice about your setup, just leave a message in the comments below here at NASCompares.com and we will get back to you.Need Help?
Where possible (and where appropriate) please provide as much information about your requirements, as then I can arrange the best answer and solution to your needs. Do not worry about your e-mail address being required, it will NOT be used in a mailing list and will NOT be used in any way other than to respond to your enquiry.
[contact-form-7]
TRY CHAT Terms and Conditions
If you like this service, please consider supporting us.
We use affiliate links on the blog allowing NAScompares information and advice service to be free of charge to you.Anything you purchase on the day you click on our links will generate a small commission which isused to run the website. Here is a link for Amazon and B&H.You can also get me a Ko-fi or old school Paypal. Thanks!To find out more about how to support this advice service checkHEREIf you need to fix or configure a NAS, check FiverHave you thought about helping others with your knowledge? Find Instructions Here
Or support us by using our affiliate links on Amazon UK and Amazon US
Alternatively, why not ask me on the ASK NASCompares forum, by clicking the button below. This is a community hub that serves as a place that I can answer your question, chew the fat, share new release information and even get corrections posted. I will always get around to answering ALL queries, but as a one-man operation, I cannot promise speed! So by sharing your query in the ASK NASCompares section below, you can get a better range of solutions and suggestions, alongside my own.
Synology vient de mettre à disposition une nouvelle version de son logiciel interne pour routeurs : SRM 1.3.1 Update 13. Cette mise à jour apporte plusieurs corrections, notamment des correctifs de sécurité importants. Examinons en détail les modifications apportées par cette version…
Synology SRM 1.3.1 Update 13
Un peu plus de 4 mois après la précédente mise à jour, Synology propose SRM 1.3.1 Update 13. Cette nouvelle version vient corriger plusieurs problèmes critiques. Voici ce qu’indique le journal des modifications :
Les connexions IPv6 pouvaient échouer après un certain temps d’utilisation dans certains environnements Wi-Fi ;
La connexion à Internet pouvait être interrompue après un redémarrage du routeur, notamment lorsqu’un réseau mobile était utilisé comme fournisseur d’accès Internet sans périphérique câblé connecté ;
Correction de plusieurs vulnérabilités de sécurité.
Le dernier point est particulièrement intrigant, car Synology ne précise pas quelles failles ont été corrigées. En consultant la page des avertissements de sécurité du fabricant, aucune mention n’est faite de ces vulnérabilités pour le moment. Il est possible que certaines d’entre elles aient un risque d’exploitation élevé, incitant Synology à attendre qu’un nombre suffisant d’appareils soit mis à jour avant de détailler les failles corrigées.
À noter que SRM 1.2.5 ne bénéficie pas de cette mise à jour.
Télécharger et installer la mise à jour SMR
Cette mise à jour est disponible pour tous les routeurs Synology, à l’exception du modèle RT1900ac. Pour l’installer, vous avez 2 options :
Téléchargement automatique : La mise à jour peut être installée directement via l’interface d’administration de votre routeur ;
Si la mise à jour automatique ne vous est pas encore proposée, voici la procédure d’installation manuelle :
Téléchargez le fichier .PAT correspondant à votre modèle de routeur
Accédez à l’interface d’administration du routeur
Allez dans : Panneau de configuration > Système > Mise à jour et restauration
Cliquez surMise à jour manuelle de SRM
Sélectionnez le fichier téléchargé et suivez les instructions affichées à l’écran
Patientez pendant le processus de mise à jour…
Votre routeur devrait redémarrer automatiquement. Pensez à vérifier que tout fonctionne correctement.
En synthèse
SRM 1.3.1 Update 13 est une bonne nouvelle. La mise à jour est importante car elle corrige plusieurs bugs critiques et renforce la sécurité des routeurs Synology… Même si le fabricant ne détaille pas les vulnérabilités corrigées. Il est fortement recommandé de mettre à jour son routeur, sans trop attendre.
QNAP continue d’enrichir son catalogue avec un nouveau switch réseau : le QSW-2104-2T-R2. Ce modèle, équipé de 6 ports RJ45, offre 4 ports 2,5 Gb/s et 2 ports 10 Gb/s. Son design et ses caractéristiques rappellent fortement le QSW-2104-2T. Disponible dans les prochaines semaines, il promet une connectivité rapide et efficace…
QNAP QSW-2104-2T-R2
Réputé pour ses NAS, QNAP propose également des switchs accessibles et simples à utiliser. Le QSW-2104-2T-R2 s’inscrit dans cette lignée avec un fonctionnement plug-and-play : aucun paramétrage avancé n’est nécessaire. On le branche, et il fonctionne immédiatement. Il s’git d’un switch 6 ports RJ45 : 4 ports 2,5 Gb/s et 2 ports 10 Gb/s.
Le fabricant précise : « le QSW-2104-2T-R2 respecte la norme NBASE-T pour fournir des vitesses de 2,5G, 1G, 100M et 10G, 5G, 2,5G, 1G, 100M, avec une capacité de commutation totale allant jusqu’à 60Gbps. Il prend en charge les Jumbo Frames de 12 KB et le contrôle de flux IEEE 802.3x, optimisant ainsi les transferts de fichiers volumineux et limitant les pertes de paquets ».
Une différence à découvrir sous le capot
À première vue, le QSW-2104-2T-R2 reprend les spécifications du QSW-2104-2T . Cependant, l’ajout de la mention R2 dans son nom indique une évolution. QNAP ne détaille pas explicitement les changements dans sa présentation officielle, mais il est probable que les améliorations concernent les composants internes.
Comme son prédécesseur, ce modèle est dépourvu de ventilateur, garantissant ainsi un fonctionnement totalement silencieux.
Prix et disponibilité
Le QSW-2104-2T-R2 remplace officiellement le QSW-2104-2T et il est déjà disponible à la commande. Son prix affiché : 189,95€ TTC.
UniFi Express 7 Review – The Affordable UniFi Gateway?
UniFi has seriously hammered the subject of Wi-Fi 7 into their existing portfolio at an alarming speed, but it’s easy to forget that just half a year ago, there wasn’t a single Wi-Fi 7 solution in their lineup. Fast forward to February 2025, and they’ve now established every single kind of Wi-Fi 7 home/business appliance you could ever need. The latest entry into this product range is the compact and expandable UniFi Express 7. Serving as a compact and affordable entry point into establishing your own UniFi network, this device removes many of the physical Ethernet connections found on a typical router and instead prioritizes a small but easily expandable wireless networking solution to grow your network ecosystem. Arriving at $199, the UX7 was launched alongside the UniFi Dream Router 7 (UDR7) and UniFi Cloud Gateway Fiber (UCG-Fiber)—three very similar devices designed to serve different kinds of Wi-Fi/wired network deployments, all offering a similar level of network control that, until now, was only really available in the UniFi Dream Machine series. However, the UniFi Express 7 is the most compact of the three new releases, and with that, it also scales back some of the feature sets found in those more powerful devices. So, is the UniFi Express 7 the best gateway device for your needs? And does its focus on gradual network expansion over out-of-the-box hardware features make it the right fit for your growing home or business network? Let’s find out in this UX7 review.
UniFi Express 7 Review – Quick Conclusion
Honestly, I kind of wish UniFi had launched the UX7 about six months ago. The UniFi Express 7 gateway is an impressive little device, and when you factor in the license-free architecture, alongside its $199 price tag for a fully Wi-Fi 7, 6 GHz-ready box, it’s hard to call this bad value. However, launching this device between the UniFi Dream Router 7 (UDR7) and the UniFi Cloud Gateway Fiber (UCG-Fiber) makes it look like the weaker option of the three. And while the UX7 certainly has network expandability and appeal, I strongly recommend anyone considering it to first check out the UDR7 or UCG-Fiber. That said, for its niche, highly scalable, and modular network appeal, the UX7 delivers exactly what UniFi promises. It’s certainly worth the $199 price tag, but keep in mind that it is designed first and foremost as a network gateway. You will struggle to fully unlock its potential without integrating a UniFi switch or expanding into an existing UniFi network.
BUILD QUALITY - 8/10
HARDWARE - 8/10
PERFORMANCE - 8/10
PRICE - 9/10
VALUE - 8/10
8.2
PROS
Affordable Entry Point – At $199, it’s one of the most budget-friendly ways to start a UniFi network with Wi-Fi 7 capabilities. Compact & Energy Efficient – Small footprint (11cm²), lightweight (422g), and low power consumption (22W max) make it ideal for home and office environments. Wi-Fi 7 & Tri-Band Support – 2.4GHz, 5GHz, and 6GHz bands with Multi-Link Operation (MLO) for better speed, lower latency, and improved reliability. 10GBASE-T WAN Port – Supports high-speed internet connections, making it future-proof for faster broadband rollouts. Scalable with UniFi Ecosystem – Easily integrates into an existing UniFi setup with mesh Wi-Fi, UniFi switches, and other devices. Powerful UniFi Software – Full UniFi Controller suite with advanced network management, security, VLANs, and traffic analytics. USB-C Power Input – Simple and universal power delivery, allowing for flexible placement and easy powering via third-party adapters.
CONS
Limited Wired Connectivity – Only one 2.5G LAN port (no PoE), making wired expansion less convenient compared to UDR7 or UCG-Fiber. No Built-in Storage – Cannot run UniFi Protect or other UniFi applications natively, requiring external UniFi hardware for advanced services.
Considering that this tiny device features tri-band Wi-Fi, 10G networking, and 2.5G networking, it’s kind of bonkers how small it is. Equipped with an internal quad-core ARM processor and 3GB of DDR4 memory, these modest yet highly capable internal components are more than enough to keep your data moving smoothly. The $199 launch price of the UX7 puts it slightly closer to the price of most Pro-sumer routers. While it’s not overpriced, some users may question whether there are better, more hardware-capable devices available at a similar price point in early 2025.
However, the main appeal of that price point is not exclusively about the hardware, and you have to factor in that this device is bundled with the UniFi software, offering full integration and utility of said hardware. This tiny box is able to host full control of a UniFi network, managing—via a single pane of glass interface—over 30 individual UniFi-connected/adopted devices and well over 300 clients at any given time. A big part of the appeal of UniFi products is that single ecosystem, and once you factor in that platform alongside the hardware, the $199 price tag starts to make a lot more sense.
Although the system features two copper connections on the rear, the priority of the device will always be Wi-Fi connectivity. This small box is able to cover up to 1,500 square feet of wireless connectivity, but do factor in walls and rooms—of course! A lot of this coverage depends on the antenna and frequencies your client devices choose to use, and in that regard, the UX7 continues to push the boundaries.
Scaling things up from the previous generation UniFi Express device, the UX7 supports Wi-Fi 7, Wi-Fi 6E, Wi-Fi 6, and traditional legacy Wi-Fi. Although the device has no external antenna, there are strategically placed antennas throughout the inside of this device. Thanks to the increased 6 GHz frequency access via the 2×2 6 GHz antennas inside and Wi-Fi 7’s utilization of 320 MHz channels, this opens the door to substantial performance increases in the UX7 over its predecessor.
Additionally, Wi-Fi 7 integrates Multi-Link Operation (MLO), which means Wi-Fi 7-supported client devices can create multiple simultaneous connections over different frequencies, drastically enhancing wireless performance—to the point where it dwarfs traditional wired connections.
The 6 GHz band has a shorter coverage distance than 5 GHz, and likewise 5 GHz has a shorter range than 2.4 GHz. Although Wi-Fi 7 certainly solves many issues related to maximizing available radio frequencies, keep in mind that distance will still be a factor. Because of the small scale of this device, there are questions about true distance coverage compared to a router with more antennas and external antennas. Depending on the number of simultaneous frequencies via MLO that your client device can utilize, the maximum performance potential of this device will differ. However, across all of the available bands, you can achieve:
688 Mbps maximum bandwidth on the 2.4 GHz frequency,
4.3 Gbps performance on the 5 GHz frequency,
A whopping 5.7 Gbps potential on the 6 GHz frequency.
Consider these more of a guideline to the larger shared bandwidth across multiple client devices, but nevertheless, they still indicate the performance potential of this tiny box once it’s integrated into your network. Although we will delve into more detail about security and encryption later in the review, it’s also worth highlighting that this system supports encrypted protocols all the way up to WPA3 for wireless transmissions. The UniFi Controller software provides an almost unrivaled level of network security management and troubleshooting, with controls extending down to individual devices, groups, VLANs, and MAC addresses.
This means that even if you begin integrating third-party hardware into your network environment or stick to UniFi client devices as you expand upon this gateway device, the lock-and-door approach to your ISP services will always be significantly tighter thanks to having the UX7 as your gateway. Moving over to the wired connections, the system features a 2.5G Ethernet port that is utilized as a LAN connection. This means you can integrate an existing switch and expand your UniFi network toward more wired devices, as well as creating multiple virtual LAN arms in your network environment.
Unfortunately, this 2.5G port does not support Power over Ethernet (PoE), which means any connected devices will need their own power source. This is a shame, because both the simultaneously released UDR7 and UCG-Fiber devices each include a PoE port, making wired expansion with UniFi switches much cleaner and more convenient.
Nevertheless, it’s good that standard Gigabit Ethernet is absent in favor of 2.5G Ethernet, allowing for 2.5 times the performance of traditional and legacy networks.
Interestingly, the UX7’s WAN port is a 10GBASE-T copper connection! Most users would have assumed that this compact device would arrive with 10G SFP+, as is common with most UniFi devices. However, opting for traditional copper 10G means that as ISP services globally begin to exceed Gigabit speeds, the UniFi Express 7 gateway will not create a bottleneck, allowing your network to fully enjoy those higher speeds as they become available. This also means that this tiny box is future-proofing your internet service gateway for a considerable length of time as better connectivity options arrive. Nevertheless, I’m a little disappointed that you cannot set the 2.5G port as your WAN, thereby allowing you to dedicate the 10G connection as a wider LAN connection. This would have been beneficial when using it alongside a traditional 10G NAS system or a larger switch that would take greater advantage of 10G network speeds. Very few users in the next few years will have internet speeds exceeding 2.5G (regardless of whether you are a home or business user), so fixing the 10G connection as the only WAN port feels like overkill for many. CORRECTION! You CAN set the 2.5G as a WAN port, but you need to manually change the initial 10G WAN port to LAN or Disabled FIRST, then the option to select 2.5G as a WAN will appear!
Impressively, the device is powered by a standard USB-C PSU, which is included in the kit. It’s probably no surprise that this device is quite power-efficient, factoring in the ARM CPU alongside the system’s prioritization of Wi-Fi connectivity out of the box rather than LAN/physical WAN connections. At peak Wi-Fi bandwidth utilization, with an active 10G connection, UniFi reports that the device draws just 22 watts at peak usage. Realistically, the device will spend 90% of its time operating at a fraction of this power consumption. Another major difference between the UX7 and other UniFi network management devices released in the last 12 months is that this system does not feature any internal storage or expandable storage via an SD card or USB port.
This means that the system is unable to host popular UniFi add-on applications for surveillance, in-house communication hardware, or dedicated UniFi hardware appliances. These features can still be added via an expanded UniFi network client installation over time, which is why this device is so affordable compared to other solutions. It is designed around gradually expanding your hardware network. That said, it’s a real shame that this device does not include any baseline storage out of the box, as many users would have wanted to utilize it as the base for a convenient and easy-to-deploy UniFi Protect surveillance device. As mentioned earlier, the UX7 is quite a niche device, making it difficult to compare against an already well-provisioned router or business gateway device. The hardware design and connectivity of the UX7 are optimized for a small, compact UniFi gateway deployment, but it also includes provisions for future scalability with wireless access points (for mesh networking) and UniFi switches for expanded connectivity later.
In that vein, let’s now discuss the UniFi Controller software and how the Express 7 takes advantage of it today—while also promising greater expansion capabilities in the future.
UniFi Express 7 Review – Software and Services
IMPORTANT !!!- Currently the Software review of the Ux7 is in progress, but I have already reviewed the UDR7 device which is very similar indeed. So, whilst I complete the UCG-Fiber and UX7 review, I have included the software review of the other 2 devices below, as they are running near identical services and features (but with differences with regard to port/wifi features. I will be amending the below text very soon, but include it here to give a better understanding of what this UniFi controller software can do. Apologies for this in the meantime.
Realistically, no one should be spending inordinate amounts of time using the software that your router arrives with – that’s just a simple fact. Indeed, you want you router (or any network appliance) to just do it’s job! Therefore talking about just how good the UniFi network software is, and how the UniFi Dream Router 7 capitalized on it, is going get a mixed reaction depending on your own level of network knowledge and custom requirements. I will say straight away though that you will really, REALLY struggle to find a more capable and flexible router software at this price point. You will struggle to find ANY setting, config, adjustable parameter of control measure not included with the UX7. First off, there is the mobile application. As the UX7 hosts the UniFi network software, ALOT of the iOS and Android official UniFi applications are supported by the UX7.
Firs time setup of the router using the mobile application (you can use a desktop machine with your web browser if you prefer of course) is incredibly straight forward. The Router can be found via the local area network or Bluetooth within 2 minutes of it’s first power-on. One big misconception (I was guilt of this too a while back) was that you have to register a UI.com account online in order to use UniFi appliances. This is NOT true. You can set the device up without a UI account (and even WITHOUT an internet connection) and doing so just needs to you create a local administrator account. It is recommended to use a UI account of course, as it allowed for easier comms and access for your larger Unifi network, but it is by no means compulsory. You can also create a system backup (with your config data of users, settings, SSIDs, etc) and backup online if you choose – and then easier pull this backup if you wish during initialization easily.
Upon creating local credentials or resisting an online account, the router performs an initial internet performance test and then goes about setting up your router. Much like other recent UniFi releases, the system has a ‘gamer’ style installation screen that shows tips and guides on how to get the most out of your router – very rare in a router I will say.
The setup process takes around 2-3 minutes and after that, you have pretty much FULL control and access to the Router’s configuration from your mobile phone. You can definitely tell that UNiFi have put the hours in with regard to the UX of the mobile application. Routers (and switches for that matter) are NOT easy systems to try and simplify – let along ocndence in a compact mobile UI. However they really have excelled in the latest version of their software.
Management of individual devices on the network are all presented intuitively in the app, and alongside their position/priority/bandwidth/consumption being presented, you can also use the app to institute controls and rules for 1, some or all devices on the fly – with instant implementation. Again, it’s no the fact that you can ‘do’ this that I am impressed by, it is the ease and intuitive way it is presented in a mobile app.
The same applies to the physical connections and wireless connections on the UX7 itself, with full remote control with the app to bridge, negotiate, failover, vLAN, disable, etc any port easily – as well as create new SSIDs, assign channels and push client devices around on the router side in 3-4 clicks. All of this is performed responsively and easily in the app.
On the subject of client devices, let’s discuss that WiFi 7 support. WiFi 7 opens up ALOT of performance and general bandwidth advantages. WiFi routers and client devices have been around now for around 10-12 months, as well as the increase in availability globally of greater than Gigabit internet services. Most internet service providers have already a router with their services – but not many provide WiFi 7 routers with their services, even at greater than gigabit speeds. So, what is the advantage? For the quicker (ish) version, watch my video below.
Now, you might well not have any devices right now that are WiFi 7, but plan on upgrading to WiFi 7 at some point in the further over a PCIe upgrade card. Even if you are using a system that lacks a PCIe upgrade clot, you can get small m.2 upgrade cards for a WiFi 7 / 802.11be upgrade for as little as $15-20 here. Hell, you do not even need to open up your system, as you can now get WiFi 7 to USB adapter upgrades for as little as $25-30, which is exactly what used when testing the router with my Windows 11 laptop for the earlier testing of the UDR7.
The USB-to-WiFi 7 Adapter I used in my testing of the UDR7 was this one HERE on Aliexpress.
This USB to WiFi 7 adapter allowed for immediate 802.11be connectivity between my laptop and the UniFi Dream Router 7, over the now available 6Ghz band. Although there is more to WiFi 7 and this router than just that additional frequency. The UX7 SUPPORTS 2.4Ghz and 5ghz (just like all WiFi 6 and 6E routers), but crucially alongside the 6Ghz band allowing for more active concurrent connections, you are also able to take advantage of 320Mhz bandwidth (till now WiFi 6/6E only allowed for up to the 160Mhz connections). This means that you have a greater bandwidth per connection – though you can only have a finite amount of connections at 320Mhz at once. This is COMBINED with WiFi allowing for overlapping connections too and 1 device enjoying multiple connections at once.
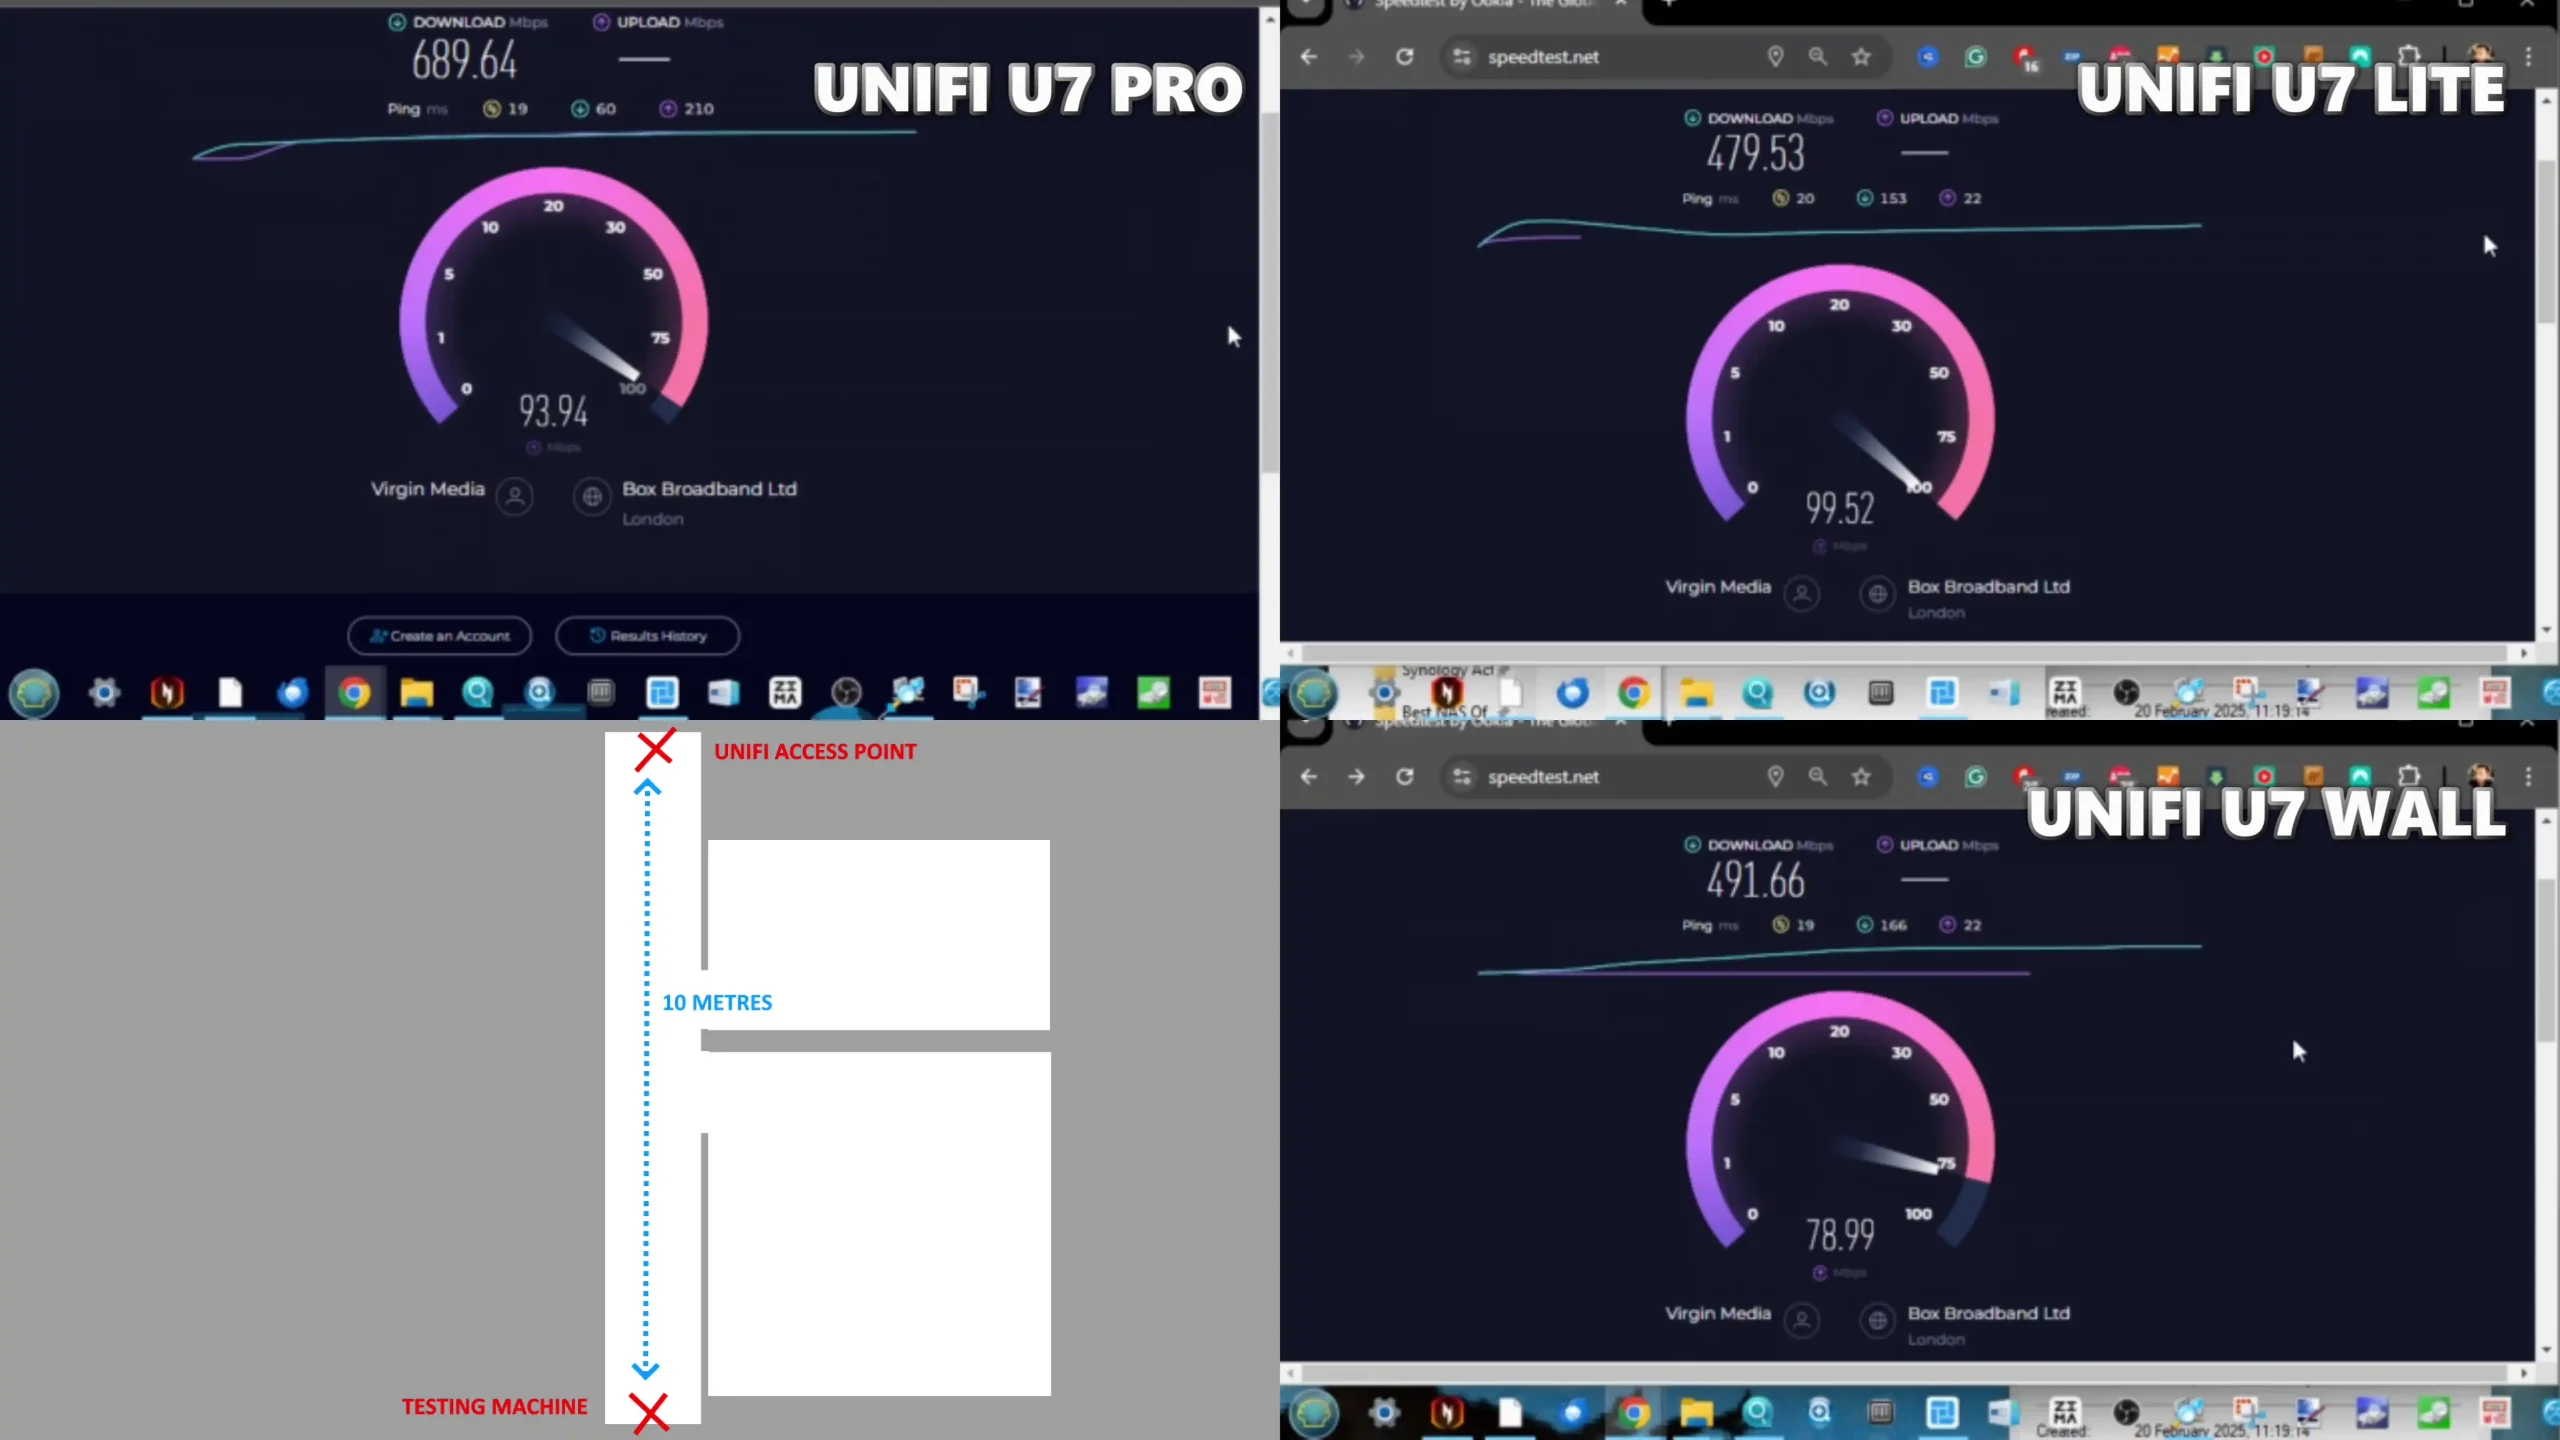
This means that not only can you match the speed of a normal wired gigabit connection, but you can ABSOLUTELY SMASH IT! As you can see below, using this USB adapter on my regular windows laptop, connecting to the UniFi Dream Router 7 over the 6Hz band – I was able to hit 2.8Gb/s wireless connectivity!!! That is even faster than using one of the physical 2.5GbE connections on the UX7.
It’s worth remembering though that WiFi 7 is NOT perfect and although it presents a lot of benefits for bandwidth improvements, reduced latency and increased encryption options, support of the wider frequencies and abilities of a larger WiFi 7 populated network are still a little ‘early days’.
By that, I mean that although you can hit high performance with 320Mhz connections, the actual radio frequency opened up right now (depending on your region) is pretty slim. The UX7 DOES show you the full radio spectrum, separated dynamically with each 20/40/80/160/320Mhz block that is spread across 2.4/5/6Ghz – but ALOT of it is still unavailable to use in many regions.
These limitations are likely going to reduce over time and, therefore you have to look at a decent % of the WiFi capabilities of the UniFi Dream Router 7 as ‘future proofing’ – but just keep in mind that although you can deploy ALOT of wireless (and wired) devices in a UX7 managed environment, those peak 802.11be/WiFi 7 bandwidth improvements are going to be shared only by a few client devices – in reality the real benefits are going to be felt with the opening up of the 6Ghz frequency allowing for more devices to be spread over all three frequencies and bands at 80/160Mhz.
Anotehr note to keep in mind is that the 6Ghz band has a shorter area of effect than 5Ghz (which likewise has a shorter area than WiFi 5). So WiFi7 is at it’s best in closer proximity without walls – more as a cable alternative if you are in the same areas as your UniFi router. But when I connected to a 10GbE NAS (connected to the 10GbE port of my UCG-Fiber), I was able to hit 187MB/s write easily (though read performance was oddly inconsistent – possibly related to the NAS, still investigating – TBC) in CrystalDiskMark.
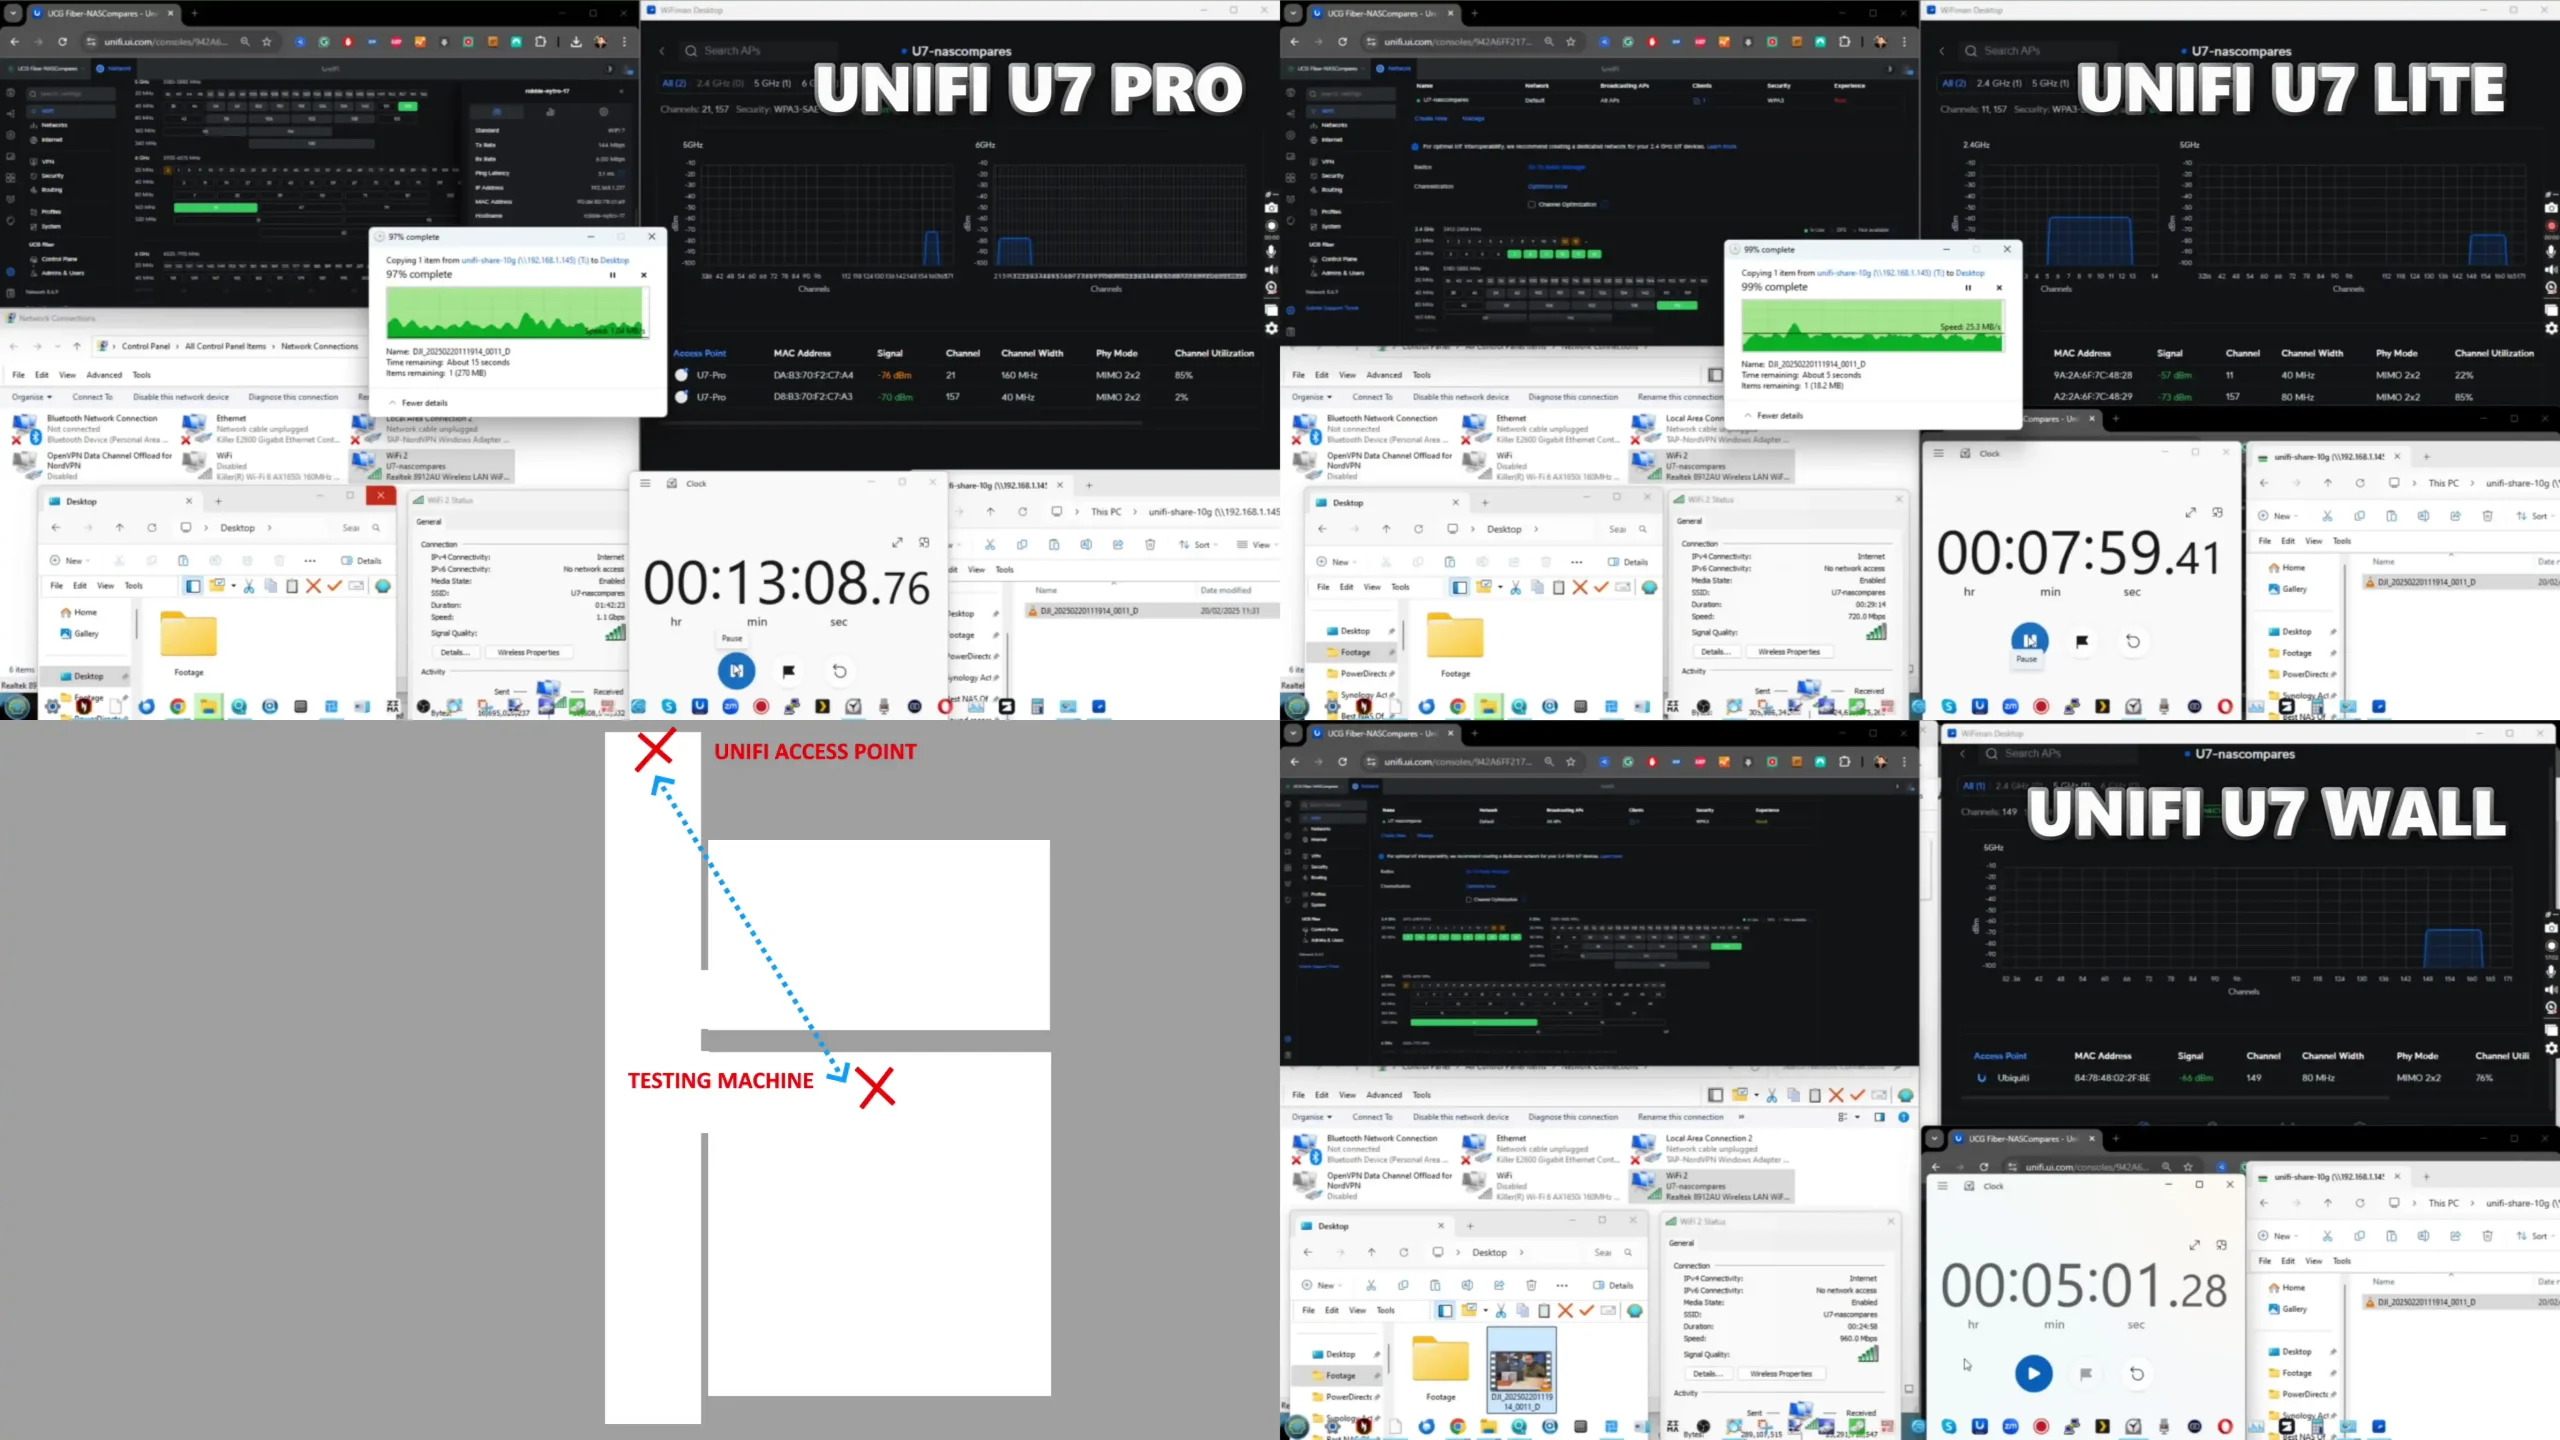
Likewise, similar testing with the WiFi 7 USB Adapter, through the UX7 and at the 10GbE connected NAS hit 260MB/s+ easily. Once again, I would have easily respected this if I had been connecting with the NAS using the 2.5GbE ports – but I am hugely impressed that I was able to hit this benchmark over a WiFi connection (thanks to that 2.8Gbps 6Ghz setup). Respect!
Additionally, it is very easy to monitor the position, WiFi coverage, Channel and performance of any device connected to the UX7 controller software. Also allowing you to create rules on the fly to automatically manage them later as/when devices arrive.
These same controls also extend all the way down to the ISP input of the UX7 AND IF YOU HAVE MULTIPLE uNIfI AP/Nodes in your setup, can control how/where bandwidth is allocated and the priority of devices/nodes that are unique to your own deployment.
The dashboard features a grouped UI and analytics overview that allows you to see the price traffic that is going into a physical LAN, grouped VLAN or just a single devices on the network – allowing you to see the sites/services/geo data in real time too!
And likewise as before, you can extent these analytics all the way to the root UX7 router to see EVERYTHING happening in realtime in your network and internet connectivity.
Blacklisting (and whitelisting occasionally) or certain websites is also easy to action manually when needed too – or you can import an existing database of ‘bad’ site lists directly into the UX7 to simplify the process.
Once rules, priorities, orders of services and limits have been created, you can then apply them to individual devices, networks, groups, vLANS, etc – even to a physical LAN port if needed. These rules are completely customizable and if 1 parameter is changed on the fly, it immediately actions across all selected devices.
It’s also worth highlighting that UniFi has its own enterprise user identity service (‘Identity Endpoint’) that you can apply to devices if you want to ensure that connected devices on the LAN or WAN are truly secure (client auth tools on each device) and this extends to the VPN and UniFi network client device access too.
I also should stress that although the UX7 seems like a very, VERY proprietary router – UniFi do NOT lock you into having to create an account with them or use only their services. You can set the system up for LOCAL ONLY management and control if you choose. Or even hybrid the two and create 1 secure ‘Identity Endpoint sys admin’, but others are ‘local’ only – nice balance tbh.
And new users (super user or billy basic!) can be created, modified and deleted at any time!
Control and configuration of the UX7 are very straight forward and there are pretty high end configuration options in the backend of the system to control both the local network setup, as well as WiFi connectivity out the box (or added later in the case of systems like the UCG Fiber via the U7/U7 Pro/U6).
And professional SI’s/Technicians can set the system to ‘truly open’ if they wish, and this can be securely controlled as needed. This allows for opening up frequencies in the case of a WiFi setup down the road and advanced settings related to antenna gain/adaption.
The system configuration and control are surprisingly extensive for a $279 router and puts it well, well into the realms of an enterprise-grade solution, despite its Prosumer/SMB price point.
Unsurprisingly, the UX7 has internet speed test tools (either using the native web browser GUI or the WiFiman application for Android/iOS).
But its goes further, with the ability to monitor the packet management in your network (covered earlier) to such as extent that you can even block the server calls to specific sites/vendors that are going through the UniFi manager and block them SPECIFICALLY. Eg, want to keep google services, but NOT YouTube (either for work/professional reasons, or because of your kids homework deadline?) – you can do that REALLY easily.
And you can apply these rules easily and analytics with ease via the topographical network monitoring window. So you can visually see the devices in the network, then apply the rules, in case a new device gets sneakily added to circumnavigate any limits/restricts in palce.
And if you see a sudden spike in internet use, you can (in seconds) isolate the device that is causing it AND see what it is – allowing yo to block/monitor as needed.
Equally, you can set some pretty extensive security provisions to pre-emptively kick in when an unknown device arrives on the scene, or if an existing device in the network begins to be suspicious.
The same goes for creating day 1/100 rules for port forwarding, traffic management and Firewall rules. All of this is HUGELY customizable and most pages in the UniFi GUI feature both ‘simple/easy’ views, as well as much more complex advanced views as needed at the top of each page.
The multiple LAN ports can also be scaled up/down as needed if your existing network is not quite ready for the full network connectivity of the UCG-Fiber too.
And thanks to the UX7 featuring multiple WAN ports, you can decide how you want to handle multiple ISP services into your home/business, to separate/combine/balance between them with ease across your connected devices.
Additionally, each WAN port can be adjusted to a ‘WAN’ or ‘LAN’ roles as needed – even disabled. So, whether it is as a failover internet connection, or that you want to free up that 10GbE port for use as a LAN – The choice is yours!
Also, as mentioned earlier, as the system supported internal storage via the slot, you can go ahead and run UniFi Protect surveillance software too – as well as as an additional switch to the available LAN ports, for cameras or add a camera to the POE port.
There are actually several different surveillance, communications, display or smart appliances in the UniFi portfolio that can be installed on the internet storage drive + also means you have more scope for that POE ready port.
It gets to a point (perhaps) that there are TOO many security and configuration options, and people looking for just a router to ‘just do it’s job’ will be somewhat overwhelmed. Most of the important settings are already set pretty well, but I never the less recommend first time buyers take the time to explore the configuration options present in order to better understand what they are buying here in terms of it’s abilities to protect your network and internet services.
This extends right the way down to the more advanced prevention and intrusion protection measures (Dark Web blocking too). Again, pretty advanced for many, but take the time to look through them if you purchase the UX7.
And if in doubt, you can use the UniFi Teleport VPN service to anonymize your site-to-site exchanges (again, very ‘first party’ and more about SD-WAN level stuff, but does form part of the purchase here).
Also, keep in mind that the UX7 has the option to create Airgaps in it’s wired network AND WiFi connectivity (if you want to add that) that allows you to create automated access times – especially useful for businesses who want to lock down access outside of the usual 9-5 operational hours.
If you want to use WiFi services, yo can create multiple SSIDs of varying degrees of access – and yes, all the controls on security, speed, antenna, frequency, vLAN, etc are all present here too.
When creating those VLANS, you can add specific physical ports, IDs, WiFi APs etc to that vLAN to segregate your network as securely as possible.
And from there you can adjust the vLAN configuration in terms of it’s smooth operation and security directly from the network management panel (as well as view all active vLANS on one page if needed to see how they interact/clash + show each device you have moved in/out of them easily.
And again, all packet management/monitoring are available within the vLAN if you need.
If this all sounds tremendously intimidating, there is a much, MUCH easier 1 panel view in the ‘Insights’ tab that just shows each current network branch and it’s connections/clients in a list format.
Not good enough? How about a global view that shows the data packet exchange in real time with regard to each region (i.e worried that your data is being harvested to an overseas location, this will show you which countries are currently connected with on your UCG-Fiber for upload/download (websites? server? It’s easy to check and find out here!).
Bottom line – the bulk of the UniFi Control Software here is available on the majority of UniFi Router, Express, Cloud Gateway and Dream Machine devices – but the EXTENT to which you can use it is heavily dependent on the device you buy. In the case of the UX7, you have a fantastic balance of Day 1 control sure, but you have an even better management and scalability on the system for when your ISP services double/triple, as well as the number of devices in your network expand.
UniFi Express 7 Review – Verdict and Conclusion
If the UniFi Express 7 had been released about six months ago, I think it would stand out considerably more than it does right now. However, sandwiching its launch between the Wi-Fi 7 UDR7 and the highly LAN-capable UCG-Fiber device somewhat muddles the launch of the UX7. The UX7 is a highly capable and highly expandable appliance that serves as an affordable, low-footprint way for home and business users to begin integrating UniFi into their network. Had this cloud gateway device arrived before the Router 7 or Fiber device, I think its integration would have been hugely appealing. However, given the small $49–$79 price difference between the Router/Fiber devices that UniFi launched at the same time, the UX7 does feel a bit underwhelming by comparison. That isn’t to say that the UX7 is a bad device! It really isn’t. UniFi has crammed a huge amount of capability and expandability into an exceedingly small frame, at just 11 cm²!
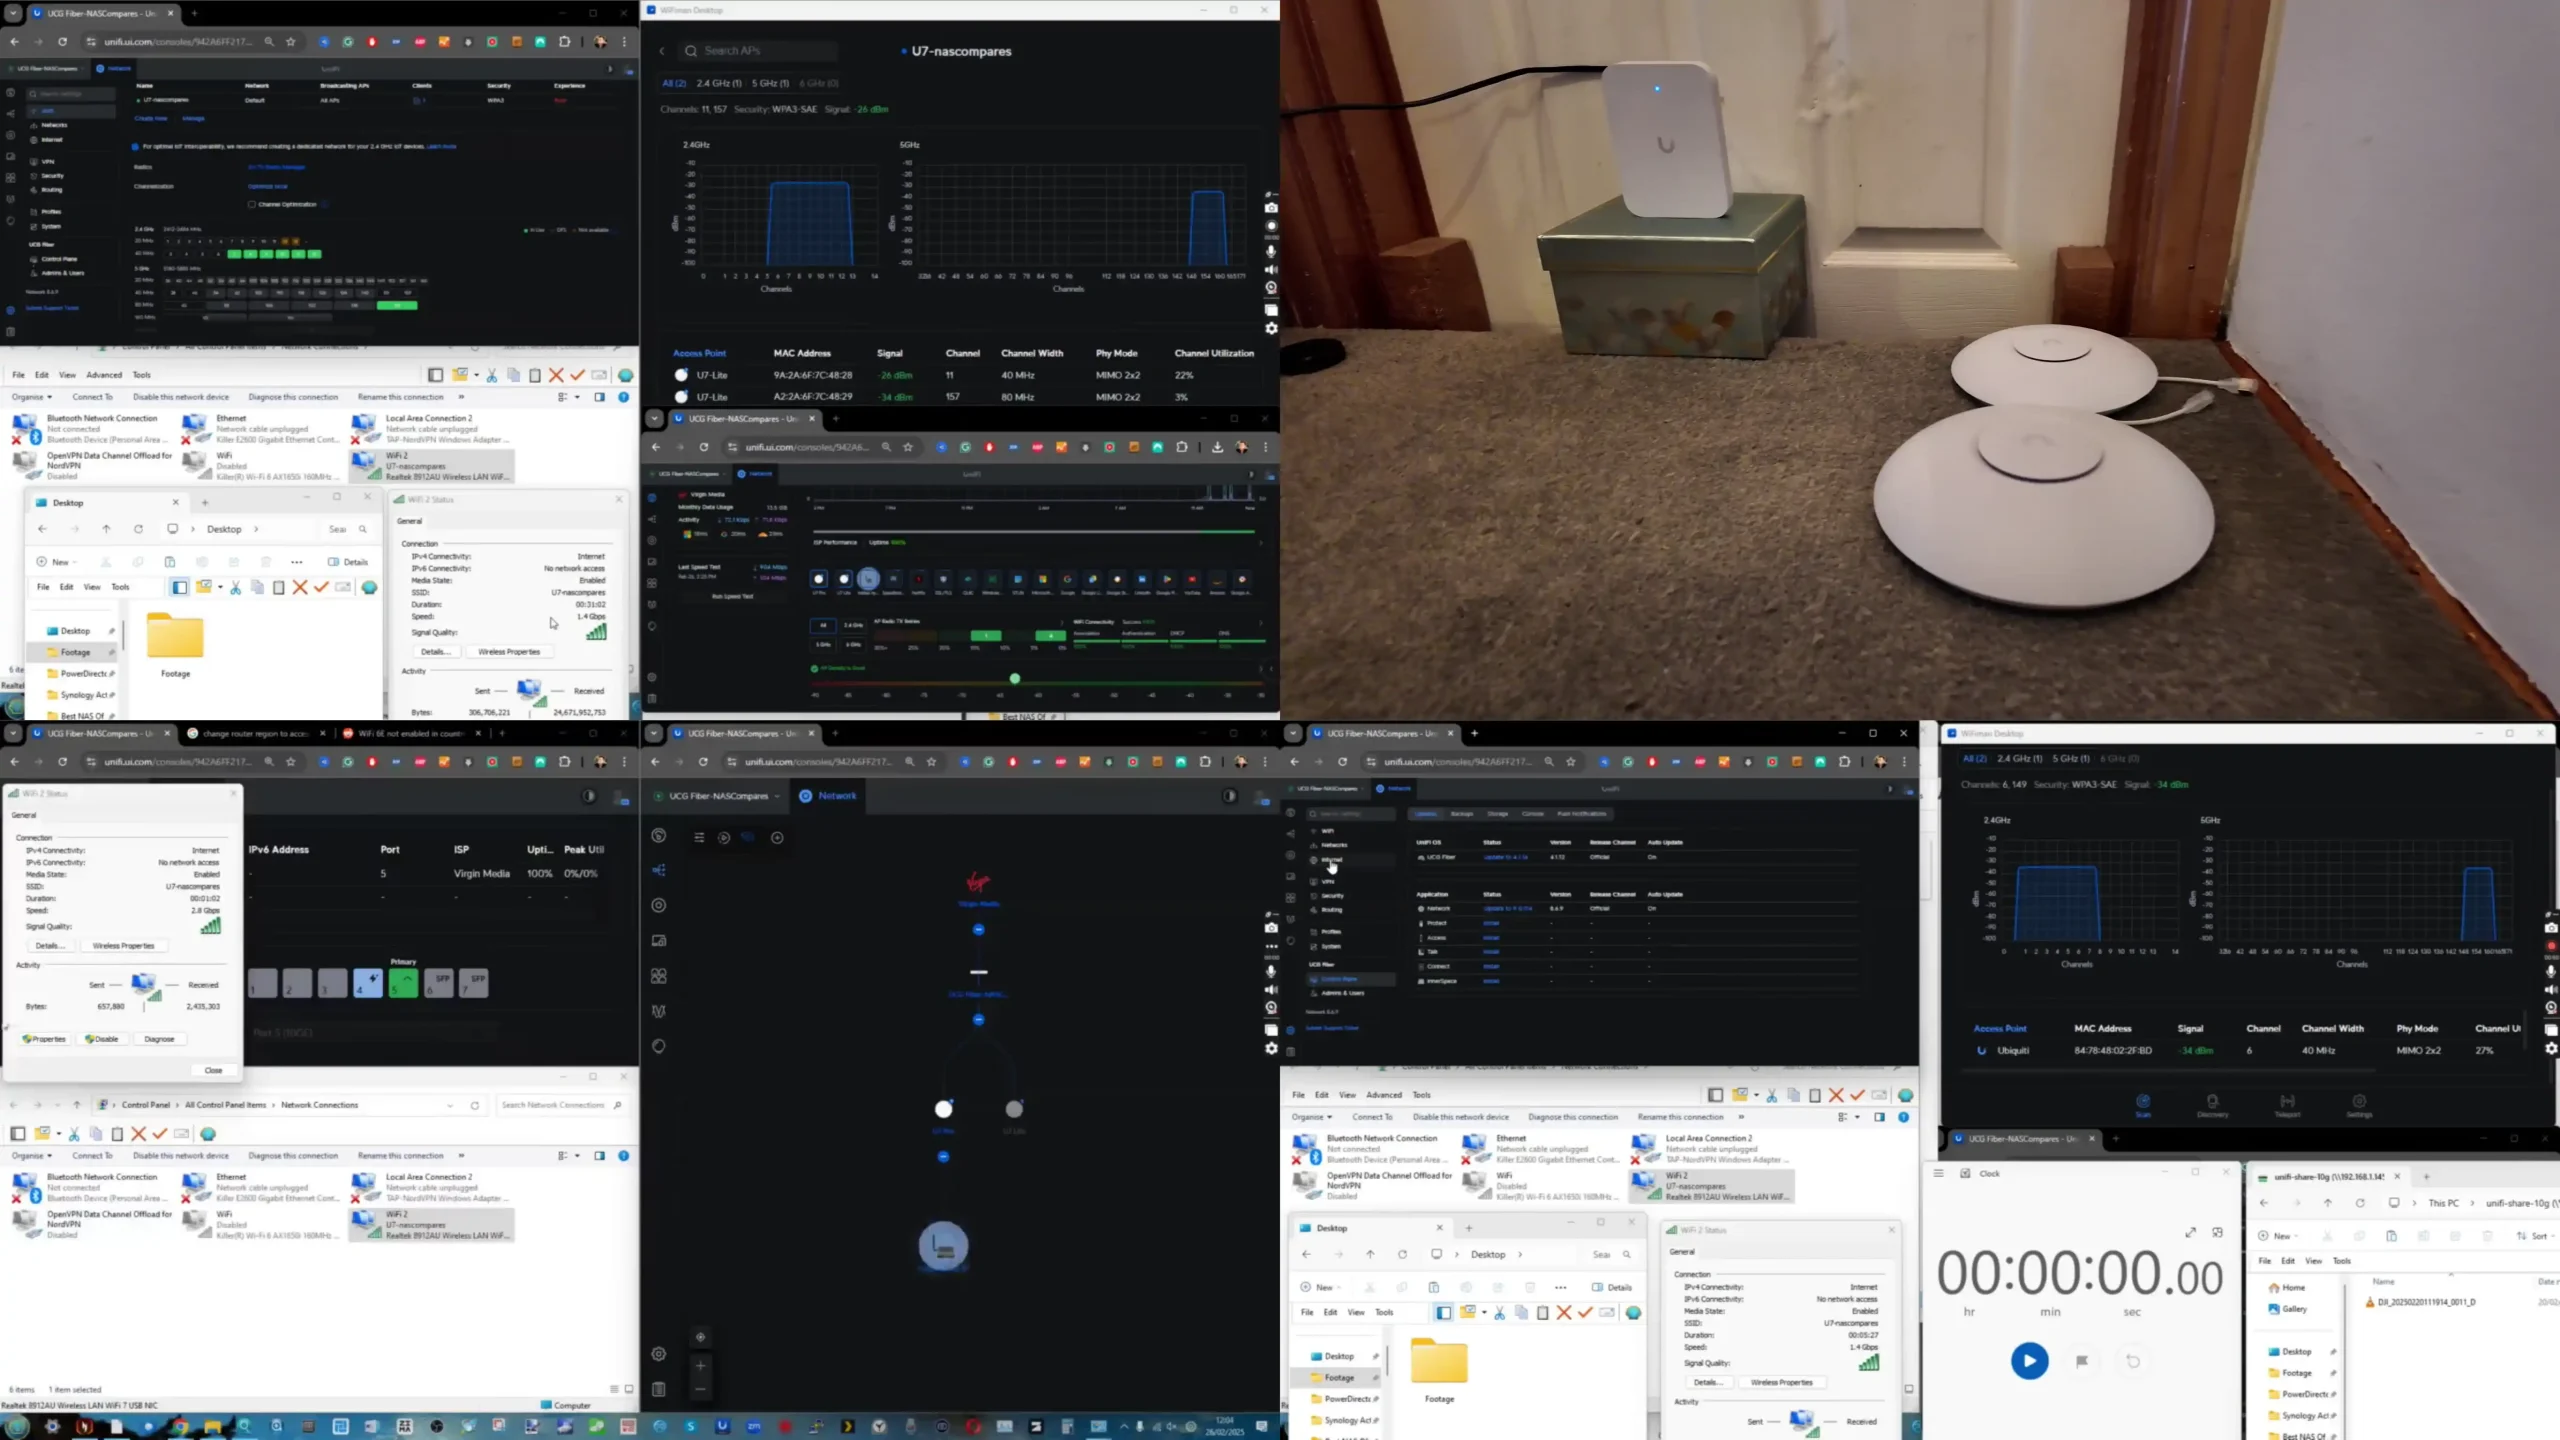
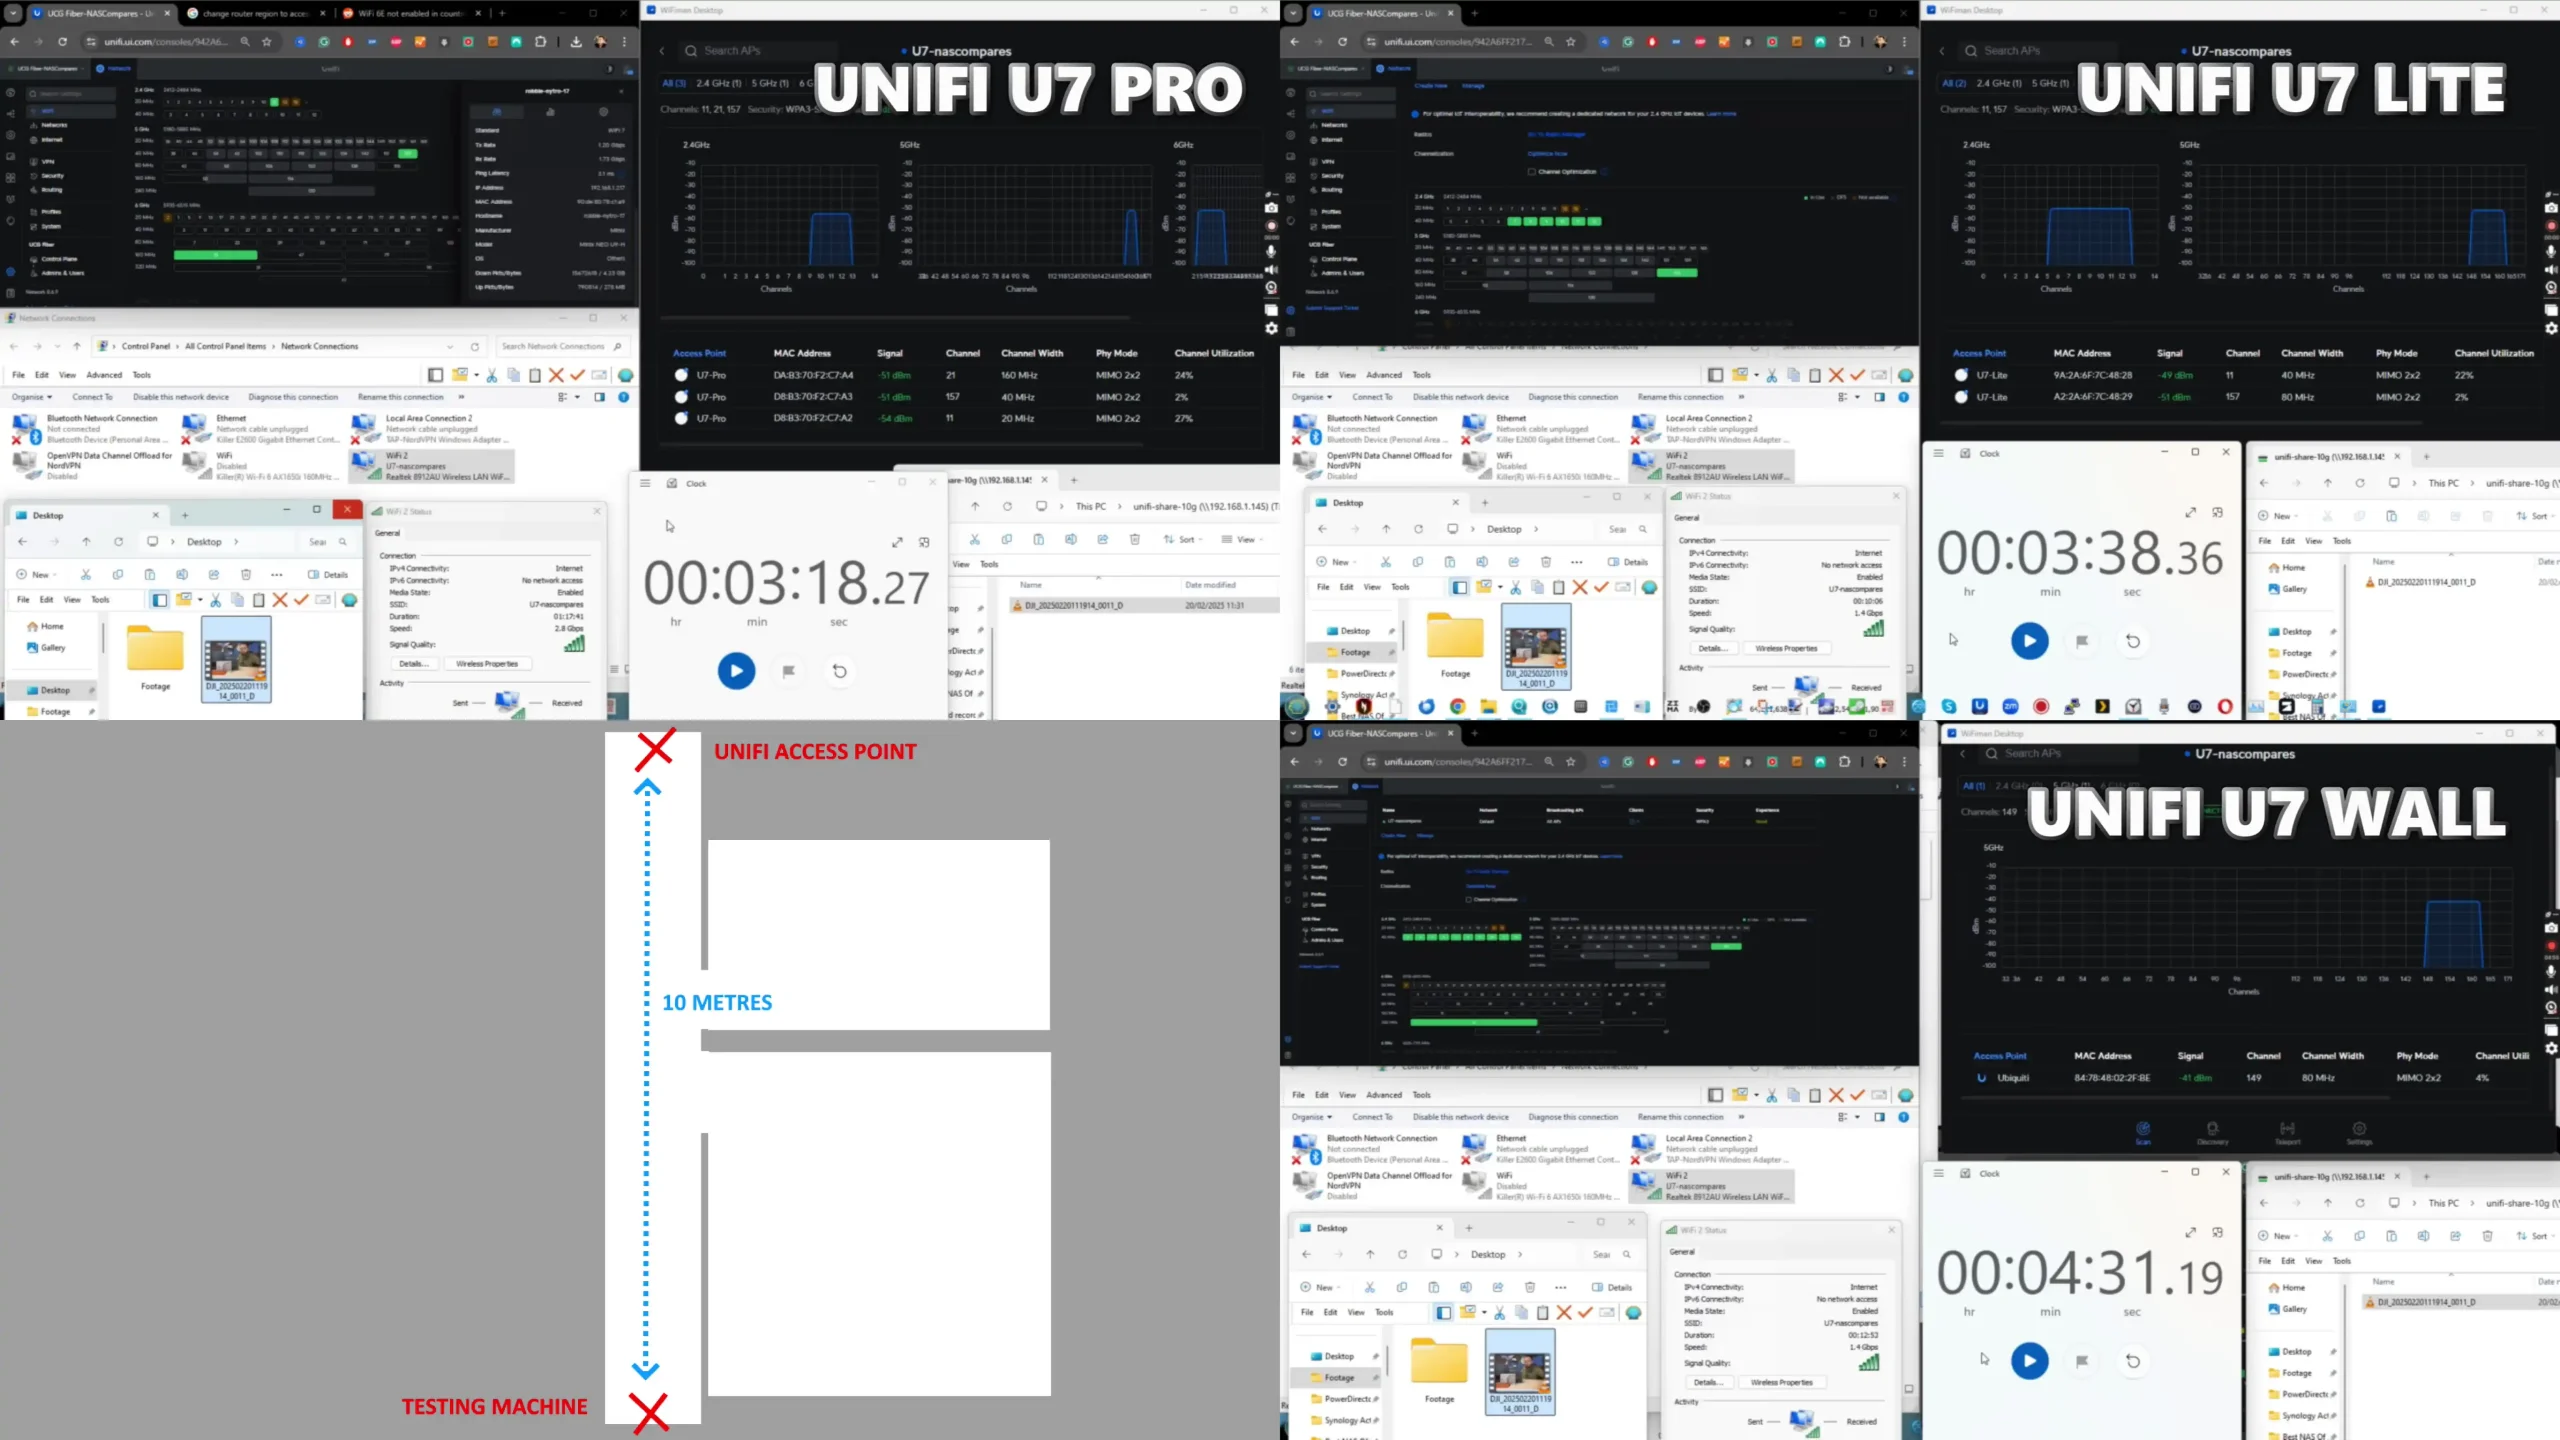
This is by far the smallest tri-band Wi-Fi 7 fully capable router-style device that I’ve ever seen, and it arrives at a lower price point than Wi-Fi 7 alternatives from Amazon or Google right now. It is also substantially easier to expand into mesh networks, thanks to the U7, U7 Pro, U6, and U6 Wall devices. Equally, the ease of adoption and integration of UniFi switches into the UX7 down the road means that you can granularly and much more affordably expand your network of UniFi devices over the years. This is a great deal easier than having to spend more money upfront on hardware that you may not even fully utilize in your network for a few years to come. Future-proofing and expandability are once again the key selling points here, but just keep in mind that there are alternatives to this product (including from UniFi themselves) available right now. It would be wise to spend a little more time considering whether those slightly more hardware-rich devices—at less than $100 more from UniFi—might be better suited to your needs.
PROS
CONS
Affordable Entry Point – At $199, it’s one of the most budget-friendly ways to start a UniFi network with Wi-Fi 7 capabilities.
Compact & Energy Efficient – Small footprint (11cm²), lightweight (422g), and low power consumption (22W max) make it ideal for home and office environments.
Wi-Fi 7 & Tri-Band Support – 2.4GHz, 5GHz, and 6GHz bands with Multi-Link Operation (MLO) for better speed, lower latency, and improved reliability.
10GBASE-T WAN Port – Supports high-speed internet connections, making it future-proof for faster broadband rollouts.
Scalable with UniFi Ecosystem – Easily integrates into an existing UniFi setup with mesh Wi-Fi, UniFi switches, and other devices.
Powerful UniFi Software – Full UniFi Controller suite with advanced network management, security, VLANs, and traffic analytics.
USB-C Power Input – Simple and universal power delivery, allowing for flexible placement and easy powering via third-party adapters.
Limited Wired Connectivity – Only one 2.5G LAN port (no PoE), making wired expansion less convenient compared to UDR7 or UCG-Fiber.
No Built-in Storage – Cannot run UniFi Protect or other UniFi applications natively, requiring external UniFi hardware for advanced services.
This description contains links to Amazon. These links will take you to some of the products mentioned in today's content. As an Amazon Associate, I earn from qualifying purchases. Visit the NASCompares Deal Finder to find the best place to buy this device in your region, based on Service, Support and Reputation - Just Search for your NAS Drive in the Box Below
Need Advice on Data Storage from an Expert?
Finally, for free advice about your setup, just leave a message in the comments below here at NASCompares.com and we will get back to you.Need Help?
Where possible (and where appropriate) please provide as much information about your requirements, as then I can arrange the best answer and solution to your needs. Do not worry about your e-mail address being required, it will NOT be used in a mailing list and will NOT be used in any way other than to respond to your enquiry.
[contact-form-7]
TRY CHAT Terms and Conditions
If you like this service, please consider supporting us.
We use affiliate links on the blog allowing NAScompares information and advice service to be free of charge to you.Anything you purchase on the day you click on our links will generate a small commission which isused to run the website. Here is a link for Amazon and B&H.You can also get me a Ko-fi or old school Paypal. Thanks!To find out more about how to support this advice service checkHEREIf you need to fix or configure a NAS, check FiverHave you thought about helping others with your knowledge? Find Instructions Here
Or support us by using our affiliate links on Amazon UK and Amazon US
Alternatively, why not ask me on the ASK NASCompares forum, by clicking the button below. This is a community hub that serves as a place that I can answer your question, chew the fat, share new release information and even get corrections posted. I will always get around to answering ALL queries, but as a one-man operation, I cannot promise speed! So by sharing your query in the ASK NASCompares section below, you can get a better range of solutions and suggestions, alongside my own.
HexOS, le système d’exploitation dédié aux NAS DIY, poursuit son évolution avec une série d’améliorations. Après un lancement en novembre dernier, l’équipe a mis l’accent sur le renforcement de son infrastructure et l’expansion de son équipe pour répondre à la demande. Cependant, tout n’est pas rose…
HexOS et NAS DIY
HexOS a été conçue pour transformer n’importe quel PC en un NAS puissant et facile à utiliser. Ce dernier repose sur TrueNAS SCALE (sous Linux), reconnu pour sa fiabilité et sa robustesse. Il dépasse le cadre de la simple surcouche en proposant une expérience utilisateur enrichie.
Cependant, tout n’est pas rose. Le système HexOS est toujours en version bêta… et il est payant. En effet, il vous en coutera 199$ (environ 184€) par serveur NAS. Attention, c’est le prix « Ealry Access », car le prix normal est de 299$ (environ 276€).
Nouveautés dans HexOS
L’une des principales évolutions attendues concerne l’introduction des préférences de localisation personnalisables. Cette fonctionnalité permettra aux utilisateurs de définir des emplacements spécifiques pour les configurations, les journaux système et les données des applications installées.
Cela offrira une plus grande flexibilité dans la gestion du stockage, ce qui est un élément crucial.
Autre amélioration notable : la refonte complète du centre d’activité. La carte de santé actuelle sera remplacée par une carte d’activité offrant une meilleure visibilité sur les notifications et les événements récents du système.
Ce changement vise à simplifier la supervision du NAS et à améliorer l’expérience utilisateur.
Aujourd’hui, nous vous proposons de découvrir le test complet du TerraMaster F8 SSD Plus. Ce NAS est atypique à bien des égards. Ce qui saute aux yeux, c’est avant tout son design élégant qui tranche avec ce que l’on a l’habitude de voir. Il est full-flash, ce qui signifie qu’il n’accepte que des SSD via ses 8 emplacements. Oui, vous avez bien lu… et il s’agit de SSD NVMe. Sous le capot, il embarque un processeur Intel Core i3 accompagné de 16 Go de RAM. Côté connectique, le F8 SSD Plus dispose de ports USB 3.2 (Typa-A et Type-C), d’une sortie HDMI et d’un port réseau Multi-Gig. Son prix public est de 840€. Découvrons ce nouveau NAS prometteur…
Test du TerraMaster F8 SSD Plus
Le F8 SSD Plus s’adresse aussi bien aux créateurs de contenu, qu’aux professionnels et aux utilisateurs les plus exigeants. Sur le papier, il a tout pour plaire.
Contenu de la boîte
Commençons par découvrir le contenu de la boîte :
Le F8 SSD Plus en lui-même ;
1 câble réseau RJ45 Cat.6 ;
L’alimentation externe et son câble ;
8 radiateurs pour SSD (avec pâte thermique et fixation) ;
1 tournevis cruciforme ;
Un guide de démarrage rapide ;
Un livret sur la garantie.
Comme à son habitude, TerraMaster fournit tout le nécessaire… voire plus. On ne peut qu’apprécier.
Construction du NAS et design
Dès le déballage, le F8 SSD Plus impressionne par ses dimensions compactes et sa légèreté. Il est conçu en plastique dur noir et mesure 177 x 160 x 140 mm. Il trouvera facilement sa place, y compris sur un bureau. Son design est sobre et moderne. Sur la balance, il affiche 0,6 kg. Si l’alimentation se situe classiquement à l’arrière, le bouton marche/arrêt se trouve sur le dessus. Ce dernier dispose d’une diode et c’est la seule sur le dessus. Aucune diode n’est présente en façade.
Deux ventilateurs présents au-dessous ont pour objectif de rafraichir les composants à l’intérieur. TerraMaster assure que son boitier ne dépasse pas les 19 dbA à 1 mètre, ce qui le rend quasiment inaudible.
Installation du NAS
L’installation du NAS a été facilitée. Pour accéder à l’intérieur, il suffit de retirer une petite vis à l’arrière (sans tournevis) puis de pousser par le dessous (au niveau des ventilateurs). Là, vous avez accès aux 8 emplacements M.2 NVMe. Pour nos tests, nous avons pris 3 SSD WD RED SN700 1 To adapté aux NAS. L’installation se fait à l’aide du tournevis fourni.
Il est important de noter que TerraMaster fournit 8 radiateurs, ainsi que la pâte thermique à mettre entre le radiateur et le SSD. C’est plutôt une bonne idée, car il est connu que les SSD NVMe ont tendance à chauffer rapidement lorsqu’ils sont sollicités… et les performances peuvent rapidement en pâtir.
Rappel : Le throttling d’un SSD NVMe se produit lorsque la température dépasse un seuil critique, entrainant une réduction automatique des performances pour éviter la surchauffe. Cela peut avoir un impact significatif lors de transferts de données intensifs. Une bonne dissipation thermique est donc essentielle.
Connectique
Le NAS dispose des interfaces suivantes :
3 ports USB 3.2 Gen 2 (2 x Type-A, 1 x Type-C) offrant 10 Gb/s ;
1 sortie HDMI 2.0b ;
1 port réseau 10 Gb/s.
Un ensemble bien équilibré pour un boîtier de cette taille.
Intérieur du F8 SSD Plus
Le TerraMaster F8 SSD Plus est construit autour d’un processeur Intel Core i3-N305 cadencé à 1,80 GHz (mode Burst jusqu’à 3,80 GHz). Ce processeur dispose de 8 cœurs et selon le site PassMark, il obtient un score 9901 points, bien au-dessus des 5000 points habituels pour un NAS. Il est donc taillé pour des tâches complexes comme le chiffrement des données et la virtualisation…
Il intègre également un iGPU Intel UHD Graphics 770, suffisant pour du transcodage vidéo. Enfin, le NAS est livré avec 16 Go de RAM DDR5 (extensible jusqu’à 32 Go), mais sur un seul emplacement. Il vous en coutera environ 85€ pour passer à 32 Go.
Les yeux des plus experts auront remarqué la présence d’une petite clé USB. Cette dernière intègre le nécessaire pour démarrer le système.
TOS 6
Le NAS fonctionne sous TOS 6.0, un système d’exploitation optimisé pour le stockage réseau. Il comprend une interface d’administration et plusieurs applications préinstallées.
Démarrage
L’installation est simple : il suffit de saisir http://tnas.local/ dans un navigateur et de suivre les instructions à l’écran.
Après un redémarrage, on crée un compte administrateur.
En moins de 10 minutes, le système est opérationnel.
Découverte
Après avoir passé le guide de démarrage, le système lance automatiquement son Conseiller de sécurité. Ce dernier permet de rechercher d’éventuel problème de configuration ou de sécurité. C’est une excellente idée, mais le novice aura peut-être des difficultés à comprendre certains termes. Si on clique dessus, on accède automatiquement à plus de détail, ainsi qu’un lien pour corriger cette alerte…
Par défault, TOS 6.0 configure les SSD dans un groupe de stockage TRAID (Raid évolué de TerraMaster) et le système de fichier est Btrfs pour le volume.
Applications
TOS dispose d’un centre d’application permettant d’ajouter d’autres fonctionnalités au NAS. Ce dernier recense 52 applications (au moment où nous écrivons ces lignes). Il y a des applications proposées par TerraMaster pour de la sauvegarde, gestion des photos, vidéosurveillance… mais aussi d’autres éditeurs bien connus : Docker, Portainer, Jellyfin, Plex, WordPress, VirtualBox, Transmission, etc. Si cela ne suffit pas, TerraMaster permet d’installer des applications communautaires (environ 60 pour TOS 6).
Vous l’aurez compris, les possibilités offertes par TOS 6 sont nombreuses, sans parler des possibilités illimitées offertes par Docker.
À noter qu’il existe une application macOS et Windows pour aider à l’installation du NAS. Elle est plutôt pratique, car elle permet d’accéder facilement au NAS, de faire de la synchronisation, de la sauvegarde, etc. Une application Android et iOS existe également, appelée TNAS mobile : « vous pouvez accéder à distance à votre dispositif TNAS, parcourir ou lire des fichiers multimédias sur votre dispositif…et également surveiller votre TNAS à l’aide de votre smartphone ».
TOS 6.0 offre un environnement complet pour sécuriser ses données et en profiter pleinement à travers de nombreuses applications. Certes, certaines traductions sont perfectibles… mais c’est déjà d’un très bon niveau.
Performances du F8 SSD Plus
Dans la première partie de nos tests, nous allons évaluer les performances des transferts à travers un réseau 10 Gb/s (entre le NAS et des ordinateurs). Ensuite, nous regarderons les capacités du processeur, en analysant ses performances dans la virtualisation et le transcodage vidéo.
Vitesses dans les transferts
Depuis plusieurs années, nous avons mis en place un protocole de tests rigoureux fournissant des données fiables et comparables avec les performances des autres NAS. Pour cela, nous utilisons 4 applications de mesure différentes (2 sous macOS et 2 sous Windows) et réalisons en plus des transferts de fichiers de tailles variées dans les deux sens (NAS -> Ordinateur puis Ordinateur -> NAS) :
Petites tailles : 100 fichiers de 500 Ko à 12 Mo (MP3, photos, documents Office)
Tailles moyennes : 30 fichiers de 12 à 350 Mo (DivX, images RAW, archives ZIP)
Fichiers volumineux : 10 fichiers avec une taille comprise entre 4 et 10 Go (MKV, ISO)
À partir de ces tests, nous calculons une moyenne des transferts que nous représentons sous forme de graphiques, exprimée en mégaoctets par seconde. Plus le nombre est élevé, plus le NAS est rapide. Pour notre évaluation du F8 SSD Plus, nous avons configuré un premier volume avec 2 SSD en RAID 1, puis en RAID 1 avec le chiffrement des données et enfin avec 3 SSD en RAID 5.
RAID 1
En RAID 1, nous profitons de la sécurité minimum avec 2 SSD combinés. Comme vous pouvez le constater, le F8 SSD Plus est très à l’aise en lecture et écriture. Il a même dépasser les 1100 Mo/s en lecture ponctuellement dans certains cas.
RAID 1 et chiffrement activé
Avec le chiffrement des données, on constate une perte significative en écriture, ce qui est normal. En lecture, les performances restent excellentes.
RAID 5
Nous terminons avec le volume en RAID 5, configuré avec les 3 SSD. Les performances en lecture et écritures sont très bonnes. On profite ici de toutes les performances offertes par les SSD et la prise réseau 10 Gb/s.
Pour ceux qui ne connaissent pas forcément TerraMaster et son système TOS 6, sachez qu’il est tout à fait possible de faire de la virtualisation de machine (Windows ou Linux). Le processeur du F8 SSD Plus est parfaitement adapté à cet usage. Il est bien sûr possible de faire tourner des conteneurs Docker. Grâce à son iGPU, il excelle également dans le transcodage vidéo, sans impacter les performances globales du NAS. En clair, il pourra gérer plusieurs flux sans ralentissement notable.
Consommation électrique et nuisance sonore
Les 2 ventilateurs au-dessous du boitier sont discrets, mais restent audibles à courte distance. Côté consommation électrique, en utilisation normale avec 3 SSD, elle varie entre 16 et 18 W. Lors de transferts intensifs avec chiffrement ou transcodage, elle ne dépasse pas 40 W.
CONCLUSION
Le TerraMaster F8 SSD Plus s’est révélé extrêmement polyvalent. Il peut être utilisé comme solution de stockage centralisée, serveur multimédia et même pour des tâches de virtualisation. Son matériel puissant et son système TOS 6 bien pensé en font un excellent choix pour les utilisateurs exigeants. Malgré quelques imperfections dans la traduction, l’ensemble reste d’un très bon niveau. TerraMaster signe ici un NAS performant et évolutif, adapté à de nombreux usages.
L’ESP32 de l’entreprise chinoise Espressif (largement utilisé dans les appareils connectés) contiendrait une backdoor. Cette découverte par les chercheurs en sécurité de Tarlogic Security a été présentée lors de la conférence RootedCON à Madrid. Des milliards d’appareils seraient impactés…
ESP32 et faille de sécurité
L’ESP32 est un microcontrôleur qui permet la connectivité Wi-Fi et Bluetooth. Il s’est vendu plus d’un milliard d’ESP32 de la société Espressif en 2023. La présence d’une porte dérobée (backdoor en anglais) dans un composant aussi répandu soulève des inquiétudes en matière de cybersécurité.
Les chercheurs ont mis en évidence que cette faille permettrait de :
Usurper l’identité d’appareils de confiance (spoofing)
Accéder à des données sensibles sans autorisation
Se propager à d’autres dispositifs connectés sur le même réseau
Établir une persistance durable sur les appareils compromis
Cette vulnérabilité pourrait donc être exploitée par des attaquants pour compromettre des dispositifs critiques : téléphone, ordinateur, lecteur multimédia, domotique, etc.
Backdoor découverte grâce à un nouvel outil
Les chercheurs de Tarlogic Security ont développé un pilote Bluetooth USB en C, indépendant du matériel et compatible avec plusieurs plateformes. Cet outil leur a permis d’accéder directement aux flux Bluetooth et de détecter des commandes cachées dans le firmware Bluetooth de l’ESP32.
Ils ont ainsi identifié 29 commandes non documentées sous le code d’opération 0x3F. Ces commandes permettent notamment :
La manipulation de la mémoire (lecture/écriture de la RAM et de la Flash)
L’usurpation d’adresse MAC
L’injection de paquets Bluetooth LMP/LLCP
Espressif n’a jamais publié de documentation sur ces commandes, ce qui pose la question de savoir si elles étaient destinées à rester inaccessibles ou si elles ont été laissées par erreur.
Il est important de préciser que le scénario d’attaque le plus probable reste celui où l’attaquant aurait un accès physique au matériel (ex. : au port USB), facilitant ainsi l’injection des commandes non documentées.
Menace persistante pour les appareils IoT
Les chercheurs de Tarlogic soulignent que cette faille pourrait permettre de dissimuler un APT (Advanced Persistent Threat) dans la mémoire de l’ESP32 et de mener des attaques Bluetooth ou Wi-Fi contre d’autres dispositifs. Une fois l’ESP32 compromis, un attaquant pourrait :
Maintenir un accès permanent à l’appareil
Modifier le firmware du microcontrôleur
Se propager à d’autres appareils connectés
Cette vulnérabilité est suivie sous la référence CVE-2025-27840. Espressif n’a pas encore réagi officiellement aux découvertes des chercheurs.
En synthèse
Cette nouvelle découverte met en lumière les risques liés à la sécurité des composants largement utilisés dans les objets connectés. La présence d’une porte dérobée dans l’ESP32 souligne la nécessité d’une plus grande transparence de la part des fabricants et d’une vigilance accrue de la part des développeurs et des utilisateurs. Dans un monde de plus en plus connecté, la sécurité des composants de base doit devenir une priorité absolue.
Les attaques DDoS menées via des botnets reposent souvent sur des dispositifs IoT compromis, ce qui renforce la nécessité de sécuriser ces équipements dès leur conception.
The Minisforum AI X1 Pro is a compact high-performance mini PC designed for users who require a balance of processing power, AI capabilities, and expandability. Featuring the AMD Ryzen AI 9 HX 370 processor, it integrates 12 cores, 24 threads, and an AI NPU capable of up to 80 TOPS, making it suitable for AI-assisted workloads, virtualization, and content creation. The inclusion of AMD Radeon 890M integrated graphics allows for moderate gaming and GPU-accelerated tasks, while OcuLink support provides the option to attach an external GPU for additional performance. The system features three M.2 NVMe slots, dual USB4 ports, and dual 2.5GbE Ethernet, offering flexible storage and connectivity options. With a 140W internal power supply, the AI X1 eliminates the need for an external power brick, reducing cable clutter. Cooling and power efficiency have been addressed, with idle power consumption averaging between 19W and 23W and higher workloads drawing around 60W at 50% – does this sound like a min PC hybrid to a desktop solution? Let’s discuss the X1’s hardware, performance, AI capabilities, and expansion potential, assessing how well it meets the needs of AI developers, content creators, and general users seeking a high-performance compact system.
Minisforum AI X1 Pro Review – Quick Conclusion
The Minisforum AI X1 Pro offers a strong balance of performance, expandability, and AI acceleration in a compact form factor. It is suitable for AI-driven workloads, mid-range gaming, video processing, and professional applications. The integrated Radeon 890M GPU provides acceptable performance for gaming and AI-assisted tasks, but for more demanding graphical workloads, the inclusion of OcuLink allows users to connect an external GPU for greater flexibility. While the system includes high-speed storage options and multiple connectivity features, the lack of 10GbE networking may limit its usefulness in high-bandwidth data transfer scenarios. However, users can leverage Wi-Fi 7 or OcuLink adapters to expand networking capabilities if necessary. Overall, the Minisforum AI X1 Pro is a versatile mini PC with a focus on AI performance, storage expandability, and modular GPU upgrades. It is best suited for users who require a compact but powerful system for workstation tasks, AI processing, and moderate gaming, with the potential for external GPU scaling if additional performance is needed.
BUILD QUALITY - 9/10
HARDWARE - 10/10
PERFORMANCE - 10/10
PRICE - 7/10
VALUE - 8/10
8.8
PROS
Powerful CPU especially for a mini PC– The Ryzen AI 9 HX 370 is fast and handles demanding tasks well. AI Acceleration – Built-in AI processor speeds up tasks like image recognition and automation. Expandable Storage – Three M.2 SSD slots for fast and flexible storage upgrades. External GPU Support – OCuLink allows for a full-sized GPU to boost graphics performance. Fast USB4 Ports – Two high-speed USB4 ports for fast storage and external devices. Good Cooling System – Dual fans and metal heatsinks keep temperatures in check. Strong Connectivity – Wi-Fi 7 and dual 2.5Gb Ethernet for fast networking. No External Power Brick – Built-in 140W power supply keeps cables minimal. Comes with Windows 11 – Ready to use out of the box. VESA Mount Included – Can be attached to the back of a monitor or wall for space-saving.
CONS
Only Features Microsoft Co-Pilot out the box – Hard/impossible to easily switch to ChatGPT or DeepSeek etc Limited OCuLink Compatibility – External GPU and storage upgrades require specific hardware. Weird PSU Placement – The power supply sits above the SSD slots, which might affect cooling. Price - Pricing is a little mixed at launch store-to-store
The initial specifications of the Minisforum AI X1 Pro Mini PC will differ slightly depending on where you buy and the configuration you choose (i.e the base level memory and storage). Additionally, the system will always arrive with Windows 11 (officially licenced) preinstalled on an SSD in one of the M.2 NVMe Gen 4×4 slots.
Component
Specification
Processor
AMD Ryzen AI 9 HX 370 (12 Cores / 24 Threads, Zen 5 + Zen 5c)
Base Clock
2.0 GHz (Zen 5), 2.0 GHz (Zen 5c)
Boost Clock
Up to 5.1 GHz (Zen 5), Up to 3.3 GHz (Zen 5c)
TDP
28W (Configurable 15-54W)
L2 Cache
12 MB
L3 Cache
24 MB
Memory
Dual-channel DDR5 (Up to 96GB at 5600MHz, 2 SODIMM Slots)
The Minisforum AI X1 Pro features a compact, square-shaped chassis, slightly more symmetrical than other models in its category. The metal and high-quality plastic construction provides a balance of durability and heat dissipation. Ventilation grilles are positioned along the sides and top to facilitate airflow. The system also includes a built-in 140W power supply unit (PSU), eliminating the need for an external power brick, reducing cable clutter, and making it easier to mount or position on a desk.
The front panel houses a power button with an integrated fingerprint sensor, allowing for biometric authentication. There is also a USB4 port, a USB 3.2 port, an audio jack, and an SD card slot for additional storage. The rear panel features multiple USB ports, dual 2.5GbE Ethernet ports, an HDMI output, a DisplayPort output, an OcuLink port, and a USB 2.0 port. These connectivity options provide compatibility with a range of peripherals, storage solutions, and external displays.
A key feature of the design is its internal 140W PSU, an uncommon inclusion in mini PCs. This allows for direct AC power input using a standard two-pin connector. While the PSU is custom-designed and not easily replaceable with off-the-shelf alternatives, it contributes to the unit’s compact and cable-free design.
The cooling system is designed to manage heat efficiently, with airflow distributed across the chassis. The fan noise varies based on workload, but the thermal management system keeps temperatures under control, even under sustained usage.
Power consumption varies depending on workload. In idle conditions, the system draws between 19W and 23W, which is higher than most entry-level mini PCs due to its high-performance hardware. Under moderate load, including CPU and GPU utilization, power usage rises to 59W to 63W. While this consumption is significant for a compact system, it aligns with the performance level it delivers. The internal PSU ensures stable power delivery without requiring an external adapter.
During extended testing, thermal performance remained stable. Heat distribution was well-managed, with no significant thermal spikes even under stress. When measured with a thermal camera, the heat output was lower than other nearby high-performance networking devices in the test environment. The fan system adjusts dynamically based on workload, ensuring consistent operation without excessive noise.
The retail package includes the Minisforum AI X1 Pro unit, a power cable, a VESA mounting bracket, and documentation. The VESA mount allows users to attach the system to the back of a monitor or a wall for space efficiency. The package does not include a keyboard, mouse, or pre-installed operating system, meaning users will need to supply their own peripherals and software. The combination of a built-in PSU, multiple I/O options, and compact design makes it a practical option for users seeking a high-performance mini PC with minimal cable clutter.
Minisforum AI X1 Pro Review – Ports and Connections
The Minisforum AI X1 Pro includes multiple high-speed and legacy connectivity options across its front and rear panels, catering to a variety of use cases. The system supports USB4, USB 3.2, USB 2.0, Ethernet, HDMI, DisplayPort, an SD card slot, and OcuLink, making it a versatile device for professional workloads, gaming, and AI-assisted tasks. These ports enable peripheral expansion, high-speed data transfers, networking, and external GPU connectivity, providing a range of possibilities for users who require flexible hardware configurations. The placement of these connections ensures easy access to frequently used ports on the front, while the rear panel accommodates more permanent connections for external monitors, networking, and high-bandwidth storage solutions.
The dual USB4 ports, located on the front and rear, are among the most notable features, delivering up to 40Gbps of bandwidth. This allows for high-speed external storage, video output, and docking station compatibility. During testing, a USB4 external SSD achieved over 3GB/s in read speeds, confirming that the system fully supports the high-bandwidth capabilities of USB4. Write speeds were more dependent on the SSD’s own specifications, averaging around 1.8GB/s, aligning with expected performance for a drive of that type. The USB4 ports also allow for eGPU expansion, enabling the connection of an external graphics card via an OcuLink-to-USB4 adapter, though performance in this configuration may not match that of a direct OcuLink connection.
For wired networking, the system includes dual 2.5GbE Ethernet ports, offering a step up from standard 1GbE connections. This provides improved network throughput, lower latency for online applications, and better support for local file transfers and virtualized environments.
Testing in a peer-to-peer direct connection resulted in speeds averaging 2.35Gbps, demonstrating reliable real-world performance. While 2.5GbE is sufficient for most users, it may not be ideal for those requiring higher bandwidth network-attached storage (NAS) solutions or extensive multi-user workloads.
Wireless connectivity is handled by Wi-Fi 7, which supports the 6GHz spectrum and 320MHz channel width, providing increased speeds and reduced interference compared to previous wireless standards. When paired with a compatible Wi-Fi 7 router, the system achieved peak throughput of over 2Gbps, depending on environmental factors such as network congestion and signal strength.
Wi-Fi 7 allows for low-latency wireless networking, making it a viable option for high-speed transfers in environments where wired networking is impractical. Wireless performance remained stable across multiple test scenarios, demonstrating consistent connectivity and minimal packet loss.
The video output options include HDMI 2.1 and DisplayPort 2.1, allowing for multi-monitor setups with support for up to four simultaneous displays. The system can handle 4K at 240Hz, 1440p at 480Hz, and 8K at 60Hz, ensuring compatibility with high-refresh-rate monitors and high-resolution displays. Adaptive Sync and HDR support improve overall display performance, reducing screen tearing and improving color accuracy. During testing, dual monitor configurations using DisplayPort and HDMI simultaneously worked without issue, delivering consistent video output with no visible latency.
A key expansion feature is the OcuLink port, which provides direct PCIe-based external device connectivity, offering low-latency, high-bandwidth expansion options. In testing, an OcuLink NVMe SSD enclosure was detected immediately, allowing for storage expansion without compromising performance. The system also supported an external GPU connected via OcuLink, which significantly improved gaming performance, particularly in titles utilizing ray tracing.
The external GPU used in testing was the Minisforum MGA1, an eGPU enclosure featuring a NVIDIA RTX 4090 GPU, PCIe Gen 4 connectivity, and dedicated cooling for high-performance graphics processing. With the MGA1 connected, games that previously struggled with ray tracing saw substantial performance improvements, demonstrating the viability of OcuLink as a direct GPU expansion solution.
The USB 3.2 Gen 2 and USB 2.0 ports serve as additional expansion options, providing 10Gbps and 480Mbps transfer speeds, respectively. While USB 3.2 Gen 2 offers sufficient bandwidth for external drives and accessories, the USB 2.0 port is more suited to lower-priority peripherals such as keyboards, mice, and older external devices that do not require high-speed connectivity. Testing showed that USB 3.2 Gen 2 ports delivered consistent performance when used with high-speed external storage, achieving expected speeds for 10Gbps-rated SSDs.
Overall, the port selection provides a balance between modern and legacy interfaces, ensuring compatibility with a range of peripherals and expansion options. The inclusion of USB4, OcuLink, dual Ethernet, and multiple display outputs allows for high-speed data transfer, wired and wireless networking, and scalable performance upgrades. The lack of 10GbE may be a limitation for certain users, but the OcuLink port compensates by allowing direct PCIe expansion. With reliable wired and wireless networking, flexible video output options, and full USB4 bandwidth support, the Minisforum AI X1 Pro provides strong connectivity for a range of professional and consumer use cases.
Minisforum AI X1 Pro Review – Internal Hardware
The Minisforum AI X1 Pro features a compact yet high-performance internal hardware configuration, designed to balance processing power, cooling efficiency, and storage scalability within a small form factor.
At its core, the system is powered by the AMD Ryzen AI 9 HX 370, a 12-core, 24-thread processor with a hybrid 4x Zen 5 and 8x Zen 5c architecture.
This CPU supports clock speeds up to 5.1GHz, with a default TDP of 28W and a configurable range of 15W to 54W, allowing users to adjust power consumption based on workload requirements. Integrated into the processor is the AMD Radeon 890M GPU, which operates at 2.9GHz and supports modern gaming, AI workloads, and media processing.
The system memory consists of two SODIMM slots, allowing for expandable RAM configurations. The reviewed model included 64GB of DDR5-5600MHz memory, with the option to upgrade to a maximum of 96GB.
Unlike some mini PCs, the RAM is user-replaceable rather than soldered to the motherboard, offering future-proofing for users who may require higher capacity memory. The lack of ECC (Error-Correcting Code) support is a limitation for users requiring data integrity features, particularly in professional environments such as virtualization or enterprise workloads.
Storage is handled via three M.2 NVMe slots, all operating on PCIe 4.0 architecture.
Two of these slots run at PCIe 4.0 x4, providing 8GB/s of potential bandwidth, while the third slot operates at PCIe 4.0 x1, limiting its performance to 2GB/s.
This configuration allows for a mix of high-speed and archival storage, with the x1 slot being more suited for less frequently accessed data. During testing, Gen 4 NVMe SSDs in the primary slots achieved full bandwidth speeds, while the third slot demonstrated the expected performance limitations.
Cooling is managed by an internal metal L-shaped cooling system, which integrates two silent operational fans. The primary fan is located above the piped CPU cooling solution, which consists of a metal heatsink with multiple heat vents to improve thermal dissipation.
This cooling system ensures sustained performance under load, preventing thermal throttling during intensive processing tasks. The second fan is positioned over the Wi-Fi card and adjacent to the internal PSU, ensuring airflow distribution across multiple components.
The internal PSU is located directly above the M.2 NVMe slots, an unconventional placement compared to traditional desktop designs. This layout reduces the need for an external power brick, making cable management more streamlined. The 140W internal power supply is a proprietary design, meaning replacement may be more complex than standard off-the-shelf units.
Despite this, the integration of an internal PSU contributes to a cleaner workspace, avoiding bulky external adapters typically associated with compact systems. Nevertheless, the PSU living DIRECTLY above the m.2 NVMe SSD bays is kinda weird. It further exacerbates the need for the SSD bays to need m.2 heatsinks to allow heat dissipation, into the fan 5-6cm away.
In terms of noise output, the cooling fans remained quiet during idle and low-power tasks, with only minor increases in noise levels under high-load scenarios. The thermal camera testing indicated that the system’s heat distribution was well-managed, with the warmest areas located around the CPU and PSU exhaust vents. The Wi-Fi card and SSD slots remained within safe temperature ranges, confirming the effectiveness of the airflow design.
The internal hardware design of the Minisforum AI X1 Pro prioritizes performance, efficient cooling, and storage flexibility. While the PSU placement above the NVMe drives is unusual, it does not appear to cause excessive heat accumulation. The combination of a high-performance processor, scalable RAM and storage, and a well-managed cooling solution ensures that the system is capable of handling a range of demanding workloads, from AI-assisted tasks to content creation and gaming.
Minisforum AI X1 Pro Review – Performance and Testing
The Minisforum AI X1 Pro integrates the AMD Radeon 890M GPU, which operates at 2.9GHz and features 16 compute units. While it lacks the power of a dedicated high-end GPU, it is capable of handling mid-tier gaming and graphical workloads. During testing, Call of Duty: Warzone was run on high settings, achieving playable frame rates without an external GPU. Performance remained stable, though demanding titles with ray tracing and high-resolution textures exhibited performance limitations. The system supports external GPU expansion via OCuLink, and testing with the Minisforum MGA1 eGPU—equipped with an AMD Radeon 7600M XT (32 compute units, 8GB GDDR6 memory, 120W TDP)—significantly enhanced graphical capabilities, particularly for ray tracing and high-resolution gaming.
The OCuLink expansion port enables a direct PCIe-level connection to external GPUs, providing higher bandwidth than Thunderbolt-based solutions. When using the MGA1 eGPU, performance improvements were immediately evident, with games running at higher frame rates and improved graphical fidelity.
This configuration allows users to scale graphical performance without replacing the base system, making it an efficient option for users requiring additional power for AI tasks, rendering, or high-end gaming.
However, OCuLink accessories are currently less common than standard eGPU enclosures, which may limit hardware compatibility options.
In terms of using the Minisforum X1 Pro in more NAS deployment utilities, the testing is still in progress (and I will make a separate video and article soon), but early testing has been very positive. Uutilized half of the available threads as vCPUs in 12 Windwos 11 VMs (each with 2GB Memory) and they ran great (at that point, my own recording machine and the UI itself became the only limitation.
Likewise, with PLEX Media server, I was able to stream 8x 1080p 100Mb (bitrate) video files at once without stressing the CPU, then 10x 4K 60Mb – still positive. Finally, I went into 8K media (something that PLEX itself is poorly optimized for) and streamed 5x 8K High end files at once (mixed native and on-the-fly conversions). In all cases, the Minisforum X1 Pro worked like a charm!
The rest of the performance benchmarks on the individual m.2 slots are still undergoing testing, as well as connecting a 4x M.2 NVMe SSD expansion device from Aoostar via Oculink.
AI processing is a core feature of the AMD Ryzen AI 9 HX 370 CPU, which boasts up to 80 TOPS (Tera Operations Per Second) and a dedicated 50 TOPS NPU (Neural Processing Unit) for AI-assisted tasks. Benchmarks using Geekbench AI indicated strong performance in OpenVINO-based workloads, with a 5024 overall AI score.
Image-related AI tasks, including image classification, object detection, and segmentation, demonstrated higher inference speeds on OpenVINO compared to ONNX, with quantized processing delivering the best overall efficiency. AI-driven tasks such as style transfer, depth estimation, and pose estimation showed notable acceleration compared to traditional CPU-only inference. Testing with ONNX-based AI models resulted in a lower AI benchmark score of 3614, reflecting reduced optimization for this framework. Despite this, the system still delivered usable performance for machine learning inference and AI-based enhancements, though OpenVINO remained the preferred framework for faster execution times and more efficient workload handling. AI-assisted image enhancement and real-time video analysis tasks performed well, making the system suitable for workflow acceleration in content creation and automated AI-based applications.
Category
Specification
Operating System
Windows 11 Pro (64-bit) (Linux support: Ubuntu, RHEL)
Limited without eGPU, decent with OcuLink external GPU
External GPU (OcuLink, eGPU tested with Minforum eGPU)
Massive improvement in ray tracing performance
Best Use Cases
AI-powered Video & Image Processing
Great for 4K upscaling, AI-style transfer, motion tracking
AI-assisted Creative Workflows
Optimized for Adobe AI tools, DaVinci Resolve AI features
Real-time AI Automation & Security
Object recognition, face detection, smart surveillance
AI-assisted Audio & Text Transcription
Speech-to-text, real-time subtitle generation
Gaming (Casual to AAA, with eGPU Support)
Decent native performance, great with eGPU via OcuLink
Limitations
✘ Not Ideal for LLM Model Training
Lacks high-end CUDA acceleration for AI model training
✘ ONNX Performance is Weaker
Better results using OpenVINO for AI inference
✘ No Built-in 10GbE
Only 2x 2.5GbE, no native 10GbE option
Connectivity & Expansion
eGPU Support
OcuLink, USB4 (Supports external RTX 4090 or similar GPUs)
Max Displays
4 Monitors (4K/8K multi-monitor setup)
External USB4 Storage
Achieved 3GB/s read speeds (USB4 SSD tested)
The X1 delivers capable performance in graphical processing, AI workloads, and high-speed storage applications. While the integrated GPU is suitable for mid-range tasks, external GPU expansion significantly enhances performance. AI capabilities, particularly with OpenVINO, demonstrate strong inference speeds for image processing, object detection, and machine learning inference. Storage performance meets expectations, with Gen 4 speeds available on the primary slots and USB4 providing high-speed external storage options. These features position the system as a versatile solution for power users, AI developers, and content creators. But keep your expectations realistic and in perspective for a mini PC nonetheless!!!
13/02/25 Update from Minisforum, re: AI local Deployment:
Our AI X1 Pro can support Deepseek local deployment.
Minisforum AI X1 Pro Review – Conclusion and Verdict
The Minisforum AI X1 Pro is a compact but powerful mini PC designed for users seeking a balance of CPU performance, AI acceleration, and expandability. It features the AMD Ryzen AI 9 HX 370 processor, which delivers strong multi-core performance with 12 cores, 24 threads, and a 50 TOPS NPU for AI workloads. The integrated AMD Radeon 890M GPU provides adequate graphical performance for mid-tier gaming and GPU-accelerated applications, though it benefits significantly from external GPU expansion via OCuLink. With support for up to three M.2 NVMe drives, dual USB4 ports, and dual 2.5GbE networking, the system is versatile in both storage and connectivity. While the lack of native 10GbE may be a drawback for high-bandwidth network users, the Wi-Fi 7 support provides a wireless alternative with high-speed connectivity options.
In terms of real-world performance, the system delivers strong results in AI-driven applications, particularly those optimized for the OpenVINO framework, where it achieved higher inference speeds compared to ONNX-based workloads. Gaming performance is reasonable on the integrated GPU, but ray tracing and high-end graphical tasks require an external GPU, such as the Minisforum MGA1 eGPU with an AMD Radeon 7600M XT, which was tested and demonstrated significant performance improvements. The internal 140W PSU eliminates cable clutter, but its placement above the M.2 slots is unconventional and may require additional SSD heatsinks for efficient cooling. Thermal management is well-executed, with a dual-fan system and metal heatsink design keeping temperatures stable during sustained workloads.
The Minisforum AI X1 Pro is best suited for AI developers, content creators, and users requiring a small yet powerful workstation. It provides AI acceleration, high-speed storage, and expandable graphics options, making it a versatile hybrid between a mini PC and a desktop-class solution. While not ideal for intensive LLM training or high-end gaming without an external GPU, it excels in AI-assisted workflows, video processing, and multi-tasking applications. The inclusion of OCuLink for PCIe expansion allows for long-term scalability, giving users the option to upgrade GPU or storage performance as needed. For those seeking a high-performance compact system with AI processing capabilities, the Minisforum AI X1 Pro is a capable and well-rounded option.
PROS of the Minisforum AI X1 Pro
CONS of the Minisforum AI X1 Pro
Powerful CPU especially for a mini PC– The Ryzen AI 9 HX 370 is fast and handles demanding tasks well.
AI Acceleration – Built-in AI processor speeds up tasks like image recognition and automation.
Expandable Storage – Three M.2 SSD slots for fast and flexible storage upgrades.
External GPU Support – OCuLink allows for a full-sized GPU to boost graphics performance.
Fast USB4 Ports – Two high-speed USB4 ports for fast storage and external devices.
Good Cooling System – Dual fans and metal heatsinks keep temperatures in check.
Strong Connectivity – Wi-Fi 7 and dual 2.5Gb Ethernet for fast networking.
No External Power Brick – Built-in 140W power supply keeps cables minimal.
Comes with Windows 11 – Ready to use out of the box.
VESA Mount Included – Can be attached to the back of a monitor or wall for space-saving.
Only Features Microsoft Co-Pilot out the box – Hard/impossible to easily switch to ChatGPT or DeepSeek etc
Limited OCuLink Compatibility – External GPU and storage upgrades require specific hardware.
Weird PSU Placement – The power supply sits above the SSD slots, which might affect cooling.
Price – Pricing is a little mixed at launch store-to-store
This description contains links to Amazon. These links will take you to some of the products mentioned in today's content. As an Amazon Associate, I earn from qualifying purchases. Visit the NASCompares Deal Finder to find the best place to buy this device in your region, based on Service, Support and Reputation - Just Search for your NAS Drive in the Box Below
Need Advice on Data Storage from an Expert?
Finally, for free advice about your setup, just leave a message in the comments below here at NASCompares.com and we will get back to you.Need Help?
Where possible (and where appropriate) please provide as much information about your requirements, as then I can arrange the best answer and solution to your needs. Do not worry about your e-mail address being required, it will NOT be used in a mailing list and will NOT be used in any way other than to respond to your enquiry.
[contact-form-7]
TRY CHAT Terms and Conditions
If you like this service, please consider supporting us.
We use affiliate links on the blog allowing NAScompares information and advice service to be free of charge to you.Anything you purchase on the day you click on our links will generate a small commission which isused to run the website. Here is a link for Amazon and B&H.You can also get me a Ko-fi or old school Paypal. Thanks!To find out more about how to support this advice service checkHEREIf you need to fix or configure a NAS, check FiverHave you thought about helping others with your knowledge? Find Instructions Here
Or support us by using our affiliate links on Amazon UK and Amazon US
Alternatively, why not ask me on the ASK NASCompares forum, by clicking the button below. This is a community hub that serves as a place that I can answer your question, chew the fat, share new release information and even get corrections posted. I will always get around to answering ALL queries, but as a one-man operation, I cannot promise speed! So by sharing your query in the ASK NASCompares section below, you can get a better range of solutions and suggestions, alongside my own.
Cela fait plusieurs années que j’utilise o2switch et sincèrement, je regrette de ne pas l’avoir connu plus tôt. L’offre unique répondait à toutes mes exigences. Cependant, le 17 février dernier, l’hébergeur a décidé de revoir sa stratégie en remplaçant son offre unique par 3 nouvelles formules… tout en augmentant ses tarifs.
Une hausse tarifaire spectaculaire
On passe de 7 à 16 € HT par mois, soit une augmentation annuelle de 130 € TTC. Une flambée des prix qui a pris de court de nombreux utilisateurs. Les réactions ne se sont pas fait attendre, notamment sur les réseaux sociaux. Cette hausse a été perçue comme brutale et globalement injustifiée.
Argument d’O2switch : des offres mieux adaptées
L’hébergeur explique que la majorité des utilisateurs n’exploitaient pas pleinement les ressources de l’offre unique. Une situation que ce dernier trouve « dommage », cela signifie donc qu’o2switch vendait une solution surdimensionnée pour certains, laissant davantage de ressources disponibles pour d’autres. Mais cela n’explique pas l’augmentation tarifaire.
Les améliorations annoncées par l’hébergeur, notamment en termes d’IOPS, ne seront perceptibles que pour l’administration des sites (mises à jour de CMS et extensions). En tant qu’utilisateur passé automatiquement sur l’offre Cloud, je peux confirmer que cela n’apporte aucune différence en matière de performances des sites pour les visiteurs. Attention, cela reste très positif… mais ne justifie toujours pas une telle augmentation.
Aussi, o2switch met en avant l’ajout de nouveaux services, présentés comme un atout pour les clients… mais dont personne ne semble avoir exprimé le besoin. J’ai interrogé plusieurs utilisateurs et aucun n’a ressenti le besoin de ces changements. En revanche, tous déplorent la hausse tarifaire.
A noter tout de même l’augmentation des Lunes, qui permettent de gérer plusieurs environnements (sous compte).
Un calcul stratégique ?
O2switch parie sur la difficulté de migration des sites pour conserver ses clients. Pourtant, d’autres hébergeurs, notamment en France et en Europe, proposent des services similaires et gèrent la migration pour vous.
Un actionnaire qui inquiète
Un autre élément à prendre en compte, o2switch appartient désormais à Your.Online, l’entreprise qui avait racheté Gandi il y a quelques années. Et que s’était-il passé suite à ce rachat ? Une refonte des offres et une augmentation significative des tarifs. Ce changement de direction chez o2switch suscite donc des interrogations…
Quelles alternatives ?
Trouver une alternative de qualité n’est pas si simple. On oublie immédiatement certains hébergeurs aux réputations douteuses. Parmi les solutions recommandables, on retrouve Hostinger, Planethoster, EX2, Ionos et Infomaniak. Chaque besoin est unique, il faudra donc comparer les offres au cas par cas.
Mieux et moins cher ? Moins cher, c’est trouvable. Mieux, cela dépendra des besoins… et c’est généralement cher.
Et pour Cachem ?
Hasard du calendrier, j’ai renouvelé mon abonnement début février pour un an, quelques jours avant l’annonce des nouvelles offres et des hausses de tarifs. Cela me laisse donc le temps de réfléchir : rester ou partir ? Si je reste, quelle offre choisir ? Sinon, vers quelle alternative me tourner ?
Cette augmentation brutale et le manque de communication en amont risquent d’affecter la relation de confiance avec les clients. Pour ma part, j’avoue que je ne sais pas si je vais continuer de recommander o2switch à l’avenir. Les hausses précédentes étaient passées en douceur, mais celle-ci… elle est plus difficile à digérer.
A noter que les offres sont remisées la première année… ce qui en fait un excellent choix (pour un an).
The GL.iNet Slate 7 is the latest entry in the company’s expanding lineup of travel routers, bringing Wi-Fi 7 support, dual 2.5GbE ports, and a compact, portable design aimed at users who need reliable internet access on the go. Designed with remote workers, frequent travelers, and security-conscious users in mind, it includes built-in VPN support, an interactive touchscreen interface, and multiple failover options, making it a versatile networking solution for those moving between different public and private networks. However, while it is marketed as a Wi-Fi 7 device, it notably lacks support for the 6GHz band and 320MHz channel width, meaning it cannot take full advantage of some key Wi-Fi 7 improvements. This raises questions about whether its performance truly surpasses high-end Wi-Fi 6E routers or if it is more of an incremental upgrade over its predecessors. In this review, we will break down the Slate 7’s design, connectivity options, and real-world performance, ultimately determining if it is a standout travel networking device or simply a modest refinement of previous GL.iNet offerings.
UPDATE – the $96 super early bird price is now over, but the early bird price is still available at the time of writing (link here or via banner below)
Note, several times in the review I reference the Gl.iNet Puli AX SIM Tracvel Router. Find out more about that router in the full review HERE on YouTube and HERE on the blog.
Gl.iNet Slate 7 Router Review – Quick Conclusion
The GL.iNet Slate 7 is a versatile and security-focused travel router, offering Wi-Fi 7 support, dual 2.5GbE ports, built-in VPN capabilities, and a touchscreen interface in a compact, low-power design. While it excels at secure networking, multi-device connectivity, and WAN failover options, its lack of 6GHz and 320MHz channel width means it does not fully utilize Wi-Fi 7’s potential. Wireless performance is solid on 5GHz, reaching 2-2.1Gbps, but latency improvements and Multi-Link Operation (MLO) help stability rather than raw speed gains. Wired performance is strong, but USB storage speeds are capped at 130-140 MB/s, limiting its use as a high-speed file-sharing device. The touchscreen adds convenience for quick settings adjustments, and power consumption remains low (~7-8W), but the lack of a built-in battery reduces portability compared to SIM-enabled or battery-powered alternatives like the Puli AX. With pricing between $96-$149, it is a strong value for users needing a secure and flexible travel router, but those prioritizing top-tier Wi-Fi performance may prefer a Wi-Fi 6E router with 6GHz support. The Slate 7 is an iterative upgrade rather than a groundbreaking innovation, making it a reliable but not revolutionary choice for portable networking.
Gl.iNet Slate 7 Router Review – Design
The GL.iNet Slate 7 follows a familiar compact and lightweight form factor, measuring 130 x 91 x 34 mm and weighing 295 grams. This makes it highly portable, fitting easily into a backpack or even a pocket, which is essential for a travel-focused device. The matte black chassis gives it a more industrial and professional look compared to some of its predecessors, with foldable external antennas that can be adjusted to optimize signal reception.
Unlike the Puli AX, which includes a built-in battery, the Slate 7 requires USB-C power input, keeping it lightweight but also limiting its standalone functionality when an external power source isn’t available.
A major upgrade in this model is the touchscreen interface, a rare feature for travel routers.
The small LCD display allows users to scan QR codes for quick Wi-Fi access, toggle VPN connections, monitor real-time network speed, and check network status through color-coded indicators for different modes such as Ethernet, Repeater, and Tethering.
While not a full replacement for web-based or app-based management, it provides a quick and convenient way to adjust settings without needing to log into a separate interface.
The physical button on the device is another useful addition, allowing users to assign it to toggle VPN services or other networking functions. This means users can activate or deactivate a secure tunnel instantly, ensuring encrypted traffic without needing to open a mobile app or browser. The button’s customization adds another layer of convenience, particularly for those frequently switching between standard and VPN-protected connections.
Build quality is solid, with a sturdy plastic shell that feels durable enough for travel but lacks the ruggedized features found in some other portable routers. There are no IP-rated dust or water resistance claims, so users should be cautious when using it in more demanding outdoor environments.
The absence of a built-in battery and no SIM card slot means it relies entirely on external power and tethered internet sources, making it less versatile than some cellular-enabled competitors. However, for users who mainly rely on wired and wireless networks, the design choices make sense, keeping the device compact while offering practical features for on-the-go connectivity.
Yes – QR code scanning, VPN toggling, real-time monitoring
Physical Button
Customizable (VPN toggle or other functions)
Failover Support
WAN/LAN, Wi-Fi repeater, USB tethering
Power Input
USB-C (5V/3A, 9V/3A, 12V/2.5A, PD compatible)
Power Consumption
~6-8W (Peak: 8.2W)
Storage Features
Samba, DLNA, WebDAV, FTP
USB File Transfer Speed
~130-140 MB/s (Samba)
Security & Encryption
WPA3, OpenVPN, WireGuard, AdGuard Home, Tor
Software Features
VLAN, Multiple SSIDs, Firewall, Traffic Monitoring, OpenWrt App Store
Physical Dimensions
130 × 91 × 34 mm
Weight
295g
Price Range
$96 (Early Bird) – $149 (Retail)
Gl.iNet Slate 7 Router Review – Connections
The GL.iNet Slate 7 offers a versatile range of wired and wireless connectivity options, making it one of the most adaptable travel routers in its class. Its standout feature is the inclusion of two 2.5GbE Ethernet ports, which can be configured as either WAN or LAN. This flexibility allows users to connect to high-speed wired networks while also providing a multi-gigabit local network for devices that support it. Unlike previous models that typically included only one multi-gig port, the Slate 7 allows for higher-speed networking between wired devices without needing an additional switch.
On the wireless side, the router supports Wi-Fi 7 with dual-band functionality, offering speeds of 688 Mbps on 2.4GHz and 2.8 Gbps on 5GHz. However, despite its Wi-Fi 7 branding, it does not support the 6GHz band or 320MHz channel width, meaning it lacks two of the most significant advantages of the latest wireless standard.
This means performance improvements will be limited compared to full-featured Wi-Fi 7 routers, though Multi-Link Operation (MLO) support helps improve stability and throughput when using simultaneous band connections.
For users needing additional network redundancy, the Slate 7 supports multiple failover options. In addition to its WAN/LAN ports, it can also connect to the internet via Wi-Fi repeater mode or USB tethering.
The USB 3.0 port allows users to connect a smartphone for cellular tethering, effectively turning the router into a backup mobile hotspot. This is a valuable feature for travelers who may find themselves in locations without reliable wired or Wi-Fi access, ensuring they remain connected through a tethered mobile device.
The router’s software-based networking features further expand its connectivity potential. Users can configure WAN failover, ensuring a seamless switch between different internet sources when one becomes unavailable.
Additionally, it supports multiple SSIDs and VLAN segmentation, allowing for separate networks for guests or different device types. These features are particularly useful for users who frequently switch between public and private networks, ensuring that personal devices remain isolated from potentially unsecured connections.
Another key connectivity feature is the USB storage functionality, which allows the Slate 7 to act as a mini NAS. When a USB drive or external SSD is connected, it can be accessed over the network using Samba, DLNA, WebDAV, and FTP protocols.
However, performance testing showed that USB file transfer speeds over Samba maxed out at around 130-140 MB/s, meaning that while the feature is useful for basic file sharing or backups, it is not optimized for high-speed storage applications.
While the inclusion of USB-based storage sharing is a welcome addition, the performance bottleneck limits its full potential.
Category
Specifications
Operating System
OpenWrt 23.05 (Kernel 5.4.213)
User Interface
Web-based UI, Mobile App, Touchscreen LCD Panel
Touchscreen Functions
QR code scanning, VPN toggling, real-time speed monitoring, network status updates
AdGuard Home, ZeroTier, Tailscale, Custom Plugin Support
Remote Access & Control
SSH, Web UI, OpenVPN, WireGuard
Firmware Updates
Web-based & OTA (Over-the-Air) updates
Gl.iNet Slate 7 Router Review – Software
The GL.iNet Slate 7 runs a customized version of OpenWrt 23.05, providing a flexible and feature-rich networking environment. The web-based management interface is similar to previous GL.iNet routers, offering a mix of beginner-friendly controls and advanced networking settings.
Users can configure WAN failover, VLANs, multiple SSIDs, and port forwarding, making it adaptable for various networking scenarios. The addition of a touchscreen interface allows for quick network monitoring, Wi-Fi access via QR codes, and VPN toggling, reducing the need to log into the full web interface for basic tasks. However, while the core interface is functional, it lacks detailed guidance for advanced settings, which could be a challenge for less experienced users.
One of the key features of the Slate 7 is its VPN support, allowing users to configure over 30 VPN services, including OpenVPN and WireGuard. With WireGuard speeds reaching up to 540Mbps, it provides a fast and secure connection for users needing encrypted traffic on public networks. The physical VPN button is a welcome addition, enabling users to instantly toggle VPN protection without accessing the interface.
VPN failover support is also included, allowing users to switch between multiple VPN providers seamlessly. However, while basic VPN setup is straightforward, more advanced configurations—such as split tunneling and custom DNS settings—require manual setup with limited on-screen guidance.
The Slate 7 also features a built-in app store, allowing users to install additional networking tools such as AdGuard Home, ZeroTier, and Tailscale. This extends the router’s functionality beyond basic networking, enabling ad-blocking, remote access solutions, and encrypted tunneling services.
While the app store adds valuable features, its interface feels somewhat outdated, and the selection of available apps remains limited compared to broader OpenWrt repositories. Users comfortable with command-line customization can access root-level OpenWrt settings, unlocking more advanced network configurations for those with the expertise to fine-tune their setup.
In file-sharing and storage management, the Slate 7 supports Samba, DLNA, FTP, and WebDAV, allowing connected USB storage to function as a basic NAS for network file sharing. The setup process is fairly straightforward, with a step-by-step wizard to create shared folders and manage user permissions.
Framing things in terms of a mobile router vs a more aggressive desktop model with 6Ghz, the Slate 7 remains a capable software-driven router, offering a solid combination of security, customization, and network flexibility, albeit with some interface and performance limitations that may require firmware optimizations in future updates.
Gl.iNet Slate 7 Router Review – Testing
Performance testing on the GL.iNet Slate 7 revealed a mix of strengths and limitations, particularly in Wi-Fi speeds, wired throughput, and storage performance. In wireless performance tests, the 5GHz band consistently delivered 2-2.1Gbps throughput, aligning closely with its 2.8Gbps theoretical maximum when using a Wi-Fi 7 USB adapter. However, the absence of 6GHz and 320MHz channel width meant that it could not take full advantage of Wi-Fi 7’s higher bandwidth capabilities. In practical use, latency remained low, and Multi-Link Operation (MLO) improved overall network stability, but competing Wi-Fi 6E routers with 6GHz support may still offer better overall performance in less congested environments.
Wired performance testing was strong, with 2.5GbE Ethernet connections delivering 230-240 MB/s transfer speeds, which is within expected limits for a multi-gigabit network. However, in USB storage performance tests, speeds were notably lower than expected. Using Samba over a 2.5GbE connection, file transfers to a connected USB SSD capped at 130-140MB/s, well below the full bandwidth potential of USB 3.0 or 2.5GbE Ethernet. This suggests either a software bottleneck or an underutilized hardware controller, limiting its effectiveness as a high-speed portable NAS.
In power consumption tests, the Slate 7 remained highly efficient, idling at 6-7W and peaking at 8.1-8.2W under full load with multiple active connections. This makes it one of the lowest-power travel routers in its class, making it ideal for users who need to power it via a laptop, power bank, or low-power USB source.
However, the lack of an internal battery means it requires a power source at all times, reducing portability compared to battery-equipped alternatives like the Puli AX. Here is the power draw of the Slate 7 when I was running my iPerf3 Tests:
VPN performance was in line with expectations, with OpenVPN reaching speeds of ~100Mbps and WireGuard peaking at ~540Mbps. This makes it suitable for secure remote access and encrypted browsing, but users requiring gigabit-level VPN throughput will need a more powerful router or a dedicated VPN server.
The physical VPN toggle button proved highly useful, allowing for instant encryption activation without navigating the web or mobile interface. However, GL.iNet’s software interface lacks clear guidance on advanced VPN configurations, which could be a barrier for less experienced users.
The GL.iNet Slate 7 stands out as a compact, feature-rich travel router that brings together Wi-Fi 7 capabilities, dual 2.5GbE ports, and a touchscreen interface in a low-power, highly portable design. It is clearly aimed at travelers, remote workers, and security-conscious users who require flexible connectivity options and encrypted internet access while moving between different networks. With built-in VPN support, USB tethering, and multiple WAN failover options, it effectively serves as a secure gateway for multiple devices when using public Wi-Fi or mobile data connections. The inclusion of Multi-Link Operation (MLO) further enhances stability by allowing simultaneous band connections, while the physical VPN toggle button adds a convenient layer of security. However, the absence of 6GHz support and 320MHz channel width raises concerns about whether it truly takes full advantage of Wi-Fi 7 technology or simply refines the capabilities of existing Wi-Fi 6E travel routers.
In real-world performance, the Slate 7 delivers respectable wireless and wired speeds, but its Wi-Fi 7 implementation feels incomplete. While the 2.5GbE ports allow for high-speed wired networking, the lack of 6GHz means users won’t experience the full benefits of the latest wireless standard, particularly in low-interference, high-bandwidth environments. USB storage performance is another notable limitation, with Samba transfers capping at 130-140 MB/s, suggesting either a software bottleneck or underpowered hardware handling file transfers. The touchscreen interface, while useful for quick access to network settings and VPN controls, does not replace the depth of web or mobile-based configuration tools, which still require some technical knowledge to fully optimize the router’s capabilities. Additionally, while power consumption remains impressively low at around 7-8W under load, the lack of an internal battery means it must always be tethered to an external power source, reducing its portability compared to battery-powered alternatives like the Puli AX.
At a price range of $96 (early bird) to $149 (retail), the Slate 7 offers strong value for users prioritizing security, network flexibility, and multiple connection options over cutting-edge Wi-Fi performance. It is not the fastest travel router available, but it excels in delivering encrypted and stable internet access in a variety of challenging connectivity scenarios. For users who primarily require a portable router for VPN security, network redundancy, and secure multi-device management, the Slate 7 is one of the most capable options on the market. However, those seeking the absolute best wireless performance may find Wi-Fi 6E routers with 6GHz support to be a better choice for future-proofing. While GL.iNet has positioned the Slate 7 as a next-generation travel router, it ultimately feels more like an evolution rather than a revolution, making it a solid but not groundbreaking addition to the travel networking space.
This description contains links to Amazon. These links will take you to some of the products mentioned in today's content. As an Amazon Associate, I earn from qualifying purchases. Visit the NASCompares Deal Finder to find the best place to buy this device in your region, based on Service, Support and Reputation - Just Search for your NAS Drive in the Box Below
Need Advice on Data Storage from an Expert?
Finally, for free advice about your setup, just leave a message in the comments below here at NASCompares.com and we will get back to you.Need Help?
Where possible (and where appropriate) please provide as much information about your requirements, as then I can arrange the best answer and solution to your needs. Do not worry about your e-mail address being required, it will NOT be used in a mailing list and will NOT be used in any way other than to respond to your enquiry.
[contact-form-7]
TRY CHAT Terms and Conditions
If you like this service, please consider supporting us.
We use affiliate links on the blog allowing NAScompares information and advice service to be free of charge to you.Anything you purchase on the day you click on our links will generate a small commission which isused to run the website. Here is a link for Amazon and B&H.You can also get me a Ko-fi or old school Paypal. Thanks!To find out more about how to support this advice service checkHEREIf you need to fix or configure a NAS, check FiverHave you thought about helping others with your knowledge? Find Instructions Here
Or support us by using our affiliate links on Amazon UK and Amazon US
Alternatively, why not ask me on the ASK NASCompares forum, by clicking the button below. This is a community hub that serves as a place that I can answer your question, chew the fat, share new release information and even get corrections posted. I will always get around to answering ALL queries, but as a one-man operation, I cannot promise speed! So by sharing your query in the ASK NASCompares section below, you can get a better range of solutions and suggestions, alongside my own.
Si vous possédez un NAS Synology, vous avez peut-être remarqué la présence de 2 options au niveau des groupes de stockage et des volumes. Ces dernières sont importantes pour maintenir les performances et la fiabilité de votre NAS. Pourtant, elles sont souvent négligées. Découvrez pourquoi il est essentiel de les exécuter…
Les bases du stockage sur un NAS Synology
Avant d’entrer dans le vif du sujet, il est important de rappeler quelques notions sur le stockage d’un NAS Synology :
Disque dur (ou SSD) : composant physique que l’on insère dans le NAS
Groupe de stockage : ensemble d’un ou plusieurs disques configurés en RAID (RAID 1, RAID 5, RAID 6…)
Volume : espace formaté sur lequel sont stockés vos fichiers et dossiers partagés
En résumé, les disques durs sont insérés physiquement dans le NAS, puis regroupés en un groupe de stockage lorsqu’un RAID est configuré. Enfin, au-dessus de cette structure, le volume est créé et formaté avec un système de fichiers (ext4 ou Btrfs).
À noter : lors de la première configuration de votre NAS (ou après l’ajout de nouveaux disques), Synology peut vous proposer de créer directement un volume. Dans ce cas, le système se charge automatiquement de configurer le groupe de stockage selon vos paramètres.
1. Nettoyage du groupe de stockage
Avec le temps, votre groupe de stockage peut accumuler des données inutiles ou fragmentées, ce qui peut impacter ses performances. Heureusement, Synology propose une fonction de nettoyage pour optimiser votre espace de stockage et améliorer la gestion des disques.
Comment lancer un nettoyage du groupe de stockage ?
Allez sur l’interface d’administration DSM de votre NAS, puis allez dans Gestionnaire de stockage > Groupe de stockage puis cliquez sur la petite flèche à droite. L’affiche s’étend et vous devriez voir un bouton Exécuter maintenant en face de Nettoyage des données (voir image ci-dessous).
Après avoir appuyé sur le bouton, un message vous informera que l’exécution de cette tâche peut prendre beaucoup de temps et avoir un impact sur les performances globales du NAS.
L’état d’avancement s’affiche en haut, sous Groupe de stockage (voir ci-dessous).
Synology indique également : « Un nettoyage régulier des données permet de garantir leur cohérence ». Une fois l’opération terminée, une notification s’affichera : « Le système a terminé le nettoyage des données sur Groupe de stockage ».
La fragmentation des fichiers peut ralentir l’accès aux données, surtout si votre NAS utilise des disques durs (HDD). La défragmentation permet alors d’améliorer les performances du système de fichiers.
Attention : Si votre volume est composé de SSD, il est déconseillé d’exécuter une défragmentation. Cela n’apportera aucun gain de performance et risque même d’accélérer l’usure des SSD.
Comment défragmenter un volume sur Synology ?
Allez dans le Gestionnaire de stockage > Volume puis à droite appuyez sur les … (3 points) et sélectionnez Défragmentation du système de fichiers.
Une demande de confirmation s’affiche vous informant sur l’amélioration des performances en lecture et écriture. Mais Synology vous alerte également sur l’exécution de cette tâche qui peut avoir un impact sur les performances de votre NAS (voir image ci-dessous).
À la fin du processus, vous recevrez la notification suivante : « Défragmentation du système de fichiers terminée sur Volume ».
UniFi U7 Lite and U7 In-Wall WiFi7 Mesh APs Review
UniFi continues to flesh out its Wi-Fi 7 portfolio at the start of 2025, and, hot on the heels of the launch of their latest router and gateway devices, we see this brand start to roll out new Wi-Fi 7 access points intended to challenge both the price point and the hardware level of market alternatives for scaling out your Wi-Fi right now. UniFi has introduced the new compact Wi-Fi 7 U7 Lite access point, and at just $99, this is easily the best-value Wi-Fi 7 and 2.5GbE PoE-equipped mesh access point in the market—full stop! Alongside this, UniFi has upgraded the compact wall-deployed range with the new U7 In-Wall access point at $149, featuring three 2.5GbE ports, PoE power, and PoE pass-through network ports, as well as Wi-Fi 7 support. Needless to say, these are ideally designed for deployment in an existing UniFi network, but they are not strictly locked into that, and for some, they could be used for slow migration away from their existing wireless mesh setup via integration into third-party systems and eventually replacing it with a UniFi setup over time. But are these actually any good? How do they stack up against the current U7 Pro and U7 Pro Max Wi-Fi points? Ultimately, what have you lost in these due to this reduction in size that you may well be missing out on if you just go for the more established and available UniFi Wi-Fi 7 access points in their portfolio? Let’s discuss it in today’s review and testing.
UniFi U7 Lite & U7 In-Wall Review – Quick Conclusion
The UniFi U7 In-Wall and UniFi U7 Lite have clearly been designed for more modest and small-scale deployments, where the current range of UniFi Wi-Fi 7 APs may be overkill for some. You cannot fault the pricing strategy that UniFi has gone for here, especially when it comes to affordability. Notwithstanding the convenience of deploying PoE access points, that $99 price tag to scale up a Wi-Fi 7 AP that isn’t going to throttle the network bandwidth down to standard gigabit speeds is going to be hugely desirable. Equally, as UniFi has been upscaling a number of their PoE switches and gateway devices to feature 2.5GbE PoE, it is no coincidence that these Wi-Fi 7 PoE APs are rolling out at the same time. Power consumption seems pretty impressive, and whether you want to trust the UniFi Controller to manage your devices across individual bands and frequencies, or manually bind devices to specific frequencies, is totally at your disposal. This provides a neat balance between the novice user and the network enthusiast, allowing different levels of control based on user expertise. The only major downfall you can throw at either of these Wi-Fi AP devices is the lack of support for the 6 GHz frequency. It’s an important distinction for those who understand the benefits of Wi-Fi 7 and MLO, as the ability to access more available bandwidth is significantly reduced without the 6 GHz spectrum, resulting in less wireless sandbox to work with. That being said, these models are clearly designed to be as affordable as possible, and it could be argued that the less tech-savvy user might not even realize this feature is missing. However, if you are opting for either of these wireless AP devices or upgrading your Wi-Fi network to Wi-Fi 7 and truly want to maximize its potential, I would say spend the extra and get the U7 Pro or U7 Pro Max. For single-device Wi-Fi networks, the U7 Lite and U7 In-Wall are more than sufficient for these needs and are phenomenally great value.
BUILD QUALITY - 9/10
HARDWARE - 7/10
PERFORMANCE - 7/10
PRICE - 10/10
VALUE - 10/10
8.6
PROS
Affordable Pricing – The U7 Lite ($99) and U7 In-Wall ($149) provide excellent value for those looking to upgrade to Wi-Fi 7 without the premium cost. 2.5GbE PoE Support – Both APs support 2.5GbE uplink, ensuring faster network speeds without being throttled to 1GbE. Multi-Link Operation (MLO) – Allows better stability and throughput by utilizing multiple bands simultaneously, even without 6 GHz. Flexible Deployment – The U7 Lite is ideal for mesh expansions, while the U7 In-Wall adds extra wired connectivity with two additional 2.5GbE ports (one with PoE pass-through). Easy Network Management – The UniFi Controller software allows both automated and manual control, catering to both novices and power users. Efficient Power Consumption – These APs remain power-efficient, making them suitable for multiple deployments without excessive energy costs.
CONS
No 6 GHz Support – Without Wi-Fi 7\'s 6 GHz band, these models lack access to the full 320 MHz bandwidth, potentially leading to higher congestion in busy environments. Limited for High-Density Networks – While they support 200+ clients, they lack the higher spatial streams of the U7 Pro and Pro Max, making them less suitable for very crowded networks.
UniFi U7 Lite & U7 in-Wall Review – Design and Hardware
The UniFi U7 Lite and U7 In-Wall are the latest additions to UniFi’s Wi-Fi 7-enabled access points, offering more budget-friendly alternatives to the U7 Pro and Pro Max. While these new models lack 6 GHz support, they retain many of the advantages of Wi-Fi 7, such as Multi-Link Operation (MLO) and higher bandwidth options for improved connectivity. Wi-Fi 7 introduces several key improvements over its predecessors, including Multi-Link Operation (MLO), wider bandwidth support, and higher efficiency for multiple connected devices. However, one of its most significant advantages comes from its ability to use the 6 GHz band, allowing for 320 MHz channel widths and significantly lower interference. While the U7 Pro and Pro Max fully leverage these benefits, the U7 Lite and In-Wall models are limited to the 2.4 GHz and 5 GHz bands, making them less capable in high-density environments but still powerful for general use.
Despite lacking 6 GHz capabilities, the U7 Lite and U7 In-Wall can still take advantage of MLO, allowing them to combine multiple frequency bands for improved stability and speed. This means that in practical use, they can still offer impressive throughput and reliable performance, even though they cannot reach the peak speeds of their Pro counterparts. For users who do not yet have many Wi-Fi 7-enabled devices, or who primarily need strong 2.4 GHz and 5 GHz coverage, these models offer a cost-effective solution that integrates well into UniFi’s ecosystem. That said, users looking for future-proofing and high-performance networking should still consider the U7 Pro or Pro Max, as they provide higher spatial streams, full 6 GHz access, and better support for high-density Wi-Fi environments. These factors make the Pro models a better fit for large offices, multi-device households, and advanced networking setups, while the U7 Lite and In-Wall models are more suited for smaller deployments and cost-conscious expansions of existing UniFi networks.
UniFi U7 Lite Hardware
The U7 Lite is designed as a compact ceiling or wall-mounted AP, delivering 115 square meters (1,250 square feet) of coverage with dual-band 2.4 GHz and 5 GHz support. It features a 2.5GbE PoE-powered connection and requires 13W at full power draw. Unlike the In-Wall model, it lacks additional Ethernet ports but still provides Wi-Fi 7 capabilities with up to 4.3 Gbps (BW240) and an 8 dBi antenna gain.
While compact, the U7 Lite is optimized for general wireless expansion in homes, offices, and mesh network deployments. It supports Multi-Link Operation (MLO), allowing it to operate across multiple frequencies for more stable connections. The plastic enclosure makes it lightweight, and its ceiling-mountable design ensures broad, unobstructed coverage.
Below is a hardware comparison table summarizing key specifications of the U7 Lite:
Feature
UniFi U7 Lite
Wi-Fi Standard
Wi-Fi 7 (802.11be)
Bands
2.4 GHz / 5 GHz
MIMO 5Ghz
2×2
MIMO 2.4Ghz
2×2
Max Data Rate
4.3 Gbps (BW240)
PoE Support
Yes, 13W (Max)
Ethernet Ports
1x 2.5GbE
Antenna Gain
5 dBi / 4 dBi
Coverage
115 m² (1,250 ft²)
Mounting
Ceiling / Wall
SSID Count
8 Max per Radio
Enclosure Material
Plastic
UniFi U7 In-Wall Hardware
The U7 In-Wall, priced at $149, is a versatile Wi-Fi 7 access point designed for wall-mounted deployment, making it a great fit for structured networking setups. It provides 115 square meters (1,250 square feet) of coverage and supports over 200 clients simultaneously, making it suitable for home and office environments. Like the U7 Lite, it supports dual-band Wi-Fi 7 (2.4 GHz and 5 GHz) but offers three 2.5GbE ports, including PoE pass-through on one of the outputs. This feature is particularly useful for powering additional devices like VoIP phones or cameras directly from the AP, reducing the need for extra power adapters.
The U7 In-Wall is designed for both wired and wireless expansion, making it stand out from simpler access points. The PoE+ uplink port (13W max) ensures efficient power delivery while enabling a seamless connection to an existing UniFi network. The metal wall mount design adds durability and stability, making it ideal for multi-room home setups or business deployments. Additionally, with 8 SSID support, it allows for network segmentation, a crucial feature for separating guest, IoT, or business traffic without requiring additional hardware.
Feature
UniFi U7 In-Wall
Wi-Fi Standard
Wi-Fi 7 (802.11be)
Bands
2.4 GHz / 5 GHz
Max Data Rate
4.3 Gbps (BW240)
PoE Support
Yes, 13W
Ethernet Ports
3x 2.5GbE (1 PoE+)
PoE Pass-Through
Yes, on one 2.5GbE port
Antenna Gain
8 dBi
Coverage
115 m² (1,250 ft²)
Mounting
Wall-mounted
Enclosure Material
Metal & Polycarbonate
Compared to the U7 Lite, the In-Wall model offers significantly greater wired networking flexibility. The addition of two extra Ethernet ports—one with PoE pass-through—makes it ideal for deployments that require a mix of wired and wireless devices. The Lite, in contrast, is more focused on providing general Wi-Fi coverage in open spaces without built-in wired networking expansion. This means that while the Lite is well-suited for broad Wi-Fi coverage, the In-Wall excels in scenarios where wired device connectivity is necessary.
Both models share several core benefits, including Wi-Fi 7 support, 2×2 MIMO on both 2.4 GHz and 5 GHz, and Multi-Link Operation (MLO). However, their lack of 6 GHz support and 320 MHz channel width capabilities means they cannot take full advantage of Wi-Fi 7’s highest potential speeds. Unlike the U7 Lite, which primarily targets budget-conscious users looking for general wireless coverage, the In-Wall is geared toward users who need wired connectivity and centralized networking within a single unit. In contrast, the U7 Pro and U7 Pro Max offer full 6 GHz support, unlocking higher bandwidth, lower interference, and greater efficiency in high-density environments. These premium models also include higher spatial streams and the ability to support more than 500 clients, making them a better fit for large offices, high-traffic environments, or future-proof setups. While the U7 Lite and In-Wall deliver strong performance at a lower price, users with demanding Wi-Fi 7 use cases may still find the U7 Pro series to be a superior long-term investment.
The U7 In-Wall is a versatile Wi-Fi 7 access point designed for wall-mounted deployment, making it a great fit for structured networking setups. It provides 115 square meters (1,250 square feet) of coverage and supports over 200 clients simultaneously, making it suitable for home and office environments. Like the U7 Lite, it supports dual-band Wi-Fi 7 (2.4 GHz and 5 GHz), but it enhances flexibility with three 2.5GbE ports, including PoE pass-through on one of the outputs. This feature is particularly useful for powering additional devices like VoIP phones or cameras directly from the AP. Unlike the U7 Lite, the U7 In-Wall is optimized for wired networking expansion while maintaining strong wireless performance. The PoE+ uplink port (13W max) allows for efficient power delivery, ensuring seamless integration into existing UniFi networks. The metal wall mount design provides durability and stability, making it ideal for permanent installations in commercial or multi-room home setups. The 8 SSID support allows for network segmentation, an essential feature for businesses and shared environments.
While the U7 Lite and U7 In-Wall share several similarities, such as dual-band Wi-Fi 7 support and 4.3 Gbps max speeds on 5 GHz, the In-Wall model stands out due to its extra Ethernet ports and PoE pass-through. These additions make it the better choice for users who need both wireless and wired expansion in their setup. The Lite, on the other hand, is geared more towards general Wi-Fi coverage in open areas, lacking the physical networking enhancements of the In-Wall model. In terms of shared benefits, both models lack 6 GHz support, meaning they do not leverage the full 320 MHz bandwidth available in Wi-Fi 7. However, both utilize Multi-Link Operation (MLO) to improve connectivity stability, ensuring strong performance even without access to 6 GHz channels. Additionally, their MIMO configurations (2×2 on both 2.4 GHz and 5 GHz) allow for consistent speeds across multiple devices, making them solid choices for Wi-Fi 7-enabled networks.
When compared to the U7 Pro and U7 Pro Max, the In-Wall and Lite models are more budget-friendly but also less feature-rich. The Pro and Pro Max benefit from 6 GHz support, higher spatial streams, and greater client capacity, making them ideal for high-density environments with demanding workloads. While the Lite and In-Wall are excellent for general networking, users needing future-proofing, greater bandwidth, and larger-scale deployment capabilities will still find the U7 Pro and Pro Max to be the superior choices. The U7 In-Wall, priced at $149, is a step up from the Lite version, integrating additional networking flexibility. Like the Lite model, it offers Wi-Fi 7 support on the 2.4 GHz and 5 GHz bands, but it distinguishes itself with two additional 2.5GbE LAN ports, one of which supports PoE pass-through. This makes it ideal for users needing wired connections for additional devices. The metal wall mount design ensures a stable and durable setup, making it a great option for expanding mesh networks. Let’s start the tests!
UniFi U7 Lite & U7 In-Wall Review – Performance Tests
To put these devices to the test, I conducted a series of benchmarks comparing them directly against the UniFi U7 Pro. The tests included file transfer speeds, internet speed tests, and long-range performance in different real-world conditions, helping illustrate where each access point excels and where certain compromises arise.
IMPORTANT – In every test, I let the client Windows laptop have it’s frequency and band be dictated by the USB WiFi 7 adapter AND the UniFi AP. I ran the ‘optimization’ scan on each UniFi AP once up to the first connection, but after that I trusted the Access Point to manage the connection and frequency position. I KNOW I could have manually adjusted/bonded bands and frequencies to each device for the tests (and most likely improve the results of each device), but this likely would not represent the average novice user experience, who would want to ‘trust’ the AP to handle their connection. So remember, that if you are connected to a UniFi U7/U7 Pro/U7 Pro Max/UY Lite/U7 In-Wall AP and you are getting low speeds, it might serve you well to log into your UniFi controller and set your bands/frequencies manually for priority devices.
The U7 Pro benefits from 6 GHz support and 320 MHz bandwidth, enabling significantly higher throughput, especially at close range with minimal interference.
The U7 Lite comes surprisingly close to the Pro’s performance despite lacking 6 GHz, showing that its 5 GHz performance and MLO are still quite strong under optimal conditions.
The U7 In-Wall is slower than the U7 Lite by almost a whole minute, yet it remains competitive for most home or small office needs.
Internet Speed Tests (Ookla Speed Test – 10m, Clear Indoor)
U7 Pro: 689 Mbps Down / 79 Mbps Up
U7 In-Wall: 491 Mbps Down / 82 Mbps Up
U7 Lite: 479 Mbps Down / 88 Mbps Up
Analysis:
The U7 Pro again comes out on top, showcasing the advantage of 6 GHz in an environment where the internet connection can exceed typical 2.4/5 GHz bandwidth.
Both the U7 Lite and U7 In-Wall achieve around 500 Mbps, which is more than adequate for everyday use. Their slight gap compared to the Pro is expected given their lack of 6 GHz.
Upload speeds are fairly close among all three, indicating stable performance on the 2.4/5 GHz bands even without the Pro’s extra frequency options.
U7 In-Wall: 5 minutes 1 second (consistent 1.2-1.4 Gbps)
U7 Lite: 8 minutes 2 seconds (locked at 720 Mbps)
Analysis:
The U7 Pro suffers here because it constantly attempts to leverage 6 GHz and MLO. Thick walls and interior interference can cause frequent band-switching, disrupting throughput consistency. I still want to investigate this, as it seems unusually slow – TBC
The U7 In-Wall excels by settling quickly on a steady 5 GHz link, showing that fewer available bands can sometimes reduce overhead and yield consistent speeds.
The U7 Lite offers moderate performance; it didn’t dynamically switch to multiple bands, so its stable but lower throughput (720 Mbps) resulted in a middling transfer time.
U7 Lite: Maintained a single 5 GHz connection at 136 Mbps / 324 Mbps
Analysis:
U7 Pro’s 6 GHz signal offers high peak speeds, but 6 GHz can degrade faster over distance or through obstacles. Once it drops down, it’s still fast, yet its throughput can vary as it switches.
U7 In-Wall uses MLO to combine 2.4 and 5 GHz, prioritizing reliability over sheer speed, which makes it ideal for consistent coverage in multi-floor homes or offices.
U7 Lite sticks to 5 GHz, delivering a surprisingly solid signal at 20m and 30m. This approach prevents the frequent channel shifts seen on the Pro, resulting in smoother, if not top-tier, long-range performance.
Overall, these tests highlight the trade-offs each model makes:
U7 Pro or U7 Pro Max: Best raw performance and peak speeds, but can suffer from complex band-hopping in tricky environments.
U7 In-Wall: Balances wired flexibility with reliable 5 GHz coverage, ideal for consistent performance and versatile setups.
U7 Lite: Compact and cost-effective, with speeds that rival the Pro at shorter distances but without the Pro’s complexity—well-suited for simpler mesh expansions.
Whether you prioritize peak throughput (U7 Pro), flexible wired connectivity (U7 In-Wall), or affordability and easy placement (U7 Lite), each model has distinct strengths to suit different user needs.
UniFi U7 Lite & U7 in Wall Review – Verdict and Conclusion
The UniFi U7 In-Wall and UniFi U7 Lite are well-positioned as affordable, small-scale Wi-Fi 7 solutions, offering dual-band 2.4 GHz and 5 GHz connectivity, 2.5GbE PoE support, and Multi-Link Operation (MLO) for improved stability. At $149 for the In-Wall and $99 for the Lite, they provide a cost-effective way to expand a UniFi network while avoiding the higher price points of Pro-tier APs. The U7 In-Wall stands out with its two additional 2.5GbE ports, including PoE pass-through, making it particularly useful for wired and wireless networking in a single unit, ideal for structured setups. Meanwhile, the U7 Lite serves as a simple and efficient mesh expansion option, making it a great fit for users looking for broad Wi-Fi coverage at a low cost.
However, the most significant limitation of these models is their lack of 6 GHz support, meaning they cannot leverage the full 320 MHz bandwidth that Wi-Fi 7 is capable of, potentially leading to higher congestion in busier environments. While MLO helps compensate, users in high-density areas may find that spending extra on the U7 Pro or U7 Pro Max is the smarter choice for future-proofing and superior performance. Still, for budget-conscious users or those expanding a smaller network, both the U7 In-Wall and U7 Lite are exceptional value, providing strong performance, power efficiency, and seamless UniFi integration without the premium price tag.
Pros of the U7 Lite / U7 In-Wall AP
Cons of the U7 Lite / U7 In-Wall AP
Affordable Pricing – The U7 Lite ($99) and U7 In-Wall ($149) provide excellent value for those looking to upgrade to Wi-Fi 7 without the premium cost. 2.5GbE PoE Support – Both APs support 2.5GbE uplink, ensuring faster network speeds without being throttled to 1GbE. Multi-Link Operation (MLO) – Allows better stability and throughput by utilizing multiple bands simultaneously, even without 6 GHz. Flexible Deployment – The U7 Lite is ideal for mesh expansions, while the U7 In-Wall adds extra wired connectivity with two additional 2.5GbE ports (one with PoE pass-through). Easy Network Management – The UniFi Controller software allows both automated and manual control, catering to both novices and power users. Efficient Power Consumption – These APs remain power-efficient, making them suitable for multiple deployments without excessive energy costs.
No 6 GHz Support – Without Wi-Fi 7’s 6 GHz band, these models lack access to the full 320 MHz bandwidth, potentially leading to higher congestion in busy environments. Limited for High-Density Networks – While they support 200+ clients, they lack the higher spatial streams of the U7 Pro and Pro Max, making them less suitable for very crowded networks.
This description contains links to Amazon. These links will take you to some of the products mentioned in today's content. As an Amazon Associate, I earn from qualifying purchases. Visit the NASCompares Deal Finder to find the best place to buy this device in your region, based on Service, Support and Reputation - Just Search for your NAS Drive in the Box Below
Need Advice on Data Storage from an Expert?
Finally, for free advice about your setup, just leave a message in the comments below here at NASCompares.com and we will get back to you.Need Help?
Where possible (and where appropriate) please provide as much information about your requirements, as then I can arrange the best answer and solution to your needs. Do not worry about your e-mail address being required, it will NOT be used in a mailing list and will NOT be used in any way other than to respond to your enquiry.
[contact-form-7]
TRY CHAT Terms and Conditions
If you like this service, please consider supporting us.
We use affiliate links on the blog allowing NAScompares information and advice service to be free of charge to you.Anything you purchase on the day you click on our links will generate a small commission which isused to run the website. Here is a link for Amazon and B&H.You can also get me a Ko-fi or old school Paypal. Thanks!To find out more about how to support this advice service checkHEREIf you need to fix or configure a NAS, check FiverHave you thought about helping others with your knowledge? Find Instructions Here
Or support us by using our affiliate links on Amazon UK and Amazon US
Alternatively, why not ask me on the ASK NASCompares forum, by clicking the button below. This is a community hub that serves as a place that I can answer your question, chew the fat, share new release information and even get corrections posted. I will always get around to answering ALL queries, but as a one-man operation, I cannot promise speed! So by sharing your query in the ASK NASCompares section below, you can get a better range of solutions and suggestions, alongside my own.
Ubiquiti annonce l’arrivée de 3 nouveaux produits UniFi. Ces derniers ont été pensés pour apporter des connexions filaire ultra-rapides en 10 Gb/s et le WiFi 7 pour le sans fil. Que vous soyez un professionnel cherchant à optimiser votre infrastructure ou un particulier souhaitant aller au-delà des limitations de votre box internet, ces nouveaux modèles pourraient bien vous intéresser. Regardons de plus près ces nouveautés…
UniFi : toujours plus rapide
Ubiquiti ne fait pas dans la demi-mesure avec ces 3 nouveautés qui viennent enrichir l’écosystème UniFi. Chacun des appareils répond à un besoin spécifique et veut proposer des connexions rapides, stable et sécurisée.
Dream Router 7 (UDR7) : Le tout-en-un ultime
Le Dream Router 7 est le compromis parfait entre puissance, connectivité avancée et simplicité. Conçu pour les utilisateurs exigeants, il intègre :
1 port WAN 10 Gb/s SFP+ pour exploiter pleinement les connexions fibre les plus rapides (idéal pour Free et autres FAI compatibles)
4 ports RJ45 2.5G, dont un WAN et un PoE pour alimenter un appareil (caméra de surveillance, borne Wi-Fi…)
Wi-Fi 7 intégrée, capable d’atteindre 5,7 Gb/s sur la bande des 6 GHz
Solution de stockage intégrée avec une carte microSD de 64 Go fournie pour UniFi Protect (vidéosurveillance)
Ce nouveau routeur tout en un sera parfait pour les appartements et petites maison, pour exploiter pleinement les connexions fibre optique et offrir une couverture Wi-Fi optimale sans nécessiter d’équipements supplémentaires.
Ce nouveau produit est d’ores et déjà disponible sur le site du fabricant. Son prix : 318€ TTC
UniFi Express 7 (UX7) : La solution compacte et abordable
Si vous cherchez à booster votre connexion sans avoir besoin de toutes les fonctionnalités avancées de l’écosystème UniFi, ou si vous avez déjà d’autres appareils du fabricant, l’UniFi Express 7 est le choix idéal.
Wi-Fi 7 ultra-rapide pour des performances optimales
2 ports réseau Multi-Gig, dont un WAN 10 Gb/s et un LAN 2.5 Gb/s
Pare-feu avancé capable de gérer jusqu’à 2,3 Gbps de trafic
Moins cher que le Dream Router 7, il se concentre sur la connectivité et conviendra parfaitement aux utilisateurs souhaitant une solution simple, performante et accessible.
Lui aussi est déjà disponible sur le site du fabricant. Son prix : 228€ TTC
Cloud Gateway Fiber (UCG-Fiber) : La puissance au service des professionnels
Si votre priorité est une connectivité ultra-rapide et évolutive, le Cloud Gateway Fiber est fait pour vous. Il s’adresse aux entreprises et aux utilisateurs les plus exigeants :
2 ports WAN 10 Gb/s (RJ45 et SFP+) pour gérer 2 connexions internet simultanées avec basculement automatique en cas de panne
1 port SFP 10 Gb/s supplémentaire pour relier un switch et créer un réseau ultra-performant
4 ports RJ45 2,5 Gb/s, dont un en PoE pour alimenter des équipements réseau
Pare-feu puissant capable d’absorber jusqu’à 5 Gbps de trafic
1 emplacement M.2 NVMe pour du stockage haute performance dédié aux caméras UniFi Protect.
C’est une alternative plus compacte et abordable aux Dream Machine Pro, idéale pour les infrastructures réseau.
Ubiquiti poursuit son expansion dans le Multi-Gig, en proposant des solutions performantes aussi bien pour les particuliers que les professionnels. Avec ces 3 nouveaux produits, le fabricant renforce son écosystème UniFi, misant sur la vitesse, la sécurité et une gestion centralisée. Il confirme aussi la démocratisation du 10 Gb/s et du WiFi 7… Il y en a pour tous.
On ne peut qu’apprécier l’effort, même si le prix sera un frein… l’investissement permet d’accéder à une infrastructure réseau haut de gamme, évolutive et sécurisée.
Pour plus d’informations, rendez-vous sur le site officiel…
Samsung Unveils 9100 PRO PCIe 5.0 SSD with Up to 14,800 MB/s Speeds and 8TB Capacity
Samsung has officially launched its 9100 PRO Series, marking its first full-fledged PCIe 5.0 NVMe SSD and its most powerful consumer storage solution to date. Designed to meet the growing demands of AI workloads, high-performance computing, 8K video editing, and gaming, this SSD delivers sequential read speeds of up to 14,800 MB/s, making it nearly twice as fast as its predecessor, the 990 PRO. The 9100 PRO lineup includes capacities of 1TB, 2TB, 4TB, and 8TB, catering to both professionals and power users requiring high-speed data access and extensive storage capacity. With the introduction of a more power-efficient 5nm controller, improved thermal management, and a choice between heatsink and non-heatsink versions, Samsung aims to push PCIe 5.0 adoption forward while setting a new benchmark for consumer SSDs.
Samsung 9100 Pro SSD Hardware and Specifications
The Samsung 9100 PRO is built using Samsung’s in-house PCIe 5.0 controller and V-NAND TLC (V8) flash memory, providing a significant increase in performance, reliability, and efficiency. Unlike its predecessors, the 9100 PRO utilizes the NVMe 2.0 protocol, enabling better optimizations for high-speed workloads. It is equipped with LPDDR4X DRAM-based caching to further enhance performance, ensuring that data retrieval and transfer speeds remain consistent under heavy loads. Power efficiency has been improved by 49% compared to the 990 PRO, allowing the drive to operate at lower power consumption levels, with an active power draw ranging from 7.6W to 9.0W depending on the model. For added security, the 9100 PRO supports AES 256-bit encryption, TCG Opal 2.0, and Microsoft eDrive, making it a viable option for enterprise-level security and personal data protection.
Samsung 9100 PRO Specifications
Specification
1TB
2TB
4TB
8TB
Interface
PCIe 5.0 x4, NVMe 2.0
Form Factor
M.2 (2280) / M.2 (2280 with Heatsink)
NAND
Samsung V-NAND TLC (V8)
Controller
Samsung In-House Controller
Cache Memory
1GB LPDDR4X
2GB LPDDR4X
4GB LPDDR4X
8GB LPDDR4X
Sequential Read/Write (MB/s)
14,700 / 13,300
14,700 / 13,400
14,800 / 13,400
14,800 / 13,400
Random Read/Write (IOPS, QD32)
1,850K / 2,600K
1,850K / 2,600K
2,200K / 2,600K
2,200K / 2,600K
Power Consumption (Active Read/Write, W)
7.6 / 7.2
8.1 / 7.9
9.0 / 8.2
TBD
Device Sleep (L1.2, mW)
4.0 / 3.3
4.8 / 4.0
6.5 / 5.7
TBD
Intelligent TurboWrite 2.0 Cache
114GB
226GB
442GB
TBD
Data Encryption
AES 256-bit, TCG Opal v2.0, MS eDrive (IEEE1667)
Total Bytes Written (TBW)
600
1,200
2,400
4,800
Warranty
Five (5) Year Limited Warranty
Samsung 9100 Pro vs Samsung 990 EVO and EVO Plus
The Samsung 9100 PRO SSD is a pretty big jump in storage performance, surpassing previous consumer SSDs like the 990 EVO and EVO Plus in nearly every metric. While the 990 EVO and EVO Plus were developed to meet the needs of mainstream users looking for a balance of performance and affordability, the 9100 PRO is engineered specifically for professionals, power users, and high-performance computing environments. One of the most significant differences is the interface upgrade, with the 9100 PRO utilizing PCIe 5.0 x4—a major step up from the 990 EVO’s PCIe 4.0 and the EVO Plus’s PCIe 3.0. This translates to dramatically higher sequential read and write speeds, where the 9100 PRO reaches up to 14,800 MB/s read and 13,400 MB/s write speeds, whereas the 990 EVO maxes out at 5,000 MB/s read and 4,800 MB/s write, and the EVO Plus is limited to 3,500 MB/s read and 3,200 MB/s write. These figures alone make the 9100 PRO nearly three times faster than the EVO Plus and close to three times faster than the 990 EVO, delivering unprecedented speed for workloads like 8K video editing, AI processing, and high-resolution content creation.
Beyond raw speed, the 9100 PRO also dominates in efficiency, endurance, and storage capacity, areas where Samsung has significantly improved upon its previous SSD lineup. The 9100 PRO features an endurance rating of up to 4,800 TBW (Total Bytes Written) for the 8TB model, whereas the 990 EVO and EVO Plus are capped at 600 TBW, meaning the 9100 PRO can handle up to eight times the write cycles before reaching its lifespan limit. This enhanced durability makes it ideal for workstations and AI applications where large datasets are continuously processed and rewritten. Furthermore, Samsung has introduced an 8TB model in the 9100 PRO lineup, a first for its consumer NVMe SSDs, whereas the 990 EVO is limited to 4TB and the EVO Plus maxes out at 2TB. Power efficiency has also been improved by up to 49%, thanks to the 5nm controller used in the 9100 PRO, allowing it to maintain higher performance while consuming less power per operation. These advancements make the 9100 PRO not just an incremental upgrade but a transformative SSD in Samsung’s lineup, aimed squarely at professionals who demand uncompromising speed, reliability, and storage capacity.
Specification
Samsung 9100 PRO
Samsung 990 EVO
Samsung 990 EVO PLUS
Interface
PCIe 5.0 x4, NVMe 2.0
PCIe 4.0 x4, NVMe 1.4
PCIe 3.0 x4, NVMe 1.3
Form Factor
M.2 (2280) / M.2 (2280 with Heatsink)
M.2 (2280)
M.2 (2280)
NAND
Samsung V-NAND TLC (V8)
Samsung V-NAND TLC
Samsung V-NAND TLC
Controller
Samsung In-House Controller
Samsung In-House Controller
Samsung In-House Controller
Cache Memory
1GB – 8GB LPDDR4X
1GB – 2GB LPDDR4
None
Sequential Read (MB/s)
14,700 – 14,800
5,000
3,500
Sequential Write (MB/s)
13,300 – 13,400
4,800
3,200
Random Read (IOPS, QD32)
1,850K – 2,200K
800K
600K
Random Write (IOPS, QD32)
2,600K
1,000K
550K
Power Consumption (Active, W)
7.6W – 9.0W
5.3W – 5.9W
4.5W – 5.0W
Device Sleep (L1.2, mW)
4.0mW – 6.5mW
5mW
5mW
Total Bytes Written (TBW)
600 – 4,800 TB
600TB
600TB
Warranty
5-Year Limited Warranty
5-Year Limited Warranty
5-Year Limited Warranty
TurboWrite – What is it?
The 9100 PRO Series introduces Samsung’s Intelligent TurboWrite 2.0, a highly optimized SLC caching system that significantly improves write speeds and overall performance consistency. amsung TurboWrite is a technology used in Samsung SSDs to make them faster. Think of it like a temporary speed boost for writing data.
Creates a Fast Cache – The SSD sets aside a small part of its storage as a high-speed buffer (like a VIP lane for data).
Speeds Up Writes – When you save files, they first go into this super-fast buffer, making it seem like the SSD is writing faster.
Moves Data in the Background – Later, when the SSD is idle, it moves the data from the fast cache to the main storage.
Faster file transfers (especially for small/medium-sized files). Better everyday performance (like booting Windows, opening apps, or saving documents). Slows down for big files – If you copy very large files that fill up the TurboWrite cache, the speed drops to the SSD’s normal (slower) write speed.
Unlike conventional SSDs, which experience a performance drop once the primary cache is exhausted, TurboWrite dynamically allocates NAND capacity as an extended cache, maintaining peak speeds for longer durations. The cache size is based on drive capacity, with 114GB allocated for 1TB models, 226GB for 2TB, and up to 442GB for 4TB variants. This feature ensures high-speed data transfers and minimizes write slowdowns, especially beneficial for video editors, software developers, and content creators working with large datasets.
Samsung 9100 Pro SSD Durability and Endurance
The Samsung 9100 PRO is designed with long-term endurance in mind, featuring Total Bytes Written (TBW) ratings of up to 4,800TB for the 8TB variant. This translates to 0.328 Drive Writes Per Day (DWPD), meaning users can rewrite roughly one-third of the drive’s full capacity daily for five years without exceeding its rated lifespan. This makes it ideal for sustained workloads, AI processing, and enterprise environments that require consistent, high-speed storage. Compared to previous-generation SSDs, the 9100 PRO offers significantly improved durability, reducing the risk of performance degradation over time.
Samsung 9100 Pro SSD Pricing and Release Information
The Samsung 9100 PRO SSD will launch in March 2025 with the following pricing:
1TB – $199.99
2TB – $299.99
4TB – $549.99
8TB – Coming in H2 2025 (pricing TBD)
The heatsink versions will be available for $20 more per model. Given its groundbreaking performance, improved efficiency, and increased storage capacity, the 9100 PRO is set to become one of the leading PCIe 5.0 SSDs in the market, competing with Seagate’s FireCuda 540 and Crucial’s T700.
This description contains links to Amazon. These links will take you to some of the products mentioned in today's content. As an Amazon Associate, I earn from qualifying purchases. Visit the NASCompares Deal Finder to find the best place to buy this device in your region, based on Service, Support and Reputation - Just Search for your NAS Drive in the Box Below
Need Advice on Data Storage from an Expert?
Finally, for free advice about your setup, just leave a message in the comments below here at NASCompares.com and we will get back to you.Need Help?
Where possible (and where appropriate) please provide as much information about your requirements, as then I can arrange the best answer and solution to your needs. Do not worry about your e-mail address being required, it will NOT be used in a mailing list and will NOT be used in any way other than to respond to your enquiry.
[contact-form-7]
TRY CHAT Terms and Conditions
If you like this service, please consider supporting us.
We use affiliate links on the blog allowing NAScompares information and advice service to be free of charge to you.Anything you purchase on the day you click on our links will generate a small commission which isused to run the website. Here is a link for Amazon and B&H.You can also get me a Ko-fi or old school Paypal. Thanks!To find out more about how to support this advice service checkHEREIf you need to fix or configure a NAS, check FiverHave you thought about helping others with your knowledge? Find Instructions Here
Or support us by using our affiliate links on Amazon UK and Amazon US
Alternatively, why not ask me on the ASK NASCompares forum, by clicking the button below. This is a community hub that serves as a place that I can answer your question, chew the fat, share new release information and even get corrections posted. I will always get around to answering ALL queries, but as a one-man operation, I cannot promise speed! So by sharing your query in the ASK NASCompares section below, you can get a better range of solutions and suggestions, alongside my own.
Asustor vient de publier la version Beta de son logiciel interne ADM 5.0. Aperçue pour la première fois avec les NAS Lockerstor Gen3 (AS68), cette version marque une étape importante dans l’évolution du système. Le fabricant confirme ainsi la feuille de route annoncée en novembre dernier. Cependant, tout n’est pas rose…
ASUSTOR ADM 5.0 Beta
Annoncée depuis plusieurs mois, ADM 5.0 avait été présentée en juin 2024 lors du Computex. En octobre, 3 nouveaux NAS (AS6804T, AS6806T, AS6808T et AS6810T) avaient été annoncés… et ces derniers sont livrés avec cette nouvelle version. Depuis, plus aucune information n’avait été communiquée jusqu’à présent…
Désormais, ADM 5.0 Beta est disponible en téléchargement. Toutefois, cette version étant encore en cours de développement, il est fortement déconseillé de l’installer sur un NAS en production contenant des données sensibles. Asustor se dégage de toute responsabilité concernant les problèmes pouvant survenir suite à son utilisation.
ADM 5.0 Beta : principales nouveautés
Regardons de plus près ce qu’indique ASUSTOR à propos de cette nouvelle version.
Nouveautés
ADM Defender propose des profils de pare-feu personnalisables et une protection proactive contre les adresses IP suspectes
Prise en charge des clés SSH pour une authentification plus sécurisée et pratique
Text Editor, une nouvelle application pour créer et modifier des fichiers texte (à télécharger depuis l’App Central)
Modifications majeures
Mise à niveau du noyau Linux vers la version 6.6 LTS avec de nombreux correctifs de sécurité (disponible uniquement sur certains modèles)
Mises à jour d’OpenSSL pour améliorer la compatibilité et les performances
SMB Multi-Channel passe (enfin) en version stable
Améliorations de l’expérience utilisateur :
La barre d’outils ADM peut être masquée automatiquement
ADM adopte par défaut la langue du navigateur
Mise à jour des options régionales et des fuseaux horaires
Affichage optimisé du Gestionnaire de stockage pour une lecture plus efficace des informations
ADM Maintenance remplace les anciennes options de mise à jour, réinitialisation d’usine et sauvegarde des paramètres
Web Center permet désormais d’utiliser plusieurs versions de PHP pour différentes applications
Renforcement de la sécurité :
Suppression d’un dossier partagé nécessite la validation par mot de passe administrateur
Meilleure gestion des certificats Let’s Encrypt avec choix d’algorithmes de chiffrement
Amélioration de la gestion des domaines Active Directory
Gestion de l’alimentation :
Un NAS connecté à un onduleur en faible consommation s’éteindra correctement
Capacité de LUN iSCSI portée à 1024 To lorsque l’allocation dynamique est activée
Corrections
Correction de bugs dans l’Explorateur de fichiers et Web Center
Amélioration des traductions
Divers correctifs de stabilité.
Vous l’aurez compris, cette nouvelle version apporte de nombreuses améliorations. Pour en savoir plus, n’hésitez pas à suivre ce lien…
Compatibilité avec ADM 5.0 Beta
Série
Processeur
Architecture
AS71
Intel 9th Xeon E
x86-64
AS67
Intel Celeron (Jasper Lake)
x86-64
FS67
Intel Celeron (Jasper Lake)
x86-64
AS54
Intel Celeron (Jasper Lake)
x86-64
AS65
Intel Atom (Denverton)
x86-64
AS66
Intel Celeron (Gemini Lake-Refresh)
x86-64
AS52/53
Intel Celeron (Gemini Lake)
x86-64
AS63/64
Intel Celeron (Apollo Lake)
x86-64
AS33/11
Realtek RTD1296
ARM 64-bit
AS33v2/AS11TL
Realtek RTD1619B
ARM 64-bit
Cette liste correspond à celle déjà publiée en novembre dernier sur le Forum des NAS. Comme indiqué précédemment, les NAS AS68 et FS68 disposent déjà d’ADM 5.0 en version finale.
Fin du support pour certaines séries
Comme prévu, certains modèles ne recevront plus de mises à jour et resteront sur ADM 4.3 :
AS31 (série lancée en 2015)
AS32 (série lancée en 2016)
AS40 (série lancée en 2018)
AS61 (série lancée en 2015)
AS62 (série lancée en 2016)
Synthèse
L’arrivée d’ADM 5.0 Beta est une version attendue pour des utilisateurs de NAS Asustor. Elle apporte de nombreuses améliorations en matière de performance, sécurité et expérience utilisateur. Toutefois, cette version est encore en phase de test et son installation est déconseillée sur un NAS de production.
When it comes to the hardware in your network environment, UniFi has always been one of those companies where you are either fully invested in practically every network appliance in its ecosystem or have nothing to do with it. A UniFi ecosystem is designed to allow you to easily and efficiently manage your entire network environment. In recent years, the brand has expanded beyond simple network appliances into a lot more IoT and client-edge tech found in homes and offices, further expanding this ecosystem. In the last year alone, we’ve seen them double down on surveillance, introduce network-attached storage, open up third-party hardware integration, and more. Today, I want to discuss their latest router, the UniFi Dream Router 7 (UDR 7), a new scaled-up 10G and WiFi 7 refresh of their existing WiFi 6 desktop-style router. Arriving at the mid-range price of around $279, it sits comfortably between affordable entry-level WiFi 7 routers from the likes of TP-Link while significantly undercutting pricing of bigger network routers from Amazon, Netgear, and Asus. Arriving with the UniFi Network and Router operating systems, as well as support for numerous UniFi software appliances, the UDR 7 marks a significant step up for comparatively domestic routers as we enter the seventh generation of wireless connectivity. Can this router be used in your network alongside non-UniFi equipment? And will this router serve you long-term as your client hardware scales up in line with modern tech innovation? Let’s find out.
UniFi Dream Router 7 Review – Quick Conclusion
As appealing as the UniFi router and network software that this system is bundled with are, the main praise I have to give the UDR 7 is that everyone is going to feel the benefits of this router in their network at this price point. The small compromises it has compared to the previous UDR system (such as fewer PoE ports) are immediately outweighed by its versatility, which would be hard to find at a better price elsewhere. The fact that all LAN ports are 2.5G and that the two WAN/LAN ports are 2.5G and 10G SFP+ respectively puts this router massively ahead of most competitors in the sub-$300 market. Equally, support for the UniFi Protect surveillance software and the included WD Purple SD card storage are nice extras that you don’t commonly find elsewhere—let alone the inclusion of a PoE 2.5G port. The router and network management software is, of course, quintessentially UniFi in its presentation. Striking a balance between usability and information is a tough challenge, and the UniFi software almost succeeds. It excels in its presentation and management via the mobile app, though the desktop UI could be a touch more intuitive. How could you make wireless and wired network management truly user-friendly? That said, the UDR 7 is a genuinely WiFi 7-ready router, offering 2×2 6GHz coverage and taking advantage of all the frequency and bandwidth benefits afforded to true WiFi 7 6GHz clients. Add a simple $20 USB WiFi 7 adapter to your system, and you can immediately enjoy base-level 2.8Gbps wireless connectivity, scaling this up substantially with the right WiFi 7 wireless NICs. Even if you’re not in love with the UniFi software platform or handing management of your services over to Ubiquiti’s remote services, you can still set up the device without a UI.com account. You do not need to deploy it with UniFi Network equipment, and VPN and encrypted protocol services can still be managed via popular third-party options if preferred.
Buying a router for your home or business instead of relying on the one supplied by your ISP can often feel like an unnecessary expense. However, considering the price point and the network advantages the UDR 7 provides, I believe this system is worth it. Some of its services might require additional polish over time, and greater network capabilities on this router will be realized as technology progresses, but I wholeheartedly recommend the UDR 7 for the majority of setups.
BUILD QUALITY - 10/10
HARDWARE - 9/10
PERFORMANCE - 9/10
PRICE - 8/10
VALUE - 9/10
9.0
PROS
WiFi 7 Support – Offers Genuine 6GHz connectivity with 320MHz channels, enabling faster speeds and lower latency. Multi-Gig Networking – Includes three 2.5GbE LAN ports and a 10GbE SFP+ WAN/LAN port, making it highly future-proof. Comprehensive UniFi Software – Provides robust network management features, including VLANs, QoS, IDS/IPS security, and VPN support. Integrated UniFi Protect Support – Comes with a pre-installed 64GB WD Purple SD card, allowing local video storage for security cameras. Flexible WAN/LAN Configurations – Supports dual WAN for failover or load balancing, or repurposing the 10GbE SFP+ port as LAN. High Customization & Security – Offers advanced firewall controls, application-aware filtering, and in-depth traffic analytics. User-Friendly Mobile App – Easy setup and management via the UniFi mobile app, with intuitive controls and real-time monitoring. No UI.com Account Required – Can be set up locally without requiring an online UniFi account, providing more control over network privacy.
CONS
Limited PoE Support – Only includes one PoE-enabled 2.5GbE port, which may be a drawback for users looking to power multiple UniFi cameras or access points. 6GHz Band Availability Varies by Region – While WiFi 7 delivers significant improvements, the 6GHz spectrum and 320MHz channels may not be fully available in all areas, limiting real-world performance. Not the Most Budget-Friendly Option – Although competitively priced for a WiFi 7 router, there are still more cost-effective alternatives on the market, especially for users who don’t need UniFi’s ecosystem.
The UniFi Dream Router 7 arrives in the same pretty and aesthetically eye-catching packaging as most UniFi products do. The fold-out cardboard packaging does a great job of protecting the device in transit while still looking absolutely great.
The unit is held tightly in custom multi-part card plus foam, and the power cable and small accessory kit are located in their own compartment at the bottom. I say accessory kit, but what there is is simply a two-pin power connector, a small manufacturer’s warranty booklet, and a pin. That’s really it. The router is designed with the software already preloaded in the system and is pretty much good to go as soon as you plug it into the power and connect your existing internet connection into an SFP RJ45 WAN port.
It is very different in design to pretty much every other router in the market, although a touch similar to that of the Apple or Amazon routers. UniFi has bolstered the existing design of the previous router/capsule style of devices and has simply scaled things up a little bit here with improved cooling and venting. It’s actually surprisingly compact for the amount of connectivity it has to offer.
The front of the system is also remarkably understated, though it does feature a small LCD panel that gives real-time information about active traffic utilization on the system. This is not exactly groundbreaking, but it does add to the aesthetic style and is arguably more than a lot of routers give you in the market anyway.
Flipping the device around shows us a bevy of network connections, and I’ll be honest—what there is to see is (brackets mostly closed brackets) absolutely fantastic for a router at this price, but more on that in a bit. The base of the system features a WPS button for easy connections just like you would find on the majority of other routers, as well as additional ventilation to keep things cool when the system’s in operation. I’m not really in love with the idea of the router not featuring much in the way of LEDs, and I do wonder about the temperatures of this system when you’re utilizing all four 2.5G connections and the 10G at once (not to mention all of those antennas running 6GHz connections). Certainly, I might have my reservations about deploying a router like this in a closed cupboard or non-ventilated location.
Instead of individual LEDs that denote connection, health, and internet health, the system instead uses a rather attractive ring color system at the top of the router that denotes the health and connectivity of an internet connection. Again, I think I would much rather have a little bit more front-mounted visualization of what’s going on with the individual connections rather than the streamlined LCD and internet LED indicator at the top, but I also know that, as more of a network systems addict, I do not represent most users. All in all, the design is exactly what you would expect from a UniFi product and does manage to cram a lot in while still maintaining a very unique and appealing aesthetic. However, there is quite a lot of hardware packed under the bonnet here; let’s discuss the ports and connectivity on this system.
UniFi Dream Router 7 Review – Ports and Connections
The previous UniFi Dream Machine Router stood out from a number of other WiFi 6 routers in the market thanks to its affordable price point and support for 2.5G WAN and PoE network connections. Now, the new UDR 7 scales things up in almost every way—but the one area it doesn’t improve upon may annoy some. For now, though, let’s discuss the default network connectivity.
There are five physical ports on the rear of the UniFi Dream Router 7. There are four copper 2.5G connections and a 10G SFP connection. Three of the 2.5G connections are dedicated LAN ports, each of which supports up to 279MB per second active connectivity.
There is then a further 2.5G optional WAN or LAN port, also in copper, that can have its utilization configured in the UniFi router software as needed. With an increase in greater-than-gigabit speeds around the world, alongside traditional ISP routers arriving with 2.5G ports for these higher-speed services, the fact that the default is 2.5G is going to be hugely appealing.
However, the UDR 7 also benefits from the inclusion of a 10G SFP connection, much like a number of premium-priced WiFi 7 routers, but at more than half the price. This is particularly useful as it too can be set as needed as a WAN port or a LAN port. That means the user can decide whether they want to directly pipe a high-speed fiber connection straight into the router to be shared across the other four 2.5G connections (covering the bulk of that 10G input), or leave this port as a LAN port for 10G NAS connectivity. That’s pretty useful and definitely advantageous in terms of scalability and long-term future-proofing as internet services in your home or business increase over time and the network capability of the appliances you buy likewise improves. This is a fantastic base-level network connection setup on the UDR 7. Once again, at $279, it makes it particularly appealing.
However, a little bit of good news/bad news is that, although the UDR 7 features a PoE port, it only features a single PoE copper output compared to the two PoE connections of the previous generation router. As the UDR 7 supports the installation of the UniFi Protect surveillance software (something we’ll touch on later), there are definitely going to be users a little disappointed that the ease of deploying PoE cameras directly into the router has been effectively halved here. This is especially disappointing now that UniFi Protect supports third-party PoE cameras too. Likewise, with an increase in PoE-ready accessories and devices from UniFi being released, some may find it a bitter pill to swallow that this new router has diminished this rather unique selling point of the previous generation UniFi router.
One interesting extra feature of the UniFi Dream Router 7 is that it features a microSD slot that arrives pre-populated with a 64GB card. This card is used in conjunction with the previously mentioned surveillance services and means that this router serves adequately as an alternative to a UniFi Dream Machine Pro or UNVR (albeit on a much smaller storage scale) for recording domestic surveillance cameras and keeping your footage. Another small note here: no one would have blamed UniFi if they’d included domestic SD cards that just happened to have the UniFi logo on them. Indeed, I don’t think anyone would have judged UniFi harshly if they hadn’t included an SD card at all! Nevertheless, this WiFi 7 router not only includes an SD card at no additional cost, but it is a WD Purple surveillance-designed SD card. Fair play.
In terms of WiFi connectivity, the router arrives with support for the 2.4GHz, 5GHz, and WiFi 7-specific 6GHz bands at 2×2. Equally, thanks to the opening of the 320MHz frequency blocks and multi-stream capabilities of WiFi 7, individually connected WiFi 7-ready appliances have the potential to not only exceed legacy physical gigabit LAN connections but achieve multiple times that speed.
For example, utilizing a simple budget $20 USB 6GHz WiFi 7 adapter from AliExpress, I was immediately able to create a direct 2.8Gbps WiFi connection between my Windows 11 laptop and the UniFi Dream Router 7. That is even greater than the physical 2.5Gbps connections on the router.
Let’s dig a little deeper into the wireless capabilities of this router and what it can and cannot do.
UniFi Dream Router 7 Review – Internal Hardware
The UniFi Dream Router 7 is built with a quad-core ARM Cortex-A53 processor clocked at 1.5GHz, paired with 3GB of DDR4 memory. This hardware configuration supports advanced networking functions such as multi-gigabit data throughput, VLAN segmentation, and application-aware security features. The DDR4 memory ensures improved performance and energy efficiency compared to older memory standards, which is crucial for delivering consistent and reliable network performance under load. The router’s CPU architecture is well-suited for multitasking, enabling it to handle multiple operations simultaneously without significant performance bottlenecks. In terms of real-world performance, the quad-core processor and 3GB of memory enable the Dream Router 7 to meet the demands of modern home and small-business networks.
The processor handles resource-intensive tasks like VPN connections, quality-of-service (QoS) adjustments, and advanced intrusion detection systems (IDS) efficiently. The ample memory capacity supports features such as traffic segmentation, advanced firewall configurations, and a high number of concurrent devices, especially over WiFi 7, which allows for faster speeds and improved device management compared to previous wireless standards. When compared to the UniFi Dream Router with WiFi 6, the newer model provides notable hardware enhancements. The older version includes a dual-core processor and 2GB of DDR4 memory, which are sufficient for many home networks but may struggle with more complex setups or environments with multiple high-bandwidth devices. The Dream Router 7’s additional CPU cores and larger memory capacity ensure better scalability and smoother performance when running advanced networking tasks or handling a larger number of connected devices. This makes the newer model more suitable for users with high-performance requirements or future-proofing in mind.
Feature
UniFi Dream Router 7
UniFi Dream Router (WiFi 6)
Processor
Quad-Core ARM Cortex-A53, 1.5GHz
Dual-Core Processor
Memory
3GB DDR4
2GB DDR4
WiFi Standard
WiFi 7 (802.11a/b/g/n/ac/ax/be)
WiFi 6 (802.11a/b/g/n/ac/ax)
MIMO Configuration
2×2 (2.4GHz, 5GHz, 6GHz)
2×2 (2.4GHz, 5GHz)
Max Throughput
2.4GHz: 688Mbps
5GHz: 4.3Gbps
6GHz: 5.7Gbps
2.4GHz: 600Mbps
5GHz: 2.4Gbps
LAN Ports
3x 2.5GbE (1 PoE)
4x 1GbE
WAN Port
1x 2.5GbE / 1x 10GbE SFP+
1x 1GbE
Storage
64GB SD Card (included)
No pre-installed storage
The improvements in the UniFi Dream Router 7 align with the growing needs of users who demand robust network performance, advanced features, and support for emerging technologies like WiFi 7. Its enhanced CPU and memory configuration allows for better multitasking, improved throughput, and reliable operation in demanding environments. These hardware upgrades ensure the router is capable of handling both current and future network demands efficiently.
UniFi Dream Router 7 Review – Software and Controls
Realistically, no one should be spending inordinate amounts of time using the software that your router arrives with – that’s just a simple fact. Indeed, you want you router (or any network appliance) to just do it’s job! Therefore talking about just how good the UniFi network software is, and how the UniFi Dream Router 7 capitalized on it, is going get a mixed reaction depending on your own level of network knowledge and custom requirements. I will say straight away though that you will really, REALLY struggle to find a more capable and flexible router software at this price point. You will struggle to find ANY setting, config, adjustable parameter of control measure not included with the UDR7. First off, there is the mobile application. As the UDR7 hosts the UniFi network software, ALOT of the iOS and Android official UniFi applications are supported by the UDR7.
Firs time setup of the router using the mobile application (you can use a desktop machine with your web browser if you prefer of course) is incredibly straight forward. The Router can be found via the local area network or Bluetooth within 2 minutes of it’s first power-on. One big misconception (I was guilt of this too a while back) was that you have to register a UI.com account online in order to use UniFi appliances. This is NOT true. You can set the device up without a UI account (and even WITHOUT an internet connection) and doing so just needs to you create a local administrator account. It is recommended to use a UI account of course, as it allowed for easier comms and access for your larger Unifi network, but it is by no means compulsory. You can also create a system backup (with your config data of users, settings, SSIDs, etc) and backup online if you choose – and then easier pull this backup if you wish during initialization easily.
Upon creating local credentials or resisting an online account, the router performs an initial internet performance test and then goes about setting up your router. Much like other recent UniFi releases, the system has a ‘gamer’ style installation screen that shows tips and guides on how to get the most out of your router – very rare in a router I will say.
The setup process takes around 2-3 minutes and after that, you have pretty much FULL control and access to the Router’s configuration from your mobile phone. You can definitely tell that UNiFi have put the hours in with regard to the UX of the mobile application. Routers (and switches for that matter) are NOT easy systems to try and simplify – let along ocndence in a compact mobile UI. However they really have excelled in the latest version of their software.
Management of individual devices on the network are all presented intuitively in the app, and alongside their position/priority/bandwidth/consumption being presented, you can also use the app to institute controls and rules for 1, some or all devices on the fly – with instant implementation. Again, it’s no the fact that you can ‘do’ this that I am impressed by, it is the ease and intuitive way it is presented in a mobile app.
The same applies to the physical connections and wireless connections on the UDR7 itself, with full remote control with the app to bridge, negotiate, failover, vLAN, disable, etc any port easily – as well as create new SSIDs, assign channels and push client devices around on the router side in 3-4 clicks. All of this is performed responsively and easily in the app.
On the subject of client devices, let’s discuss that WiFi 7 support. WiFi 7 opens up ALOT of performance and general bandwidth advantages. WiFi routers and client devices have been around now for around 10-12 months, as well as the increase in availability globally of greater than Gigabit internet services. Most internet service providers have already a router with their services – but not many provide WiFi 7 routers with their services, even at greater than gigabit speeds. So, what is the advantage? For the quicker (ish) version, watch my video below.
Now, you might well not have any devices right now that are WiFi 7, but plan on upgrading to WiFi 7 at some point in the further over a PCIe upgrade card. Even if you are using a system that lacks a PCIe upgrade clot, you can get small m.2 upgrade cards for a WiFi 7 / 802.11be upgrade for as little as $15-20 here. Hell, you do not even need to open up your system, as you can now get WiFi 7 to USB adapter upgrades for as little as $25-30, which is exactly what used when testing the router with my Windows 11 laptop for the earlier testing of the UDR7.
The USB-to-WiFi 7 Adapter I used in my testing of the UDR7 was this one HERE on Aliexpress.
This USB to WiFi 7 adapter allowed for immediate 802.11be connectivity between my laptop and the UniFi Dream Router 7, over the now available 6Ghz band. Although there is more to WiFi 7 and this router than just that additional frequency. tHE udr7 SUPPORTS 2.4Ghz and 5ghz (just like all WiFi 6 and 6E routers), but crucially alongside the 6Ghz band allowing for more active concurrent connections, you are also able to take advantage of 320Mhz bandwidth (till now WiFi 6/6E only allowed for up to the 160Mhz connections). This means that you have a greater bandwidth per connection – though you can only have a finite amount of connections at 320Mhz at once. This is COMBINED with WiFi allowing for overlapping connections too and 1 device enjoying multiple connections at once.
This means that not only can you match the speed of a normal wired gigabit connection, but you can ABSOLUTELY SMASH IT! As you can see below, using this USB adapter on my regular windows laptop, connecting to the UniFi Dream Router 7 over the 6Hz band – I was able to hit 2.8Gb/s wireless connectivity!!! That is even faster than using one of the physical 2.5GbE connections on the UDR7.
It’s worth remembering though that WiFi 7 is NOT perfect and although it presents a lot of benefits for bandwidth improvements, reduced latency and increased encryption options, support of the wider frequencies and abilities of a larger WiFi 7 populated network are still a little ‘early days’.
By that, I mean that although you can hit high performance with 320Mhz connections, the actual radio frequency opened up right now (depending on your region) is pretty slim. The UDR7 router DOES show you the full radio spectrum, separated dynamically with each 20/40/80/160/320Mhz block that is spread across 2.4/5/6Ghz – but ALOT of it is still unavailable to use in many regions.
These limitations are likely going to reduce over time and, therefore you have to look at a decent % of the WiFi capabilities of the UniFi Dream Router 7 as ‘future proofing’ – but just keep in mind that although you can deploy ALOT of wireless (and wired) devices in a UDR7 managed environment, those peak 802.11be/WiFi 7 bandwidth improvements are going to be shared only by a few client devices – in reality the real benefits are going to be felt with the opening up of the 6Ghz frequency allowing for more devices to be spread over all three frequencies and bands at 80/160Mhz.
Anotehr note to keep in mind is that the 6Ghz band has a shorter area of effect than 5Ghz (which likewise has a shorter area than WiFi 5). So WiFi7 is at it’s best in closer proximity without walls – more as a cable alternative if you are in the same areas as your UniFi router. But when I connected to a 10GbE NAS (connected to the 10GbE port of my UDR7), I was able to hit 187MB/s write easily (though read performance was oddly inconsistent – possibly related to the NAS, still investigating – TBC) in CrystalDiskMark.
Likewise, similar testing with the WiFi 7 USB Adapter, through the UDR7 and at the 10GbE connected NAS hit 260MB/s+ easily. Once again, I would have easily respected this if I had been connecting with the NAS using the 2.5GbE ports – but I am hugely impressed that I was able to hit this benchmark over a WiFi connection (thanks to that 2.8Gbps 6Ghz setup). Respect!
Additionally it is very easy to monitor the position, WiFi coverage, Channel and performance of any device connected to the UDR7 controller software. Also allowing you to create rules o the fly to automatically manage them later as/when devices arrive.
These same controls also extend all the way down to the ISP input of the UDR7 AND IF YOU HAVE MULTIPLE uNIfI AP/Nodses in your setup, can control how/where bandwidth is allocated and the priority of devices/nodes that are unique to your own deployment.
The dashboard features a grouped UI and analytics overview that allows you to see the price traffic that is going into a physical LAN, grouped VLAN or just a single devices on the network – allowing you to see the sites/services/geo data in real time too!
And likewise as before, you can extent these analytics all the way to the root UDR7 router to see EVERYTHING happening in realtime in your network and internet connectivity.
Blacklisting (and whitelisting occasionally) or certain websites is also easy to action manually when needed too – or you can import an existing database of ‘bad’ site lists directly into the UDR7 to simplify the process.
Once rules, priorities, orders of services and limits have been created, you can then apply them to individual devices, networks, groups, vLANS, etc – even to a physical LAN port if needed. These rules are completely customizable and if 1 parameter is changed on the fly, it immediately actions across all selected devices.
It’s also worth highlighting that UniFi has its own enterprise user identity service (‘Identity Endpoint’) that you can apply to devices if you want to ensure that connected devices on the LAN or WAN are truly secure (client auth tools on each device) and this extends to the VPN and UniFi network client device access too.
I also should stress that although the UDR7 seems like a very, VERY proprietary router – UniFi do NOT lock you into having to create an account with them or use only their services. You can set the system up for LOCAL ONLY management and control if you choose. Or even hybrid the two and create 1 secure ‘Identity Endpoint sys admin’, but others are ‘local’ only – nice balance tbh.
And new users (super user or billy basic!) can be created, modified and deleted at any time!
Control and configuration of the UDR7 are very straight forward and there are pretty high end configuration options in the backend of the system to control both the local network setup, as well as WiFi connectivity out the box (or added later in the case of systems like the UCG Fiber via the U7/U7 Pro/U6).
And professional SI’s/Technicians can set the system to ‘truly open’ if they wish, and this can be securely controlled as needed. This allows for opening up frequencies in the case of a WiFi setup down the road and advanced settings related to antenna gain/adaption.
The system configuration and control are surprisingly extensive for a $279 router and puts it well, well into the realms of an enterprise-grade solution, despite its Prosumer/SMB price point.
Unsurprisingly, the UDR7 has internet speed test tools (either using the native web browser GUI or the WiFiman application for Android/iOS).
But its goes further, with the ability to monitor the packet management in your network (covered earlier) to such as extent that you can even block the server calls to specific sites/vendors that are going through the UniFi manager and block them SPECIFICALLY. Eg, want to keep google services, but NOT YouTube (either for work/professional reasons, or because of your kids homework deadline?) – you can do that REALLY easily.
And you can apply these rules easily and analytics with ease via the topographical network monitoring window. So you can visually see the devices in the network, then apply the rules, in case a new device gets sneakily added to circumnavigate any limits/restricts in palce.
And if you see a sudden spike in internet use, you can (in seconds) isolate the device that is causing it AND see what it is – allowing yo to block/monitor as needed.
Equally, you can set some pretty extensive security provisions to pre-emptively kick in when an unknown device arrives on the scene, or if an existing device in the network begins to be suspicious.
The same goes for creating day 1/100 rules for port forwarding, traffic management and Firewall rules. All of this is HUGELY customizable and most pages in the UniFi GUI feature both ‘simple/easy’ views, as well as much more complex advanced views as needed at the top of each page.
The multiple LAN ports can also be scaled up/down as needed if your existing network is not quite ready for the full network connectivity of the UDR7 too.
And thanks to the UDR7 featuring multiple WAN ports, you can decide how you want to handle multiple ISP services into your home/business, to separate/combine/balance between them with ease across your connected devices.
Additionally, each WAN port can be adjusted to a ‘WAN’ or ‘LAN’ roles as needed – even disabled. So, whether it is as a failover internet connection, or that you want to free up that 10GbE port for use as a LAN – The choice is yours!
Also, as mentioned earlier, as the system supported internal storage via the slot, you can go ahead and run UniFi Protect surveillance software too – as well as as an additional switch to the available LAN ports, for cameras or add a camera to the POE port.
There are actually several different surveillance, communications, display or smart appliances in the UniFi portfolio that can be installed on the internet storage drive + also means you have more scope for that POE ready port.
It gets to a point (perhaps) that there are TOO many security and configuration options, and people looking for just a router to ‘just do it’s job’ will be somewhat overwhelmed. Most of the important settings are already set pretty well, but I never the less recommend first time buyers take the time to explore the configuration options present in order to better understand what they are buying here in terms of it’s abilities to protect your network and internet services.
This extends right the way down to the more advanced prevention and intrusion protection measures (Dark Web blocking too). Again, pretty advanced for many, but take the time to look through them if you purchase the UDR7.
And if in doubt, you can use the UniFi Teleport VPN service to anonymize your site-to-site exchanges (again, very ‘first party’ and more about SD-WAN level stuff, but does form part of the purchase here).
Also, keep in mind that the UDR7 has the option to create Airgaps in it’s wired network AND WiFi connectivity (if you want to add that) that allows you to create automated access times – especially useful for businesses who want to lock down access outside of the usual 9-5 operational hours.
If you want to use WiFi services, yo can create multiple SSIDs of varying degrees of access – and yes, all the controls on security, speed, antenna, frequency, vLAN, etc are all present here too.
When creating those VLANS, you can add specific physical ports, IDs, WiFi APs etc to that vLAN to segregate your network as securely as possible.
And from there you can adjust the vLAN configuration in terms of it’s smooth operation and security directly from the network management panel (as well as view all active vLANS on one page if needed to see how they interact/clash + show each device you have moved in/out of them easily.
And again, all packet management/monitoring are available within the vLAN if you need.
If this all sounds tremendously intimidating, there is a much, MUCH easier 1 panel view in the ‘Insights’ tab that just shows each current network branch and it’s connections/clients in a list format.
Not good enough? How about a global view that shows the data packet exchange in real time with regard to each region (i.e worried that your data is being harvested to an overseas location, this will show you which countries are currently connected with on your UDR7 for upload/download (websites? server? It’s easy to check and find out here!).
Bottom line – the bulk of the UniFi Control Software here is available on the majority of UniFi Router, Express, Cloud Gateway and Dream Machine devices – but the EXTENT to which you can use it is heavily dependent on the device you buy. In the case of the UDR7, you have a fantastic balance of Day 1 control sure, but you have an even better management and scalability on the system for when your ISP services double/triple, as well as the number of devices in your network expand.
UniFi Dream Router 7 Review – Conclusion and Verdict
The UniFi Dream Router 7 (UDR 7) is a well-rounded offering that brings WiFi 7 connectivity, multi-gig networking, and UniFi’s robust software ecosystem into a single package. Its combination of 2.5GbE LAN ports, a 10GbE SFP+ WAN/LAN port, and built-in UniFi network management tools make it a compelling option for users looking to future-proof their network without stepping into enterprise pricing. Features such as VLAN segmentation, VPN support, and content filtering provide a high level of customization for both home and small business users. However, the router’s design choices—such as the removal of an additional PoE port from its predecessor—may limit its appeal for those heavily invested in UniFi’s surveillance ecosystem.
While the UDR 7 shines in many areas, it is not without drawbacks. The router’s software, while feature-rich and highly configurable, may be overwhelming for users who simply want a plug-and-play experience. The reliance on UniFi’s ecosystem means that those who prefer third-party integrations may not fully benefit from its capabilities. Additionally, despite its strong WiFi 7 performance, the real-world benefits of the 6GHz band will depend on device compatibility and regulatory limitations, which are still evolving. The absence of more detailed LED indicators and the reliance on a single PoE port may also be seen as minor inconveniences for users who expected more from this mid-range offering.
Overall, the UniFi Dream Router 7 offers an excellent balance of performance, features, and pricing, making it a solid choice for users looking to upgrade to WiFi 7 and multi-gig networking. Its strong hardware, extensive software options, and future-proofing potential make it a standout option in the sub-$300 price range. However, its best value is realized within a UniFi-centric network, and those seeking broader third-party compatibility or simpler setups may need to weigh their options carefully.
PROS
CONS
WiFi 7 Support – Offers 2×2 6GHz connectivity with 320MHz channels, enabling faster speeds and lower latency.
Multi-Gig Networking – Includes three 2.5GbE LAN ports and a 10GbE SFP+ WAN/LAN port, making it highly future-proof.
Comprehensive UniFi Software – Provides robust network management features, including VLANs, QoS, IDS/IPS security, and VPN support.
Integrated UniFi Protect Support – Comes with a pre-installed 64GB WD Purple SD card, allowing local video storage for security cameras.
Flexible WAN/LAN Configurations – Supports dual WAN for failover or load balancing, or repurposing the 10GbE SFP+ port as LAN.
High Customization & Security – Offers advanced firewall controls, application-aware filtering, and in-depth traffic analytics.
User-Friendly Mobile App – Easy setup and management via the UniFi mobile app, with intuitive controls and real-time monitoring.
No UI.com Account Required – Can be set up locally without requiring an online UniFi account, providing more control over network privacy.
Limited PoE Support – Only includes one PoE-enabled 2.5GbE port, which may be a drawback for users looking to power multiple UniFi cameras or access points.
6GHz Band Availability Varies by Region – While WiFi 7 delivers significant improvements, the 6GHz spectrum and 320MHz channels may not be fully available in all areas, limiting real-world performance.
Not the Most Budget-Friendly Option – Although competitively priced for a WiFi 7 router, there are still more cost-effective alternatives on the market, especially for users who don’t need UniFi’s ecosystem.
This description contains links to Amazon. These links will take you to some of the products mentioned in today's content. As an Amazon Associate, I earn from qualifying purchases. Visit the NASCompares Deal Finder to find the best place to buy this device in your region, based on Service, Support and Reputation - Just Search for your NAS Drive in the Box Below
Need Advice on Data Storage from an Expert?
Finally, for free advice about your setup, just leave a message in the comments below here at NASCompares.com and we will get back to you.Need Help?
Where possible (and where appropriate) please provide as much information about your requirements, as then I can arrange the best answer and solution to your needs. Do not worry about your e-mail address being required, it will NOT be used in a mailing list and will NOT be used in any way other than to respond to your enquiry.
[contact-form-7]
TRY CHAT Terms and Conditions
If you like this service, please consider supporting us.
We use affiliate links on the blog allowing NAScompares information and advice service to be free of charge to you.Anything you purchase on the day you click on our links will generate a small commission which isused to run the website. Here is a link for Amazon and B&H.You can also get me a Ko-fi or old school Paypal. Thanks!To find out more about how to support this advice service checkHEREIf you need to fix or configure a NAS, check FiverHave you thought about helping others with your knowledge? Find Instructions Here
Or support us by using our affiliate links on Amazon UK and Amazon US
Alternatively, why not ask me on the ASK NASCompares forum, by clicking the button below. This is a community hub that serves as a place that I can answer your question, chew the fat, share new release information and even get corrections posted. I will always get around to answering ALL queries, but as a one-man operation, I cannot promise speed! So by sharing your query in the ASK NASCompares section below, you can get a better range of solutions and suggestions, alongside my own.
Comme vous l’avez peut-être vu, j’ai domotisé ma maison depuis un moment, notamment en intégrant le contrôle de mes volets roulants. Pourtant, un seul volet échappait encore à cette automatisation : un modèle solaire Velux, commandé par radio via une télécommande murale.
Mon objectif ? Pouvoir fermer ce volet automatiquement le soir et permettre à mon fils de le contrôler facilement depuis sa chambre, sans avoir recours à l’écran mural ni à un smartphone.
Une solution DIY trouvée sur GitHub
Après quelques recherches, j’ai découvert sur GitHub un projet ESPHome permettant de modifier la télécommande pour la connecter à un ESP8266. Cette solution répondait parfaitement à mon besoin initial, mais un problème persistait : la télécommande devenait inutilisable manuellement une fois modifiée, les fils soudés rendant les boutons inopérants.
J’ai alors envisagé une alternative : appairer une seconde télécommande avec le volet. Si cela fonctionnait, je pourrais conserver la commande murale d’origine et cacher une seconde télécommande modifiée avec l’ESP8266.
Pour vérifier cette hypothèse, il me fallait une seconde télécommande. Et quitte à expérimenter, autant éviter d’investir dans du neuf pour limiter les risques en cas d’échec. Après avoir relevé la référence de ma télécommande actuelle, je me suis tourné vers Le Bon Coin et ai trouvé une opportunité à 20 €.
Un test avec deux télécommandes… voué à l’échec
Mon hypothèse initiale s’est révélée incorrecte : il est impossible d’appairer deux télécommandes au même volet roulant Velux. Un seul émetteur radio peut être associé. Je m’y attendais, mais il était important de le vérifier.
Heureusement, j’avais déjà une autre solution en tête pour conserver des boutons physiques au mur tout en gardant une seule télécommande.
Une alternative : déplacer les boutons sur l’ESP8266
Plutôt que de modifier la télécommande elle-même, j’ai ajouté des boutons physiques directement à l’ESP et adapté le code en conséquence. Ainsi, l’ESP agit comme un relais : il pilote la télécommande, tandis que les boutons sont désormais connectés à lui et non plus à la télécommande.
Cette approche a un inconvénient : si l’ESP venait à tomber en panne, il deviendrait impossible de piloter le volet. J’aurais pu souder des boutons supplémentaires directement sur la télécommande pour contourner ce problème, mais cela m’aurait privé d’une fonctionnalité essentielle : connaître l’état du volet dans Home Assistant. Nous reviendrons sur ce point un peu plus loin…
Le boitier
Ma seconde idée était de créer un interrupteur mural encastrable, semblable à un interrupteur de lumière classique. Il a donc fallu tout calculer précisément pour que l’ensemble tienne dans l’espace réduit disponible. Je voulais également conserver les boutons d’origine de la télécommande Velux.
L’interrupteur est composé de 3 parties :
La base, qui contient l’alimentation, l’ESP8266, un bornier à visser et les connecteurs permettant de relier les platines décrites plus bas. Cette partie est conçue pour s’insérer dans une boîte d’encastrement de 63 mm de diamètre et 40 mm de profondeur.
La platine intermédiaire, qui se visse sur le premier bloc et sert aussi à fixer l’ensemble au boîtier encastrable grâce à ses deux trous prévus à cet effet.
Le couvercle, qui permet de réutiliser les boutons en plastique d’origine.
Je voulais un bouton le plus fin possible. La base était prête, mais j’ai dû réaliser plusieurs prototypes pour le couvercle. Initialement, je voulais conserver le caoutchouc situé entre la platine et les boutons en plastique afin d’améliorer le confort à l’appui, mais cela ajoutait trop d’épaisseur. Finalement, avec les mini-boutons que j’ai choisis, ce n’était pas nécessaire.
Au final, le bouton dépassera de 15 mm du mur.
Et voici notre commande avec la réutilisation des boutons de la télécommande. Pour l’impression 3D, aucun support n’est nécessaire. Les fichiers sont téléchargeable en cliquant ici.
Entrons dans la construction
Pour réaliser cette modification il nous faut:
Une télécommande qui correspond à votre Velux (testez-la avant la modification) ;
Il faut commencer par démonter complétement la télécommande. Pour le moment nous allons garder que le PCB.
Sur celui-ci, un film plastique est collé pour retenir les pastilles métalliques servant de ressorts pour les boutons. Retirez le film ainsi que les pastilles. Vous devez également dessouder les ressorts des piles.
Avant de commencer la modification électronique, voici un schéma.
Nous avons :
Le PCB de la télécommande d’origine,
3 petits interrupteurs pour une commande manuelle,
Un ESP8266 D1 Mini,
Une alimentation 230V / 5V,
Un disjoncteur de 2A pour alimenter l’ensemble.
Pour toutes les liaisons j’ai utilisé du fil de 28 AWG.
Pour piloter la télécommande, il faudra envoyer une impulsion électrique au centre des boutons. Grattez légèrement la surface pour que la soudure adhère, puis soudez un fil sur chaque bouton.
Le PCB a besoin d’une alimentation. La télécommande fonctionnant avec deux piles de 1,5V, soit 3V au total, nous allons l’alimenter via l’ESP8266 et son pin 3.3V.
Soudez un fil sur le + et un autre sur le –, en veillant à ne pas les inverser.
Nous allons maintenant préparer la platine qui servira aux boutons physiques. Il vous faudra une plaque de 2 cm par 8 cm, qui devra être découpée par la suite. Vous remarquerez deux trous légèrement plus grands, destinés au montage sur la plaque.
Placez les boutons en plastique sur le cache, puis, à l’aide de deux petites vis, fixez la platine sur le couvercle.
Je n’ai pas pensé à prendre une photo du PCB avec les fils soudés, mais sur celle-ci, vous pouvez voir comment j’ai procédé.
Avant de souder les fils à vos mini-interrupteurs, faites attention à leur fonctionnement. En effet, ils peuvent être configurés de deux façons : soit en contact ouvert, soit en contact fermé en continu, selon l’endroit où vous soudez. Utilisez un multimètre pour identifier les pins à utiliser. Dans notre cas, le circuit doit être ouvert lorsque le bouton n’est pas enfoncé.
Une fois cette étape terminée, reliez tous les boutons à la masse.
Ensuite, fixez le PCB de la télécommande à l’aide de deux vis. Il repose légèrement sur le PCB des boutons, ce qui est normal. Je n’ai pas eu d’autre choix afin de conserver une taille standard, comparable à un interrupteur ou une prise murale.
Sur le PCB de la télécommande, on peut voir un nouveau fil noir. Il permet de relier toutes les masses des mini-boutons au circuit.
On remarque également les connecteurs JST, qui offrent la possibilité de démonter facilement le bouton si besoin.
Programmation de l’ESP
Avant de continuer, il va falloir injecter le programme de l’ESP dans notre ESP8266.
Sur Home Assistant, allez dans ESPHome Builder, puis cliquez sur New Device. Indiquez un nom, puis passez à l’étape suivante. Dans la liste, sélectionnez ESP8266, puis cliquez sur Suivant. Dans la dernière étape, cliquez sur Skip.
Notre dispositif est créé, nous allons maintenant ajouter le code YAML. Cliquez sur Éditer.
Dans cette nouvelle fenêtre, supprimez tout le code déjà présent. Copiez et collez le code ci-dessous.
Avant de continuer, modifiez l’IP statique, la gateway et le subnet. Si vous préférez utiliser une IP en DHCP, supprimez les lignes 13 à 16.
Vous pouvez fermer la fenêtre de l’éditeur de code. Allez dans le menu avec les trois points pour valider que le code est correct, puis cliquez sur Validate.
Si vous voyez la case verte, cela signifie que tout est OK. Vous pouvez maintenant cliquer sur Install.
À cette étape, il faudra brancher l’ESP sur un port USB du PC serveur. Si vous utilisez Proxmox, vous devrez ajouter le port USB à la VM et redémarrer complètement la VM.
Vous pouvez aussi télécharger le programme sur votre PC, puis, avec un navigateur compatible comme Chrome, injecter le programme directement dans l’ESP en USB.
Étant sur une VM, je vais choisir la troisième option. La deuxième option reste cependant la plus facile.
Une fois le code injecté, votre ESP8266 va redémarrer et apparaître en Online. Cliquez sur Logs pour vérifier si tout est OK.
Dans le menu Paramètres, puis Appareils et services, vous trouverez votre ESP prêt à être configuré.
Vous y trouverez ensuite toutes les entités et boutons nécessaires pour piloter votre volet.
Reprenons la fabrication du boitier
Nous avons terminé la première partie. Pour la suite, soudez l’alimentation de l’ESP8266 en 5V. Pour la partie arrivée du 230V, il vous faudra un fil un peu plus épais, comme du 0,5 mm² voire 0,75 mm². À l’extrémité de ce fil, soudez un bornier à vis. Sur un morceau de PCB de 7 cm x 3 cm, soudez deux connecteurs JST (un à 5 pins pour le PCB de la télécommande et un à 3 pins pour le PCB des mini-boutons).
Reportez-vous au schéma pour le raccordement à l’ESP. Bien entendu, au niveau des connecteurs, il n’y a pas d’ordre spécifique. À vous de bien vous repérer en utilisant la partie femelle du connecteur, que nous avons sur le couvercle.
On peut maintenant tout monter dans le boîtier. Avant cela, repérez la longueur nécessaire pour le PCB des connecteurs afin de couper une partie si nécessaire. Pour le montage de l’ESP, une fente au fond du boîtier est prévue. Je vous recommande de mettre un point de colle pour qu’il ne bouge pas.
Pour le bornier à vis, un espace est également prévu.
Faites une dernière vérification de vos câbles pour vous assurer que tout correspond entre le connecteur JST mâle et femelle. Enfin, vissez le PCB avec deux vis.
Voici notre cube terminé.
Montez la platine avec 4 vis. Les 2 trous restants serviront à fixer le bouton sur la boîte encastrable. On remarque que le port USB reste accessible en cas de besoin. Il suffira d’ouvrir le couvercle et de brancher notre PC dessus, sans avoir à tout démonter.
Vous pouvez maintenant connecter le couvercle à la platine.
Notre commande murale Velux connectée en Wi-Fi est maintenant prête.
Sur la partie basse du bouton, le couvercle est maintenu par une vis. Le bornier est également accessible, ce qui permet un montage facile.
Montage murale
Pour cela j’ai tiré une nouvelle ligne avec du câble de 1.5mm. Je suis arrivé à descendre une gaine de mon grenier pour aller rejoindre le bouton de la lumière de la chambre d’un côté et de l’autre mon tableau électrique sur le quel j’ai ajouté un disjoncteur de 2A dédié à cette ESP. Je n’est pas pu mettre le bouton juste au dessus de la lumière, car juste derrière il y a le bouton de mon couloir.
Pour cela, j’ai tiré une nouvelle ligne avec du câble de 1,5 mm². J’ai réussi à descendre une gaine depuis mon grenier pour rejoindre le bouton de la lumière de la chambre d’un côté, et de l’autre, mon tableau électrique, où j’ai ajouté un disjoncteur de 2A dédié à cet ESP. Je n’ai pas pu mettre le bouton au-dessus de la lumière, car juste derrière se trouve le bouton du couloir.
Ensuite, montage du boîtier encastrable et raccordement. Le bouton est fixé dans le mur avec les vis fournies avec le boîtier. On monte le couvercle et on n’oublie pas la petite vis sous le bouton.
Conclusion
Nous avons maintenant un volet connecté, pilotable aussi bien sur Home Assistant que manuellement. Le volet se ferme désormais automatiquement le soir avec tous les autres volets de la maison. Lors de nos absences, il pourra également s’ouvrir automatiquement le matin. Notre panneau de commande peut être ajouté à notre dashboard.
Concernant le retour d’état, il n’est pas forcément réel. En effet, lorsque vous appuyez sur « fermer » ou « ouvrir », l’icône passera en rouge ou en vert, mais les deux flèches resteront actives, contrairement à mes autres volets. Pour avoir un véritable retour d’état, il faudrait ajouter un contacteur d’ouverture de fenêtre, mais son installation en extérieur serait compliquée.
Synology vient de déployer 2 nouvelles versions de son logiciel interne : DSM 7.2.1 Update 7 et DSM 7.1.1 Update 8. Ces mises à jour apportent quelques nouveautés, mais surtout corrigent une des failles de sécurité identifiées lors du concours PWN2OWN 2024. Si DSM 7.2.2 avait rapidement reçu les correctifs, les versions antérieures n’avaient pas encore été mises à jour jusqu’à présent…
DSM 7.2.1 update 7 et DSM 7.1.1 update 8
Si vous n’avez pas passé votre NAS sous DSM 7.2.2 ou si votre boitier n’est pas compatible, vous serez ravis de savoir que Synology vient de mettre à DSM 7.2.1 et DSM 7.1.1. En effet, le fabricant vient de mettre à disposition les mises à jour. Voici ce qu’indique le journal des modifications :
1. DSM 7.2.1 update 7
Amélioration : Ajout de la prise en charge de la vérification des certificats des serveurs LDAP lors de la connexion à un annuaire :
La vérification des certificats pour C2 Identity Edge Server n’est pas prise en charge.
Cette configuration ne peut pas être sauvegardée dans la sauvegarde du système DSM ou dans Hyper Backup.
Ce que n’indique pas Synology (certainement un oubli), c’est que cette mise à jour ajoute également la correction de la faille sous la référence Synology-SA-25:01. Pour rappel, cette dernière permet à des attaquants de type « man-in-the-middle » de détourner l’authentification des administrateurs.
2. DSM 7.1.1 update 8
Amélioration : Ajout de la prise en charge de la vérification des certificats des serveurs LDAP lors de la connexion à un annuaire :
La vérification des certificats pour C2 Identity Edge Server n’est pas prise en charge.
Cette configuration ne peut pas être sauvegardée dans la sauvegarde du système DSM ou dans Hyper Backup.
Problèmes corrigés :
Le système pouvait afficher un statut incorrect dans les paramètres de notification par e-mail.
Certains paquets ne s’affichaient pas après l’installation.
Là encore, le fabricant a oublié de préciser que cette version corrigeait la faille Synology-SA-25:01.
Comment télécharger et installer DSM ?
Si votre NAS fonctionne toujours sous DSM 7.2.1 ou DSM 7.1.1, il est fortement recommandé d’appliquer ces mises à jour afin d’améliorer la sécurité. Voici la procédure à suivre pour installer manuellement si votre système ne propose pas automatiquement la mise à jour :