Windows 11 avait fait couler beaucoup d’encre lors de sa sortie car la configuration minimale requise était assez compliquée à avoir pour tous (TPM, Secure Boot, Processeur récent…). Cependant, nous l’avons vu ici sur le blog et également en vidéo, il est assez simple de contourner ces prérequis. Jusqu’à aujourd’hui Microsoft n’avait encore rien fait …
Hey ! Bonjour à toutes et à tous ! 🤙 Nous voici de nouveau ensemble pour un nouvel article et aujourd’hui, celui-ci va concerner un nouveau paramétrage qui a fait son apparition dans les dernières mises à jour de Windows 11. Il s’agit d’une option qui fait que votre touche Impr. Écran de votre clavier …
Les bloatwares… véritable fléau lors de l’installation de Windows. Ce sont ces « petits » logiciels qui viennent polluer votre installation sur l’OS de Microsoft : TikTok, Instagram, Spotify, Prime Vidéo, Netflix…. Nous avions déjà vu ensemble qu’il existe des logiciels ou des scripts pour supprimer ces bloatwares. Cependant c’était une méthode qui n’était pas toujours 100% …
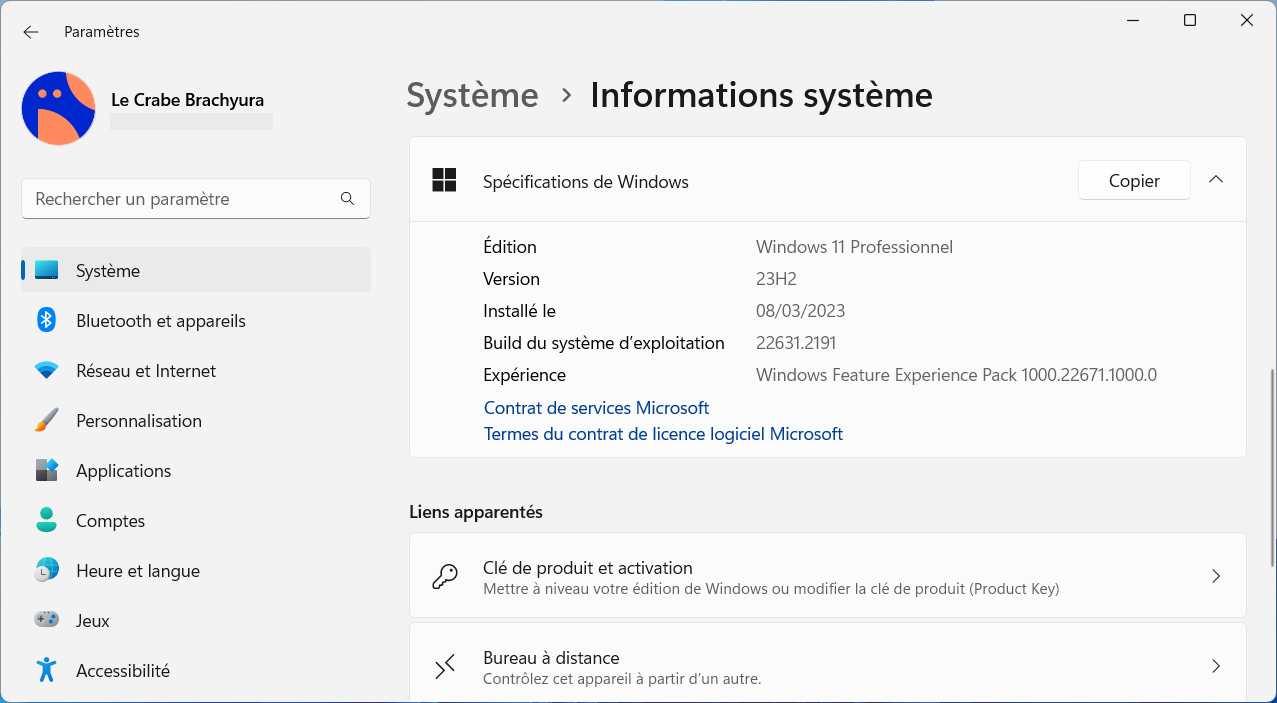
Windows 11 23H2 (nom de code « Sun Valley 3 », build 22631) est la nouvelle mise à jour majeure de Windows 11 qui a été déployée le 31 octobre 2023.
Cette mise à jour s’accompagne de nombreuses nouveautés et améliorations. De Windows Copilot à la nouvelle application Sauvegarde Windows en passant par une nouvelle interface pour l’Explorateur de fichiers, cette version 23H2 de Windows 11 regorge de nouveautés qui améliorent notre expérience sur PC au quotidien !
Envie de découvrir toutes les nouvelles fonctionnalités de Windows 11 23H2 ?
Comme à l’accoutumée sur Le Crabe Info, nous allons vous lister et vous expliquer en détails et en images toutes les nouveautés de la prochaine version de Windows 11 afin que vous soyez prêt à les utiliser dès maintenant !
Spécifications de Windows – Windows 11 23H2
Résumé des nouveautés de Windows 11 23H2
Vous n’avez pas le temps ?
Vous voulez connaître en deux minutes toutes les nouveautés de Windows 11 23H2 ?
Voici un résumé des nouveautés les plus importantes :
Nouvel assistant Windows Copilot alimenté par l’intelligence artificielle.
Nouvelle application Sauvegarde Windows.
Nouvelle application Dev Home pour les développeurs.
Support natif des archives au format RAR, 7-zip, TAR et GZ.
Prise en charge des passkeys.
Nouvelle fonctionnalité Éclairage dynamique pour gérer l’éclairage RGB de ses périphériques sans avoir besoin d’utiliser d’applications tierces.
Nouvelle interface pour l’Explorateur de fichiers.
Barre des tâches : possibilité de dégrouper les instances d’une même application et d’afficher le nom des applications (comme dans les versions précédentes de Windows).
Paramètres : nouvelle page d’accueil avec des cartes interactives, gestion des disques virtuels (VHD, VHDX et disque Dev) et amélioration du réseau.
Widgets : nouvelle option permettant de désactiver le flux d’actualités et d’épingler des widgets sur le Bureau.
Microsoft Store : ajout de fonctionnalités d’intelligence artificielle.
Partage de fichiers : interface mise à jour avec des vitesses de transfert plus rapides.
Windows 11 23H2 : la liste de toutes les nouveautés !
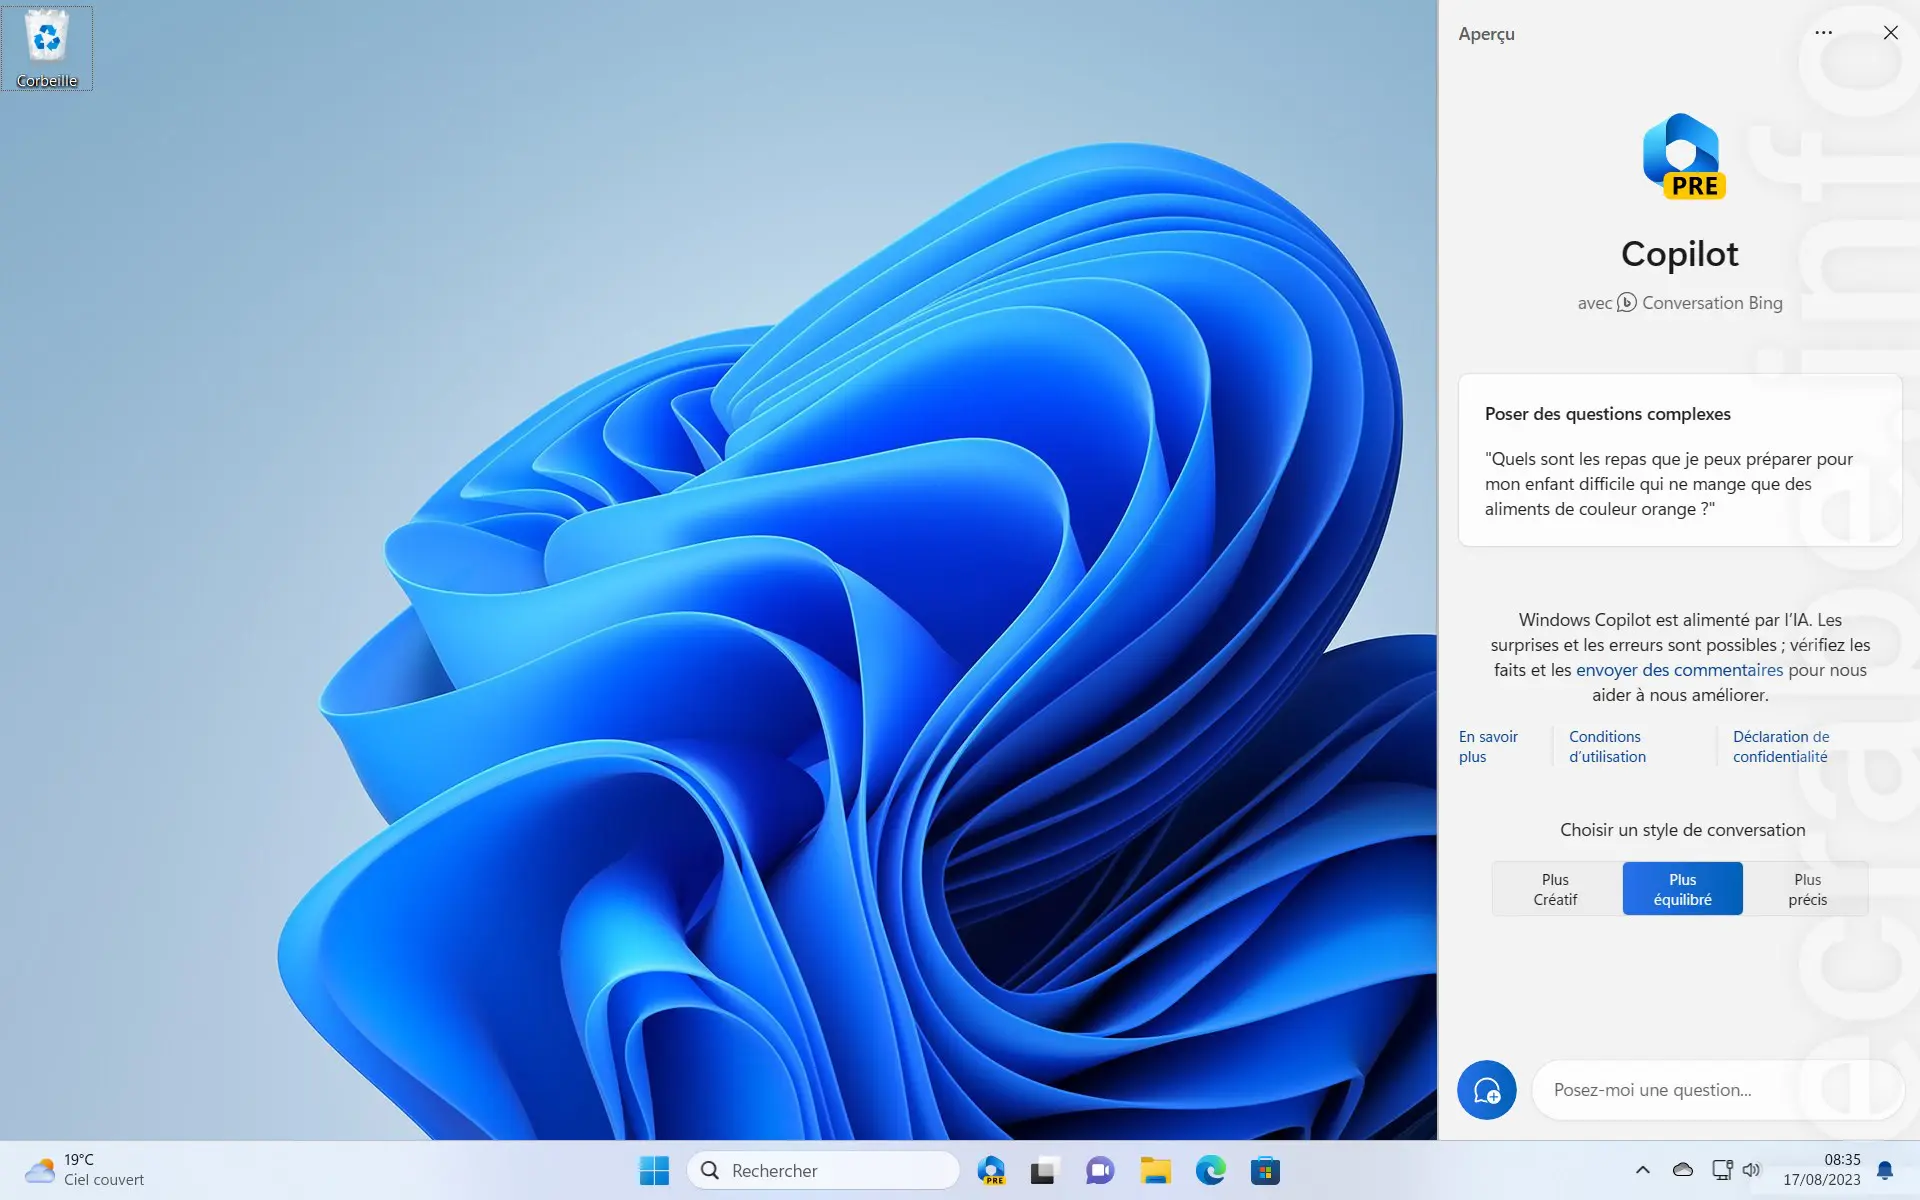
Nouveau Windows Copilot
La nouveauté majeure de Windows 11 23H2 est sans aucun doute Windows Copilot, un assistant virtuel basé sur l’intelligence artificielle qui vous permet d’obtenir rapidement des informations sur n’importe quel sujet, d’obtenir de l’aide pour effectuer diverses tâches et activités, d’interagir avec les applications et même modifier certains paramètres de Windows et exécuter des commandes.
Windows Copilot
Windows Copilot est accessible depuis la barre des tâches ou via le raccourci clavierWin ❖ + C et s’ouvre dans une barre latérale située à droite de l’écran. Une fois ouverte, la barre latérale de Windows Copilot reste affichée à côté des applications ouvertes pour être toujours disponible et agir comme un assistant personnel.
Grâce à l’intégration de Bing Chat, il est possible de poser à Windows Copilot toute une série de questions, des plus simples aux plus complexes. Vous pouvez par exemple l’utiliser pour trouver un voyage, une activité, un établissement ou n’importe quelle information.
Windows Copilot est amené à remplacer Cortana, Microsoft ayant déjà annoncé qu’il retirerait son ancien assistant virtuel avant la fin de l’année.
Windows Copilot à côté de l’application Microsoft Edge
Bien que promoteur, d’après les tests effectués par nos confrères de BleepingComputer, Windows Copilot est pour l’instant décevant sur plusieurs points.
Premièrement, l’assistant IA de Microsoft semble être davantage une enveloppe web plutôt qu’une application totalement intégrée au système d’exploitation. Au niveau de l’expérience utilisateur, on a l’impression d’utiliser Bing.com dans Microsoft Edge.
Deuxièmement, Windows Copilot a souvent du mal comprendre l’intention de l’utilisateur. Par exemple, lorsque l’on demande de désactiver le mode clair alors que le mode sombre est activé, Windows Copilot effectue une recherche sur Bing.com et fournit des instructions au lieu de modifier les paramètres du système et répondre à la demande de l’utilisateur.
Enfin, Windows Copilot est souvent lent. L’assistant IA de Microsoft a tendance à prendre du temps pour faire une recherche sur le web ou exécuter une action, ce qui nuit à l’expérience utilisateur. Étant donné que la version actuelle de Copilot dépend fortement de la qualité de connexion Internet, les utilisateurs peuvent rencontrer des problèmes de réactivité, d’autant plus si lorsque la connexion internet est lente ou indisponible.
Nouvelle interface pour l’Explorateur de fichiers
Basé sur la nouvelle bibliothèque WinUI 3, l’Explorateur de fichiers de Windows 11 s’accompagne de quelques nouveautés intéressantes avec – entre autres – une nouvelle interface visuelle pour la page Accueil, une nouvelle vue Galerie et des changements visuels dans l’en-tête.
Voici toutes les nouveautés de l’Explorateur de fichiers dans Windows 11 23H2 :
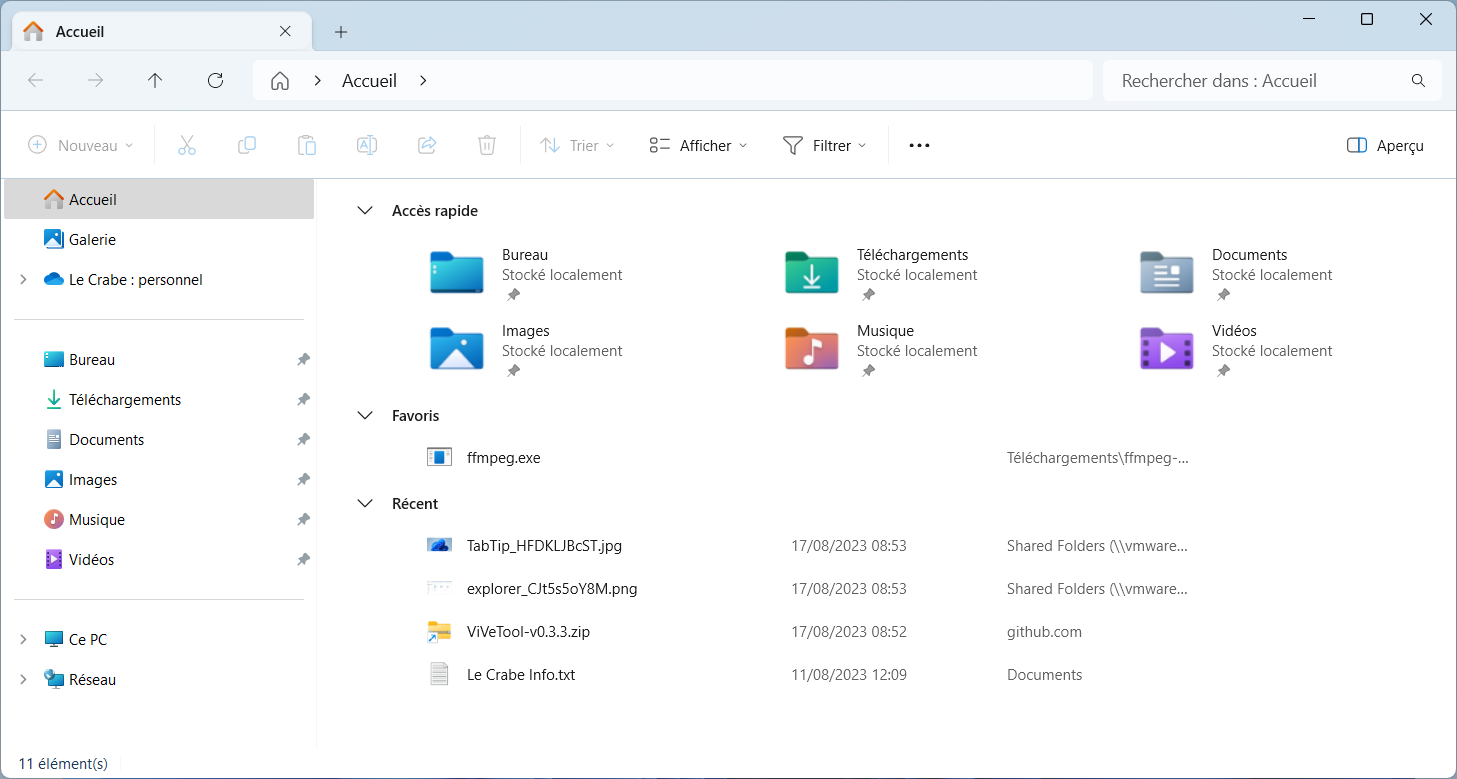
Page Accueil : bien qu’elle conserve sa conception habituelle, la page Accueil (et ses groupes Accès rapide, Favoris et Récent) a été redessinée. Techniquement, elle utilise désormais le framework Windows UI Library (WinUI), ce qui explique ces changements visuels qui sont plus en harmonie avec le design de Windows 11.
La nouvelle page Accueil de l’Explorateur de fichiers
L’en-tête de l’Explorateur de fichiers a aussi été mis à jour. La zone de navigation (boutons de navigation, barre d’adresse et barre de recherche) a été rafraîchie et est maintenant intégrée dans l’en-tête ; la barre d’outils et ses différentes commandes (copier, coller, renommer, supprimer…) est maintenant située sous la zone de navigation.
Le nouvel en-tête de l’Explorateur de fichiers
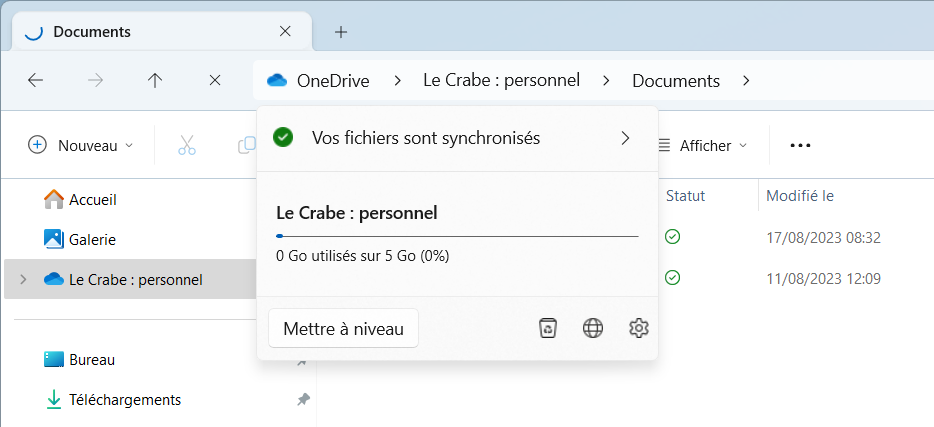
Barre d’adresse : lorsque vous êtes dans OneDrive, la barre d’adresse affiche désormais l’état de synchronisation des fichiers OneDrive, et en cliquant l’icône, un nouveau volet s’ouvre avec le quota de stockage et des boutons d’accès vers la corbeille, l’application web de OneDrive et les paramètres.
De plus, la barre d’adresse n’affiche plus de barre de progression verte. À la place, l’icône de l’onglet s’anime, indiquant que l’emplacement est en cours de chargement.
État de OneDrive dans l’Explorateur de fichiers
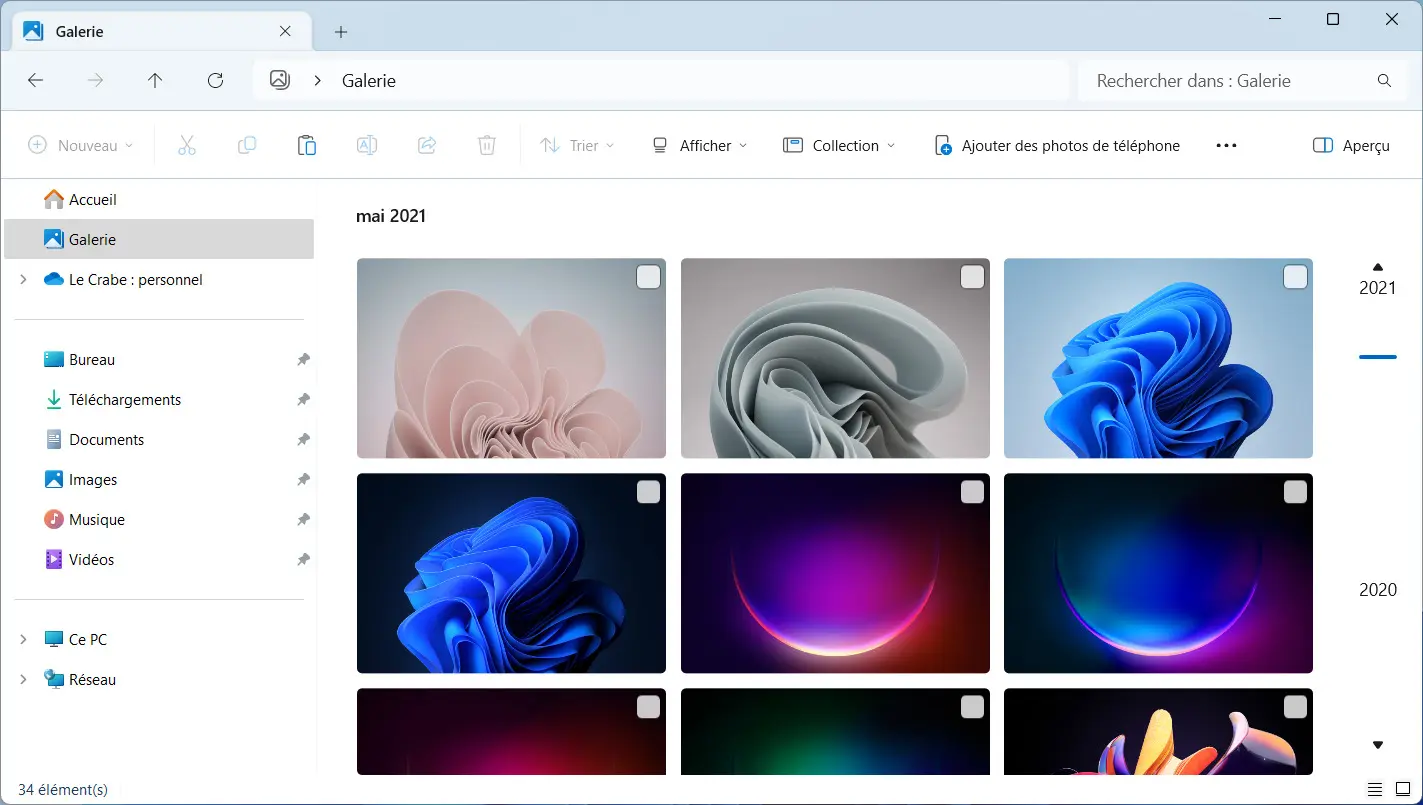
La nouvelle page Galerie introduit une nouvelle façon de visualiser et de gérer les images. Cette nouvelle page affiche les images de la même manière que l’application Photos, avec des miniatures plus grandes, des coins arrondis, le nom des fichiers masqué et l’utilisation d’un tri chronologique.
Sur cette nouvelle page, vous pouvez utiliser l’option Gérer les emplacements dans le menu Collection pour ajouter ou supprimer des dossiers contenant des images. Par défaut, la page Galerie n’affiche que le contenu du dossier Images de l’utilisateur.
Enfin, un nouveau bouton Ajouter des photos du téléphone est disponible dans la barre de commandes pour connecter votre téléphone et accéder aux photos qu’il contient.
Nouvelle page Galerie dans l’Explorateur de fichiers
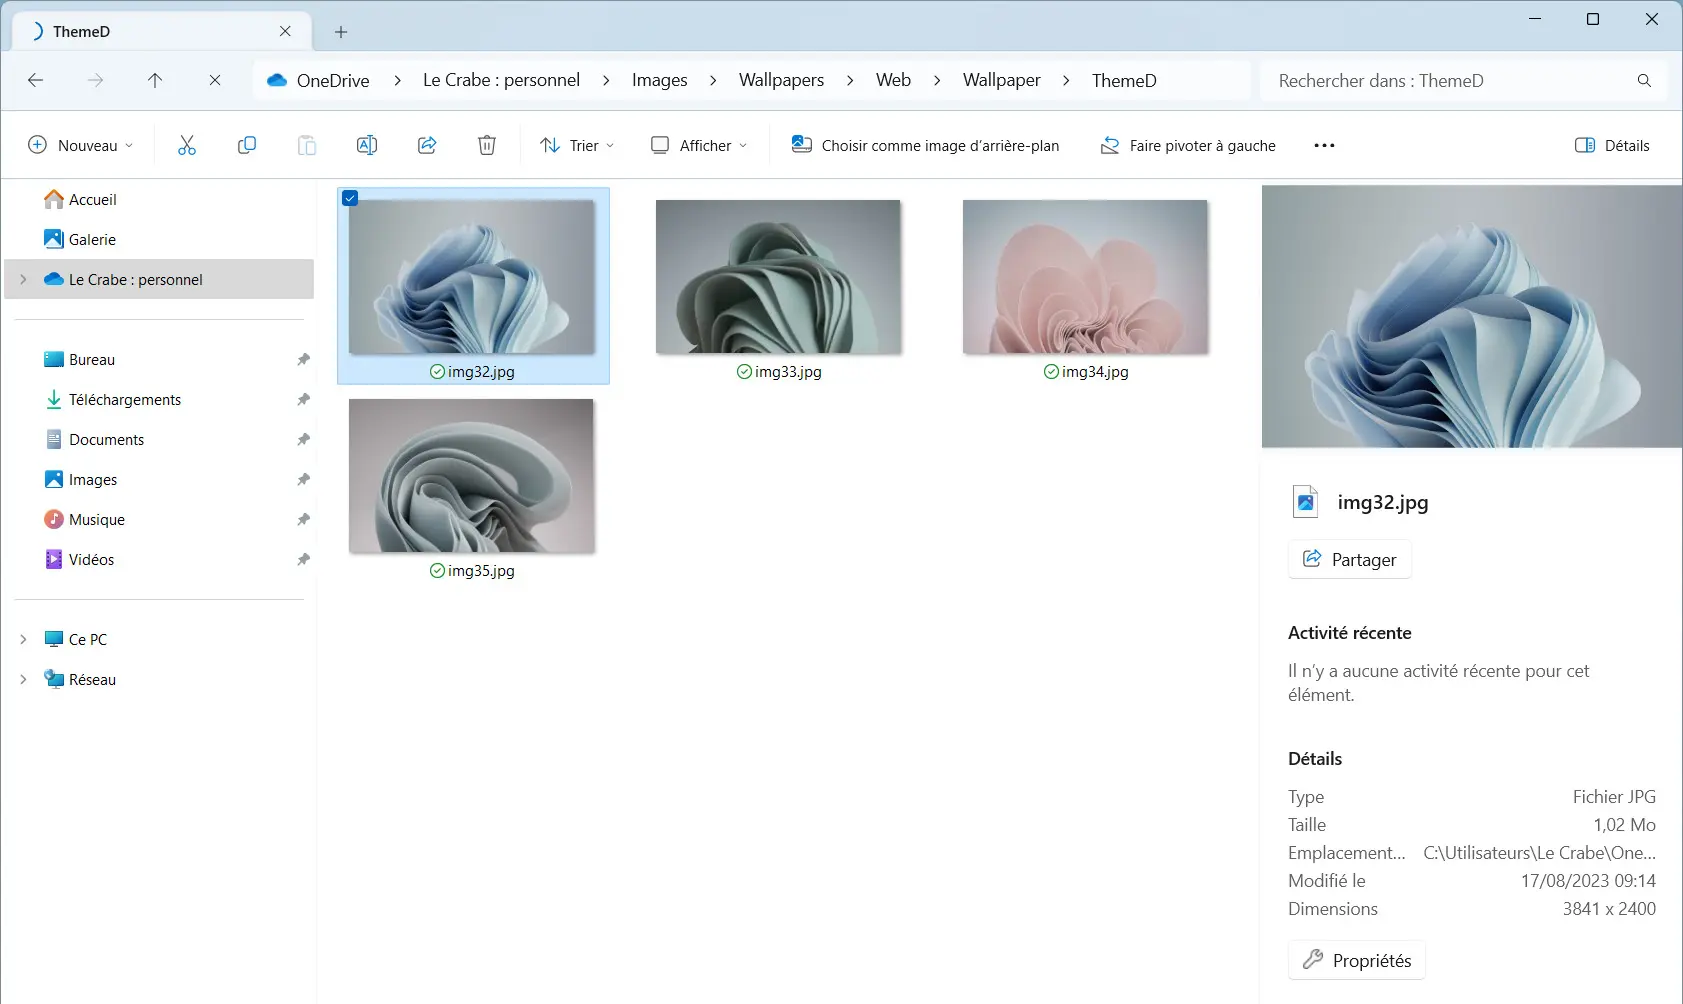
Le volet des détails offre plus d’informations et d’actions pour un fichier, un dossier ou un lecteur sélectionné.
Nouveau volet Détails dans l’Explorateur de fichiers
Enfin, il est désormais possible de faire glisser un onglet hors d’une fenêtre pour créer une autre instance de l’Explorateur de fichiers.
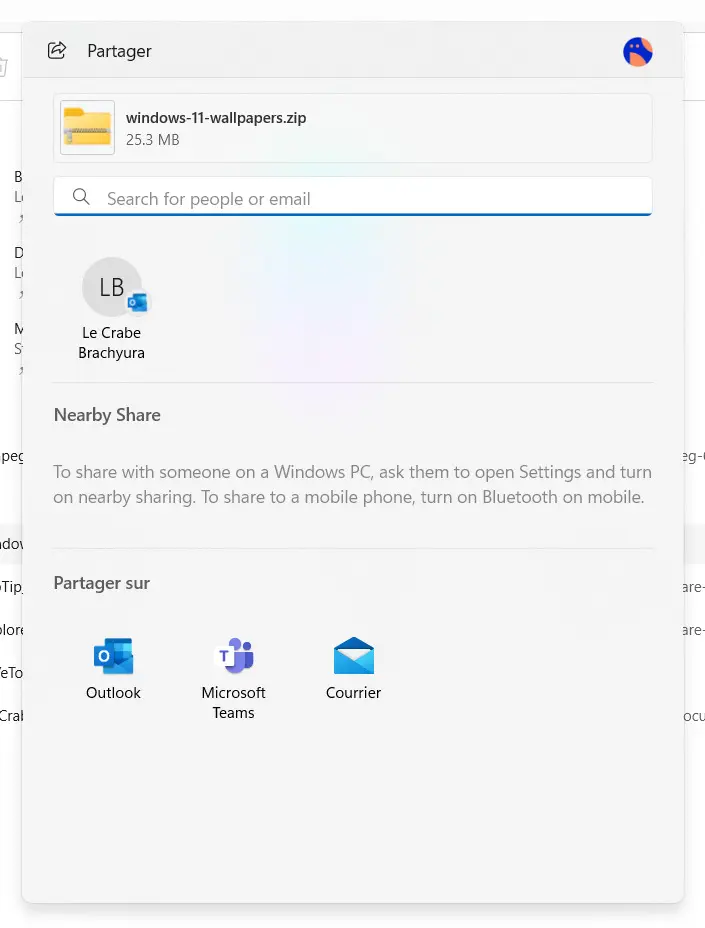
Partage de fichiers amélioré
Windows 11 23H2 intègre des améliorations importantes pour la fenêtre Partager, accessible en faisant un clic droit sur un fichier dans l’Explorateur de fichiers :
interface mise à jour pour correspondre au langage visuel de Windows 11 ;
une nouvelle option est disponible pour envoyer des fichiers par courrier électronique directement depuis la fenêtre Partager ;
une barre de recherche a été ajoutée pour rechercher des contacts dans Outlook ;
jusqu’à 10 contacts sont maintenant suggérés ;
un nouveau bouton a été ajouté pour activer le partage à proximité ;
vos propres PC sont affichés en haut de la liste sous « Partage à proximité ».
Nouvelle fenêtre « Partager » dans Windows 11 23H2Partage de fichiers via e-mail dans la fenêtre « Partager »
Par ailleurs, le partage de fichiers est maintenant plus rapide entre ordinateurs grâce à l’utilisation du Wi-Fi Direct.
Support natif des fichiers RAR, 7-zip, TAR et GZ
Windows 11 23H2 intégre nativement le support des formats d’archivage RAR et 7z grâce à la l’intégration du projet open-source « libarchive ».
Cette prise en charge permet d’ouvrir et d’extraire les formats de fichiers d’archivage suivants (de la même manière que vous le faites actuellement avec les fichiers ZIP dans l’Explorateur de fichiers) :
.tar
.tar.gz
.tar.bz2
.tar.zst
.tar.xz
.tgz
.tbz2
.tzst
.txz
.rar
.7z
Microsoft a aussi ajouté la possiblité de gérer les fichiers RAR et 7z via la ligne de commande avec PowerShell et l’invite de commandes.
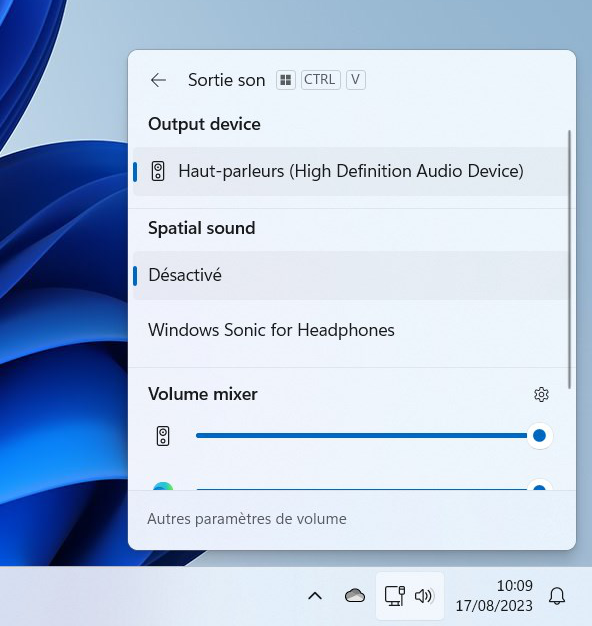
Mélangeur de volume amélioré
Windows 11 23H2 introduit un nouveau mélangeur de volume dans les Paramètres rapides, permettant de régler plus rapidement le volume audio de chaque application et de passer d’un périphérique de lecture audio à un autre instantanément.
Il donne également accès aux technologies de son spatial (comme Windows Sonic) et suggère des options supplémentaires telles que Dolby et DTS à partir du Microsoft Store.
Nouveau mélangeur de volume dans les Paramètres rapides
Un nouveau raccourci clavier Win ❖ + Ctrl + V permet un accès plus rapide au mélangeur de volume.
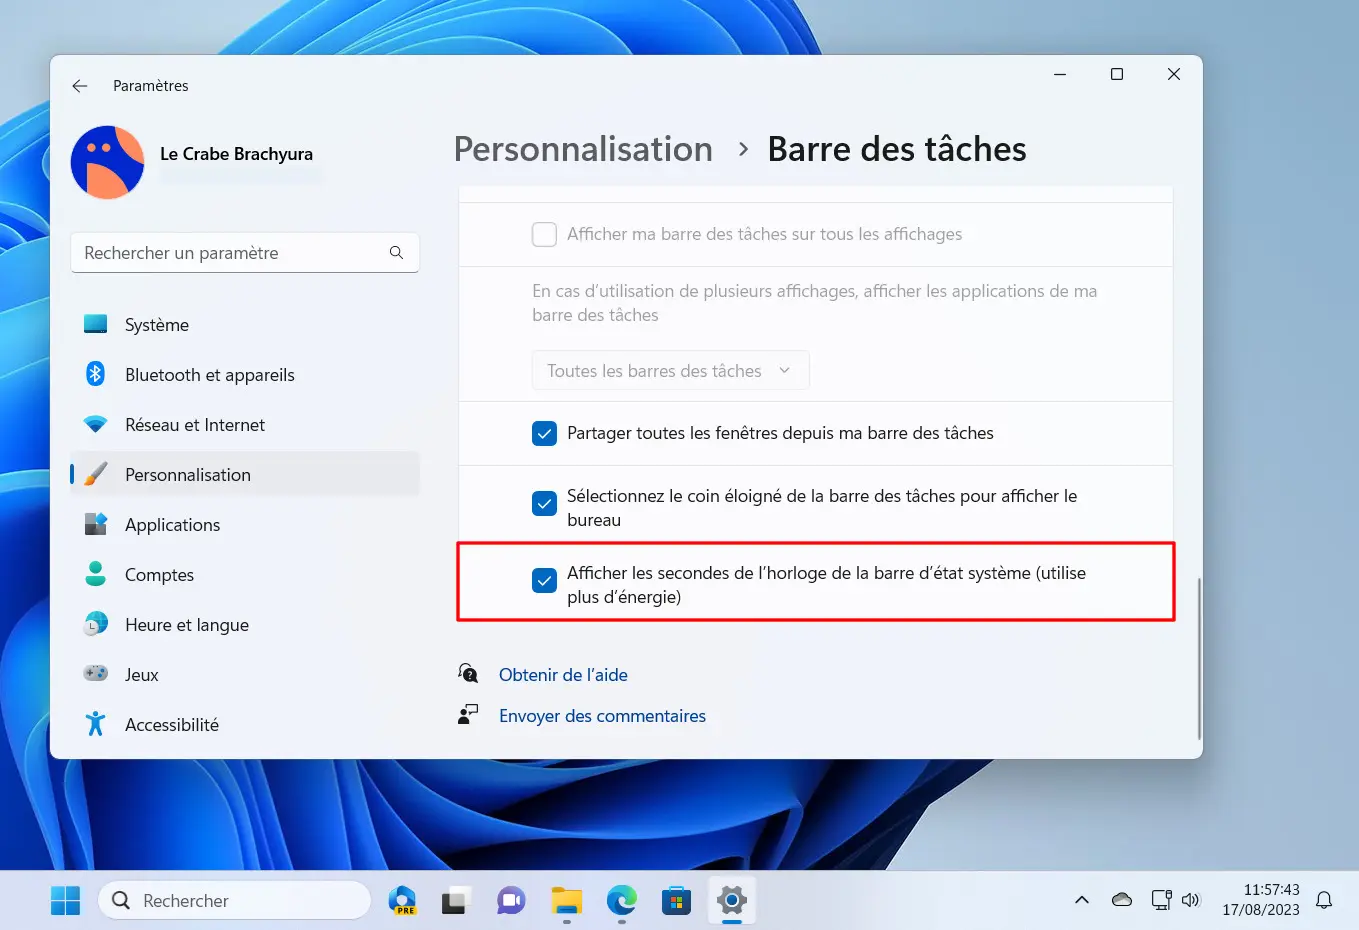
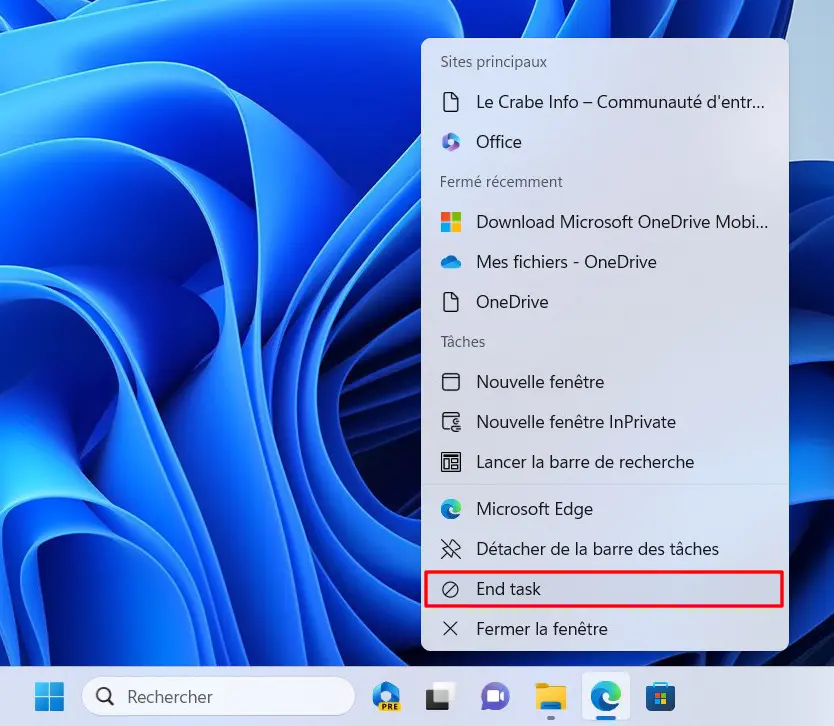
Nouvelles options pour la barre des tâches
Windows 11 23H2 intègre de nouvelles options de personnalisation et quelques changements intéressants pour la barre des tâches :
Affichage des secondes sur l’horloge : Microsoft réintègre l’option « Afficher les secondes de l’horloge » qui était disponible dans les anciennes versions de Windows et qui permet – comme son nom l’indique – d’afficher les secondes sur l’horloge dans la barre d’état système.
Affichage des secondes de l’horloge
Le menu contextuel des applications dans la barre des tâches inclut une nouvelle option Terminer la tâche (End task) qui permet de mettre fin à l’application sans ouvrir le Gestionnaire des tâches. Cependant, cette option ne sera pas disponible par défaut, il faut l’activer à partir de la page « Pour les développeurs » dans les Paramètres.
Terminer la tâche (End task) sur une application dans la barre des tâches
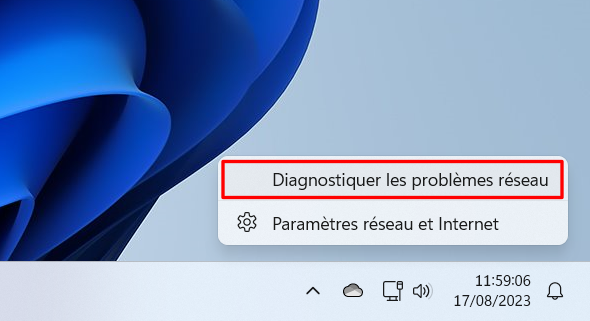
Le menu contextuel de l’icône réseau dans la zone de notification inclut une nouvelle option Diagnostiquer les problèmes réseau pour résoudre et corriger plus rapidement les problèmes de réseau.
Diagnostiquer les problèmes réseau
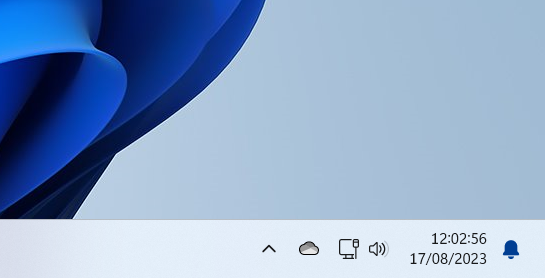
Notifications : une nouvelle icône « cloche » est maintenant présente tout à droite de la barre des tâches et permet d’accéder aux notifications. Auparavant, Windows 11 affichait uniquement le nombre de notifications non lues dans un cercle ; désormais, la cloche est toujours présente et est mise en valeur avec la couleur d’accentuation du système lorsqu’il y a de nouvelles notifications.
Nouvelle icône « cloche » pour les notifications
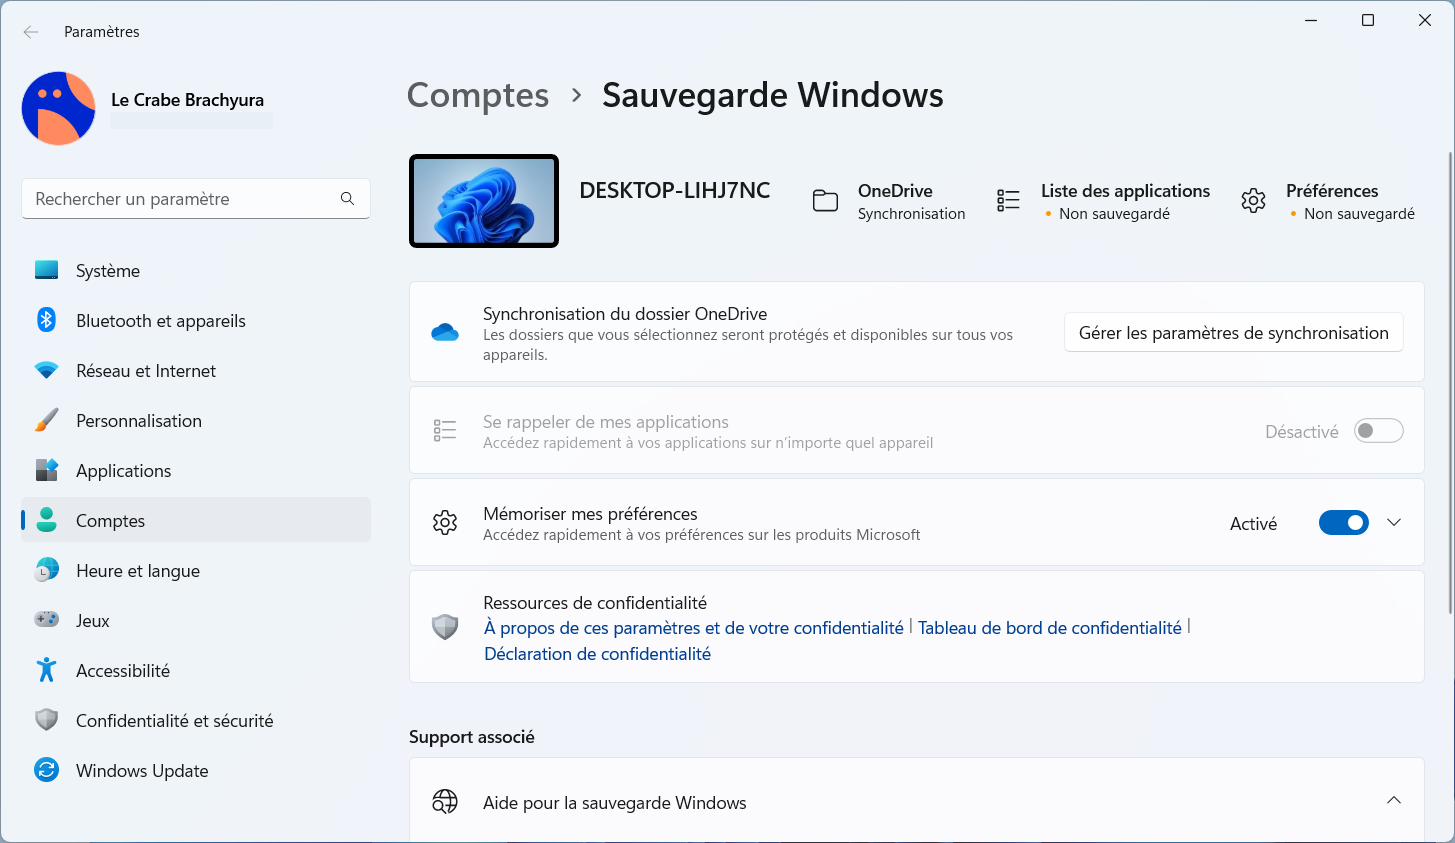
Nouvelle application Sauvegarde Windows
Windows 11 23H2 inclut une nouvelle application Sauvegarde Windows (Windows Backup).
Grâce à cette nouvelle application, vous allez pouvoir sauvegarder vos fichiers, paramètres, informations d’identification et applications (téléchargées sur le Microsoft Store) sur votre compte OneDrive et les restaurer sur un nouvel ordinateur ou après une nouvelle installation ou une réinitialisation de Windows 11.
Vous aurez la possiblité de restaurer une sauvegarde lors de la première configuration de Windows 11 et de récupérer d’anciens fichiers et dossiers disponibles dans une sauvegarde depuis votre compte OneDrive.
Nouvelle application Sauvegarde Windows
Bien que pratique, la nouvelle application Sauvegarde Windows ne crée pas vraiment de sauvegarde de vos applications. Au lieu de cela, elle se souvient des applications que vous avez installées sur votre ordinateur et de leurs paramètres, puis, lorsque vous les restaurez, le système télécharge et installe une nouvelle copie des applications à partir du Microsoft Store et restaure les paramètres.
À noter que seules les applications du Microsoft Store peuvent être sauvegardées, et non les applications Win32 classiques.
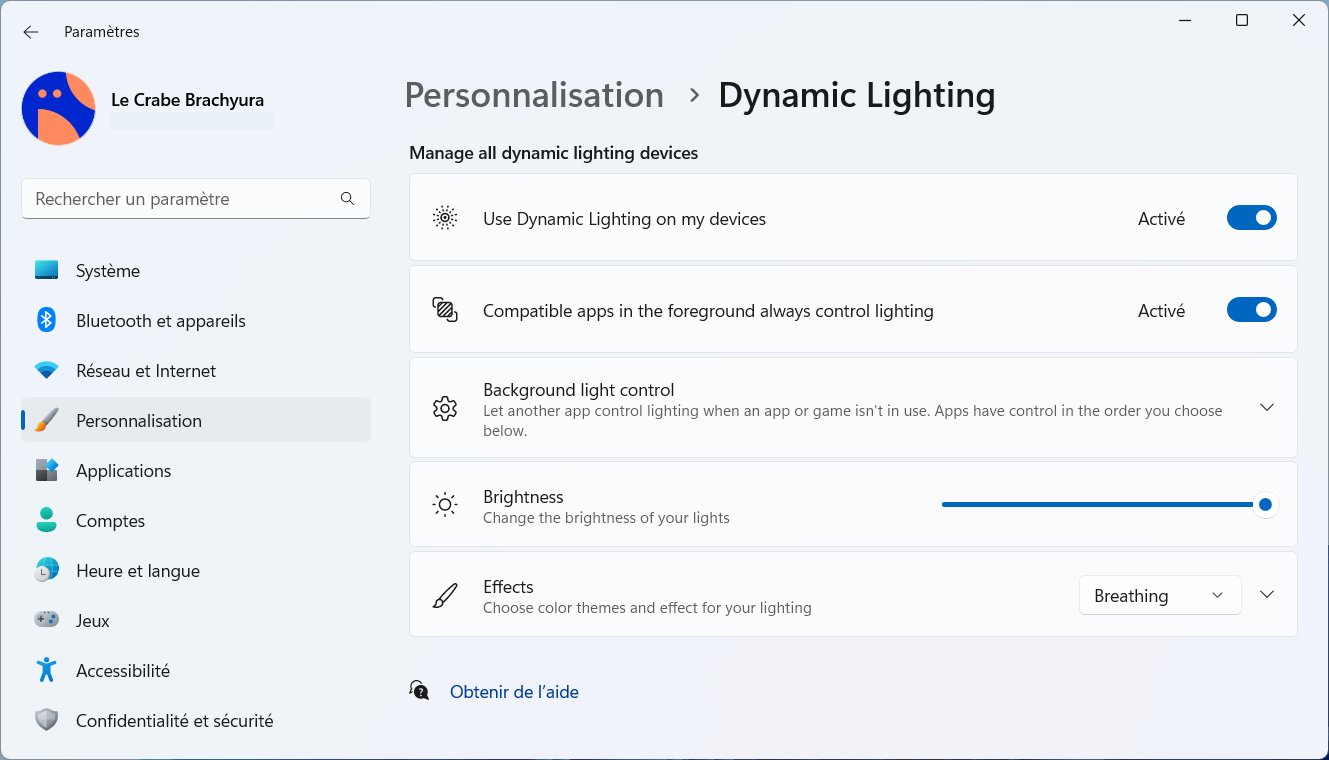
Éclairage dynamique (Dynamic Lighting)
Avec Windows 11 23H2, une nouvelle page Éclairage dynamique (Dynamic Lighting) fait son apparition dans les Paramètres et permet de gérer l’éclairage RGB de vos périphériques sans avoir besoin d’utiliser d’applications tierces.
Éclairage dynamique (Dynamic Lighting)
Actuellement, de nombreux accessoires fonctionnent et dépendent d’applications tierces et l’accumulation de toutes ces applications tierces n’est pas idéal. L’éclairage dynamique de Windows 11 améliore l’écosystème et permet de configurer et de personnaliser en un seul endroit les lumières RGB de tous vos appareils, directement depuis l’application Paramètres.
Disponible dans Paramètres > Personnalisation > Éclairage dynamique, il suffit d’activer l’option « Utiliser l’éclairage dynamique sur mes appareils » pour activer cette nouvelle fonctionnalité. Vous pourrez contrôler la luminosité, les effets d’éclairage (couleur unie, clignotement, arc-en-ciel…), la vitesse et la couleur, et vous aurez la possibilité de faire correspondre l’éclairage avec la couleur d’accentuation de Windows 11.
Microsoft s’est associé à plusieurs fabricants pour mettre en œuvre l’éclairage dynamique, notamment Acer, ASUS, HP, HyperX, Logitech, Razer et Twinkly. Par exemple, les claviers ASUS ROG Scope II Wireless 96 et Razer (BlackWidow, DeathStalker, Huntsman, Ornata et Turret Keyboard Xbox One Edition) sont d’ores et déjà pris en charge, tout comme les souris ASUS ROG Harpe Ace AimLab Edition, Microsoft Pro IntelliMouse et Razer (Turret Mouse Xbox One, DeathAdder, Naga Left-Handed et Naga Pro).
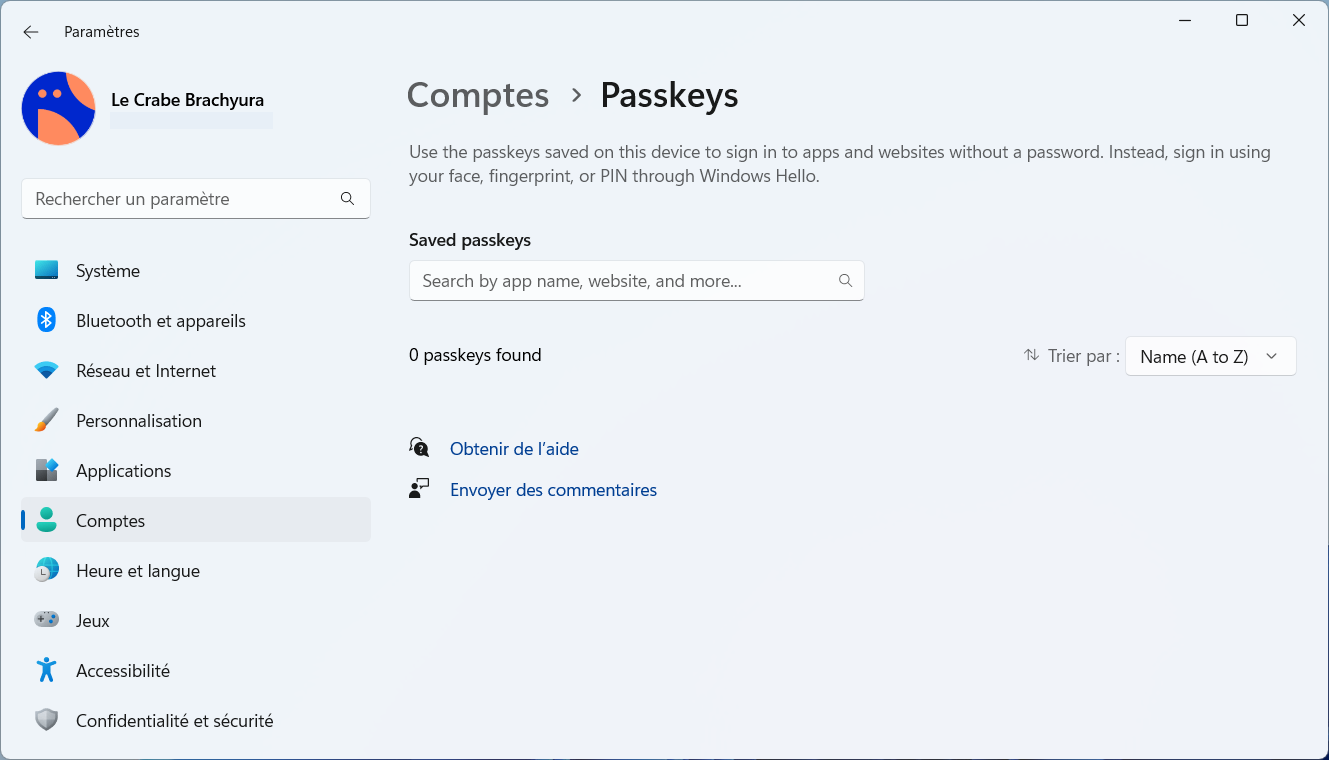
Support des passkeys
Microsoft poursuit son objectif d’un monde sans mot de passe !
Windows 11 23H2 prend maintenant en charge les passkeys, permettant aux utilisateurs de se connecter sur des applications et des sites web compatibles via Windows Hello en utilisant une méthode d’authentification biométrique (reconnaissance faciale, empreinte digitale) ou un code PIN. Ainsi, vous n’aurez plus besoin d’utiliser de mot de passe pour vous authentifier.
Une nouvelle page Passkeys est disponible dans les Paramètres > Comptes et permet d’afficher, de rechercher et de supprimer ses passkeys.
Gestion des passkeys dans Windows 11
Microsoft Paint en mode sombre
La célèbre application Microsoft Paint prend maintenant en charge le mode sombre.
Mode sombre dans Microsoft Paint
Quelques autres nouveautés également pour Microsoft Paint :
les commandes de zoom ont été améliorées pour régler plus finement le niveau de zoom et un nouveau bouton permet d’ajuster automatiquement le niveau de zoom à la taille de la fenêtre ;
la boîte de dialogue « Propriétés de l’image » a été mise à jour pour correspondre au design de Windows 11 ;
les touches d’accès et les raccourcis clavier ont été améliorés.
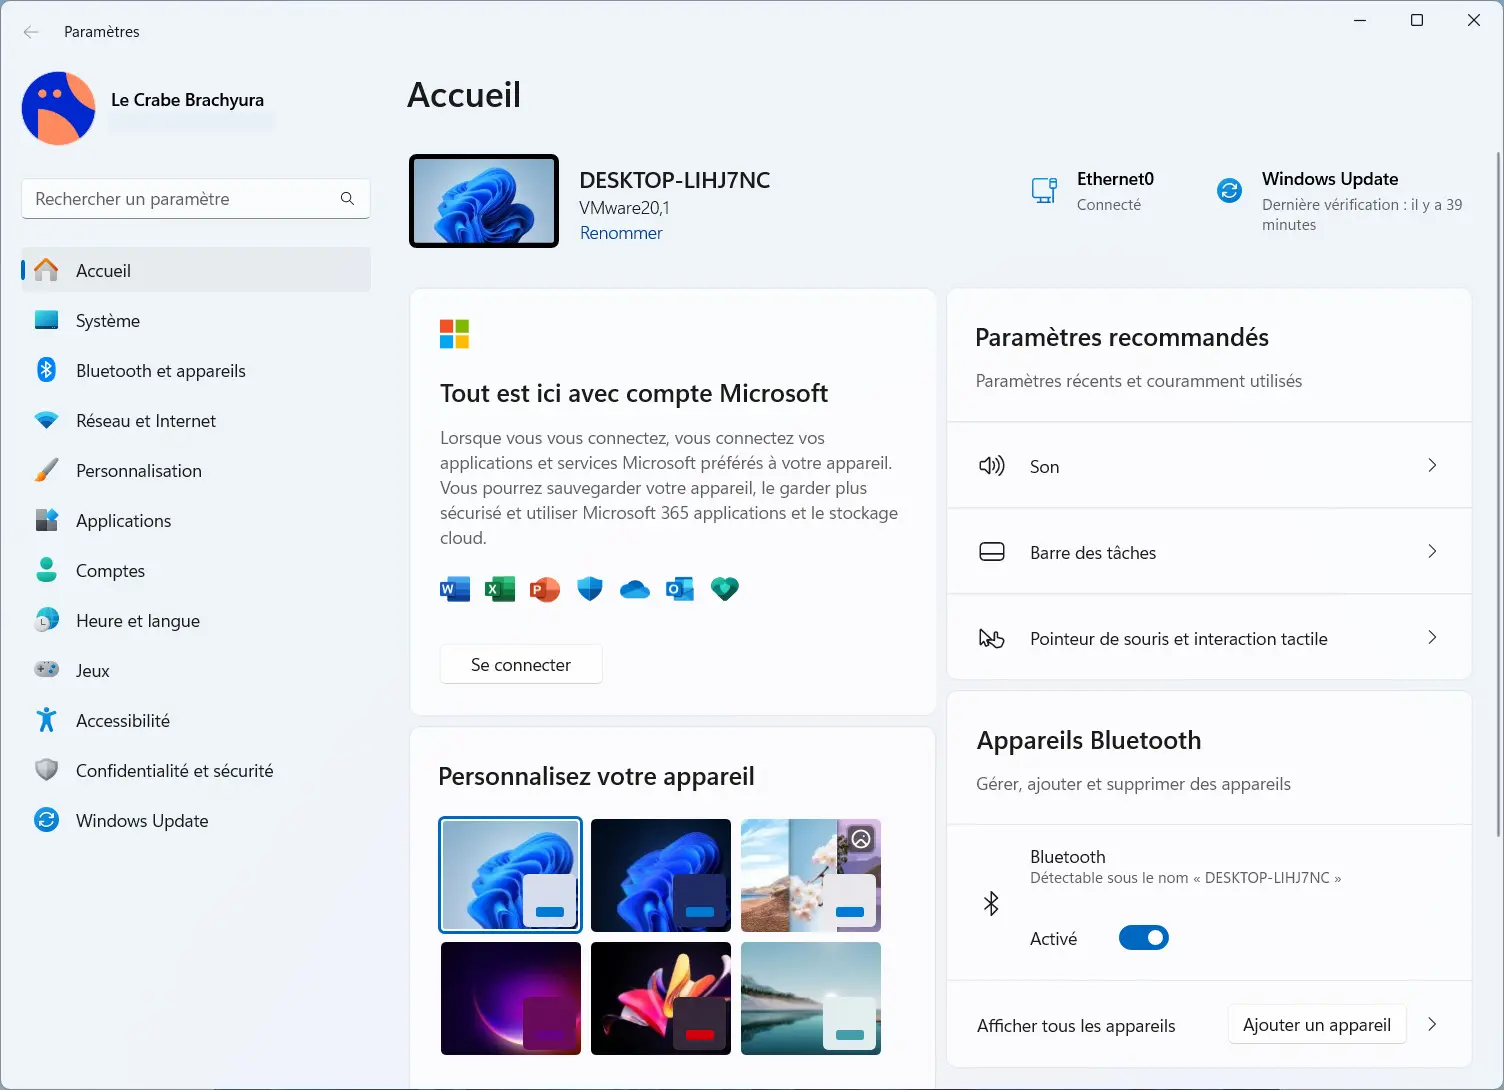
Nouvelle page Accueil dans les Paramètres
La nouvelle version de Windows 11 introduit une nouvelle page « Accueil » avec des cartes interactives qui vous permettra d’avoir un aperçu rapide de votre ordinateur et de vos abonnements et d’accéder rapidement à des options utiles.
En haut, vous trouverez des informations de base sur le système, notamment un aperçu du Bureau, le nom de l’ordinateur et la possibilité de modifier le nom de l’ordinateur. Sur la droite, vous trouverez l’état du réseau ainsi que celui de Windows Update.
Nouvelle page Accueil dans les Paramètres
En bas, vous trouverez des cartes interactives :
Paramètres recommandés : permet un accès rapide aux paramètres récents et couramment utilisés.
Stockage cloud : affiche l’état du stockage de votre compte OneDrive.
Personnalisez votre appareil : permet de changer de thème Windows et de passer du mode clair au sombre (et inversement) rapidement.
Microsoft 365 : affiche l’état et les avantages de votre abonnement.
Xbox : affiche l’état de votre abonnement et des options le gérer.
Appareils Bluetooth : facilite la gestion des appareils Bluetooth.
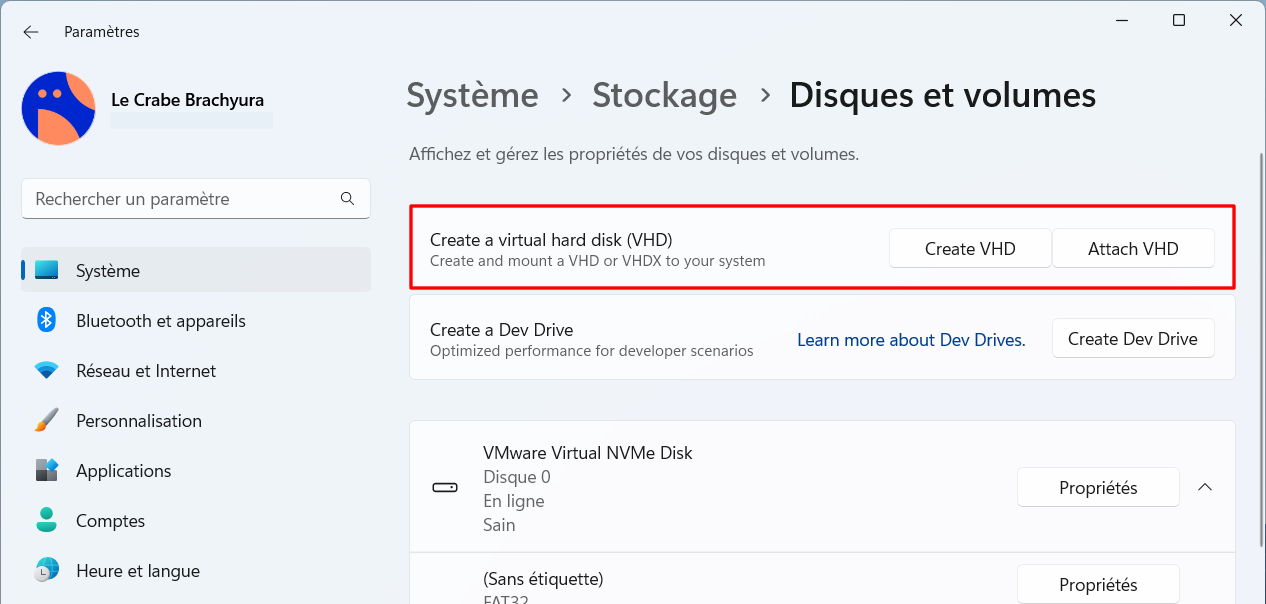
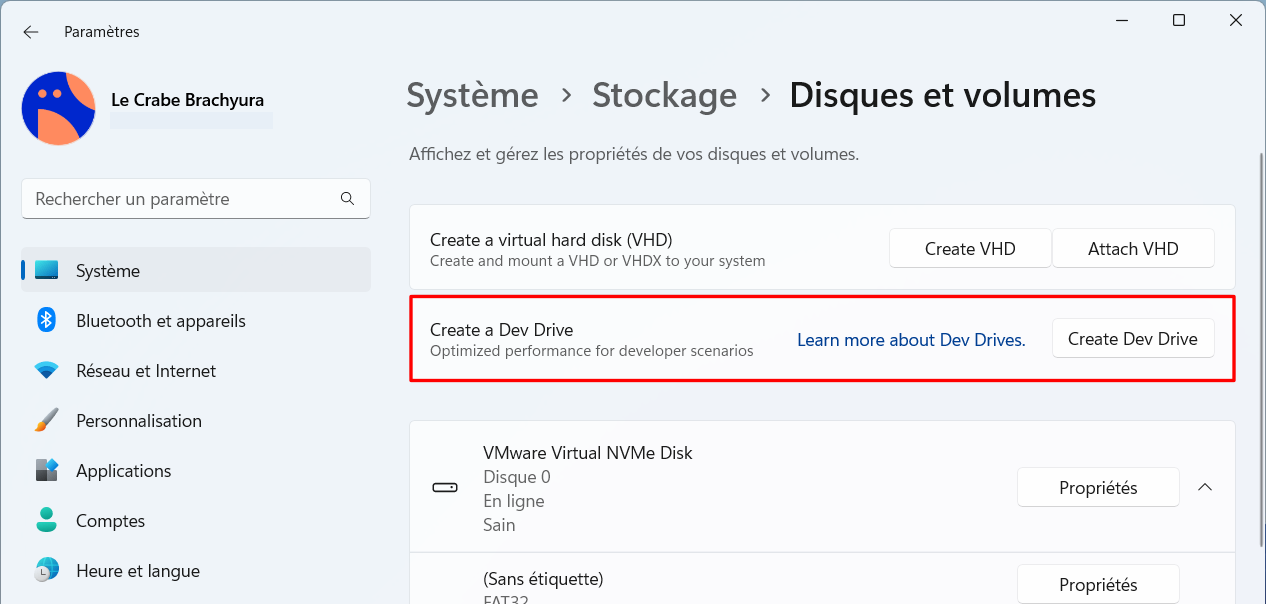
Disques durs virtuels dans les Paramètres
Windows 11 23H2 permet de créer et de gérer des disques durs virtuels (VHD, VHDX et Dev Drives) directement depuis l’application Paramètres, dans Stockage > Disques et volumes. Vous pourrez créer et attacher des disques durs virtuels existants qui seront ensuite accessibles dans l’Explorateur de fichiers.
Disques durs virtuels (VHD) dans les Paramètres
De plus, le nouvel assistant de création de disque virtuel facilite la création d’un VHD ou d’un VHDX en permettant de configurer la taille, la format et le type du lecteur virtuel dans une seule et unique fenêtre.
Assistant de création de disque dur virtuel (VHD) dans les Paramètres
Enfin, une nouvelle fonctionnalité Dev Drive (lecteur de développement) fait son apparition. Similaire au lecteur virtuel traditionnel, Dev Drive permet aux développeurs de créer des disques durs virtuels plus performants grâce à l’utilisation du système de fichiers ReFS (Resilient File System) plus des optimisations du système de fichiers et des fonctionnalités qui offrent un meilleur contrôle sur les paramètres de stockage et la sécurité.
Créer un Dev Drive dans Windows 11 23H2
De nouvelles options dans les Paramètres
Windows 23H2 inclut de nouvelles options qui vous permettront de personnaliser et de gérer plus efficacementr votre système :
Dans Paramètres > Système > Batterie et alimentation, vous trouverez une nouvelle page Détection de présence pour contrôler les appareils qui peuvent détecter votre présence à proximité de l’ordinateur.
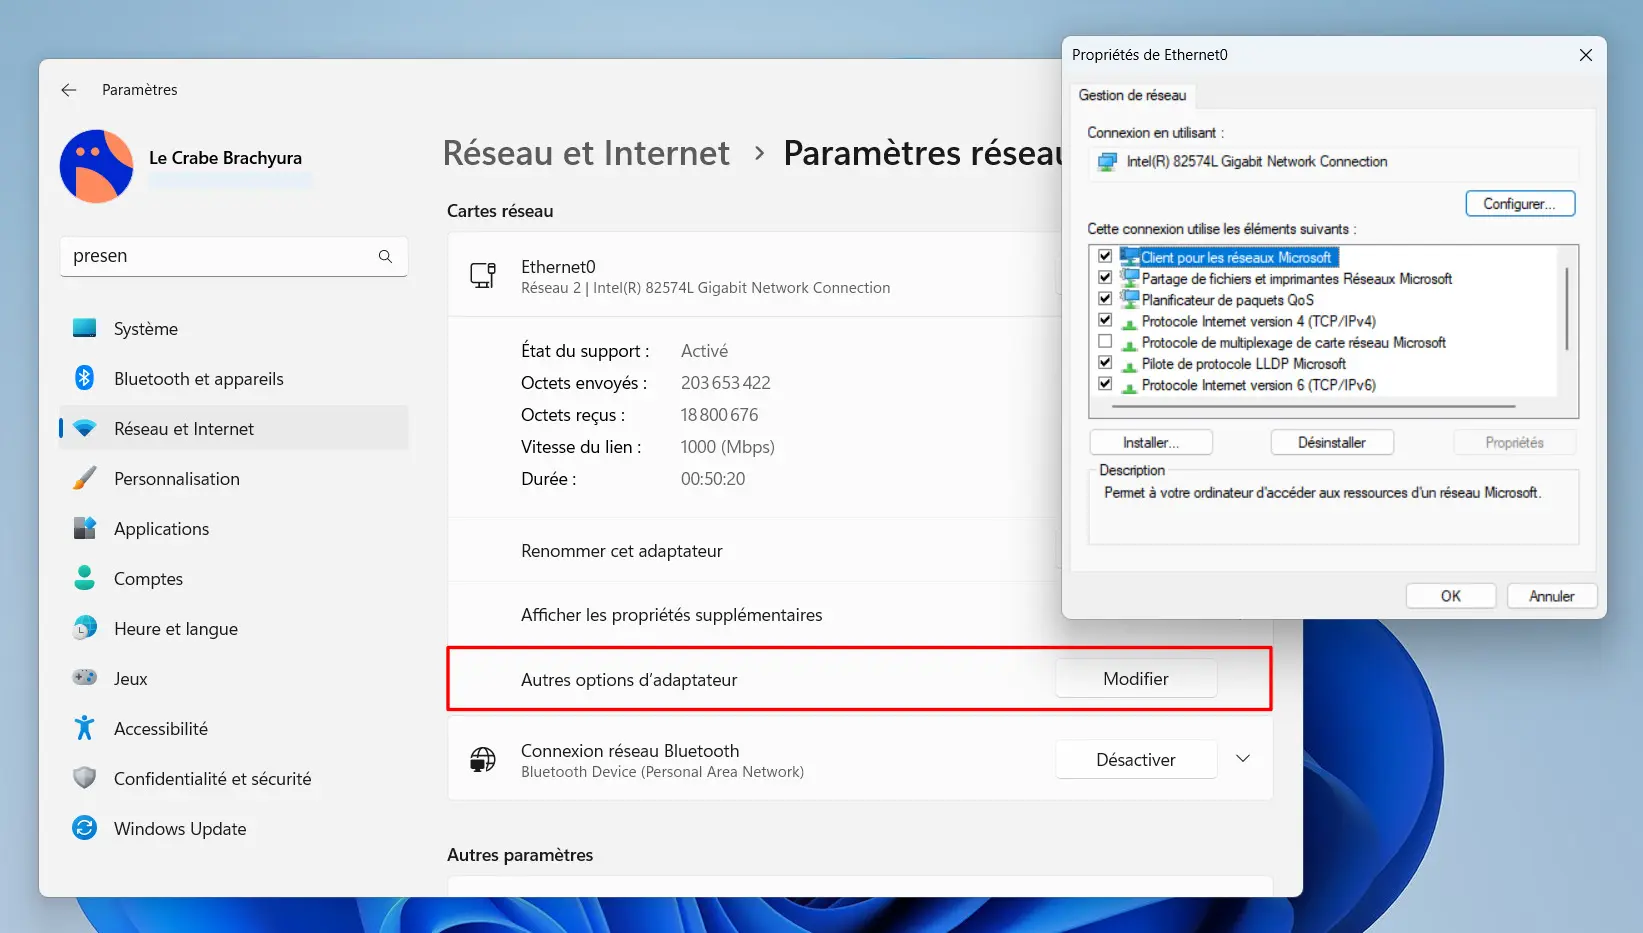
Dans Paramètres > Réseau et Internet > Paramètres réseau avancés, vous trouverez une nouvelle option Autres options d’adaptateur afin d’accéder aux propriétés des adaptateurs réseau.
Propriétés d’un adaptateur réseau accessibles depuis les Paramètres
Dans Paramètres > Réseau et Internet > Wi-Fi, vous trouverez une nouvelle option pour afficher les mots de passe Wi-Fi des réseaux sans-fil connus.
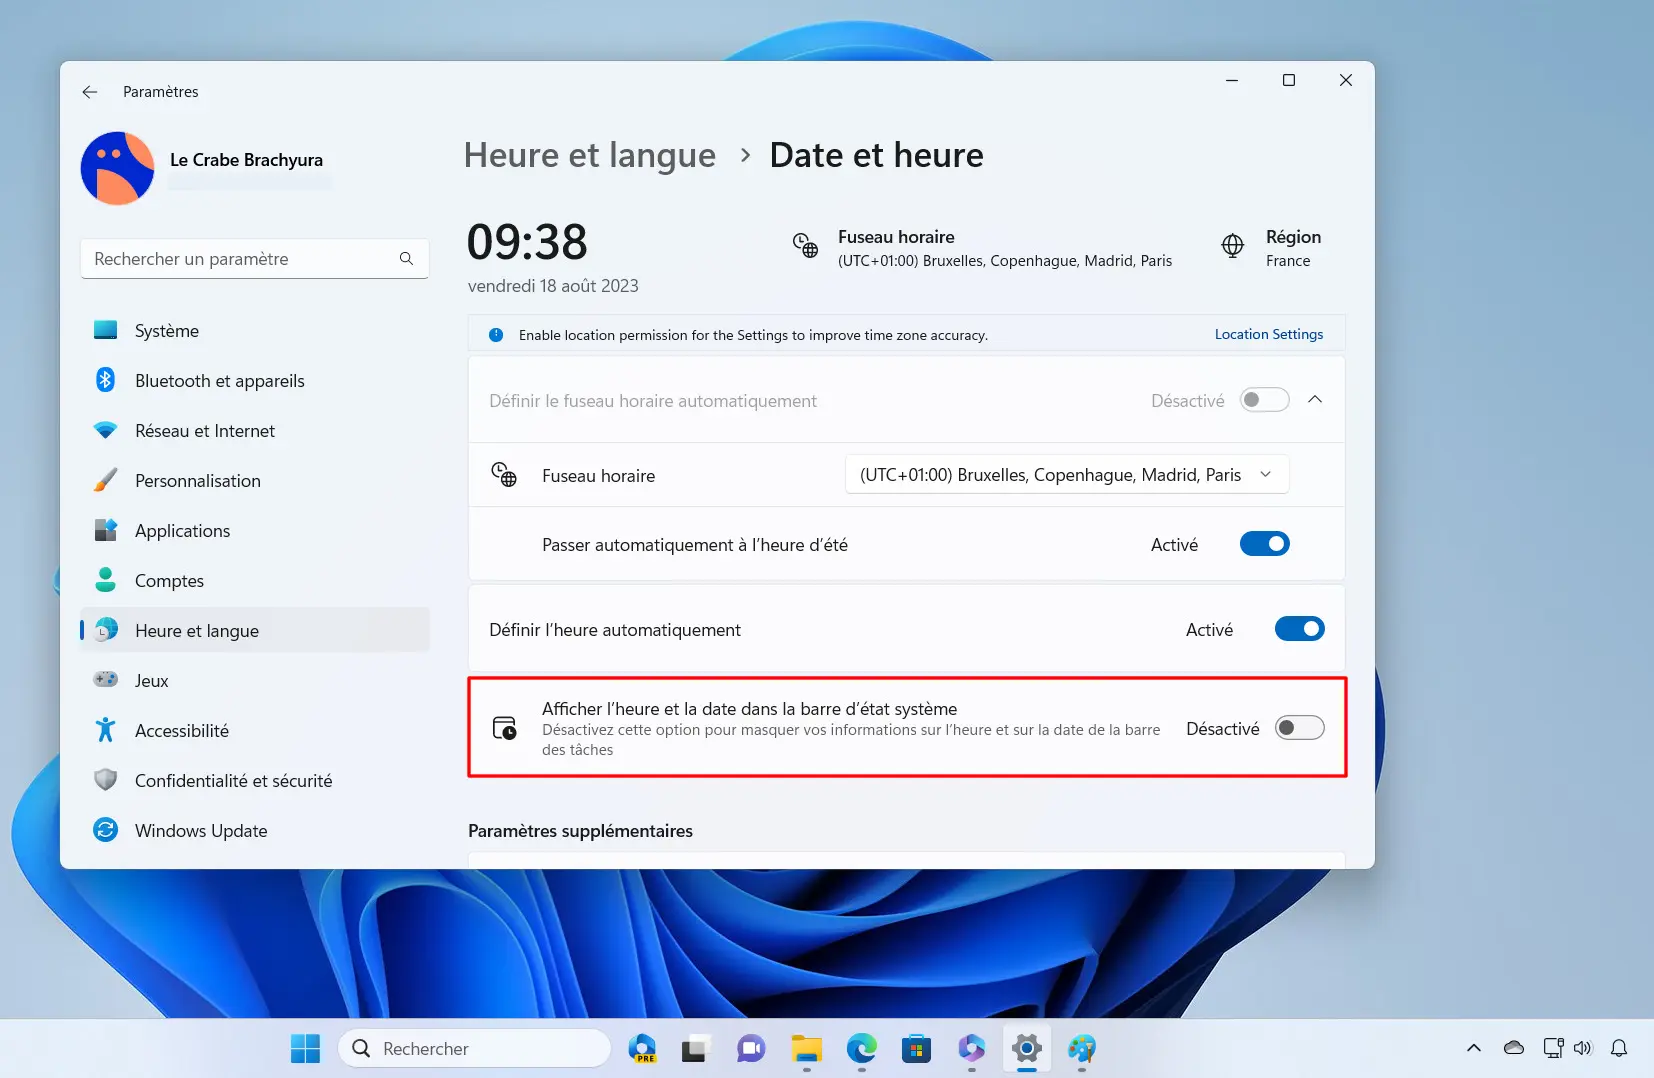
Dans Paramètres > Heure et langue > Date et heure, il est désormais possible de masquer l’heure et la date de la barre des tâches en désactivant l’option « Masquer l’heure et la date dans la barre d’état système ».
Masquer l’horloge dans la barre des tâches
Dans Paramètres > Bluetooth et appareils > Appareils, vous aurez la possibilité de rejoindre un réseau personnel Bluetooth. L’option apparaîtra pour les appareils jumelés comme les téléphones qui partagent une connexion Internet via Bluetooth.
Autres nouveautés de Windows 11 23H2
Pour terminer, voici d’autres nouveautés que Microsoft a développées pour Windows 11 23H2 et qui pourraient vous intéresser :
Windows à la une (Windows Spotlight) a été mis à jour et offre une expérience plus immersive avec des images d’aperçu, des vues plein écran et de nouvelles façons pour en savoir plus sur une image.
Prise en charge des fichiers JXR pour l’arrière-plan de bureau.
Si plusieurs écrans sont connectés à votre ordinateur, l’arrière-plan de bureau s’affichera en HDR ou en SDR, en fonction des capacités de chaque écran. Cela permet à l’ordinateur d’assombrir intelligemment l’écran lorsque vous détournez le regard et de le rendre plus lumineux lorsque vous regardez à nouveau.
Caméra : lorsqu’un problème au niveau de la diffusion (streaming) est détecté, une notification apparaît et propose de lancer l’outil de dépannage « Obtenir de l’aide » pour résoudre le problème.
Menu Démarrer : le menu « Toutes les applications » affiche désormais une étiquette « Système » pour aider les utilisateurs à identifier les applications du système. De plus, le tri des fichiers les plus récemment utilisés a été mis à jour et tient désormais compte de la dernière utilisation du fichier, de l’extension de fichier, etc.
Diffuser : Windows 11 affichera une notification pour vous suggérer d’utiliser Diffuser (fonctionnalité qui permet de se connecter à un écran sans fil) s’il détecte que vous effectuez régulièrement des activités multitâches, par exemple si vous passez souvent d’une fenêtre à une autre ou que vous utilisez souvent l’ancrage des fenêtres.
Dev Home : une nouvelle application conçue pour aider les développeurs à configurer, tester et créer des applications ainsi que surveiller les flux de travail.
Widgets : une nouvelle option permet de désactiver complètement le fil d’actualités dans le tableau des Widgets. Cela signifie que vous aurez la possibilité d’afficher uniquement les widgets que vous avez sélectionnés. De plus, un nouveau widget Focus Session est disponible.
Windows Ink : il est désormais possible d’utiliser l’écriture manuscrite dans les champs de texte. De plus, la mise à jour 23H2 apporte des améliorations pour la précision et un geste de grattage lorsque les utilisateurs doivent apporter des modifications.
Emojis : la mise à jour déploiera la version 15 d’Emoji sur Windows 11, avec de nouveaux designs qui incluent plus de cœurs, d’animaux et un nouveau visage souriant.
Notifications : le système sera désormais en mesure de détecter si l’utilisateur interagit avec les notifications ou non et suggera de désactiver les notifications pour les applications qui les affichent.
Installer Windows 11 23H2
Pour installer la mise à jour 23H2 de Windows 11 sur votre ordinateur, consultez cet article :
Le Bluetooth vous permet de connecter divers appareils à votre ordinateur (Enceinte, Casque, Écouteur, Manette, Téléphone…), parfois pour certaine fonctionnalité, il est nécessaire d’avoir une version spécifique du Bluetooth, c’est le cas par exemple avec l’application « Mobile Connecté » qui nécessite le Bluetooth 4.0 ou encore si vous souhaitez utiliser la fonction de partage de proximité …
Sur cette page, vous trouverez les liens pour télécharger tous les ISO de Windows 11 gratuitement en téléchargement direct (direct download). Toutes les versions de Windows 11 (21H1, 22H2…) sont disponibles, en version 64 bits (x64).
i Info : une fois l’image ISO de Windows 11 téléchargé, n’oubliez pas de vérifier l’intégrité de l’image ISO avec SHA1 pour être sûr et certain qu’elle n’a pas été corrompue durant le téléchargement.
Liste des versions de Windows 11
Avant de commencer, voici la liste de toutes les versions de Windows 11 :
Un fichier ISO est une représentation exacte d’un disque optique, tel qu’un DVD ou un CD, mais sous forme de fichier. Un ISO de Windows 11 est une image disque qui contient l’ensemble des fichiers nécessaires pour installer le système d’exploitation Windows 11.
Pour obtenir l’ISO de la dernière version de Windows 11, vous pouvez vous rendre sur le site web de Microsoft ou bien utiliser les liens ci-dessus provenant de la logithèque de Le Crabe Info qui vous donne accès aux ISO de toutes les versions de Windows 11.
Comment utiliser l’ISO de Windows 11 ?
Une fois l’ISO de Windows 11 téléchargé, vous pouvez :
Pour installer ou mettre à jour Windows 11, votre ordinateur doit répondre à la configuration matérielle minimale requise de Microsoft, qui stipule entre autres l’obligation pour un PC d’être équipé d’une puce de sécurité TPM 2.0 ou encore de 4 Go de mémoire vive (RAM) minimum.
Depuis, des mises à jour de Windows 11 (appelée « mise à jour de fonctionnalités ») ont été publiées par Microsoft et notamment la version 22H2 (le 20 septembre 2022) et la version 23H2 (le 31 octobre 2023).
Cependant, si vous avez déjà réussi à installer Windows 11 sur un PC qui ne répondait pas aux exigences matérielles requises, vous ne pourrez pas installer ces mises à jour de fonctionnalités, que ce soit via Windows Update, l’assistant d’installation ou bien l’ISO de Windows 11 : tous ces canaux de mise à jour revérifient si votre PC est compatible avant de lancer l’installation de la nouvelle mise à jour…
Pas d’inquiétude, vous n’êtes pas bloqué : grâce à un script inclut dans MediaCreationTool.bat, vous allez pouvoir forcer l’installation de cette nouvelle mise à jour de Windows 11 sur votre PC, même incompatible !
Dans cet article, nous allons voir comment forcer l’installation de Windows 11 23H2 sur un PC non compatible, qui ne répond pas aux exigences matérielles imposées par Microsoft.
Préambule
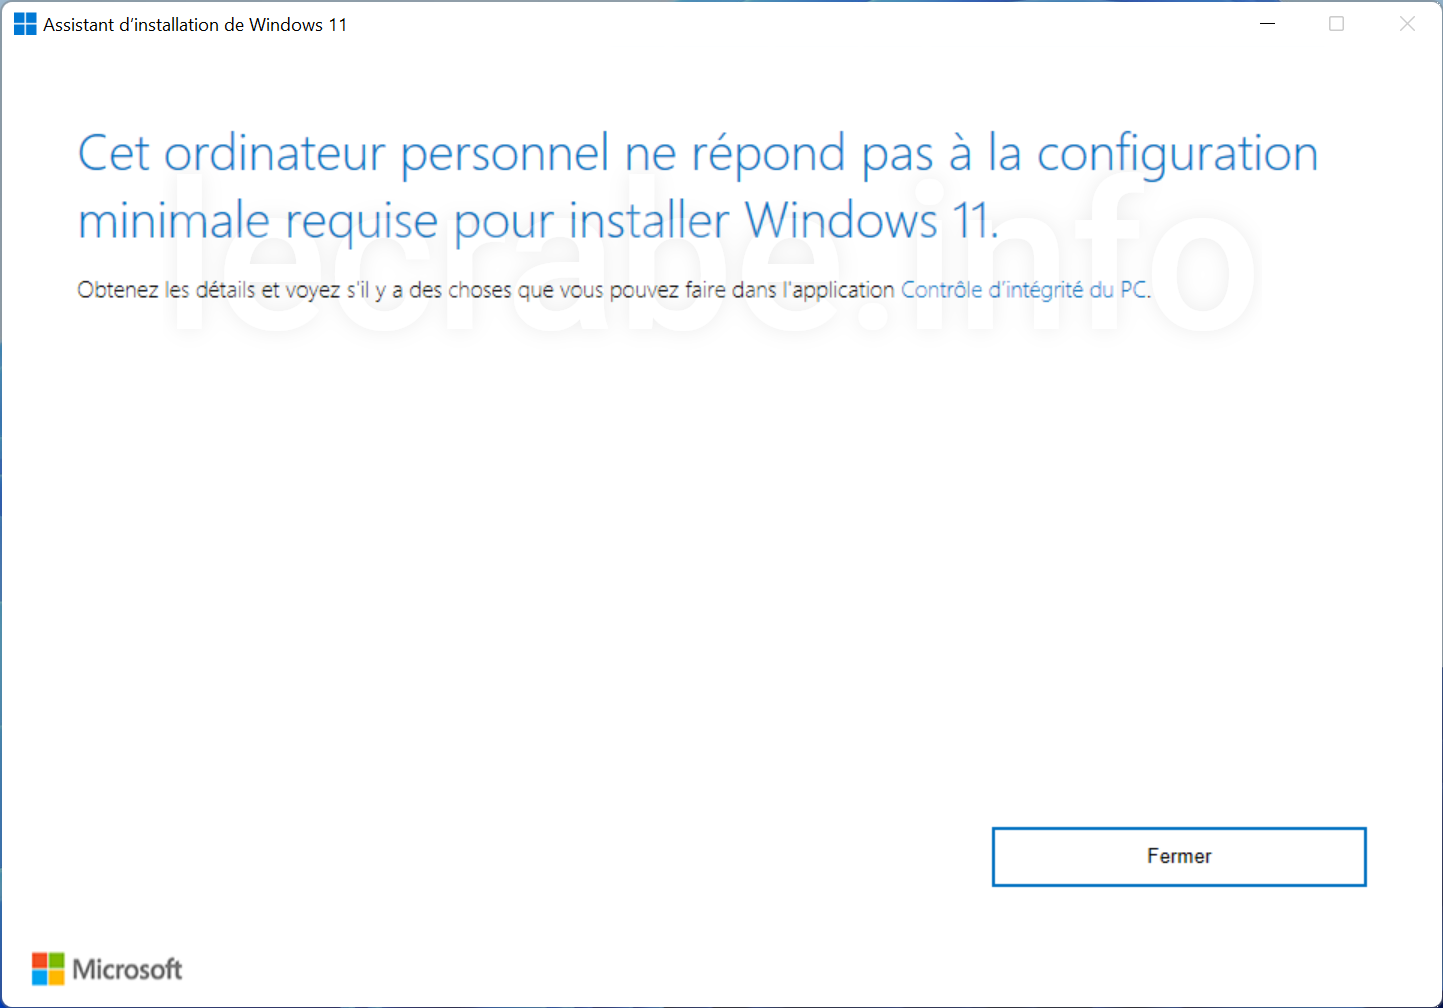
Lorsque vous essayez d’installer la mise à jour 23H2 de Windows 11 sur un PC non compatible, les messages d’erreur suivants apparaissent :
Cet ordinateur personnel ne répond pas à la configuration minimale requise pour installer Windows 11.
Ce PC ne répond pas actuellement à la configuration système requise pour Windows 11.
Installer Windows 11 23H2 sur un PC non compatible
via le package d’activation KB5027397
Les versions 22H2 et 23H2 de Windows 11 partagent un système d’exploitation de base commun avec un ensemble de fichiers système identique. Par conséquent, les nouvelles fonctionnalités de Windows 11 23H2 sont déjà incluses dans la dernière mise à jour qualité mensuelle pour Windows 11 22H2 mais elles sont dans un état inactif, en attente d’être installées. Ces nouvelles fonctionnalités resteront inactives jusqu’à ce qu’elles soient activées via un « package d’activation », un outil rapide à installer qui active les fonctionnalités de Windows 11 version 23H2.
Si vous êtes sur Windows 11 22H2, la méthode la plus simple pour passer à la version 23H2 est donc d’installer ce package d’activation, disponible dans la mise à jour KB5027397 :
Avant de commencer, recherchez et installez toutes les mises à jour disponibles pour votre ordinateur via les Paramètres -> Windows Update. En effet, pour utiliser le package d’activation, la mise à jour cumulative KB5031455 (ou une mise à jour cumulative ultérieure) doit être installée sur votre système.
Double-cliquez sur le fichier windows11.0-kb5027397-x64.msu que vous avez téléchargé.
Cliquez sur le bouton Oui.
Une fois installé, cliquez sur le bouton Redémarrer pour redémarrer votre ordinateur et activer les nouvelles fonctionnalités de Windows 11 23H2.
✓ Grâce au package d’activation, Windows 11 23H2 est maintenant installé sur votre ordinateur ! 👇
via MediaCreationTool.dat
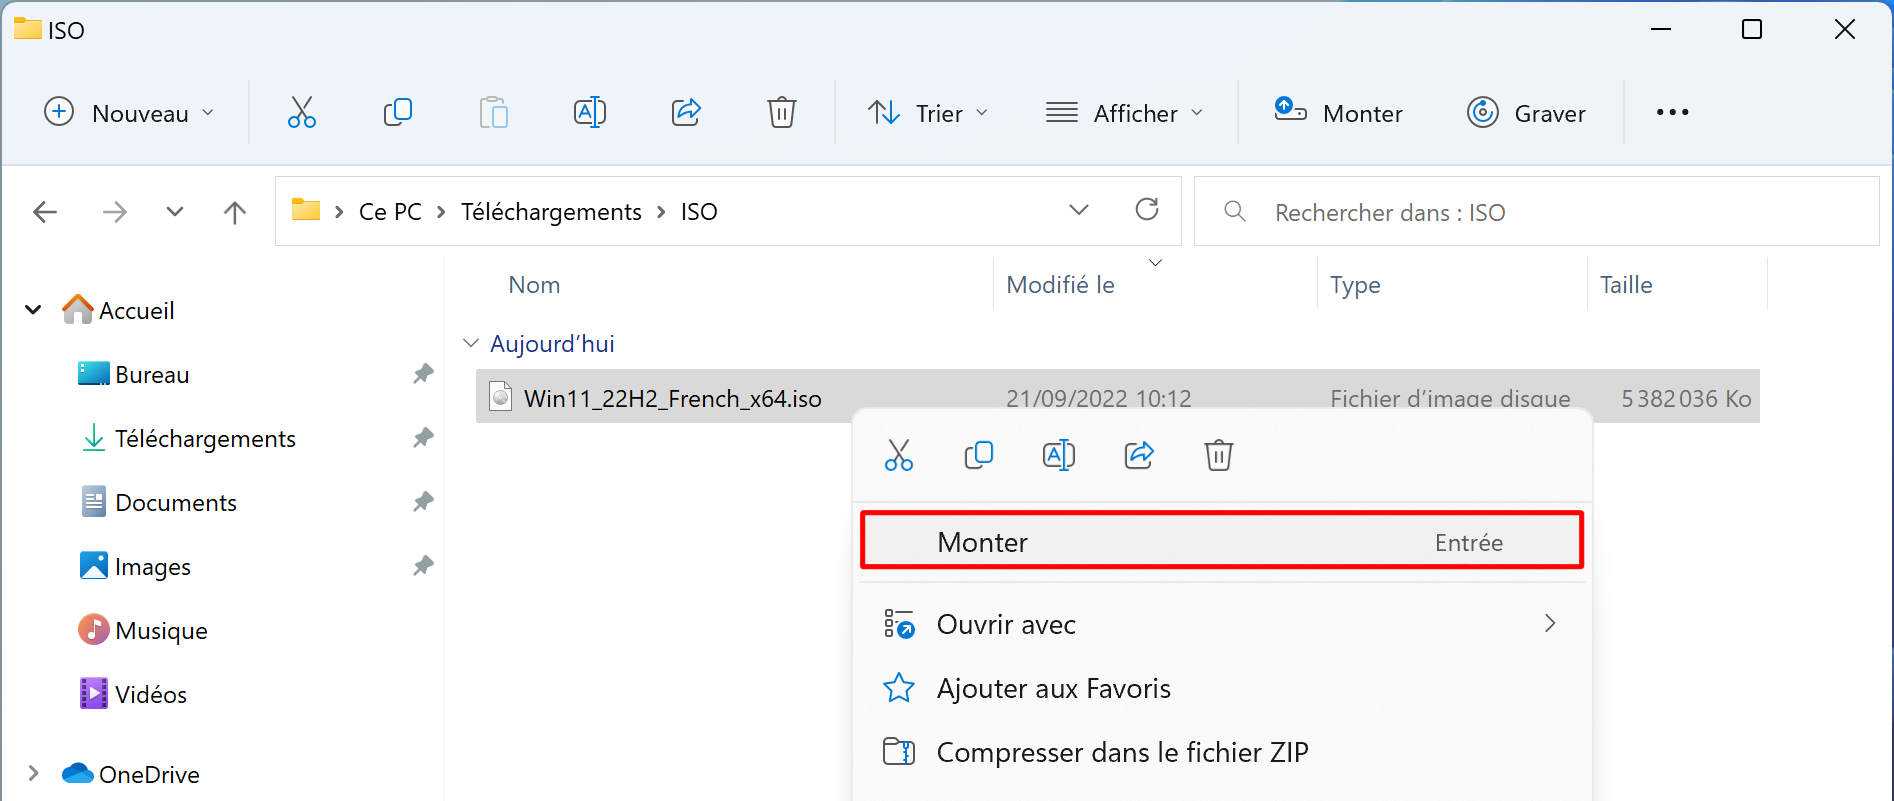
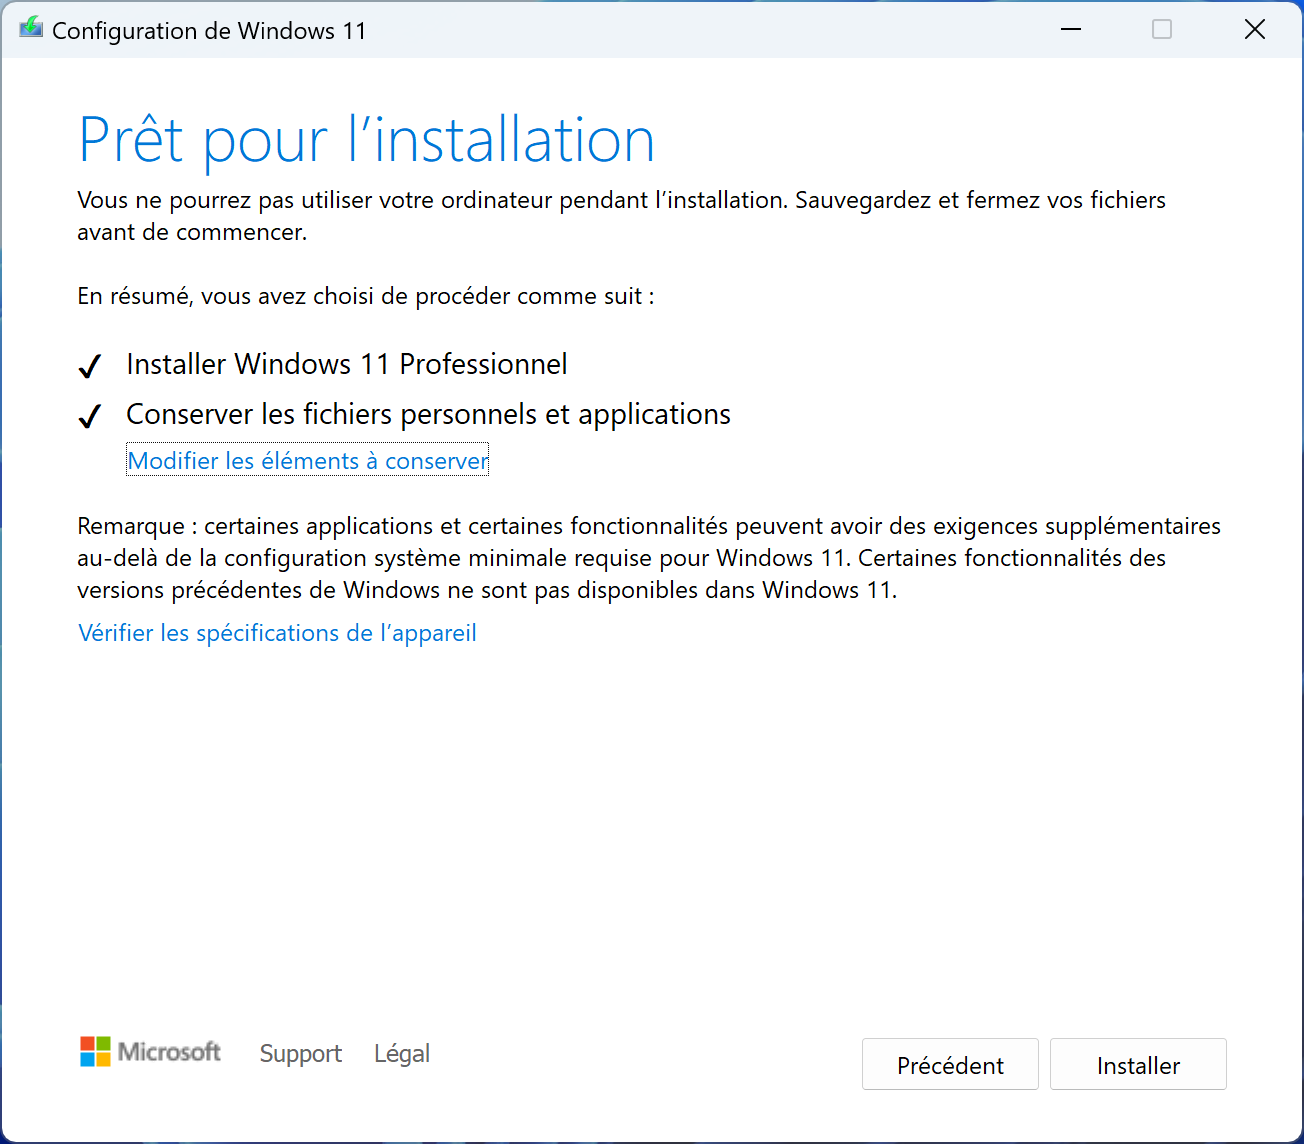
Pour forcer l’installation de Windows 11 version 23H2, vous pouvez aussi exécuter le script Skip_TPM_Check_on_Dynamic_Update.cmd disponible dans MediaCreationTool.dat ; ce dernier modifie certains paramètres système et permet de contourner les exigences matérielles requises pour Windows 11 :
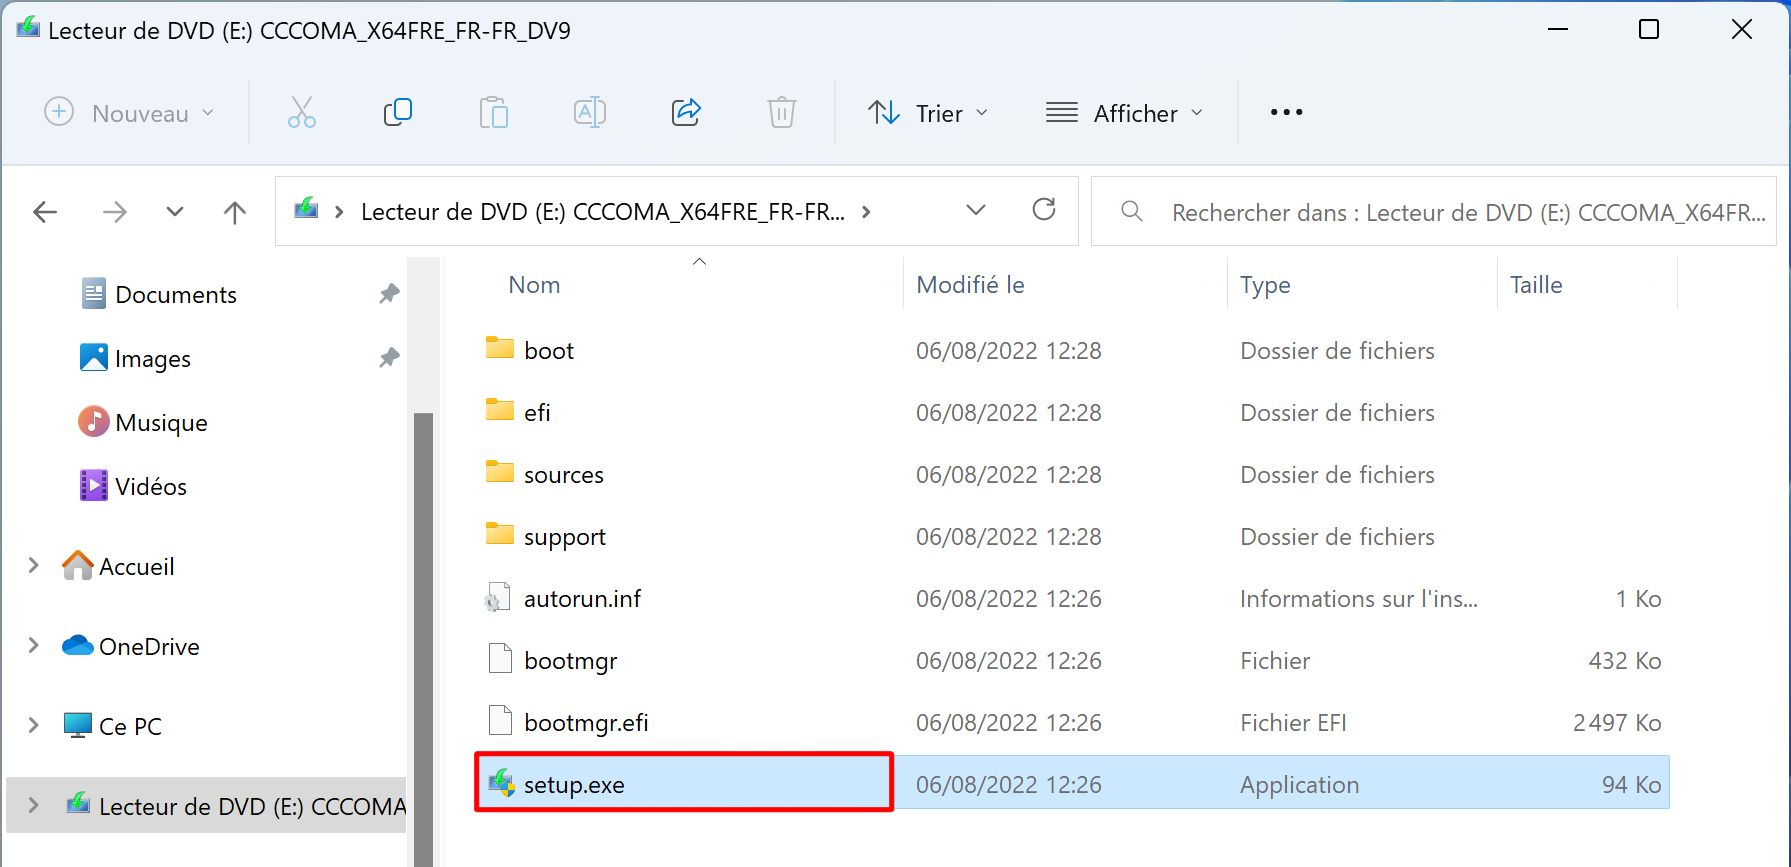
Montez l’image ISO en faisant un clic droit sur le fichier Win11_23H2_French_x64.iso > Monter.
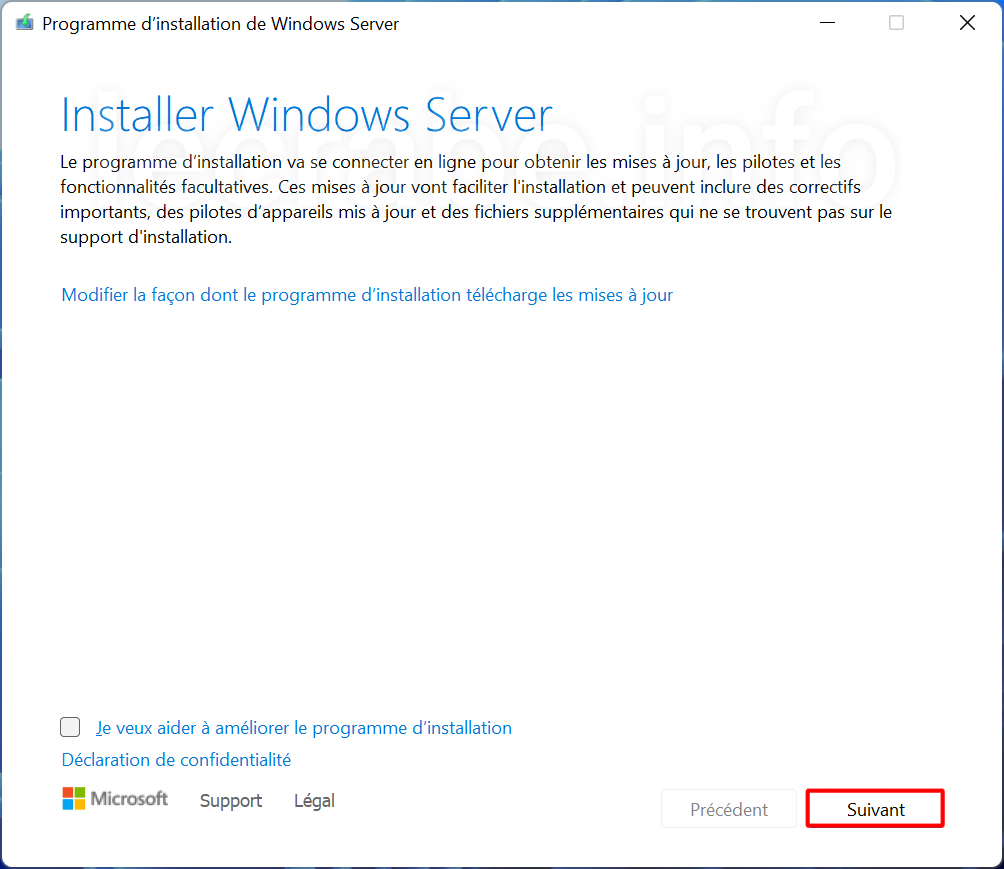
Dans le lecteur DVD virtuel créé, double-cliquez sur le setup.exe.
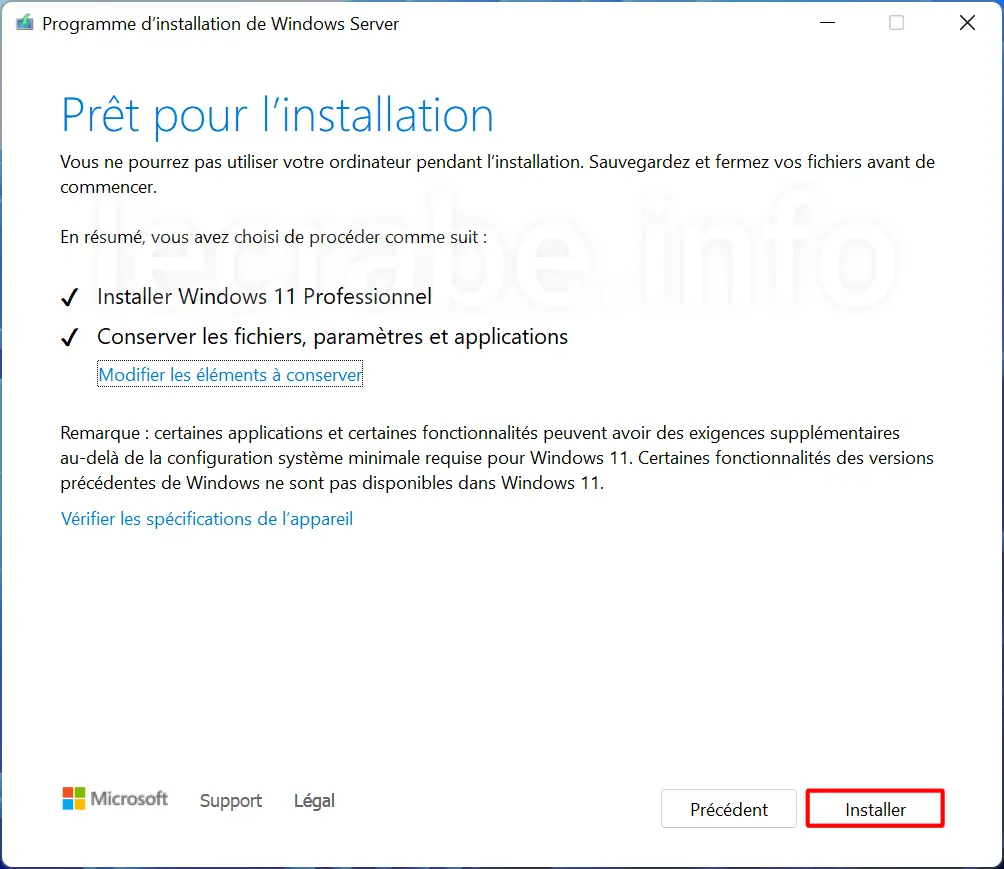
Le programme d’installation affiche « Installer Windows Server ». Pas de panique, c’est seulement les résultats de l’exécution du script, mais c’est bel et bien Windows 11 qui va être installé. Cliquez sur Suivant.
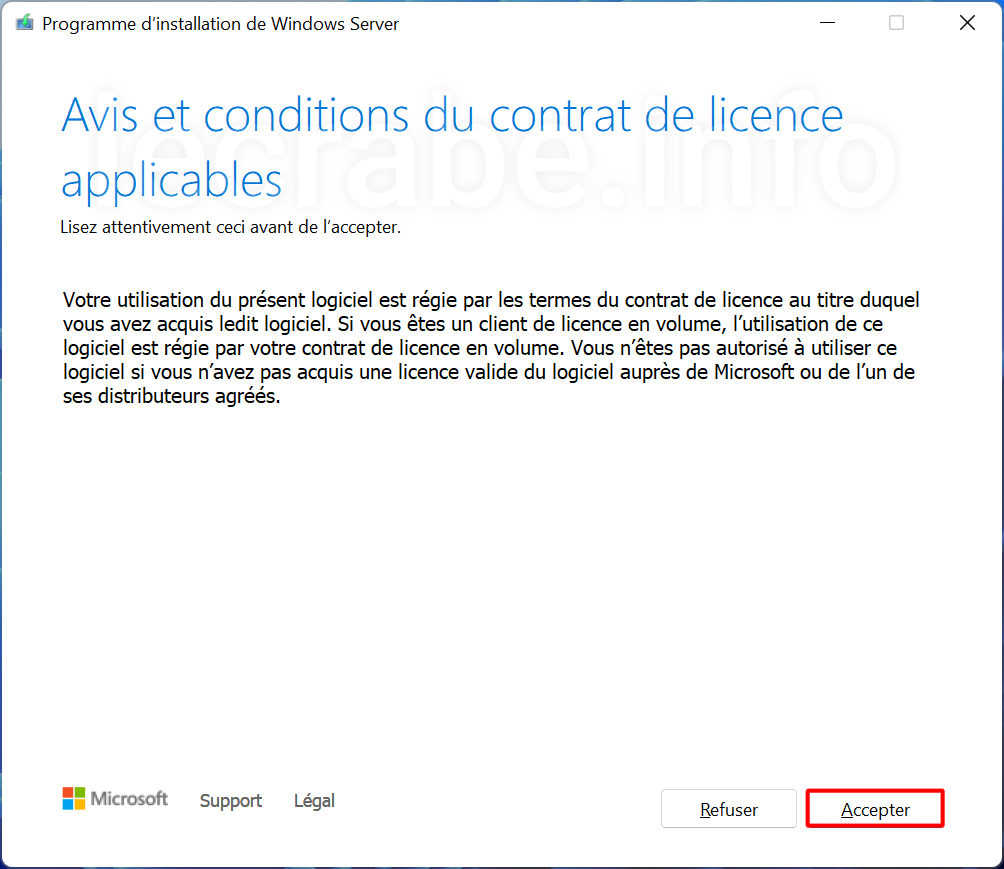
Acceptez les termes du contrat de licence.
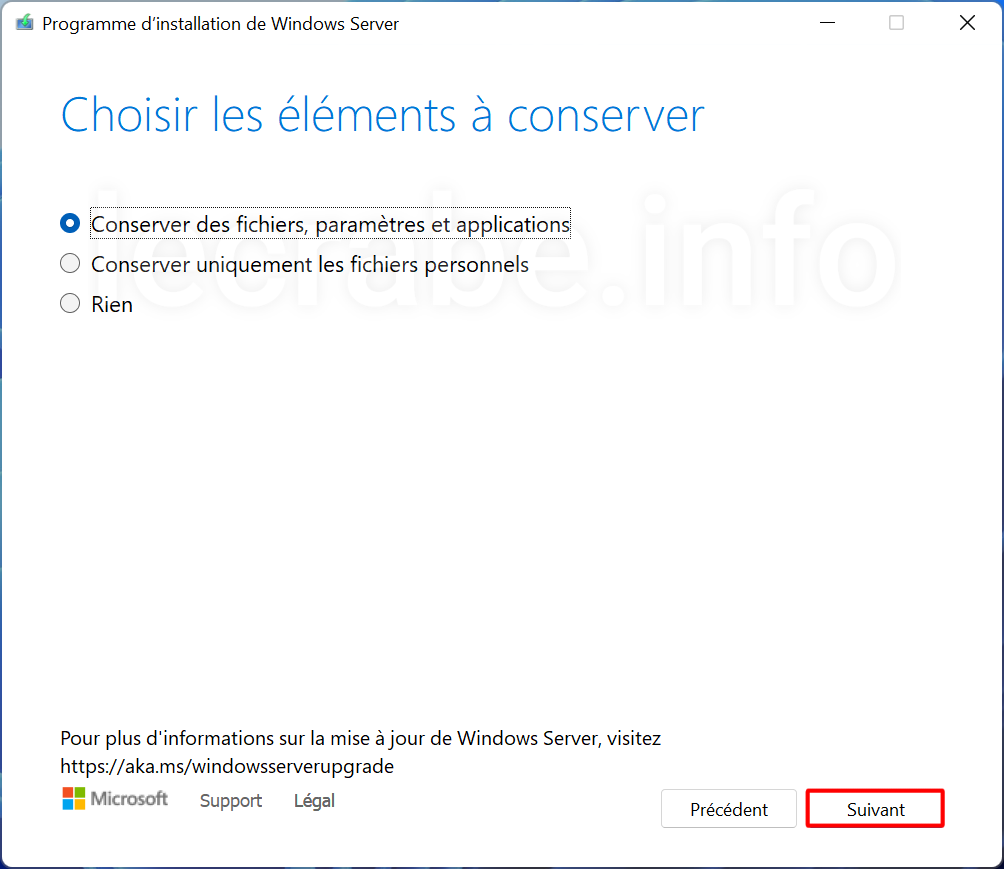
Sélectionnez Conserver des fichiers, paramètres et applications et cliquez sur Suivant.
Enfin, cliquez sur Installer pour lancer l’installation de la mise à jour 23H2 de Windows 11.
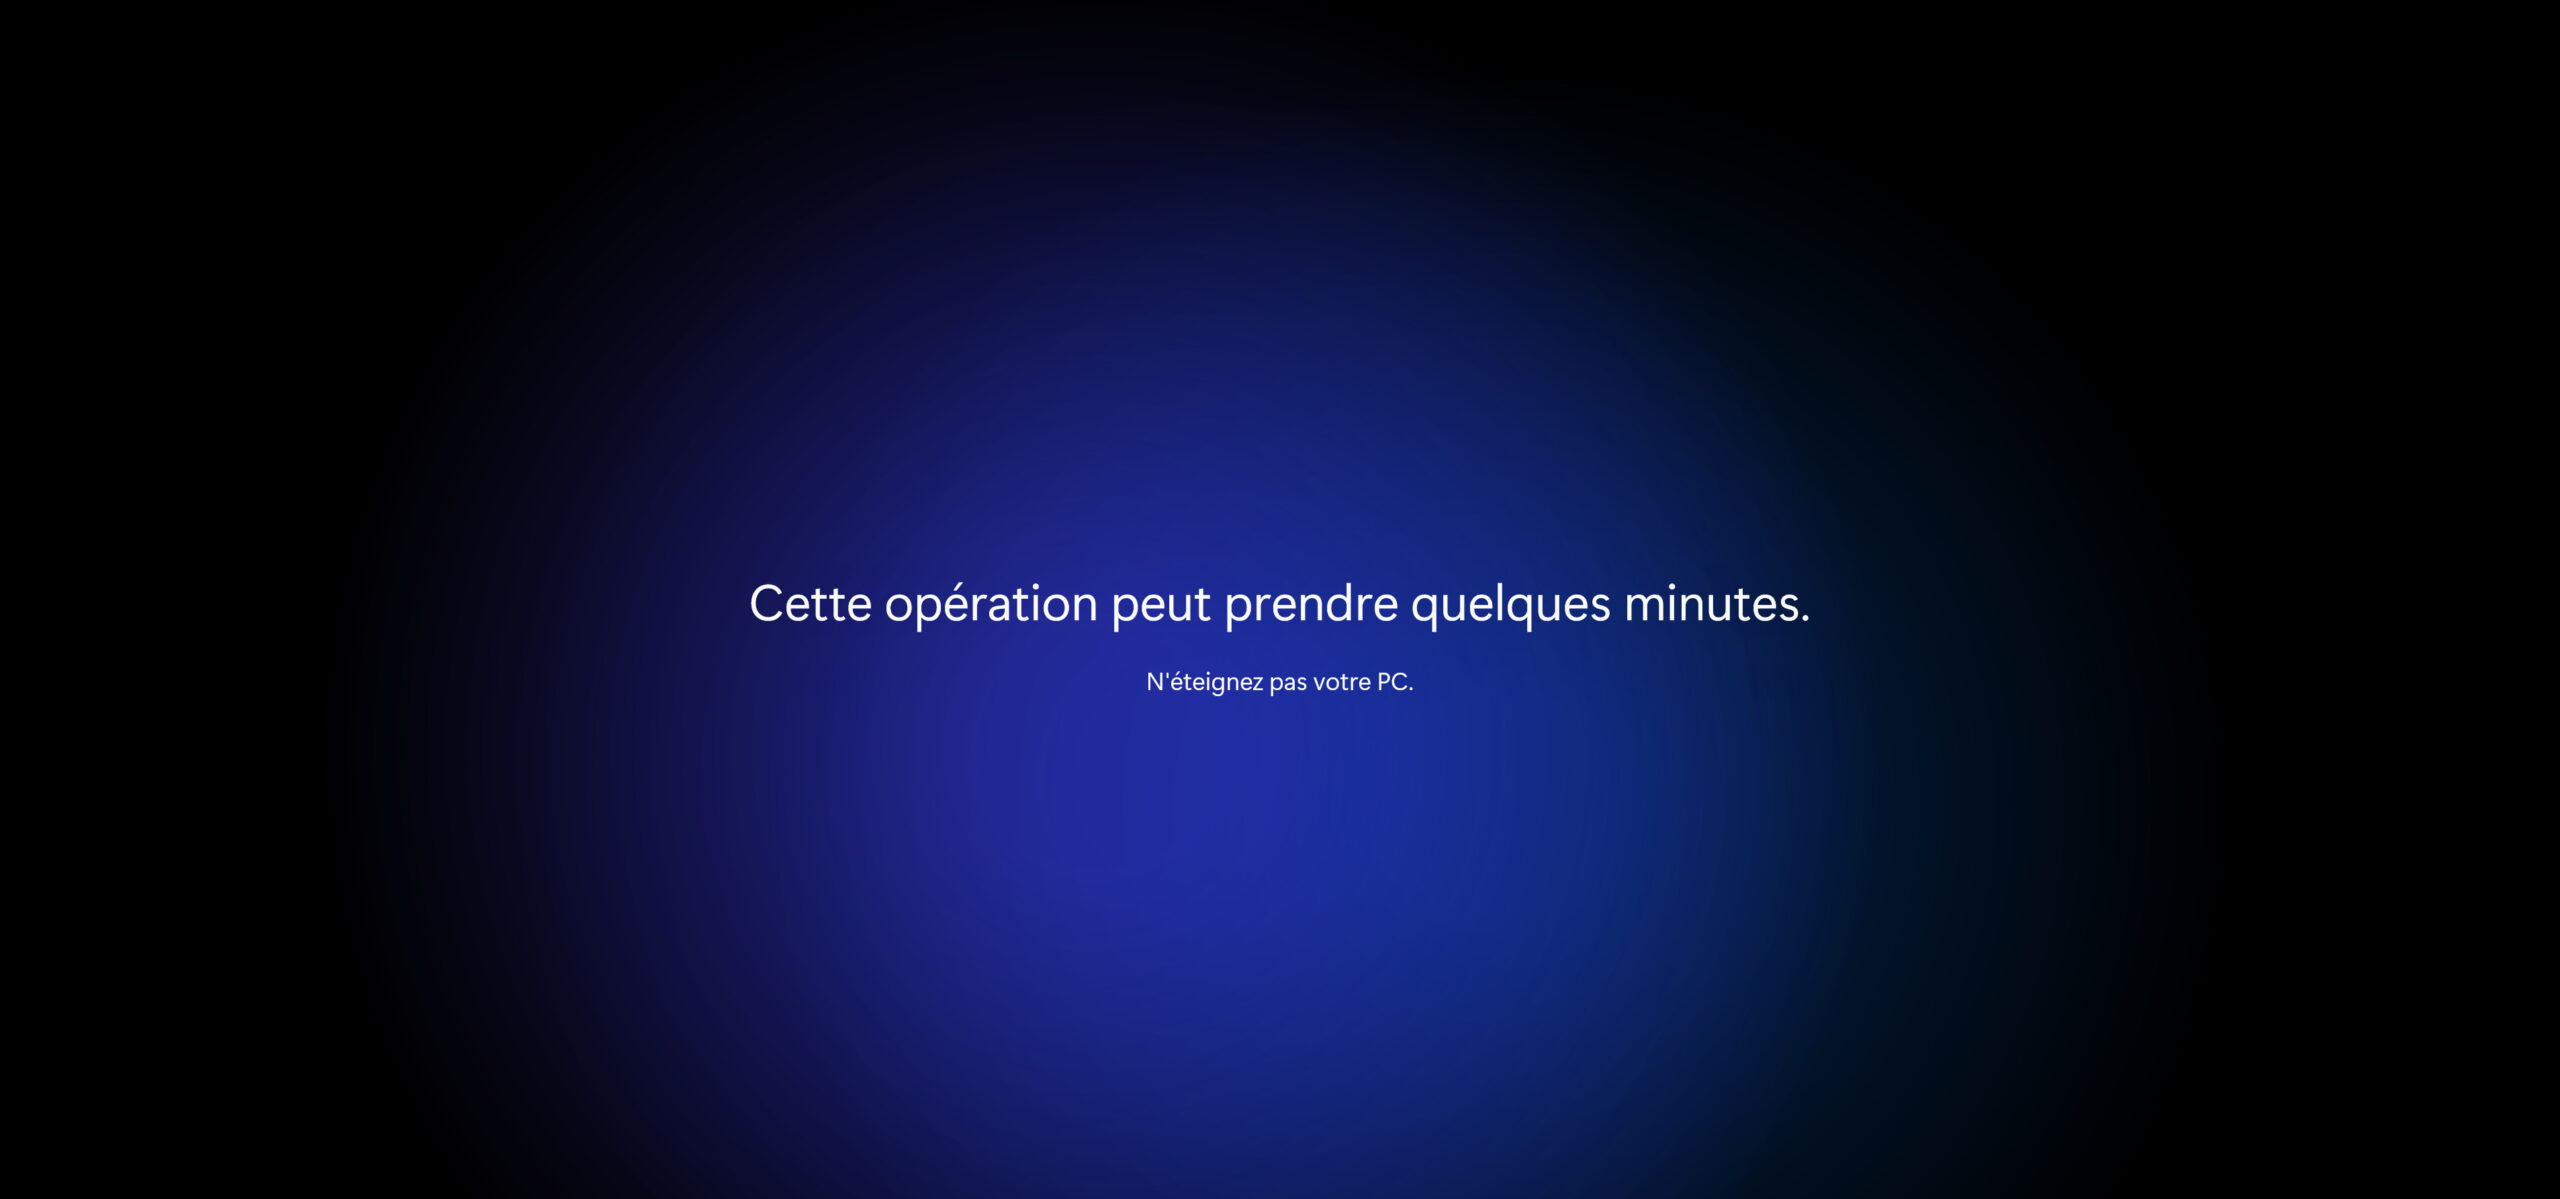
L’installation de la nouvelle version de Windows 11 commence.
Votre PC redémarre. Un écran noir « Installation des mises à jour » s’affiche. Notez que votre ordinateur peut redémarrer plusieurs fois de suite.
Une fois l’installation terminée, vous arrivez sur l’écran de verrouillage de Windows 11. Connectez-vous avec votre compte utilisateur habituel.
La mise à jour de Windows 11 se termine avec les derniers réglages.
Voilà, la dernière version de Windows 11 a bien été installée sur votre ordinateur !
✓ Félicitations : vous avez réussi à forcer l’installation de la mise à jour de Windows 11 sur votre PC pourtant non compatible ! 👍
Windows 11 23H2 (nom de code « Sun Valley 3 ») est maintenant disponible pour tous les utilisateurs du dernier système d’exploitation de Microsoft ! Aussi appelée « mise à jour de 2023 » par Microsoft, c’est la deuxième mise à jour de fonctionnalités pour Windows 11 et vous pouvez dès maintenant l’installer sur votre ordinateur.
Windows 11 23H2 est une mise à niveau gratuite disponible en tant qu’installation facultative pour les ordinateurs qui répondent aux exigences matérielles requises. Comme d’habitude, cette mise à jour de fonctionnalité apporte un ensemble de fonctionnalités et d’améliorations pour améliorer la productivité, la sécurité et l’expérience utilisateur globale.
Basé sur la build 22631, Windows 11 23H2 est déployé progressivement via Windows Update mais il est possible de l’installer tout de suite grâce à différentes méthodes.
Dans cet article, nous allons voir comment télécharger et installer Windows 11 23H2 sur votre ordinateur dès maintenant !
Voici toutes les méthodes disponibles pour installer Windows 11 23H2 :
avec l’assistant d’installation ;
avec l’ISO de Windows 11 23H2 ;
avec Windows Update.
Informations système – Windows 11 23H2
Présentation de Windows 11 23H2
Windows 11 23H2 succède à Windows 11 22H2 paru à l’automne dernier.
Tout comme Windows 10, Windows 11 est un service, ce qui signifie qu’il va évoluer au fil des années grâce à des mises à jour logicielles périodiques, officiellement appelées « mises à jour de fonctionnalités ». La version 23H2 est donc la deuxième d’une longue série.
Contrairement à Windows 10, Windows 11 recevra une mise à jour de fonctionnalités par an (au lieu de deux pour Windows 10). Les mises à jour de fonctionnalités de Windows 11 seront publiées dans la seconde moitié de l’année civile et seront accompagnées de 24 mois de support pour les éditions Famille, Professionnel, Professionnel pour les Stations de travail et Professionnel Éducation ; et 36 mois de support pour les éditions Entreprise et Éducation.
Windows 11 23H2 sera ainsi pris en charge jusqu’en octobre 2025. Pour plus d’informations, consultez les dates de fin de support des versions de Windows 11.
Pour découvrir toutes les nouveautés de Windows 11 23H2, ça se passe par ici :
Désinstallez votre logiciel antivirus, juste le temps de la mise à jour. Vous le réinstallerez une fois la mise à jour de 2023 installée. Par le passé, certains logiciels antivirus ont perturbé l’installation de mises à jour de Windows 11.
Créez une image de votre système avec Macrium. En cas de problème, il vous suffira de restaurer cette image pour retrouver votre PC exactement comme avant l’installation de la mise à jour de 2023.
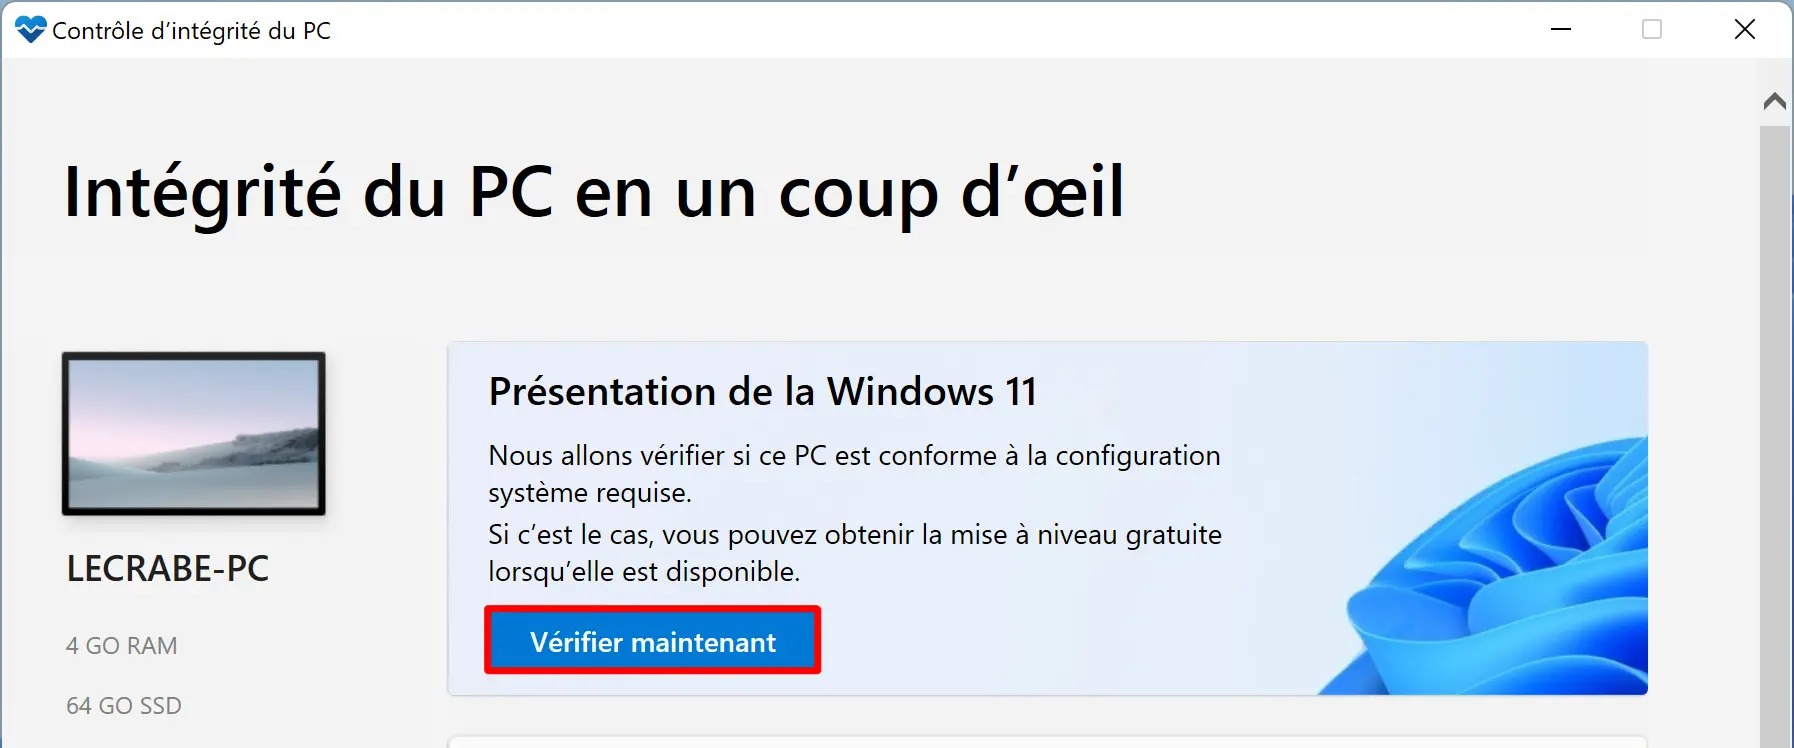
Vérifiez que l’application indique bien « Ce PC répond aux exigences Windows 11 ».
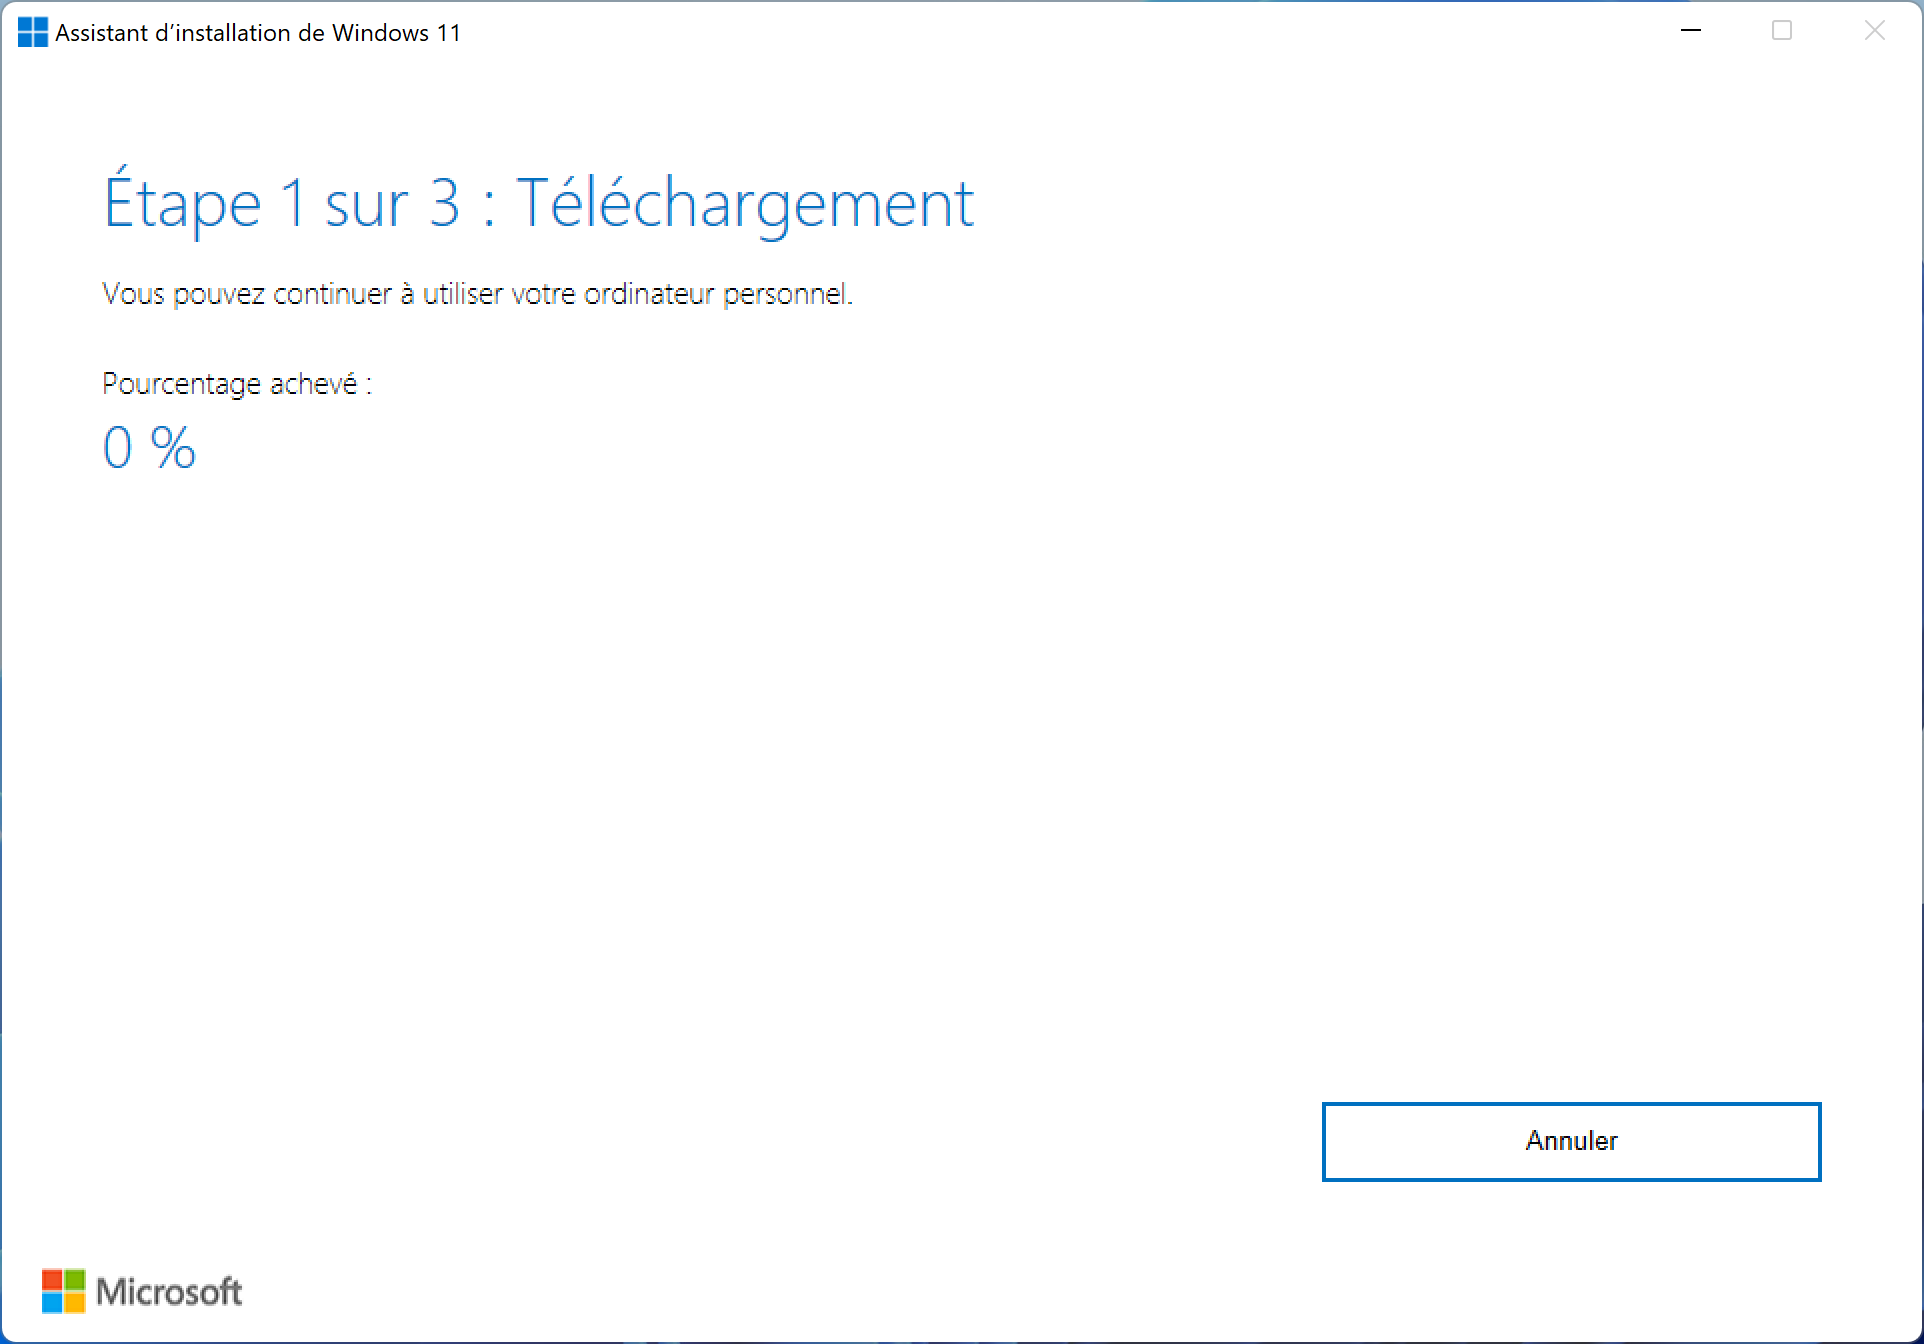
Retournez sur l’assistant d’installation de Windows 11.
Cliquez sur Actualiser.
Cliquez sur le bouton Accepter et installer.
L’assistant lance alors le téléchargement de Windows 11 23H2. Vous pouvez continuer à utiliser votre ordinateur et laisser le téléchargement se faire en tâche de fond.
L’assistant installe ensuite la nouvelle version de Windows 11 sur votre ordinateur. Commencez à enregistrer votre travail car votre PC redémarrera automatiquement 30 minutes après que l’installation ait atteint 100%.
Une fois l’installation terminée, cliquez sur Redémarrer maintenant.
Votre ordinateur redémarre et termine l’installation de Windows 11 23H2 !
✓ Félicitations : vous avez installé Windows 11 23H2 via l’assistant d’installation !
Patientez pendant le téléchargement de l’ISO de Windows 11 23H2 (Win11_23H2_French_x64.iso).
Une fois le téléchargement terminé, montez l’ISO de Windows 11 23H2 en double-cliquant dessus ou en faisant un clic droit > Monter dans l’Explorateur de fichiers.
Ouvrez le fichier setup.exe.
Suivez ensuite la procédure habituelle pour mettre à niveau Windows 11 !
✓ Félicitations : vous avez installé Windows 11 23H2 via l’ISO !
via Windows Update
i Note : Microsoft déploie la mise à jour 23H2 sur Windows Update progressivement, il se peut donc qu’elle n’apparaisse pas tout de suite pour vous dans Windows Update.
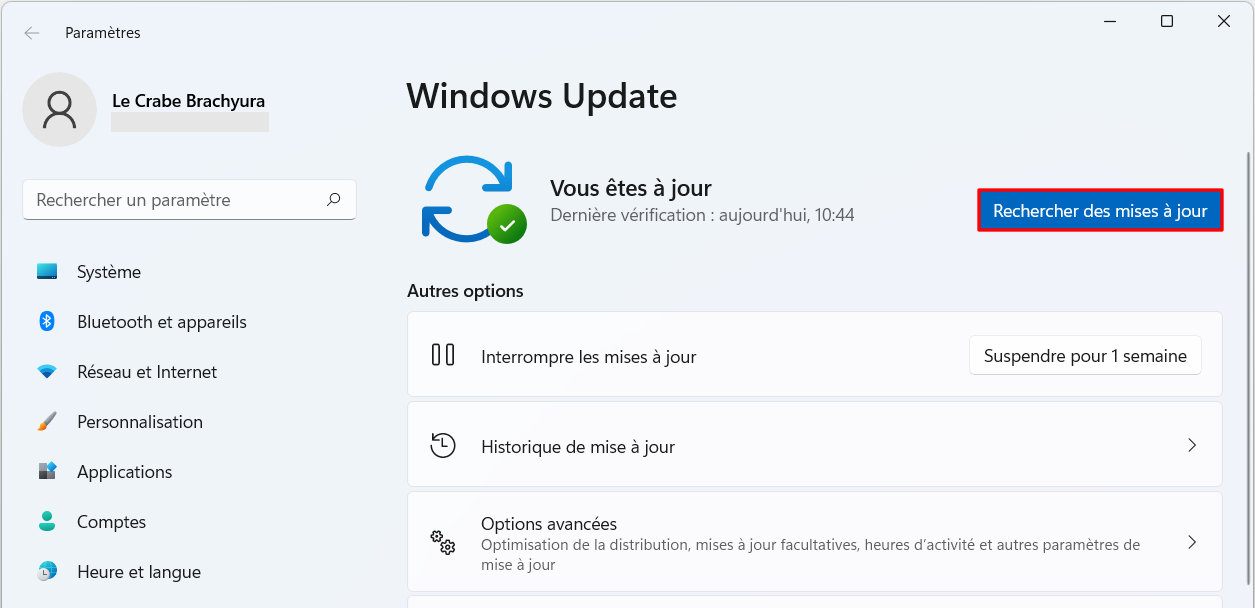
Pour installer Windows 11 23H2 via Windows Update, suivez ces instructions :
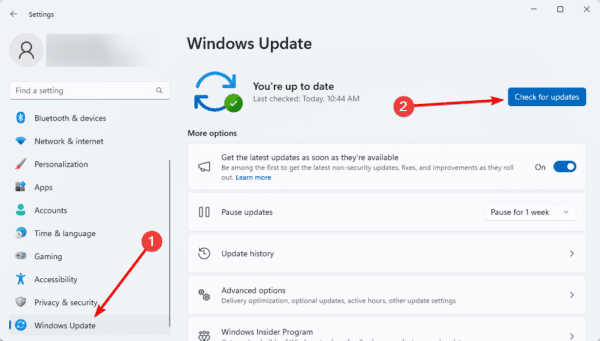
Ouvrez Windows Update :
via les Paramètres > Windows Update.
via la commande Exécuter : ms-settings:windowsupdate.
Cliquez sur le bouton Rechercher des mises à jour.
Patientez pendant la recherche des mises à jour.
Le téléchargement de la mise à jour Mise à jour de fonctionnalité vers Windows 11, version 23H2 devrait se lancer automatiquement.
Cliquez sur le bouton Redémarrer pour redémarrer votre PC et terminer l’installation de Windows 11 23H2.
✓ Félicitations : vous avez réussi à installer Windows 11 23H2 via Windows Update !
Vous êtes sur Windows 10 ?
Vous êtes encore sur Windows 10 et vous souhaitez passer à Windows 11 ?
Bonne nouvelle : Windows 11 est gratuit pour tous les utilisateurs de Windows 10 ! Cependant, pour en profiter, votre ordinateur doit répondre à certaines exigences matérielles imposées par Microsoft, notamment l’obligation d’avoir une puce de sécurité TPM 2.0.
Commencez par vérifier si votre PC est compatible avec Windows 11 :
En cas de problème, vous pouvez désinstaller Windows 11 23H2 et revenir à la version précédente de Windows 11 (22H2) pendant 10 jours à compter de la date d’installation de la version 23H2.
Voici comment procéder :
Si vous avez installé Windows 11 23H2 via l’assistant d’installation ou bien l’ISO : vous pouvez revenir à la version précédente de Windows 11 via les Paramètres > Système > Récupération, en cliquant sur Retour en arrière.
Pour plus d’informations, consultez ce article : Rétrograder Windows 11 : revenir à la version précédente de Windows 11
Si vous avez installé Windows 11 23H2 via Windows Update : vous pouvez revenir à la version précédente de Windows 11 via les Options de redémarrage avancées > Dépannage > Options avancées > Désinstaller des mises à jour > Désinstaller la dernière mise à jour des fonctionnalités.
Ca y est, la nouvelle mise à jour majeure de Windows 11 est disponible ! La version 23H2 apporte quelques fonctionnalités intéressantes, notamment Windows Copilot qui ajoutera un peu d’IA à votre installation de Windows. Si vous souhaitez mettre à jour votre ordinateur et installer la dernière version de Windows 11 alors c’est ci-dessous que …
The most common response you will get when you want to open a HAT file on Windows 11 is Windows can’t open a file; You should now look for an application that can launch the file. This is a generic message when there are missing or incorrect file associations.
Do not despair cause if you are at a loss to open your HAT files on the new OS, this guide will walk you through every possible solution. But before we get to it, let us explore what HAT files are.
What Are HAT Files?
The .HAT extension stands for Hierarchical Annotation Tables. This extension is akin to software developers during the development and debugging of applications.
These files provide structure and organization for information on memory usage, memory apps, heap analysis, performance profiling, and code analysis.
How Do I Open HAT Files on Windows 11?
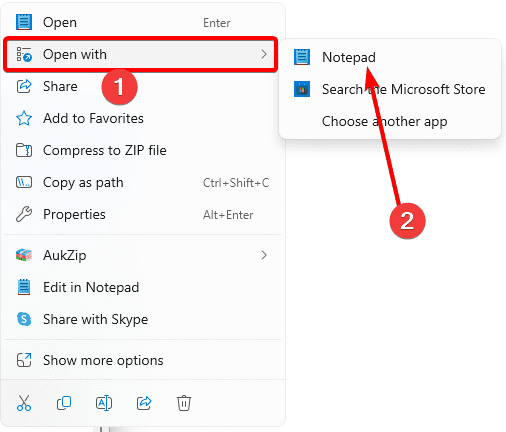
1. Open the .hat File Using Notepad
Notepad is the built-in text editor on the Windows 11 operating system. In addition to taking notes, you may use it as the go-to app for opening .hat files. Follow the steps below.
1. Launch the File Explorer by pressing Windows + E on your keyboard.
2. Navigate to the location of the .hat file.
3. Right-click the file and click Open with, then click Notepad.
Note that Notepad is a very basic text editor. You may find better results and compatibility using alternative software.
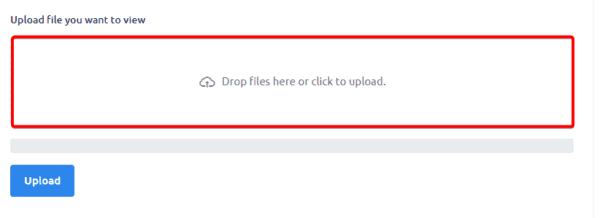
2. Open HAT Files Using an Online Resource
This may be your go-to if you do not have success using the Notepad app or its alternatives. Simply follow the steps below.
2. Drag the file to the section that says Drop files here or click to upload.
3. Now, you may view the content of the hat file.
Note that if you do not have a dedicated HAT file-opening app, you may only be able to view the file’s content but will not be able to use the file, especially when you use a text editor to open it.
Is It Safe to Edit Hierarchical Annotation Tables (Hat) Files?
You can open the .hat files with the methods we have explored above, but you should not know that we do not recommend manually updating or editing these files.
This is because they are designed to be used with specific software development tools for tasks, and modifying them may break the internal structure and ruin functionality.
However, if you must edit them, we recommend using appropriate tools. This should be the tool provided by your development environment or the software used to create the hat file.
Generally, you should consult the documentation for your development tools before editing the file.
Is It Safe to Delete Hat Files?
You may delete these files only if you are no longer actively developing and debugging a related project and you are sure the project is completed.
As a best practice, you should back up the file before deleting it; you should also document the deletion and probably consider archiving it.
Wrapping It Up It With .Hat Files
We have provided all the information you should know if you need to open HAT files on Windows 11. The steps are very easy, and you should not break a sweat.
Let us know in the comments if you have worked with .hat files in the past.
Windows update errors are not uncommon. You usually get them during an update or upgrade, and the Windows 11 0xC007000D is one such error many people have encountered.
This specific error is often a sign of system file corruption or malware infection, and in this guide, we walk you through all possible ways to fix it. Let us get started.
1. Run the Windows Update Troubleshooter
Running the Windows Update troubleshooter is a good starting point for all update errors. This is because the troubleshooter does a deep scan of the computer to detect and fix possible causes of all update errors.
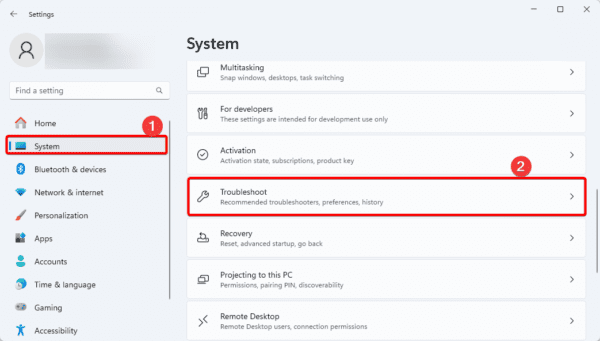
1. Open the Settings app by pressing Windows + I.
2. Click the System tab on the left, and on the right, click Troubleshoot.
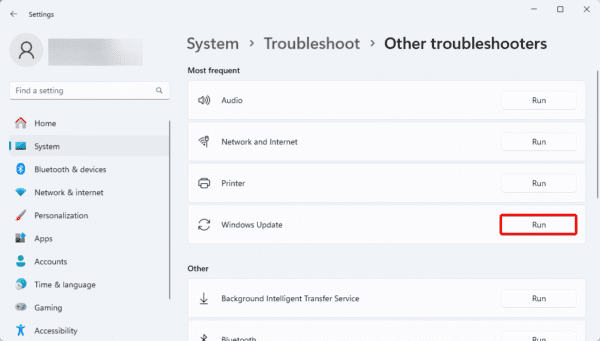
3. Click Other troubleshooters.
4. Click the Run option for Windows Update and follow the on-screen commands to complete the process.
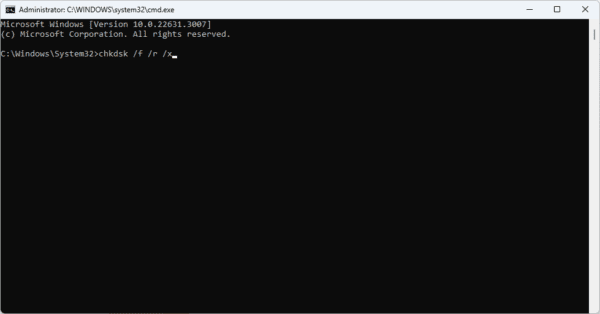
2. Fix Drive Bad Sectors
When there are bad sectors on your hard disk, Windows may be unable to complete some functions as these disk locations will be unreadable. Windows 11 provides a built-in chkdsk tool to fix this problem. Follow the steps below to run it.
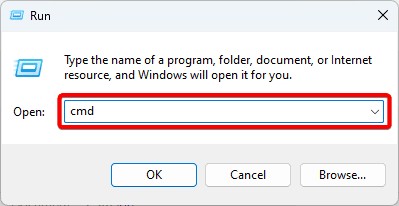
1. Press Windows + R to open the Run dialog.
2. Type cmd and hit Ctrl + Shift + Enter to open an elevated Command Prompt.
3. Type the command below and hit Enter, substituting C for your drive letter.
chkdsk /f /r /x
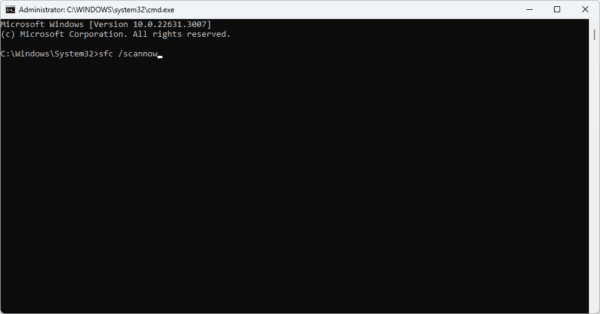
3. Fix File and Image Corruption with DISM and SFC Scans
Corruption within the system files or Windows installation may prevent your update from completing, resulting in the Windows 11 0xC007000D update error. You may use the built-in DISM and SFC scans to fix it.
These scans will find the corrupted files and repair or replace them. You may run them with the steps below.
1. Press Windows + R to open the Run dialog.
2. Type cmd and hit Ctrl + Shift + Enter to open an elevated Command Prompt.
3. Input the command below, hitting Enter after each one to find image corruption and repair them.
DISM /Online /Cleanup-Image /ScanHealth
DISM /Online /Cleanup-Image /RestoreHealth
4. Lastly, run the sfc scan by inputting the command below and hitting Enter.
sfc /scannow
4. Reset Update Components on Windows 11
Windows 11 update components compare all the services and files that work together to download, install, and manage updates. You may experience the 0xC007000D Windows 11 update error when they are corrupt or buggy. Reset the following steps below.
1. Press Windows + R to open the Run dialog.
2. Type cmd and hit Ctrl + Shift + Enter to open an elevated Command Prompt.
3. Input the commands below, hitting Enter after each one to stop critical update services.
net stop wuauserv
net stop cryptsvc
net stop bits
net stop appidsvc
4. Run the command below to qmgr.dat files.
Del "%ALLUSERSPROFILE%\Application Data\Microsoft\Network\Downloader*.*"
5. Re-register BITS and Windows Update files by inputting the commands below and hitting Enter after each one.
7. Restart the services you stopped in step 3 by entering the commands below and hitting Enter after each one.
net start bits
net start wuauserv
net start appidsvc
net start cryptsvc
8. Restart the computer.
5. Run the Windows Restore Utility
Note that this solution will only work if you created a restore point before encountering the 0xC007000D Windows update error on Windows 11. You should still try this solution even if you have not consciously created one because the computer may have automatically created a restore point.
A system restore will take your computer back to a state where it functioned properly.
1. Type restore on Windows Search and select the Recovery option.
2. Click the Open System Restore option on the Control Panel.
3. Select Choose a different restore point and click the Next button.
4. Select a different restore point from the available options and click Next.
5. Lastly, click the Finish button. The process will begin, and your computer may restart as the restore runs.
6. Reset Windows 11 From the Could
Your version of Windows may be corrupted. This may be the primary cause of the Windows 11 update error 0xC007000D. A reset will fix it, but you must carefully perform it with a new Windows setup. Follow the steps below.
1. Press Windows + I to open the Settings app.
2. Scroll down the right pane and select Recovery.
3. Click the Reset PC button.
4. Select the Keep my files option.
5. Click Cloud download.
6. Follow the wizard to complete the reset. Note that this will take a while, and your computer will restart several times.
FAQ on Windows 11 Update Error 0xC007000D
1. Are there any specific updates associated with Windows 11 Update Error 0xC007000D?
No, this error may be associated with any Windows update. You will resolve it regardless, using the solutions we have explored.
2. Can I get professional assistance for Windows 11 Update Error 0xC007000D?
Yes, you may seek professional assistance if these DIY solutions do not work.
Successfully Recovering from Windows 11 Update Error 0xC007000D
Windows 11 0xC007000D update error is one of the problems you may encounter during an update. However, the solutions are often easy. A last resort would be a reinstallation of the OS, but the chances of getting to this point are rare.
Group Policy is vital in managing the Windows environment. When you cannot find GPedit.msc in Windows 11, it leaves you stranded as an administrator, and you lose a lot of centralized control.
This guide leads you through the best ways to fix this problem. However, before proceeding with solutions, you should note that on a Windows 11 Home installation, the administration tool is missing by default.
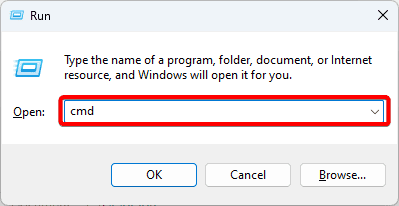
1. Install Group Policy From the Command Prompt
When you cannot find GPedit.msc on your computer, installing the administration tool is one of the best fixes. You may ensure proper installation using Command Prompt commands.
1. Press Windows +R to open the Run dialog, type cmd, and hit the Enter key to open the Command Prompt with administrative privileges.
2. Copy and paste the commands below, hitting the Enter key after each to install Group Policy.
FOR %F IN ("%SystemRoot%\servicing\Packages\Microsoft-Windows-GroupPolicy-ClientTools-Package~*.mum") DO ( DISM /Online /NoRestart /Add-Package:"%F" )
FOR %F IN ("%SystemRoot%\servicing\Packages\Microsoft-Windows-GroupPolicy-ClientExtensions-Package~*.mum") DO ( DISM /Online /NoRestart /Add-Package:"%F" )
2. Enable Group Policy With Batch Command
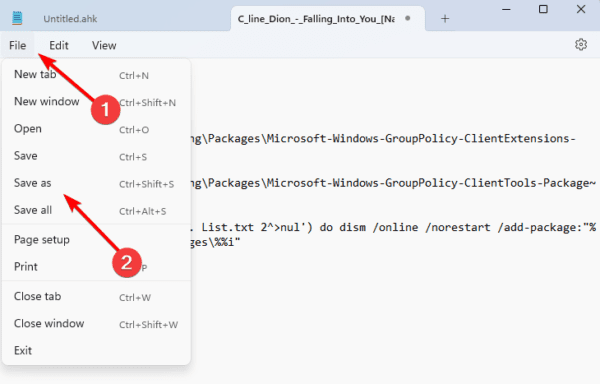
A second option for when you cannot find gpedit.msc on Windows 11 is to enable it with a batch file. Follow the steps below.
1. Press Windows + R, type Notepad and hit Enter.
2. Copy and paste the script below into Notepad.
@echo off
pushd "%~dp0"
dir /b %SystemRoot%\servicing\Packages\Microsoft-Windows-GroupPolicy-ClientExtensions-Package~3*.mum >List.txt
dir /b %SystemRoot%\servicing\Packages\Microsoft-Windows-GroupPolicy-ClientTools-Package~3*.mum >>List.txt
for /f %%i in ('findstr /i . List.txt 2^>nul') do dism /online /norestart /add-package:"%SystemRoot%\servicing\Packages\%%i"
pause
3. Click the File menu and click Save As.
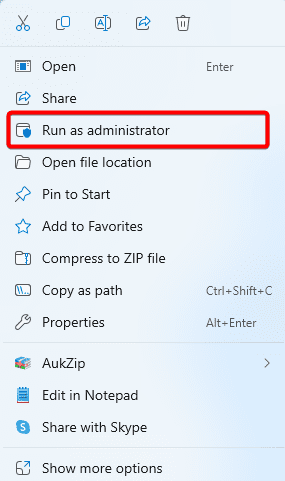
4. Name the file Group Policy Editor.bat and click the Save button.
5. Lastly, right-click the file and click Run as Administrator. When the script completes execution, verify if the Group Policy is no longer missing.
3. Install Group Policy with the gpedit-main Zip File
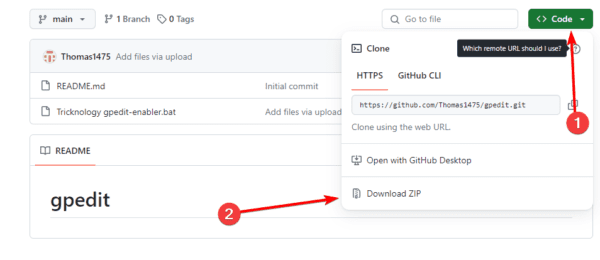
Another option to install Group Policy when missing is via the GitHub gpedit-main zip file. The process is easy.
1. Open your browser and navigate to the gpedit-main GitHub download page.
2. Click the Code button, then click Download Zip.
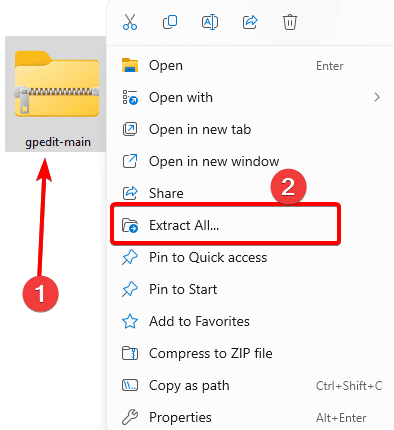
3. Right-click on the downloaded zip file and click Extract All.
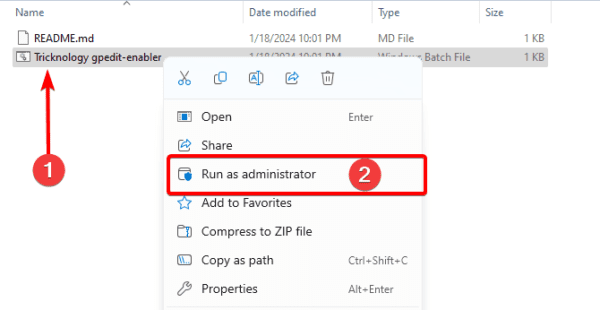
4. Open the extracted file, right-click on Tricknology gpedit-enabler, and click Run as Administrator.
5. Once all needed extensions are installed, you should get a message: The operation was completed successfully. Close the Command prompt and verify the Group Policy problem is fixed.
4. Run DISM and SFC SCans
If your Group Policy is on your computer but you can not find it, you may have severe system and installation file corruption. You may run the DISM and SFC scans to check for corrupt files and repair or replace them.
1. Press Windows + R to open the Run dialog.
2. Type cmd and hit Ctrl + Shift + Enter to open an elevated Command Prompt.
3. Input the command below, hitting Enter after each one to find image corruption and repair them.
DISM /Online /Cleanup-Image /ScanHealth
DISM /Online /Cleanup-Image /RestoreHealth
4. Lastly, run the sfc scan by inputting the command below and hitting Enter.
sfc /scannow
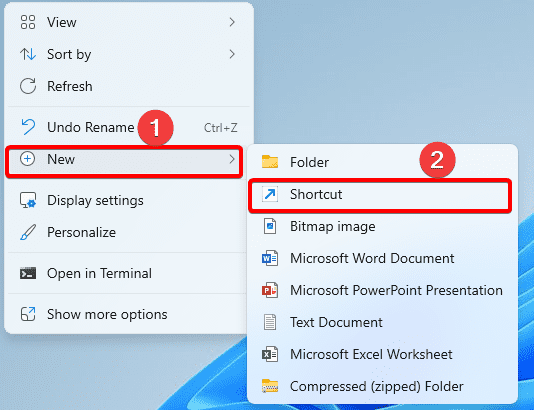
5. Create a Group Policy Shortcut
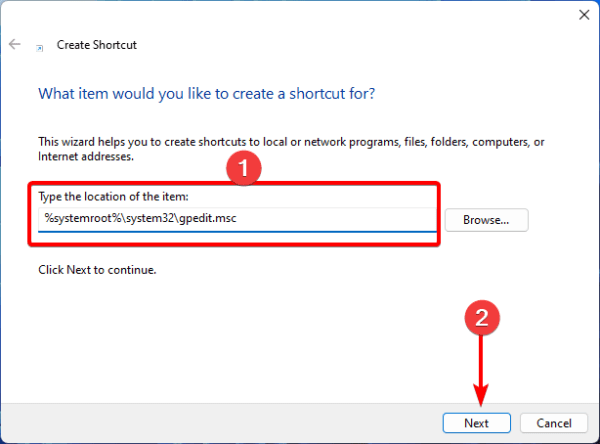
When you cannot find gpedit.msc on Windows 11, you may have a problem with the shortcut. Creating a new shortcut for the utility will resolve the issue.
1. Right-click a space on your desktop and click Shortcut in the Context Menu.
2. Type the location below in the text field and click Next.
%systemroot%\system32\gpedit.msc
3. Click Finish, then you may click the shortcut that appears on your desktop to open the Group Policy Editor.
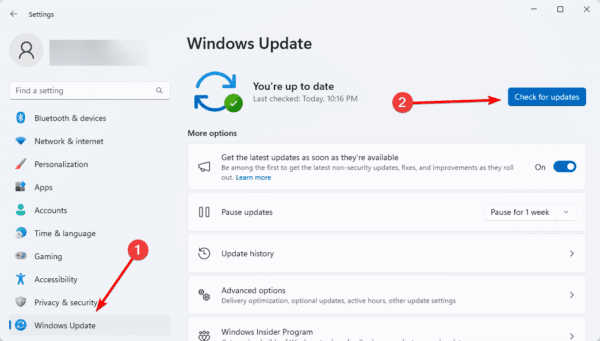
6. Update Windows 11
One effective solution is a simple Windows update. This is because updates often come with security patches and fixes. A new update could fix any corruption that made locating the Group Policy Editor impossible.
1. Press Windows + I to open the Settings app.
2. On the left pane, click Windows Update, then on the right, click Check for updates.
3. If there are any updates, download and install them.
7. Clean Install Windows
A clean install on Windows 11 enables the computer to boot with only essential services and programs. It cuts off all third-party applications, a useful way of eliminating conflicts that trigger the Group Policy problem.
Once your computer boots in a clean install, verify the Group Policy can be located and opened.
Fixing the Missing Gpedit.msc Issue on Windows 11
that is all you need to know regarding this missing gpedit.msc problem on Windows 11. In rare cases, you may consider a total reinstallation of the operating system.
Please let us know if you successfully fixed the problem in the comment section.
When your Windows 11 Device Manager keeps refreshing, it often means a particular device is connecting and disconnecting. This may be because there is a problem with this specific device. However, it could mean more than that.
In some cases, there could be conflicting software or devices or even a more profound case of malware infection or system file corruption. We show you how to address it in this guide.
1. Disconnect Peripherals
Your best bet is to disconnect all connected peripheral devices. This should immediately fix the problem; however, you may need to troubleshoot further to know which of the devices triggered the problem.
So, connect the devices one after the other until you can pinpoint the problematic one. You may then change it or leave it disconnected.
2. Disable Problematic Device
The step above shows how you may manually find the problematic I/O device. However, you may take a more automated approach by using a tool.
You may download and install the USB Log View tool. This tool will run in the background and give you a total record of all the connected USB devices on your computer. It shows you all the log times, and you may easily use it to figure out why Windows 11 Device Manager Keeps Refreshing.
3. Run SFC Scan
An SFC scan is very efficient in finding corrupted or bad system files. It scans your computer for these files and fixes or replaces them. You may run this scan using the following steps.
1. Press Windows + R to open your Run dialog, then type cmd and hit the Enter key.
2. In the computer, input the command below, then follow the on-screen instructions to complete the scan.
sfc /scannow
3. Restart your computer.
4. Disable the Error Reporting Services
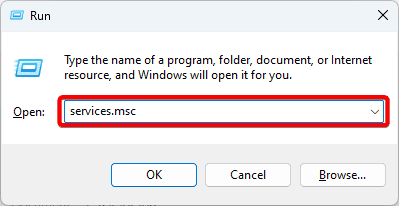
the Error Reporting Service is in charge of collecting errors on your computer and sending them to Microsoft. There are rare situations when it sends device errors that conflict with the Device manager, causing the refreshing problem.
1. Press Windows + R to open your Run dialog, then type services.msc and hit Enter.
2. Right-click on Windows Error Reporting Service and click Stop if it is not greyed out.
3. Repeat the same process for the Problems Report Control Panel Support service.
5. Run A Virus Scan
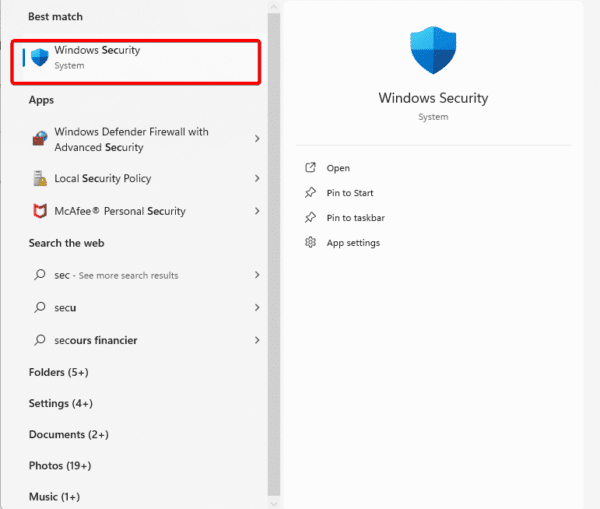
Virus infection often causes the computer to malfunction. When the Device Manager keeps refreshing in Windows 11, it is often a result of a virus, and a proper scan should fix it. You may use a reliable third-party antivirus or the built-in Windows Security shown below.
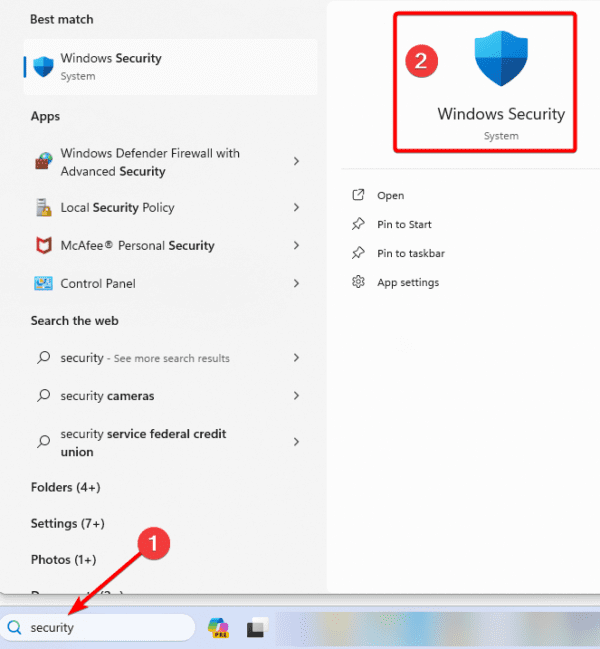
1. Type Security in the Taskbar’s search and click Windows Security.
2. Click Virus & threat protection on the right pane, then click Scan Option on the left.
3. Click Full scan, then click Scan now.
5. Clean Boot the Computer
Clean booting your computer is a great way to eliminate conflicts caused by applications or drivers. When you clan boot the computer, it will start without any third-party services, and this would be effective if the Windows 11 Device Manager keeps refreshing.
FAQ on Windows 11 Device Manager Keeps Refreshing
1. Why does my Device Manager keep refreshing in Windows 11?
Driver conflicts, outdated drivers, or system instability are the most common causes for the constant refreshing of the Device Manager.
2. Can the specific device causing the refresh loop be identified?
Yes, you may observe the Device Manager and check for the flickering section.
Moving Ahead
As a best practice, keep your computer constantly updated. It reduces the chance of conflicts leading to the Device Manager problem. However, you should be able to fix it with the solutions we explored in this guide.
Do you need to Open an OPUS file format in Windows 11? This guide is for you.
OPUS files are related to the OPUS audio codec. These are versatile files created for different apps used for video conferencing, voice over IP (VoIP), and streaming audio over the internet. If you need to open an OPUS file in Windows 11, the solutions below will help you.
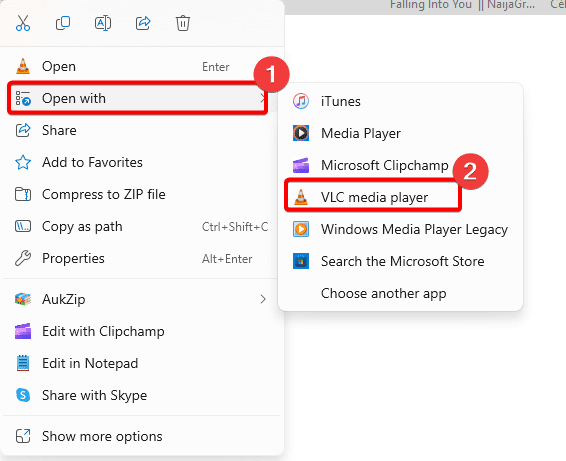
2. Press Windows + E to open the File Explorer, then navigate to the file’s location.
3. Right-click the File, hover on Open with from the context menu, then click VLC Media Player.
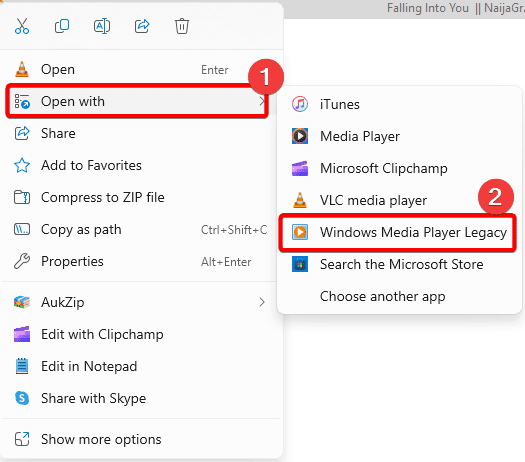
2. Open OPUS File Using Windows Media Player
Windows Media Player is the native multimedia player on Windows 11 computers. You may use it to open the OPUS file as well.
1. Press Windows + E to open the File Explorer, then navigate to the file’s location.
2. Right-click the File, hover on Open with from the context menu, then click Windows Media Player.
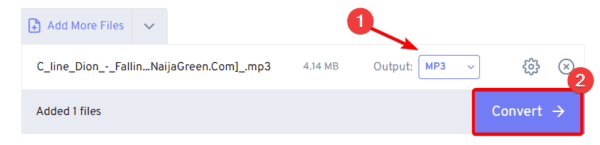
3. Open OPUS File By converting them to MP3
Since MP3 is a more well-known format, converting your OPUS files to MP3 will mean you can open them with a wider range of applications. You may convert the files online using any solution from a quick Google search. Below, we use the freeconvert OPUS to MP3 Converter.
2. Which media players support OPUS files on Windows 11?
There is a good number that supports OPUS files. In addition to the ones already mentioned you may try Winamp, Foobar2000, and AIMP.
3. Can I convert OPUS files to a more widely supported format?
We explore converting OPUS files in our third solution. However, there are many more options for converting this file.
Opening the OPUS FILE on Windows 11
That is all you need to know to open an OPUS file format on Windows 11. Note that for any Media Player to open this file, it must have the OPUS codec.
The examples we used in this guide all have the codec preinstalled, however you may opt for any other media player, as long as you can download and install this codec on it.
That is all we share in this guide. Let us know if you have any questions.
On Windows 11, the Terminal acts as a host to several command-line shells. These include Command Prompt, PowerShell, and even Linux shells through Windows Subsystem for Linux (WSL). However, you may observe the Windows 11 Terminal opening and closing on its own.
This random action may be alarming, and we show you the best ways of fixing it in this guide. Walk with us.
1. Fix File Corruption with DISM and SFC Scans
File corruption is one reason your Terminal may be opening and closing randomly. When essential system or installation files are corrupt, the computer may stop communicating correctly with certain components, triggering the problem.
Windows 11 provides two scans that will repair or replace any corruption.
1. Press Windows + R to open your Run dialog, then type cmd and hit Enter.
2. Type the commands below hitting Enter after each one to scan for image corruption and fix any discovered corruption.
DISM /Online /Cleanup-Image /ScanHealth
DISM /Online /Cleanup-Image /RestoreHealth
3. In the computer, input the command below, then follow the on-screen instructions to complete the scan.
sfc /scannow
3. Restart your computer.
2. Run a Virus Scan
Malware on a computer is a common reason why your Terminal may open and close randomly. Malware is known to alter normal system performance. You should scan your computer with a reliable antivirus app or use the built-in Windows Security.
1. Type Security in the Taskbar’s search and click Windows Security.
2. Click Virus & threat protection on the right pane, then click Scan Option on the left.
3. Click Full scan, then click Scan now.
3. Update Windows 11
A Windows update is often very effective in fixing the random opening and closing of the Terminal. This is because outdated drivers or Windows components may trigger the problem. An update will fix such issues.
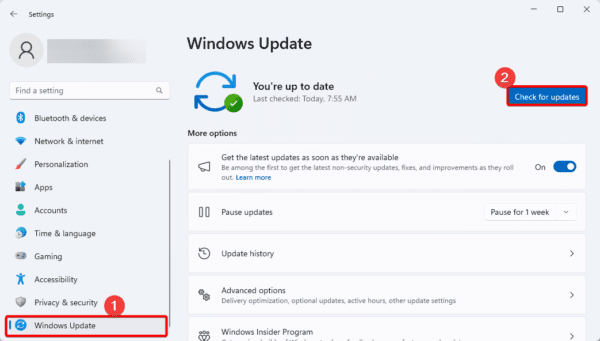
1. Open the Settings app by pressing Windows + I.
2. Click Windows Update on the left pane, then on the right click the Check for Updates button.
4. Download and install any detected updates.
4. Clean Boot the Computer
When Windows 11 Terminal is opening and closing on its own you may be having a problem with conflicting programs and services. One way to resolve these conflicts is by clean booting the computer.
During a clean boot, the computer starts up with some essential programs. All third-party applications are blocked, isolating the problem.
5. Create a New User Profile
Creating a new user profile is an efficient solution since corruption in your current profile may be causing the Terminal to open and close on its own on Windows 11. Follow the steps below to create a new user profile.
1. Press Windows + I to open the Settings App.
2. Click Accounts on the left pane, then on the right, click Other users.
3. Click the Add account button.
4. Click I don’t have this person’s sign-in information.
5. Select Add user without a Microsoft account.
6. Fill out the form with your desired username and password, then click next.
7. Click the Change account type button for the newly created account.
8. Select Administrator and click OK.
Getting Past the Terminal Issue
We have explored all you need to know to get past this Terminal issue on Windows 11. The solutions are not written in any particular order, and we encourage you to start with any that feels the most appropriate.
On Windows, Network Discovery is a setting that determines if your computer can see other devices and if they can find your computer. Some users have complained that network discovery is turned off on Windows 11.
This problem limits your ability to connect to networks or even the internet. It may be caused by bad settings, firewall interference, a bad network profile, or even conflicting software. In this guide, we help you fix it.
1. Remove Peripheral Devices
If you have devices connected via wire on your computer, you should start by removing them. This is especially a useful fix when some of these devices have their own internet connection. They may cause interference.
Once all devices are disconnected from the computer, verify if it fixes the problem.
2. Enable the Network Discovery via the Settings App
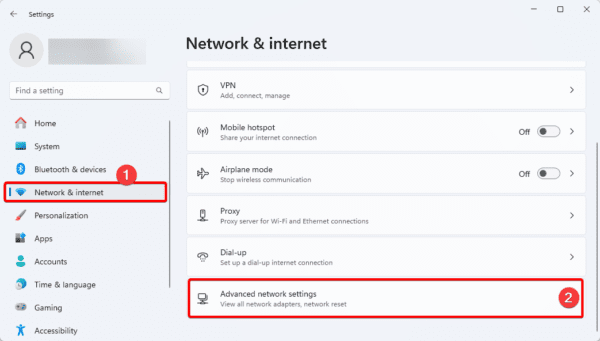
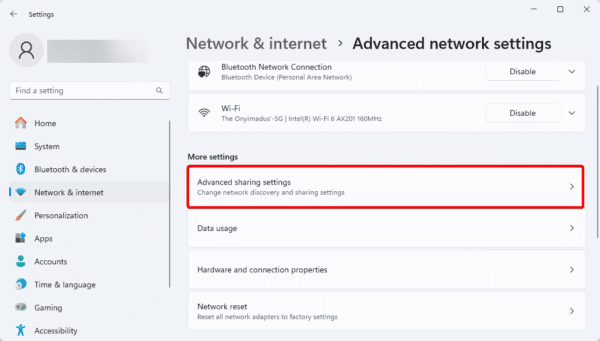
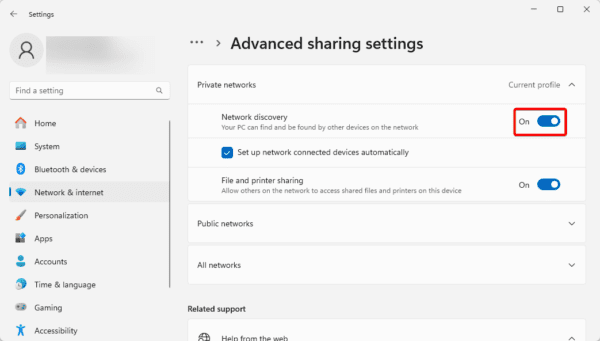
When Network Discovery is turned off on Windows 11, you may want to start by turning it back on. One way to do this is via the Settings app, as shown below.
1. Press Windows + I to open Settings.
2. On the left pane, click Network & internet, then click Advanced Network Settings on the right.
3. Click Advanced Sharing Settings.
4. Toggle on Network discovery.
3. Enable all Network Discovery Dependent Services
Some services play a crucial role in the functioning of Network Discovery. If some of these services are not enabled on your Windows 11 device, it may be why the network discovery is turned off. Enable them with the steps below.
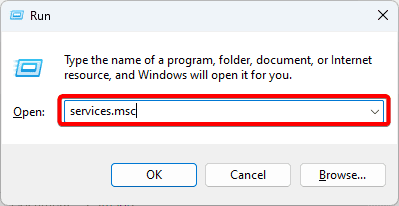
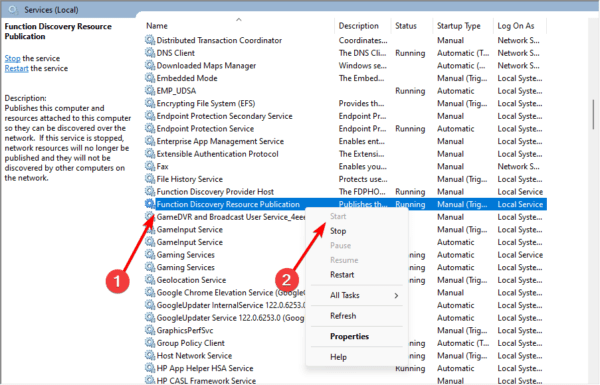
1. Press Windows + R, type services.msc in the text field, and hit Enter.
2. Right-click the Function Discovery Resource Publication service and click Start.
3. Repeat step 2 for the following services: SSDP Discovery, DNS Client, and UPnP Device Host,
4. Allow network Discovery through Your Firewall
Network Discovery may be turned off because your firewall has blocked it. If true, following the steps below, you must let it through the firewall.
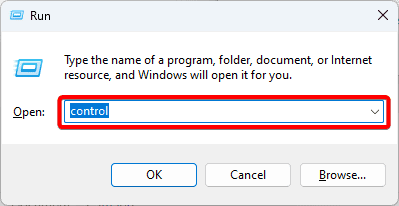
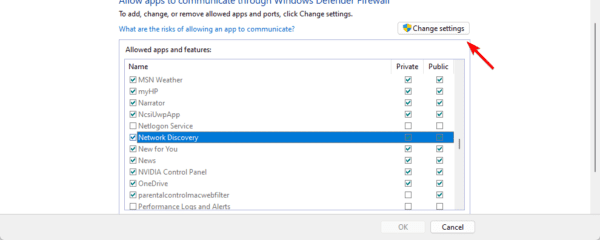
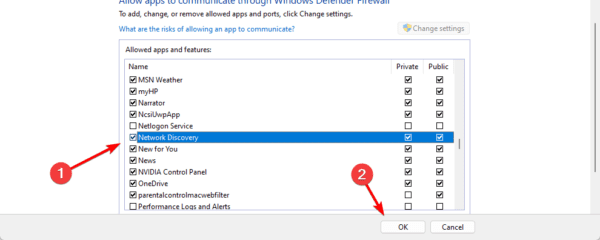
1. Press Windows + R, type control, and hit Enter to open the Control panel.
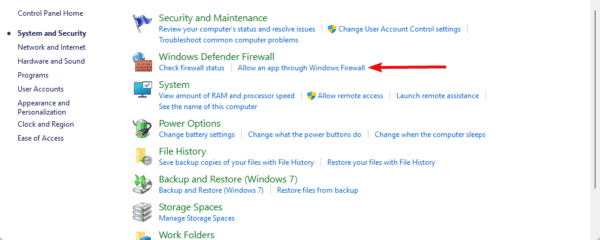
2. Click System and Security, then click Allow an app through Windows Firewall in the following windows.
3. Click the Change Settings button.
4. Tick the Network Discovery checkbox and click the OK button.
Recovering Windows 11 Network Discovery When it is Turned Off
There you have it: the best solution when Network Discovery is turned off in Windows 11. All the solutions should work, so we recommend you start with whichever seems the most practical.
Blue screen of death errors are not uncommon to Windows users. These crashes may be random and often cause a lot of panic. This guide explores the memory management Blue Screen of Death in Windows 11.
This BSoD is mostly caused by faulty RAM, storage errors, or bad drivers. We have explored the problem and present the most effective solutions below.
Pre-solution: Boot in Safe Mode
The system crashes may be very regular, making it impossible to fix the problem. A way to avoid this is by booting into safe mode. When you are in safe mode, the computer will run the barest number of services, allowing your computer to be stable during the troubleshooting process.
You may then continue with the fixes below.
1. Check for RAM Problems
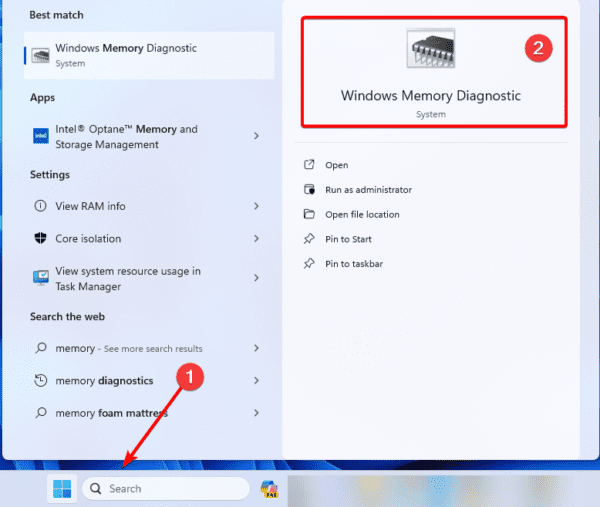
Windows 11 comes with a Windows Memory Diagnostic Tool. This tool tests the RAM for errors and other hardware failures. Since the memory management blue screen on Windows 11 is mainly triggered by RAM failure, this solution will be very effective.
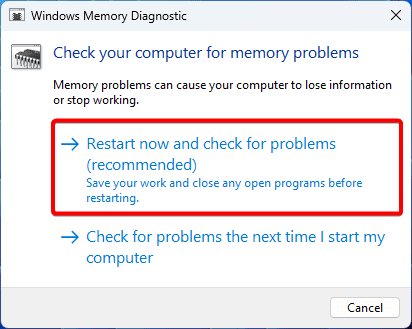
1. click the lens on the Taskbar, type memory, and click Memory Diagnostic Tool.
2. Click ‘Restart now and check for problems.’
3. Follow all recommendations provided after the test is completed.
2. Run the CHKDSK Scan
Windows 11 comes with a built-in CHKDSK utility. This utility can scan the drives for bad sectors and repair any detected problems. This will be an effective fix if drive problems trigger the memory management blue screen of death on Windows 11.
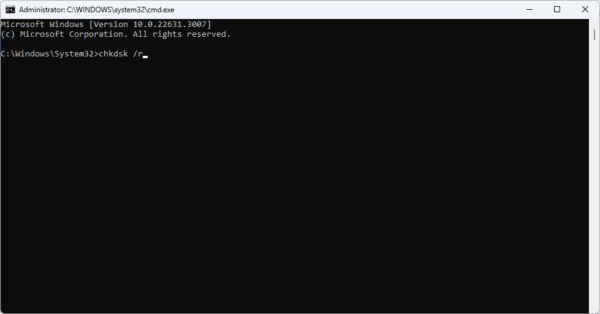
1. Press Windows + R to open your Run dialog.
2. Type cmd and hit Ctrl + Shift + Enter to open an elevated Command prompt.
3. Type the command below to start the scan.
chkdsk /r
4. Restart your computer.
3. Update the OS
When your computer is outdated, many hardware components will not work correctly, which may cause the memory management blue screen on Windows 11. Updating the operating system will fix it.
1. Press Windows + I to open the Settings application.
2. Click Windows Update on the left pane, then click the Check for updates button on the right.
3. Download & Install any updates.
4. Update Drivers
On Windows 11, drivers are a vital connection between hardware components and the operating system. They are essential for proper communication.
The Graphics driver is especially useful for rendering graphics components and may trigger the Memory Management BSoD. You may update drivers using an update software or follow the steps below.
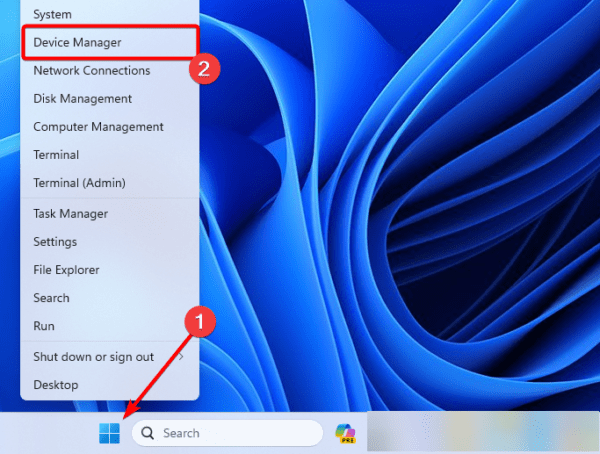
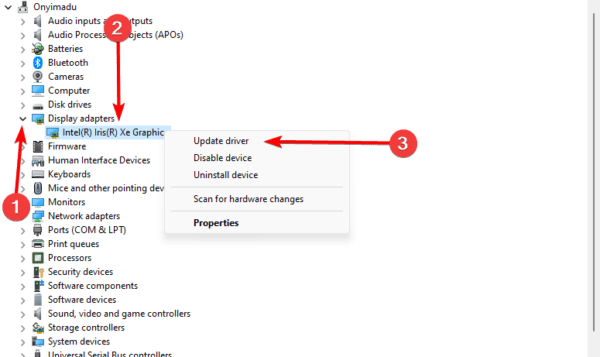
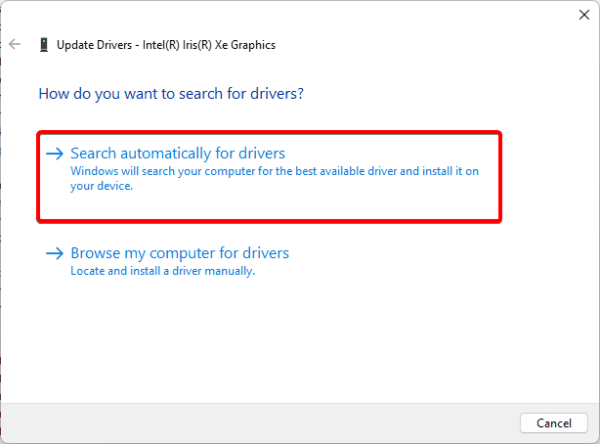
1. Right-click the Start menu and click Device Manager.
2. Expand the Display adapters category, right-click your driver, and click Update driver.
3. Click Search automatically for updates.
5. Fix Installation and System File Corruption
File corruption is a common cause of the memory management BSoD on Windows computers. This is because Windows relies on system files to manage your RAM. You may fix any corruption by running the DISM and SFC scans.
1. Press Windows + R to open your Run dialog.
2. Type cmd and hit Ctrl + Shift + Enter to open an elevated Command prompt.
3. Type the two commands below, hitting Enter after each one to scan for and fix installation file corruption.
DISM /Online /Cleanup-Image /ScanHealth
DISM /Online /Cleanup-Image /RestoreHealth
4. Type the command below and hit Enter to run the SFC scan, then restart the computer when the scan is complete.
sfc /scannow
6. Run a Malware Scan
Malware is one of the most common reasons for file corruption on a Windows device. While you may run the DISM and SFC to fix corruption, you should scan for malware to ensure the problem is permanently fixed.
1. Click the lens in the Taskbar, type security, and click Windows Security.
2. Click Virus & threat protection on the right pane, then click Scan Option on the left.
3. Click Full scan, then click Scan now.
7. Undo Memory Overclocking Settings
If you use an overclocking software, you should undo the overclocking settings. While overclocking may unlock some potential and allow you to run your computer to some higher limits, it may also cause crashes on your computer due to stress and overheating.
So be careful if you use overclocking software as it may be the cause of the memory management blue screen on Windows 11.
8. Reseat the RAM and Hard Disk
A final solution could be reseating your RAM and hard drives. This is effective because you may face the BSoD because of bad contact or connection. Note that in most cases, you will have to open the computer to reseat these hardware components.
How Do I Prevent Memory Management Blue Screen in Windows 11?
Many computer problems may repeat if you do not take proper attention to prevent them. Here are a few things to note if you do not want a repeat of the memory management blue screen on Windows 11.
Regularly update your computer.
Keep your drivers regularly updated.
Monitor memory usage. You may do this using the Task Manager.
Avoid Overclocking your computer.
FAQ
1. Can RAM issues cause blue screen?
Yes, it can. You should always check your RAM to ensure it has no defects.
2. Can GPU cause blue screen?
The GPU itself may not cause a BSoD, but its drivers may, especially if outdated or corrupted.
Recovering From the Memory Management Blue Screen in Windows 11
With the solutions explored in this guide, you should successfully recover from the blue screen of death.
You may start with any more practical solution since we have not written them in any particular order.
Have you noticed that your Windows 11 Device Manager is not responding? Let us help you fix it in this guide.
On Windows 11, the device manager helps you to view and manage all your connected hardware devices. It includes features to update or uninstall driver updates, enable or disable drivers, and more.
So, when the Windows 11 Device Manager is not working, is unresponsive, stuck, or hangs, it could restrict many management functions. Below are the best solutions.
What to Do When the Windows 11 Device Manager Is Not Responding, Not Opening, Stuck, or Hangs
1. Restart the Computer
When the Device Manager is not responding or opening, you should start with a system restart.
A reboot will force problematic processes to shut down, and at restart you should have all processes working properly. If the problem persists, continue to other solutions.
2. Uninstall Windows Updates
Uninstalling the update is an effective fix when the Windows 11 Device Manager is not opening or responding after you update your computer.
While updates are often essential, a few cases may be buggy. By removing them, the Device Manager problem will be fixed.
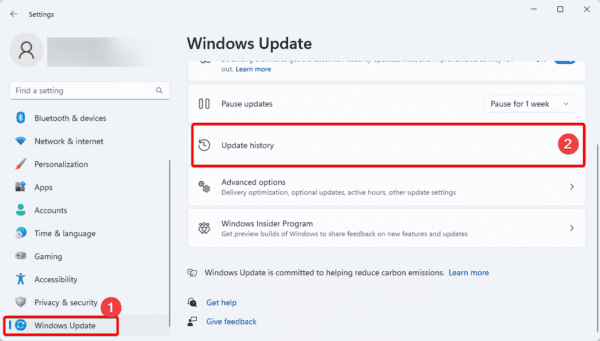
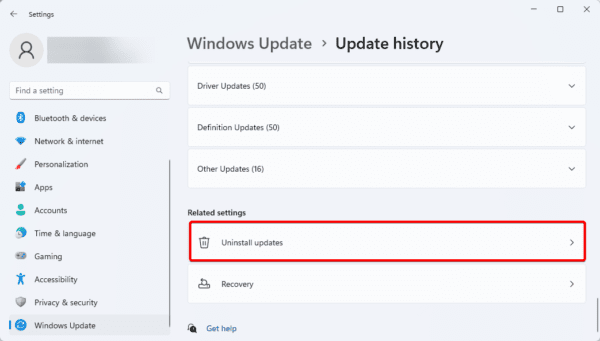
1. Launch the Settings app by pressing Windows + I
2. Click Windows Update on the left pane, then click Update History on the right.
3. Scroll down and click Uninstall updates.
4. Click the Uninstall button for your most recent update.
3. Open Device Manager as an Admin
You may try accessing Device Administrator as an Administrator. This may be effective if you did not have the right to open the utility otherwise. Follow the steps below.
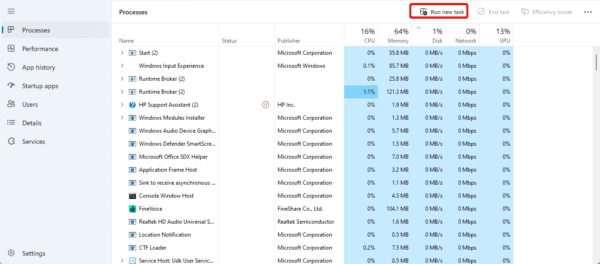
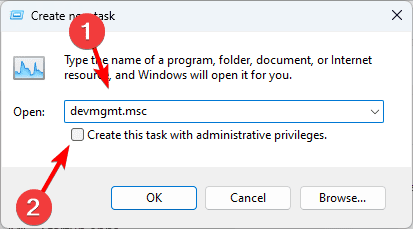
1. Press Ctrl + Shift + Esc to open the Task Manager.
2. Click the Run new task option.
3. Type devmgmt.msc into the text file, tick the Create this task with administrative privileges checkbox and hit Enter.
4. Open the Device Manager from the Command Prompt
When the Device Manager is not opening, you may simply try different means. The most common way is via the Start menu, but you may use the Command Prompt alternatively.
1. press Windows + R to open the Run dialog.
2. Type cmd and hit Ctrl + Shift + Enter.
3. Type the command below and hit Enter.
devmgmt.msc
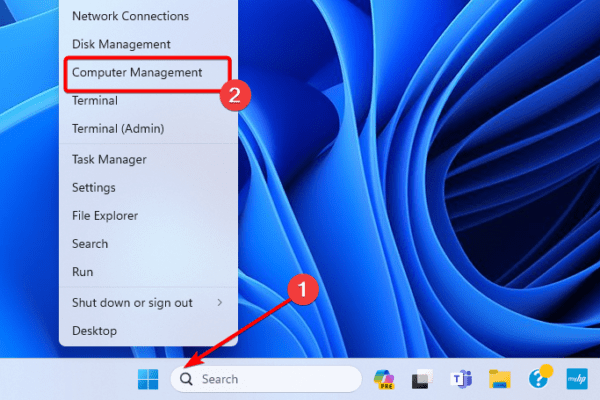
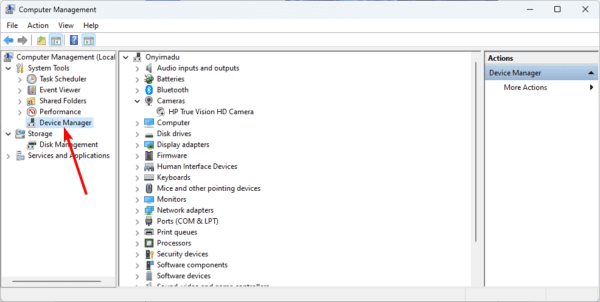
5. Open the Device Manager Using the Computer Management Tools
Here is another option to explore when the Device Manager is not opening on Windows 11.
2. Right-click the Start menu and click Computer Management.
2. On the left pane, under System tolls, click Device Manager.
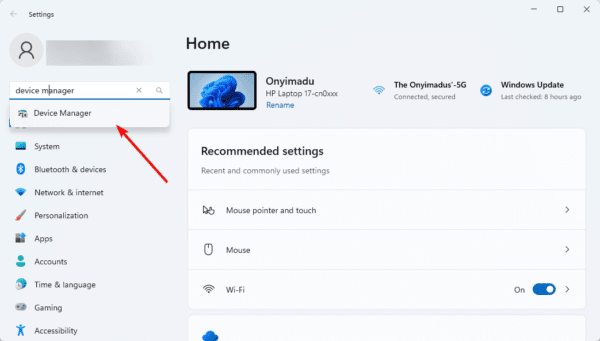
6. Open the Device Manager from the Settings App
A different option to open the Device Manager is using the Settings app. In addition to being a central hub for system app configuration, you may use it to open certain apps.
1. Press Windows + I to open the Settings app.
2. Type Device Manager in the search bar and click the app.
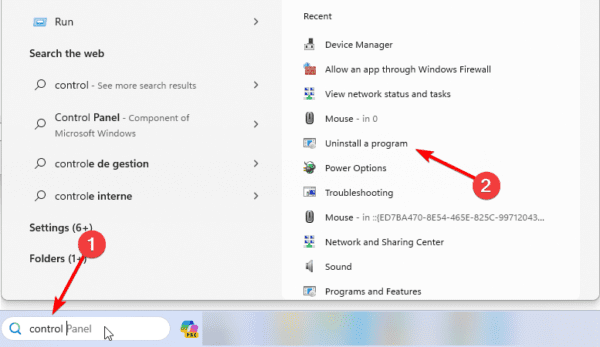
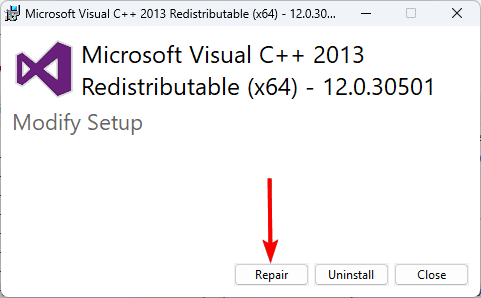
7. Repair Microsoft Visual C++ Programs
Many programs, including the Device Manager, use Microsoft Visual C++ libraries to function correctly. When it is corrupt, you may notice that the Windows 11 Device Manager is not responding or opening or is stuck. You may repair Microsoft Visual C++ with these steps.
1. Click the search bar in the Taskbar, type control, and click Uninstall a program.
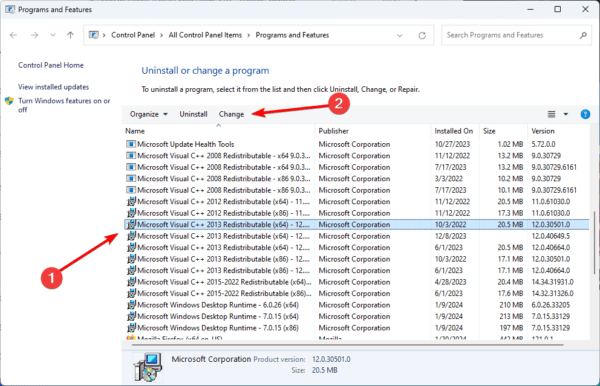
2. Click on Microsoft Visual C++ and click Change.
3. Click the Repair button.
4. Repeat steps 2 and 3 for all instances of Microsoft Visual C++.
8. Fix Drive Problems
When you have bad sectors in your drive, the computer may be unable to communicate effectively. This may cause certain components, like the Device Manager, to be unresponsive or stuck. You may fix these drive issues running the chkdsk tool.
1. press Windows + R to open the Run dialog.
2. Type cmd and hit Ctrl + Shift + Enter.
3. Type the command below and hit Enter, substituting C for your drive letter.
chkdsk /f /r
9. Fix Image and System File Corruption
Corrupted installation and system files are common culprits when the Windows 11 Device Manager is not responding, is stuck, or is not opening.
You may run the DISM and SFC scans to detect and repair or replace any corrupted files.
1. press Windows + R to open the Run dialog.
2. Type cmd and hit Ctrl + Shift + Enter.
3. Type the commands below, hitting Enter after each to scan for installation corruption and fix detected corruption.
DISM /Online /Cleanup-Image /ScanHealth
DISM /Online /Cleanup-Image /RestoreHealth
4. Fix system file corruption by running the command below, then restart the computer.
sfc /scannow
10. Run the System Restore Utility
On Windows, the system restore tool will revert the computer to a state where it worked without problems. If the Windows 11 Device Manager is not responding, this tool will take it to a state where it works perfectly.
To run this tool, you would need to have created a restore point, however you may be fortunate if there are automatic retore points already created.
1. Type restore on Windows Search and select the Recovery option.
2. Click the Open System Restore option on the Control Panel.
3. Select Choose a different restore point and click the Next button.
4. Select a different restore point from the available options and click Next.
5. Lastly, click the Finish button. The process will begin, and your computer may restart as the restore runs.
FAQ
1. Why is Device Manager not responding?
The most common reason is file corruption. These may be system files, or even installation components.
2. Can I reinstall Device Manager in Windows 11?
This utility is a native component of the Windows 11 installation and can not be uninstalled or installed individually. However if you reinstall the OS, it reinstalls all components including the Device Manager.
Fixing Device Manager Errors
this is as much as we share in this guide. With the solutions discussed, you will fix all underlying issues making the Device Manager not to respond or open.
Note that these solutions are not in any particular order, so we recommend you start with any that feels the most practical.
Un problème courant que les utilisateurs de Windows 11 peuvent rencontrer est que la barre des tâches ne s’affiche plus. Que faire alors s’ils disparaissent soudainement ? Cela peut se produire après une mise à jour ou un redémarrage, ce qui rend la navigation dans Windows 11 très frustrante. Vous pouvez utiliser la touche Windows du clavier pour faire apparaître le menu Démarrer (et le reste de la barre des tâches), mais c’est loin d’être une solution idéale.
Heureusement, il existe des solutions potentielles. Dans ce tutoriel, je vous explique comment remettre la barre des tâches de Windows 11 qui a disparu lorsque la barre des tâches a disparu.
Pourquoi ma barre des tâches a disparu dans Windows 11
Voici les principales explications pourquoi la barre des tâches ne s’affiche plus dans Windows 11
Une application se charge dans explorer.exe et cause des plantages de ce dernier
La barre des tâches est endommagée
Windows est corrompu
Comment remettre la barre des tâches qui a disparu dans Windows 11
Restaurer l’affichage de la barre des tâches
Si la barre des tâches disparaît puis réapparaît lorsque vous placez la souris en bas de l’écran, ce comportement de la barre des tâches s’explique par le fait que le masquage de la barre des tâches est activée. Voici comment le désactiver :
Faites un clic droit sur le menu Démarrer puis Paramètres. Pour aller plus vite, vous pouvez aussi utiliser le raccourci clavier + I. Sinon d’autres méthodes dans le tutoriel suivant : Comment ouvrir les paramètres de Windows 11
A gauche, cliquez sur Personnalisation
Puis à droite barre des tâches
Déroulez Comportements de la barre des tâches
Enfin si actif, décochez Masquer automatiquement la barre des tâches
Redémarrer l’explorateur Windows
Vous pouvez tenter de redémarrer l’explorateur Windows, cela recharge le bureau de Windows 11 avec la barre des tâches.
Appuyez le raccourci clavier CTRL+MAJ+ESC
Dans la liste des processus, cherchez la partie Processus Windows
Puis faites un clic droit sur Explorateur Windows
Ensuite dans le menu déroulant, cliquez sur Redémarrer
L’installation d’une application récente peut causer des problèmes de chargement du processus explorer.exe et empêche la barre des tâches de s’afficher. Désinstaller la dernière application installée en suivant ces indications pour résoudre ce problème :
Faites un clic droit sur le menu Démarrer de Windows puis Applications et fonctionnalités
En haut à droite, cliquez sur l’icône Liste
Puis sélectionnez Date d’installation dans le menu déroulant
En début de liste, vous obtenez les dernières applications installées. Désinstallez celles qui peuvent causer des problèmes
Voici comment réparer la barre des tâches avec des commandes PowerShell :
Appuyez sur le raccourci clavier + X ou cliquez avec le bouton droit de la souris sur le menu Démarrer puis sélectionnez “Terminal Windows (admin)“. Plus d’informations : Comment ouvrir Windows Terminal
Laissez l’opération se dérouler et redémarrer l’ordinateur
Créer un nouvel utilisateur
Il peut arriver que votre session utilisateur soit corrompu. Si c’est le cas, vous devez créer un nouvel utilisateur dans Windows 11 pour tester si l’affichage de la barre des tâches se fait correctement. Pour y parvenir suivez ce guide :
Lorsque Windows est totalement endommagé et que les problèmes sont trop nombreux, vous pouvez tenter de réparer Windows 10, 11 sans perte de données et en conservant les programmes installés. Cela permet de rétablir un système fonctionnel à partir des fichiers ISO et images de Windows. La procédure est décrite pas à pas dans cet article :
Il s’agit d’une opération de réinitialisation et de remise à zéro qui supprime les applications et remet le système à son état d’origine. C’est la solution radicale pour retrouver un système fonctionnel :
 Windows 11 avait fait couler beaucoup d’encre lors de sa sortie car la configuration minimale requise était assez compliquée à avoir pour tous (TPM, Secure Boot, Processeur récent…). Cependant, nous l’avons vu ici sur le blog et également en vidéo, il est assez simple de contourner ces prérequis. Jusqu’à aujourd’hui Microsoft n’avait encore rien fait …