Windows 11 avait fait couler beaucoup d’encre lors de sa sortie car la configuration minimale requise était assez compliquée à avoir pour tous (TPM, Secure Boot, Processeur récent…). Cependant, nous l’avons vu ici sur le blog et également en vidéo, il est assez simple de contourner ces prérequis. Jusqu’à aujourd’hui Microsoft n’avait encore rien fait …
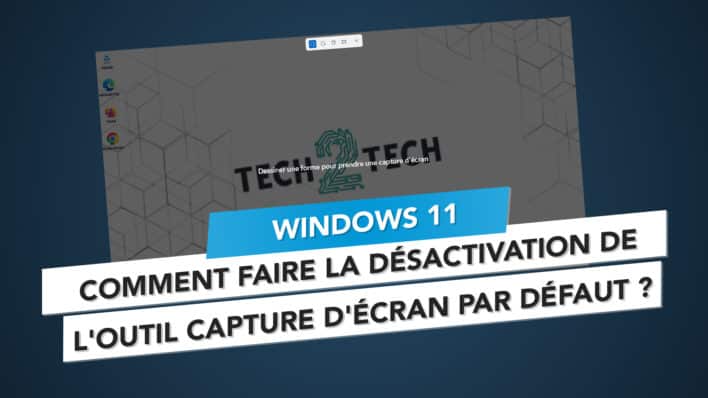
Hey ! Bonjour à toutes et à tous ! 🤙 Nous voici de nouveau ensemble pour un nouvel article et aujourd’hui, celui-ci va concerner un nouveau paramétrage qui a fait son apparition dans les dernières mises à jour de Windows 11. Il s’agit d’une option qui fait que votre touche Impr. Écran de votre clavier …
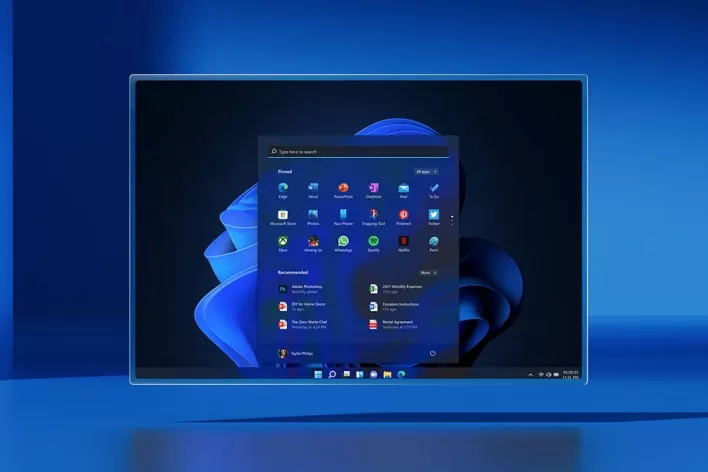
Les bloatwares… véritable fléau lors de l’installation de Windows. Ce sont ces « petits » logiciels qui viennent polluer votre installation sur l’OS de Microsoft : TikTok, Instagram, Spotify, Prime Vidéo, Netflix…. Nous avions déjà vu ensemble qu’il existe des logiciels ou des scripts pour supprimer ces bloatwares. Cependant c’était une méthode qui n’était pas toujours 100% …
Le Bluetooth vous permet de connecter divers appareils à votre ordinateur (Enceinte, Casque, Écouteur, Manette, Téléphone…), parfois pour certaine fonctionnalité, il est nécessaire d’avoir une version spécifique du Bluetooth, c’est le cas par exemple avec l’application « Mobile Connecté » qui nécessite le Bluetooth 4.0 ou encore si vous souhaitez utiliser la fonction de partage de proximité …
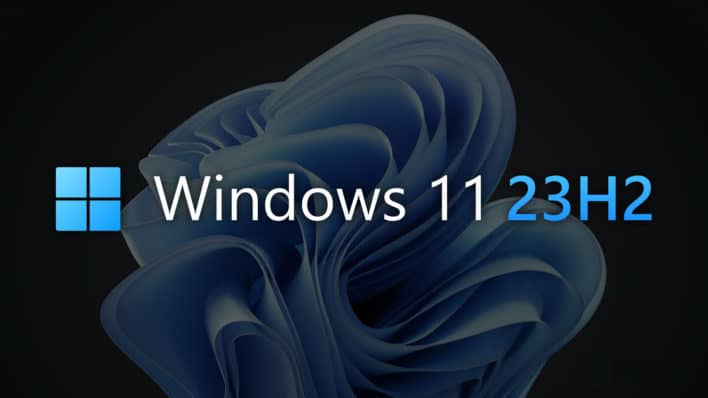
Ca y est, la nouvelle mise à jour majeure de Windows 11 est disponible ! La version 23H2 apporte quelques fonctionnalités intéressantes, notamment Windows Copilot qui ajoutera un peu d’IA à votre installation de Windows. Si vous souhaitez mettre à jour votre ordinateur et installer la dernière version de Windows 11 alors c’est ci-dessous que …
While using your computer, did you run into the message Please power down and connect the PCIe cables? Most times, this message indicates a power mismatch for your graphics card. You may experience a sudden crash before you get this error message.
This is a problem some of our readers have encountered, and we will help you walk through fixing it in this comprehensive guide.
1. Change the Power Connection for the Graphics Card
Changing the power connection that goes into your graphics card is essential when you change your graphics card. This is because a less powerful power cable may have powered the old graphics card, hence a mismatch for the new unit.
If you also purchased a new power supply, ensure it powers your graphics card directly. If you do not know how the internal workings of your PC are done, you may have to seek help from a technician.
2. Power the Graphics Card with a PCIe connector, not a CPU Connector
The problem with powering your graphics card is that the CPU connector looks very similar to the PCIe connector in most instances. In fact, it may fit properly and click, but it would not have enough power to run it.
3. Ensure all the Connectors are Making Contact
When you get the error message: Please power down and connect the PCIe power cables, you should check for contact. This is even more important if you use a spit connector.
Even though you have used the correct kind of connectors, there are chances that some pins have not made contact. You may need to reconnect them inverted. Once there is proper contact, the power problem should be solved.
4. Upgrade your Power Supply
In the past, you would have gotten away with 250 or 400 Watts, but more recent graphics cards require much more power, and you will keep experiencing the problem until you upgrade to a newer and more powerful power supply.
You should note that some graphics cards will now require as much as 1000 watts.
What Are PCIe Power Cables, and Why Are They Necessary?
We have discussed the video card problem, and most solutions refer to your connector or cables. You may be wondering what these PCIe cables are.
These cables supply power from the PSU (Power Supply Unit) to a PCIe device, such as graphics cards, sound cards, and expansion cards.
In most cases, these devices will have a higher requirement than the motherboard can supply through the PCIe slot. With PCIe cables, the needed devices get the required power and can function optimally.
Please Power Down And Connect The PCIe Power Cables: Fixed
You should have successfully fixed the power and video card problem with the solutions we have explored. All the solutions would require some technical knowledge, so you may also consider contacting a technician if you have no experience with opening up a computer.
FAQ
Is it safe to connect PCIe power cables while my computer is running?
No, while your computer is operating, connecting or unplugging PCIe power cords is unsafe. Always turn off your system entirely before performing any hardware modifications to protect your components and your safety.
How do I know if my device requires PCIe power cables?
To determine if your equipment needs PCIe power cords, look up the specs or consult the user manual. Furthermore, your device probably needs more power from PCIe cables if you experience performance problems or error warnings about low power.
Shutting your computer down is a helpful process that ensures it gets an easy reset and processes and applications can function optimally when restarted. However, some readers have complained about Windows 11 being stuck on the shutting down screen.
Why is Windows 11 Stuck on the Shutting Down Screen?
You may encounter this problem on your Windows 11 devices for several reasons. Some of the more common ones include:
Corruption in essential system files or the Windows installation.
Persistent running processes.
Minor bugs and glitches on your computer.
It would be best if you succeeded using the solutions we recommend below, regardless of the cause.
What Should I Do When Windows 11 Is Stuck on Shutting Down Screen?
1. Close Programs that are Still Running
When some programs are active, they still have some unsaved data. This data will stop a complete Windows shutdown. This may be the case for some programs you do not see that run in the background. You may be required to exit shutdown and properly save or end the program or wait while they end automatically.
2. Force a Shutdown
If the shutting-down screen is stuck, you may be able to force a shutdown. However, you should note that this will likely cause data loss, and your computer may go into automatic startup repair mode on the next startup.
To force a shutdown, press the power button for about 5 seconds till the computer shuts down.
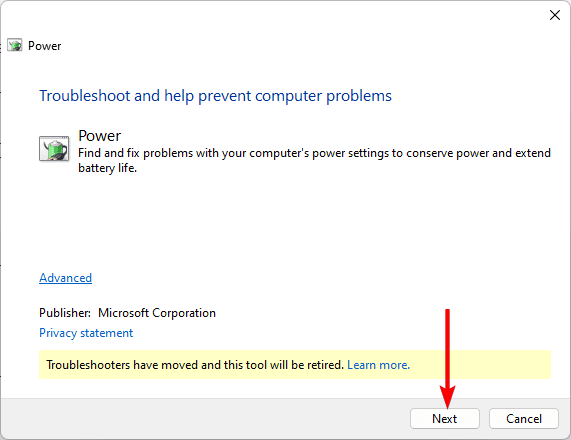
3. Run the Power Troubleshooter
Windows comes with some built-in troubleshooters. The Power troubleshooter is one of them. It will scan the computer for glitches and pugs that may interfere with shutting down and powering your computer and attempt to fix them or recommend actions you may take. To run this utility, follow the steps below.
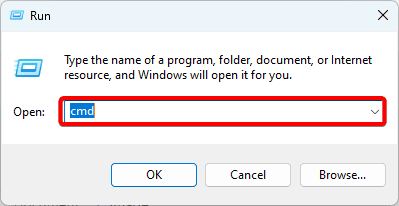
1. Press Windows + R.
2. Type cmd and hit Ctrl + Shift + Enter.
3. Type the command below and hit Enter to start the troubleshooter.
msdt.exe /id PowerDiagnostic
4. Click Next and follow the wizard.
4. Disable Fast Startup
While Windows 11’s Fast Startup seeks to speed up startup times, there are a few scenarios in which it may actually impede the shutdown procedure. This is because it hibernates the kernel and device drivers to a hiberfil.sys file.
1. Press the magnifying lens of the Taskbar, type control, and click Control Panel.
2. Click Hardware and Sound, then select Power Options from the list.
3. Click Choose what the power button does on the left pane.
4. Select the Change settings that are currently unavailable option.
5. Uncheck ‘Turn on fast startup’.
5. Update Drivers
Drivers play a critical role in the correct functioning of the computer. They are a communication link between hardware and Windows, and when outdated, you may expect some odd computer behavior.
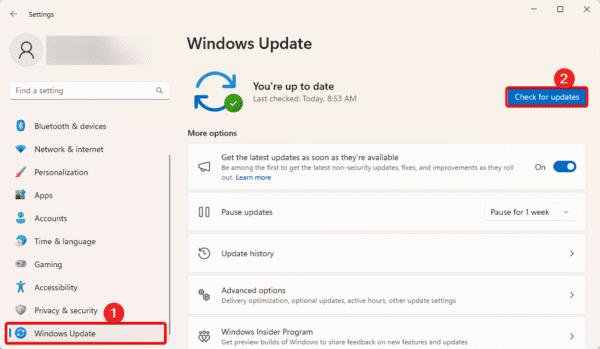
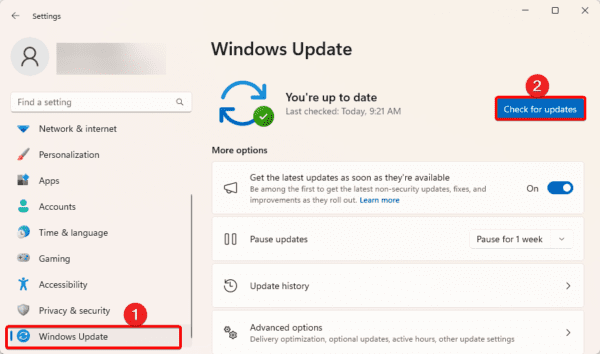
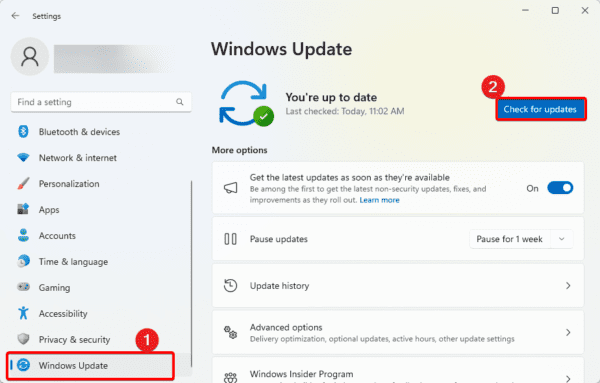
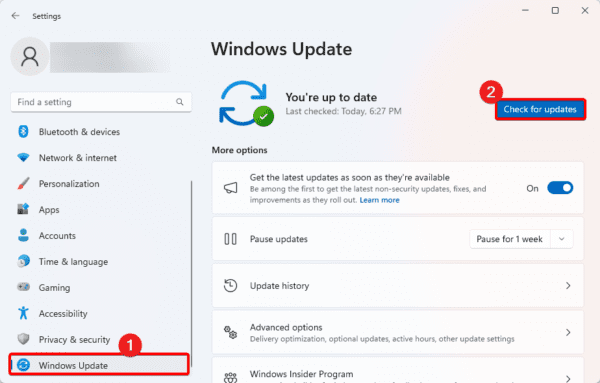
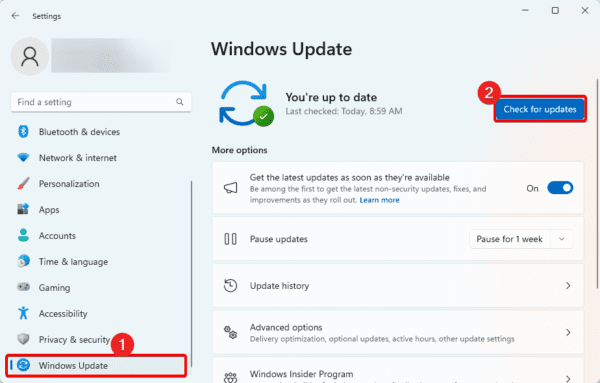
Windows Update is an important part of the operating system. The update often comes with bug fixes and patches. When Windows 11 is stuck on the shutting down screen, you may force a shutdown, restart your computer, and update it. Follow the steps below to update Windows.
1. Press Windows + I to open the Settings app.
2. Click Windows Update on the left pane, then click the Check for updates button on the right.
3. Download and install any pending updates, then restart your computer.
7. Fix Image and System File Corruption
File corruption is a common reason why Windows 11 is stuck on the shutting down screen. The corrupted files may be system or installation files. On Windows 11, you may use the DISM and SFC scans to fix this problem.
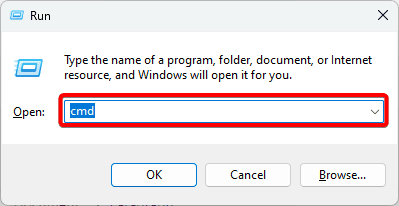
1. Launch the Run dialog by pressing Windows + R.
2. Type cmd and hit Ctrl + Shift + Enter to open an elevated Command prompt.
3. Type the command below and hit Enter to scan for Image errors.
DISM /Online /Cleanup-Image /ScanHealth
4. Type the command below and hit Enter to fix all discovered image errors.
DISM /Online /Cleanup-Image /RestoreHealth
5. Rund the command below to fix corrupted system files on the computer.
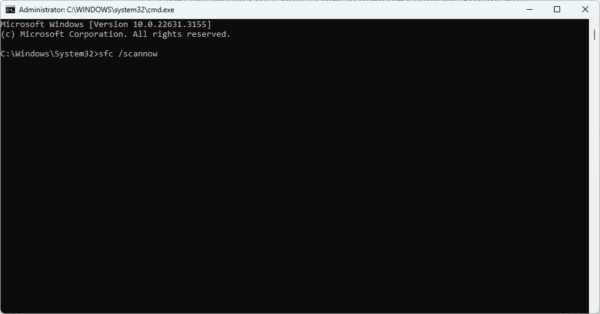
sfc /scannow
Properly Shutting Down Windows
If you need to shut down a problematic computer properly, the solutions we have in this guide should fix the problem. We have not written them in any order, so try what seems the most applicable.
That will be it for this guide. Please tell us in the comment section what fix was most effective.
FAQ
Will force shutting down my computer damage the system?
Force shutting down is not recommended and should be done only when the computer will simply not turn off. It often leads to data loss.
How can I prevent Windows 11 from getting stuck on shutting down screen in the future?
Update your machine with the most recent versions of Windows and drivers. Installing unneeded or perhaps incompatible software should be avoided. Keep your system clean and run regular malware scans.
Connecting to the internet is one of the most important things to do on a computer. Connecting via a hotspot is a common method. However, some users have complained that the hotspot is not working on Windows 11. This article is for you if you belong to this category.
We have researched the problem and will introduce you to some of the most effective solutions. Let us get to it.
1. Restart Computer
You should restart your computer when the Windows 11 hotspot is not working. This fix is effective because the problem sometimes is minor bugs.
The computer shuts down problematic processes on a reboot, killing minor bugs. If, after a restart, the problem persists, you should try other solutions.
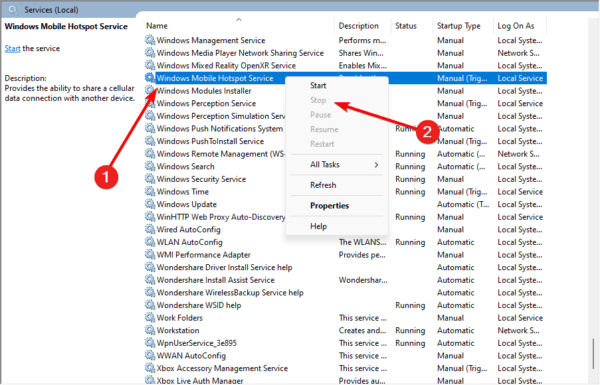
2. Restart Windows Mobile Hotspot Service
There are dedicated services for different operations on the Windows 11 OS. The Windows Mobile Hotspot service is connected with the functioning of the hotspot on your computer. When you restart this service, your hotspot gets a soft reset that will fix the problem.
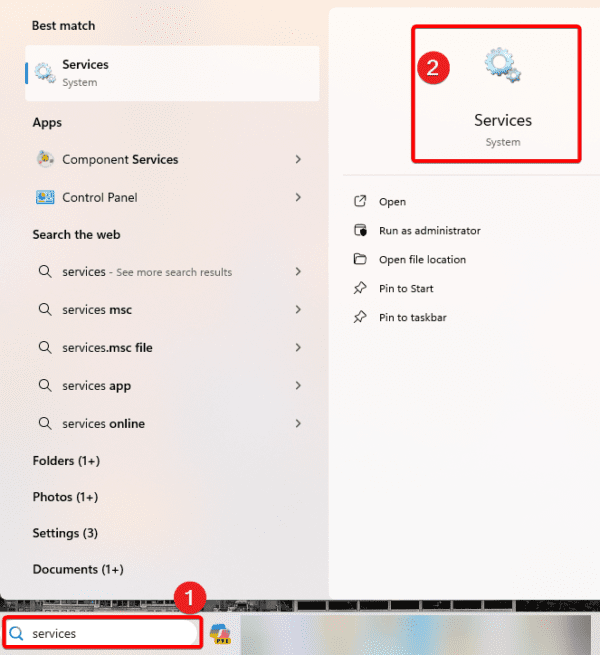
1. Click the Taskbar’s magnifying lens, type services, and click the Services app.
2. Right-click the Windows Mobile Hotspot Service, and click Stop.
3. Right-click the Windows Mobile Hotspot Service, and click Start.
3. Change Mobile Hotspot Password and Reconnect
Changing the Password will often reset your hotspot. This may be strong enough to fix any minor problems.
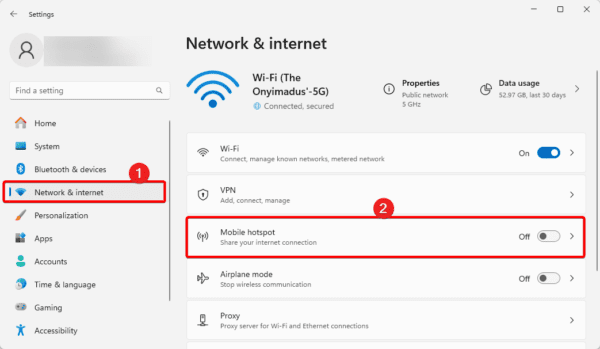
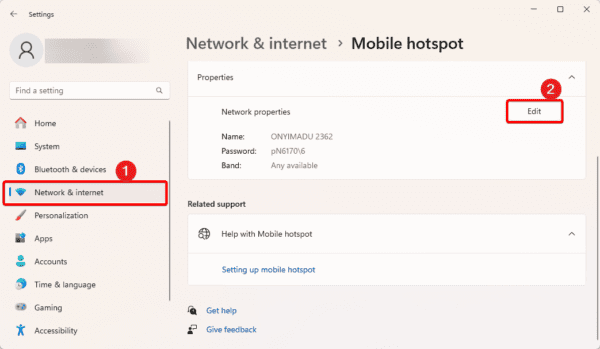
1. Press Windows+ I to open the Settings app, click Network & Internet, and click Mobile hotspot.
2. Click the Edit button for Network Properties.
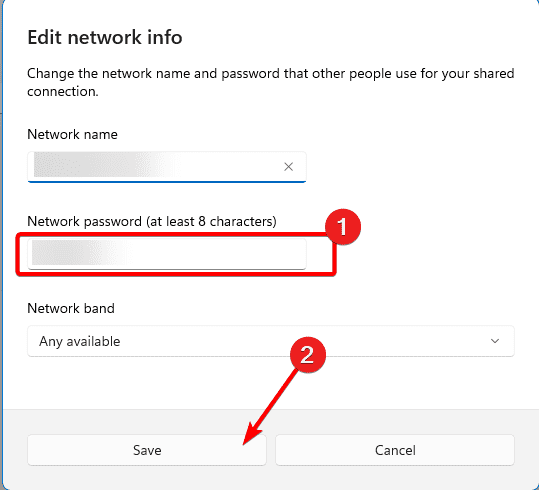
3. Input the new password for your hotspot and click the Save button.
4. Forget the connection on your phone and try reconnecting.
4. Update Wireless Driver
Drivers are an essential communication link between hardware and the operating system. When the wireless browser is outdated, you will have problems using a hotspot, which may be why the hotspot is not working on Windows 11.
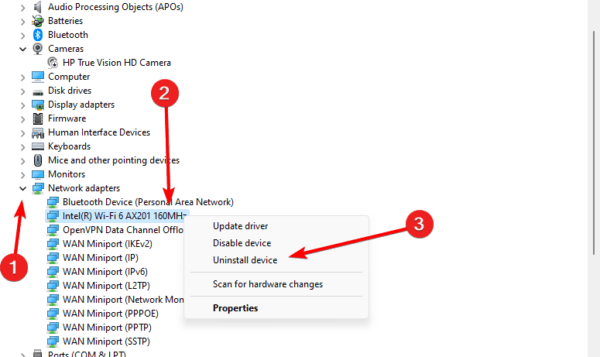
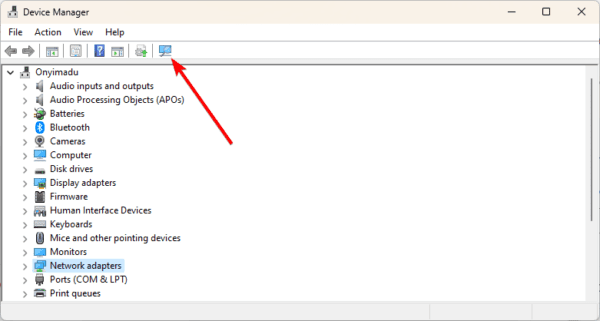
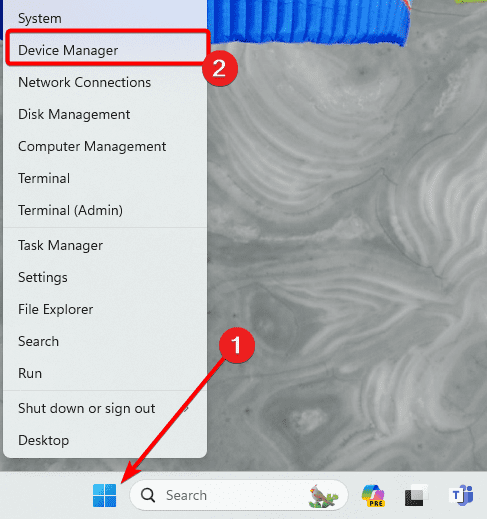
1. Right-click the Start menu and click Device Manager.
2. Expand Network adapters, right-click your wireless driver, and click Uninstall device.
3. Confirm your choice and restart your computer.
4. Relaunch the Device Manager and click the icon for Scan for hardware changes.
5. Forget Hotspot and Reconnect
You will successfully remove outdated, saved network information when you forget the hotspot and reconnect. It also clears temporary files and resets network adapter settings. This makes it an effective fix when the hotspot is not working in Windows 11.
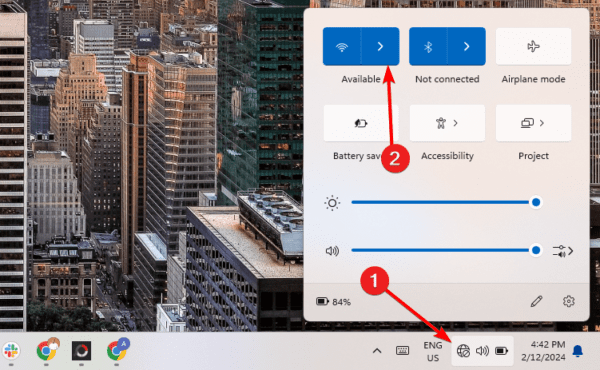
1. Click the Network icon on the right corner of your Taskbar, then click the Manage Wi-Fi connections arrow.
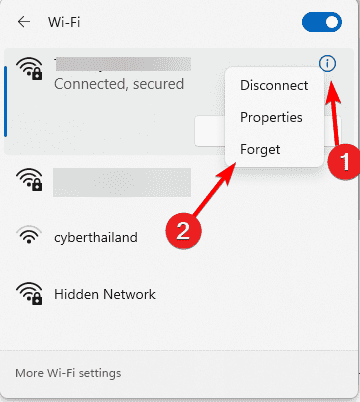
2. Right-click the exclamation icon and click Forget.
3. Now click on your hotspot network again and input the password to reconnect.
6. Rollback Windows Updates
Some of our readers said they noticed that the hotspot is not working in Windows 11 just after an OS update. If this is the case, uninstalling the update will fix the problem. While we encourage updating your device, there are rare cases where the update comes with some bugs.
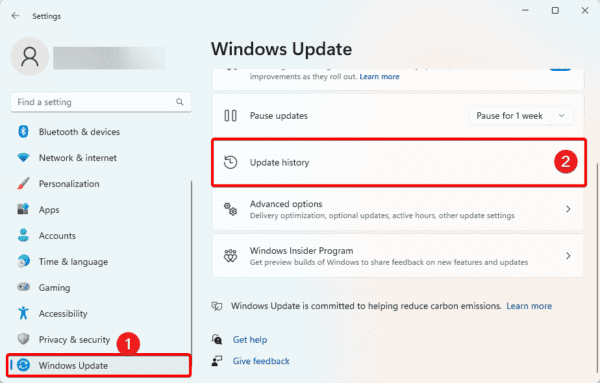
1. Open the Settings app by pressing Windows + I.
2. Click Windows Update on the bottom left pane, then click Update History on the right.
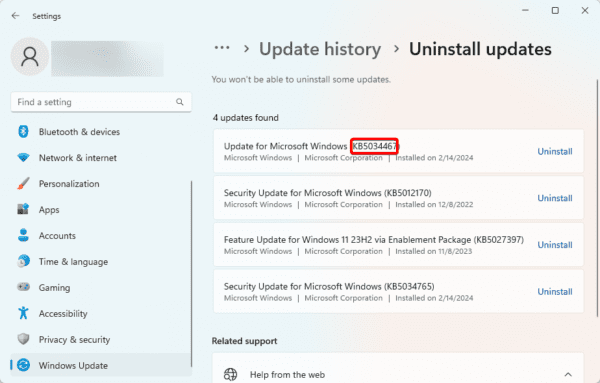
3. Scroll down and click Uninstall updates.
4. Click Uninstall for your latest update.
Fixing Hotspot Issues on Windows
You may easily fix the hotspot when it is not working on Windows devices by following the solutions we explored in this guide. Let us know in the comment section what solution was effective.
High CPU usage is a problem all Windows users should try to avoid. It often leads to reduced performance and system crashes. On Windows 11, the Shell Infrastructure Host high CPU usage is quite common.
In fact, for some users, the Shell Infracture Host may use as much as 60 to 90% of CPU power. In this guide, we explore causes and top fixes. Follow along.
What is Windows 11 Shell Infrastructure Host?
Before going into fixes, you should know that Shell Infrastructure Host is not a virus but a useful Windows process. It handles UI elements such as window transparency, the Start Menu layout, and the desktop background slideshow.
This process also controls animations and transitions within the Windows interface. It also integrates with the Shell Experience Host to control search functionalities and context menus.
However, its resource usage may sometimes fluctuate and cause CPU spikes. The solutions below will come in handy.
How to Fix Windows 11 Shell Infrastructure Host High CPU Usage
1. Close Open Windows and Apps
Shell Infrastructure Host is a process that is linked to the rendering of UI features like transparency. If you have so many open windows or applications that require this feature, you should close them to reduce the need for the process.
2. End the sihost.exe Process
An easy way to fix the high CPU usage is by ending the sihost.exe process. However, you should note that this process performs some key functions like:
Managing your desktop icons and layout.
Handling the Start Menu and taskbar.
Rendering certain types of windows and UI elements.
Handling thumbnail preview generation.
Displaying desktop notifications.
When you disable it, it affects some of these UI functions. Follow the steps below to end the process.
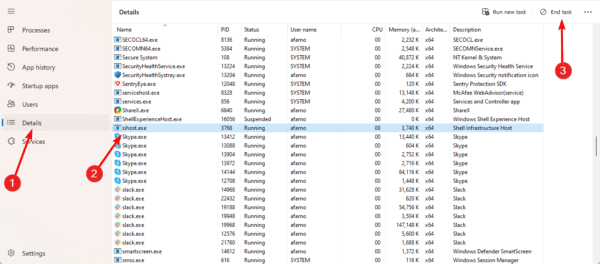
1. Press Ctrl + Shift + Esc to open the Task Manager.
2. Click the Details tab, click sihost.exe, and click the End task option. You may need to pause Task Manager updates to find this process.
3. Restart the Computer
High CPU usage means the computer is running more tasks than it should be. One quick resolution is a reboot. When you restart your computer, all processes are shut down, and all running apps are closed.
On restart, you should prioritize and open only the needed applications. If you still notice Windows 11 Shell Infrastructure Host high CPU usage, you may try other solutions.
4. Change to a Static Desktop Background
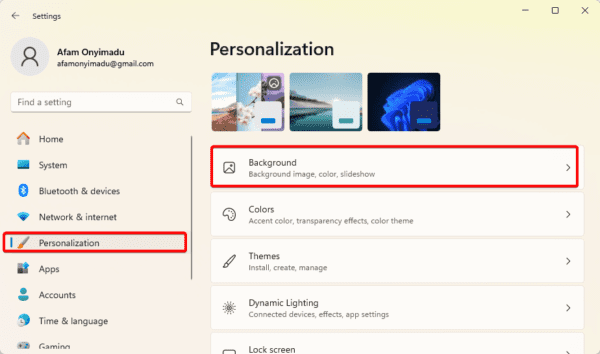
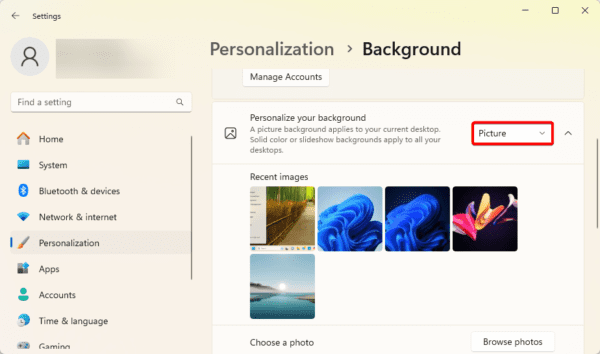
The Windows 11 Shell Infrastructure is essential in rendering animated backgrounds. If you are using one, you should expect the process to always draw on CPU resources. You may curb this by switching to a static background. Follow the steps below.
1. Press Windows + I to open the Settings app.
2. Click Personalization on the left pane, then click Background on the right.
3. Set Personalize your background to Picture.
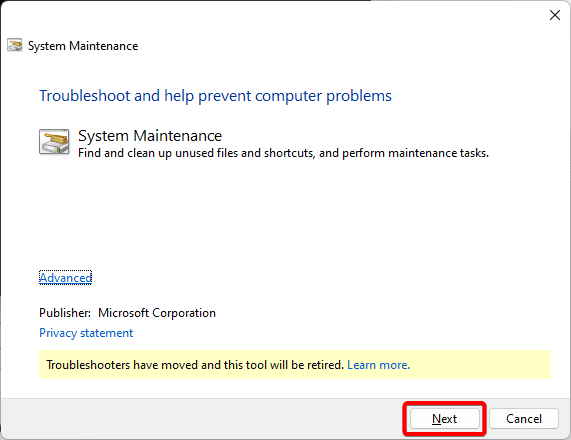
5. Run the System Maintenance Troubleshooter
Windows 11 comes with several troubleshooters. The system maintenance troubleshooter will help fix daily maintenance issues. These include minor cases of high CPU usage caused by the Windows 11 Shell Infrastructure Host. You may run this tool with the steps below.
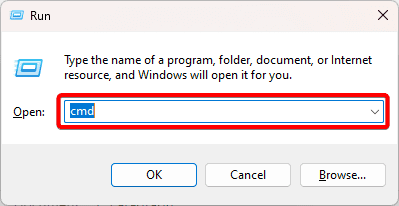
1. Press Windows + R to open the run dialog.
2. Type cmd and hit Ctrl + Shift + Enter.
3. Type the command below and hit Enter to launch the troubleshooter.
msdt.exe -id MaintenanceDiagnostic
4. Click Next and follow the wizard to complete the troubleshooting.
6. Update Windows
An outdated operating system is the cause of many resource management problems you may encounter on your device. When you update your computer, you will get bug fixes that can correct the Windows 11 Shell Infrastructure Host high CPU usage.
1. Press Windows + I to open the Settings app, then click the Windows Update option on the left pane and the Check for Update option on the right.
2. Download any available update and restart the computer.
7. Run the DISM and SFC Scans
On Windows 11, you may run the DISM and SFC scans to fix file corruption within the system and installation. This is a valid fix because when some essential files are corrupted, the system shows irregular behavior, which may manifest as the Windows 11 Shell Infrastructure Host’s high CPU usage.
1. Launch the Run dialog by pressing Windows + R.
2. Type cmd and hit Ctrl + Shift + Enter to open an elevated Command prompt.
3. Type the command below and hit Enter to scan for Image errors.
DISM /Online /Cleanup-Image /ScanHealth
4. Type the command below and hit Enter to fix all discovered image errors.
DISM /Online /Cleanup-Image /RestoreHealth
5. Rund the command below to fix corrupted system files on the computer.
sfc /scannow
8. Run a Malware Scan
Running a malware scan will ensure you are not getting high CPU usage due to a program mimicking the Sihost process. It is also another way to ensure viruses that corrupt essential files are eradicated. You may use any reliable antivirus or the built-in Windows Security.
1. Click the Taskbar’s magnifying lens, type security, and select Windows Security.
2. On the left, click Virus & threat protection, then click Scan options on the right.
3. Select Full scan, then click Scan now.
9. Clean Boot the Computer
When you clean boot your computer, you allow it to start with a limited number of services while blocking out third-party applications. This is a good way to isolate triggers of the Windows 11 Shell Infrastructure Host high CPU usage. After clean booting, confirm that the problem is fixed.
Returning to Normal CPU Use
The solutions we have explored will return your computer to normal CPU use. We have written these solutions in order of complexity, so you may walk yourself from top to bottom.
FAQ
Why does Windows 11 Shell Infrastructure Host consume high CPU resources?
The Shell Infrastructure Host may be using a lot of CPU power for some reasons, such as driver conflicts, corrupt system files, program conflicts, or problems with the system configuration.
How can I check if Windows 11 Shell Infrastructure Host is consuming high CPU resources?
The Task Manager lets you keep an eye on CPU utilization. To access Task Manager, press Ctrl + Shift + Esc. Once there, select the “Processes” tab and search for “Shell Infrastructure Host” or “Windows Shell Experience Host” in the list. If the CPU utilization is always high, there might be a problem with performance.
On a computer, you would love the flexibility of increasing or reducing display brightness as it suits you. However, there are some rare cases when Windows users complain that the brightness is not working in Windows 11.
There are a few factors that may cause this problem. We have explored all of them, and in this guide, we introduce you to the most effective fixes.
Why is Brightness Not Working in Windows 11?
There are a few reasons why the brightness is not working on your Windows 11 device. The top ones include:
Misconfigured power settings
Outdated drivers.
Corrupted system files.
Hardware damage
You may try the solutions below to fix it.
What Do I Do When Brightness is Not Working on Windows 11?
1. Adjust Brightness With a Different Method
On Windows 11, there are several ways to adjust the brightness. So, if one does not work, you should try a different method. One of the easiest ways is using the function keys with the brightness logo. If they don’t work, try any of the following.
Access Brightness from Action Center
1. Click the Volume button on the Taskbar.
2. Use the Brightness slider to increase or reduce brightness.
Access Brightness from Settings
1. Press Windows + I to open the Settings app.
2. Click the System menu on the left, then click Display on the right.
3. Use the Brightness slider to increase or reduce brightness.
2. Disable Auto-Brightness
When you disable Auto brightness, you remove an initial control barrier and give yourself access to changing the brightness manually.
1. Press Windows + I to open the Settings app.
2. Click the System menu on the left, then click Display on the right.
3. Click on Brightness, and under it, set Change brightness based on content to Off.
3. Reinstall Your Display Driver
Display drivers control several display settings. This may include the brightness display. You should update this driver to fix the problem when it is outdated. However, it would be best to consider reinstalling it altogether to correct potential corruption problems.
1. Right-click the Start menu and click Device Manager.
2. Expand Monitors, right-click your display driver, and click Uninstall device.
3. Confirm your choice and restart your computer.
4. Relaunch the Device Manager and click the icon for Scan for hardware changes.
4. Update Your Graphics Card
Graphics card controls how graphical components are rendered on your computer. The brightness slider is one such component. If this driver is outdated, you may have irregularity using the brightness slider. Update your graphics card.
5. Run the SFC Scan
System file corruption is a common reason for the brightness feature not working in Windows 11. This is because once the essential brightness files are corrupted, your computer will no longer understand the signals passed. You may run the SFC scan to fix the file corruption.
1. Press Windows + R to open your Run dialog, then type cmd and hit the Enter key.
2. In the computer, input the command below, then follow the on-screen instructions to complete the scan.
sfc /scannow
3. Restart your computer.
6. Charge the Computer
While charging the computer feels very basic, it is sometimes the only effective fix. Your computer may enter an automatic power saver mode at a certain battery level. If this is the case, connect your charger, and the problem will be resolved.
7. Update Power Plan
When the brightness is not working in Windows 11, updating the power plan may fix it. Updating your power plan simply means using a different power plan. This will work if specific power settings locked within a plan override manual brightness adjustments;
1. Press Window + I to open the Settings app.
2. Click System on the right pane and Power & battery on the right.
3. Under Power Mode, choose a different plan.
8. Update Windows
Windows updates are important in fixing bugs on your computer. The brightness not working in Windows 11 may be triggered by a bug that the update can fix.
1. Press Windows + I to launch Settings.
2. Click Windows Update on the bottom left, then click Check for updates on the right.
3. Download and install any updates.
9. Restore Your Computer
A system restore takes your computer to a different point in its history before the brightness problem started. You may use the restore utility to clear the current bugs triggering the problem.
1. Type restore on Windows Search and select the Recovery option.
2. Click the Open System Restore option on the Control Panel.
3. Select Choose a different restore point and click the Next button.
4. Select a different restore point from the available options and click Next.
5. Lastly, click the Finish button. The process will begin, and your computer may restart as the restore runs.
Control Brightness on Windows 11
If you have read this far, you should have perfect control of brightness on your computer. It should work whether you use the brightness function keys, the action center, or the Settings app.
Please let us know what solutions were effective in the comment section below.
You must have encountered the Windows Search Indexer if you use a Windows computer. The most common use case is performing a Windows search from the Start menu or Windows Explorer.
A few people also encounter it because of a certain Windows Search Indexer’s high CPU usage. In this guide, we talk about this service, helping you understand all it is and its function on your computer.
What is the Windows Search Indexer?
Windows Search Indexer is a background process on a Windows device that enables you to quickly locate files and other content.
It performs its task by creating a database that comprises your system’s file instructions. This information often includes:
File names
File contents (for some file types)
Metadata (e.g., date created, file type)
Location
The services in the C:\Windows\System32 path as searchindexer.exe.
Advantages of Using Search Indexer
Faster searches: Once your index is built, you will have significantly reduced times when searching for any content, including files and emails.
More accurate results: Windows Search Index ensures you find relevant files even when you don’t recollect the exact file name or location.
Supports various file types: You are not limited in the file types it can locate. So, from documents and emails to photos and music, the list is endless.
Drawbacks of the Search Indexer
Resource usage: Because building and maintaining the index is resource-intensive, you may experience a performance drop, especially on older or low-powered machines.
Privacy concerns: The index will store some of your information, which may concern some users.
How to Manage the Search Index
You may achieve a lot of configuration and customization with the Windows Search Index. Here are a few:
How to Access Indexing Options
There are three ways to access the Indexing Options on Windows 11.
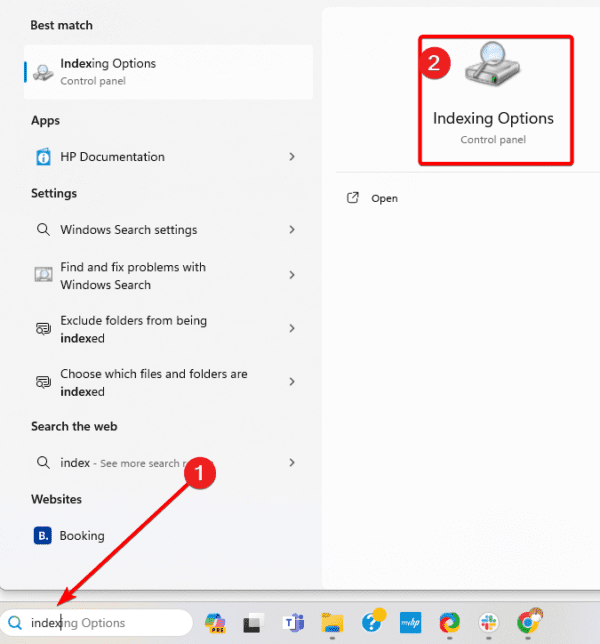
1. From the Start menu
Click the magnifying lens of the Start menu, type index, and click Indexing Options.
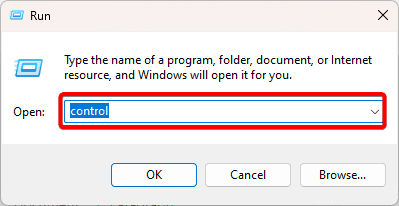
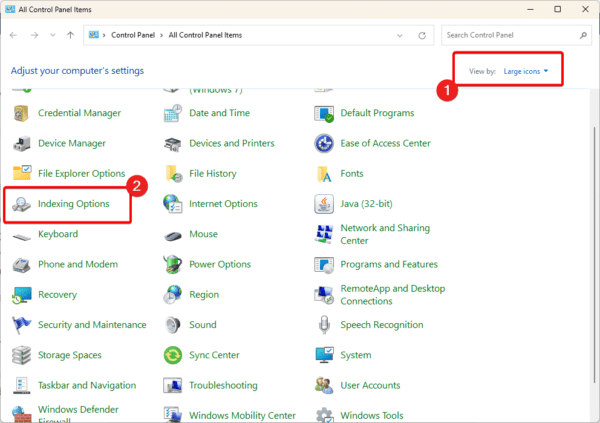
2. From the Control Panel
1. Press Windows + R, type control, and hit Enter.
2. Set View by to Large icons and click Indexing Options.
3. From the Settings App
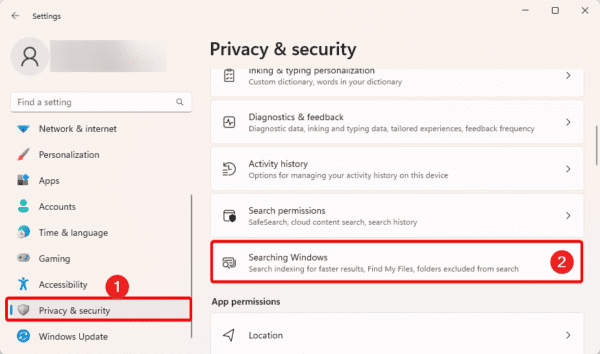
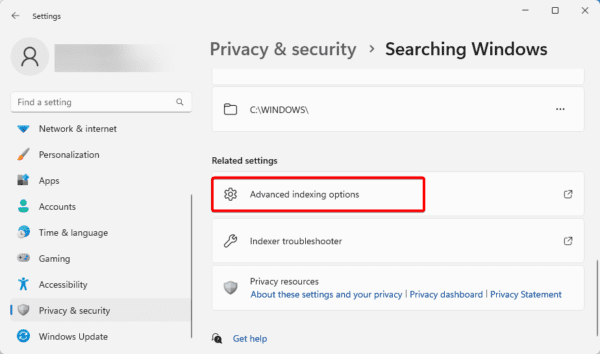
1. Press Windows + I to open the Settings app.
2. On the left pane, click Privacy & security, then click Searching Windows.
3. Scroll down and click Advanced Indexing options.
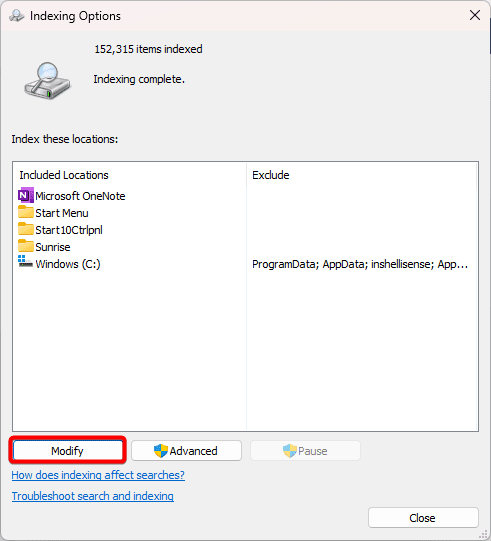
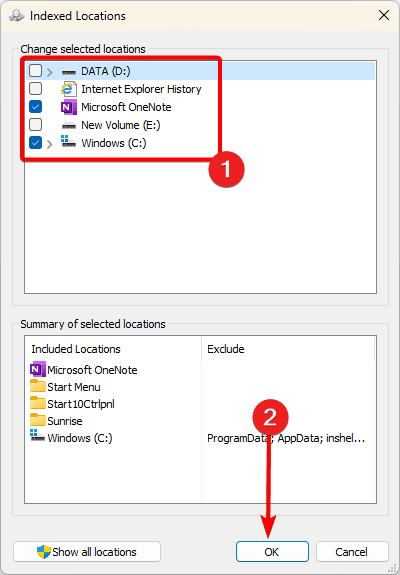
How to Add and Remove Locations to be Indexed
The Windows Search Indexer is the backbone of a Windows computer’s search functionality. You may add locations, exclude specific content, and use other advanced features.
1. Launch Indexing options using any of the methods we shared above,
2. Click the Modify button.
3. To include a location, tick it in the Change selected locations section or uncheck it to exclude it.
How to Disable or Enable Windows Search Index
If you believe Windows Indexing is using up so many system resources, you may opt to disable it. You should, however, note that when disabled, you will lose all its advantages and will experience slow and inaccurate searches.
Disable Windows Search Indexer
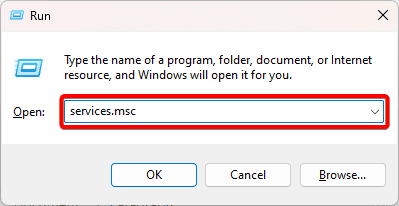
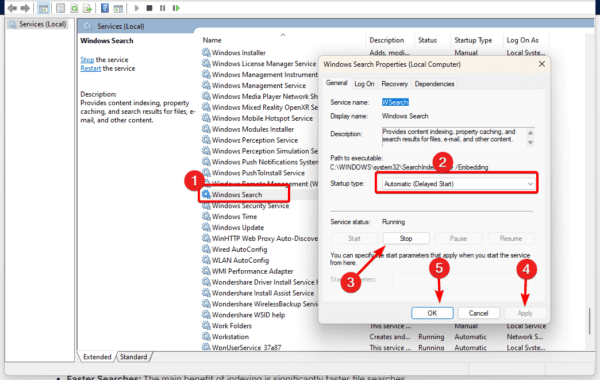
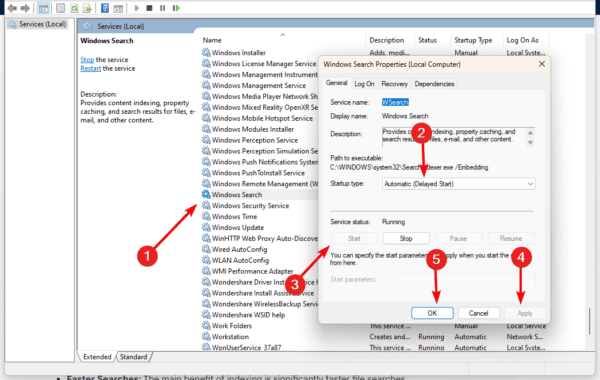
1. Press Windows + R, type services.msc, and hit Enter.
2. Double-click Windows Search, Set Startup type to Manual, click Stop, then Apply and OK.
Enable Windows Search Indexer
1. Press Windows + R, type services.msc, and hit Enter.
2. Double-click Windows Search, Set Startup type to Automatic, click Start, then Apply and OK.
Fast Searches on WIndows11
You must enable the Windows Search Indexer utility to access faster and more efficient searches on Windows 11. You will find it a general way to improve the user experience on Windows devices.
Have you used Search indexer? Let us know your thoughts in the comment section below.
FAQ
Does the Search Indexer use a lot of system resources?
While actively building the index, it may use a lot of system resources.
Does the Search Indexer invade my privacy?
It stores details about your files which may be a privacy concern for some users.
The bad image error in Windows 11 often comes as a pop-up when you try to open some applications. Sometimes, you may get it as a series of pop-ups that make it impossible to open the application.
We have explored the problem, and in this guide, we will show you how to resolve it with a few easy solutions. Let us get to it.
What is the Bad Image Error in Windows 11?
This error may come with the error code 0xc000012f or 0xc0000020. It is an application error that shows a program is not able to launch correctly. Any of the following may cause it:
Corrupted system files
Missing system files
Incorrectly installed program
Malware infection
The solutions below should help you fix it.
Fix Bad Image Error in Windows 11
1. Uninstall Windows Update
If you encounter a bad image error after a Windows 11 update, you may face issues with a buggy update. Even though we always recommend updating the OS, on rare occasions, they may introduce bugs that spark other problems. It would be best if you uninstalled the update.
1. Open the Settings app by pressing Windows + I.
2. Click Windows Update on the bottom left pane, then click Update History on the right.
3. Scroll down and click Uninstall updates.
4. Click Uninstall for your latest update.
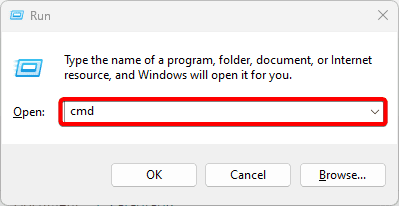
2. Run DISM and SFC Scans
You May use the DISM and SFC scans to fix image and system file corruptions. This is helpful because the bad image pop-up on Windows 11 indicates that certain files needed for the app to work correctly are corrupted.
1. Press Windows + R to open the Run dialog.
2. Type cmd and hit Ctrl + Shift + Enter to open an elevated Command Prompt.
3. Input the command below, hitting Enter after each one to find image corruption and repair them.
DISM /Online /Cleanup-Image /ScanHealth
DISM /Online /Cleanup-Image /RestoreHealth
4. Lastly, run the sfc scan by inputting the command below and hitting Enter.
sfc /scannow
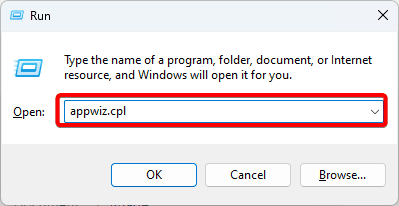
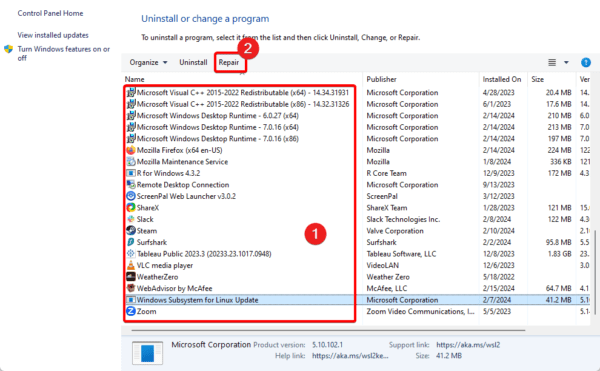
3. Reinstall Visual C++ Redistributable
Visual C++ Redistributable contains essential code libraries needed by many applications that run on your computer. If any of these libraries are corrupted, you may face a bad image error on Windows 11, and you should reinstall the distributable.
1. Press Windows + R to launch the Run dialog.
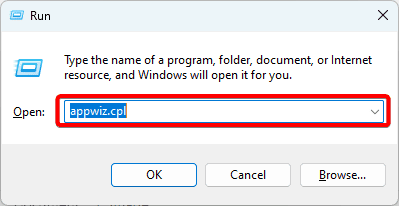
2. Type appwiz.cpl to open the programs and features applet of the Control Panel.
3. Click your Microsoft Visual C++ Redistributable and click the Uninstall button. Note that you may carry out these steps on all versions of the redistributable.
4. Click Uninstall and follow the wizard to complete the process.
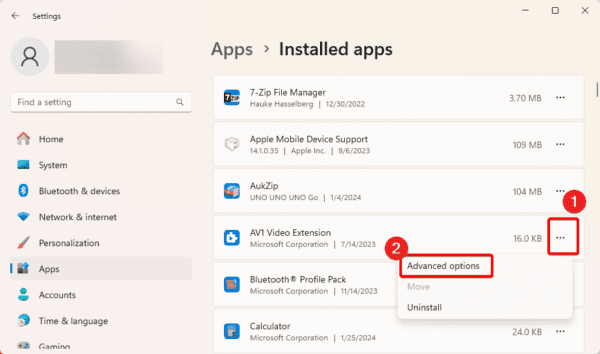
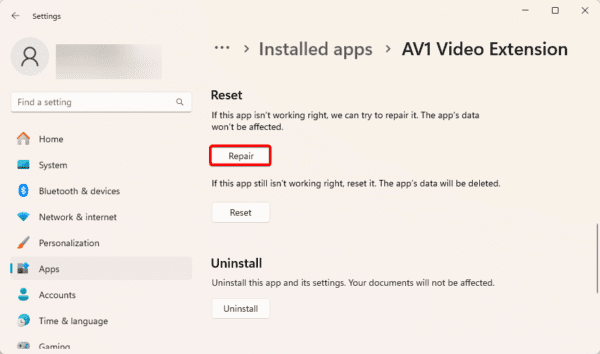
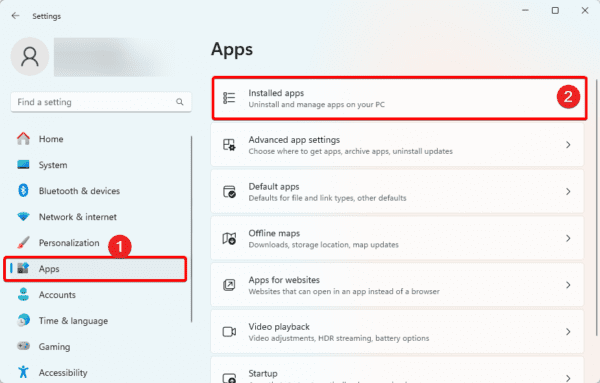
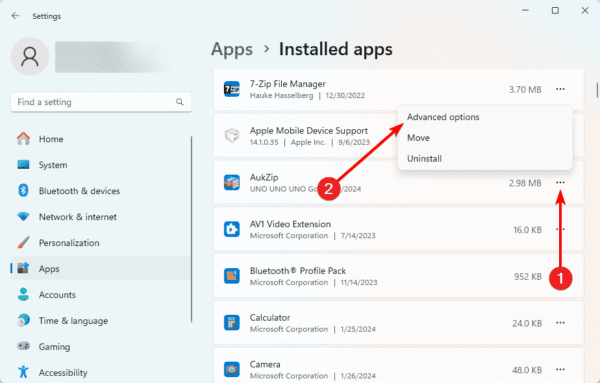
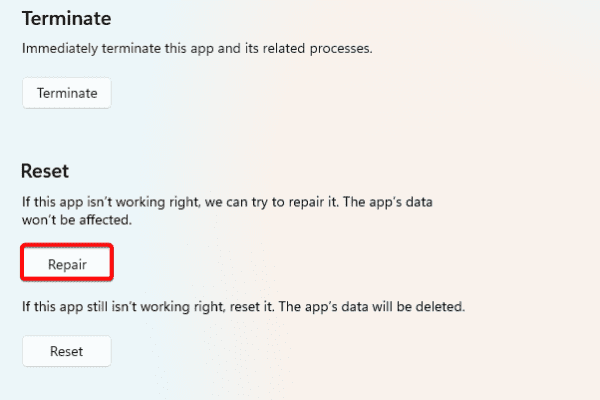
Corrupted app files are one of the more common causes of bad image error in Windows 11. However, you may easily fix corruption, especially for Store apps, using the app repair function in the Settings app. Follow the steps below.
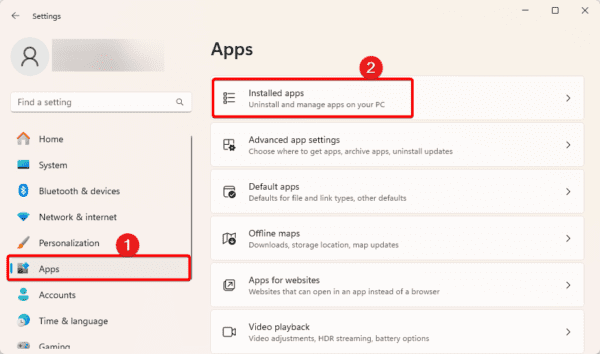
1. Open the Settings app by pressing Windows + I.
2. Click Apps on the left pane, then Installed apps on the right.
3. Click the options icon for the problematic program and click Advanced options.
4. Scroll down and click the Repair button.
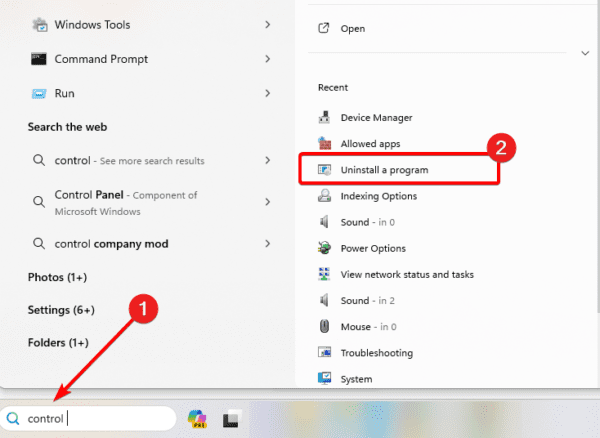
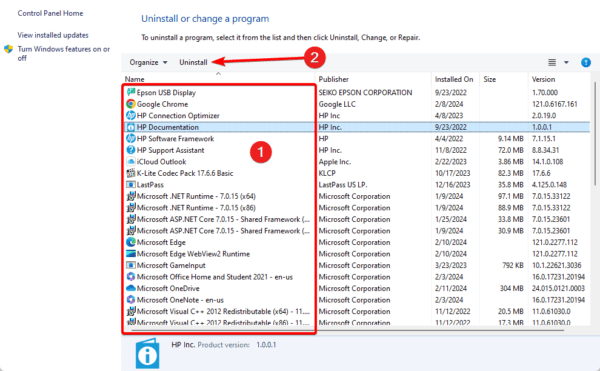
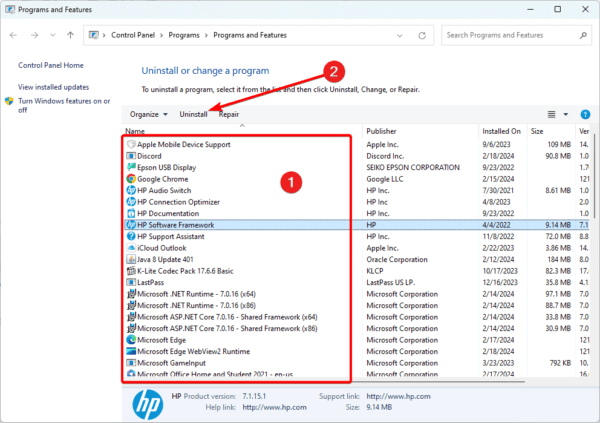
5. Reinstall the Program
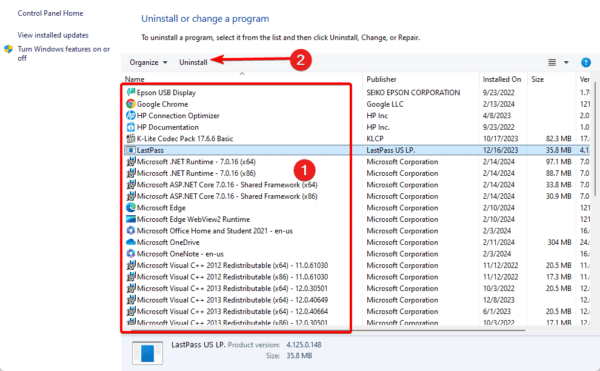
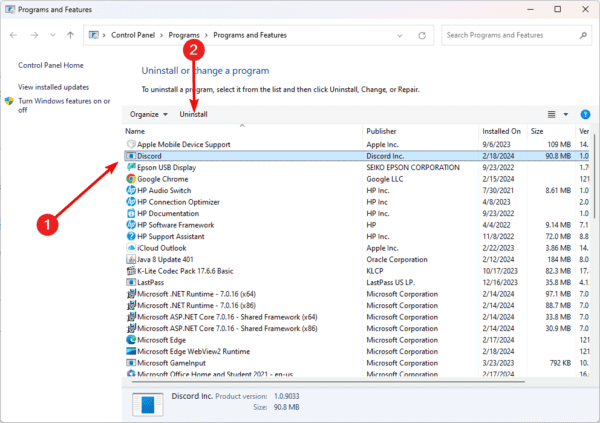
If repairing the program does not work, you should consider uninstalling it and reinstalling a fresh copy. When you uninstall the program, ensure you have removed all leftovers. Follow the steps below to uninstall the program.
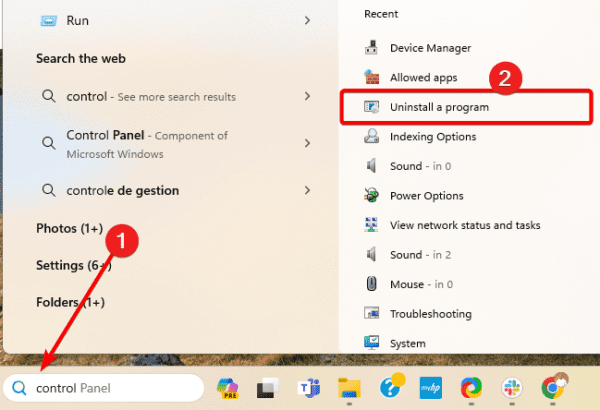
1. Click the Taskbar’s magnifying lens, type control, and click Uninstall a program.
2. Click the program and click the Uninstall button.
3. Follow the wizard to complete the process.
6. Scan for Virus
The bad image error on Windows 11 may be a sign of malware on your computer. The malware may corrupt files triggering the application error. You may use a robust antivirus to fix it or run a scan using the built-in Windows Security.
1. Click the Taskbar’s magnifying lens, type security, and select Windows Security.
2. On the left, click Virus & threat protection, then click Scan options on the right.
3. Select Full scan, then click Scan now.
7. Restore Windows
If none of the fixes above work, you may restore Windows to an earlier state. You will be able to do this with the System Restore utility. However, it will work only if there are pre-created restore points.
1. Type restore on Windows Search and select the Recovery option.
2. Click the Open System Restore option on the Control Panel.
3. Select Choose a different restore point and click the Next button.
4. Select a different restore point from the available options and click Next.
5. Lastly, click the Finish button. The process will begin, and your computer may restart as the restore runs.
Final Thoughts on the Image Error
We have covered all the effective solutions for the bad image error on Windows 11. You would find that the solutions are easy to follow. As a last resort, you may consider reinstalling the operating system.
Please tell us in the comment section below what solution was effective.
While using a Windows computer, you may encounter many processes. Many would be essential to the running of your computer, and others not so important. If you have encountered HpseuHostLauncher.exe or are simply curious to know what it is, this guide is for you.
We explore the HpseuHostLauncher.exe process and answer basic questions about it. Let us get started.
What is HpseuHostLauncher.exe?
HpseuHostLauncher.exe is an executable file. It comes with HP programs that are installed on a computer. It is often present in non-HP computers, especially if you connect them to HP hardware like printers.
HPSEU is short for HP System Event Utility. This utility monitors system health, assembles system info, and triggers actions based on pre-defined events.
Some of its functionalities include the following:
System stability monitoring and reporting
Power management and optimization
Automatic updates and driver installations
Error detection and troubleshooting assistance
With a printer, for example, it will monitor its status, help with updates, initiate scan jobs and handle low ink warnings or paper jams, and trigger notifications.
Troubleshooting HpseuHostLauncher.exe Issues
Some of the common related issues that users run into include:
High CPU/memory usage
Error messages
Conflicting software
Easy troubleshooting options include the following:
1. Uninstall HP-Related Application
You may uninstall the HP application if you have problems with the HpseuHostLauncher.exe process. Steps for app uninstallation will vary, but generally, they would be as shown below.
1. Click the magnifying lens on the Taskbar, type control, and click Uninstall a program.
2. Click on the installed application and click the Uninstall option.
3. Follow the wizard to complete the process.
2. Disable the HpseuHostLauncher.exe Process
By disabling the process, you shut it down. However, this will mean that services or apps that rely on this process will not function properly. You may disable it using the Task Manager.
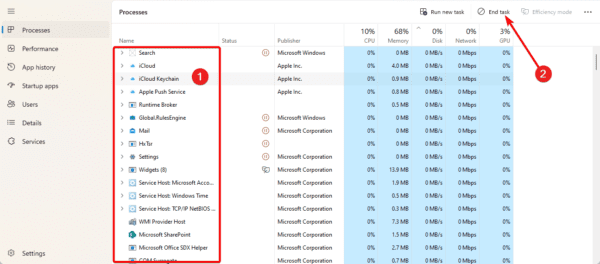
1. Press Ctrl + Shift + Esc to open Task Manager.
2. Click HpseuHostLauncher.exe under the process list and click End task. You may have to pause Task Manager updates to find the process.
Final Thoughts
That is all you need to know about the Windows HpseuHostLauncher.exe process. If you have additional questions, please leave them in the comment section below.
Shutting down your Windows computer is an essential housekeeping. It allows the laptop a soft reset and is sometimes a great way to fix minor glitches and bugs. However, you lose all the advantages of a shutdown when the shutdown button is not working, and many Windows 11 users have complained about this.
This guide examines this problem and shows you the most effective solutions.
1. Run the Power Troubleshooter
Windows 11 comes with a bunch of troubleshooters. The power troubleshooter will scan your computer for power defects and fix them or recommend solutions.
1. Press Windows + R , type cmd and hit Ctrl + Shift + Enter.
2. Type the command below and hit Enter to launch the troubleshooter.
msdt.exe /id PowerDiagnostic
3. Click the Next button and follow the wizard to complete the process.
2. Use Alternative Methods to Shutdown
You may try other shutdown options when the Windows 11 shutdown button is not working. Below are some possibilities.
Shutdown from the Command Prompt
1. Press Windows + R , type cmd and hit Ctrl + Shift + Enter.
2. Type the command below and hit Enter.
shutdown /s
Shutdown With Keyboard Shortcuts
The first option is to press Windows + X, then press U and U again.
The second option is to close all windows, press Alt + F4, select Shutdown, and click OK.
3. Force Shutdown
You may consider forcing a shutdown. While this will be effective in most cases, you should note that the computer may go into repair mode on startup.
Press and hold down the power key to force shutdown until your computer turns off.
4. Close Running Programs
One of the main reasons your computer shutdown button seems not to be working is because you have running apps or processes. To ensure this is not the case, close all running applications first and retry shutting down.
5. Update Windows
An outdated computer will often run into several bugs and glitches. Some of this may make the shutdown button or option not work on your computer. The walkaround is updating the computer.
1. Press Windows + I to open the Settings app.
2. Click Windows Update on the left pane and then Check for updates on the right.
3. Download and install available updates.
4. Now, try shutting down once more.
6. Update Drivers
Outdated drivers may also be why the Shutdown button is not working. The graphics driver in most cases is the culprit, however, as a best practice you should ensure all drivers are updates. You may use automatic driver updaters to keep them updated.
7. Run the DISM and SFC Scans
Bad or corrupted files may make the shutdown button stop working on Windows 11. If the corruption is in the installation or with system files, you may run the DISM and SFC scans.
1. Launch the Run dialog by pressing Windows + R.
2. Type cmd and hit Ctrl + Shift + Enter to open an elevated Command prompt.
3. Type the command below and hit Enter to scan for Image errors.
DISM /Online /Cleanup-Image /ScanHealth
4. Type the command below and hit Enter to fix all discovered image errors.
DISM /Online /Cleanup-Image /RestoreHealth
5. Rund the command below to fix corrupted system files on the computer.
sfc /scannow
8. Use System Restore
If none of the solutions above work and the shutdown button still does not work on your Windows 11 computer, you should run the System Restore utility. This tool will revert your computer to a previous state in a time when it worked perfectly.
1. Type restore on Windows Search and select the Recovery option.
2. Click the Open System Restore option on the Control Panel.
3. Select Choose a different restore point and click the Next button.
4. Select a different restore point from the available options and click Next.
5. Lastly, click the Finish button. The process will begin, and your computer may restart as the restore runs.
Successfully Shutting Down Windows 11
When the Windows 11 shutdown button does not work, it may indicate corruption or outdated drivers or OS. This guide has covered the most practical ways of fixing it. Please let us know in the comment section below if you have succeeded.
Some of our readers have complained that they get a black screen when using the Windows 11 camera. This problem may occur with the laptop’s built-in camera or even an external camera.
Inadequate camera permissions, bad hardware or connections, minor bugs, or app corruption could trigger it. We researched the problem, and in this guide, we recommend the most effective solutions.
1. Turn on Camera
Turning on your camera should be your first call. This is especially the case if you use an external camera. It may have a tiny switch that needs to be toggled on.
Also, you should look through your function keys; if any has a camera symbol, press it to switch on your camera. If the camera black screen persists on Windows 11, proceed to other fixes.
2. Remove Camera Slider
There is a chance that even though the camera is on, it is covered by a shutter guide or webcam cover slides.
While these may be perfect ways to protect yourself from unseen intrusion, if you leave them on while using the camera, all you will get is a black screen on Windows 11. Take off the slide.
3. Confirm Camera is Correctly Connected
When you are using an external camera and experiencing the camera black screen on Windows 11, you should confirm that you have correctly connected the camera. You may unplug it and plug it back. You should also clean the connection port to ensure particles or dust are not obstructing contact.
Tiu may also try connecting to a different port or using a different connection cable.
4. Restart the Computer
If none of the solutions above have helped you resolve the Windows 11 camera black screen, you should restart the computer.
A restart is an effective fix because it forces your computer to have a soft reset where all running processes are turned off. This is often strong enough to fix minor bugs.
5. Run the Camera Troubleshooter
Windows 11 comes with a bunch of troubleshooters. One of them is the camera troubleshooter.
When you run this utility, it thoroughly scans your computer for possible triggers of the camera problem. It will fix the discovered issues or recommend solutions.
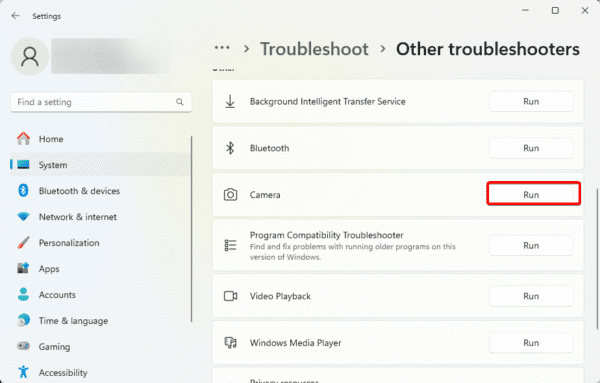
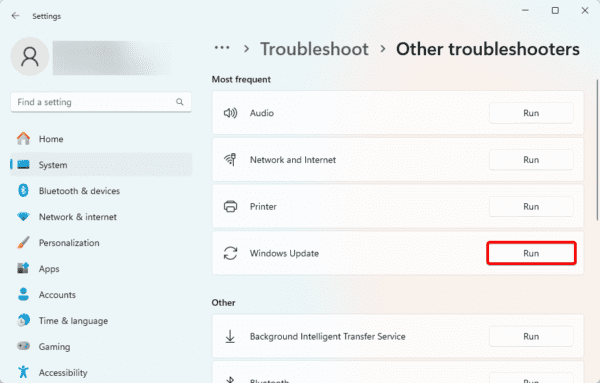
1. Open the Settings app by pressing Windows + I.
2. Click System on the left pane, then Troubleshoot on the right.
3. Click Other troubleshooters.
4. Click the Run button for Camera.
5. Follow the wizard to complete the process.
6. Grant Camera Permissions
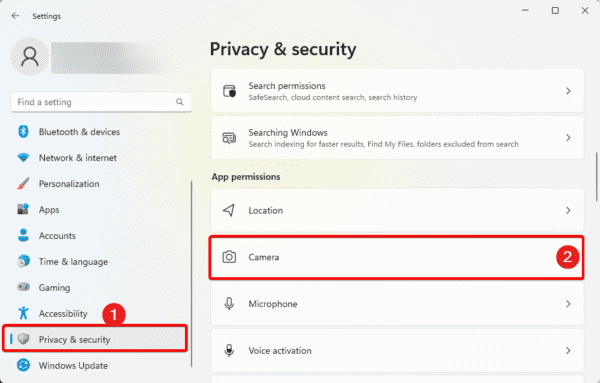
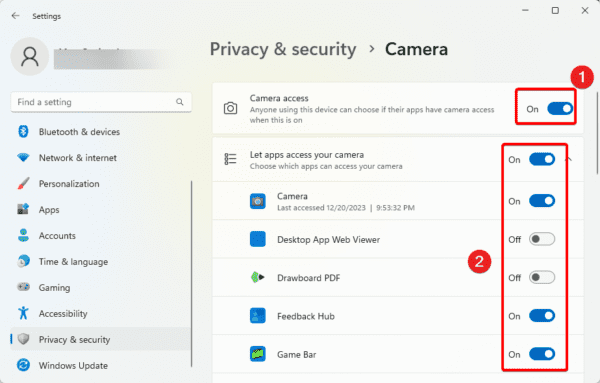
You may notice a black screen if the app that needs your camera does not have proper permission. You should grant it permissions from the Settings app.
1. Open the Settings app by pressing Windows + I.
2. Click Privacy & security on the left pane, then Camera on the right.
3. Toggle on Camera access, then toggle on the switch for the specific app that needs the camera.
7. Update Camera Drivers
Drivers are an integral connection between hardware components and the operating system. When your camera driver is outdated, the computer may no longer be able to access it, causing the camera black screen on Windows 11.
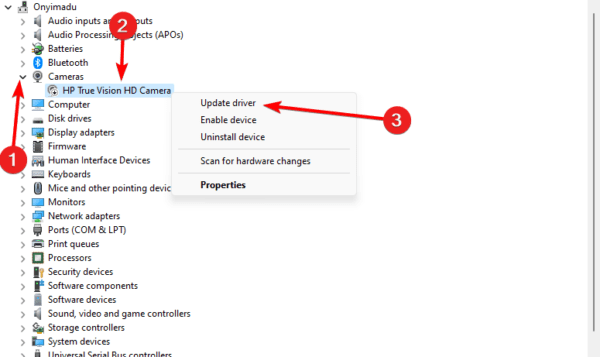
1. Right-click the Start menu and click Device Manager.
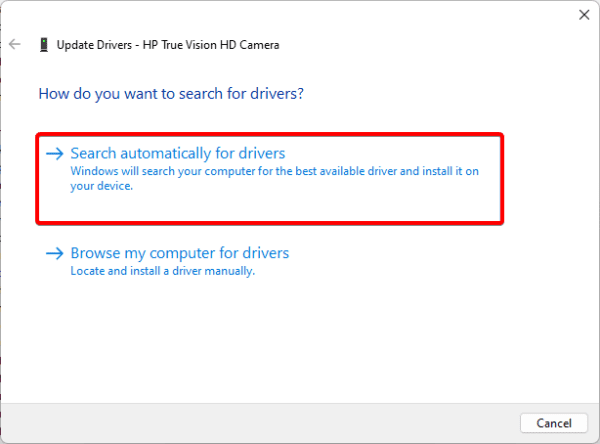
2. Expand the Camera category, right-click your camera driver, and click Update driver.
3. Click Search automatically for updates.
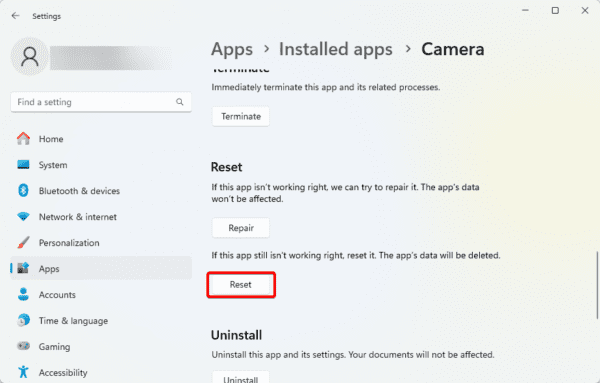
8. Reset Camera App
bad configurations and settings are sometimes responsible for the camera’s black screen in Windows 11. You may remove corrupted settings and fix the problem by resetting the device.
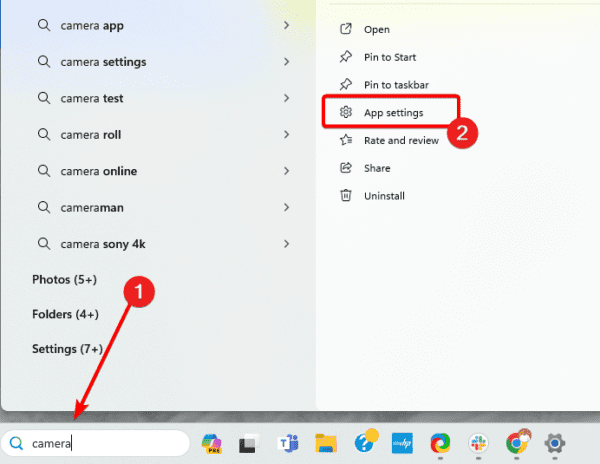
1. Press the magnifying lens on the Taskbar, type Camera, and click App Settings.
2. Scroll down and click the Reset button.
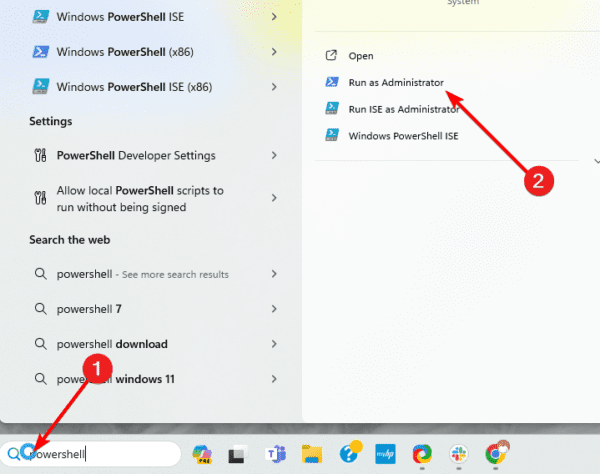
9. Re-registering Camera App
You should consider re-registering the camera when you encounter the black screen on Windows 11. This is because the process will resolve corrupted registry entries, reset app permissions, validate app files, and clean temporary data.
1. Click the Taskbar’s magnifying lens, type PowerShell, and click the Run as Administrator option.
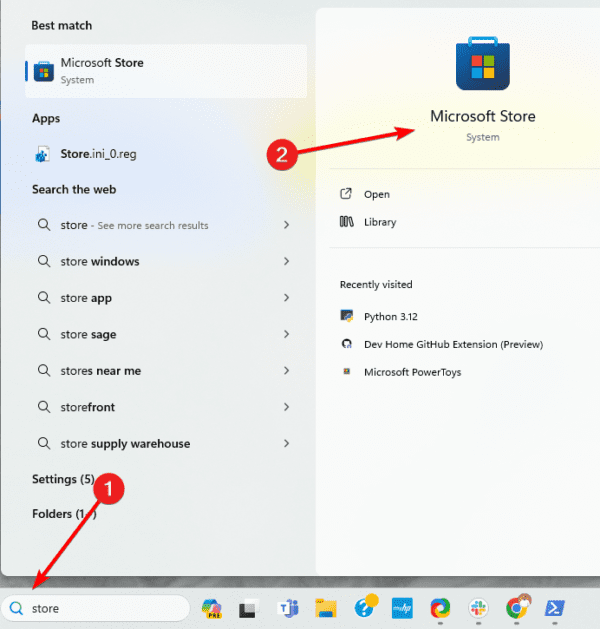
The camera black screen on Windows 11 may be a sign of serious app corruption. If so, uninstall the camera app and reinstall a fresh copy. To do so, follow the steps below.
1. Click the Taskbar’s magnifying lens, type PowerShell, and click the Run as Administrator option.
3. Click the Taskbar’s magnifying lens, type Store, and click the Microsoft Store option.
4. Search for Camera and install the Windows Camera app.
11. Replace the Camera
If you have read this far but cannot resolve the camera’s black screen on Windows 11, you may be dealing with bad hardware, and your last option may be to replace the camera.
There are many options, and once you connect the new camera, you should no longer have the black screen.
No More Camera Worries
This will be all. Hopefully, you can use your camera without the black screen error. We have written these fixes in order of priority and recommend you start from the first walking your way down.
Have you fixed the camera’s black screen? Let us know in the comment section what solution worked.
Discord is a VoIP and instant messaging app that facilitates text, phone, and video chats and file and media sharing. Many Windows enthusiasts, especially gamers, use it. However, you may encounter a problem of Discord high CPU usage on Windows 11.
This situation can be rectified by changing certain settings. However, corruption of vital app files may also trigger it. Your computer specs may also be a factor for the high CPU usage. Regardless, you may try the solutions in this guide.
1. Restart the Discord App
Restarting the Discord app should be your first call when faced with its high CPU usage on Windows 11.
When you restart the app, you force all running processes connected to the app to shut down and have a soft reset. This is capable of fixing minor bugs that trigger the problem.
2. Restart the Computer
If restarting the app is unsuccessful, you should try restarting your computer.
During a reboot, your computer will force problematic processes to shut down. This may be the fix if system-wide bugs cause the Discord high CPU usage in Windows 11.
3. Disable the Discord Voice Processing Feature
In Discord, there are two methods to reduce background noise in your calls: echo cancellation and noise reduction. However, they take up a specific percentage of your CPU. As a result, when you are not actually using these two options, you can disable them.
1. Launch the Discord app.
2. Click the Settings gear icon on the bottom left corner.
3. Click Voice & Video on the left pane; on the right, toggle off the option for Echo Cancelling and select None under Noise Suppression.
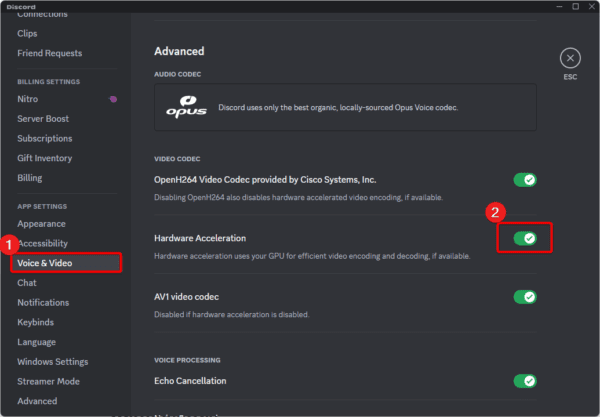
4. Disable Hardware Acceleration in Discord Settings
Hardware Acceleration makes Discord run more smoothly by using your GPU. But it uses a lot of CPU power, which might cause spikes. Disabling it is a good idea.
1. Launch the Discord app.
2. Click the Settings gear icon on the bottom left corner.
3. Click Voice & Video on the left pane; on the right, toggle off the option for Hardware Acceleration.
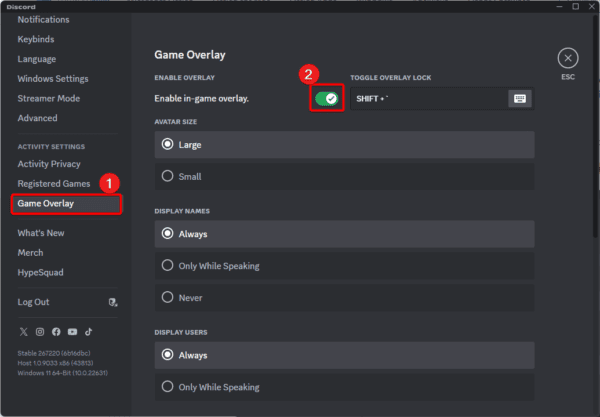
5. Disable the Discord Overlay
When gaming or using other applications, turning off the Discord overlay might assist in lowering the amount of CPU resources the application uses. Disabling the overlay can enhance performance since it provides an additional layer of processing that may use resources.
1. Launch the Discord app.
2. Click the Settings gear icon on the bottom left corner.
3. On the left pane, click Game Overlay, then toggle off the option for Enable in-game overlay on the right.
6. Increase the Number of Processors
High CPU use indicates that most of the CPU’s available power has been utilized. However, additional CPU power could be accessible. Even while your CPU is being utilized heavily, only a portion of its many cores can be used; the remaining cores remain inactive.
As a result, using all or most of the CPU cores will lighten the workload on the active ones.
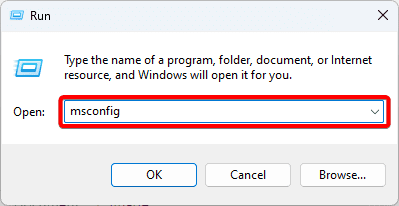
1. Press Windows + R to open the Run dialog, type msconfig, and hit Enter.
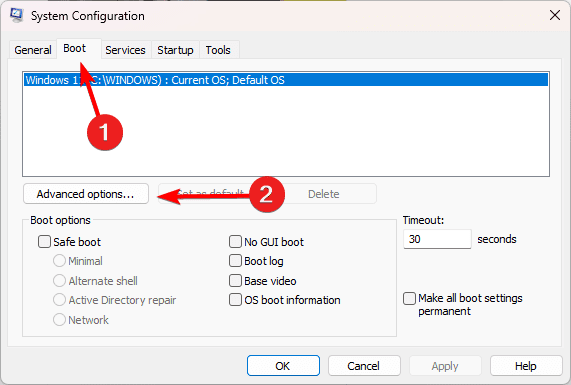
2. Navigate to the Boot tab and click the Advanced Options button.
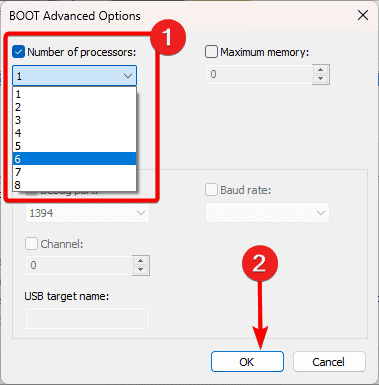
3. Tick the Number of cores checkbox, select additional cores, and click OK.
7. Update Windows and Your Drivers
When you experience high CPU usage in certain apps like Discord on your Windows 11 computer, it may indicate outdated drivers or even an outdated operating system. You may use an automatic driver updater to update the drivers and follow the steps below to update the OS.
1. Press Windows + I to open the Settings app.
2. Click Windows Update on the left, and Check for updates on the right.
3. Download and install any updates and restart your computer.
8. Reinstall Discord
If any of the solutions above have not worked, you may be dealing with a deeper case of app corruption. Your best bet would be to uninstall the app and reinstall a freshly downloaded copy.
1. Press Windows + R to open the Run dialog, type apwiz.cpl, and hit Enter.
2. Click Discord, click Uninstall, and follow the wizard to complete the process.
No More High CPU Usage
If you have gone through the solutions above, you should no longer experience high CPU usage while using Discord. In most cases, an app or computer restart should be effective.
Did you successfully fix the problem? Let us know what solution worked in the comment section below.
FAQ
Is increased GPU usage normal for Discord?
No, it is not a normal occurrence. It could be a sign of bad configurations or may be a CPU defect.
What specific Discord features contribute most to high GPU usage?
Hardware acceleration is the more common culprit; however, you may also consider disabling screen sharing, video calls, and Nitro features.
Deployment Image Servicing and Management (DISM) is a Windows command line tool for servicing and preparing Windows images. It is great for repairing bad image errors. However, you may stumble on some problems, like the DISM error 87 on Windows 11, which makes it impossible to use the tool.
This error 87 is mainly associated with wrong commands but may indicate wider DISM problems, like corrupted system files. Missing privileges may also trigger it. This guide walks you through all possible solutions.
1. Verify the Syntax and Command Is Correct
As stated, a wrongly written DISM command usually returns the error 87 on Windows 11. Your first call should review your command and ensure its syntax is correct.
Also, you should double-check the spacing. So, for example, you must have one space before a slash.
Global options – These are optional and are used to modify your command. Examples may include, /online, /image.
Operation – Here is the specific operation you hope to achieve. For example, /Add-Package, /Cleanup-Image.
Operation options – These are the specific arguments you need to complete your operation. An example may include the package file path for /Add-Package
source – These may be installation media paths for repairs and are optional.
Common DISM commands include:
DISM.exe /Online /Cleanup-image/Restorehealth
DISM.exe /Online /Cleanup-image /Scanhealth
2. Fix Privilege Issues
DISM alters protected system files and configurations. This function will require elevated rights. Hence, you must run it as an administrator or risk having the DISM error 87 on Windows 11.
Follow the steps below:
1. Press Windows + R to open the Run dialog.
2. Type cmd and hit Ctrl + Shift + Enter to open the Command prompt with admin rights.
3. Run your DISM command.
3. Fix Corrupted Files with the SFC Scan
Several corruptions may lead to the DISM error 87 on Windows 11. The DISM tool itself may have corrupted files, DISM-dependent system files may be corrupted, or sometimes it may be corrupted source files, like installation media or package files.
It would be best if you ran the SFC to fix corruption where possible.
1. Press Windows + R to open the Run dialog.
2. Type cmd and hit Ctrl + Shift + Enter to open the Command prompt with admin rights.
3. Type the command below and hit Enter.
sfc /scannow
4. Update the Operating System
When you run commands on an outdated computer, you may encounter errors. This is because the OS has become buggy. With an update, you can fix bugs and restore your computer to optimal functionality.
1. Open your Settings app by pressing Windows + I.
2. On the lower left pane, click Windows Update, then click the Check for updates button on the right.
3. Download and install available updates, restart your computer, and retry the DISM command.
5. Reset Windows
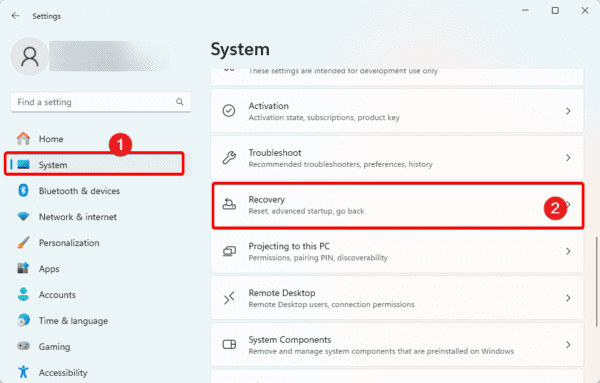
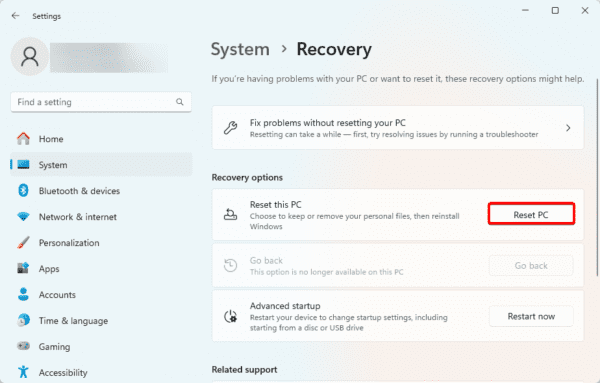
This should be your last option because resetting your computer may lead to data loss. However, it is a very effective solution. To reset the OS, follow the steps below.
1. Press Windows + I to open the Settings app.
2. Click System on the right pane, then Recovery on the left.
3. Click the Reset PC button.
4. Select Remove Everything and follow the wizard to complete the process.
Running DIS Commands Smoothly
We have shared all the most effective solutions for DISM error 87 on Windows 11. Now, you may run your DISMm commands smoothly.
Were you able to correct the problem successfully? Tell us what solution worked.
Updating your computer is essential housekeeping to ensure optimal device performance. However, hiccups like the Windows 11 update error 0x800f0831 make it impossible for the process to complete properly.
In the past, we have explored other update errors, but this 0x800f0831 error is mainly associated with the missing manifest of an update package. You should run through the solutions below to fix it.
1. Run the Windows Update Troubleshooter
This is a perfect starting point for the 0x800f0831 Windows 11 update error. The Windows Update installer will scan your computer for update problems, fix them, or recommend solutions.
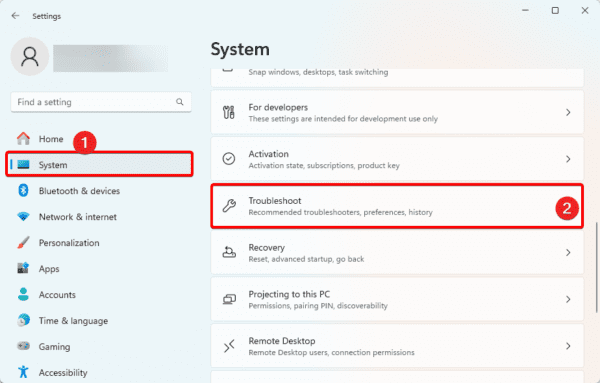
1. Press Windows + I to open the Settings app.
2. Click the System tab on the left, then click Troubleshoot on the right.
3. Click Other troubleshooters.
4. Click the Run button for Windows Update.
5. Follow the Wizard to complete the process.
2. Reset Windows Update Components
Update components include a group of services, files, and tools that are essential to successfully updating the computer. When some of these components are corrupted, you may reset them to fix the Windows 11 update error 0x800f0831. Follow the steps below.
1. Press Windows + R to open the Run dialog.
2. Type cmd and hit Ctrl + Shift + enter.
3. Type the command below, hitting enter after each one to stop updating components.
net stop wuauserv
net stop cryptSvc
net stop bits
net stop msiserver
4. Rename update folders by typing the commands below and hitting Enter after each one.
5. Restart the update components by typing the commands below and hitting Enter.
net start wuauserv
net start cryptSvc
net start bits
net start msiserver
3. Manually Fix Partially Installed Components
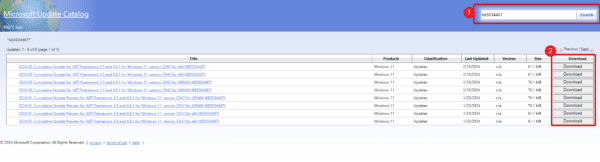
If a specific update causes the Windows 11 update error 0x800f0831, you may manually download it from the Windows catalog website and install it manually.
1. Press Windows + I to open the Settings app.
2. Click Windows Update on the left pane and Update History on the right.
3. You should see the name of your most recent update. It usually starts with a K. Note the name.
4. head to the Windows Update Catalog website.
5. Past your update in the search bar, click Search, then click Download for the specific update you need.
6. Double-click the download to install it.
4. Run the DISM and SFC Scans
You may use DISM and SFC to fix corruption issues that trigger the Windows 11 update error 0x800f0831 on Windows. These utilities will scan images and system files for corruption and repair or replace any observed corruption.
1. Press Windows + R to open the Run dialog.
2. Type cmd and hit Ctrl + Shift + enter.
3. Type the command below, hitting Enter after each one to run the DISM scan.
3. Type the command below and hit Enter to run the SFC scan.
sfc /scannow
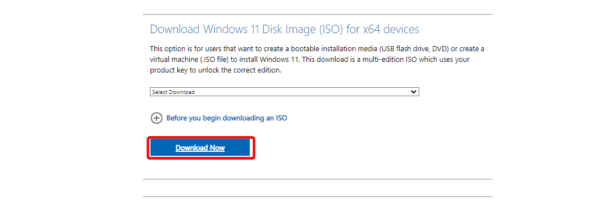
5. Perform an In-place Upgrade
An in-place upgrade should be your last resort because this solution may lead to some data loss. However, it is very effective. You must visit the Windows 11 ISO download website and follow the steps below.
1. Click the Download Now button to get the ISO image.
2. Double-click the downloaded file to run it.
3. When you get to the Install Windows 11 screen, ensure that you uncheck I want to help make the installation of Windows better, then select the Change how Windows Setup download updates option.
4. Click Not right now on the subsequent window, then click Next.
5. Accept the user terms.
6. Click Choose what to keep on the Ready to install window, then select what you like to preserve.
7. Finally, click Install.
Update Windows 11 Without Hitch
Now, you can update your Windows 11 without the 0x800f0831 update error. While we have offered some effective solutions, you should start with the most appropriate ones.
Let us know what worked in the comment section below.
FAQ
What is 0x800f0831 installation failed?
Windows error 0x800f0831 typically arises from problems installing or upgrading particular Windows features or components. File corruption or missingness, incompatibilities with installed applications, or issues with the Windows Update service might all be the reason.
Is the 0x800f0831 update error cause by malware?
Malware is not a common suspect for this error, but it can not be entirely ruled out. We recommend using a reliable antivirus at all times.
You must have run into the Windows 11 application error 0xC00007b. This error comes with the error message: The application was unable to start correctly.
This error comes when opening certain applications, especially games. Users have observed it with apps like Sherlock Holmes the devils daughter, Dying Light 2, etc. This error may indicate missing DLLs, essential .Net components, or other app-dependent files. You may fix it with the solutions below.
1. Restart the Application
Before trying any complex solutions, restart the problematic application. During restart, you force all connected app processes to shut down, allowing them to reset and fix minor bugs that may trigger the application error.
2. Reboot Your Computer
While rebooting seems like an easy fix, it is often very effective. When you reboot the computer, you will stop all running processes and give the computer a soft reset.
This is a handy way of fixing minor bugs that may trigger the 0xc00007b application error in Windows 11.
2. Install DirectX
DirectX is a collection of APIs that offer a low-level interface for components like graphics cards, sound cards, and input devices. This Microsoft API is essential for running certain apps, especially game apps.
Since the 0xC00007b Windows 11 application error indicates configuration or missing dependencies, installing DirectX may cover these dependencies.
3. Double-click the downloaded file and follow the steps to install it.
3. Install the Missing DLL
DLLs or Dynamic Link Libraries are reusable code packages used by different applications on your computer. When a DLL that your app relies on is missing, you may get the 0xc00007b application error in Windows 11. If you know the exact missing DLL, you can try downloading it; if not, you may run the SFC scan that can repair file corruption or replace missing files.
1. Press Windows + R to open the Run dialog.
2. Type cmd and hit Ctrl + Shift + Enter to open the Command Prompt with elevated rights.
3. Type the command below and hit Enter.
sfc /scannow
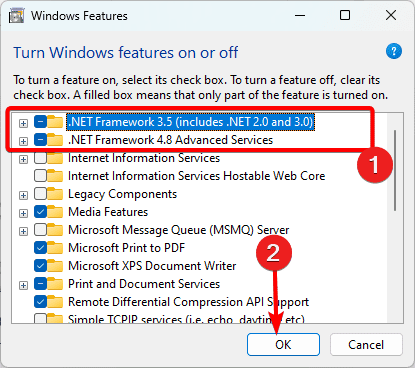
4. Install .Net Framework and Enable the .NET Framework Feature
You may be getting this problem because .Net Framework is missing on your computer. Sometimes, it is corrupted, and you need a fresh installation. However, you should note that even if it is installed, there is a chance that the .Net feature will be disabled. The steps below show how to download and enable it.
1. Visit the .Net site and click the Runtime offline installer.
2. Double-click the downloaded file and follow the wizard to complete the process.
3. After the installation is complete, press Windows + R, type apwiz.cpl, and hit Enter.
4. Click Turn Windows features on or off.
5. Tick all .Net Framework checkboxes and click the OK button.
5. Repair the Application
If application files are damaged, you may encounter the 0xc00007b application error in Windows 11. Some apps come with a built-in Repair feature. You may access repair from the Settings app or the control panel. We explore both options below.
Repair App Using the Settings App
1. Press Windows + I to open the Settings app, click Apps on the left pane, and Installed Apps on the right.
2. Click the ellipses of the problematic app and click Advanced Options.
3. Scroll down and click the Repair button.
Repair App Using the Control Panel App
1. Press Windows + R, type apwiz.cpl, and hit Enter.
2. Click the problematic app and the Repair button (sometimes it may be a Change button).
3. Follow the wizard to complete the repair.
6. Reinstall the Application
If none of the solutions above work, you must consider reinstallation. When you uninstall the app, download a fresh copy that is void of any corruption, and reinstall it. Make sure you remove all leftover software before installing the new download.
1. Press Windows + R, type apwiz.cpl, and hit Enter.
2. Click the problematic app and the Uninstall button.
3. Follow the wizard to complete the process, then reinstall a fresh version.
Recovering From the 0xc00007B Application Error in Windows 11
This guide shows you the best ways to recover seamlessly from the 0xc00007B application error. You should choose what solutions resonate the most with your specific situation. While this problem is often seen with games, it may affect any other application.
Let us know what solution has been effective for you.
 Windows 11 avait fait couler beaucoup d’encre lors de sa sortie car la configuration minimale requise était assez compliquée à avoir pour tous (TPM, Secure Boot, Processeur récent…). Cependant, nous l’avons vu ici sur le blog et également en vidéo, il est assez simple de contourner ces prérequis. Jusqu’à aujourd’hui Microsoft n’avait encore rien fait …