Vue lecture

Il y a de nouveaux articles disponibles, cliquez pour rafraîchir la page.

UniFi UNAS Pro 4 NAS Review

Review of the UniFi UNAS Pro 4 NAS – Possibly the Best Value 1U Rack Ever?

Over the last 18-24 months, Ubiquiti has shifted the ‘UniFi’ label from being a networking and bridging ecosystem into a wider storage hardware and software platform that now includes a steadily expanding NAS line under UniFi Drive. Early UniFi UNAS storage products leaned heavily on simple file sharing and basic backup, but the pace of updates and the broader product rollout in 2025/2026 pushed the range closer to what small business buyers expect from an entry level NAS platform: clearer storage management, stronger snapshot and backup tooling, and tighter integration with the UniFi account and identity layer for remote access and user control (with the recent Drive 4.0 Update really uping their game considerably). The UniFi UNAS Pro 4 sits within that context as a compact 1U, 4 bay rack mount system designed mainly for file storage and sharing over SMB and NFS, rather than running third party applications, containers, or virtual machines. At $499, it is priced noticeably lower than many competing 1U rack NAS products at broadly comparable “headline” hardware, particularly where dual 10Gb networking and NVMe caching are concerned, which makes it hard to ignore if the goal is simple, high bandwidth storage in a rack footprint without moving into significantly higher spend.

UniFi UNAS Pro 4 Review – Quick Conclusion

The UniFi UNAS Pro 4 is a 1U, 4 bay rack mount NAS aimed at straightforward SMB and NFS file storage, and its main differentiator is value: at $499 it undercuts many comparable 1U rack units while still offering 2x 10Gb SFP+ plus a separate 1GbE management port, 4 hot swap bays for 3.5 inch or 2.5 inch drives, and 2 M.2 NVMe slots for read and write caching. In testing with 4 HDDs in RAID 5 over 10GbE, it delivered strong real-world file transfer results for a small SATA array, with synthetic benchmarks showing high peak throughput but some variability depending on the tool used, and the platform’s power draw and noise profile were heavily influenced by drive choice and fan mode, including very loud output if maximum cooling is forced. UniFi Drive covers the core fundamentals expected at this level, including snapshots, encrypted volumes, and a wide range of backup targets (NAS, SMB, and multiple cloud services, with Microsoft 365 direction evident in recent updates), but the interface still limits deeper tuning in places and the feature set remains focused on storage rather than apps. The main downsides are structural and easy to identify up front: NVMe can only be used for cache rather than storage pools, the NVMe carriers are an extra purchase, there are no USB ports for local copy tasks, the PSU is internal and not a hot swap module, and missing features like iSCSI, ECC, and RAM upgradability place a clear ceiling on more advanced workloads, though those trade-offs are broadly consistent with a $499 ‘turnkey’ NAS appliance in 2026 though and hard to criticise!

BUILD QUALITY - 9/10
HARDWARE - 7/10
PERFORMANCE - 7/10
PRICE - 9/10
VALUE - 10/10


8.4
PROS
👍🏻Dual 10Gb SFP+ networking is unusual in a 1U 4 bay NAS at this price point + failover will not result in bandwidth throttle
👍🏻A separate 1GbE port is useful for management or fallback connectivity
👍🏻1U chassis with relatively short depth is easier to fit in smaller racks and cabinets
👍🏻Rails and rack hardware included, reducing extra setup cost and friction
👍🏻Ubiquiti and UniFi online/brand services are optional (i.e pure offline/LAN is possible)+ no need for a Ubiquiti/UniFi network setup to use
👍🏻NVMe read and write caching support can improve responsiveness in mixed workloads
👍🏻UniFi Drive provides snapshots, encryption, and a broad set of backup targets (NAS, SMB, and multiple cloud providers)
👍🏻Setup and management are streamlined, especially for users already running UniFi infrastructure
👍🏻Drive 4.0 Update scales up the Business Utilities notably
CONS
👎🏻NVMe is cache only, with no option to use M.2 drives as primary storage pools
👎🏻NVMe trays or carriers are not included, adding extra cost and an extra purchase step
👎🏻Single PSU (no redundency) and non-slide removable SFX/ATX PSU (relies on propriatary UniFi Battery Backup rack module or external UPS)
👎🏻No NAS Expansion Support, so 4 HDDs are your limit

Here are all the current UniFi NAS Solutions & Prices:
  • UniFi UNAS Pro 4 (4 Bay + 2x M.2, $499) – HERE
  • UniFi UNAS 2 (2 Bay, $199) – HERE
  • UniFi UNAS 4  (4 Bay + 2x M2, $379) – HERE
  • UniFi UNAS Pro (7 Bay, $499) – HERE
  • UniFi UNAS Pro 8 (8-Bay + 2x M.2, $799) HERE

You can buy the UniFi UNAS Pro 4 NAS via the link below – doing so will result in a small commission coming to me and Eddie at NASCompares, and allows us to keep doing what we do! 


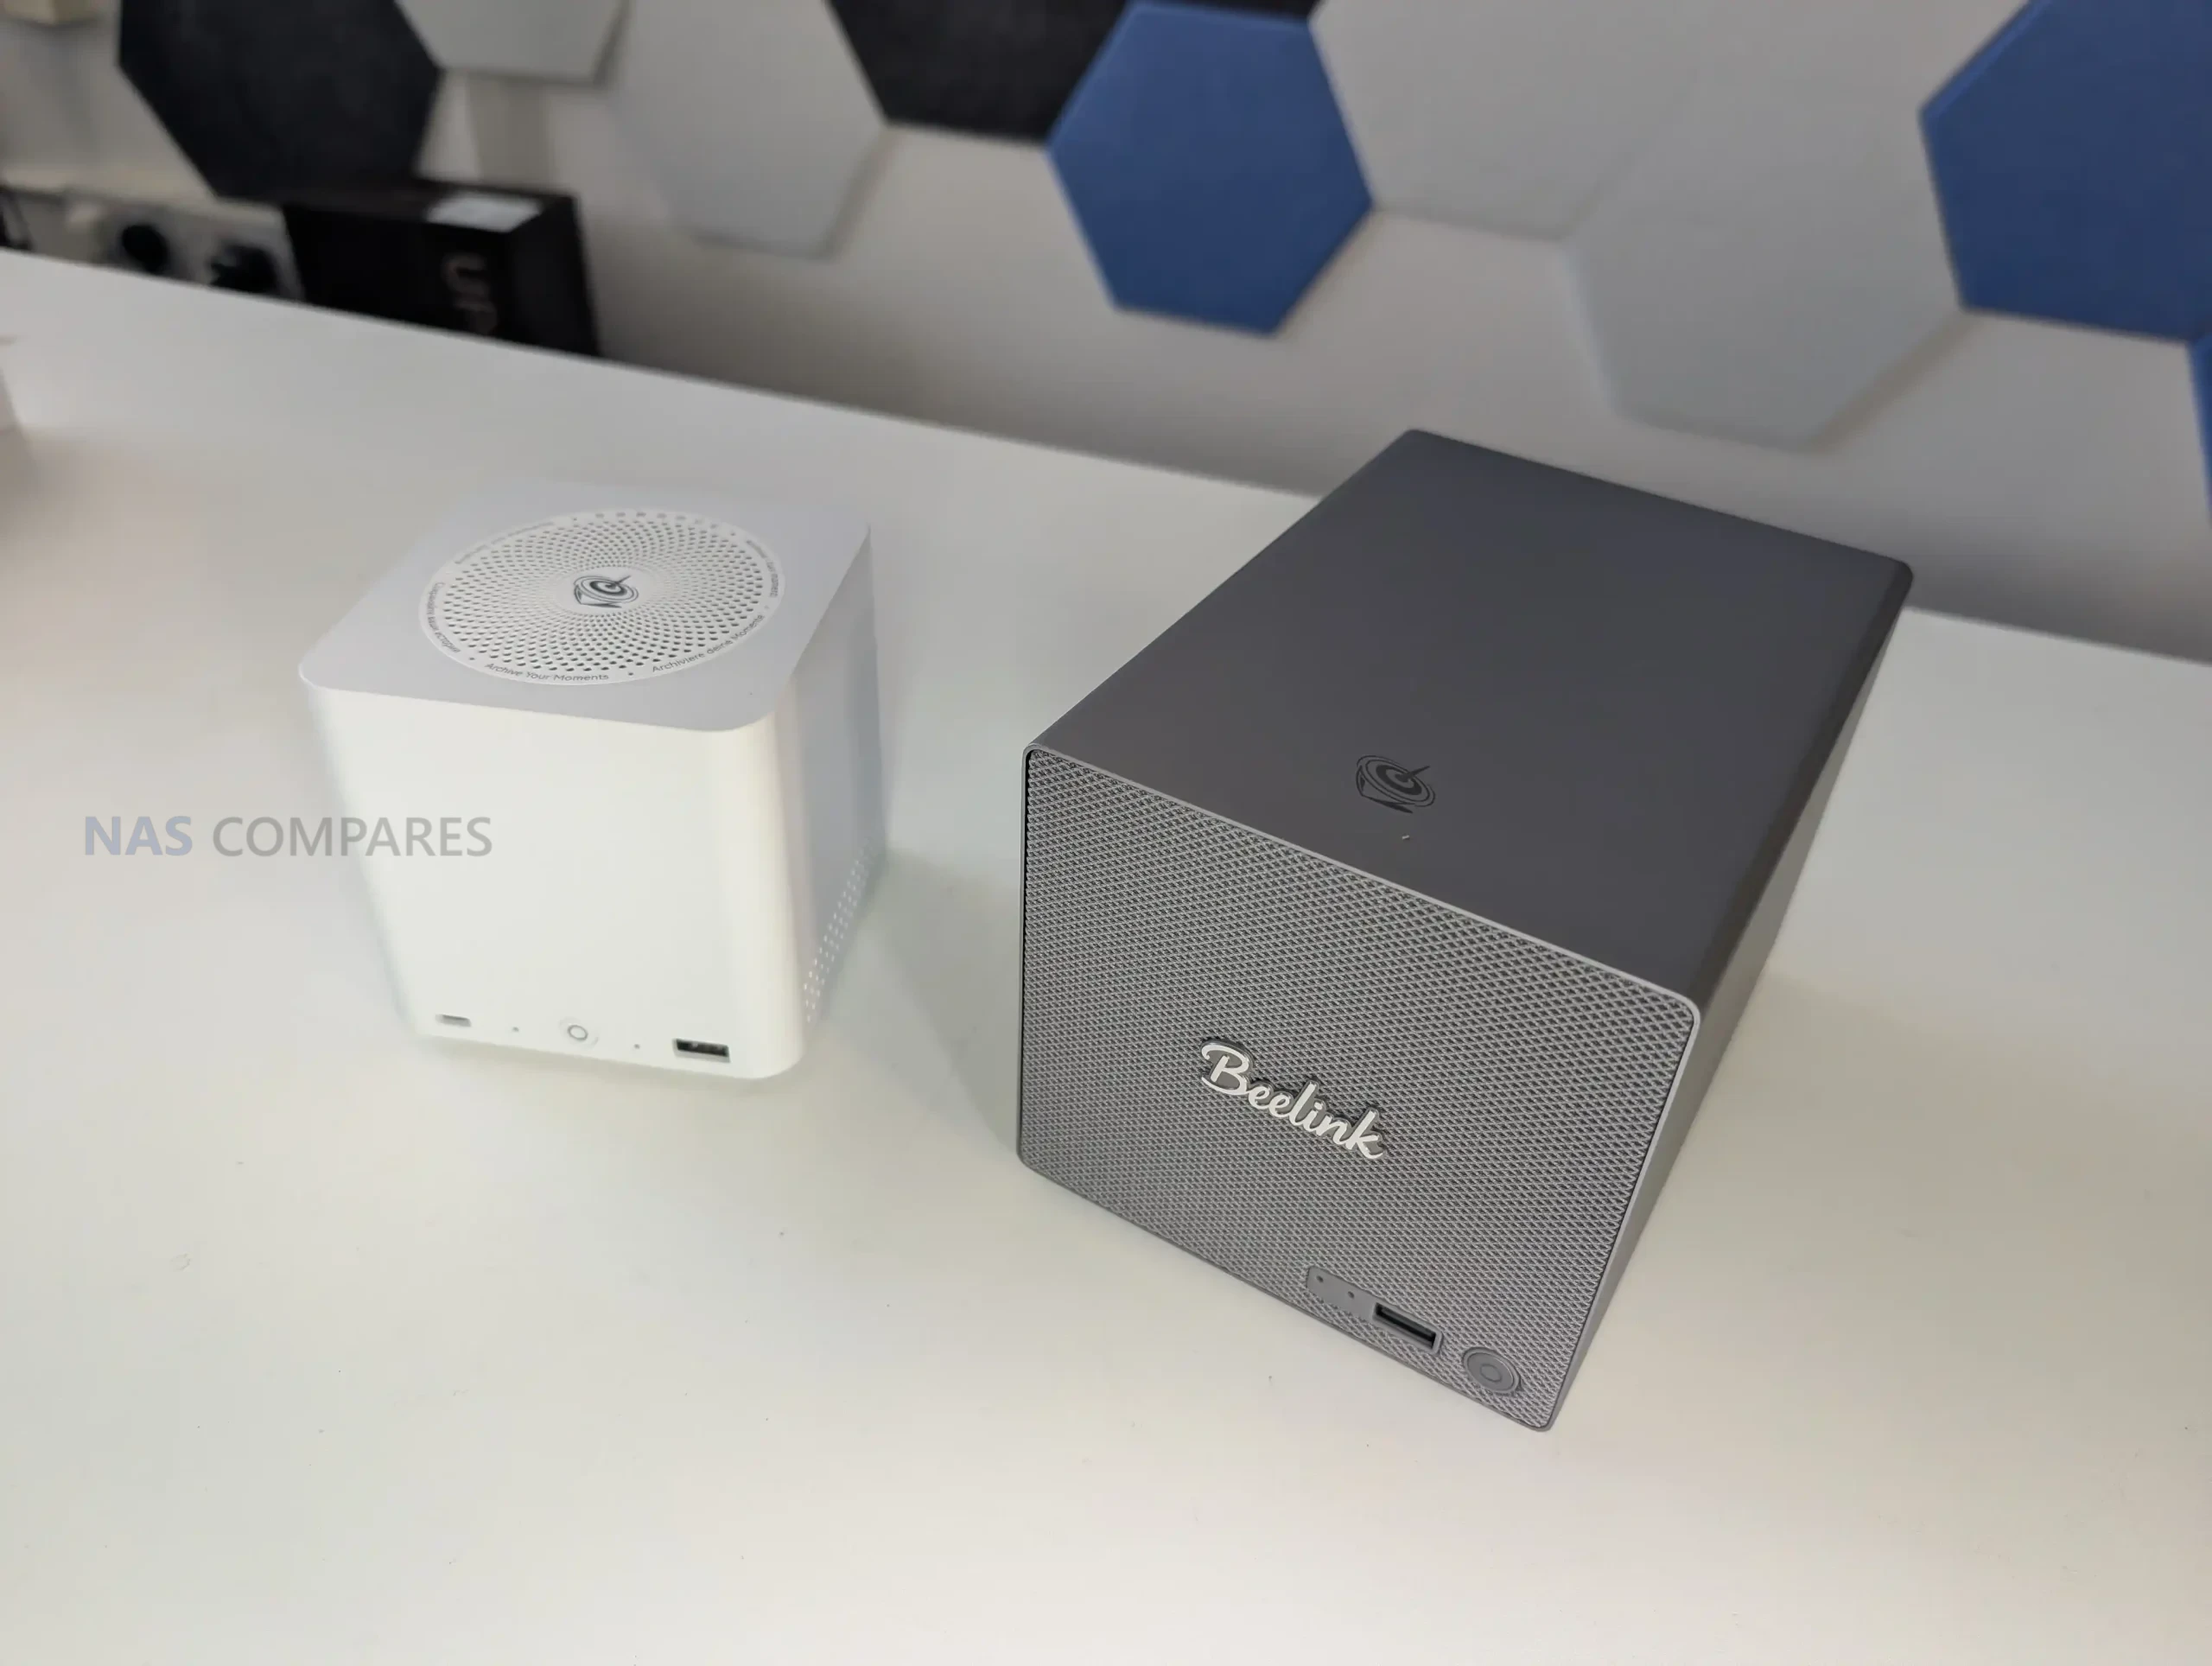
UniFi UNAS Pro 4 Review – Design & Storage

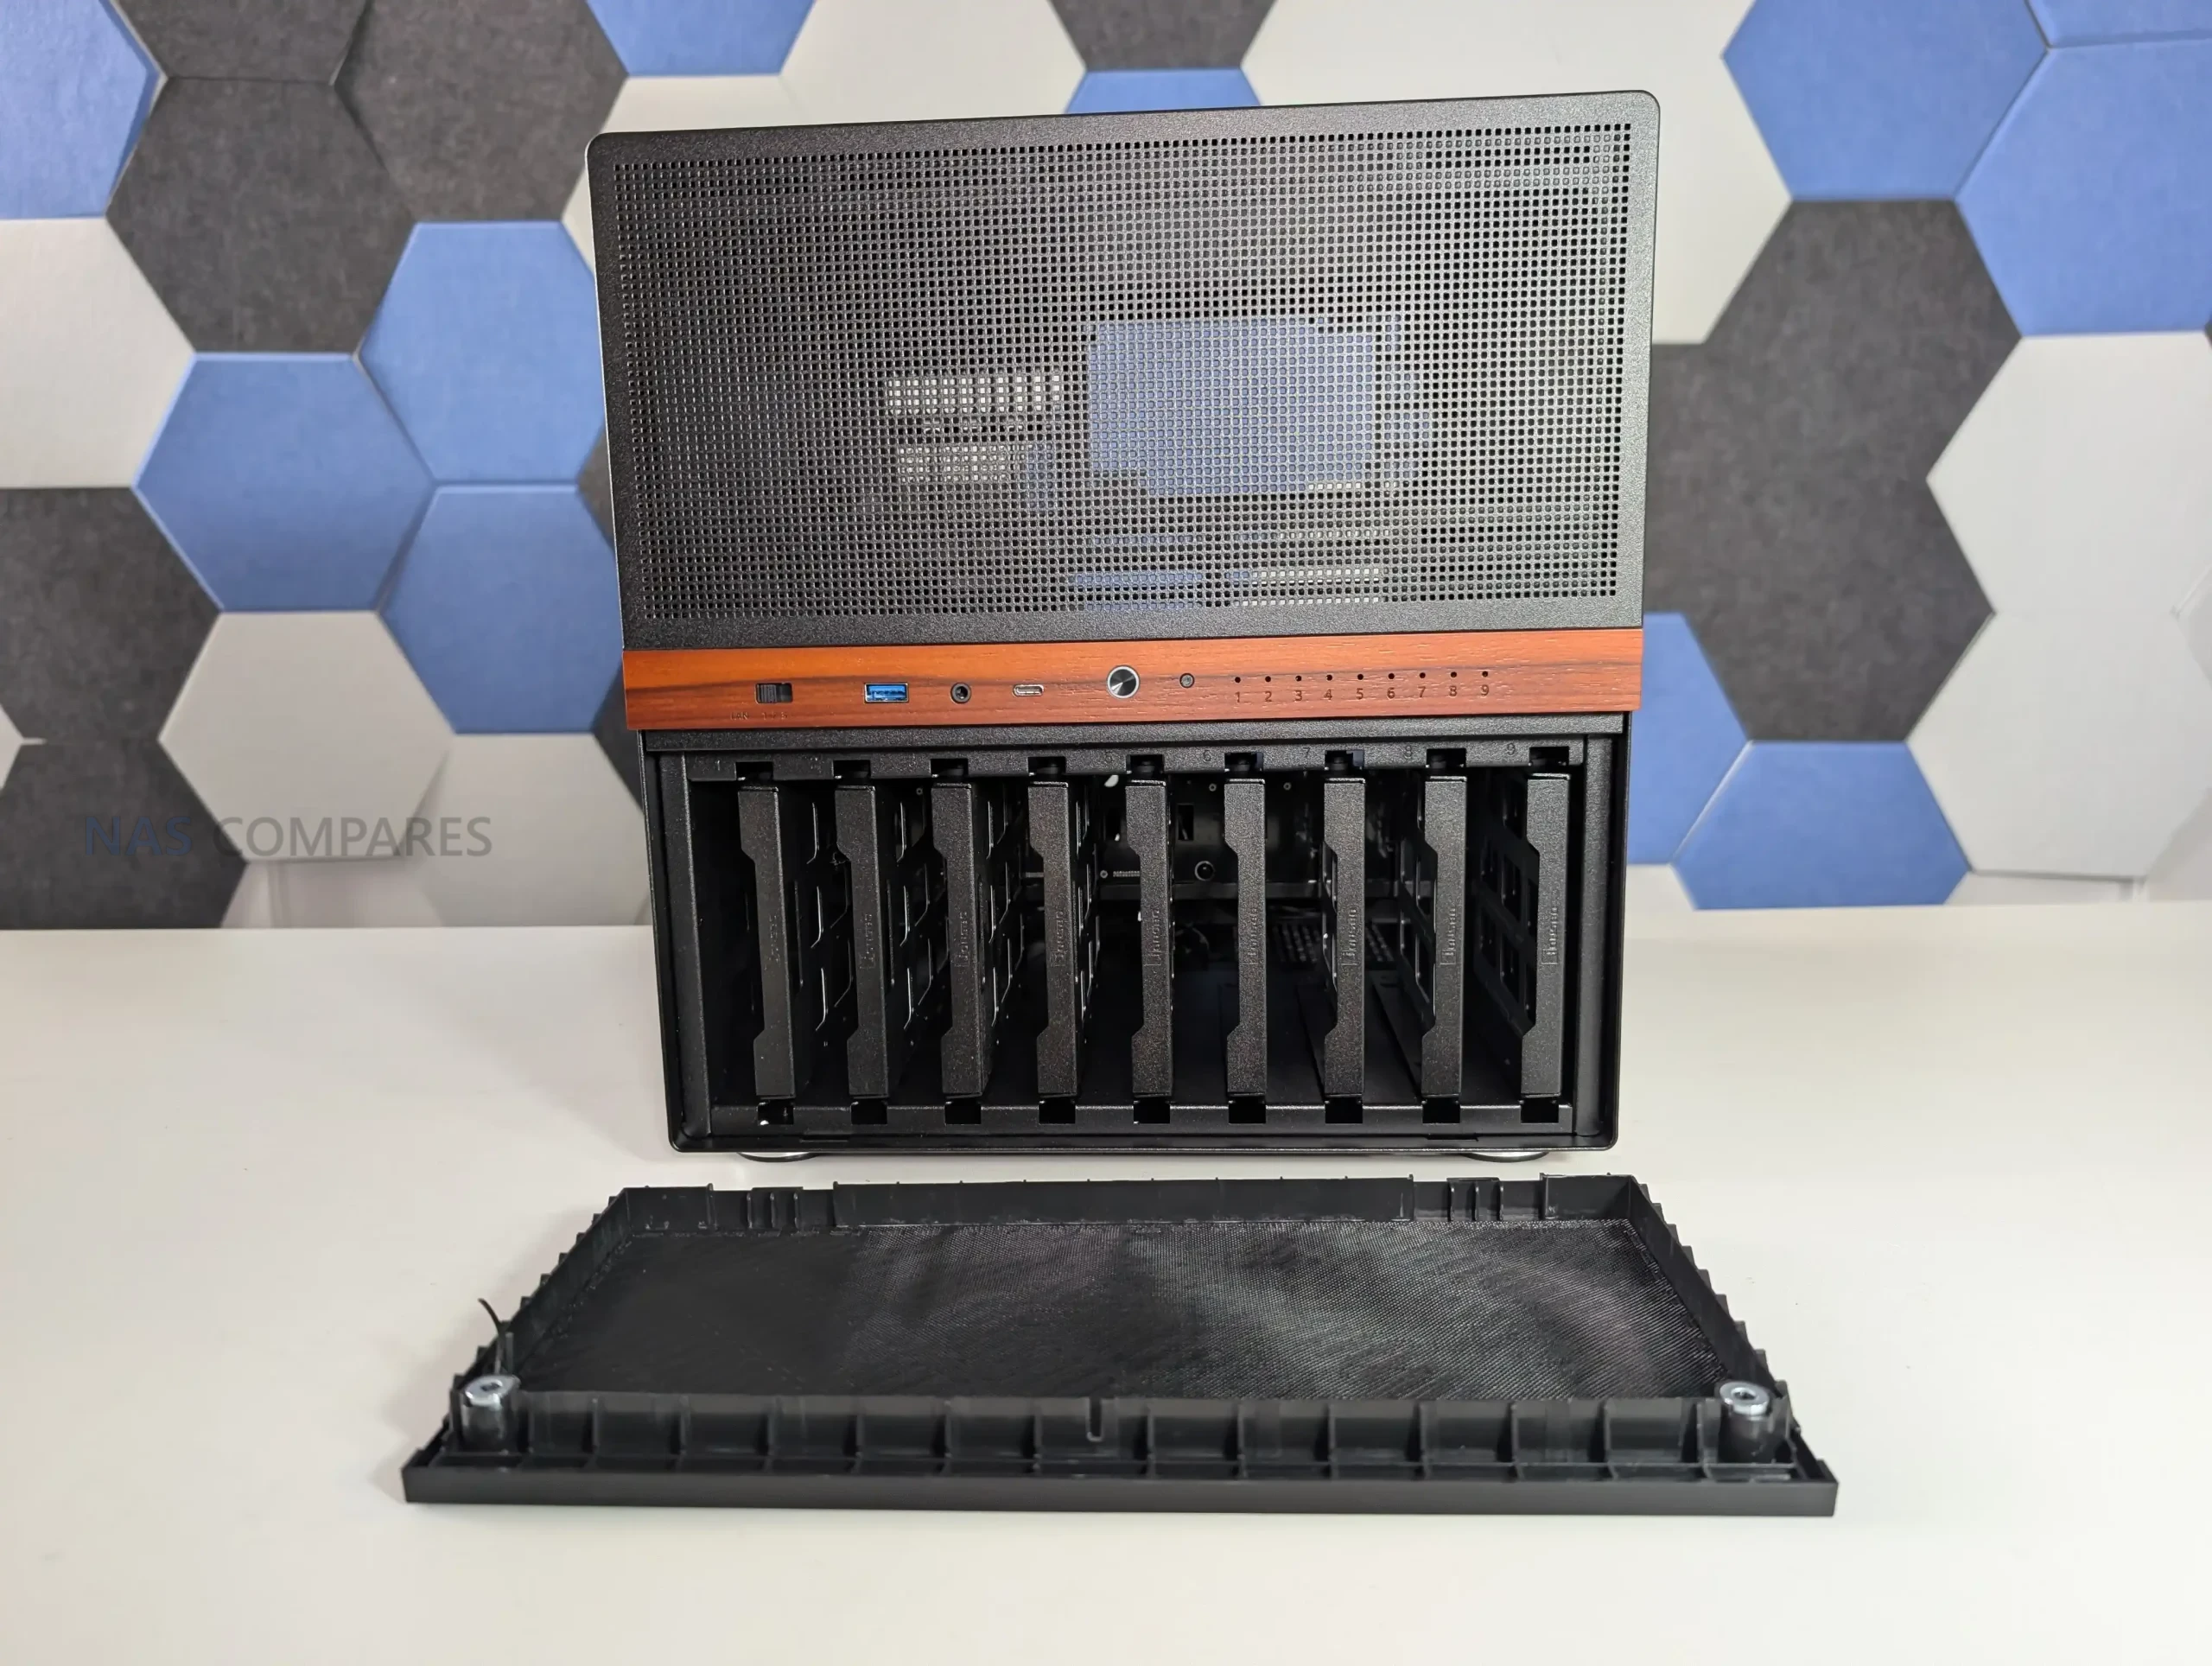
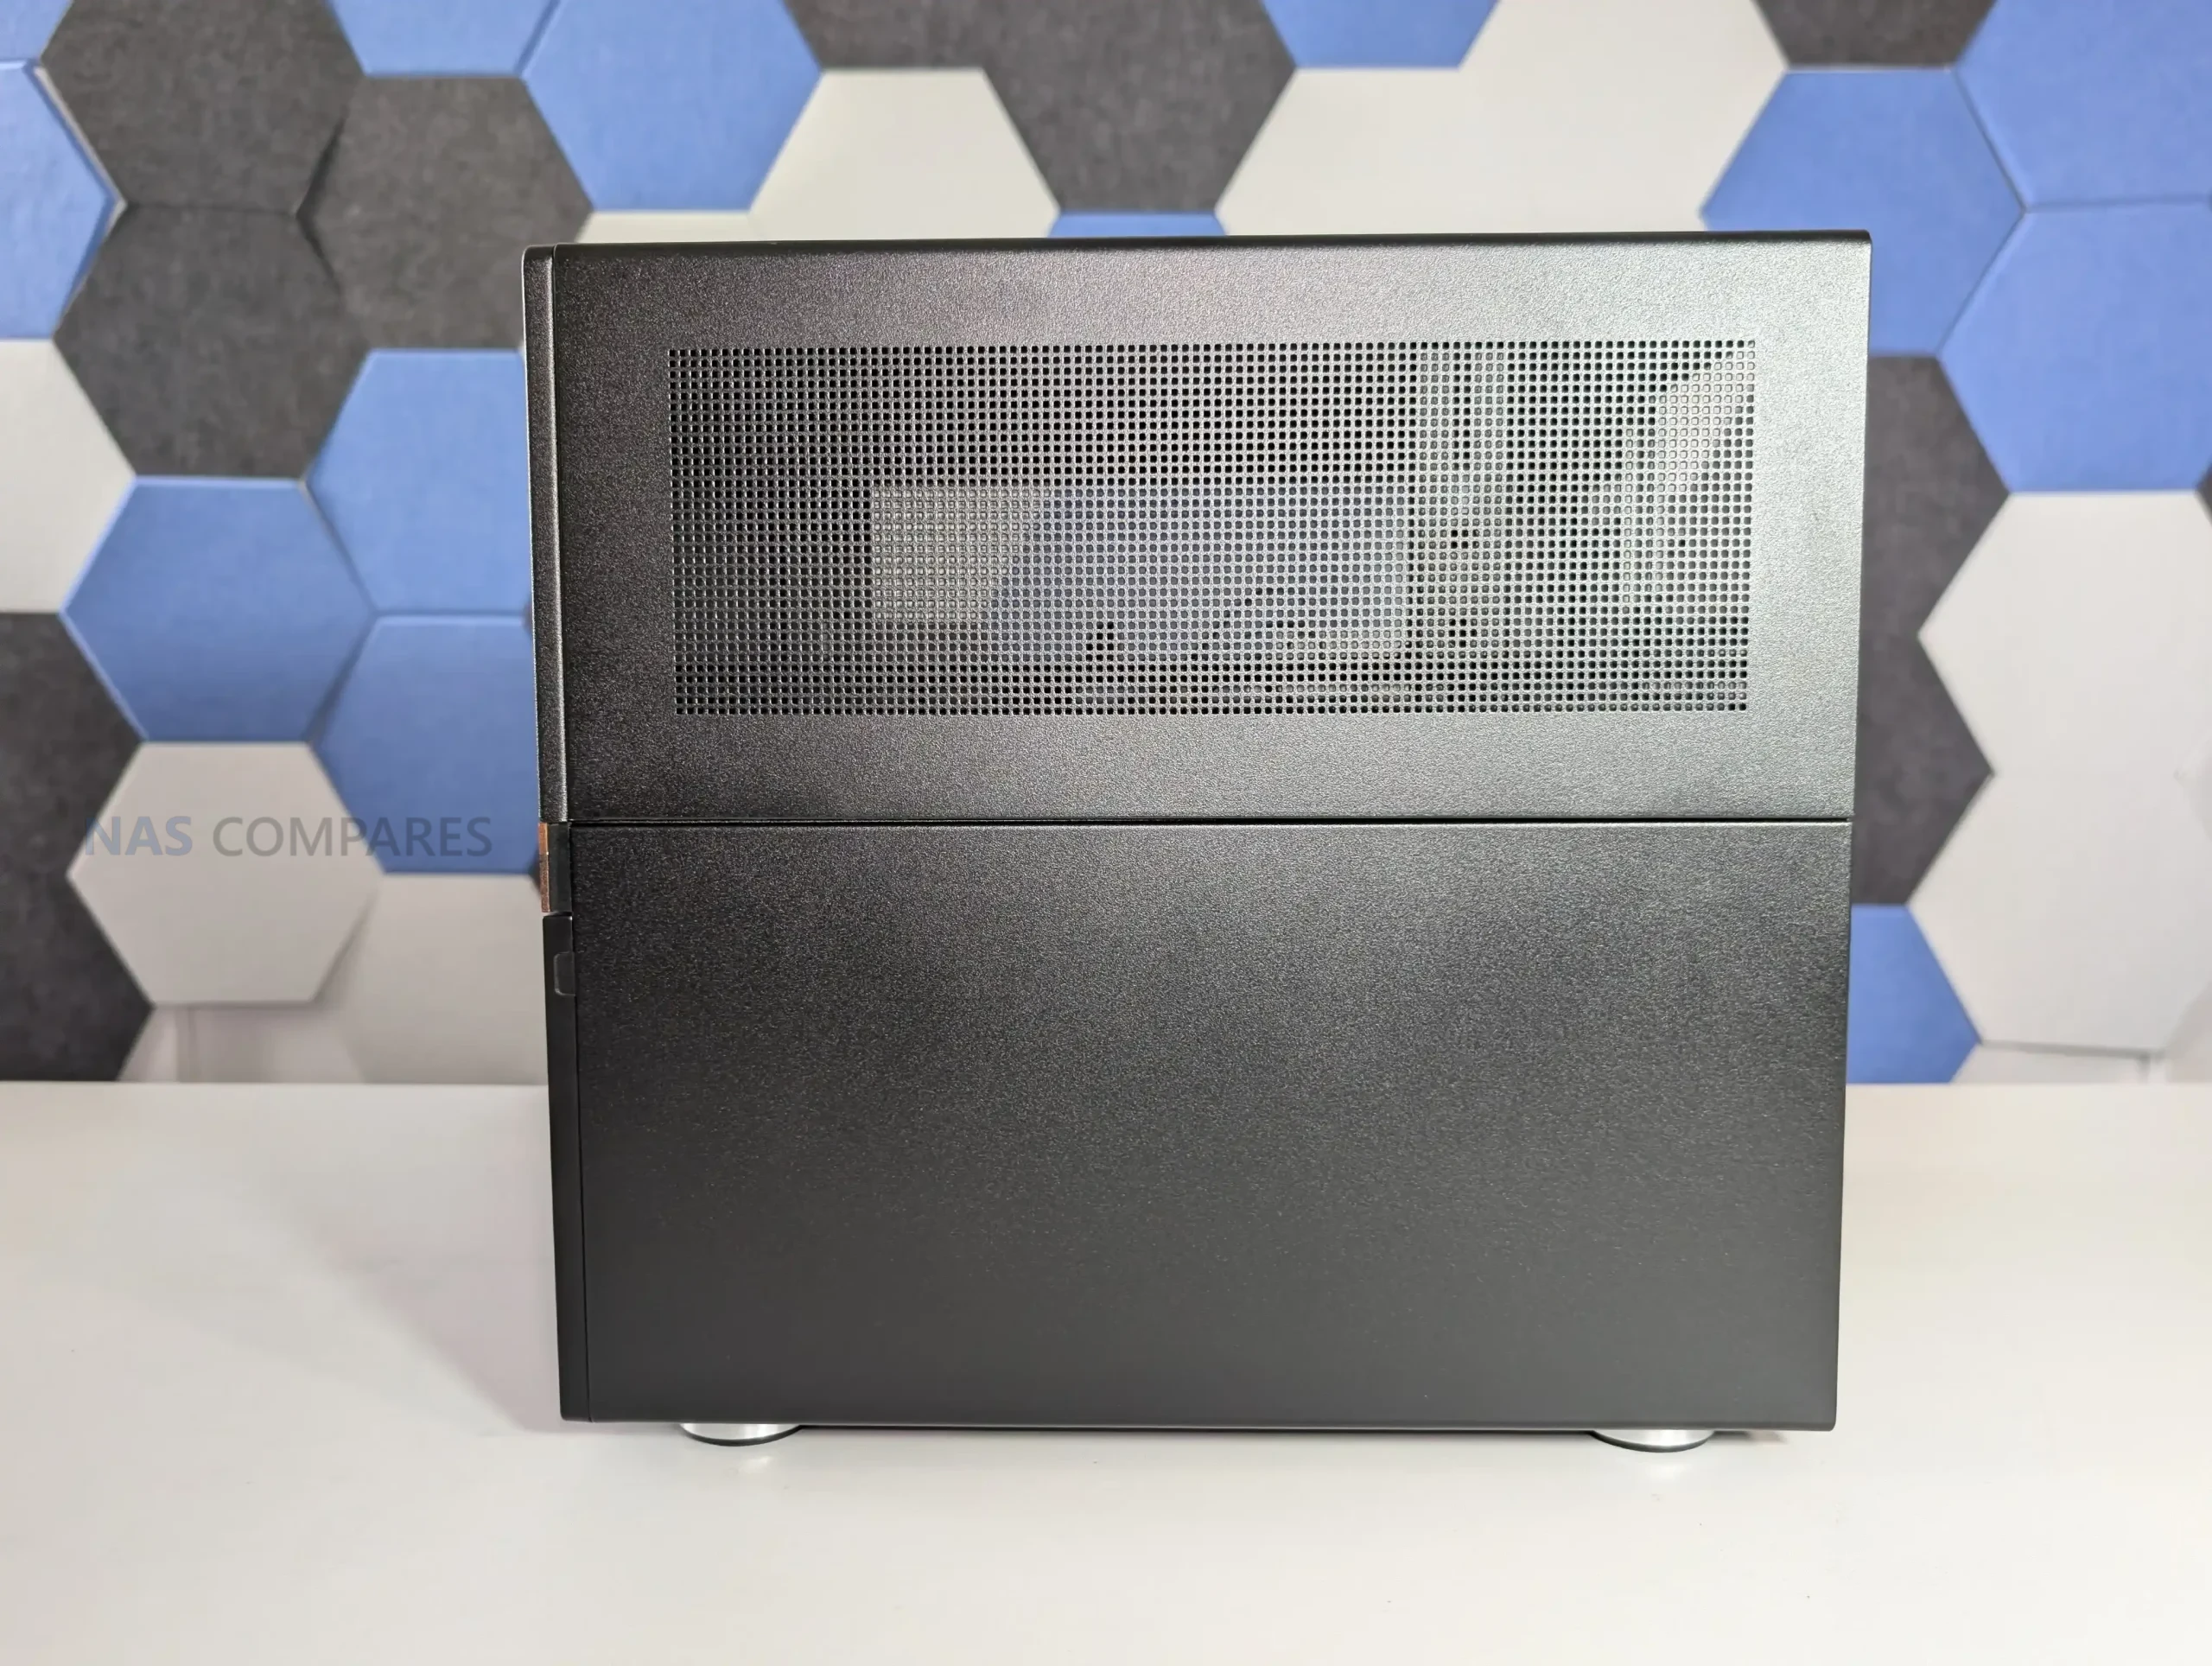
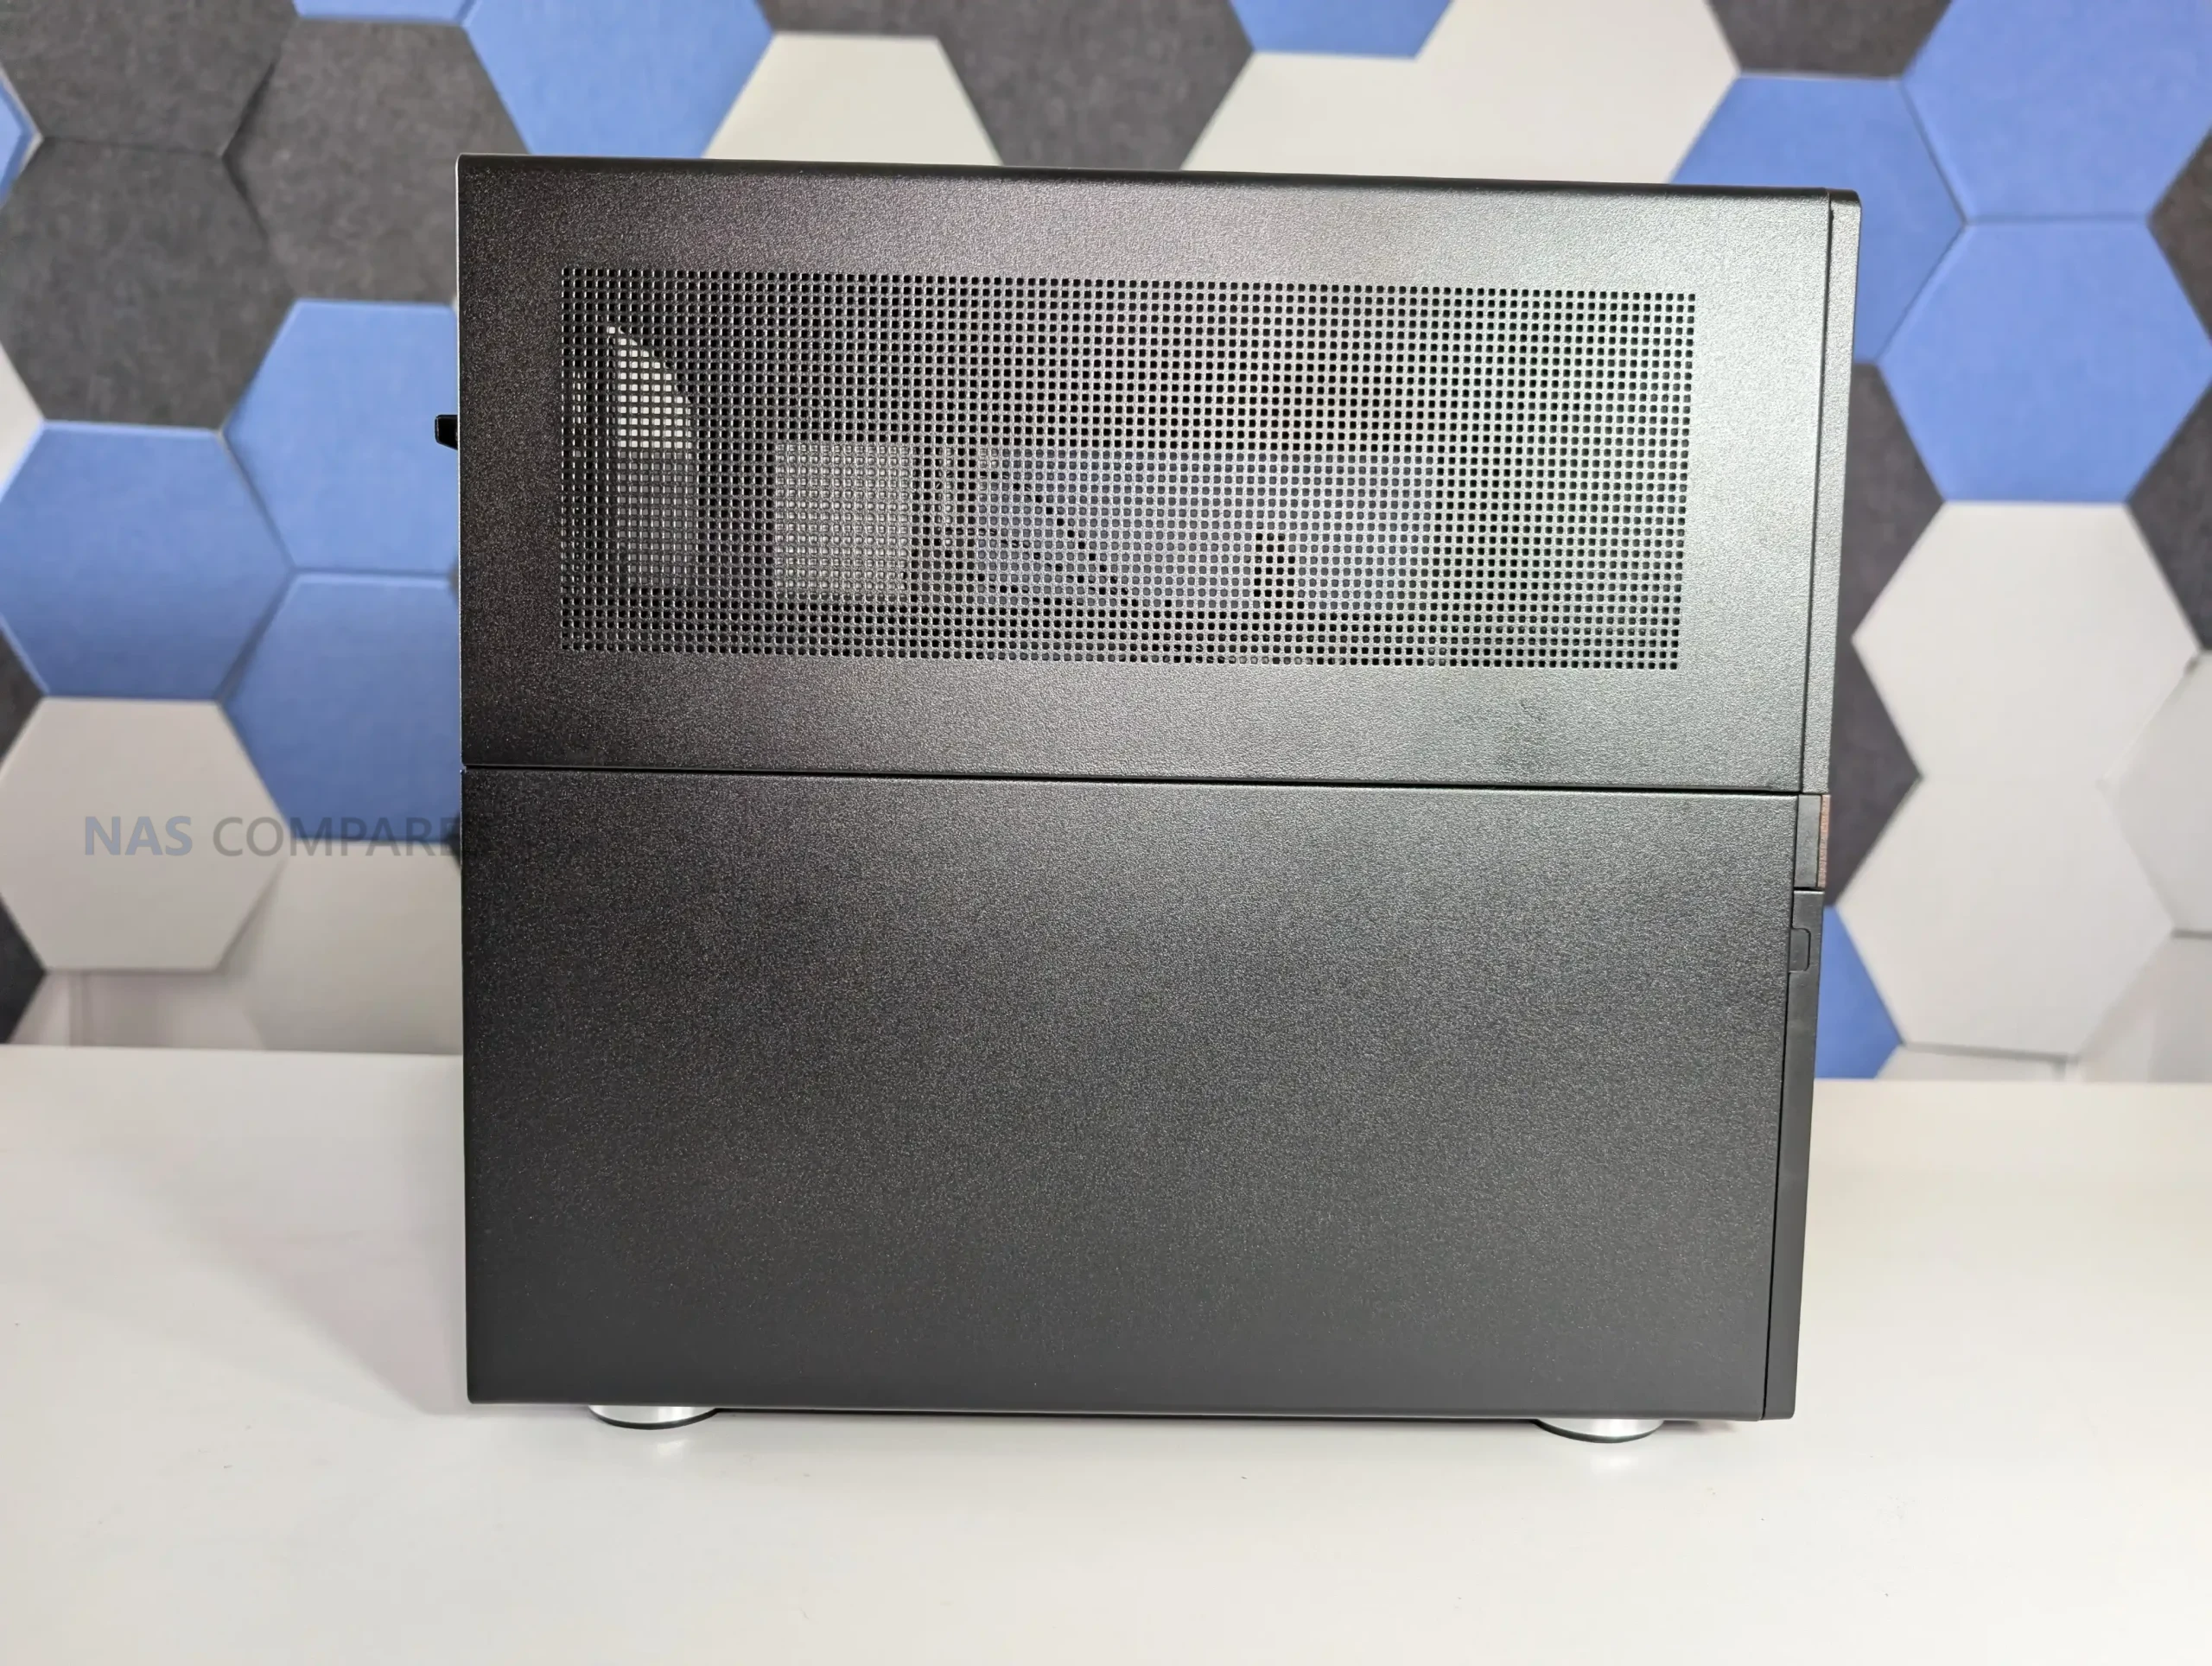
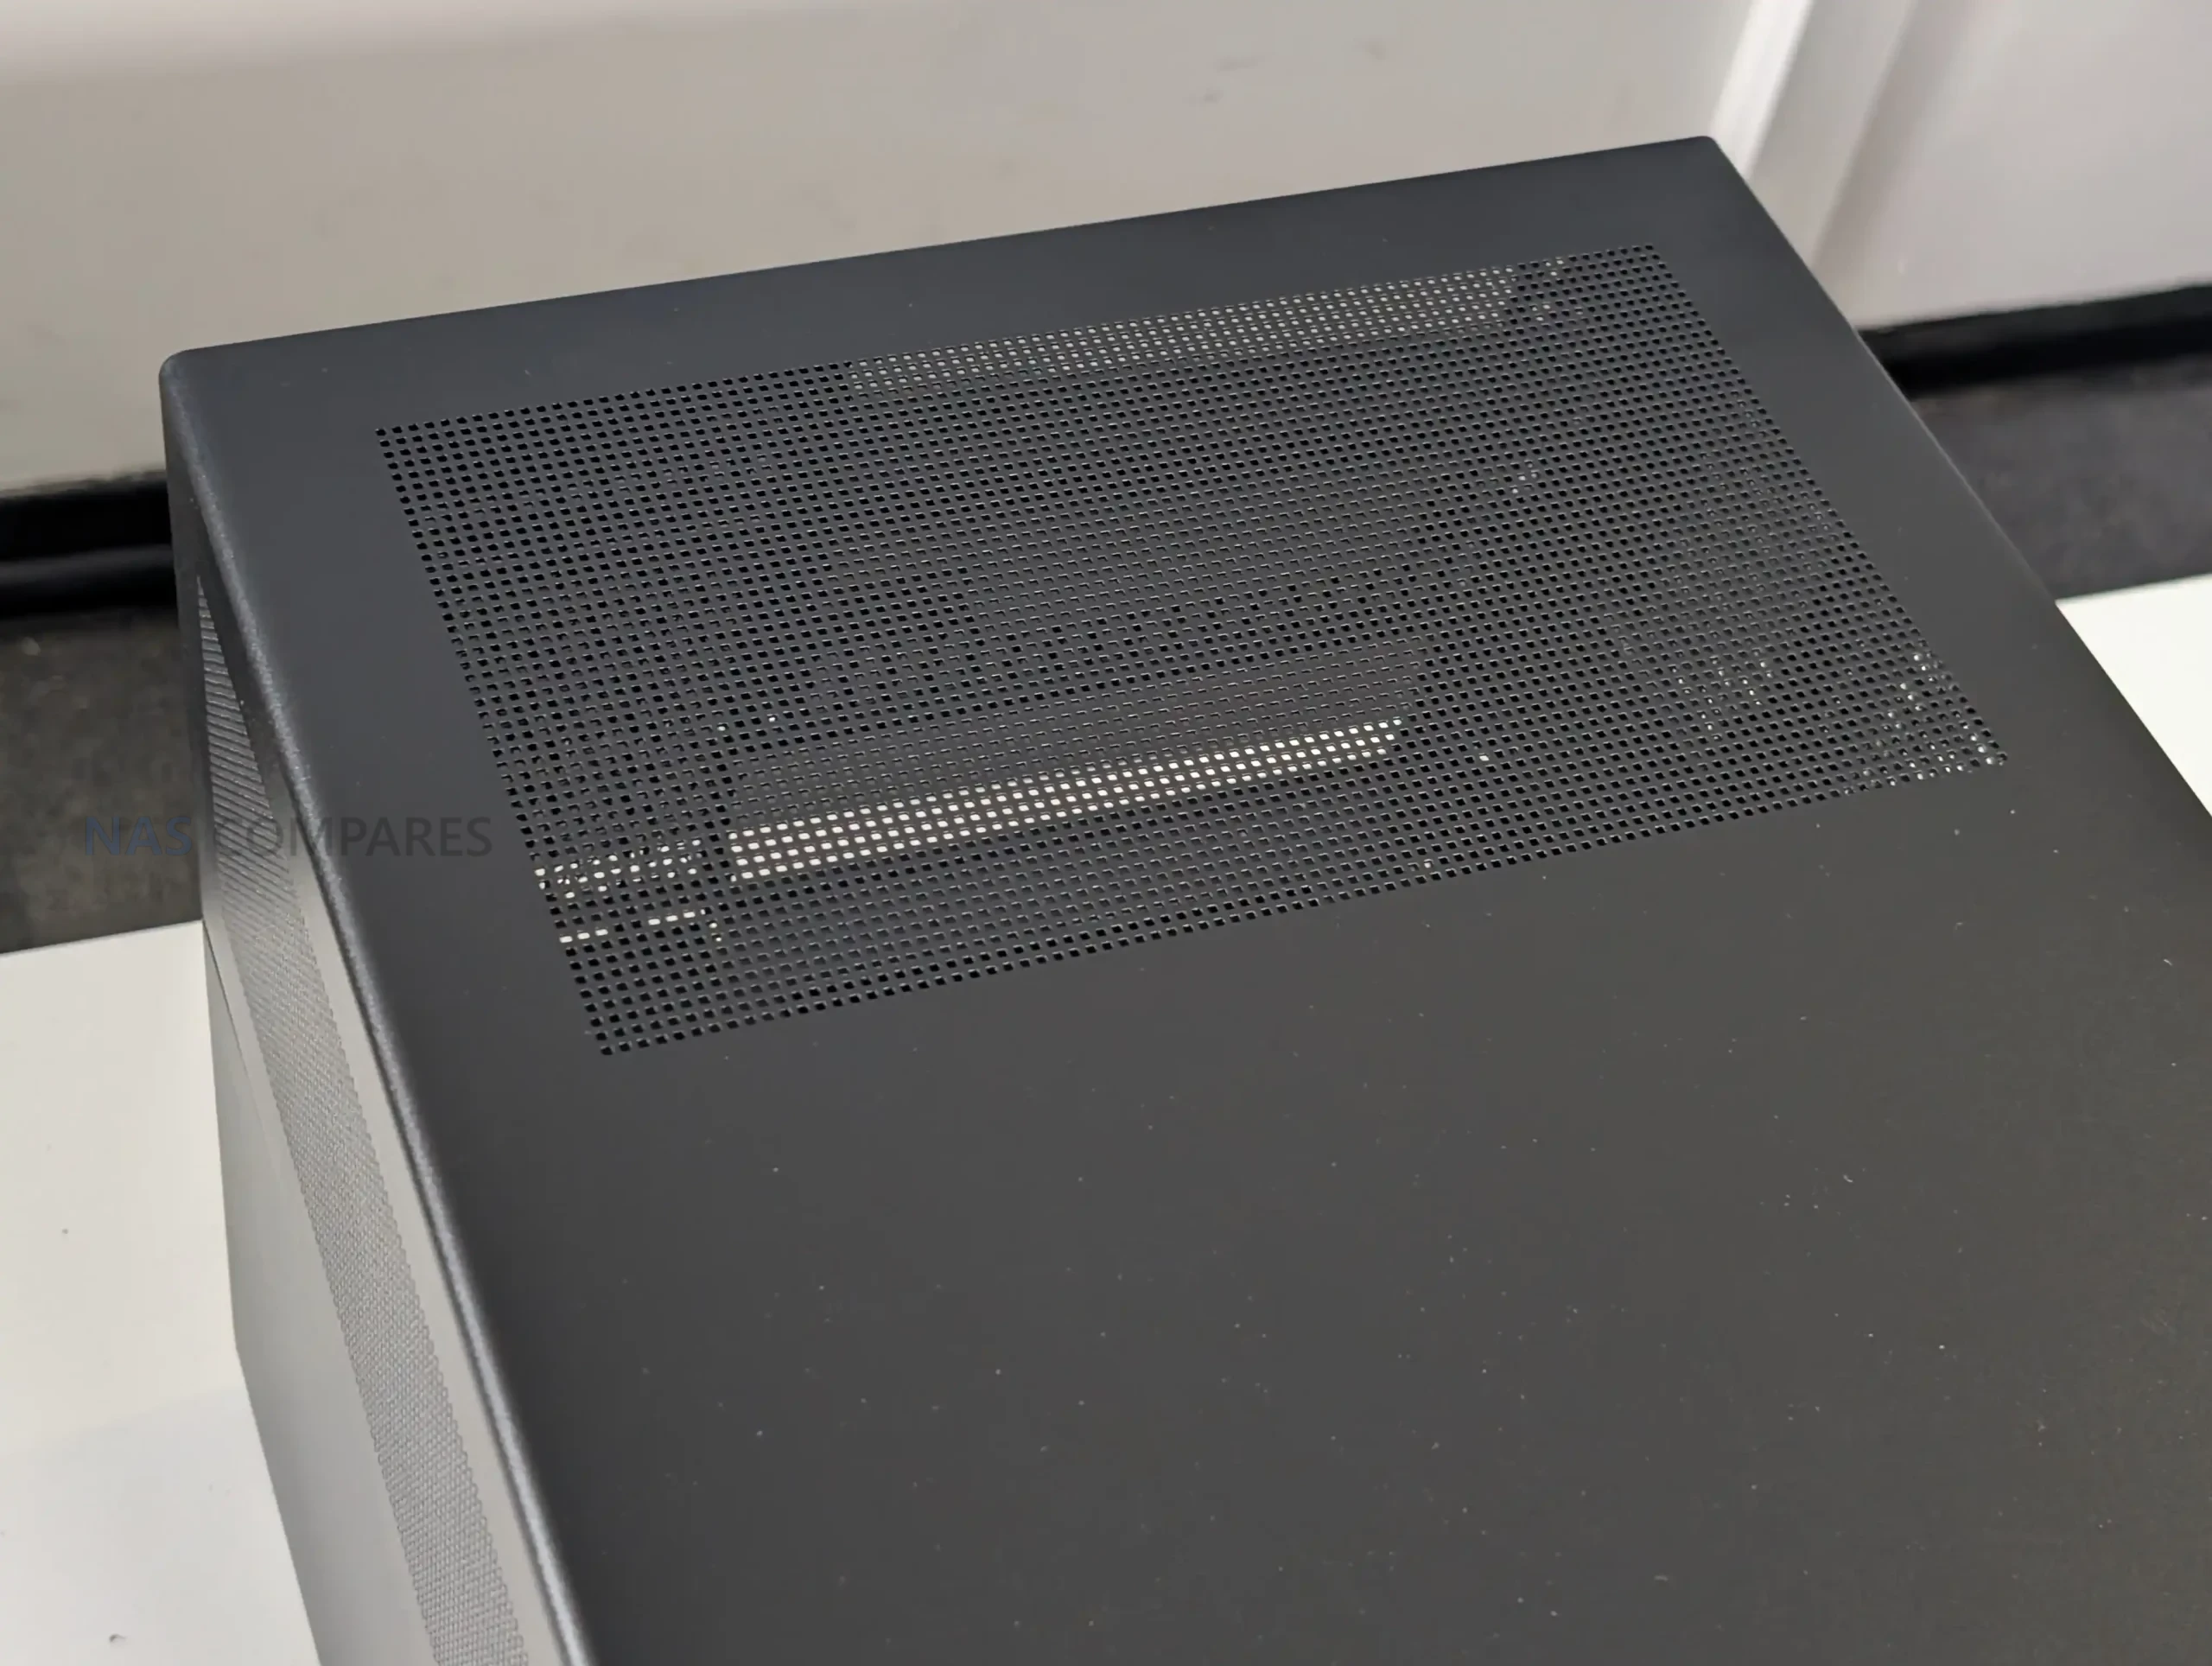
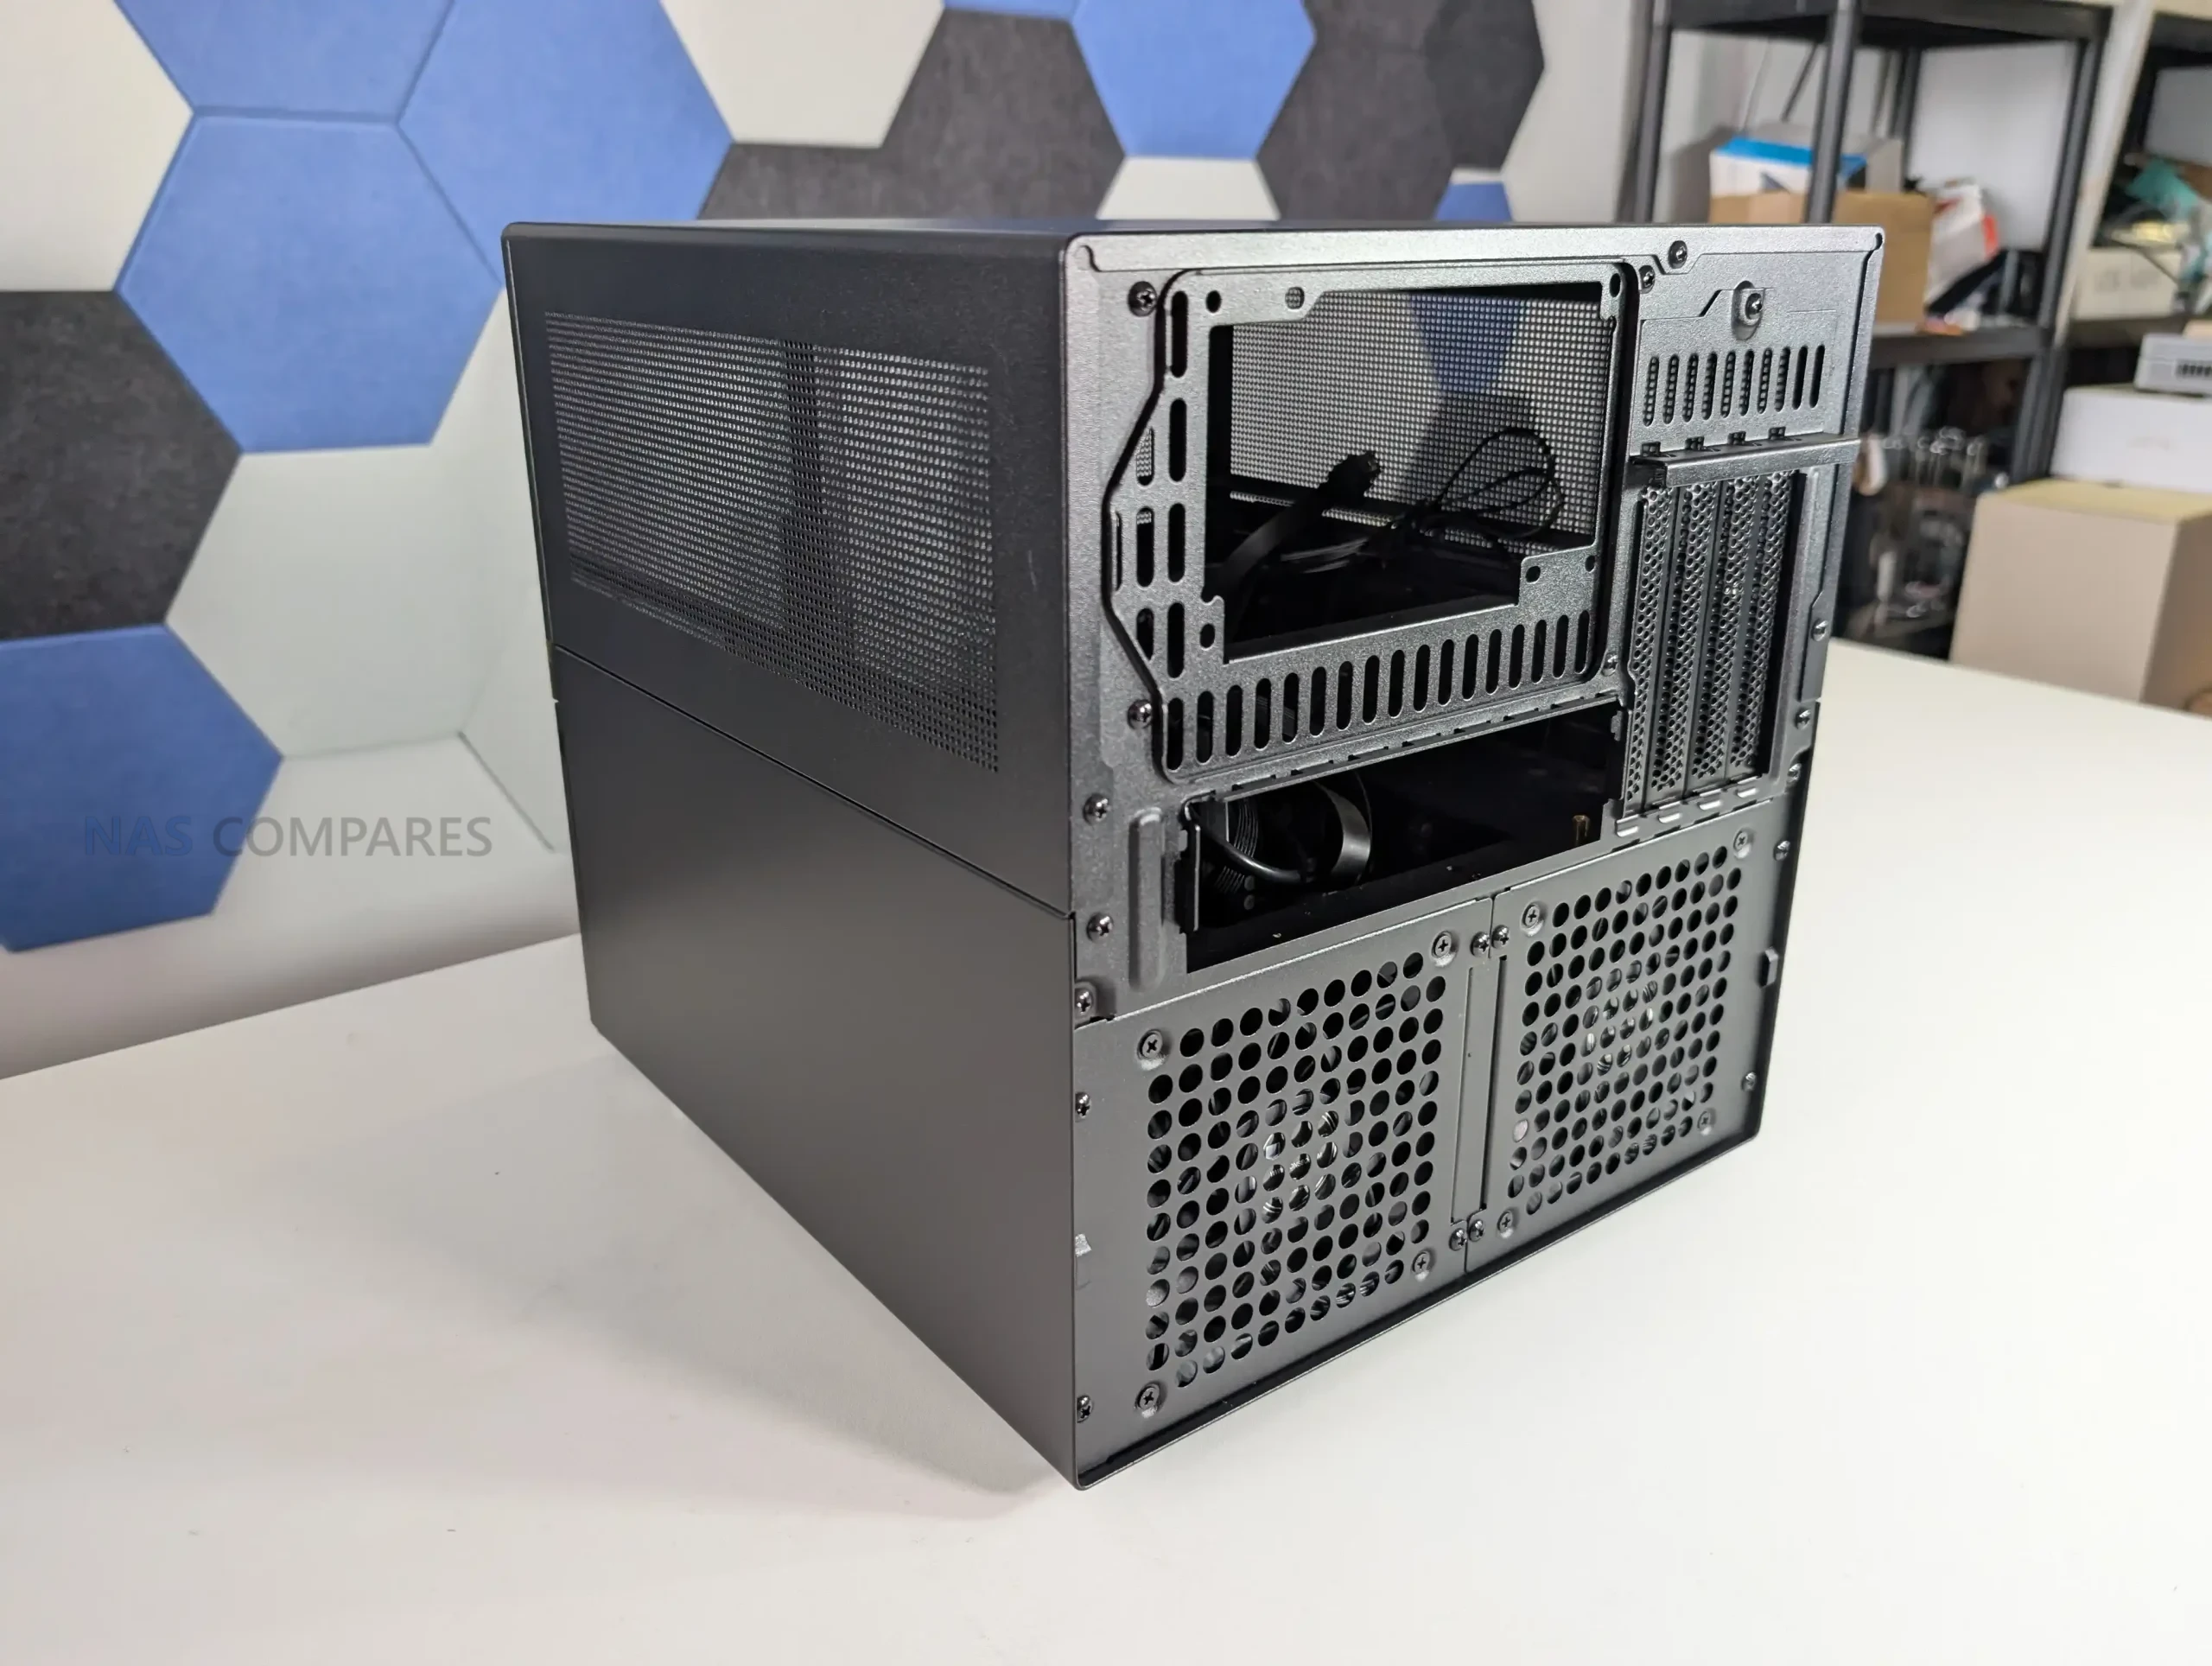
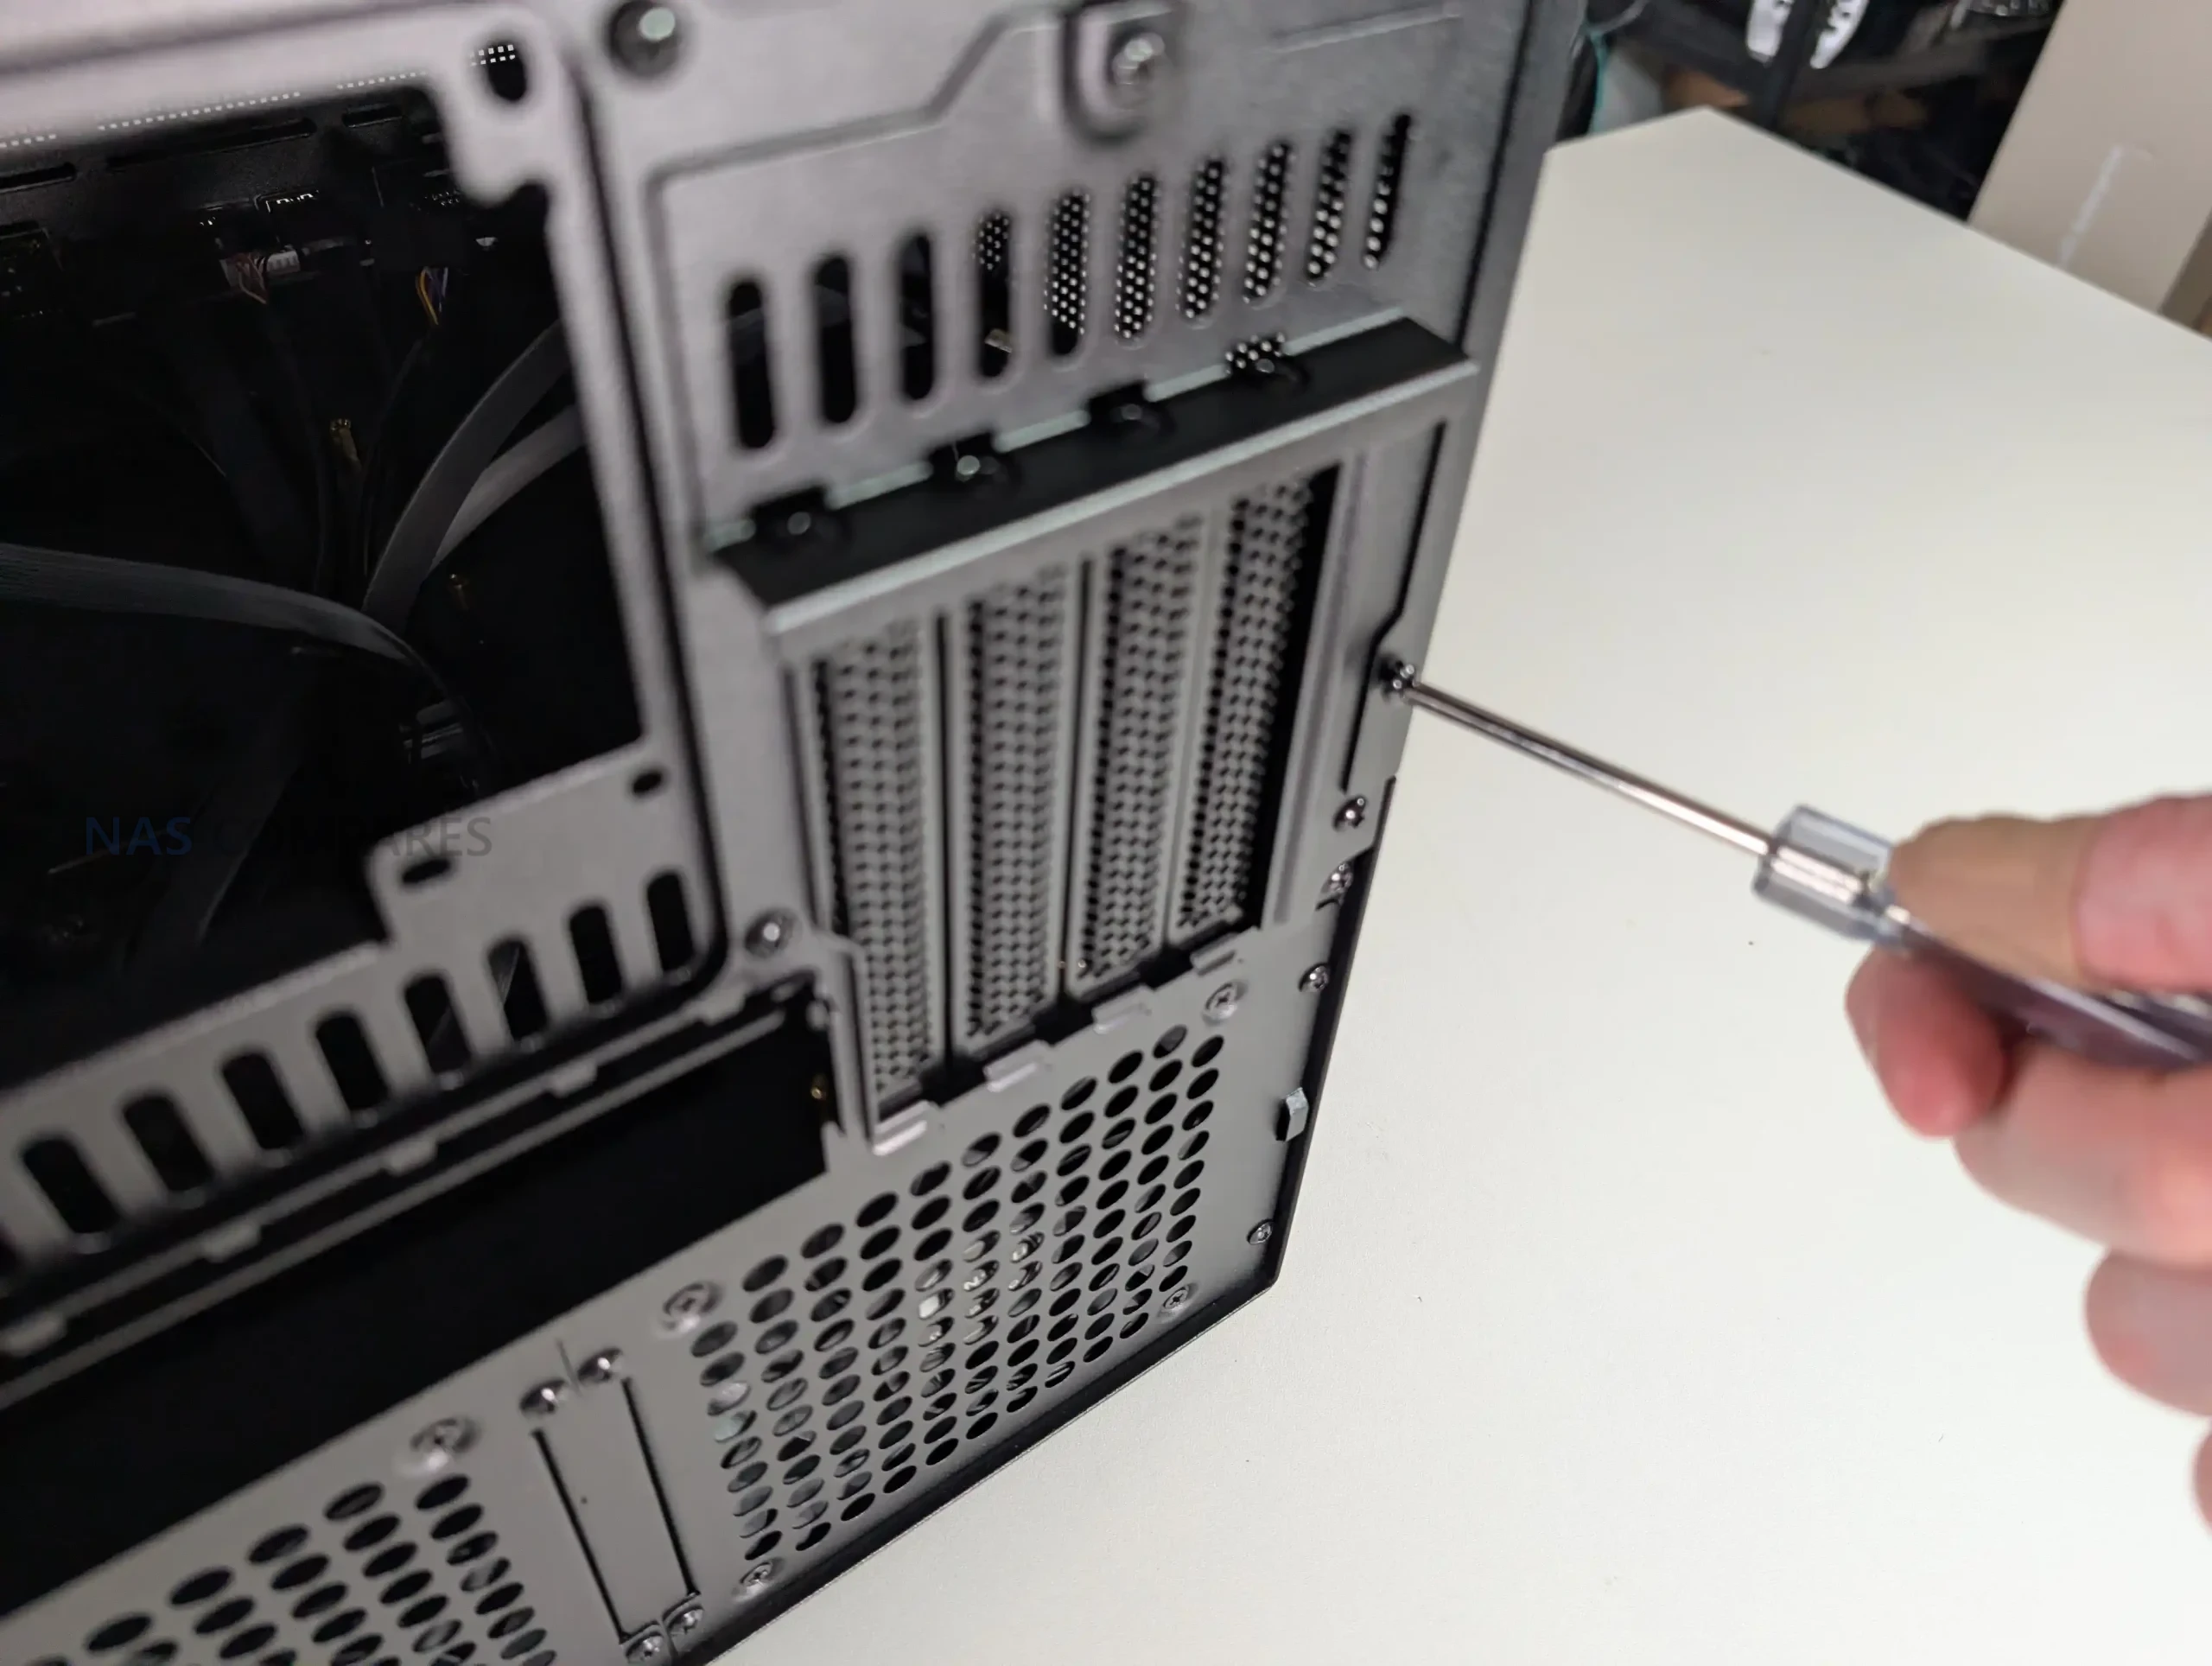
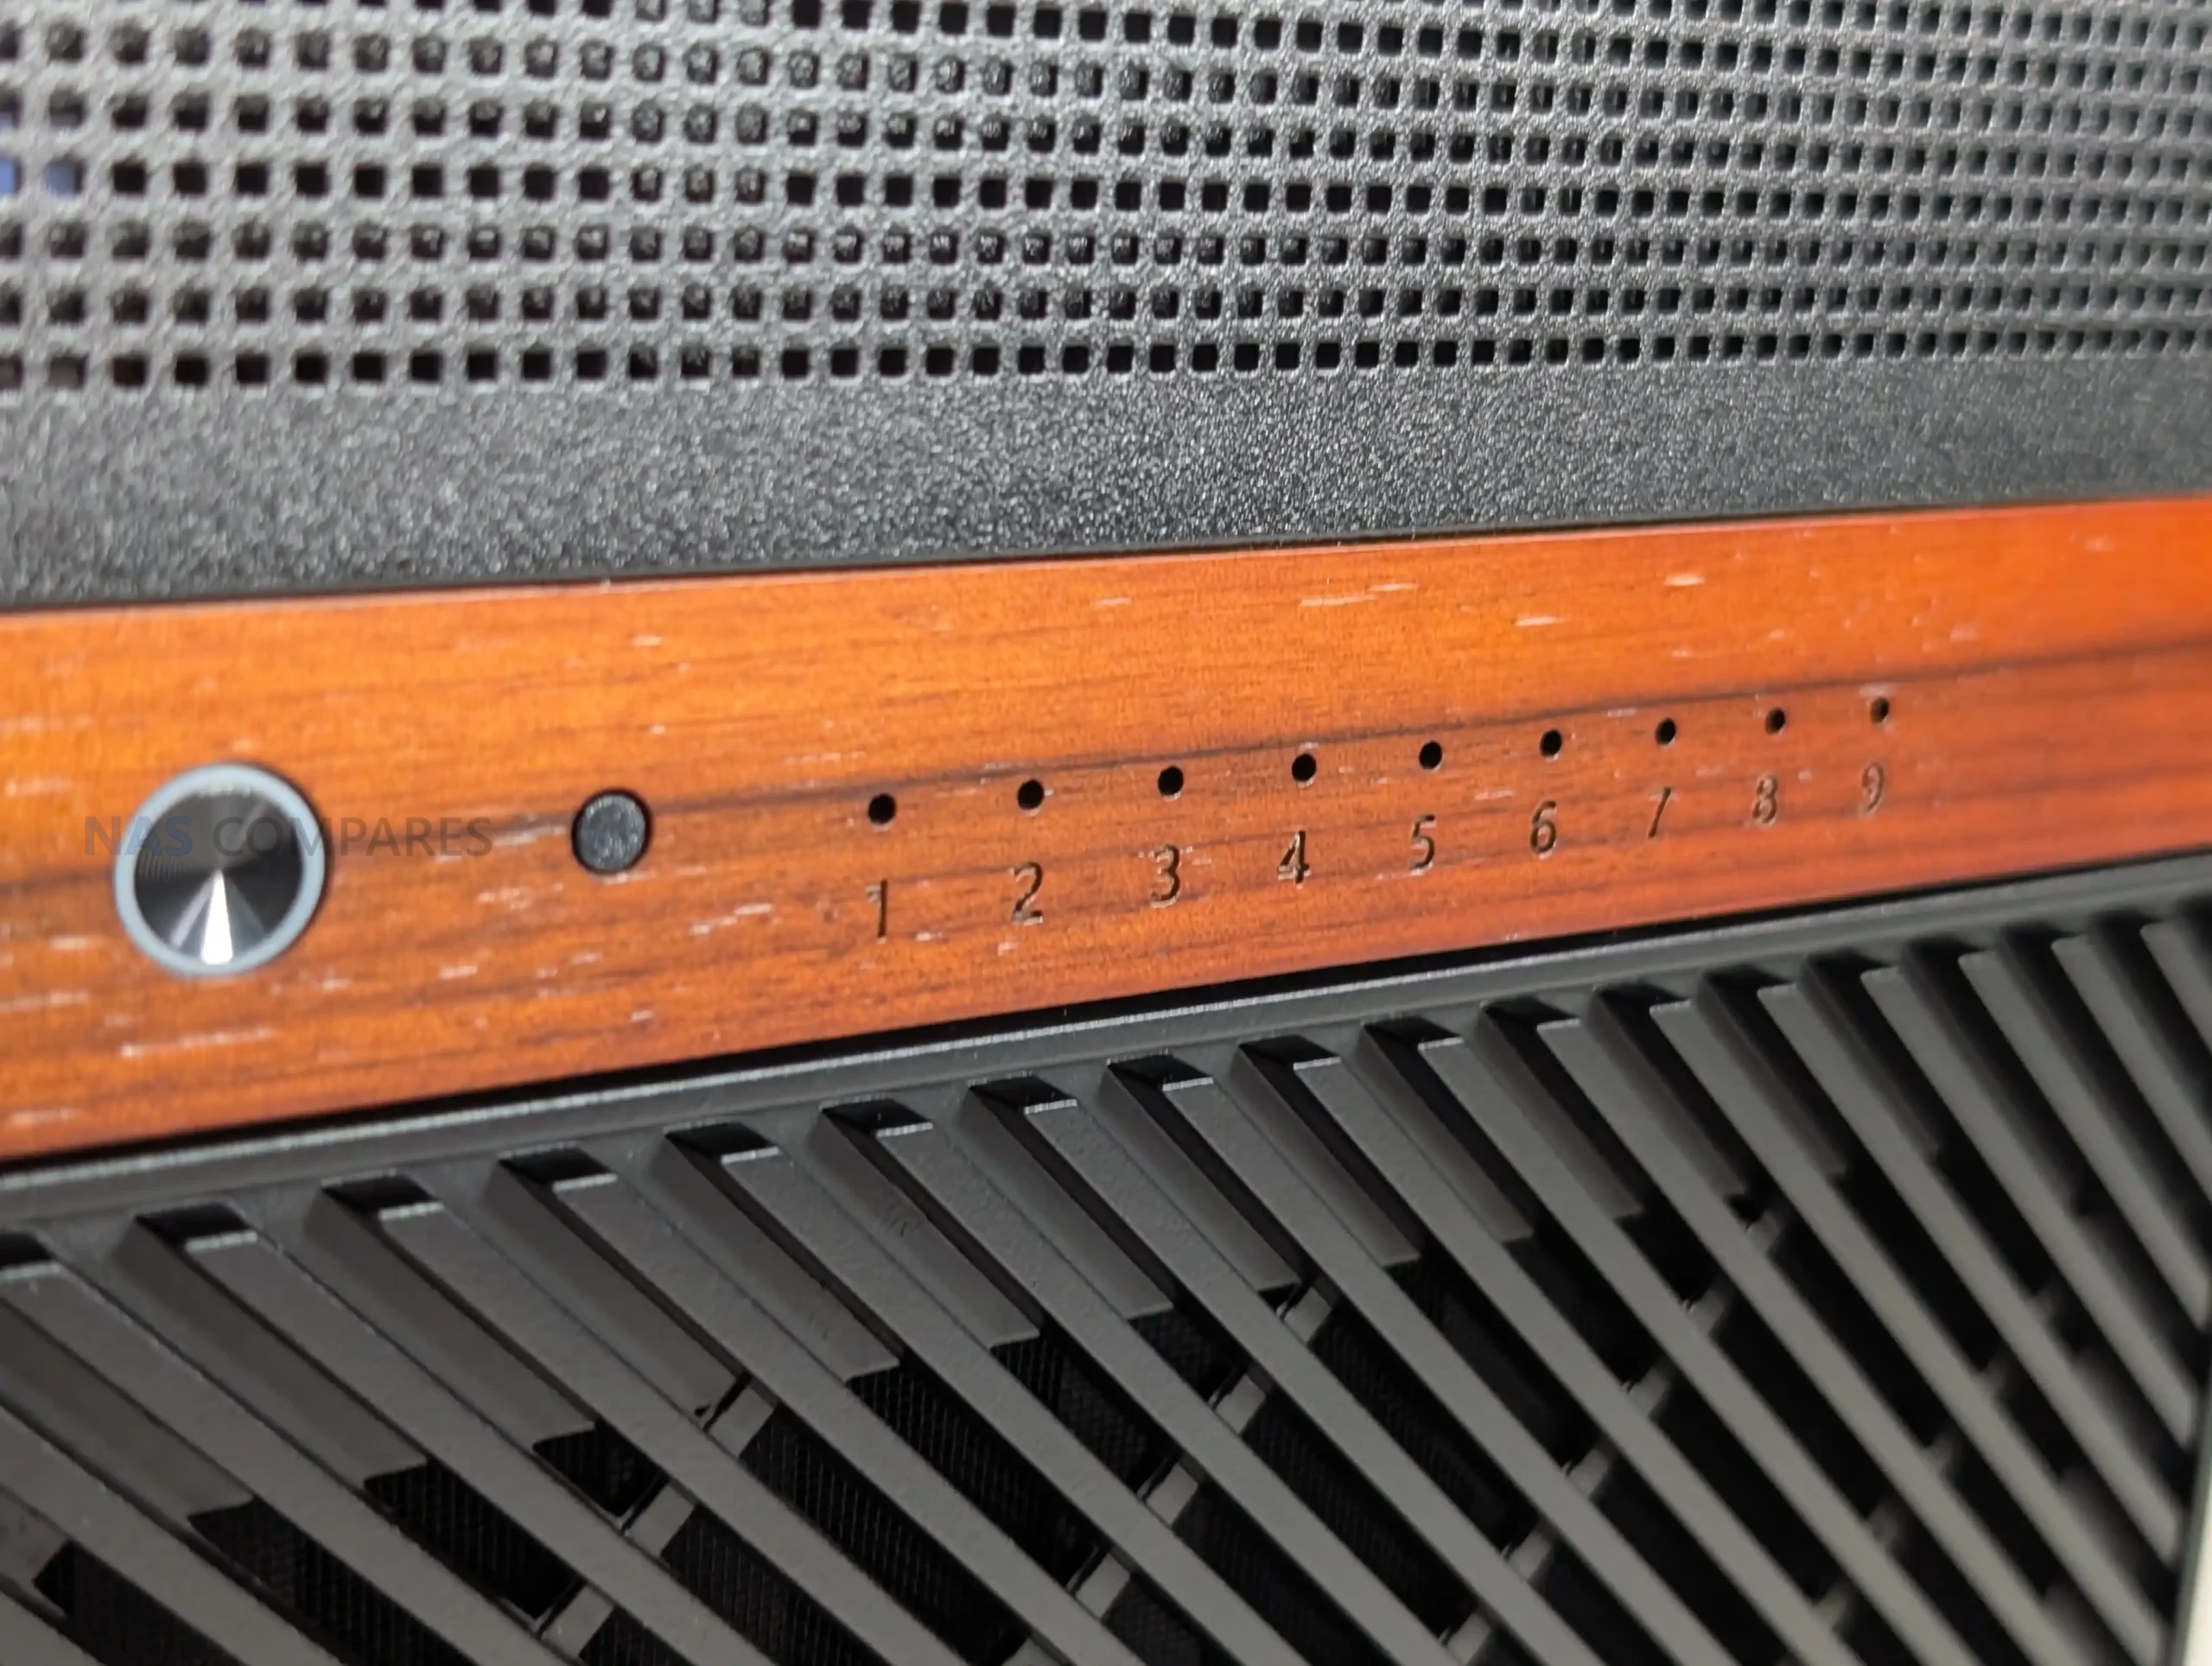
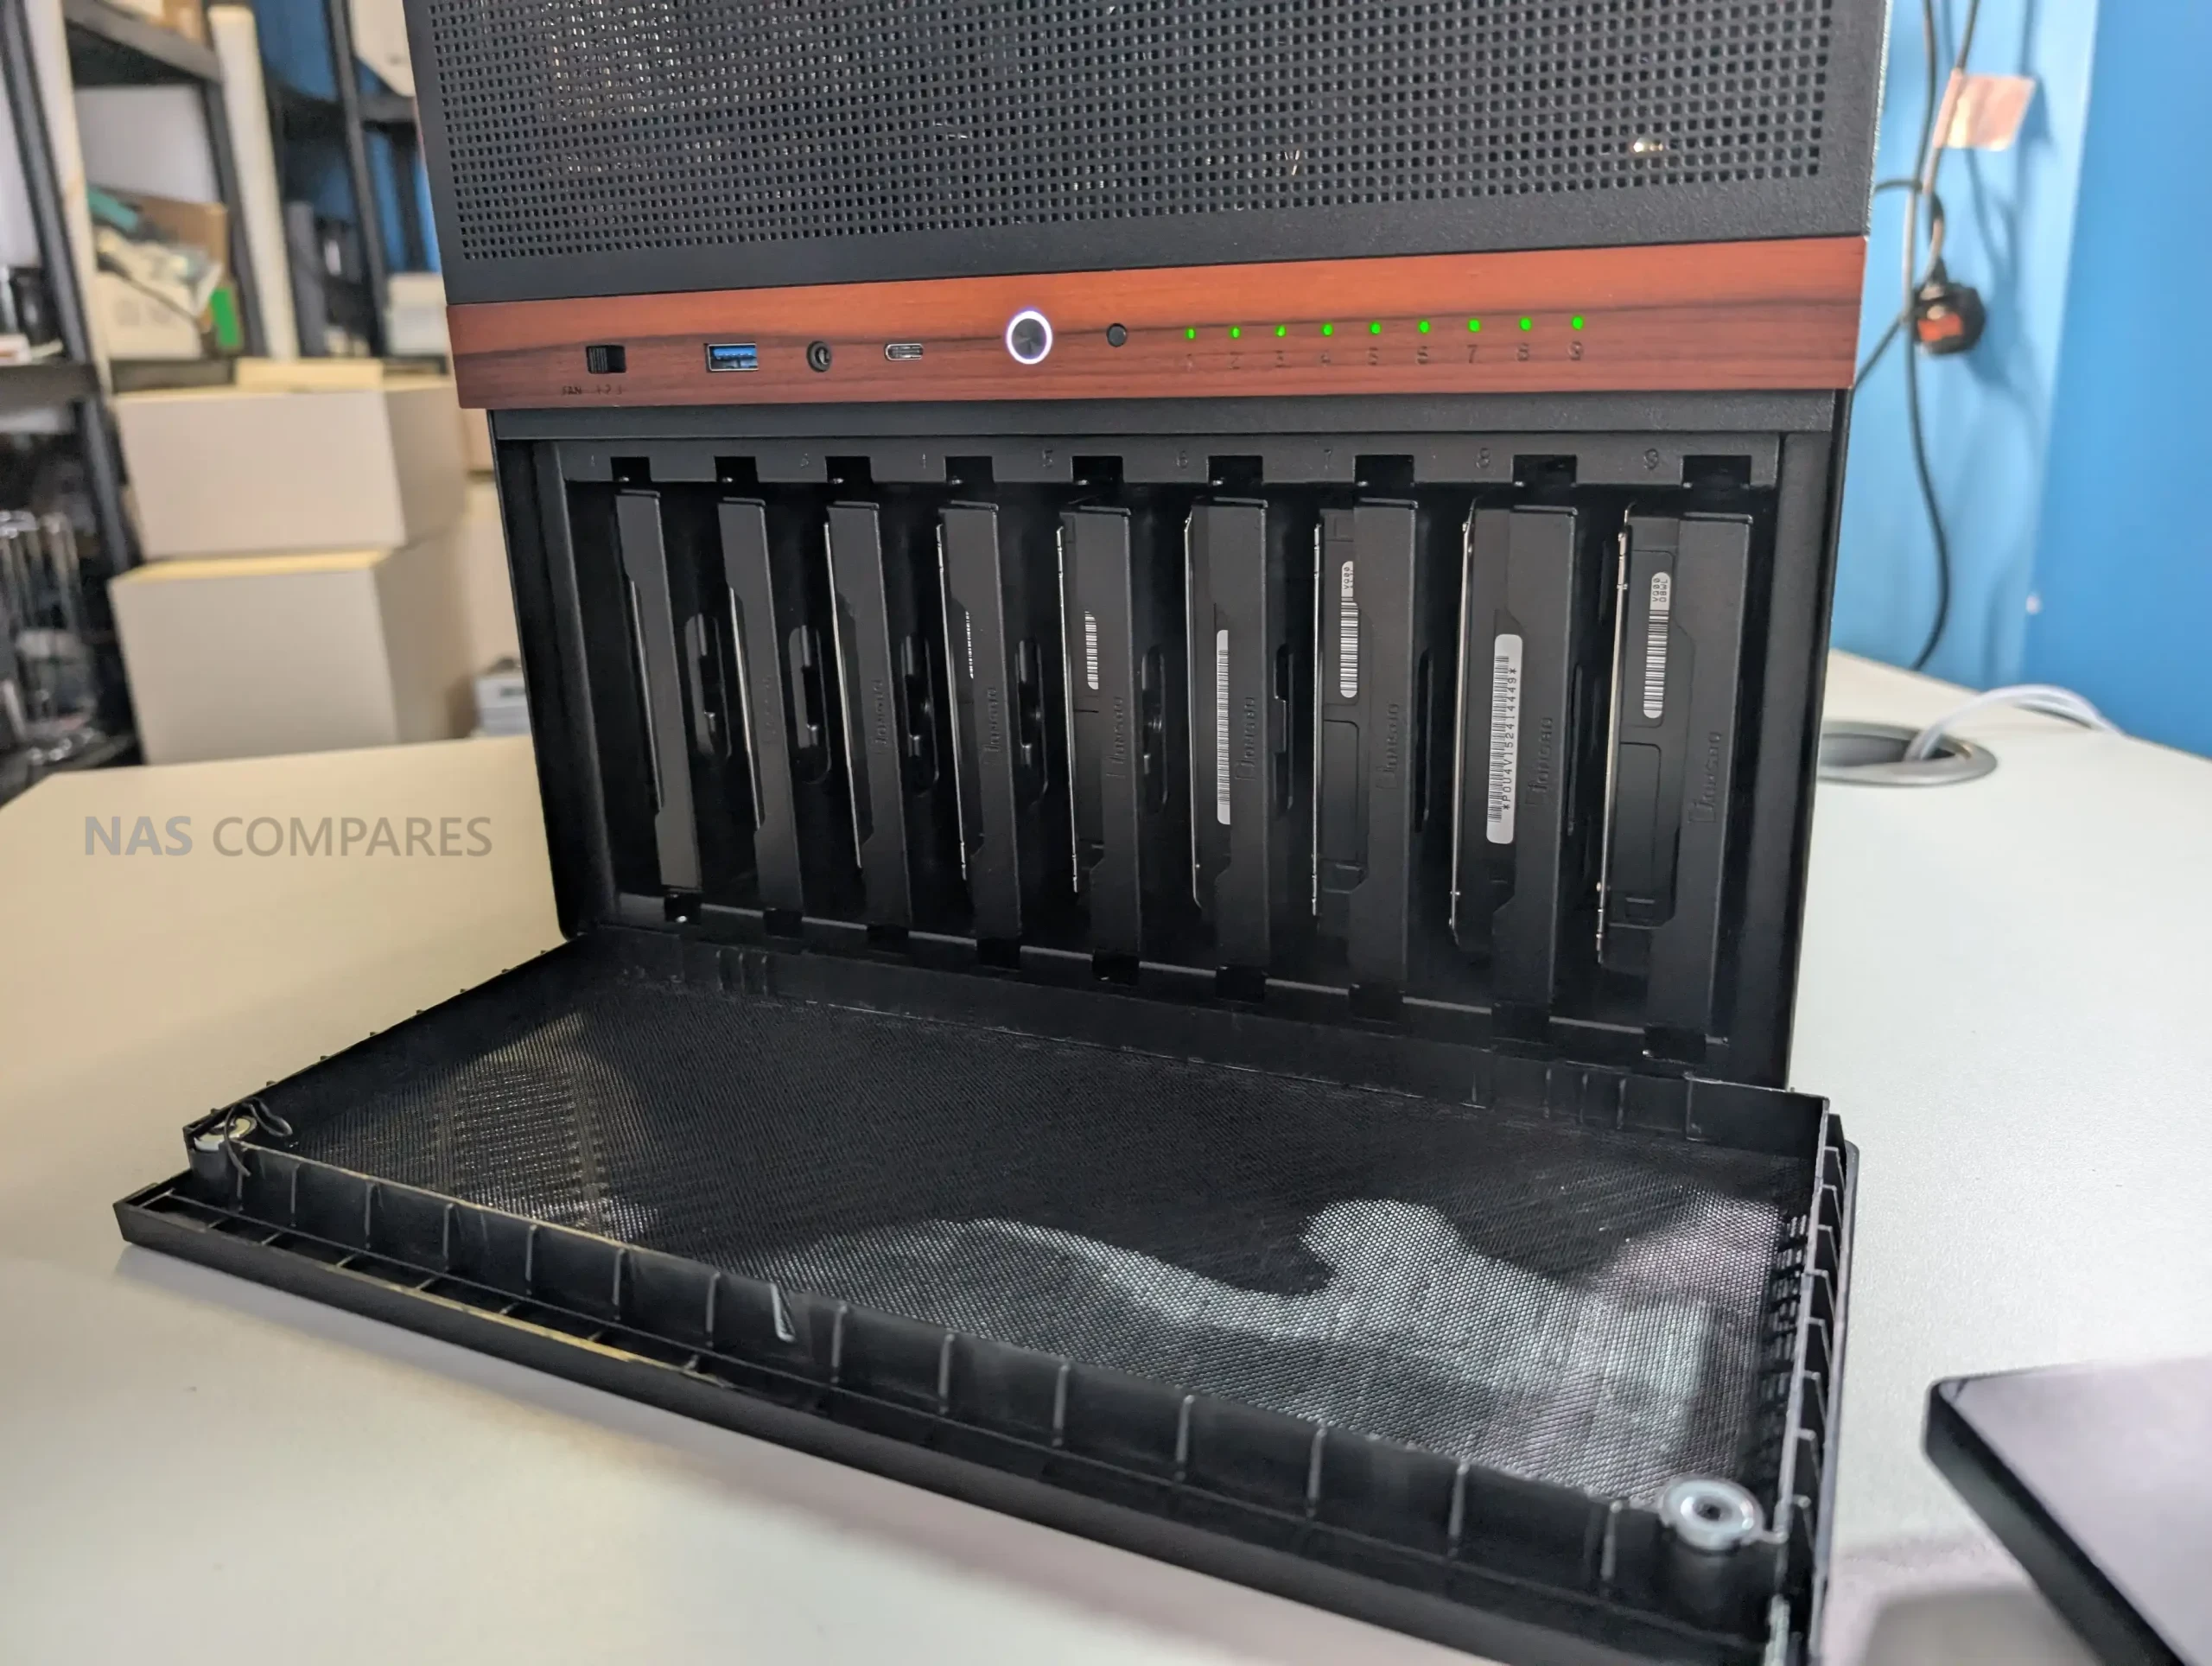
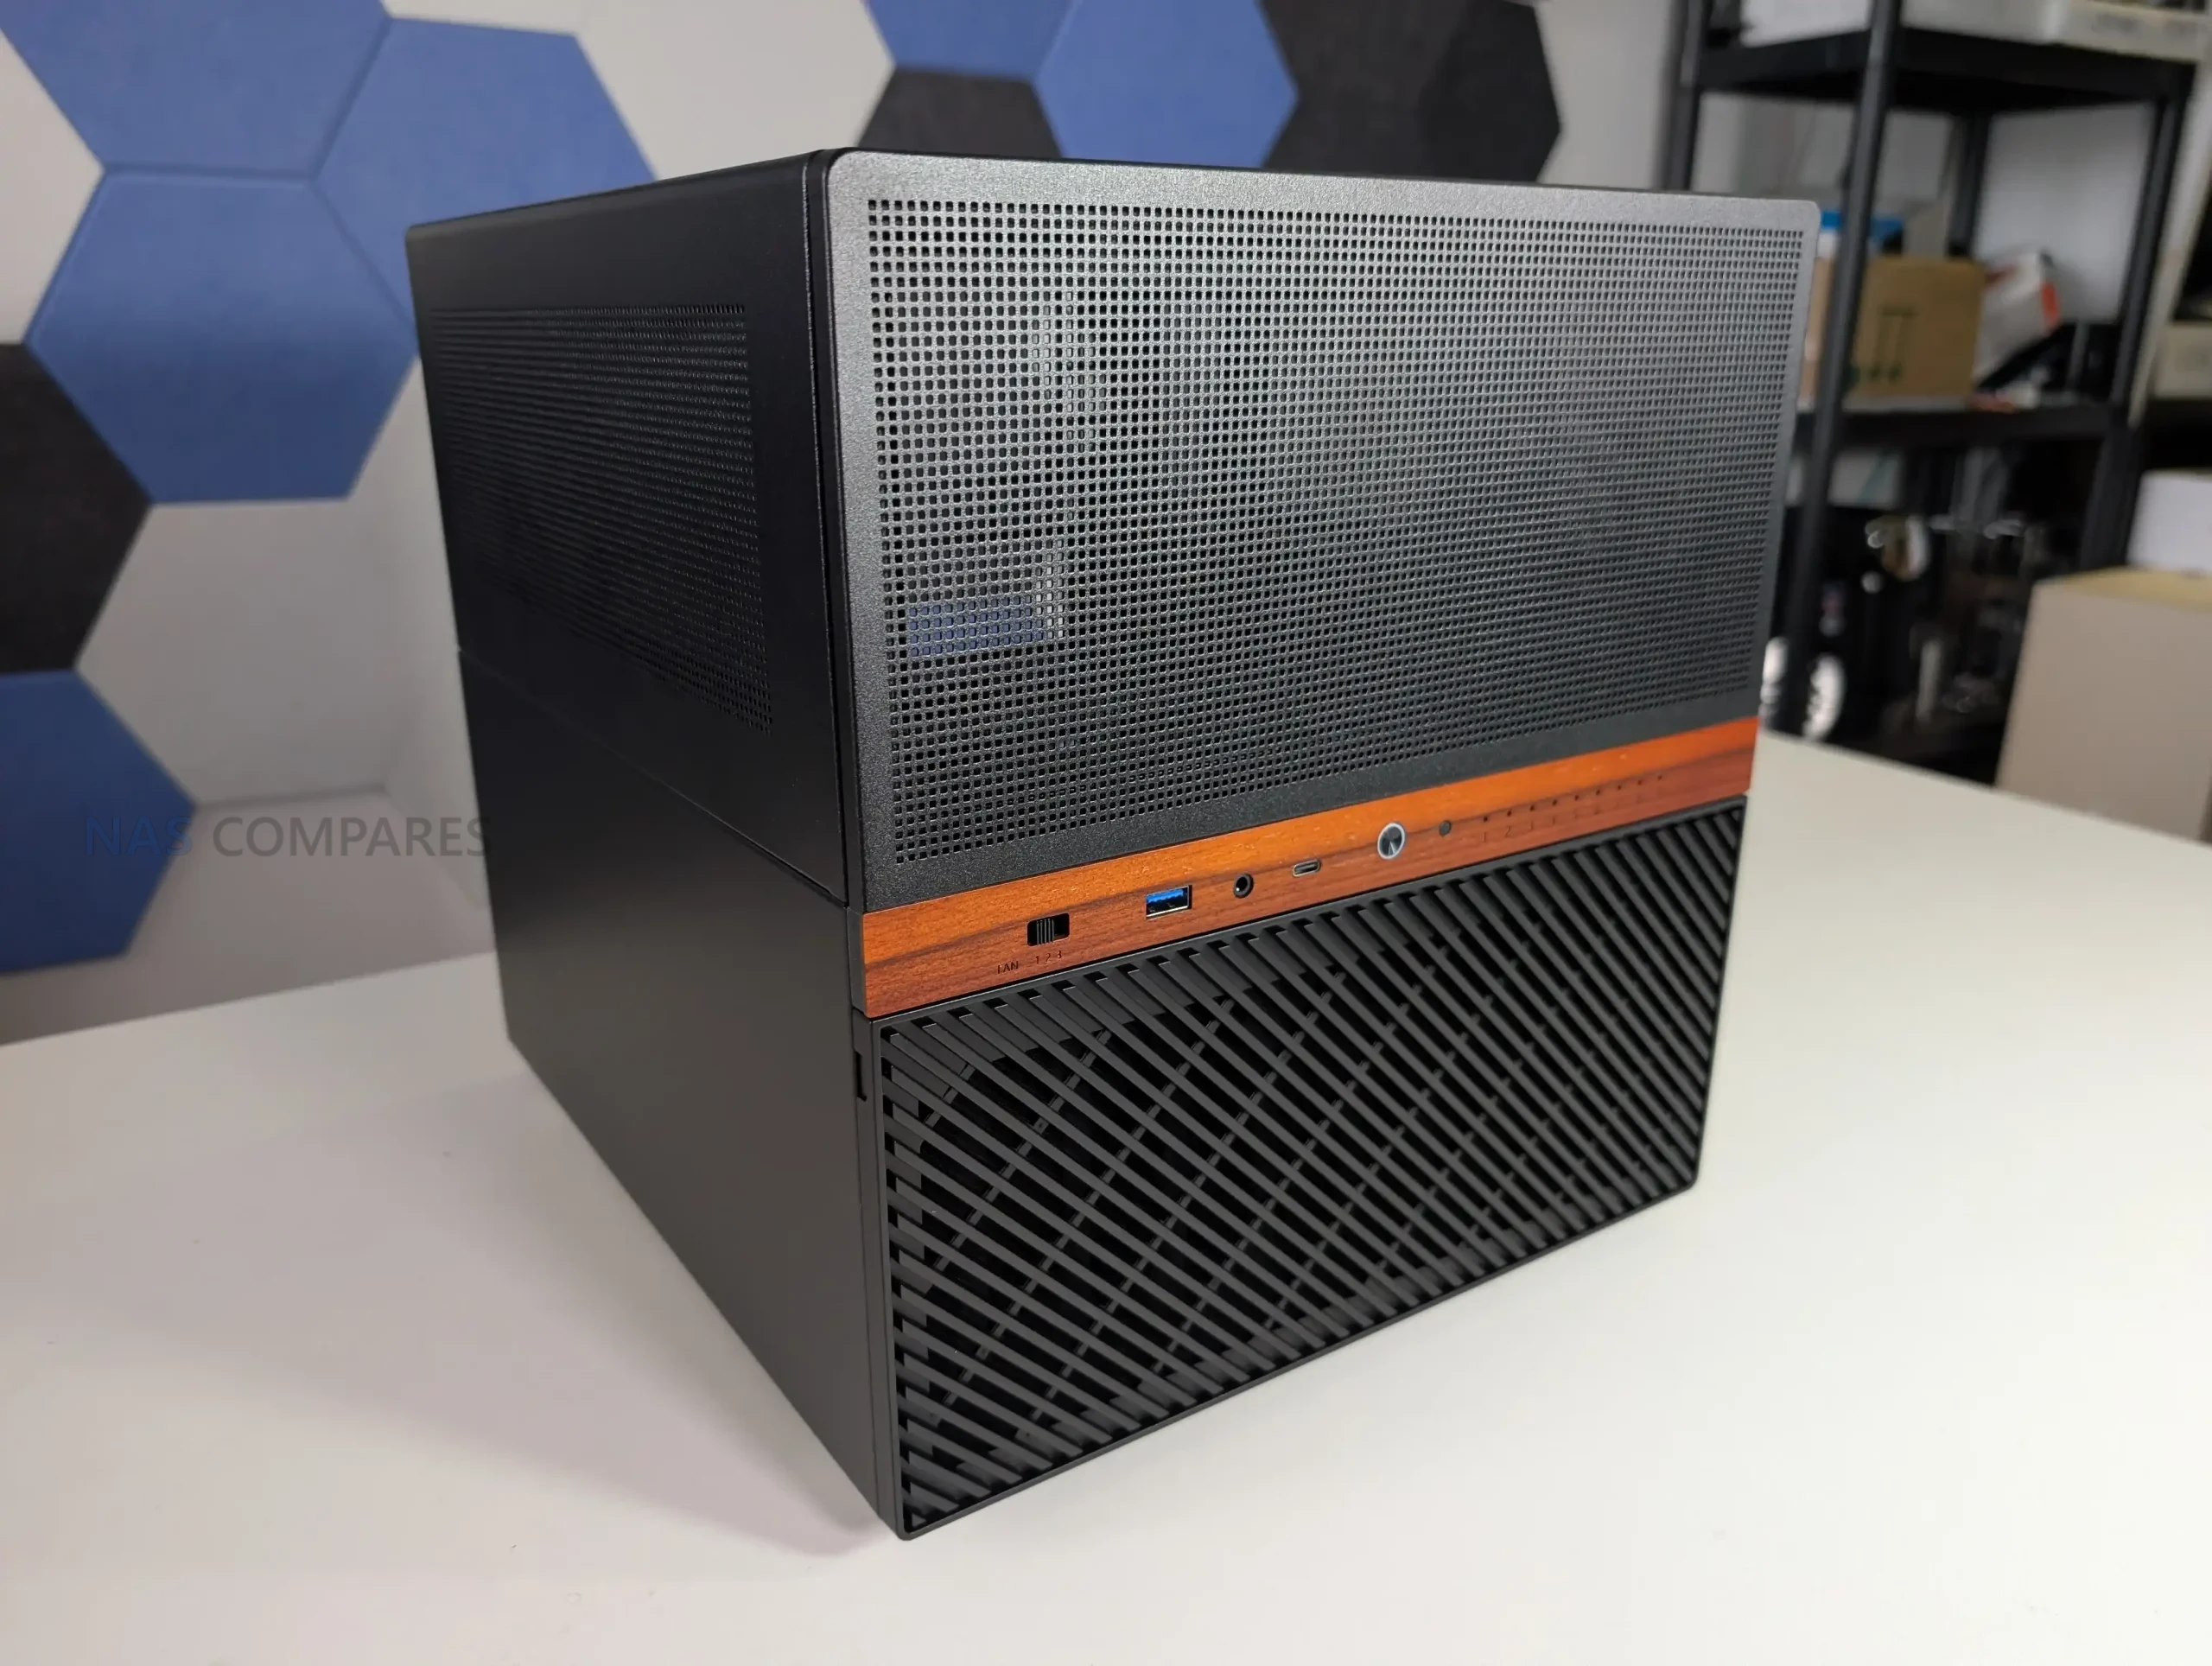
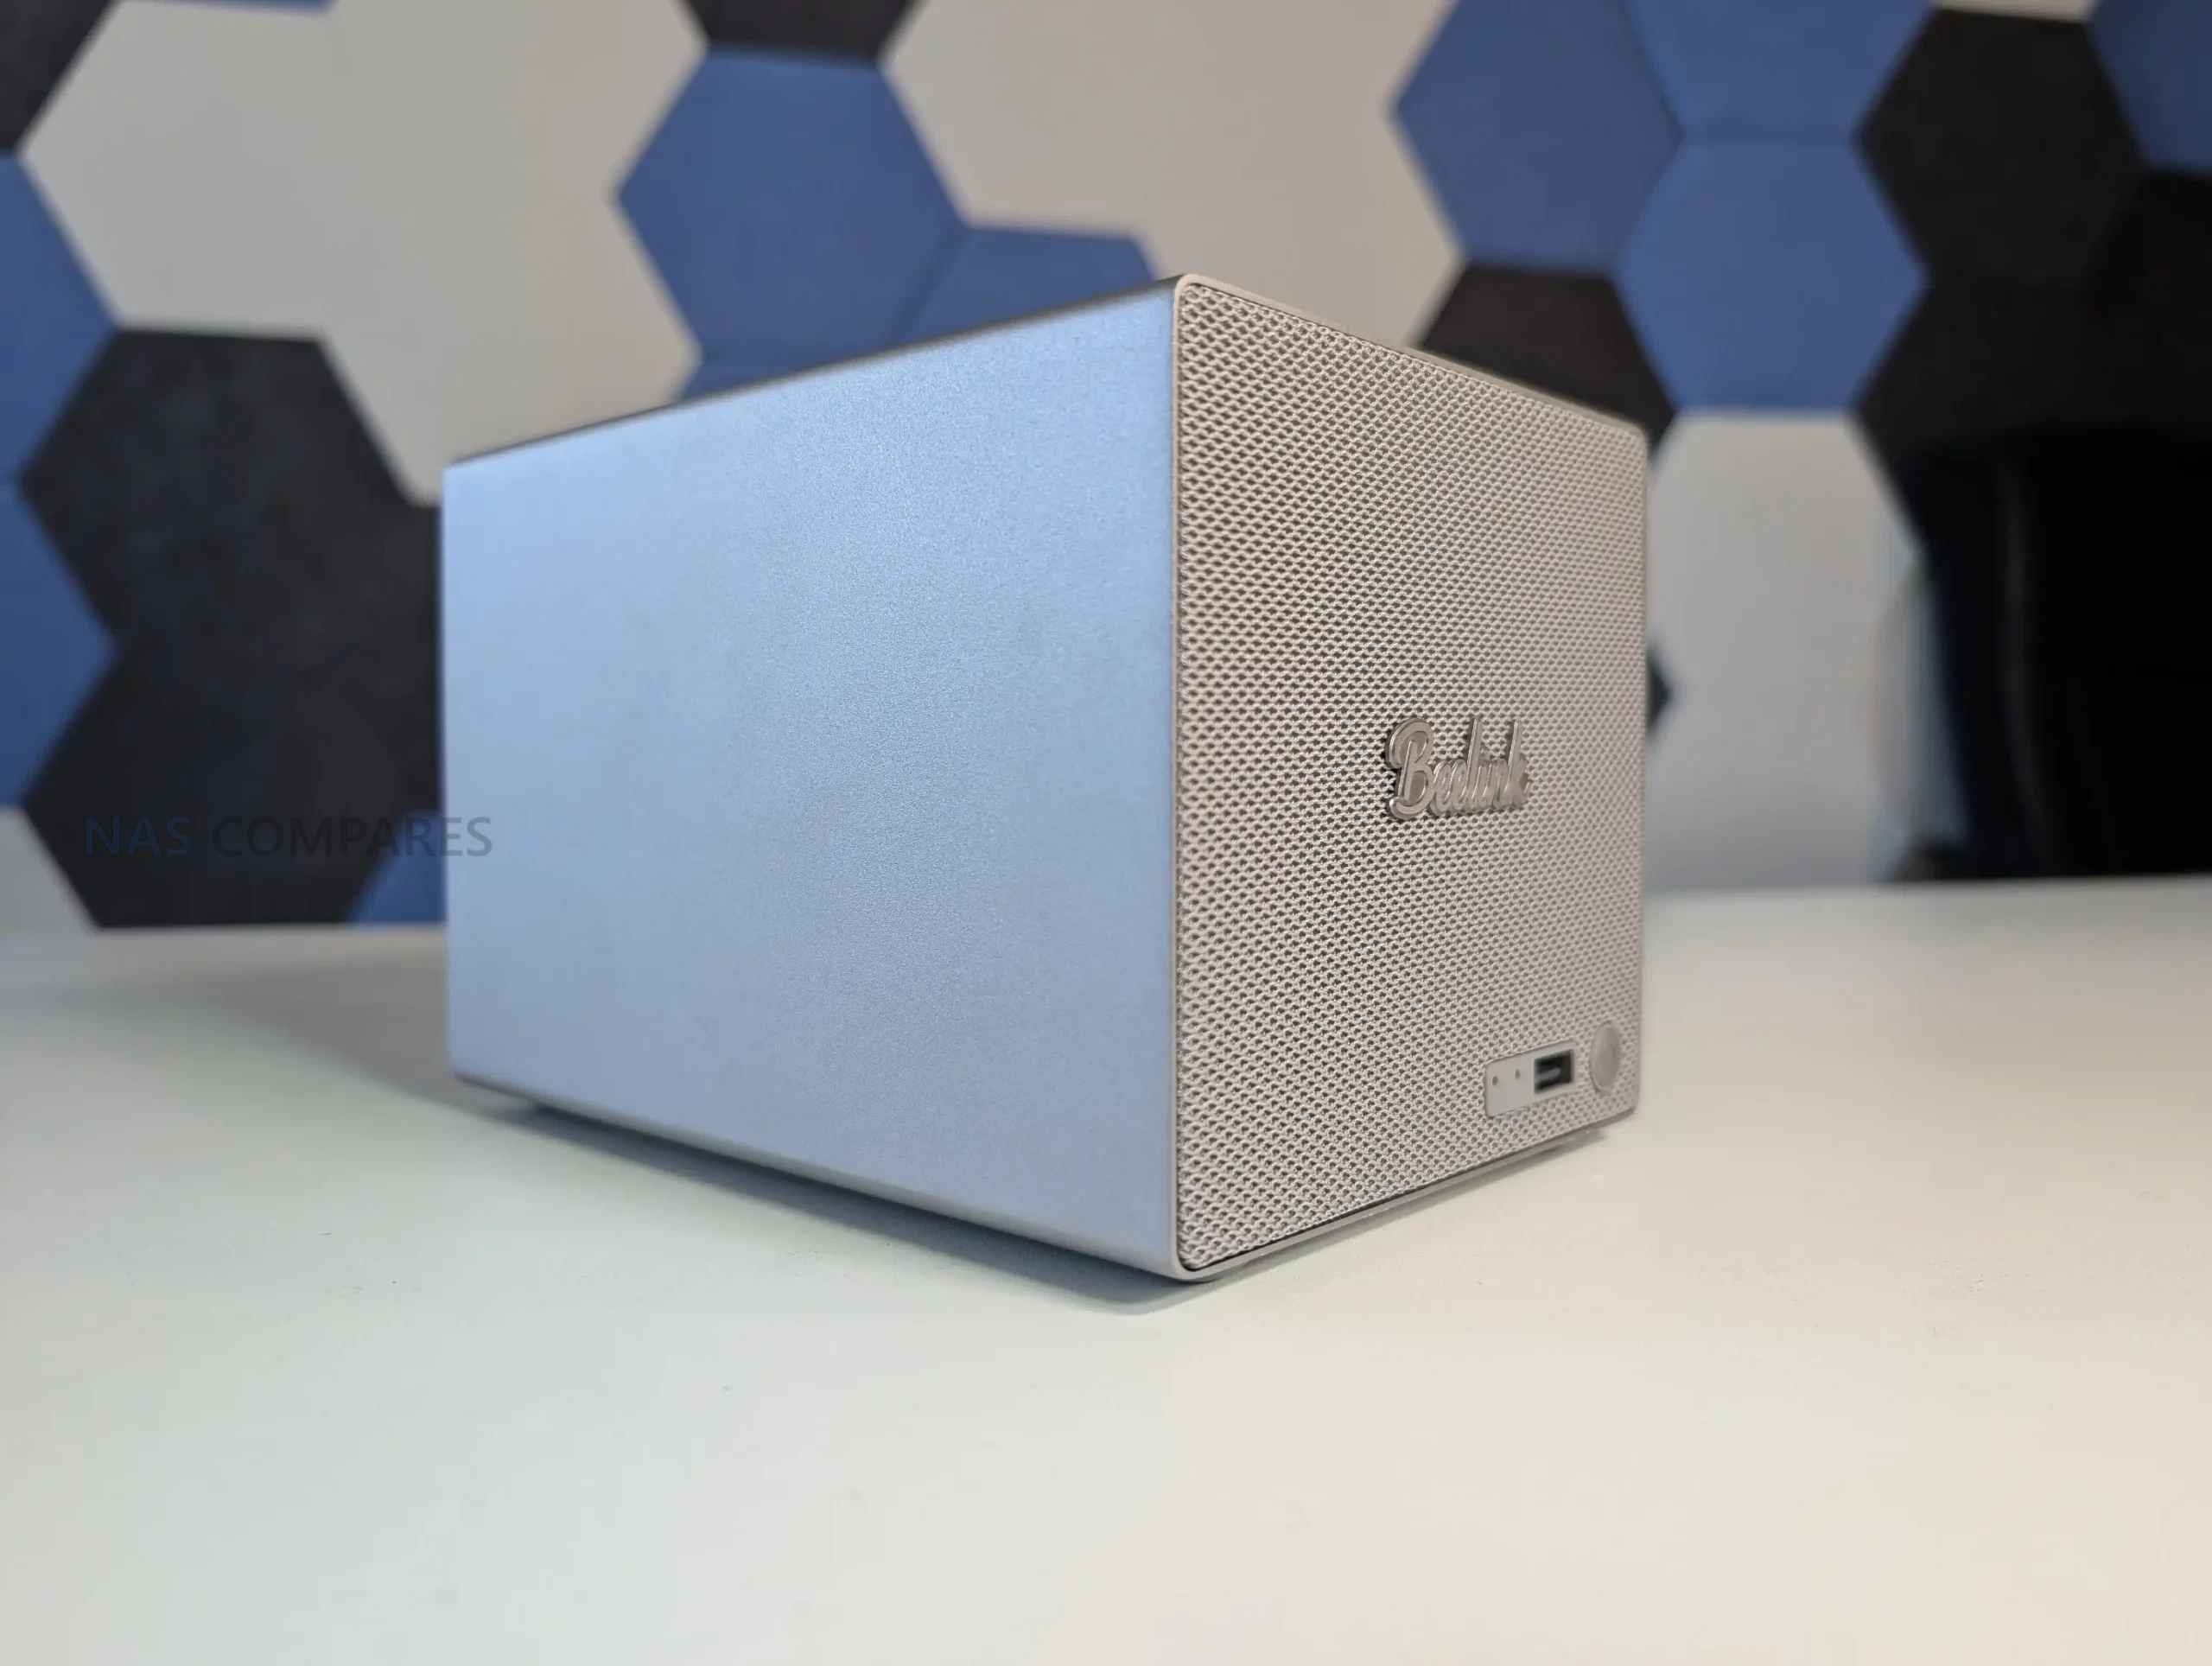
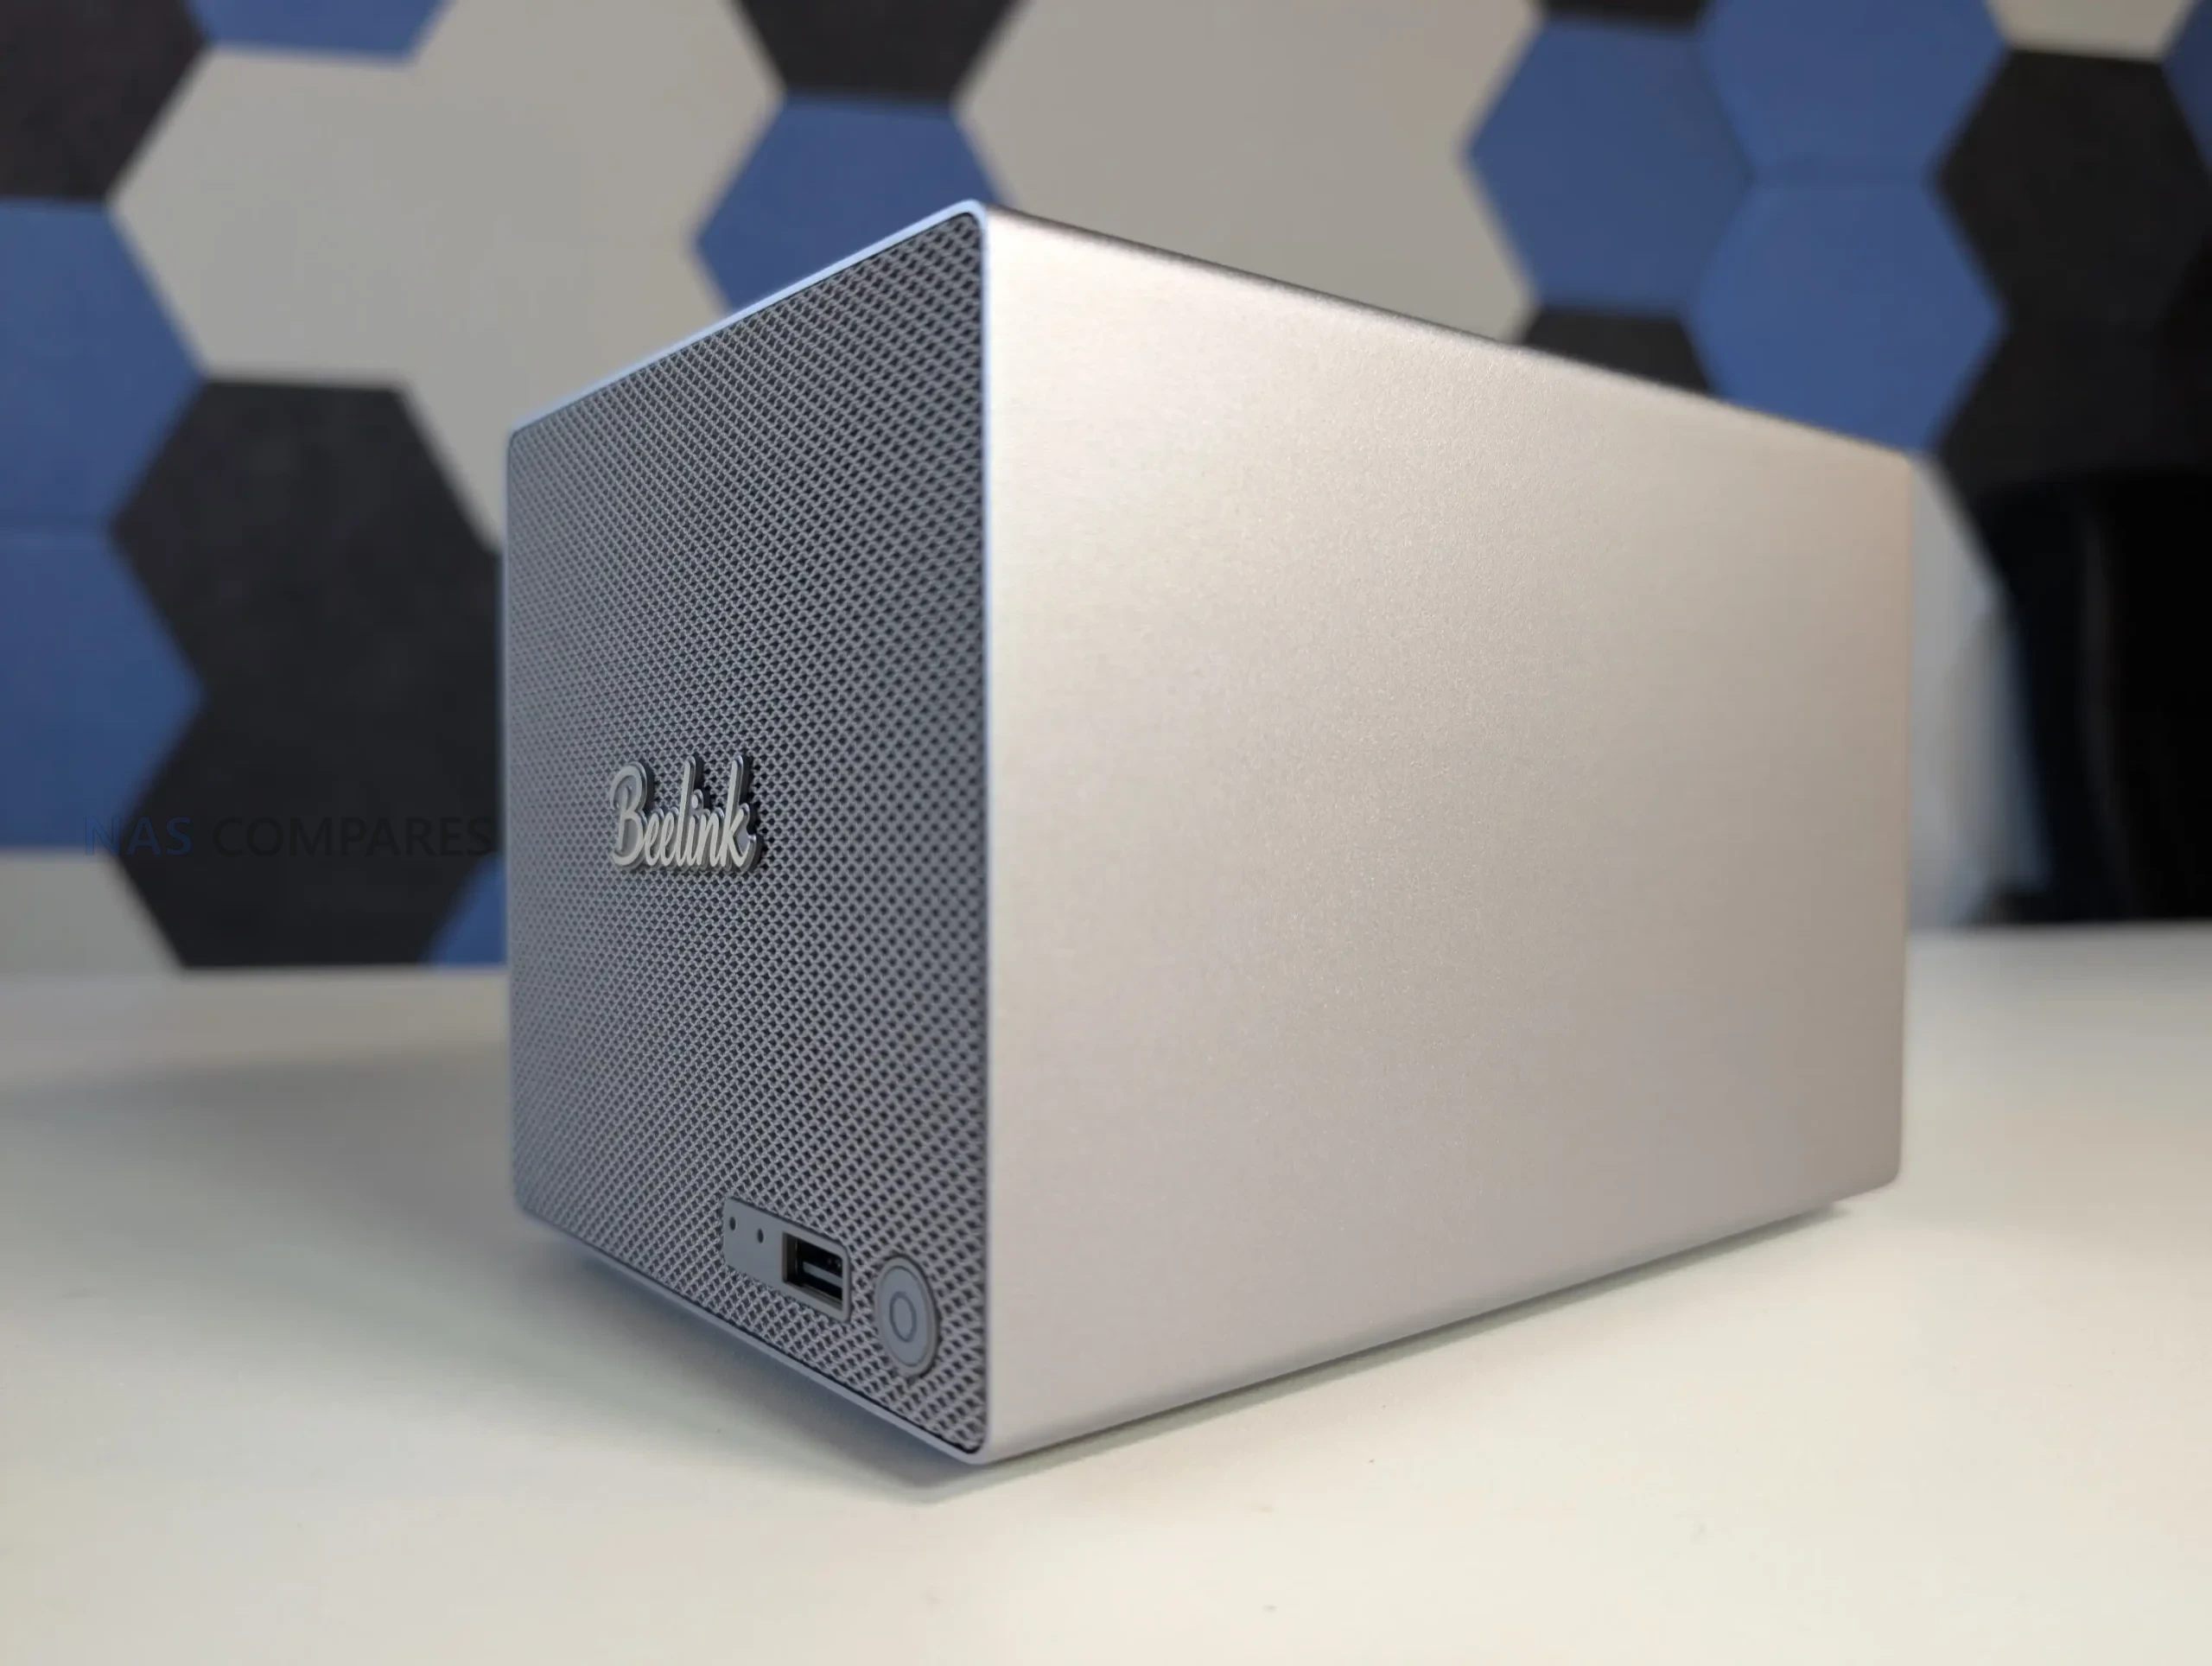
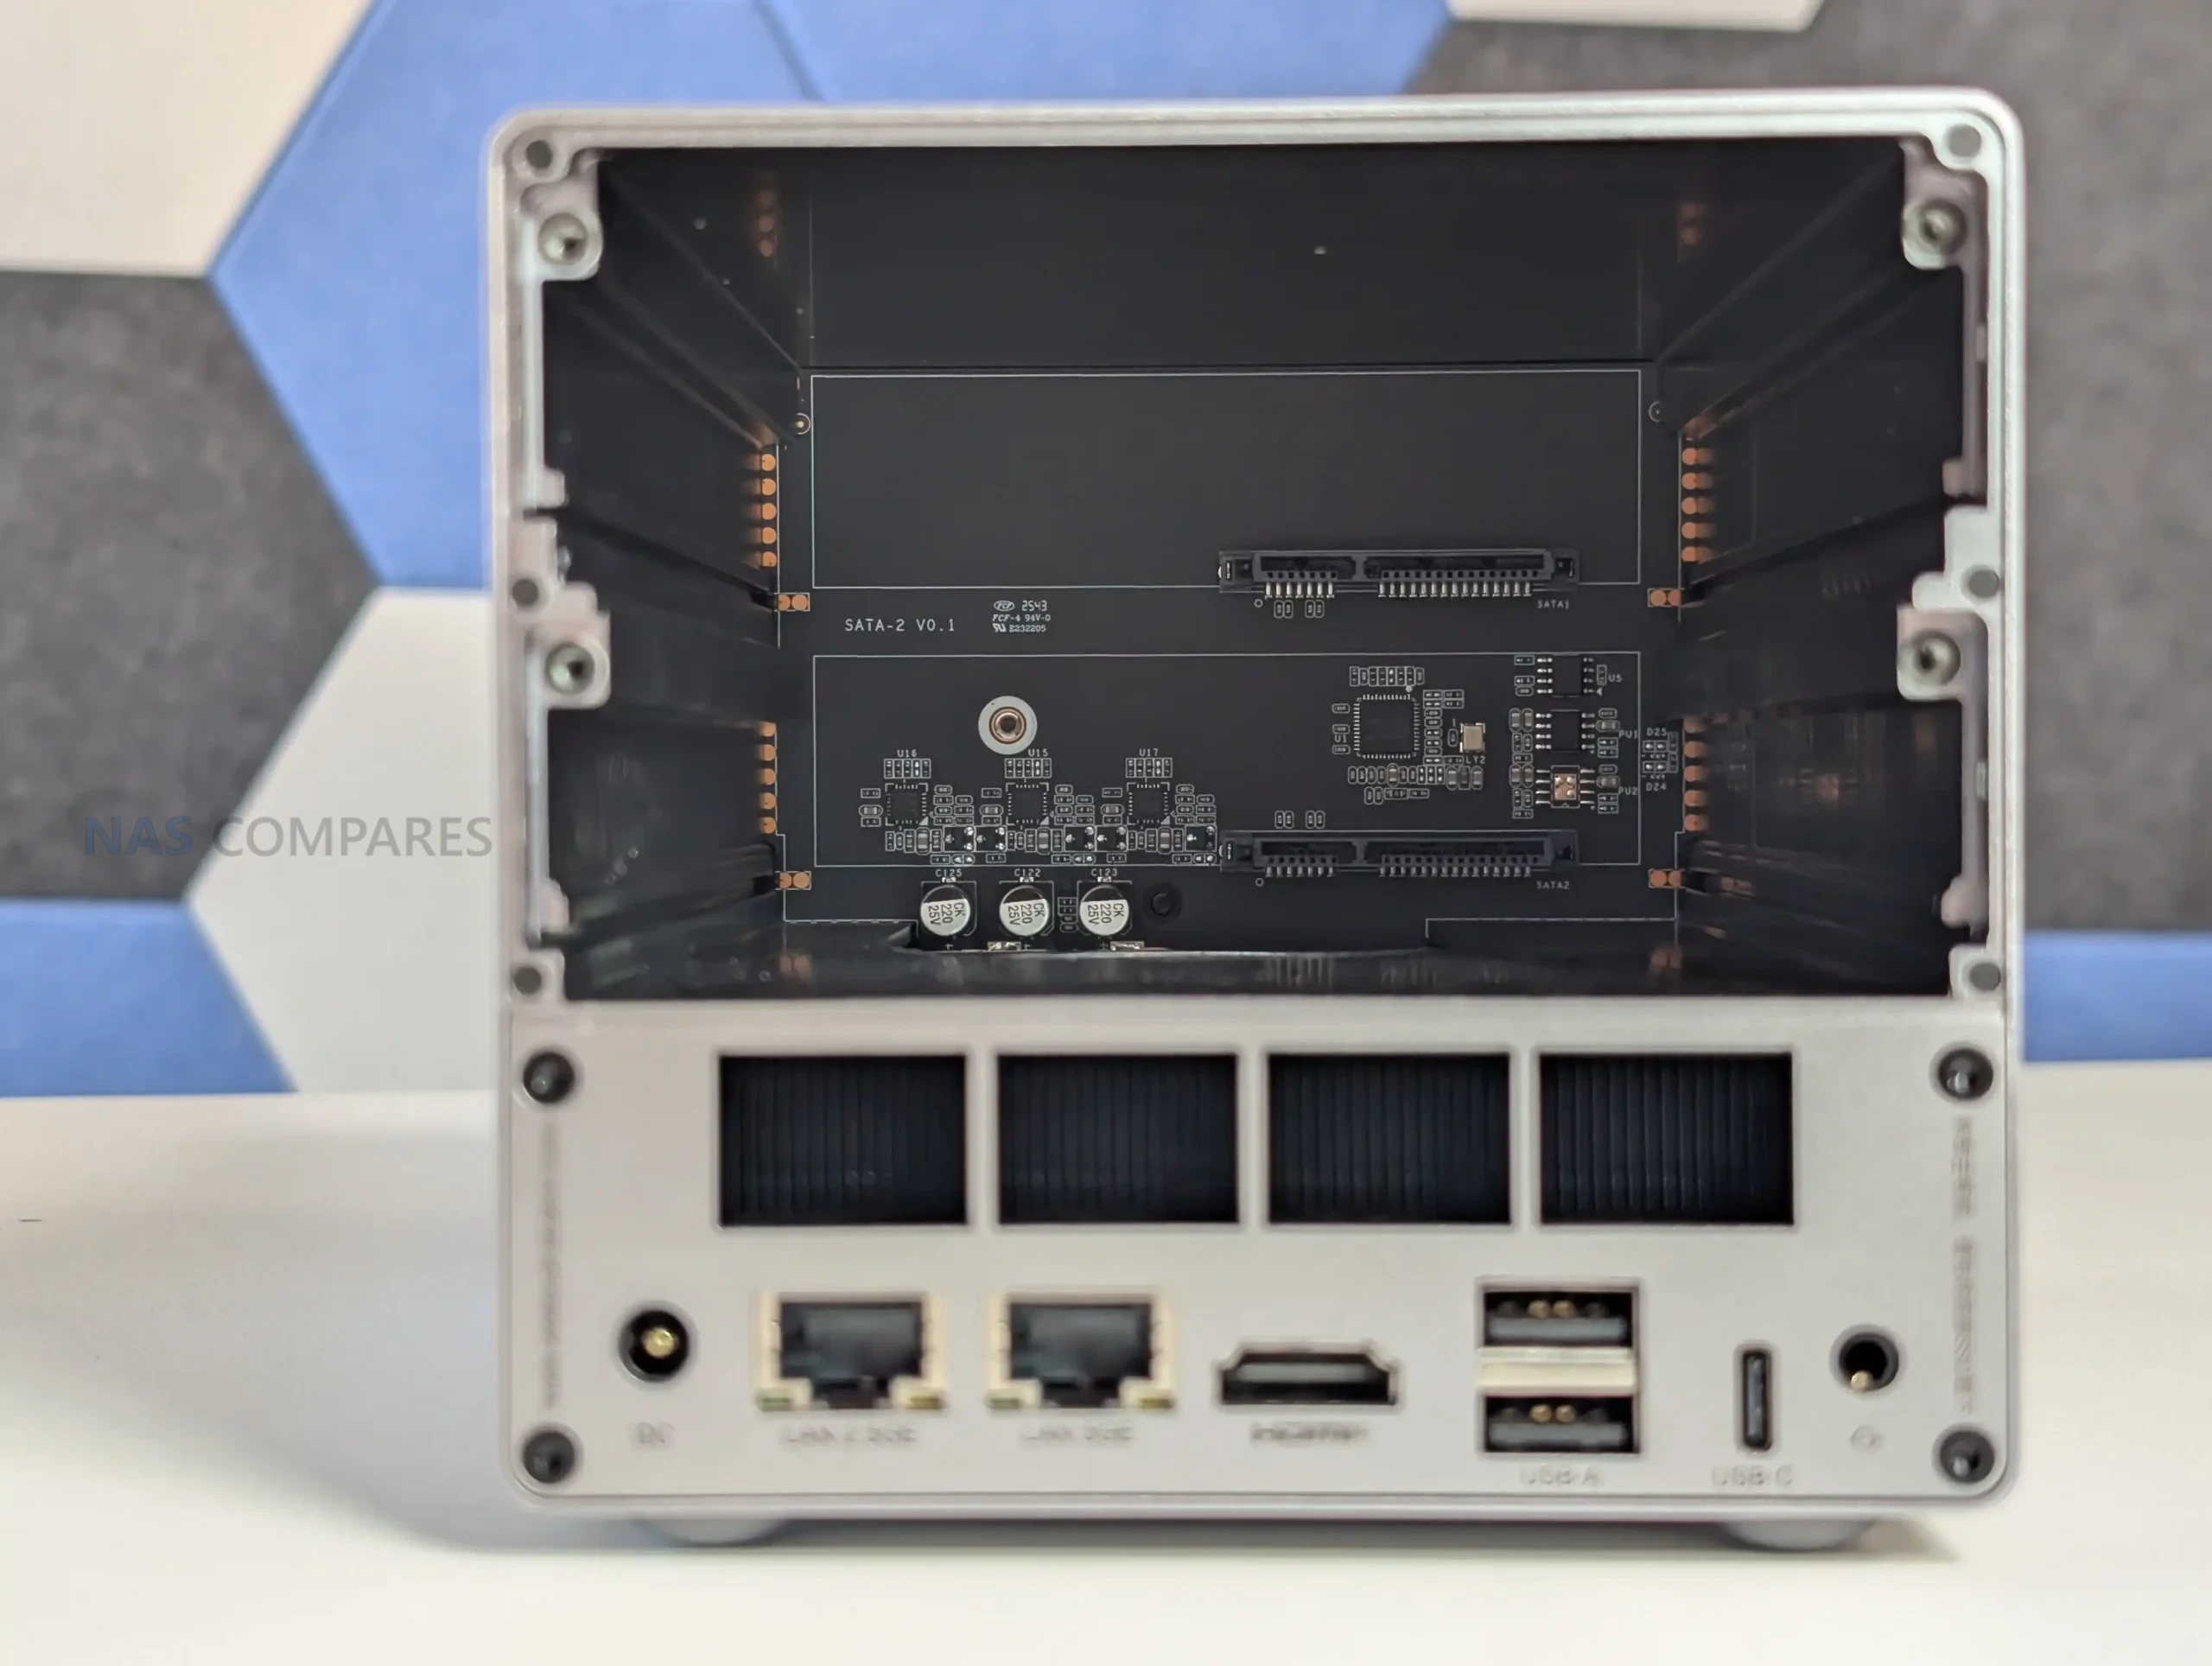
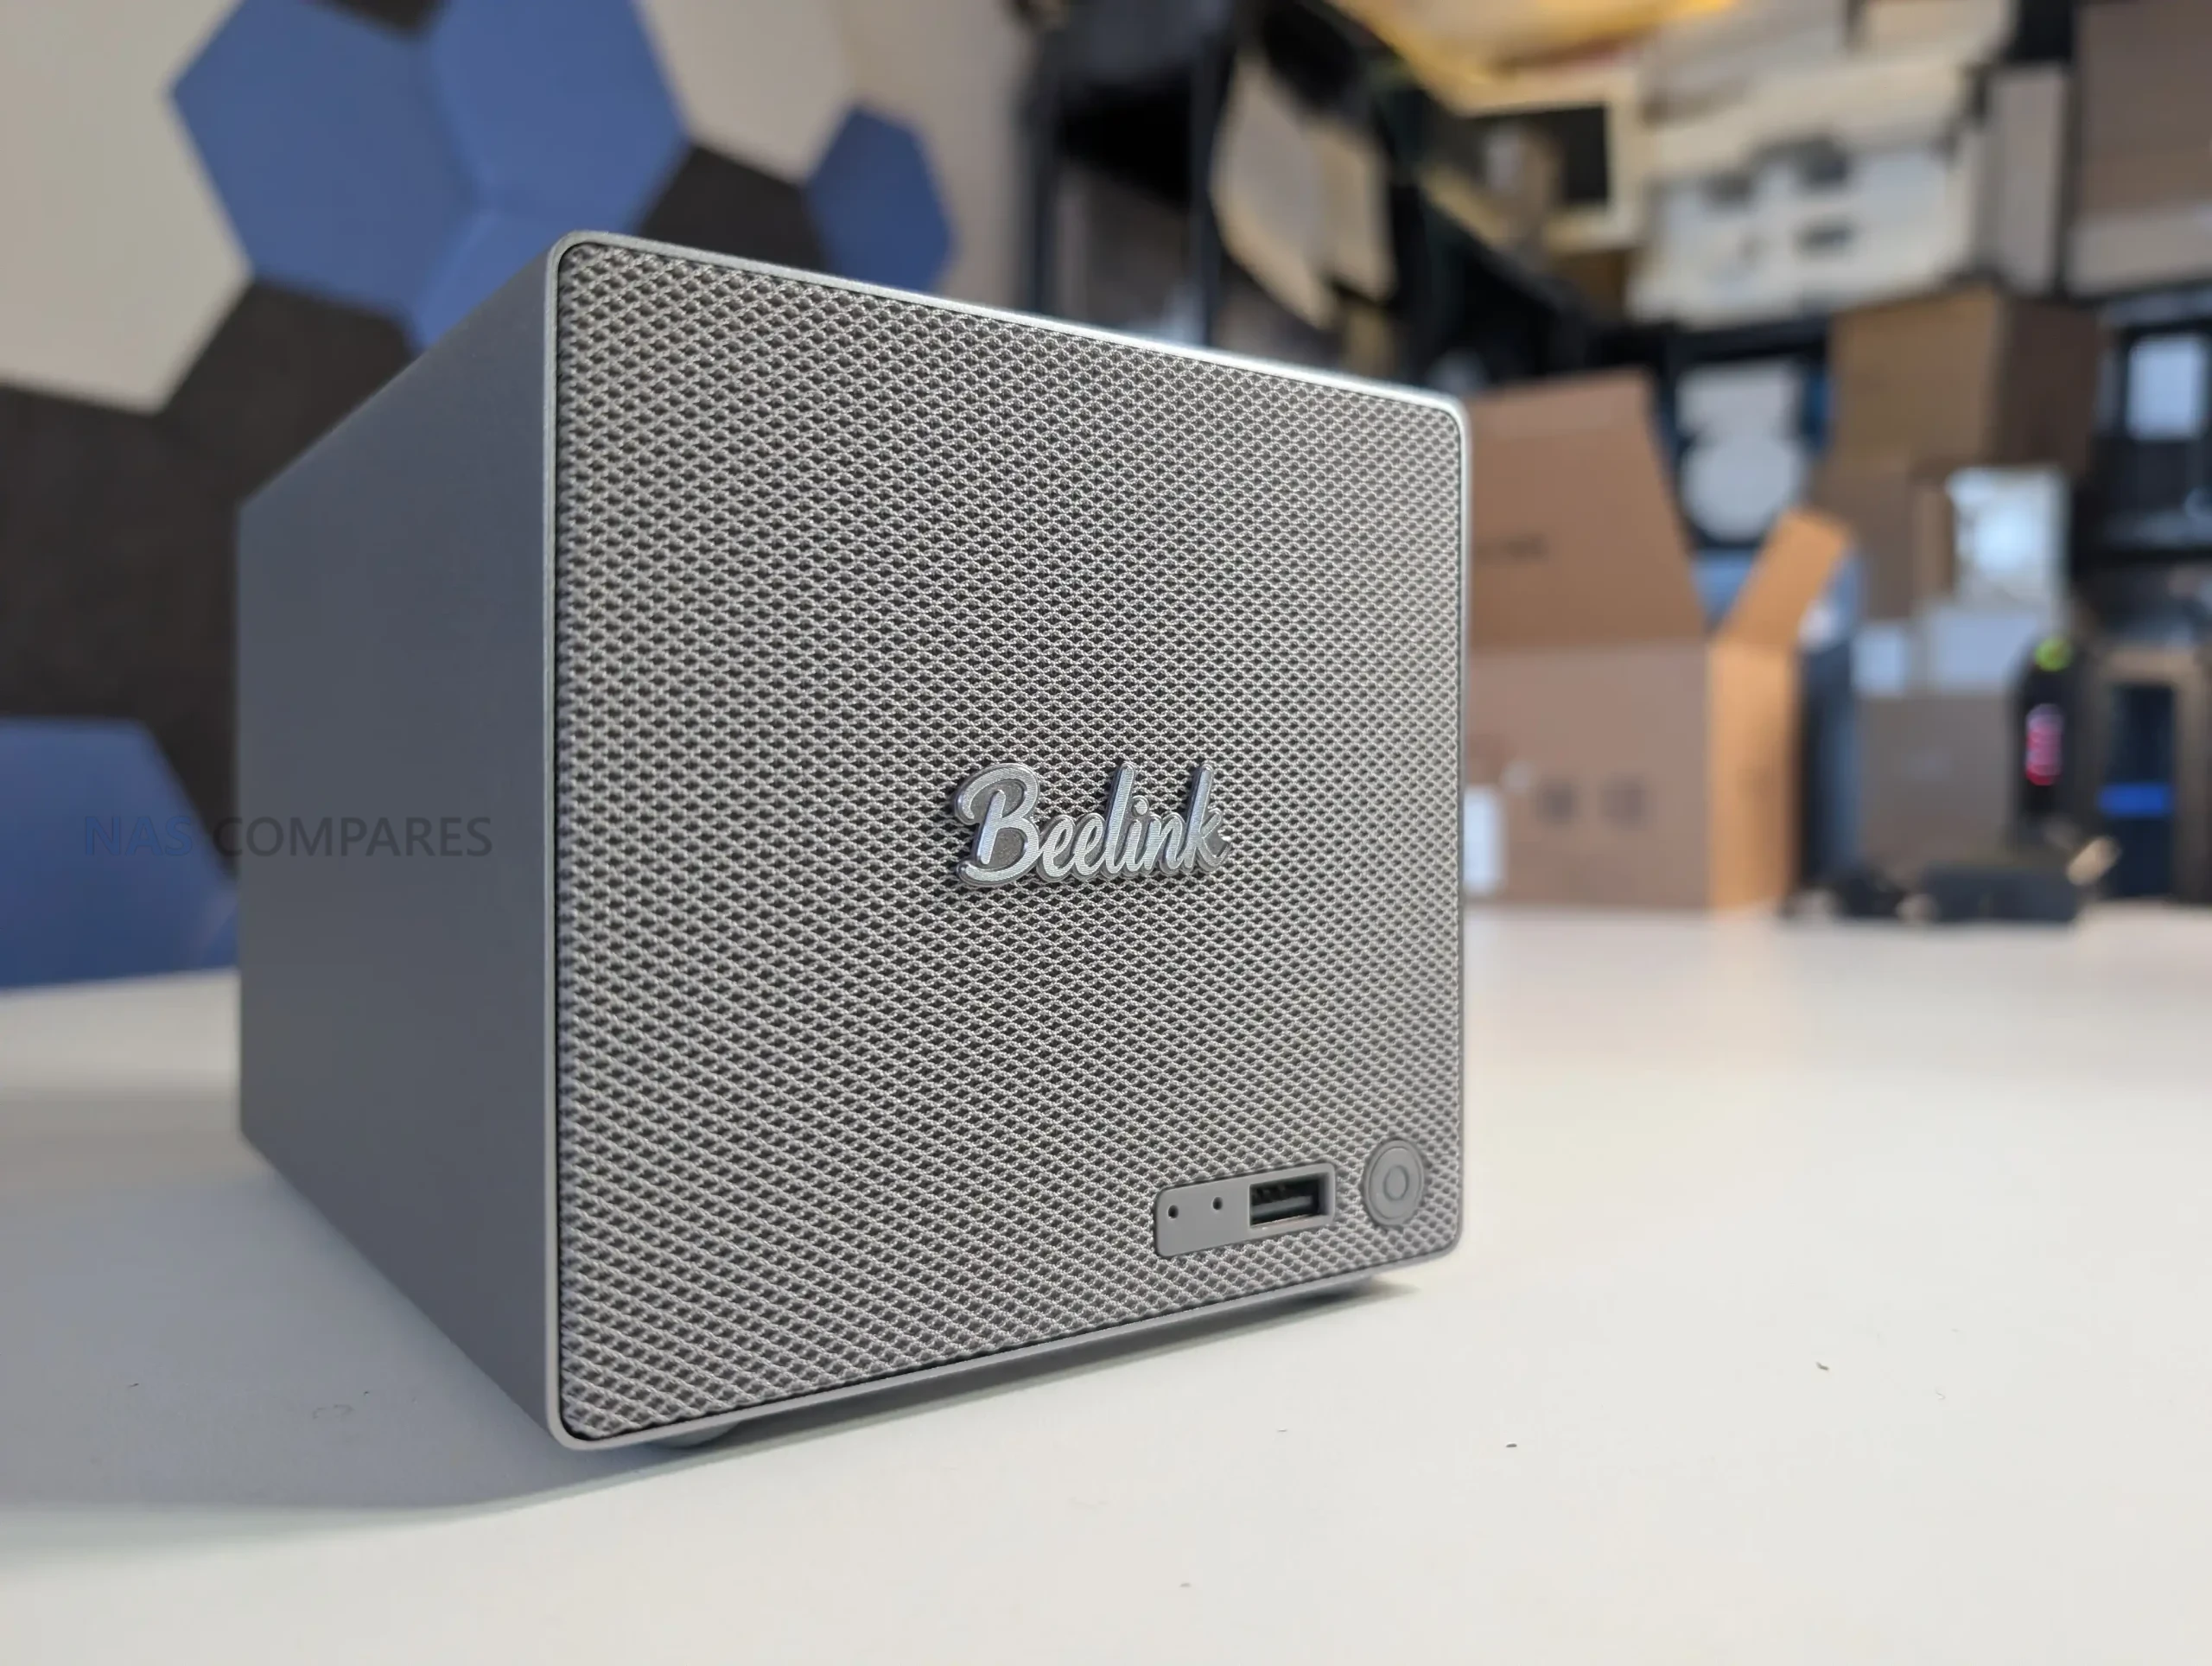
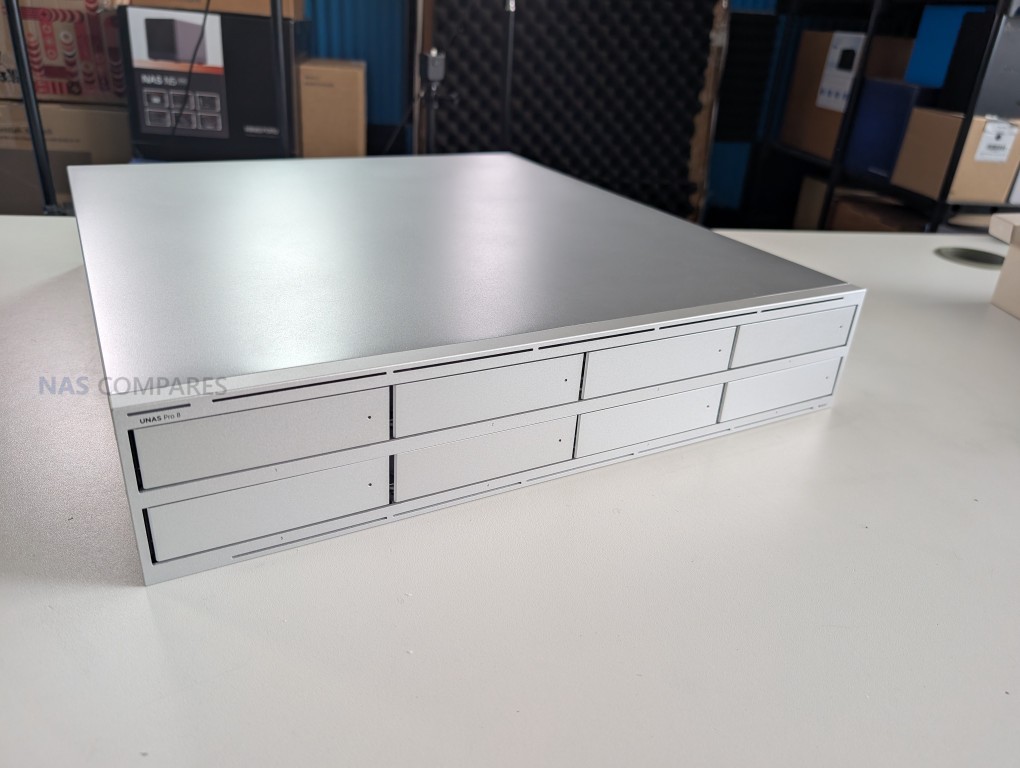
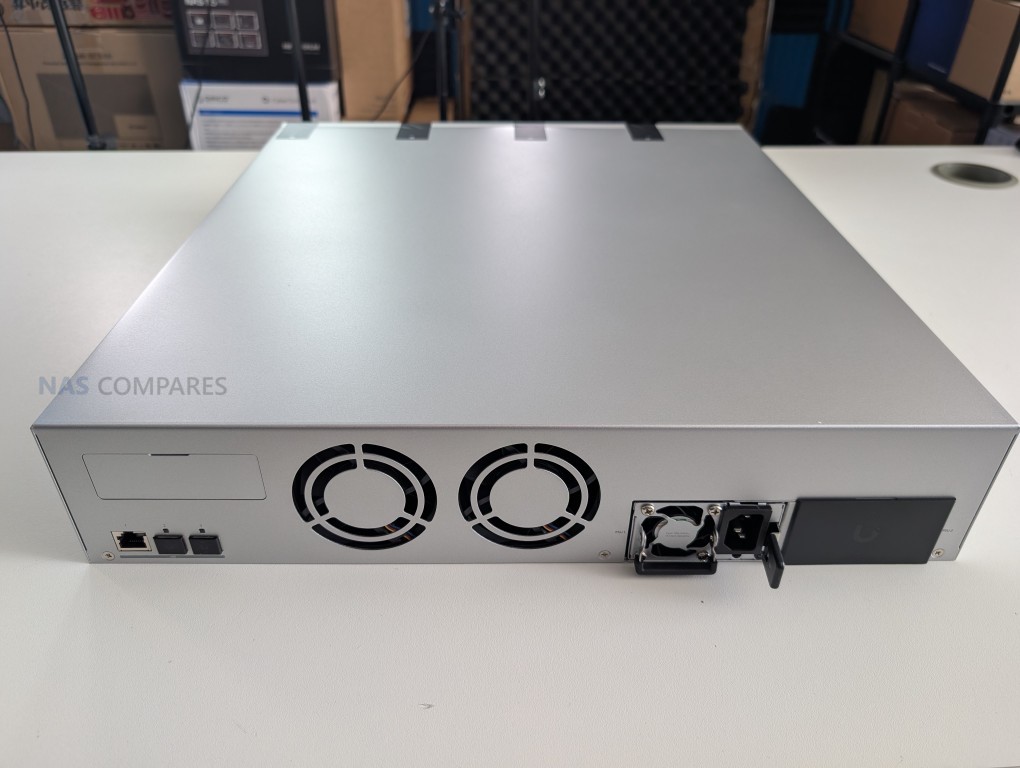
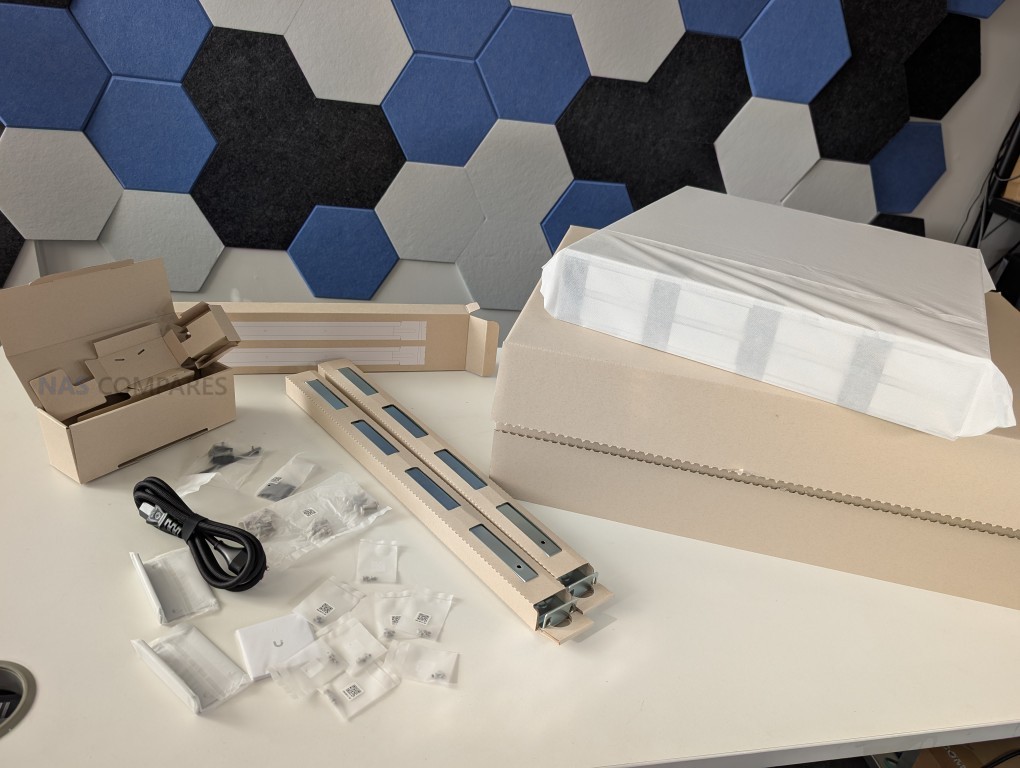
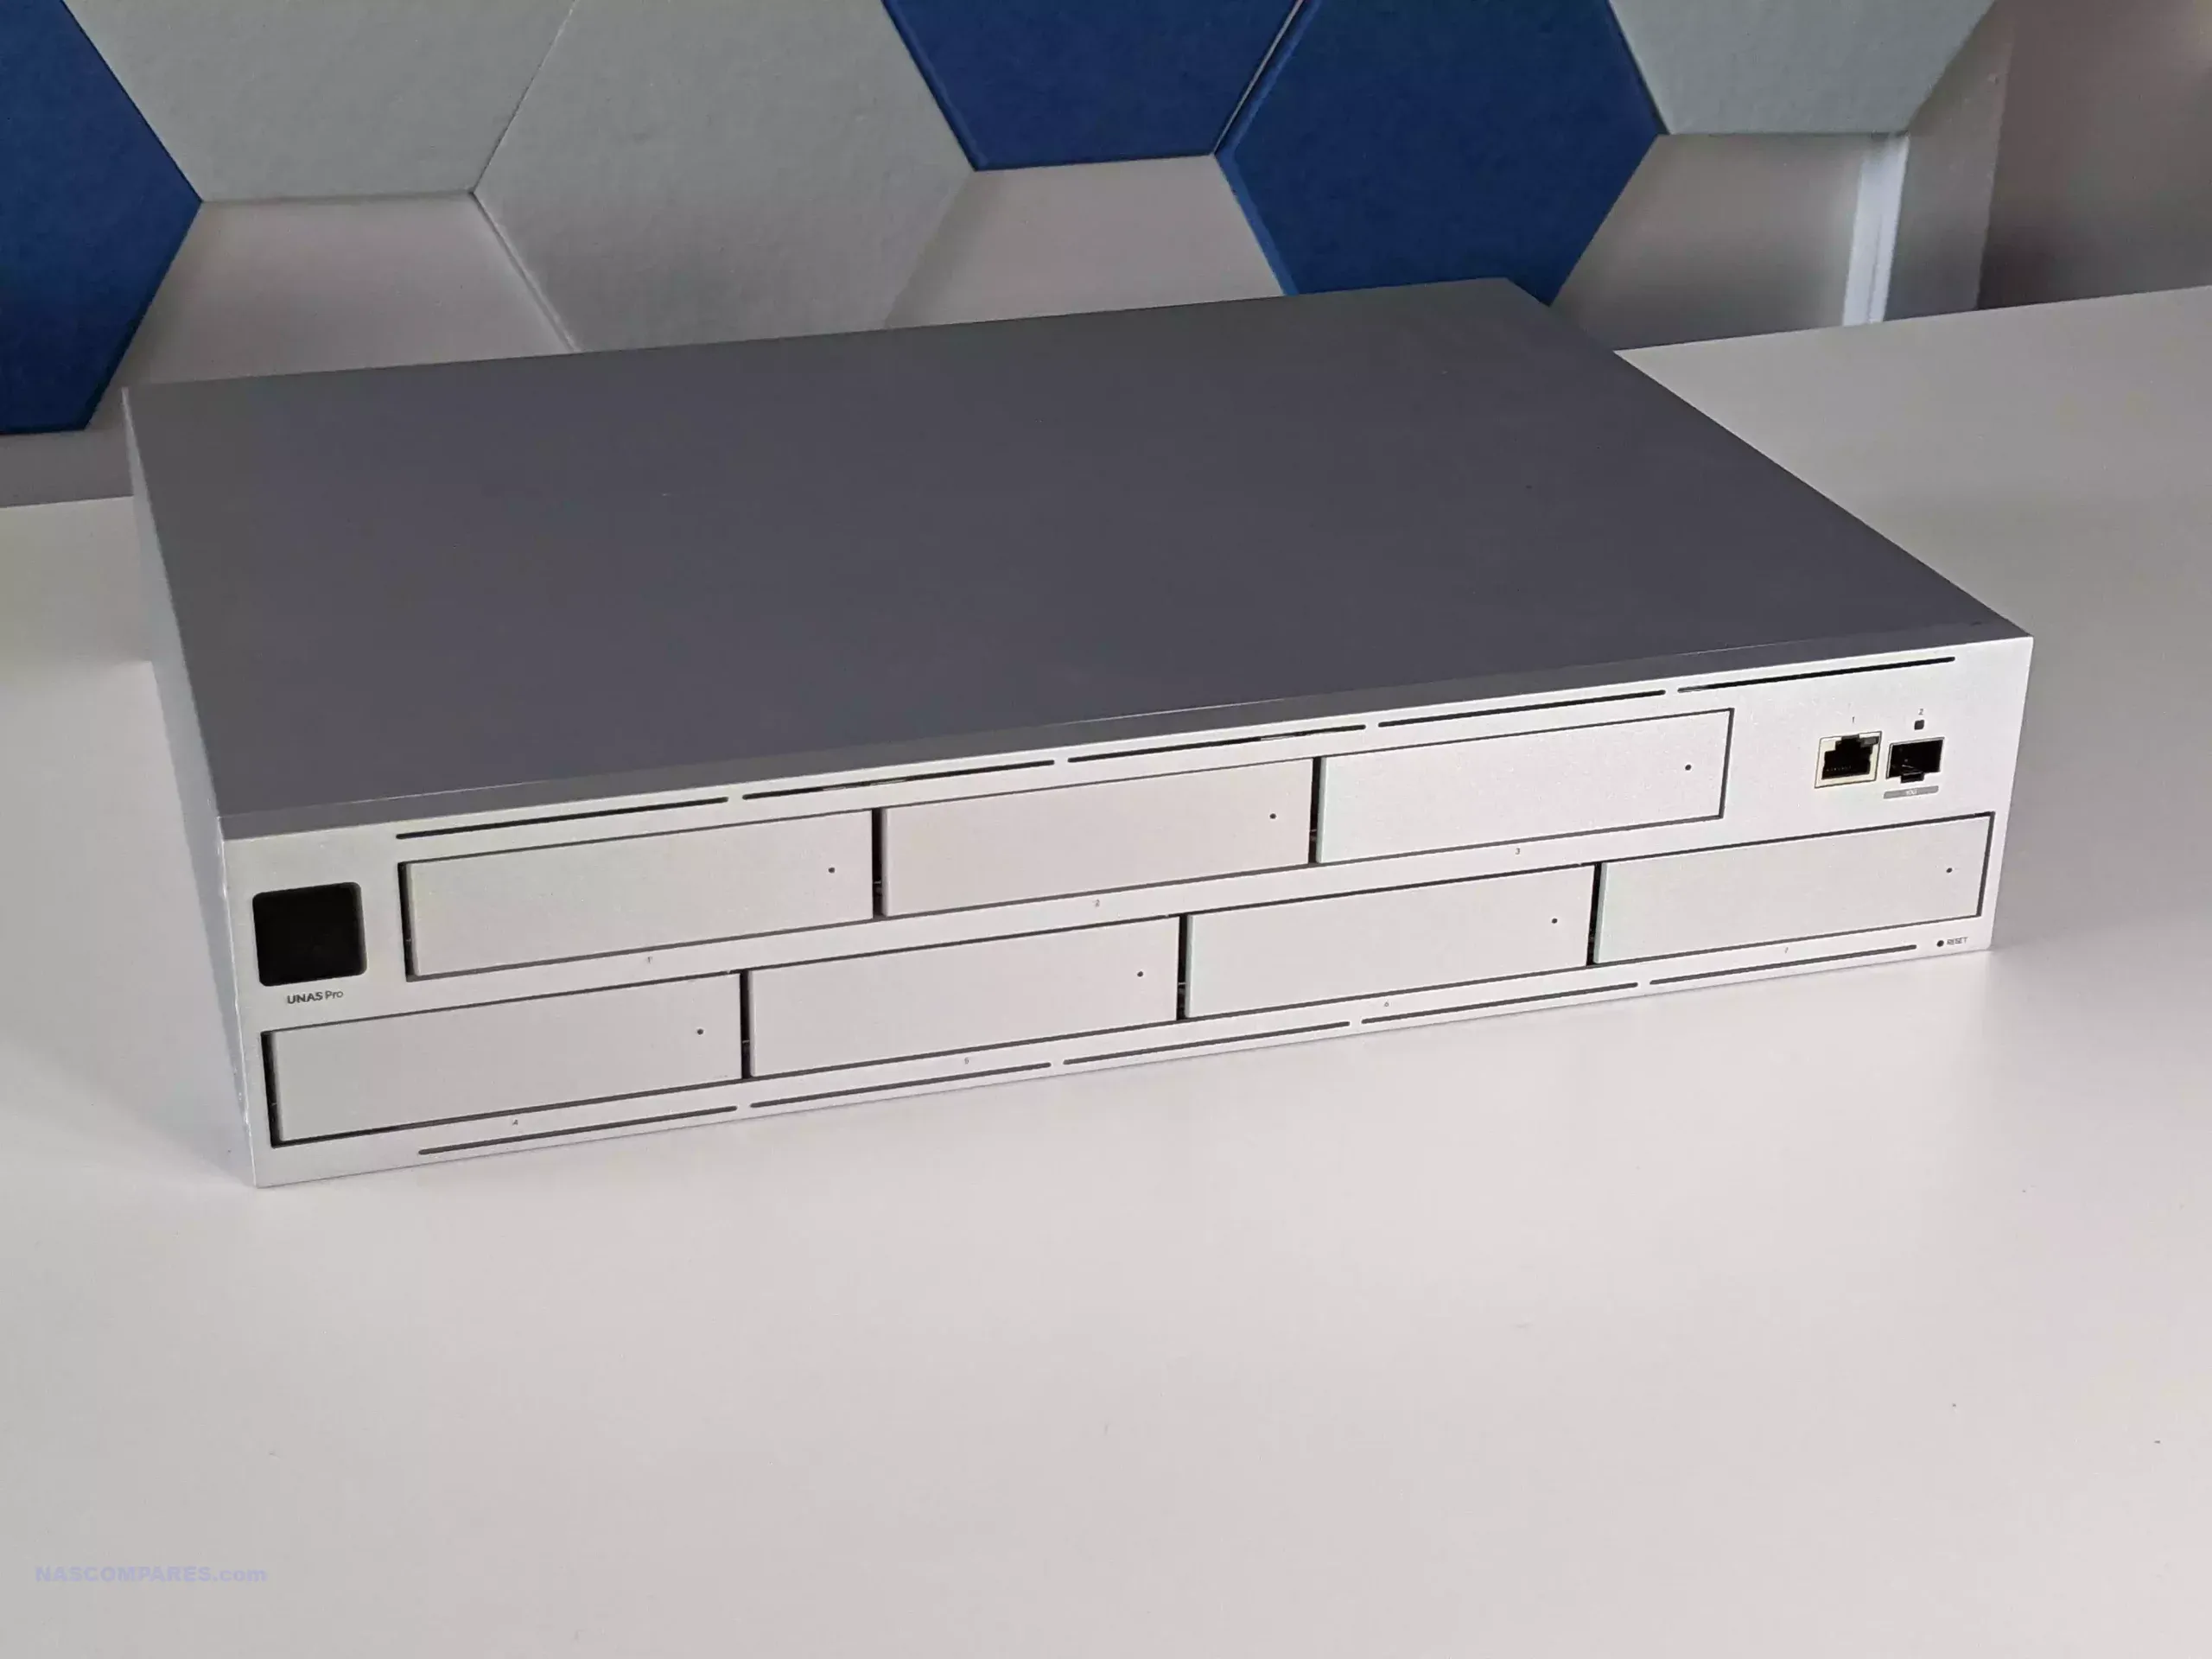
The UNAS Pro 4 uses a conventional 1U rack mount layout, with a plain, functional front panel and an all metal enclosure intended for permanent installation rather than desktop use. It ships with rails and rack handles, which removes the usual extra step of sourcing mounting hardware separately. The chassis depth is about 400 mm, so it is not in the “full depth server” category, and that helps in smaller cabinets where rear clearance and cable management space can be limited.

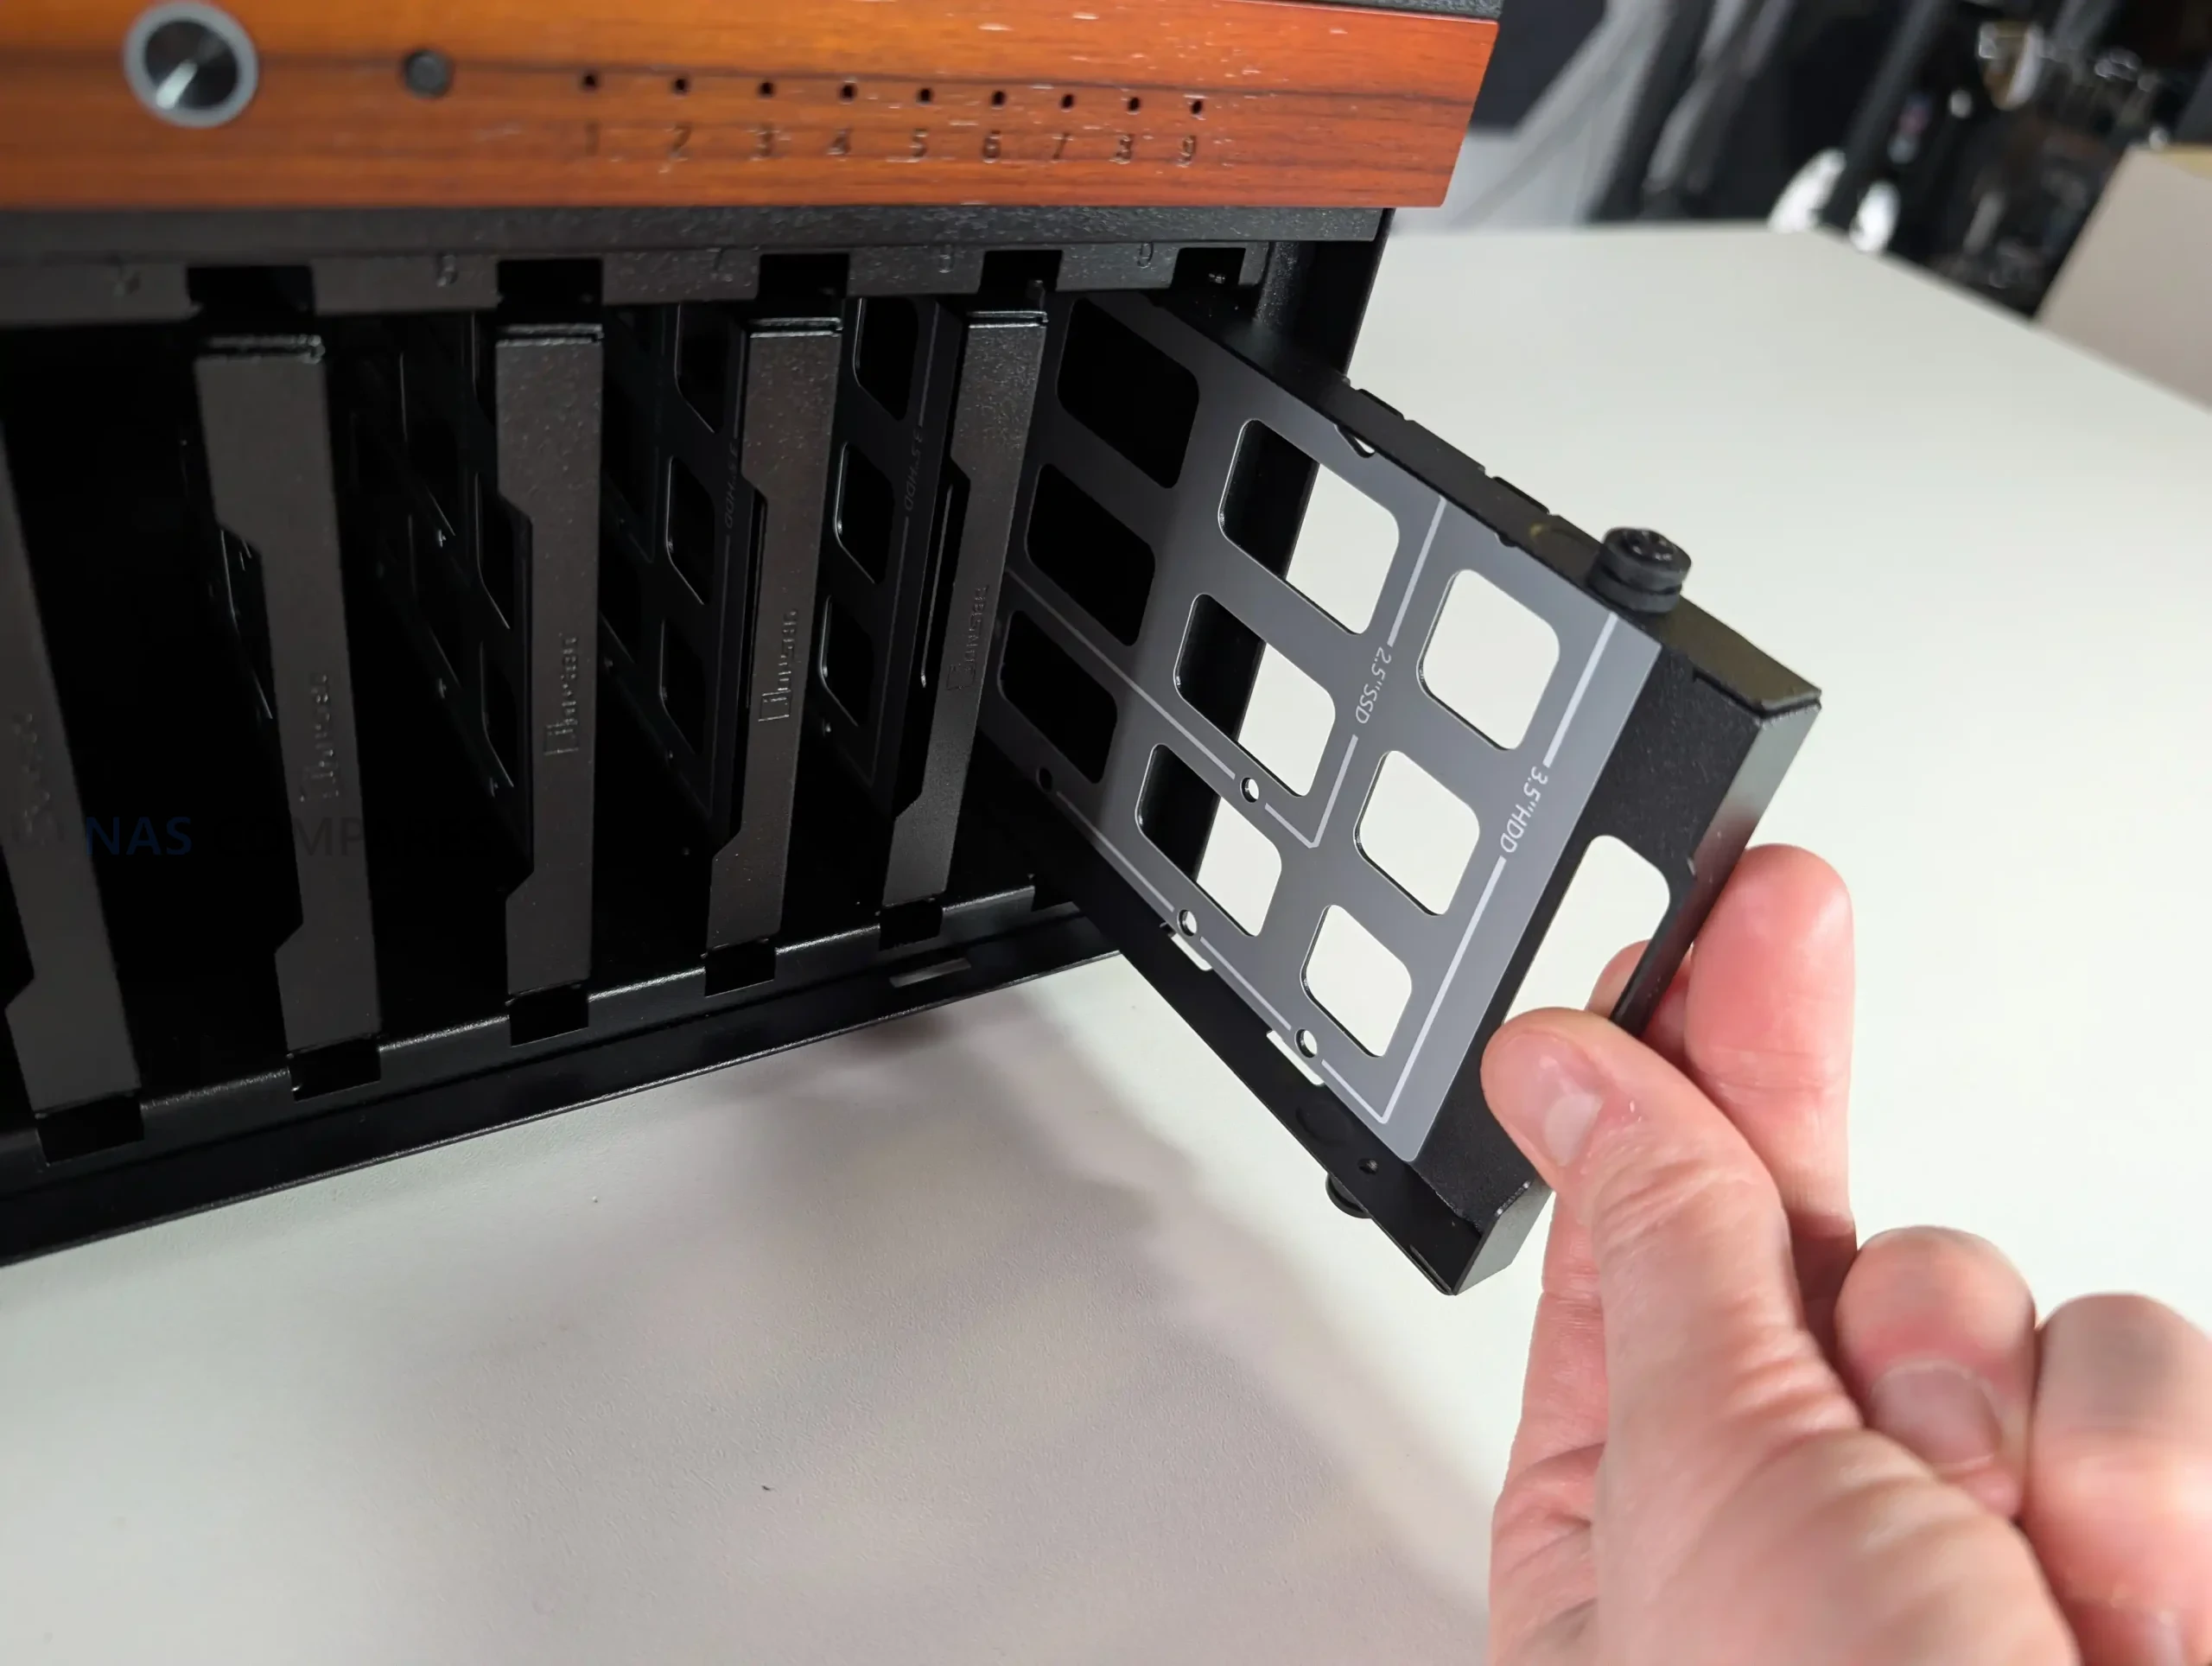
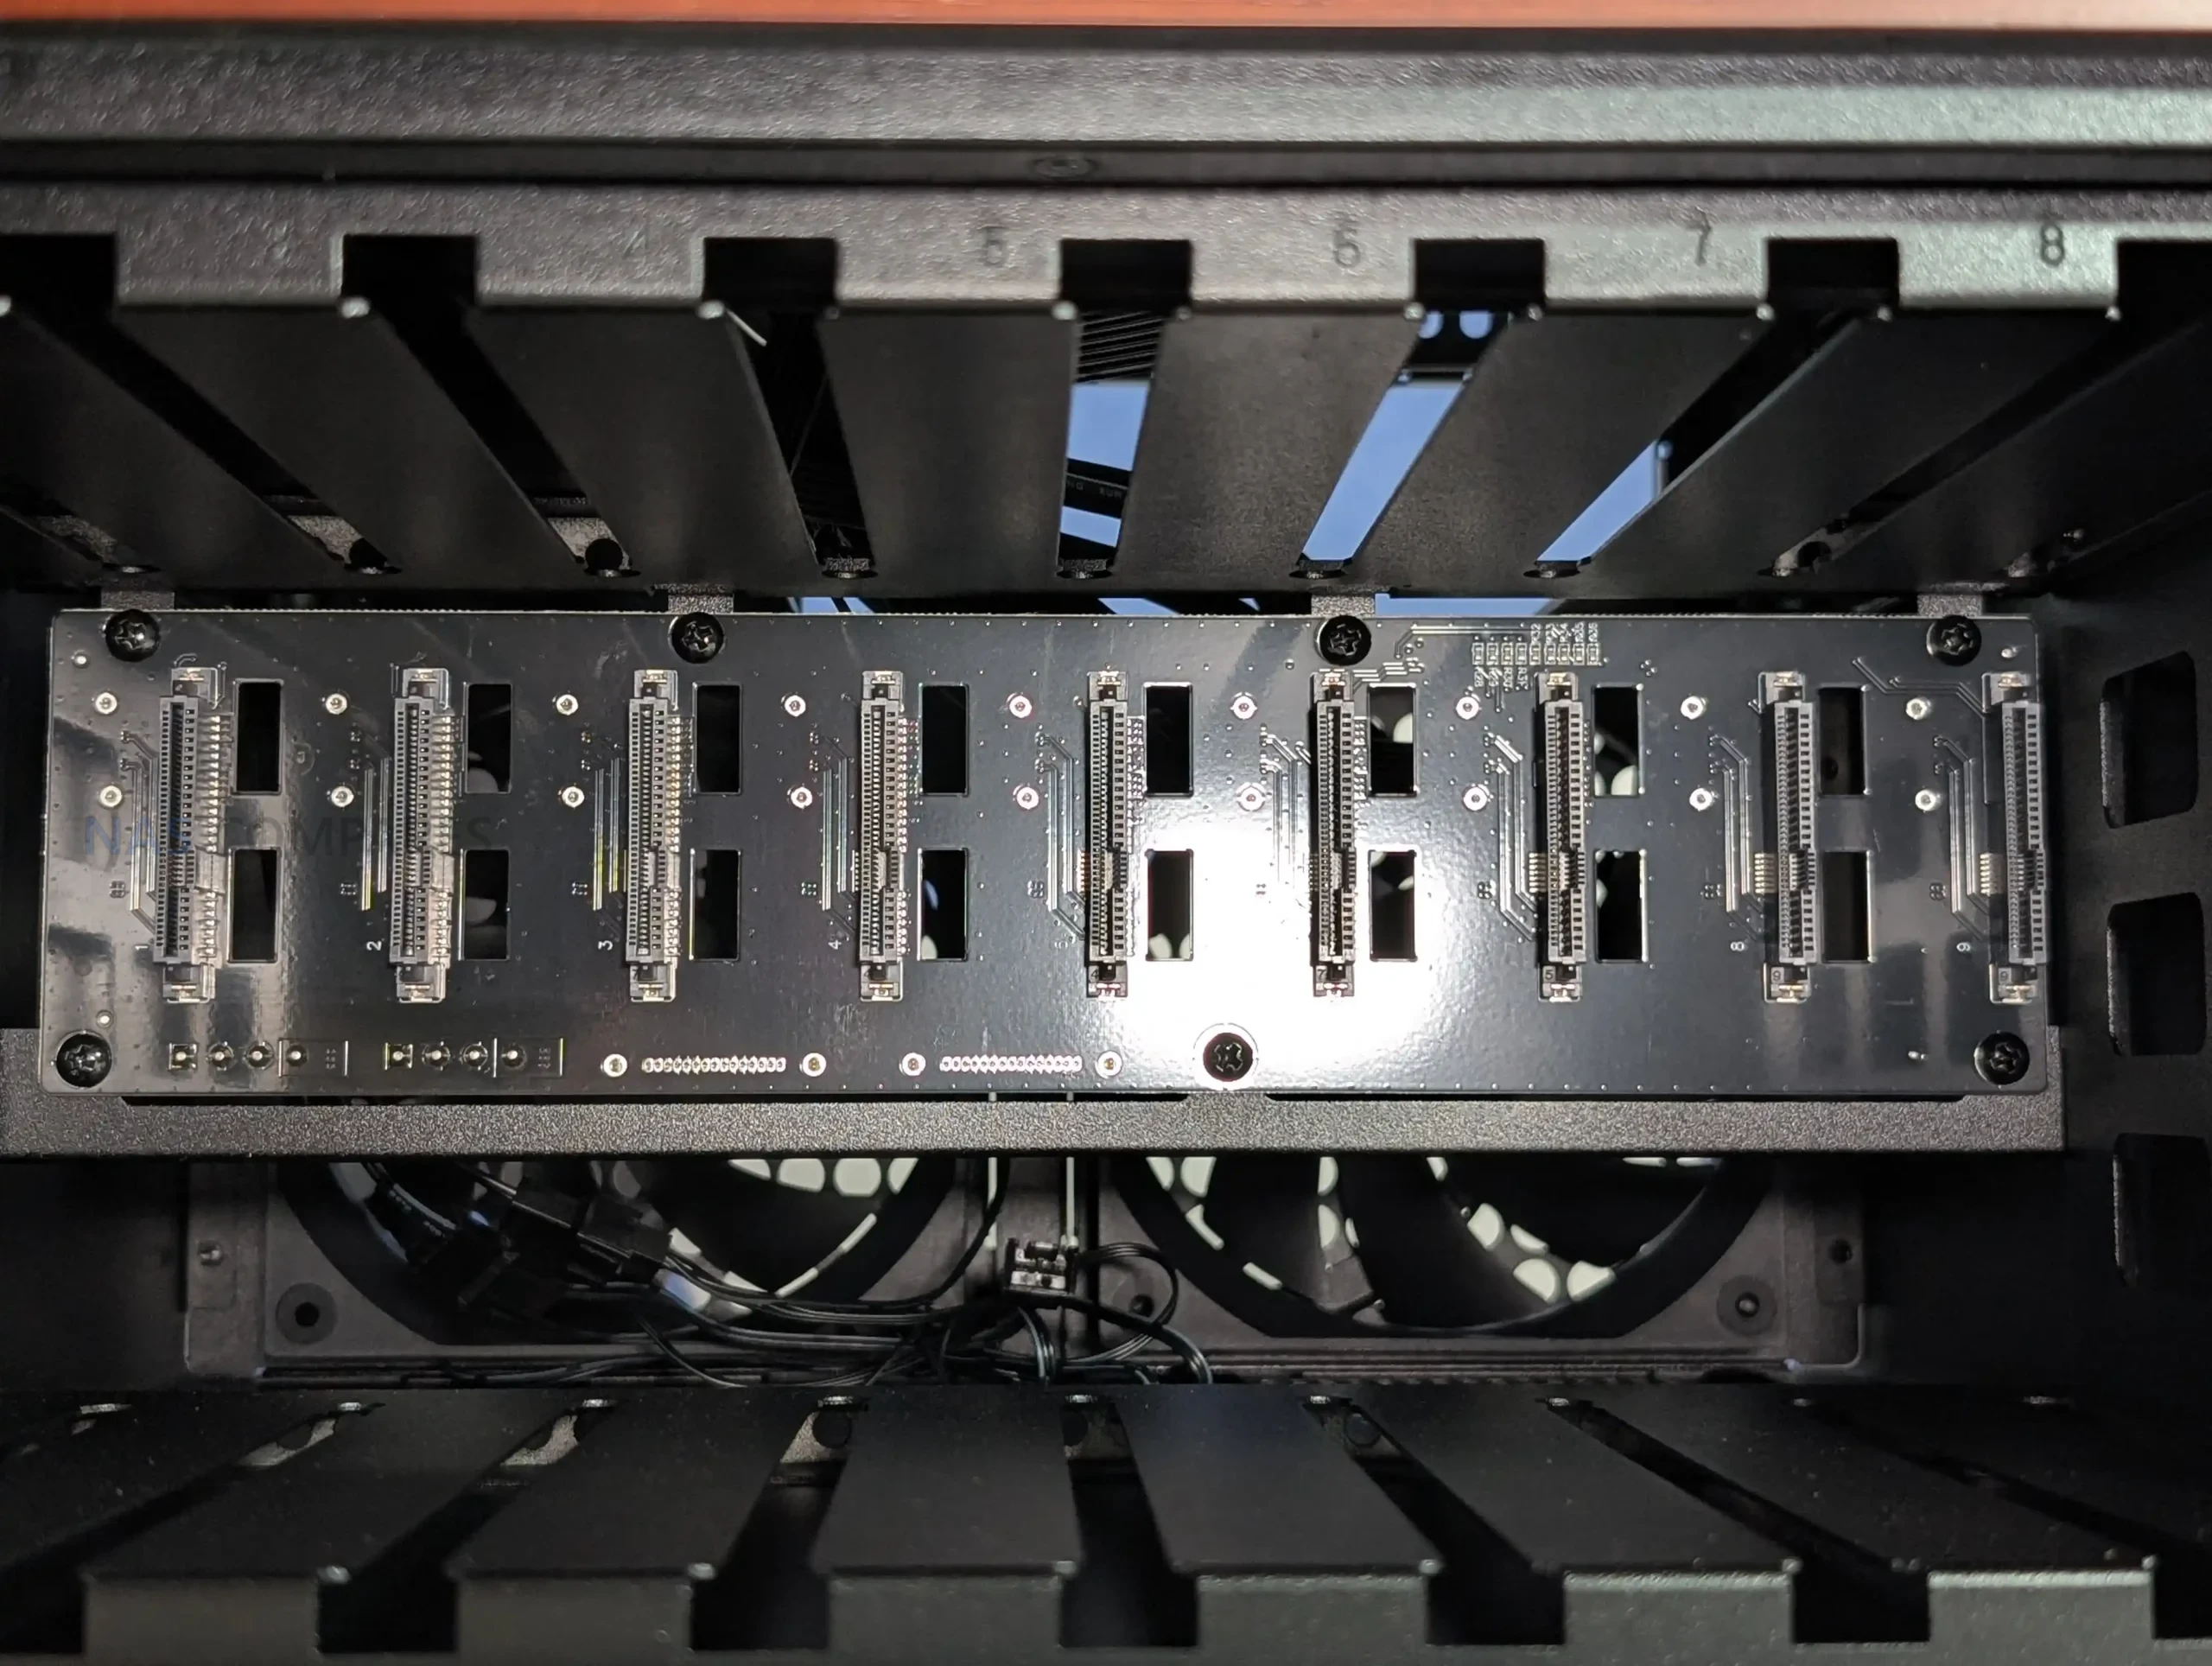
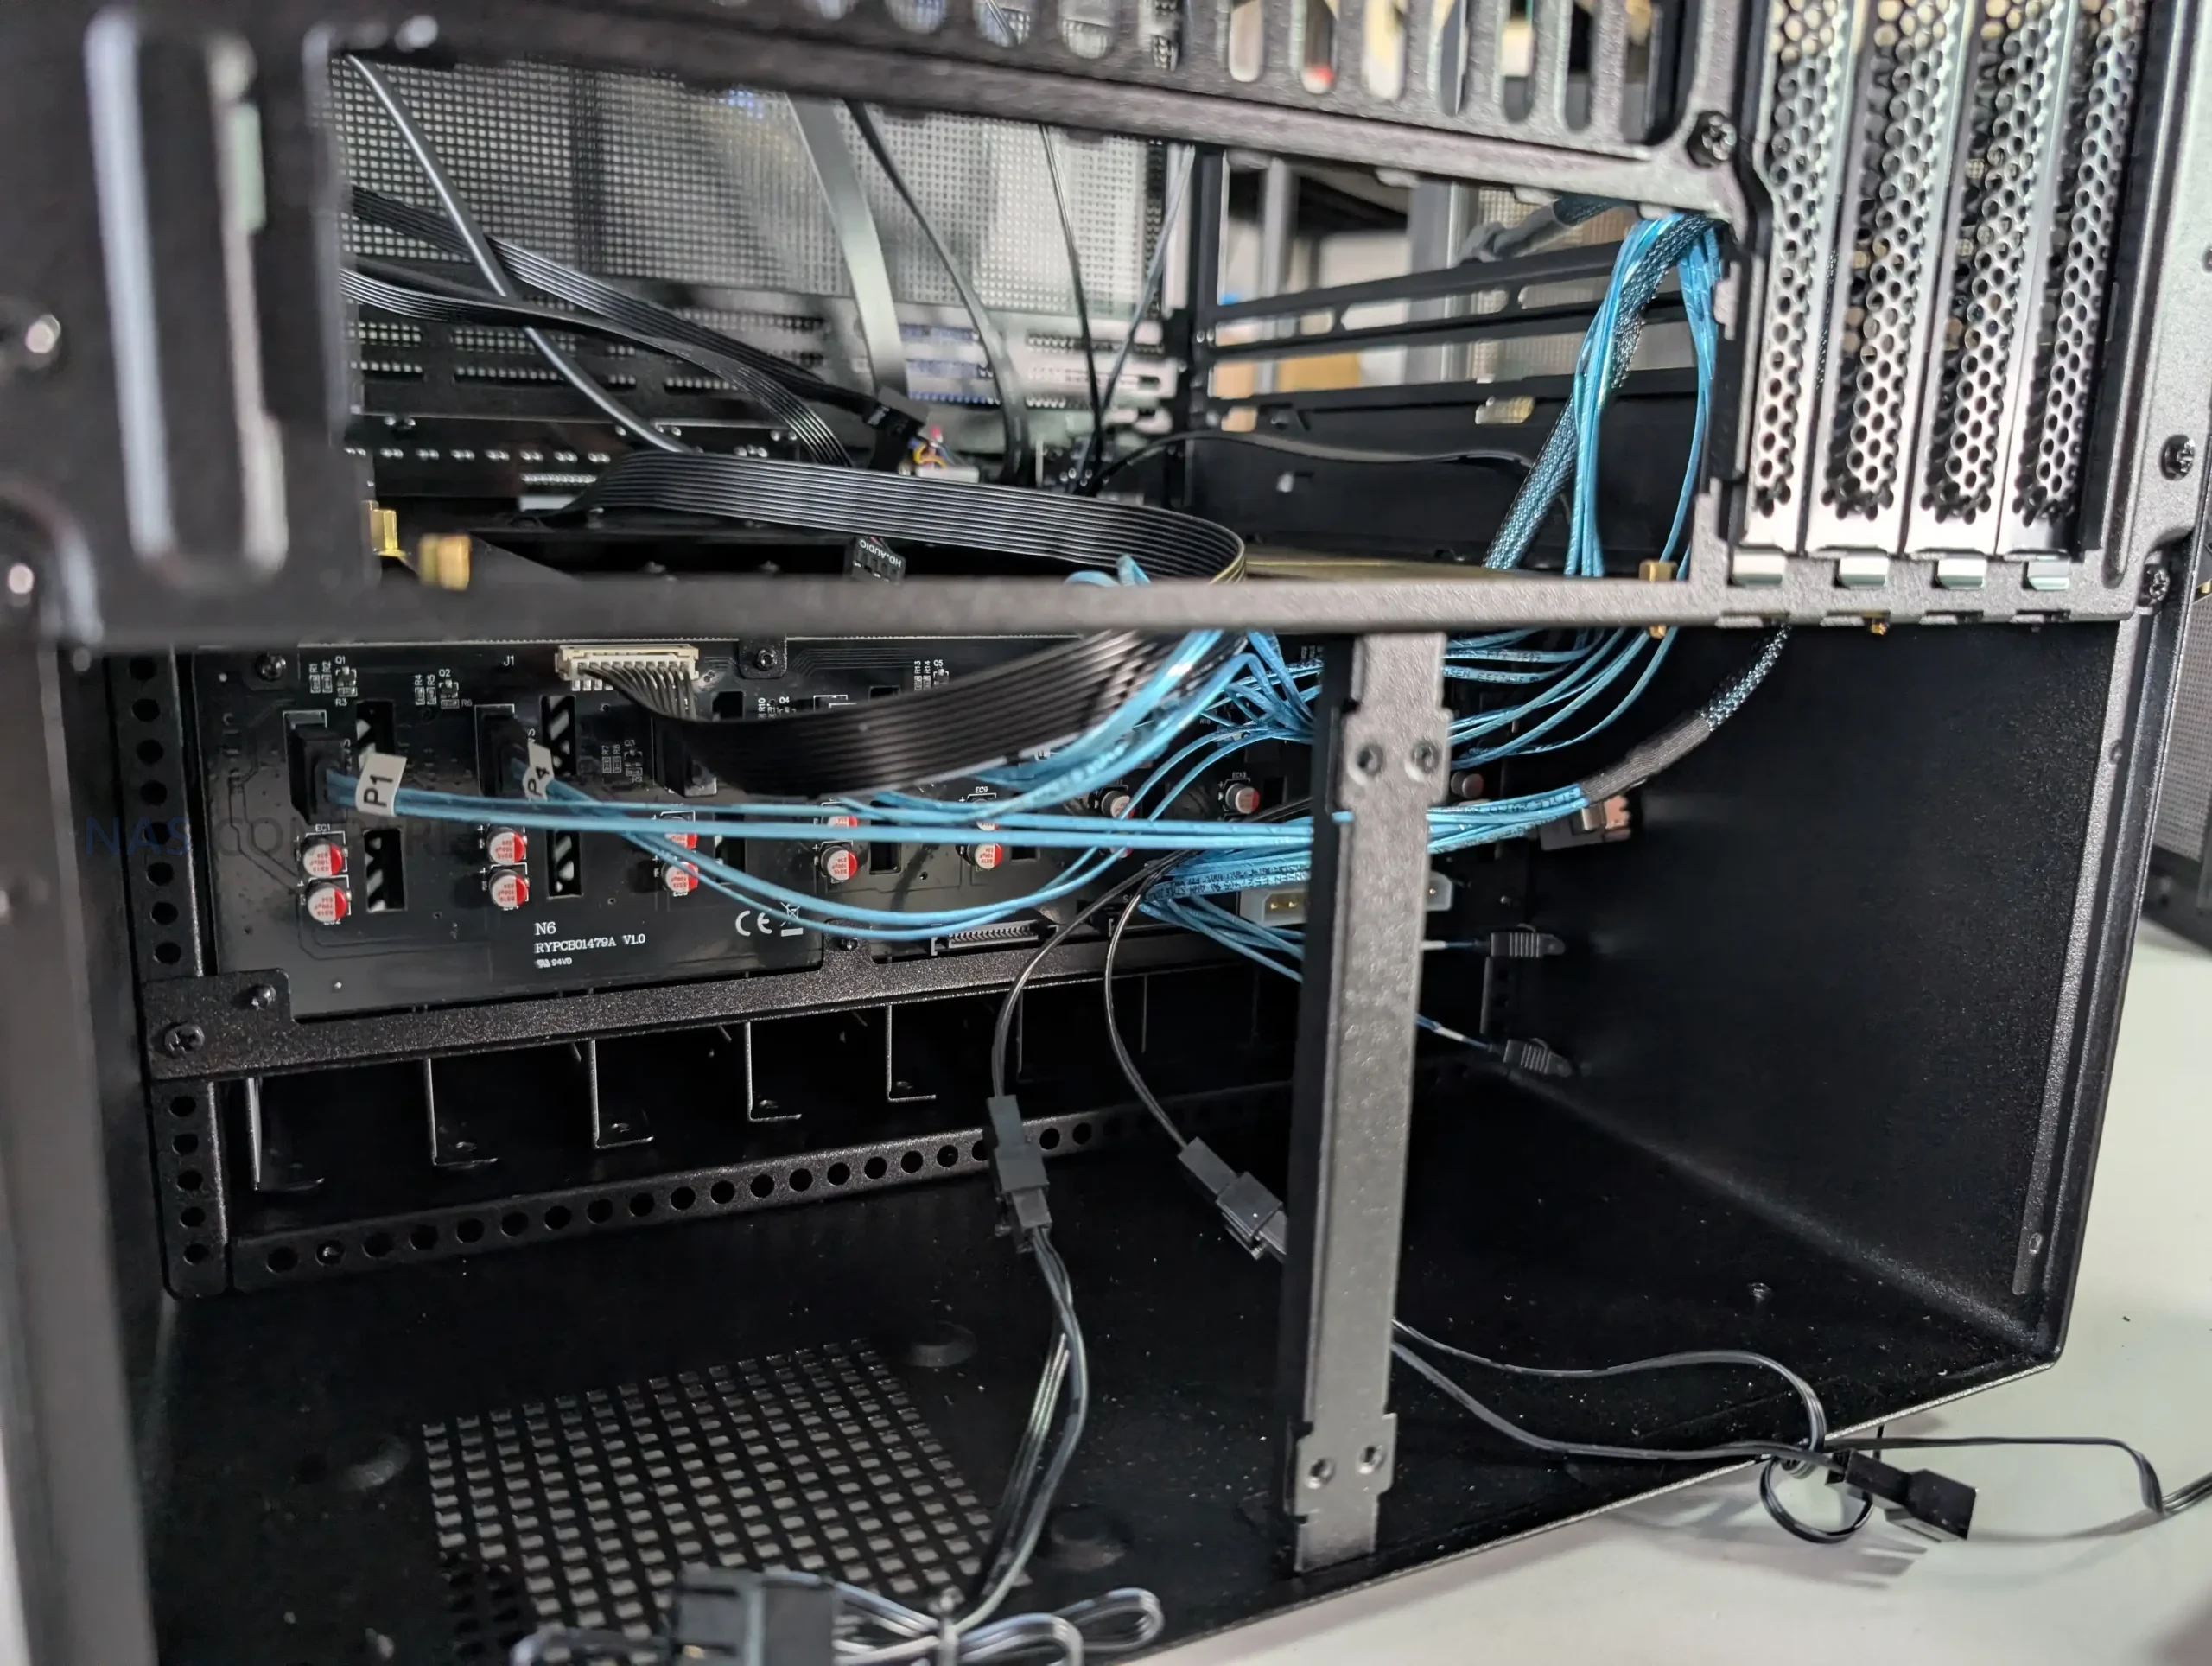
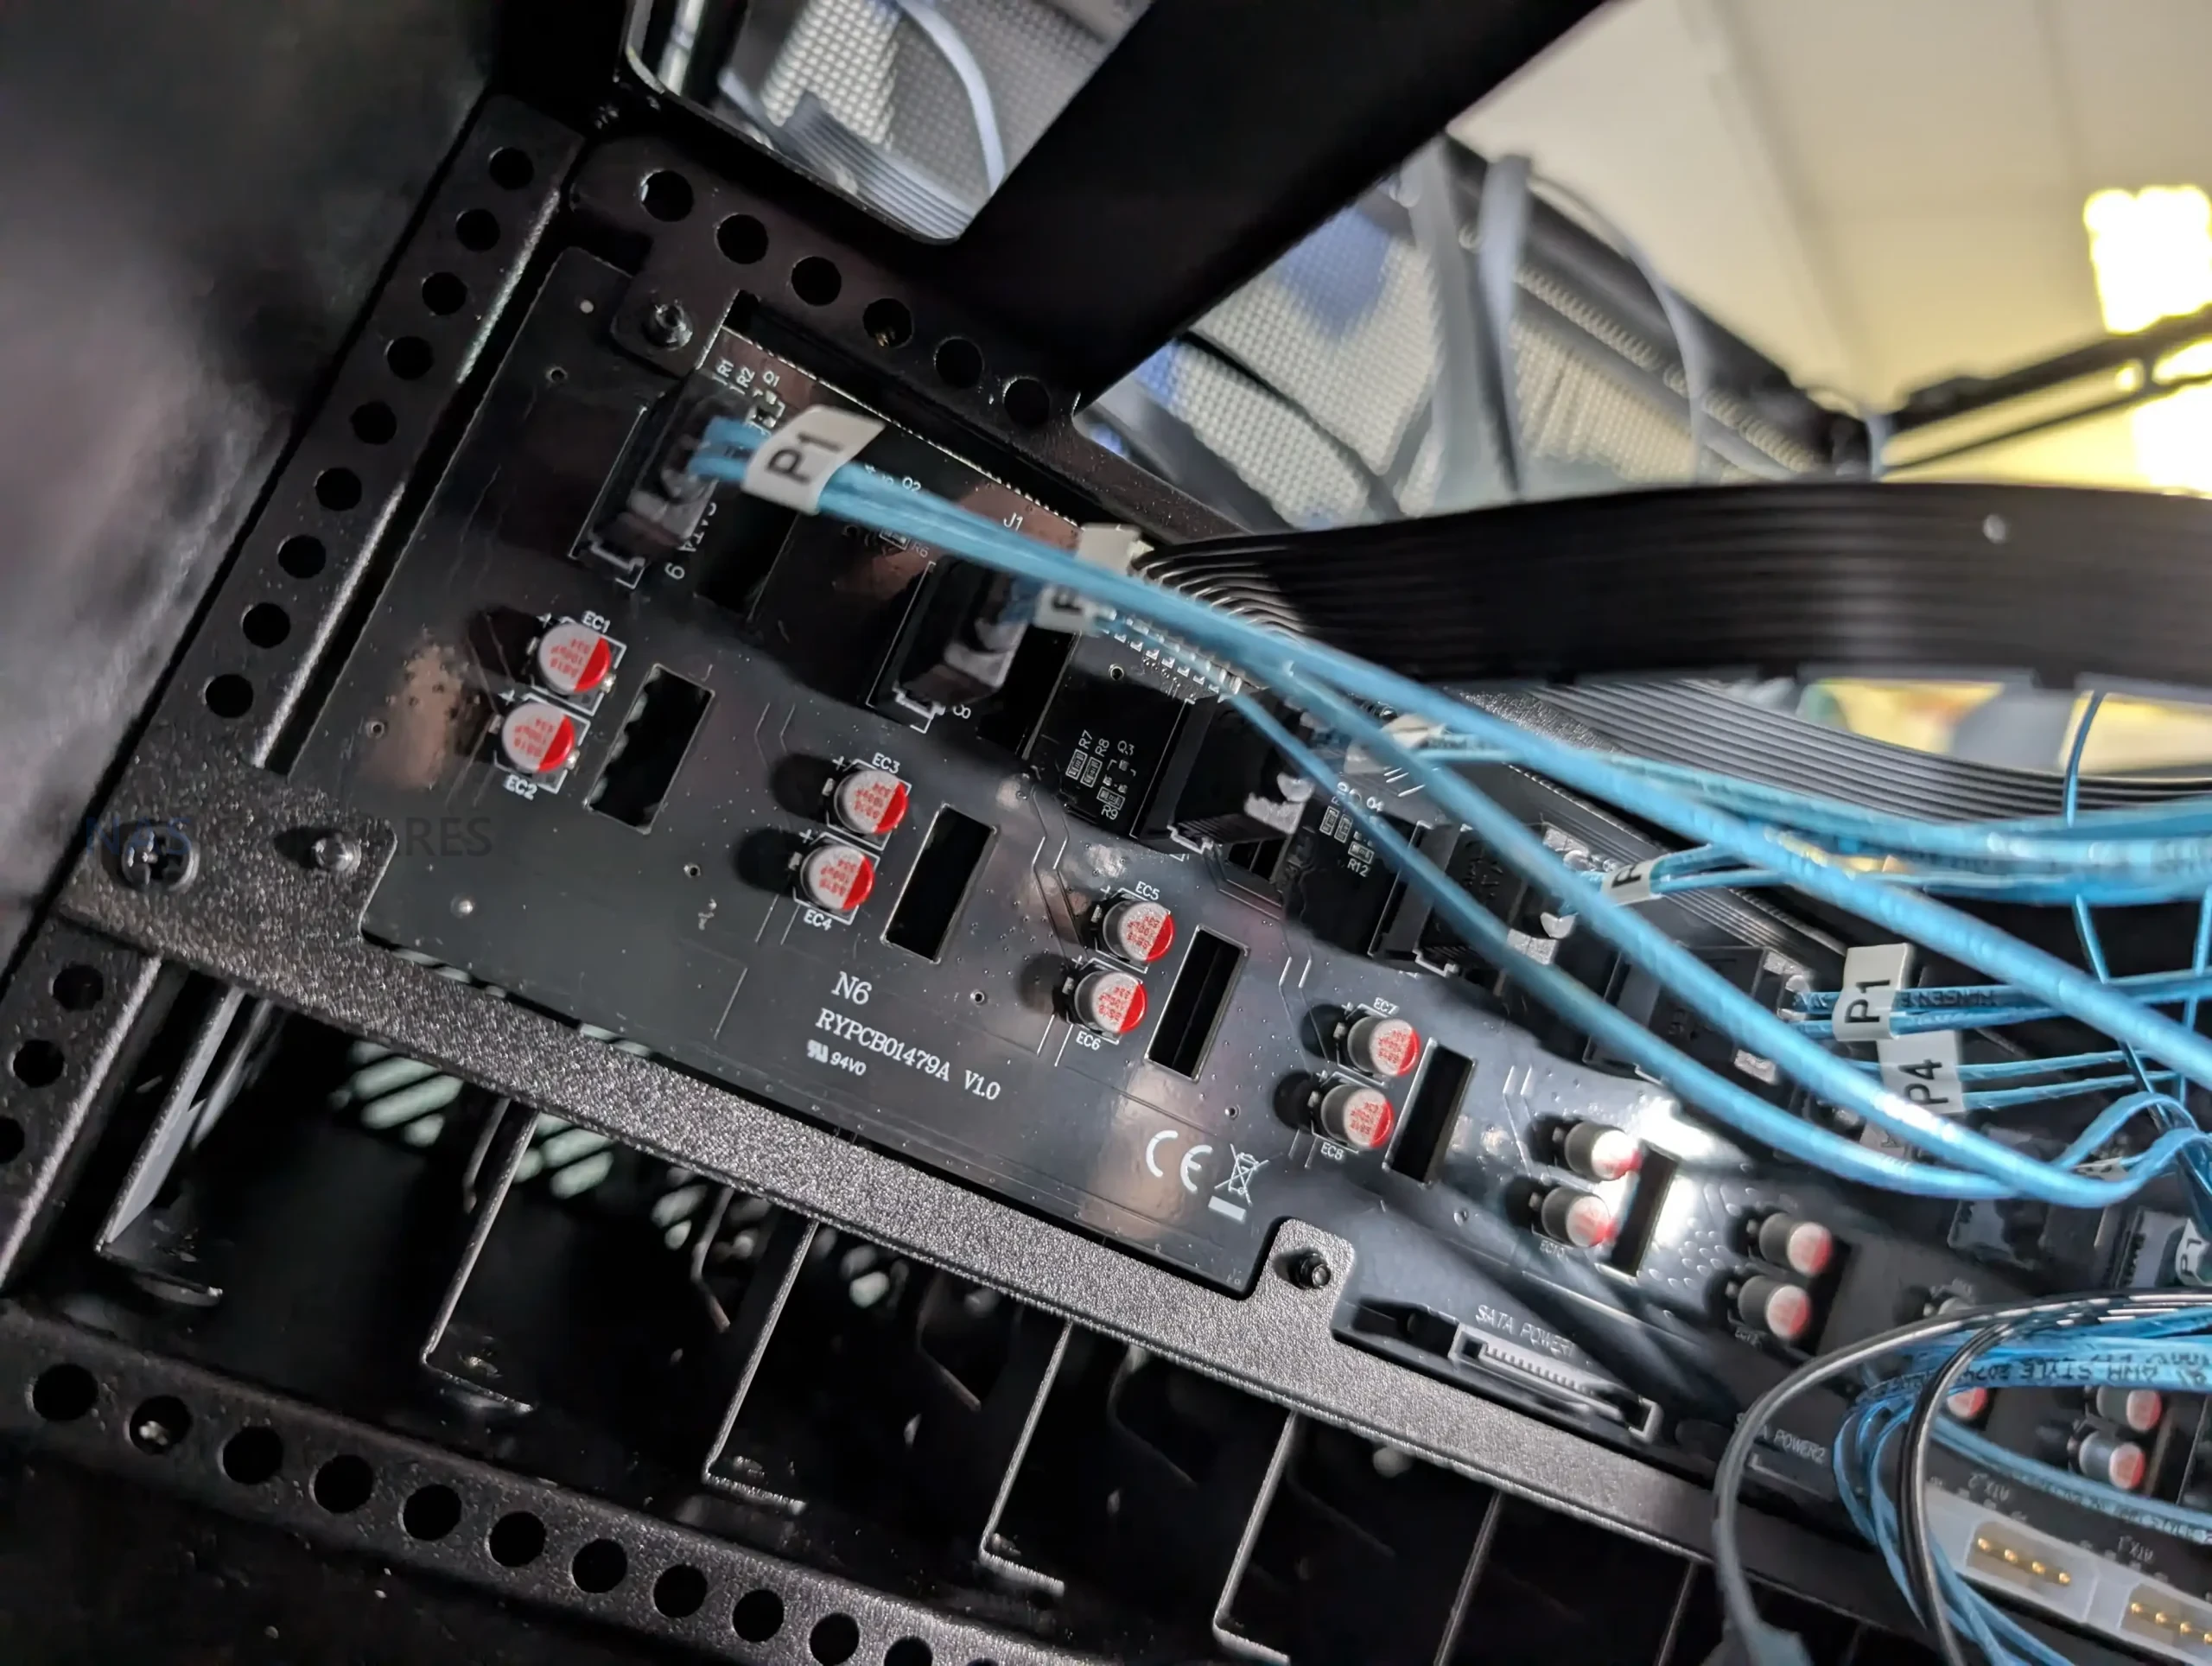
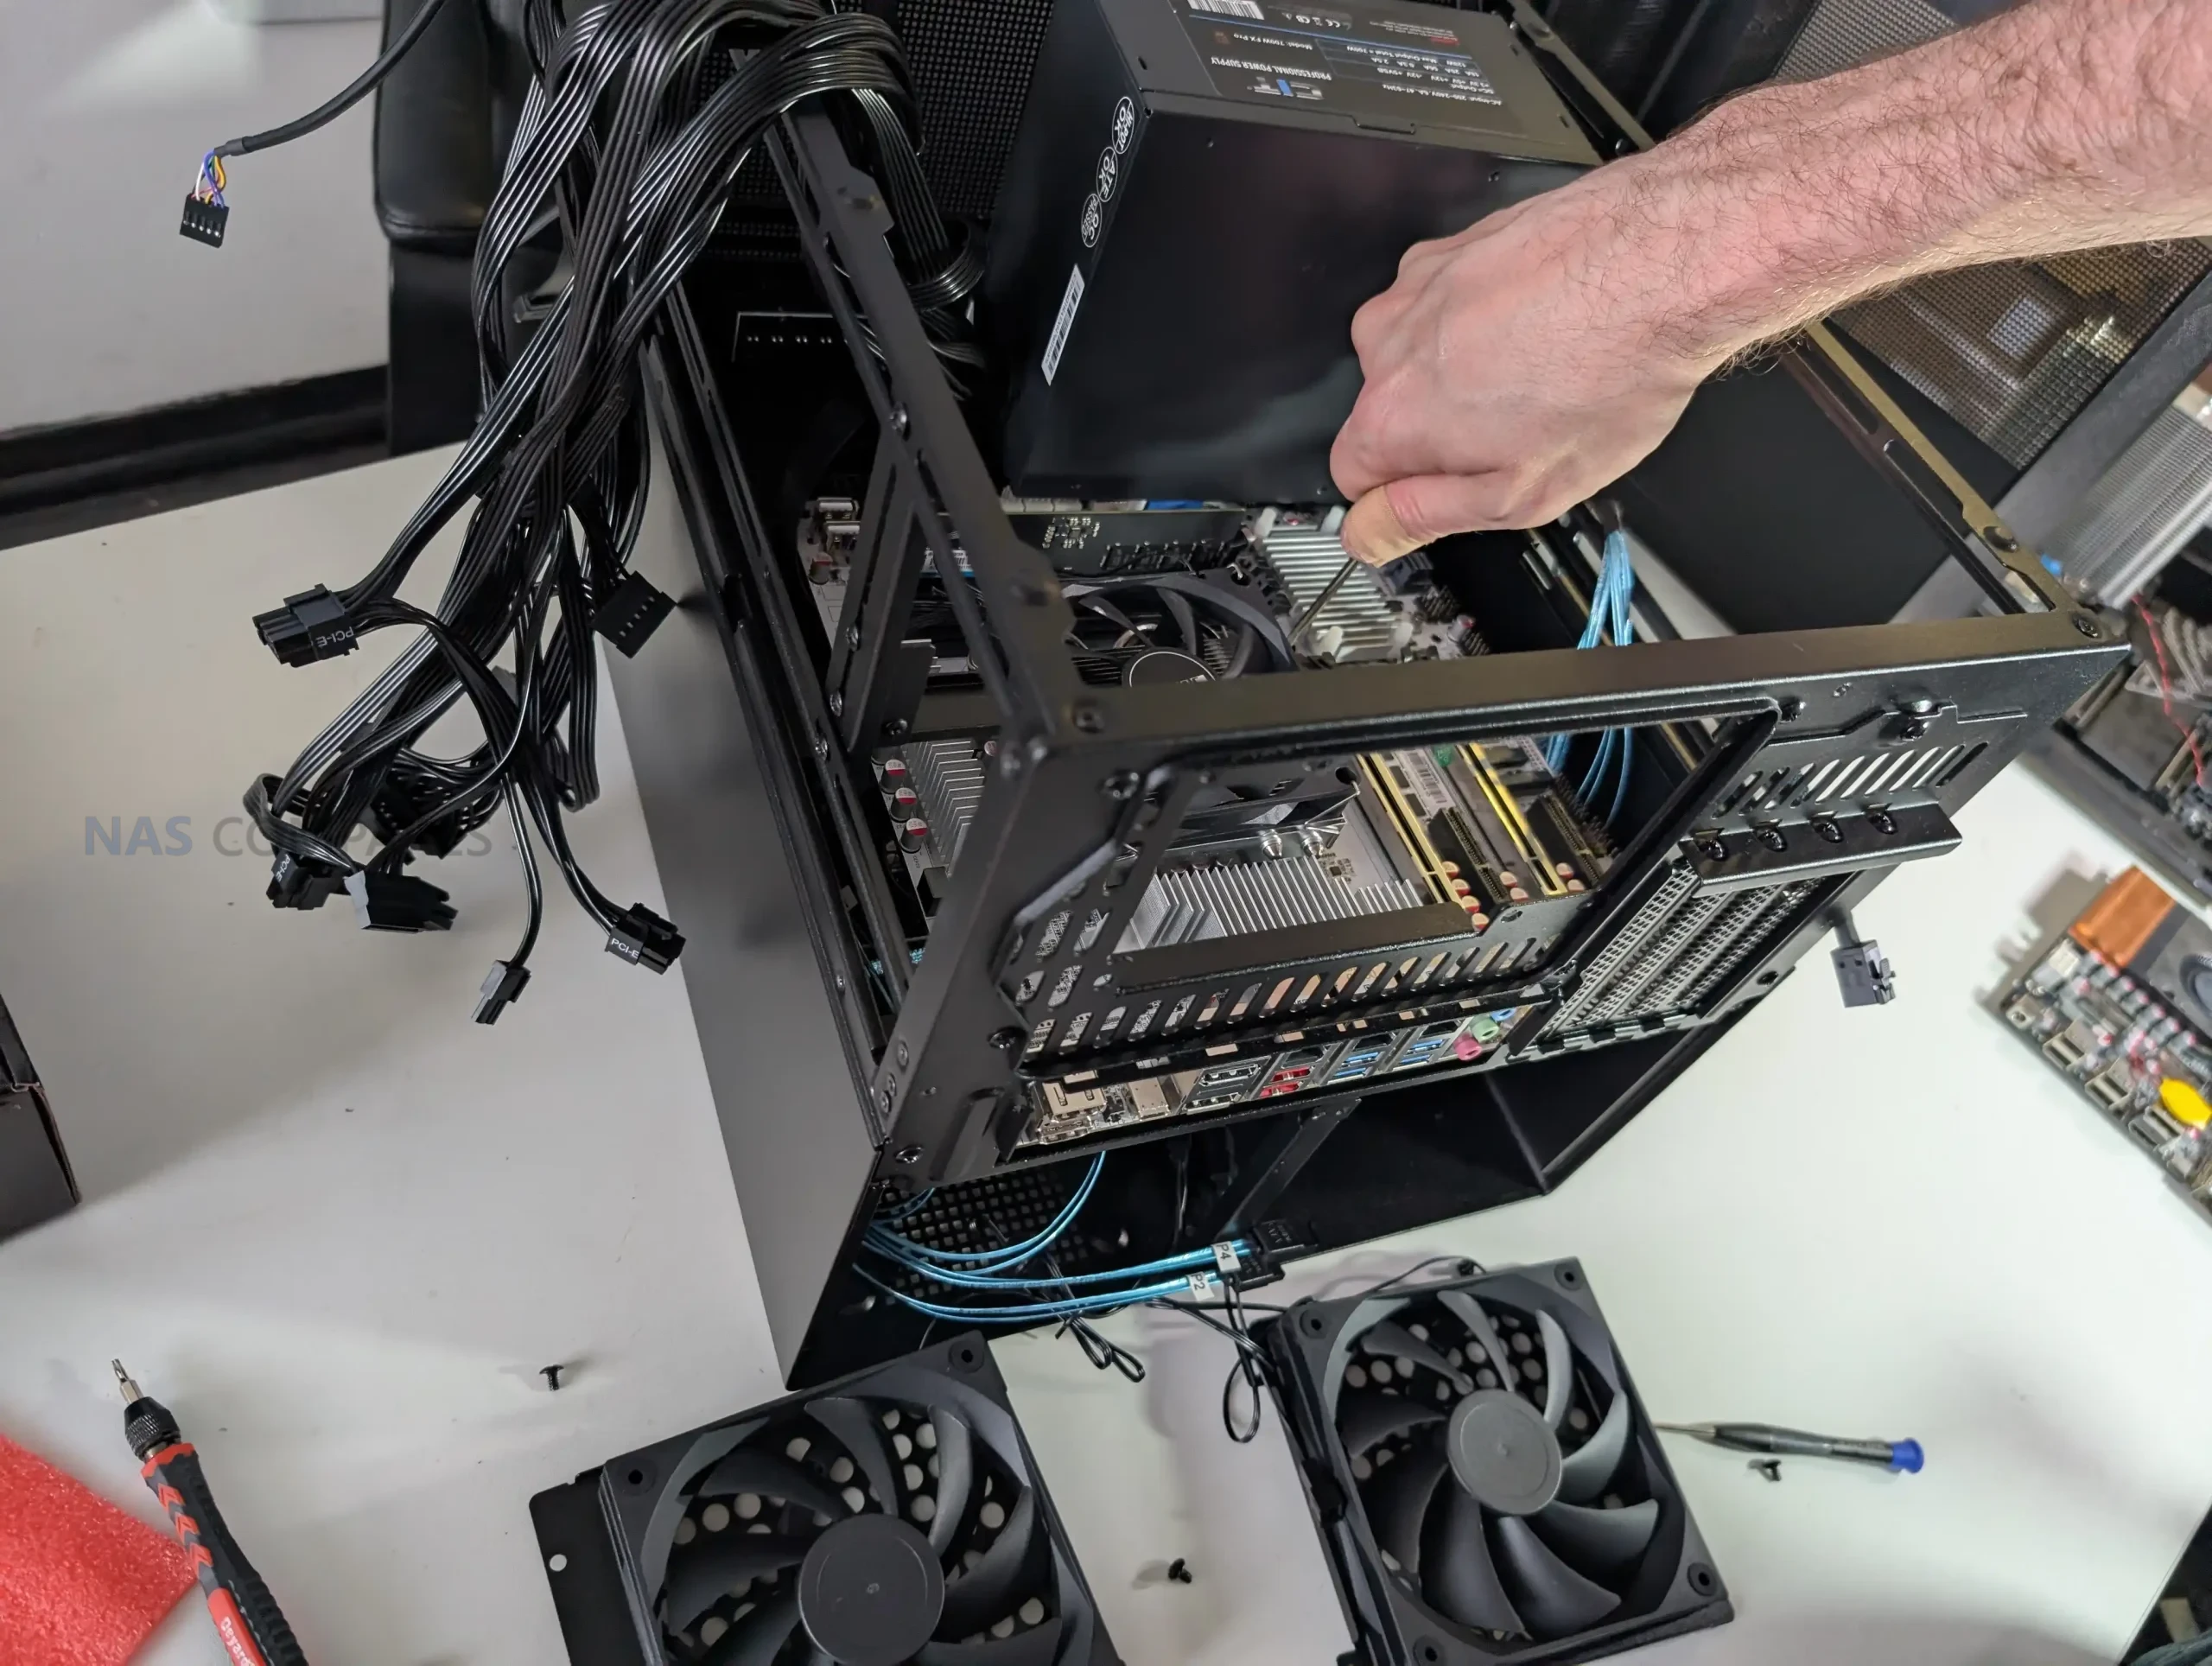
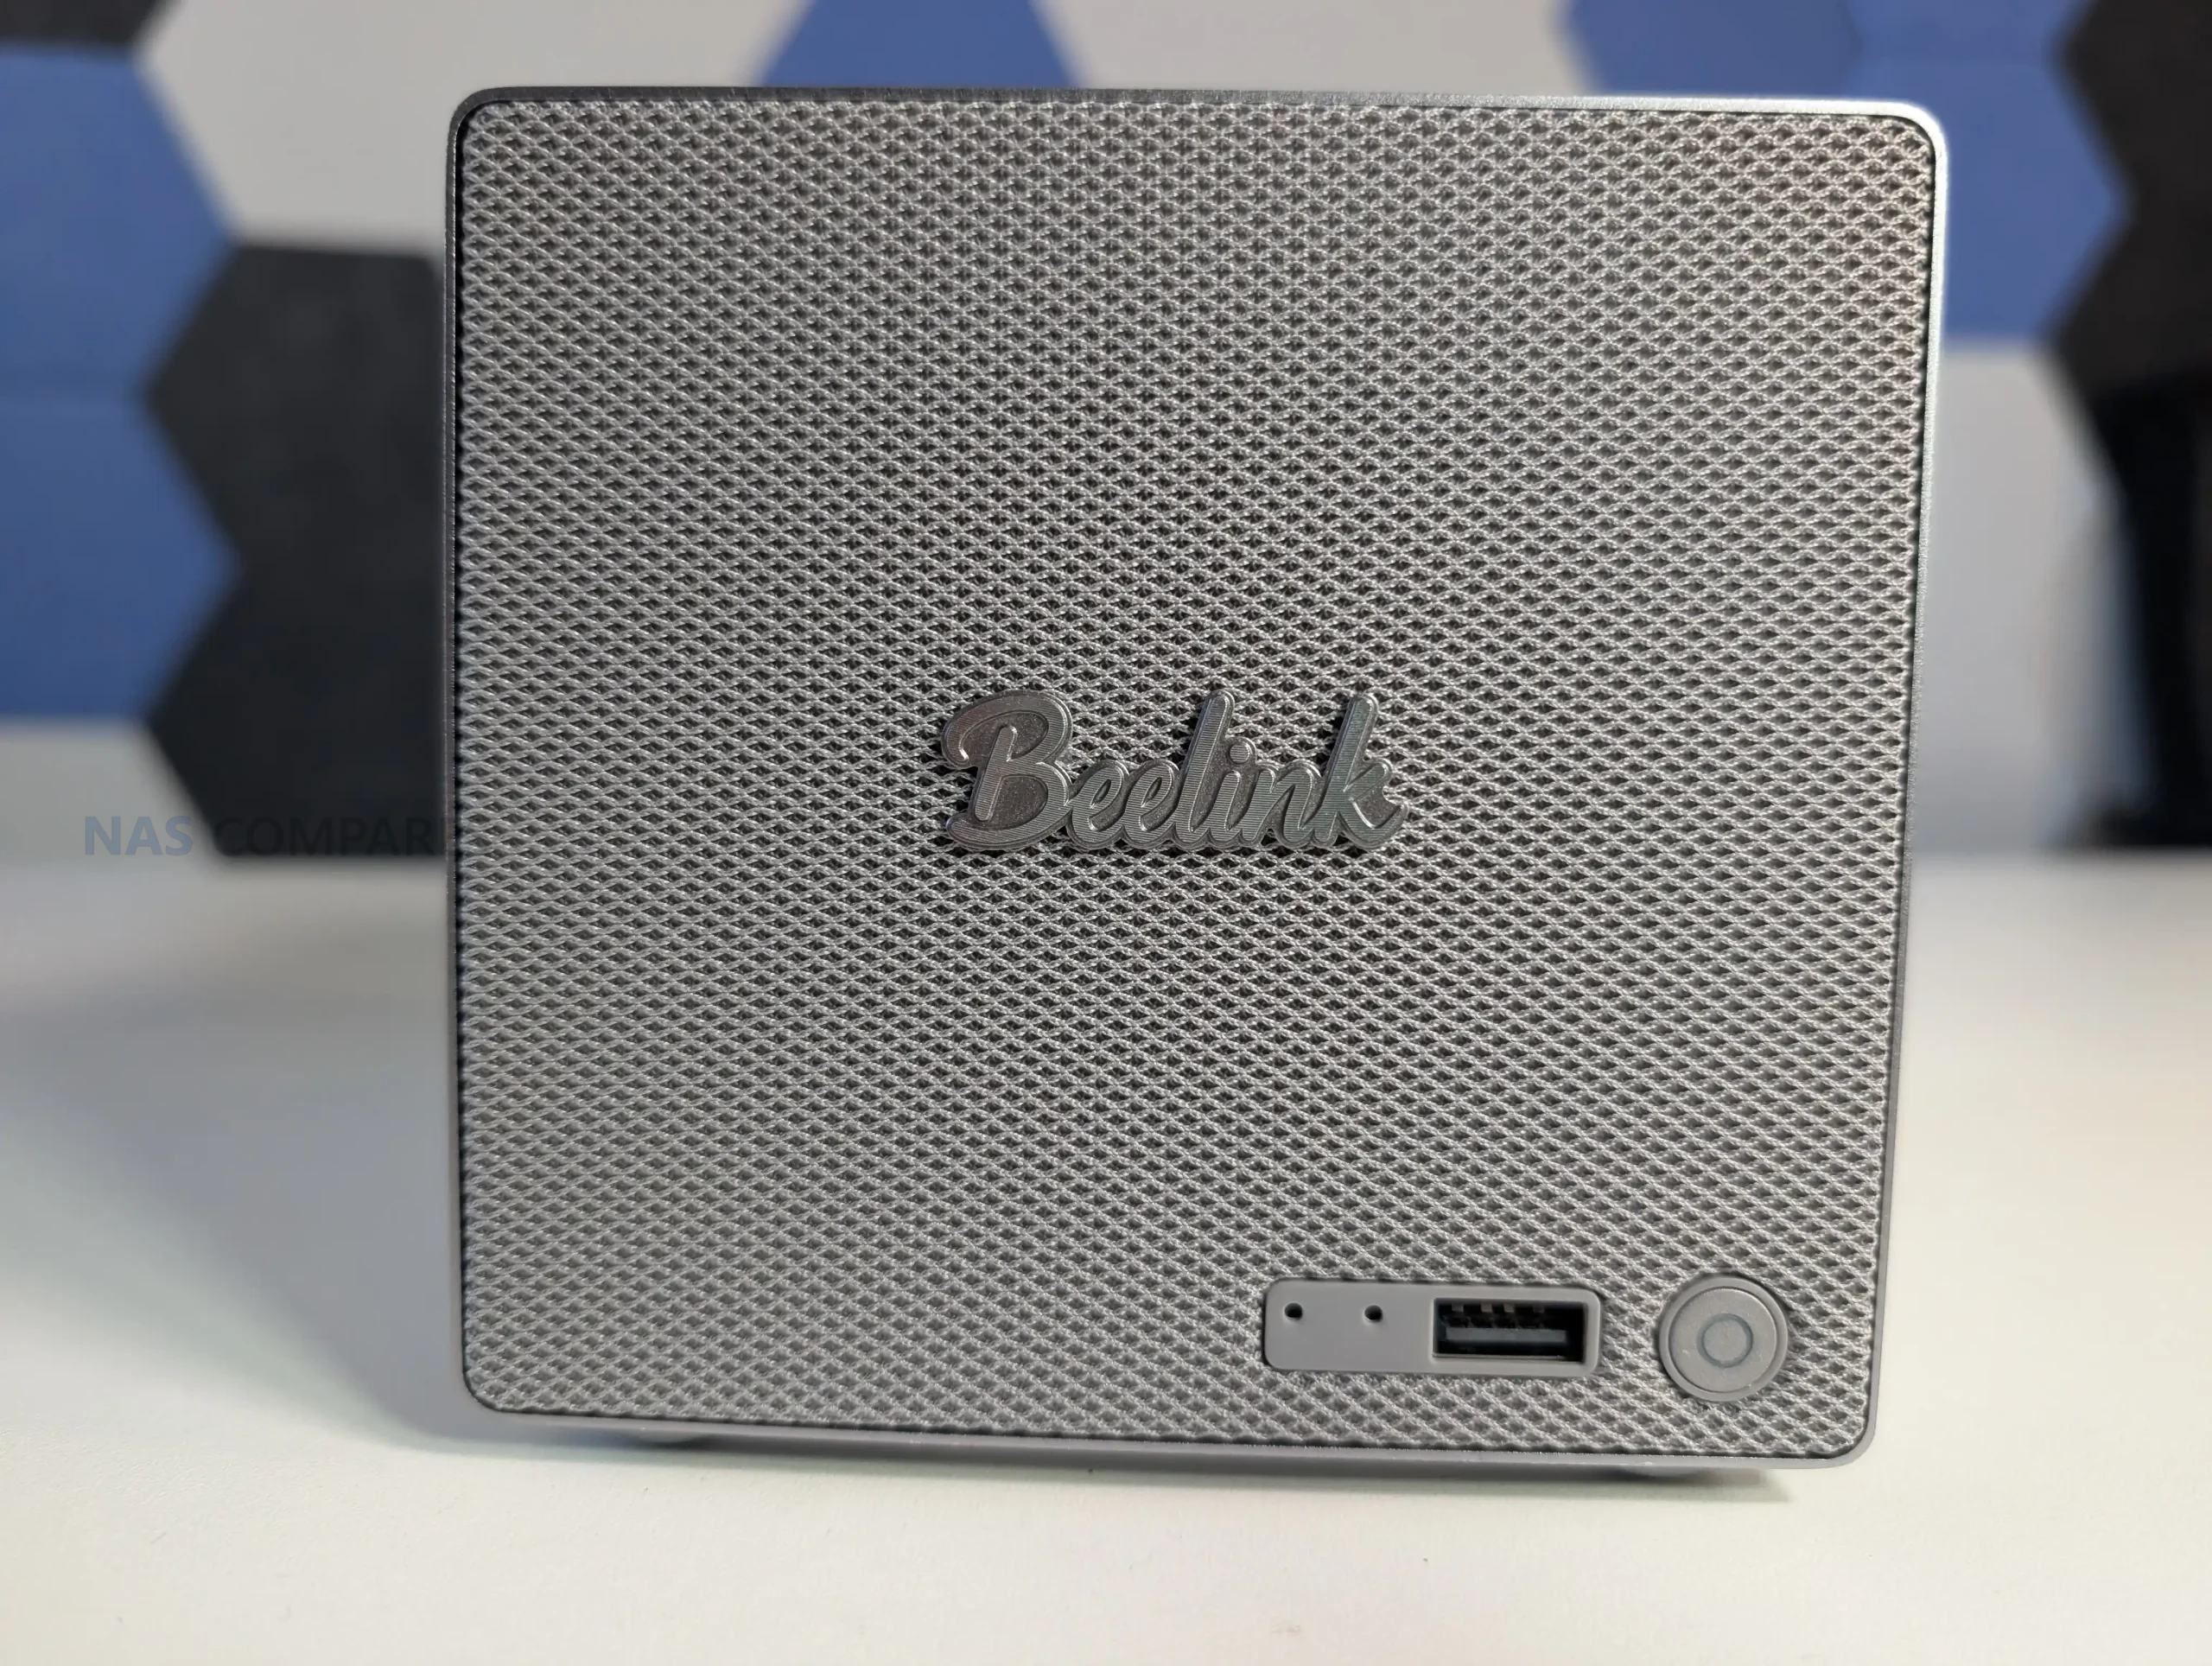
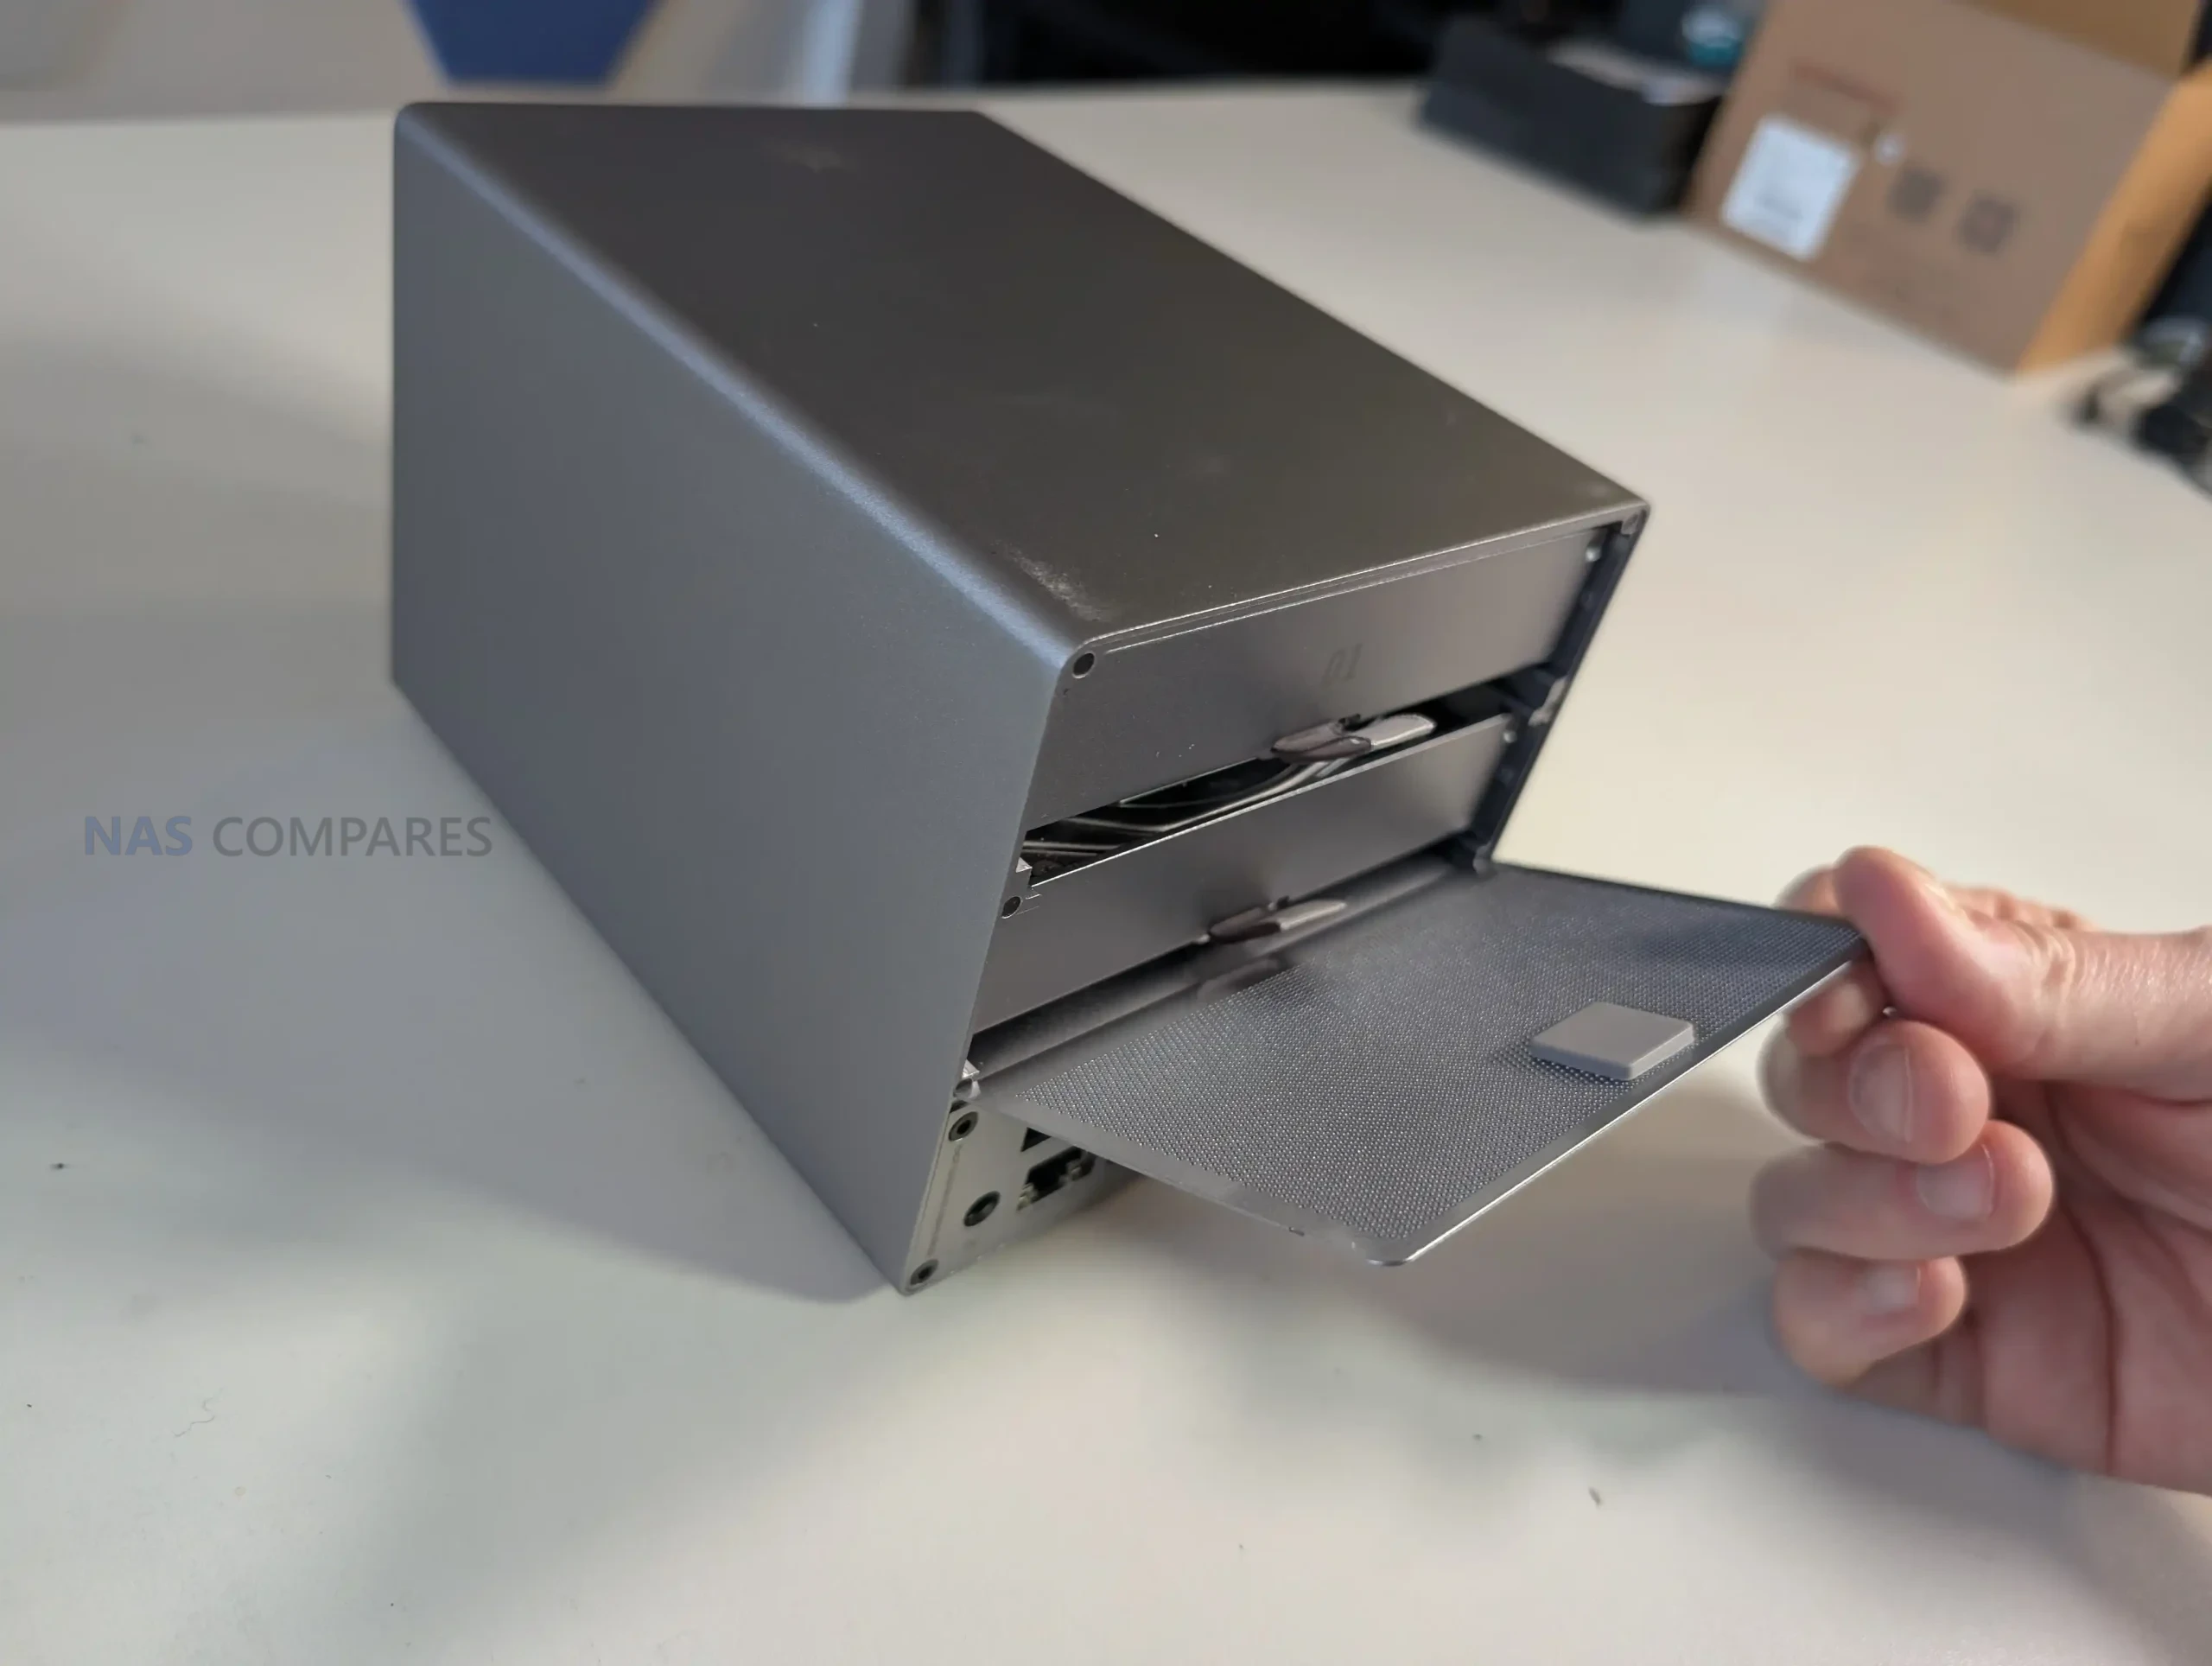
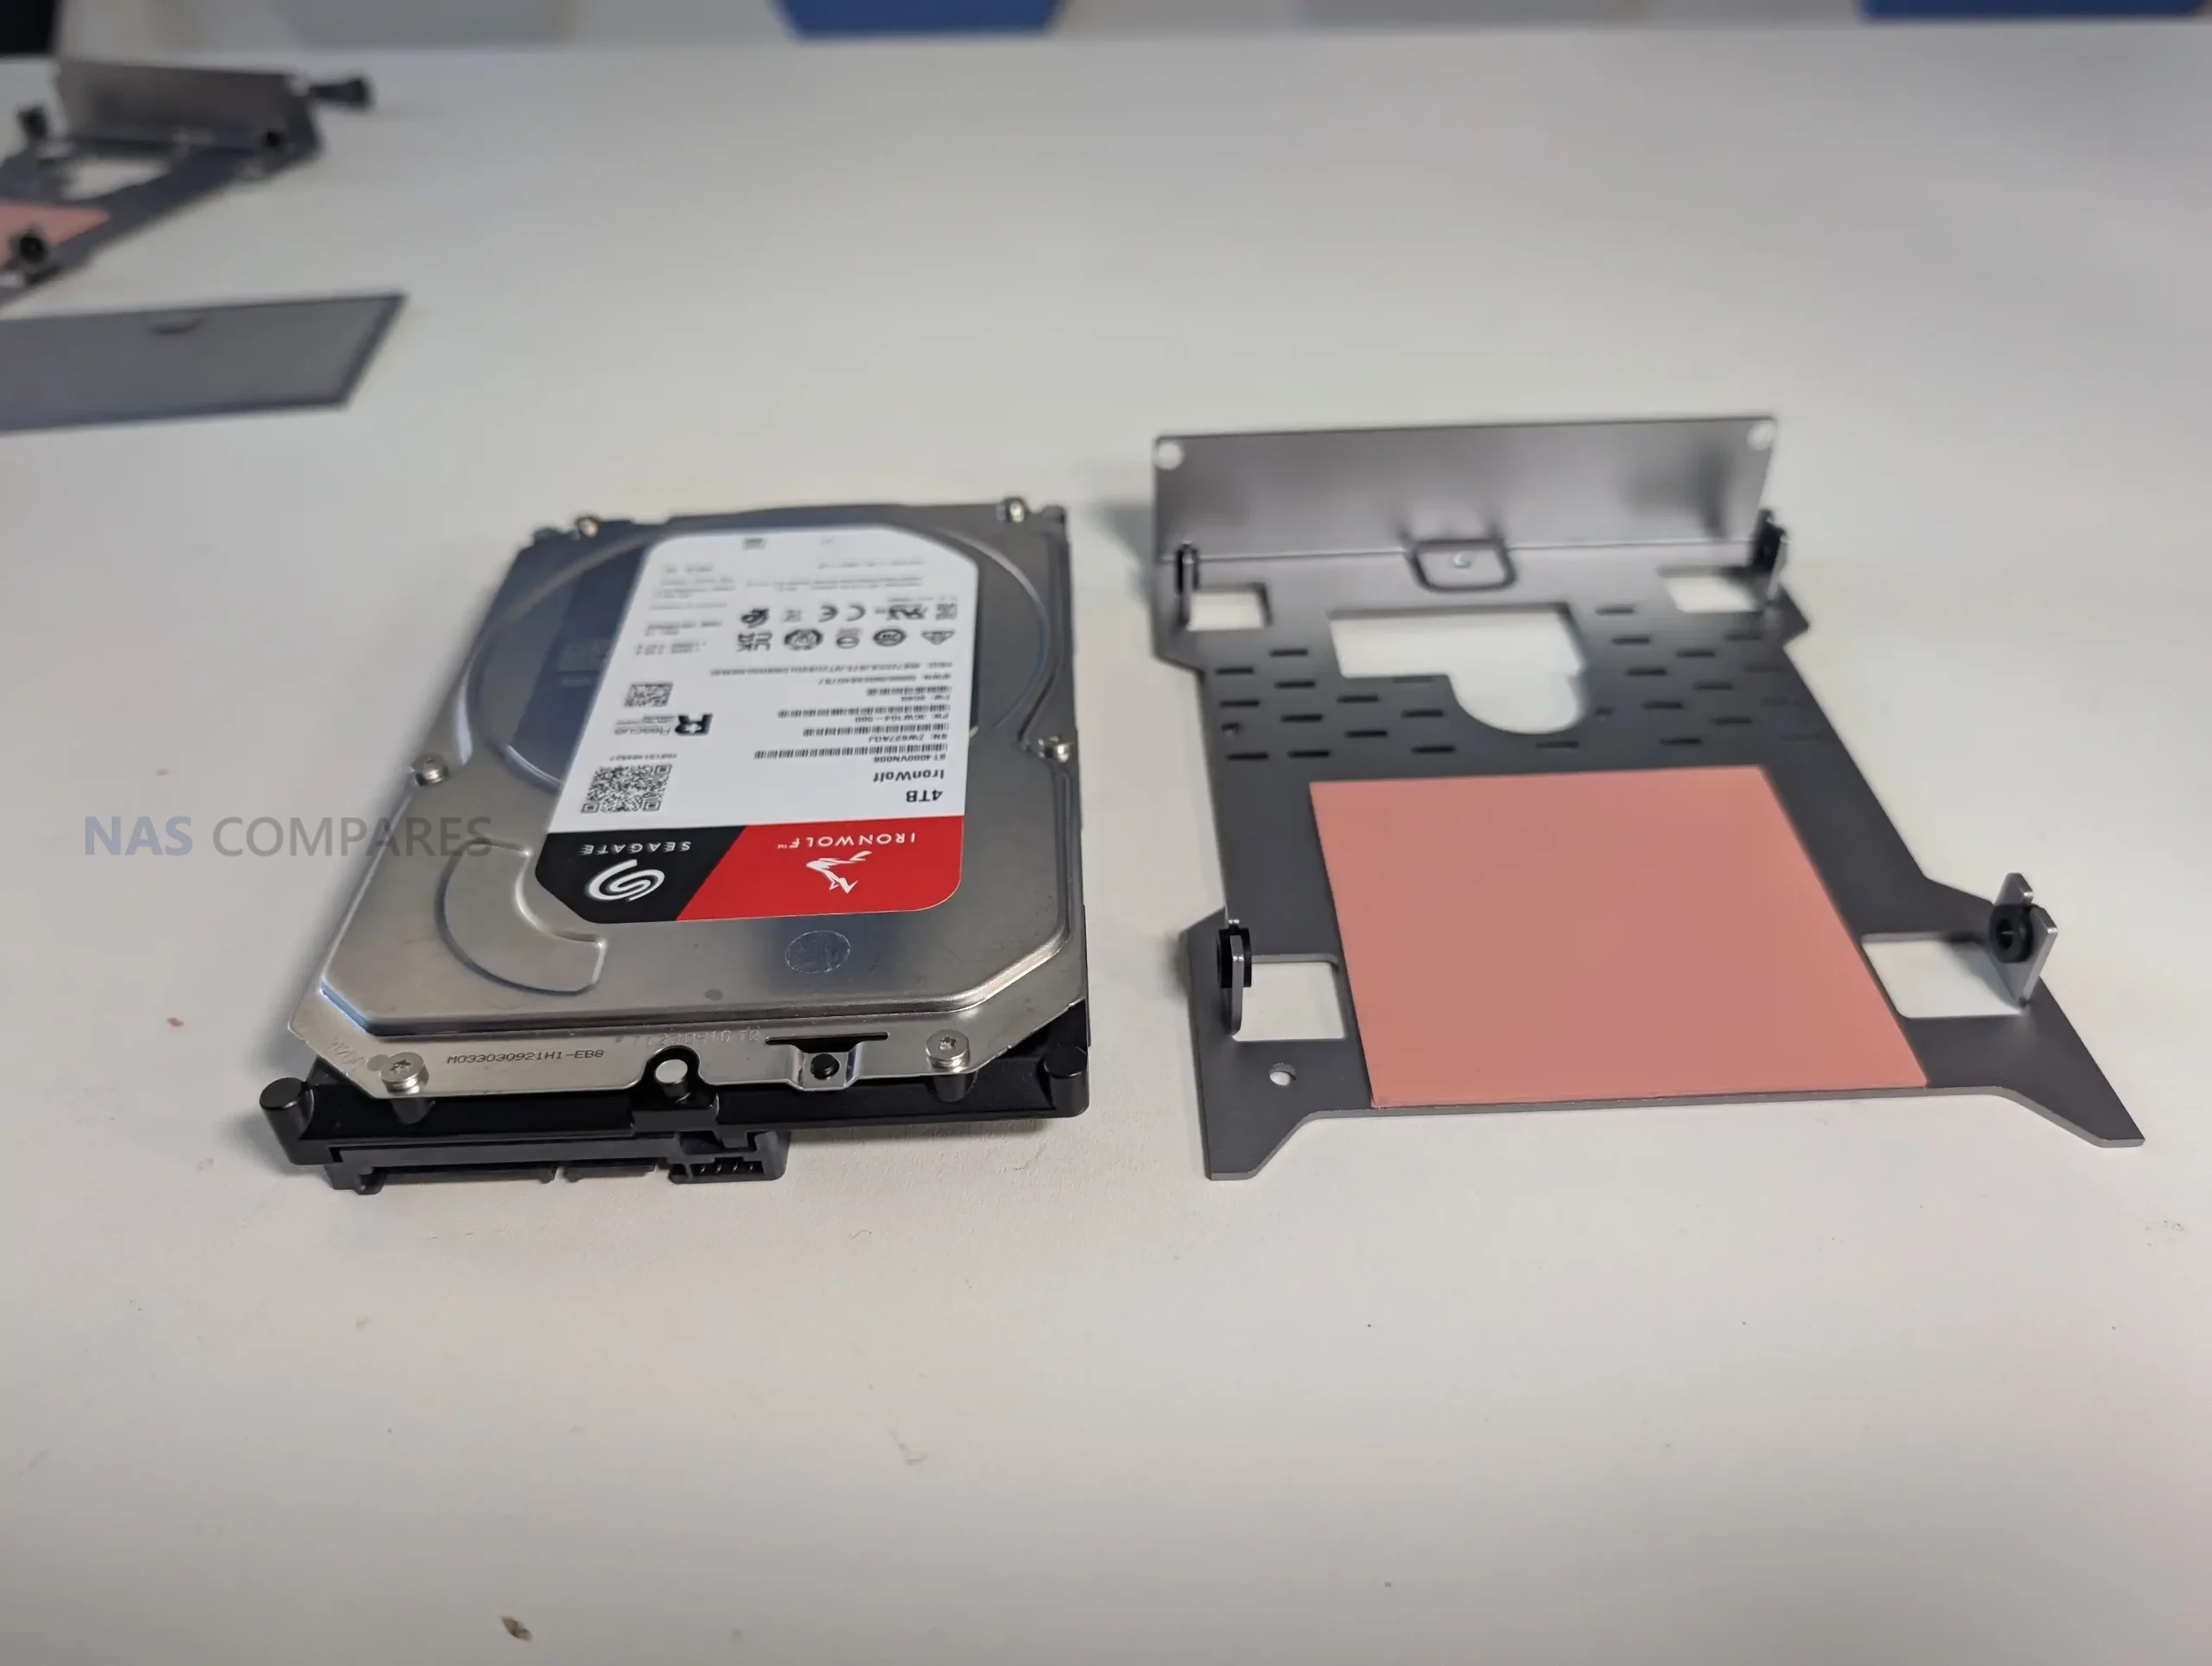
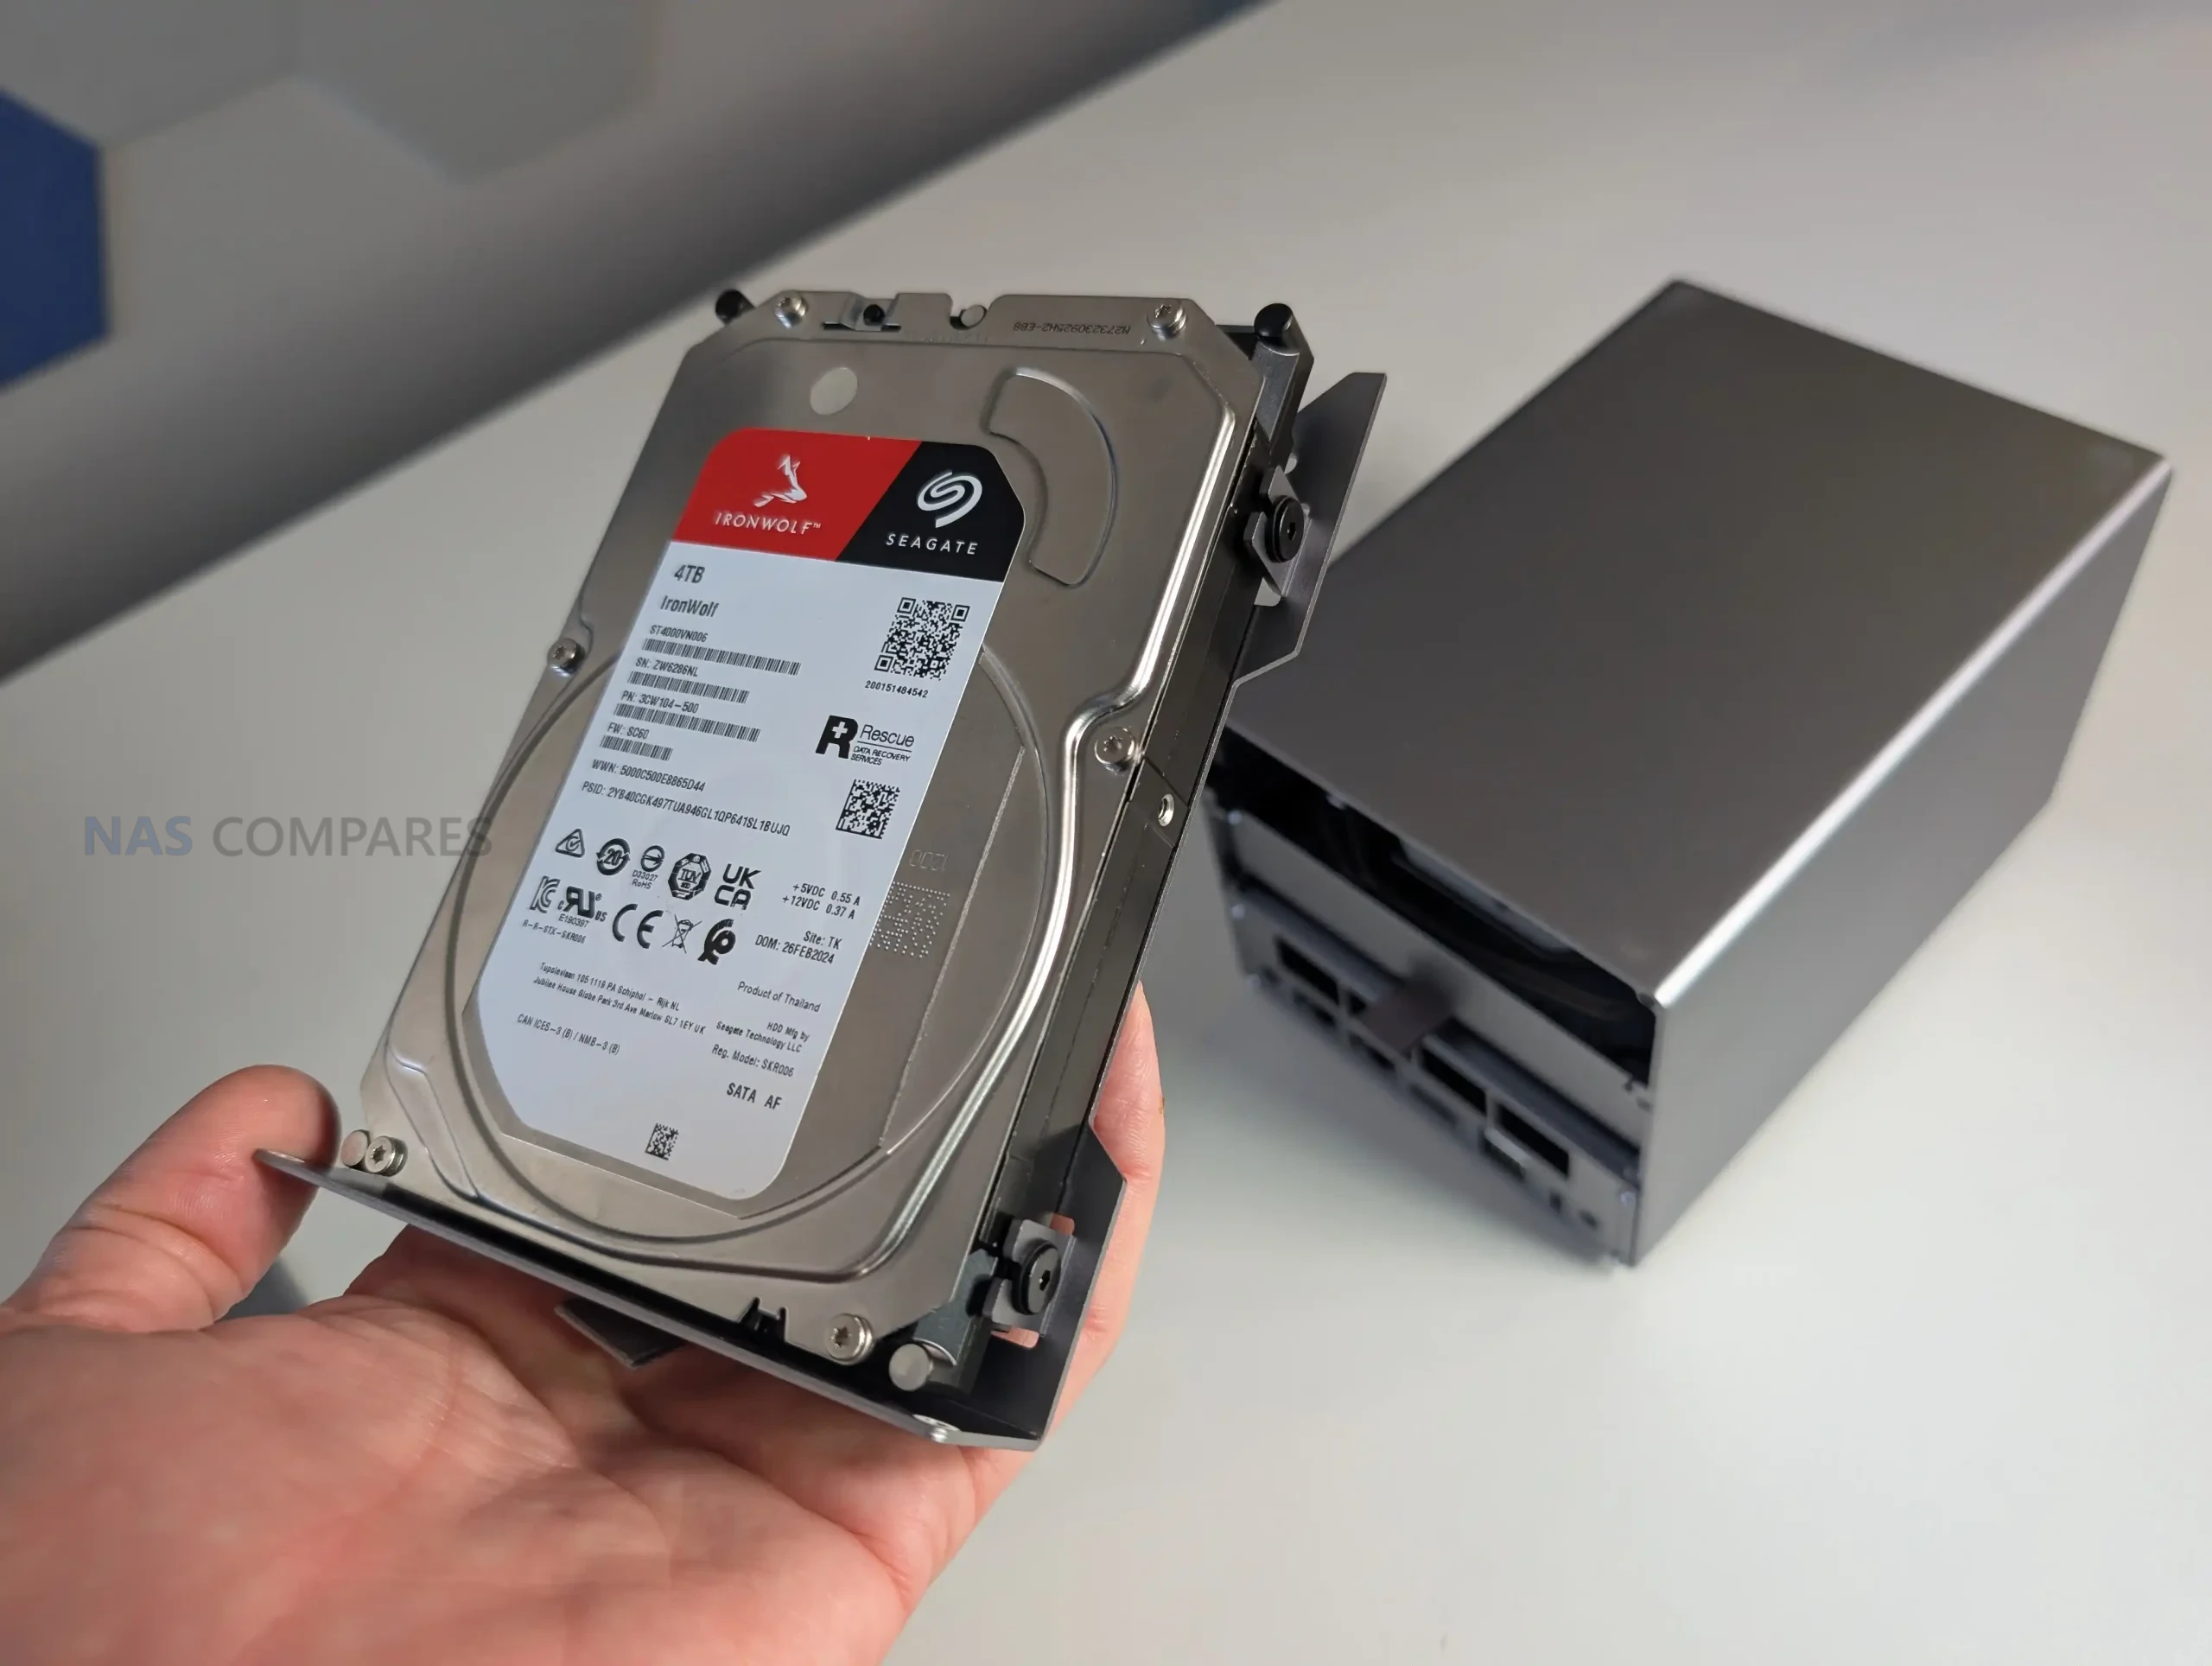
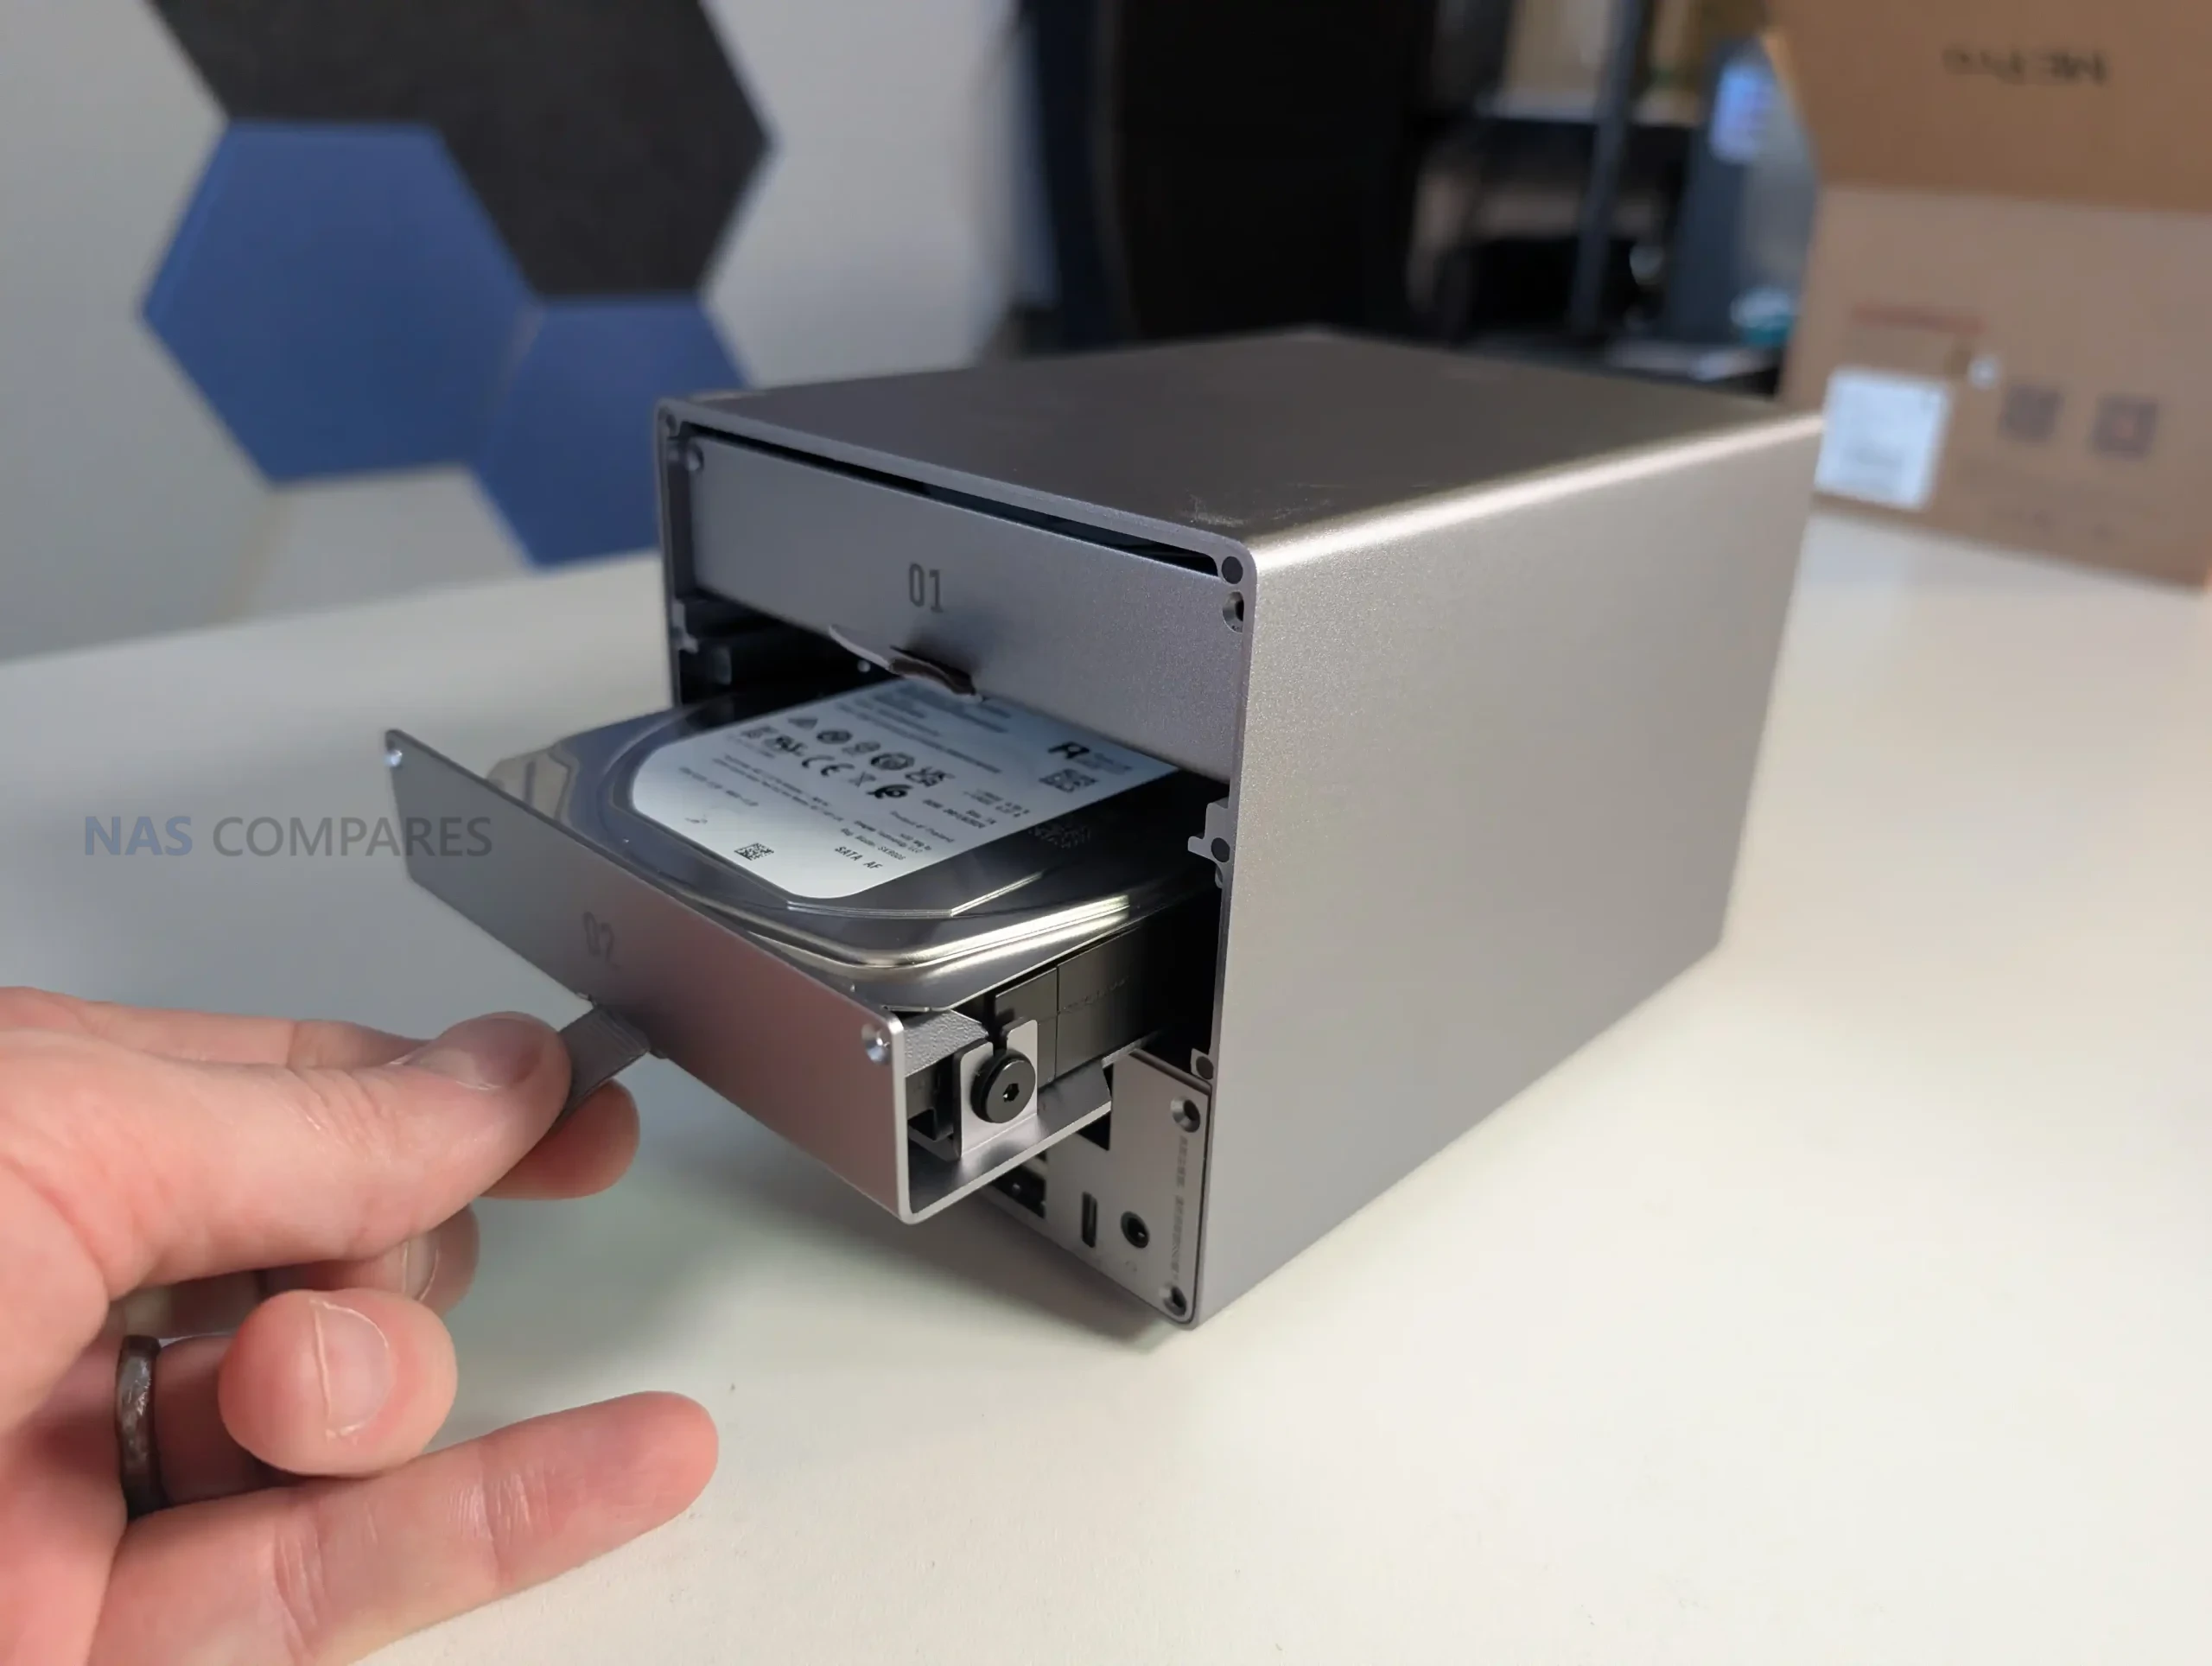
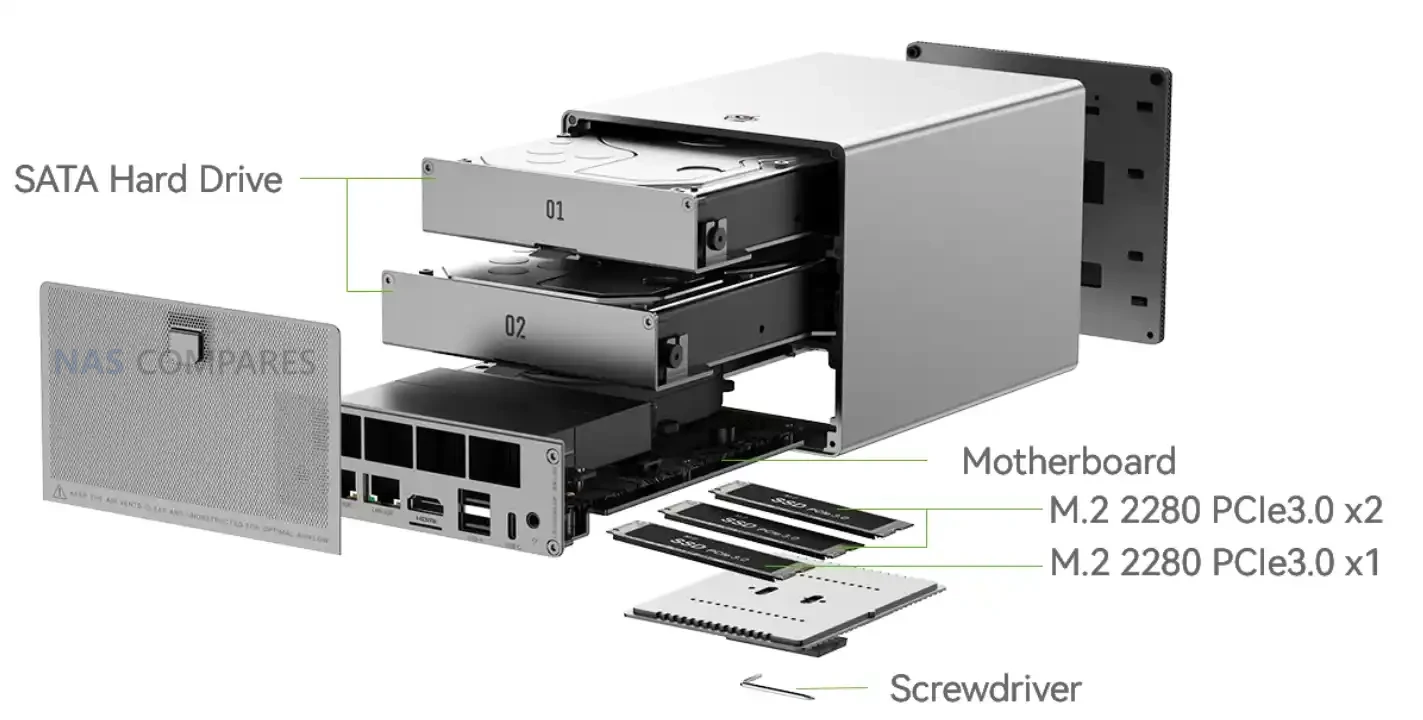
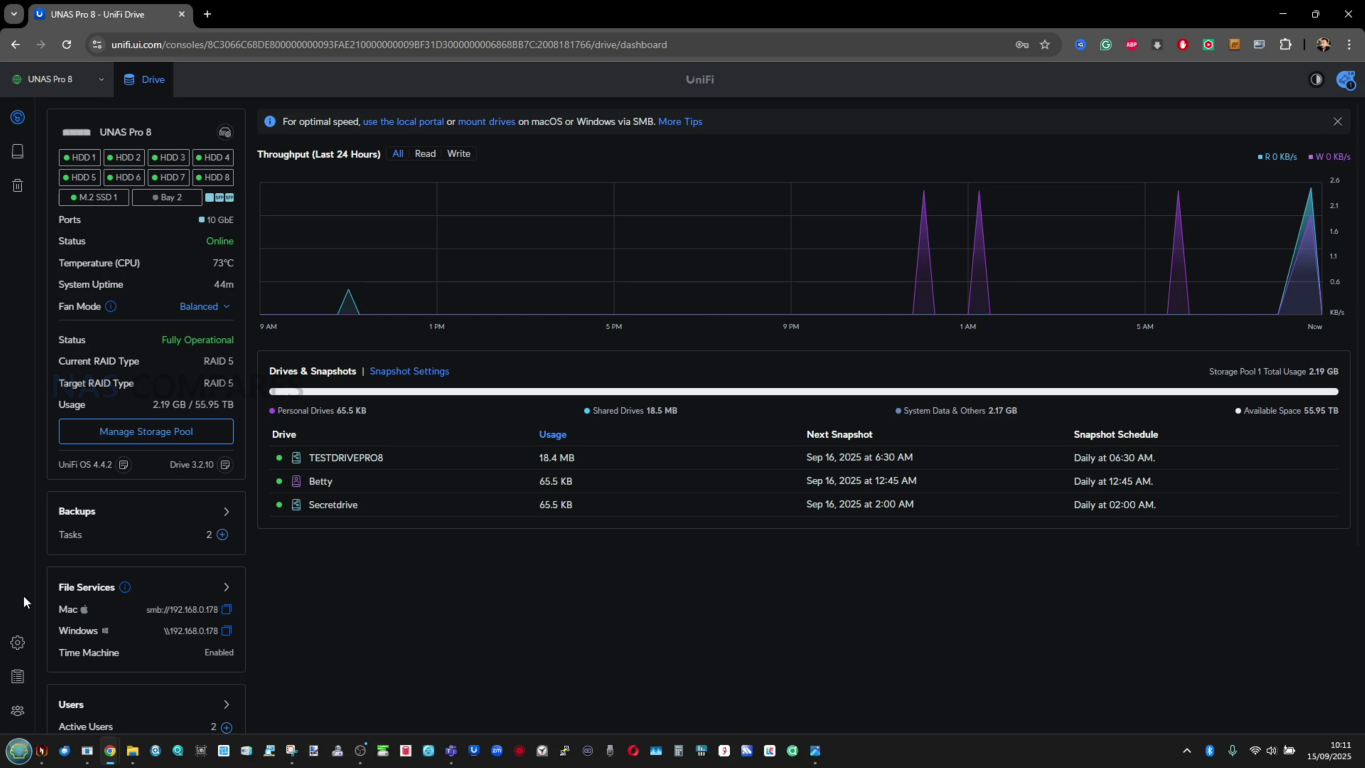
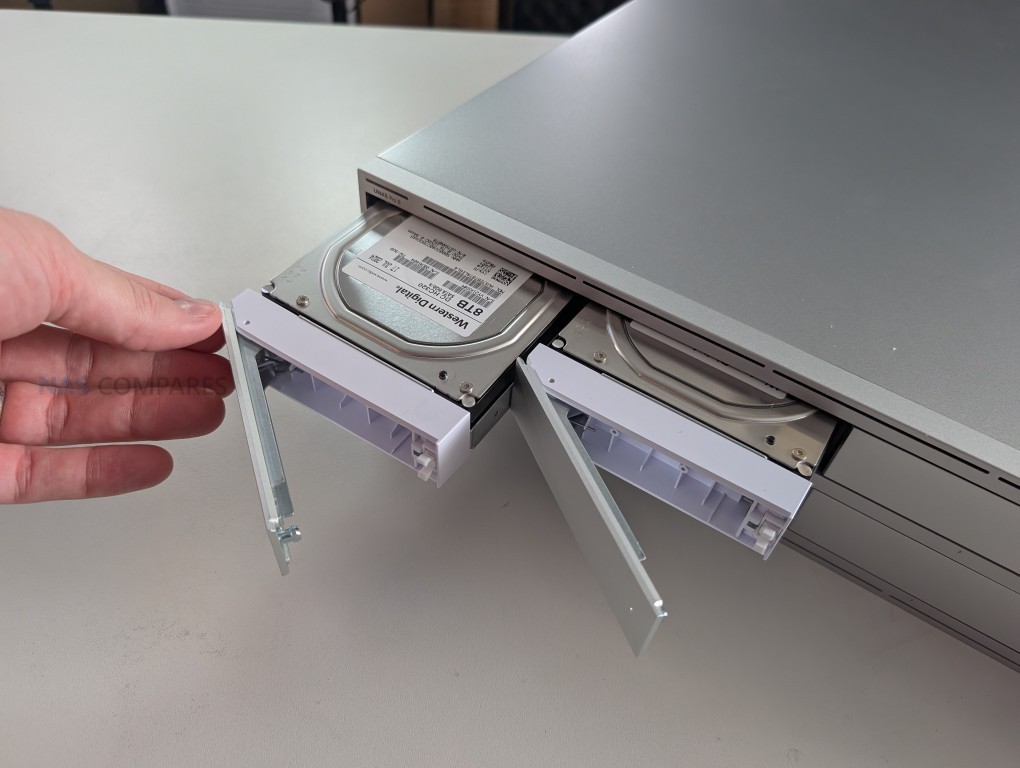
Across the front are 4 hot swap bays supporting both 3.5 inch and 2.5 inch SATA drives. The trays are set up for tool-less 3.5 inch HDD installation with a click-in fit, while 2.5 inch SSDs still require screws to secure them properly. Each bay has status lighting, and the front panel also provides system level indicators so you can identify basic state and drive activity at a glance without logging into the interface. The trays feel rigid and spring-loaded, but they are not lockable, which is a practical consideration if the unit is placed in a shared rack or anywhere physical access is not strictly controlled.

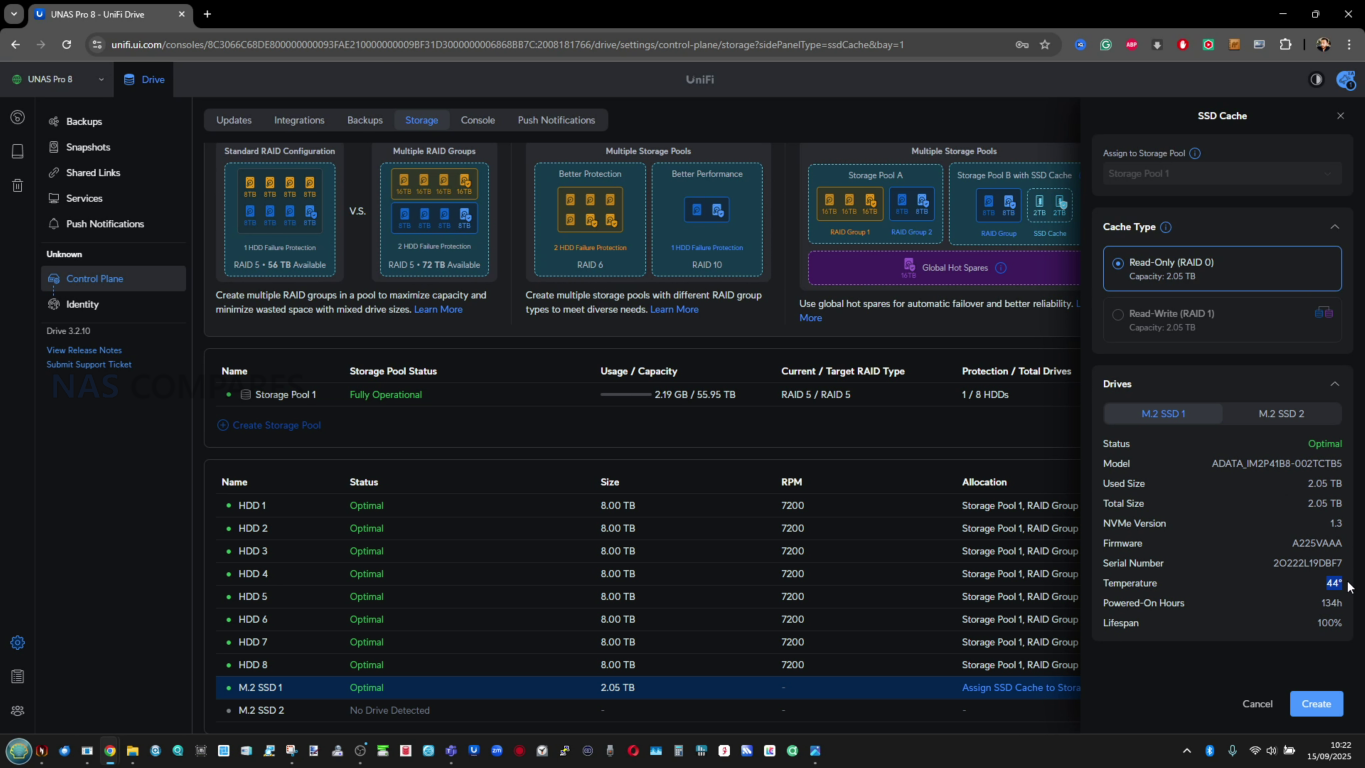
From a capacity and planning perspective, this system is defined by its fixed 4 bay layout. You can configure a conventional RAID group within those bays, but there is no built-in path to scale beyond the internal slots, and there is no supported external expansion shelf option to push the same chassis further later on. That means the decision on drive sizes and redundancy level matters upfront, because the ceiling is reached quickly compared with higher bay count rack units. In a small rack deployment, it also means the unit is either a compact standalone store or part of a broader multi-NAS approach rather than a single box that grows over time.

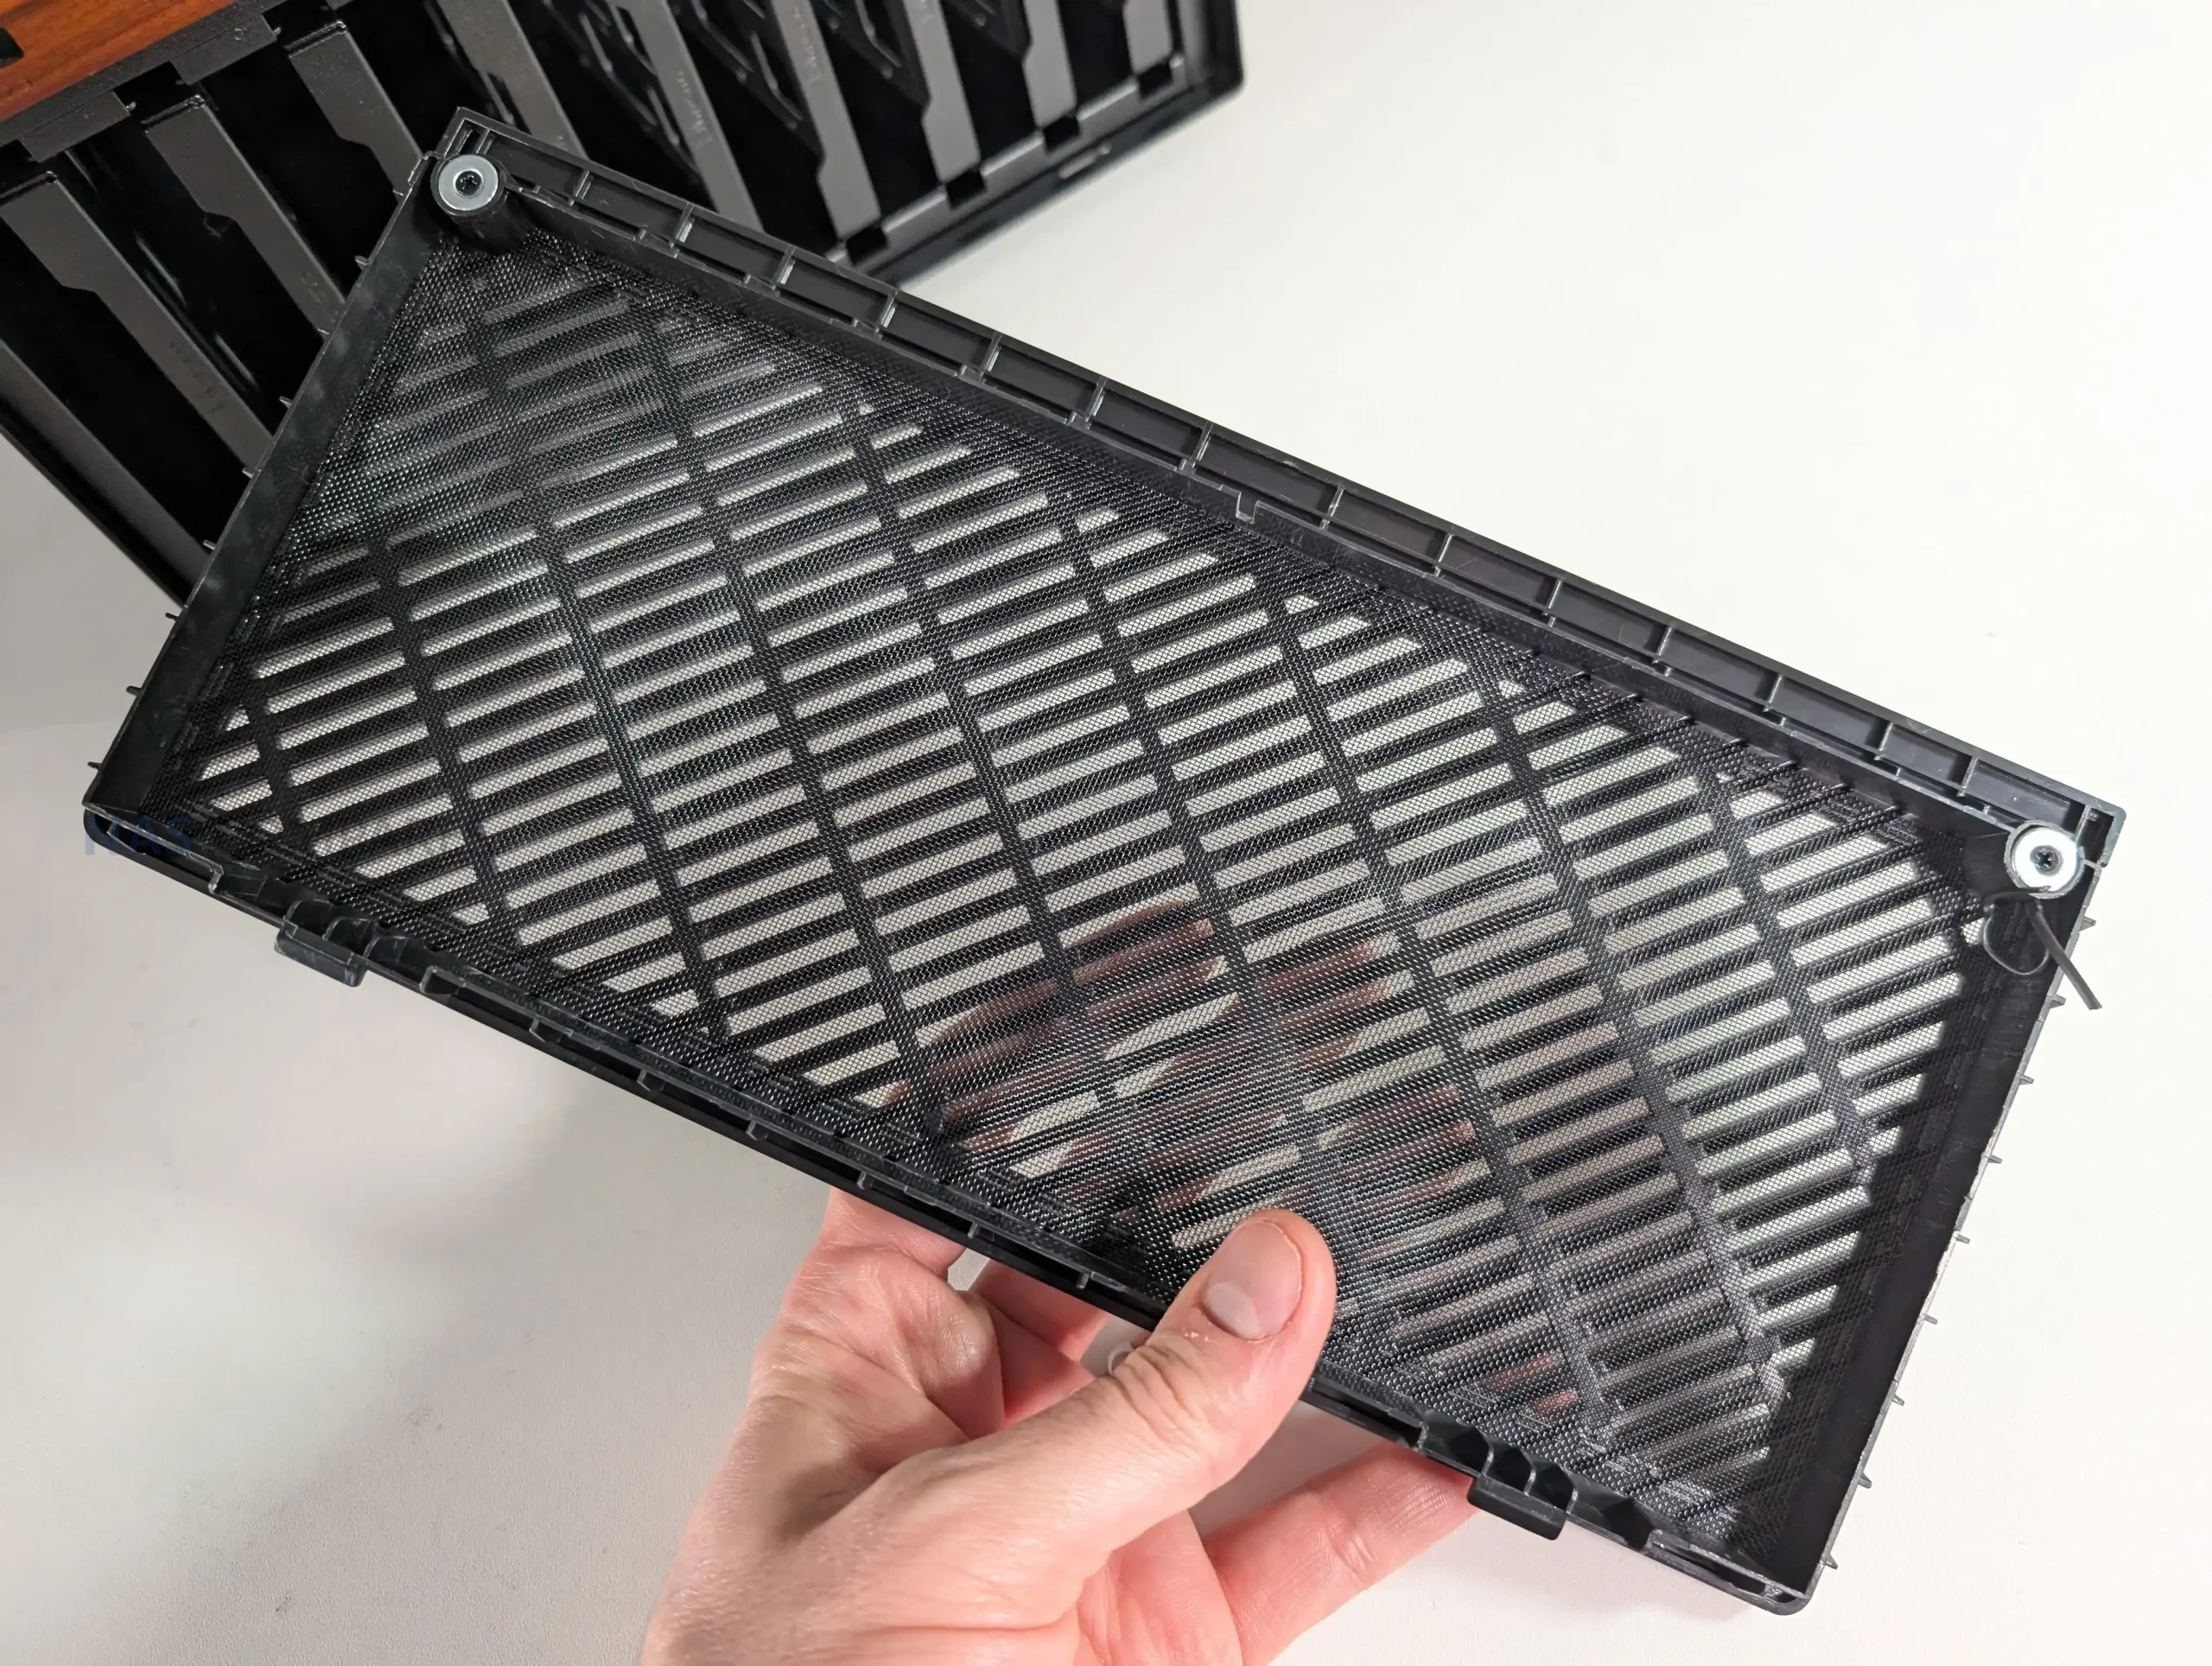
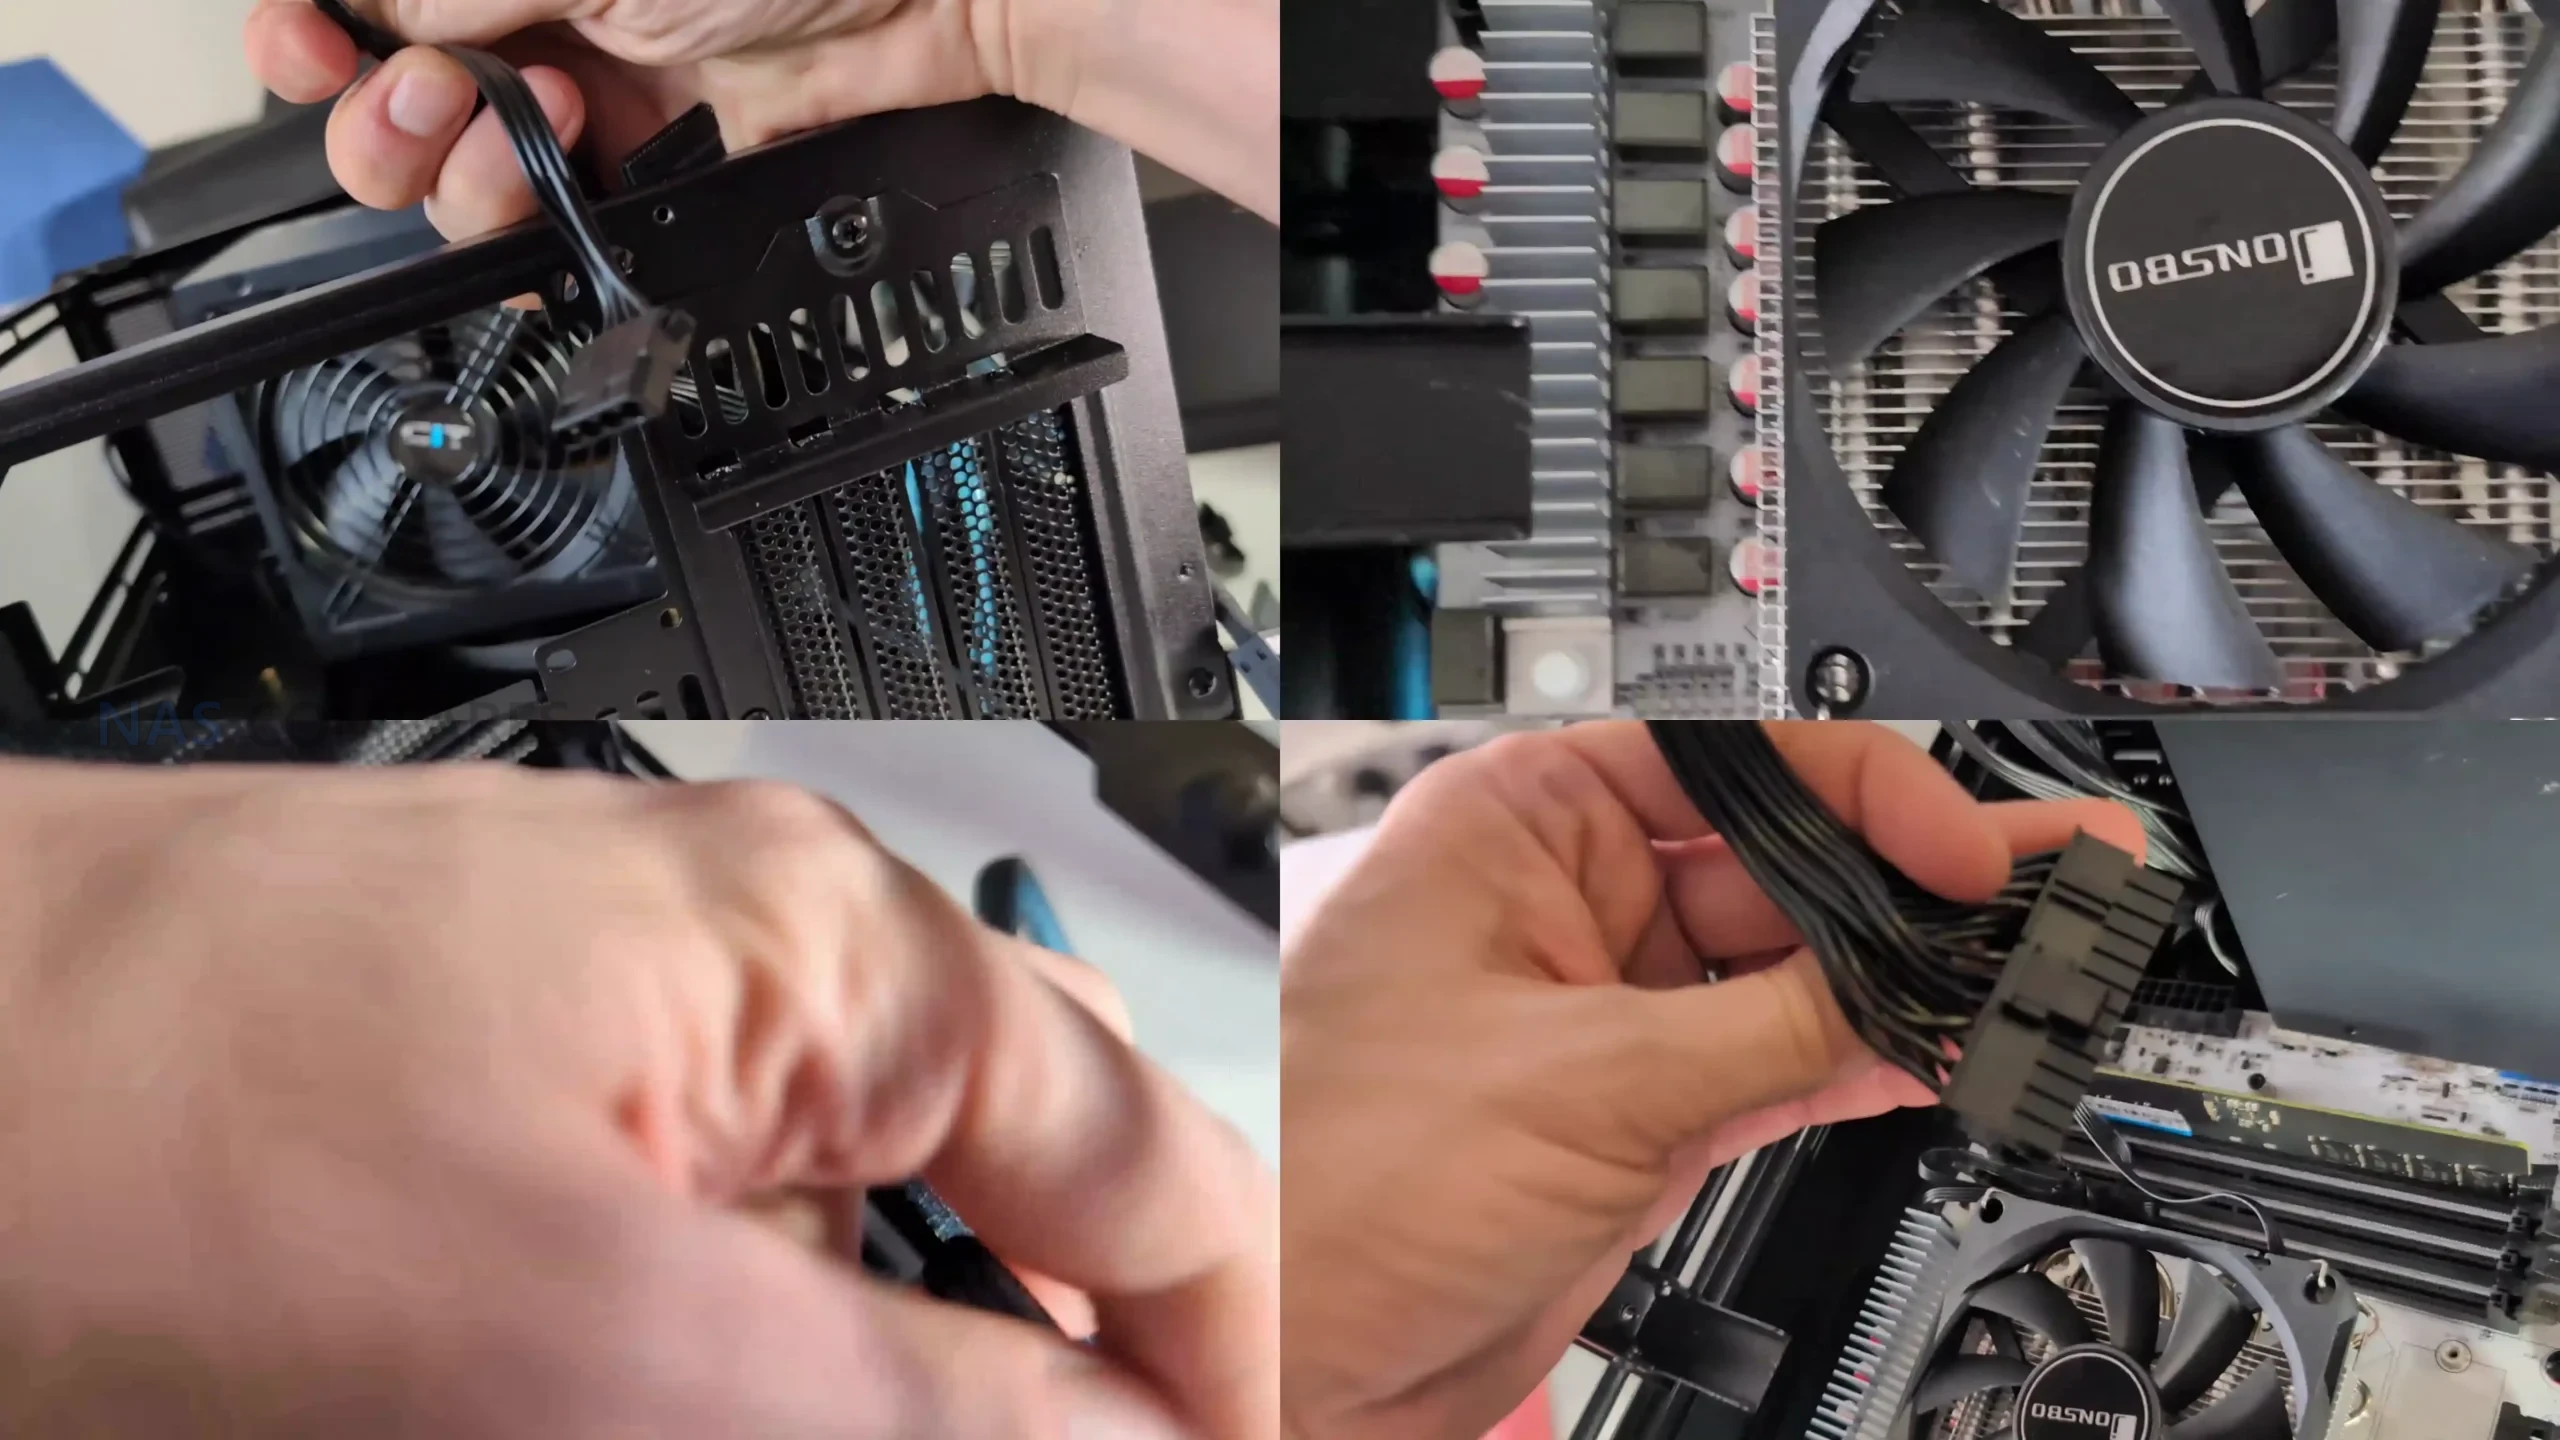
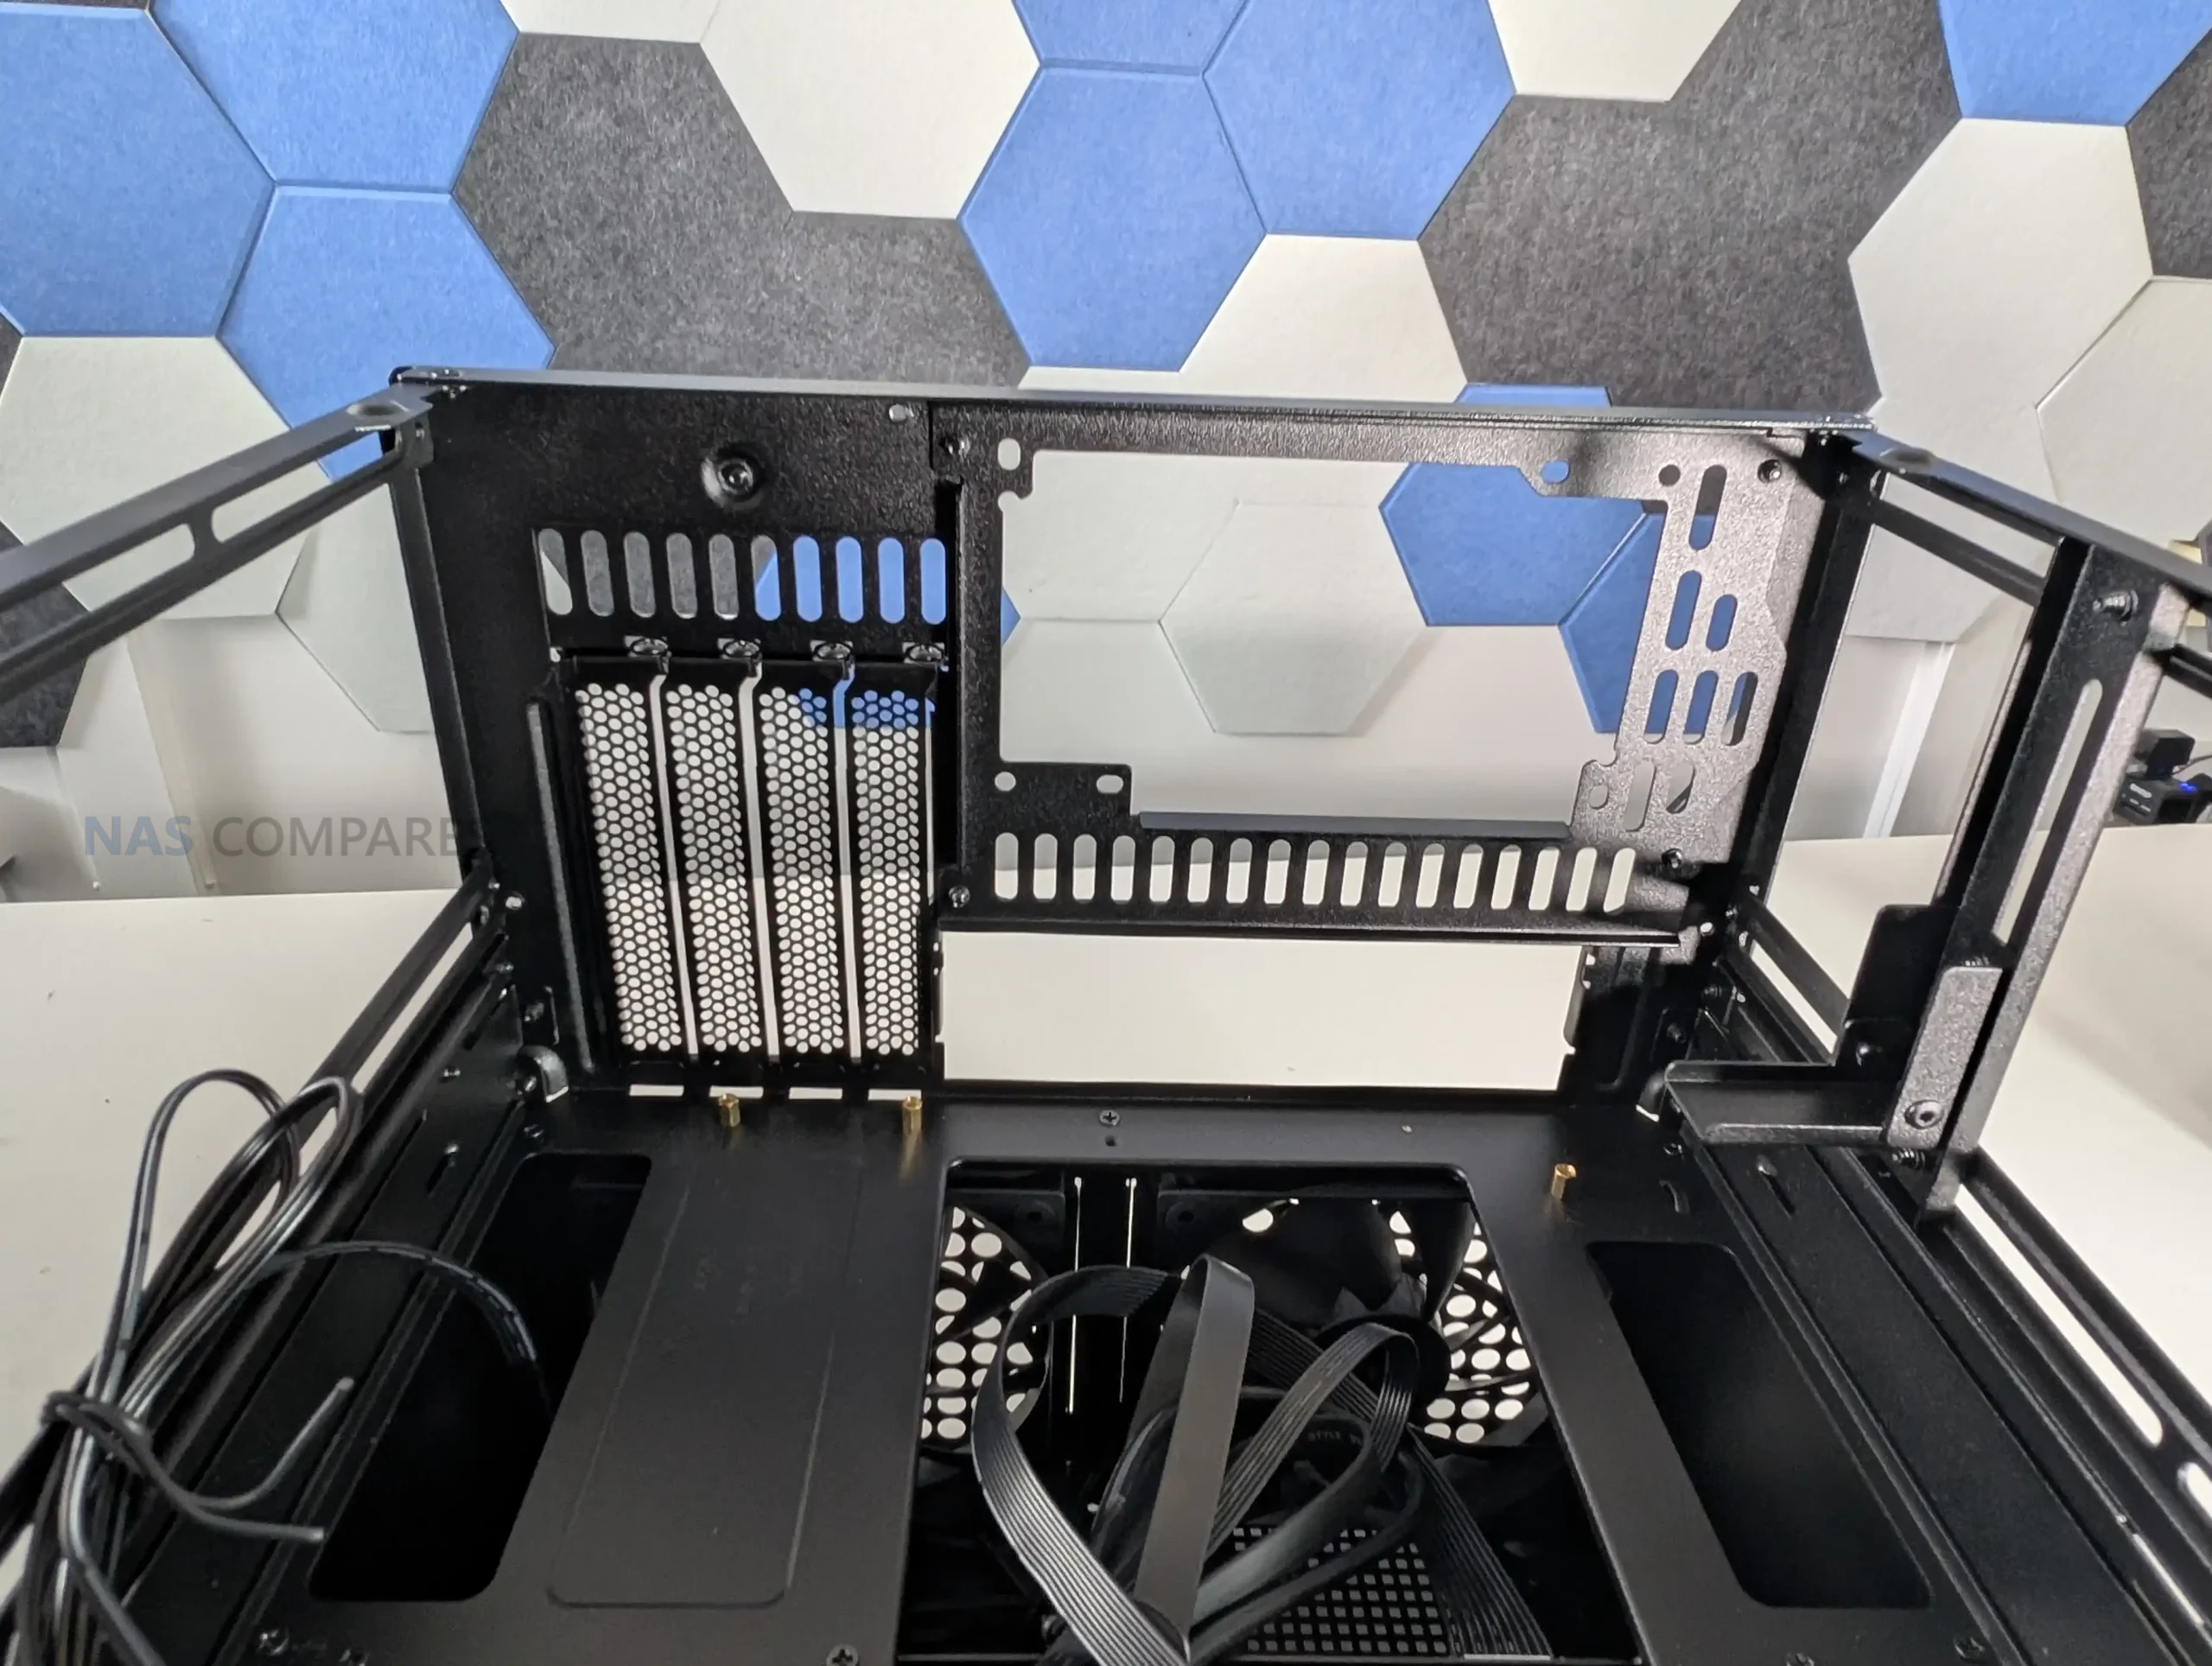
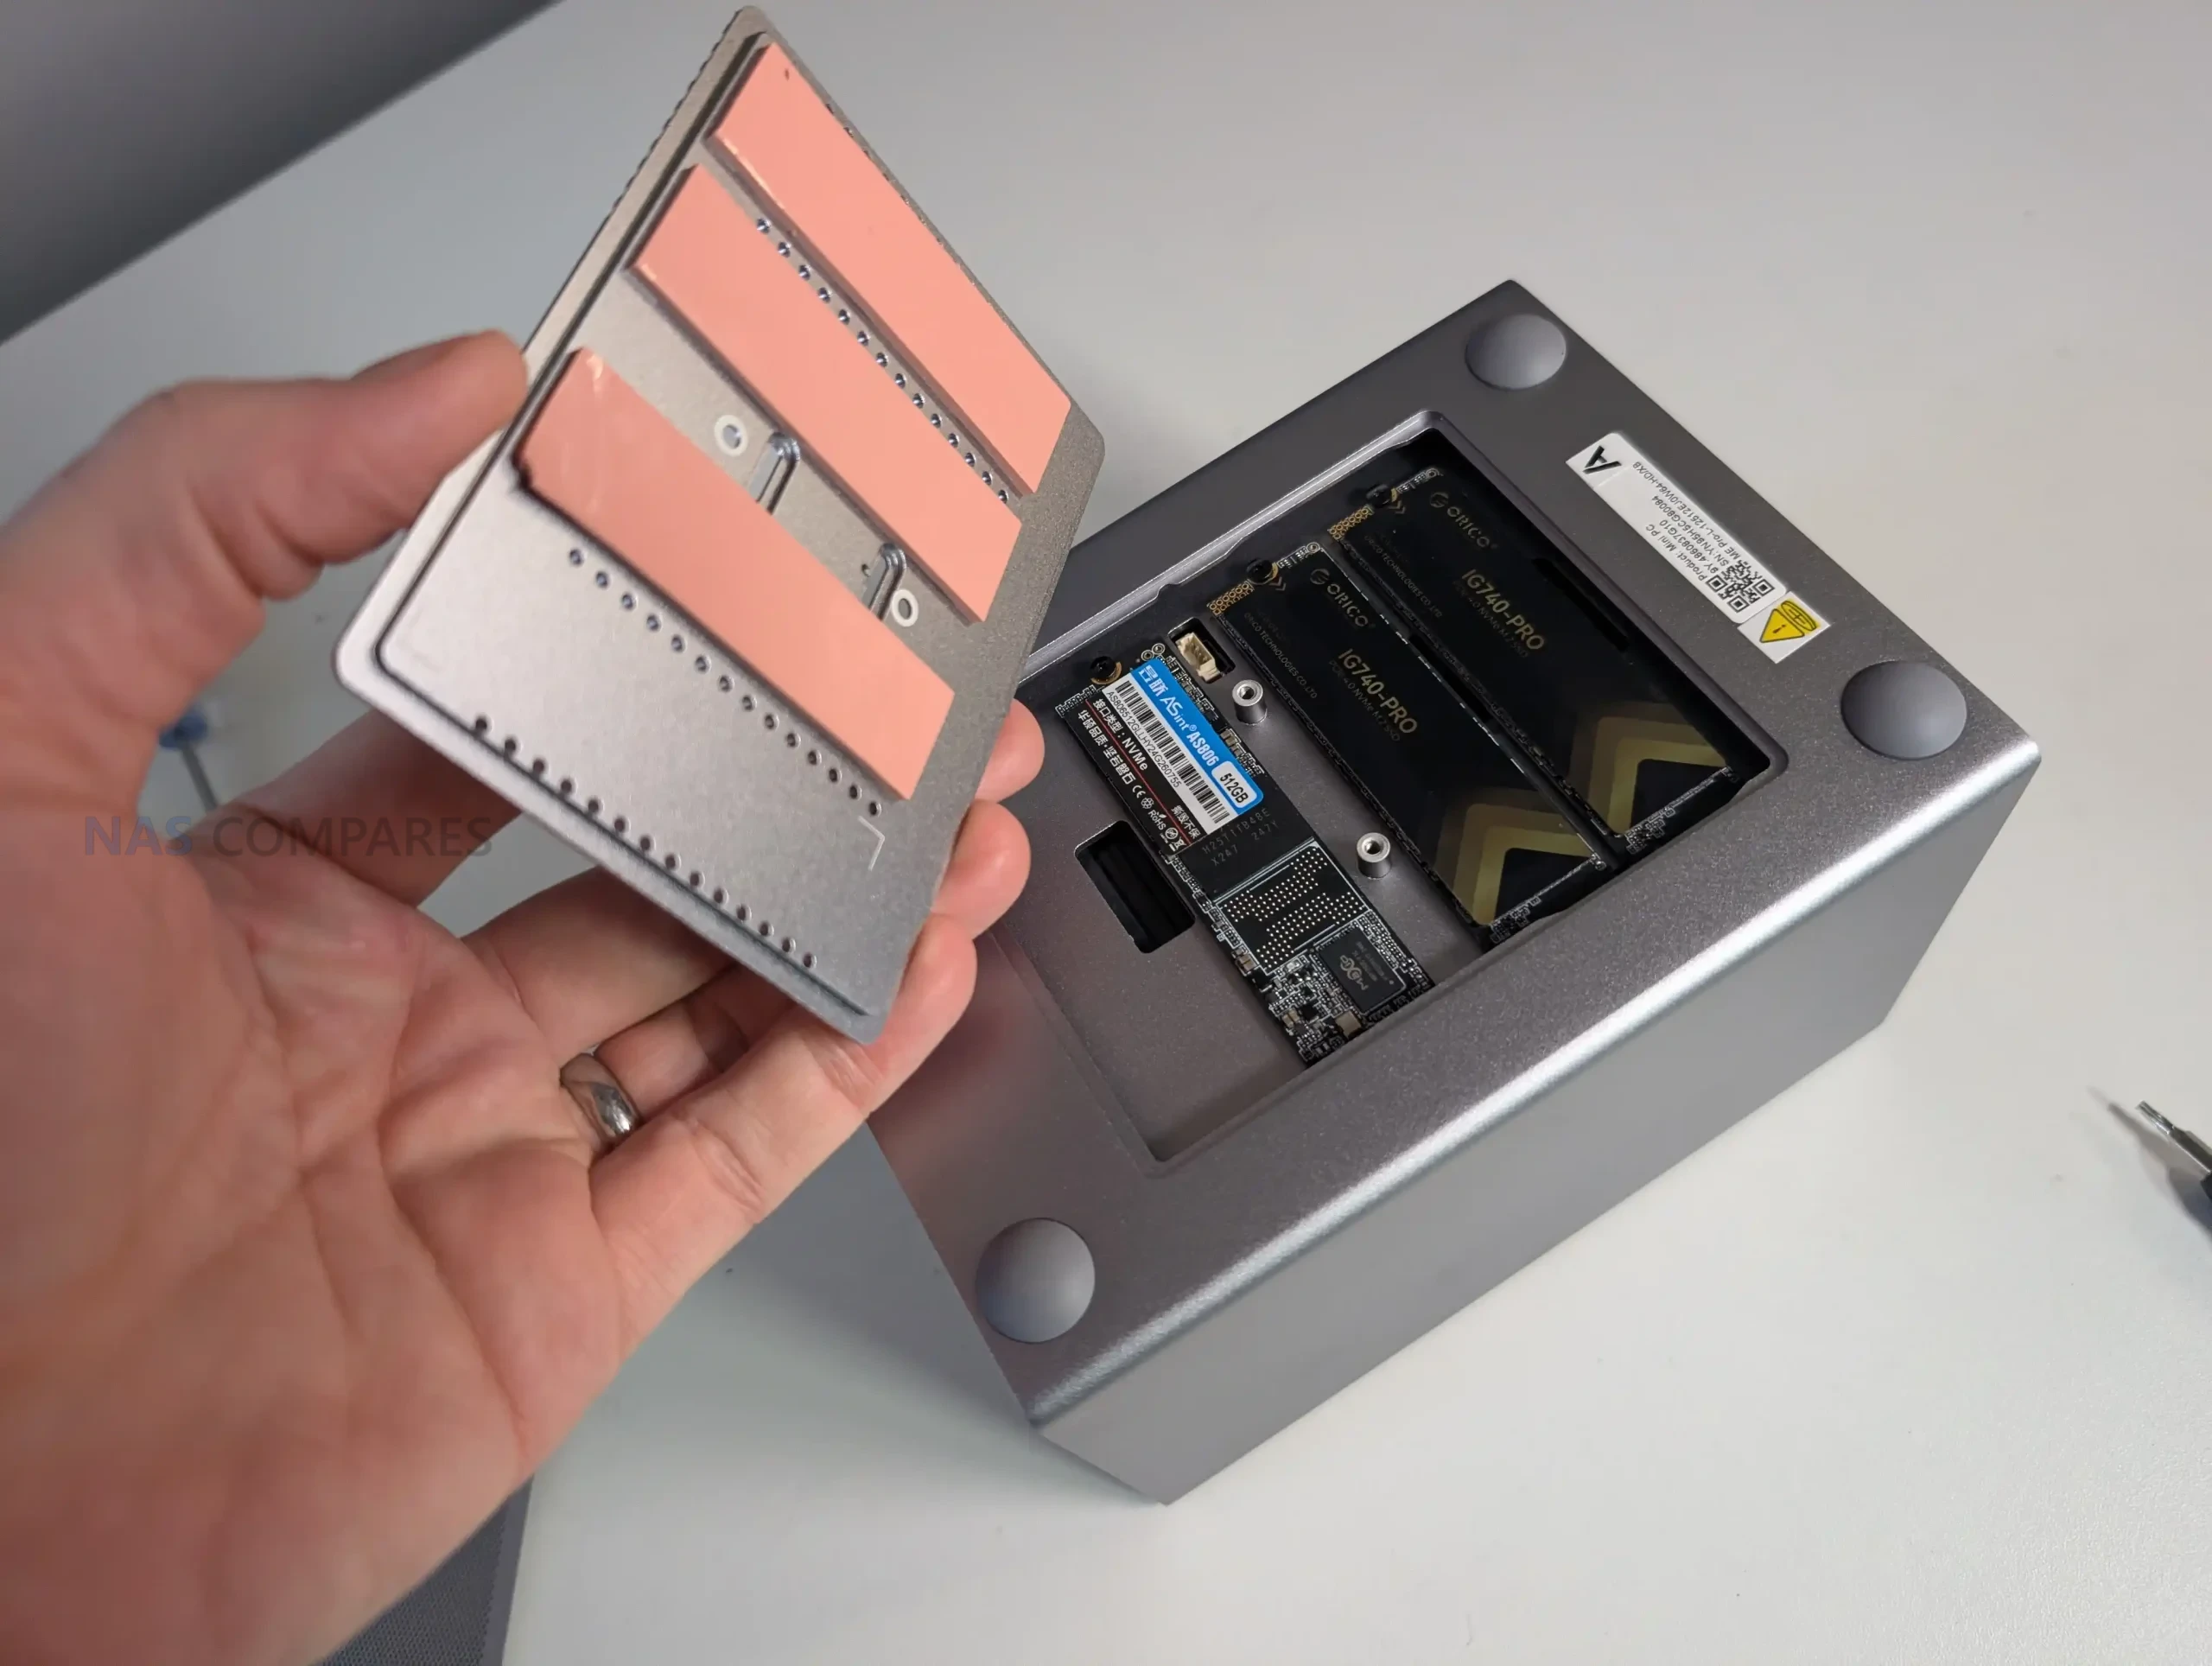
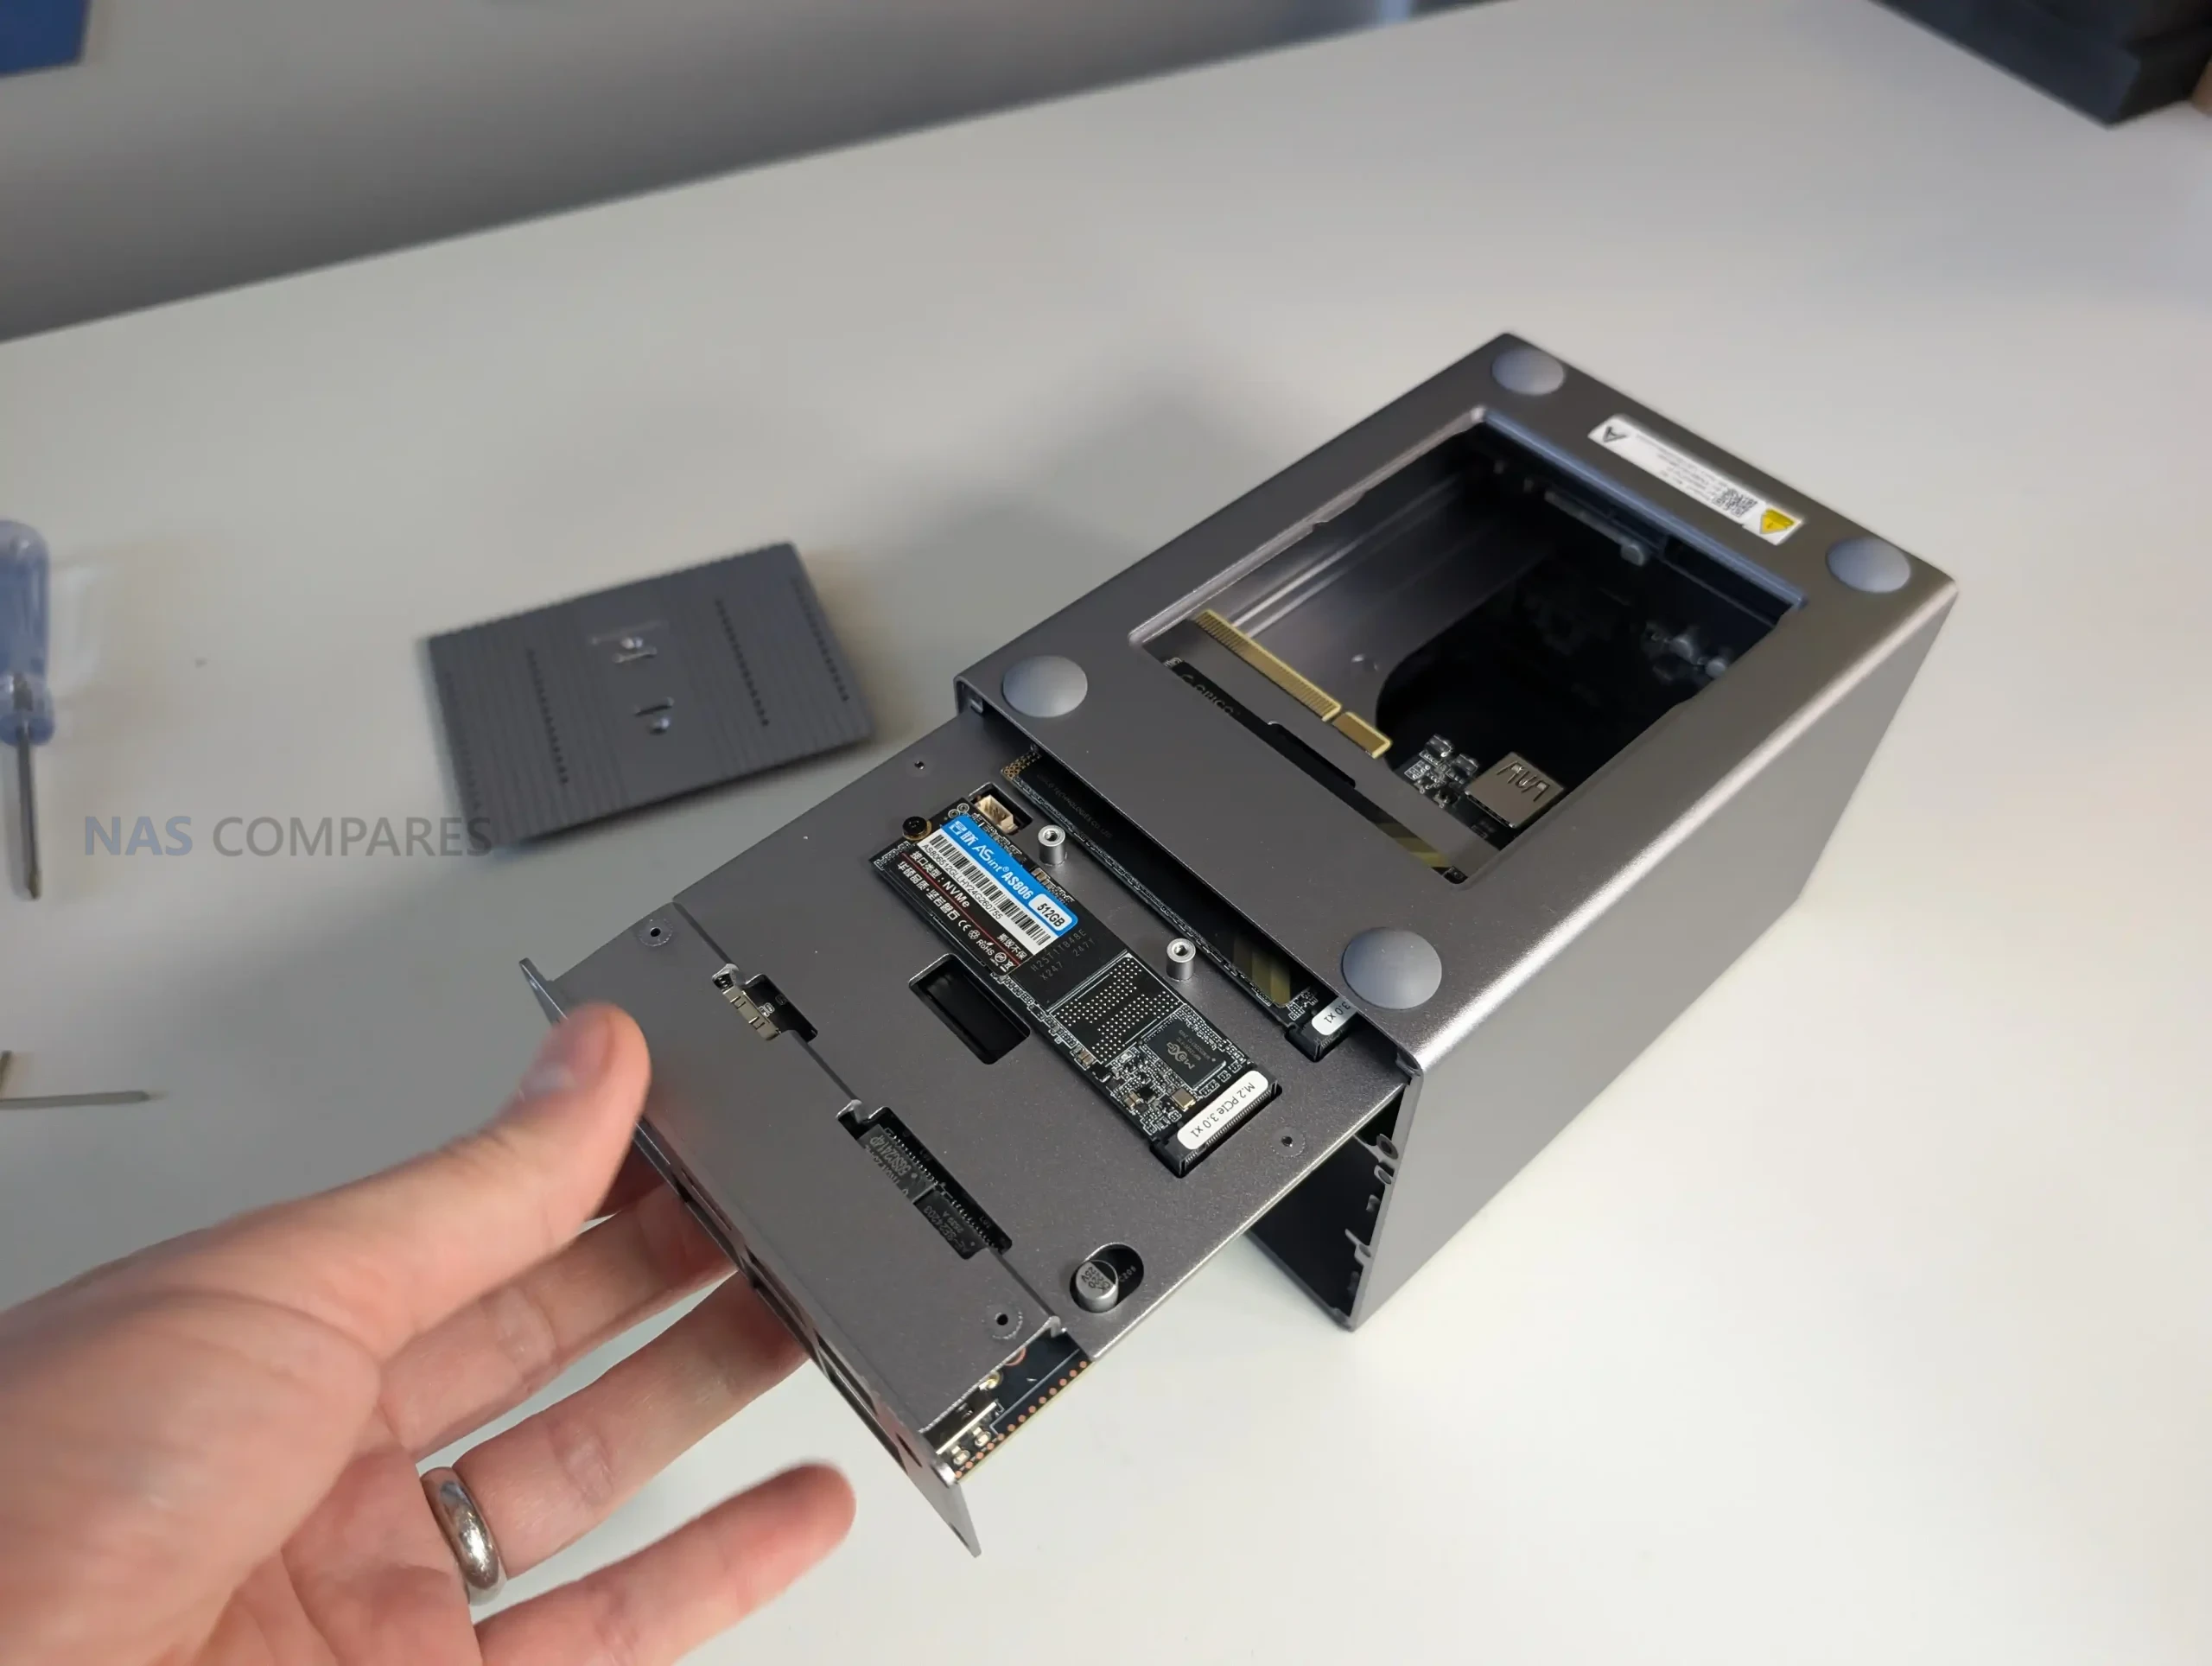
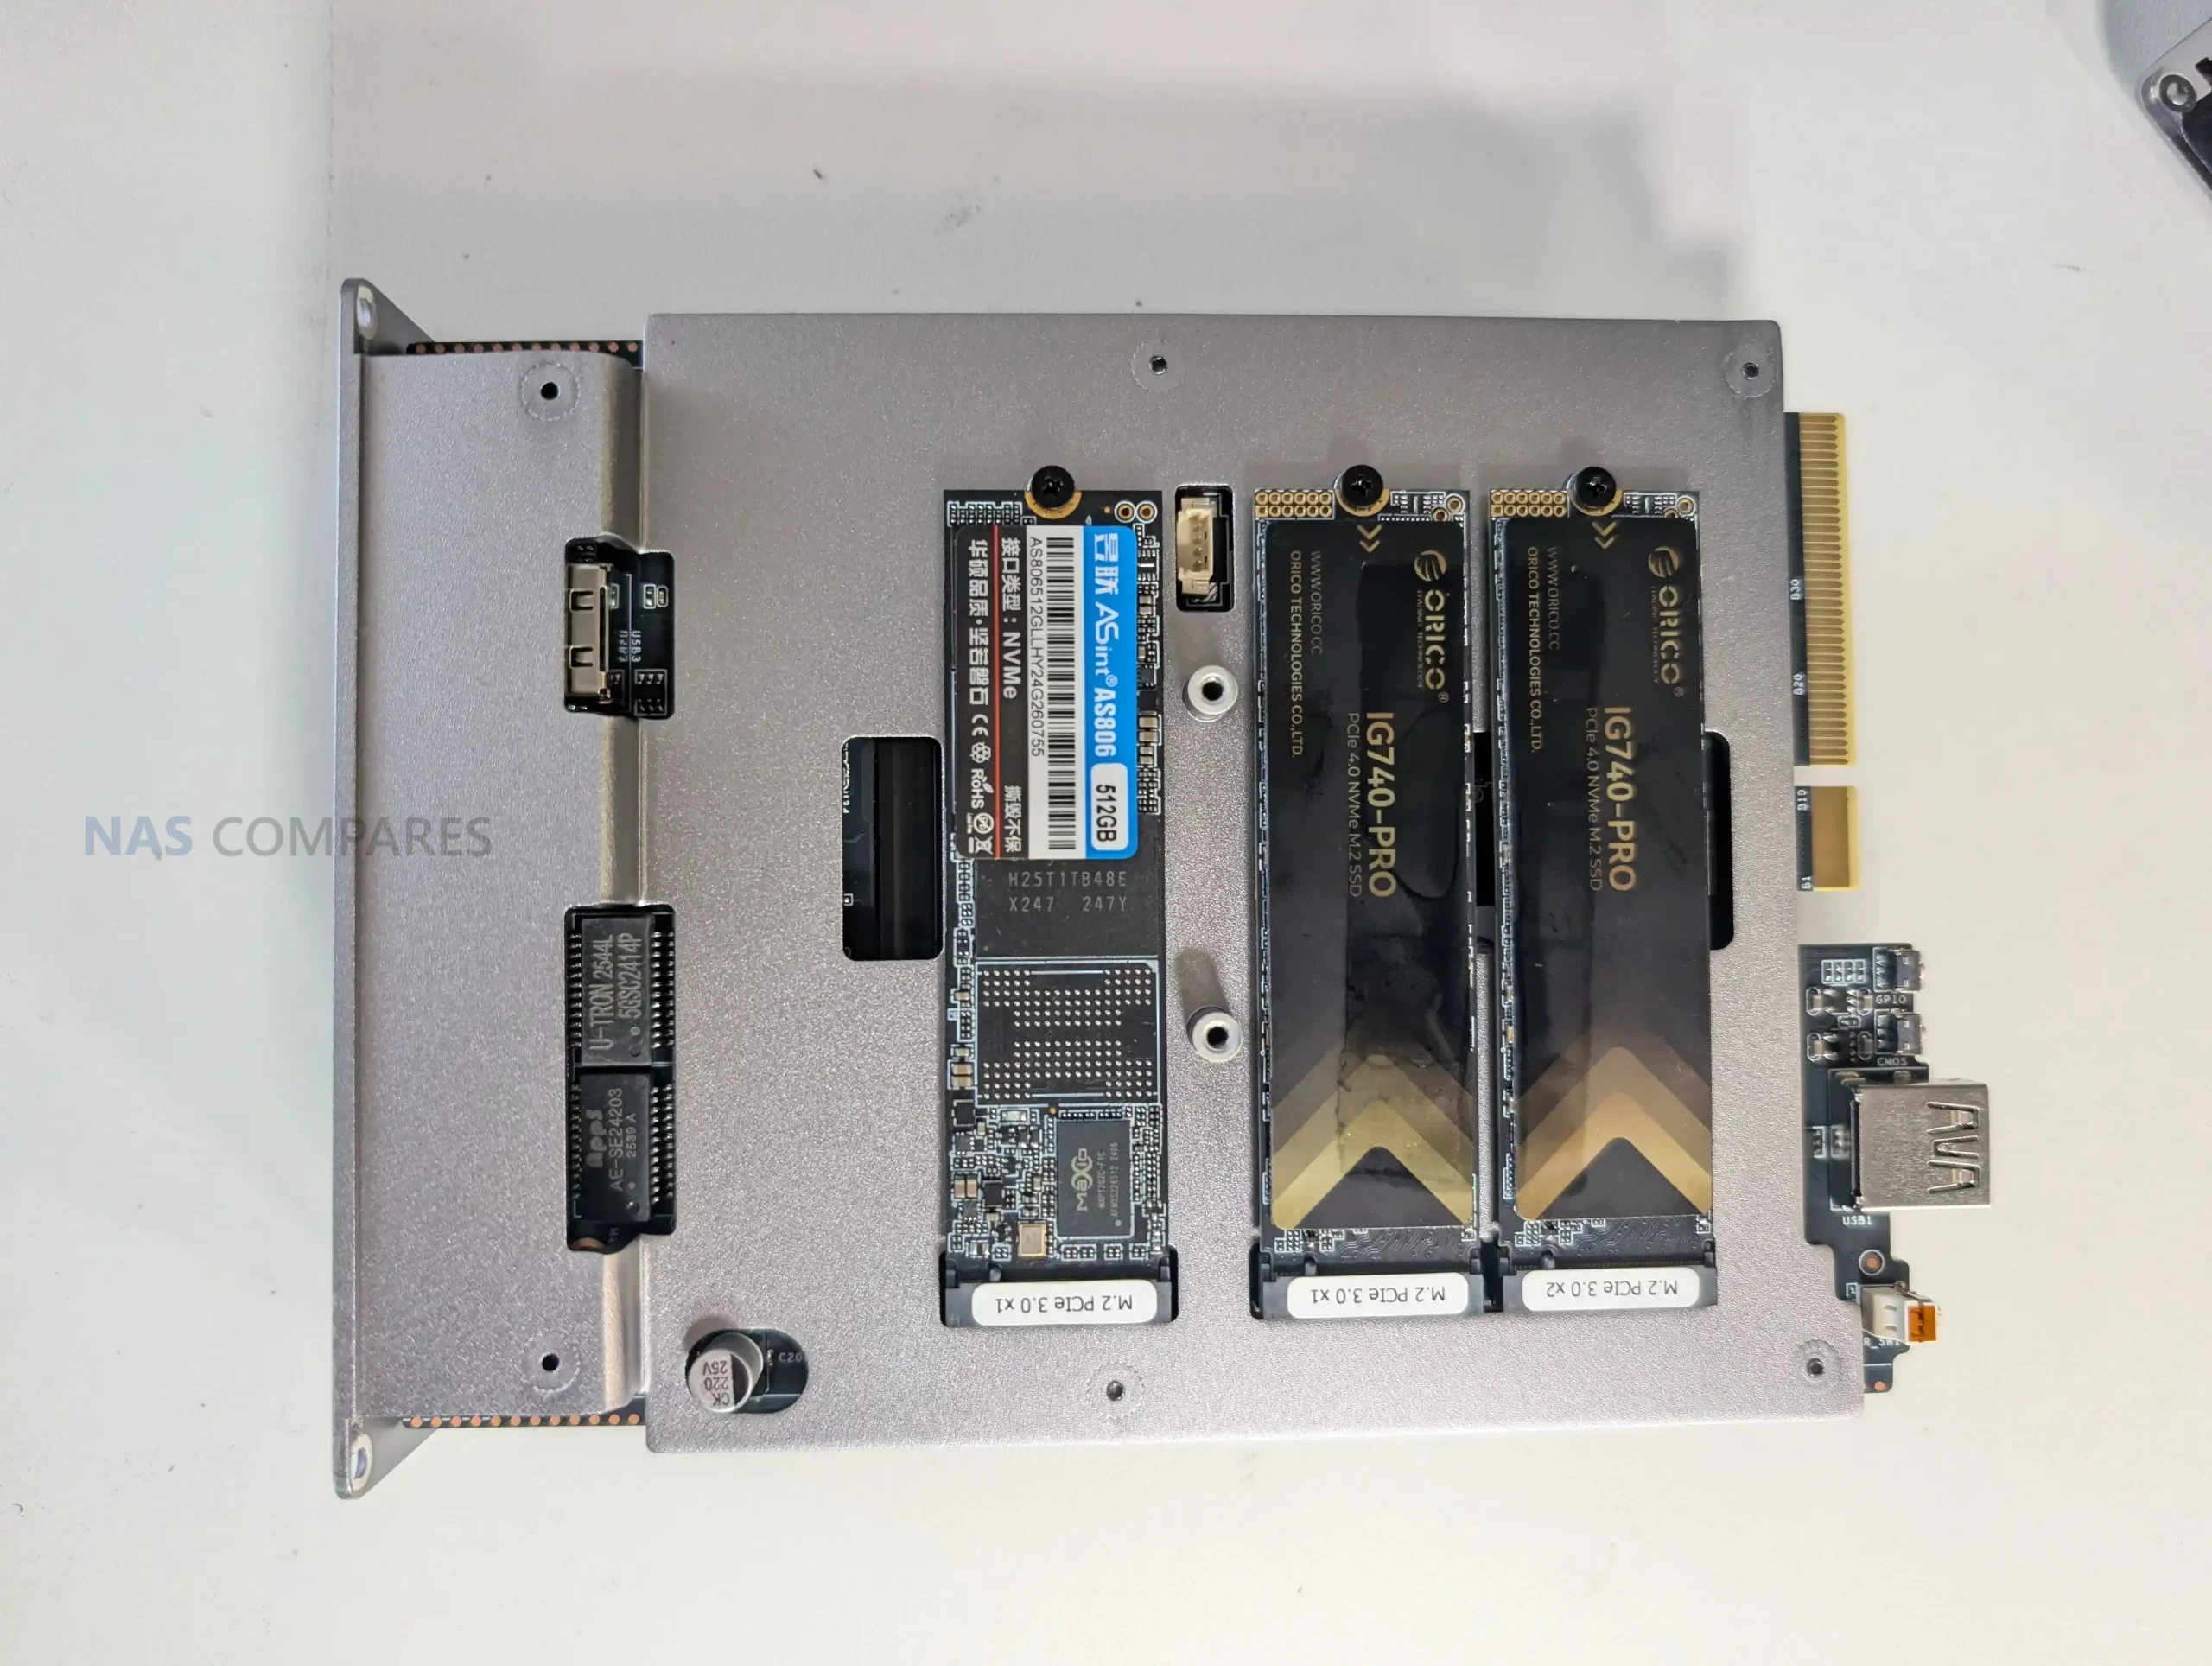
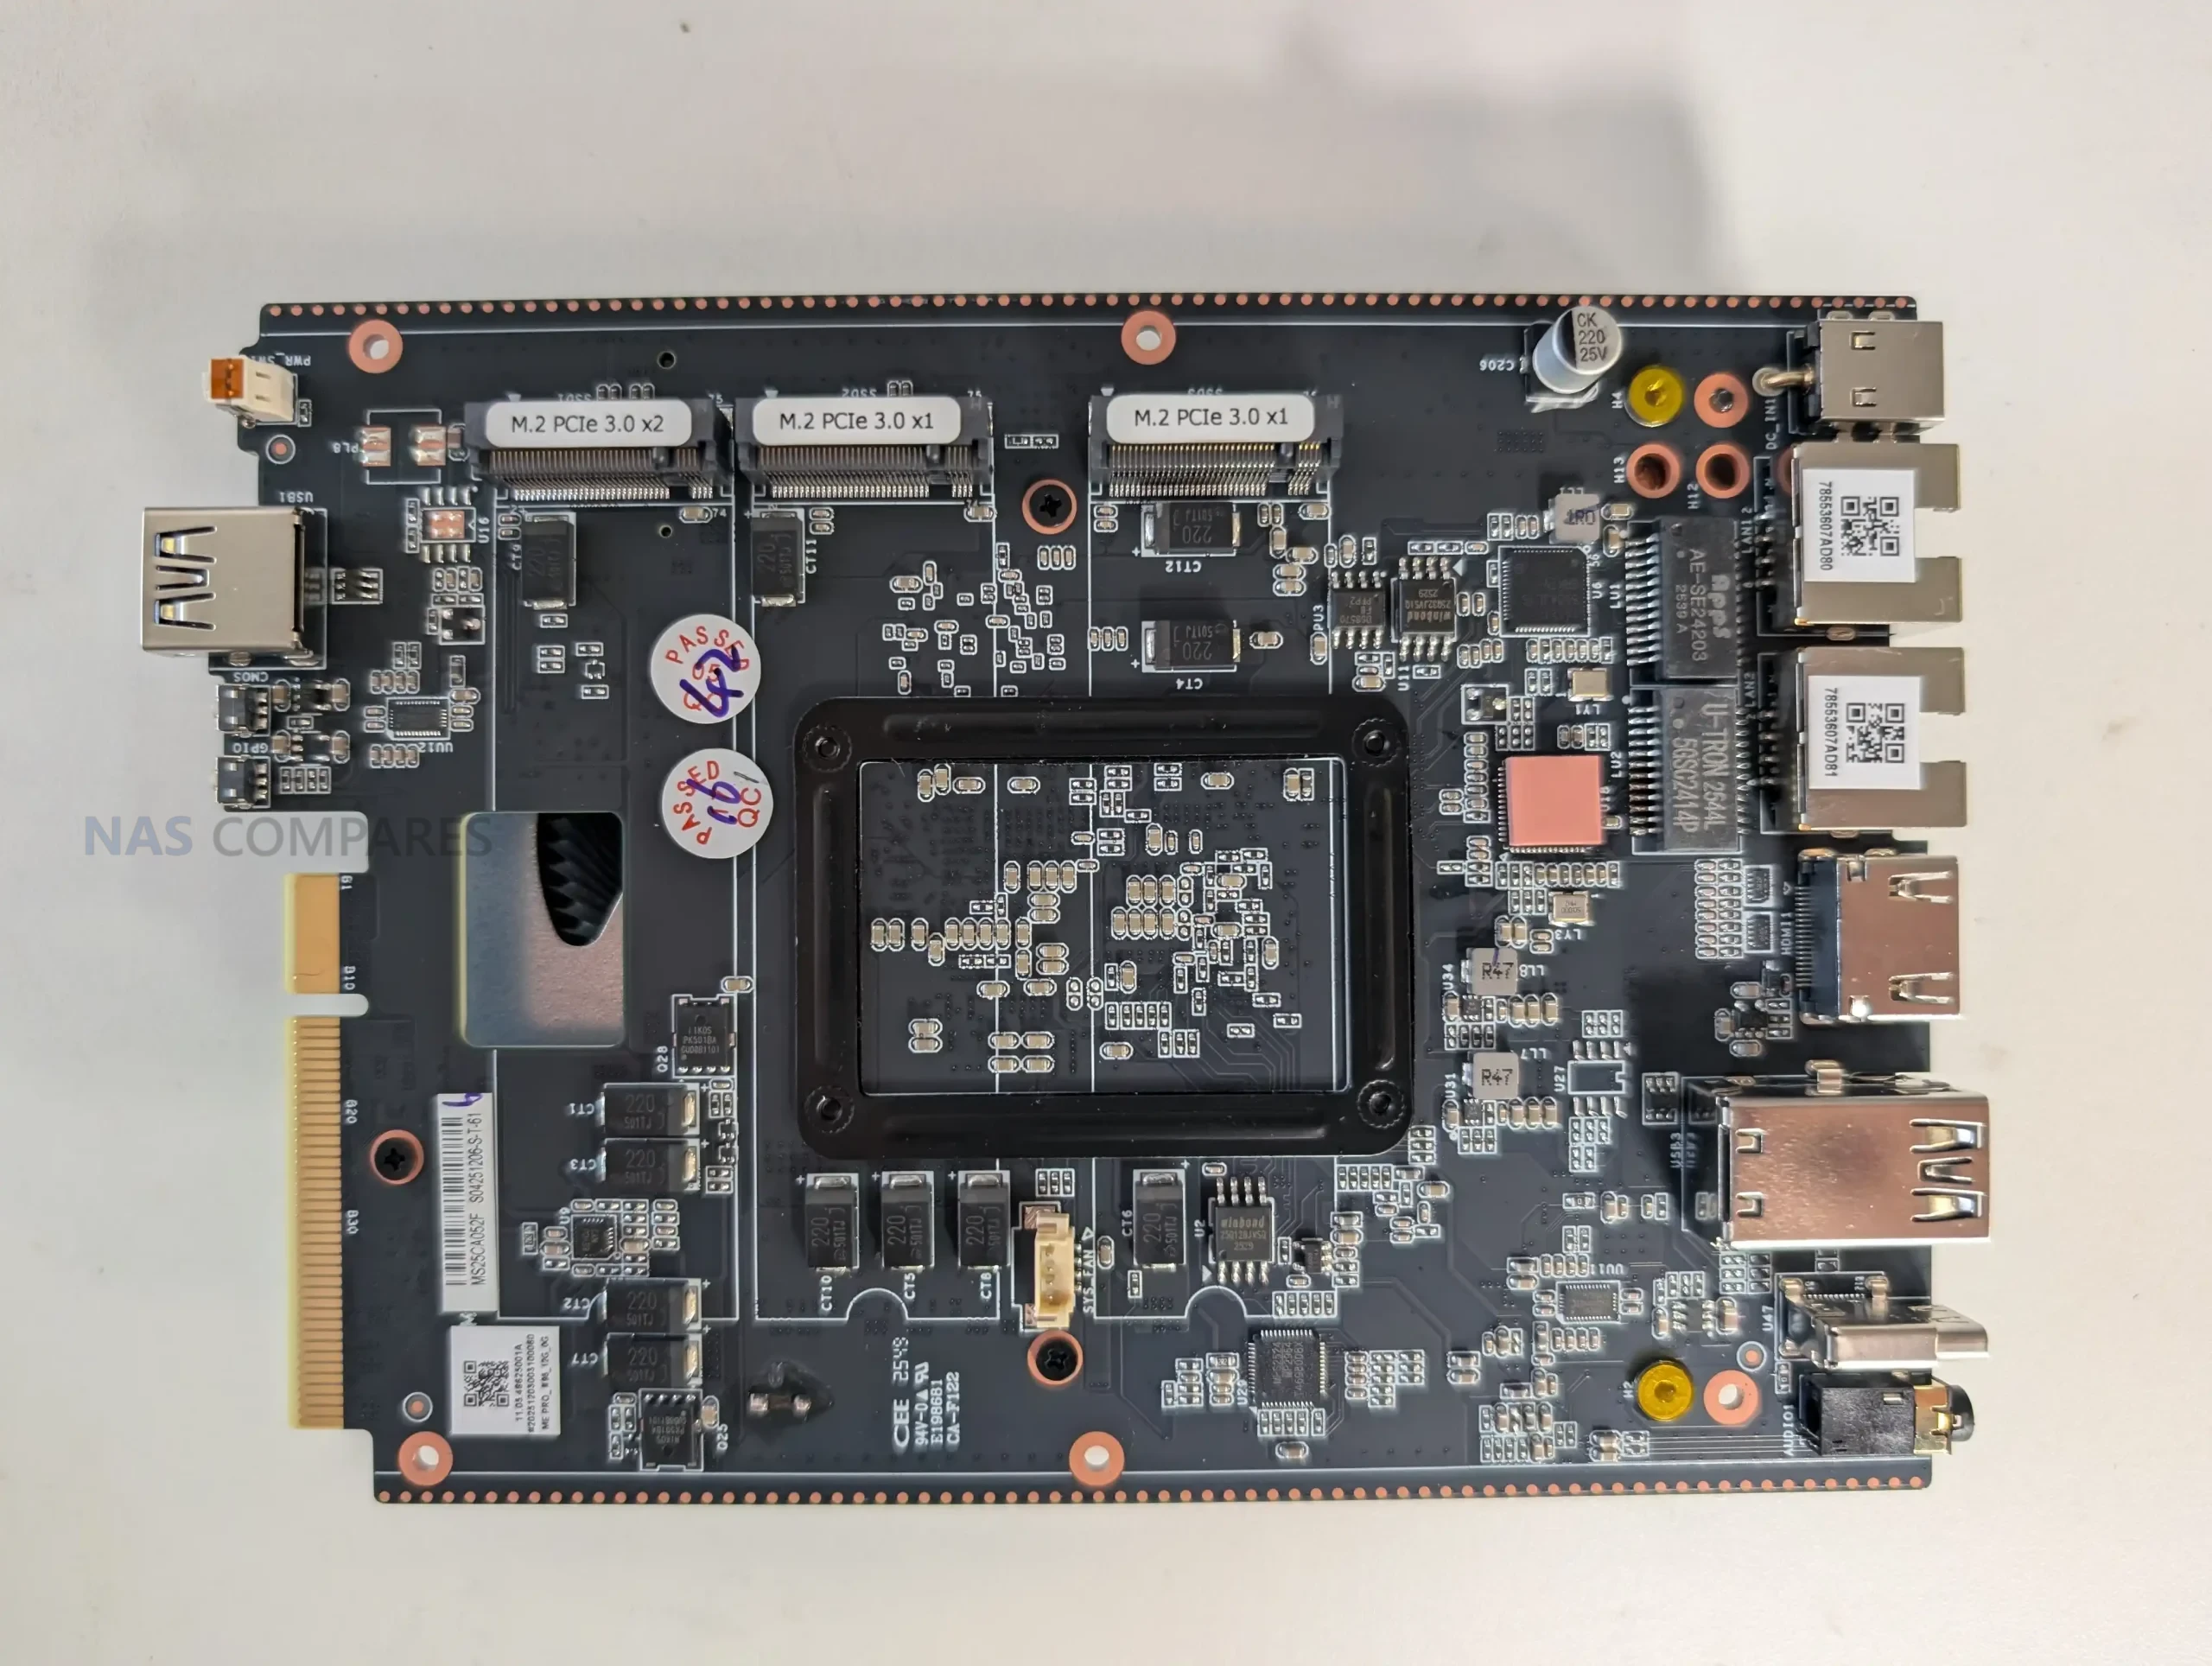
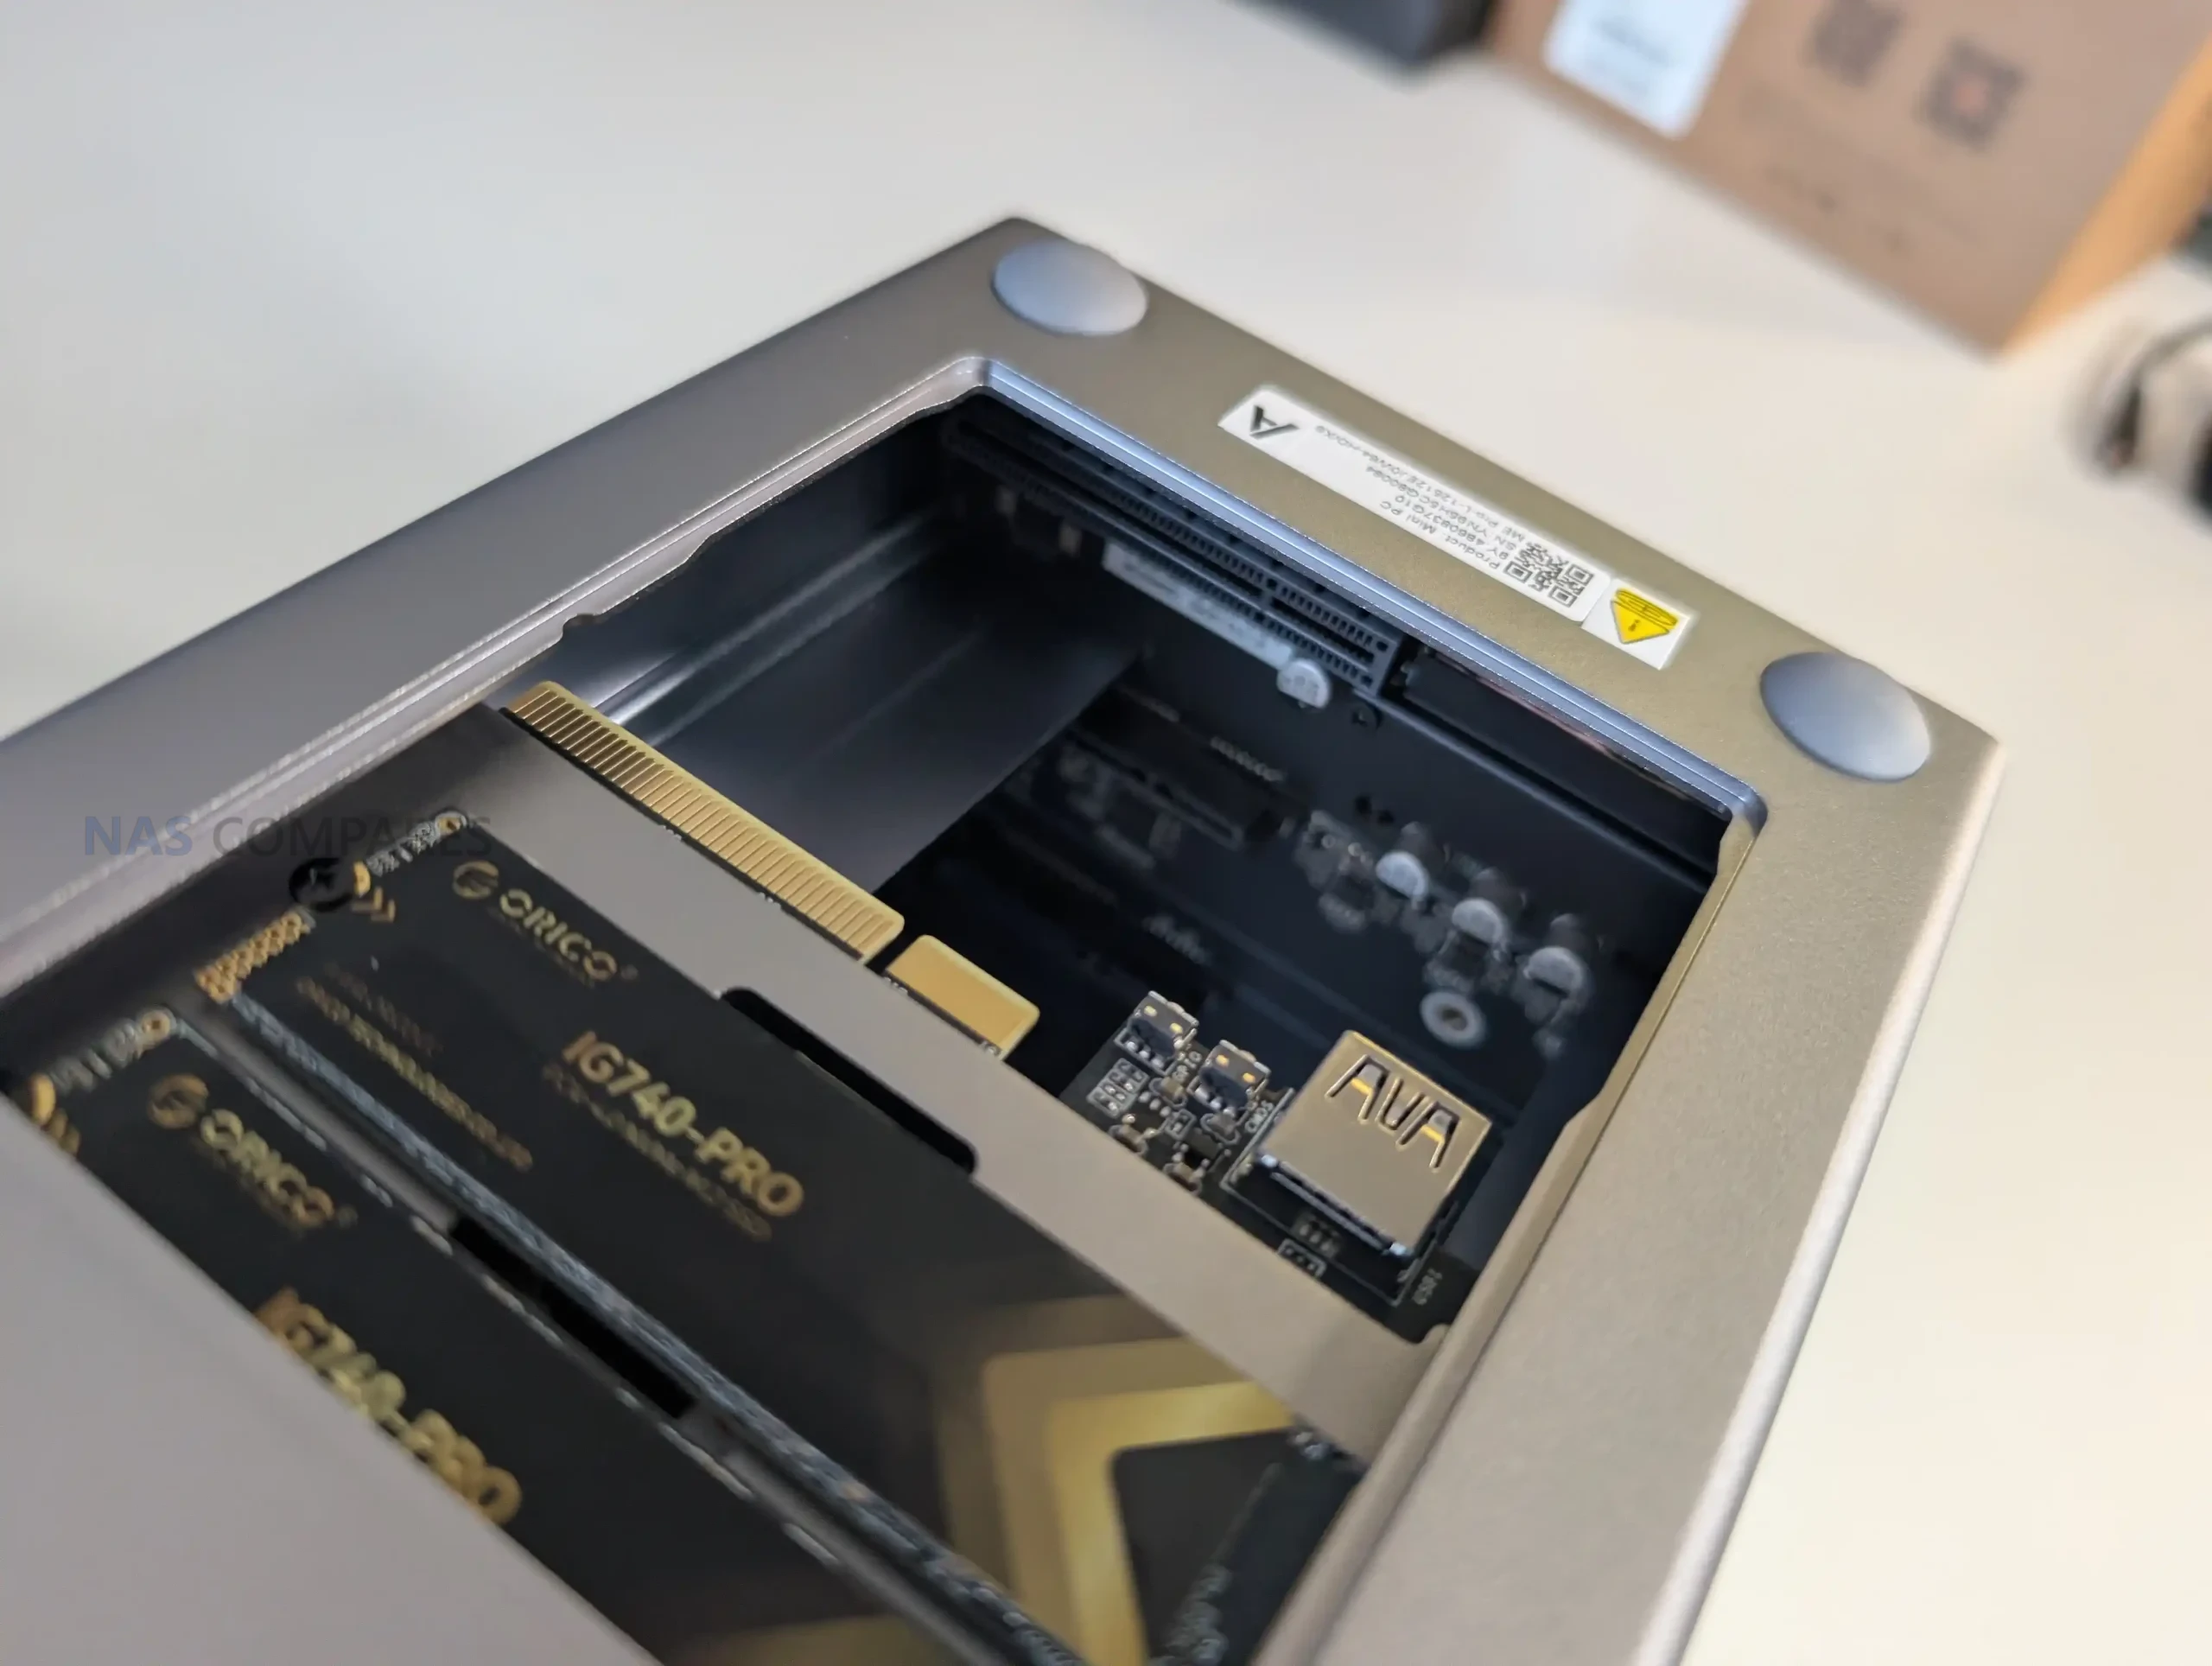
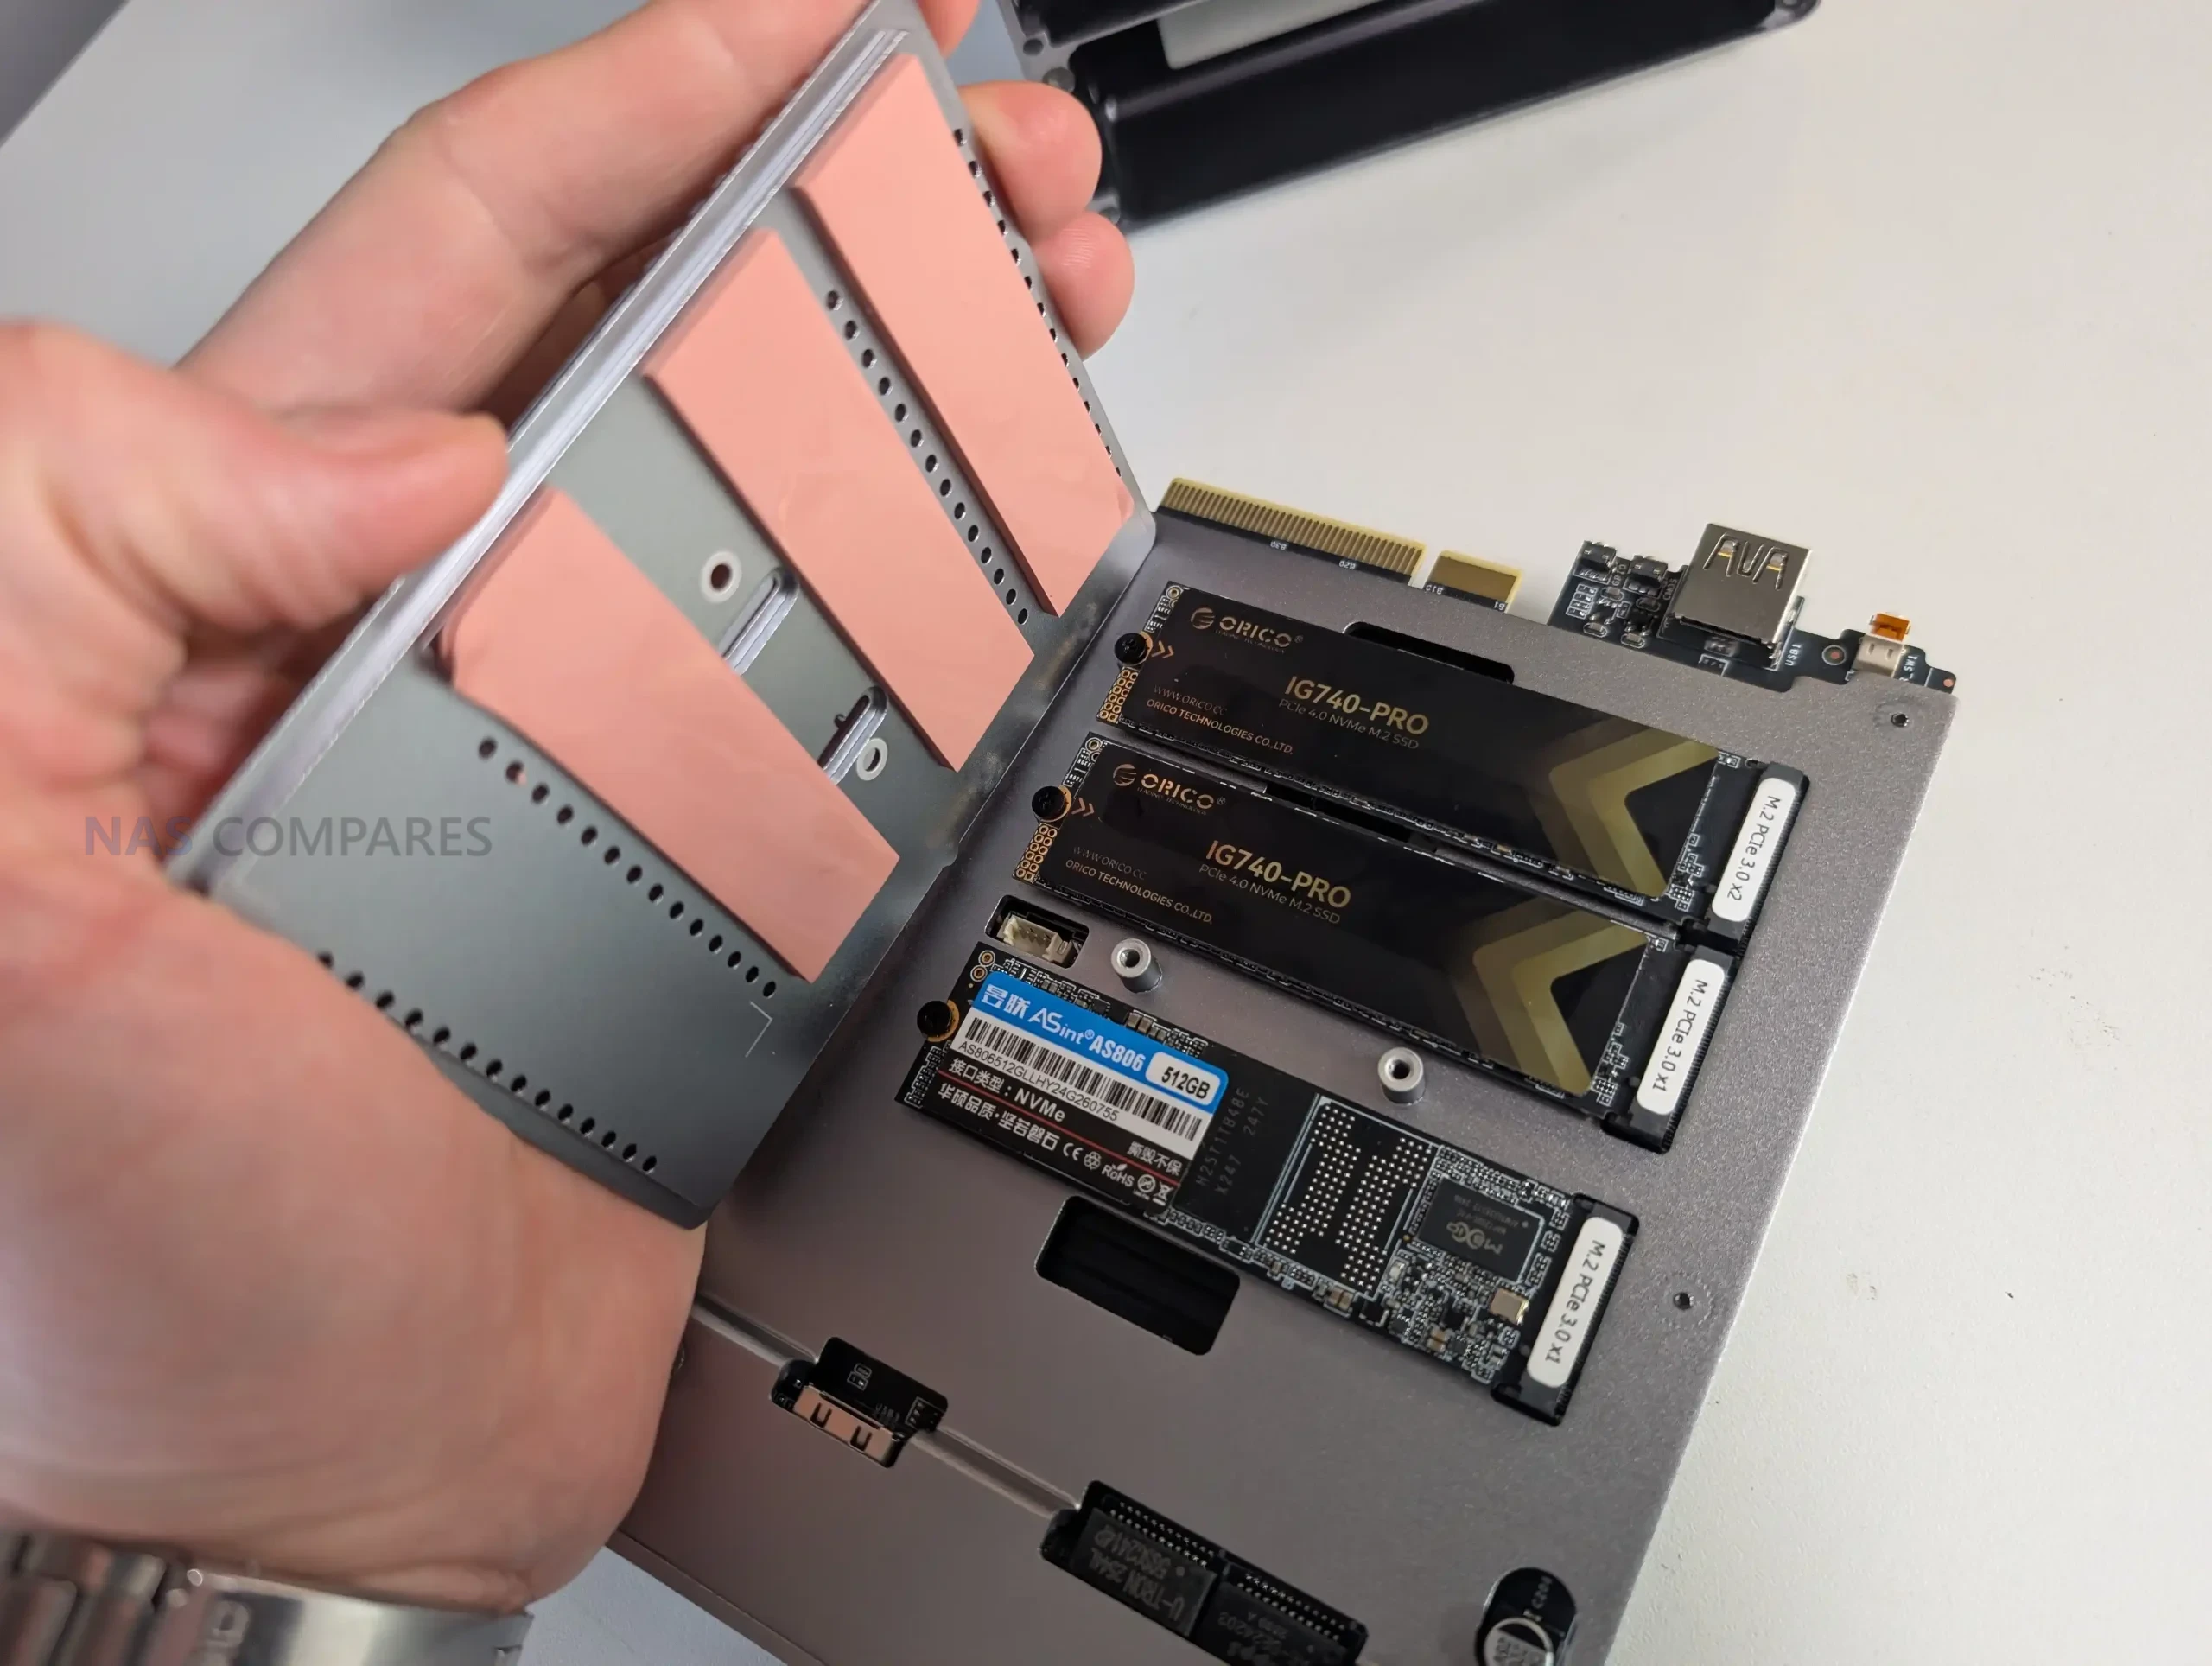
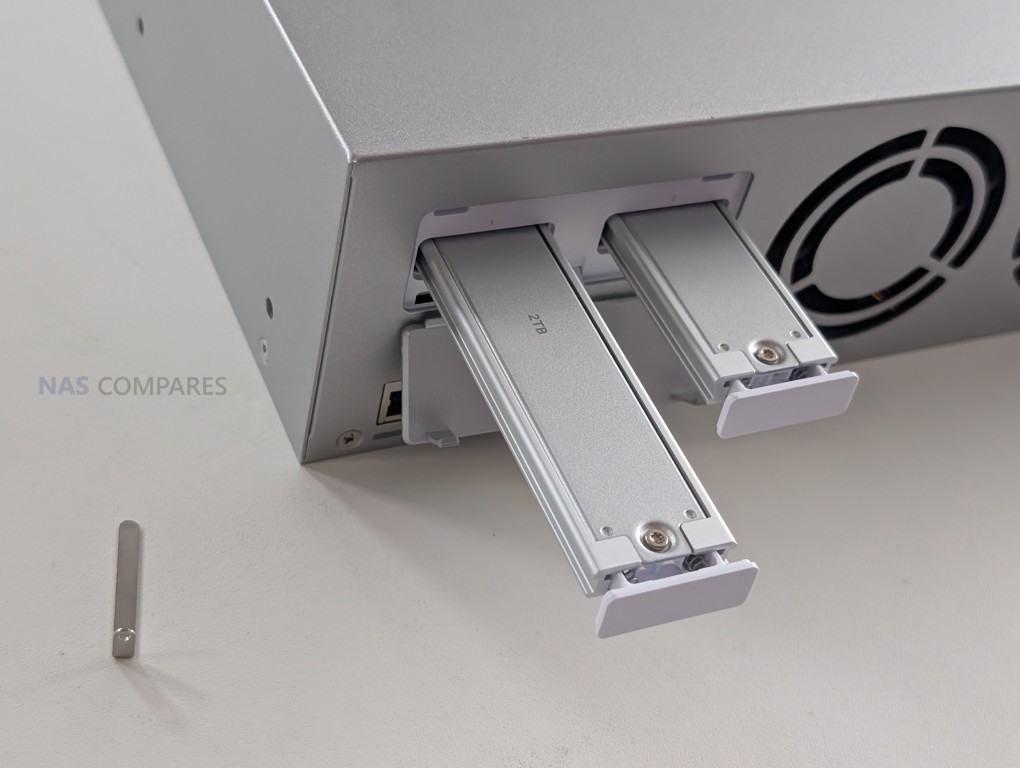
In addition to the SATA bays, the chassis supports 2 M.2 NVMe slots intended specifically for SSD caching. The caching model is designed to accelerate HDD-based storage by using SSDs as a performance layer, rather than allowing NVMe drives to become their own primary pool for general file storage. Practically, that positions the NVMe feature as a supplement for mixed workloads, such as improving responsiveness for frequently accessed data and smoothing write behavior, rather than a route to running the system as a small all flash NAS.

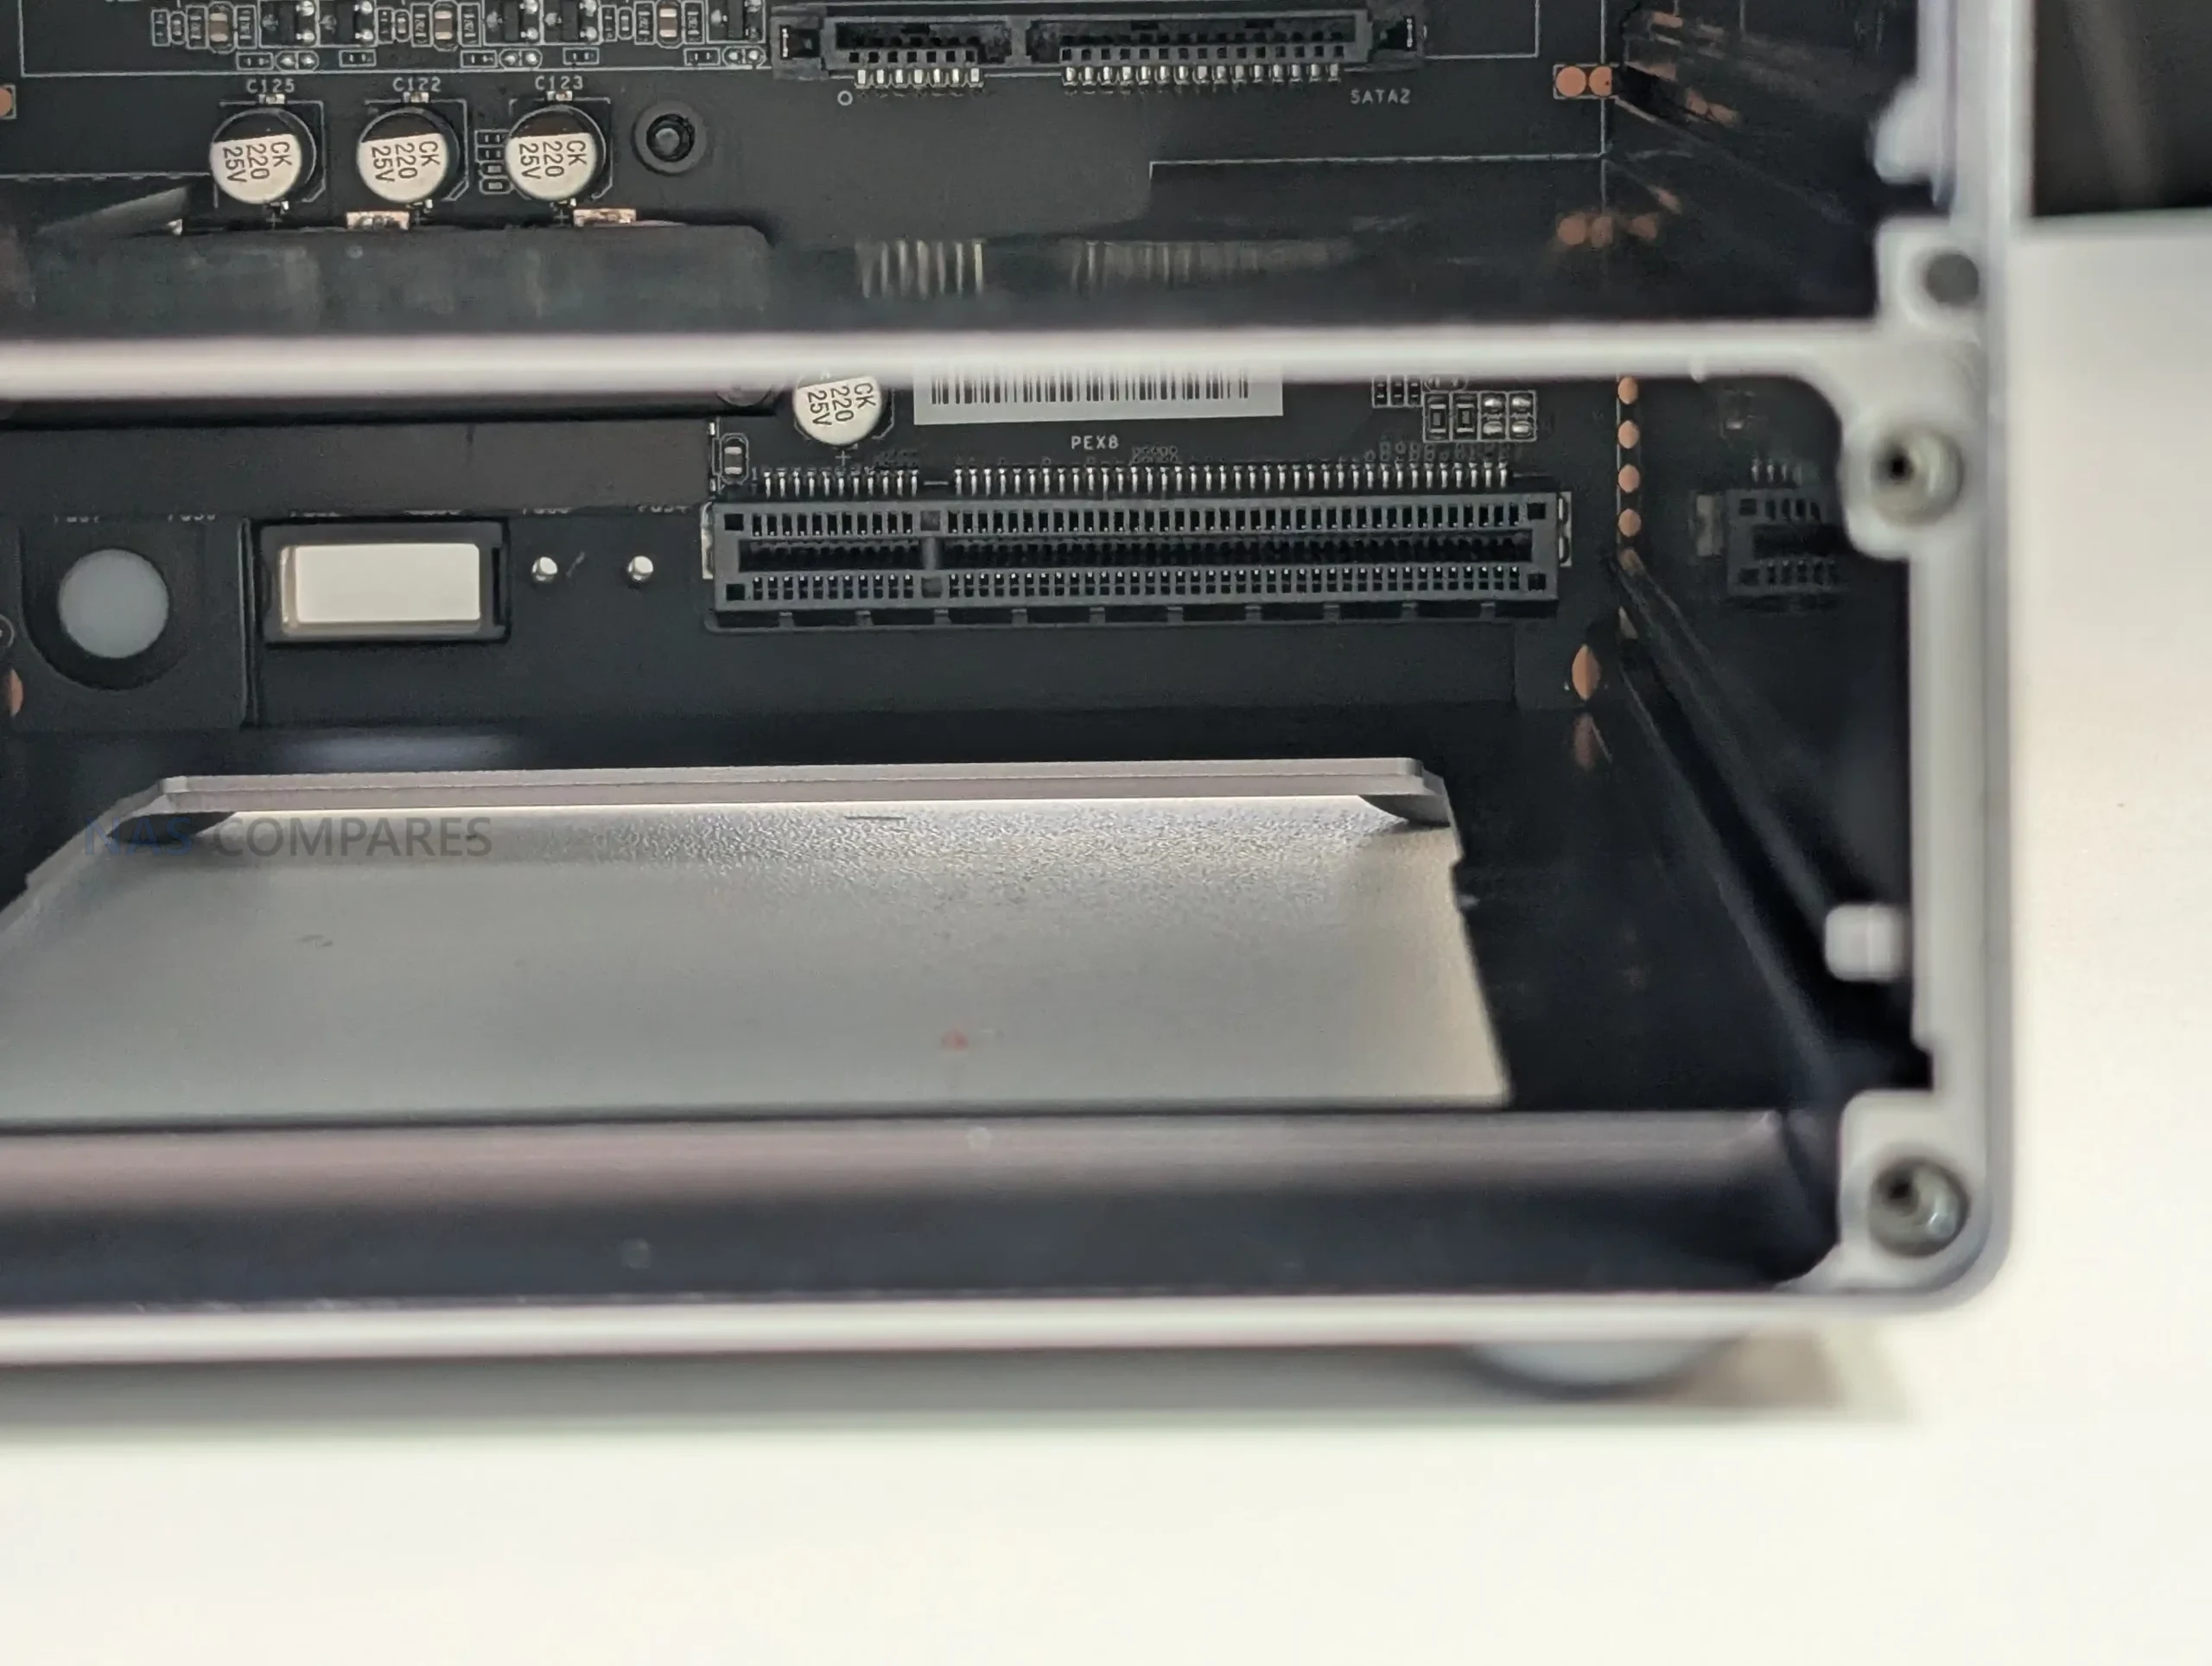
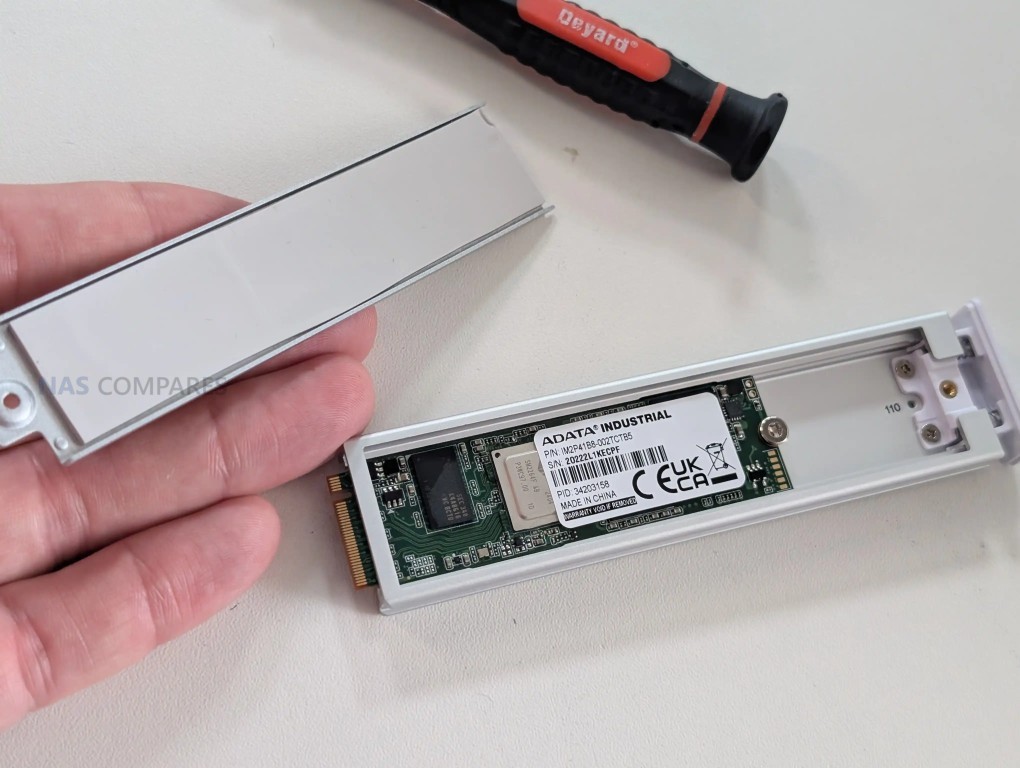
A design detail that affects the storage experience is the physical NVMe mounting method. Instead of a simple screw-down slot on a board, the NVMe drives are installed via a tray or carrier mechanism, and that carrier is not included with the base unit. The carrier itself is neatly engineered with a clip-in style insertion and thermal padding, and it supports common M.2 lengths including 2280 and 22110, but requiring an additional part adds friction if caching is part of the plan from day 1. It is a small issue, but it is the kind of detail that can slow down an otherwise straightforward deployment.

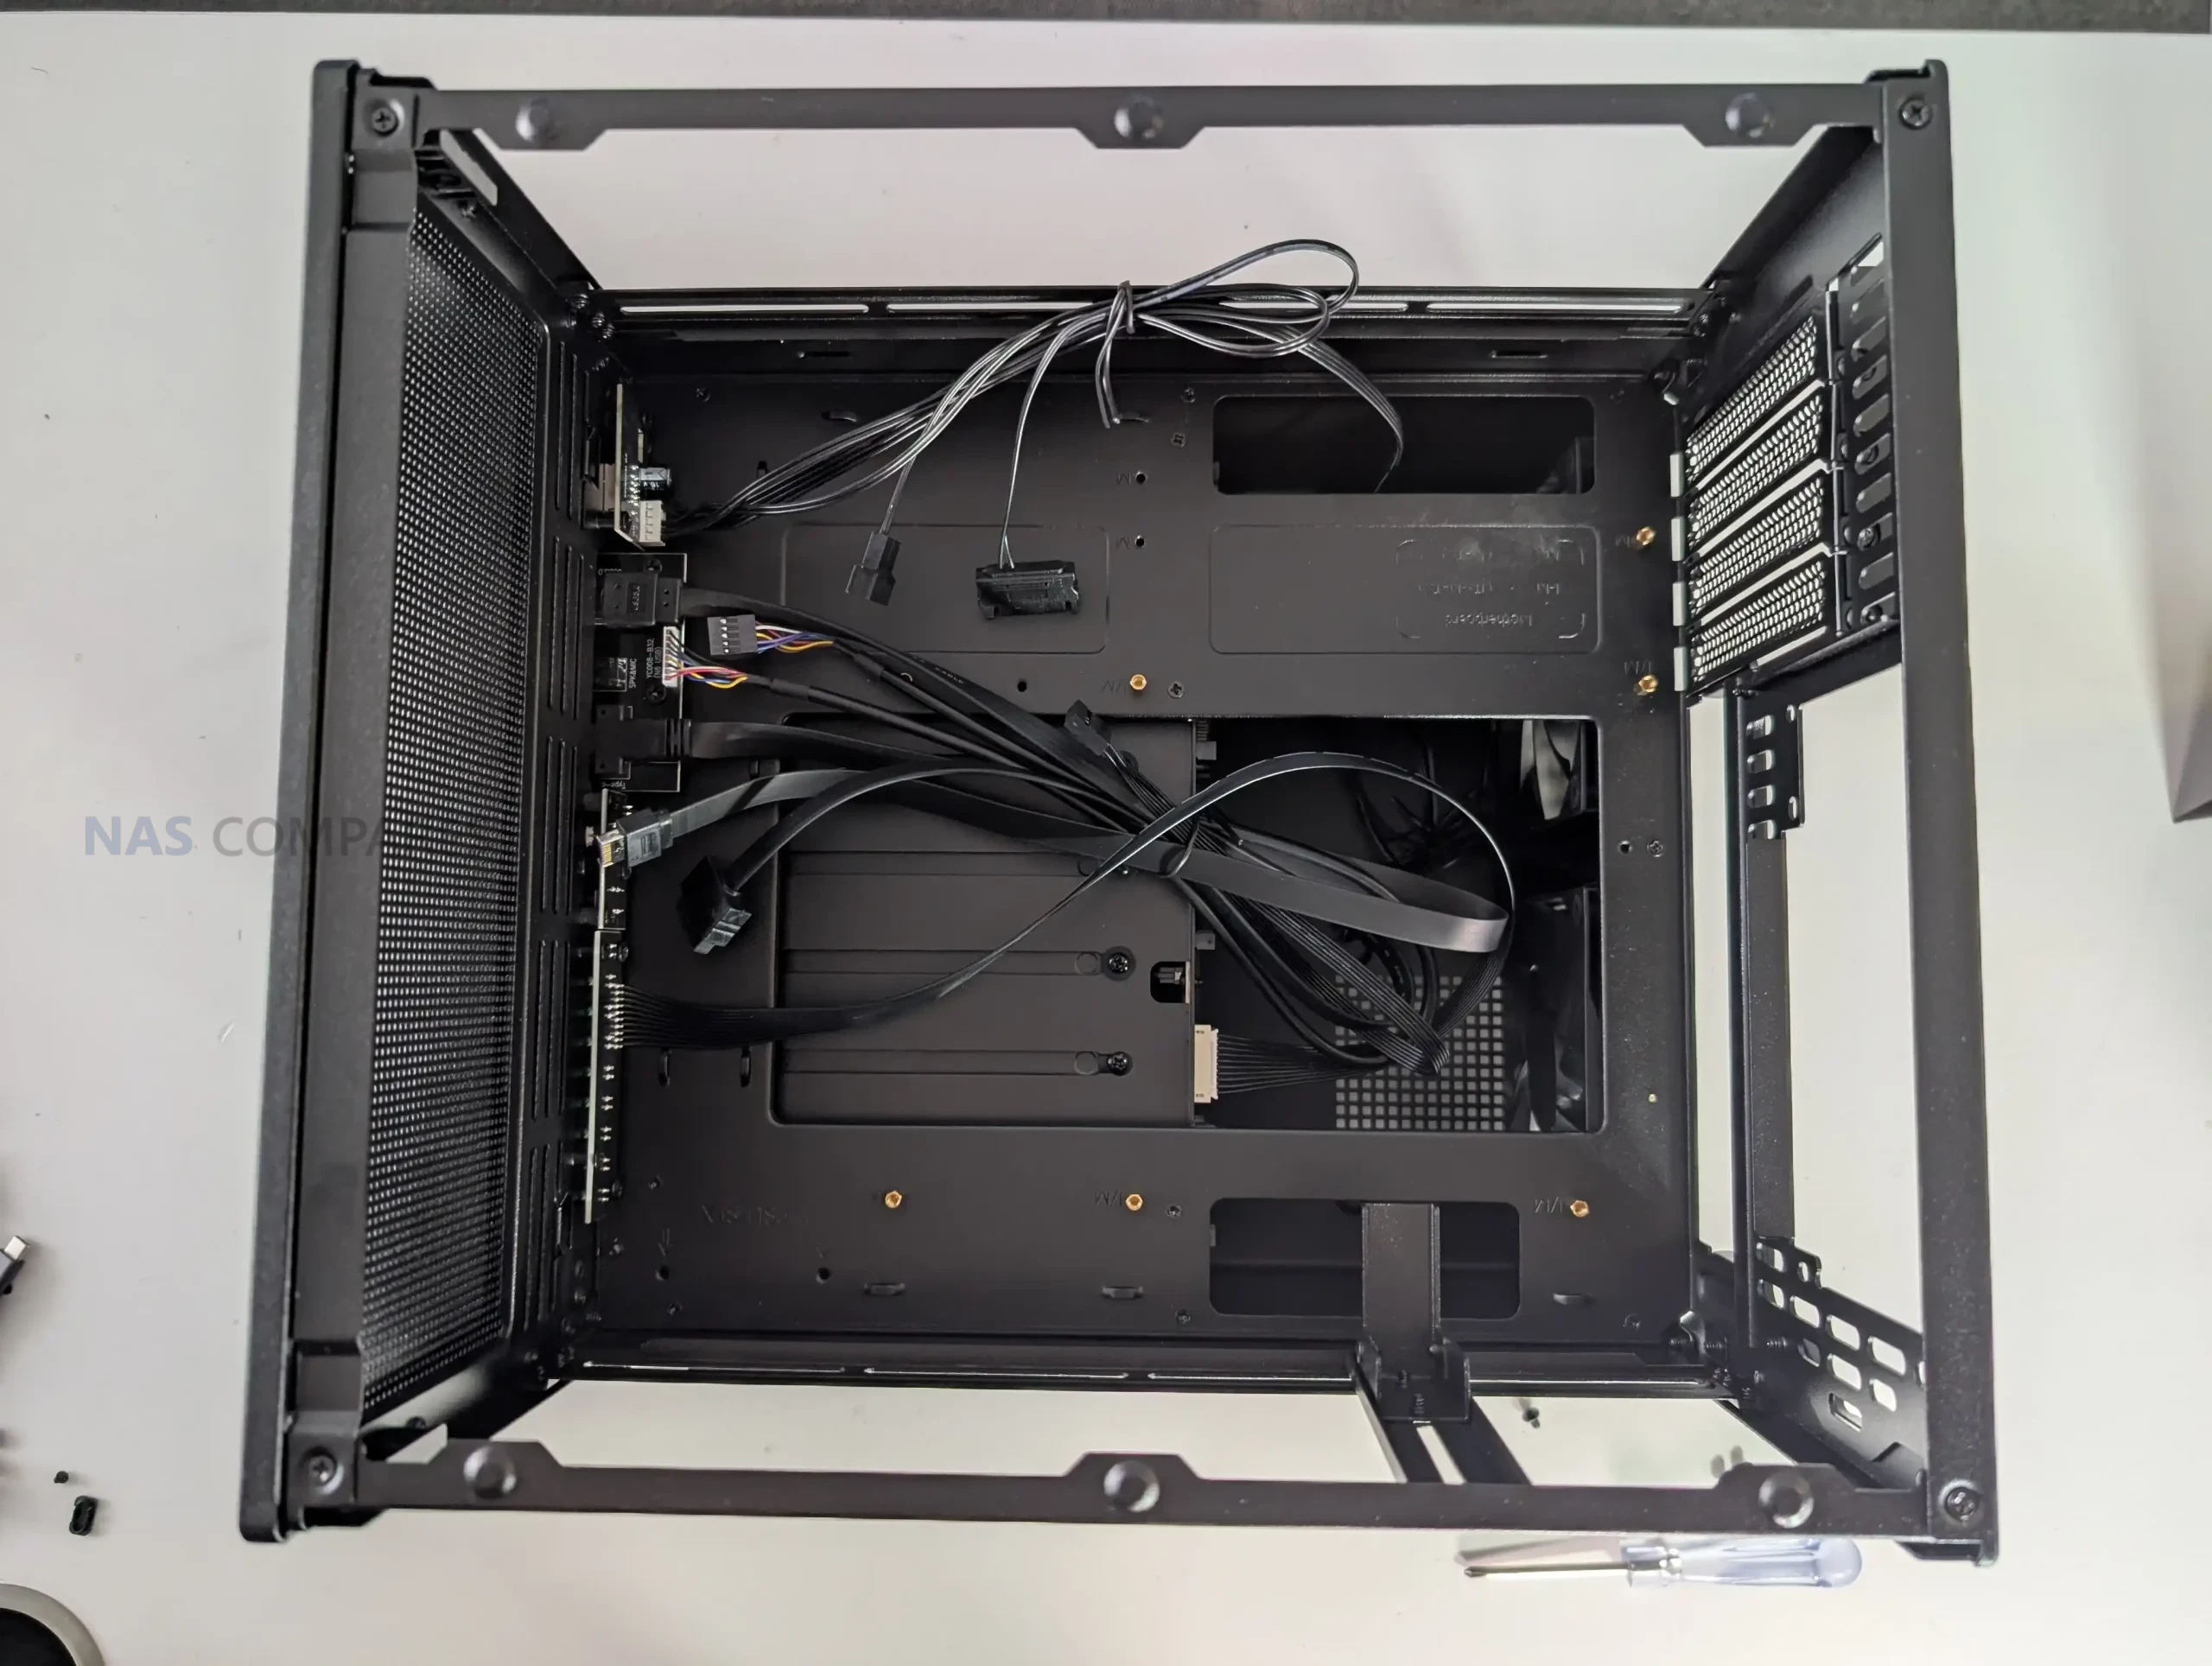
UniFi UNAS Pro 4 Review – Internal Hardware

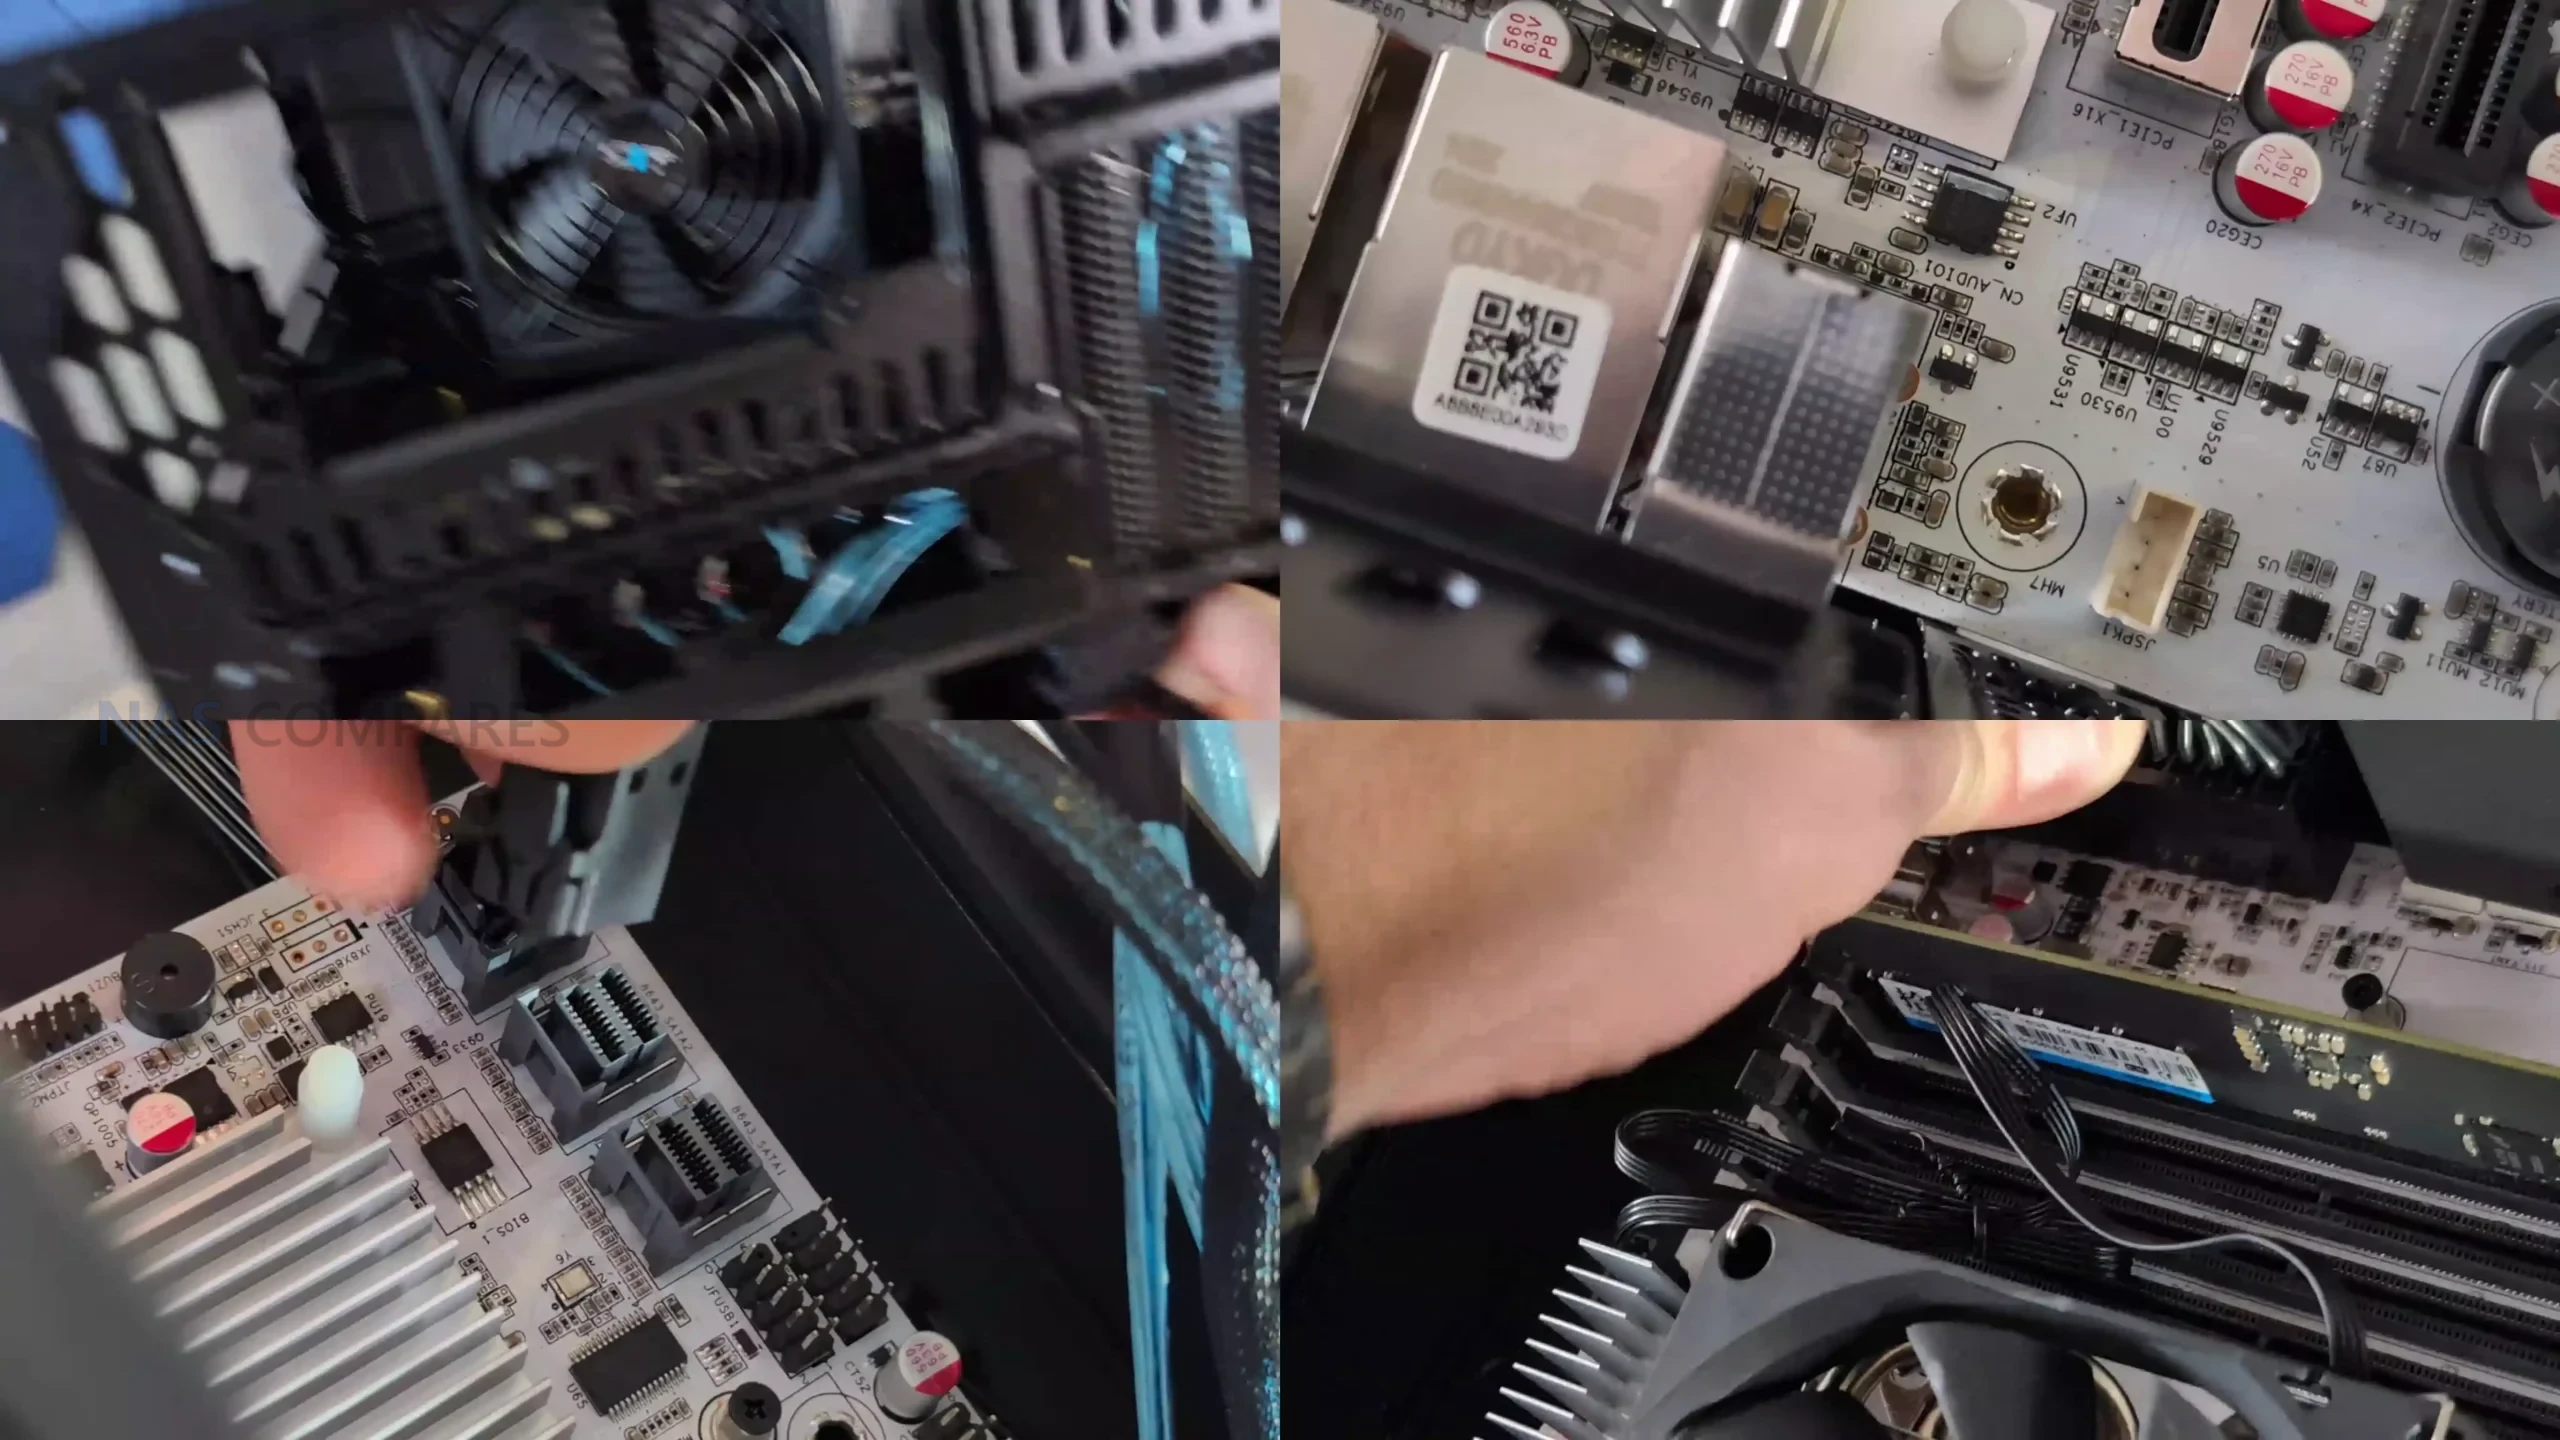
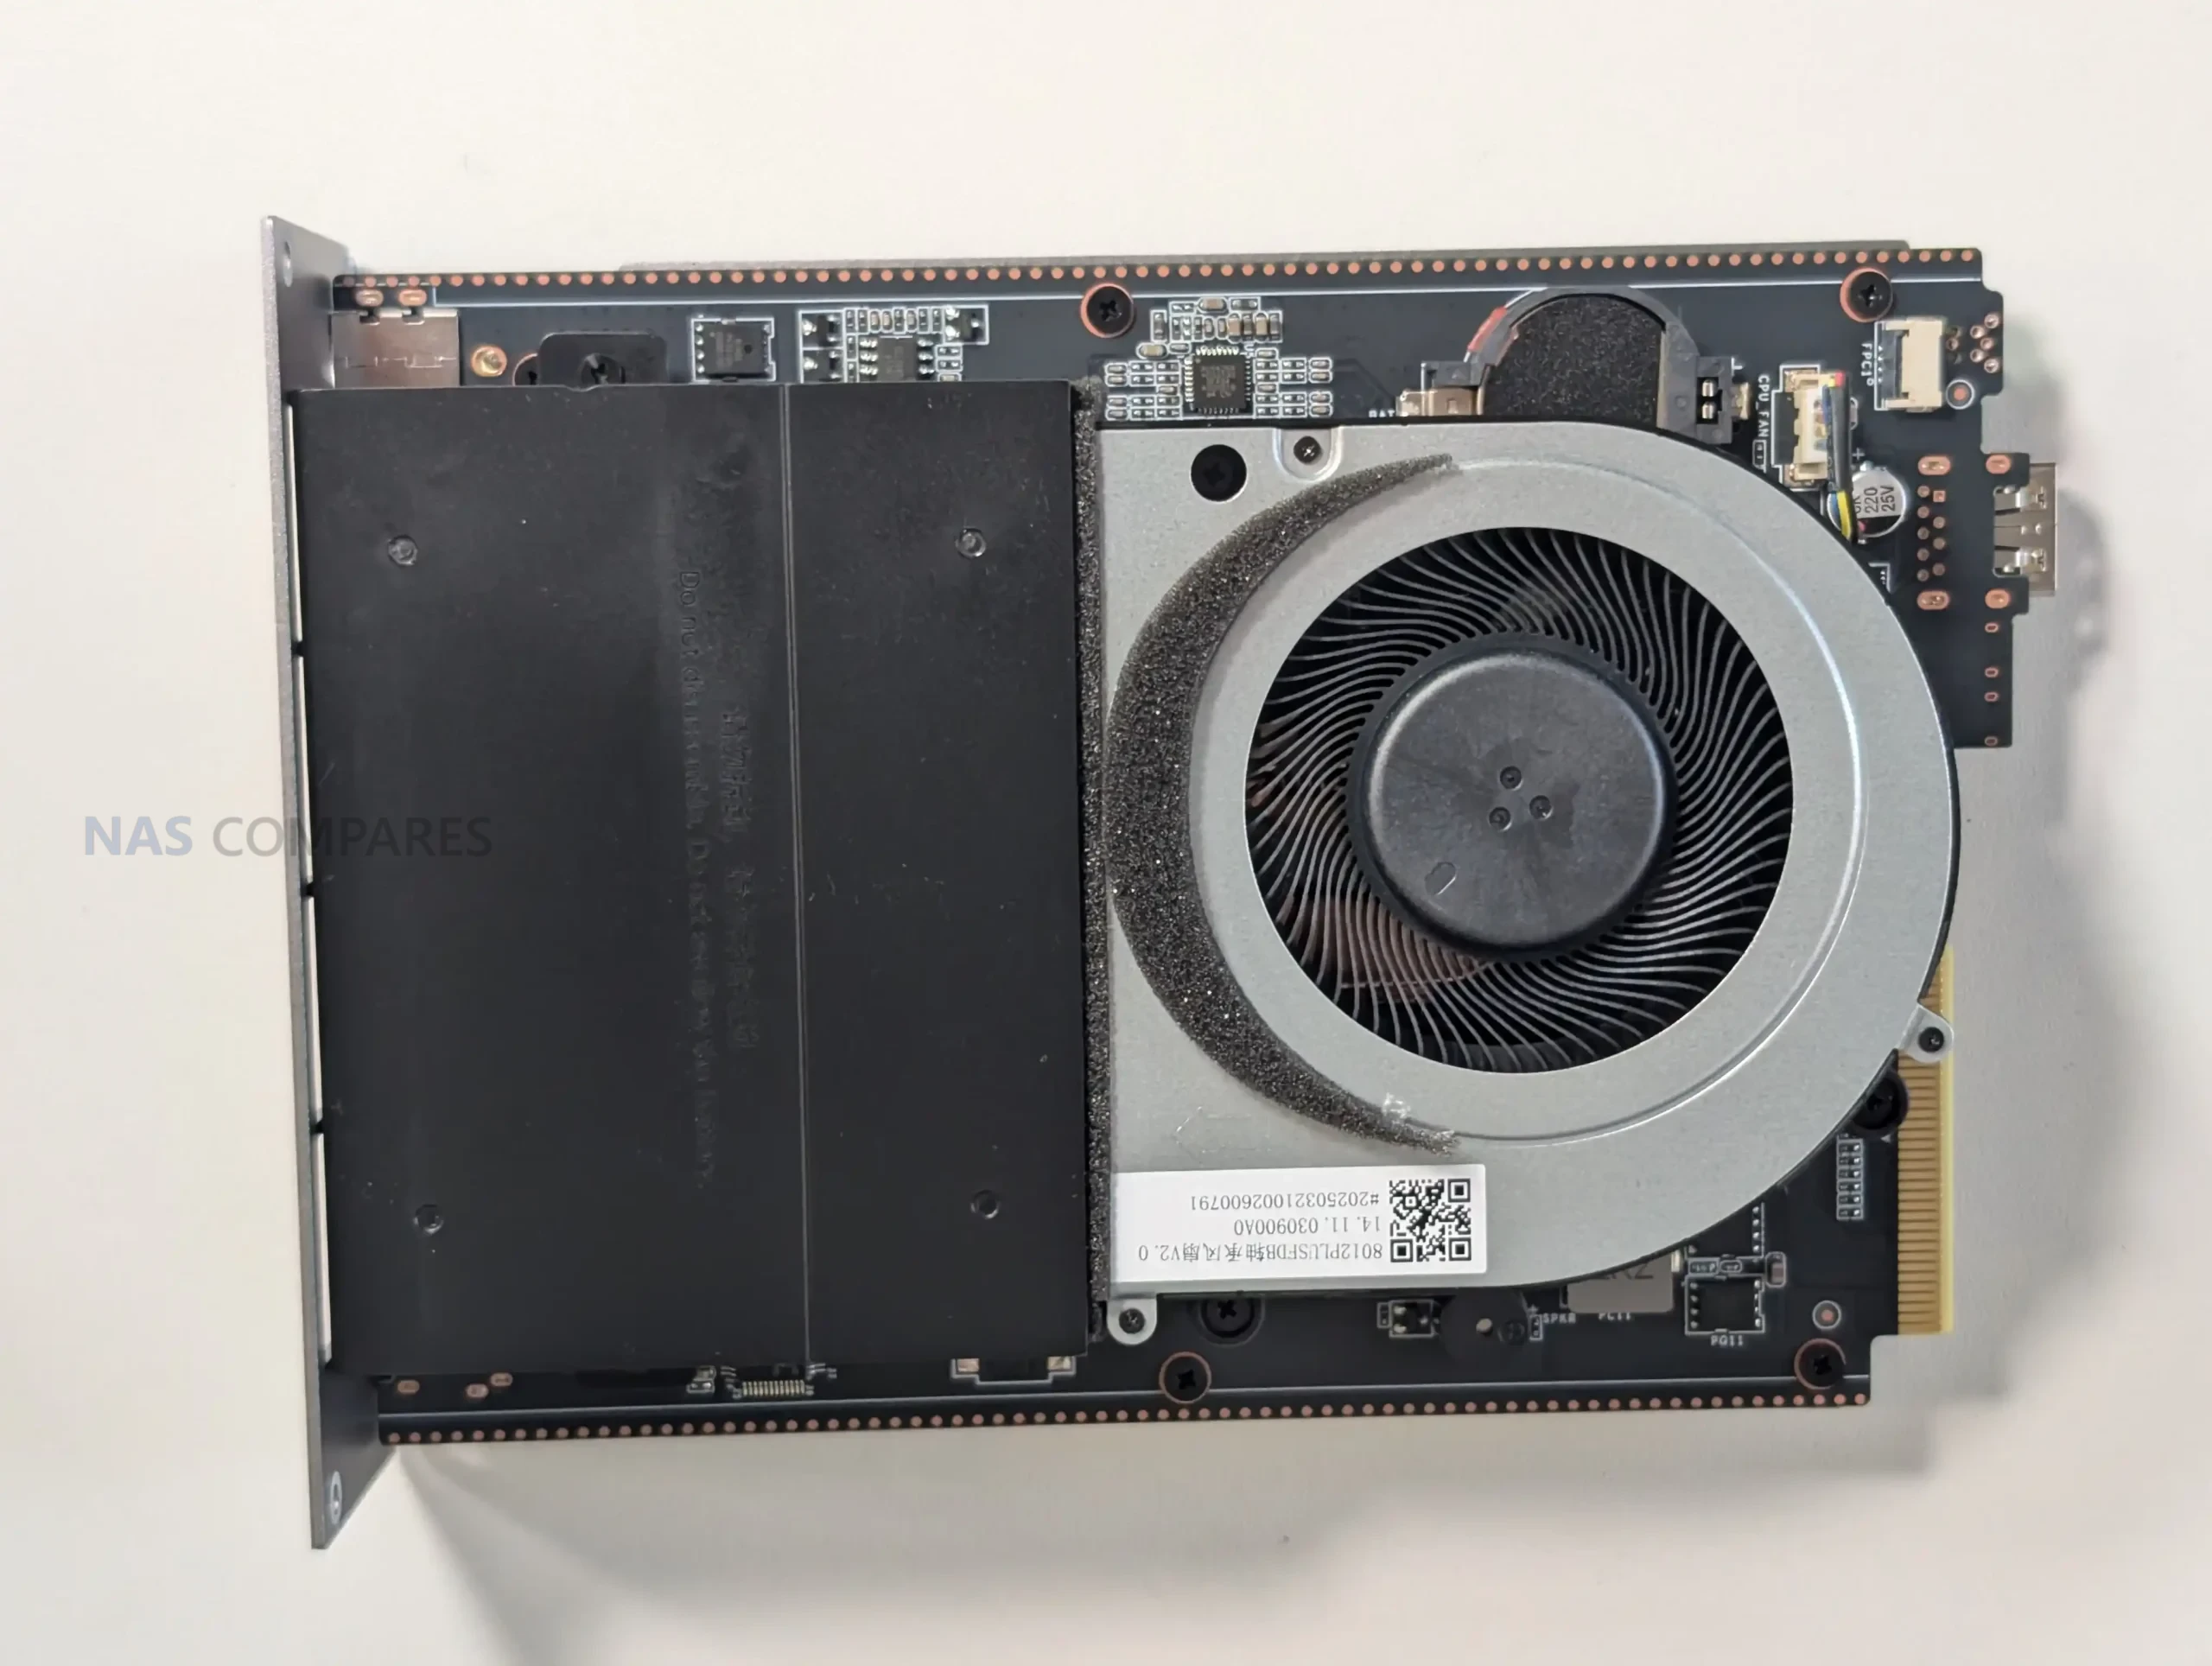
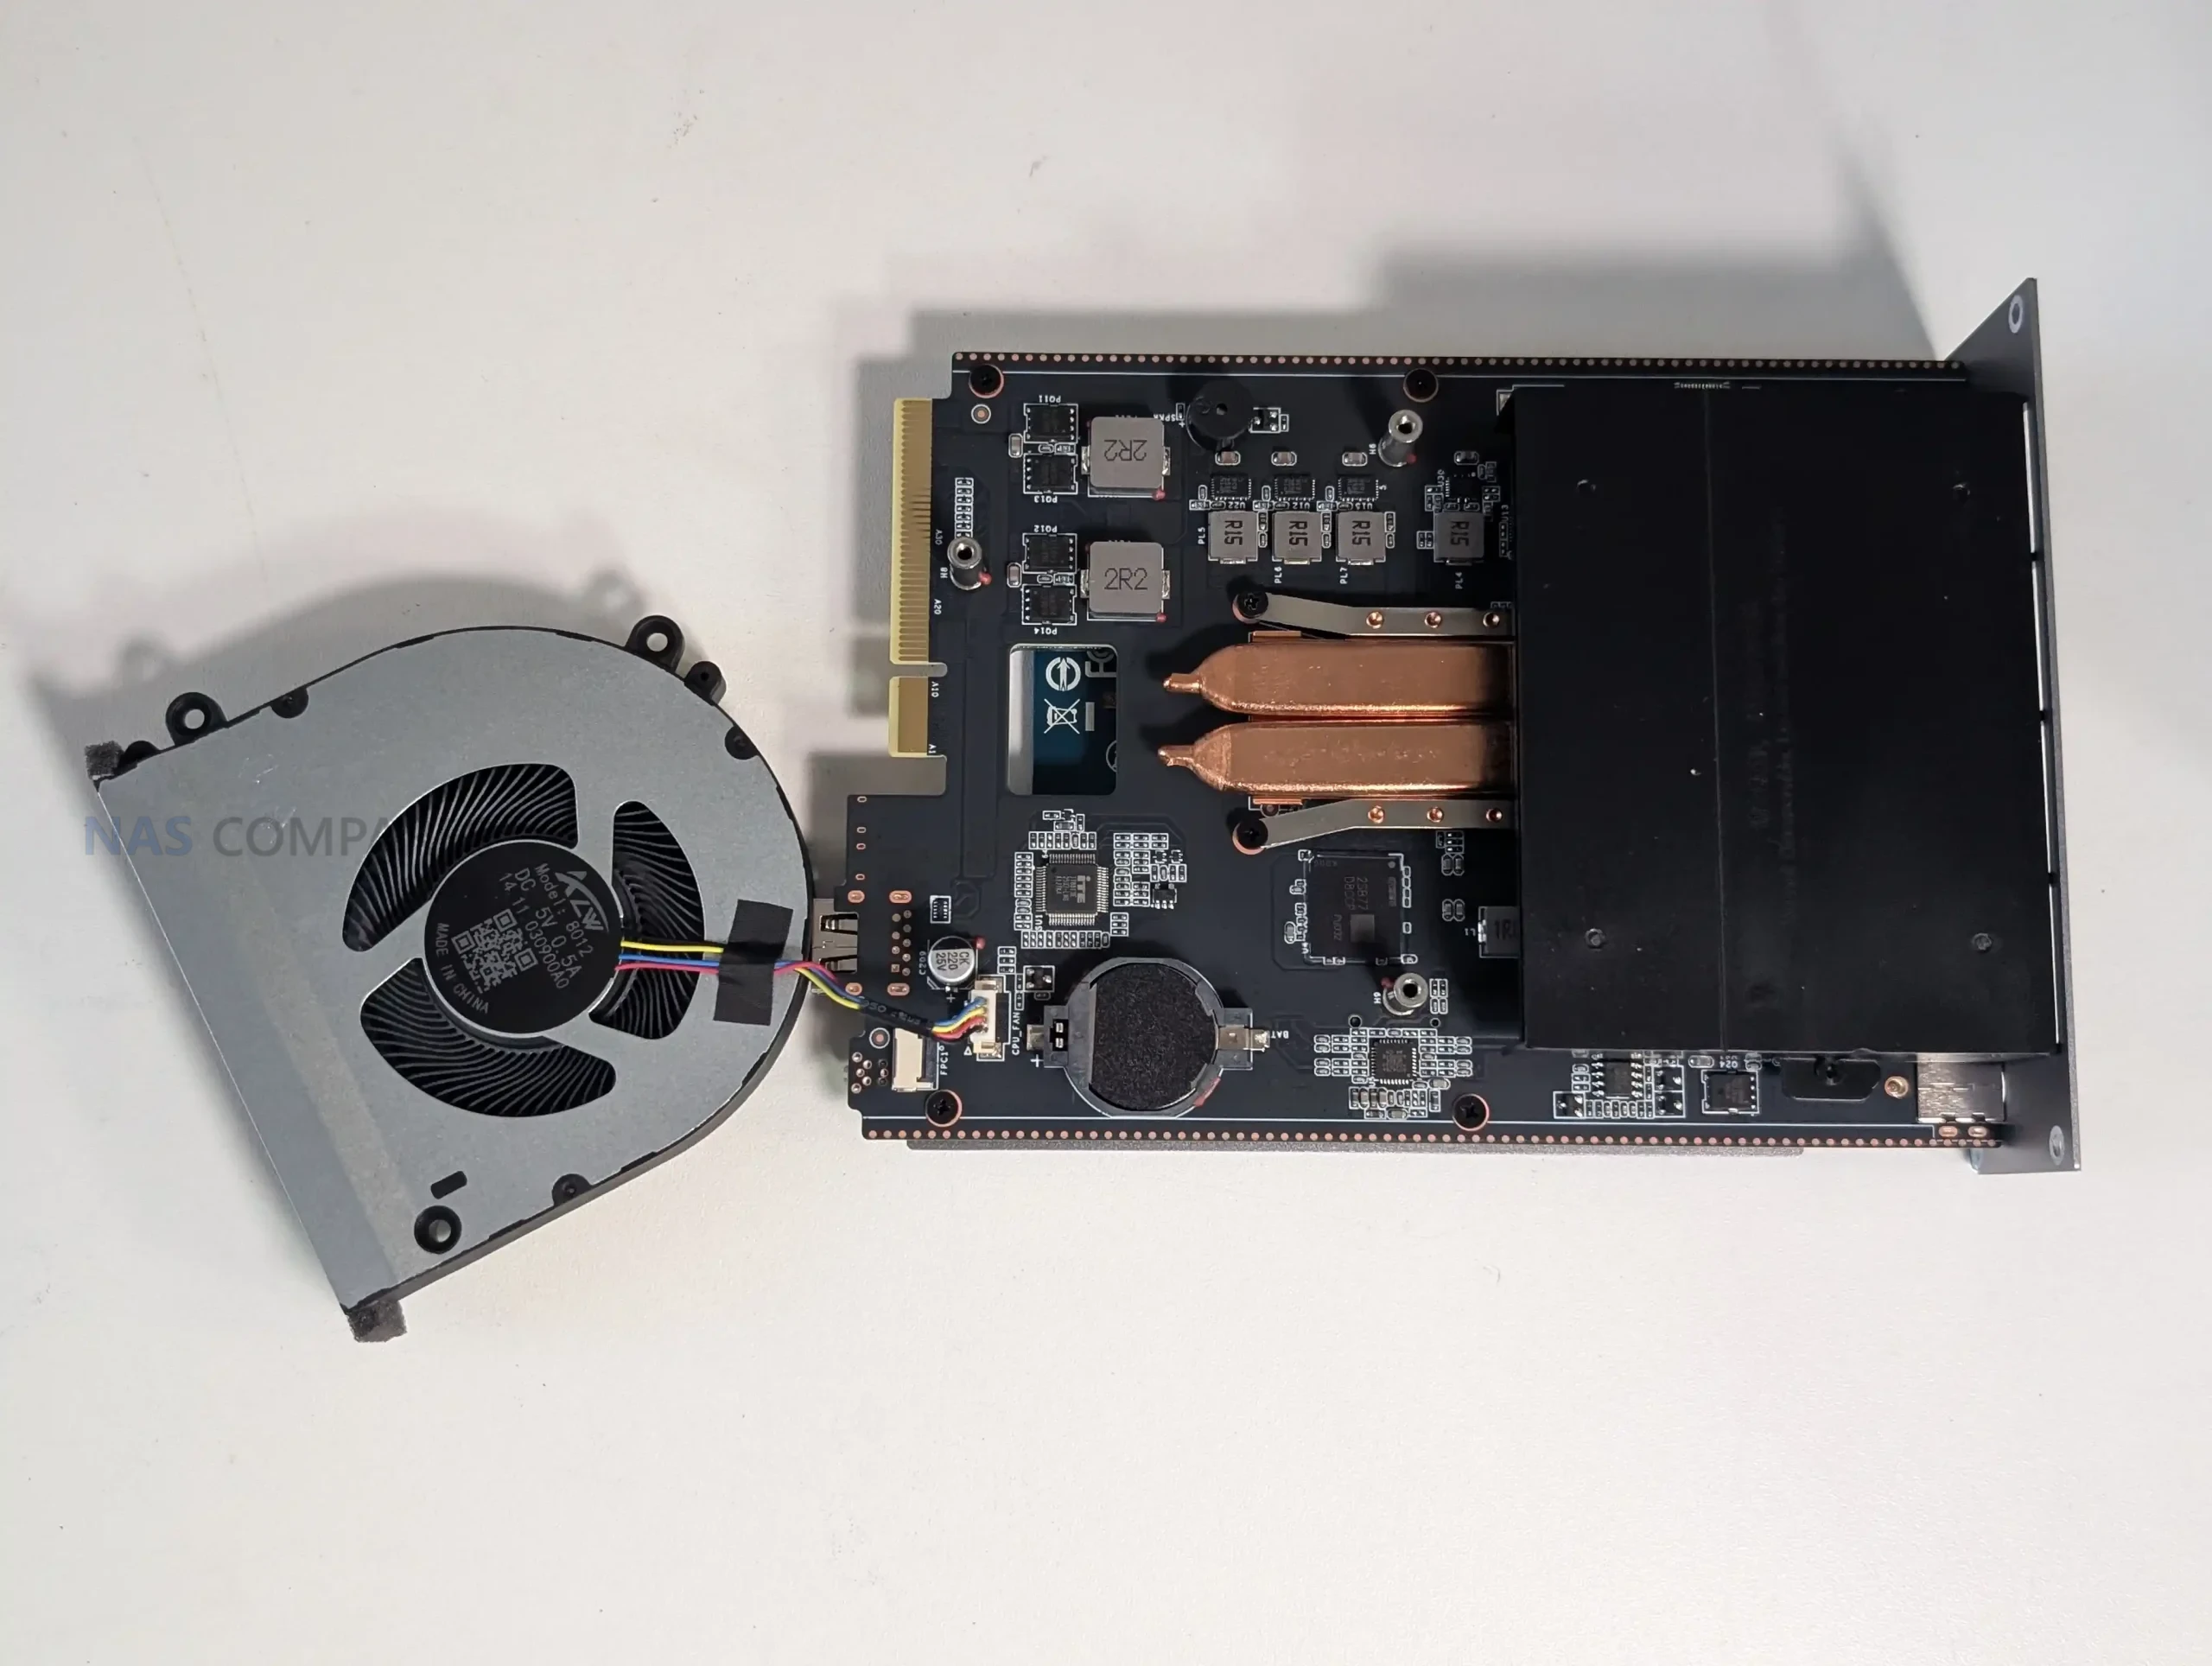
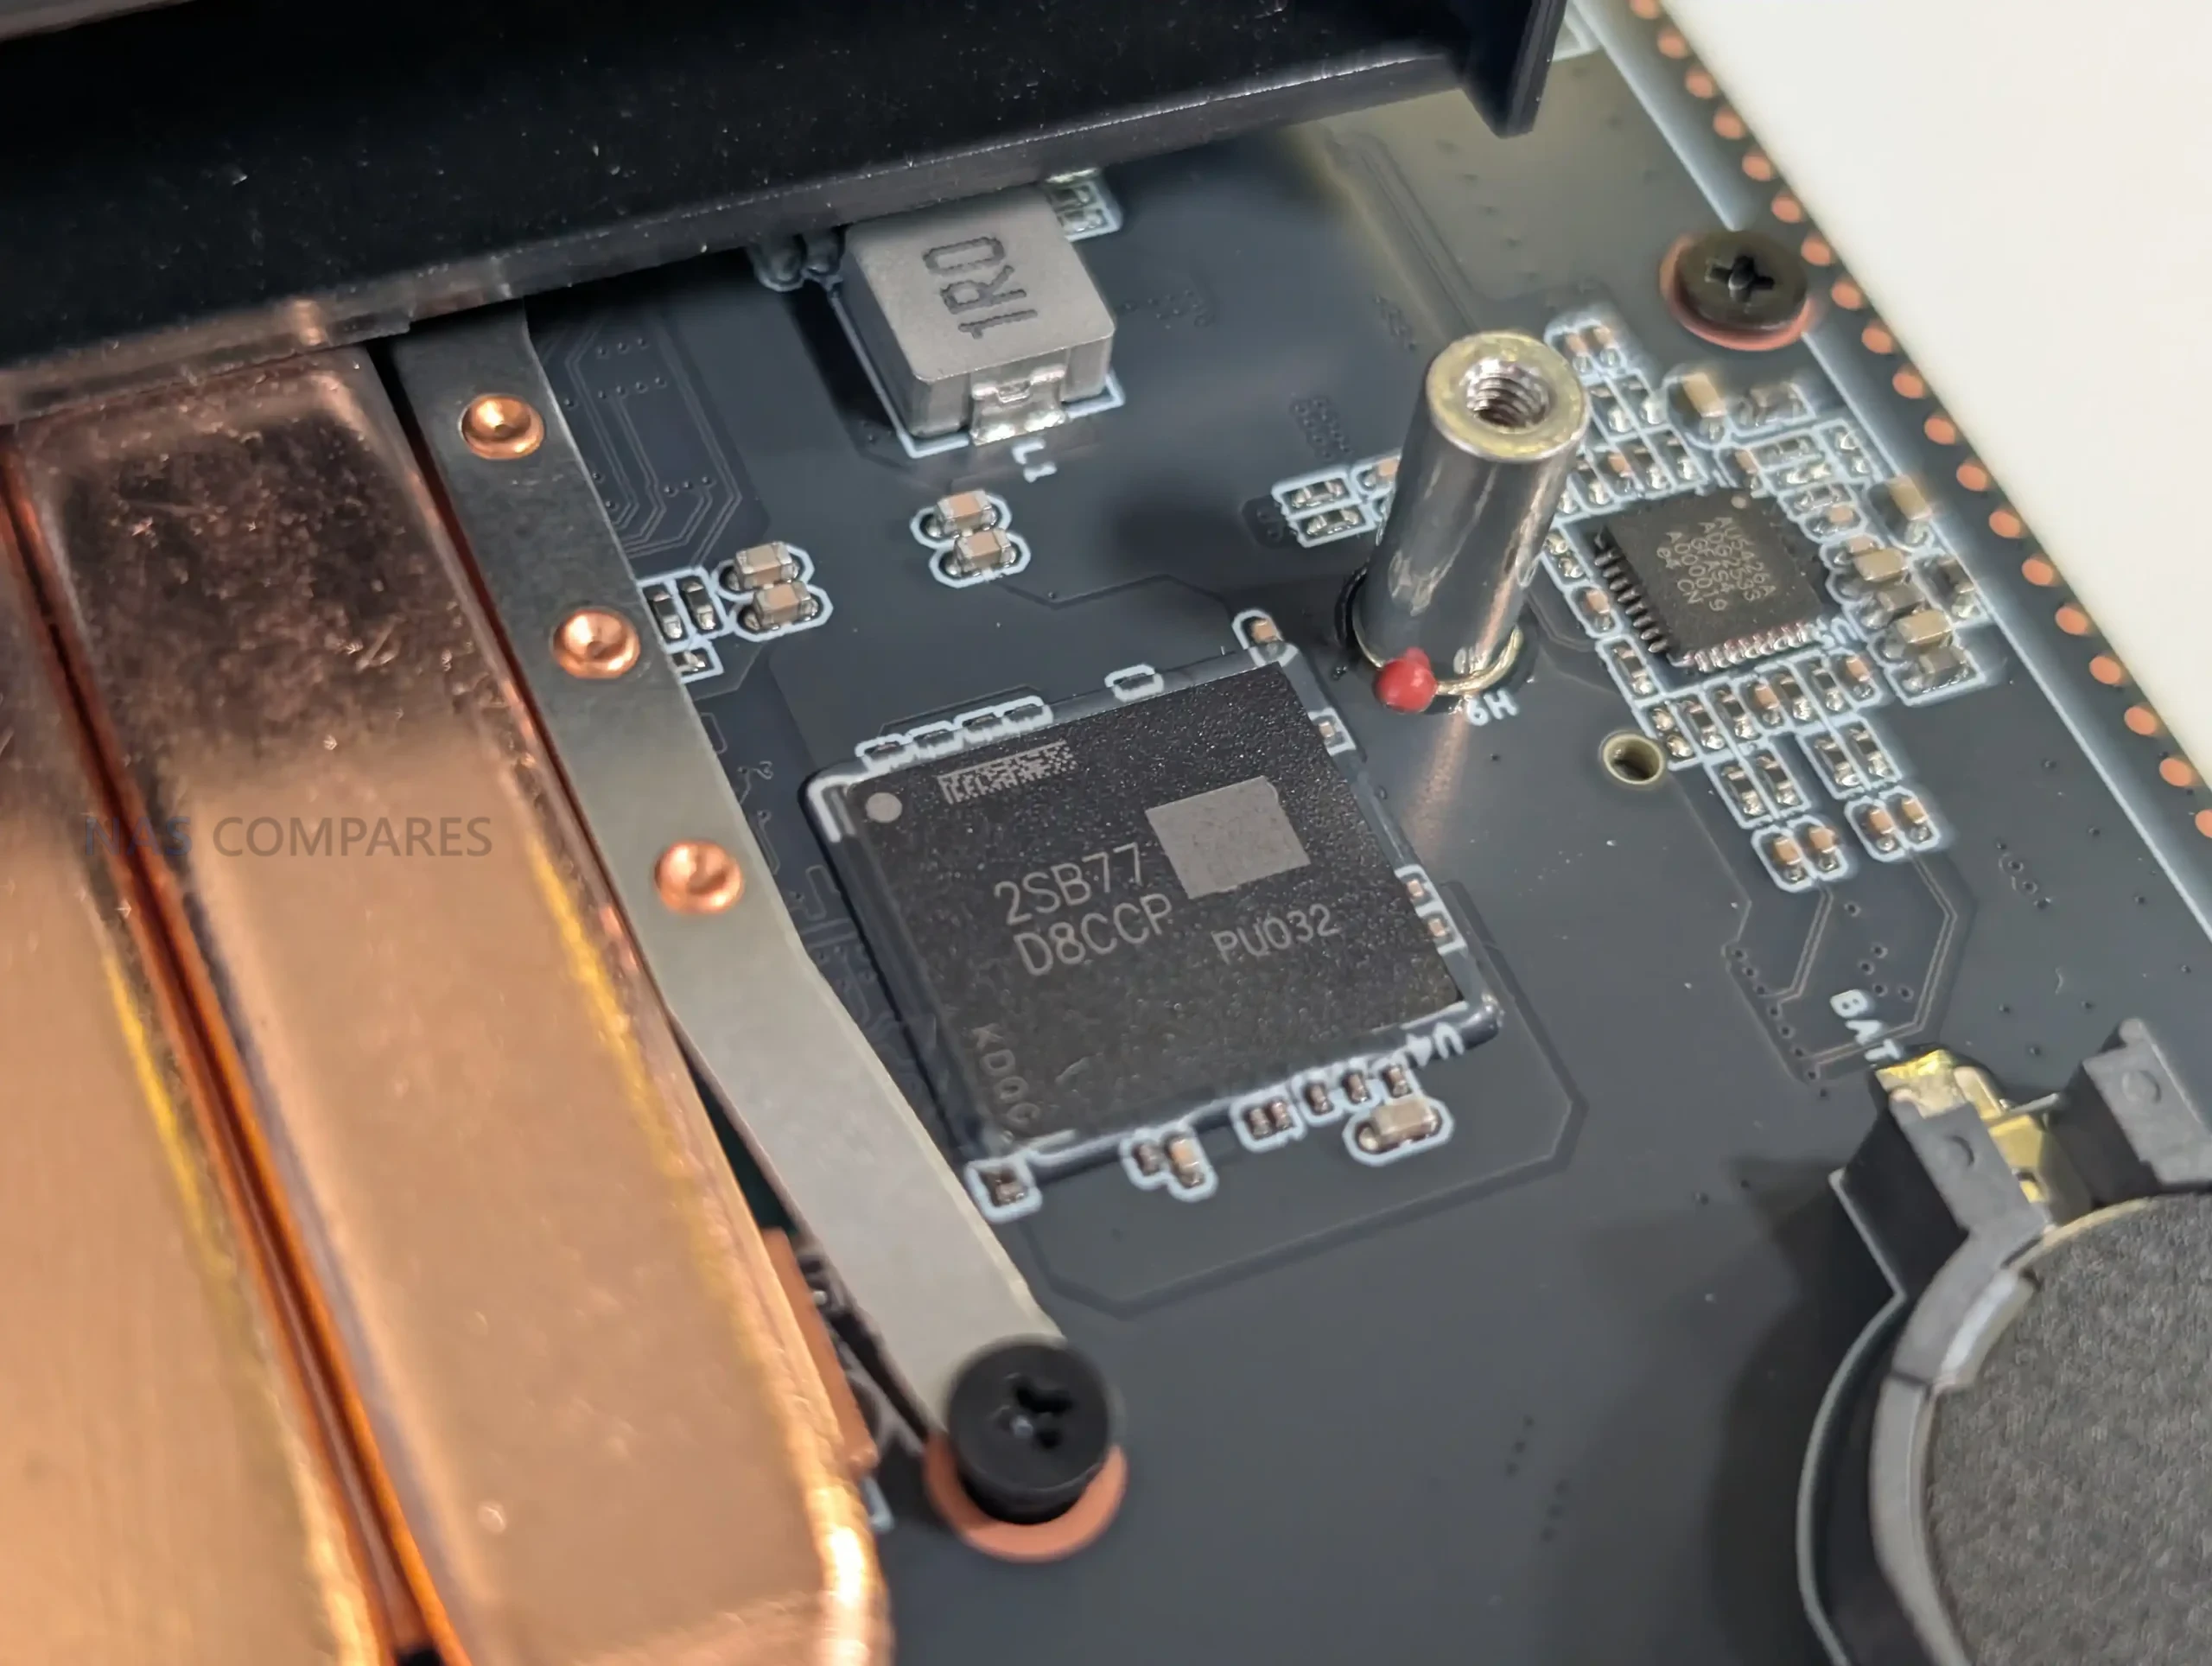
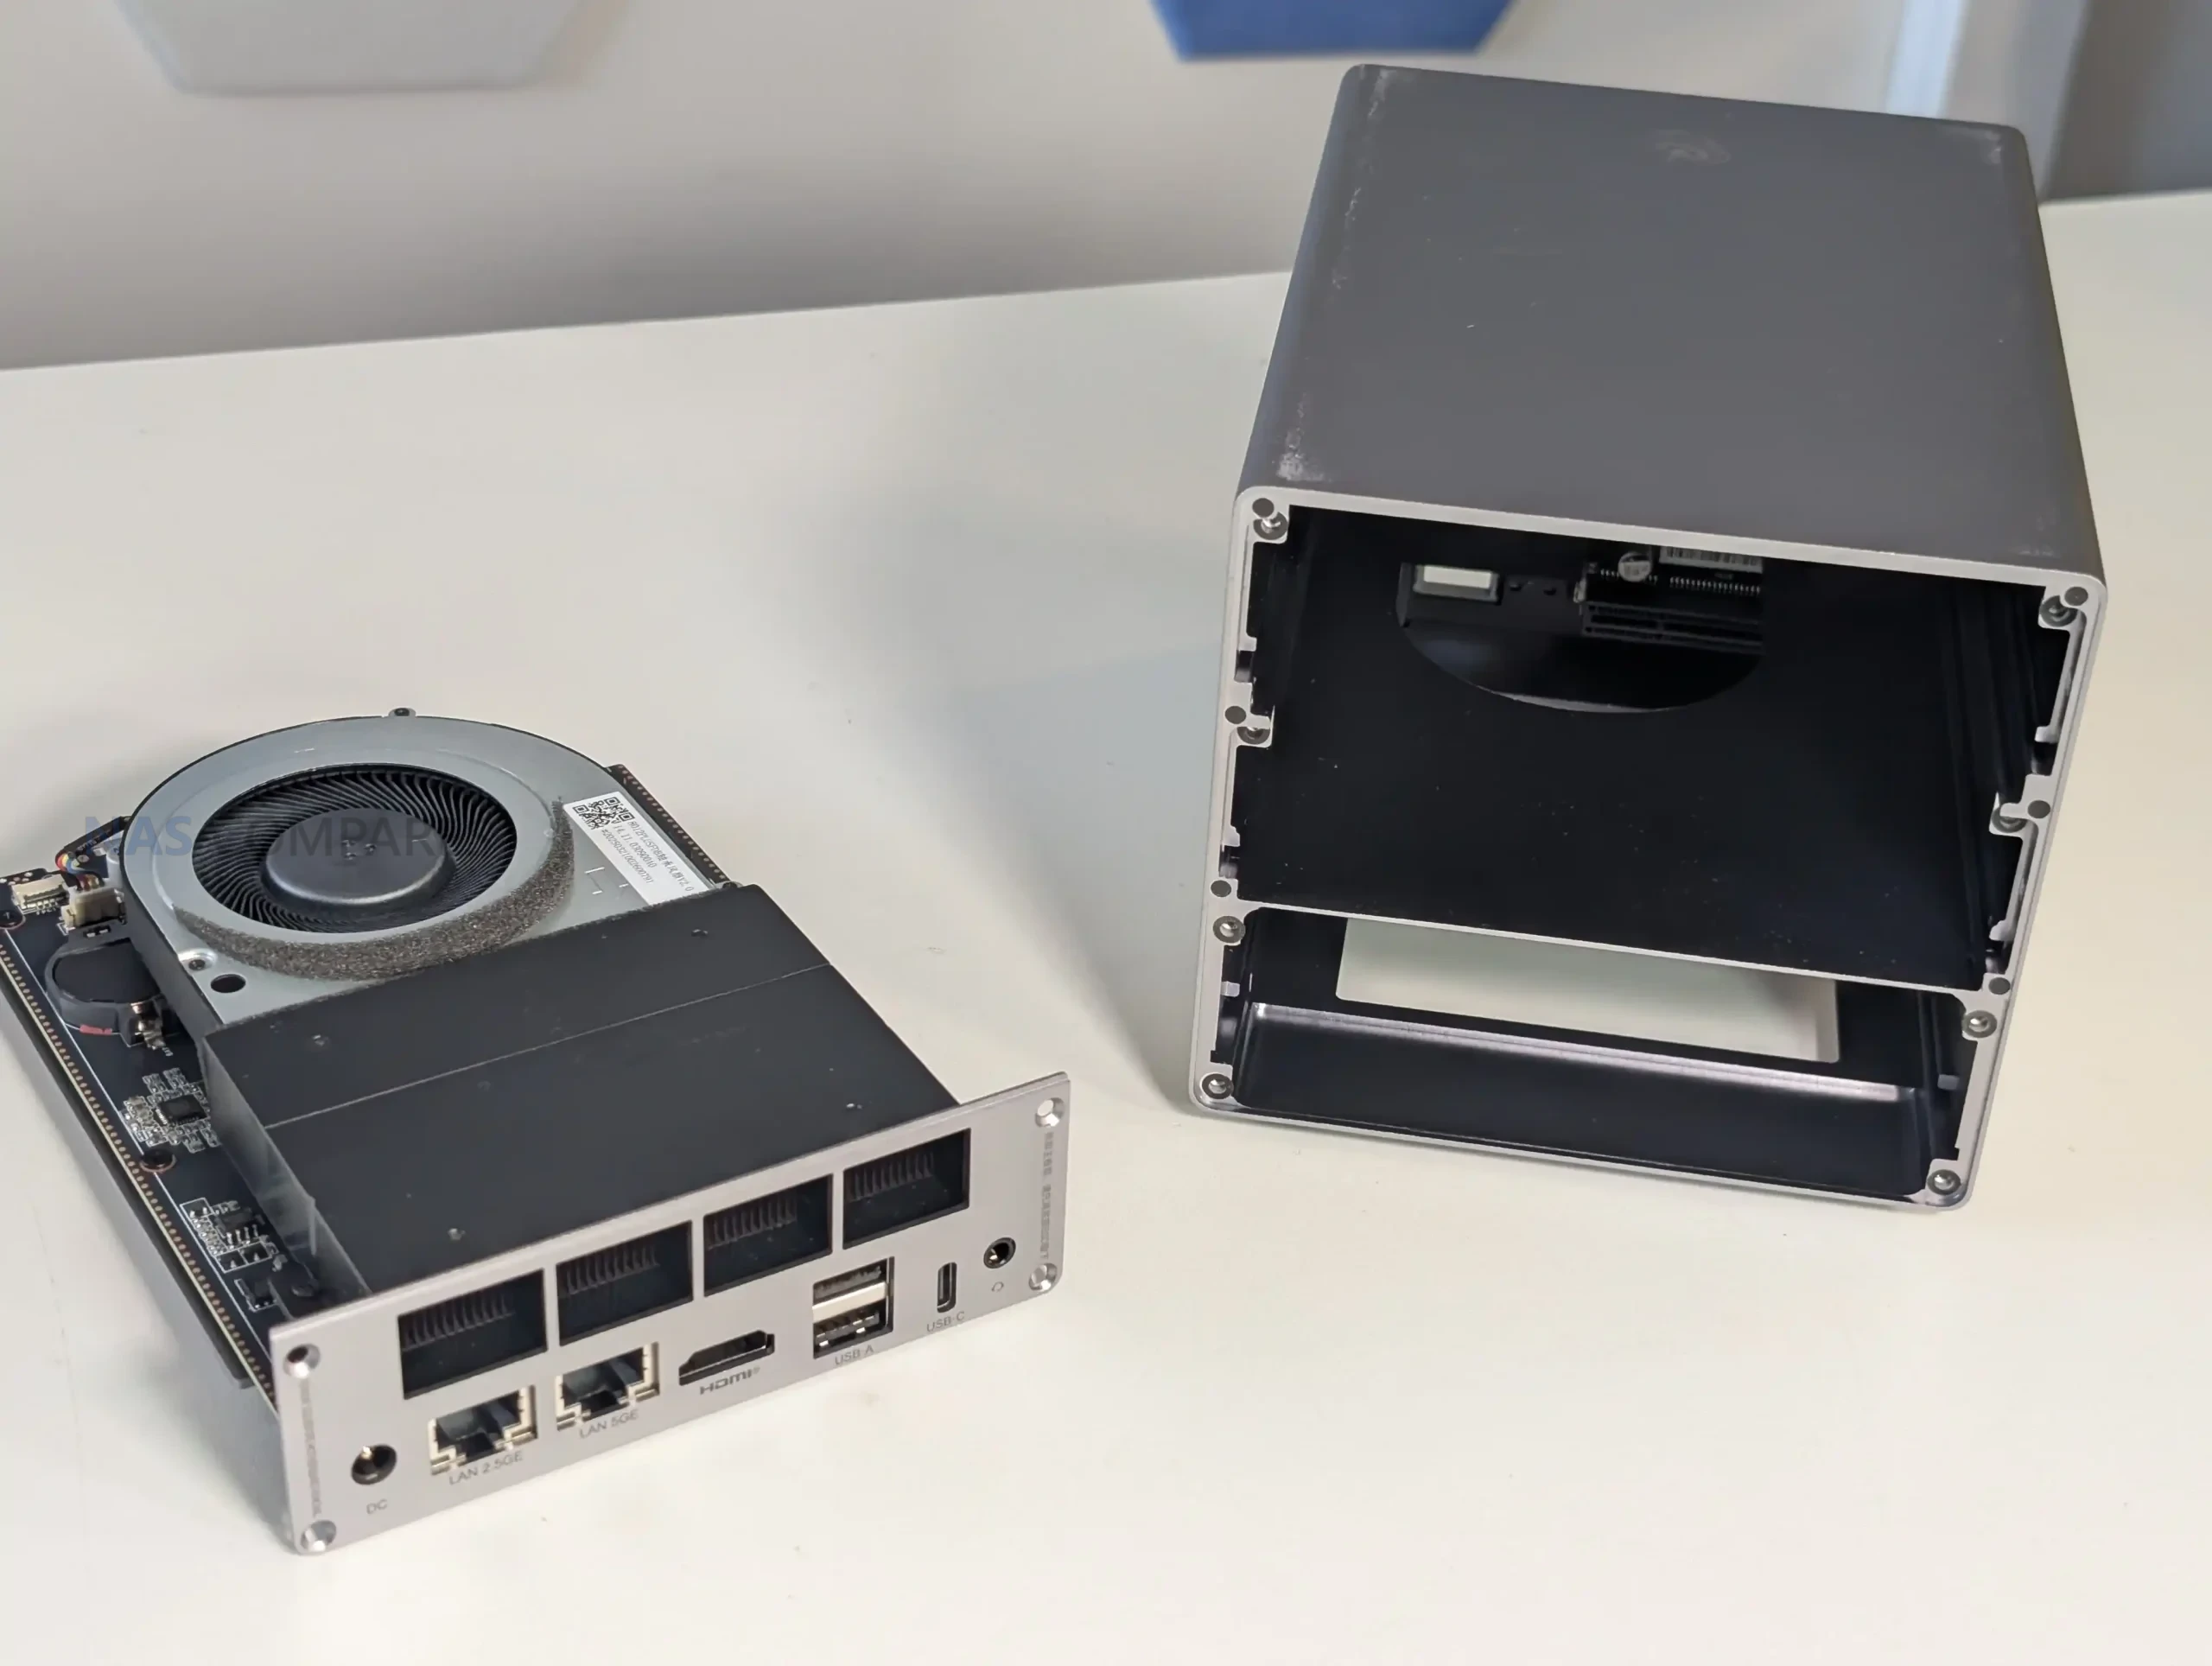
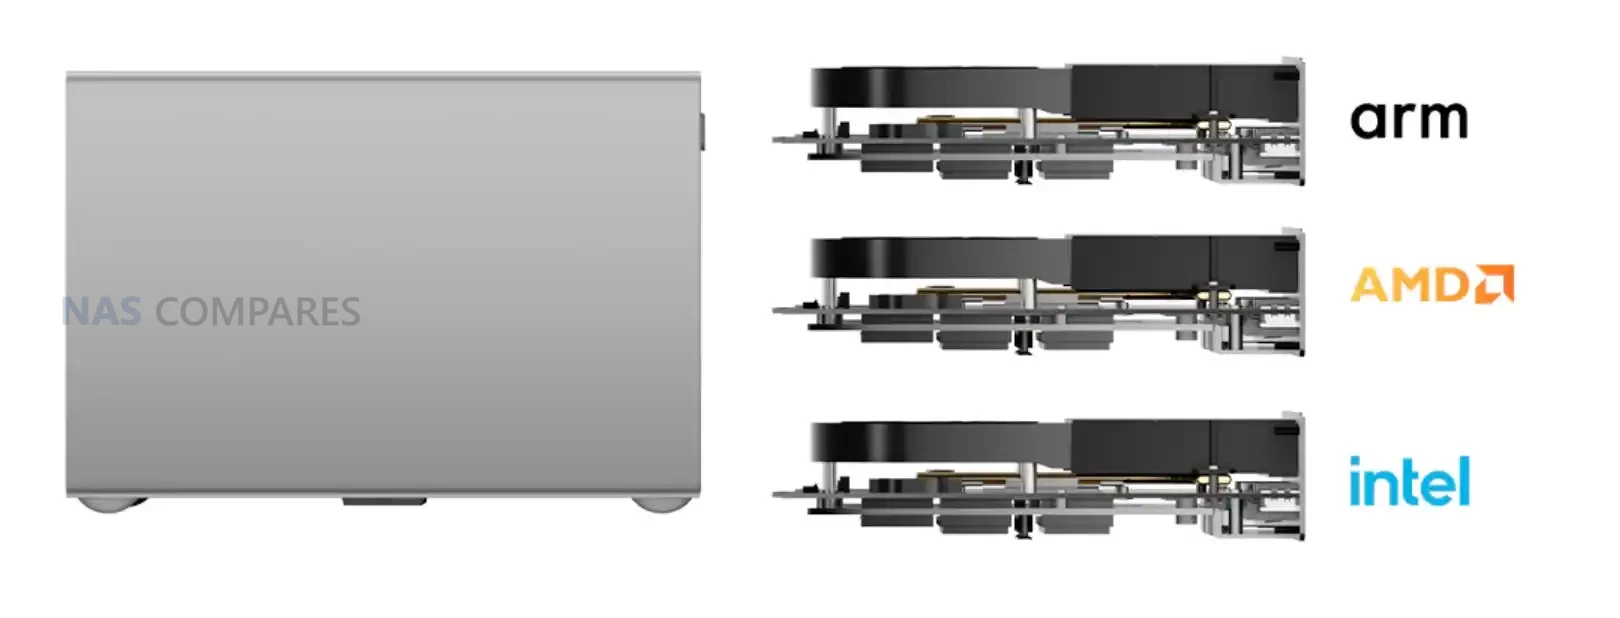
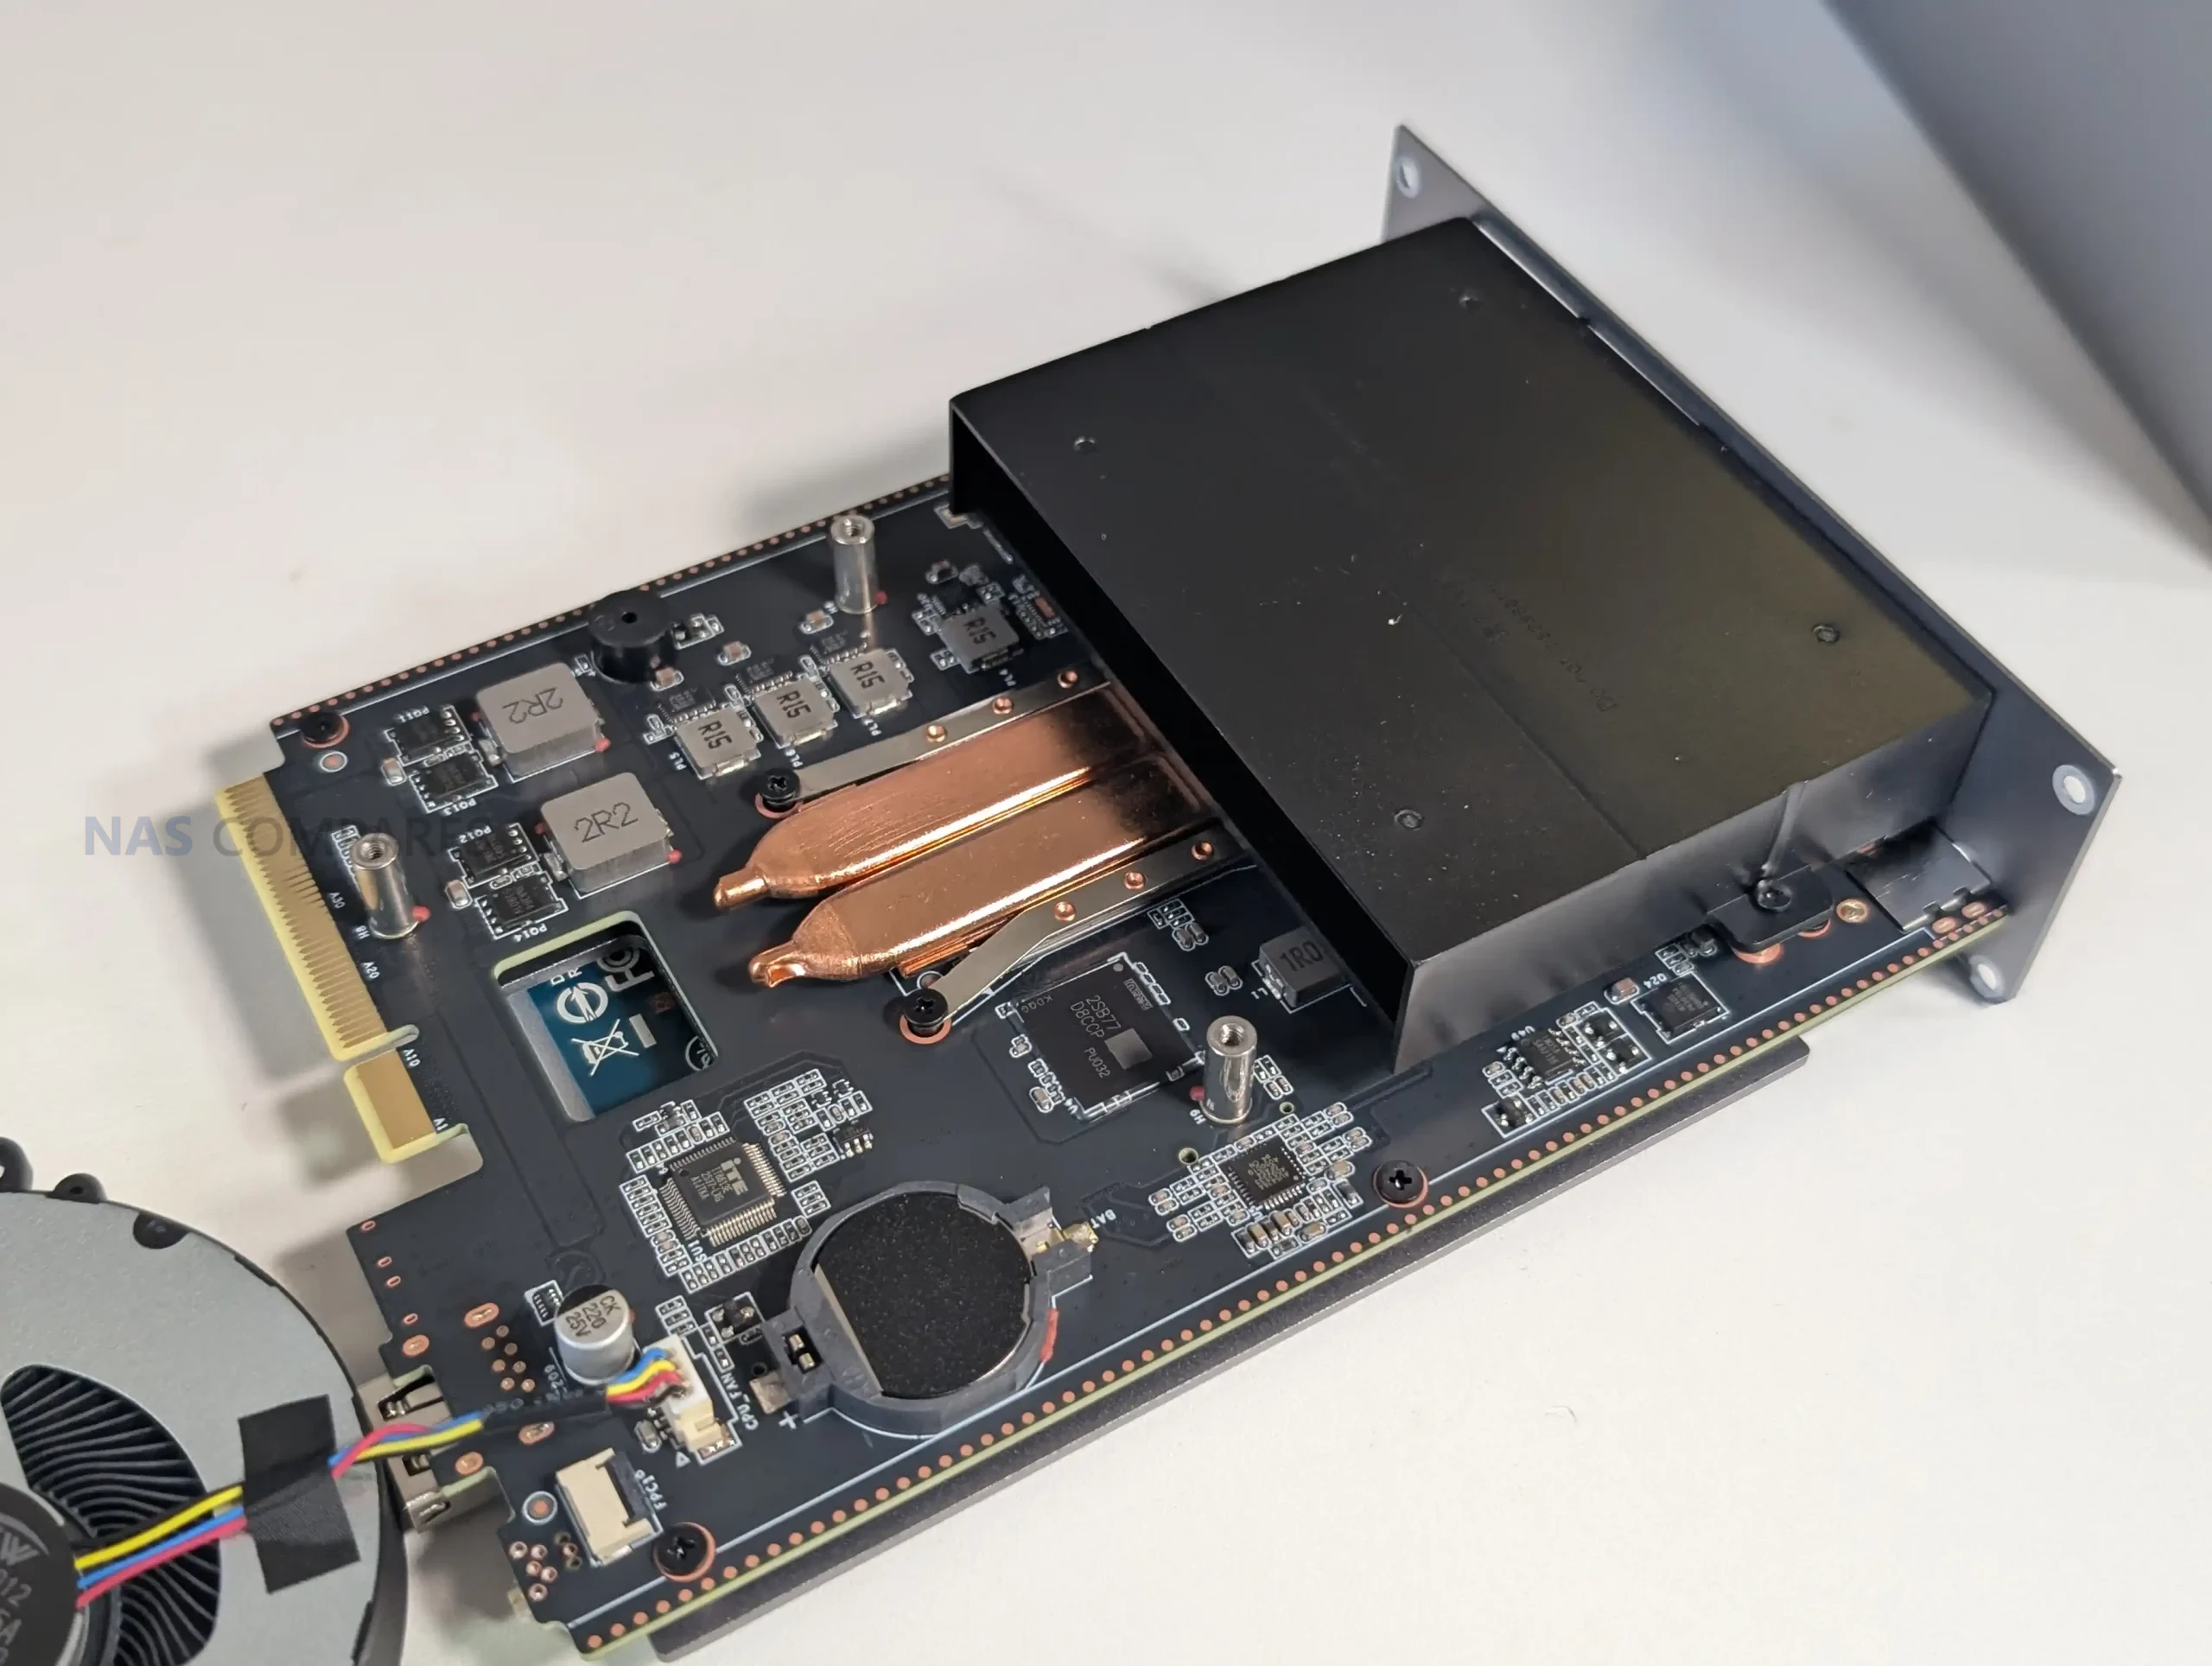
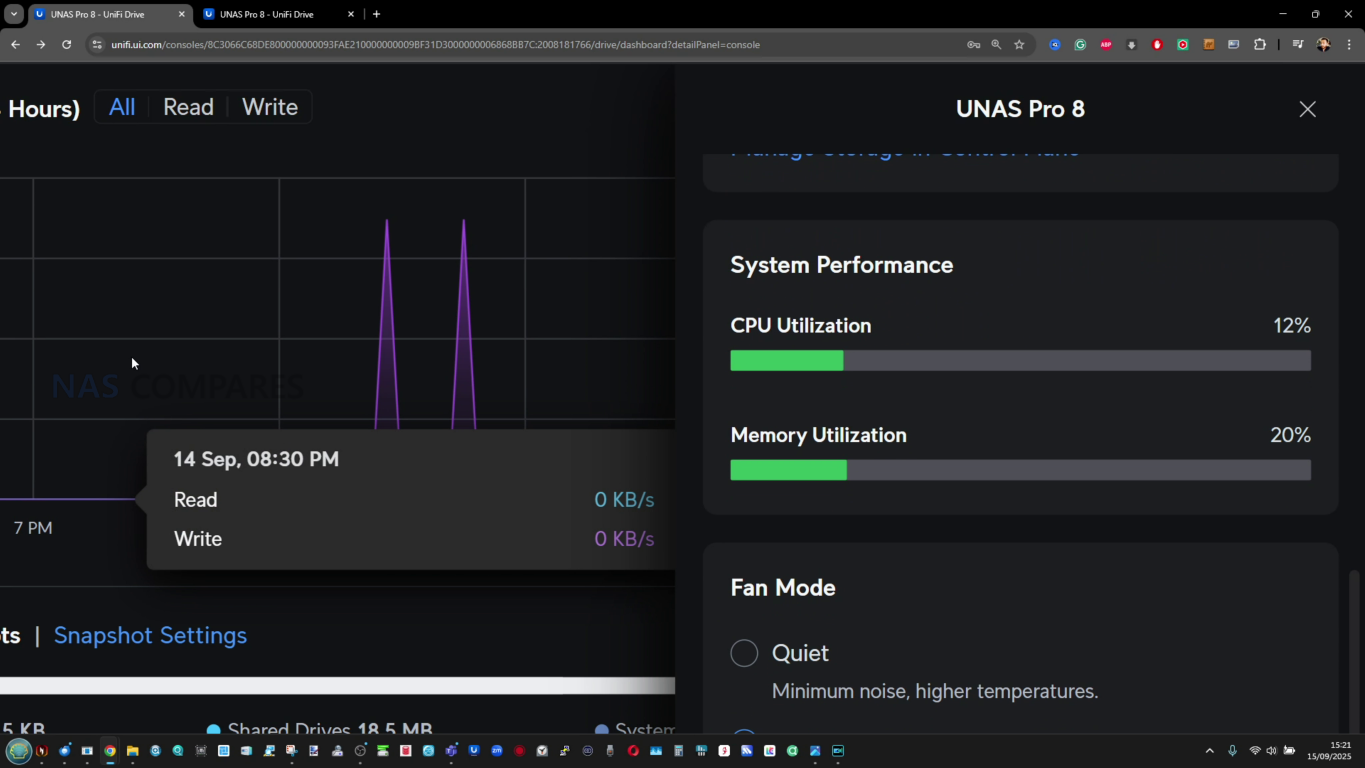
The UNAS Pro 4 is built around a quad core ARM Cortex-A57 CPU clocked at 2.0 GHz and paired with 8 GB of memory, which sets expectations for the type of workloads it is designed to handle. This is not a platform aimed at heavyweight compute tasks, but for file services and scheduled backup activity it has enough headroom to keep the system responsive, particularly when multiple users are accessing shared folders and snapshots are being taken in the background.

The CPU choice also reflects a focus on predictable appliance behavior and lower overall platform complexity rather than maximum expandable performance.

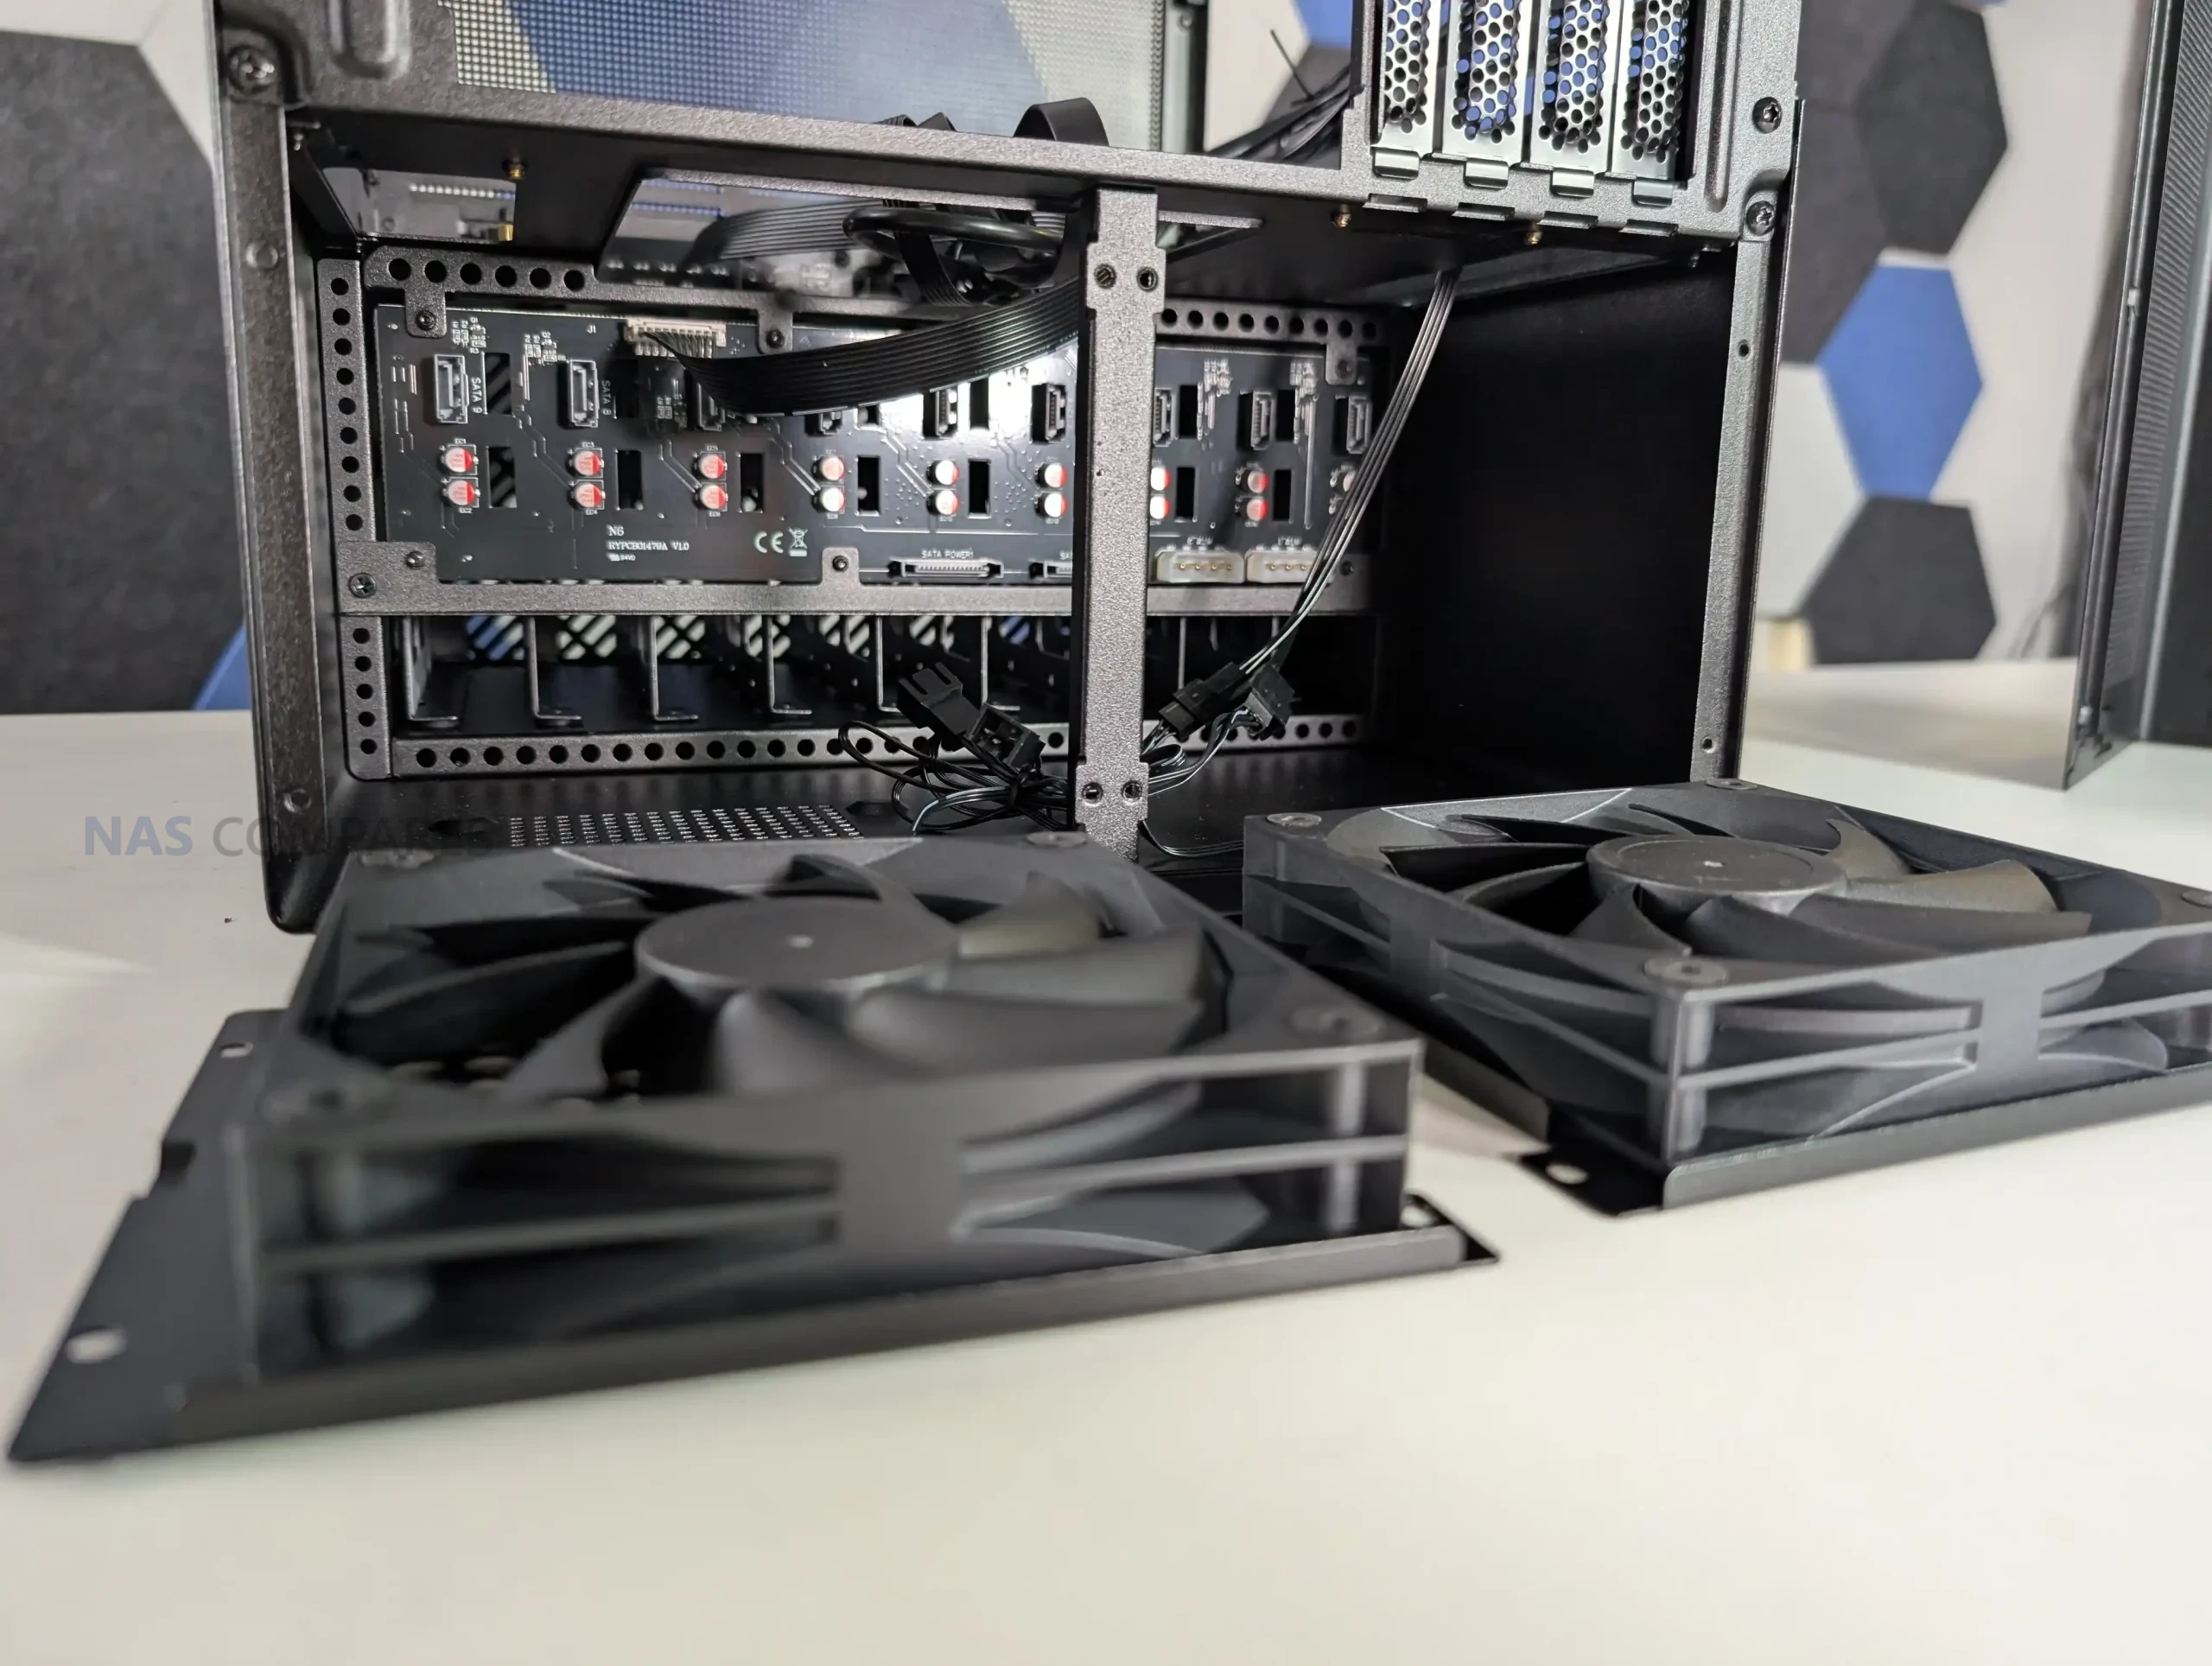
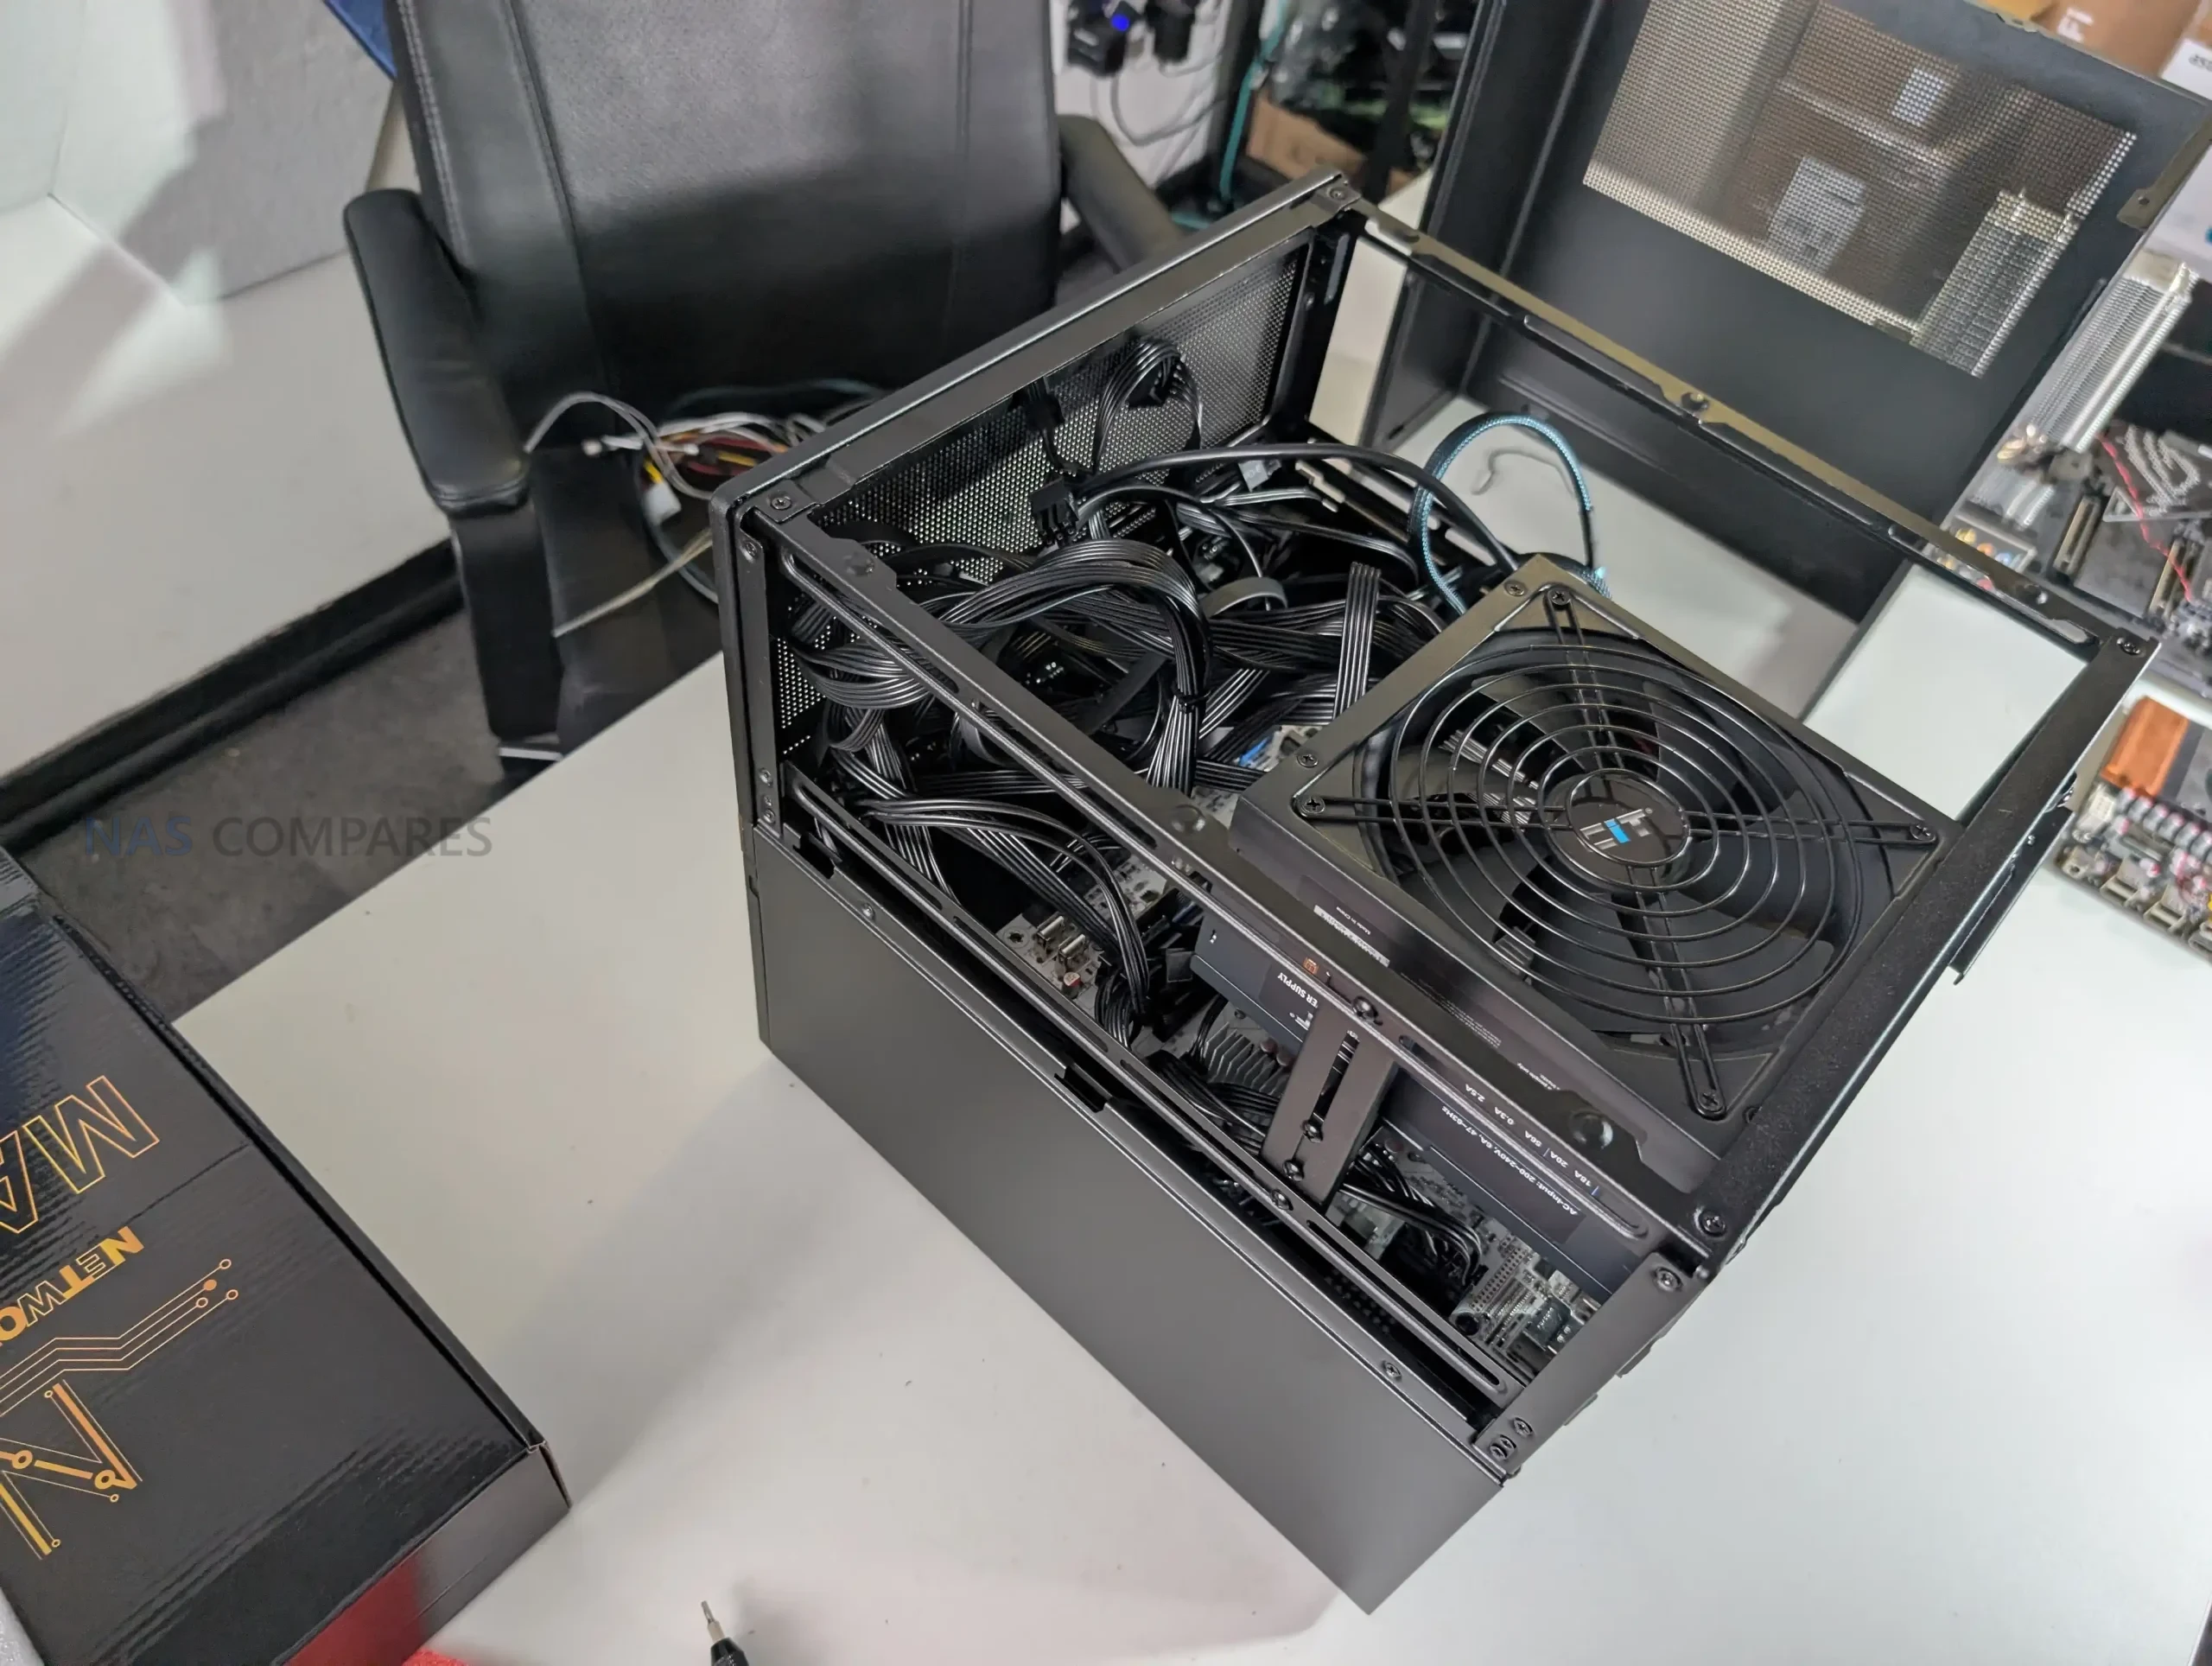
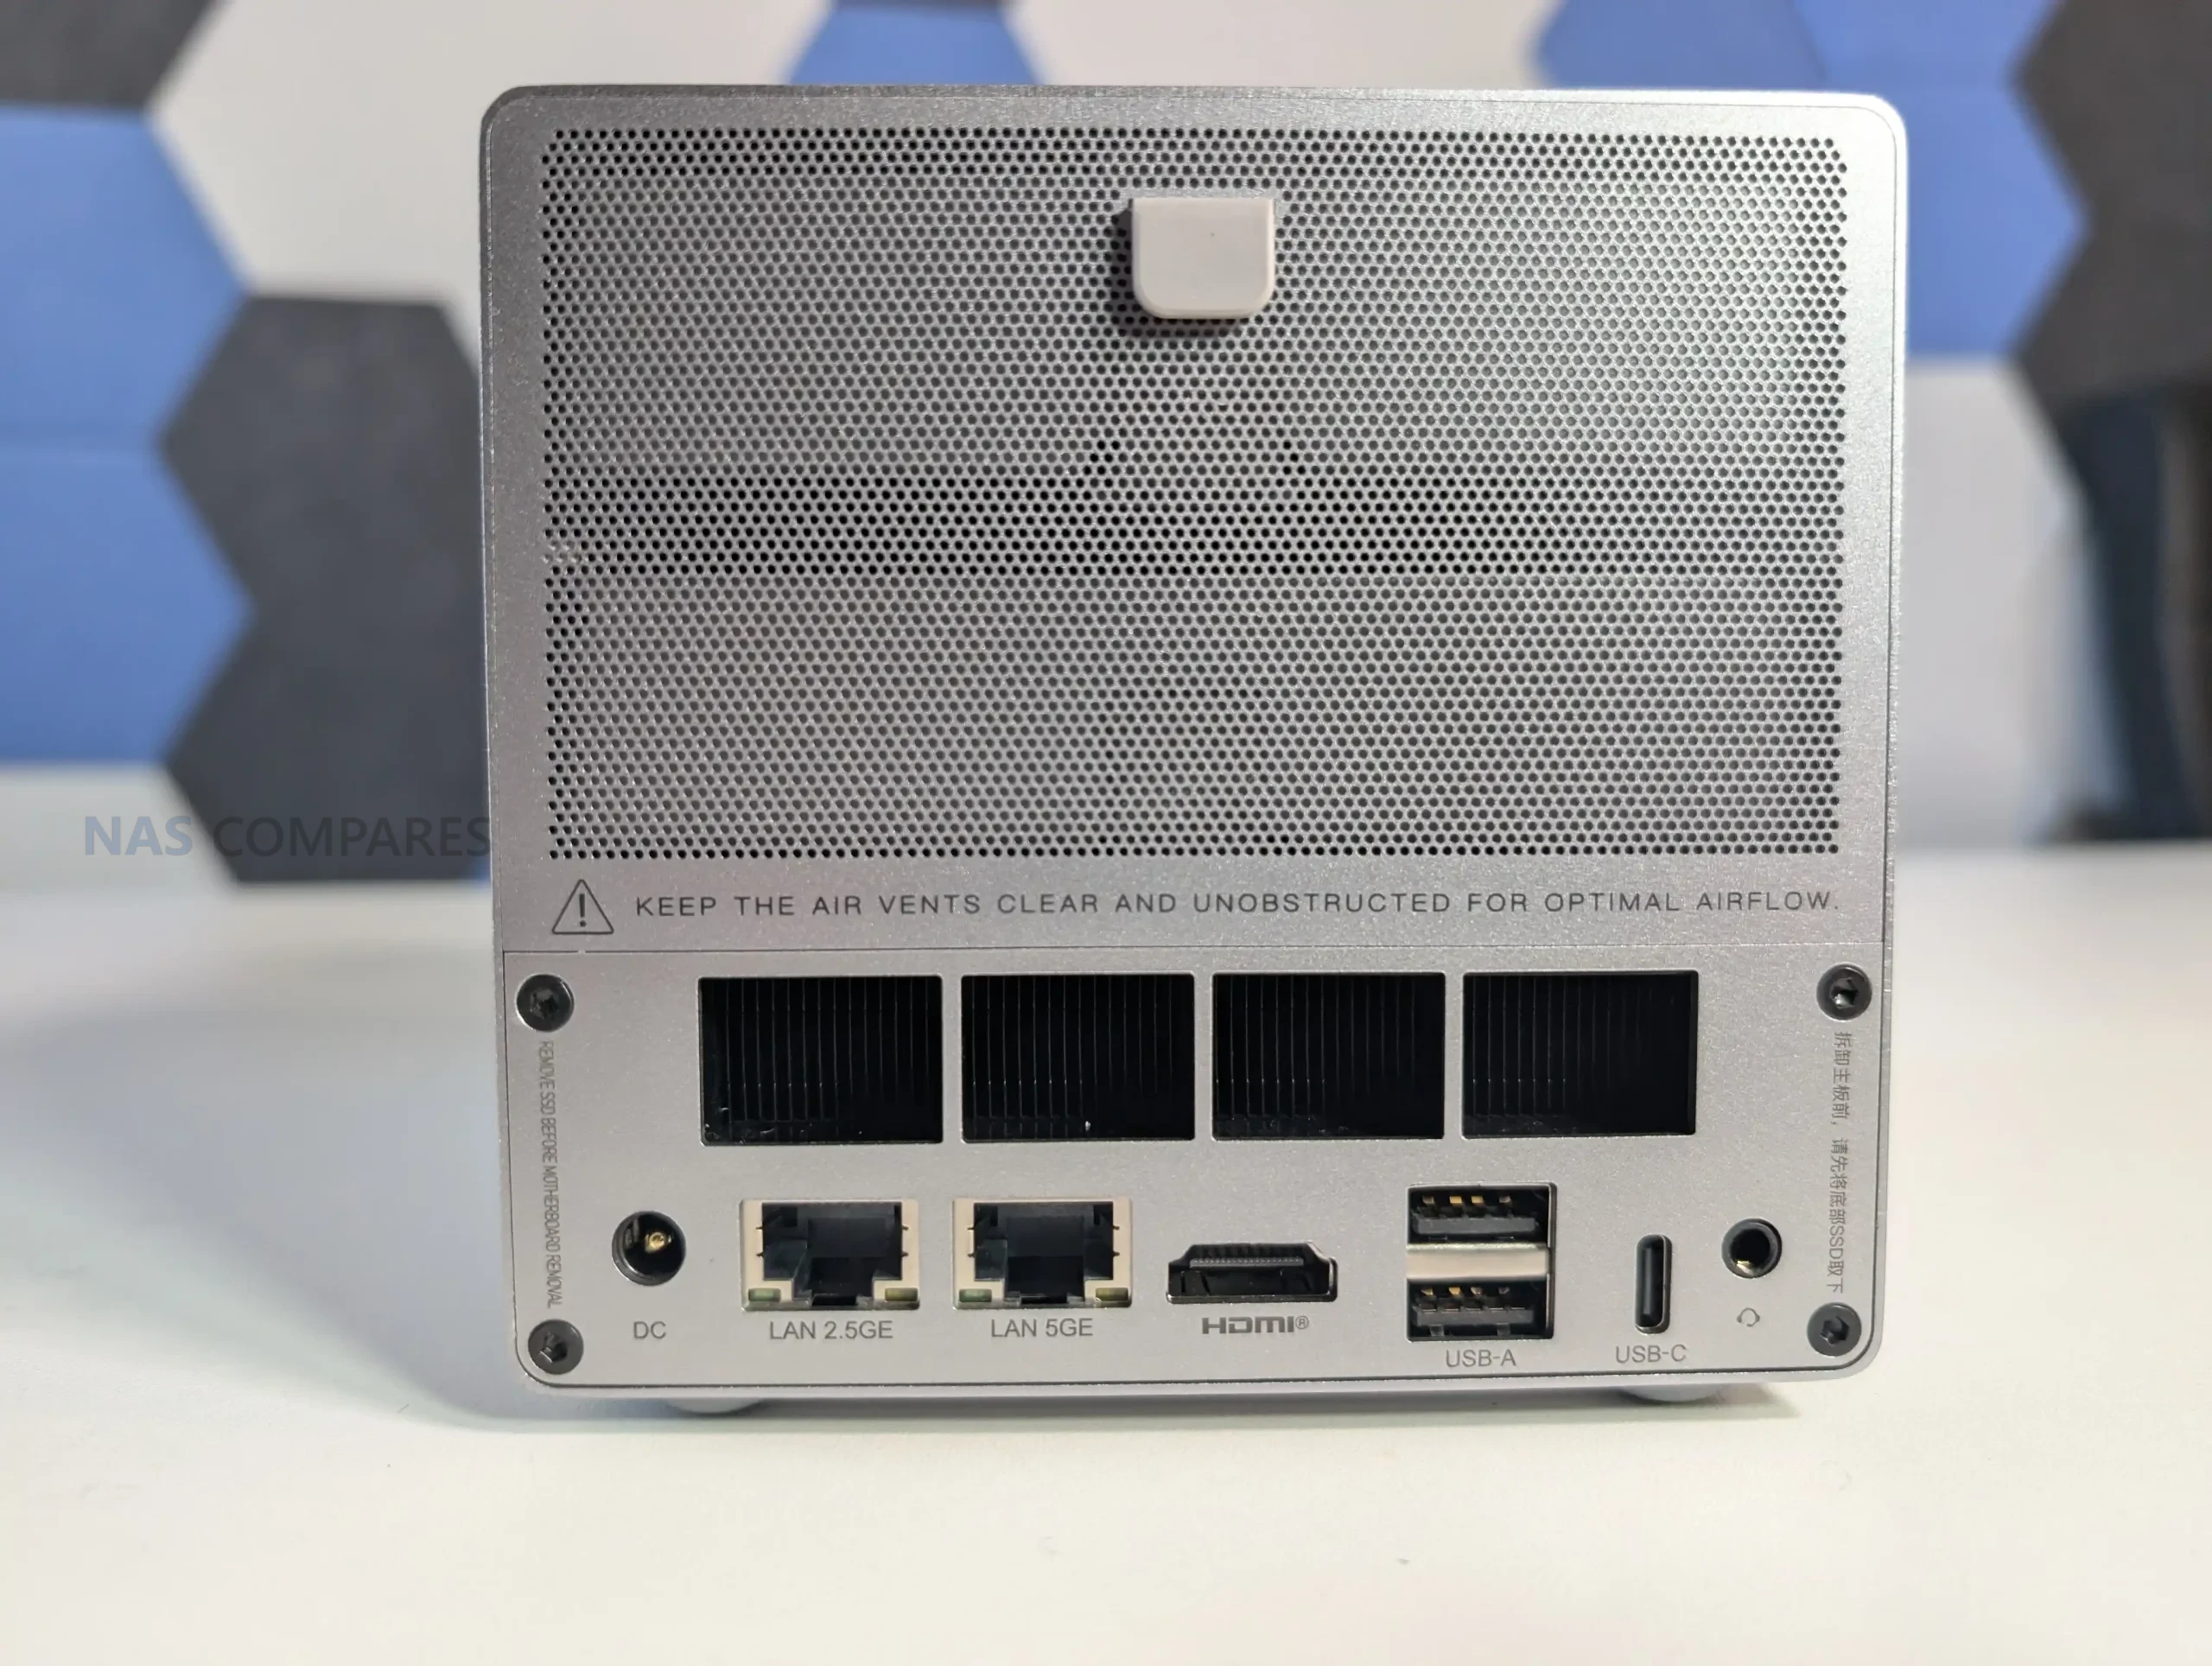
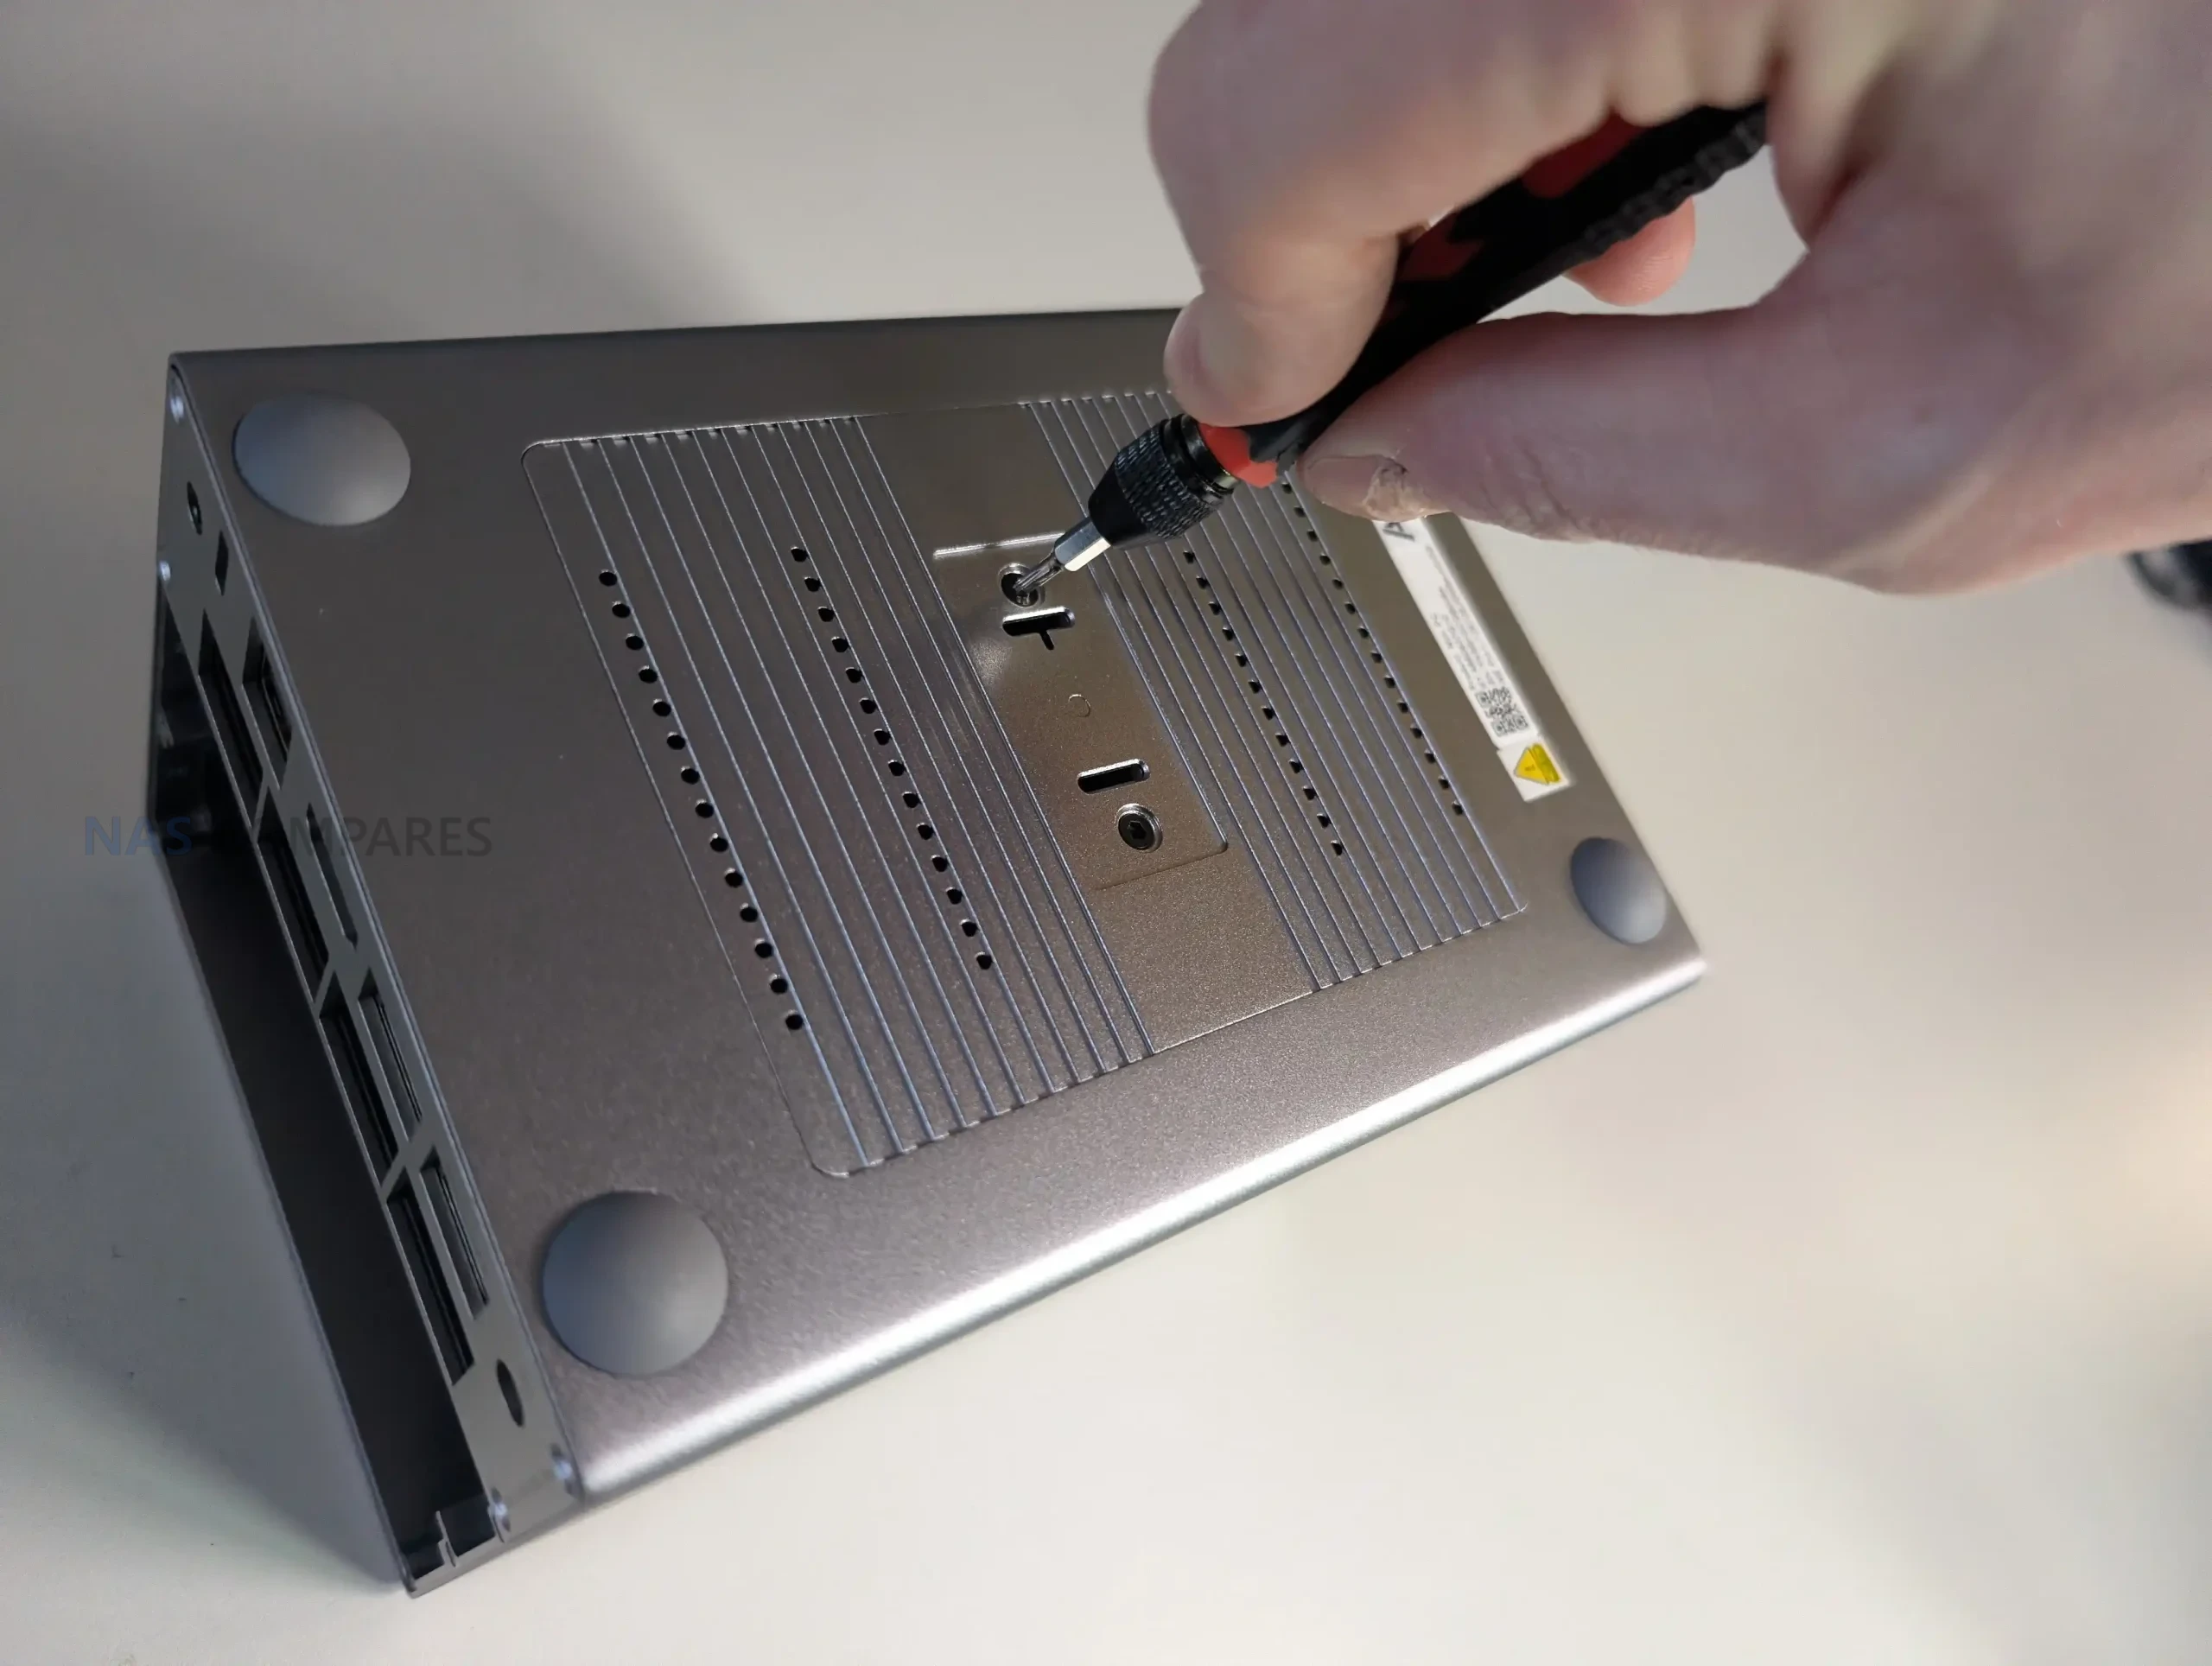
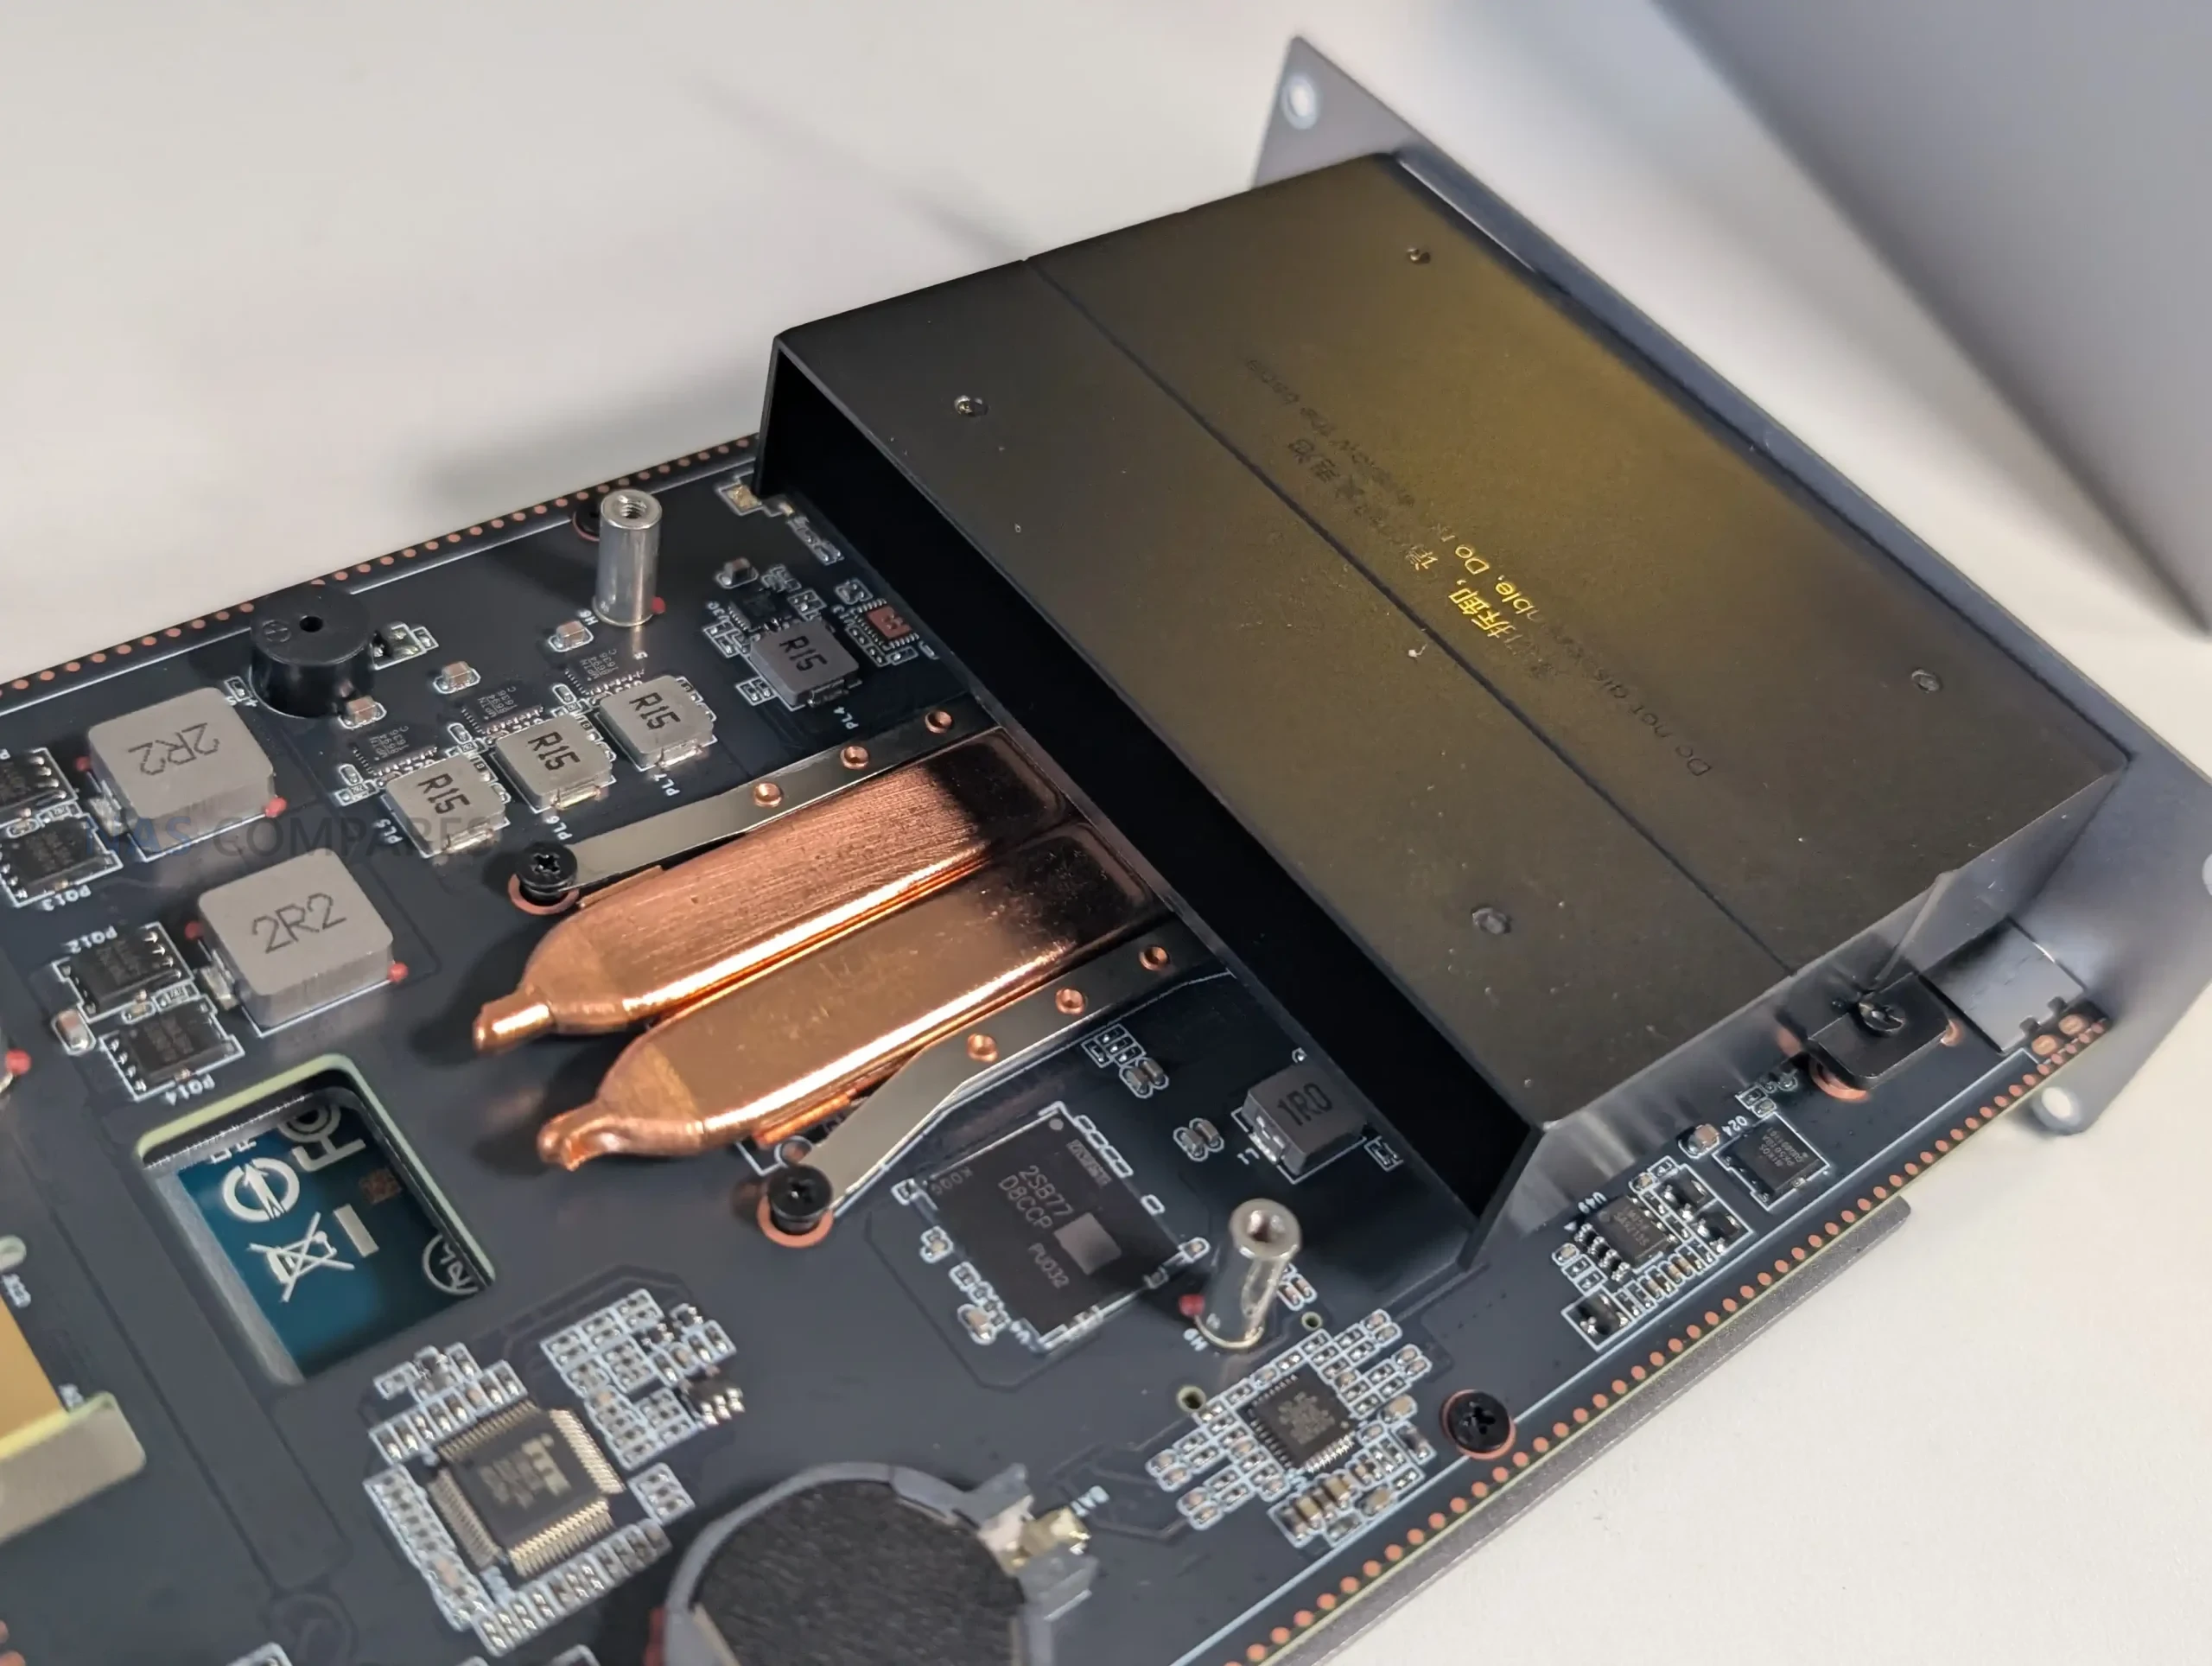
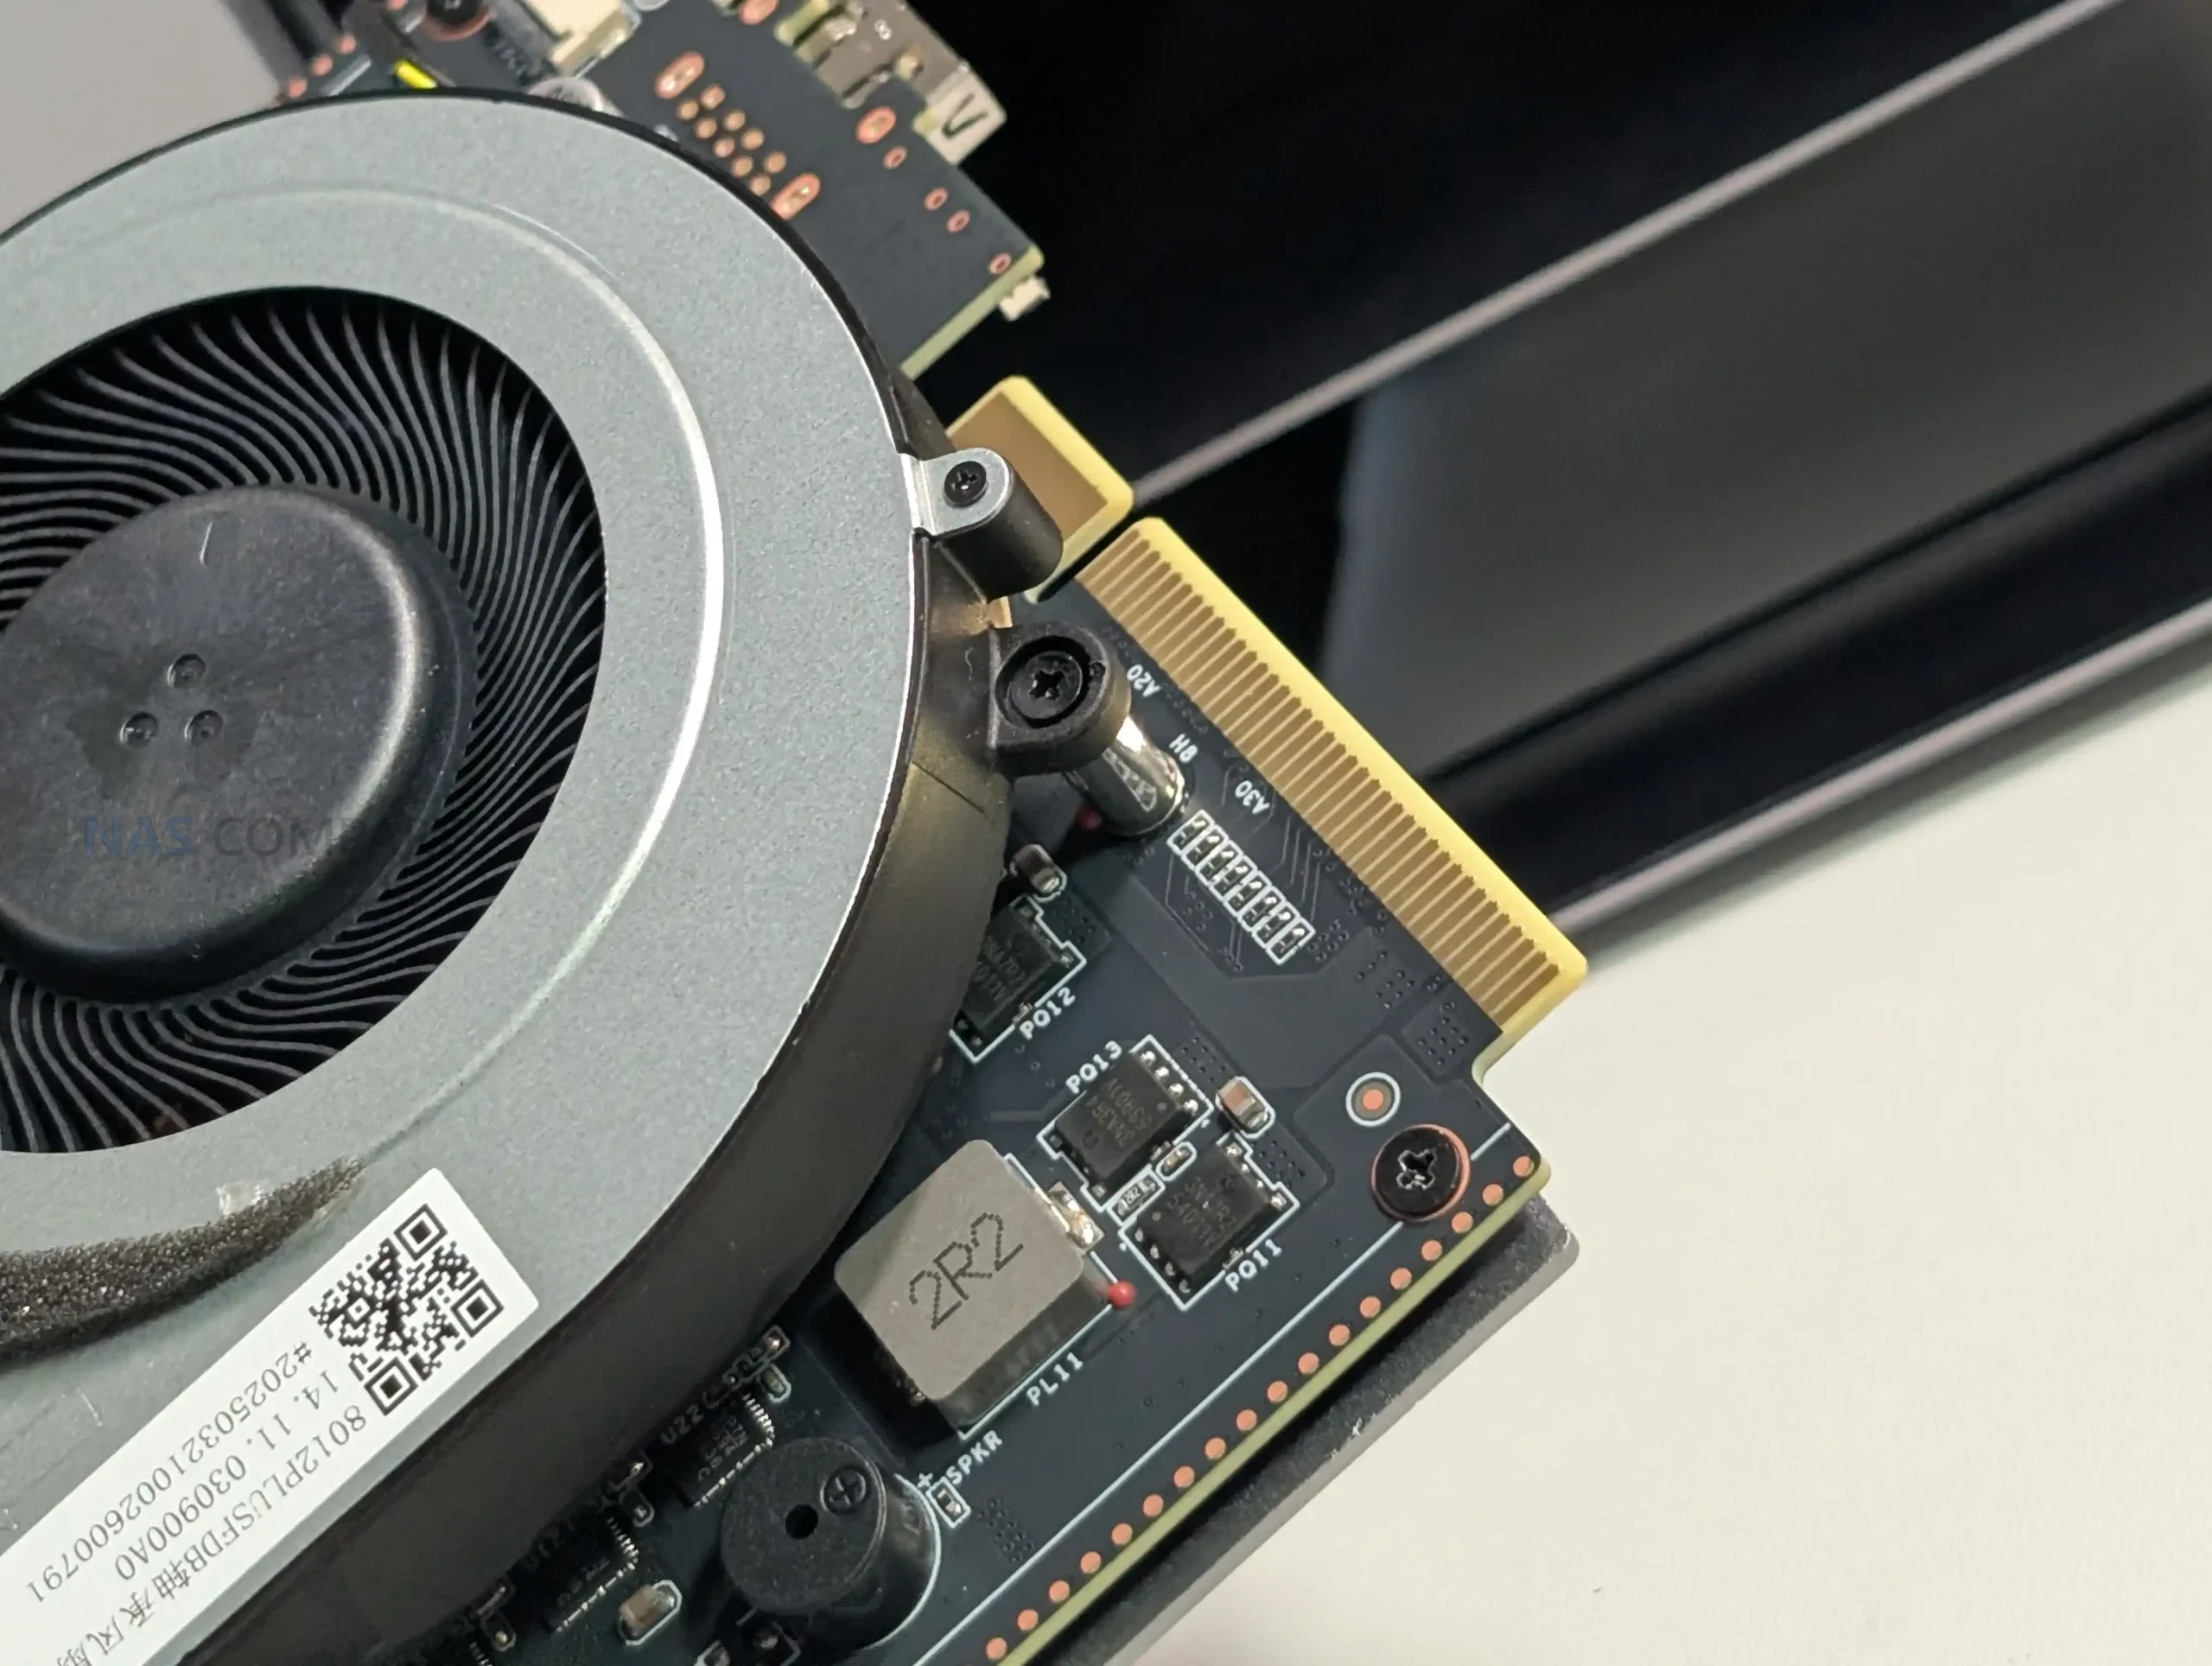
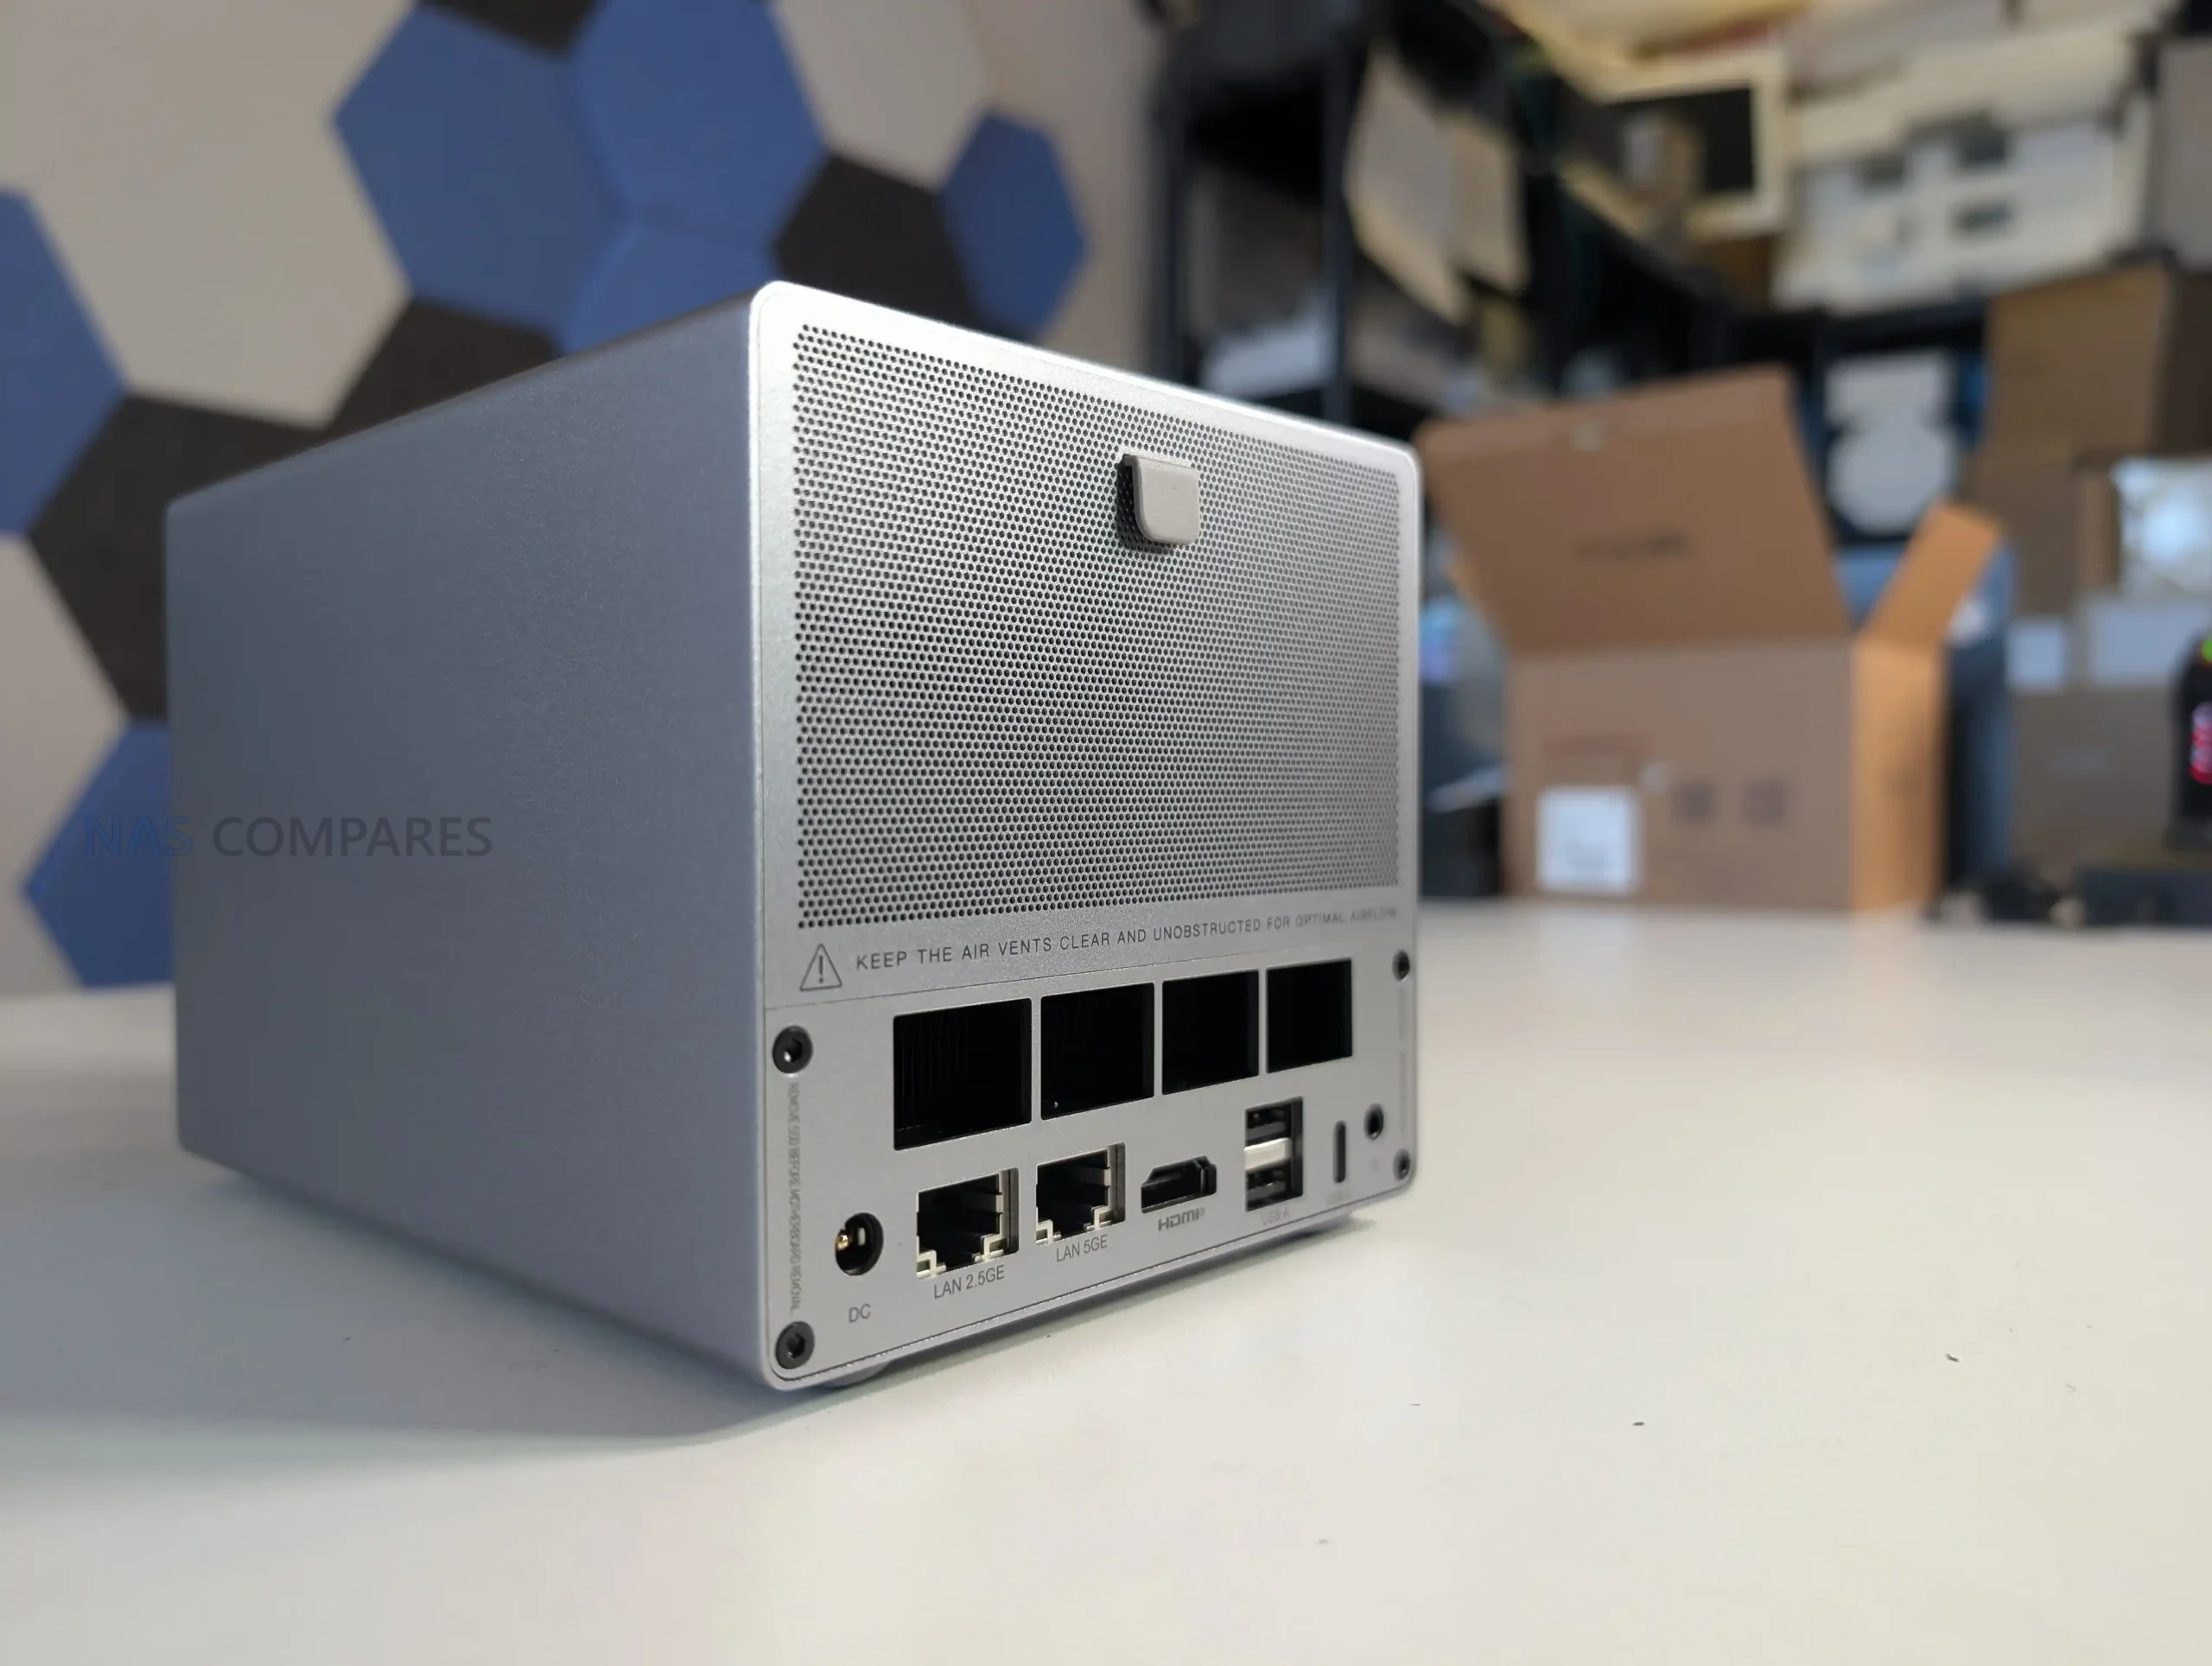
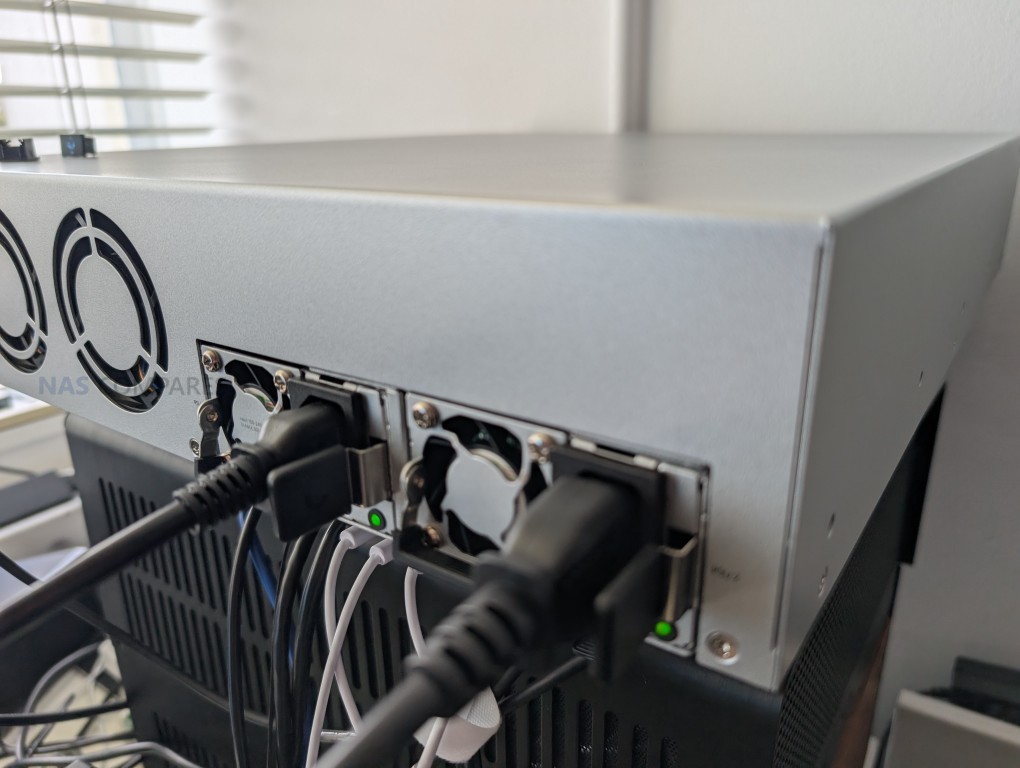
Internally, the power system is a single 150 W unit mounted inside the chassis rather than a hot swap module, which influences servicing and downtime planning. If the PSU fails, replacement is more involved than swapping an external canister, and that is a meaningful difference compared with rack systems that use easily replaceable redundant modules.

The unit does, however, support UniFi’s USP-RPS DC input as an alternative redundancy method, which changes the redundancy approach from “dual PSU in the chassis” to “centralized redundant supply for multiple devices,” with different trade-offs in cost, cabling, and rack layout.

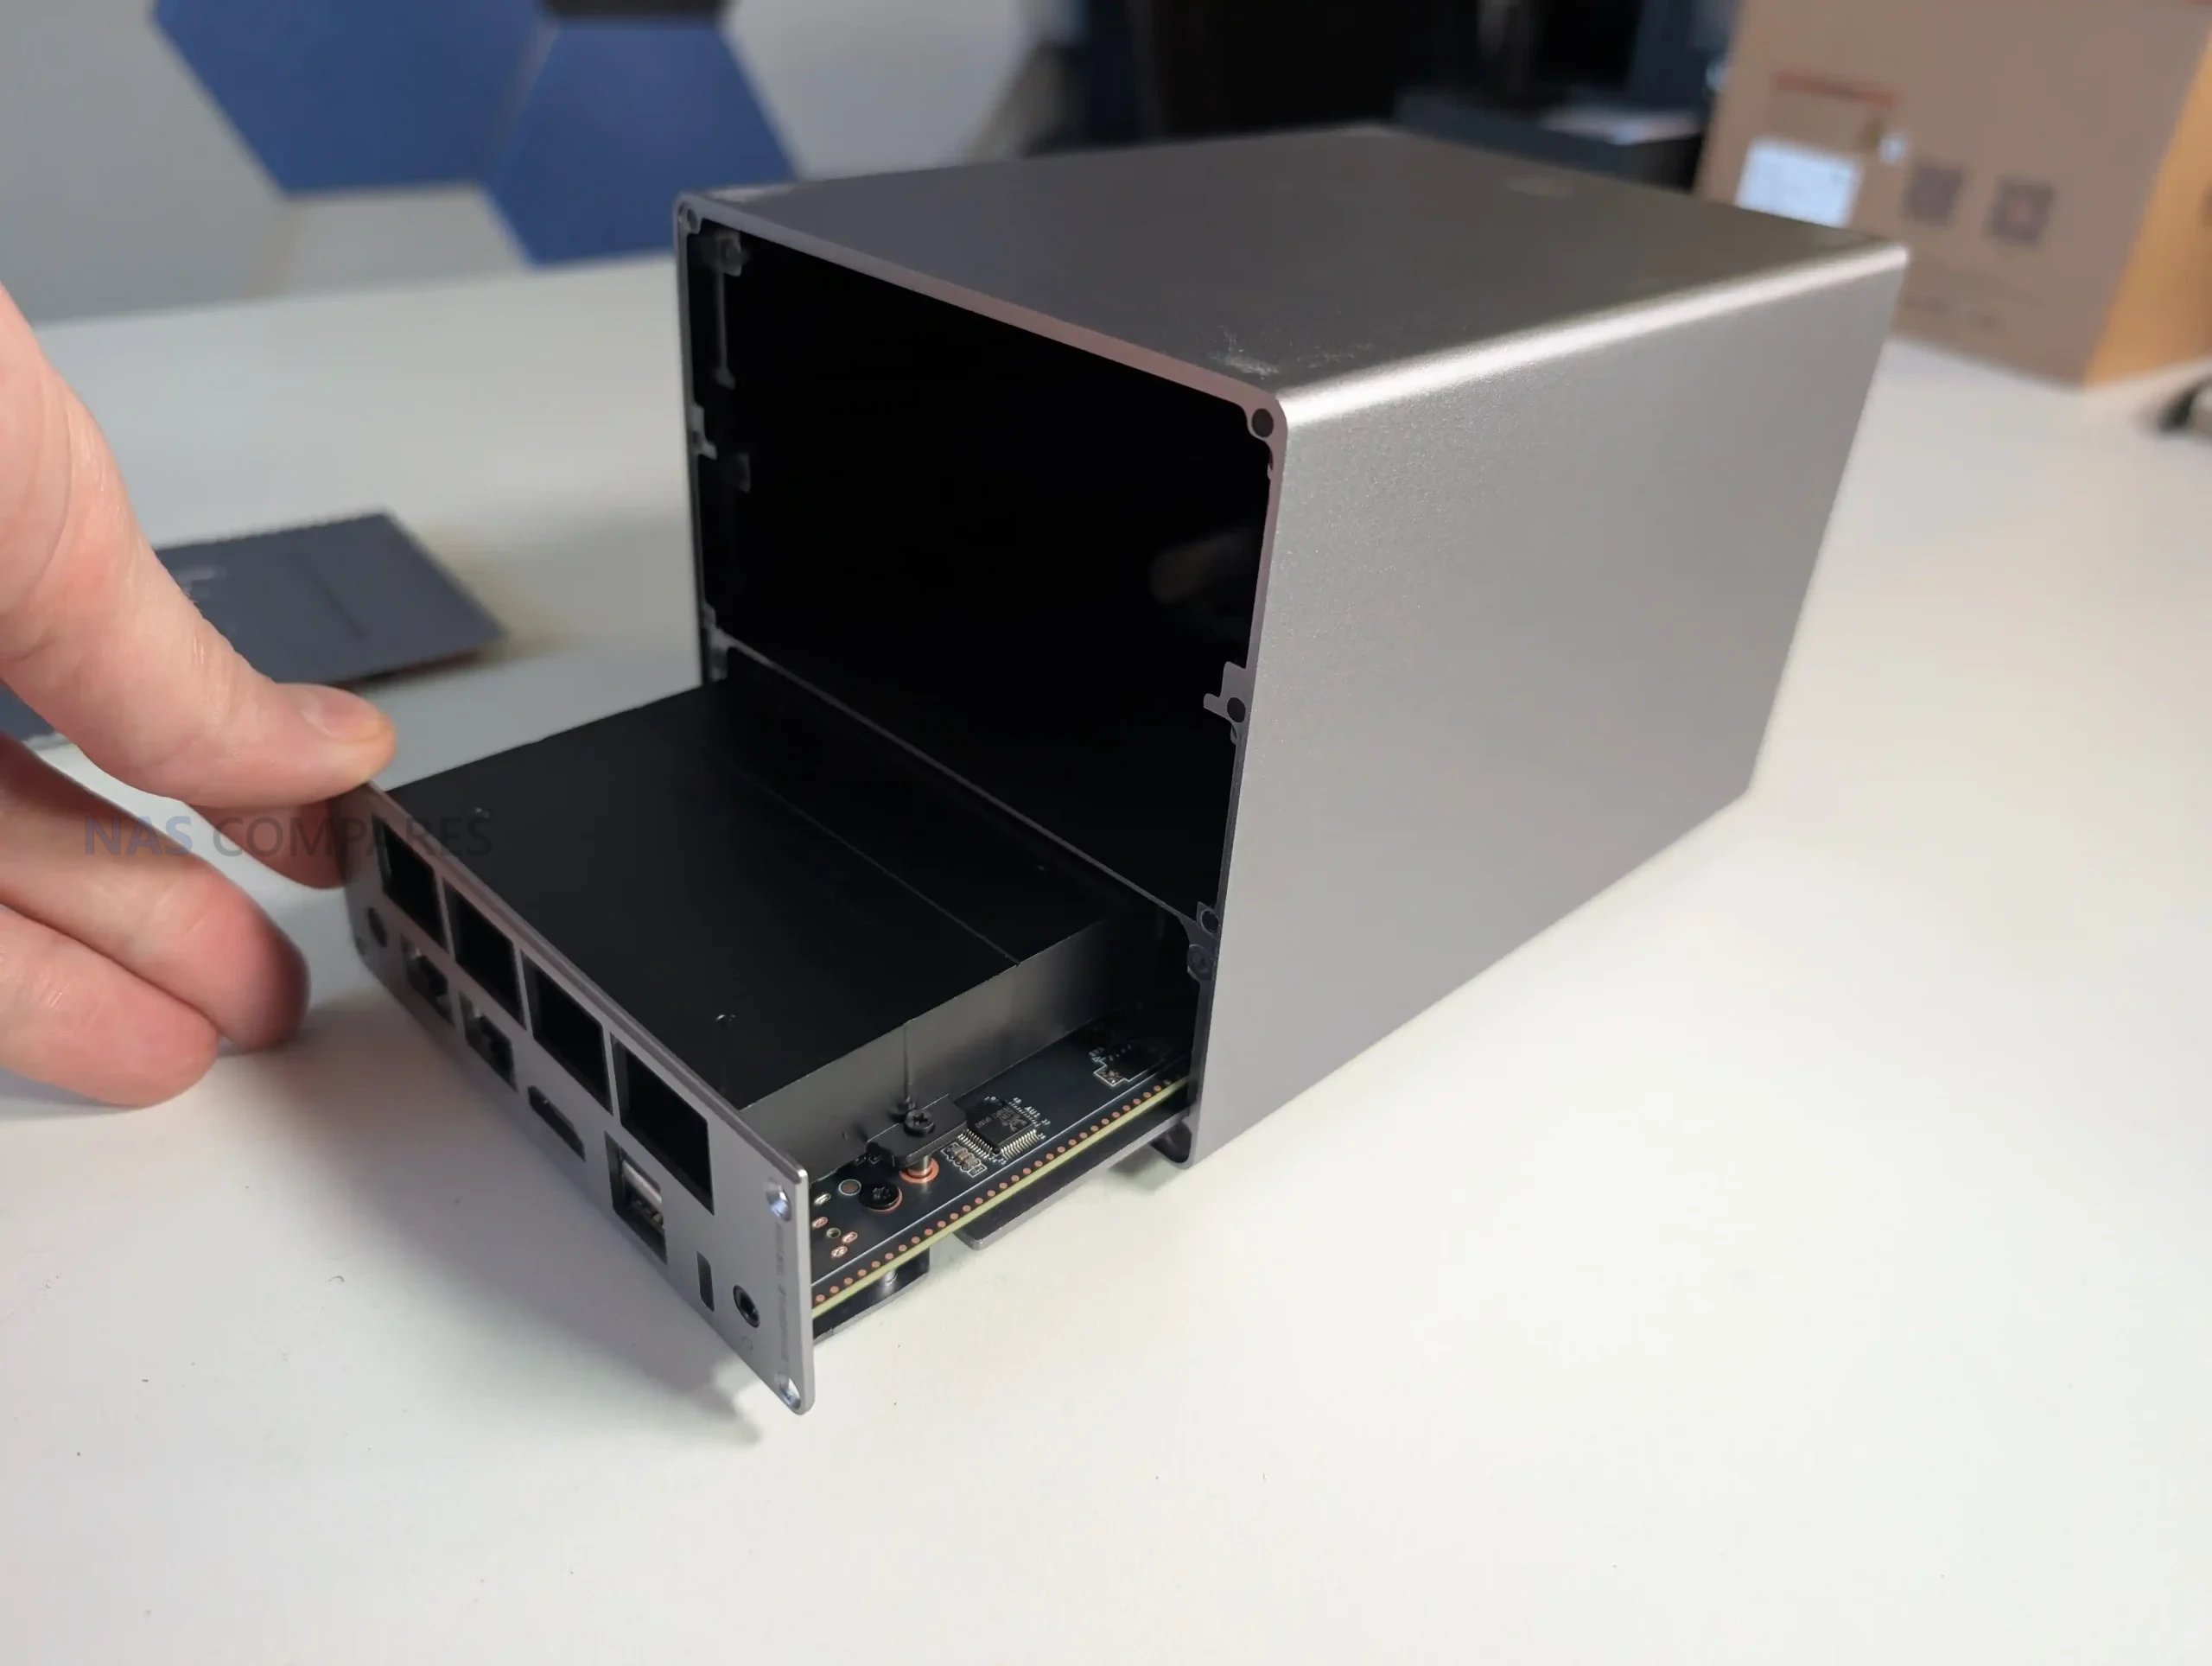
A further internal design choice is how the system treats its software environment as a dedicated appliance rather than an OS sharing space with user storage. The system software runs on its own internal storage rather than living on the same disks that hold your data. In practical terms, that reduces the chance of the OS being affected by changes to the main array, and it can make maintenance tasks like drive replacement or pool rebuilds feel more self-contained, because the unit remains manageable even while the primary storage is under stress.

ARM-based NAS platforms typically bring some efficiency advantages, and this model follows that general pattern. The CPU class and memory configuration are aligned with lower baseline overhead than many x86 NAS designs, which can help keep idle draw and sustained power use in check relative to equivalent rack hardware, though drive choice still dominates the total. The trade-off is a lower performance ceiling compared with modern x86 systems for certain workloads, plus the usual limitations seen in this category: no practical RAM upgrade path, no ECC support, and fewer options for buyers who want to push beyond file services into heavier compute. At $499, those omissions are consistent with the target price bracket in 2026 rather than being unexpected corner cutting.

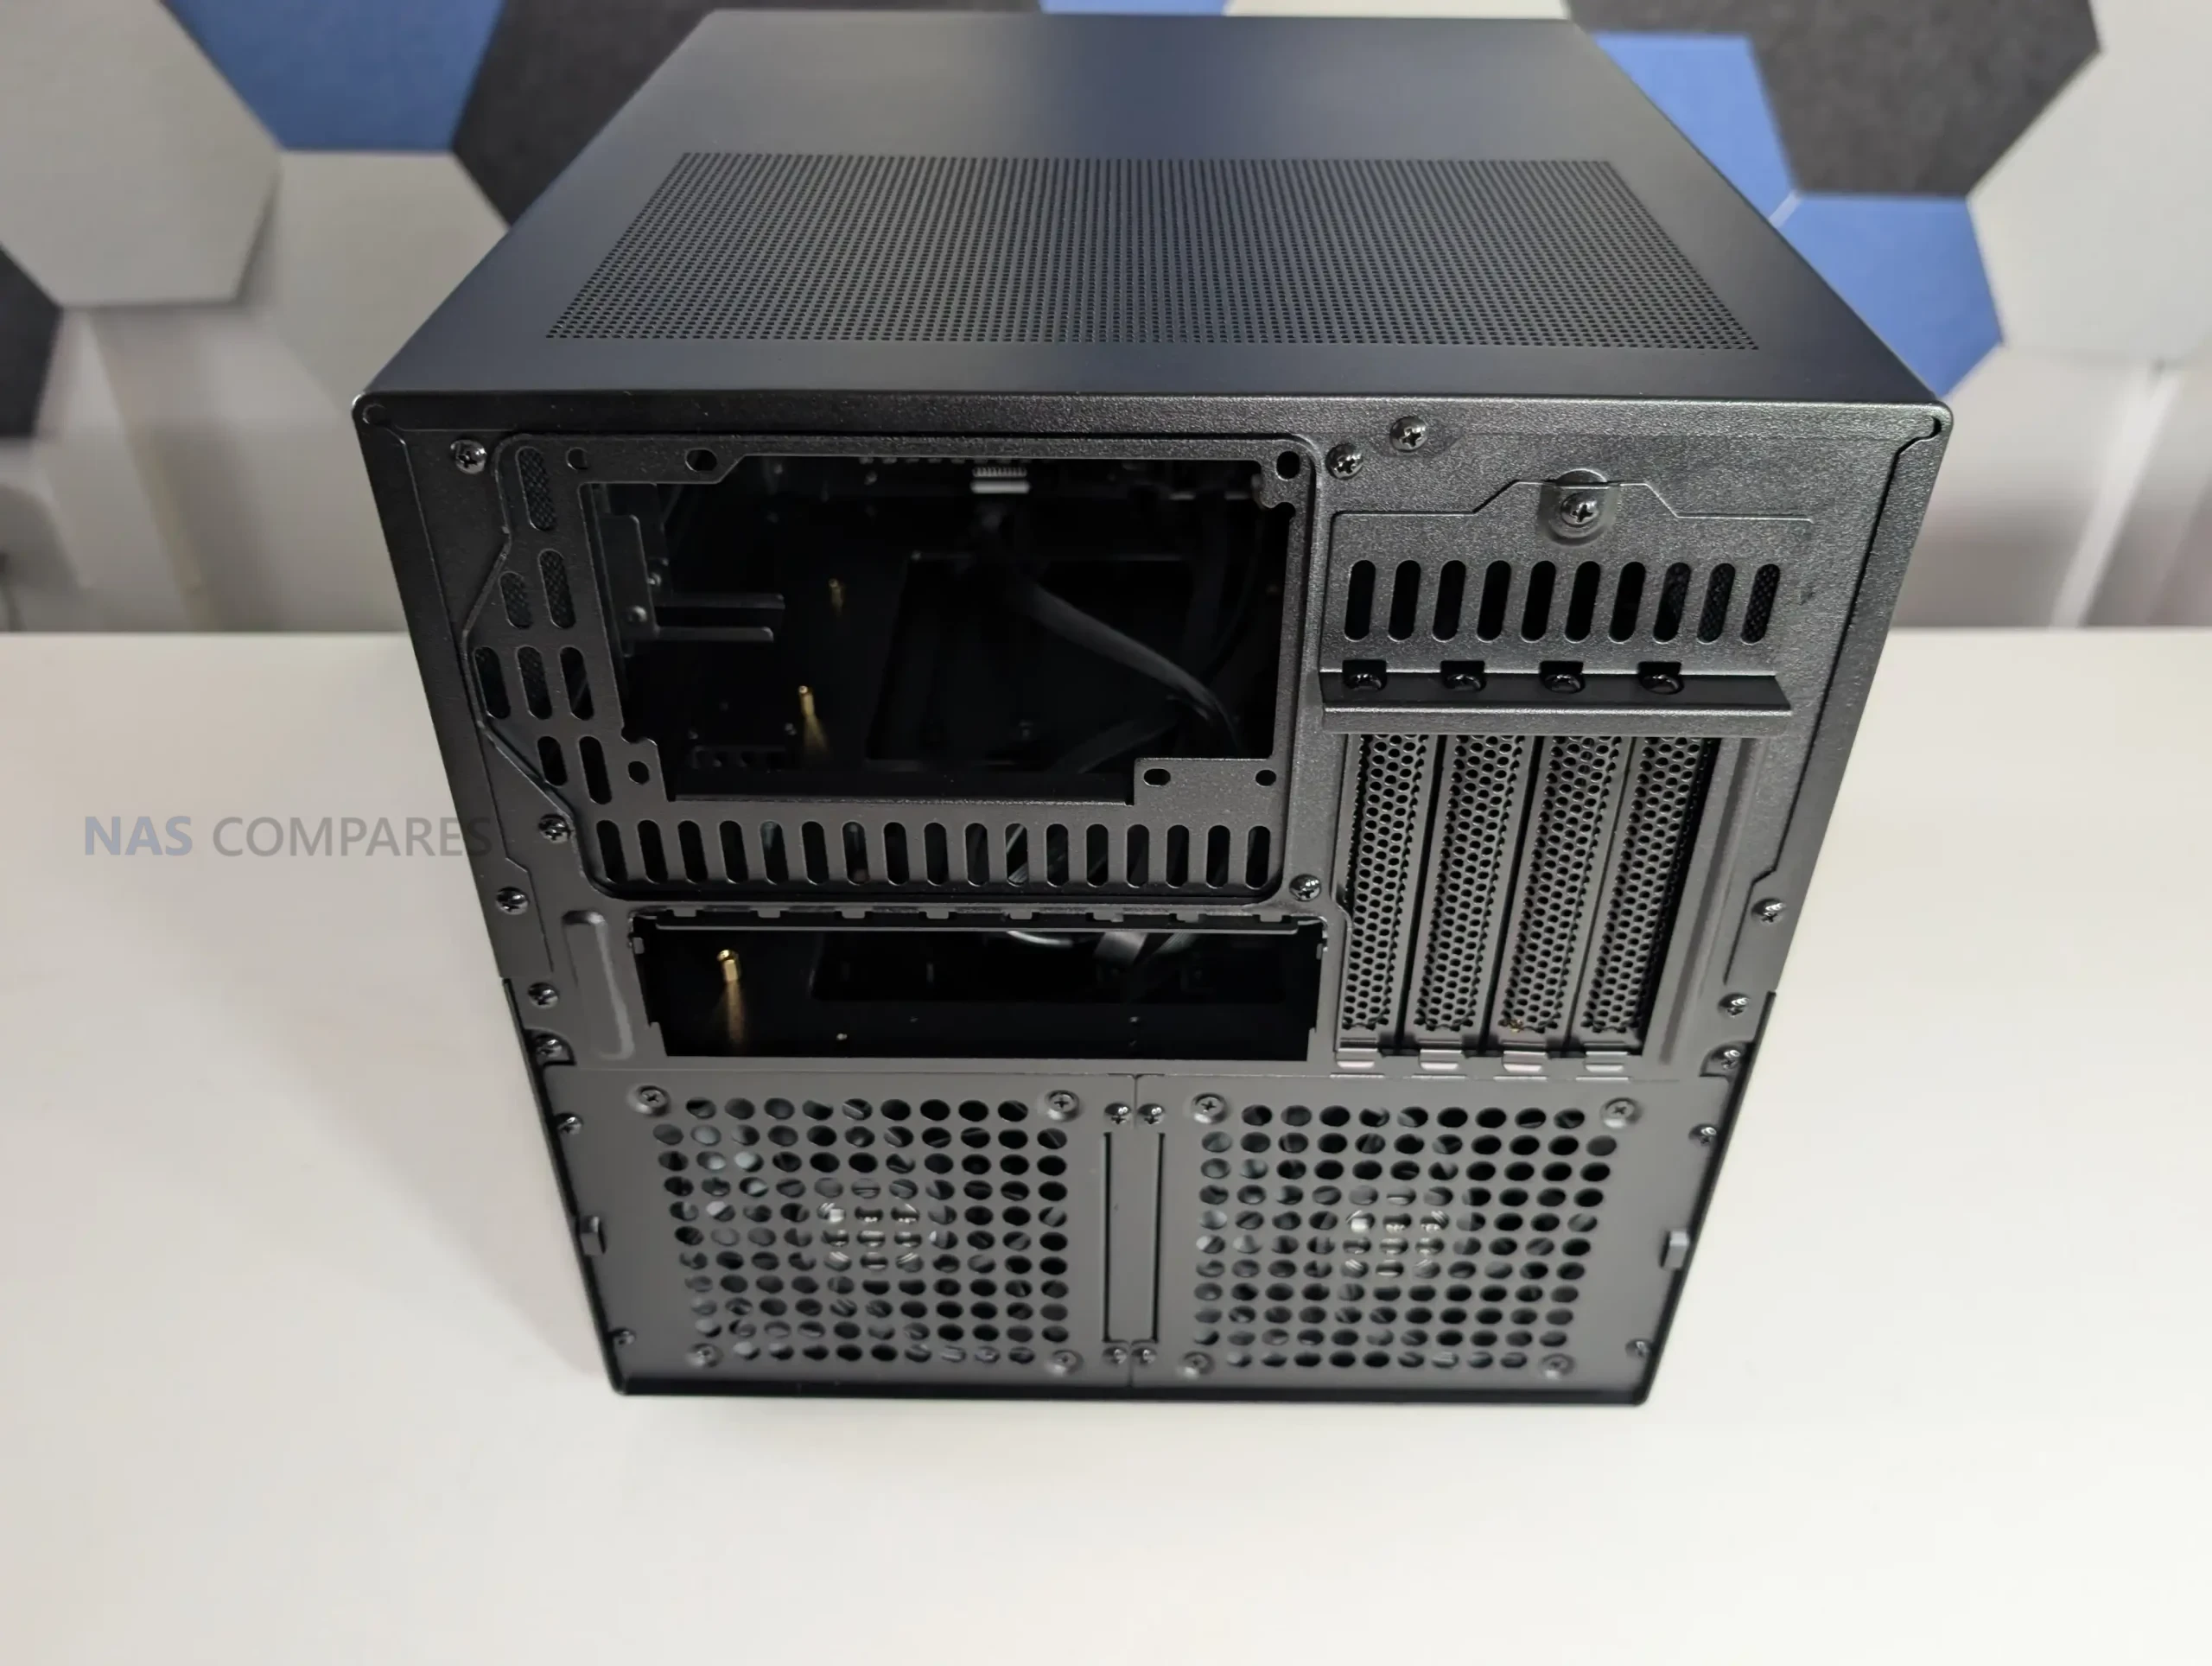
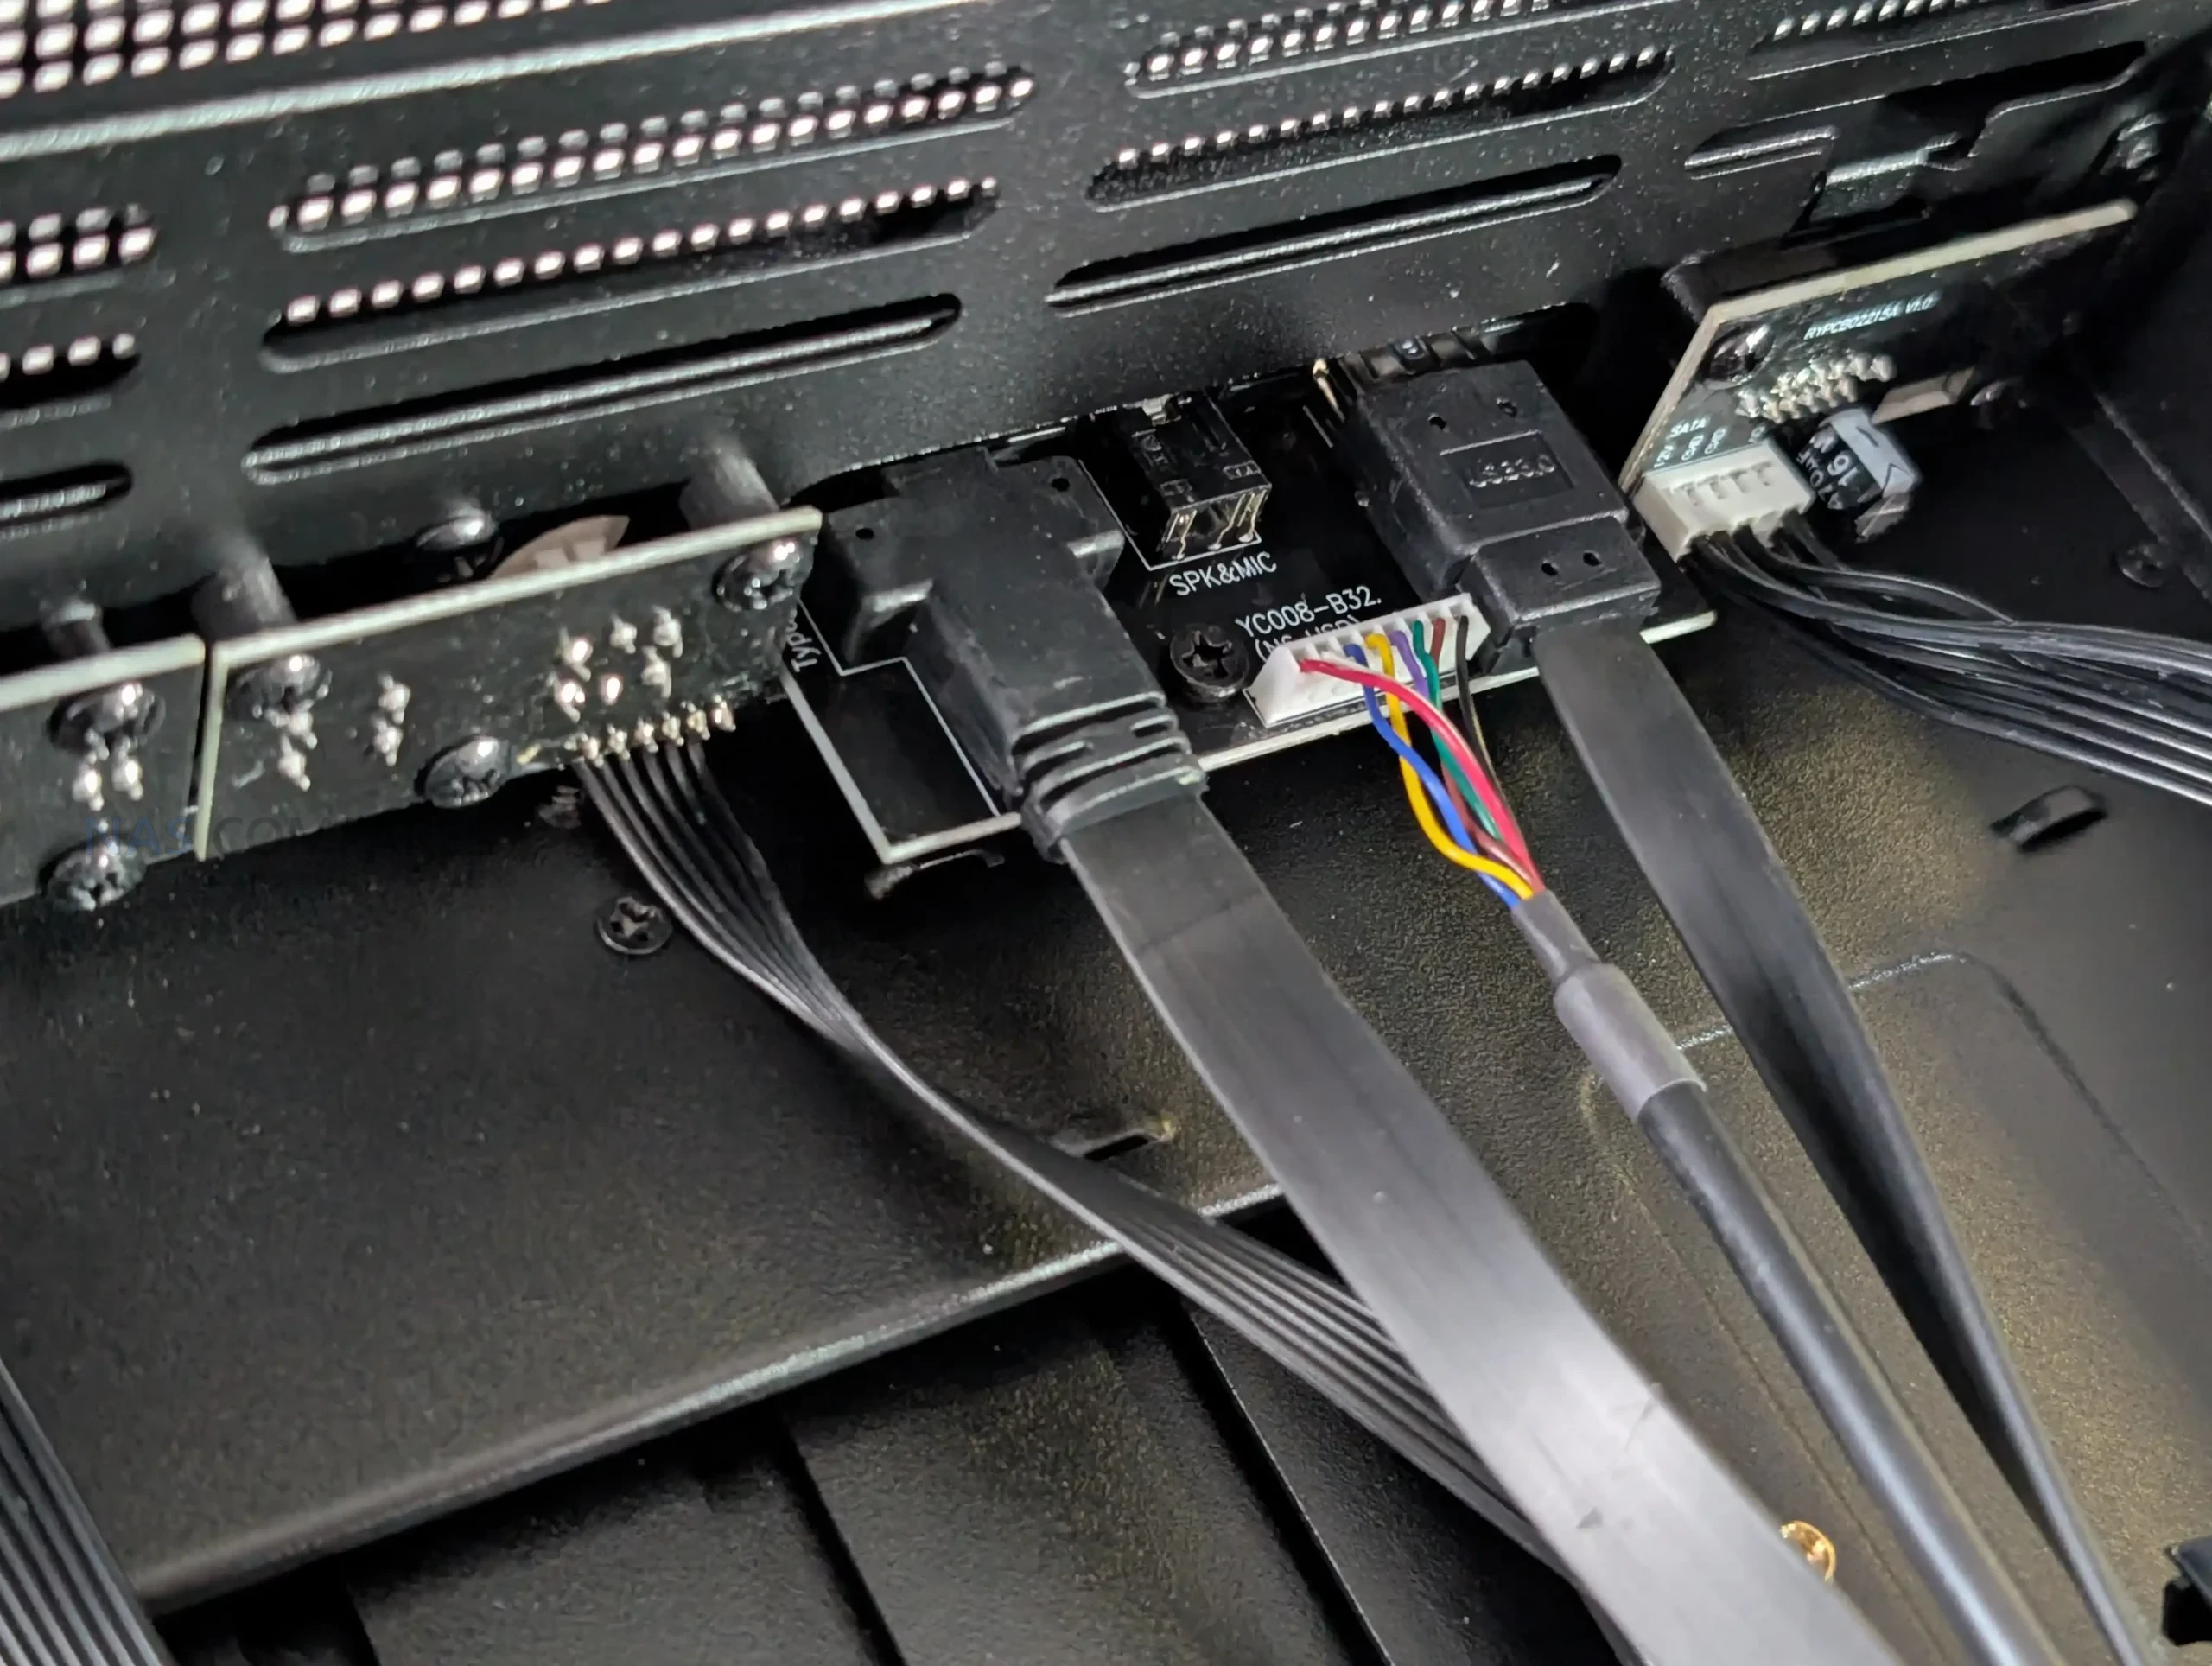
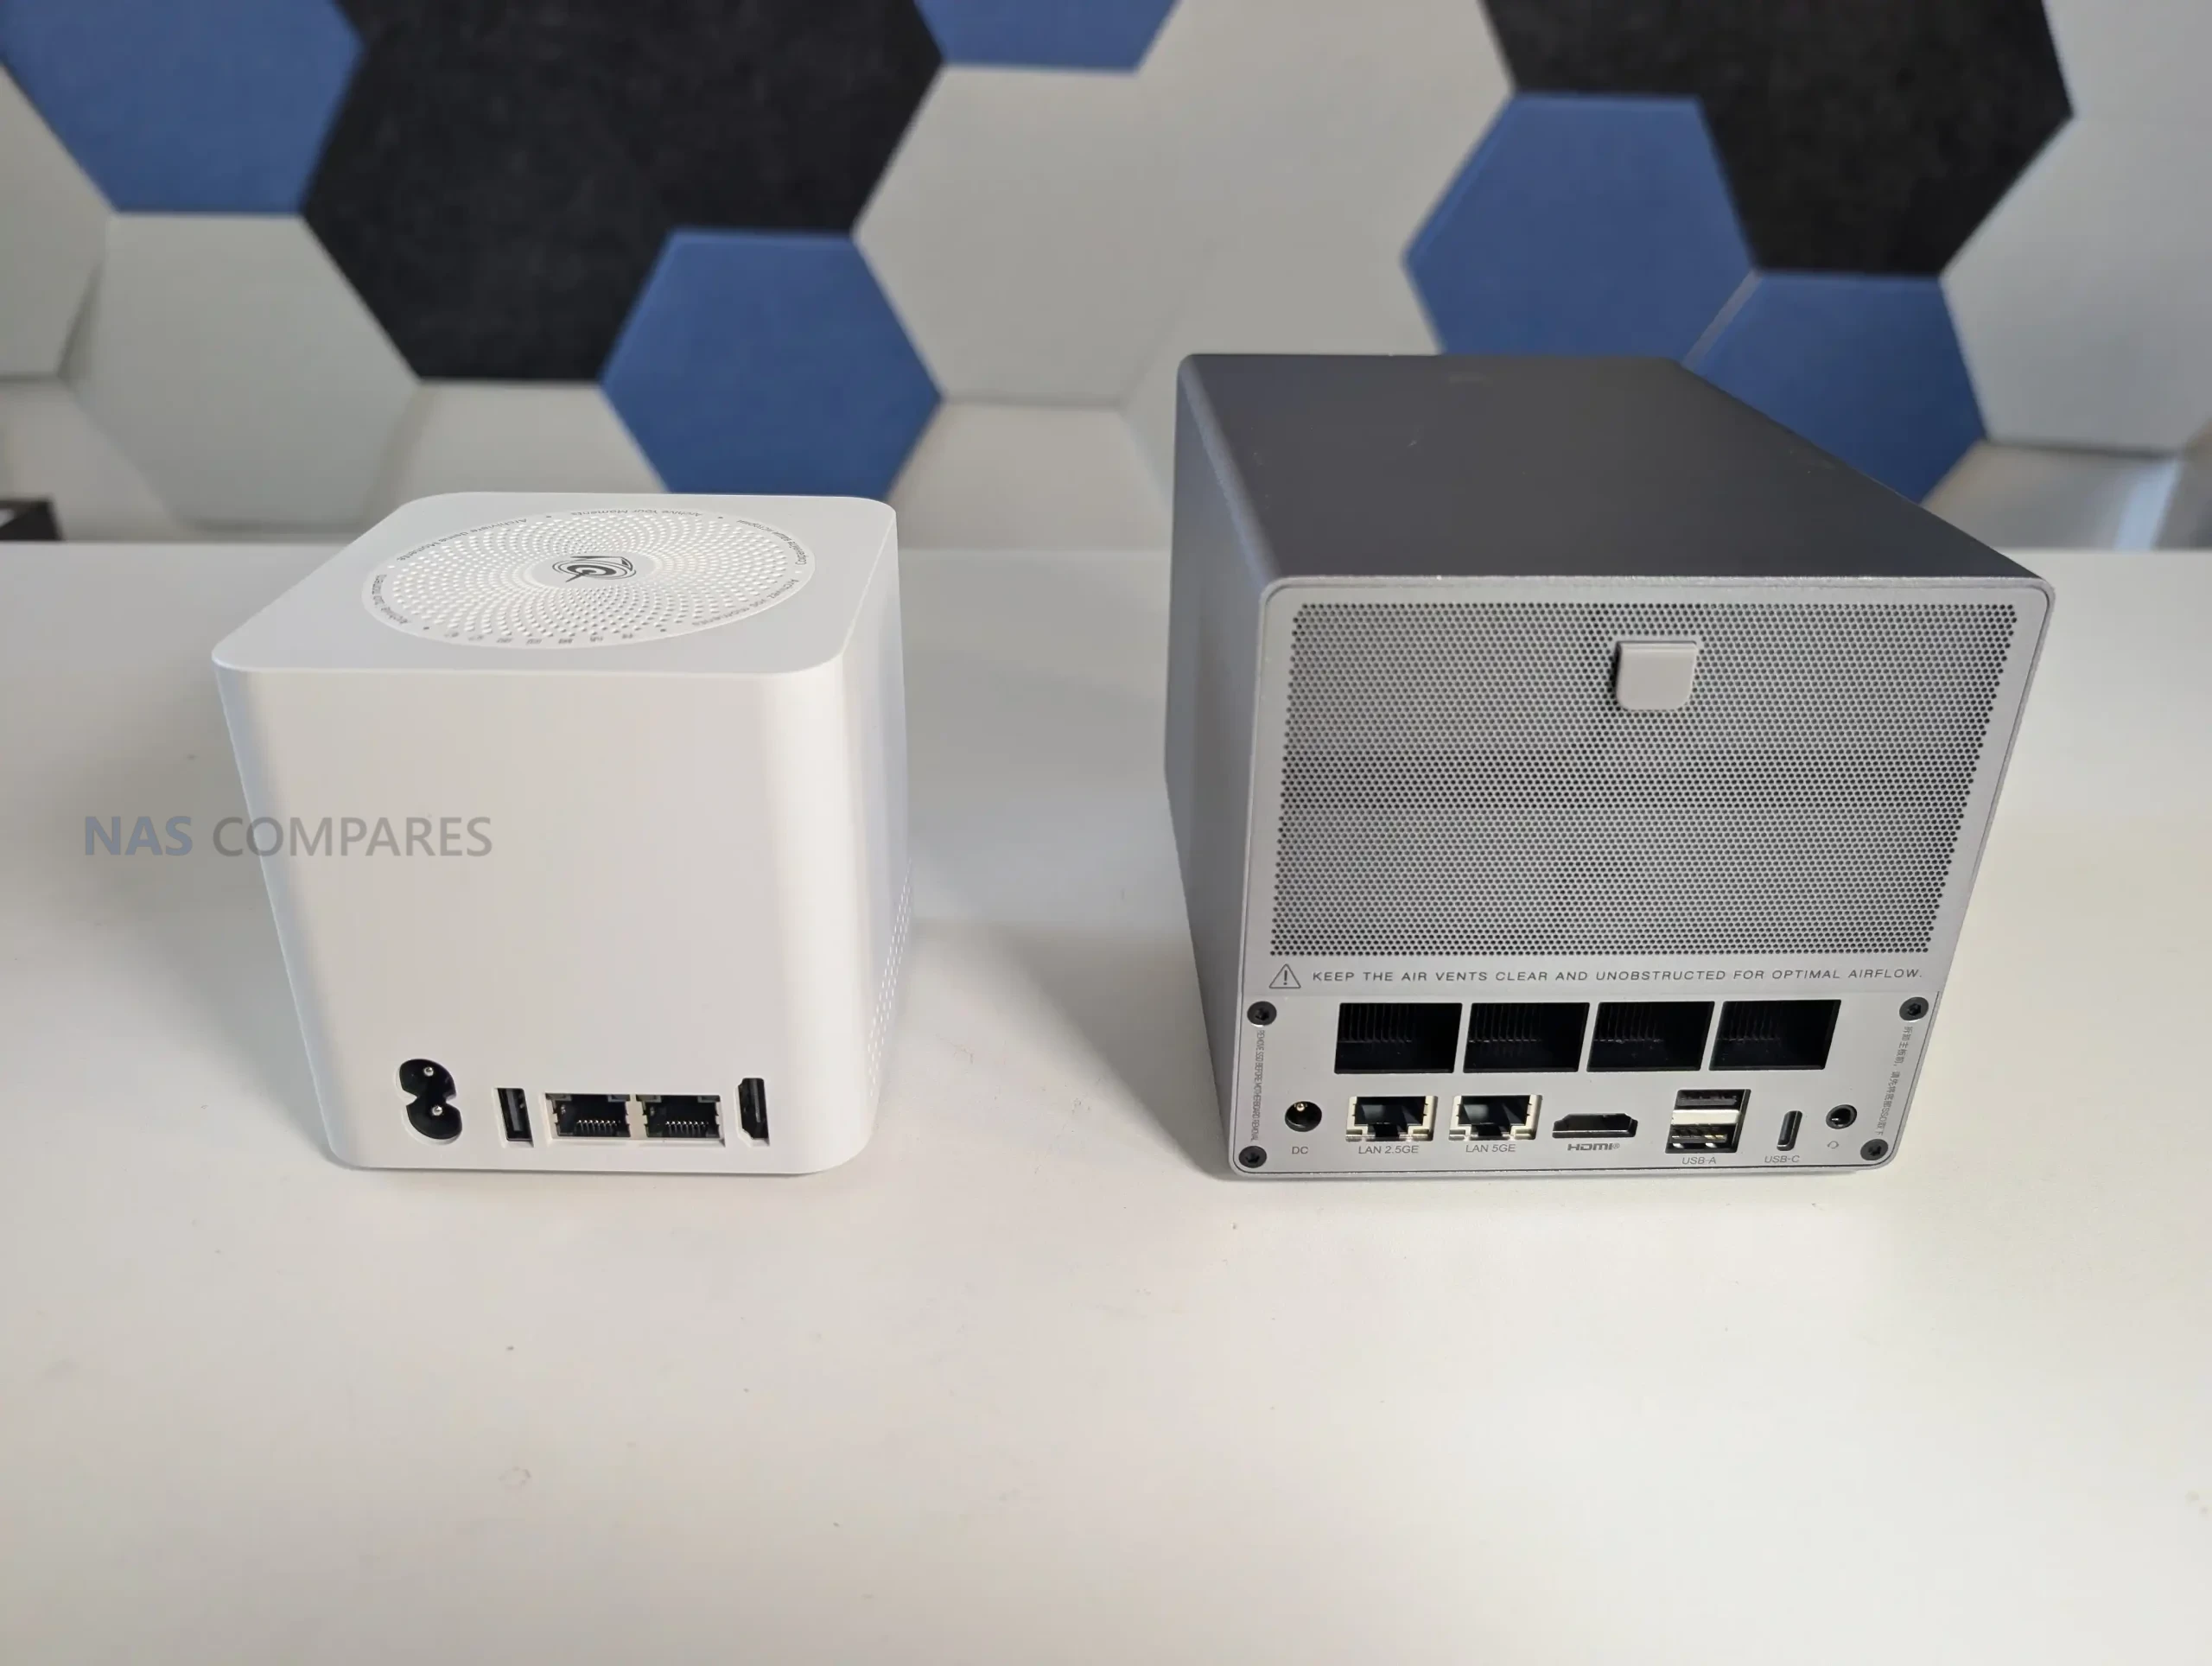
UniFi UNAS Pro 4 Review – Ports and Connections

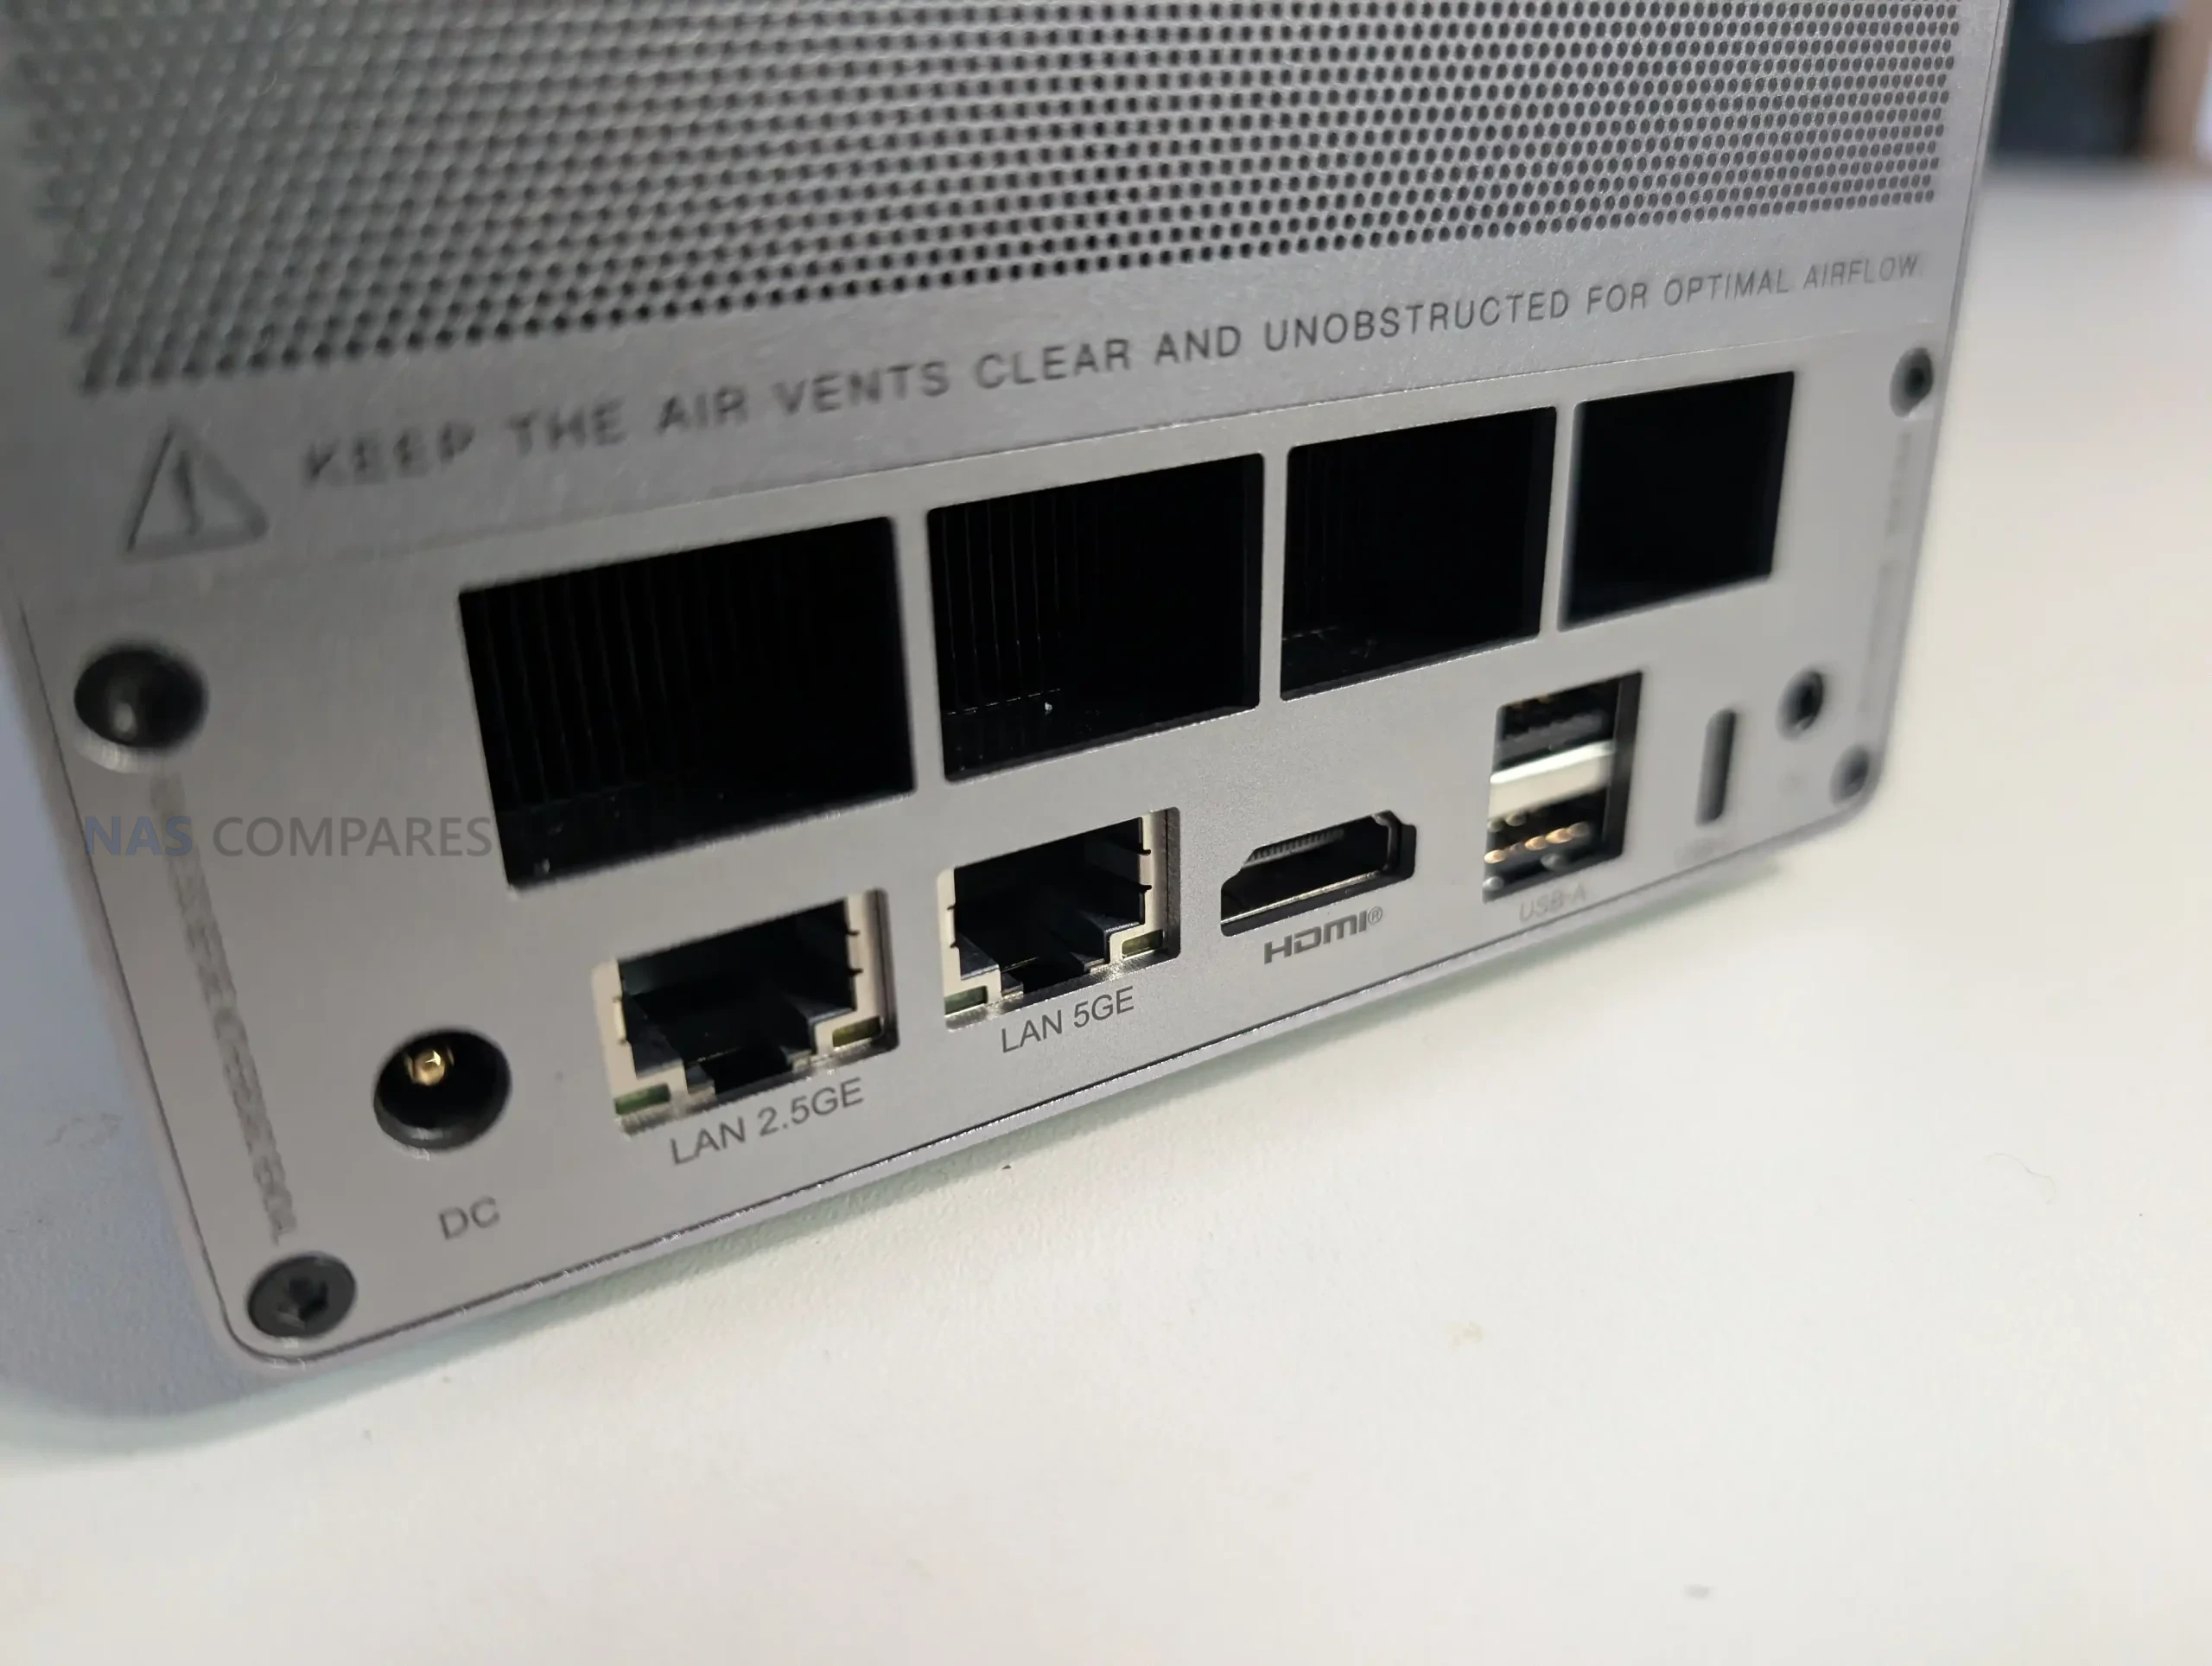
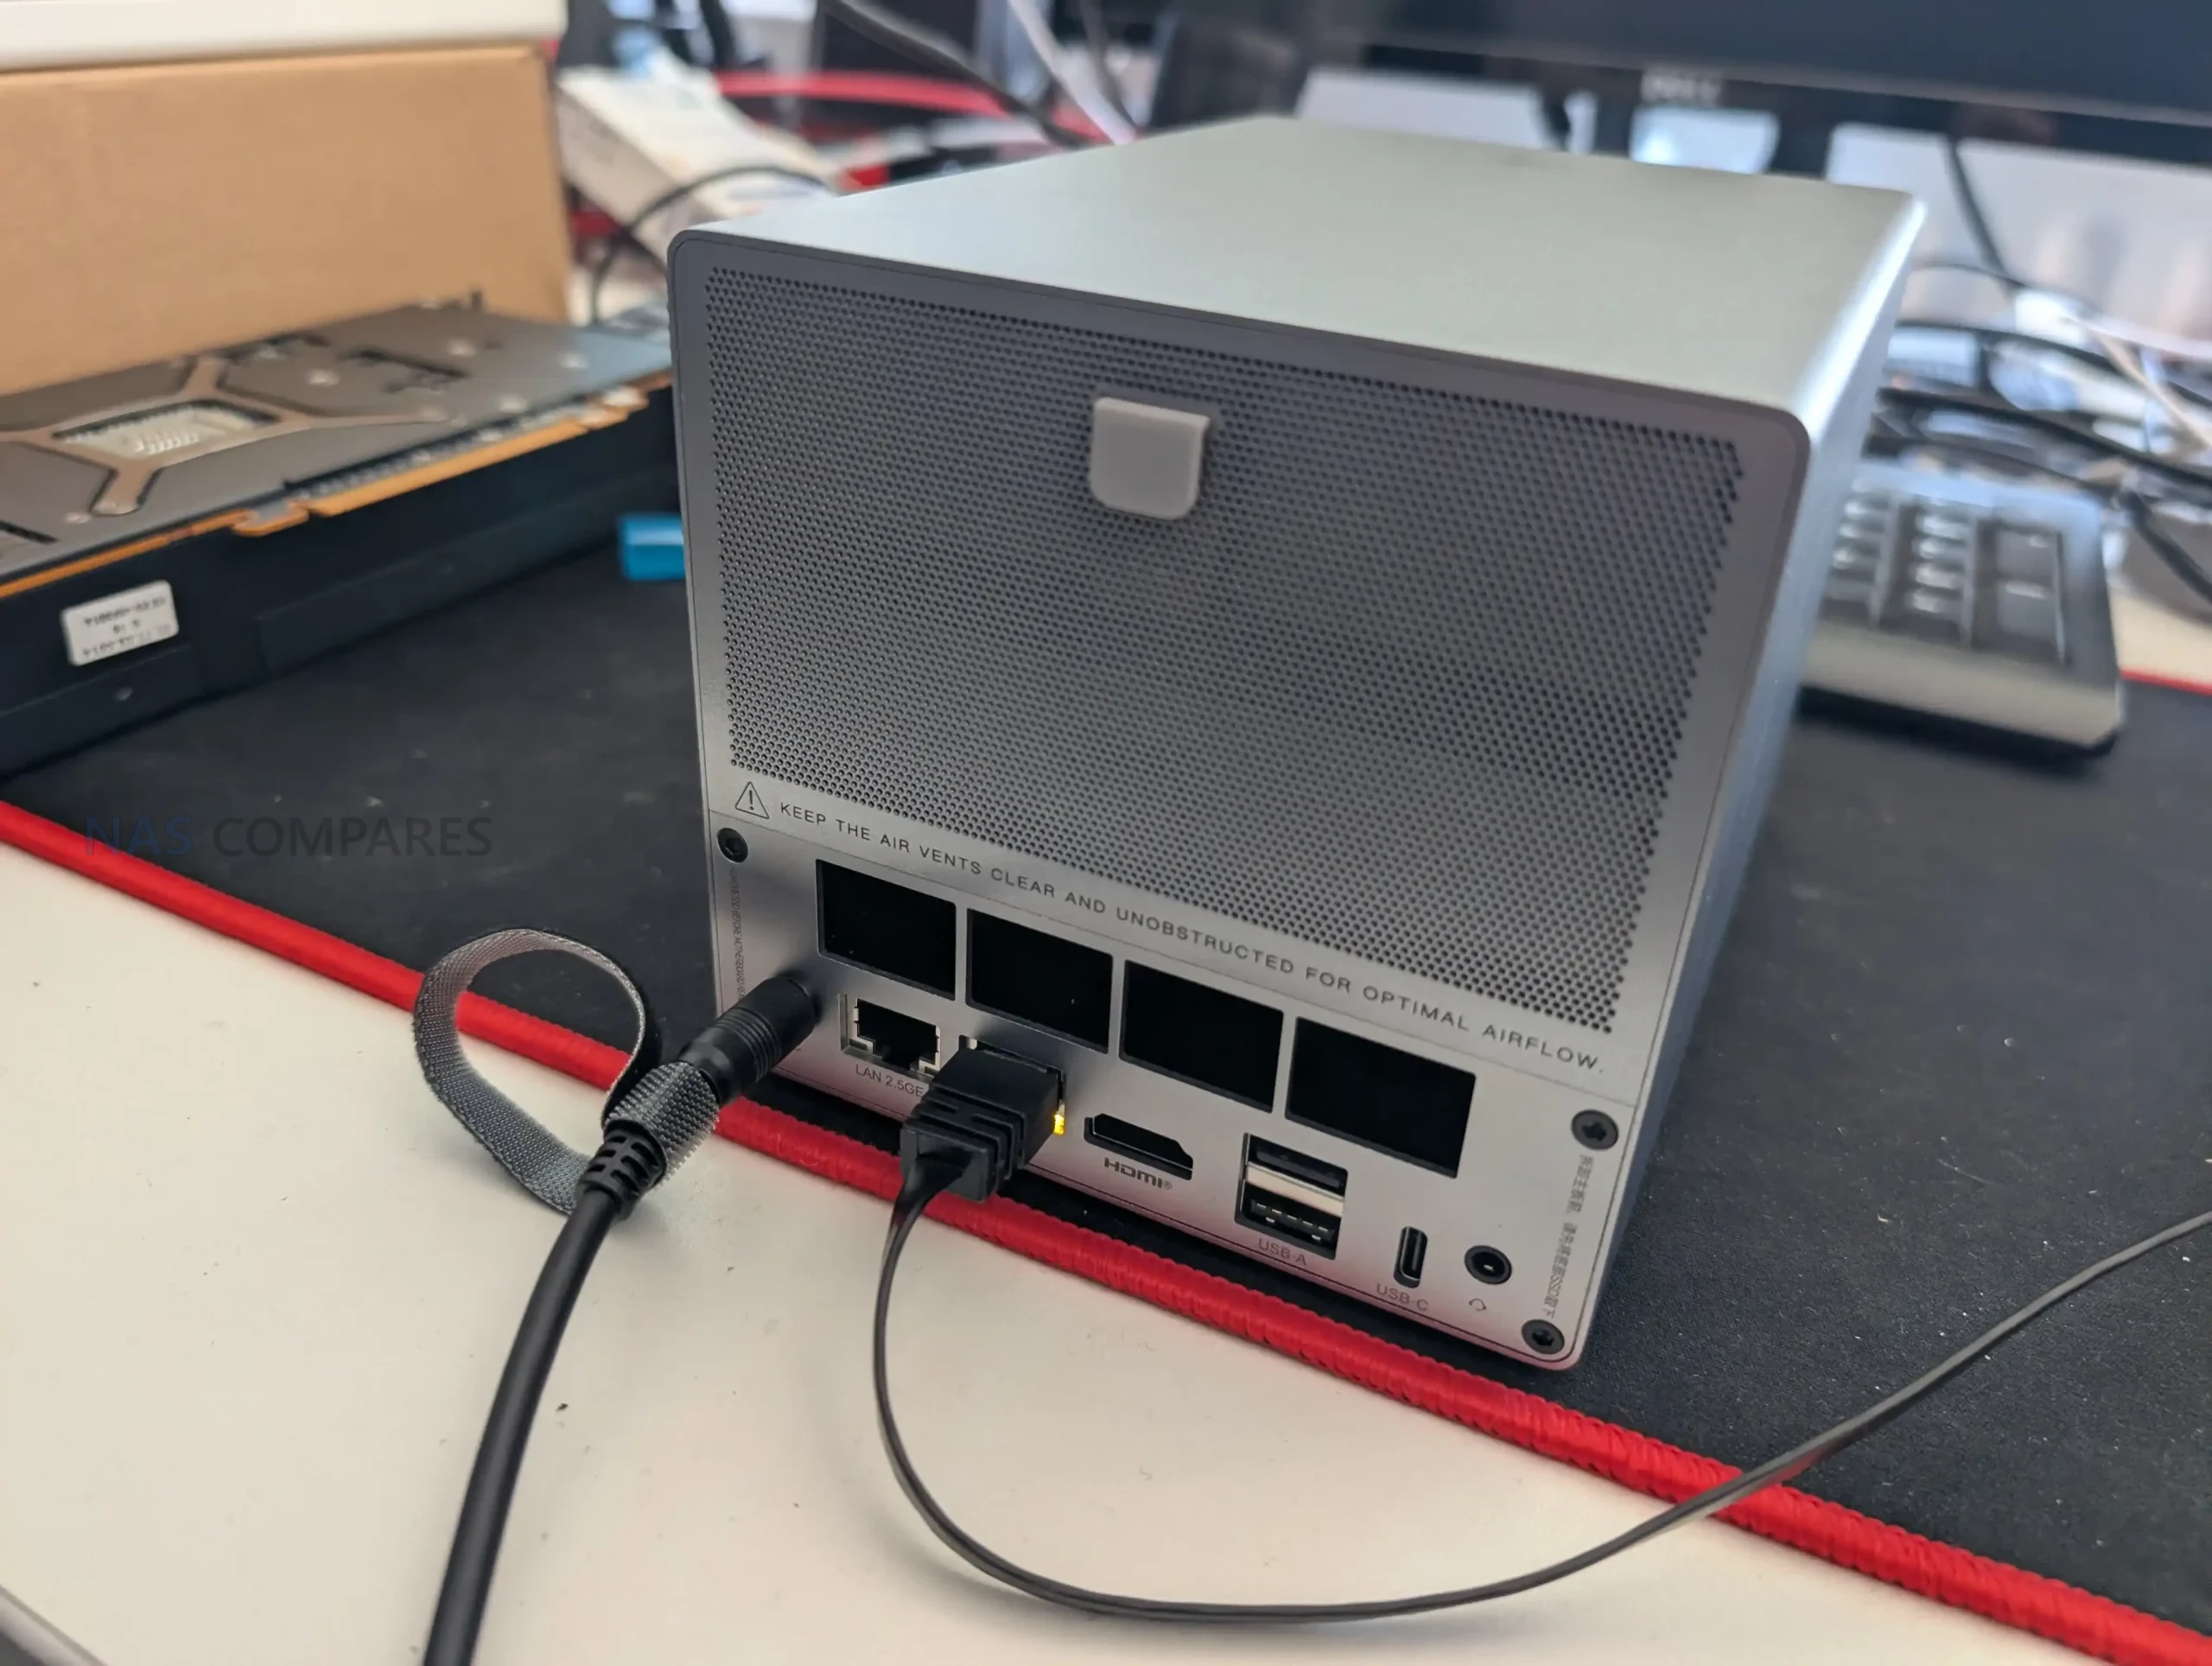
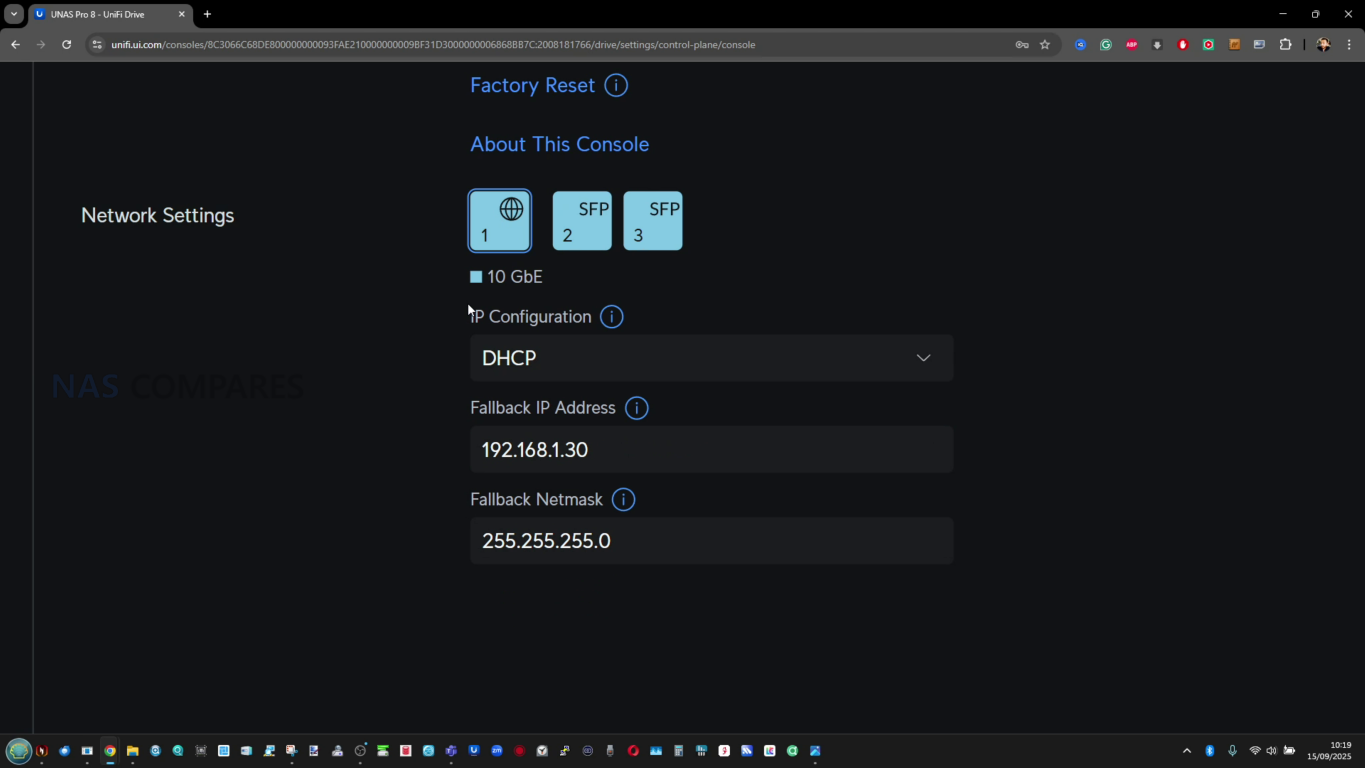
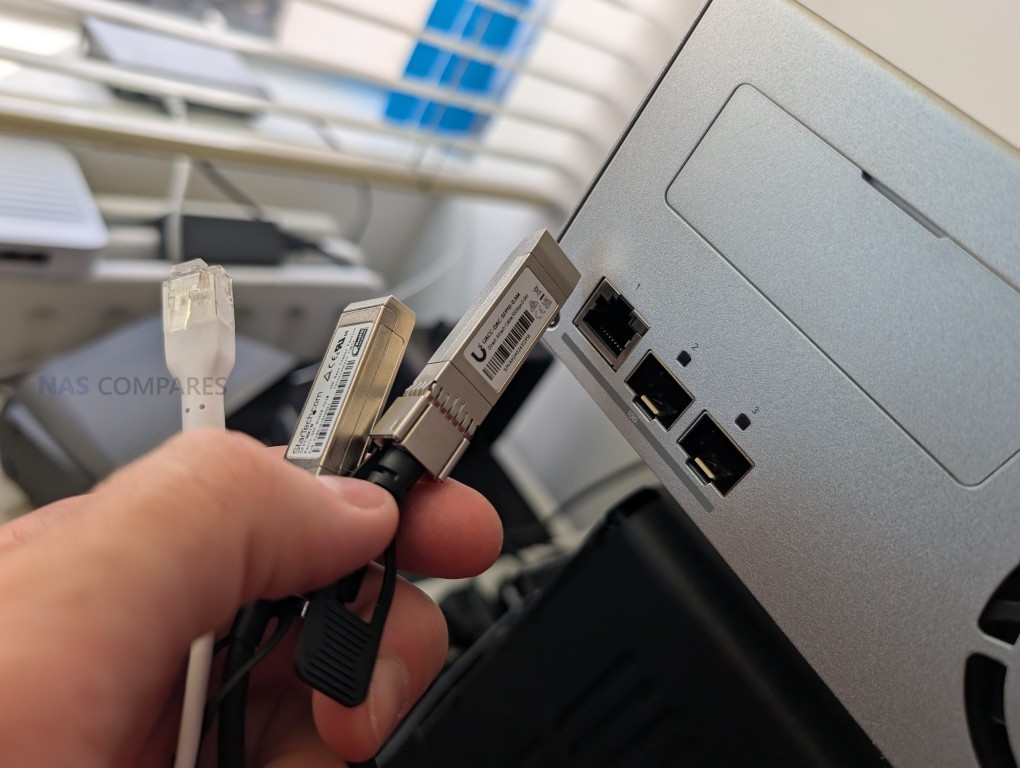
The rear connectivity is centered on 2x 10Gb SFP+ ports, and that is the defining hardware choice for this NAS in a 1U, 4 bay format. It allows the unit to be placed into a 10Gb environment without adapters, and it also opens up practical options beyond raw throughput, such as separating traffic types, connecting into different switches, or keeping a second path available for failover. The choice of SFP+ over 10GBase-T will suit users already running fiber or DAC links in a rack, but it can be less convenient for small setups built around copper RJ45.

Alongside the 10Gb ports is a separate 1GbE RJ45 port that can be used for management or for general connectivity in networks where 10Gb is not available everywhere. In a mixed UniFi environment, this is useful because it avoids tying basic onboarding and administration to a 10Gb port that might be better reserved for file traffic. It also gives a simple fallback path for access and troubleshooting if the 10Gb side is being reconfigured, moved between switches, or temporarily taken offline.

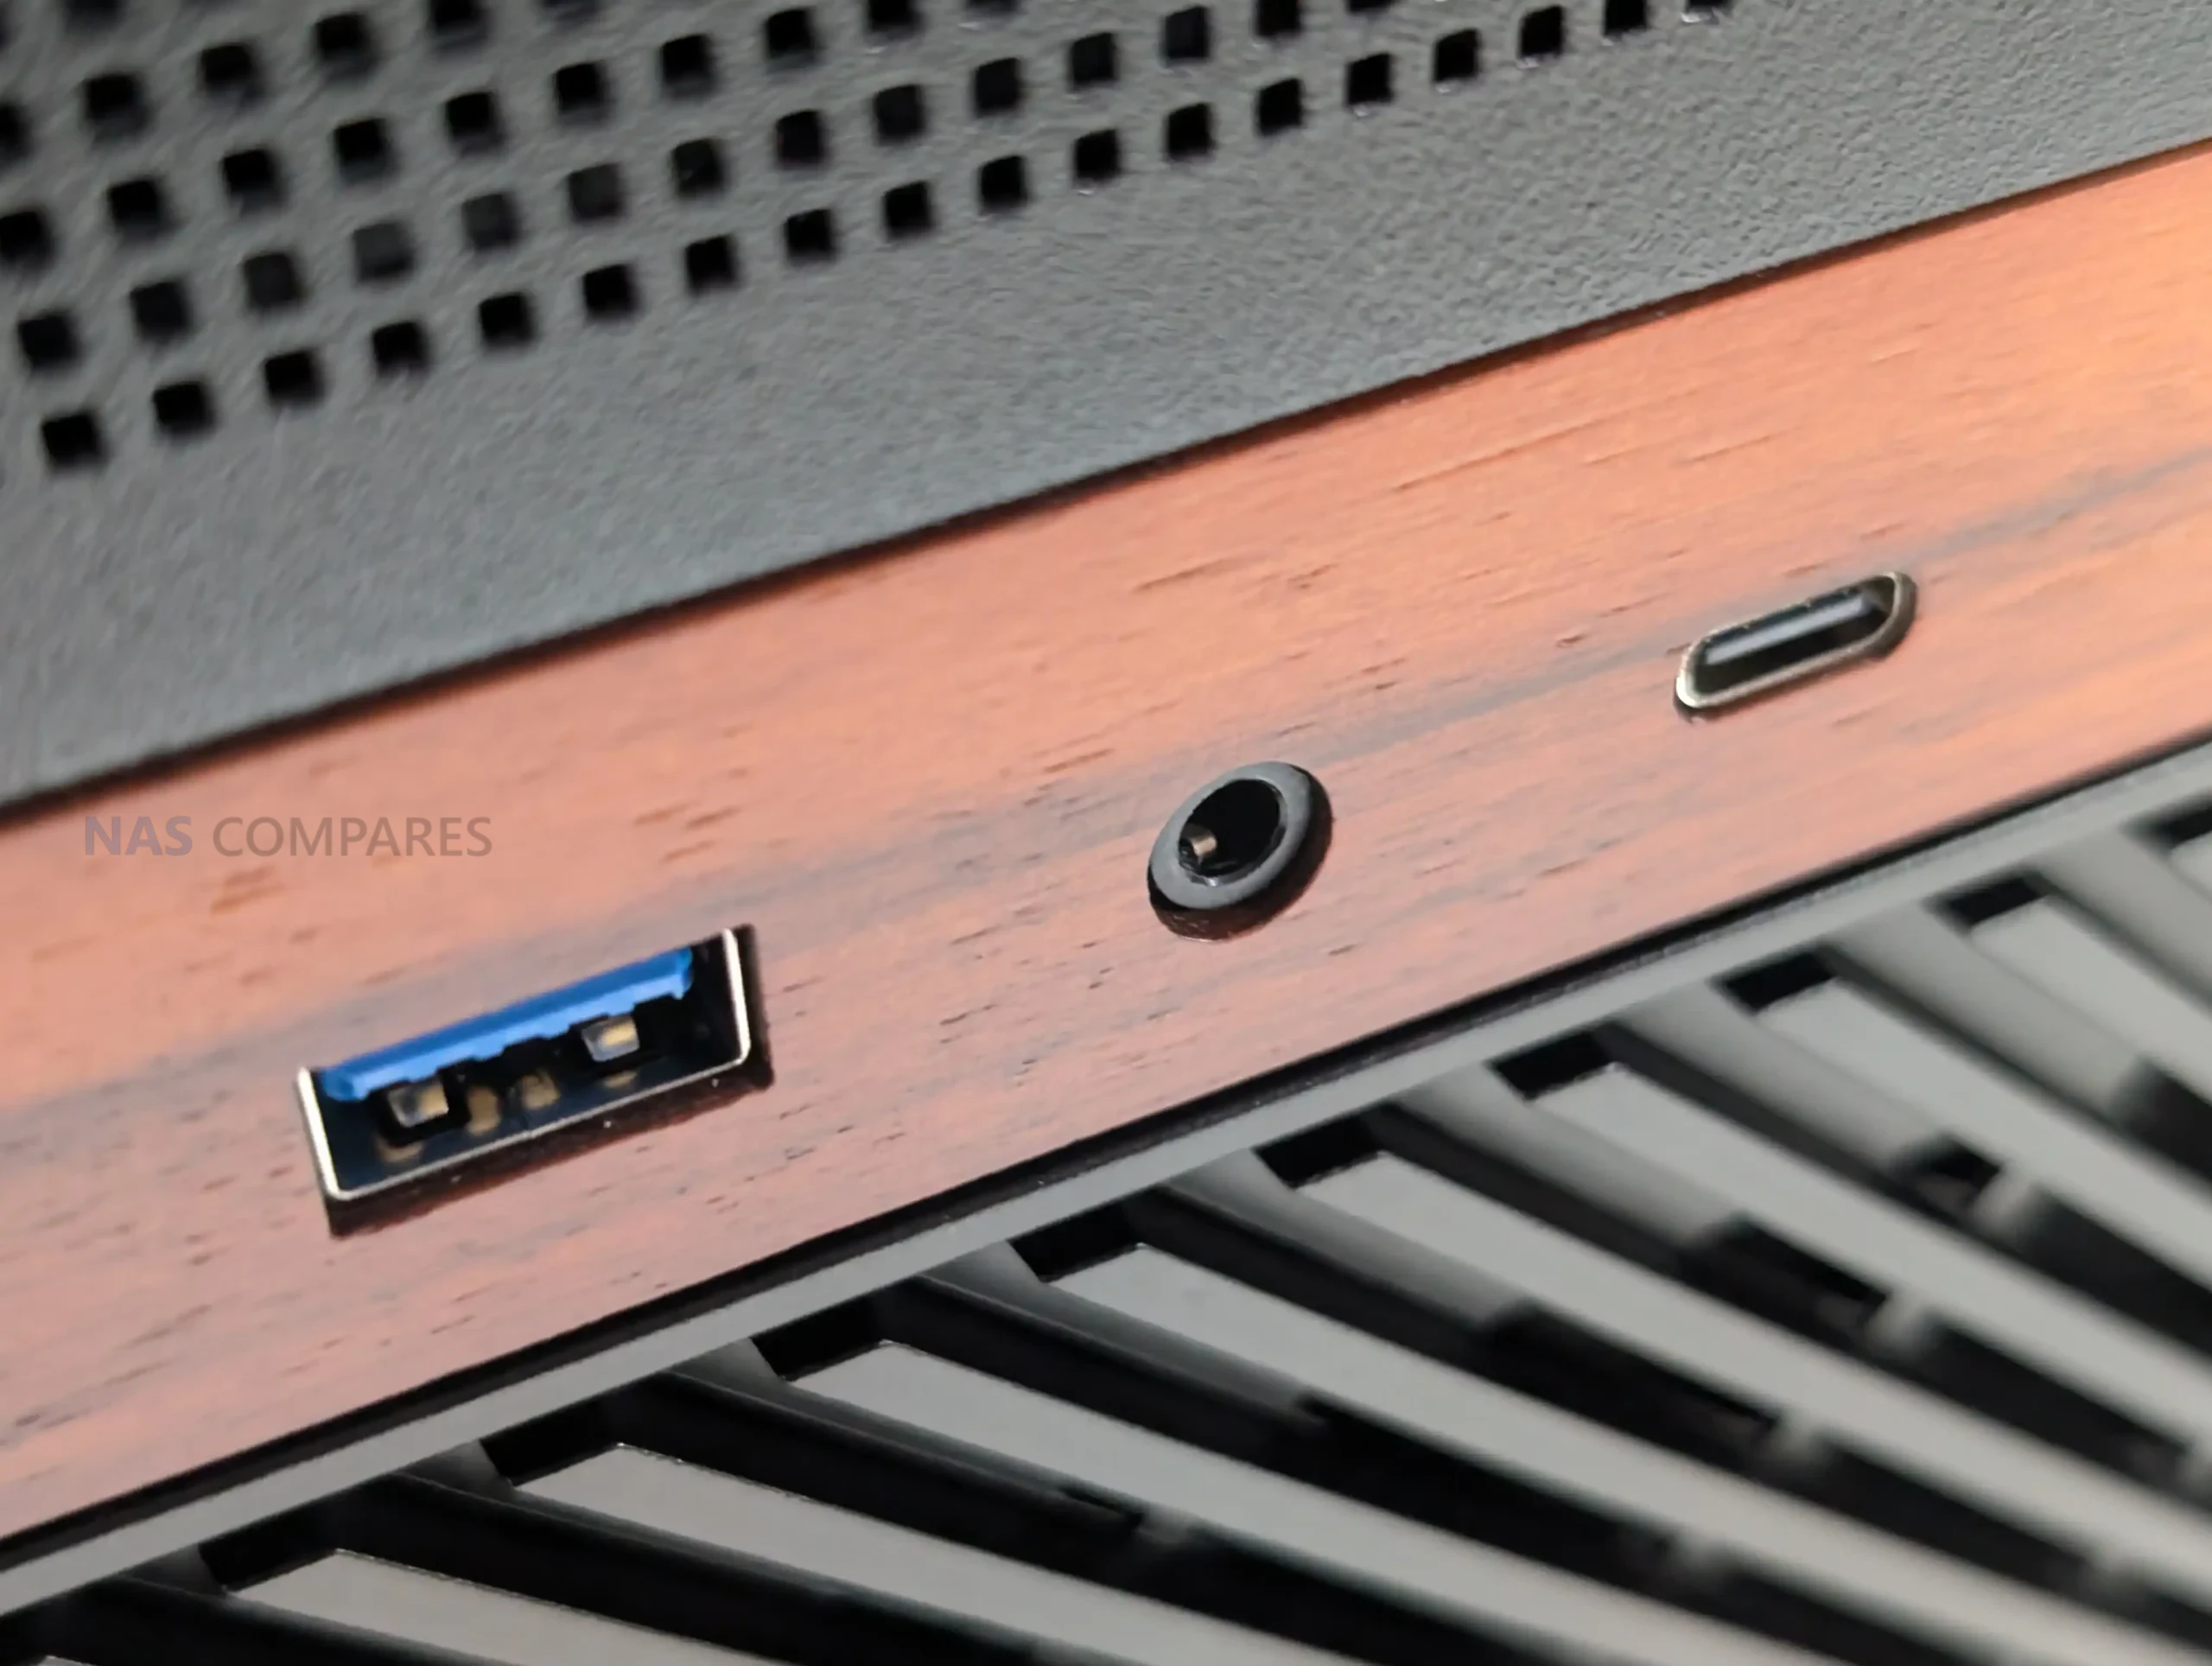
What is missing is just as relevant as what is included. There are no USB ports for quick ingest, offline copy tasks, or attaching temporary media, which some rack NAS platforms still provide for convenience even in 1U designs. Wireless is not a focus here, though Bluetooth is present for initial setup workflows, which fits the product’s “appliance onboarding” approach more than it does ongoing connectivity. The result is a port layout that prioritizes network-first storage and rack integration, while leaving out local expansion and quick-access I/O features that some users expect on a NAS.

However, (and I am sounding like a broken record at this point) at $499, these ports and connections are a notable degree more than most other turn-key NAS solutions from Synology, QNAP and even Terramaster (the more budget end of the NAS market already) are offering at under 500! So, what is presented here is a great value Day 1 solution in terms of base connectivity, but there is no denying that it might well feel the pinch in 5 years down the road when your storage is filling and your storage speeds begin to bottleneck vs your other equipment bandwidth.

UniFi UNAS Pro 4 Review – Testing Noise, Temps, Power Consumption & Speed

Performance here needs to be framed around the physical limits of 4 SATA bays and the role of SSD caching. Even with dual 10Gb networking available, a 4 drive HDD array has a throughput ceiling that will be reached long before the network becomes the bottleneck in most single-client scenarios. The value of 10Gb in this context is less about hitting theoretical maximums and more about maintaining higher transfer rates consistently, handling multiple simultaneous users, and keeping latency lower when lots of smaller operations are happening alongside big file moves.

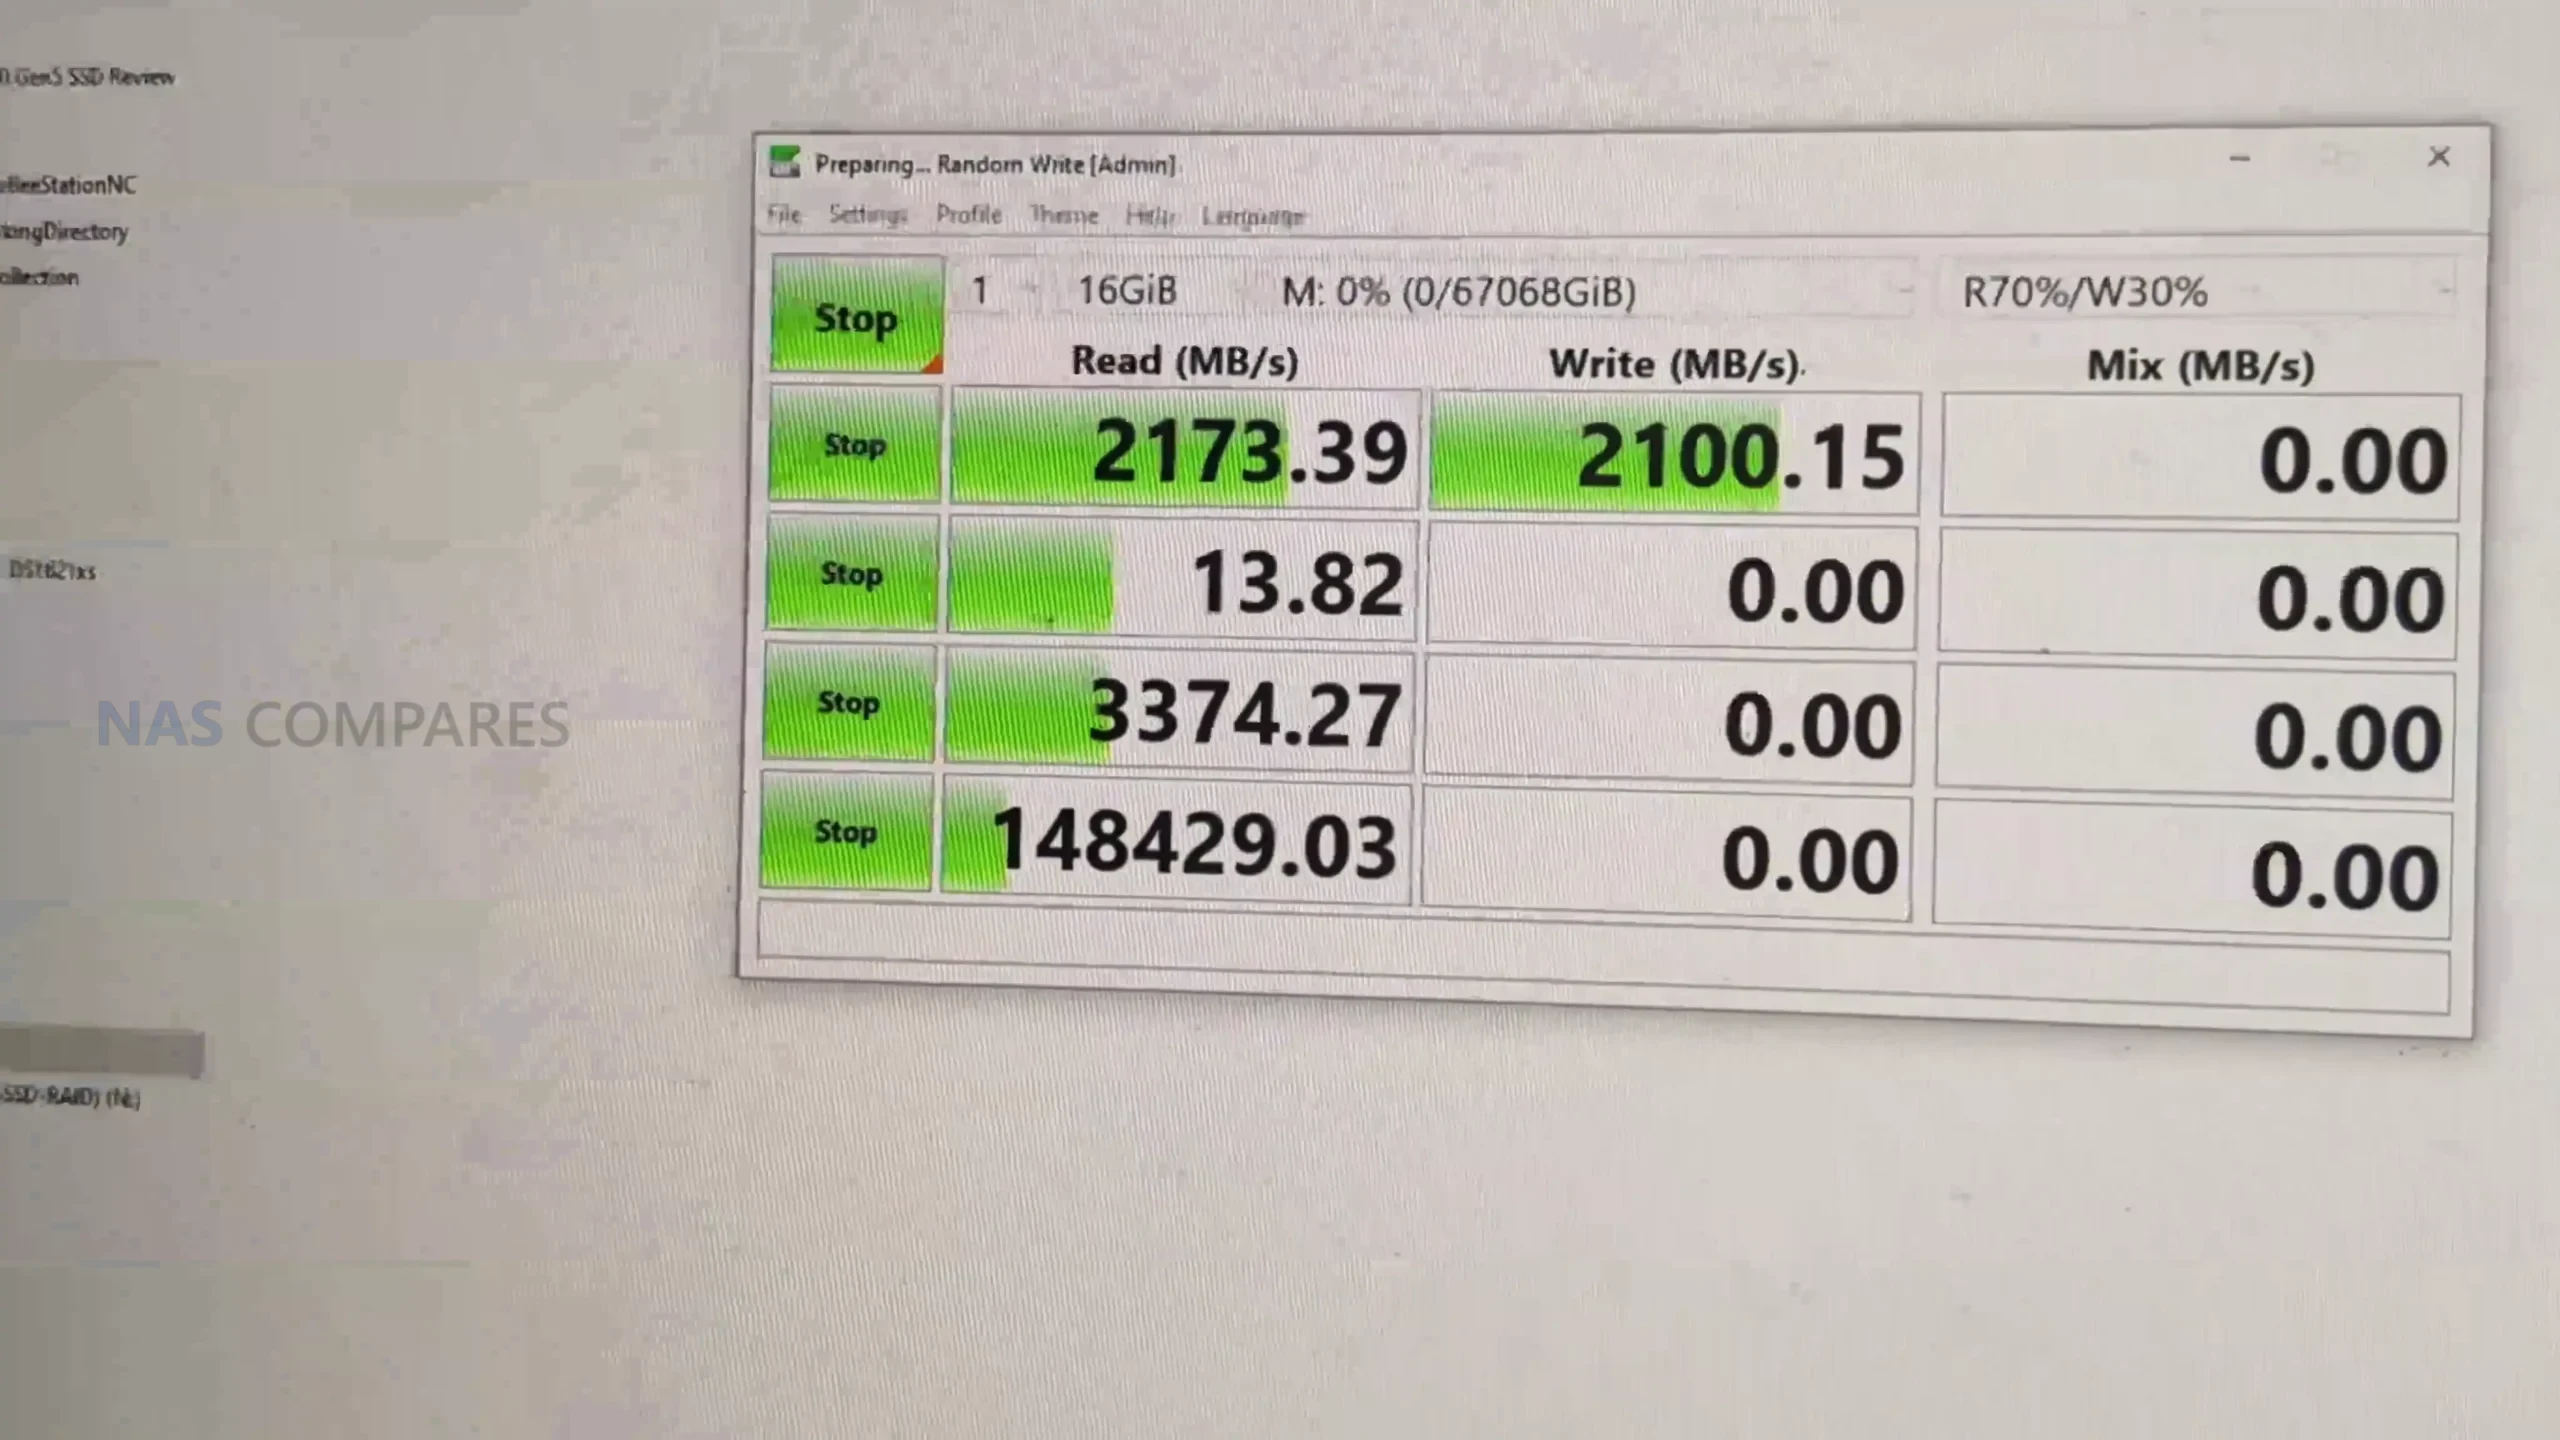
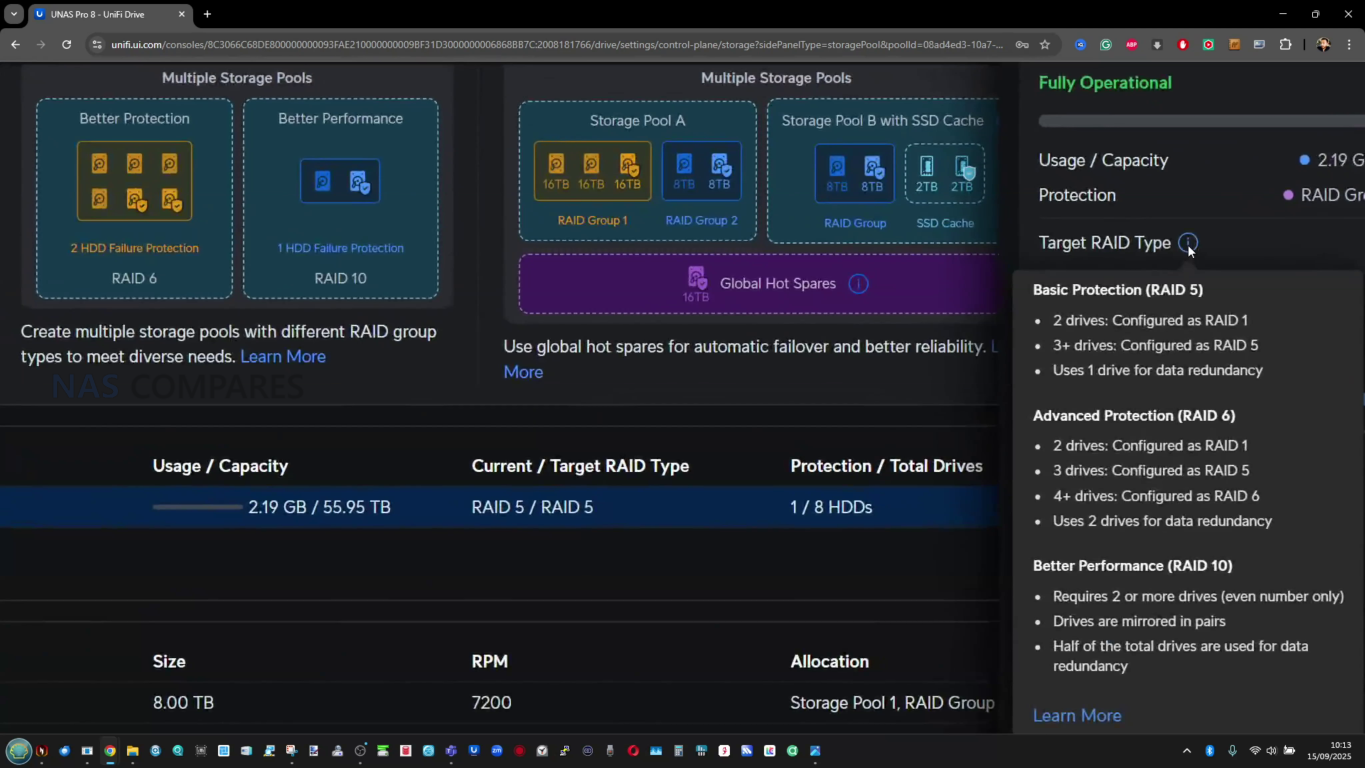
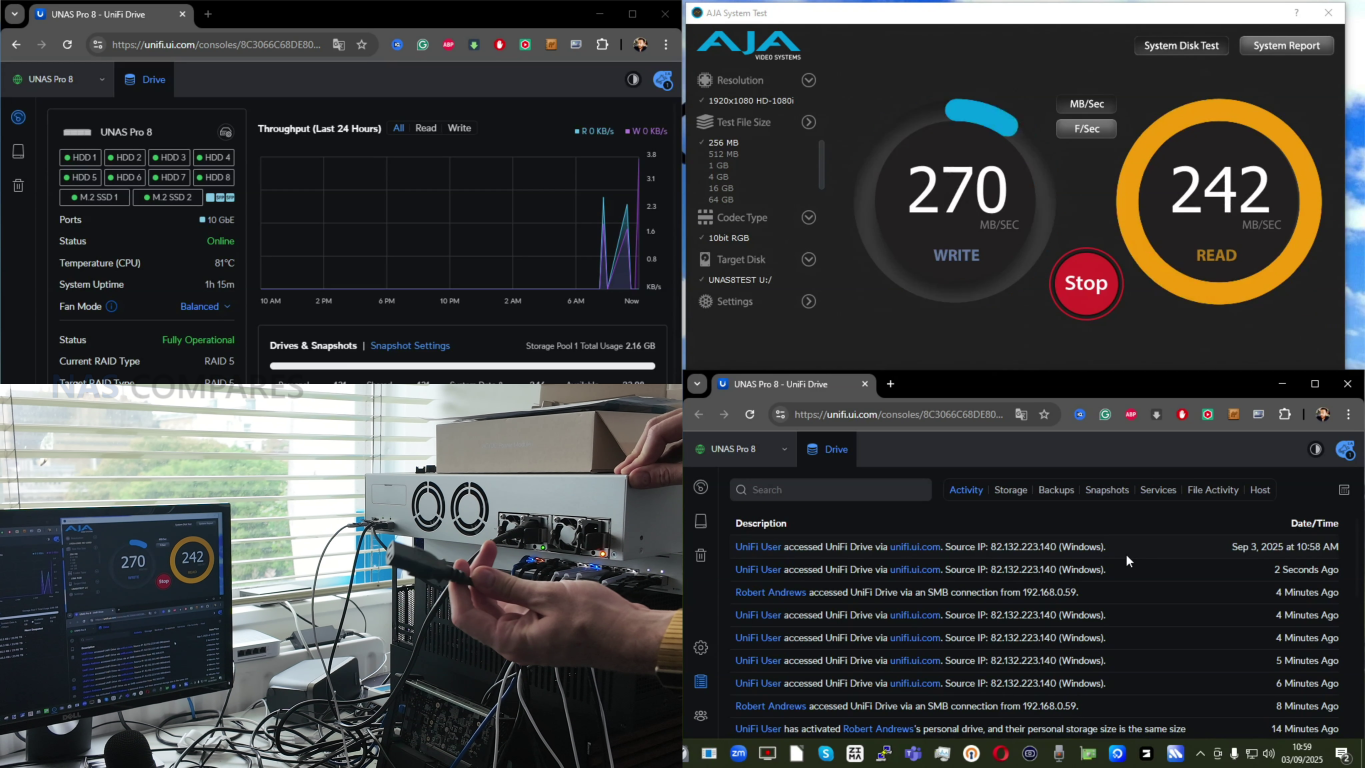
In testing with 4 HDDs in a RAID 5 configuration over a 10Gb link to a Windows 11 client, measured throughput landed in the range expected of a well-tuned 4 disk array. Using AJA with a repeated 1 GB test file, results sat around 680 to 730 MB/s for download and 520 to 600 MB/s for upload. A real-world Windows file transfer of 101 GB made up of 1,231 mixed files completed in 3 minutes and 57 seconds, which works out at an average of about 426 MB/s across the transfer, reflecting the usual drop from synthetic peak results when file variety and filesystem overhead are introduced.

Synthetic benchmarking results varied depending on the tool used, which is not unusual when caching behavior and test patterns differ. CrystalDiskMark with a 1 GB test file reported 353 MB/s read and 429 MB/s write in this run, with write coming out higher than read, which is atypical enough to treat as an outlier pending further retesting. ATTO produced stronger peak figures of 860 MB/s read and 570 MB/s write at the top end, which aligns more closely with the best-case behavior seen in sequential-focused tests on multi-drive arrays.

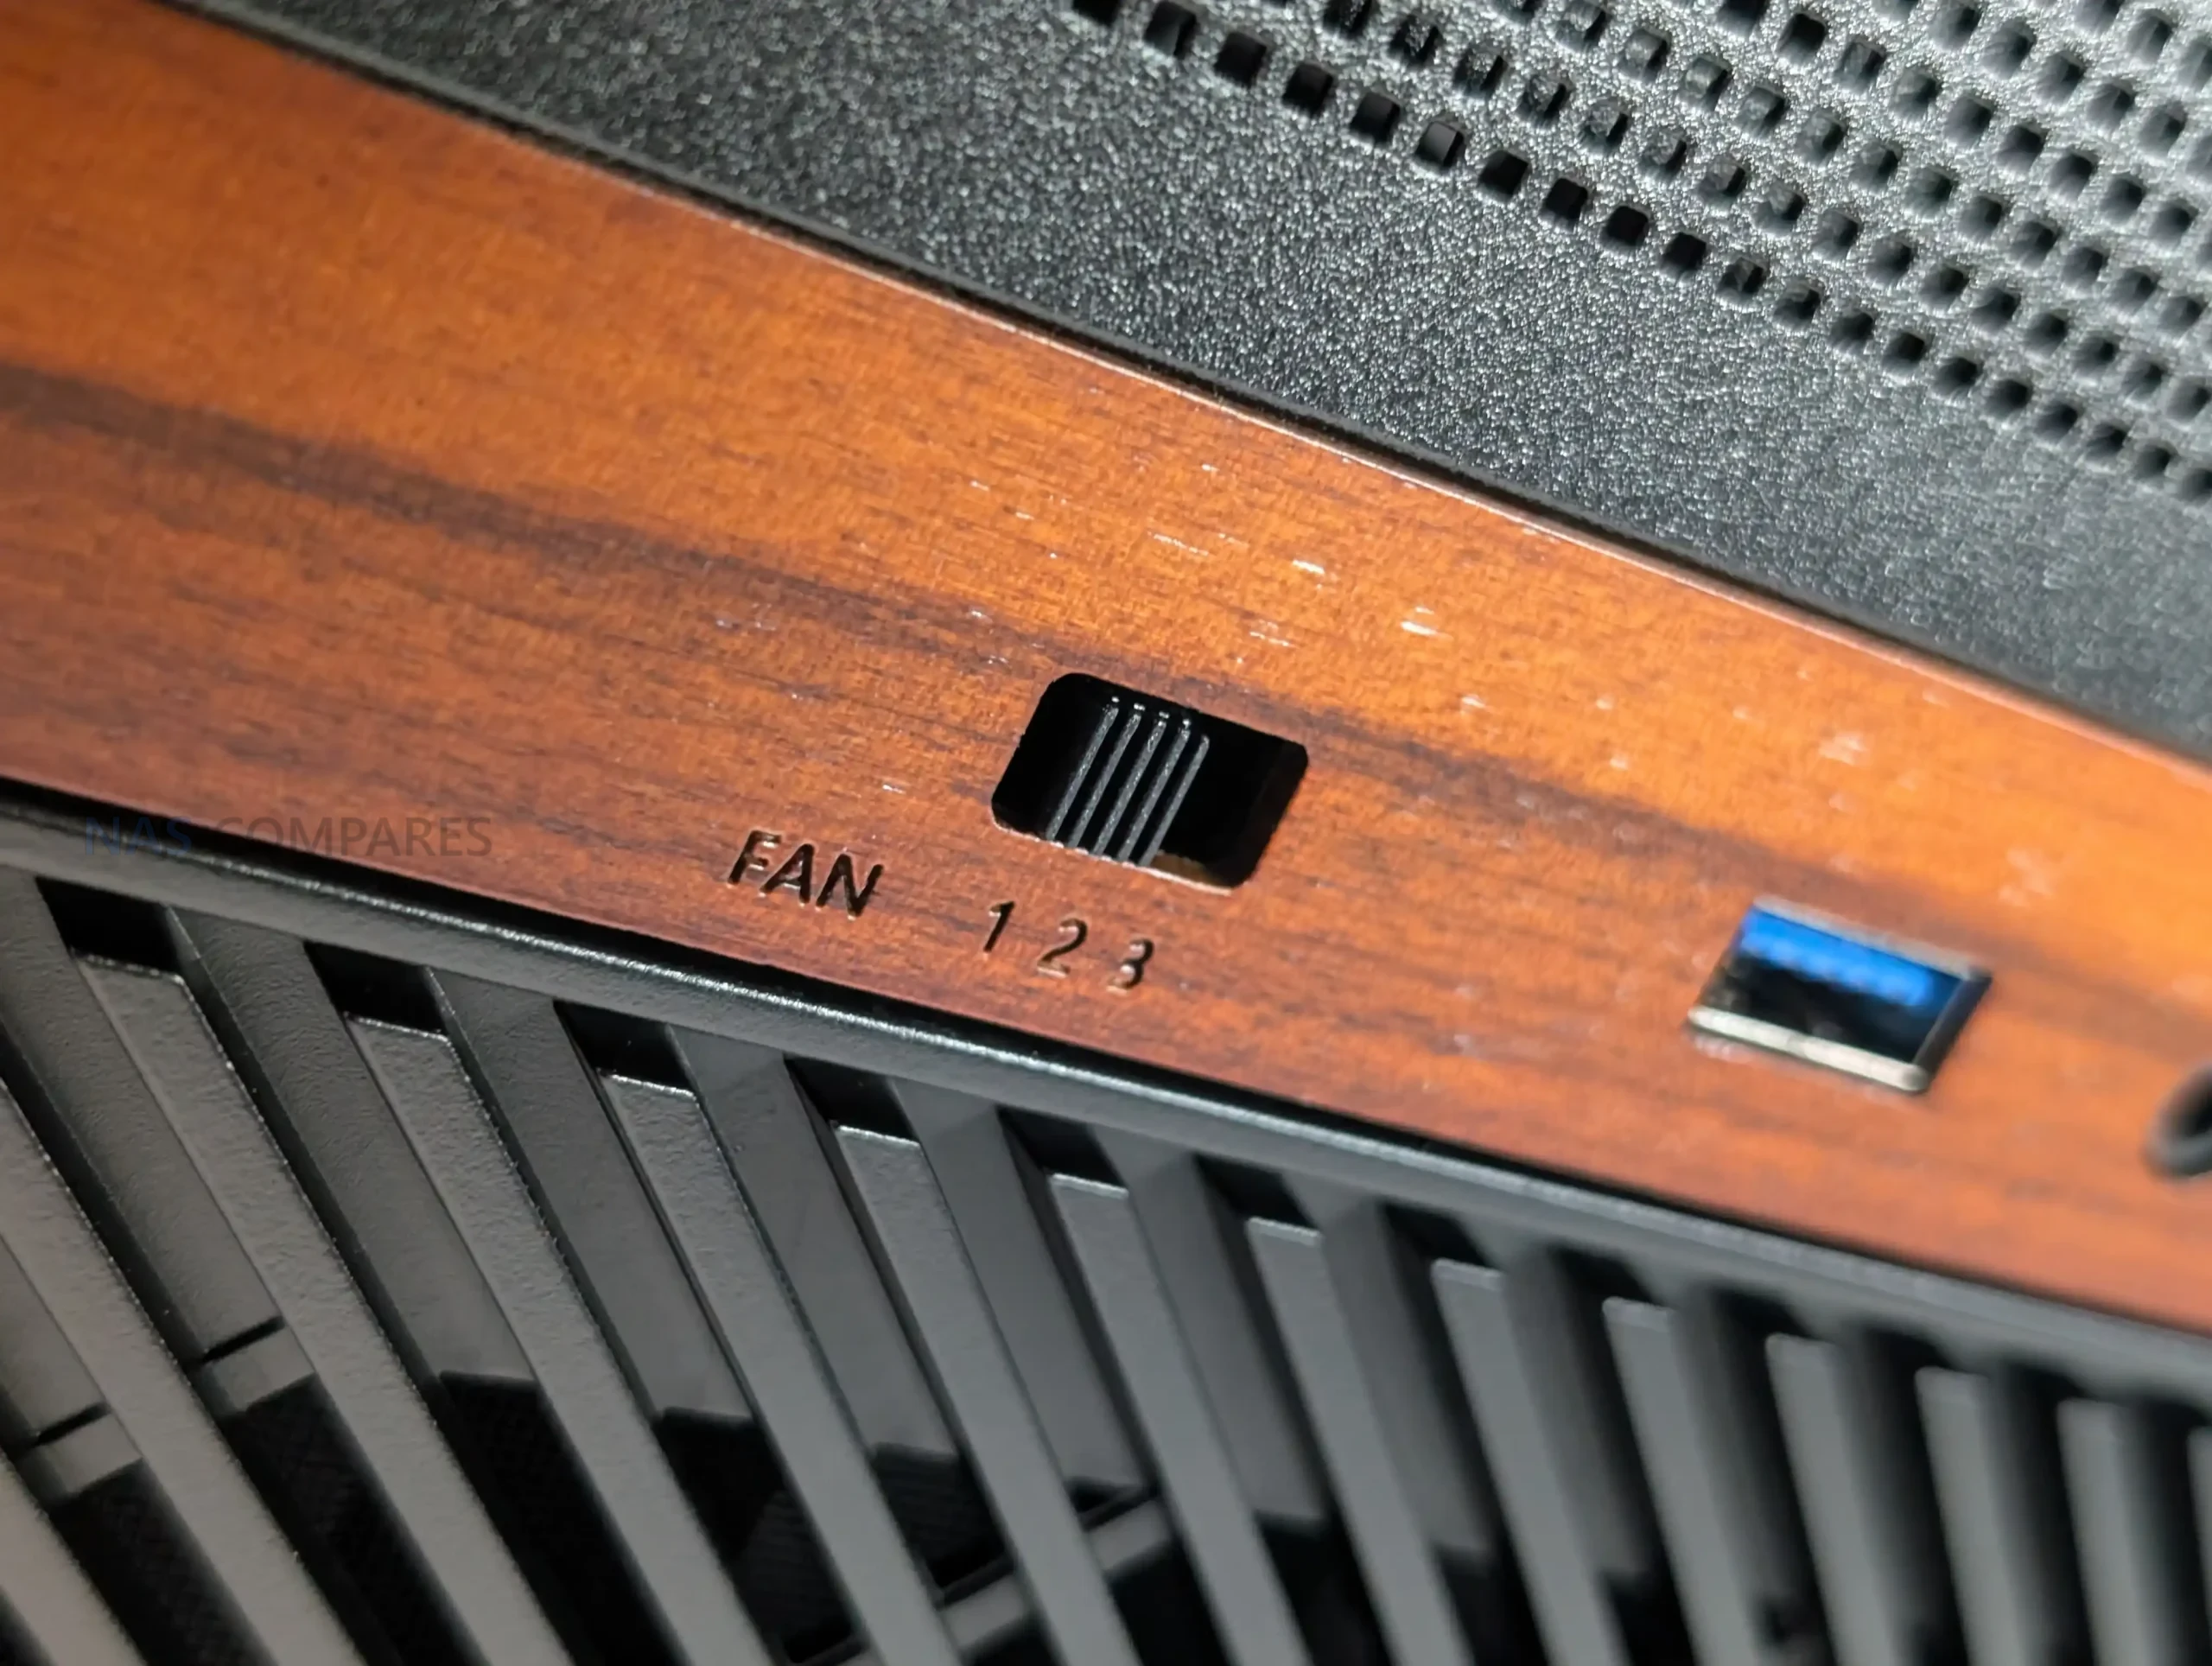
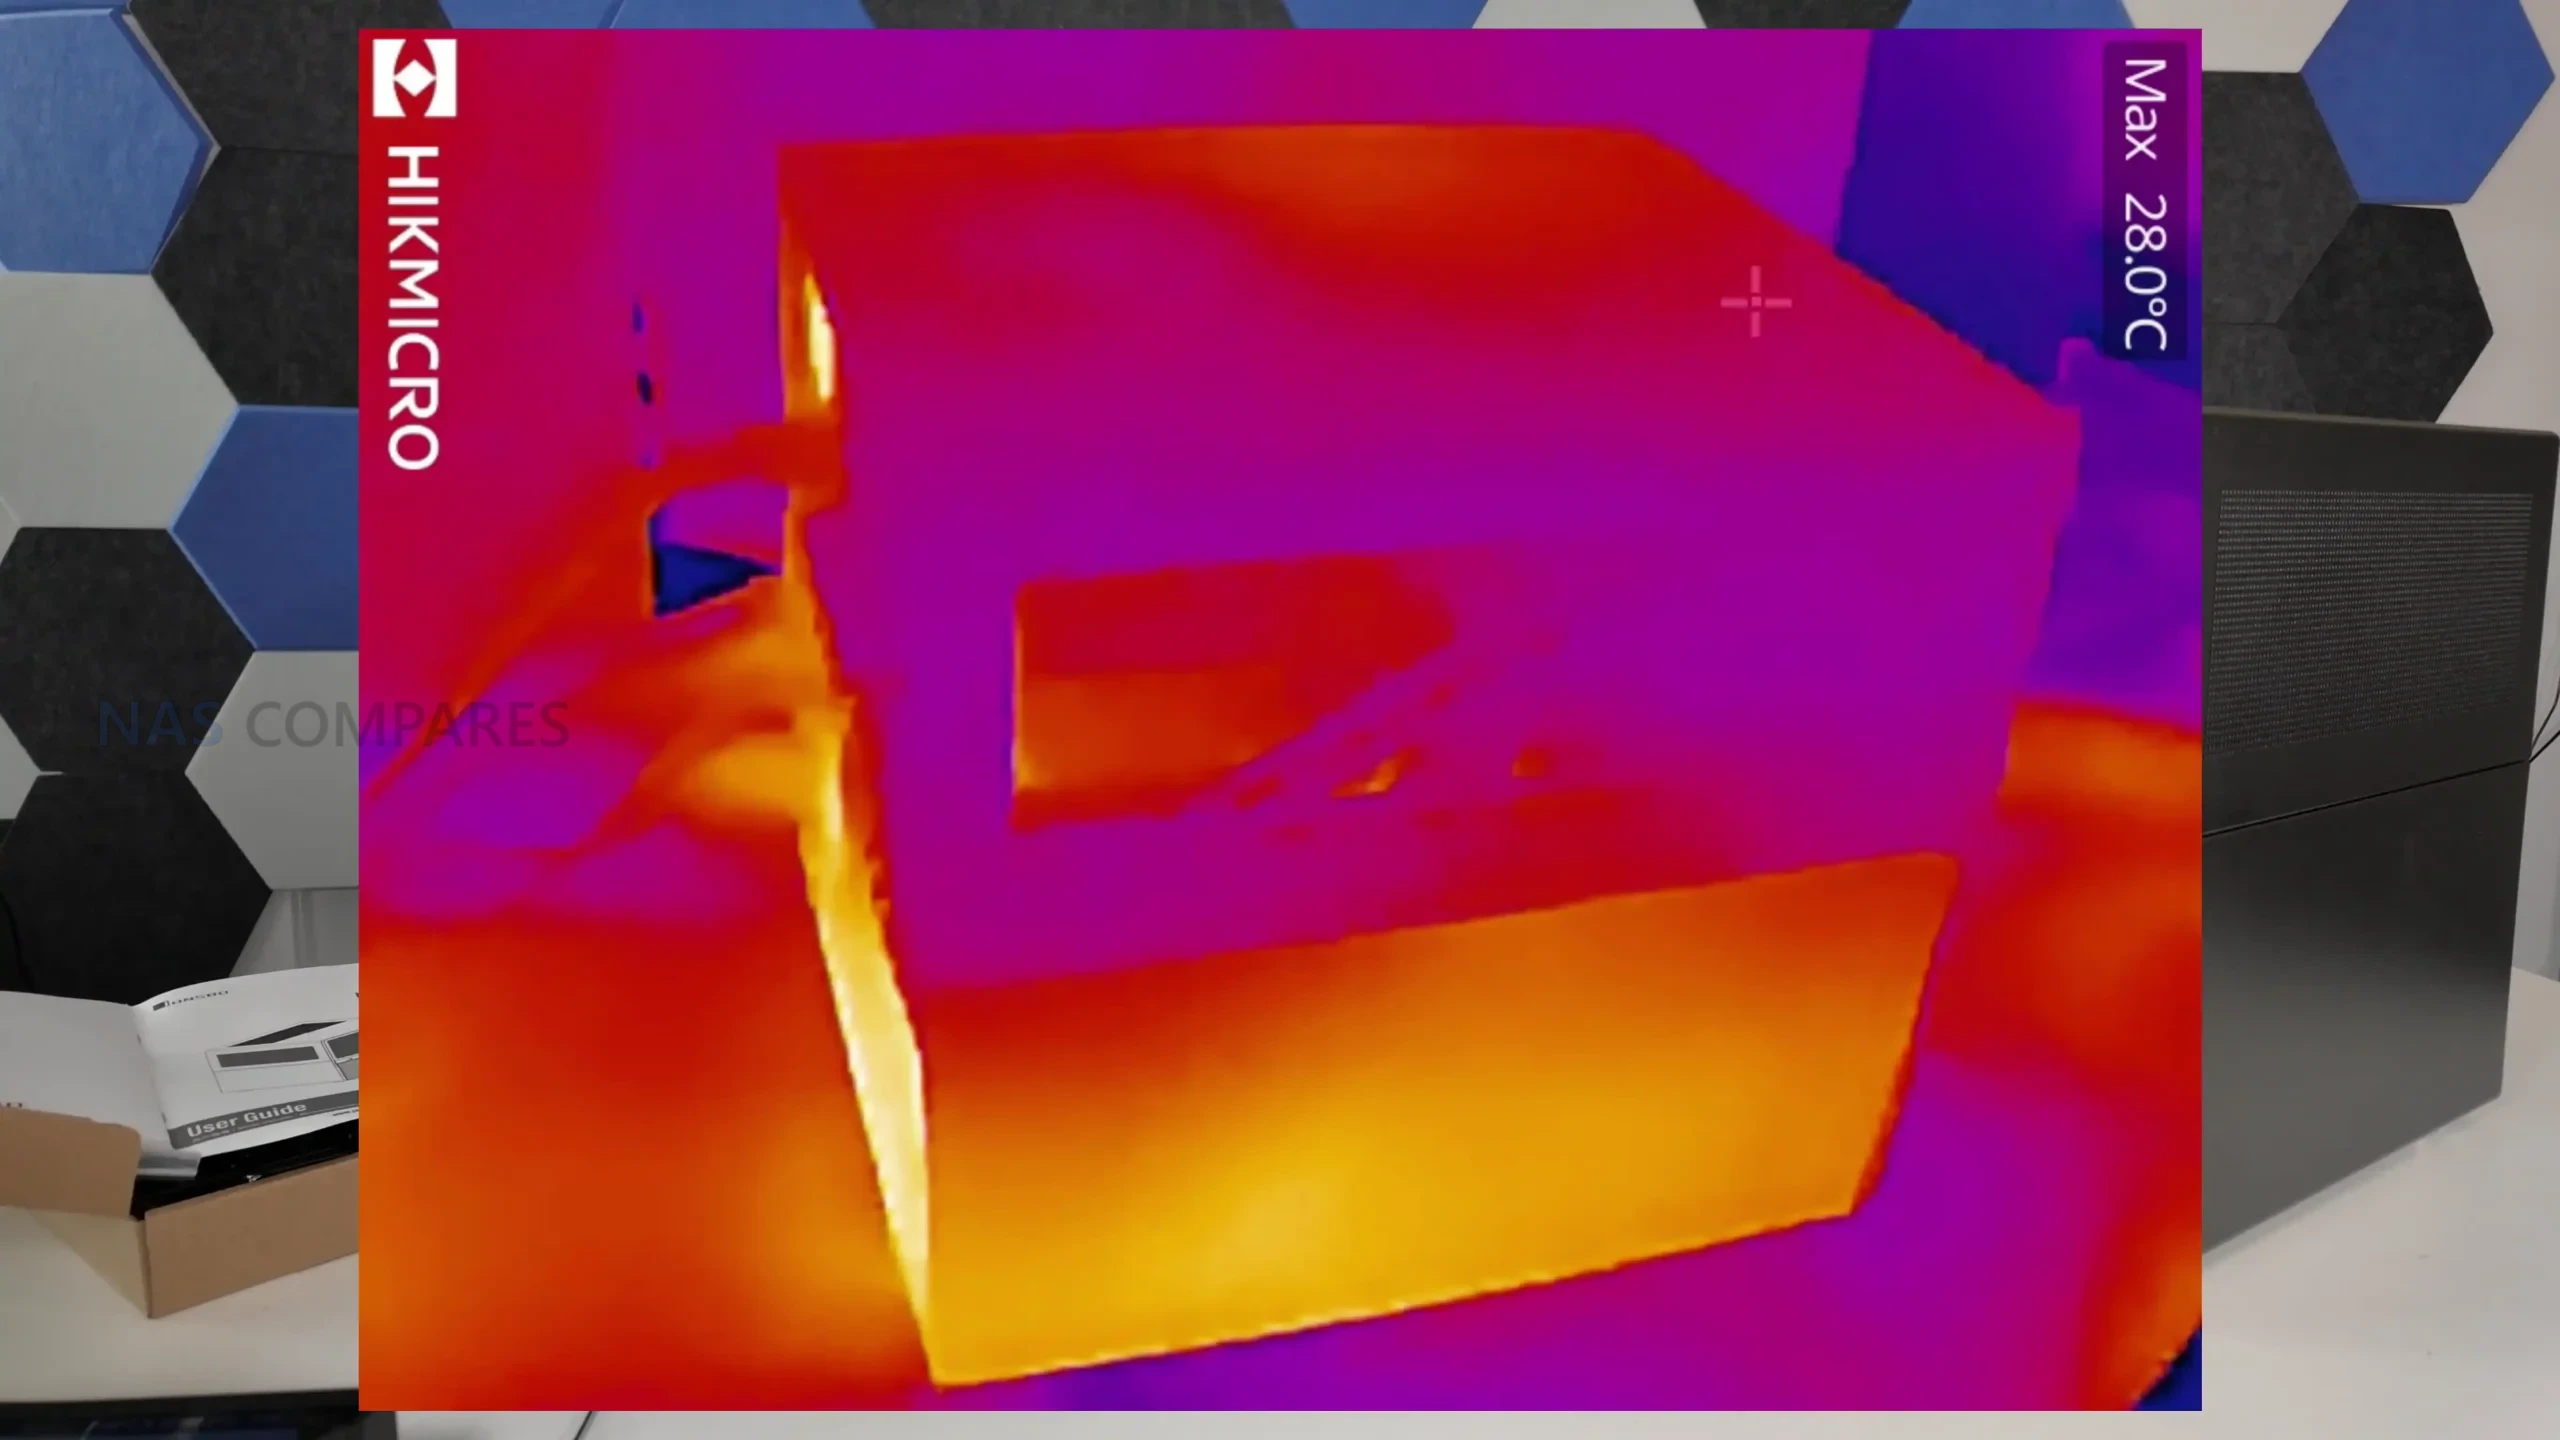
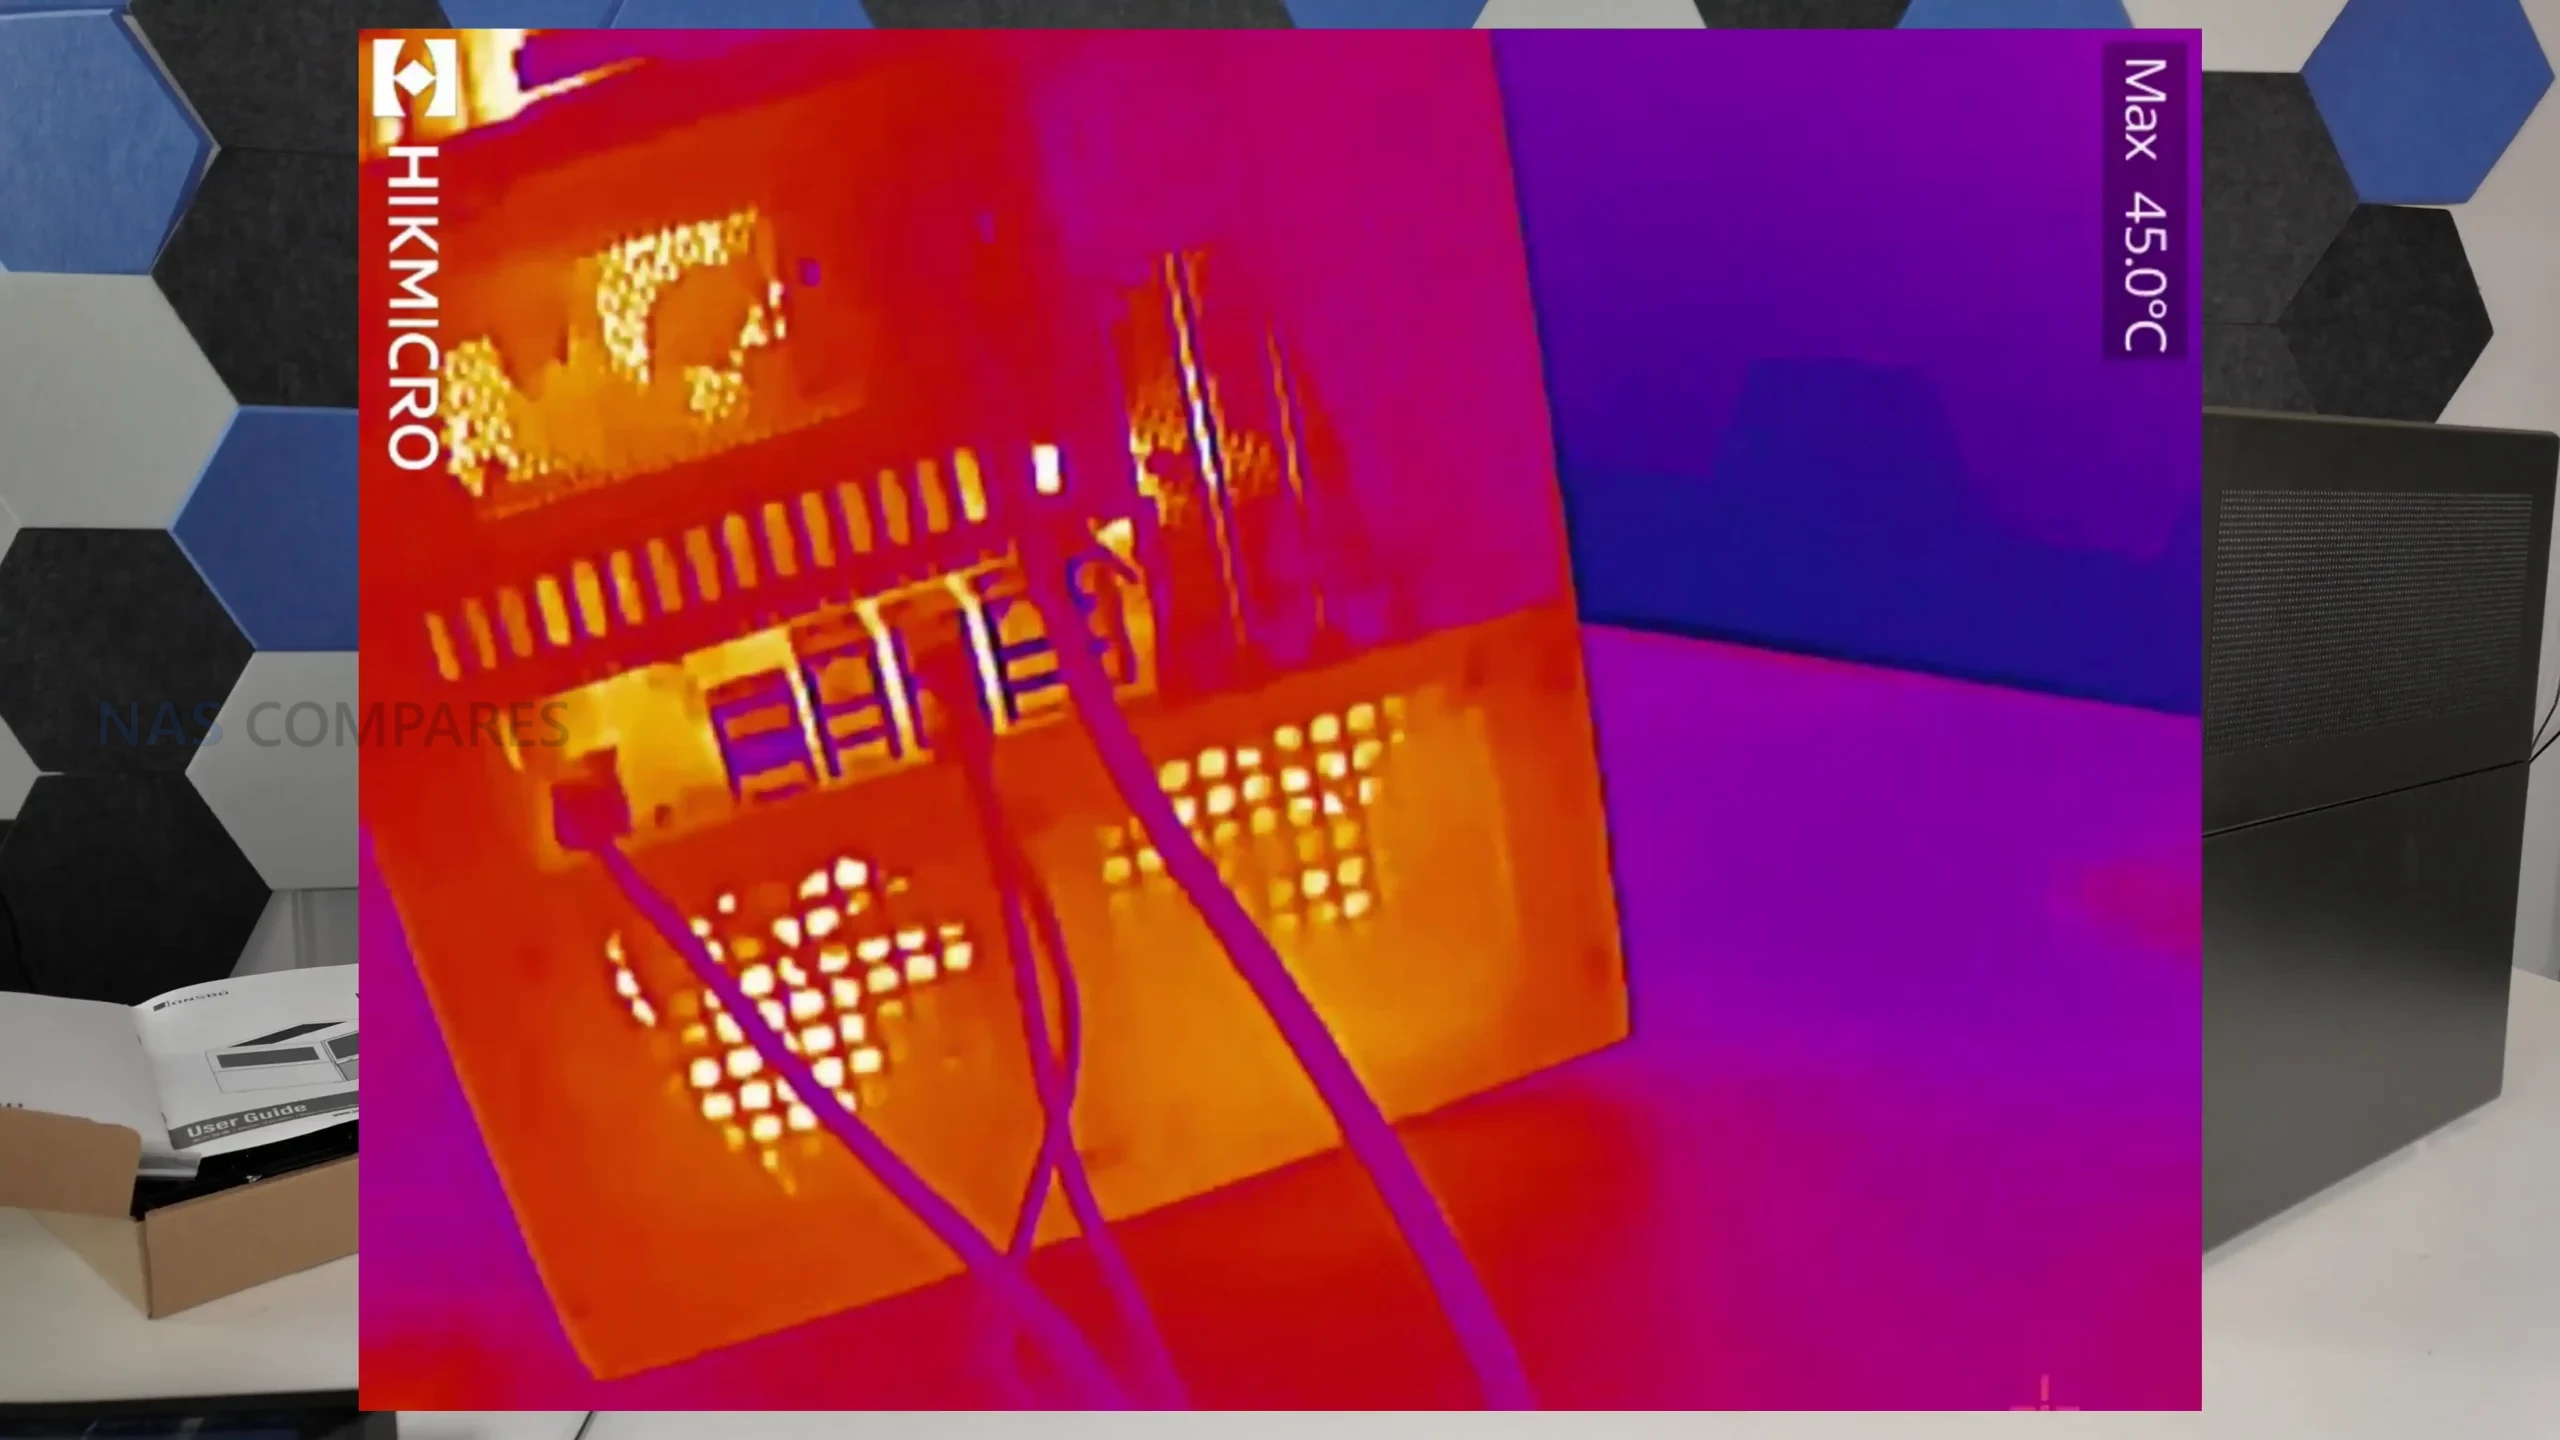
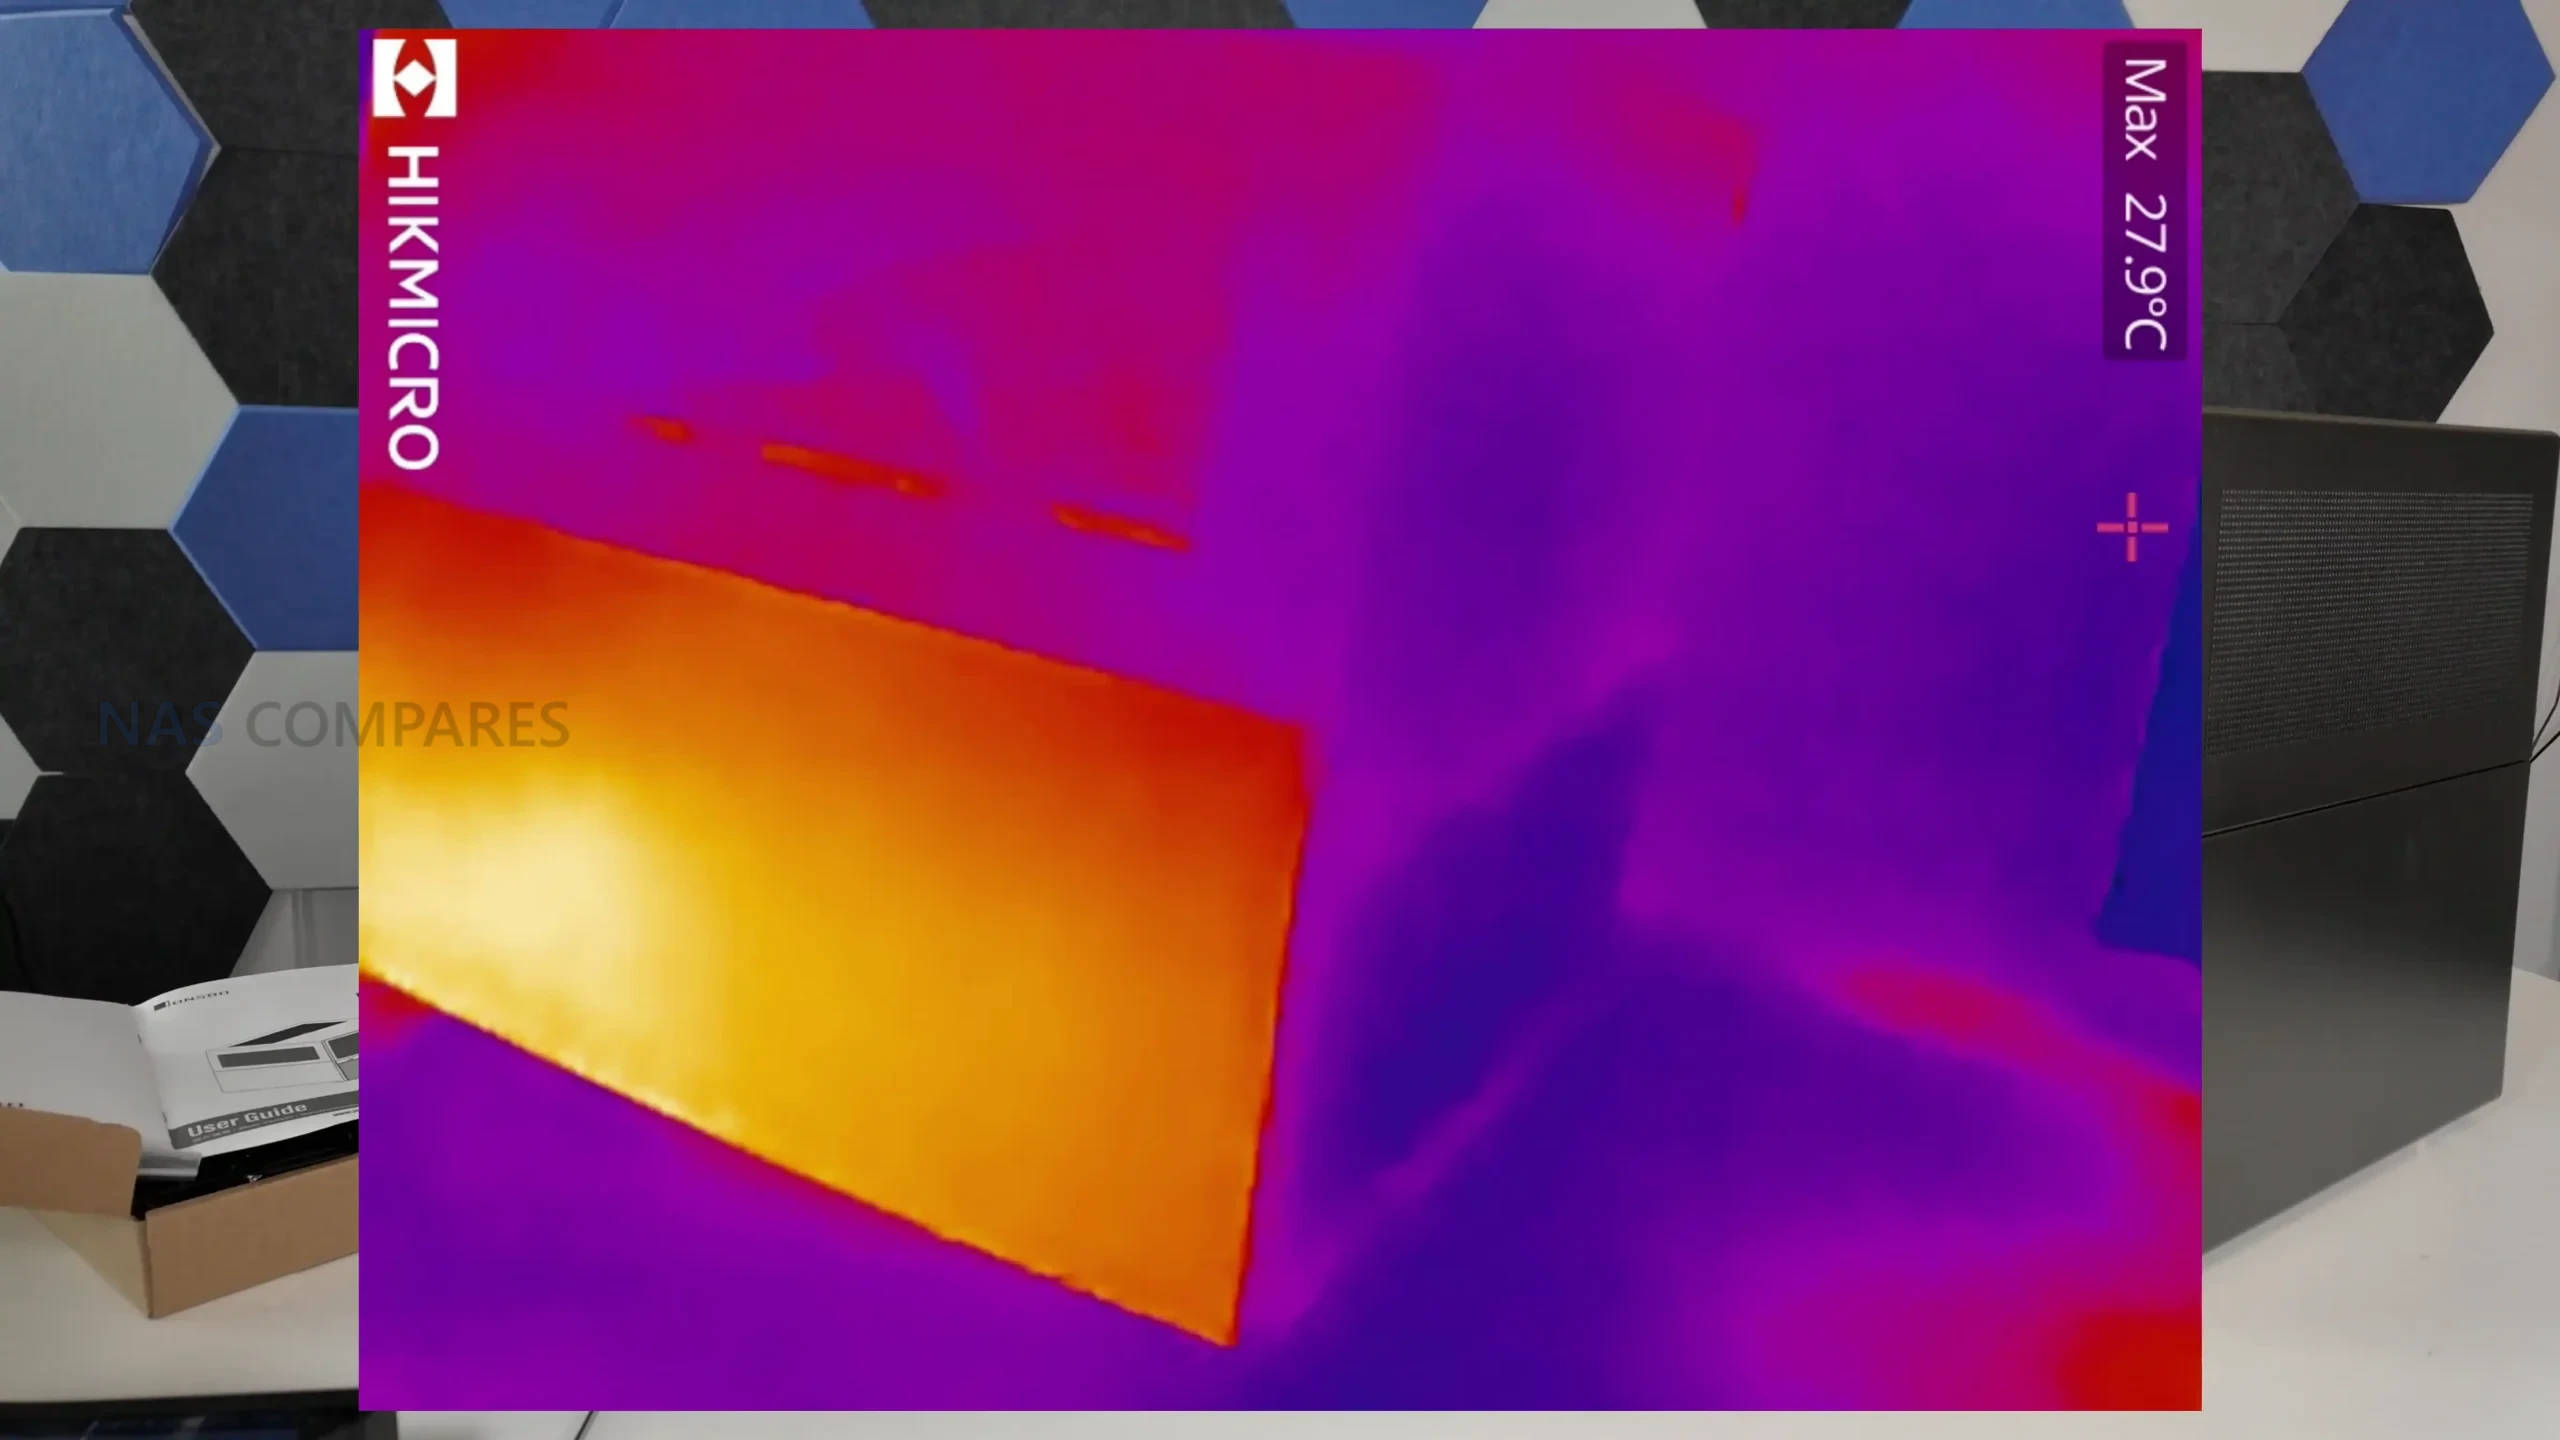
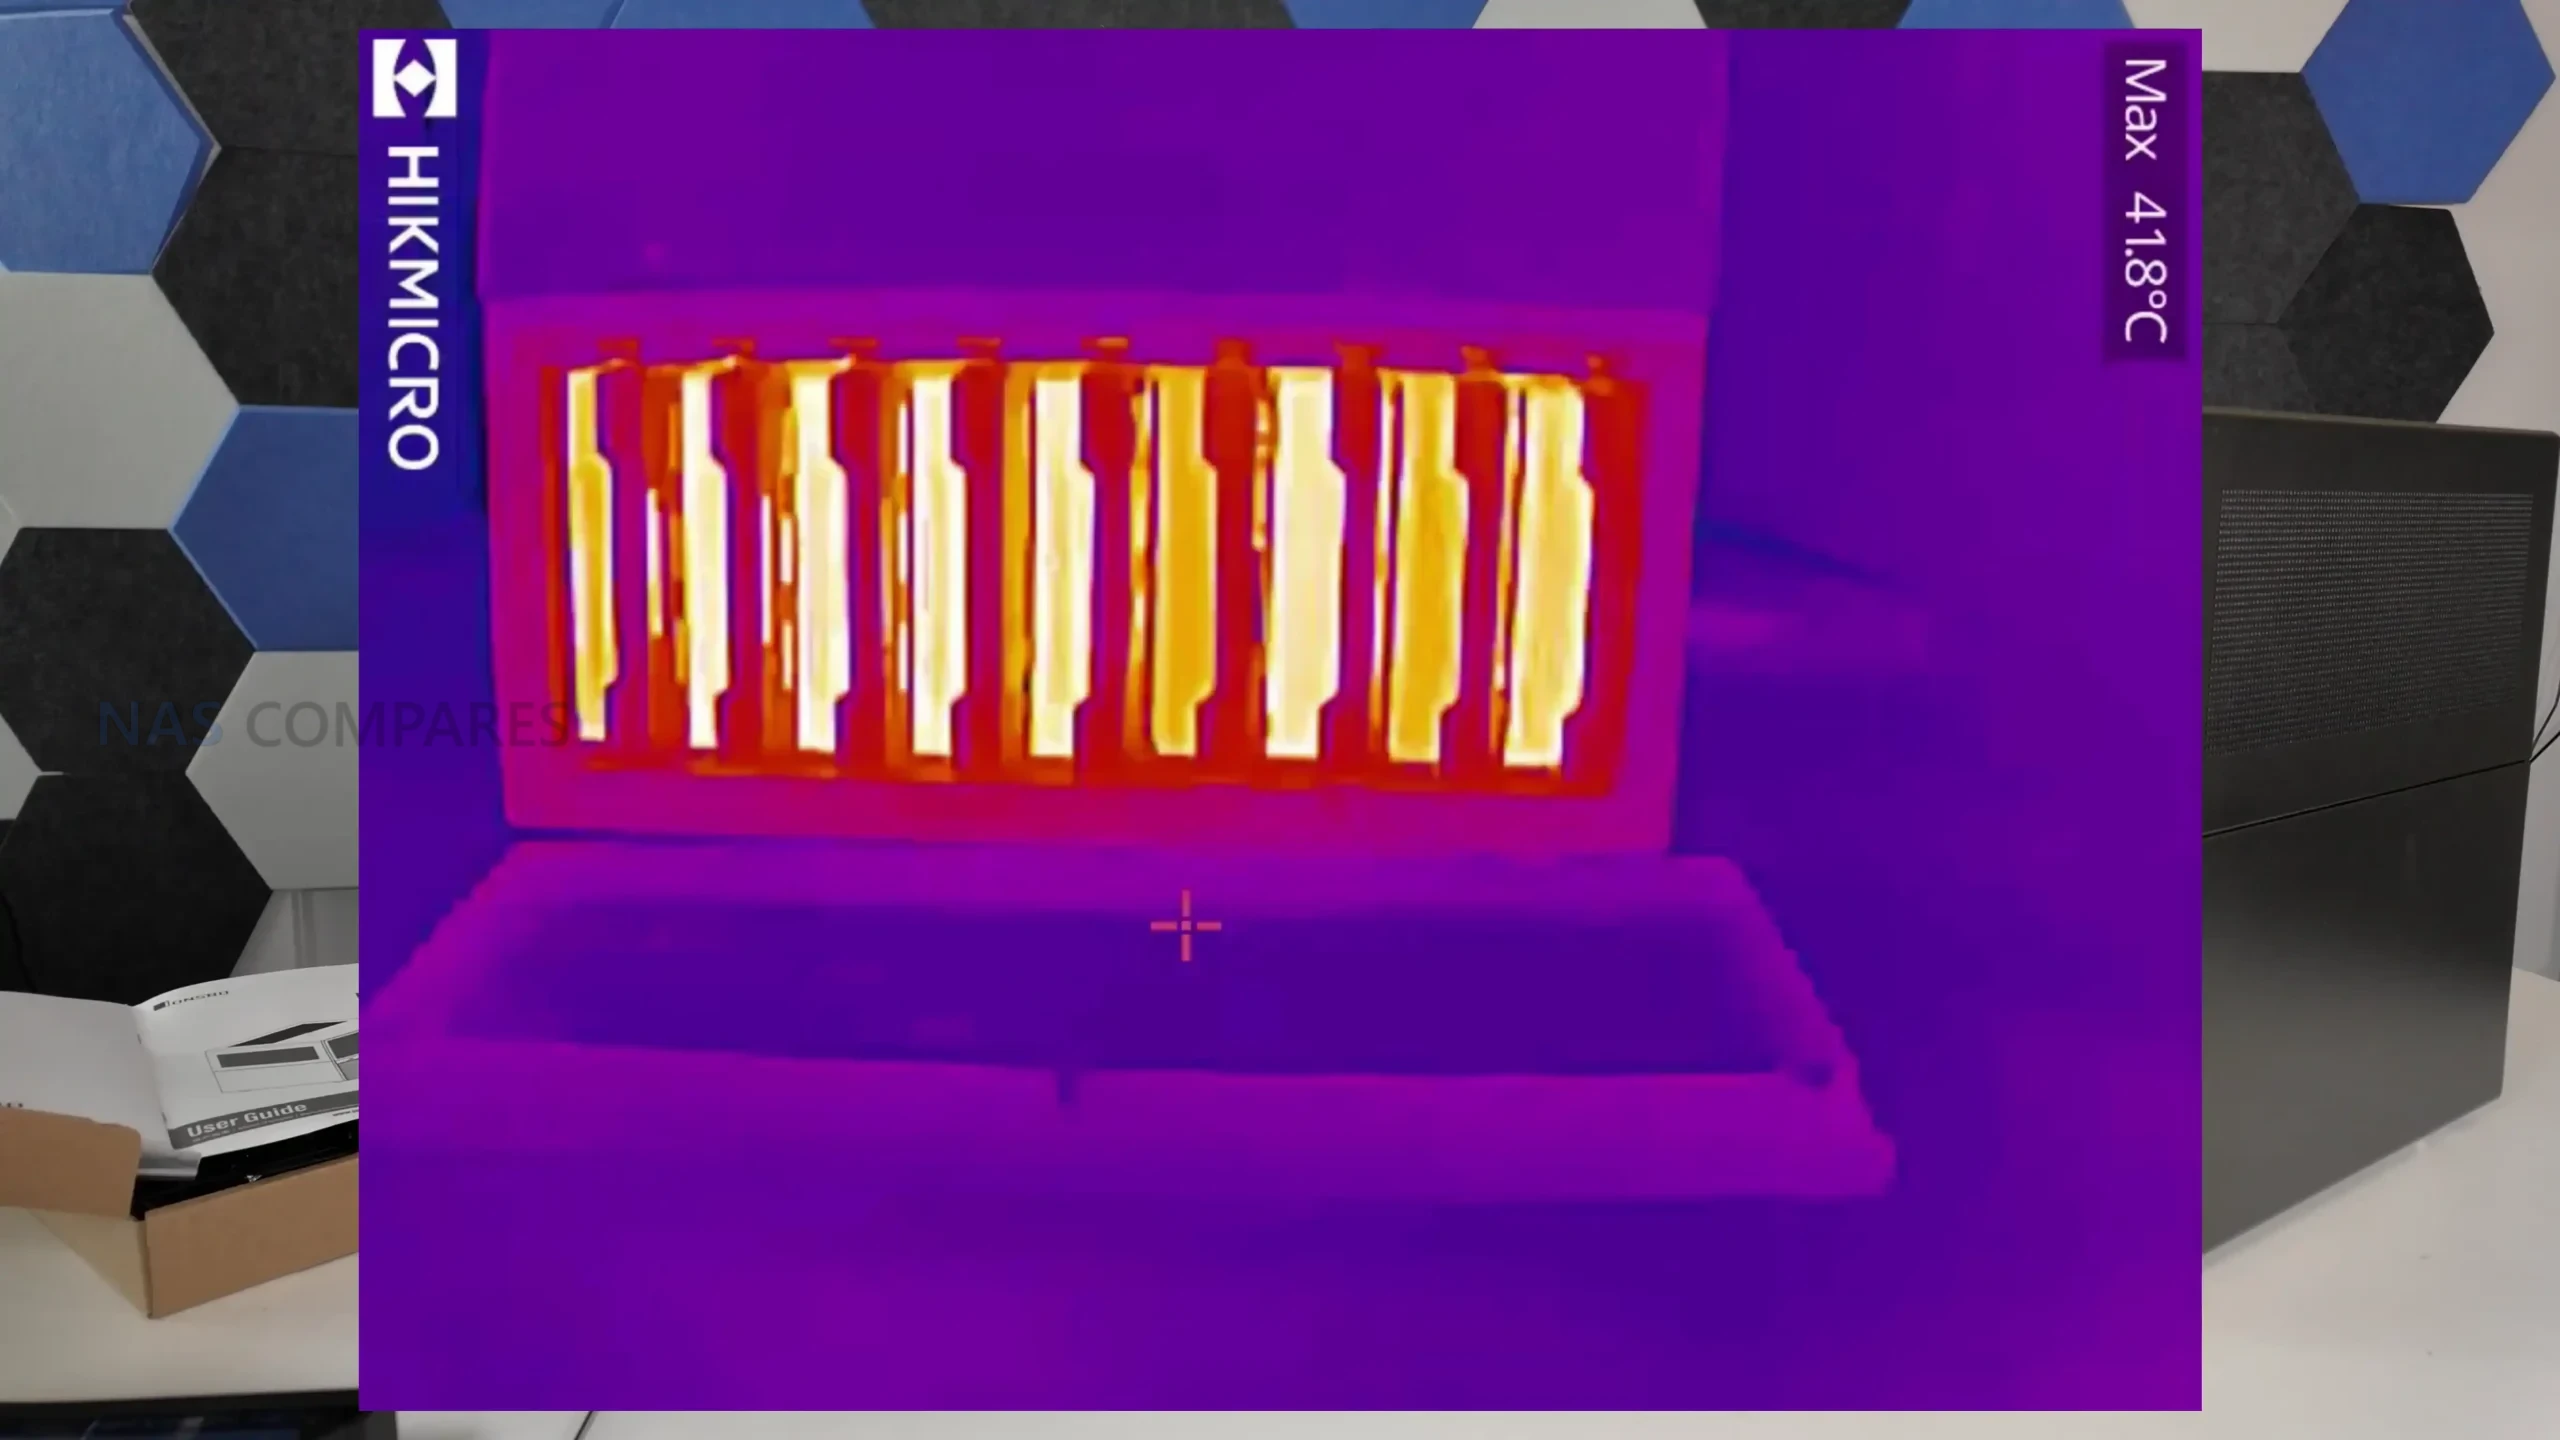
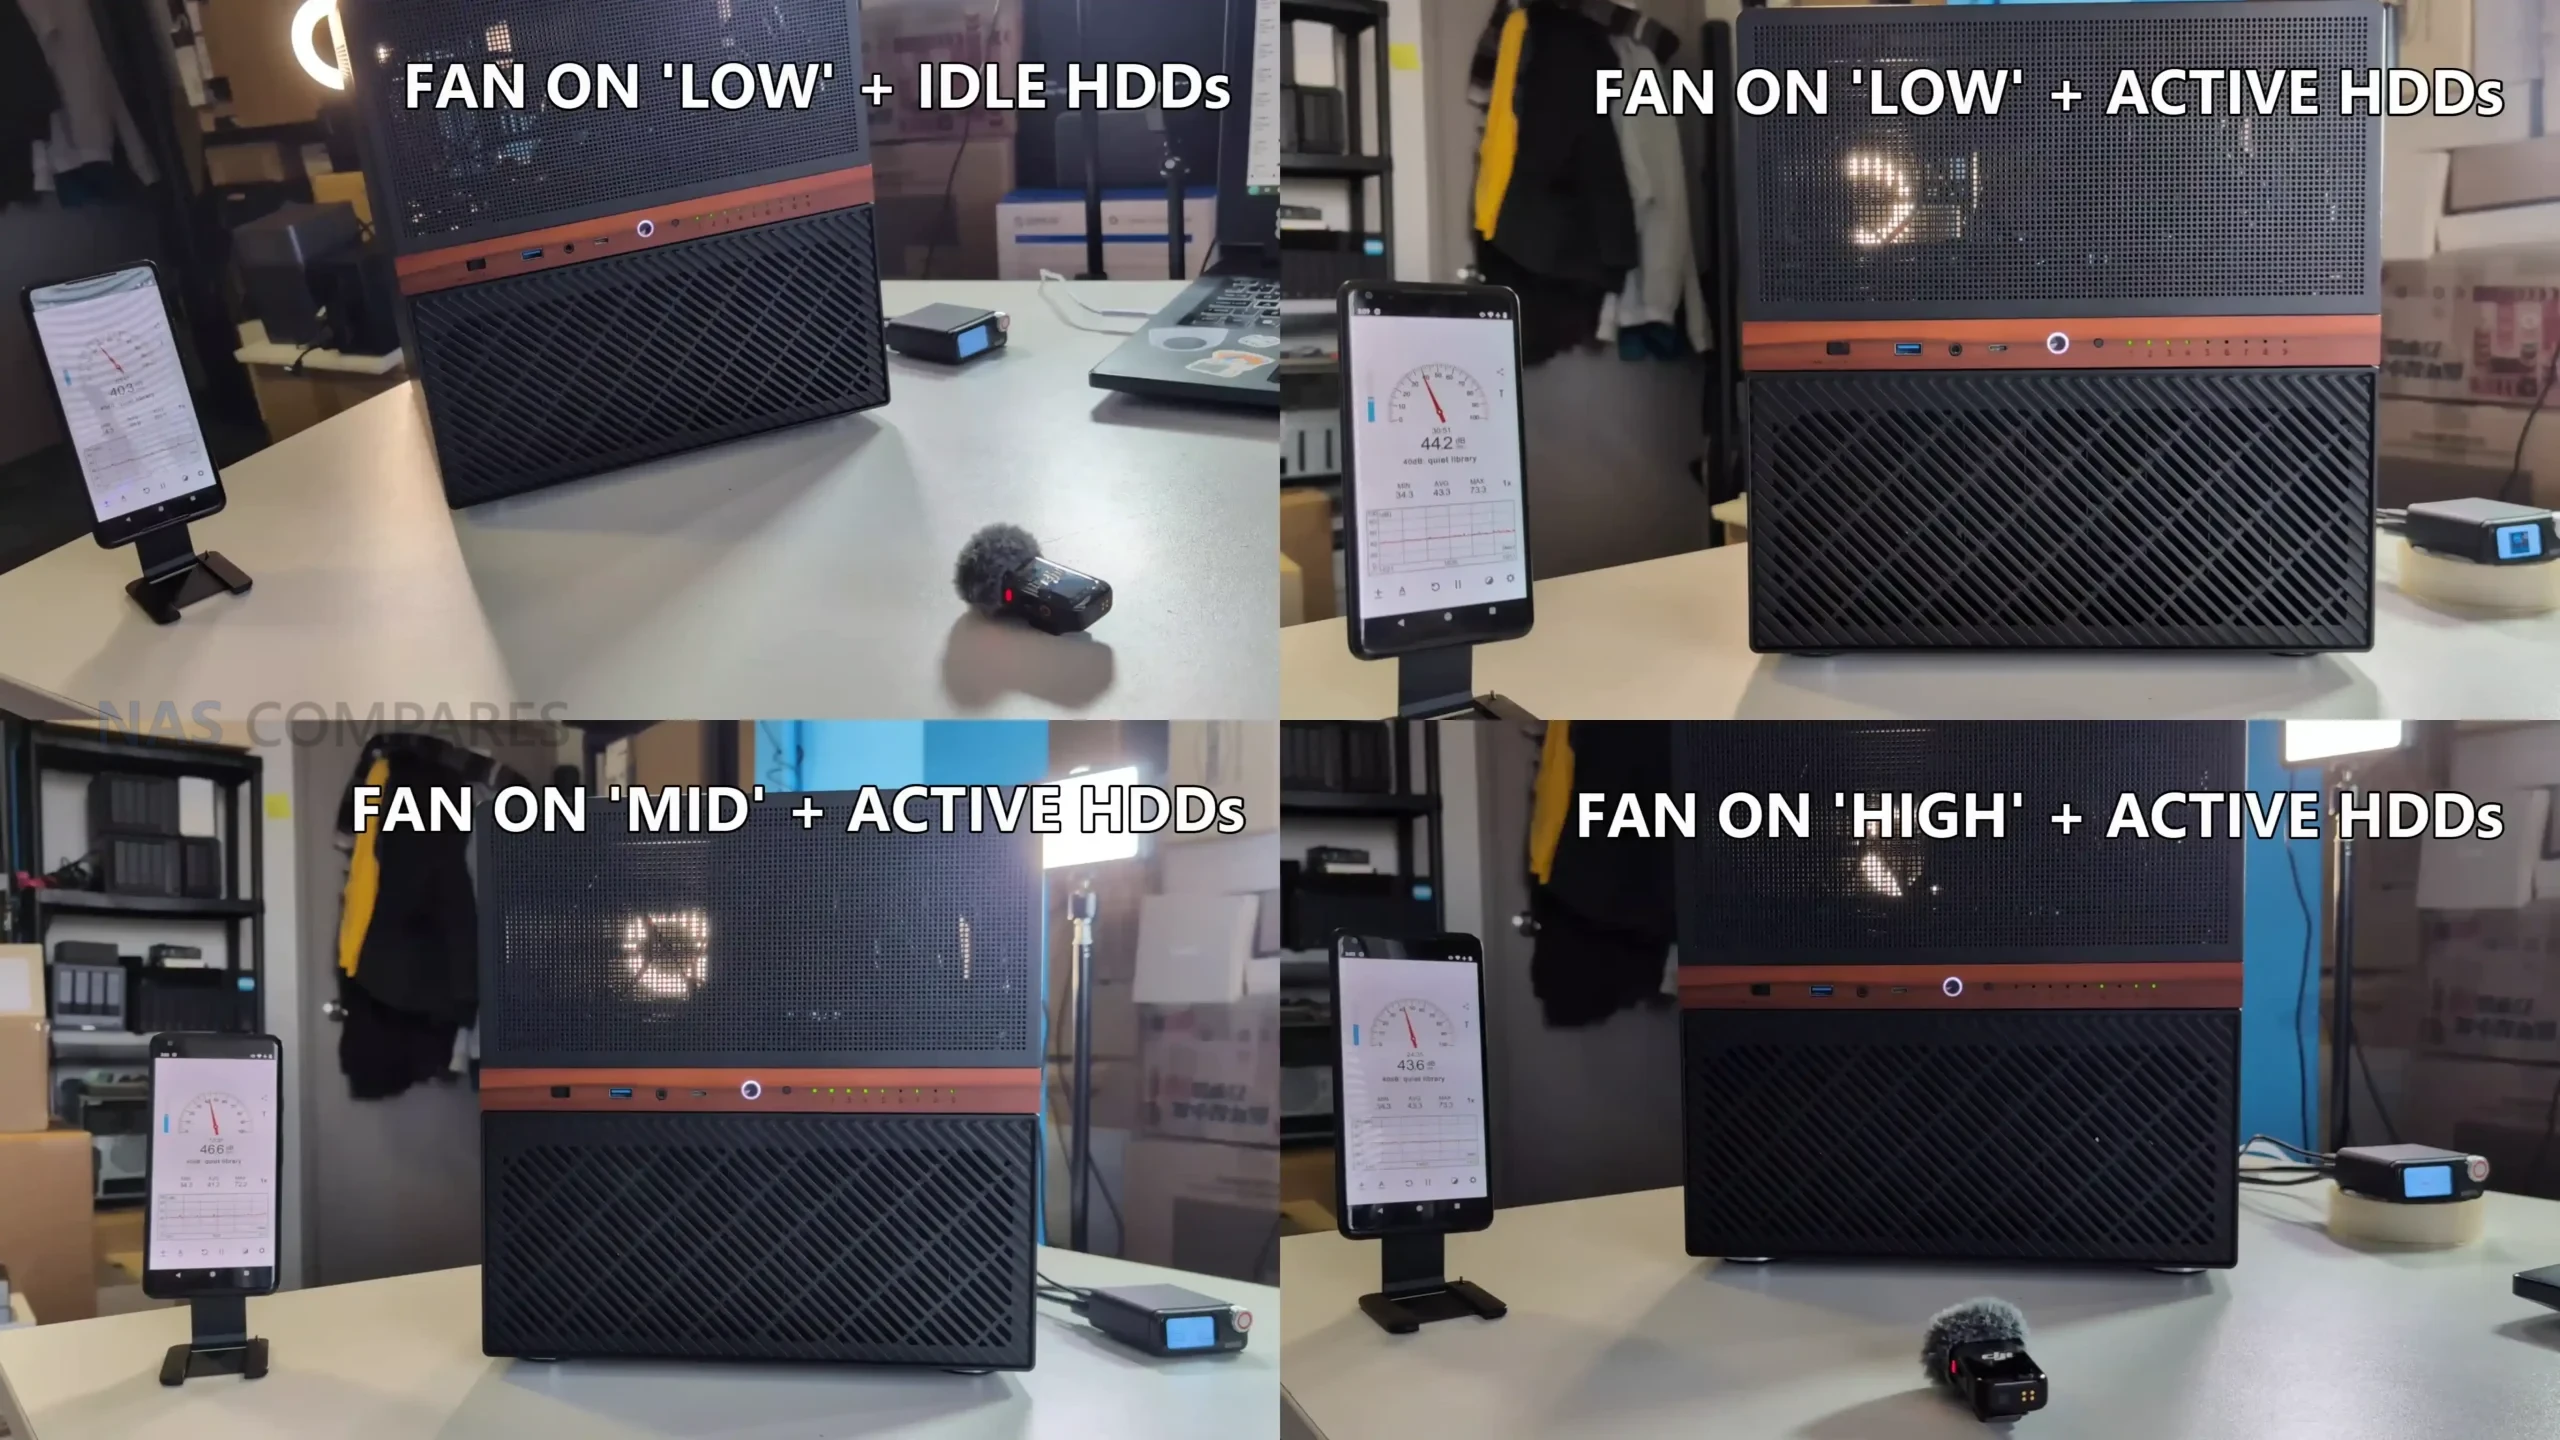
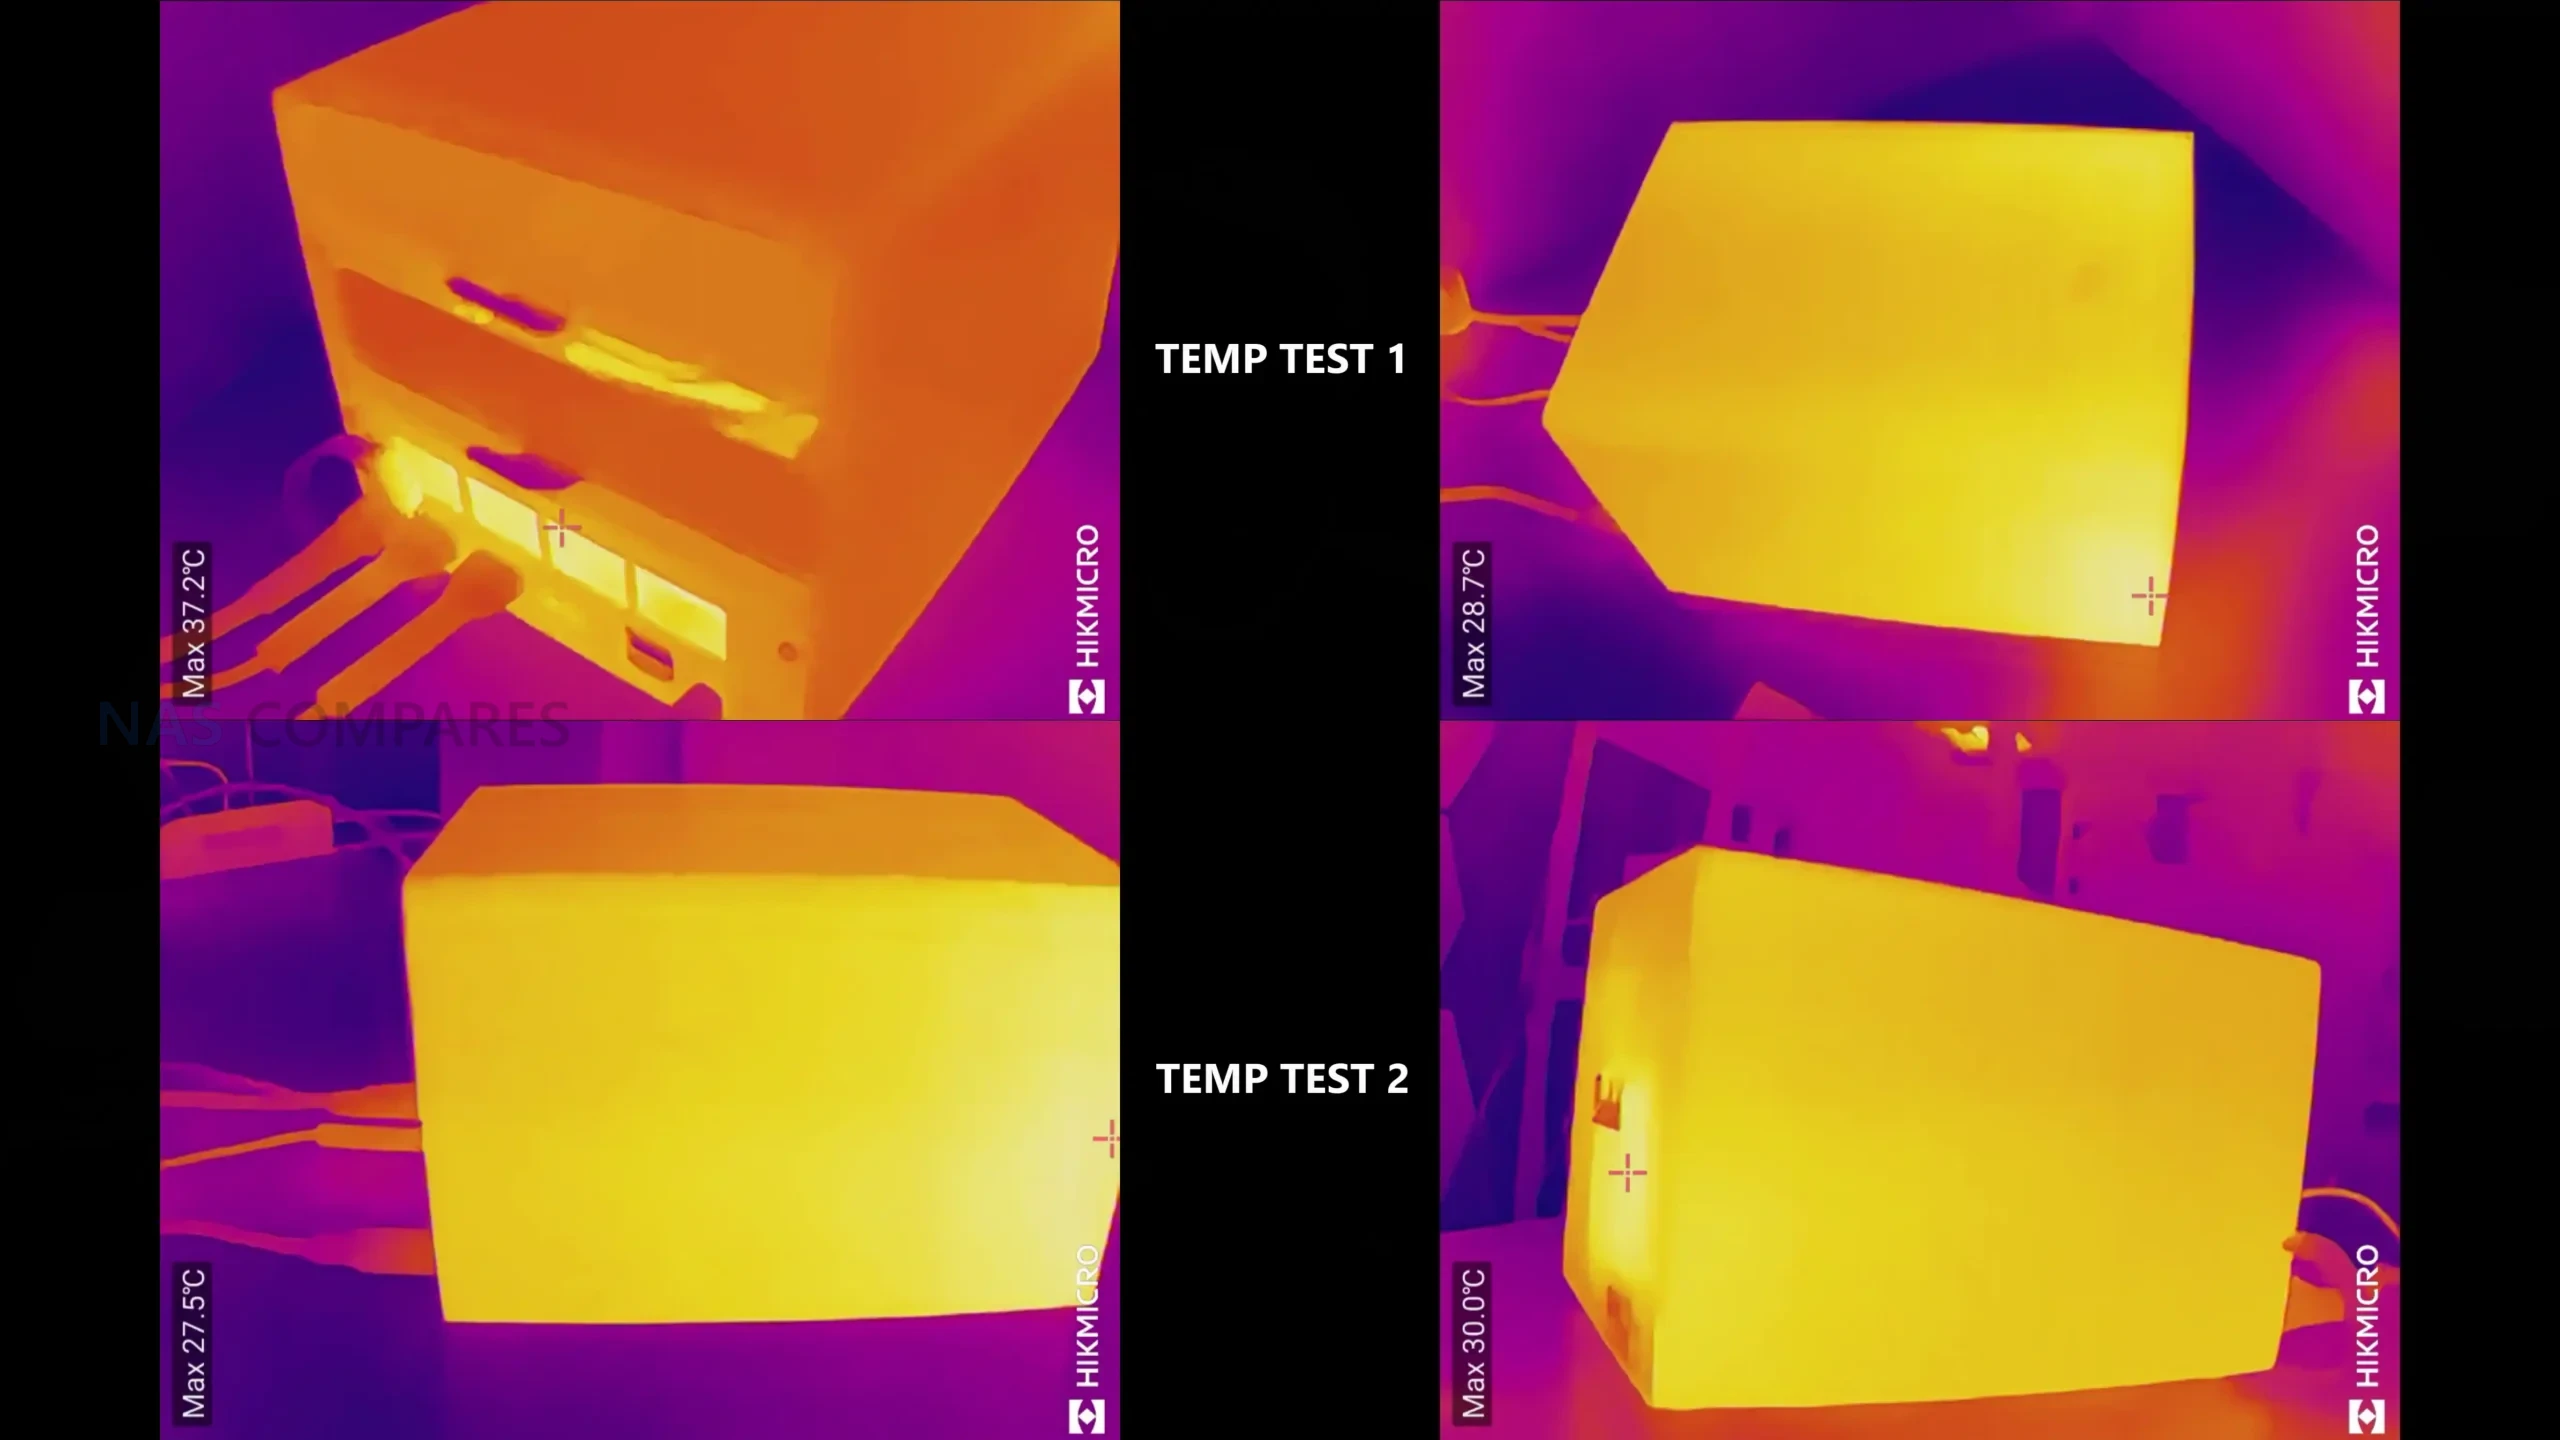
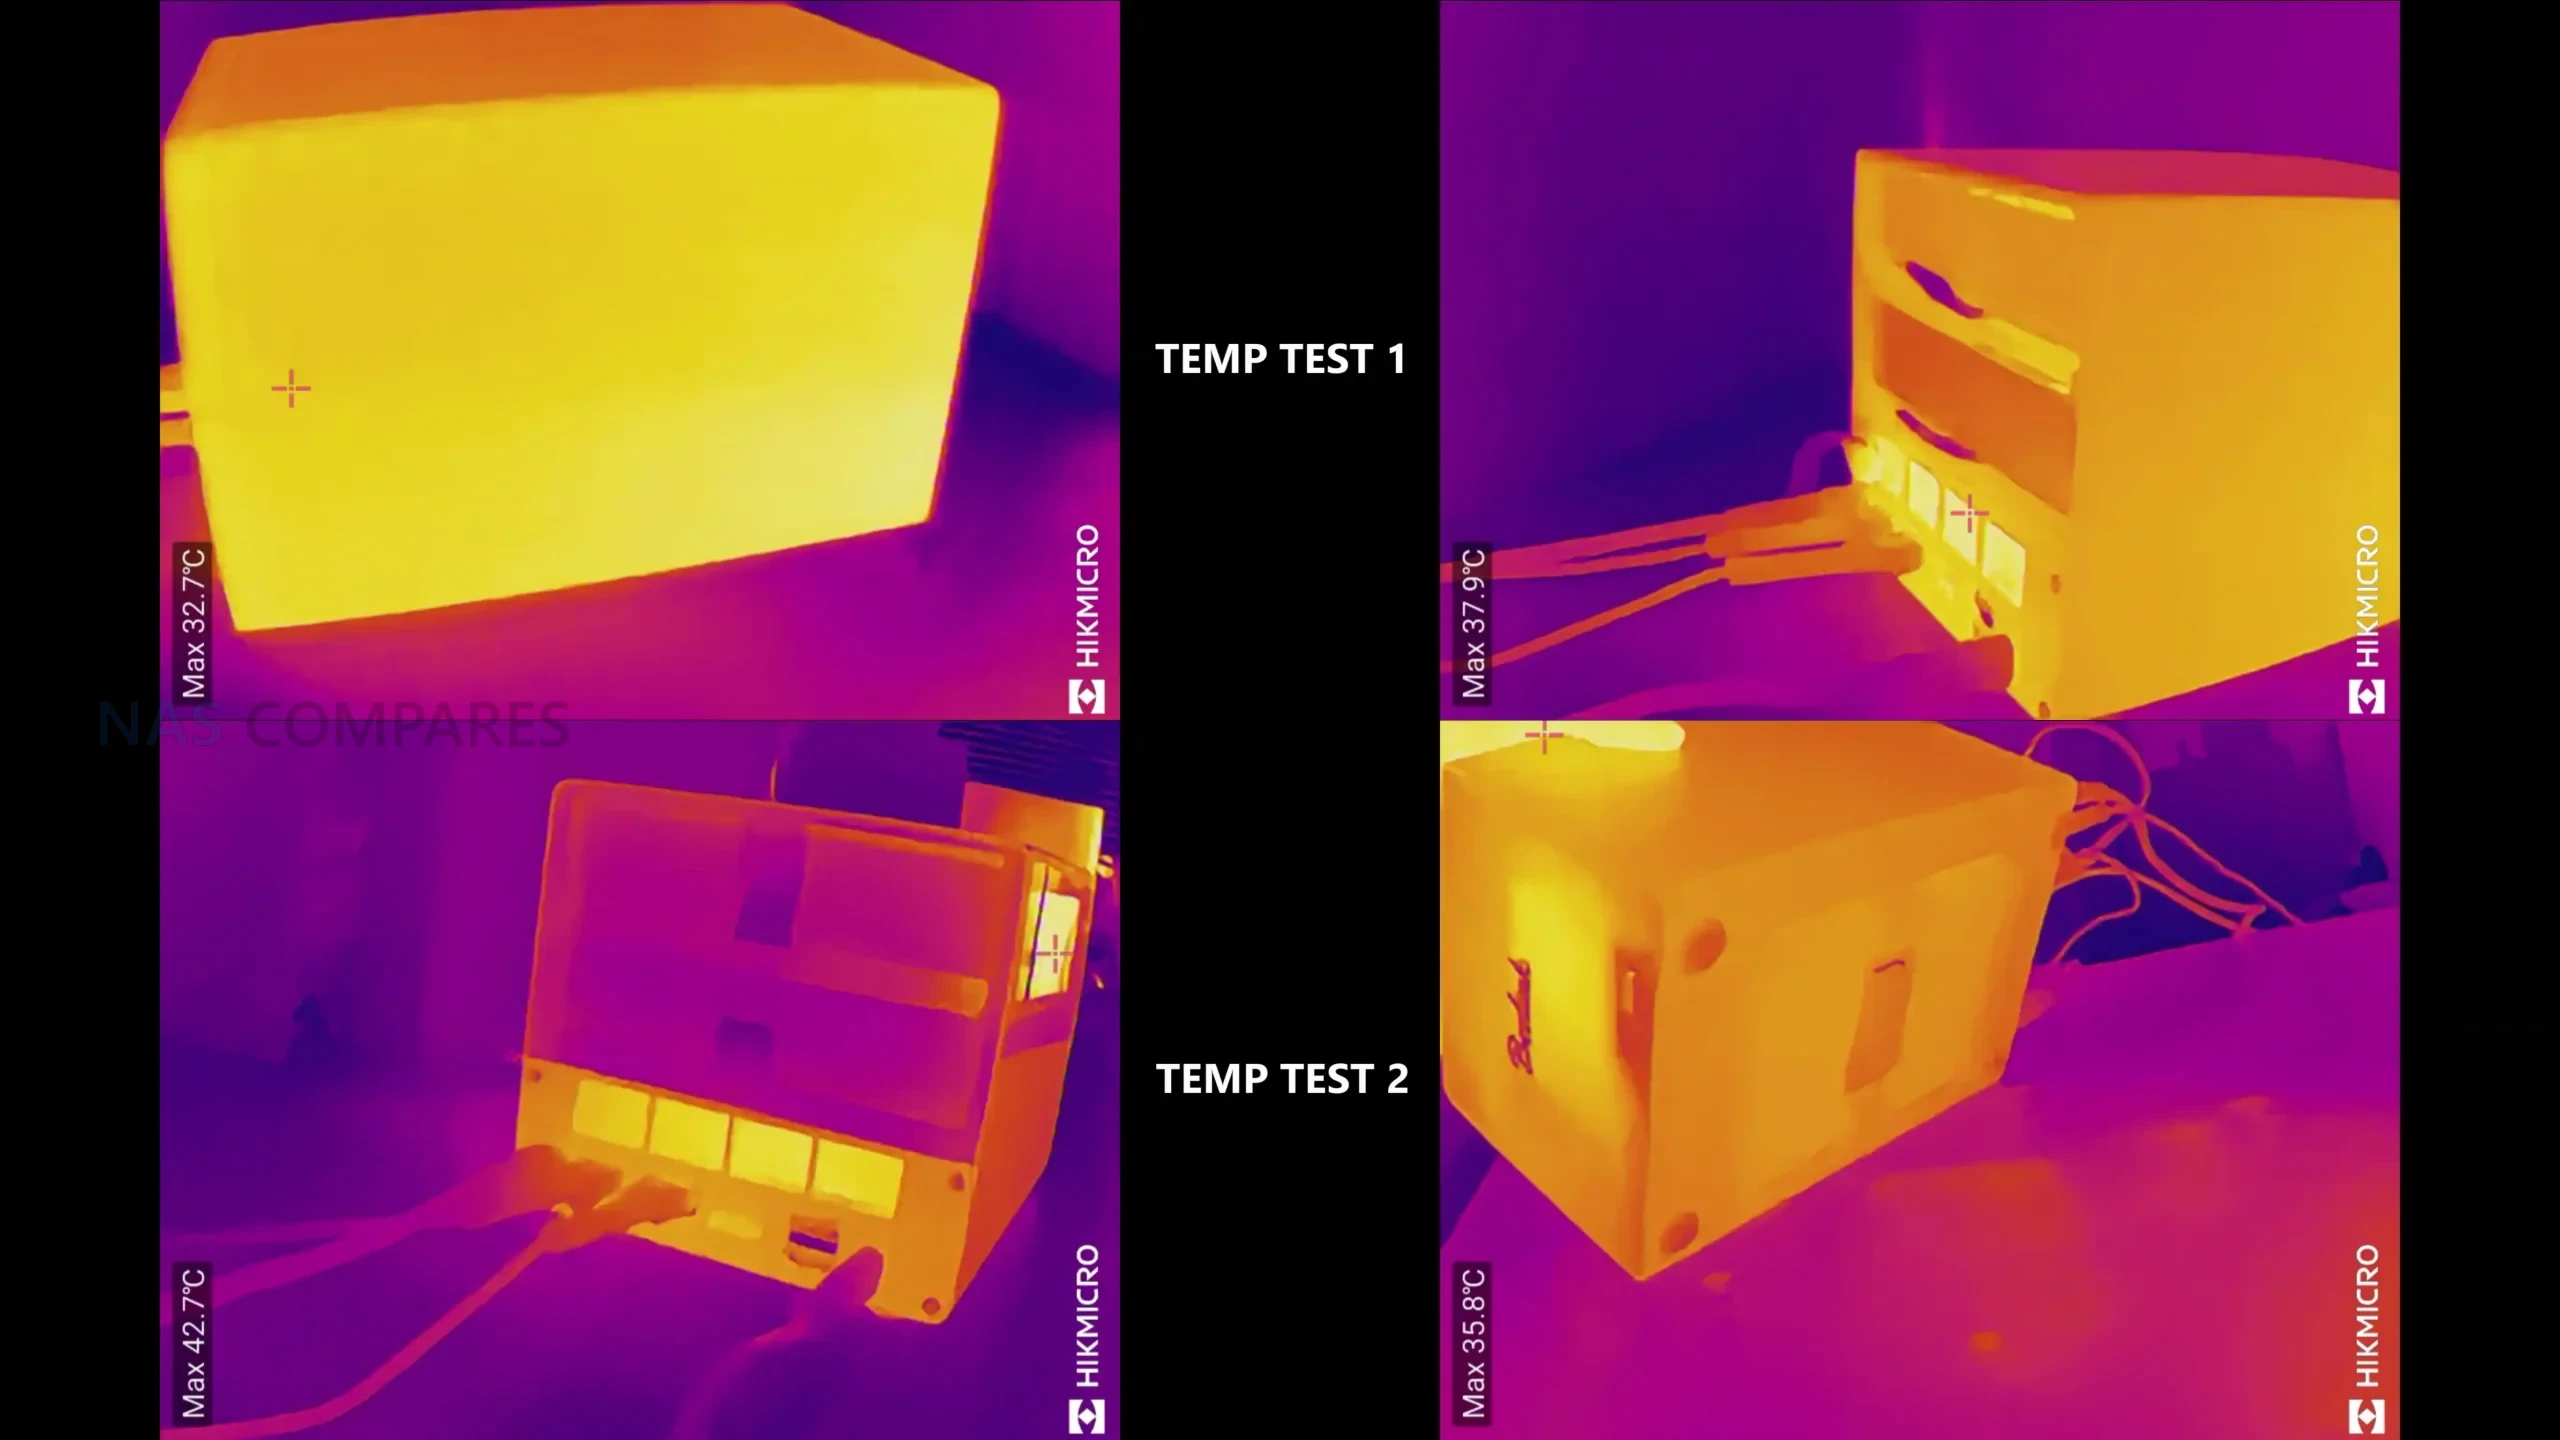
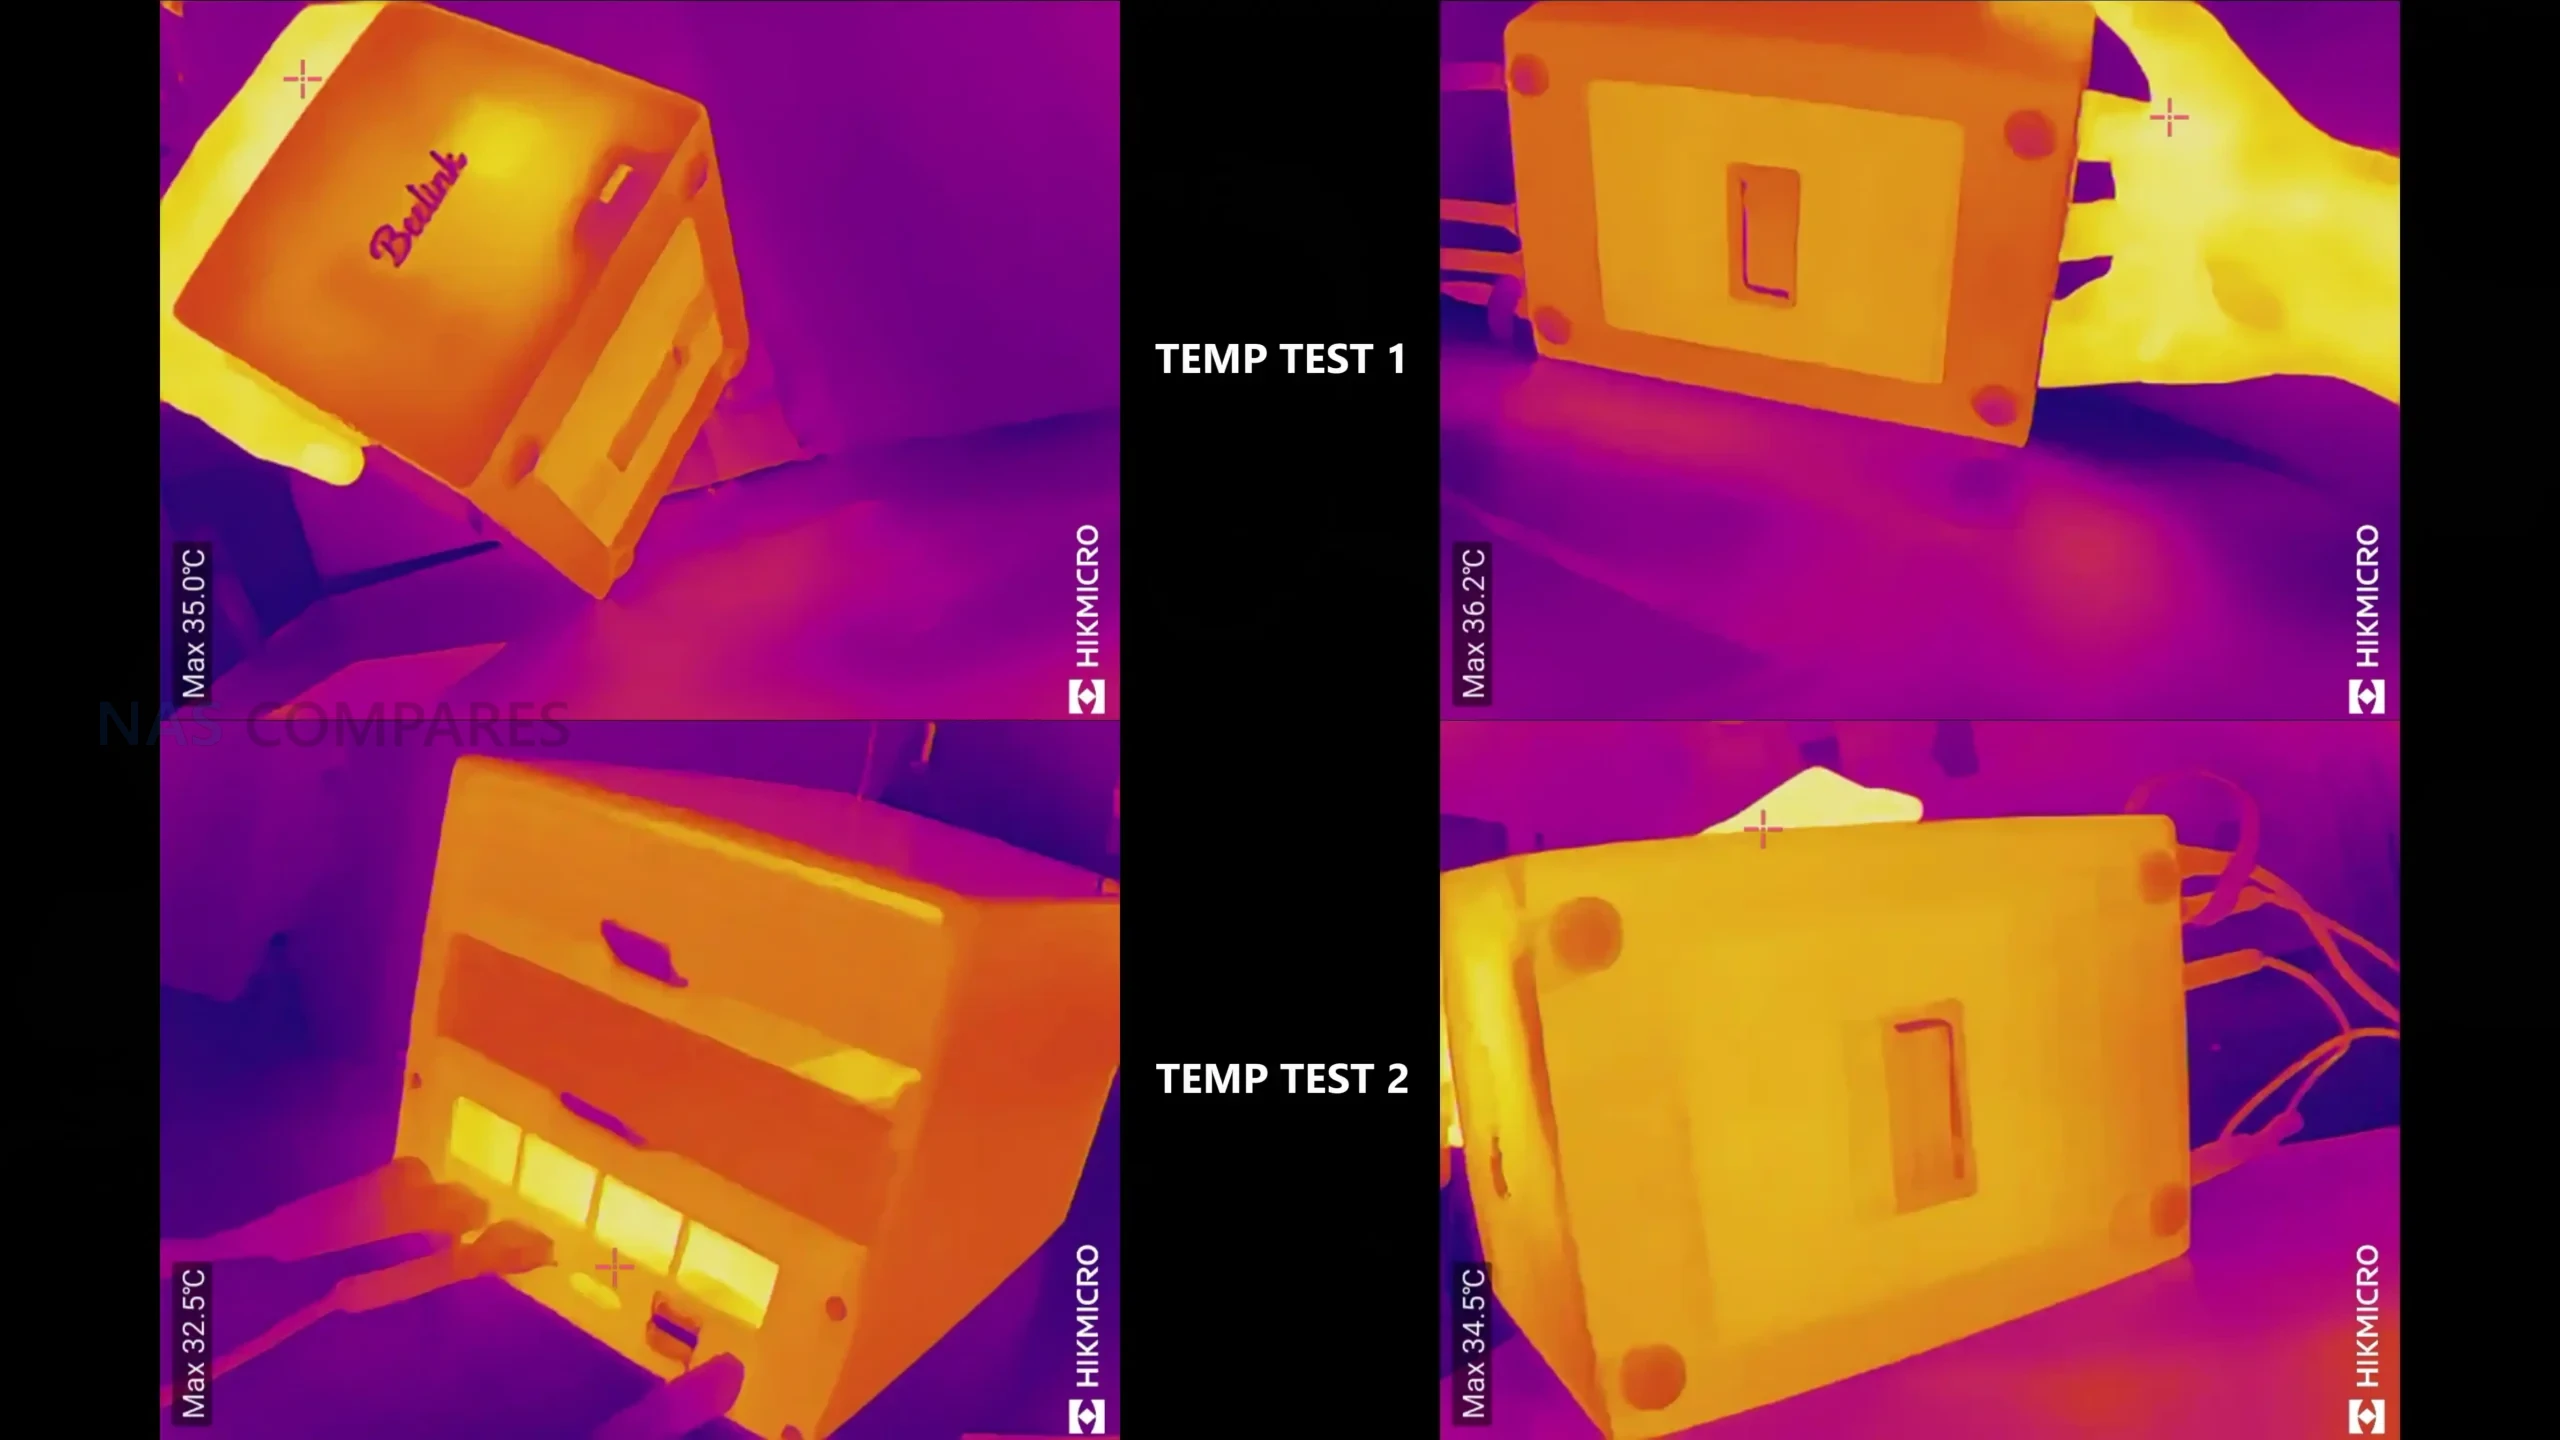
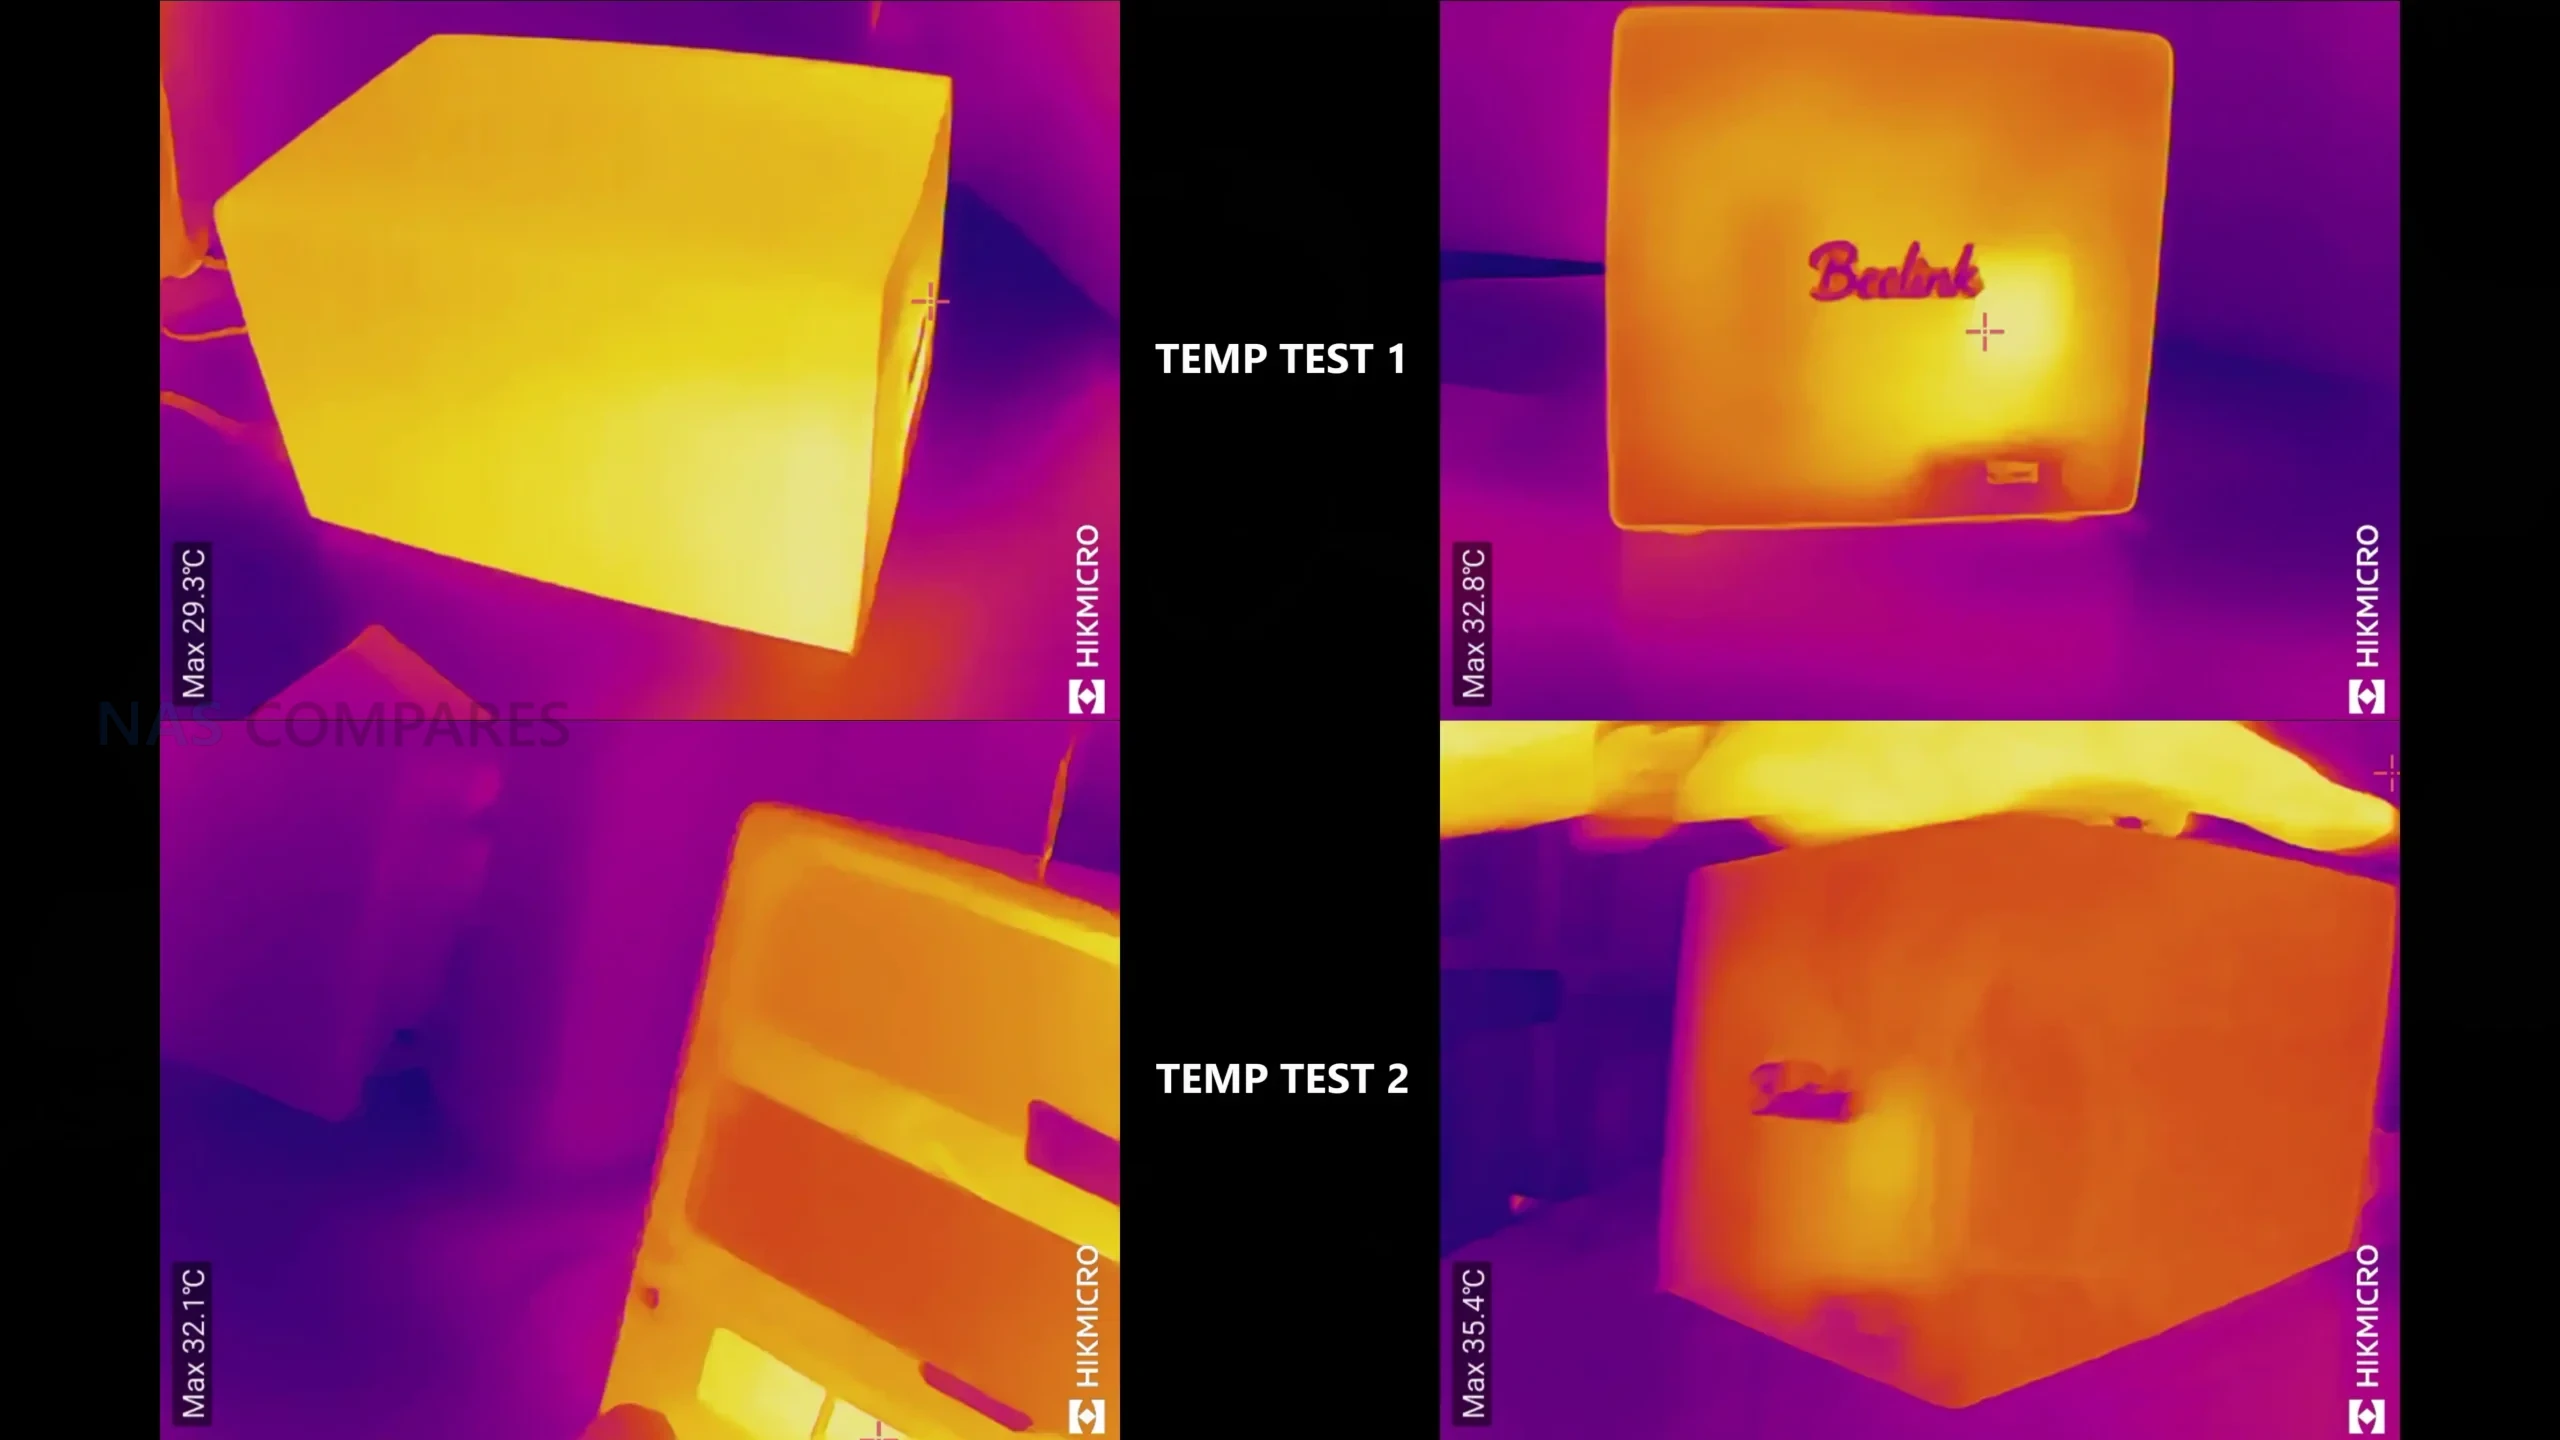
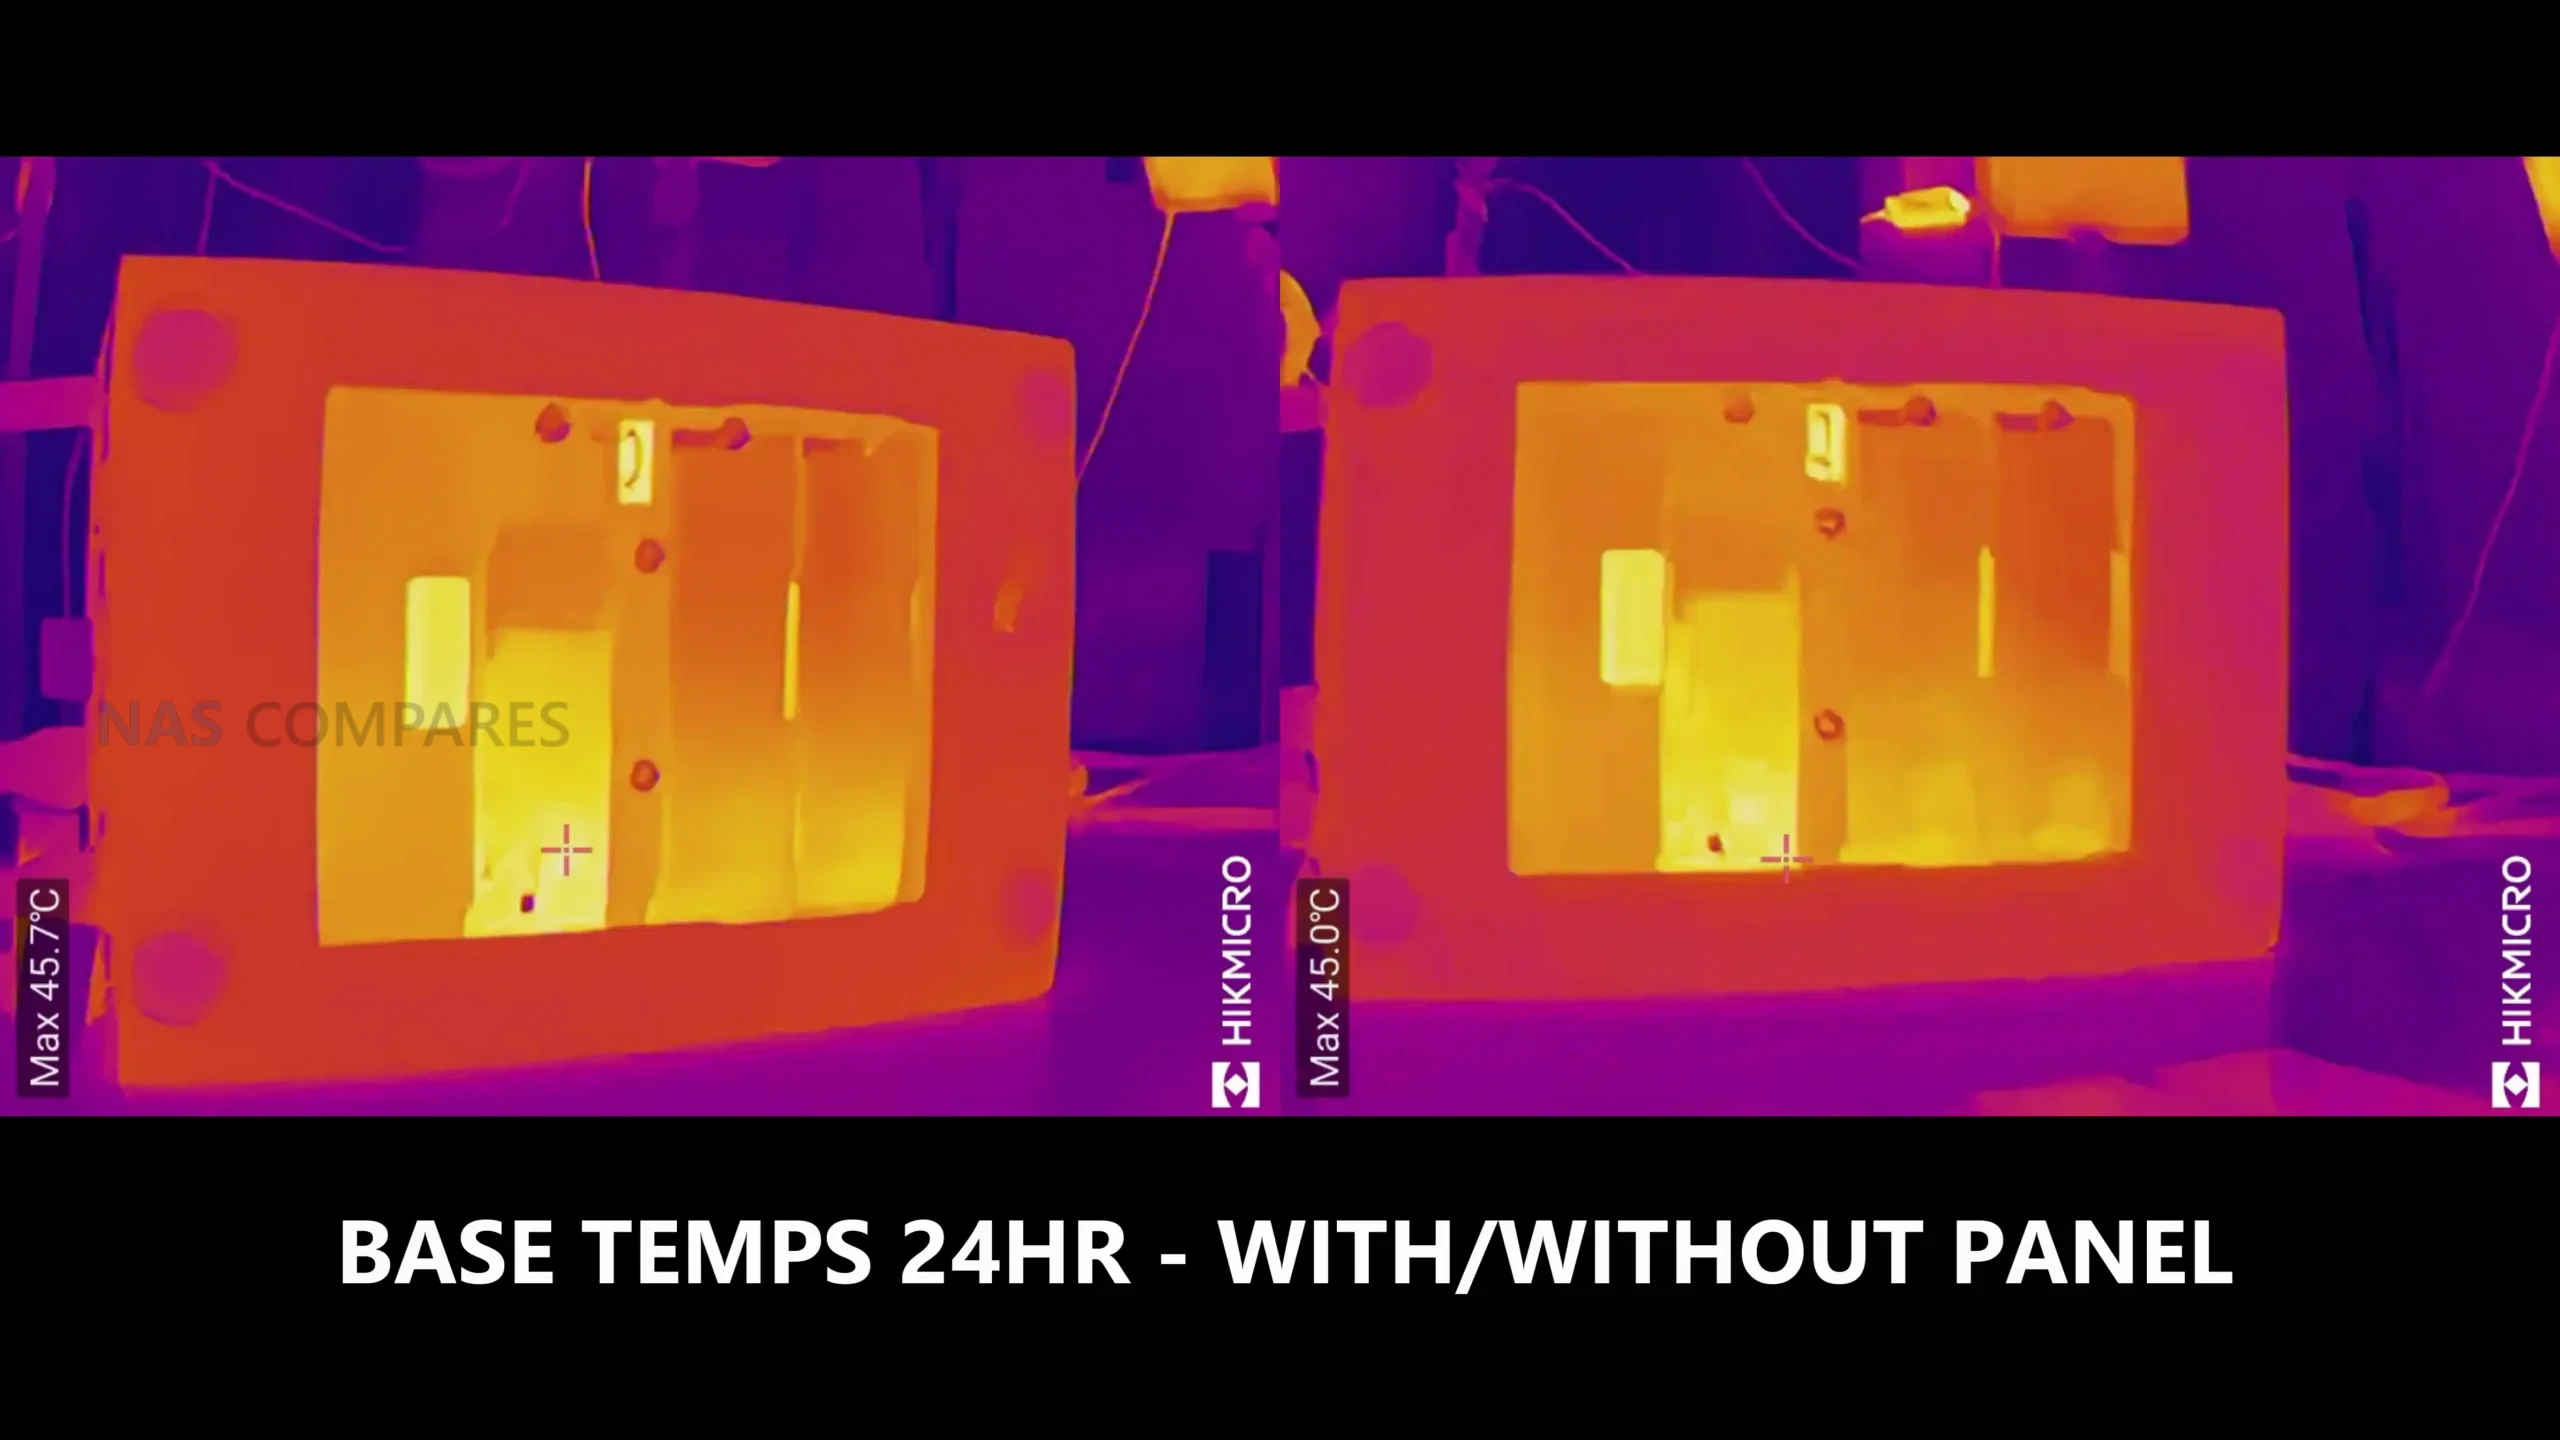
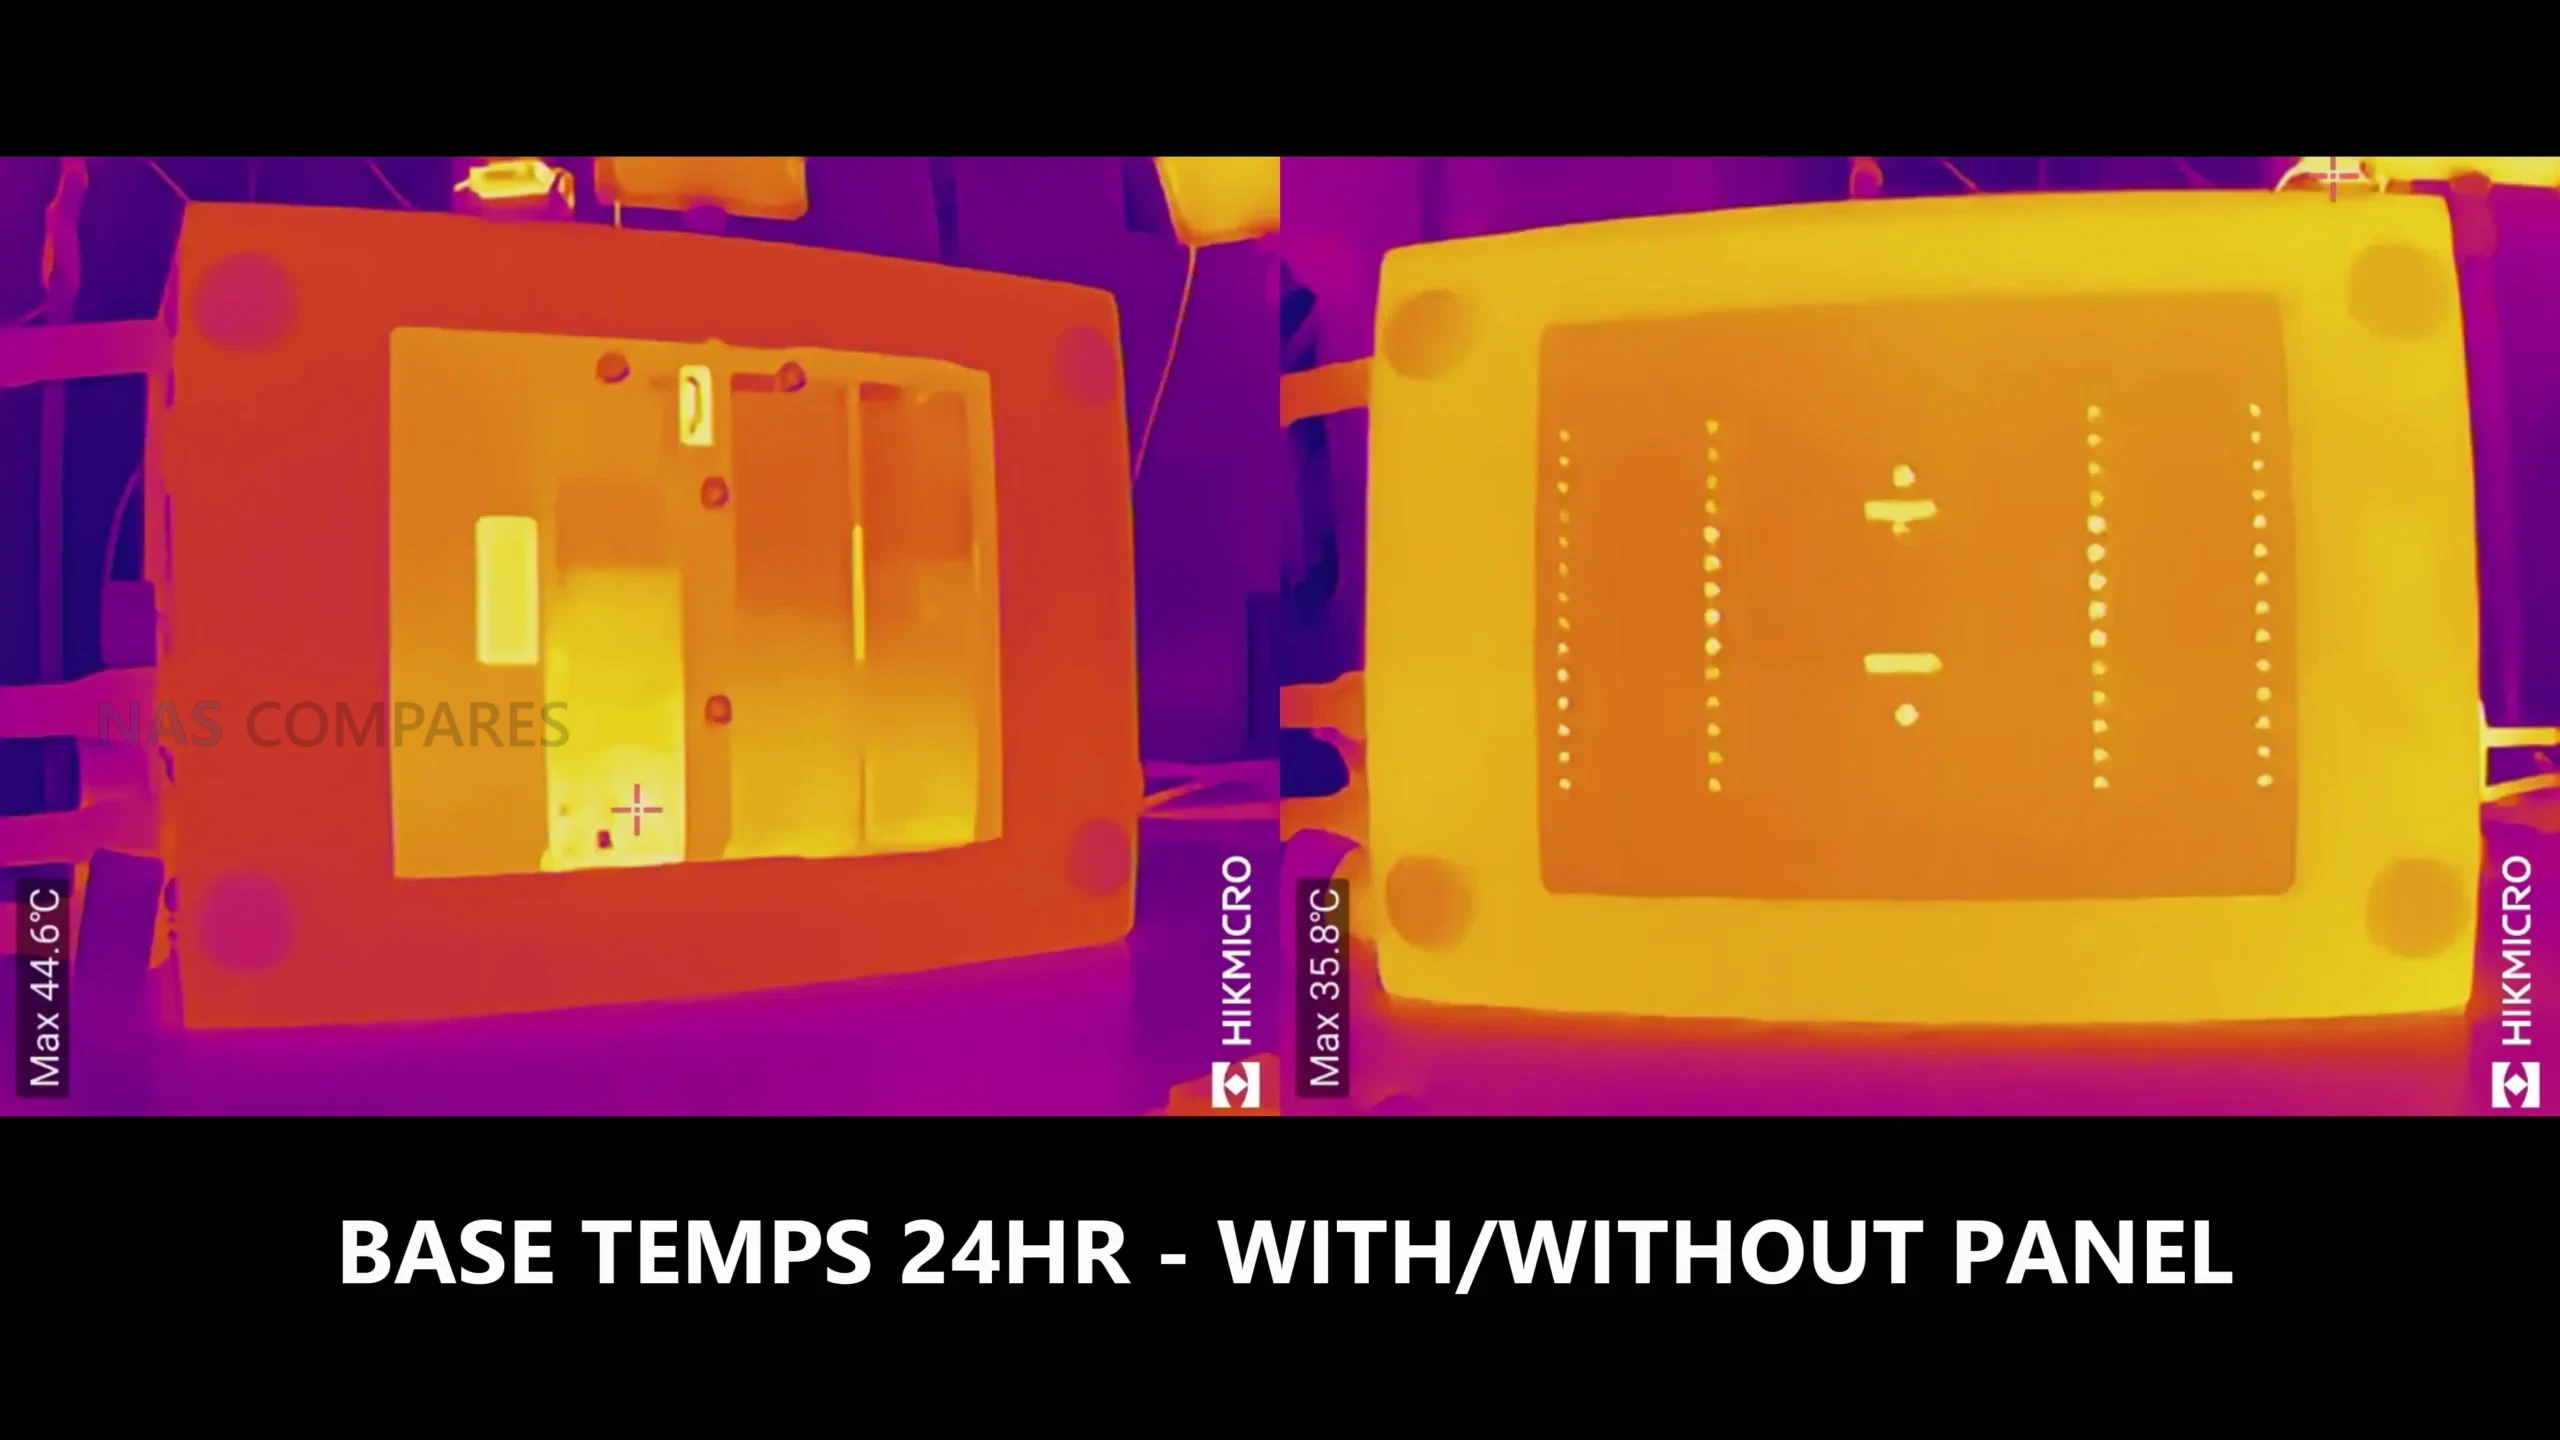
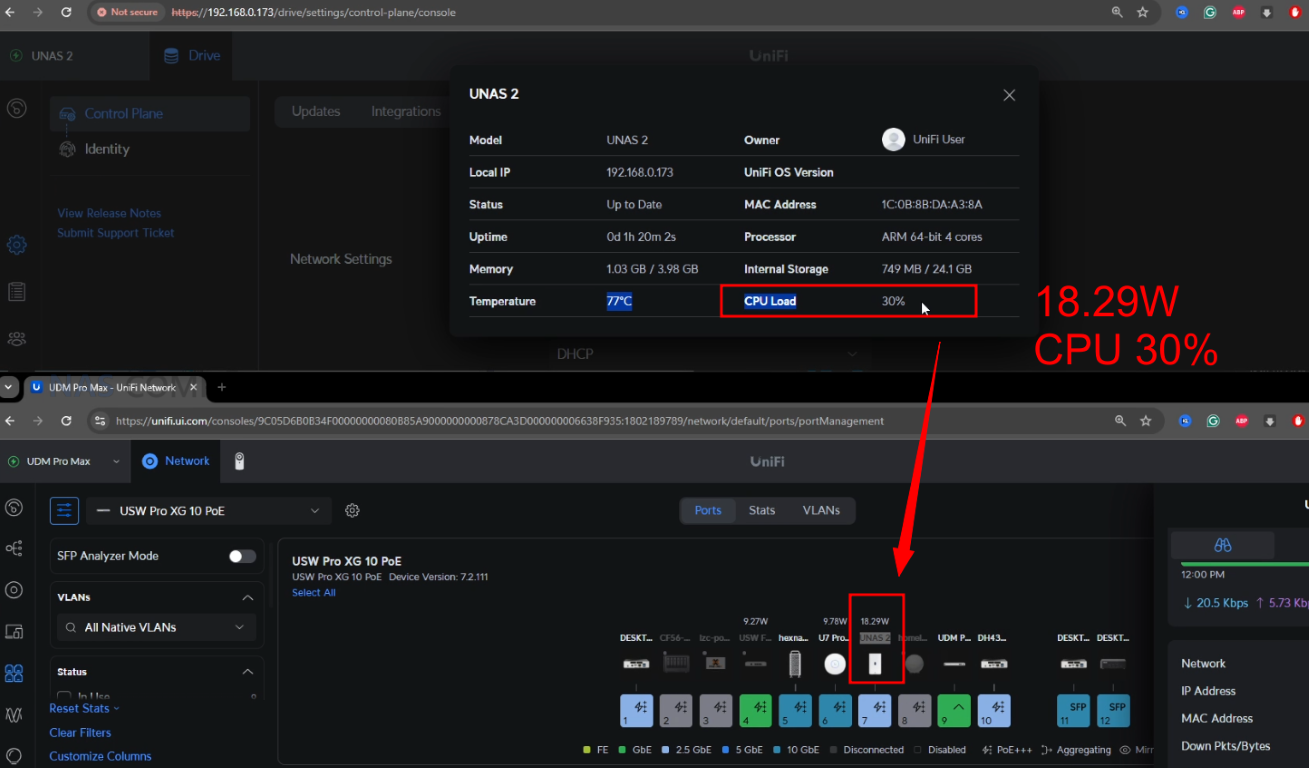
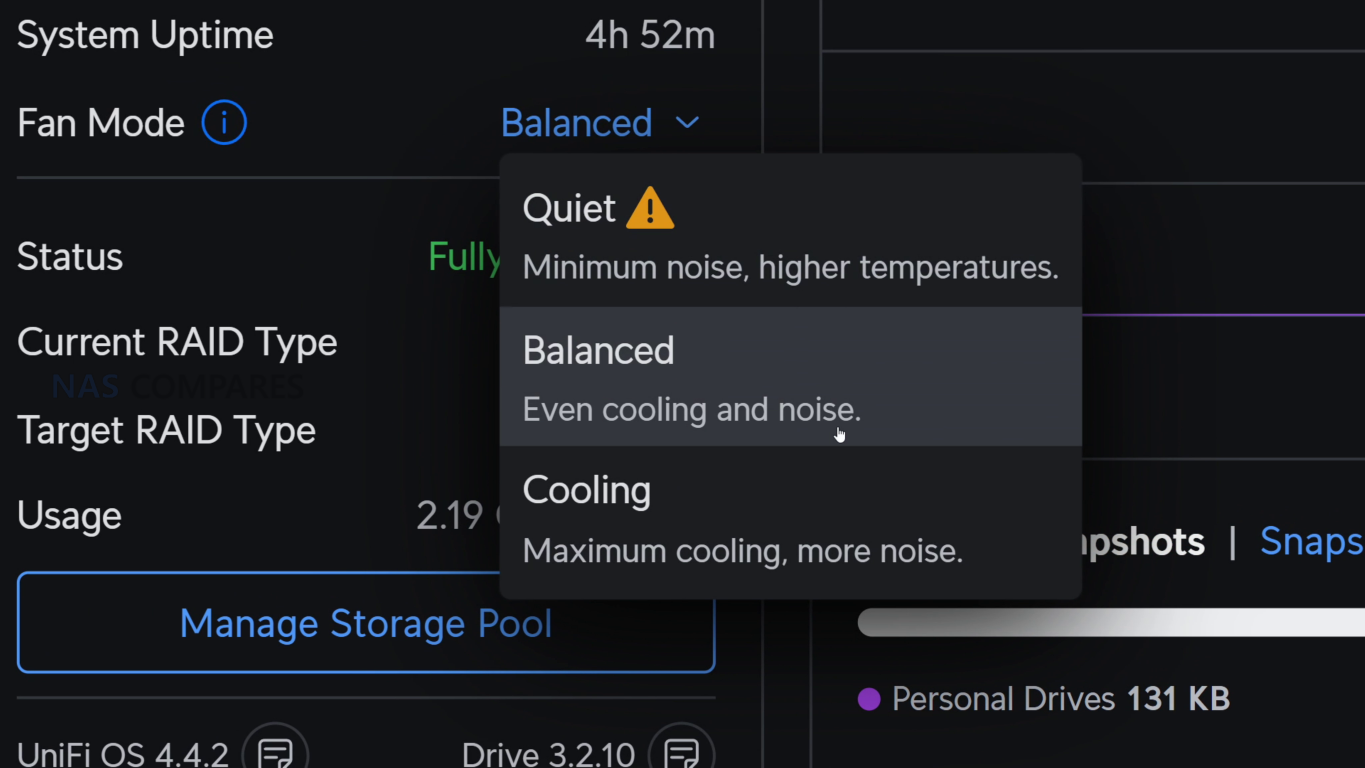
Noise, power draw, and thermal behavior were also measured because they affect rack placement and operating cost. With the fan profile set to auto and drives idle, noise sat around 42 to 44 dBA, dropping to roughly 38 to 40 dBA in the lowest RPM mode. Manually forcing maximum cooling pushed noise to around 56 to 57 dBA, and that level remained dominant even when drive activity increased, suggesting the cooling system prioritizes aggressive airflow when pushed. Power consumption with 4 enterprise HDDs measured roughly 49 to 50 W at idle and 60 to 62 W under activity, while swapping to 4 SATA SSDs reduced that to around 32 W during synchronization, underlining how drive choice can change the overall profile as much as the base platform.

UniFi UNAS Pro 4 Review – Software and Services

The UNAS Pro 4 runs UniFi Drive and is managed through the same style of web interface used across the broader UniFi portfolio, with system status, storage, backups, and user access presented in a single dashboard. For basic NAS use, the core functions are in place: creating storage pools, managing shares, enabling file services, and monitoring drive health. The interface is generally structured around doing common tasks quickly rather than exposing every possible tuning option, which keeps setup approachable but also limits deeper control in areas that some experienced NAS users look for.

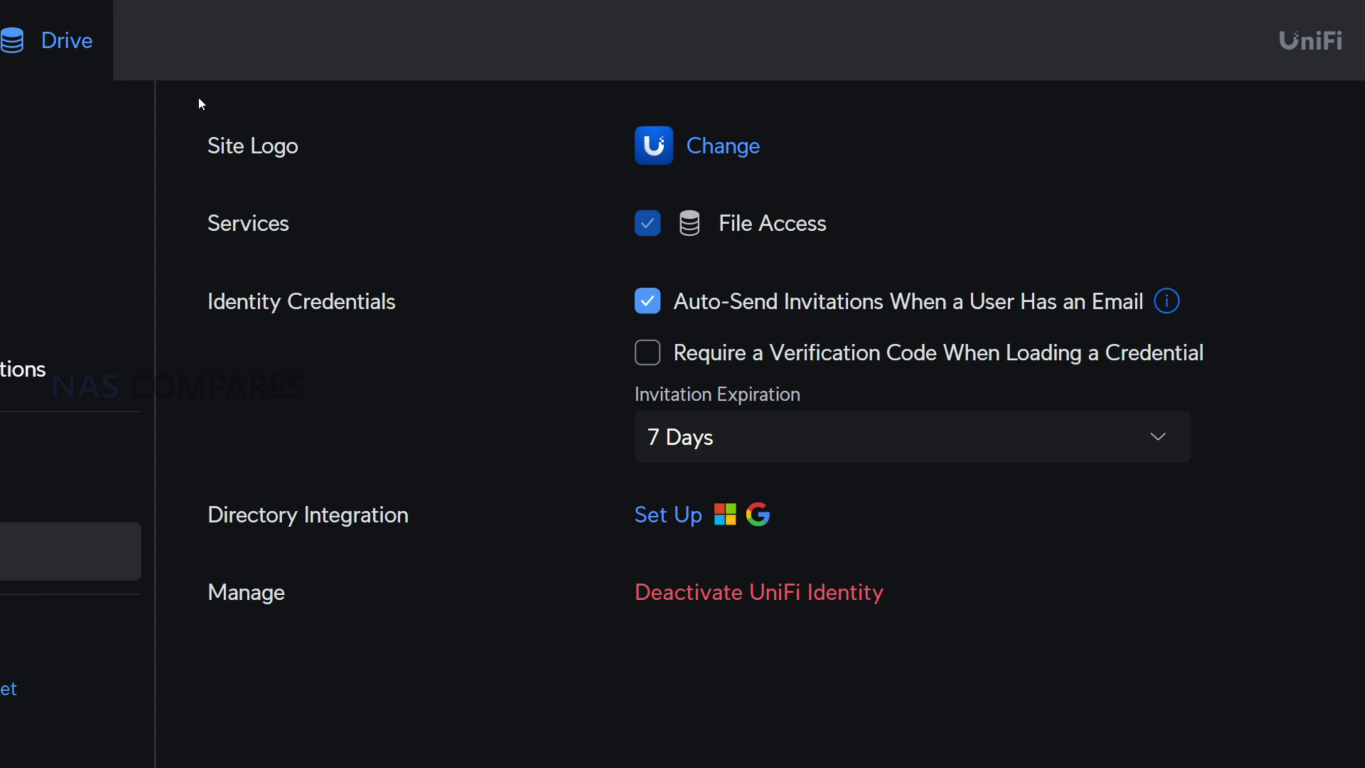
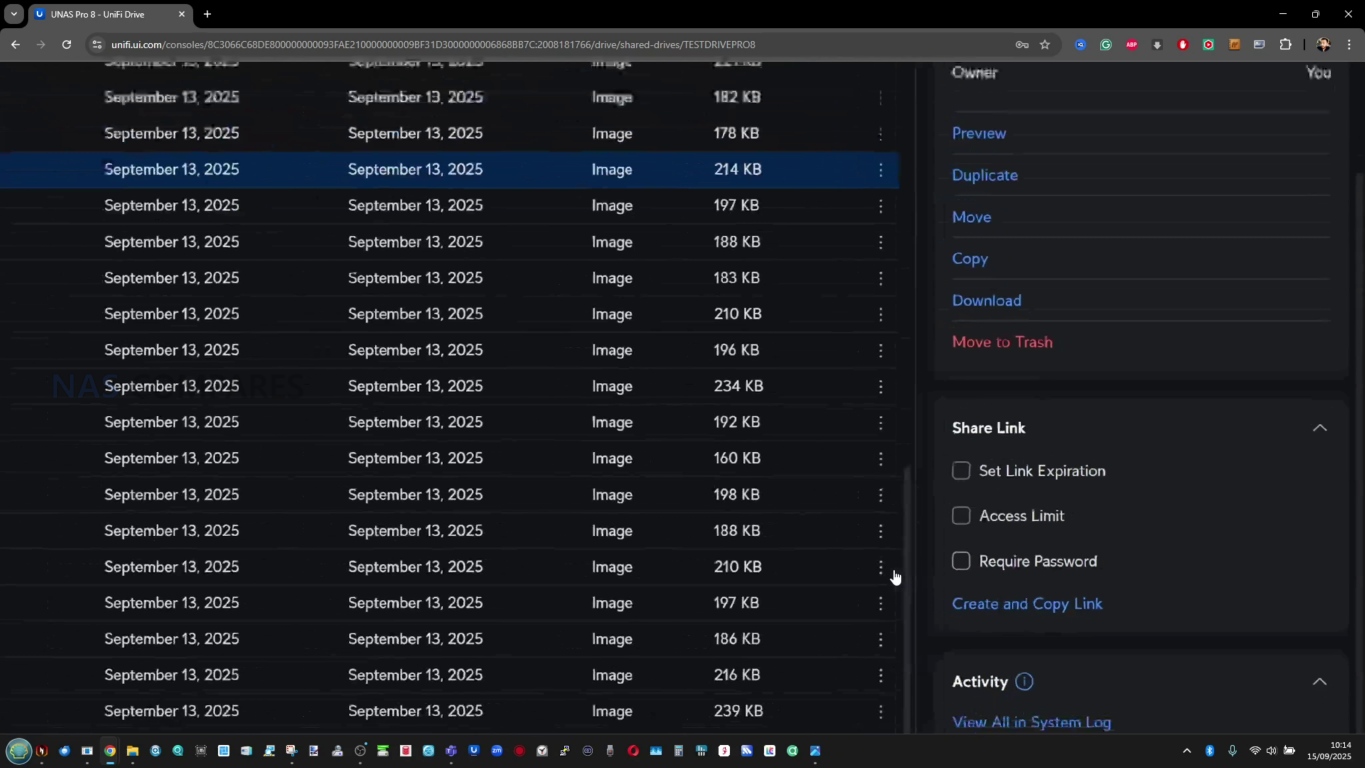
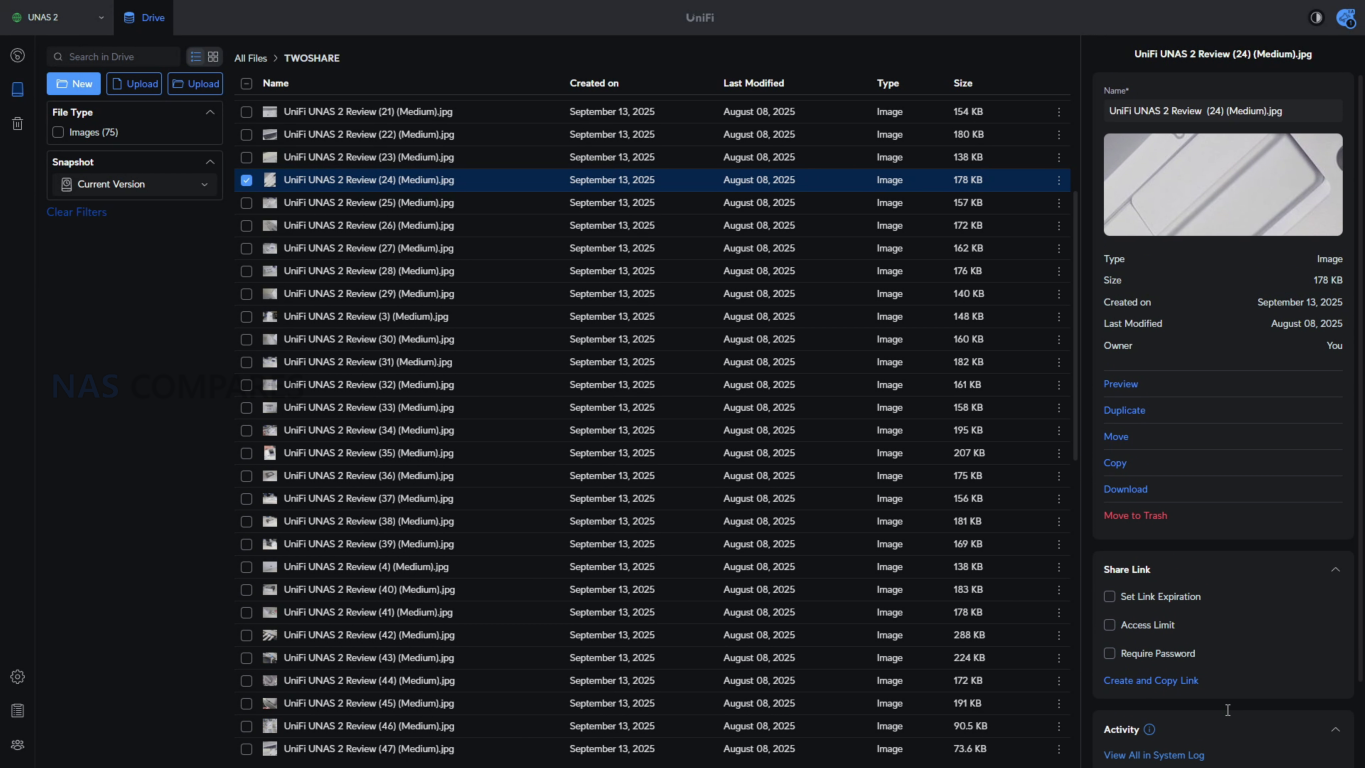
File access is centered on SMB and NFS, with browser-based file management available for basic upload, download, and folder navigation. The browser file manager covers the essentials and includes sharing link creation, but it is not positioned as a full productivity layer with advanced file handling or rich collaboration features. Remote access and identity-based access tools are tied into UniFi’s account and identity layer, and while local-only deployment is possible, the most integrated remote workflow is clearly designed around UniFi’s own services rather than third party remote networking tools.

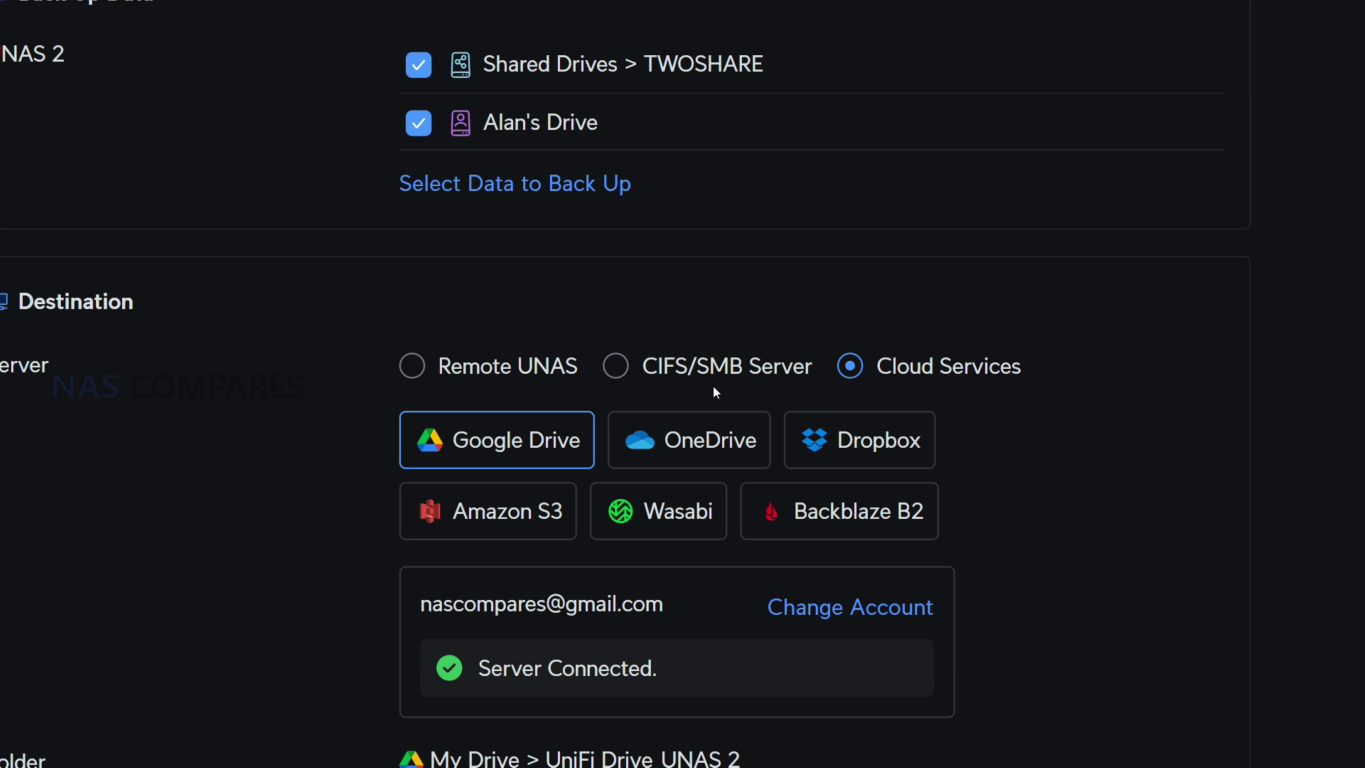
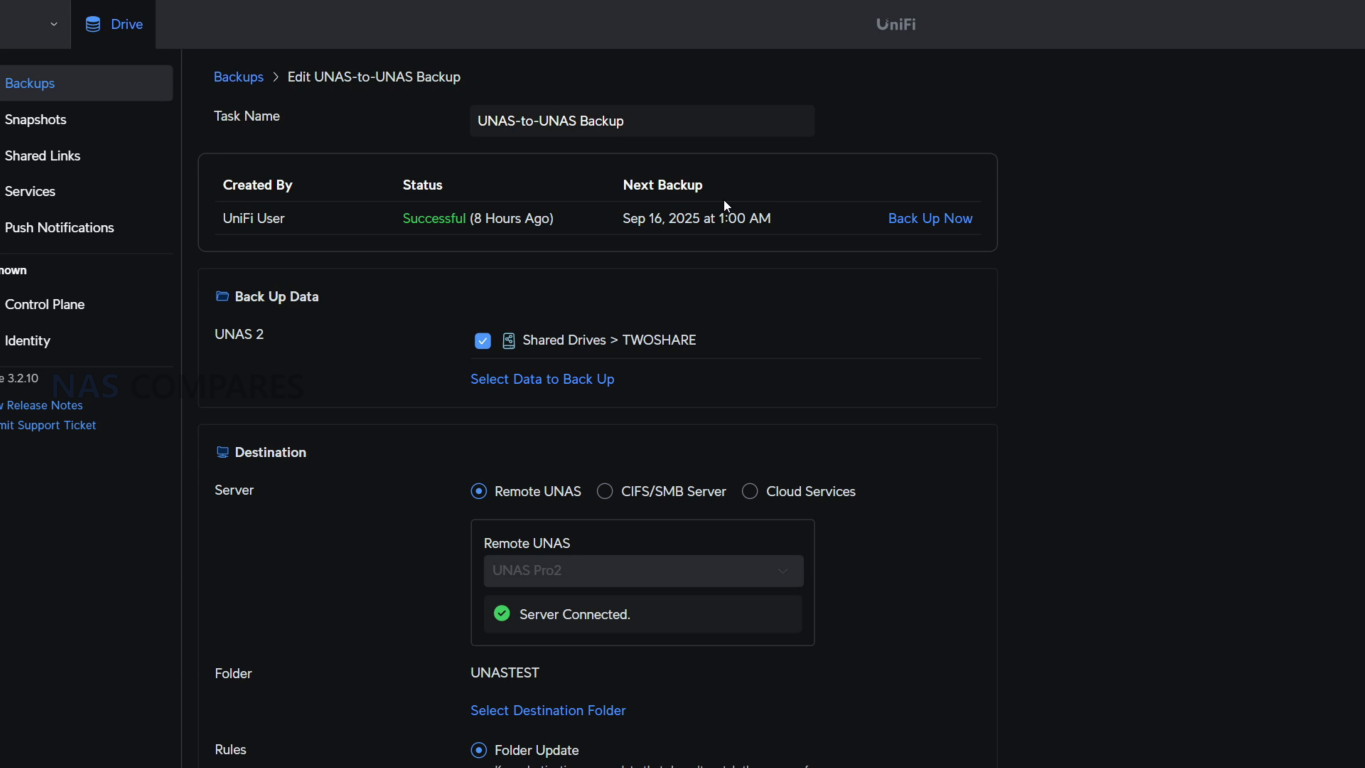
Storage protection features include snapshot support, encrypted volumes, and configurable retention policies, which addresses most common rollback and recovery needs for file storage. Backup tooling covers several targets, including backing up to another UniFi NAS, to SMB targets, and to cloud services such as Google Drive, OneDrive, Dropbox, Amazon S3, Backblaze B2, and Wasabi, with Microsoft 365 backup support also part of the broader UniFi Drive direction. These features reflect the brand’s recent focus on strengthening data protection rather than expanding into application hosting or media server style functionality.

The gaps are consistent with the product’s current scope. There is no iSCSI target support, which limits certain virtualization and block-storage workflows, and there is no container or VM layer for running third party services directly on the NAS. NVMe usage remains limited to caching rather than becoming its own storage pool, which narrows the performance paths available if the goal is to build a small all-flash volume.

Client-side tooling is also still limited compared with platforms that provide a dedicated sync-and-pin application, with access leaning on standard network shares and UniFi’s identity-driven access methods rather than a full drive-style client experience.

UniFi UNAS Pro 4 Review – Conclusion & Verdict

The UNAS Pro 4 is a focused 1U, 4 bay NAS that prioritizes networked file storage and straightforward deployment over broader application support. The hardware choices align with that goal: dual 10Gb SFP+ connectivity, 4 hot swap bays, and optional NVMe caching provide a platform that can deliver strong file transfer rates for a small array, while the ARM-based design keeps the system positioned as an appliance rather than a general-purpose server. Its main compromises are largely structural rather than hidden: fixed bay count with no expansion path, NVMe limited to cache, no USB I/O for local tasks, and a single internal PSU rather than a hot swap redundant design.

At $499, the value case is driven by how much rack-oriented networking is included at a price that undercuts many comparable 1U NAS systems, especially those offering 10Gb as standard. The software is usable for core storage tasks and has clearly improved over the last year in areas like snapshots and backup targets, but it still leaves out features that matter to some buyers, including iSCSI and a fuller client sync experience. For users who want a compact rack NAS primarily for SMB or NFS file storage with modern backup and snapshot features, it fits its role well; for users expecting a broader NAS app ecosystem or more hardware serviceability, the limitations are likely to be decisive. But, as Delboy once said, at this price, “what do you want? Jam on it?”. This system is giving more at this price than anyone else right now and for its limitations, for many these will be paletable in the grand scheme of things. 1U 4Bay rackmounts has always been something that most turnkey NAS brands treat poorly, due to the low saturation point of four SATA drives and why waste more capable hardware on that? In that sense, Ubiquiti is really piling on the hardware here at this price – and I for one applaud this.

Here are all the current UniFi NAS Solutions & Prices:
  • UniFi UNAS Pro 4 (4 Bay + 2x M.2, $499) – HERE
  • UniFi UNAS 2 (2 Bay, $199) – HERE
  • UniFi UNAS 4  (4 Bay + 2x M2, $379) – HERE
  • UniFi UNAS Pro (7 Bay, $499) – HERE
  • UniFi UNAS Pro 8 (8-Bay + 2x M.2, $799) HERE

You can buy the UniFi UNAS Pro 4 NAS via the link below – doing so will result in a small commission coming to me and Eddie at NASCompares, and allows us to keep doing what we do! 

PROs of the UniFi UNAS Pro 4 NAS PROs of the UniFi UNAS Pro 4 NAS
  • Dual 10Gb SFP+ networking is unusual in a 1U 4 bay NAS at this price point + failover will not result in bandwidth throttle

  • A separate 1GbE port is useful for management or fallback connectivity

  • 1U chassis with relatively short depth is easier to fit in smaller racks and cabinets

  • Rails and rack hardware included, reducing extra setup cost and friction

  • Ubiquiti and UniFi online/brand services are optional (i.e pure offline/LAN is possible)+ no need for a Ubiquiti/UniFi network setup to use

  • NVMe read and write caching support can improve responsiveness in mixed workloads

  • UniFi Drive provides snapshots, encryption, and a broad set of backup targets (NAS, SMB, and multiple cloud providers)

  • Setup and management are streamlined, especially for users already running UniFi infrastructure

  • Drive 4.0 Update scales up the Business Utilities notably
  • NVMe is cache only, with no option to use M.2 drives as primary storage pools

  • NVMe trays or carriers are not included, adding extra cost and an extra purchase step

  • Single PSU (no redundency) and non-slide removable SFX/ATX PSU (relies on propriatary UniFi Battery Backup rack module or external UPS)

  • No NAS Expansion Support, so 4 HDDs are your limit


📧 SUBSCRIBE TO OUR NEWSLETTER 🔔
[contact-form-7]
🔒 Join Inner Circle

Get an alert every time something gets added to this specific article!


Want to follow specific category? 📧 Subscribe

This description contains links to Amazon. These links will take you to some of the products mentioned in today's content. As an Amazon Associate, I earn from qualifying purchases. Visit the NASCompares Deal Finder to find the best place to buy this device in your region, based on Service, Support and Reputation - Just Search for your NAS Drive in the Box Below

Need Advice on Data Storage from an Expert?

Finally, for free advice about your setup, just leave a message in the comments below here at NASCompares.com and we will get back to you. Need Help? Where possible (and where appropriate) please provide as much information about your requirements, as then I can arrange the best answer and solution to your needs. Do not worry about your e-mail address being required, it will NOT be used in a mailing list and will NOT be used in any way other than to respond to your enquiry. [contact-form-7] TRY CHAT Terms and Conditions
If you like this service, please consider supporting us. We use affiliate links on the blog allowing NAScompares information and advice service to be free of charge to you.Anything you purchase on the day you click on our links will generate a small commission which isused to run the website. Here is a link for Amazon and B&H.You can also get me a ☕ Ko-fi or old school Paypal. Thanks!To find out more about how to support this advice service check HEREIf you need to fix or configure a NAS, check Fiver Have you thought about helping others with your knowledge? Find Instructions Here  
 
Or support us by using our affiliate links on Amazon UK and Amazon US
    
 
Alternatively, why not ask me on the ASK NASCompares forum, by clicking the button below. This is a community hub that serves as a place that I can answer your question, chew the fat, share new release information and even get corrections posted. I will always get around to answering ALL queries, but as a one-man operation, I cannot promise speed! So by sharing your query in the ASK NASCompares section below, you can get a better range of solutions and suggestions, alongside my own.

☕ WE LOVE COFFEE ☕


Jonsbo N6 DIY NAS Case Review

Jonsbo N6 DIY NAS Case Review

The Jonsbo N6 is the latest addition to the company’s long running lineup of DIY NAS focused enclosures, positioned between the compact N4 and the much larger N5. It is designed as a 9 bay desktop NAS chassis that supports both ITX and Micro ATX motherboards, while also introducing several changes compared with earlier Jonsbo designs. These include proper metal drive trays instead of rubber mounted sleds, expanded fan support, flexible PSU placement, and the inclusion of a physical fan controller. After spending the last 2 weeks building, configuring, and testing the N6 in a real world NAS environment, this review looks at how the case performs in practice, how its design decisions affect usability, and where it fits within the wider Jonsbo NAS case range.

Component Area Specification
Motherboard Support Mini ITX, Micro ATX
PCIe Expansion Slots 4 full height
PSU Support ATX up to 220mm, SFX up to 100mm
Dual PSU Support Yes
Max CPU Cooler Height 65mm to 160mm depending on PSU placement
Max GPU Length 275mm to 320mm depending on configuration
Drive Interface SATA via rear backplane
Drive Count 9 x 3.5 inch or 9 x 2.5 inch

Jonsbo N6 Review –  Quick Conclusion

The Jonsbo N6 positions itself as a compact but flexible DIY NAS enclosure that sits neatly between small form factor NAS cases and much larger tower style solutions. It combines a 9 bay storage layout with support for mATX and ITX motherboards, multiple PSU configurations, and extensive cooling options, aiming to address many of the limitations found in earlier Jonsbo NAS designs. In practical use, it delivers solid thermal behavior, manageable noise levels, and a relatively straightforward build process, while also introducing long requested changes such as proper drive trays and integrated fan control. That said, it is not without compromises, particularly around internal clearance when using larger components and the continued reliance on SATA connectors on the backplane. Overall, the N6 feels like a mature evolution of Jonsbo’s NAS lineup, offering meaningful improvements over smaller models like the N2, N3, and N4, while intentionally stopping short of replacing the larger and more expandable N5.

Check Amazon in Your Region for the Jonsbo N6 Case

Check AliExpress or the Jonsbo N6 Case

BUILD QUALITY - 10/10
HARDWARE - 9/10
PERFORMANCE - 9/10
PRICE - 7/10
VALUE - 8/10


8.6
PROS
👍🏻Supports up to 9 x 3.5 inch or 2.5 inch drives, allowing dense storage in a relatively compact footprint
👍🏻Compatible with ITX and Micro ATX motherboards, offering more flexibility than earlier Jonsbo NAS cases
👍🏻Flexible PSU placement with support for ATX and SFX units, including multiple mounting positions
👍🏻Integrated drive backplane simplifies installation and reduces individual cable clutter
👍🏻Built in 3 speed fan controller provides basic manual airflow control without software dependency
👍🏻Extensive ventilation on all sides, top, and base helps maintain reasonable thermals under load
👍🏻Drive trays replace older rubber grommet mounting, making drive installation more straightforward
👍🏻Build quality feels solid overall, with steel construction and improved internal layout for cable routing
CONS
👎🏻Backplane uses individual SATA connectors rather than Mini SAS, limiting appeal for SAS focused builds
👎🏻Clearance becomes tight with Micro ATX boards and larger ATX PSUs, especially around CPU cooling
👎🏻Drive trays lack tool less latches, locks, or orientation indicators, increasing the chance of installation mistakes


Where to Buy a Product
amzamexmaestrovisamaster 24Hfree delreturn VISIT RETAILER ➤ 
amzamexmaestrovisamaster 24Hfree delreturn VISIT RETAILER ➤

Jonsbo N6 Review – Design & Storage

The Jonsbo N6 continues the brand’s established NAS focused design language, combining a compact tower format with a restrained, industrial appearance. The chassis uses a steel construction with aluminum accents and a wooden front trim, which has become a recognizable feature across several recent Jonsbo NAS cases. While the wood insert will not appeal to everyone, it is purely cosmetic and does not interfere with airflow or structural rigidity. Overall dimensions place the N6 clearly below the larger N5, though it is still substantial compared to many ITX cases due to its storage capacity.

Storage is the defining feature of the N6, with support for up to 9 drives in either 3.5 inch HDD or 2.5 inch SSD formats. All drives are housed in a dedicated lower compartment, separated from the motherboard area. This layout helps with cable management and keeps storage thermals isolated from CPU and expansion hardware. The capacity places the N6 in a relatively uncommon position, offering more drive bays than most compact NAS cases without stepping into full tower territory.

Unlike earlier Jonsbo NAS models that relied on rubber grommets and pull tabs, the N6 uses metal drive trays as standard. Each tray supports both 3.5 inch and 2.5 inch drives and slots directly into a rear mounted backplane. The trays are functional rather than refined, lacking tool less locking mechanisms or individual activity LEDs. However, spacing between drives allows some passive airflow, which is important given the density of a fully populated array.

All 9 drive trays connect to a single backplane PCB located at the rear of the drive cage. The front side of the board uses individual SATA connectors for each bay, simplifying installation compared to loose cabling. On the output side, the board breaks out into standard SATA data connectors rather than Mini SAS, alongside SATA and Molex power inputs. This choice favors compatibility but limits native SAS support, which may matter to users running enterprise drives or SAS controllers.

From an installation standpoint, drive access is straightforward, but orientation is something to be careful with. The trays do not include visual indicators for correct alignment, making it possible to insert a drive incorrectly if rushed. While this is not unique to the N6, it does introduce some risk during initial setup or drive swaps. Overall, the storage design prioritizes density and compatibility over convenience features, aligning with the case’s focus on DIY NAS builders rather than hot swap environments.

Jonsbo N6 Review – Internal Structure

The internal layout of the Jonsbo N6 is designed around flexibility rather than absolute clearance, and that becomes clear once hardware installation begins. The case supports Mini ITX and Micro ATX motherboards, but does not officially support full ATX boards, despite physical dimensions that appear close.

In practice, fitting an ATX board is technically possible but leaves insufficient clearance for cabling, airflow, and component access, making it impractical for most builds. With ITX boards, internal space is generous and largely unobstructed, while Micro ATX installations require more planning due to tighter edge clearances near the drive backplane and PSU mounting areas.

PSU placement plays a major role in how the internal hardware layout behaves. The N6 supports both ATX and SFX power supplies and allows installation in multiple positions using included brackets. Mounting a full size ATX PSU above the motherboard significantly reduces available CPU cooler height, which can limit cooler selection to low profile or compact tower designs. SFX power supplies offer more flexibility and reduce conflicts around the CPU socket area, particularly when using Micro ATX boards.

The option for dual PSU installation adds another layer of configurability, but it further increases complexity around airflow paths and cable routing.

PCIe expansion is relatively strong for a case in this category, with support for up to 4 full height expansion slots. This allows for the use of HBAs, network cards, or even a discrete GPU, provided length and thickness limits are respected. Clearance becomes tight when multiple expansion cards are installed alongside side mounted fans, especially on the lowest slot. Cable routing is generally straightforward, with clear channels and anchor points, but routing SATA or Mini SAS fan out cables is easier if completed before final motherboard installation, particularly in Micro ATX configurations.

Jonsbo N6 Review – Connectivity

The Jonsbo N6 keeps external connectivity relatively straightforward, with all user facing ports located on the front panel for easy access. This placement makes sense for a NAS chassis that is likely to be positioned on a desk, shelf, or rack adjacent surface rather than frequently accessed from the rear. The front I O layout focuses on essential connectivity rather than attempting to replicate a full desktop case feature set.

In practical use, the inclusion of a USB 3.2 Gen2 Type C port provides a high bandwidth option for external storage, temporary backups, or maintenance tasks such as system recovery media. Alongside it, the USB 3.0 Type A port offers compatibility with a wide range of existing peripherals. This combination should be sufficient for most NAS focused workflows, where frequent hot swapping of peripherals is uncommon but occasional high speed access is still required.

Internally, connectivity is more complex and is closely tied to the integrated drive backplane. All 9 drive bays connect through the rear mounted PCB, which uses individual SATA data connectors rather than Mini SAS or SAS HD outputs. Power delivery is handled through a mix of SATA power and Molex connectors, which provides flexibility but may increase cable management complexity depending on the power supply used.

While functional, this approach places more responsibility on the user to plan cabling carefully, especially in fully populated configurations.

Feature Specification
Front USB Type C USB 3.2 Gen2
Front USB Type A USB 3.0
Audio I O Combined headphone and microphone
Drive Data Interface Individual SATA per bay
Drive Power Inputs 2 x SATA power, 2 x Molex
Backplane SAS Support No
Front Panel Cabling Pre routed internal cables

Jonsbo N6 Review – N5 vs N6

The Jonsbo N6 and the N5 address similar DIY NAS use cases but sit at different points in the product lineup in terms of capacity and flexibility. The N6 is designed around a nine-bay drive layout with support for ITX and micro-ATX motherboards and compatibility with either ATX or SFX power supplies, offering a balance between storage density and a relatively compact footprint, which makes it suitable for builds that need a significant number of drives without a full tower size. By contrast, the N5 supports up to twelve 3.5-inch drives and up to four 2.5-inch SSDs, and accepts larger motherboard formats including ITX, micro-ATX, ATX, and E-ATX, giving it broader component compatibility and expansion potential.

The N5 also provides more PCIe slots and larger GPU clearance, supporting use cases that may combine NAS storage with workstation-class expansions, and includes a mesh front and more extensive cooling provisions to manage heat in its larger enclosure. Both cases offer USB-C and USB-A front I/O for quick access, but the N5’s larger size and multi-material construction generally result in greater internal space for hardware and cooling options. In practice, the N6 aims to offer a middle ground with substantial drive capacity and flexible power supply choices, while the N5 pushes more towards maximum expandability and support for larger and more powerful builds within the Jonsbo NAS ecosystem

Jonsbo N6 Review – Build Testing

In day to day use, the Jonsbo N6 shows that its performance characteristics are shaped more by component choice than by any inherent limitation of the chassis itself. With a fully populated 9 bay configuration using 7200 RPM hard drives, the case does not introduce noticeable bottlenecks in sustained storage workloads. During extended uptime testing across multiple days, system stability remained consistent, with no unexpected thermal throttling or airflow related instability observed. This aligns with the case design philosophy, which prioritizes open ventilation paths and modular fan placement rather than aggressive acoustic dampening.

Storage performance testing was carried out using a RAID 0 array across 9 mechanical drives, paired with a workstation class MATX motherboard and a dedicated SATA controller. Sequential read and write speeds reached approximately 2.0 to 2.1 GB/s in CrystalDiskMark, indicating that the enclosure itself does not constrain throughput. These figures are primarily governed by controller bandwidth, PCIe lane allocation, and drive characteristics, rather than the internal backplane. Random access behavior remained typical for high capacity HDD arrays, with no anomalies linked to vibration or drive seating within the metal trays.

Noise testing was conducted under multiple operating conditions to evaluate how the N6 behaves in real environments rather than synthetic silence. At idle with fans set to the lowest manual setting and drives spun down, measured noise levels hovered around 37 to 39 dBA. Under active disk access with the same fan profile, noise increased modestly to around 41 to 44 dBA, with most audible output coming from the rear exhaust area. Increasing the fan controller to mid and high settings resulted in only marginal increases, topping out around 43 to 44 dBA, suggesting diminishing returns in airflow relative to acoustic output.

Thermal measurements were taken after the system had been operating continuously for roughly 2.5 days, followed by active load and cooldown observation. Drive temperatures during idle periods generally sat between 25°C and 28°C, with active access pushing internal drive area temperatures to around 42°C. Surface readings across the chassis showed consistent heat distribution, with the rear PCB area and PSU zone measuring close to 42°C, while the top and side panels remained closer to ambient at roughly 26°C to 27°C. These results indicate that while airflow around the drive backplane is not optimal, overall thermal behavior remains within acceptable limits for a 9 bay enclosure.

Test Area Result
Sequential Read Speed ~2.0 to 2.1 GB/s
Sequential Write Speed ~2.0 to 2.1 GB/s
Idle Noise Level 37 to 39 dBA
Load Noise Level 41 to 44 dBA
Idle Drive Temperature 25°C to 28°C
Load Drive Area Temperature ~42°C
PSU Area Temperature ~41.8°C to 42°C

Jonsbo N6 Review – Verdict and Conclusion

After extended hands on use, the Jonsbo N6 positions itself as a compact but ambitious DIY NAS enclosure that sits clearly between the smaller N4 and the larger, more expansive N5. It delivers a high storage density with 9 drive bays while introducing support for Micro ATX motherboards, which meaningfully expands hardware choice compared with earlier Jonsbo NAS cases. Build quality is consistent with the brand’s established approach, using thick steel panels, simple exterior styling, and a layout that prioritizes airflow potential and internal flexibility over visual flair. The inclusion of drive trays, a physical fan controller, multiple PSU mounting options, and extensive fan support marks a clear evolution over previous generations.

That said, the N6 is not without compromises. ATX motherboard support is effectively absent despite tight tolerances, cooling outcomes remain highly dependent on fan selection and placement, and the backplane design relies on standard SATA connections rather than SAS aggregation. Pricing at launch also places it in a competitive bracket where expectations are higher, particularly around refinement of drive trays and airflow optimization around the disk stack. For users who found the N5 too large or excessive but felt constrained by the N3 or N4, the N6 fills a specific and practical gap. It does not replace the N5 as a flagship option, but it stands as a capable and thoughtfully designed alternative for builders who value density, flexibility, and manageable footprint over absolute expansion.

Check Amazon in Your Region for the Jonsbo N6 Case

Check AliExpress or the Jonsbo N6 Case

Jonsbo N6 Case Review PROs Jonsbo N6 Case Review CONs
  • Supports up to 9 x 3.5 inch or 2.5 inch drives, allowing dense storage in a relatively compact footprint

  • Compatible with ITX and Micro ATX motherboards, offering more flexibility than earlier Jonsbo NAS cases

  • Flexible PSU placement with support for ATX and SFX units, including multiple mounting positions

  • Integrated drive backplane simplifies installation and reduces individual cable clutter

  • Built in 3 speed fan controller provides basic manual airflow control without software dependency

  • Extensive ventilation on all sides, top, and base helps maintain reasonable thermals under load

  • Drive trays replace older rubber grommet mounting, making drive installation more straightforward

  • Build quality feels solid overall, with steel construction and improved internal layout for cable routing

  • Backplane uses individual SATA connectors rather than Mini SAS, limiting appeal for SAS focused builds

  • Clearance becomes tight with Micro ATX boards and larger ATX PSUs, especially around CPU cooling

  • Drive trays lack tool less latches, locks, or orientation indicators, increasing the chance of installation mistakes


📧 SUBSCRIBE TO OUR NEWSLETTER 🔔
[contact-form-7]
🔒 Join Inner Circle

Get an alert every time something gets added to this specific article!


Want to follow specific category? 📧 Subscribe

This description contains links to Amazon. These links will take you to some of the products mentioned in today's content. As an Amazon Associate, I earn from qualifying purchases. Visit the NASCompares Deal Finder to find the best place to buy this device in your region, based on Service, Support and Reputation - Just Search for your NAS Drive in the Box Below

Need Advice on Data Storage from an Expert?

Finally, for free advice about your setup, just leave a message in the comments below here at NASCompares.com and we will get back to you. Need Help? Where possible (and where appropriate) please provide as much information about your requirements, as then I can arrange the best answer and solution to your needs. Do not worry about your e-mail address being required, it will NOT be used in a mailing list and will NOT be used in any way other than to respond to your enquiry. [contact-form-7] TRY CHAT Terms and Conditions
If you like this service, please consider supporting us. We use affiliate links on the blog allowing NAScompares information and advice service to be free of charge to you.Anything you purchase on the day you click on our links will generate a small commission which isused to run the website. Here is a link for Amazon and B&H.You can also get me a ☕ Ko-fi or old school Paypal. Thanks!To find out more about how to support this advice service check HEREIf you need to fix or configure a NAS, check Fiver Have you thought about helping others with your knowledge? Find Instructions Here  
 
Or support us by using our affiliate links on Amazon UK and Amazon US
    
 
Alternatively, why not ask me on the ASK NASCompares forum, by clicking the button below. This is a community hub that serves as a place that I can answer your question, chew the fat, share new release information and even get corrections posted. I will always get around to answering ALL queries, but as a one-man operation, I cannot promise speed! So by sharing your query in the ASK NASCompares section below, you can get a better range of solutions and suggestions, alongside my own.

☕ WE LOVE COFFEE ☕


Beelink ME Pro NAS Review – BIG Thing in a Small Package?

Beelink ME Pro NAS Review

The Beelink ME Pro is a 2-bay NAS-style mini PC that aims to deliver a full home or small office storage setup in a much smaller chassis than most traditional 2-bay systems. It is sold in 2 main versions, based on the Intel N95 or Intel N150, and both ship with pre-attached LPDDR5 memory and a bundled NVMe SSD as the system drive. Storage expansion is a mix of 2 SATA bays for 2.5-inch or 3.5-inch drives, plus 3 internal M.2 NVMe slots (1 running at PCIe 3.0 x2 and 2 running at PCIe 3.0 x1), and networking includes 5GbE plus 2.5GbE alongside WiFi 6 and Bluetooth 5.4. This review is based on several weeks of use and a set of structured tests covering temperatures over extended uptime, noise in idle and active states, power draw across different drive and workload combinations, and storage and network performance over both HDD and NVMe, with additional notes on the system’s internal layout and the practical limitations that come from its compact design.

Beelink ME Pro NAS Review – Quick Conclusion

The Beelink ME Pro is a very compact 2-bay NAS-style mini PC that combines 2 SATA bays with 3 M.2 NVMe slots and multi-gig connectivity, aiming to deliver a small footprint system without dropping features that are often reserved for larger enclosures. It is sold in N95 and N150 versions, both with pre-attached LPDDR5 memory (12GB or 16GB) and a bundled system SSD, and its internal layout uses 1 PCIe 3.0 x2 NVMe slot plus 2 PCIe 3.0 x1 slots, with 5GbE plus 2.5GbE Ethernet, WiFi 6, USB-C 10Gbps (with video output), HDMI 4K60, and a barrel-powered 120W PSU. In testing over extended uptime, external chassis temperatures stayed broadly in the mid-30C range with the rear around 38C, HDDs sat around 34C to 36C with modest 4TB drives installed, and NVMe temperatures rose sharply if the base thermal panel was removed, indicating the thermal pads and chassis contact are part of the cooling design and leaving no practical clearance for NVMe heatsinks. Noise in the tested setup remained in the mid-30 dBA range both at idle and under mixed access, power draw ranged from around 15W to 16W with no drives installed, 18W to 19W with only NVMe, about 22W to 23W with HDDs and NVMe idle, and peaked around 41W to 42W under a combined heavy workload. Performance was consistent with the hardware layout: HDD RAID1 throughput landed around 250MB/s to 267MB/s and will not saturate 5GbE, while NVMe could saturate the 5GbE link and internal testing showed about 1.5GB/s to 1.6GB/s reads and 1.1GB/s to 1.2GB/s writes on the PCIe 3.0 x2 slot, with the PCIe 3.0 x1 slots closer to roughly 830MB/s reads and 640MB/s to 670MB/s writes; media server use handled 4 simultaneous high bitrate 4K playback streams with CPU usage in the teens using Jellyfin. The main drawbacks are tied to the compact design choices: the RAM is not upgradeable, the chassis and storage fitting are very tight during installation, fan control outside BIOS was not straightforward in early testing, the NVMe slots are mixed speed by design, and the CPU options are closely spaced, meaning the upgrade decision is often about the bundled memory and SSD tier as much as the processor. Official messaging also says hot swapping is not supported, yet it worked during testing in a RAID1 scenario, suggesting a support-position limitation rather than a strict hardware block.

DESIGN - 9/10
HARDWARE - 8/10
PERFORMANCE - 8/10
PRICE - 8/10
VALUE - 8/10


8.2
PROS
👍🏻Very compact footprint for a 2-bay NAS class system (166 x 121 x 112mm, metal chassis)
👍🏻2x SATA bays (2.5-inch or 3.5-inch) plus 3x M.2 NVMe slots in the same enclosure
👍🏻Multi-gig wired networking: 5GbE + 2.5GbE, plus WiFi 6 and Bluetooth 5.4
👍🏻Strong idle efficiency in testing with drives installed and idle (about 22W to 23W)
👍🏻Noise stayed in the mid-30 dBA range in the tested HDD and NVMe configuration
👍🏻NVMe performance is sufficient to saturate the 5GbE link, with the PCIe 3.0 x2 slot clearly faster than the x1 slots
👍🏻Chassis thermal design appears effective under typical always-on use, with external temps broadly in the mid-30C range
👍🏻Practical service access features: magnetic rear cover, base access for M.2, stored tool in the base, reset and CLR CMOS available
CONS
👎🏻RAM is fixed (no SO-DIMM), so memory cannot be upgraded after purchase
👎🏻Very tight internal tolerances make drive and bracket insertion less forgiving during installation and changes
👎🏻Mixed NVMe slot speeds (1x PCIe 3.0 x2 and 2x PCIe 3.0 x1) and no 10GbE option

Where to Buy the Beelink ME Pro NAS:
  • Beelink ME Pro (N95 + 12GB + 128GB) $369 – HERE
  • Beelink ME Pro (N150 + 16GB + 512GB) $529 – HERE
  • Beelink ME Pro (N150 + 16GB + 1TB) $559 – HERE

Beelink ME Pro NAS Review – Design & Storage

The ME Pro is built around an all-metal unibody chassis that prioritizes footprint over easy internal spacing. In physical terms it sits noticeably smaller than many mainstream 2-bay enclosures, and in my comparisons it looked roughly 20% to 25% smaller next to typical 2-bay units from brands like Synology and TerraMaster. The front panel styling leans into a speaker-like look, and it has been compared to a Marshall speaker design, which is likely intentional given the mesh and badge layout. Functionally, that front area is not a speaker, and the design choice is mostly about appearance and airflow rather than adding any front-facing audio hardware.

From a storage perspective, the ME Pro is a hybrid layout rather than a traditional “2-bay only” NAS. It supports 2 SATA bays for 2.5-inch or 3.5-inch drives, and Beelink positions it as supporting up to 30TB per SATA bay, giving a stated 60TB HDD ceiling. Alongside that, it has 3 internal M.2 NVMe slots with a stated 4TB per slot limit, which Beelink frames as up to 12TB of SSD capacity. Taken together, that is the basis for the commonly quoted 72TB maximum figure, although most buyers will treat that as an upper boundary rather than a typical real-world configuration due to drive cost and heat considerations.

The SATA bays are accessed from the rear by removing a magnetic cooling mesh cover, then sliding out the drive bracket assembly. The trays are screw-mounted rather than tool-less, and the manual specifies different screw types depending on whether you are installing 2.5-inch or 3.5-inch drives. In practice, it is possible to physically place a drive in a tray without fully fastening it, but the design clearly expects proper screw mounting for stability and vibration control. The device also includes silicone plugs intended to reduce vibration and protect the drives, and the overall bay system is designed to sit very flush once reassembled.

One unusual design detail is that each HDD tray includes a thermal pad intended to draw heat away from the drive’s underside. That is not common on many 2-bay systems, and it suggests Beelink is trying to compensate for the compact enclosure by using direct contact points for heat transfer. The tradeoff is that this design pushes the product toward precision fitting, and it aligns with the wider theme of the ME Pro being tightly engineered rather than roomy.

If you typically choose NAS hardware where drive swaps are quick and frequent, this approach will feel more like a compact appliance that expects occasional changes, not a platform designed around constant drive rotation.

The compact chassis also affects how storage installation feels in the hands. Because clearances are tight, inserting the drive bracket and getting everything seated can feel less smooth than on larger 2-bay boxes, even though it looks clean once it is in place. This tightness is likely part of how Beelink is managing airflow paths and vibration control in such a small enclosure, but it still means you have less margin for error during installation. Overall, the storage design is best described as space-efficient and deliberate, but it asks for patience during assembly and it rewards users who install drives once and leave the configuration largely unchanged.

Beelink ME Pro NAS Review – Internal Hardware

The ME Pro is sold in 2 CPU variants, based on Intel’s N95 or N150, both 4-core and 4-thread chips with integrated graphics. In practical NAS terms, these CPUs sit in the low power mini PC category rather than the heavier desktop class, so the platform is designed around efficiency and compact integration rather than raw compute headroom. In your testing and general use, that design target showed up as stable day-to-day responsiveness for typical NAS tasks, plus enough iGPU capability for common media server workloads when paired with the right software stack.

Memory is integrated rather than socketed. The configurations pair the N95 with 12GB LPDDR5 4800MHz and the N150 with 16GB LPDDR5 4800MHz, and there is no user-accessible SO-DIMM slot to expand it later. In the context of a small NAS, this matters less for basic file serving and backups, but it becomes more relevant if the device is expected to run multiple containers, heavier indexing, or virtual machines. Because the memory is fixed at purchase, the CPU choice is also effectively tied to your long-term memory ceiling.

Internally, the platform is constrained by limited PCIe resources, which affects how the storage and networking are wired. In the review you noted the CPU platform has 9 lanes available, and the device uses a split approach across its internal components rather than giving every subsystem the same bandwidth. The NVMe area reflects this most clearly, with 1 slot operating at PCIe 3.0 x2 while the other slots operate at PCIe 3.0 x1, which makes slot choice part of performance planning for any workload that leans heavily on NVMe. This lane budgeting also helps explain why the system lands at 5GbE plus 2.5GbE rather than a single 10GbE port, since 10GbE would typically add pressure to an already tight allocation.

Controller choices are mixed rather than uniform, and you called that out as unusual. The 5GbE port uses a Realtek RTL8126 controller and the 2.5GbE port uses an Intel i226-V controller, which is not a common pairing in the same chassis. On the storage side, the SATA side is handled by an ASMedia ASM2116 controller, and in your notes you referenced it operating on a PCIe 3.0 x1 link, which is still sufficient for 2 SATA bays in most real-world use. These choices are relevant for OS compatibility and driver maturity, particularly if the unit is being used with NAS focused platforms rather than the included Windows 11 installation.

Cooling is one of the main internal design decisions that enables the smaller enclosure. Instead of a traditional rear fan placed at the drive backplane, the system uses a CPU fan working with a vapor chamber arrangement, and airflow is routed so that it also passes over other internal heat sources rather than treating the CPU as a separate cooling zone. In your thermal testing, you observed that the front panel area ran warmer than the rest of the chassis due to the WiFi hardware placement, and you also saw a noticeable rise in NVMe temperatures when the base thermal panel was removed, which supports the idea that the chassis panels and pads are intended to be part of the heat management system. Power is delivered via a barrel connector using a 120W external PSU, which provides headroom for spin-up and load, but it also means this is not a USB-C powered design.

Beelink ME Pro NAS Review – Ports and Connections

Up front, the ME Pro keeps things simple: a power button and a single front-mounted USB port for quick access. This suits the NAS-first intent, where most interaction is remote, but it also sets expectations for local use. If you plan to attach multiple peripherals directly to the unit, you are quickly pushed toward using a hub or relying on network-based management rather than treating it like a conventional mini PC with generous front I/O.

Most connectivity is placed at the rear and along the base section of the chassis, which also helps keep cables routed in one direction when the unit is placed on a desk or shelf. Wired networking is split across 2 Ethernet ports, a 5GbE port and a 2.5GbE port, and the unit also includes WiFi 6 plus Bluetooth 5.4. That mix allows both a standard single-cable setup and more flexible layouts such as separating traffic across the 2 wired links, or keeping WiFi available for temporary placement, troubleshooting, or scenarios where pulling Ethernet is not straightforward.

For general external connectivity, the ME Pro includes a USB-C port rated at 10Gbps for data and it supports video output, but it is not used for power input. Power is delivered through a barrel connector and the unit ships with a 120W external PSU, which provides comfortable headroom and removes any questions around USB-C PD negotiation. Alongside USB-C, it includes 1 USB 3.2 port rated at 10Gbps and 2 USB 2.0 ports at 480Mbps, which covers basic keyboard, mouse, UPS signalling, or low bandwidth accessories, but it is still a small selection compared with many mini PCs.

For local display and basic audio, there is 1 HDMI output rated up to 4K 60Hz and a 3.5mm audio jack. The manual also calls out a reset hole and a CLR CMOS function, which is useful context for users who intend to experiment with different operating systems, boot media, or BIOS settings, since recovery options are clearly exposed rather than being hidden inside the chassis. Overall, the port selection feels intentionally weighted toward networking and core connectivity, with enough display and USB support for setup and troubleshooting, but not a layout aimed at heavy local peripheral use.

Beelink ME Pro NAS Review – Noise, Heat, Power and Speed Tests

Testing was done over several weeks of general use and targeted measurements, with a focus on temperatures, noise, power draw, and storage and network throughput. The typical configuration used for the core measurements included 2 SATA HDDs and 3 installed NVMe drives, with the system left running for extended periods and accessed regularly throughout the day. In addition to network file transfers, I also checked internal storage performance directly over SSH to separate storage limits from network limits.

On thermals, external chassis temperatures after a 24-hour period of operation with regular hourly access sat around 34C to 35C across most sides. The base area was a little warmer at roughly 34C to 38C, and the rear section around the motherboard and vapor chamber area was around 38C. The installed HDDs sat around 34C to 36C in that same period, using 4TB IronWolf drives, so not high power enterprise class media. The front panel area peaked higher than the rest of the enclosure, which aligned with the internal placement of the WiFi hardware near the front of the chassis.

The NVMe area showed the clearest example of how much the chassis panels and pads matter. With the base thermal panel in place, the panel itself sat around 36C over the same extended uptime. When that panel was removed, temperatures on the NVMe drives rose noticeably, with the PCIe 3.0 x2 slot drive reaching around 45C to 46C and the PCIe 3.0 x1 slot drives sitting around 38C to 41C. The difference suggested that the base panel and thermal pad contact are doing meaningful work as part of the heat path, and it also reinforces that there is no practical clearance for NVMe heatsinks in this chassis.

Noise levels were measured in a modest drive configuration, and they stayed in the mid-30 dBA range in the test environment. With the HDDs idle and the system otherwise sitting in standby, noise came in around 36 dBA to 37 dBA. With both HDDs being accessed simultaneously and NVMe activity occurring, it sat around 35 dBA to 38 dBA. The system uses a compact fan approach tied to the CPU cooling path, and one limitation I ran into is that I did not find a straightforward way to control the fan outside the BIOS during early testing, including attempts via SSH, which reduces fine tuning options for users who want tighter acoustics control.

Power consumption was tested in several stages to isolate the impact of installed storage. With no HDDs or NVMe installed and the system powered on, it drew around 15W to 16W. With 3 NVMe installed and no HDDs, it rose to around 18W to 19W. With 2 HDDs and 3 NVMe installed but all media idle, it sat around 22W to 23W.

Under a heavy combined workload with HDD and NVMe activity plus the CPU at full utilization, power draw reached around 41W to 42W, which reflects a worst case state rather than typical idle or light service operation.

For throughput, 2 HDDs in a RAID1 style setup were able to deliver around 250 MB/s to 267 MB/s, which is consistent with what you would expect from 2-bay HDD performance and means the HDD side will not saturate a 5GbE link.

NVMe storage over the 5GbE connection was able to reach full saturation of the network link in testing, so the network became the limiting factor rather than the SSD. Internal NVMe testing over SSH showed the expected split between slots, with the PCIe 3.0 x2 slot delivering roughly 1.5 GB/s to 1.6 GB/s reads and 1.1 GB/s to 1.2 GB/s writes, while the PCIe 3.0 x1 slots delivered around 830 MB/s to 835 MB/s reads and roughly 640 MB/s to 670 MB/s writes with more variability.

On media server use, 4 simultaneous high bitrate 4K playback streams ran with CPU usage in the teens, using Jellyfin. One extra operational note from testing is that while official messaging indicates hot swapping is not supported, I was able to remove and replace a drive in a RAID1 environment without powering down and continue the rebuild process, which suggests the limitation may be a support stance rather than an absolute hardware block.

Beelink ME Pro NAS Review – Conclusion & Verdict

The ME Pro’s main practical strengths are the space-efficient chassis, the combination of 2 SATA bays with 3 internal NVMe slots, and a connectivity set that includes 5GbE plus 2.5GbE and WiFi 6. In measured testing it delivered controlled external temperatures under typical always-on use, mid-30 dBA noise levels in the tested configuration, and power draw that stayed in the low-20W range at idle with drives installed, rising into the low-40W range under a full combined workload. Storage performance matched the internal design limits: HDD throughput was solid but not enough to saturate 5GbE, while NVMe performance split clearly between the PCIe 3.0 x2 slot and the PCIe 3.0 x1 slots, with the faster NVMe slot capable of saturating the 5GbE link in network transfers.

The main limitations are tied to the same compact, integrated approach that makes it unusual. Memory is fixed at purchase with no SO-DIMM upgrade path, NVMe cooling relies on chassis contact and leaves no clearance for heatsinks, and the lane allocation results in mixed NVMe slot speeds rather than uniform bandwidth across all 3 slots. The launch CPU options also remain close enough that the decision is often as much about bundled memory and SSD tier as it is about a clear performance tier shift. For buyers who want a small, always-on NAS with mixed SATA and NVMe storage, multi-gig networking, and reasonable thermals, noise, and power characteristics, the ME Pro aligns with that goal, but it is less suitable for users who expect frequent hardware changes, want expandability in RAM, or prefer a more conventional 10GbE-first network design.

PROs of the Beelink ME Pro NAS CONs of the Beelink ME Pro NAS
  • Very compact footprint for a 2-bay NAS class system (166 x 121 x 112mm, metal chassis)

  • 2x SATA bays (2.5-inch or 3.5-inch) plus 3x M.2 NVMe slots in the same enclosure

  • Multi-gig wired networking: 5GbE + 2.5GbE, plus WiFi 6 and Bluetooth 5.4

  • Strong idle efficiency in testing with drives installed and idle (about 22W to 23W)

  • Noise stayed in the mid-30 dBA range in the tested HDD and NVMe configuration

  • NVMe performance is sufficient to saturate the 5GbE link, with the PCIe 3.0 x2 slot clearly faster than the x1 slots

  • Chassis thermal design appears effective under typical always-on use, with external temps broadly in the mid-30C range

  • Practical service access features: magnetic rear cover, base access for M.2, stored tool in the base, reset and CLR CMOS available

  • RAM is fixed (no SO-DIMM), so memory cannot be upgraded after purchase

  • Very tight internal tolerances make drive and bracket insertion less forgiving during installation and changes

  • Mixed NVMe slot speeds (1x PCIe 3.0 x2 and 2x PCIe 3.0 x1) and no 10GbE option


📧 SUBSCRIBE TO OUR NEWSLETTER 🔔
[contact-form-7]
🔒 Join Inner Circle

Get an alert every time something gets added to this specific article!


Want to follow specific category? 📧 Subscribe

This description contains links to Amazon. These links will take you to some of the products mentioned in today's content. As an Amazon Associate, I earn from qualifying purchases. Visit the NASCompares Deal Finder to find the best place to buy this device in your region, based on Service, Support and Reputation - Just Search for your NAS Drive in the Box Below

Need Advice on Data Storage from an Expert?

Finally, for free advice about your setup, just leave a message in the comments below here at NASCompares.com and we will get back to you. Need Help? Where possible (and where appropriate) please provide as much information about your requirements, as then I can arrange the best answer and solution to your needs. Do not worry about your e-mail address being required, it will NOT be used in a mailing list and will NOT be used in any way other than to respond to your enquiry. [contact-form-7] TRY CHAT Terms and Conditions
If you like this service, please consider supporting us. We use affiliate links on the blog allowing NAScompares information and advice service to be free of charge to you.Anything you purchase on the day you click on our links will generate a small commission which isused to run the website. Here is a link for Amazon and B&H.You can also get me a ☕ Ko-fi or old school Paypal. Thanks!To find out more about how to support this advice service check HEREIf you need to fix or configure a NAS, check Fiver Have you thought about helping others with your knowledge? Find Instructions Here  
 
Or support us by using our affiliate links on Amazon UK and Amazon US
    
 
Alternatively, why not ask me on the ASK NASCompares forum, by clicking the button below. This is a community hub that serves as a place that I can answer your question, chew the fat, share new release information and even get corrections posted. I will always get around to answering ALL queries, but as a one-man operation, I cannot promise speed! So by sharing your query in the ASK NASCompares section below, you can get a better range of solutions and suggestions, alongside my own.

☕ WE LOVE COFFEE ☕


Beelink ME Pro NAS – Should You Buy?

The Beelink ME Pro NAS – Should You Buy

After the surprising hit that was the Beelink ME Mini NAS in 2025, a lot of users were looking forward to seeing what the brand would do next in the NAS space. In January 2026, the brand responded with the launch of the Beelink ME Pro: an Intel N95/N150 powered system with DDR5 memory, 5GbE plus 2.5GbE connectivity, 2 SATA HDD bays, 3 M.2 NVMe bays, and one of the smallest physical footprints in this device class that I have seen. I have a full detailed review in progress on the ME Pro, but even after several days of use, several pros and cons have already emerged that may influence whether this is the right purchase for a homelab. While the review comes together, this article will outline the good, the bad, and the weird aspects of the Beelink ME Pro NAS.

Where to Buy the Beelink ME Pro NAS:
  • Beelink ME Pro (N95 + 12GB + 128GB) $369 – HERE
  • Beelink ME Pro (N150 + 16GB + 512GB) $529 – HERE
  • Beelink ME Pro (N150 + 16GB + 1TB) $559 – HERE

Bonus Point: Really Nice Logistics Design

This is a minor point, but it is worth noting how the ME Pro arrives. The chassis box is unusually small for a 2-bay NAS, and at first glance it can look like the packaging contains little more than the unit itself. In practice, the accessory items are stored inside the drive bracket area in small internal boxes, which helps avoid loose parts moving around in transit and reduces wasted packaging volume.

The device also arrives with the M.2 thermal pads already positioned in place, so the initial storage installation process is more direct. It is not a major buying factor, but it is a practical packaging decision that avoids the excessive empty space and material waste that is common in this product category.

Reasons you Should Buy the Beelink ME Pro NAS

The ME Pro is positioned as a compact, high-connectivity 2-bay NAS that also provides NVMe expansion and local display capability, with hardware aimed at users who want more than basic file serving in a small footprint. It combines dual-port networking, integrated wireless connectivity, and multiple internal storage options in a chassis designed for straightforward access and cleaning, while also introducing a motherboard drawer concept that Beelink claims will support future platform upgrades. If those priorities match your setup goals, the ME Pro has several practical advantages that can justify its price and design choices.

#1 Man alive – this 2 Bay NAS is TINY!

The ME Pro’s most immediate differentiator is its physical footprint. The chassis measures 166 x 121 x 112mm and uses an all metal unibody design, which is notably smaller than most 2-bay NAS boxes that also include NVMe storage and dual network ports. In person it reads closer to a compact mini PC enclosure than a traditional NAS, and that difference matters if you are placing it on a crowded desk, a media shelf, or anywhere you are trying to keep cabling and hardware out of the way.

That compactness is not just cosmetic, it directly shapes how the hardware is arranged and how it feels to work with. Storage bays, the NVMe area, networking, and the cooling hardware are densely packed, so clearances are tight and the device is designed around precision fit rather than roomy access. The upside is that it is easy to place in small spaces without needing the usual NAS sized footprint. The tradeoff is that installations and maintenance are likely to feel more constrained than they would on a larger, more conventional 2-bay enclosure.

#2 Arrives with 5GbE and WiFi6, when everyone else is still on 2.5GbE

On networking, the ME Pro ships with 2 wired Ethernet ports and integrated wireless. The wired setup is a 5GbE Realtek RTL8126 port alongside a 2.5GbE Intel i226-V port, and the unit also includes WiFi 6 plus Bluetooth 5.4. For a compact 2-bay NAS, that is a broader mix of connectivity than the many systems that still top out at dual 2.5GbE, and it gives you more options for how the device fits into an existing home or small office network.

In practical terms, this provides flexibility rather than guaranteeing a specific performance outcome. A 5GbE port can be useful for faster transfers if you already have compatible switching or direct attach options, while the 2.5GbE port can serve as a secondary link for a different subnet, failover, or a separate device path depending on the OS and network configuration you choose. WiFi 6 is not a replacement for wired networking in a NAS role, but it can be relevant for temporary placement, initial setup, or use cases where running a cable is not straightforward, and the manual indicates the antenna is integrated into the front panel design rather than using an external antenna.

#3 Maintenance and Internal Access is a work of art!

The ME Pro is built around user access rather than treating the internals as a sealed appliance. The manual’s process is simple: remove the magnetic cooling mesh cover, unscrew and pull out the hard drive bracket, and use the bottom access panel to reach the M.2 slots. A screwdriver is stored in the base under a silicone pad, so the tool required for basic access is physically included with the device. The ports and recovery related features also acknowledge user servicing, with items like a reset hole and a CLR CMOS function shown in the manual.

In day to day handling, the layout is designed to slide out and reassemble in a specific order, and it generally supports the idea of quick cleaning and drive installation without full disassembly. At the same time, access relies on small screws and tight tolerances, so it is not a tool-less experience. In your first impressions, the mechanism for sliding the internal assembly out felt solid and precisely aligned, but you also noted that the included tool is very small and can be fiddly to use. The result is a design that prioritizes compact service access, but still expects careful handling during installation and maintenance.

#4 Great Base Memory Quantity at a time when RAM costs are BONKERS

From the start, the ME Pro is configured with either 12GB LPDDR5 4800MHz on the N95 models or 16GB LPDDR5 4800MHz on the N150 models, rather than shipping with a minimal memory pool that immediately pushes users toward an upgrade. In practical NAS use, that baseline capacity is relevant because it can influence how comfortably the system handles common add-ons such as containers, light virtualization, background indexing, and multiple concurrent services, depending on the operating system and workload. It also reduces the likelihood that memory becomes the first immediate bottleneck for typical home and small office setups.

The tradeoff is that this approach is linked to the way the memory is implemented. In your inspection of the unit, you noted there is no SO-DIMM slot and the RAM appears soldered to the board, which means users are effectively choosing their memory tier at purchase rather than treating it as a later upgrade (more on that in a bit). This makes the initial configuration choice more important, especially for buyers who already know they will run heavier applications or multiple VMs over time.

#5 Genuinely unique modularisation and upgradability in a pre-built solution, which I have ever seen

The ME Pro’s most unusual design claim is the swappable modular motherboard. Beelink markets the system as supporting interchangeable boards across Intel, AMD, and ARM options, using a drawer style layout intended to let the main compute board slide out rather than being permanently fixed inside the chassis. The product page frames this as a way to avoid replacing the entire enclosure when you want a different CPU platform, and instead treat the chassis, drive housing, and general structure as the long-term part of the purchase.

In practical terms, this concept will only matter if Beelink actually sells the alternative boards at sensible pricing and maintains availability over time, but the physical architecture appears to be built around the idea. Your first look showed a clear internal separation between the board assembly and the rest of the enclosure, and you also observed hints of planned scale-up hardware, such as layout markings that suggest different future storage or platform variants. For buyers who like the idea of extending a system’s usable life without a full rebuild, the ME Pro is one of the few pre-built NAS style devices currently trying to formalize that upgrade path rather than leaving it to a full case swap.

Reasons You Might Want to Skip the Beelink ME Pro NAS

The ME Pro’s compact design and connectivity focused feature set come with tradeoffs that will matter to some buyers more than others. Several of the core choices are linked together, meaning you get the small chassis, the storage density, and the modular drawer approach, but you also accept limits around upgrades, physical handling, and how the platform is configured from the factory. This is not a device where every part is meant to be user replaceable or easily swapped in the way a DIY small form factor build would be.

It is also worth treating the launch configuration and roadmap as part of the buying decision. The product is being introduced with very similar Intel CPU options and fixed memory tiers, while the company is already pointing toward future AMD and ARM variants and possible expanded layouts. For some buyers, that is a reason to wait until the wider range exists and the upgrade parts are actually available. For others, the current design constraints are enough to prefer a more conventional 2-bay NAS that is larger, simpler to work on, and has clearer long-term upgrade paths.

The RAM is FIXED (i.e cannot be upgraded or changed)!!!

The ME Pro uses LPDDR5 memory (12GB on the N95 models, 16GB on the N150 models), and based on the internal layout you inspected, there is no SO-DIMM slot for user upgrades. In other words, the memory appears to be soldered to the motherboard rather than installed as a replaceable module. That makes the initial purchase configuration more important than on many small NAS builds where memory can be upgraded later as needs change.

The practical impact shows up when your usage grows beyond basic file storage. If you plan to run multiple containers, heavier indexing tasks, or virtual machines, memory headroom can become a limiting factor long before CPU or network does, depending on the OS and services you deploy. With this platform, there is no simple path to increase RAM after purchase, so anyone unsure about future requirements may prefer a system with upgradeable memory, or may want to treat the 16GB model as the safer long-term option by default.

The design is so, so very tight!

The ME Pro’s small enclosure is achieved through very tight internal tolerances. That is visible in how the drive bracket, motherboard drawer area, and storage zones are packed together, and it influences the overall experience during installation and servicing. The system relies on screw mounting for drives rather than a click-in tray approach, and while the manual provides clear steps, the process assumes careful alignment rather than quick, tool-less handling. This level of precision fit is likely part of how Beelink is trying to control airflow and improve thermal transfer in a compact space, and it also aligns with their noise and vibration messaging around tightened mounting and silicone dampening.

In the first impressions, that tightness showed up most clearly when inserting and removing components. Slotting the hard drive bracket and drives could feel rough at times, with very little clearance to work with, and the internal assembly can require a firmer push to seat correctly. Even if the compact fit is helping with heat dissipation and vibration control, it remains a very tight build, and it is less forgiving if you are frequently swapping drives, testing different storage combinations, or repeatedly opening the chassis. The end result is a device that looks clean and flush when assembled, but can feel constrained during hands-on work compared with a larger enclosure with more physical margin.

Launching the N95 version and N150 version was an odd choice (i.e very similar processors)

At launch, the ME Pro is offered in N95 and N150 variants, and on paper these CPUs sit very close to each other. Both are 4-core, 4-thread Intel N-series parts with 6MB cache, and the headline frequency difference is modest: up to 3.4GHz on the N95 and up to 3.6GHz on the N150. For many NAS workloads that are constrained by storage or network throughput rather than CPU, this kind of gap may not translate into a clearly different experience, especially once real world thermal and power limits are applied.

This tight spacing makes the product stack less clear than it could be, because the pricing difference between the entry and higher tier configurations is not simply paying for a meaningfully different platform. In practice, buyers are also paying for the memory and SSD tier attached to each CPU option, and in your case the non-upgradeable memory makes that choice more permanent. If the goal is to segment the lineup, the N95 and N150 pairing may feel like a small step that leaves some users waiting for a more distinct higher performance option rather than choosing between two closely related CPUs. Given the noise that Beelink has made about this expanding range, that only further encourages some users who think these CPUs a little timid, to remain on the fence a bit longer….

There are other CPU/Architecture versions coming

As mentioned, Beelink is already signalling that the ME Pro chassis is intended to outlive the initial Intel configurations. The official product messaging highlights a swappable modular motherboard concept and explicitly references future boards beyond the current Intel N-series options, including AMD and ARM. In your first look, you also noted visible hints inside the unit that suggest the internal layout has been planned with other variants in mind, rather than being a one-off design limited to the launch hardware.

For buyers, this creates a timing question. If those alternative boards and models arrive soon, they may offer clearer performance separation, different feature priorities, or a better match for specific workloads. At the same time, the current purchase decision depends on what is available today, not what is promised, and the value of the modular approach only becomes real once the upgrade boards can actually be bought at reasonable pricing. Until the roadmap becomes a shipping product line, some users may prefer to wait, while others will simply evaluate the current N95 and N150 models on their own merits.

Mixed M.2 Speeds at PCIe 3.0 x2 and PCIe 3.0 x1? Was 10GbE and uniform lanes discussed instead?

The ME Pro’s 3 M.2 NVMe slots are not equal. Slot 1 is PCIe 3.0 x2, while slots 2 and 3 are PCIe 3.0 x1, and the manual specifically recommends using slot 1 for the system drive because it is the fastest slot. In practical terms, this creates a tiered NVMe layout where one drive has higher potential bandwidth than the other 2, which can influence how you plan cache, containers, VM storage, or scratch workloads. It also means peak NVMe performance depends heavily on which slot you choose, not just the SSD you buy.

That design choice raises an obvious tradeoff question: whether the platform would have been better served by a different allocation, such as keeping all 3 M.2 slots at PCIe 3.0 x1 in exchange for other connectivity, or prioritizing a different network tier such as 10GbE (though arguably, it might well have to sit at 3×1 and potentially be bottlenecked to 800-900MB/s, unless that lowered the m.2 to x2 bays). The ME Pro already includes 5GbE plus 2.5GbE, so the networking is not low end, but the mixed NVMe lane widths still make the storage side feel uneven by design. For a NAS focused build, the practical impact will depend on real testing: whether the internal topology causes contention under mixed loads, and whether the faster slot meaningfully benefits common tasks once network and SATA throughput are considered.

Conclusion & Verdict – Should You Buy the Beelink ME Pro NAS?

The Beelink ME Pro is a compact 2-bay NAS platform that combines SATA storage with 3 M.2 NVMe slots, dual wired networking, and integrated wireless in an enclosure that prioritizes density and internal access. It also introduces a modular motherboard drawer concept that, if supported with real upgrade boards over time, could change how long the chassis remains useful compared with typical pre-built NAS systems. As a hardware package, it is aimed at users who want high connectivity and mixed storage options without moving to a larger box.

At the same time, several of its main limitations are set at purchase and cannot be easily changed later. The memory appears fixed, the internal fit is very tight during drive and bracket handling, and the launch CPU options are closely spaced rather than clearly separated performance tiers. The NVMe layout is also mixed speed by design, which affects how you should plan drive placement and workloads. Whether these tradeoffs are acceptable depends largely on how much you value the enclosure size, the network ports, and the promised modular roadmap versus the more conventional upgrade flexibility of larger or more established NAS designs.

Where to Buy the Beelink ME Pro NAS:
  • Beelink ME Pro (N95 + 12GB + 128GB) $369 – HERE
  • Beelink ME Pro (N150 + 16GB + 512GB) $529 – HERE
  • Beelink ME Pro (N150 + 16GB + 1TB) $559 – HERE


📧 SUBSCRIBE TO OUR NEWSLETTER 🔔
[contact-form-7]
🔒 Join Inner Circle

Get an alert every time something gets added to this specific article!


Want to follow specific category? 📧 Subscribe

This description contains links to Amazon. These links will take you to some of the products mentioned in today's content. As an Amazon Associate, I earn from qualifying purchases. Visit the NASCompares Deal Finder to find the best place to buy this device in your region, based on Service, Support and Reputation - Just Search for your NAS Drive in the Box Below

Need Advice on Data Storage from an Expert?

Finally, for free advice about your setup, just leave a message in the comments below here at NASCompares.com and we will get back to you. Need Help? Where possible (and where appropriate) please provide as much information about your requirements, as then I can arrange the best answer and solution to your needs. Do not worry about your e-mail address being required, it will NOT be used in a mailing list and will NOT be used in any way other than to respond to your enquiry. [contact-form-7] TRY CHAT Terms and Conditions
If you like this service, please consider supporting us. We use affiliate links on the blog allowing NAScompares information and advice service to be free of charge to you.Anything you purchase on the day you click on our links will generate a small commission which isused to run the website. Here is a link for Amazon and B&H.You can also get me a ☕ Ko-fi or old school Paypal. Thanks!To find out more about how to support this advice service check HEREIf you need to fix or configure a NAS, check Fiver Have you thought about helping others with your knowledge? Find Instructions Here  
 
Or support us by using our affiliate links on Amazon UK and Amazon US
    
 
Alternatively, why not ask me on the ASK NASCompares forum, by clicking the button below. This is a community hub that serves as a place that I can answer your question, chew the fat, share new release information and even get corrections posted. I will always get around to answering ALL queries, but as a one-man operation, I cannot promise speed! So by sharing your query in the ASK NASCompares section below, you can get a better range of solutions and suggestions, alongside my own.

☕ WE LOVE COFFEE ☕


UniFi UNAS Series of NAS Devices – 12 Months Later, Should You Buy One?

UniFi UNAS – 1 Year Later. Should You Buy Now?

It has now been one full year since Ubiquiti made its formal debut in the NAS market with the launch of the UniFi UNAS Pro, a 7-bay rackmount storage system designed to integrate seamlessly within the existing UniFi ecosystem. At launch, the device was seen as a bold but limited step into a space traditionally dominated by established brands such as Synology and QNAP, focusing more on straightforward network storage than application-heavy server functions. Over the following twelve months, the company has steadily expanded the UNAS lineup and rolled out numerous firmware and software updates, refining its NAS operating system, UniFi Drive, and addressing user feedback gathered through real-world testing. From introducing multiple new RAID configurations, encryption, fan control, and USB backup capabilities, to expanding cloud backup support and improving system responsiveness, UniFi has demonstrated a consistent approach to building out the platform incrementally rather than replacing hardware prematurely. Today, the UNAS family includes five systems spanning both desktop and rackmount designs, with capacity options ranging from 2-bay PoE-powered units to 8-bay multi-10GbE solutions. Taken together, these changes illustrate a deliberate evolution of UniFi’s NAS portfolio from a proof of concept into a structured, multi-tier ecosystem with increasing competitiveness in the storage market.

Here are all the current UniFi NAS Solutions & Prices:
  • UniFi UNAS 2 (2 Bay, $199) – HERE
  • UniFi UNAS 4  (4 Bay + 2x M2, $379) – HERE
  • UniFi UNAS Pro 4 (4 Bay + 2x M.2, $499) – HERE
  • UniFi UNAS Pro (7 Bay, $499) – HERE
  • UniFi UNAS Pro 8 (8-Bay + 2x M.2, $799) HERE

Unifi UNAS, 1 Year Later – THE TL;DR:

In a rush and just want the cold facts? Here’s a clear TL;DR breakdown of all major UniFi UNAS product and software changes over the past 12 months, based entirely on your three video transcripts (3 months, 6 months, 1 year). It captures both software and hardware evolution, along with remaining limitations and future signals.

Initial Launch (UNAS Pro, Oct 2024)

  • First UniFi NAS, priced at $499, 7-bay rackmount, ARM CPU, 10GbE networking.

  • Marketed as “pure storage” for UniFi ecosystem integration, not an app-rich NAS.

  • Praised for value, build quality, and easy setup.

  • Criticized for missing features: iSCSI, RAID 6, multiple pools, containerization, USB ports, UniFi Protect integration, and limited cloud backup (Google Drive only).

  • Early software lacked advanced admin control, backup management, and multi-user oversight.

  • SMB performance and file integrity inconsistencies appeared during large data transfers.

  • Frequent backend updates released in first quarter, addressing GUI layout, alignment, and minor stability fixes.


3-Month Mark (Jan 2025)

  • Rapid patching cycle began: RAID 6 added, marking UniFi’s first major new feature.

  • Ongoing bugs fixed in the Drive OS interface and file manager.

  • Still missing key functionality like iSCSI and multiple pools.

  • Admin-level restrictions persisted; super admins could not manage user backups.

  • File browser inconsistencies fixed only partially (e.g., trash handling, SMB sync).

  • Backups limited to other UNAS or Google Drive, no AWS or S3 options yet.

  • Users frustrated by Safari bug (incomplete file downloads on iPhone, later acknowledged by UniFi).

  • Performance still below expectations on large SMB transfers; memory leaks and “skipped file” issues noted.

  • Despite flaws, praised for value and ongoing support rather than abandonment.


6-Month Mark (Apr 2025)

  • Software maturity improving, most updates focused on stability rather than new features.

  • RAID 6 officially released across all devices, with migration tools from RAID 5 + hot spare.

  • New cloud backup options: Dropbox and OneDrive added.

  • Admin control improved: super admins could now manage user backups and shared drives.

  • File sharing responsiveness and accuracy improved significantly in the GUI.

  • New file activity monitor added, showing per-folder change history.

  • Apple Time Machine backups now officially supported.

  • Fixed .exe execution issue when accessed via SMB.

  • Ongoing quality-of-life improvements: faster interface, better consistency, fewer sync issues.

  • Remaining issues:

    • Still no iSCSI, no fan control, no scheduled power management, and occasional temperature irregularities.

    • GUI bug showed 20,000 days uptime (fixed later).

  • System temperatures remained high (~68–72°C CPU under light load), highlighting poor thermal automation.

  • No new NAS hardware yet announced at this point.


1-Year Mark (Oct 2025)

  • Major expansion: full UNAS lineup introduced.

    • UNAS 2: 2-bay PoE++ desktop ($199).

    • UNAS 4: 4-bay desktop with M.2 slots.

    • UNAS Pro 4: 1U rackmount, 4-bay, dual PSU support.

    • UNAS Pro 8: 8-bay, 3x10GbE ports, 2x M.2 slots ($799).

  • Core software improvements across all models:

    • Multiple RAID levels and hot-spare support expanded.

    • Multiple pools and clustered RAID pools introduced (first time UniFi allowed split or mixed pools).

    • M.2 NVMe caching added on larger models (read/write caching only).

    • Encrypted volumes now supported and integrated into backup routines.

    • Fan control added, both manual and automatic.

    • USB-C mounting and backup support for desktop models (UNAS 2, UNAS 4).

    • Expanded cloud backup integration (Google Drive, Dropbox, OneDrive).

    • Snapshot performance improved, faster rollback and lower latency.

    • SMB and NFS protocols optimized for better throughput and reduced latency.

    • Improved admin tools for shared drives and user management.


Software Features Added/Improved in UniFi UNAS in 12 Months

In the twelve months since the release of the original UNAS Pro, UniFi Drive OS has developed from a relatively simple file server interface into a more complete NAS management platform. Early releases of the Drive software offered only basic storage creation and sharing options, limited to single-pool RAID 5 or mirror configurations with few administrative tools. Over time, multiple key features have been introduced, including support for RAID 6, multiple storage pools, clustered RAID pools, and hot spare functionality, each of which was implemented through system firmware updates and confirmed through beta and public release candidates. The platform now supports encrypted volumes, user-defined snapshots, and restoration features, offering greater resilience and improved recovery options after system events or accidental deletions. These updates collectively mark a notable improvement in fault tolerance and customization, allowing the UNAS range to better serve both small business and advanced home deployments that require multiple storage tiers or redundancy strategies.

Beyond storage structure, UniFi Drive has also introduced new tools for day-to-day administration and external connectivity. Cloud backup support has expanded to include Dropbox, OneDrive, and Google Drive, replacing the early limitation to only local or UNAS-to-UNAS replication. Shared drive management now includes central administrative oversight, allowing super admins to configure and monitor user-level backup routines across all profiles. The graphical interface itself has become more responsive, adding a file activity monitor that provides timeline-based access logs for folders and files. Support for Apple Time Machine has been added, as well as improved handling of executable files via SMB, and overall network protocol efficiency has increased through back-end adjustments to Samba and NFS. With these refinements, UniFi Drive OS now feels less like an experimental branch and more like a unified part of the broader UniFi management ecosystem, with greater parity across its networking, surveillance, and storage products.

Feature Category Initial State (Oct 2024) Current State (Oct 2025) Improvement Summary
RAID Configurations Single RAID 5 / 1 RAID 0, 1, 5, 6, clustered pools Major redundancy and performance improvements
Storage Pools Single unified pool only Multiple pools with clustering Hot/cold data separation, flexible tiering
Encryption None Volume encryption supported Improved data protection and compliance
Snapshots Basic rollback Full timeline management Faster recovery and rollback precision
Backup Options Local & Google Drive Google Drive, Dropbox, OneDrive Wider offsite backup compatibility
Admin Control User-limited backups Central admin management Full oversight of shared and user drives
File Monitoring Absent Folder-based activity tracking Improved audit trail visibility
Time Machine Support Absent Full support Expanded Mac OS compatibility
SMB/NFS Performance Unoptimized Tuned with caching improvements Higher throughput, lower latency

Hardware Products Added/Improved in UniFi UNAS in 12 Months

Since the launch of the original UniFi UNAS Pro in late 2024, Ubiquiti has expanded the UNAS product line into a full hardware family, each model tailored for different deployment scales and power requirements. The first expansion arrived with the compact UNAS 2, a two-bay desktop NAS powered by PoE++, marking the brand’s first use of Power-over-Ethernet as a primary power source for network storage. This device, built around a quad-core ARM Cortex-A55 CPU and 4 GB of LPDDR4 memory, aimed to serve as a lightweight edge storage unit for small offices or UniFi network environments that rely on central power distribution. Its 2.5GbE connection and USB-C port (5 Gbps) provided moderate performance for local transfers and basic backup operations, while its non-hot-swappable dual-drive cage emphasized affordability over convenience. This smaller system demonstrated UniFi’s intent to create entry-level options that could still operate within their ecosystem while maintaining core integration with UniFi Drive OS and cloud management via ui.com.

The next step up in the product family is the UNAS 4, a four-bay desktop NAS that builds directly on the UNAS 2’s design but adds more flexibility. It retains the same ARM Cortex-A55 processor and 4 GB RAM, but introduces dual M.2 NVMe slots for SSD caching or storage expansion and four 3.5-inch SATA bays for larger arrays. It still uses 2.5GbE with PoE+++ as its main power and data input, though at the time of writing, UniFi has not confirmed if the final retail version will include a secondary Ethernet port for redundancy or faster link aggregation. This model brings the UniFi storage ecosystem closer to small business-level performance, allowing for RAID 6 redundancy and improved cooling through a refined chassis design. While compact, the inclusion of NVMe caching and full integration into UniFi Drive 3.3 makes it a practical choice for users who want local storage with minimal cabling and higher data throughput.

At the higher end, the UNAS Pro 4 and UNAS Pro 8 extend the lineup into the rackmount segment, reinforcing UniFi’s move toward professional and enterprise environments. The UNAS Pro 4 adopts a 1U form factor, supporting four 3.5-inch SATA drives and two M.2 NVMe slots, while maintaining the same ARM Cortex-A57 CPU and 16 GB LPDDR4 memory as its larger sibling. It also supports dual hot-swappable PSUs for redundancy and arrives with improved thermal airflow optimized for data center racks. The flagship UNAS Pro 8 offers eight 3.5-inch bays, two rear M.2 NVMe bays, and three 10GbE ports (one RJ45 and two SFP+), making it the highest-performing UniFi NAS to date. The system consumes up to 200W under load, uses Btrfs as the primary file system, and integrates the most comprehensive cooling and failover options in the UniFi NAS lineup. Together, these models illustrate UniFi’s full-tier hardware strategy: from PoE-powered desktop storage to rackmount systems supporting multi-gigabit networking and dual redundant power.

Model Form Factor Drive Bays CPU Memory Network Interface NVMe Support Power Method Key Features
UNAS 2 Desktop 2 x SATA (3.5″) Quad-Core ARM Cortex-A55, 1.7 GHz 4 GB LPDDR4 1 x 2.5GbE (PoE++) None PoE++ / 60W Compact PoE NAS, USB-C 5Gbps, LCD panel
UNAS 4 Desktop 4 x SATA (3.5″) Quad-Core ARM Cortex-A55, 1.7 GHz 4 GB LPDDR4 1 x 2.5GbE (PoE+++) 2 x M.2 NVMe PoE+++ Dual M.2, compact 4-bay, UniFi Drive 3.3 ready
UNAS Pro 4 1U Rackmount 4 x SATA (3.5″) Quad-Core ARM Cortex-A57, 1.7 GHz 16 GB LPDDR4 2 x 10GbE (RJ45 + SFP+) 2 x M.2 NVMe Dual PSU Redundant PSU, RAID 6, enterprise airflow
UNAS Pro 8 2U Rackmount 8 x SATA (3.5″) Quad-Core ARM Cortex-A57, 1.7 GHz 16 GB LPDDR4 3 x 10GbE (1 RJ45, 2 SFP+) 2 x M.2 NVMe Dual PSU 8-bay, clustered RAID, high throughput
UNAS Pro (2024) 2U Rackmount 7 x SATA (3.5″) Quad-Core ARM Cortex-A57, 1.7 GHz 16 GB LPDDR4 2 x 10GbE None Single PSU

Fixes, Changes and Improvements in UniFi UNAS in 12 Months

Over the past year, UniFi has steadily refined the UNAS operating environment, addressing a number of software and usability issues identified by early adopters of the original UNAS Pro. Many of these improvements were released through incremental firmware updates across both the Drive OS and UniFi Controller platforms. Among the most significant early fixes was the resolution of file handling inconsistencies between the built-in web file manager and SMB-based network access, which previously caused discrepancies when deleting or restoring data.

This issue, which affected synchronization between the NAS GUI and mapped network shares, has now been corrected. Similarly, early memory leak and permission errors during large-scale SMB transfers have been resolved through back-end optimization, reducing skipped files and improving overall data reliability. Updates to the system logs and storage integrity checks also brought clearer reporting of failed transfers and RAID rebuild activity, ensuring that users now receive consistent system notifications and warnings.

Another key focus for UniFi’s development team over the last twelve months has been user management, network integration, and environmental control. Earlier versions of Drive OS restricted backup operations to individual users, preventing the super admin from managing backups or schedules across the system. This has since been rectified, allowing full central backup management, while user permission hierarchies have been expanded to distinguish between local-only accounts, remote accounts, and enterprise identity-linked users.

Environmental improvements include the long-requested fan control interface, which gives users the option to manually adjust fan speeds or keep automatic control active depending on temperature thresholds. The addition of real-time thermal monitoring, more accurate CPU and drive temperature reporting, and improved resource graphs now make it easier to track system health. The Drive 3.3 release also introduced a refined GUI with more responsive dashboard elements, consistent data updates in the system console, and a correction to the long-standing uptime reporting bug that falsely displayed “20,000 days active.”

Area of Improvement Previous Limitation Current Status / Fix Impact
File Handling (SMB vs GUI) Files deleted via GUI not matching SMB state Unified file operations between interfaces Consistent data management
Memory & Transfer Errors Large SMB jobs skipped files, memory overflow Memory optimization and error logging fixes Improved reliability in large transfers
Admin Backup Control Admins could not manage user-level backups Centralized backup control added Easier global administration
Thermal & Fan Controls No manual fan speed control Manual and auto fan profiles integrated Better system cooling management
Temperature Accuracy Inconsistent CPU and drive readings Updated sensors and calibration More reliable thermal data
GUI Responsiveness Lag when creating shares or users Streamlined front-end caching Faster configuration changes
Uptime Reporting Displayed exaggerated uptime values Corrected uptime counter logic Accurate monitoring metrics
System Logs Limited data visibility Extended log detail for transfers and RAID rebuilds Clearer diagnostic insights


Missing Features and Planned Features in UniFi UNAS in the Next 12 Months

Despite significant progress since the launch of the original UNAS Pro, several key features are still missing from the UniFi Drive OS ecosystem. The most frequently requested addition from users continues to be iSCSI target and initiator support, a capability that would allow direct block-level storage mapping for virtual machines and professional applications. Its absence limits the UNAS series to traditional network file protocols such as SMB and NFS, which are less efficient for tasks requiring raw storage access or integration with virtualization platforms. Equally, the continued lack of RAID 0 support restricts high-performance users who are willing to trade redundancy for speed. While RAID 6 and clustered pools have been introduced, there is still no configuration option that prioritizes sequential throughput over redundancy. Another omission is a native UniFi Drive client tool for Windows, macOS, or Linux that would allow direct desktop synchronization, local file pinning, and on-demand streaming similar to Synology Drive or Dropbox. At present, users must rely on the web interface or manually mapped drives, which limits productivity and offline access.

Looking forward, UniFi has hinted through developer notes and recent firmware structure that the ENAS (Enterprise NAS) line will introduce ZFS file system support, marking a major shift toward high-end storage with data integrity and snapshot efficiency beyond Btrfs. This aligns with the observed trend of UniFi testing ZFS integration within their enterprise roadmap, possibly extending limited functionality to future revisions of the Pro 4 and Pro 8. The upcoming UniFi Drive 3.3 and 3.4 updates are also expected to expand fan and power scheduling, allowing users to define specific system on/off cycles and control Ethernet port activation schedules, effectively creating customizable air-gap routines. Additionally, UniFi’s roadmap includes exploring expansion connectivity, potentially leveraging unused 10GbE interfaces for network-based expansion enclosures or storage clustering between UNAS units. This would mirror the high-availability (HA) or expansion behavior of established NAS brands, though implemented entirely over the UniFi network layer.

UniFi is also expected to refine NVMe handling, particularly the ability to use installed M.2 drives as standalone storage pools rather than just as cache devices. The introduction of pool-level tiering and dynamic storage balancing could allow users to automatically assign workloads between SSD and HDD pools, improving I/O efficiency without manual adjustment. Beyond hardware-level improvements, there is ongoing demand for the integration of UniFi Protect within the NAS family, allowing video surveillance to run on the same physical storage units rather than on separate NVRs. Although UniFi has historically separated its Protect and Drive ecosystems, internal hardware similarities between the UNAS Pro and UNVR Pro systems suggest eventual compatibility is possible. Finally, more advanced backup filters, bandwidth scheduling, and automated snapshot policies are likely to appear in the next major OS iteration as part of UniFi’s effort to close the gap with traditional NAS brands while maintaining its minimalist network-first design approach.

Feature / Function Current Status Planned / Proposed Update Expected Benefit
iSCSI Support Not available Under evaluation for enterprise roadmap Block-level access for VMs and servers
RAID 0 Unsupported Potential inclusion in Drive 3.4+ High-speed sequential workloads
UniFi Drive Client App Not available Planned for 2026 Desktop sync and offline access
ZFS File System (ENAS) In development Expected on ENAS and future Pro models Greater data integrity and snapshot efficiency
Fan & Power Scheduling Manual control only Scheduled automation (Drive 3.3+) Energy savings, thermal management
10GbE Expansion Support Not implemented Proposed network-based expansion option Scale-out storage via UniFi network
NVMe as Storage Pool Cache-only Drive 3.4+ feature under testing SSD-only pools and tiering
UniFi Protect Integration Not supported Possible future overlap Unified surveillance and storage system
Backup Filters & Scheduling Basic inclusion/exclusion Enhanced filters and timed backups Greater control and efficiency

Conclusion and Verdict – Is the UniFi UNAS Good Now?

One year after the launch of the original UniFi UNAS Pro, the UniFi NAS platform has evolved from a single experimental product into a diversified ecosystem that spans both desktop and rackmount storage. The introduction of the UNAS 2, UNAS 4, UNAS Pro 4, and UNAS Pro 8 demonstrates that Ubiquiti is committed to building a scalable product range capable of serving both home users and small business environments. On the software side, the development of UniFi Drive OS has been steady and deliberate, with a focus on improving reliability, expanding RAID options, and tightening cloud and local backup integration. These changes, combined with improved temperature management, admin-level control, and performance tuning for SMB and NFS, have resulted in a more mature and dependable NAS experience than the early versions from 2024. However, the range remains deliberately streamlined, prioritizing simplicity and ecosystem integration over third-party app support or virtualization features.

Looking ahead, the next phase of the UniFi NAS roadmap appears to focus on deeper enterprise integration and feature parity with long-standing NAS brands. The likely addition of iSCSI, ZFS, and network-based expansion options will determine how far UniFi can move beyond entry and mid-range use cases. The hardware continues to rely on ARM processors rather than x86, which reinforces UniFi’s focus on efficiency and security but limits advanced workloads such as containerization and VM hosting. Even so, the value proposition remains strong, particularly given the aggressive pricing across the entire UNAS range and its seamless compatibility with the existing UniFi infrastructure. Overall, UniFi’s NAS systems are no longer a novelty—they represent a serious and rapidly developing branch of the company’s portfolio that has gained stability, utility, and confidence within just one year.

You can buy the UniFi UNAS Pro 8 NAS via the link below – doing so will result in a small commission coming to me and Eddie at NASCompares, and allows us to keep doing what we do! 

Here are all the current UniFi NAS Solutions & Prices:
  • UniFi UNAS 2 (2 Bay, $199) – HERE
  • UniFi UNAS 4  (4 Bay + 2x M2, $379) – HERE
  • UniFi UNAS Pro 4 (4 Bay + 2x M.2, $499) – HERE
  • UniFi UNAS Pro (7 Bay, $499) – HERE
  • UniFi UNAS Pro 8 (8-Bay + 2x M.2, $799) HERE


📧 SUBSCRIBE TO OUR NEWSLETTER 🔔
[contact-form-7]
🔒 Join Inner Circle

Get an alert every time something gets added to this specific article!


Want to follow specific category? 📧 Subscribe

This description contains links to Amazon. These links will take you to some of the products mentioned in today's content. As an Amazon Associate, I earn from qualifying purchases. Visit the NASCompares Deal Finder to find the best place to buy this device in your region, based on Service, Support and Reputation - Just Search for your NAS Drive in the Box Below

Need Advice on Data Storage from an Expert?

Finally, for free advice about your setup, just leave a message in the comments below here at NASCompares.com and we will get back to you. Need Help? Where possible (and where appropriate) please provide as much information about your requirements, as then I can arrange the best answer and solution to your needs. Do not worry about your e-mail address being required, it will NOT be used in a mailing list and will NOT be used in any way other than to respond to your enquiry. [contact-form-7] TRY CHAT Terms and Conditions
If you like this service, please consider supporting us. We use affiliate links on the blog allowing NAScompares information and advice service to be free of charge to you.Anything you purchase on the day you click on our links will generate a small commission which isused to run the website. Here is a link for Amazon and B&H.You can also get me a ☕ Ko-fi or old school Paypal. Thanks!To find out more about how to support this advice service check HEREIf you need to fix or configure a NAS, check Fiver Have you thought about helping others with your knowledge? Find Instructions Here  
 
Or support us by using our affiliate links on Amazon UK and Amazon US
    
 
Alternatively, why not ask me on the ASK NASCompares forum, by clicking the button below. This is a community hub that serves as a place that I can answer your question, chew the fat, share new release information and even get corrections posted. I will always get around to answering ALL queries, but as a one-man operation, I cannot promise speed! So by sharing your query in the ASK NASCompares section below, you can get a better range of solutions and suggestions, alongside my own.

☕ WE LOVE COFFEE ☕


Windows 11 Shell Infrastructure Host High CPU Usage: FIXED

High CPU usage is a problem all Windows users should try to avoid. It often leads to reduced performance and system crashes. On Windows 11, the Shell Infrastructure Host high CPU usage is quite common.

In fact, for some users, the Shell Infracture Host may use as much as 60 to 90% of CPU power. In this guide, we explore causes and top fixes. Follow along.

What is Windows 11 Shell Infrastructure Host?

Before going into fixes, you should know that Shell Infrastructure Host is not a virus but a useful Windows process. It handles UI elements such as window transparency, the Start Menu layout, and the desktop background slideshow.

This process also controls animations and transitions within the Windows interface. It also integrates with the Shell Experience Host to control search functionalities and context menus.

However, its resource usage may sometimes fluctuate and cause CPU spikes. The solutions below will come in handy.

How to Fix Windows 11 Shell Infrastructure Host High CPU Usage

1. Close Open Windows and Apps

Shell Infrastructure Host is a process that is linked to the rendering of UI features like transparency. If you have so many open windows or applications that require this feature, you should close them to reduce the need for the process.

2. End the sihost.exe Process

An easy way to fix the high CPU usage is by ending the sihost.exe process. However, you should note that this process performs some key functions like:

  • Managing your desktop icons and layout.
  • Handling the Start Menu and taskbar.
  • Rendering certain types of windows and UI elements.
  • Handling thumbnail preview generation.
  • Displaying desktop notifications.

When you disable it, it affects some of these UI functions. Follow the steps below to end the process.

1. Press Ctrl + Shift + Esc to open the Task Manager.

2. Click the Details tab, click sihost.exe, and click the End task option. You may need to pause Task Manager updates to find this process.

Windows 11 Shell Infrastructure Host high CPU usage

3. Restart the Computer

High CPU usage means the computer is running more tasks than it should be. One quick resolution is a reboot. When you restart your computer, all processes are shut down, and all running apps are closed.

On restart, you should prioritize and open only the needed applications. If you still notice Windows 11 Shell Infrastructure Host high CPU usage, you may try other solutions.

4. Change to a Static Desktop Background

The Windows 11 Shell Infrastructure is essential in rendering animated backgrounds. If you are using one, you should expect the process to always draw on CPU resources. You may curb this by switching to a static background. Follow the steps below.

1. Press Windows + I to open the Settings app.

2. Click Personalization on the left pane, then click Background on the right.

Windows 11 Shell Infrastructure Host high CPU usage

3. Set Personalize your background to Picture.

5. Run the System Maintenance Troubleshooter

Windows 11 comes with several troubleshooters. The system maintenance troubleshooter will help fix daily maintenance issues. These include minor cases of high CPU usage caused by the Windows 11 Shell Infrastructure Host. You may run this tool with the steps below.

1. Press Windows + R to open the run dialog.

2. Type cmd and hit Ctrl + Shift + Enter.

Windows 11 Shell Infrastructure Host high CPU usage

3. Type the command below and hit Enter to launch the troubleshooter.

msdt.exe -id MaintenanceDiagnostic

4. Click Next and follow the wizard to complete the troubleshooting.

6. Update Windows

An outdated operating system is the cause of many resource management problems you may encounter on your device. When you update your computer, you will get bug fixes that can correct the Windows 11 Shell Infrastructure Host high CPU usage.

1. Press Windows + I to open the Settings app, then click the Windows Update option on the left pane and the Check for Update option on the right.

Windows 11 Shell Infrastructure Host high CPU usage

2. Download any available update and restart the computer.

7. Run the DISM and SFC Scans

On Windows 11, you may run the DISM and SFC scans to fix file corruption within the system and installation. This is a valid fix because when some essential files are corrupted, the system shows irregular behavior, which may manifest as the Windows 11 Shell Infrastructure Host’s high CPU usage.

1. Launch the Run dialog by pressing Windows + R.

2. Type cmd and hit Ctrl + Shift + Enter to open an elevated Command prompt.

Windows 11 Shell Infrastructure Host high CPU usage

3. Type the command below and hit Enter to scan for Image errors.

DISM /Online /Cleanup-Image /ScanHealth

4. Type the command below and hit Enter to fix all discovered image errors.

DISM /Online /Cleanup-Image /RestoreHealth

5. Rund the command below to fix corrupted system files on the computer.

sfc /scannow
Windows 11 Shell Infrastructure Host high CPU usage

8. Run a Malware Scan

Running a malware scan will ensure you are not getting high CPU usage due to a program mimicking the Sihost process. It is also another way to ensure viruses that corrupt essential files are eradicated. You may use any reliable antivirus or the built-in Windows Security.

1. Click the Taskbar’s magnifying lens, type security, and select Windows Security.

Windows 11 Shell Infrastructure Host high CPU usage

2. On the left, click Virus & threat protection, then click Scan options on the right.

3. Select Full scan, then click Scan now.

Windows 11 Shell Infrastructure Host high CPU usage

9. Clean Boot the Computer

When you clean boot your computer, you allow it to start with a limited number of services while blocking out third-party applications. This is a good way to isolate triggers of the Windows 11 Shell Infrastructure Host high CPU usage. After clean booting, confirm that the problem is fixed.

Returning to Normal CPU Use

The solutions we have explored will return your computer to normal CPU use. We have written these solutions in order of complexity, so you may walk yourself from top to bottom.

FAQ

Why does Windows 11 Shell Infrastructure Host consume high CPU resources?

The Shell Infrastructure Host may be using a lot of CPU power for some reasons, such as driver conflicts, corrupt system files, program conflicts, or problems with the system configuration.

How can I check if Windows 11 Shell Infrastructure Host is consuming high CPU resources?

The Task Manager lets you keep an eye on CPU utilization. To access Task Manager, press Ctrl + Shift + Esc. Once there, select the “Processes” tab and search for “Shell Infrastructure Host” or “Windows Shell Experience Host” in the list. If the CPU utilization is always high, there might be a problem with performance.

The post Windows 11 Shell Infrastructure Host High CPU Usage: FIXED appeared first on Next of Windows.

❌