With Microsoft Teams, you can collaborate and enjoy features such as chatting with colleagues, file and document sharing, meetings, and project work. In this article, we will show you the best solutions if Teams does not work in Windows 11.
Fix 1: Basic Solutions and Checks
Before going into anything complex, try these basic fixes.
You can run Teams as an administrator by searching for Teams and clicking the Run as Administrator option.
Restart your computer to fix minor glitches that prevent Teams from working.
If none of the above fixes the problem with Teams, you may proceed to the fixes below.
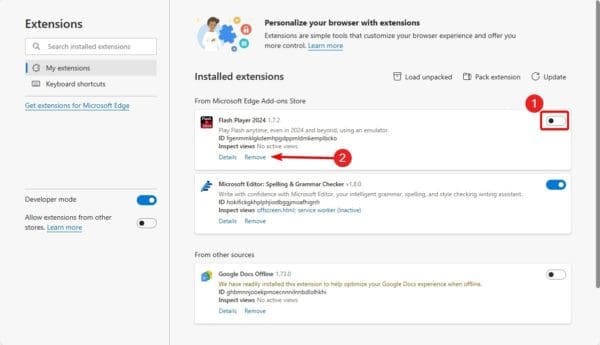
Fix 2: Clear your Teams cache
Clearing the cache is an important fix when Microsoft Teams refuses to start. If the cache is old or corrupted, this solution should work. If you have the new Teams built into Windows 11, this solution will not work, as there is no separate app data file. However, for the stand-alone Teams installation, you may follow the steps below.
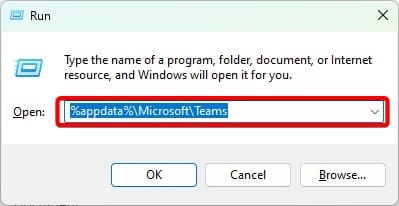
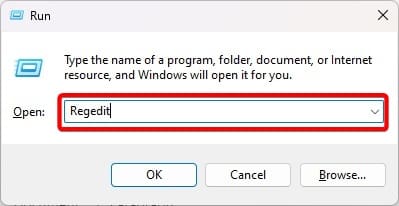
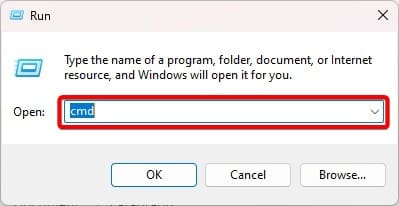
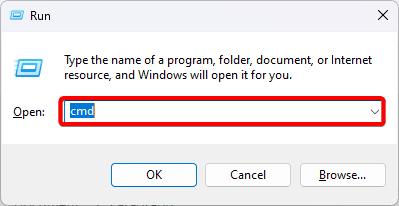
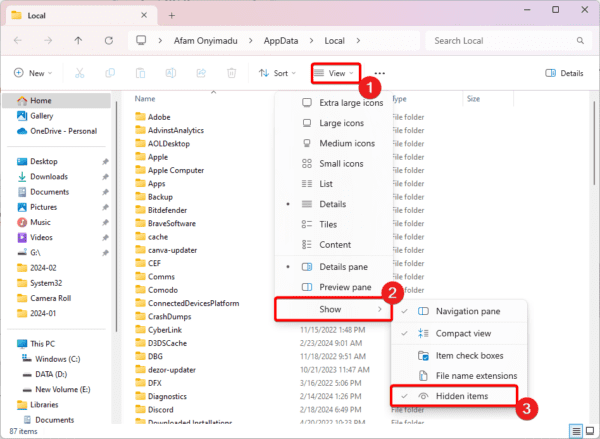
1. Press Windows + R to launch the Run dialog.
2. Type the command below and hit Enter.
%appdata%\Microsoft\Teams
3. Delete the folder’s content and try to start Teams to see if the problem is fixed.
Fix 3: Force Close Microsoft teams in the Task Manager
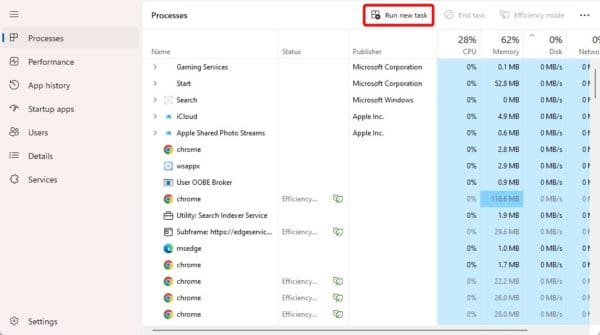
If you are having problems opening Teams, there is a chance that a Teams process is already running. To fix the problem, you will have to close this in the Task Manager. You may have to pause Task Manager updates to complete this process.
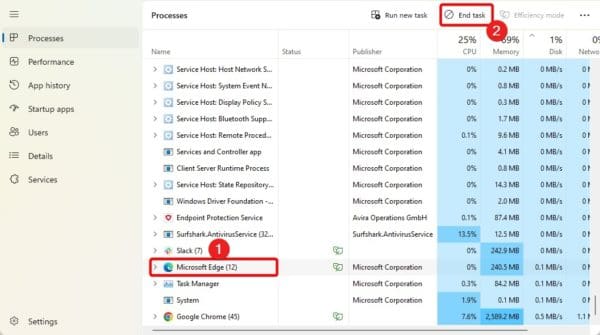
1. Press Ctrl + Shift + Esc to open the Task Manager.
2. Search for Microsoft Teams, right-click it, and click End task.
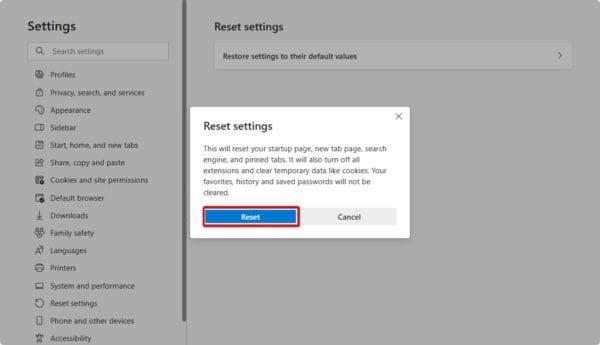
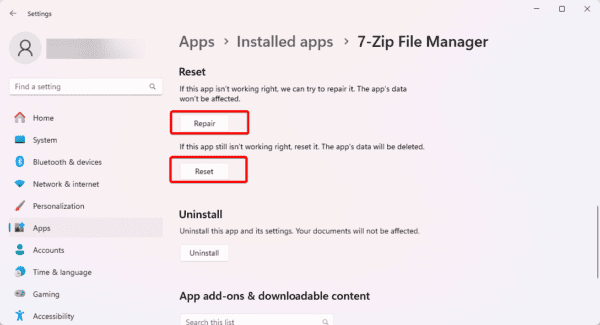
Fix 4: Repair and Reset Microsoft Teams
many native Windows 11 applications come with built-in Repair and Reset features. These features will scan for problems within the app and also take the app to its default settings. Follow the steps below to repair and reset Teams when it is not working.
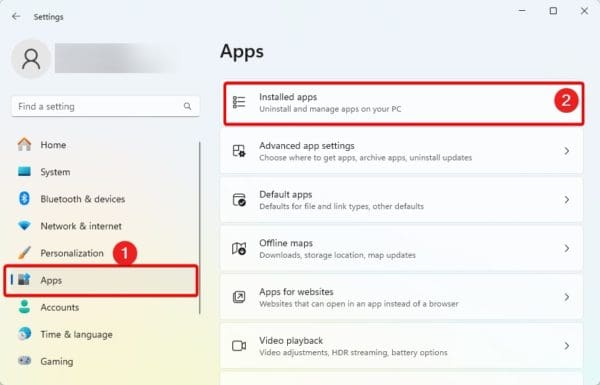
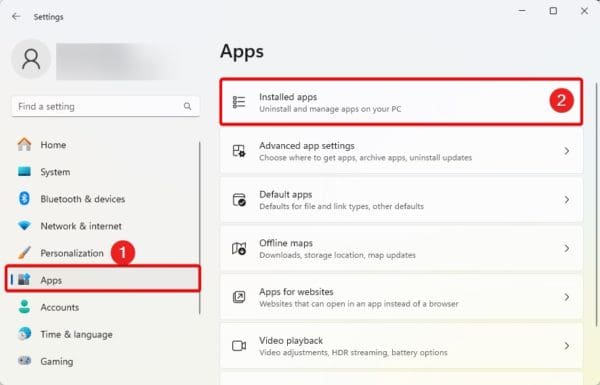
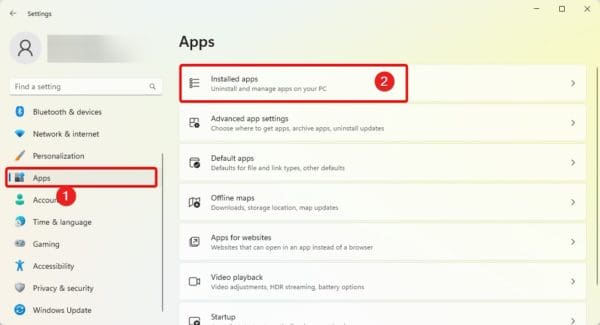
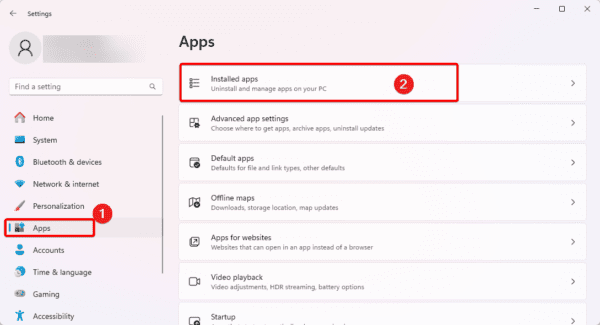
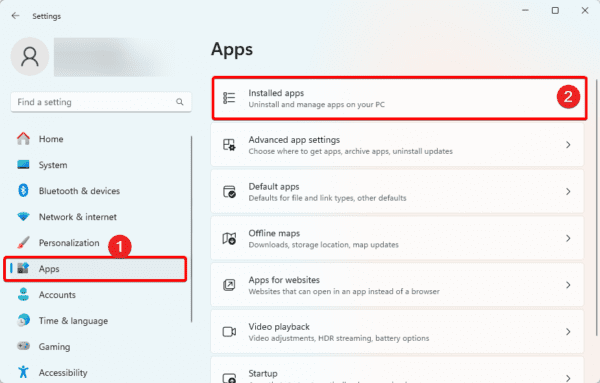
1. Press Windows + I to open the Windows 11 Settings app.
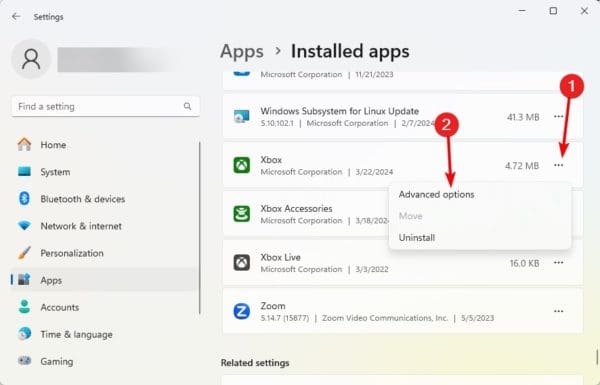
2. Click Apps on the left pane, then click Installed Apps on the right.
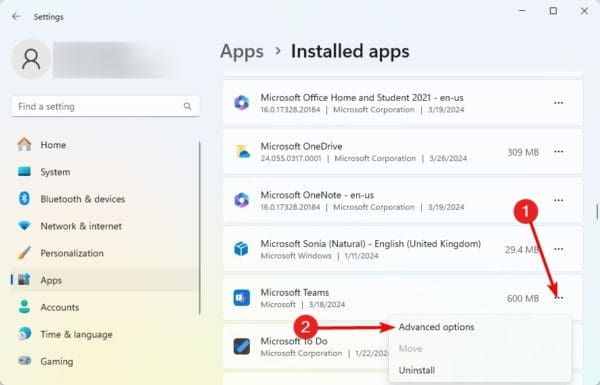
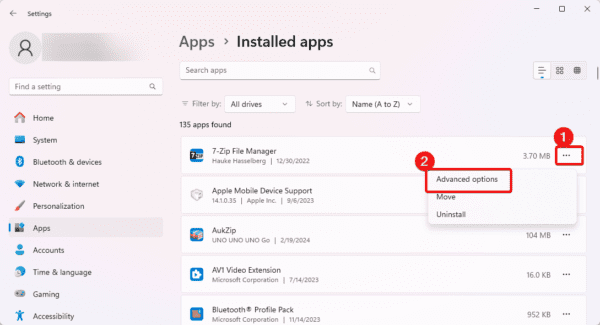
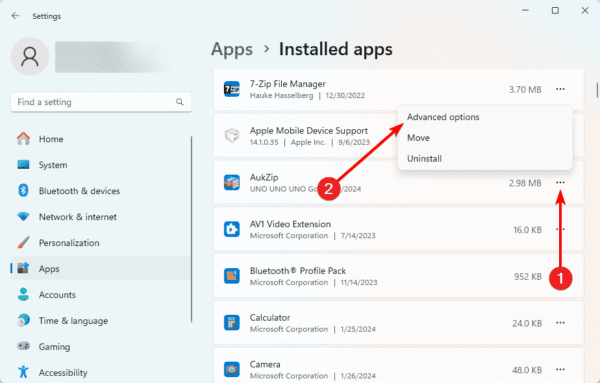
3. Click the 3 dots for Microsoft Teams, then click Advanced options.
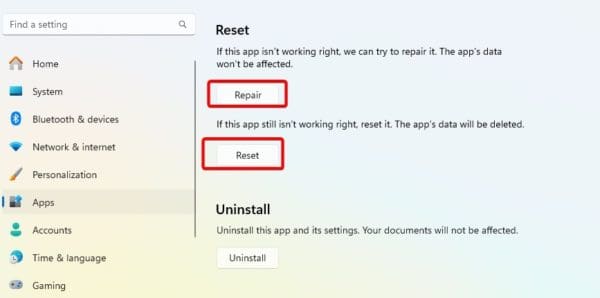
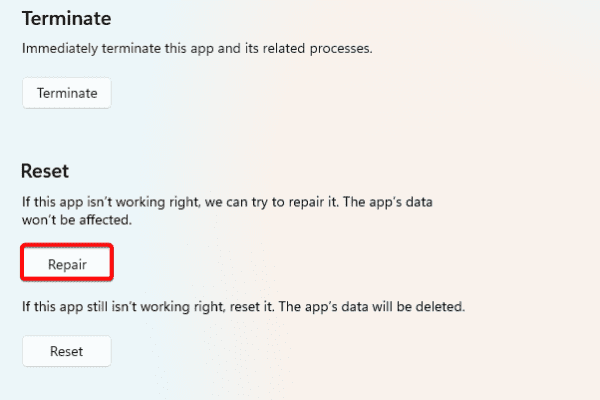
4. Click the Repair button, then the Reset button, and verify the problem is fixed.
That is as much as we share. These solutions should help you if Teams is not starting, if it is stuck, or if it is not working properly on Windows 11.
What solution did you find most effective? Please tell us in the comment section.
All keyboards will include number keys at the top, and if you use a full-sized keyboard, it probably has number keys on the right. However, there are times when the numbers key of a Windows 11 keyboard does not work. You should fix the problem using the solutions in this guide.
Fix 1: Try Some Basic Checks and Fixes
Before going into any complex troubleshooting, you should try the following:
Check Num Lock – The numbers may have been disabled. Tapping the Num Lock key or switch will reactivate them.
Restart your computer – If some temporal glitches trigger the problem, a simple restart will be strong enough to fix it.
Check for physical damage – if some blunt force has been applied to your keyboard, some keys may be broken. By inspecting closely, you may discover if this is the case.
If the problem persists after these preliminary checks, move on to the next fix.
Fix 2: Disable Control the Mouse With the Keyboard
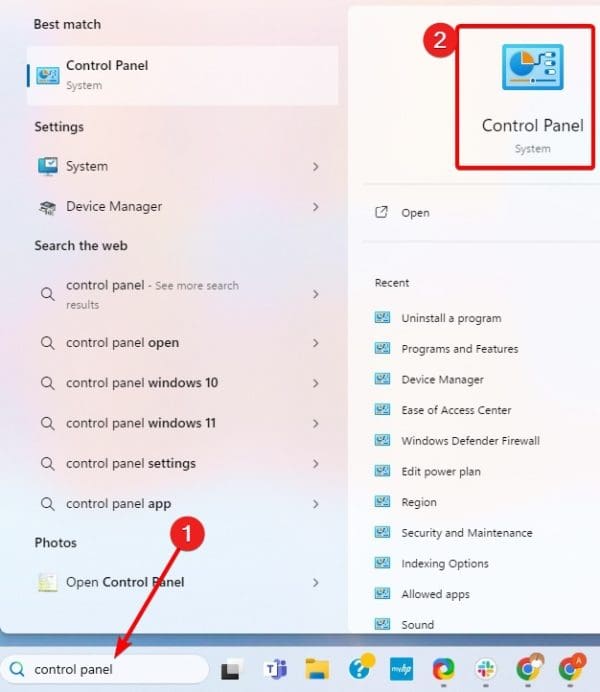
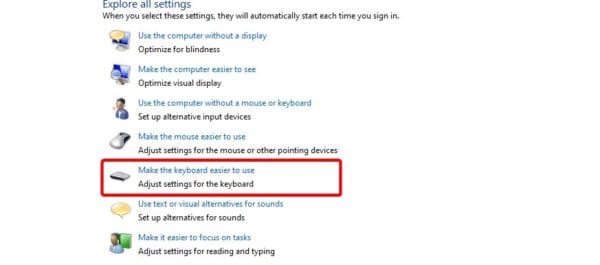
1. Type in Control Panel in the Taskbar’s search box, and click on the app to open it.
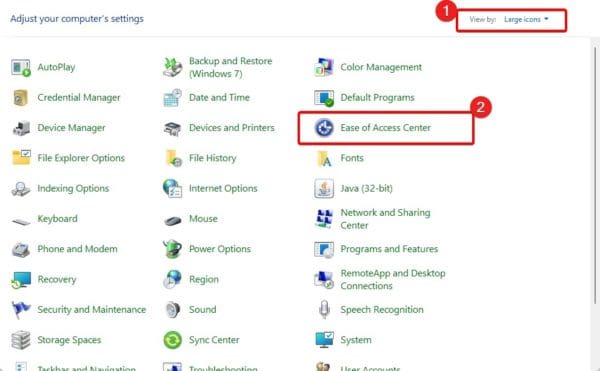
2. Change View by to Large icon and click Ease of Access Center.
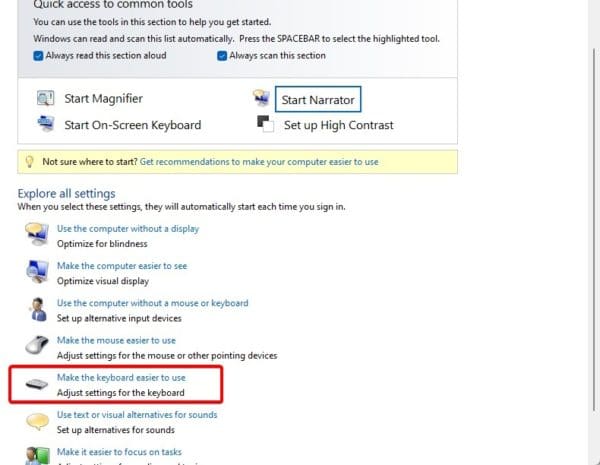
3. Click Make the keyboard easier to use.
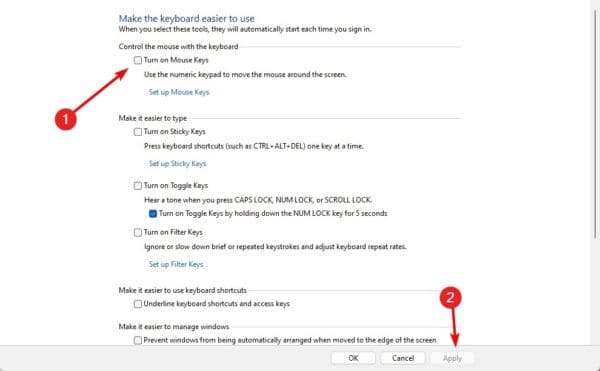
4. Disable Turn on mouse keys under the Control the mouse with the keyboard section, then click Apply. You should now be able to use the number pad keys on your Windows 11 device.
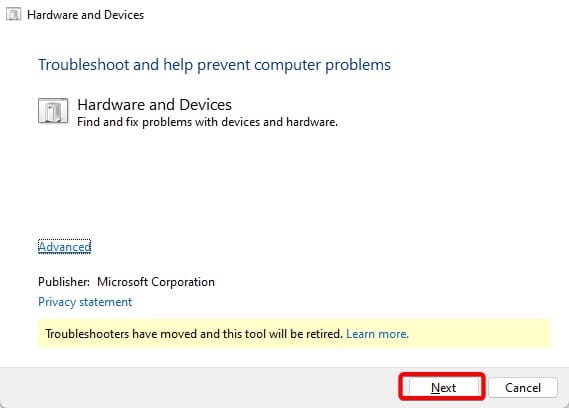
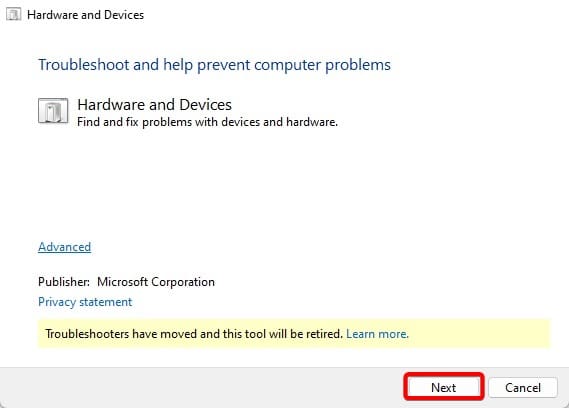
Fix 3: Run the Hardware Troubleshooter
While this troubleshooter is not optimized for keyboard problems, it will generally resolve hardware issues, and if these issues affect the keyboard, it will fix it.
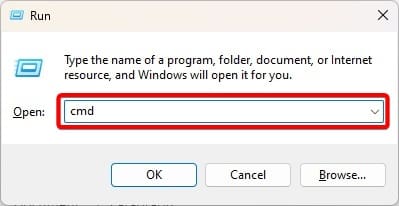
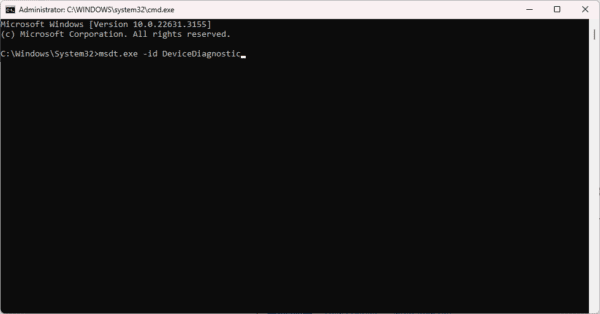
1. Open the Run dialog by pressing Windows + R.
2. Type cmd and hit Ctrl + Shift + Enter to open a Command Prompt with advanced rights.
3. Type the command below and hit Enter.
msdt.exe -id DeviceDiagnostic
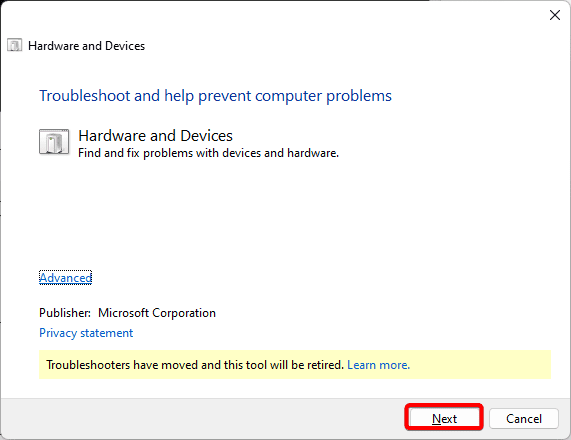
5. Click Next and follow the wizard to complete the troubleshooting.
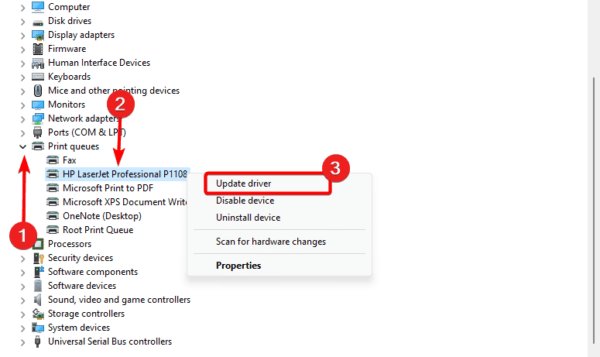
Fix 4: Update your Keyboard Drivers
Drivers form a vital communication link between hardware components and the operating system. When the Keyboard driver is outdated, you may experience several issues, which may be a possible reason why the number pad is not working on a Windows 11 keyboard. Fix it with the steps below.
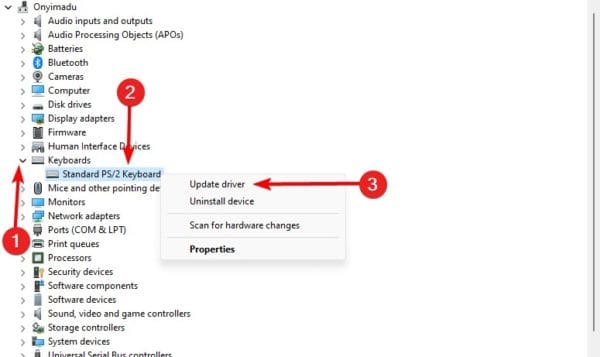
1. Right-click the Start menu and click Control Panel.
2. Expand the Keyboards category, right-click on your keyboard driver, and click Update driver.
3. Click Search automatically for drivers; your computer should update the driver.
Note: You may also employ driver updating software to update your drivers.
If none of the solutions we have shared work, you may consider using your computer’s virtual keyboard or referring to your keyboard maker, especially if you use an external keyboard.
Did any of the fixes work? Please tell us what was most effective for you in the comment section.
In the past, we have explored the problem of Edge not working on your computer. However, there is a unique problem where Microsoft Edge is running slow on Windows 11.
If you experience this problem, this comprehensive article will show you how to fix it. However, consider using any other efficient Windows 11 browser before diving into the fixes below.
1. Disable Graphics Acceleration
While disabling Graphics Acceleration may decrease performance, it may be a great option for fixing a slow Microsoft Edge. When disabled, you will fix conflicts between your graphics card driver and Edge hardware acceleration that may slow the browser.
Additionally, even though rare, graphics acceleration may conflict with other running software, causing Microsoft Edge to run slow. To fix it, follow the steps below.
1. Launch the Edge browser.
2. In the address bar, type the path below and hit Enter.
edge://settings/system
3. Toggle off the use graphics acceleration when available option.
2. Close Other Running Applications
Closing other running applications can be very effective when you have a slow Microsoft Edge on Windows 11. Each running app takes some memory; the more open applications you have, the less memory is available for efficiently running processes. If Microsoft Edge is still slow after closing your running apps, you may move on to a different solution.
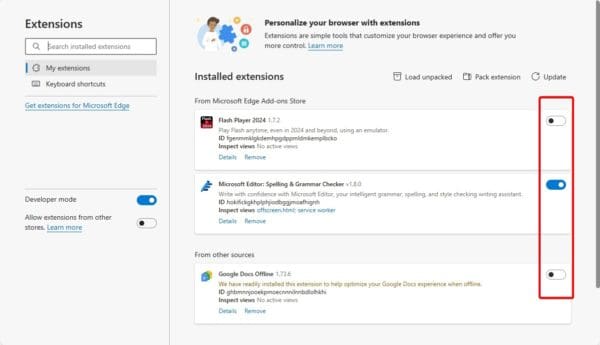
3. Disable Edge Extensions
Microsoft Edge uses extensions to increase functionality. However, some extensions may slow down the browser and sometimes even make it unresponsive. You may fix this by disabling any problematic extension. Follow the process below.
1. Launch the Microsoft Edge browser.
2. Enter the path below into the address bar and hit Enter.
edge://extensions/
3. Toggle off the problematic extension. If the problem persists, move to a different solution.
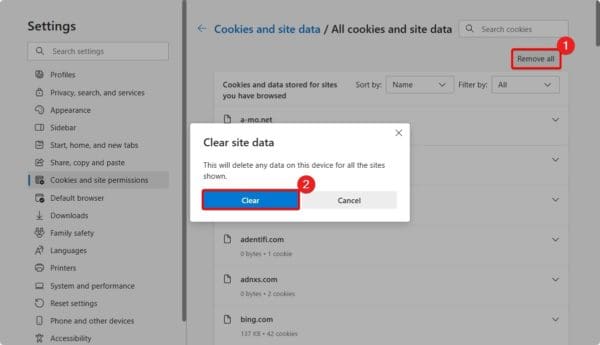
4. Clear Microsoft Edge Cache and Cookies
Cache and cookies are important data often used to make the browser more efficient or collect user information. However, clearing these data may be an efficient fix when Microsoft Edge is slow on your Windows 11 computer, especially if data corruption causes the problem.
1. Launch the Edge browser.
2. Input the path below and hit Enter.
edge://settings/siteData
3. Click the Remove all button, then click Clear.
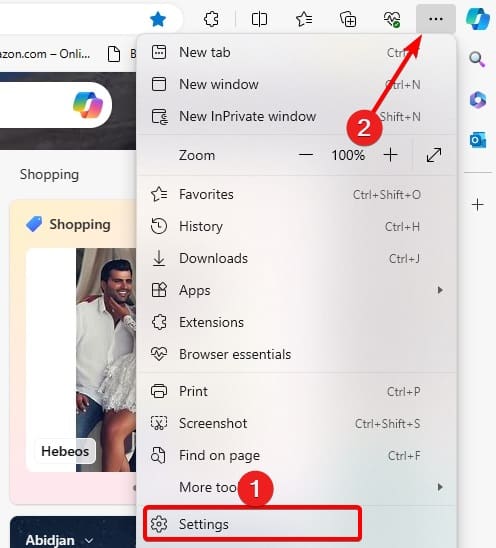
5. Update Microsoft Edge
An outdated Microsoft Edge browser is prone to bugs, and in some cases, they may cause a slow browser. The easy fix, in this case, will be updating your browser.
1. Launch the Edge browser.
2. Input the path below and hit Enter.
edge://settings/help
3. The browser should automatically download and install any available updates. Once the process is complete, you may restart the browser.
6. Flush Your DNS Cache
Flushing your DNS cache is a potential fix for a slow Microsoft Edge on Windows 11 in certain situations, including a corrupted DNS cache or an outdated DNS entry. Follow the steps below.
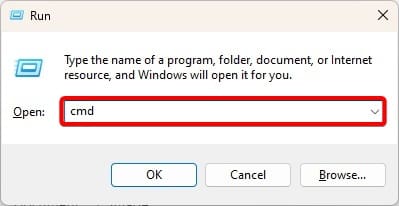
1. Press Windows + R to open the Run dialog.
2. Type cmd and hit Ctrl + Shift + Enter to open an elevated Command Prompt.
3. Type the command below, then restart the computer when it completes execution. Check if the problem is restored.
ipconfig /flushdns
7. Repair Microsoft Edge
Occasionally, you will have a slow Microsoft Edge because of corruption and file damage. Luckily, the app has a self-repair function that you may use. Follow the steps below.
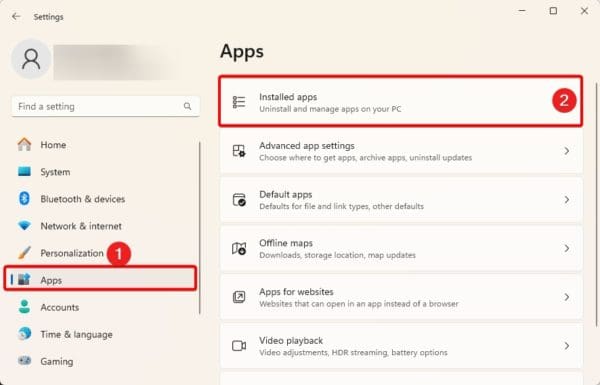
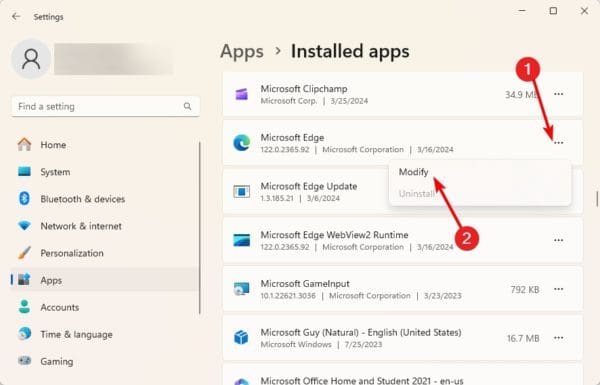
1. Press Windows + I to open the Settings app.
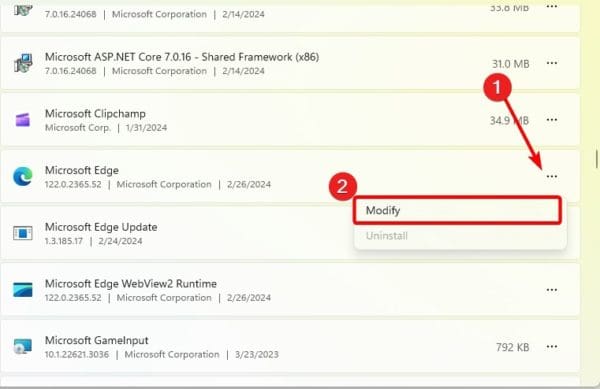
2. Click Apps on the left pane, then Installed apps on the right.
3. Click the Microsoft Edge options (the three dots), then click Modify.
4. Click the Repair button to verify the problem is solved when the process completes.
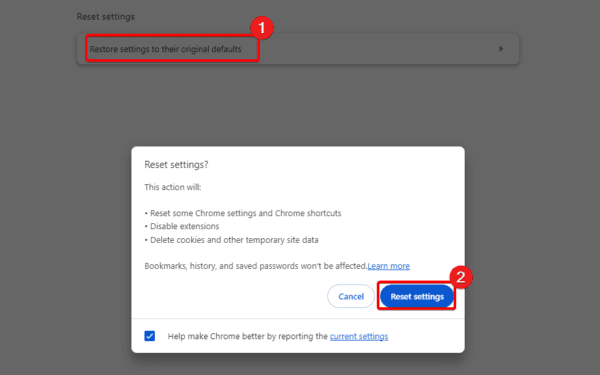
8. Reset the Edge Browser
You should reset your Microsoft Edge browser if none of the above fixes work. A reset will take it back to its default settings and fix whatever causes the slowness.
1. Launch the Edge browser.
2. Input the path below in the address bar and hit Enter.
edge://settings/resetProfileSettings
3. Click the Reset button.
Bringing Microsoft Edge Back to Proper Functioning
The solutions we highlighted above should suffice to bring your Microsoft Edge browser back to functioning properly. In extreme cases, you may consider reinstalling your operating system. You may also scan for malware
Could you fix the slow Microsoft Edge problem on your Windows 11 computer? What solutions were effective?
FAQs
Why is Microsoft Edge so slow on Windows 11?
This problem can be caused by several factors, including a bad connection, corrupted data and cache, problematic extensions, and bad browser files.
How can I make Microsoft Edge faster?
You may close other running applications, disable certain extensions, or disable hardware acceleration.
If gaming features aren’t available for your Windows desktop, you may update the computer to save you further troubleshooting or move to the solutions below if an update does not work.
1. Repair and Reset the Xbox App
Microsoft applications come with a repair and reset option. When you repair the app, minor bugs that may trigger the problem are corrected. Additionally a reset will restore all configurations, fixing any issues that may cause the error message gaming features aren’t available for the Windows desktop or File Explorer.
1. Press Windows + I to open the Settings app.
2. Click Apps on the right pane, then click Installed Apps on the left.
3. Click the three dots of your Xbox app and click Advanced options.
4. Click the Repair button, and if the problem remains, repeat the steps above, but this time, click the Reset button.
2. Update the Xbox App
An Outdated Xbox app could affect the gaming features. This may be the reason behind the error message gaming features aren’t available for the Windows desktop or File Explorer.
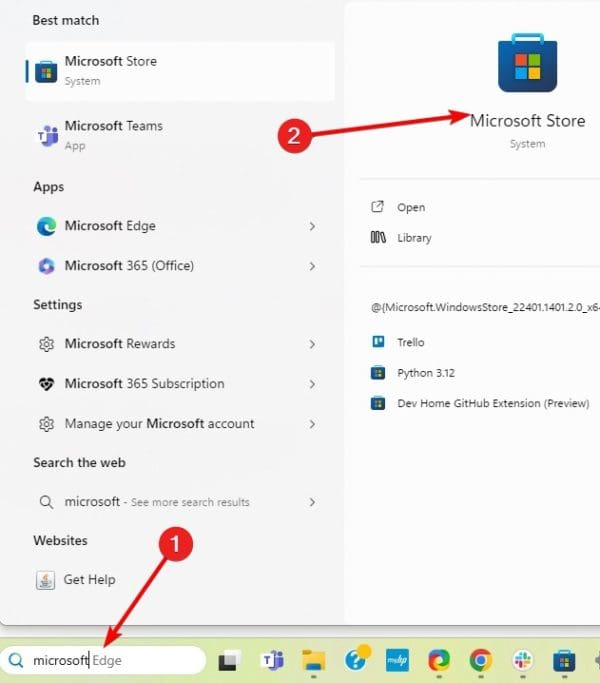
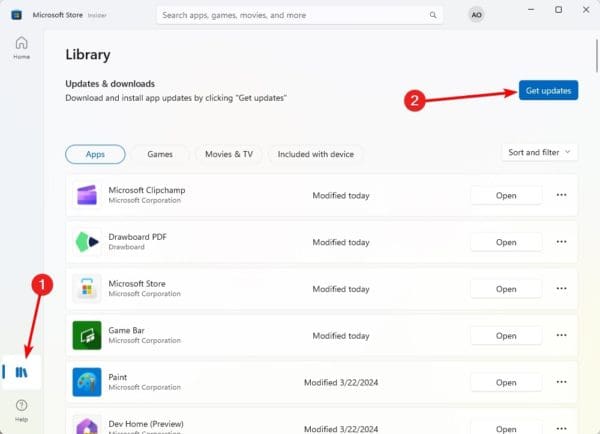
1. Click the magnifying lens on the Taskbar, type Microsoft Store, and click the app.
2. Click the Library option on the left pane, then click Get Updates on the left.
3. Reinstall Xbox Game Bar
You may also reinstall the Xbox game bar. This is a valid fix when bugs or file corruption cause the problem on your computer. Follow the steps below.
1. Click the magnifying lens on the Taskbar, type PowerPoint, and click the Run as administrator option.
4. Open the Xbox App Directly from Microsoft Store
If you get the error message gaming features aren’t available for the Windows Desktop, you may be facing a problem with your video recorder button in the Game bar. An easy workaround that many users have found effective is opening the Xbox app directly from Microsoft Store.
5. Enable Xbox Game Bar
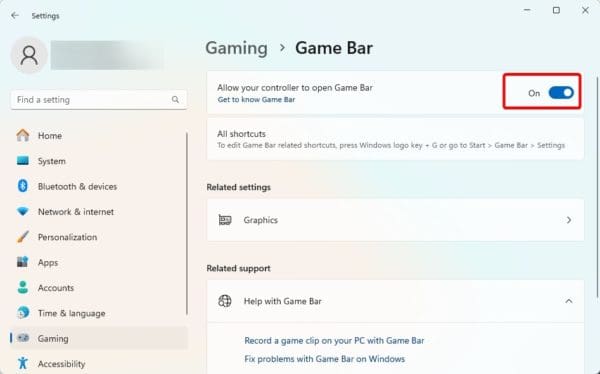
Enabling the Xbox game bar is an effective gaming optimization setting. When the game bar is disabled, there is a chance that some gaming features may not work. Follow the steps below.
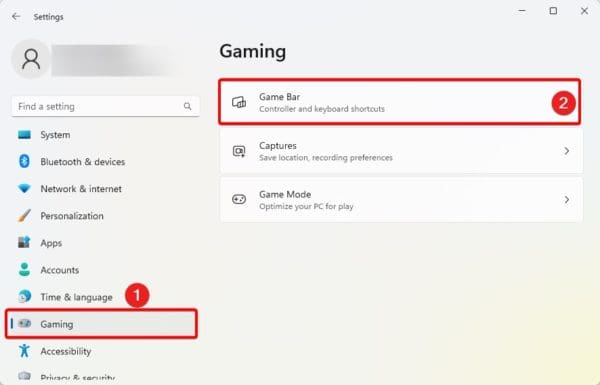
1. Open the Settings app by pressing Windows + I.
2. Click Gaming on the left and Gaming Bar on the right.
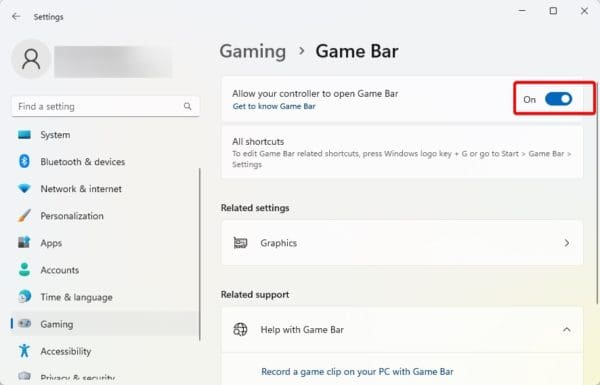
3. Toggle on Allow your controller to open Game bar.
Note: If specific gaming settings, like screen recording, do not work, you may use alternative apps like the RecForth tool to regain this feature.
That is all for this guide.
FAQ
Why are gaming features not available for my computer?
This error may result from bad configuration, system bugs, or disabled game options on Windows 11.
Using an alternative browser when YouTube is not playing videos in Windows 11 may save you further troubleshooting. However, the steps below will fix it on your current browser.
1. Update the Browser
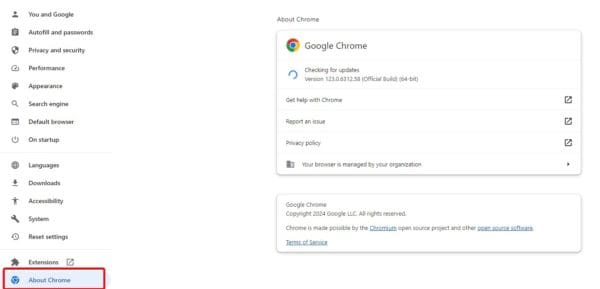
An outdated driver can potentially trigger multiple problems on your computer. This could be why YouTube videos are not paying on Windows 11. Simply update it. The steps to update your browser will depend on the browser, but we will show you the steps below on Google Chrome.
1. Launch the Chrome browser.
2. Type the path below in the Address bar and hit Enter.
chrome://settings/
3. Click About Chrome on the left pane, and the browser should auto-update.
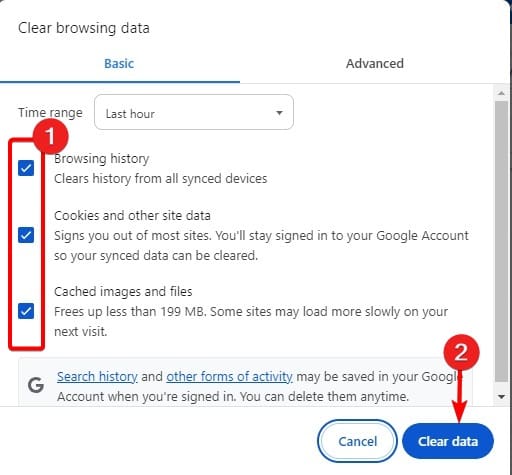
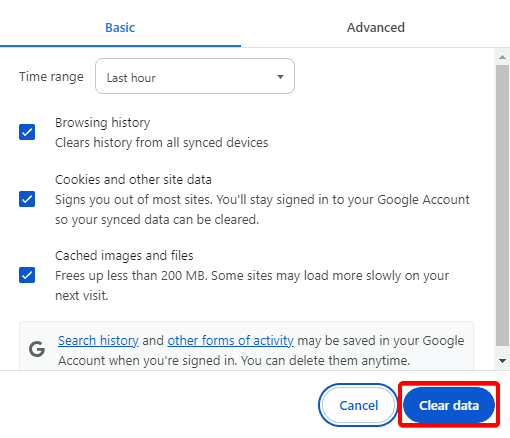
2. Clear Browser Cache
Cache helps optimize speed and efficiency, but you may sometimes need to clear this data. This is because an old or corrupted cache is often a reason for the video problem in Windows 11. You should follow the steps below.
1. Launch your browser.
2. Press Ctrl + Shift + Del to open the browsing data. This short key may be different for other browsers.
3. Click Clear data.
3. Uninstall or Turn Off your VPN
Sometimes, a very restrictive VPN may make it impossible for certain YouTube videos to play on a Windows 11 device. If this is the case, your best bet is to uninstall or temporarily disable the VPN. The steps will depend on the VPN you use.
4. Clean Boot Windows
A clean boot of the operating system is also a valid fix. This is because it disables all third-party tools. If any of these tools cause conflicts that trigger the YouTube playback problem, this solution will resolve it.
1. Press the magnifying lens on the Taskbar, type msconfig, then click the System Configuration tool.
2. Click the Services tab, check the Hide all Microsoft services option, then click Disable all.
3. Click the Startup tab, then the Open Task Manager link.
4. Select a startup app and click Disable. Then repeat this step for any additional apps you wish to disable.
5. Return to the System Configuration screen and click the OK button.
6. Now restart the computer and confirm that the issue of YouTube videos not playing on your Windows 11 computer is fixed.
Converting the MKV files to a different format should save you further troubleshooting; however, if you must use VLC media player, try the fixes below.
1. Install the MKV Codec for VLC
You may be missing the appropriate MKV codec for VLC. If this is the problem, your fix should be straightforward. Download the missing codec and run the exe file.
2. Update VLC
If you have an old or outdated VLC player, it is possibly the reason MKV files are not playing. You may simply update your version.
1. Launch the VLC media player.
2. Click the Help menu and click Check for Updates.
3. After the update, confirm that the problem is fixed.
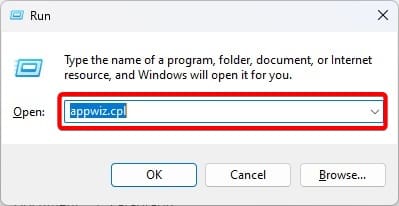
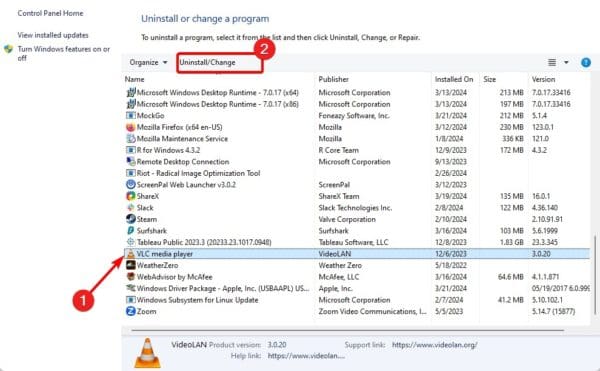
3. Reinstall VLC Player
If an update does not work, you may have certain corrupted files. This may require a total reinstallation. You should uninstall the app and reinstall it from a fresh download.
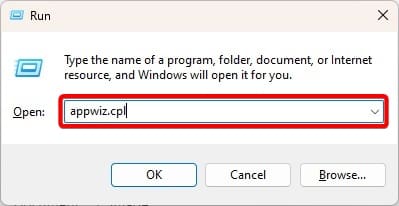
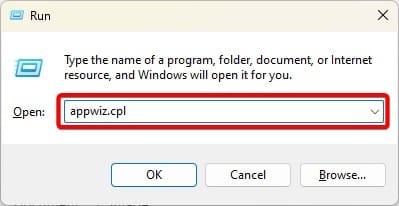
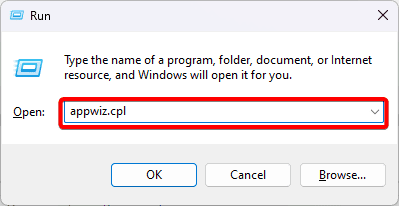
1. Press Windows + R.
2. Type appwiz.cpl and hit Enter.
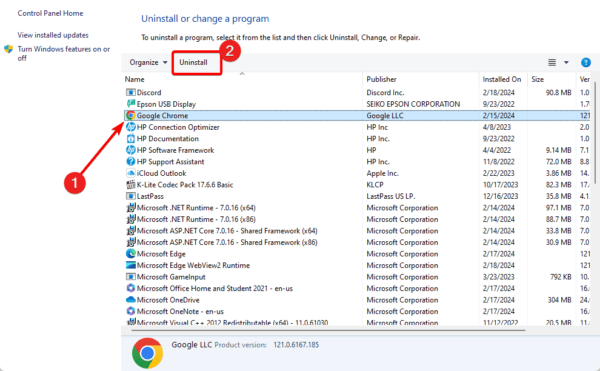
3. Click on VLC Media Player and select the Uninstall/Change option. Then, follow the wizard to complete the process.
VLC generates a minimal quantity of cache files to guarantee uninterrupted playback. If the player consistently skips MKV files or has trouble playing them, other apps or the operating system are likely using up disk space.
To ensure seamless playback in this scenario, you can raise the cache size and let VLC obtain additional data before the buffer is full.
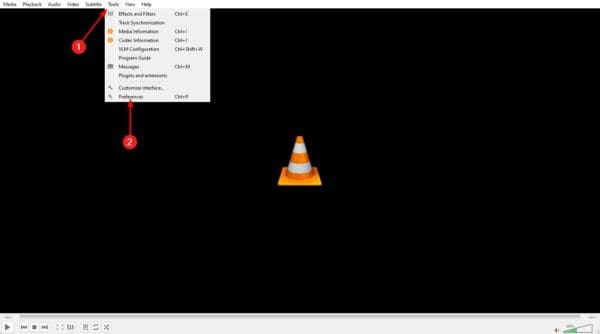
1. Launch VLC.
2. Click the Tools menu, then click Preferences.
3. At the lower left corner, click All, click Input/Codecs on the left pane, then on the right, under the Advanced section, set File caching to 1000.
4. Click Save to check if VLC is playing your MKV files.
Why is My VLC App Not Playing MKV Files?
The primary cause is problems with the MKV codec. The codec may be damaged or not installed for VLC, which means the application cannot recognize MKV files.
You may also encounter problems due to your VLC version. An old or outdated app may be unable to handle certain data streams.
You may also have configurations that are not favorable for VLC files. If you have tried changing certain VLC settings, this is a likely cause.
While using your Windows 11 device, you may experience a zoomed-in screen. While there may be multiple causes of this problem, the solutions are often quite easy, and in this guide, we show you all possible ways to correct it.
Why is My Screen Zoomed in Windows 11?
While there are several possible reasons for a zoomed-in screen in Windows 11, you most likely are facing this situation because you accidentally used a keyboard zoom shortcut.
You may also have a zoomed-in screen because certain applications you are running cause the display to change, or it may result from a recent Windows update.
Any of the solutions below should help you fix it.
How Do I Fix a Zoomed in the Windows 11 screen?
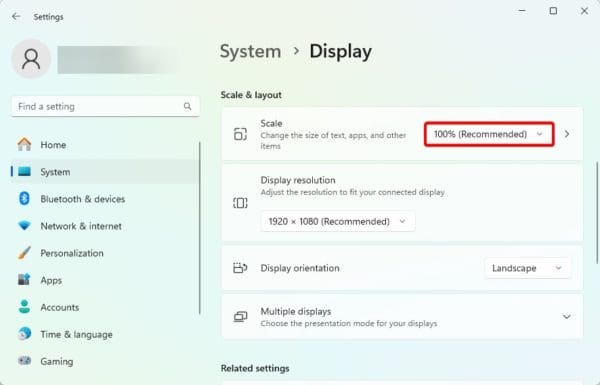
1. Reset the Display Zoom Settings
Since this problem is often a misconfiguration or an accidental activation, you may simply reset the display settings to fix it. Follow the steps below.
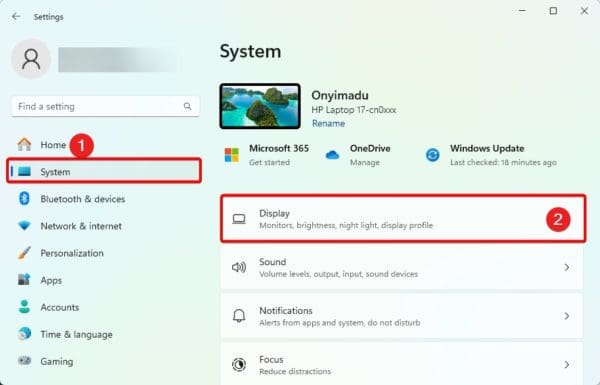
1. Open the Settings app by pressing Windows + I.
2. Click System on the left pane and Display on the right.
3. Select the Recommended option from the Scale dropdown in the Scale & Layout section.
2. Update Zoom Option From the Running Program
If you noticed that your screen zoomed in only when you launched a certain program, you may consider updating the display settings within the program.
This is often the case in some gaming applications. If you do not want to update the game’s zoom option, you may simply close the application, and the display zoom should return to its default.
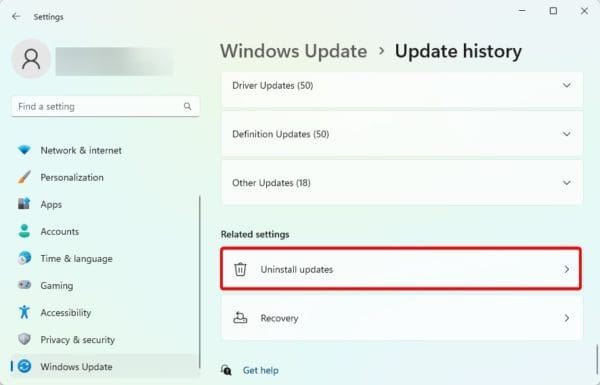
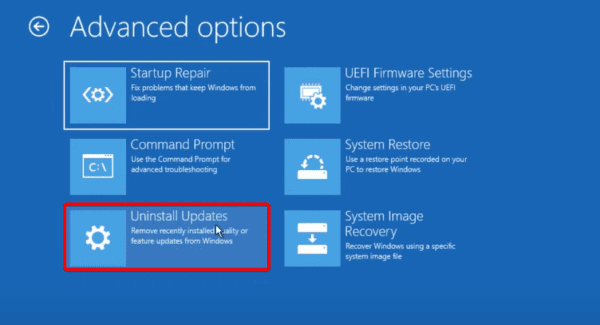
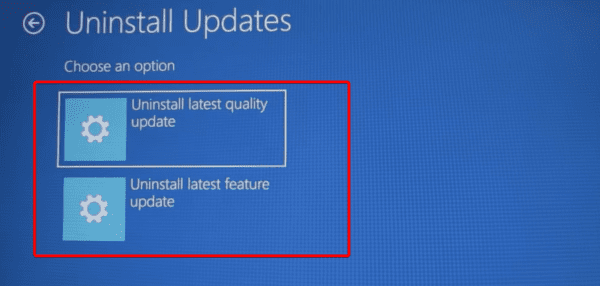
3. Uninstall Windows Updates
Sometimes, you may notice that the display is zoomed in after you install a recent Windows update. While this is rare, there are chances that the update is buggy. You may uninstall it to fix the problem.
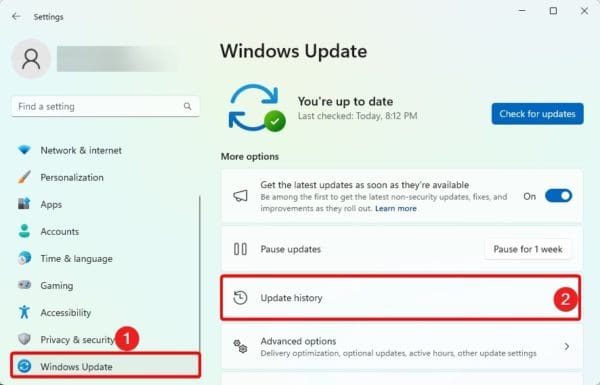
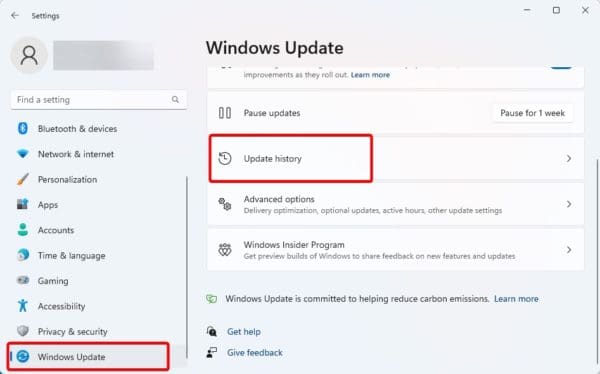
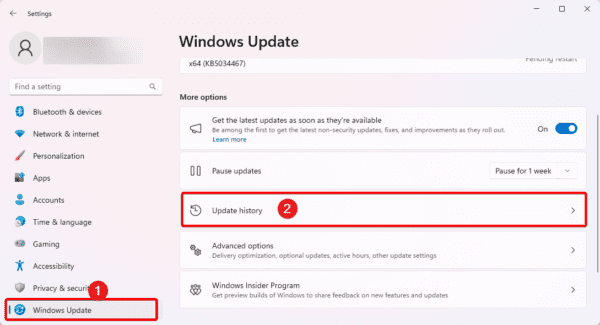
1. Press Windows + I to open the Settings app.
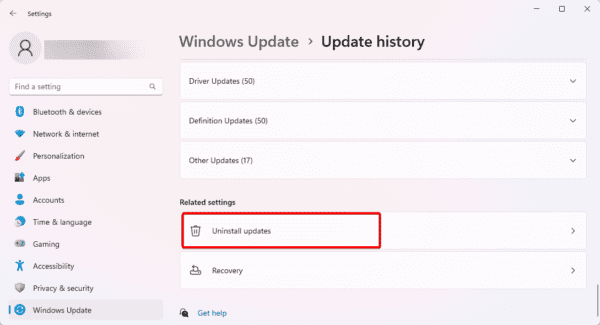
2. Click Windows Update on the lower left corner, then click Update History on the right pane.
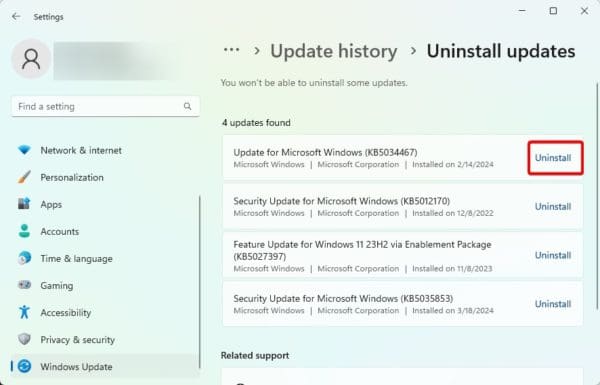
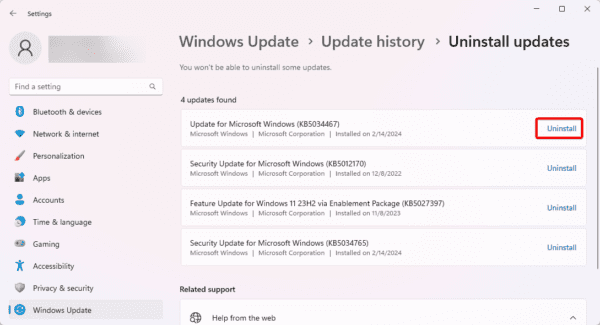
3. Scroll down and click Uninstall Updates.
4. Click the Uninstall button for your most recent updates.
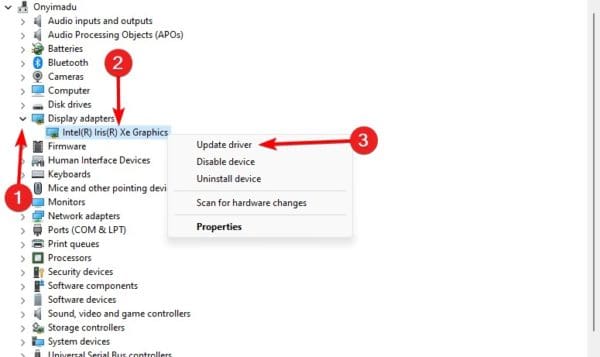
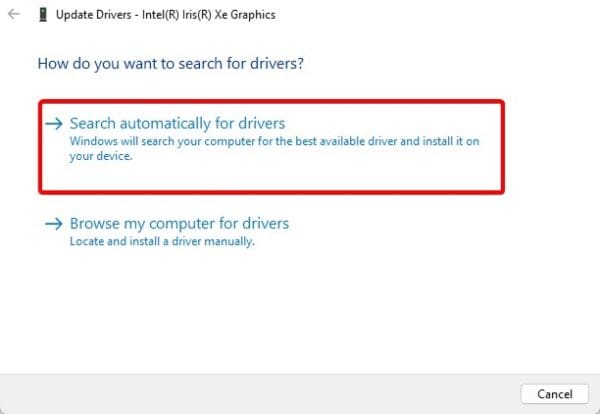
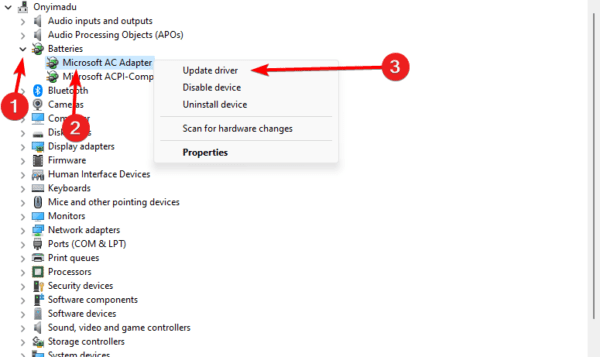
4. Update Windows Display Drivers
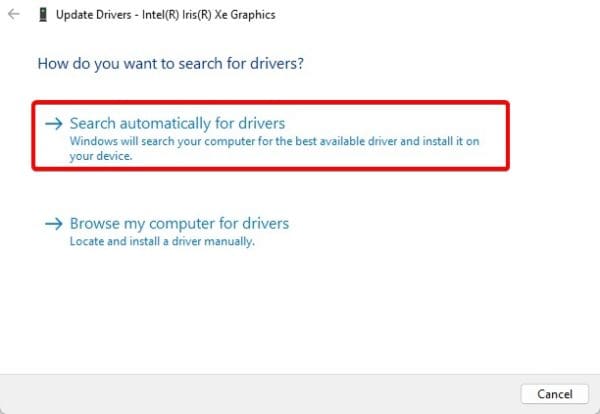
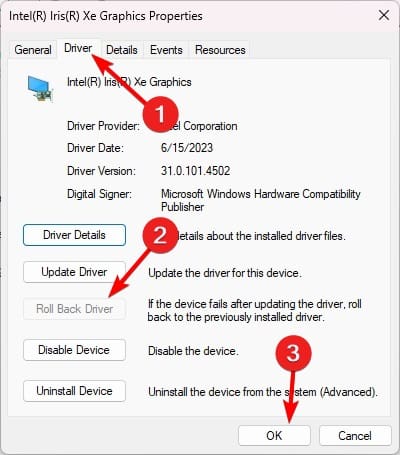
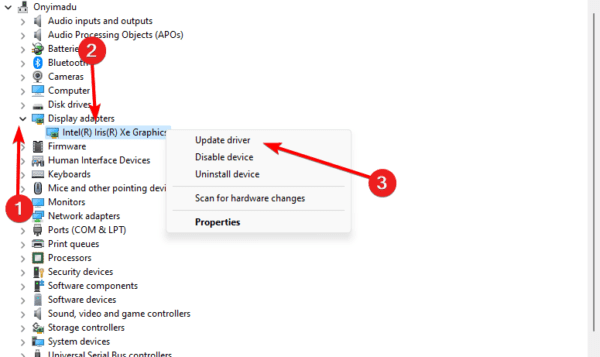
Drivers are an essential part of your computer. They help to maintain communication between the hardware and the operating system. If the display driver is outdated, you may expect a resolution problem. You should update the driver. You may use a driver updater or follow the steps below.
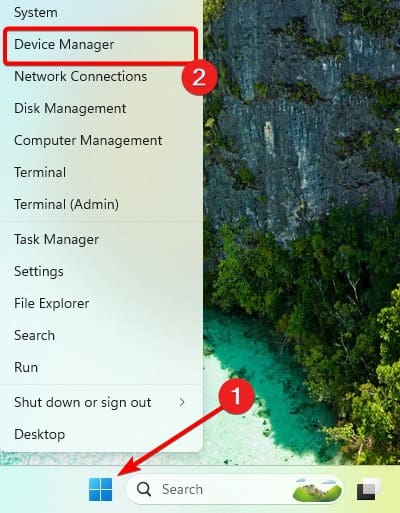
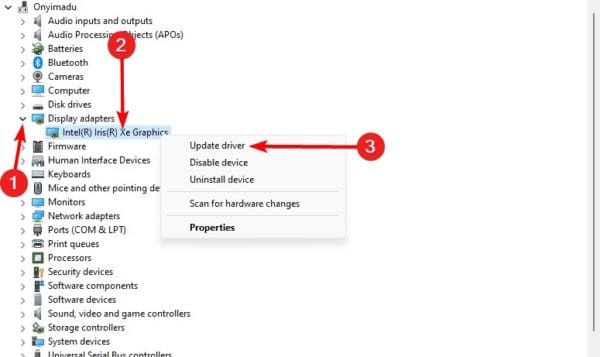
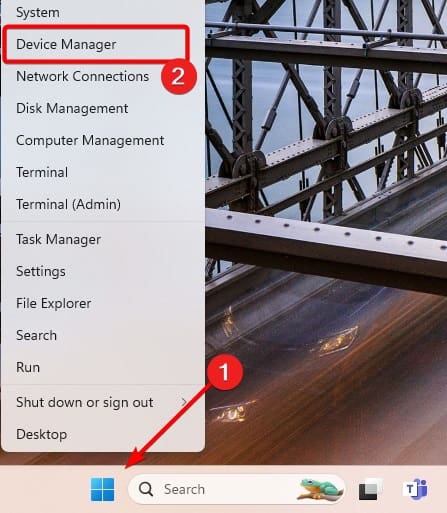
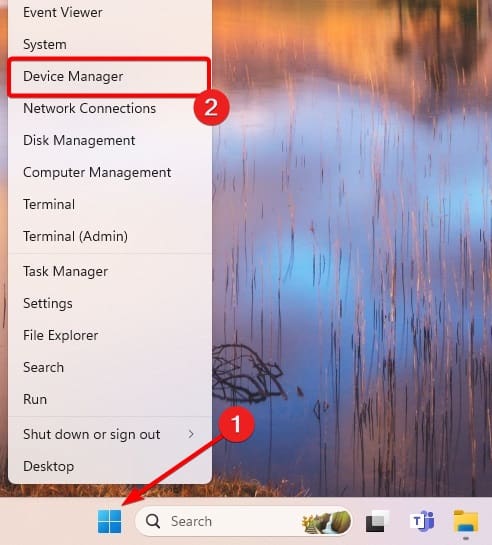
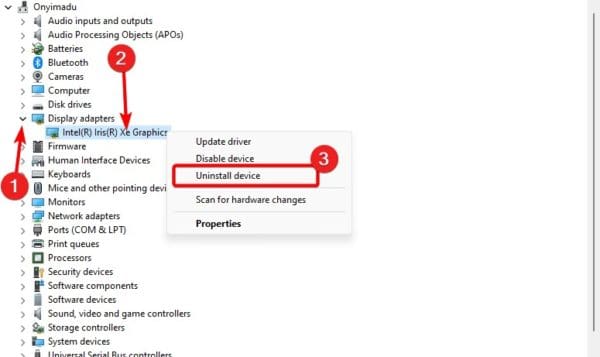
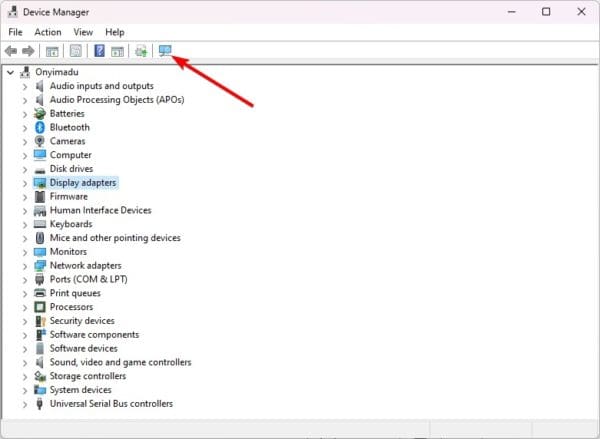
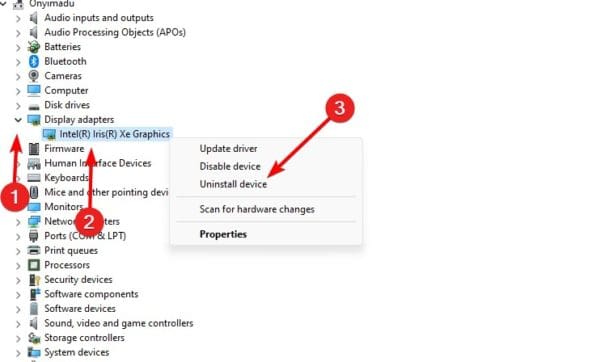
1. Right-click the Start menu and click Device Manager.
2. Expand the Display Adapters category, right-click your display driver, and click Update Driver.
3. Click Search automatically for updates.
Returning the Display to Proper Functioning
There you have it. Any solutions we have explored should return your screen to proper functioning. We have not compiled these fixes in any particular order, so you should start with the most relevant ones.
Please let us know what worked in the comment section below.
USB ports make your computer more accessible. You may use them to transfer files or extend connections to other devices. However, there are a few occasions when you may want to disable USB ports in Windows 11.
This may be necessary to protect against data leaks, reduce the chance of malware exposure, or prevent unnecessary access to certain features like printing. This guide shows you all possible ways to disable the Windows 11 USB ports.
1. Disable Windows 11 USB Ports from the Device Manager
You can use Windows’s Device Manager to monitor and control connected hardware devices. It is the easiest way to enable or disable ports in Windows 11. Follow the steps below.
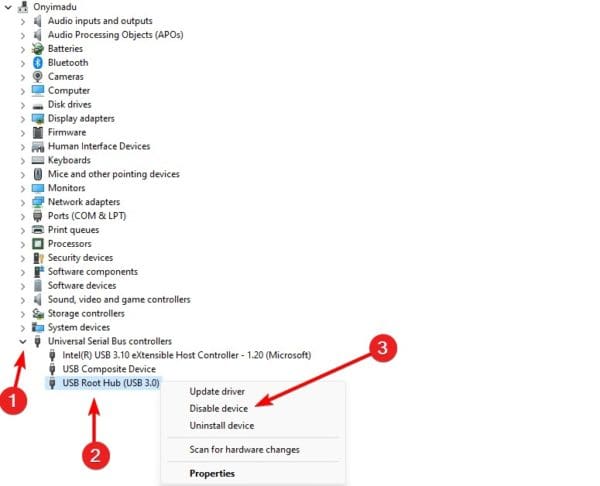
1. Right-click the Start menu and click Device Manager.
2. Expand Universal Serial Bus Controllers, right-click USB Root Hub, and click the Disable device option.
3. Confirm your choice, and the ports should be successfully disabled.
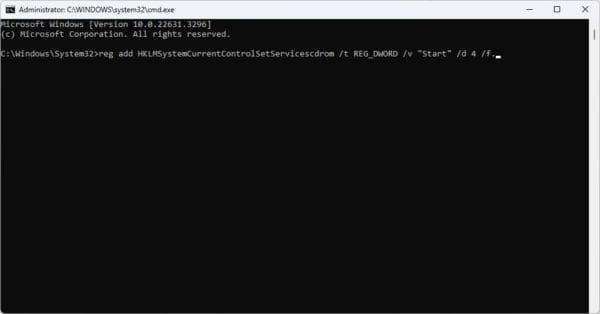
2. Disable Windows 11 USB Ports Using the Command Prompt
On Windows devices, the Command Prompt is an interface for communicating with the operating system via text-based commands. You may run specific commands that will disable the USB ports on your computer.
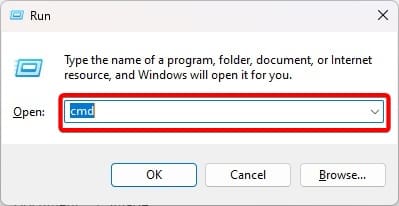
1. Press Windows + R to open your Run dialog.
2. Type cmd and hit the Ctrl + Shift + enter keys to launch the Command Prompt.
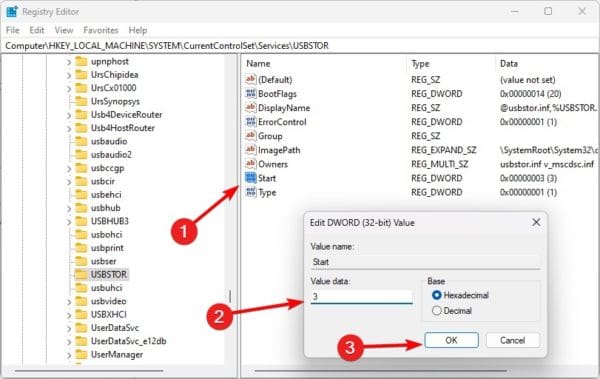
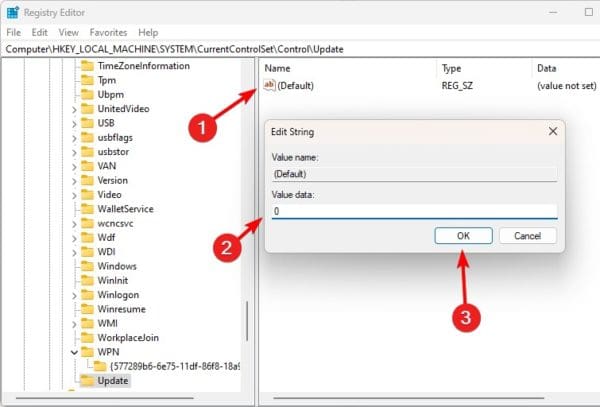
On Windows 11, the Registry Editor is a hierarchical database of configurations and settings for the operating system and applications. You may edit certain keys to disable ports in Windows 11.
1. Open the Run dialog by pressing Windows + R.
2. Type regedit and hit Enter to open the Registry Editor.
4. Double-click Start in the right pane, edit the value data to 4, then click OK.
5. Restart your computer for the changes to take effect.
4. Disable the Windows 11 Ports via the Group Policy
Group policies are often used for administration of groups of devices or users. You may edit the port policy to ensure they are disabled. Follow the steps below.
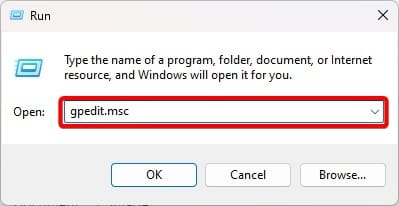
1. Open the Run dialog by pressing Windows + R.
2. Type gpedit.msc and hit Enter to open the Group Policy Editor.
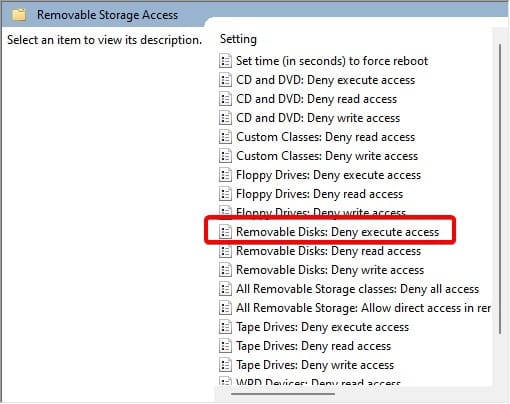
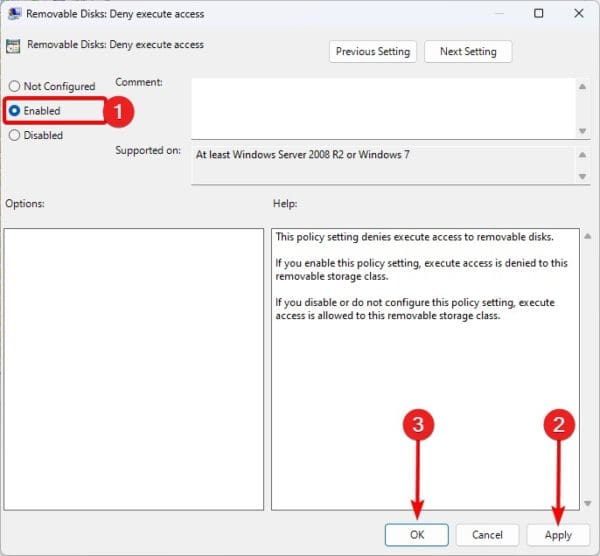
4. In the right pane, double-click Removable Disks: Deny execute access.
5. Click Enabled, then Apply, and OK.
6. Return to the Group Policy Editor and double-click Removable Disks: Deny read access. Then, follow the process in Step 5.
5. Using The BIOS to Disable Windows 11 Ports
The last option for disabling ports is using the Windows BIOS. The BIOS starts your computer and basic hardware components and may be used to disable basic hardware initialization, including shutting down the ports.
1. Turn on your computer and keep tapping the BIOS function key to enter the BIOS. This key may be F10 or some other function key.
2. Navigate to Advanced or More options.
3. Navigate to Advanced.
4. Select USB Configuration.
5. Set the USB port to disable.
No More Windows 11 BIOS
That is as much as you need to know. With the solutions above, the USB ports will no longer function on your computer.
What was your favorite solution? Please tell us in the comment section below. If you are interested in what ports your computer supports, you can check out a related guide.
When you right-click on your Windows desktop, you should see a context menu option to refresh the screen. However, some users have complained that the Windows 11 desktop refresh option is not working.
While this refresh is not a data refresh, it will update the display, which is handy if you have made slight changes to the desktop or its icons. This guide will explain how to fix the problem and provide easy solutions.
Why is the Windows 11 Desktop Refresh Option Not Working?
When your Windows 11 desktop refresh option is not working, there are two leading possibilities.
A Visual Glitch
Certain updates, like the KB5031455 October 2023 preview update, may work well but do not have the visual cue of icons shaking.
Icon elements may be refreshed behind the display so they appear unchanged.
Missing Refresh Option
This may be a sign of file corruption.
Sometimes, it may also be triggered by malware that alters specific operating system behavior.
You may try the solutions below.
How do I Fix a missing refresh Option for the Windows 11 Desktop?
1. Restart the Computer
Restarting your computer is a valid starting point. There are minor bugs or glitches that a reboot will fix. This is because it will force problematic processes, triggering the problem to shut down.
So restart your computer, and if the Windows 11 desktop refresh option is still not working, you may try other solutions.
2. Run the DISM and SFC Scans
File corruption is a common cause of many refresh options’ missing or nonfunctional context. You should run the DISM and SFC scans to fix corruption in system files as well as the installation.
1. Press the Windows + R keys to open the Run dialog.
2. Type cmd and hit Ctrl + Shift + Enter to open the Command Prompt with elevated privileges.
3. Type the command below, hitting Enter after each one to run the DISM scan.
DISM /Online /Cleanup-Image /ScanHealth
DISM /Online /Cleanup-Image /RestoreHealth
4. Run the command below and restart the computer when it completes.
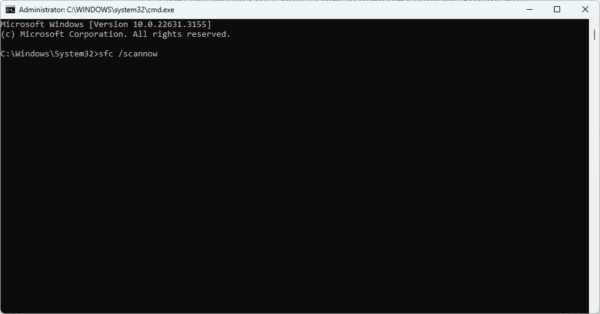
sfc /scannow
3. Update the Operating System
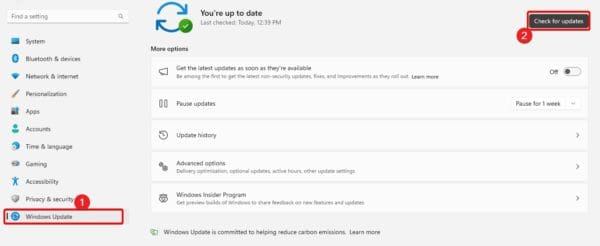
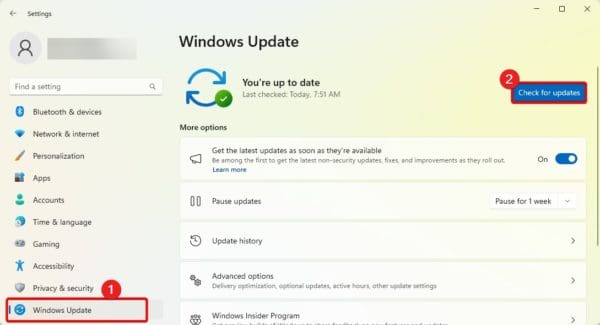
It is a best practice to always run on the latest Windows updates. When the Windows 11 desktop refresh option is not working, an update may fix it. Simply follow the steps below.
1. Press Windows + I to open the Settings app.
2. Click Windows Update on the bottom left pane, then click Check for Updates on the right.
3. Download and install any updates, then restart your computer.
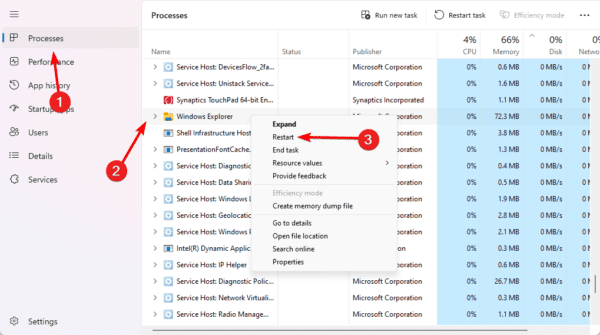
4. Restart Windows Explorer
Windows Explorer is in charge of managing many graphical components. When you press the context menu refresh option, there is a chance that it is not being graphically displayed while it has been refreshed. Restarting Windows Explorer may fix this glitch.
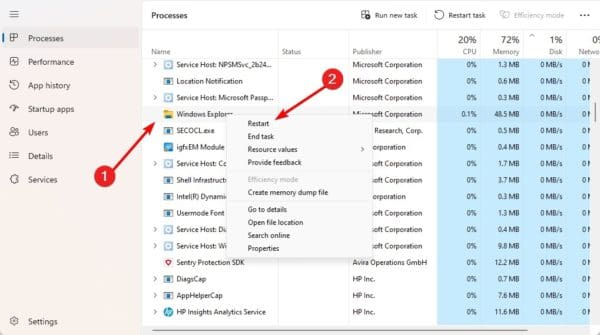
1. Press Ctrl + Shift + Esc to open the Task Manager.
2. Click the Windows Explorer process and click Restart. You may have to pause Task Manager updates to find this process.
5. Scan for Malware
You should not rule out the possibility of malware infection when the Windows 11 desktop refresh option is not working. This is because viruses are known to alter the proper functioning of computers.
You may run a complete malware scan using the built-in Windows Security or any other robust antivirus program.
6. Update Registry Control Key Configuration
If none of the solutions we have explored above work, you may update certain registry keys. This will ensure that the refresh option is not turned off.
1. Press the Windows + R keys to open the Run dialog.
2. Type regedit and hit Enter to open the Registry Editor.
An exe file is a program or executable file on Windows computers. When you double-click on these files, Windows tries to run the program’s instructions. However, there are cases when you are unable to run exe files on Windows 11.
This guide explains the most effective way to fix this problem. Follow along.
1. Restart the Computer
You should first start by restarting. A restart will free up temporary files, which is effective if they are corrupt and interfering with other applications.
It will also reload Windows services, which may fix minor bugs that make you unable to run exe files on Windows 11. After the restart, if the problem is not fixed, proceed to other solutions.
2. Resolve File Association Issues
When you are unable to run an exe file, you may simply have the wrong file association. The process of fixing file association is fairly easy. Just follow the steps below.
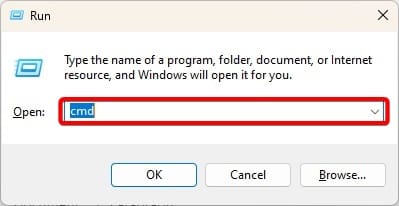
1. Press Windows + R to launch the Run dialog.
2. Type cmd and hit Ctrl + Shift + Enter to launch an elevated Command Prompt.
3. Type the command below and hit Enter.
assoc .exe=exefile
3. Tweak the Associated Registry Entries
The Windows registry is a hierarchical database of Windows settings and configurations. A wrong configuration will affect software performance and may be why you are unable to run EXE files on Windows 11. You may tweak certain values following the steps below.
1. Press Windows+ R to open the Run dialog.
2. Type regedit and hit Enter.
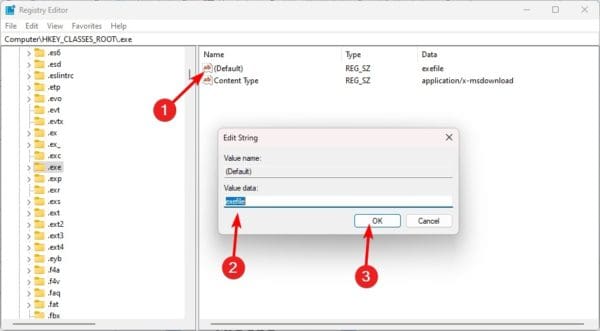
3. Navigate to the path below:
Computer\HKEY_CLASSES_ROOT.exe
4. On the right pane, double-click Default, change its Value data to exefile, and click OK.
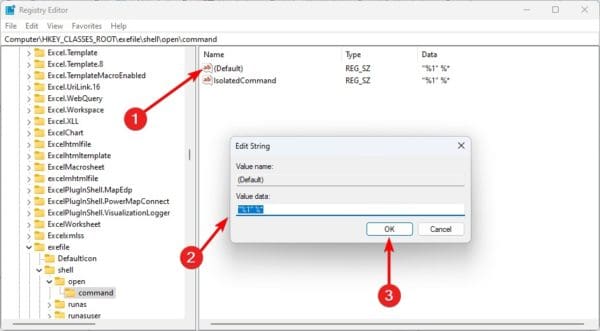
5. Next, Navigate to the path below:
HKEY_CLASSES_ROOT\exefile\shell\open\command
6. On the right pane, double-click Default, change its Value data to “%1”%*, and click OK.
7. restart your computer and verify it fixes the exe error.
4. Scan for Malware
Malware can change the general functioning of your computer. It could easily be why you are unable to run exe files on Windows 11. You should run a comprehensive malware scan.
You may use the built-in Windows Security or other trusted antivirus programs. After the scan, verify that the problem is fixed.
5. Use an Administrator Account
There is a chance that your current user account does not have permission to run the file. This may be why you are unable to run exe files on Windows 11.
If this is the case, logging out and re-logging in with an administrator account should fix the problem. However, if it persists, you may try the last solution below.
6. Fix Corrupted System Files
File corruption is a common reason you are unable to run EXE files on Windows 11. You may resolve the problem by running the SFC scan. This scan will repair or replace corrupted files and should resolve the problem.
1. Press Windows + R to launch the Run dialog.
2. Type cmd and hit Ctrl + Shift + Enter to launch an elevated Command Prompt.
3. Type the command below and hit Enter.
sfc /scannow
4. Follow any on-screen instructions to complete the process, then restart your computer and verify the problem is fixed.
7. Create a New User Profile
If you are unable to fix the problem by running the exe file with an administrative account, you should create a new user profile and retry opening the file. Follow the steps below to create a new user account.
1. Press Windows + I to open the Settings App.
2. Click the Accounts option on the left pane, then on the right, click Other users.
3. Click the Add account button.
4. Click the I don’t have this person’s sign-in information option.
5. Click the Add user without a Microsoft account option.
6. Fill out the form with your desired username and password, then click next.
7. Click Change account type for the newly created account.
8. Select Administrator and click OK.
Running EXE Files on Windows 11 With Ease
If you have followed the abovementioned solutions, you should be able to run your exe files on Windows 11. Since we did not mention the fixes in any particular order, you should start with whatever feels the most applicable.
Please tell us what solution worked in the comment section below.
FAQs
Why is my EXE file not running?
The file may be corrupted, or there may be problems with the program association.
How can I determine if my EXE files are corrupted?
A good option will be to try running the file on a different computer or other exe files to see if it is an isolated problem.
You may do a lot with the Group Policy, including managing the browser. Are you trying to view applied group policies for your Windows 11 device? This guide covers all the important concepts to help you view these policies. Let us get right to it.
What is a Windows 11 Group Policy?
Windows 11 Group Policy is a powerful operating system feature that allows an administrator to manage features for users and computers in a domain environment.
You may use it as an administrator to enforce consistency and security across several devices or users concurrently. This tool is available by default for Windows 11 Pro and Enterprise editions.
How can I view Applied Group Policies on Windows Computers?
1. Using the Command Prompt
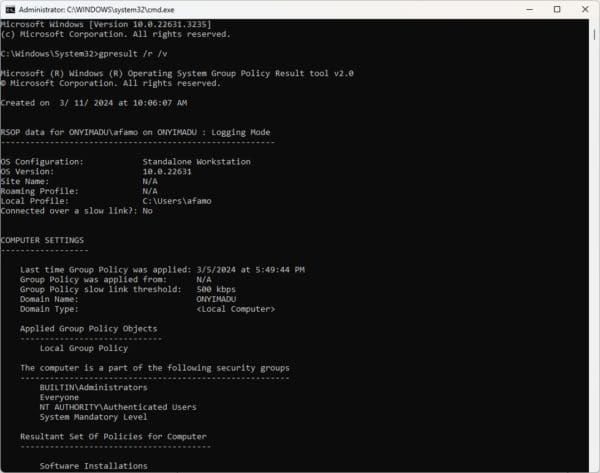
The command prompt is a command line interface that allows you to interact with the operating system using text-based commands. You may write certain commands on the Command prompt to view the applied group policies on your computer. Follow the steps below.
1. Press Windows + R to open your Run dialog.
2. Type cmd and hit Ctrl + Shift + Enter.
3. Type the command below and hit Enter.
gpresult /r /v
4. You may study the results to see all applied policies.
2. By Sorting and Filtering the Local Group Policy Editor
The Windows Group Policy editor comes with a set of features. You may use its sorting and filtering options to view the applied group policies. Follow the steps below.
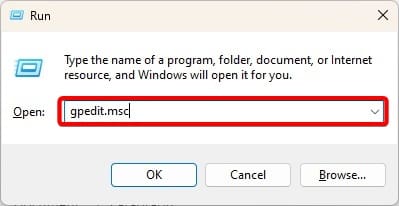
1. Press Windows + R, type gpedit.msc, and hit Enter to open the Group Policy Editor.
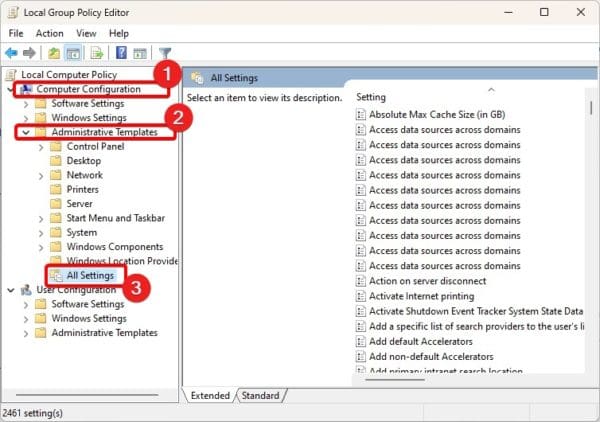
2. On the left pane, navigate Computer Configuration > Administrative Templates > All Settings
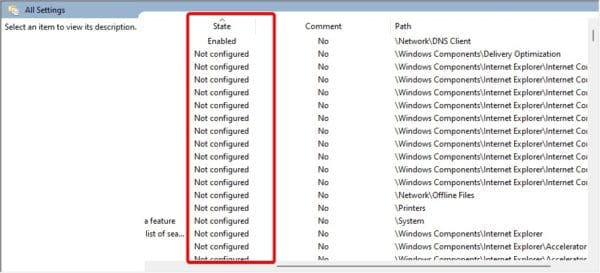
3. On the right, you will see a set of policies. You may click the State column to sort them into Enabled and Not Configured policies.
3. Using the Resultant Set of Policy (RSOP)
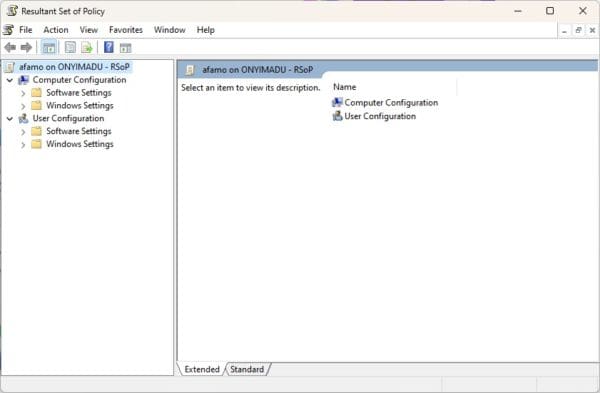
The Resultant Set of Policy is built into Windows 7 and all later editions. This tool is used for admins to view and troubleshoot Group Policy settings. You may also use it to view the applied group policies for your device.
1. Press Windows + R, type rsop.msc, and hit Enter to open the Resultant Set of Policy.
2. Resultant Set of Policy will open. It looks similar to your Local Group Policy Editor but will only show policies applied to your computer.
4. Using Windows PowerShell
The Powershell is similar to the Command Prompt; however, it offers more capabilities and functions for administration. You may use it to view applied group policies for your device by following the steps below.
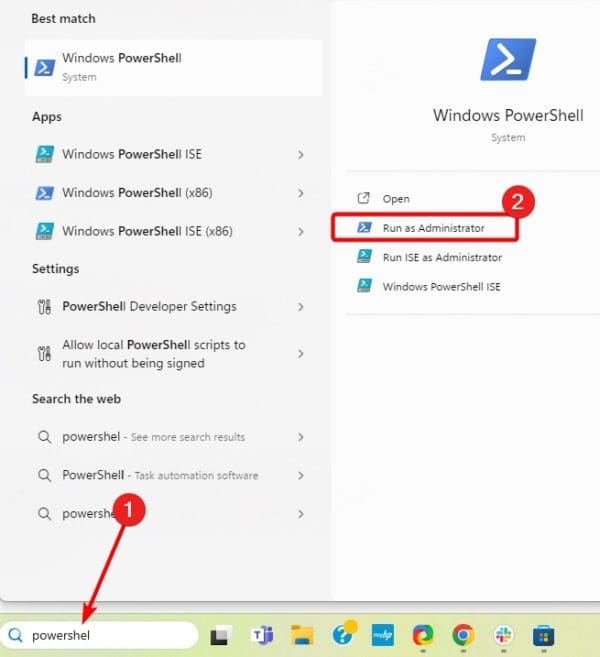
1. Click the magnifying lens of your Taskbar, type PowerShell, and click the Run as Administrator option.
2. In the terminal, type the command below and hit Enter.
gpresult /Scope User /v
3. Go through the results to view applied group policies for your device.
Viewing Windows 11 Applied Group Policies
In this guide, we have explored all you need to know about viewing applied group policies on Windows 11. We have provided four options; you may stick to whichever you find more convenient.
That is as much as we share in this guide. Did you find the solutions helpful? Please tell us what your favorite is in the comment section below.
If you have tried to update your computer but cannot install some critical updates, you may get the error message that your device is missing important security and quality fixes. This error may include the 0x80070643 error code.
This error is similar to the 0x8024ce16 Windows update. In this guide, we will walk you through some of the most effective ways of fixing the Windows 11 problem.
1. Run the Windows Update Troubleshooter
On Windows 11, you have several troubleshooters built into the operating system. The Windows Update troubleshooter is one of them. It will scan the computer for potential causes of your device missing important security and quality fixes. It will fix the problem or recommend solutions.
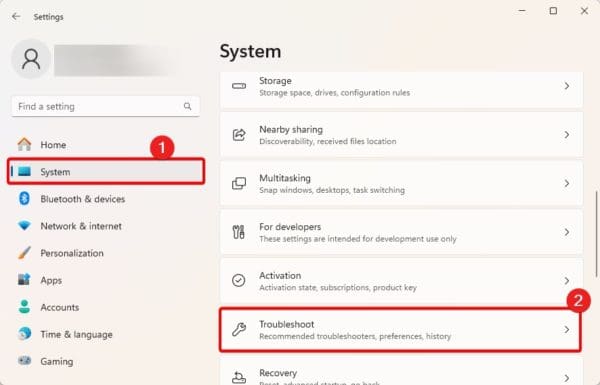
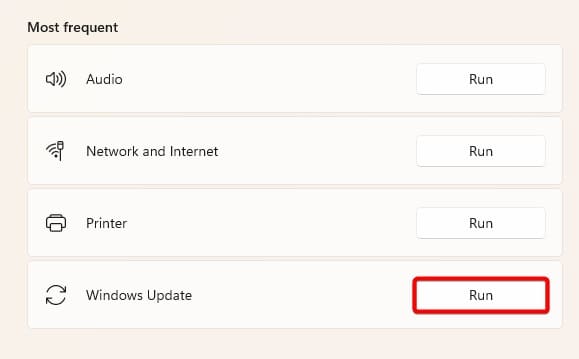
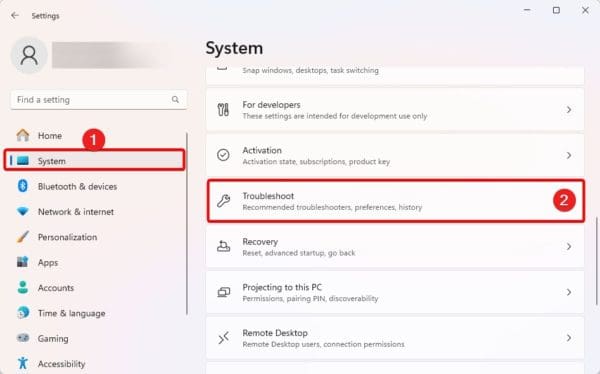
1. Open the Settings app by pressing the Windows + I keys.
2. Click the System option on the left, then click Troubleshoot on the right.
3. Click Other troubleshooters.
4. Click the Run button for Windows Update.
5. Follow the wizard to complete the process, then restart the computer if needed.
2. Reset Windows Update Components
When you encounter the error that your device is missing important security and quality fixes, you should reset Windows update components. This reset will fix corruption or missing files that may contribute to the error.
1. Click the magnifying lens on the Taskbar, type cmd, and hit Run as Administrator.
2. Run the commands below by typing them in the command prompt and hitting Enter after each one. This will stop all update services.
net stop wuauserv
net stop bits
net stop appidsvc
net stop cryptsvc
3. Optionally, delete your temporary files by running the command below:
cd %systemroot%\SoftwareDistribution
del /f /s /q *.*
4. Run both commands below to rename the SoftwareDistribution and Catroot2 folders.
5. Finally, restart the update services by running the command below, then restart the computer.
net start wuauserv
net start bits
net start appidsvc
net start cryptsvc
3. Fix Image and System File Corruption
File corruption is a common cause of update errors: your device is missing important security and quality fixes. On Windows 11, you may use the DISM and SFC scans to fix said corruption. These scans will replace or repair any corrupted files.
1. Click the magnifying lens on the Taskbar, type cmd, and hit Run as Administrator.
2. Run the two DISM commands below to scan for image corruption and fix any discovered corruption.
DISM /Online /Cleanup-Image /ScanHealth
DISM /Online /Cleanup-Image /RestoreHealth
3. Fix system file corruption by running the SFC scan below.
sfc /scannow
4. Delete the Windows Update Registry Log
You may suspect log corruption if you are still experiencing the update error after all the solutions above. In that case, you should consider deleting the Windows Update registry log. Follow the steps below.
1. Click the magnifying lens on the Taskbar, type cmd, and hit Run as Administrator.
2. Type the commands below, and hit Enter after each one.
3. Lastly, restart your computer and retry the update to see if the error: your device is missing important security and quality fixes is resolved.
Successfully Updating Windows
The solutions in this guide will help you successfully update your computer without the error: your device is missing important security and quality fixes.
You may reset the computer as a last resort; however, the solutions we offer should suffice in most cases.
Were you able to resolve the error? Please tell us what worked in the comment section below.
FAQs
Why am I unable to install critical updates on my Windows 11 computer?
Common causes may include corrupted system files or problems with update components.
Is a computer reset safe to fix this problem?
It is safe; however, it should only be a last resort because you may lose valuable data.
Smart App Control on Windows 11 is a security feature that protects you from new threats by blocking malicious or untrusted apps. You may also use the feature to block any app you do not want. If you are wondering how to enable or disable Smart App Control in Windows 11, this article is for you.
How Do I Enable Smart App Control?
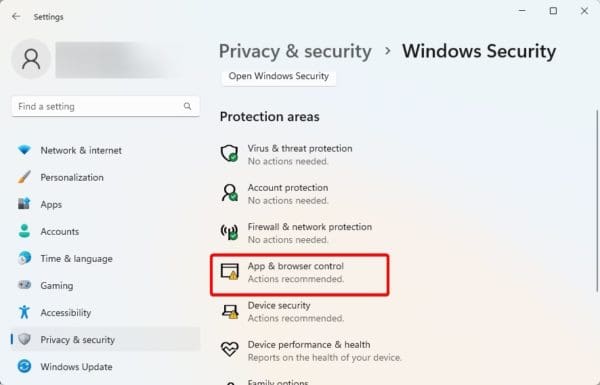
1. Open the Settings application by pressing the Windows + I keys.
2. Click Privacy & Security on the left and Windows Security on the right pane.
3. Click App & browser control.
4. Click the Smart App Control settings option.
5. Click On.
How Do I Disable Smart App Control?
1. Open the Settings application by pressing the Windows + I keys.
2. Click Privacy & Security on the left and Windows Security on the right pane.
3. Click App & browser control.
4. Click the Smart App Control settings option.
5. Click Off.
How Does Smart App Control Function?
Microsoft has an intelligent cloud-powered security service that predicts how safe applications are. When you enable Smart App Control, it consults this service anytime an application is run to determine its safety.
Smart App Control will automatically block the application once it is predicted to be unsafe or harmful.
Also, whenever the intelligent cloud-powered security service cannot predict an app’s safety, Smart App Control consults to see if the app has a valid signature and only allows it to run if the signature can be authenticated.
Why is Smart App Control Off by Default?
If you do not have a clean install of Windows 11, it is normal for Smart App Control to be disabled by default.
If this is the case, you must note that the only way to turn it on will be by clean installing your computer. This is because Microsoft needs to ensure that no untrusted apps are installed on the computer before using Smart App Control.
Get the Best Out of Smart App Control
In this guide, we have explored other important concepts related to Smart App Control, including how it operates, in addition to how to enable or disable It in Windows 11.
Will you feel safe using a computer without Smart App Control? Please let us know in the comment section below.
FAQs
Should you use Smart App Control in place of an antivirus?
No, you should not. In fact, Smart App Control works to complement other security applications.
Is it safe to disable Smart App Control?
While you can run any app on your computer with Smart App Control disabled, you should know that you carry the risk of running apps with potential security concerns.
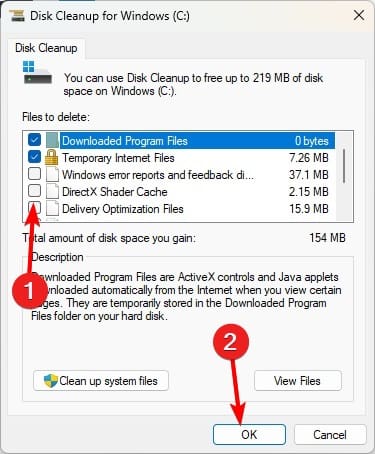
Windows 11 is a robust operating system with a host of features, especially optimization features. In this guide, we explore one of them, the DirectX Shader Cache in Windows 11, and show you all the different ways to clear it when needed.
What is DirectX Shader Cache in Windows 11?
On Windows 11, the DirectX Shader is the optimization feature for storing pre-compiled versions of special instructions, which are called shaders.
Shaders are tiny programs that your graphics card understands. These programs direct the graphics card’s handling of various graphical effects.
Compiling these shaders may be time-consuming, so the cache increases optimization because pre-compiled versions are easier and faster to access.
Should I Clear the DirectX Shader Cache?
Your decision to clear the cache will depend on you. However, below are some reasons why you may want to do so.
To resolve performance issues – A cleared DirectX Shader cache may resolve some performance issues, including graphical glitches and stuttering.
Freeing up disk space – Even though the cache may not take up much space, clearing it will still free up some extra space on your computer.
To update the cache – If you have just updated your graphics card or installed new games, you may clear the DirectX Shader cache to fill it with new information.
How do I Clear the DirectX Shader Cache?
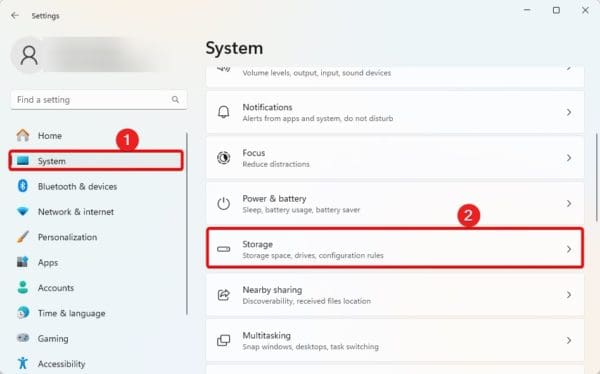
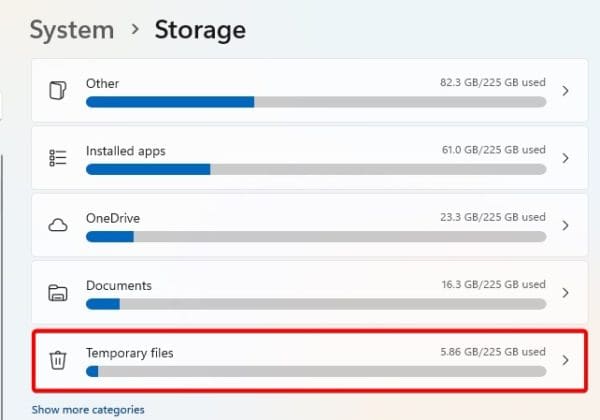
1. Using the Settings App
1. Lunch the Settings app by clicking Windows + I.
2. Navigate System, then Storage.
3. Select Temporary files.
4. Select DirectX Shader cache and click the Remove Files option at the top.
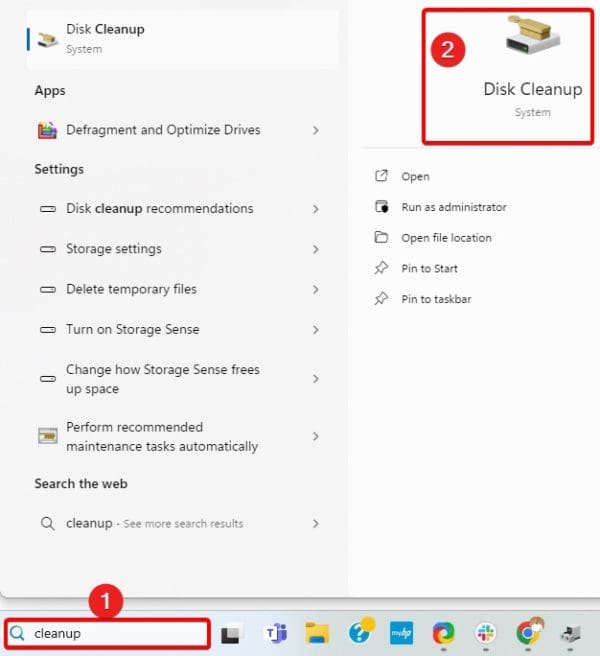
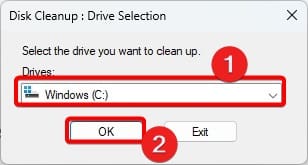
2. Clear DirectX Shader Cache Using Disk Cleanup
1. Click the Taskbar’s magnifying lens type cleanup, and click Disk Cleanup.
2. Select your C drive, then click the OK button.
3. Tick the DirectX Shader cache option and click OK.
Do I Have to Replace the DirectX Shader Cache After Deleting It?
No, you do not have to replace it. After this cache is deleted, your operating system will automatically fill it with all the needed information.
You should also note that clearing the cache is not something you must do often. It is mainly a troubleshooting step when you face some graphical issues.
A New DirectX Shader Cache
This is all we share in this guide. If you have followed from the beginning, you already know all there is to know about the cache, and you probably already have a new DirectX Shader cache.
Were you able to clear the DirectX Shader Cache in Windows 11? Ask your questions in the comment section below.
FAQs
Does clearing the cache affect system stability?
No, this procedure will not negatively affect your system. This is because the cache is isolated storage with no permanent information.
Is it possible to disable or prevent the creation of the DirectX Shader Cache?
Windows 11 has no official way of disabling this optimization feature.
The keyboard is an integral part of your computer. In addition to typing text and entering data, you may use it for other activities like gaming. However, there are a few instances when the Windows 11 Keyboard starts automatically typing.
This guide addresses this problem, recommending the most effective fixes. Let us get started.
1. Check for Mechanical Faults
Before proceeding to complex solutions, you should ensure no mechanical faults on the keyboard. Some of these faults could happen because of impact, so maybe you dropped the keyboard. It may also just be natural wear and tear.
In some cases, you may have debris or dirt on your keyboard. You should make sure it is properly cleaned. Also, examine the cables to ensure they are not broken at any point.
2. Connect the Keyboard to a Different Port
If you are experiencing the keyboard automatically typing, you should try plugging it into another port. This may be useful for a wired keyboard connected to a faulty port.
You may even try connecting to a different computer to rule out keyboard damage.
3. Restart the Computer
Once you are sure the keyboard is not faulty, restart your computer. A simple restart is often strong enough to fix minor faults on your keyboard. When you restart the computer, it will forcefully stop all running programs and processes.
If any of these processes had bugs, the problem should be corrected at restart.
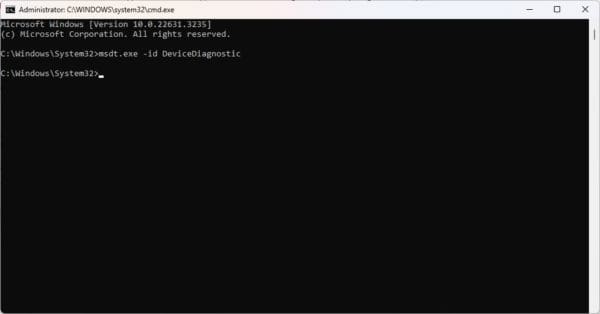
4. Run the Keyboard Troubleshooter
Windows comes with a handy keyboard troubleshooter. When the keyboard is automatically typing, you may use this utility. It scans the computer for possible causes and will fix them or recommend troubleshooting steps.
1. launch your Run dialog by pressing Windows + R.
2. Type cmd and hit Enter.
3. Type the command below and hit Enter to launch the troubleshooter.
msdt.exe -id DeviceDiagnostic
4. Click Next and follow the wizard to complete troubleshooting.
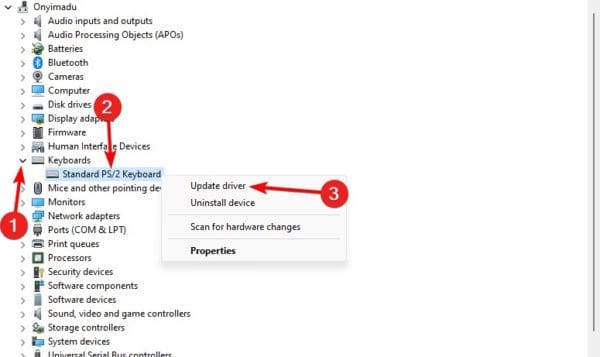
5. Update Keyboard Drivers
Drivers are integral to communication between hardware components and the operating system. When your keyboard driver is outdated, you may expect erratic keyboard behavior, like the keyboard automatically typing. You may use an updater software or manually update the keyboard driver with the steps below.
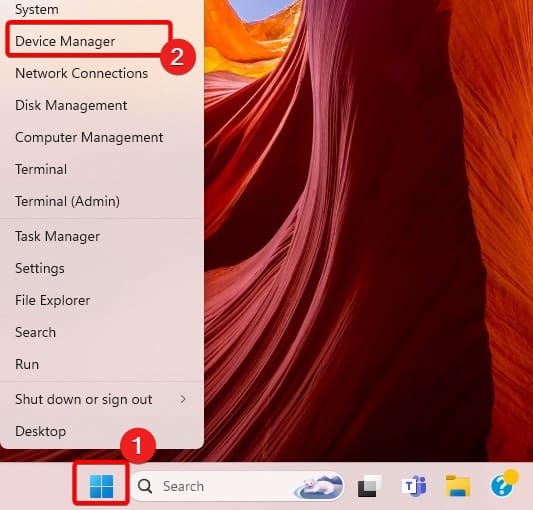
1. Right-click the Start menu and click Device Manager.
2. Expand the Keyboard category, right-click your driver, and click Update driver.
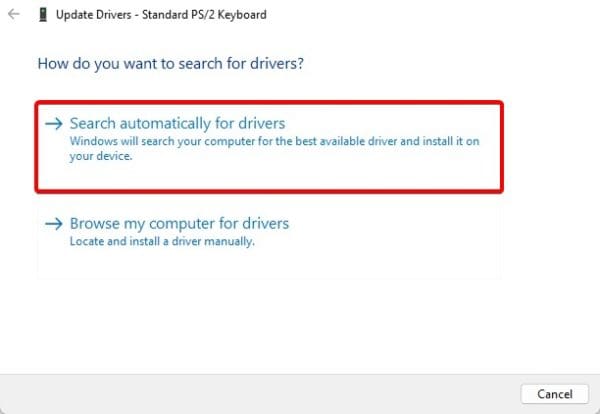
3. Click Search automatically for drivers.
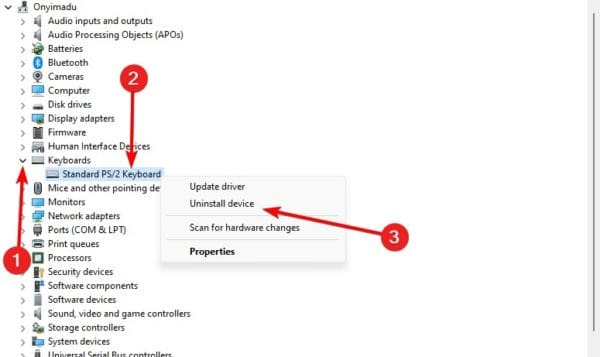
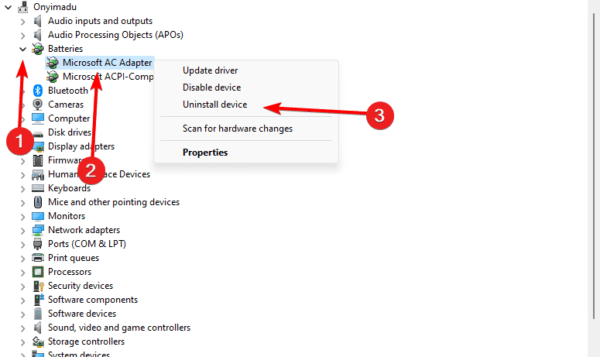
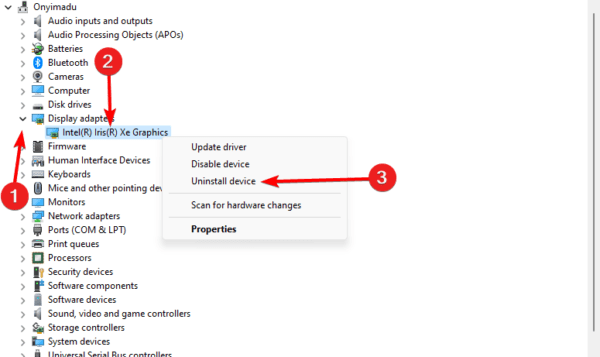
6. Reinstall Keyboard Drivers
If an update does not work, severe driver corruption may trigger the problem; you should uninstall and reinstall it. Follow the steps below.
1. Right-click the Start menu and click Device Manager.
2. Expand the Keyboard category, right-click your driver, and click Uninstall device.
3. Restart your computer, and a new driver should automatically be installed.
7. Disable the Mouse, Sticky, and Filter Keys
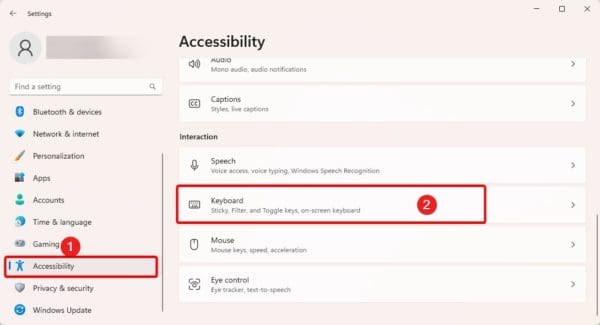
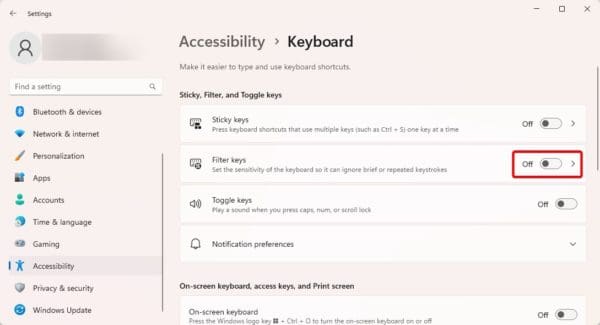
This is a small tweak, but it can fix the problem because these options are disabled by default, and enabling them may have triggered the mouse typing on its own.
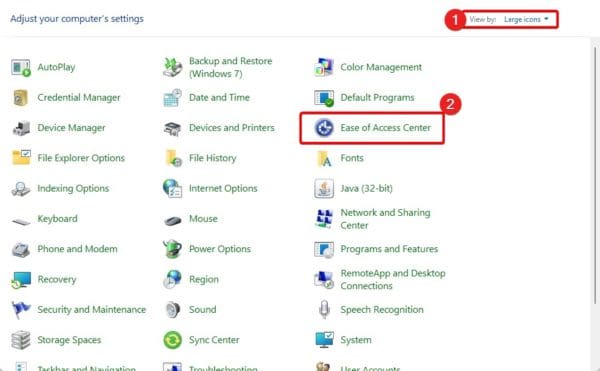
1. Press Windows + R, type control, and hit Enter.
2. Set View by to Large icons and click Ease of Access Center.
3. Select Make the keyboard easier to use.
4. Uncheck the options for Mouse, Sticky, and Filter Keys, then click Apply and OK.
8. Update Windows
When your computer is outdated, you may expect some malfunction. The keyboard automatically typing is often a side effect. You should follow the steps below to update Windows.
1. Launch the Settings app by pressing the Windows + I keys.
2. On the left pane, click Windows Update, then click the Check for updates button on the right.
3. Download and install any updates and restart your computer.
Printing is often an important part of computer use, converting soft copy materials to paper form. However, you may have come across the 0x000006d9 printer sharing error. This is what we will resolve in this guide.
This printer-sharing error has existed since earlier versions of Windows and may still be a problem on Windows 11. It is often a sign that your firewall is disabled.
The solutions below will be your best options to fix the error. However, ensure your printer drivers are updated before proceeding to the fixes below—this may save you a lot of trouble. You can use automatic driver updaters to ensure all computer drivers are current.
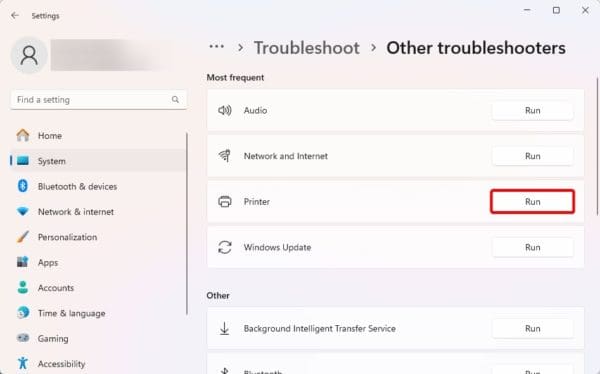
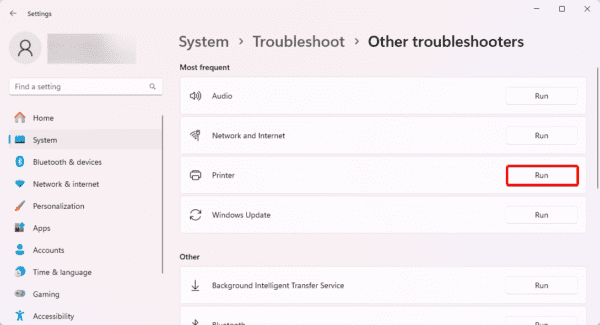
1. Run the Printer Troubleshooter
Windows 11 has a set of troubleshooters, and the printer troubleshooter is one of them. It scans your computer for potential triggers of the problem and fixes it or recommends troubleshooting steps.
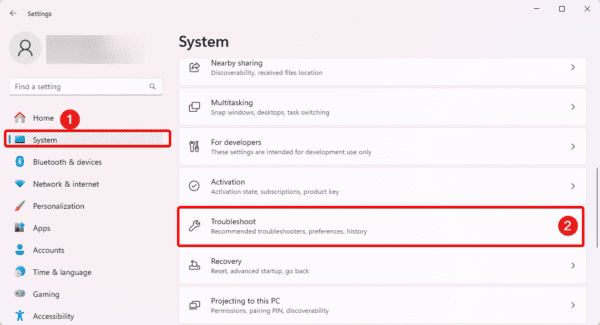
1. Open your Settings app. You may do so by pressing Windows + I on your keyboard.
2. Click on the System tab on the left pane, then on the right, click Troubleshoot.
3. Click Other troubleshooters.
4. Run the Printer troubleshooter by clicking its Run button.
2. Enable Windows Firewall
The 0x000006d9 printer sharing error often indicates that the Windows firewall is disabled. This is because sharing a printer also means sharing files associated with the printer driver and configuration. This process is controlled by the File and Printer Sharing feature that the Windows firewall must authorize.
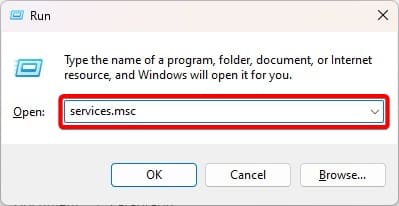
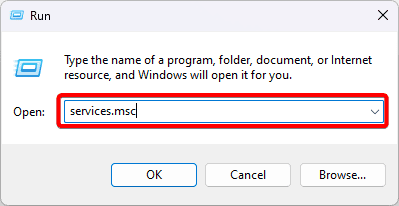
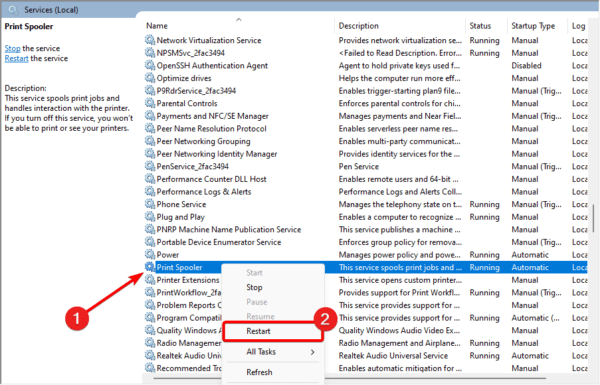
1. Press Windows + R.
2. Type services.msc and hit Enter.
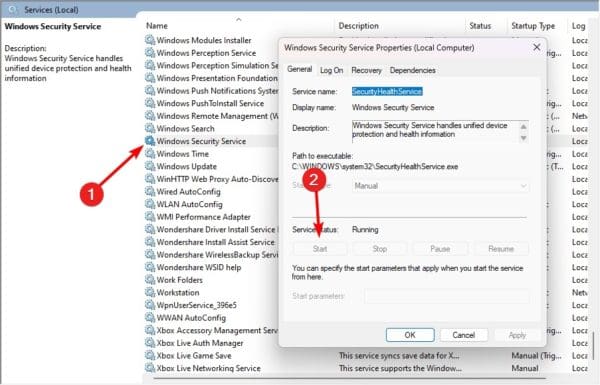
3. Double-click Security Health Service, click Start if it is not running, then click Apply and OK.
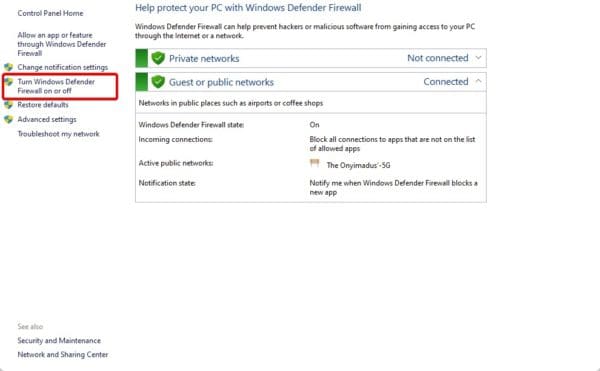
4. Once more launch Windows Run dialog, inpute control.exe /NAME Microsoft.WindowsFirewall and hit Enter.
5. Click Turn Windows Firewall on or off on the left pane.
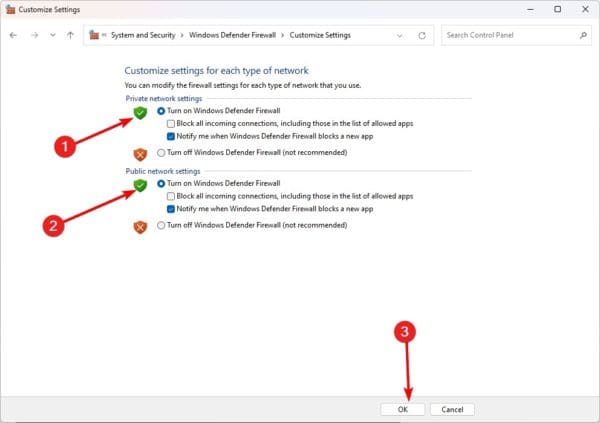
6. Tick all Turn on Windows Defender Firewall options, then click OK.
3. Uninstall or Disable Third-party Antivirus
While we always recommend using antivirus software, you should note that some third-party options may not be best suited for your computer. It may conflict with the built-in Windows Security and trigger the 0x000006d9 printer sharing error.
If this is the case, you should uninstall or temporarily disable the antivirus.
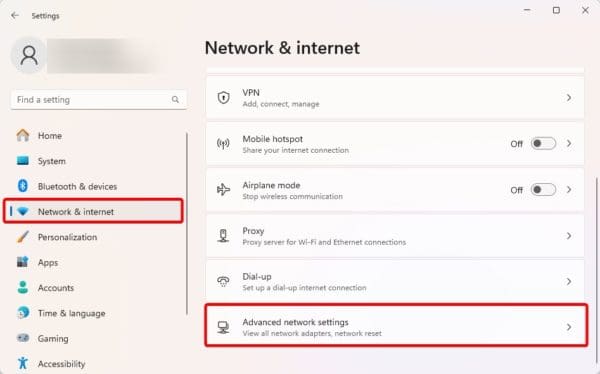
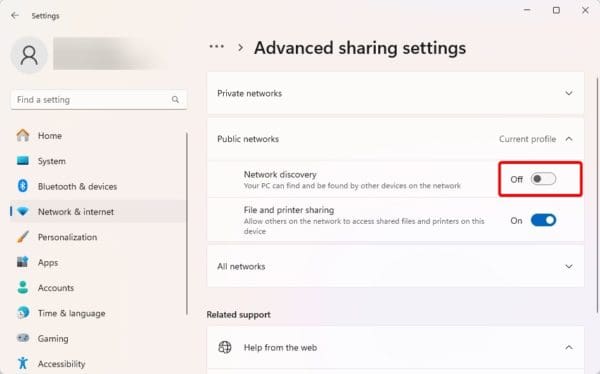
4. Turn on Network Discovery for Printer
Your last option to resolve the 0x000006d9 printer sharing error is to enable network discovery.
Network discovery ensures that your computer is able to see and interact with devices on the same network. You may follow the steps below.
1. Launch the Settings app by pressing Windows + R.
2. On the left pane, click Network & Internet, then click Advanced network sharing on the left.
3. Click Advanced sharing settings.
4. Lastly, toggle on the option for Network Discovery.
Moving Past the 0x000006d9 Printer Sharing Error
With the solutions we have shared in this guide, you should be past the 0x000006d9 printer sharing error. While we have shown steps in the Windows 11 operating system, please note that this error happens in earlier versions of the OS. The fixes will still apply, even though there may be slight UI changes.
Did you successfully fix the problem? Please tell us in the comment section what fixes worked.
FAQs
Why can’t I share a printer between Windows 7 and 10?
You can share printers between these operating systems; however, you will have to supply the 64-bit printer driver on the Windows 7 device.
Should I uninstall third-party antivirus software?
Yes, this may be a reliable fix if the third-party antivirus is conflicting with the built-in tool.
In the past, we have explored the best gaming settings on your PC. However, if you want to go deeper and find the best suggestion on how to run high-graphics games on low-end Windows computers, you should read this guide till the end.
Playing High-Graphics Games on a Low-Spec Computer
1. Get the Latest graphics Cards
Your graphics card plays a vital role in rendering high-fidelity visuals. They also ensure that you get smooth visuals even on high-resource demanding games. While on a low-spec computer, you should ensure your graphics driver is updated to the latest version. This way, you get the most out of your current hardware.
2. Reduce the Graphics Settings for the Game
Lowering the graphics settings in-game is a very effective way to get the most out of your current hardware. This will reduce the system’s resource demand and allow the game to run smoothly.
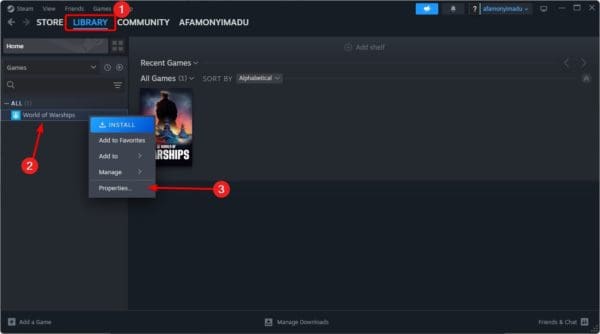
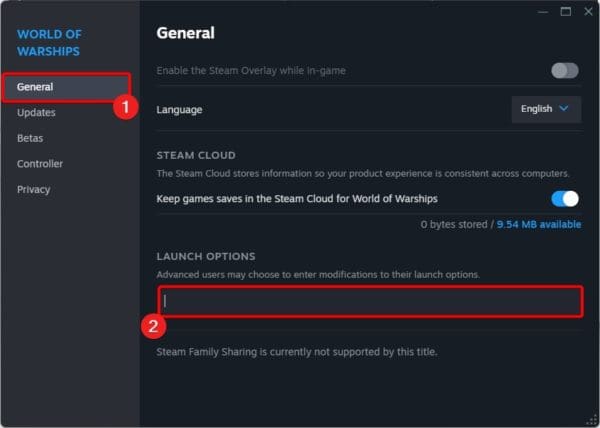
It will also elevate the frame rate and reduce the amount of memory your computer requires to run the game. The process will depend on the app you use for playing games. On Steam, you may follow the steps below.
1. Launch your Steam app.
2. Click Library, right-click on the game, and click Properties.
3. Click General on the left pane, then enter game-specific options in the Launch Options text space. For instance, certain games’ start choices let you choose the resolution or graphical quality level. You can also find directions for a particular game through internet groups or forums.
3. Overclock your Computer
When you overclock a computer, you increase its clock speed. This simply allows the central processing unit (CPU) or graphics processing unit (GPU) to perform beyond their default ratings. It lets the computer process information faster and boosts performance.
However, overclocking should be done carefully to guard against crashes, overheating, and damage. There are several software you may use to overclock your computer. Some common ones include:
Another suggestion when running high-resolution games on a low-end Windows device is to play them on a browser. Web-based games are generally lightweight and less demanding on system resources, so you can have a great gaming experience even on lower-spec computers.
5. End other Running Processes
Since these games are very demanding on your system resources, you must make all resources available to them. Hence, closing other running programs makes the game run more efficiently and smoothly.
You may simply click the close button for running apps, or launch the task manager, and close open programs. Follow the steps below.
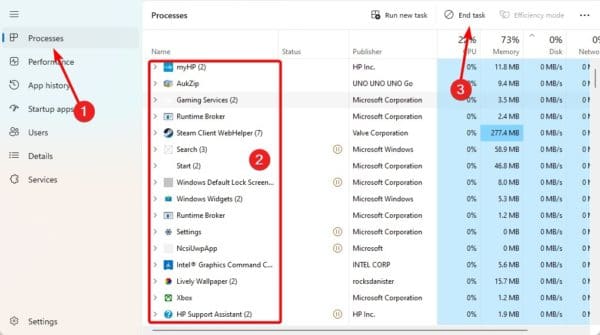
1. Press Ctrl + Shift + Esc to open the Task Manager.
2. Click the Processes tab on the left, click on a process you wish to end, then click End task.
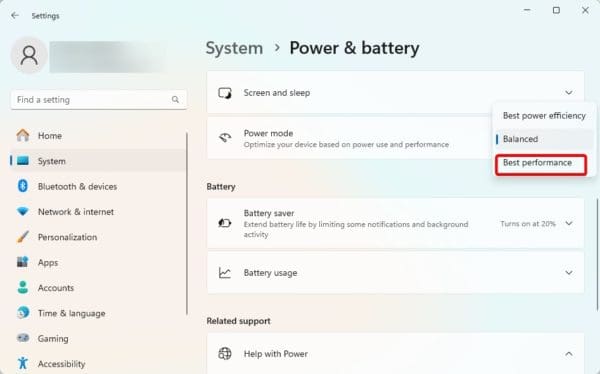
6. Run the Computer on Best Performance Battery Mode
When you set your computer to run on Best Performance battery mode, it maximizes its processing power. This results in faster image and video rendering and generally smoother gameplay.
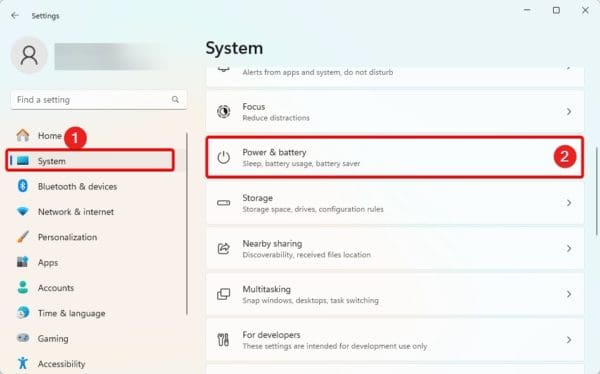
1. Press Windows + I to open Settings.
2. Click System on the left, then Power & battery on the right.
3. Set Power Mode to Best Performance.
7. Set RAM Priority to High for the Game
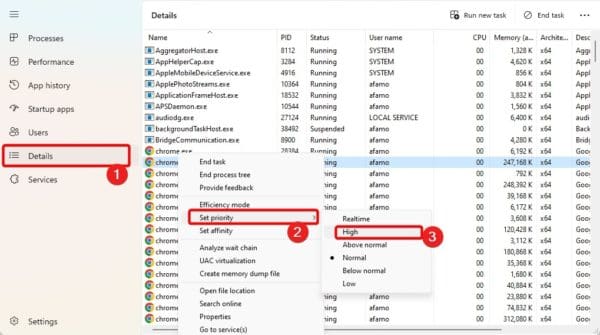
To run high graphics games on low end Windows, you must set the game’s RAM priority to high. This way, the computer prioritizes memory allocation to the game before other applications.
1. launch the game.
2. Press Ctrl + Shift + Esc to open the Task Manager.
3. Click the Details tab, right-click the game, click Set Priority, then click High.
Running High Graphics Games on Low End Windows Devices
While the experience may not be the same as with more expensive devices, you may still have a good time playing these games if you adopt the tips we have shared in this guide.
What was your favorite suggestion? Please tell us in the comment section below.
FAQs
Which window is best for gaming for low end PC?
It is hard to tell what will be best, but a few options include Windows 10 LTSC and Windows 7.
Is Windows 11 bad for gaming?
No, in fact, many users see Windows 11 as a gaming OS. This is because it includes several gaming-centric features.
You may encounter the Windows cannot find uninstall.exe error when you try to uninstall a program on Windows 11. People have experienced it while uninstalling Steam and other applications.
We explain this error and offer the most effective solutions in this article. Let us get to it.
Why Do I Get the Windows Cannot Find uninstall.exe Error?
You may encounter this error if the application has been previously uninstalled, but not properly uninstalled. So, even though it is removed, you may still see some parts of it on your computer. These are called uninstallation residues.
Another reason you encounter this uninstallation problem is because of system or app file corruption. There are chances the uninstall.exe file is missing or bad.
Regardless of the triggers, you should try the solutions we offer below.
How Do I Fix the Windows Cannot Find uninstall.exe Error?
1. Remove App Leftovers
When you install an application, it comes with several components. Some of these are written in the registry and other parts of the computer. During uninstallation, if all the components are not entirely removed, you may still see the app icon or some of its other elements.
If you try uninstalling again, you will likely get the error: Windows cannot find uninstall.exe. To fix this, make sure you remove all app leftovers after installation.
2. Uninstall the Program Using a Different Method
On Windows, there are several ways to uninstall an application. When you get the error, Windows cannot find uninstall.exe while uninstalling an app; you may try a different uninstallation method. Below, we explore two common ways of uninstalling apps.
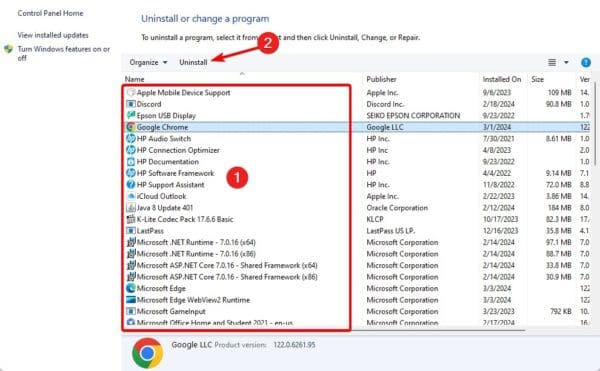
Uninstall from Apps and Features
1. Press Windows + R to open the Run dialog.
2. Type appwiz.cpl and hit Enter.
3. Click on the problematic app and click the Uninstall button.
4. Follow the wizard to complete the process.
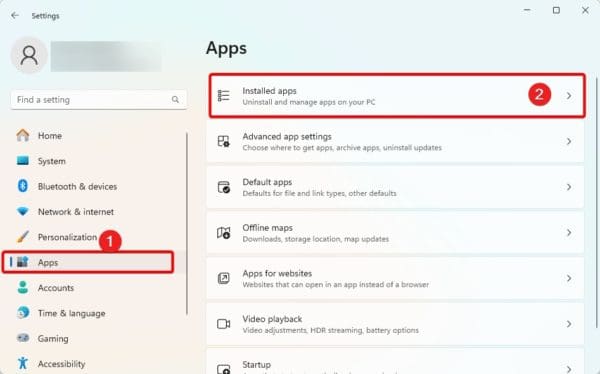
Uninstall From Windows 11 Settings
1. Press Windows + I to open your Settings app.
2. Click Apps on the left pane, then on the right, click Installed Apps.
3. Click the app’s ellipsis or three dots and Uninstall.
4. Follow the wizard to complete the process.
3. Fix Corrupted Files
File corruption is a major cause of Windows’s inability to find uninstall.exe error. If the uninstall.exe file is bad, missing, or corrupted, the uninstallation will fail and trigger the error.
You may use the DISM and SFC scans on Windows to fix file corruption. Follow the steps below.
1. Press Windows + R to open the Run dialog.
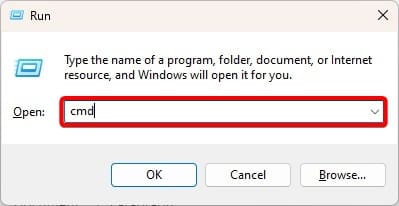
2. Type cmd and hit Ctrl + Shift + Enter to open an elevated Command prompt.
3. Type the commands below, hitting Enter after each one to run the DISM scan.
DISM /Online /Cleanup-Image /ScanHealth
DISM /Online /Cleanup-Image /RestoreHealth
4. Run the command below to fix file corruption with the SFC utility.
sfc /scannow
4. Reinstall the Program, then Uninstall it
Since some program components may still be on your computer, making an uninstallation possible, you should download and install a fresh copy.
Once perfectly installed, you may try uninstalling it, which should fix the problem.
Moving Past the uninstall.exe Error
That is as much as we explore in this article. With our shared solutions, you should be way past the uninstall.exe error. Since we have not written the fixes in any particular order, you should start with what feels the most practical.
Were you able to resolve the problem? Please share with us the solution that worked in the comment section below.
FAQs
Where is uninstall located in Windows?
The uninstall option may be found in the control panel under apps and features.
What are uninstallation residues, and can they cause errors?
Uninstallation residues are application leftovers after a program is removed from your computer. In most cases, they remain without any impact, however, on some instances they may interfere with other apps and cause errors.
You have found this guide because your PC only boots after a second attempt. This situation is often called a false boot and can be really frustrating; however, we help you resolve it in this guide.
Why is My PC Booting only after a Second Attempt?
When you cannot boot on the first attempt, you possibly have faulty hardware. These may also be faulty connected peripheral devices. Common devices associated with this problem are the RAM module, graphics card, and the motherboard.
You also may have loosely connected cables inside your PC. These may be the power cables connecting the motherboard or even cables for the hard drive.
Lastly, you may have dust build-up. This is a real problem because it may stop air flow and cause the computer to overheat, making it impossible to boot until it is cool.
What to Do When a Computer Is Not Booting on the First Attempt
1. Remove Peripheral Devices and Power Cycle your Computer
This solutions is very effective because it addresses power draw issues, it also resolves conflicting driver issues making it impossible to boot on first attempt. It is also a good way to resolve minor hardware bugs that cause problems.
Simply start by making sure no peripheral devices are connected. These may include external drives, controllers, etc. Once disconnected, press the power button for a few seconds until the computer shuts down. Wait a few seconds, then press the power button again to restart it.
2. Disable Fast Startup
Fast Startup will prevent perfect shutdown because it puts the computer into a state of hibernation. By disabling it, the computer shuts down perfectly, allowing it to boot without any problems.
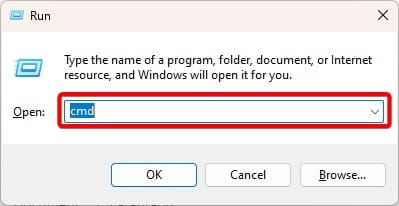
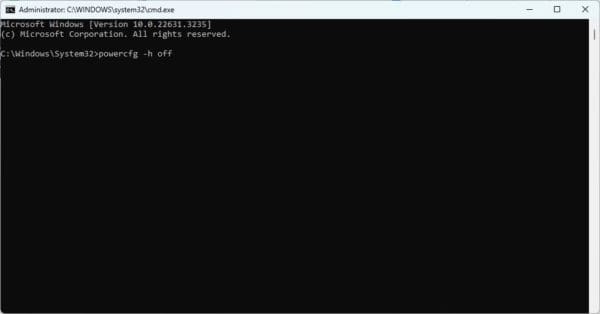
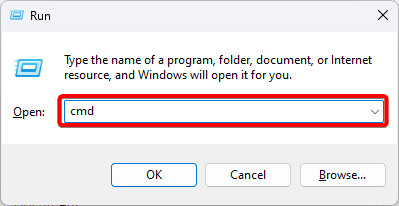
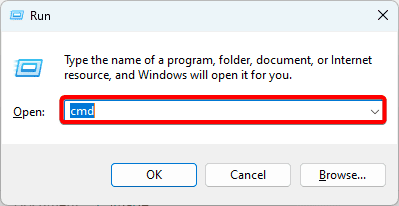
1. Press Windows + R, type cmd and hit Ctrl + Shift + Enter to open the Command Prompt.
2. Type the command below and hit Enter.
powercfg -h off
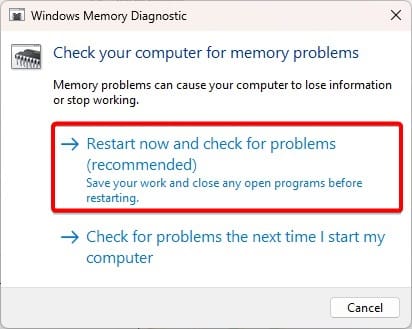
3. Run a Memory Test
Hardware components are a common reason your PC only boots after a second attempt. The RAM, in particular, would lead to the problem once it becomes faulty. You should run a RAM test and change the faulty RAM if needed.
4. Update Power Plan
When you update the power plan, it potentially addresses the issue of a corrupted power plan. It fixes power management conflicts that may make it difficult for your PC to start, especially on the first attempt.
Follow the steps below.
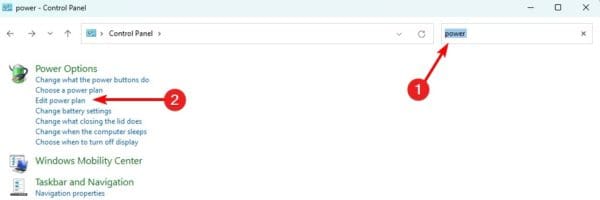
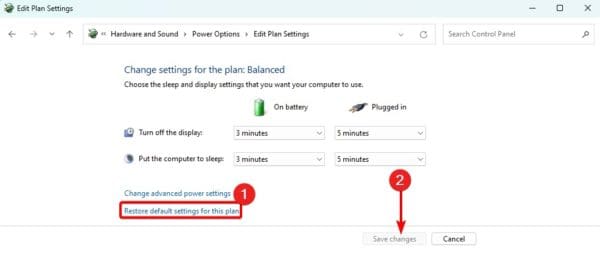
1. Press Windows + R, type control, and hit Enter.
2. Type power in the Control Panel search and click Edit power plan.
3. Click Restore default settings for this plan and click Save Changes.
4. Update BIOS
When you update your BIOS, it addresses the problem of your PC not booting on the first attempt by fixing bugs and compatibility issues that trigger it. An update may also include improved power management.
We show you how to update the BIOS in HP. The steps will differ for other manufacturers.
1. Type HP on the Taskbar’s search box and select HP PC Hardware Diagnostics Windows.
2. In the BIOS-System Firmware category, click Check for BIOS updates.
3. Click Agree.
5. Reset BIOS
If an update does not work, you may reset the BIOS. This will be especially useful if you notice the problem after making changes to your BIOS.
1. Restart your computer and start tapping the BIOS key when you see the manufacturer’s logo. The BIOS key is usually one of the function keys, and you may verify with your manufacturer.
2. Go to the Security tab, then select Restore Security settings to factory defaults using the arrow keys.
3. Read the description, input a passcode, and hit Enter.
4. Save changes, then exit the BIOS.
Regain Smooth PC Booting
We have come to the end of this guide. Now your computer should be able to booth without hiccup. We have not made solutions in any particular order; starting from what seems the most effective is wise.
Please tell us what was most effective in the comment section below.
While using a computer, having an eye on your performance is essential. Being conscious of your performance potentially helps you avoid problems connected with overload. So, in this guide, we will explore how to show the Windows 11 Performance Overlay.
What is Windows 11 Performance Overlay?
Windows 11 Performance Overlay is a tool built into the computer for real-time system performance monitoring. This utility shows different metrics essential in understanding how your computer handles a range of tasks.
Some common metrics to find in Performance Overlay include the following:
CPU use
GPU use
RAM use
Network use
There are many advantages to viewing or using the Performance Overlay. However, at the top of the list is that you get enough information to help you troubleshoot issues that result in lags or crashes on your computer.
Because overlay is often transparent, it does not obstruct your workflow or gameplay.
How Do I Show the Windows 11 Performance Overlay?
1. Show the Performance Overlay Using the Game Bar
Xbox Game Bar is built into Windows 10 and 11. It is essentially a customizable gaming overlay. This utility gives access to essential functionalities without you leaving the game. You may show this performance overlay by following the steps below.
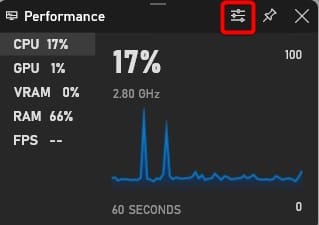
1. Press Windows + G to open the Game bar.
2. Click the Performance tab to open performance options.
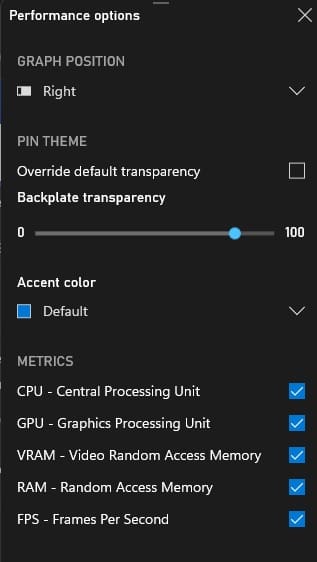
3. Select your Performance options menu.
4. Tick the checkboxes for any information you want to display.
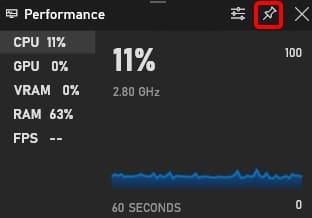
5. Return to the Performance window and click the Pin icon.
6. Latsly, press the Windows + G keys to hide your Game Bar.
2. Enable Windows 11 Performance Overlay Via the Settings App
On Windows 11, the Settings app allows you to tweak app and operating system functions. You may access the Windows Overlay option for your game bar from Settings.
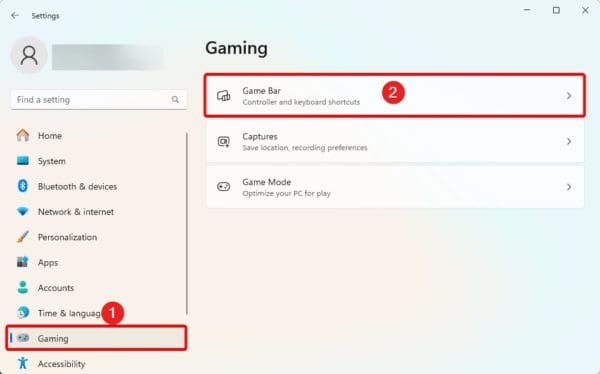
1. Press Windows + I to open the Settings app.
2. On the left pane, click Gaming; on the right, click Game Bar.
3. Toggle the switch to Allow your controller to open Game Bar.
4. Now, you can use a gaming controller to open the game bar and configure Performance Overlay, as shown in the first solution.
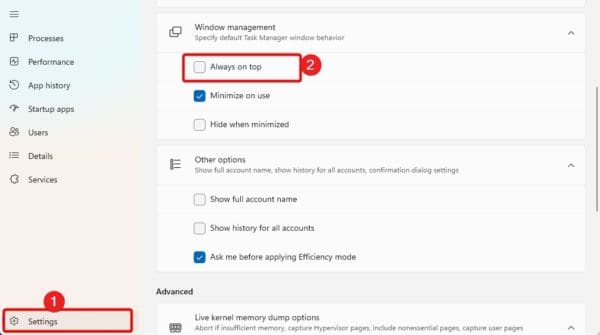
2. Show the Windows 11 Performance Overlay Using the Task Manager
All your performance data is shown in the Task Manager. This utility also has an Always on top feature that permanently displays your performance on the screen.
1. Press the Ctrl + Shift + Esc keys to open the Task Manager.
2. Click Settings at the bottom left, then under the Windows Management category, tick Always on top.
3. Click the Performance tab, then double-click CPU for a summary view of your performance.
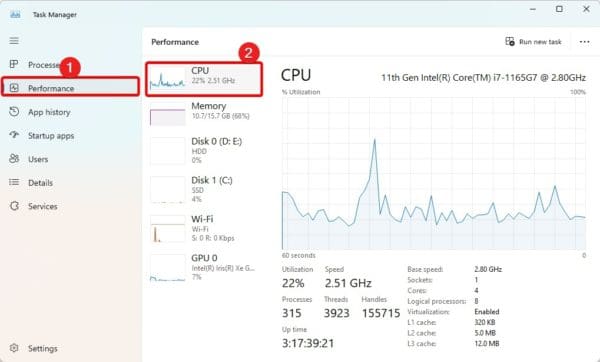
Where Can I Find the Windows 11 Performance Tab?
Your performance is displayed at all times in the Task Manager. Simply launch it by pressing Ctrl + Shift + Esc, then click on the Performance tab on the left pane.
Viewing Windows 11 Performance Overlay
If you have read through this guide, you should now be able to view your performance on the operating system easily. Showing performance is one of the better settings for gaming on Windows 11.
Do you have further questions on Performance Overlay? Let us know in the comment section below.
FAQs
Is Windows 11 Performance Overlay the same as FPS counter?
No, they are not, even though they are related. The FPS counter only shows the number of frames rendered per second, while the Performance Overlay offers a wide range of performance metrics.
Will enabling the Performance Overlay affect system performance?
Enabling this functionality has a negligible impact on performance. In most computers, you will barely notice a difference.
You will get a Windows lock screen when your computer remains inactive for a period of time. Naturally, this screen should be in your computer’s default language; however, some of our readers have complained that the Windows lock screen is in another language.
For many users, this is a problem that may be encountered after a Windows update; for others, it may be a simple configuration problem.
If you fall under this category, we have written this post with the most effective solutions for you. Let us get right into it.
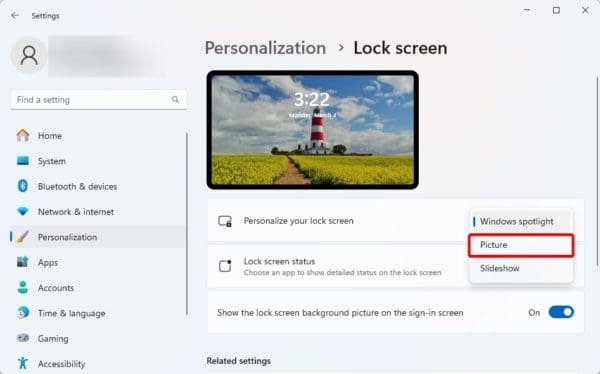
1. Re-enable Windows Spotlight
Even though Windows Spotlight does not feel directly related to the lock screen, re-enabling it may be an effective fix because it will restart the Content Delivery Manager service, fixing any glitches that may trigger the lock screen language change.
1. Press Windows + I to open the settings application.
2. Click Personalize and Lock Screen.
3. Set Personalize your lock screen to Picture, then restart your computer.
4. Follow steps 1 and 2 when the computer comes on, and this time set Personalize your lock screen to windows spotlight.
2. Uninstall Windows Updates
If you start encountering this problem after updating the operating system, you may have a bug in the new update, and it needs to be uninstalled. Follow the steps below.
1. Press Windows + I to launch the Settings app.
2. Click the Windows Update option on the bottom left pane, then click Update History on the right.
3. Scroll down and click Uninstall updates.
4. Click the Uninstall button for your latest update.
3. Select the Lock Screen Language
You may divide to select the lock screen language manually. This is a potent fix because it will overrule any settings that display your Windows lock screen in another language. Follow the steps below.
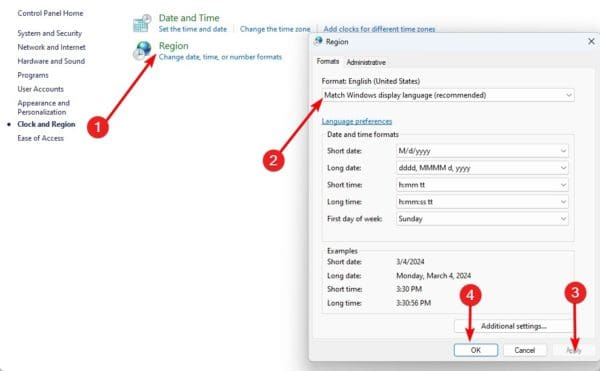
1. Press Windows + R, type control, and hit Enter to open the Control Panel.
2. Click Clock and Region.
3. Click Region, then in the new window, select Match Windows display language (Recommended).
4. Click Apply and OK.
4. Copy the Current Language to the Welcome Screen and Current Users
On Windows 11, it is able to copy your language settings and make them apply to all user accounts, your Welcome, and Lock screens. This can be effective if the Windows lock screen is in another language. Follow the steps below.
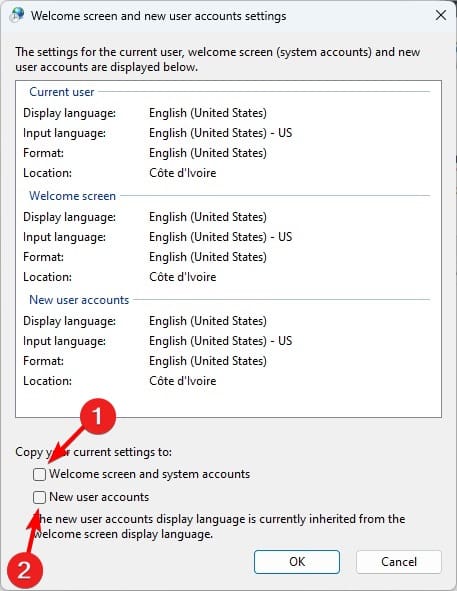
1. Press Windows + R, type control, and hit Enter to open the Control Panel.
2. Click Clock and Region.
3. Click Region, in the new window, select Administrative, then click the Copy Settings button.
4. tick the checkboxes for Welcome screen and system and New user accounts then click OK.
Experiencing the Same Language on Lock Screen and an Active Computer
That is as much as you need to do to have the same language on your lock screen and an active Windows 11 computer. As a last resort, you may consider resetting the computer. However, while a reset will be effective, it usually will lead to data loss.
Did you successfully fix the problem? Please let us know what worked in the comment section below.
FAQs
Why is my lock screen in a foreign language?
This may be due to a bad configuration, but also be a sign of a bugging Windows update.
How do I remove a language from my lock screen in Windows?
Open Settings > Time & language > Language. Ensure the desired language is set as the preferred language.
Are you trying to remove the Windows 11 Learn about this picture in Windows Spotlight icon? This guide shows you the best ways to get rid of it.
This Spotlight feature has been available from Windows 10 and is present in the latest operating system. By howering this icon you get some detail and perspective of your desktop background.
While this feels like a lovely little feature if you must remove it, follow the steps below.
Remove Learn About This Picture with a Registry Tweak
The Windows registry is a hierarchical database of Windows 11 settings and configurations for apps and features. You may disable the spotlight feature by following the steps below.
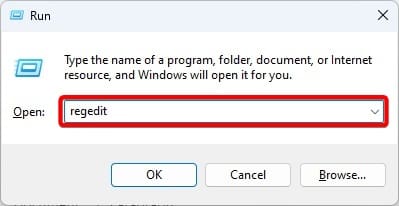
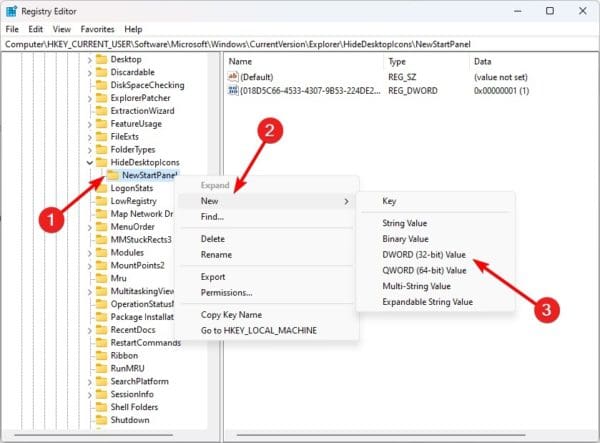
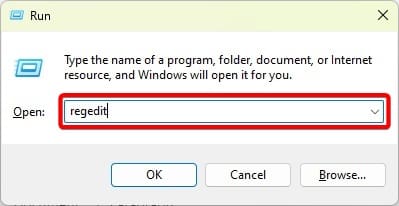
1. Press Windows + R, type regedit, and hit Enter.
3. Right-click NewStartPanel, click New, then click DWORD (32-bit) Value.
4. Name the new DWORD (32-bit) Value {2cc5ca98-6485-489a-920e-b3e88a6ccce3}.
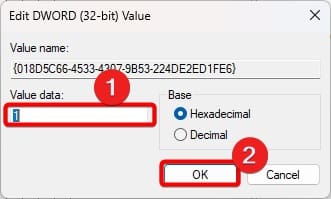
5. Open the new DWORD by double-clicking it; give it a value data of 1 and click OK.
6. Restart your computer for the changes to take effect.
Add Learn About This Picture with a Registry Tweak
If you have disabled this functionality, you may re-enable it as you please. The process is quite simple. Follow steps 1 to 4 from the above section. Then in step 5 give it a data value of 0.
Close the Registry Editor and restart your computer for the changes to take effect.
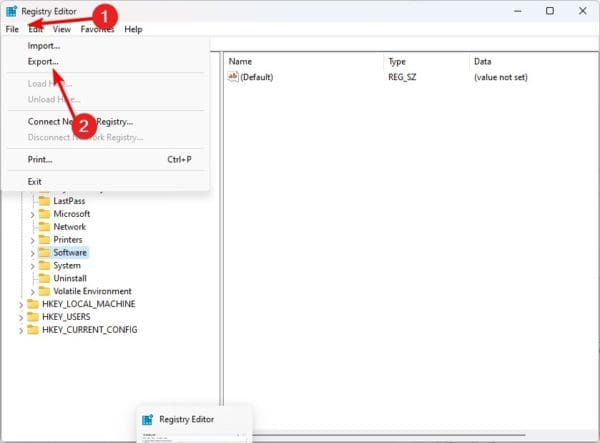
It is good practice to back up your registry before making any changes we have explored. You can revert to the old registry if there is an error.
To back up your registry, follow the steps below.
1. Press Windows + R, type regedit, and hit Enter.
2. Click the File menu, then click Export.
3. Save it in a secure location.
No More Windows Spotlight icon
There you have it. The most direct way to remove Learn about this picture in Windows 11. You should note that you can use third-party solutions like Winaero Tweaker; however, the simple registry tweak should always be effective.
That is all we share in this guide. If you have additional questions, please ask them in the comment section below.
The Windows 11 Action Center, which comprises the Notification Center, quick settings, and accessibility options, comes in handy while using the operating system. However, some users have encountered problems and complain that the Action Center is not opening in Windows 11.
This guide explores the common causes and provides the most effective fixes for this problem. Let’s get to it.
Why Won’t My Action Center Open?
When the Windows 11 Action Center is not opening, it often comes down to any of the following triggers:
Corruption of vital app installation or system files associated with the Action Center.
Bad configuration, especially those that disable the Action center.
Bugs in a recent update or an outdated Windows 11 operating system.
Regardless of the cause, you should try the solutions we discuss below.
1. Re-Register Your Action Center
Corruption is a major reason the Action Center is not opening on Windows 11. Your Actin center settings may be bad, so reregistering it will be an easy fix. Follow the steps below.
1. Press Windows + R to open the Run dialog, type Powershell, and hit Ctrl + Shift + Enter.
3. Restart the computer for the changes to take effect.
2. Tweak Registry Configuration for Action Center
The Windows registry is a hierarchical database of app configurations and operating system configurations. You may enable the Action Center from this utility. Follow the steps below.
4. Double-click on the DisableNotificationCenter value and change the Value data to 0. You may need to first create this key by clicking a space on the right pane, hovering New, clicking DWORD (32-bit) Value, and naming it DisableNotificationCenter.
3. Enable Action Center Via Local Group Policy Editor
The Group Policy Editor is a utility for managing multiple Windows computers simultaneously. It gives an easy option for enabling the Action Center.
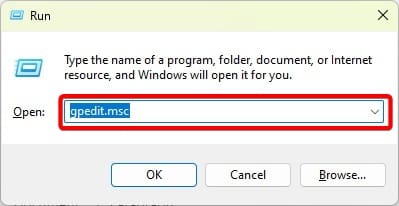
1. Press Windows + R to open the Run dialog.
2. Type gpedit.msc and hit Enter.
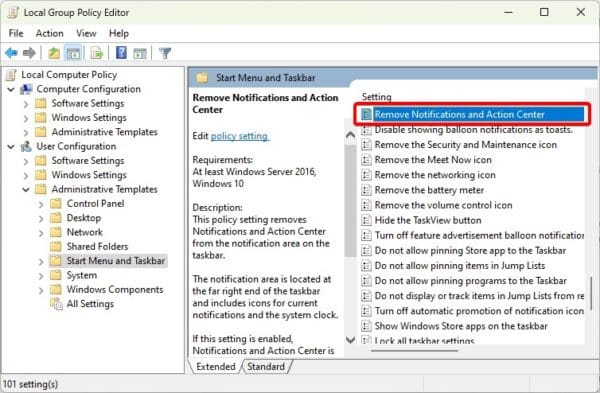
3. Navigate to the path below:
User Configuration / Administrative Templates / Start Menu and Taskbar
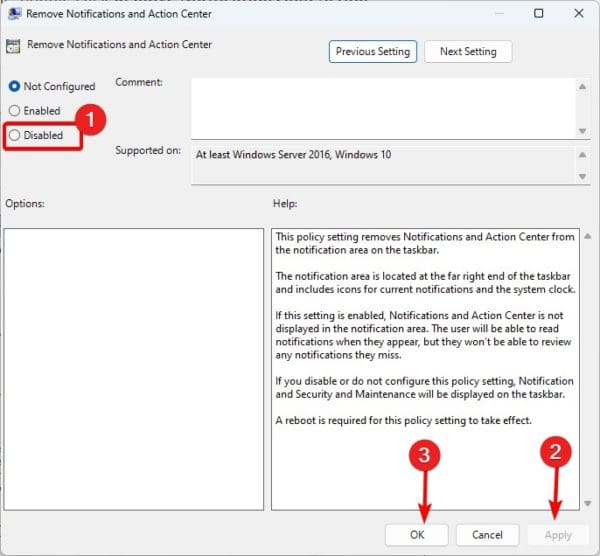
4. On the right pane, double-click Remove Notifications and Action Center.
5. Click the Disabled radio, then click Apply and OK.
4. Update Windows 11
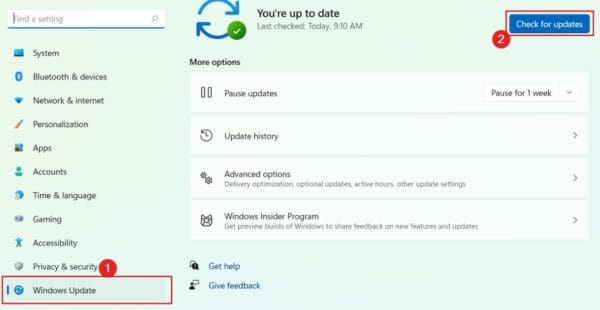
Updating the Windows 11 operating system is an effective fix because Windows updates often come with bug fixes and security patches. Follow the steps below to update your OS.
1. Press Windows + I to open the Settings app.
2. Click Windows Update on the bottom left pane and then Check for updates on the right.
3. If there are updates, download and install them, then restart your computer.
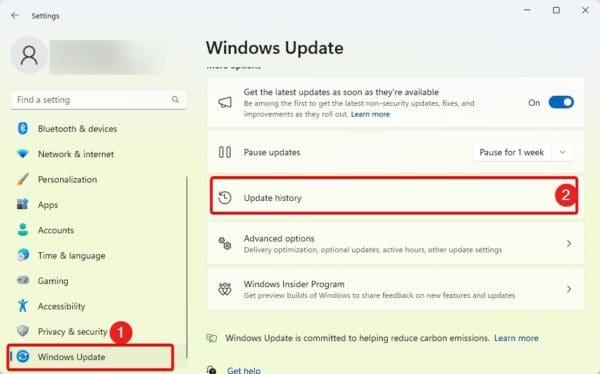
5. Uninstall Windows Updates
While updating Windows is a best practice, on rare occasions, updates may be buggy, which may be why the Action Center is not opening in Windows 11. If you experience the problem just after an update, you must uninstall or roll back the update.
1. Press Windows + I to open the Settings app.
2. Click Windows Update on the bottom left pane and then Update history on the right.
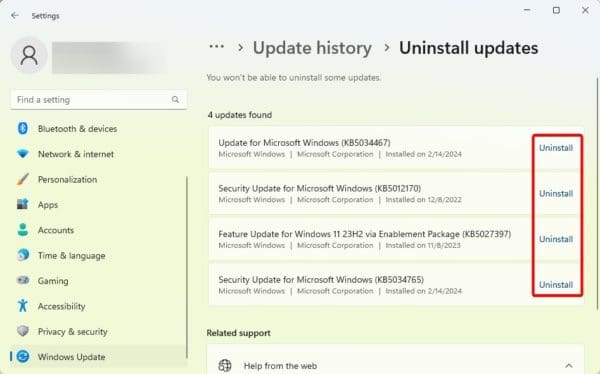
3. Scroll down the left pane and click Uninstall updates.
4. Click Uninstall for your most recent update.
6. Fix File Corruption with the DISM and SFC Scans
As stated earlier, file corruption is why the Action Center is not opening in Windows 11. The DISM and SFC tools are important built-in utilities that fix corruption on Windows 11.
1. Press Windows + R to open the Run dialog.
2. Type cmd and hit Ctrl + Shift + Enter to open the Control Panel with administrative rights.
3. Type the commands below, hitting Enter after each to scan for image corruption and fix identified corruption.
DISM /Online /Cleanup-Image /ScanHealth
DISM /Online /Cleanup-Image /RestoreHealth
4. run the command below to fix system file corruption, then restart your computer after it completes executing.
sfc /scannow
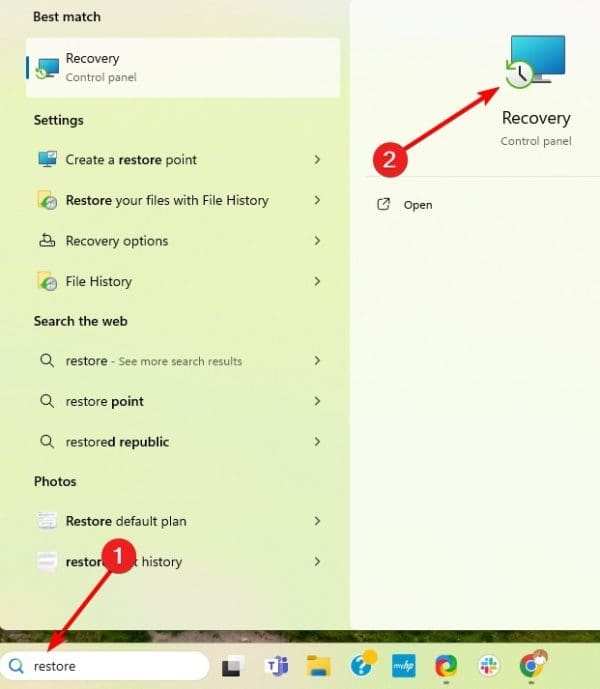
7. Run the System Restore Utility
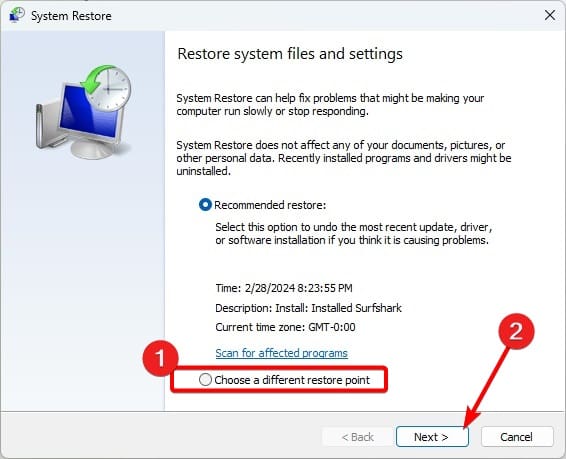
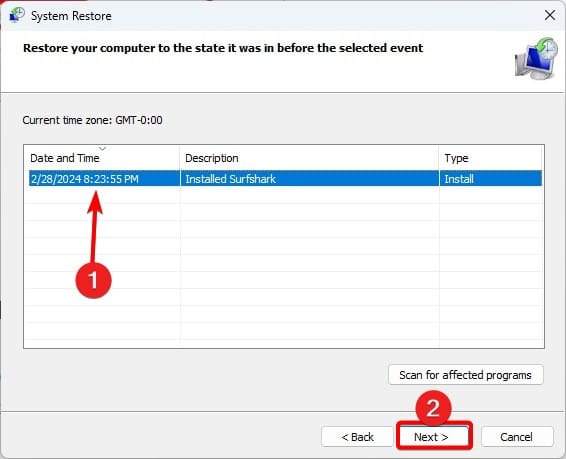
The System Restore tool takes your computer to a previous state before the Action Center problem started. For this fix to work, you should have created a restore point. However, Windows may also automatically create restore points for you. Follow the steps below to run System Restore.
Note that you may lose data during this process.
1. Click the magnifying lens on the Start menu, type Restore, and click Recovery.
2. Click the Command prompt’s Open System Restore option.
3. Select Choose a different Restore point and click Next.
4. Select a restore point and click Next.
5. Click Finish.
8. Clean Install Windows
We recommend a clean install of Windows as a last resort. While effective, this fix will lead to data loss and may take several minutes or hours to complete.
1. Press Windows + I to launch the Settings app.
2. Click System on the left pane and Recovery on the right.
3. Click the Reset this PC button.
4. Select either Keep my files or Remove everything.
5. Click Cloud Download and follow the wizard to complete the reset.
Accessing the Action Center Again
In this guide, we explored the problem of the action center not opening in Windows 11. The solutions we recommended should help you resolve it seamlessly.
Please leave us a comment below, telling us what solution was most effective.
FAQs
Why is the Action Center icon missing in Windows 11?
The most common reason for a missing Action Center icon is file corruption. These may be system files or installation files.
Can I access Action Center functionality even if it’s not opening?
Yes. You may use the keyboard shortcuts Windows + A or click the notification icon on the taskbar.
In Windows 11, you may use the new Photos app to manage, view, edit, and share your photos and videos. This Windows 11 Photos app comes with a new AI feature called Generative Erase.
In this guide, we walk you through this feature and explore some of the best ways to use it. Let’s get started.
What is the Windows 11 Photos App Generative Erase?
The Generative Erase function allows you to remove unwanted objects from your images in the Photos app. You may picture it as a magic eraser.
It is an upgrade and replacement of the Spot Fix tool, boosting better results, especially for larger objects and areas. It analyzes the image using AI and fills up the space where you need to erase.
While this feature is currently available to Windows Insiders on all channels, we expect it will be rolled out sooner for public use. Below, you get a head start on how to use it.
How to Use Generative Erase in Photos App
1. Click the magnifying lens on the Taskbar, type Photos, and click the Photos app.
2. Right-click on an image you want to edit and click Edit.
3. Alternatively, you may right-click on any photo on your computer, then click Open with and choose Photos app. Then click the Edit image icon at the top.
4. In the image edit mode, click the Erase option to open the Generative erase option on the left.
5. Set your brush size to what you find appropriate.
6. Drag the brush through anything you want to erase automatically. Generative erase will remove everything.
Erasing With AI
That is all on the Generative Erase feature on the Windows 11 Photos app.
Using the Generative Erase Photos feature is very simple. It increases your productivity and enhances the editing experience on Photos. While this is a preview feature, you may expect it to be open to all users in the nearest feature.
Tell us what you think about the new AI feature, and if you have used it, we love to know how big of a difference it makes.
FAQs
How does Generative Erase differ from traditional editing tools like spot healing?
Spot Healing uses surrounding pixels to fill up deleted areas, while Generative Erase leverages AI to understand the image and recreate parts.
What types of objects or elements can Generative Erase effectively remove from images?
It works on a wide range of images with higher success in larger objects and intricate backgrounds with repeating patterns or textures.
Is Generative Erase available for both photos and videos within the Photos app?
It can be troubling when you experience a random shutdown on your Windows 11 computer. It will most likely lead to some loss of data or work progress, and it is bad for your computer health,
This guide explores all essential elements to help you fix the problem. Let us get started.
1. Boot in Safe Mode
Booting in Safe Mode is a preliminary step. When you are in Safe Mode, your computer operates with a very restricted set of services and applications, allowing it to remain stable without restarting or shutting down.
While in this mode, you may run through most of the solutions we provide below.
2. Shut Down Running Applications
Heavy workload is one reason you experience random shutdown on your Windows 11 computer. You may avoid this by closing multiple open programs.
If you always have to work with many apps simultaneously, you may consider upgrading your RAM to a higher capacity that can handle the workload.
3. Stop Overclocking
Overclocking is used to enhance your computer above its regular clock speeds. While this is a way of increasing performance, overclocking may also mean that your computer is working beyond its normal capacity. This will lead it to shut down randomly.
The way to fix it is by turning off any overclocking apps on your computer.
4. Check For RAM Failure
For most people, the random shutdown of a Windows 11 device is a sign of bad RAM. You may run tests on your computer to determine the state of your RAM and take adequate steps to fix it. Below is how to check for RAMm failure.
1. Press the Taskbar’s magnifying lens, type Memory Diagnostic, and click Windows Memory Diagnostic.
2. Click Restart now and check for problems.
5. Run the Power Troubleshooter
Several factors may lead to the random shutdowns on your Windows 11 computer. While pointing out the specific issue may be hard, the Windows Power troubleshooter will scan your computer to find the cause. It may fix it or recommend troubleshooting steps.
1. Press the Windows key + R, type cmd, and hit Enter.
2. Type the command below in the Command prompt and hit Enter.
msdt.exe /id PowerDiagnostic
3. Click Next and follow the wizard to complete the process.
6. Run DISM and SFC Scans
Corruption of critical installation and system files may cause your Windows computer to shut down randomly. You may fix corruption using the DISM and SFC utilities, as shown below.
1. Press the Windows key + R, type cmd, and hit Enter.
2. Type the command below, hitting Enter one after the other to complete the DISM scan.
DISM /Online /Cleanup-Image /ScanHealth
DISM /Online /Cleanup-Image /RestoreHealth
3. Run the command below to complete the SFC scan, then restart your computer.
sfc /scannow
7. Restore the Default Power Schemes
When your power schemes are misconfigured and do not match the workload on the computer, you may experience random shutdowns. You may reconfigure your power settings to their defaults by following the steps below.
1. Press the Windows key + R, then type the command below and hit Enter.
powercfg -restoredefaultschemes
2. Restart your computer.
8. Clean Boot the Device
Conflicting applications may cause Windows 11 to shut down randomly. You may resolve all conflicts by clean booting the computer.
In this state, all third-party programs are turned off, and you may start launching them one after the other to trace the root cause of the problem.
No More Unexpected Windows Shutdowns
There you have it. All the perfect solutions to guarantee you no longer have any unexpected Windows 11 shutdowns.
We have not written the solutions in any particular order, so you should start with whichever is most relevant. Lastly, please let us know what worked in the comment section below.
Sometimes, you need to connect your monitor to a larger screen. You will often do this using an HDMI cable, which may even connect to your TV. Sadly, some users have complained of the error: no HDMI signal from your device in Windows 11.
A faulty cable, bad or outdated drivers, misconfiguration, or other display detection issues may cause this problem. We help you fix it with the solutions below.
1. Preliminary Checks
Before you go into complex fixes, we recommend the following preliminary checks.
Check if Connections are Properly Done
You should check that your HDMI cable is fitted tight into the ports. A loose cable will probably not have contact and produce no signal.
Use a Different HDMI Cable
If you have a spare cable, you may try using it. It is an easy way to rule out a worn-out cable as the cause of the problem. You may also try the cable on a different device to be sure it works.
Use a Different Port
Also, take a look at your ports. If you have dust or some other dirt stuck in the ports, they may obstruct contact and lead to no signal. You should clean them or blow dry air through them to remove dirt. Alternatively, you may try connecting with a different port.
2. Manually Detect Your Connected Display
If you are connecting to an old TV or monitor, Windows 11 may show no HDMI signal from your device. In this case, you will have to detect the connection manually. Follow the steps below.
1. Open the Settings app by pressing Windows + I.
2. On the left pane, click System, then click Display on the right.
3. Expand Multiple displays and click the Detect button to Detect other displays.
3. Select your Second Display Manually
After connecting via an HDMI cable, by default, the operating system names the new monitor your default. However, if you still get no HDMI signal from your device, you may manually select the second display in Windows 11.
1. Right-click a space on your desktop and select Display Settings.
2. Expand Identify and choose Show only on 2.
4. Update the Graphics Driver
Your graphics driver is integral to the proper operation of all graphics components, including transmitting graphics via HDMI. When the Windows 11 graphics driver is outdated, you may experience no HDMI signal from your device. You may update it using an automatic driver updater or manually following the steps below.
1. Right-click the Start menu and click Device Manager.
2. Expand Display Adapter, right-click your driver, and click Update driver.
3. Click Search automatically for drivers.
5. Roll Back the Graphics Driver
There are a few exceptions when Windows 11 users get no HDMI signal from their device just after updating the driver. If that is the case with you, you should consider rolling back the update. Follow the steps below.
1. Right-click the Start menu and click Device Manager.
2. Expand Display Adapter, right-click your driver, and click Properties.
3. Click the Driver tab, then click the Roll back driver button and click OK.
6. Reinstall the Graphics Driver
Driver corruption on Windows 11 may also lead to no HDMI signal from your device. In this case, an update will not work. You would need an entirely new driver. You should follow the steps below to fix the problem.
1. Right-click the Start menu and click Device Manager.
2. Expand Display Adapter, right-click your driver, and click Uninstall device.
3. Confirm your choice, then restart the computer.
4. Relaunch the Device Manager and click the Scan for hardware changes button.
7. Run the Hardware Troubleshooter
Windows comes preinstalled with a bunch of troubleshooters, one of which is the hardware troubleshooter. This tool will check for faults with hardware components, fix the issues, or recommend troubleshooting steps.
1. Press Windows + R to open the Run dialog.
2. Type cmd and hit Ctrl + Shift + Enter.
3. Type the command below and hit Enter.
msdt.exe -id DeviceDiagnostic
4. Click the Next button.
Enjoy Viewing a Second Monitor
No HDMI signal from your device in Windows 11 is a problem you may easily correct with some troubleshooting steps. The solutions we have explored should get the monitor working in no time.
Were you successful in resolving the problem? Please tell us in the comment section below what worked.
You must have stumbled upon this guide because your Windows key is not working on your Windows 11 PC. We have explored the problem and bring you some of the most efficient solutions in this guide.
Why Is My Windows Key Not Working in Windows 11
When the windows key is not working, you may suspect mechanical failure. This may be triggered by impact or natural wear and tear.
Faulty or outdated drivers may also cause certain keys on the keyboard to stop working. They may no longer allow proper communication between the keyboard and the operating system.
You also may notice problems with the Windows keys if you have conflicting software. These programs may use the Windows key to perform other functions.
The solutions below should help you fix it.
What to Do if Windows Key is Not Working in Windows 11
1. Restart the Computer
The first step should be restarting your computer. This is effective because the Windows key may not work because of some process bugs. When you reboot the computer, you will force the [problematic processes to shut down, fixing the keyboard problem.
2. Check for Keyboard Damage
Before you go into complex solutions, you should examine the keyboard for physical damage. Check if the Windows key is broken. Sometimes, it may have dirth pilled underneath; you should clean it or blow dry air to flush out all stuck debris.
If the key is damaged, you may have to change the keyboard or take it to a repairer to fix the individual key.
3. Run the Hardware Troubleshooter
Windows 11 comes with a set of troubleshooters. The hardware troubleshooter effectively resolves faults relating to hardware components, like the keyboard. Running the hardware troubleshooter will scan the computer for these faults, fix them, or recommend solutions.
1. Press Ctrl + Shift + Esc to open the Task Manager. Windows + R to launch your Run dialog, then click Run new Task.
2. Type cmd and hit Ctrl + Shift + Enter.
3. Type the command below and hit Enter.
msdt.exe -id DeviceDiagnostic
4. Click the Next button.
4. Disable Filter Keys
The filter key accessibility feature is designed to ignore certain keystrokes. You may have to disable the filter keys to ensure you do not have a keyboard problem.
1. Click the Start menu and click the Settings gear icon.
2. Click Accessibility on the right, then click Keyboard on the left.
3. Toggle off Filter keys.
5. Repair Windows Apps
You may be having a general problem with Windows apps. Hence, you should repair Windows apps when the Windows key is not working in Windows 11.
1. Press Ctrl + Shift + Esc to open the Task Manager. Windows + R to launch your Run dialog, then click Run new Task.
2. Type powershell and hit Ctrl + Shift + Enter.
3. Type the commands below, hitting Enter after each one.
Drivers are a vital way of communication between hardware components and software. If your keyboard driver is outdated, the Windows key may not work in Windows 11. You should update your driver. You may use automatic drive updaters.
7. Create a New Local Administrator Account
When the Windows key does not work in Windows 11, you may face serious corruption with your user profile. By creating a new admin account, you should fix the problem.
1. Press Windows + I to open the Settings App.
2. Click Accounts on the left pane, then on the right, click Other users.
3. Click the Add account button.
4. Click I don’t have this person’s sign-in information.
5. Select Add user without a Microsoft account.
6. Fill out the form with your desired username and password, then click next.
7. Click the Change account type button for the newly created account.
8. Select Administrator and click OK.
Fixed Windows Key in Windows 11
This is all we share in this guide. If you have followed the solutions, you should have fixed the Windows key. Note that none of these solutions were written in any particular order, so you may start with any that feels more practical.
You may have just encountered the error message your PC can’t project to another screen while trying to connect to an external monitor. This problem may be noticed just after installing a new graphics card.
In some cases, it also could be a sign of minor connection flaws. This guide has explored all potential causes and will introduce you to the most effective fixes. Let us get to it.
1. Confirm all Connections are Correctly Made
Before exploring any complex fixes, you should confirm your connection has no problems. A good starting point is verifying cables are tightly connected.
You should also physically examine the cables and ensure they are not broken or damaged. You may clean the ports or blow dry air through them to ensure no particles are obstructing the connection.
2. Uninstall Graphics Drivers
If your graphics drivers cause the problem, uninstalling them will be an efficient fix. The current drivers may be corrupted or damaged, leading to the error: your PC can’t project to another screen.
Follow the steps below.
1. Right-click the Start menu and click Device Manager.
2. Expand Display Adapters, right-click your driver, and click Uninstall device.
3. Confirm your choice and restart your computer.
4. Relaunch the Device Manager and click Search for hardware changes to reinstall the driver.
3. Download Drivers from Manufacturer’s Websites
Alternatively, you may visit the website of your video card manufacturer and download the correct drivers right from the website.
This may be the fix, especially if your computer cannot match the proper driver to your video card. For example, you may download GeForce Drivers for Nvidia cards. Once you have downloaded and installed the new driver, confirm if you still get the message your PC can’t project to another screen.
4. Run the Built-in Hardware Troubleshooter
Windows 11 comes with an easy-to-use and convenient hardware troubleshooter tool. This tool will scan your computer for all possible causes of your PC can’t project to another screen. It will fix potential triggers or recommend specific troubleshooting steps.
You may run this troubleshooter by following the steps below.
1. Press Windows + R to launch your Run dialog.
2. Type cmd and hit Ctrl + Shift + Enter.
3. Type the command below and hit Enter.
msdt.exe -id DeviceDiagnostic
4. Click the Next button.
5. Replace your Graphics Card
If none of the solutions worked, then you may have a bad graphics card, in which case your only solution will be to replace it. Before replacing it, you must note your PCIe slot and generation and power supply (PSU) capacity to ensure you get a proper fit for your device.
Projecting to Another Screen
With the solutions we have explored in this guide, you will now easily be able to project your PC to another monitor screen.
We have not written these fixes in any particular order, so you should try whichever seems the most appropriate.
Please let us know in the comment section what solution worked.
Microsoft Edge is the default browser for Windows 11. While some believe its only importance is downloading other browsers, it has highly evolved to become a great option for everyday use. That’s why it gets very uncomfortable when Edge is not working on Windows 11.
Note that there are many issues associated with the browser not working. Some could be:
Microsoft Edge not opening on Windows
Microsoft Edge constantly crashing
The Microsoft Edge browser not responding
In this guide, we look at this problem and offer the best solutions to fix it.
Why is Microsoft Edge Not Working in Windows 11?
One of the major reasons Microsoft Ende may not be opening is because of a corrupted user profile. While this may affect the Edge browser, you may also notice some other apps are not responding.
Another problem that may make Microsoft Edge not work is the corruption of dependent files. This may be a sign of a virus on the computer, and you should scan using a robust antimalware.
Another reason for this problem is conflicting extensions. Even though Microsoft Edge is built on Chromium and offers a huge extension library, not all interact properly. These conflicts may cause Microsoft Edge to hang.
In some rare cases, you may be having resource constraints. This is especially true if you use an older computer with too many open applications or processes.
What Do I Do if Microsoft Edge Is Not Working in Windows 11?
1. Restart the Computer
While it may seem like an insignificant step, it is very effective in some cases. If you run an old, congested computer, you may have too many processes that make the browser hang or unresponsive. Restarting your computer will force most open processes to shut down.
2. Close Other Open Apps
If you would rather not turn off the computer, close other open applications. Your computer may simply be struggling with resource allocation, and by closing these apps, you create more space for the browser. This is especially useful when Microsoft Edge is hanging or not opening.
3. End The Edge processes on the Task Manager
While it may be impossible to shut down an unresponsive Microsoft Edge application, you may easily shut down all related processes on the Task Manager. You may have to pause Task Manager updates to find these applications.
1. Press Ctrl + Shift + Esc to open the Task Manager.
2. Click Microsoft Edge and click End task.
4. Repair Microsoft Edge
Windows apps often come with a Repair functionality. This feature will help you clear the cache or remove misconfigurations that make apps malfunction.
You may repair Microsoft Edge by following the steps below.
1. Open the Settings app by pressing Windows + I.
2. Click Apps on the left pane, then on the right, click Installed Apps.
3. Click the three dots for Microsoft Edge and click Modify.
4. Click the Repair option.
5. Update Microsoft Edge
Updating Microsoft Edge will be a valid fix if it is hanging, slow, or sometimes unresponsive. This is because updates often include bug fixes, which may correct this problem.
1. Launch Microsoft Edge.
2. Click the ellipses or menu icon on the top right, then click Settings.
3. On the left pane, click About Microsoft Edge and any updates will automatically be installed. Restart the browser if prompted to do so.
6. Delete Microsoft Edge User Data
Every Edge user has some data stored on the computer. If this data is corrupted, you may notice that Microsoft Edge becomes unresponsive or closes as soon as it opens. You may delete the corrupted data to fix the problem.
1. Press Windows + R to open the Run dialog.
2. Type the path below and hit Enter.
appdata/Local/Microsoft/Edge/User Data
3. Delete the Default folder.
7. Uninstall or Remove Extensions
While extensions will improve the browser’s functionality, some may not be suited for interaction with others. These conflicts may cause problems and may be why Edge is not working in Windows 11.
1. Launch the Microsoft Edge browser.
2. Type the path below in the browser address locator and hit Enter.
edge://extensions/
3. Toggle off recently added extensions or click the Remove option.
8. Run the DISM and SFC Scans
As we stated earlier, corruption is a major reason for Microsoft Edge not working. You may fix corruption on Windows 11 by running the DISm and SFC scans.
1. Open the Run dialog by pressing Windows + R.
2. Type cmd and hit Ctrl + Shift + Enter.
3. Type the command below and hit Enter to run a DISM scan.
DISM /Online /Cleanup-Image /RestoreHealth
4. Run the command below to fix system file corruptions.
sfc /scannow
9. Create a New User Profile
We have mentioned that corruption may cause the Microsoft browser not to work. One such corruption is with your user profile. You may create a new user and try opening Edge again.
1. Press Windows + I to open the Settings App.
2. Click Accounts on the left pane, then on the right, click Other users.
3. Click the Add account button.
4. Click I don’t have this person’s sign-in information.
5. Select Add user without a Microsoft account.
6. Fill out the form with your desired username and password, then click next.
7. Click the Change account type button for the newly created account.
8. Select Administrator and click OK.
10. Reinstall Microsoft Edge
As a last resort, you should install Microsoft Edge. To reinstall the browser, you must first uninstall it. However, this will mean you lose settings and configuration. Also, ensure all leftovers are removed, then download and reinstall a fresh copy of Edge.
1. Press Windows + R to open the Run dialog, type appwiz.cpl, and hit Enter.
2. Click Microsoft Edge, then click Uninstall and follow the wizard to complete the process.
The Deployment Image Servicing and Management (DISM) utility is a command-line tool for managing and maintaining the operating system. Sadly, you may run into the DISM error 1392 in Windows 11.
When you get this error, you may no longer be able to use the DISMm utility. In this guide, we will walk you through the most effective solutions.
What causes the DISM error 1392 in Windows 11?
While there are a few reasons you may encounter the DISM error 1392 on a Windows 11 device, it is a sign of file corruption in most cases. So, some of the temporary files needed for the process may be unreadable.
It is also a common error showing underlying computer disk issues. It could mean that vital drives are unreachable or your disk is corrupted and bad. But also, it may be a sign of malware.
Regardless of the causes, you should try the solutions below.
1. Boot into Safe Mode
As a Starting point, you should boot into Safe Mode. On Windows 11, Safe Mode guarantees that your computer starts with only an essential set of drivers and applications.
This is a valid solution because you may isolate processes or programs causing conflicts and triggering the DISM error 1392 on your computer.
2. Perform a Disk Clean Up
Cleaning up the disk is an essential housekeeping process on Windows 11. When you run the Disk Cleanup utility, it will remove unnecessary files. This process is a valid fix because all corrupted files that may interrupt the DISM process will also be removed.
After running Disk Cleanup, you should try other solutions if the problem persists.
3. Run the Check Disk Scan
Bad drive sectors are not uncommon in Windows. However, they are a huge problem because they make it impossible for the OS to access some important files for the DISM tool. This may cause the DISM error 1392 in Windows 11.
Run the Check Disk scan to fix the problem.
1. Press Windows + R to launch the Run dialog.
2. Type cmd and hit Ctrl + Shift + Enter to open an elevated Command prompt.
3. Type the command below and hit Enter.
chkdsk C: /f
4. Follow the on-screen instructions to complete the process.
4. Update Windows OS and Drivers
When your operating system is outdated or vital drivers are outdated, you will experience bugs on the computer. Some of them may trigger the DISM error 1392 in Windows 11.
You should update your driver. You may do so using a reliable driver updater. Also, follow the steps below to update the operating system.
1. Lunch the Settings app by pressing Windows + I.
2. Click Windows Update on the lower left pane, then click Check for updates on the right.
3. Download and install any updates, then restart your computer.
5. Scan for Malware
We stated that system file corruption may trigger the DISM error. However, you should note that malware is one of the more common causes of file corruption.
We recommend you perform a deep malware scan using a reliable antivirus application. After the scan, restart the computer and see if the DISM problem is resolved.
6. Restore the Computer
The system restore utility effectively returns your computer to a state where it worked without errors. For this solution to work, you should have restore points on your computer already created. In most cases, these may be created automatically. Follow the steps below to run System Restore.
1. Type restore on Windows Search and select the Recovery option.
2. Click the Open System Restore option on the Control Panel.
3. Select Choose a different restore point and click the Next button.
4. Select a different restore point from the available options and click Next.
5. Lastly, click the Finish button. The process will begin, and your computer may restart as the restore runs.
7. Reset the PC
If none of the solutions we have explored proves effective, you should reset the computer. While this may seem extreme, it will fix all possible causes of corruption that trigger the DISM error.
1. Press Windows + I to open the Settings app.
2. Select Recovery from the right pane.
3. Click Reset PC.
4. Select Keep my files.
5. Click Cloud download.
Step 6: Follow the wizard to complete the reset.
Running the DISM Utility Without Errors
The DISM tool must run without errors. This way, you may harness its maintenance and management capacities. The solutions we have explored will be useful if you encounter DISM error 1392 in Windows 11.
Were you able to fix the problem? Please tell us in the comment section below what worked.
FAQs
Can the DISM error 1392 be indicative of underlying hardware issues?
Yes, it can. It may be ta sign of a failing drive, in most cases it could also mean drive congestion.
How do I prevent encountering the DISM error 1392 in Windows 11?
Keep your computer updated. Ensure it is free from malware, and occasionally clean your drives.
Automatic repair in Windows computers is a tool for diagnosing and fixing boot-up issues on your computer. It attempts to fix issues by initiating the Startup Repair, or in some cases, a System Restore process. However, in a few cases, users got the error automatic repair couldn’t repair their PC on Windows 11.
If you fall into this category where the Automatic Repair tool is not fixing issues, you should try the solution below.
1. Rebuild the BCD and Repair MBR
The Master Boot Record (MBR) is responsible for initiating the boot process, while the Boot Configuration Data (BCD) is a database file that stores information about installed operating systems and boot options. If either is damaged or corrupted, Automatic Repair may not function. Follow the steps below.
1. Click Advanced Options.
2. Click Command Prompt.
3. Type the following commands, hitting Enter after each one.
bootrec.exe /rebuildbcd
bootrec.exe /fixmbr
bootrec.exe /fixboot
4. If you get an Access denied message while running any of these commands, run the command below first, then retry step 3.
bootsec /nt60 sys
5. Type exit, hit Enter, and click Continue to restart the computer.
2. Repair Bad Drive Sectors with the Check Disk Utility
Bad drives make it impossible for the operating system to find the files needed to complete the Automatic Repair process. This may be why you get the error message: Automatic Repair couldn’t repair your Windows 11 PC.
Fix the drive using the Check Disk utility.
1. Click Advanced Options.
2. Click Command Prompt.
3. Type the following command, hitting Enter to run it.
chkdsk /r c:
4. Type exit, hit Enter, and click Continue to restart the computer.
3. Fix File Corruption with the DISM and SFC Scans
On Windows 11, you may use the DISM and SFC scans to fix corruption with installation files and system files. This corruption may make it impossible for your Automatic Repair process to complete. Hence the error message: Automatic Repair couldn’t repair your PC on Windows 11.
Follow the steps below to repair the bad files.
1. Click Advanced Options.
2. Click Command Prompt.
3. Type the following commands, hitting Enter after each to run the DISM scan.
DISM /Online /Cleanup-Image /ScanHealth
DISM /Online /Cleanup-Image /RestoreHealth
4. Run the following command to initiate a system file repair.
sfc /scannow
5. Type exit, hit Enter, and click Continue to restart the computer.
4. Uninstall Windows Updates
You should uninstall the updates if you have just installed certain Windows updates before encountering the problem. They may have bugs that make it impossible for Automatic Repair to complete successfully.
1. Click Advanced Options.
2. Click Uninstall Updates.
3. Click either Uninstall latest quality update or Uninstall latest feature update, then follow the on-screen instructions to complete the process.
5. Reset your Computer from the Cloud
You may need to reset the computer to fix the Automatic Repair problem. This is because vital files may be corrupted, or certain configurations may stop Automatic Repair from working. All these may lead to the error message: automatic repair couldn’t repair your PC on Windows 11.
1. Click Advanced Options.
2. Click Command Prompt.
3. Type the command below and hit Enter.
systemreset -factoryreset
4. Select the Keep my files option.
5. Click Cloud download. This option will ensure you reinstall a new copy of the operating system, which may be the better choice if the version currently on your computer is faulty.
Step 6: Follow the wizard to complete the reset. Note that this will take a while, and your computer will restart several times.
Run Automatic Repair Smoothly
When automatic repair couldn’t repair your Windows 11 PC, our shared solutions are your best options to fix the problem. We have listed this fixes in order of simplicity, however, you may start with whichever you find the most appropriate.
Please tell us in the comment section what solution worked for you.
FAQ
Why is my PC saying automatic repair?
Hardware malfunctions, software conflicts, damaged system files, and other difficulties can all result in an automated repair cycle. There might be more underlying reasons if you have already updated your RAM and hard drive and the problem persists.
How long should automatic repair take?
It may vary, but generally, you may expect it to last between 5 minutes and 2 hours.
Icons are visual elements that help you identify programs, applications, and files on your computer. You can trigger the shortcuts and launch your applications or open the files by clicking on these icons. However, some users complain about corrupted icons and shortcuts in Windows 11.
This corruption will make it impossible to use some files and applications. This guide shows you all possible ways to fix this problem. Let’s go.
1. Restart the Computer
You may want to begin by rebooting your computer. When you reboot the computer, you force all problematic processes to shut down. If a minor bug in some process triggers the problem, it will be fixed on restart. If this does not work, you may move on to other solutions.
2. Restart Windows Explorer
Windows Explorer controls certain visual elements on the computer, including the shortcuts and icons. When you start it, you give all connect processes a soft reset, fixing any triggers that lead to corrupted icons and shortcuts in Windows 11.
1. Press Ctrl + Shift + Esc to open the Task Manager.
2. Click the Processes tab, right-click Windows Explorer, and click Restart. You may need to pause Task Manager updates to find this process.
3. Run DISM and SFC Scans
The DISM and SFC scans are utilities on the Windows 11 device that repair corrupted installation and system files. If some broader system file corruption triggers the corrupted icons and shortcuts in Windows 11, this should be a perfect fix.
1. Press Windows + R to open the Run dialog.
2. Type cmd and hit Ctrl + Shift + Enter.
3. Type the command below, hitting Enter one after the other to complete the DISM scan.
DISM /Online /Cleanup-Image /ScanHealth
DISM /Online /Cleanup-Image /RestoreHealth
4. Run the command below to complete the SFC scan, then restart your computer.
sfc /scannow
4. Delete Icon Cache
The computer keeps miniature versions of icons. This technique improves loading speed. However, if icons in the cache become corrupted, the shortcuts will no longer work. You must clear the cache to fix the problem.
1. Press Windows + R to open the Run dialog, type %localappdata% and hit Enter.
2. Click the View option, hover Show, and click Hidden Items.
3. Click the IconCache file and press Shift + Del.
4. Reboot the computer.
5. Rebuild your Icon Cache
An alternative to deleting or clearing the icon cache is rebuilding it. This will also fix corrupted icons and shortcuts in Windows 11. Follow the steps below.
1. Press Windows + R to open the Run dialog.
2. Type cmd and hit Ctrl + Shift + Enter.
3. Run the command below one after the other:
ie4uinit.exe -show
taskkill /IM explorer.exe /F
DEL /A /Q “%localappdata%\IconCache.db”
DEL /A /F /Q “%localappdata%\Microsoft\Windows\Explorer\iconcache*”
shutdown /r /f /t 00
6. Repair the Program
If the issue of corrupted icons and shortcuts in Windows 11 affects just one program, then it is likely that that specific app is corrupted. You may fix individual app corruption by repairing the program. Follow the steps below.
1. Press Windows + I to open the Settings app.
2. Click the Apps option on the left pane, then click Installed Apps on the right.
3. Click the options or three dots for the problematic app, then click Advanced options.
4. Scroll down and click the Repair button. You may also click the Reset button.
7. Run a Virus Scan
Malware is a common cause of computer corruption. It may be a sign of infection when you have corrupted icons and shortcuts in Windows 11. You may use an antivirus program to perform an elaborate scan on your computer.
8. Create a New User Profile
As a last resort, you should create a new user profile. This will eliminate the chances of any corruption from your profile that makes the icons or shortcuts not work.
1. Press Windows + I to open the Settings App.
2. Click Accounts on the left pane, then on the right, click Other users.
3. Click the Add account button.
4. Click I don’t have this person’s sign-in information.
5. Select Add user without a Microsoft account.
6. Fill out the form with your desired username and password, then click next.
7. Click the Change account type button for the newly created account.
8. Select Administrator and click OK.
Recovering From Icon and Shortcut Corruption
The steps to recover from this icon or shortcut corruption are pretty straightforward. In most cases, you should be done in a few clicks.
Have you successfully fixed the corruption? Please tell us below what worked for you.
Batteries are an essential backup for your Windows 11 devices. This makes it quite problematic when no battery is detected on Windows 11.
This and other battery issues may have several causes, including BIOS configuration, driver issues, and bugs, but the solution is often straightforward. In this guide, we walk you through all the best fixes.
1. Restart the Computer
Sometimes, a simple restart will be all you need to fix the problem. When you restart the computer, you force problematic processes that may have sparked the battery problem to shut down. If the problem lingers after a reboot, try a different solution.
2. Reconnect the Device Battery
Before diving deeper into troubleshooting, you should remove the battery and clean the battery compartment. This will be a great fix if certain debris obstructs the battery from making proper contact.
However, you may need technical knowledge, especially if the battery is built into the device.
3. Update Battery Drivers
Drivers are a vital link between hardware and the operating system. When you get the no battery is detected error on your Windows computer, you should ensure that the battery drivers are updated. You may update them using an update software or manually following the steps below.
1. Right-click the Start menu on your Taskbar and click Device Manager.
2. Expand Batteries, right-click your printer driver, and click Update driver.
3. Click Search automatically for drivers.
4. Repeat the steps for all drivers in the battery category.
4. Reinstall Battery Drivers
If updating does not fix the problem, reinstall the drivers. A reinstallation would be effective if you get this battery problem because of corrupted drivers.
1. Right-click the Start menu on your Taskbar and click Device Manager.
2. Expand Batteries, right-click your printer driver, and click Uninstall device.
3. Confirm your choice.
4. Restart the computer, relaunch the Device Manager, and click the Scan for Hardware changes icon.
5. Update the Operating System
Some users have experienced this error while the operating system is outdated. Windows releases updates with bug fixes and security patches. If your computer can not detect the battery because of a bug, an update may be a perfect fix.
1. Press Windows + I to open the Settings app.
2. Click Windows Update at the lower left pane, then click Check for updates on the right.
3. Download and install available updates, then restart your computer.
6. Uninstall Windows Update
While updating Windows is an effective fix, you may get this battery problem right after a Windows update. In this case, you must uninstall the update. This is because some updates may be buggy.
1. Press Windows + I to open your Settings.
2. Click Windows Update on the left pane, then click Update History on the right.
3. Scroll down and click Uninstall updates.
4. Click the Uninstall button for your last update and confirm your choice.
7. Power Cycle the Computer
You should power cycle the device when no battery is detected on your Windows 11 computer. Power cycling will clear temporary glitches, reinitialize hardware components, and reset power settings.
Simply press down the power button and wait till the computer shuts down. Allow it to stay off for a few seconds, then restart it.
8. Run the Hardware Troubleshooter
on Windows 11, you get a bunch of built-in troubleshooters. The hardware troubleshooter is one of many. This tool will scan all hardware components, fix detected problems, or recommend solutions.
1. Press Windows + R type cmd and hit Ctrl + Shift + Enter.
2. Type the command below and hit Enter:
msdt.exe -id DeviceDiagnostic
3. Click Next and follow the wizard to complete the troubleshooting.
9. Run the Power Troubleshooter
If the hardware and devices troubleshooter does not fix the problem, you should run the Power troubleshooter on Windows 11. Follow the steps below.
1. Press Windows + R type cmd and hit Ctrl + Shift + Enter.
2. Type the command below and hit Enter:
msdt.exe /id PowerDiagnostic
3. Click Next and follow the wizard to complete the troubleshooting.
10. Reset the BIOS
Corrupted BIOS settings that are linked with battery management may trigger no battery is detected in Windows 11. When you reset the BIOS, you will send all configurations to their defaults and fix all corruption.
1. Restart your computer and start tapping the BIOS key when you see the manufacturer’s logo. The BIOS key is usually one of the function keys, and you may verify with your manufacturer.
2. Navigate to the Security tab, then move to Restore Security settings to factory defaults using the arrow keys.
3. Enter a passcode and hit Enter.
4. Save the changes, then exit BIOS.
11. Update your BIOS
If a BIOS reset does not fix the no battery is detected Windows 11 error, you may perform a full BIOS update. Follow the steps below.
1. Click the magnifying lens in the Taskbar, type HP, and select HP PC Hardware Diagnostics Windows.
2. In the BIOS-System Firmware area, click Check for BIOS updates.
3. Click the Agree button.
Detect Windows 11 Batteries with Ease
This is as much as we share in this guide. Now, your computer should be able to detect the battery, which should be charging and running as expected.
Were you able to fix the problem? Let us know what worked in the comment section below.
FAQs
Why is my computer saying no battery detected?
Most likely, faulty battery drivers are the root cause of the problem of no battery being detected. Therefore, you might try reinstalling the battery drivers to fix the issue.
Why is the battery not showing in Device Manager Windows 11?
While this is a separate problem, it may indicate that the battery is hidden in the notification area overflow pane.
Printing is often a necessity. It helps you convert a digital document to a physical form. There are many sources to print from, one of the more common ones being Google Chrome. However, you may have encountered the error can’t print from Google Chrome on a PC.
We will walk you through all possible solutions on your Windows computer. Let us get to it.
1. Confirm if the Problem Is Isolated to Google Chrome
Before you start with any other solutions, you must know if it is a problem peculiar to printing from Chrome. So, try printing documents from your computer; try printing from other browsers as well.
If you cannot print, it may be a general computer problem, and you may skip all steps specific to the Chrome browser. However, if you can print from other browsers, it is a Chrome issue, and you may pursue Chrome-specific solutions.
2. Select a Connected Printer for the Print Job
You may encounter the error that you can’t print from Google Chrome on a Windows PC because you have selected a printer that is not connected to your computer or one that is not switched on. Make sure you have the correct PC.
1. Launch Chrome or open the document you want to print with Chrome.
2. Press Ctrl + Shift + Prt SC to launch the Print window.
3. Under the Printer dropdown, select a different printer, then hit Print.
3. Run the Built-in Printer Troubleshooter
Windows comes equipped with built-in troubleshooters. The Printer troubleshooter is one of many.
This troubleshooter will scan the computer for print problems. It will fix these problems or recommend solutions. To run this tool, follow the steps below.
1. Press Windows + I to open the Settings application.
2. Click System on the left pane and Troubleshoot on the right.
3. CLick Other Troubleshooters.
4. Click the Run button for the Printer.
4. Use an Alternative Option to Open Print
Sometimes, you may be unable to open the Print Window, so you can’t print on the Windows PC. You may try all possible ways of opening Print. You may start with the shortcuts:
Ctrl + P
Ctrl + Shift + P
If they do not work, Click the ellipses, the three dots on the top right, and click Print.
5. Restart your Print Spooler Services
The Print Spooler service plays a vital role in print task management. It acts as a middleman when you start a print job by storing the print data. It also controls priority among print tasks. Restarting this service may fix minor bugs that make it impossible to print from the Chrome browser.
1. Press Windows + R to open the Run dialog.
2. Type services.msc and hit Enter.
3. Click Print Spooler service and click Restart.
6. Update the Printer Drivers
Outdated drivers always pose multiple problems to the operating system. When your printer drivers are outdated, there will be communication errors between the printer and the OS. This is a likely cause for can’t print from Google Chrome on PC. You may use a driver updater software or manually update it with the steps below.
1. Right-click the Start menu on your Taskbar and click Device Manager.
2. Expand Print queues, right-click your printer driver, and click Update driver.
3. Click Search automatically for drivers.
7. Clear Chrome Cache
A cache stores temporal data. When your Chrome cache is corrupted, you may have conflicts completing operations on Google Chrome. You should clear the old cache.
1. Launch Google Chrome and press Ctrl + Shift + Del.
2. Click the Clear data button.
8. Reset Google Chrome Settings
You should reset the Google Chrome browser if you still cannot fix the problem. Possibly, some bad configurations are making it impossible to complete a print job. When resetting the browser, you will return all default settings.
1. Launch your Google Chrome browser, type the pattern below in the address locator, and hit Enter.
chrome://settings/
2. Click Reset Settings.
3. Click Restore settings to their original defaults and click the Reset Settings button.
9. Reinstall Google Chrome
Lastly, you may try reinstalling the browser altogether. A reinstallation will fix all corruption or misconfiguration that trigger the can’t print from Google Chrome on PC error.
1. Press Windows + R, type appwiz.cpl, and hit Enter.
2. Click Google Chrome and Uninstall, then follow the wizard to complete the process.
3. Download and install a new Chrome.
Print with Ease on Google Chrome
If you have followed this far, you should no longer get the error can’t print from Google Chrome on your Windows PC. We have not arranged these solutions in any particular order, so you should start with the most appropriate solutions.
Have you fixed the problem? Let us know what worked in the comment section below.
FAQs
Why is my printer not printing from Google Chrome?
Misconfiguration, an outdated cache, driver issues, or connection problems may cause it.
Does Chrome have printer settings?
Yes, it does. You will first need to locate the page for printing, then press Ctrl + P.
In this guide, we explore the best freeware for Windows 11.
We hope freeware excites you as much as it excites us. However, there is much to choose from on the new Windows OS. We plan to take the stress away from you. So, we have done all the necessary research and compiled the absolute best in this guide. Let us get to it.
Productivity Boosters
1. LibreOffice – Open-Source Office Suite
If you prefer not to subscribe to Microsoft 365, try LibreOffice, the open-source office productivity suite. The suite has word processing, presentation, spreadsheet, and drawing applications.
The word processor gives extensive processing tools and supports multiple formats, including ODT, DOCX, RTF, and PDF.
You will be able to do complex calculations on the spreadsheet as well as create very beautiful charts and graphs.
If you seek distraction-free writing software, you must try FocusWriter. It is great because it will hide every toolbar and menu item, allowing you to focus only on writing.
You may also enjoy its basic features that help you keep track, like the word counter and pomodoro counter.
Video editing software can be very expensive, yet for many Windows users, they are indispensable. Clipchamp is a great freeware alternative for Windows 11 users.
This application is great for mixing photos into visually striking slideshow films that stand out on social media.
It is an excellent app for improving your media, adding dynamic text or frames, and using filters to change the colors of the movie. You may also use its video templates to create customized meme videos quickly and easily.
4. Download OBS Studio – Live Streaming and Recording
Download OBS Studio is so feature-rich that you will hardly believe it is a Windows 11 freeware. It is about the best option available for live streaming and recording software.
It is highly beneficial for creating tutorials, recording gameplay, or live streaming on platforms like Twitch and YouTube.
Some core features we love include screen recording, adding text, encoding, and graphic overlays. OBS uses community-developed plugins that are great for extending functionality.
The hard drive is a common culprit when your computer becomes slow and performs poorly. You may use the Defraggler Windows 11 freeware to defragment entire drives, individual files, or folders.
It is very robust, especially for freeware. It allows you to analyze drives and will visually analyze fragmented files to make them more understandable.
You may even configure automatic defrag sessions, a handy way of doing the work when you are not really busy on the computer.
If you have heard of the popular Ccleaner tool, then you may know Speccy. They share the same creator.
This freeware app offers detailed monitoring and information about your computer hardware and software.
You will get an in-depth view of your RAM, CPU, motherboard, graphics card, and storage drives. However, it excels most at offering comprehensive data displays like temperatures and fan speeds.
VLC Media Player combines two of the things we love the most, free and open-source. It, however, competes very well with paid options as it processes an extensive feature list.
VLC plays almost everything you throw at it, including DVDs, CDs, VCDs, audio files, and most video and audio codecs.
This tool offers robust subtitle support, customization options, and advanced features like video conversion, screen recording, and playback speed adjustment.
Technically, Steam may not be freeware, but it is a conduit to so many free-to-play games on Windows 11. This makes it a vital tool if you need diverse and engaging gaming experiences.
It, however, extends beyond free gaming. Steam offers paid titles through demos, tweaks existing games with user-created mods, and connects with fellow gamers via forums, groups, and chat functions.
With some Settings tweaks, you get the most expansive gaming experiences on Windows 11.
Enjoy Premium Experiences with Windows 11 Freeware
Not everything has to be paid. And on Windows 11, some of the coolest tools are often offered for free. In this guide, we have covered some of the best freeware you may download on Windows 11.
Did we omit any of your favorites? Lastly, let us know in the comment section below.
There are multiple errors associated with different things on your computer. One of the most common categories is the Blue Screen of Death error. However, a few less common ones, like the white screen, may occur on a Windows 11 device while gaming.
For this guide, we have explored the error and will introduce you to the most effective ways of fixing it.
It may be wise to boot into Safe Mode to ensure your computer is stable before troubleshooting. Walk with us.
1. Confirm Connections Are Properly Done
Before diving into any complex solutions, you should confirm you have proper and tight connections between devices.
If you use an HDMI or DisplayPort cable, you may experience a white screen or other glitches when they are loose. You may proceed to other solutions once all connections are correctly done and the error persists.
2. Kill Running Background Apps
While this solution may seem aggressive, it can be very effective. This is because when you run a gaming application, it usually will demand a lot of system resources like the CPU, RAM, and graphics processing power. When you have many background apps running, they will compete for power, which may lead to a white screen.
Follow the steps below to fix it.
1. Press the Ctrl + Shift + Esc keys to open the Task Manager.
2. Click the Details tab, click a process, and click End task.
3. Repeat step 2 for as many processes as you would love to end.
3. Update Graphics Driver
You may suspect graphic card issues when you have errors that affect how the monitor displays. In the case of the white screen while gaming on Windows 11, there may be an outdated driver, and you should update it.
1. Open the Device Manager by right-clicking the Start menu and selecting Device Manager.
2. Expand the Display Adapters category, right-click your driver, and click Update driver.
3. Click Search automatically for drivers.
4. Disable Integrated Graphics Driver on Dual-GPU Configuration
If you have a dual GPU configuration, you may be experiencing conflicts in image, video, or graphic rendering. This may lead to a white screen while gaming on Windows 11. You should disable one of the drivers.
1. Open the Device Manager by right-clicking the Start menu and selecting Device Manager.
2. Expand the Display Adapters category, right-click your driver, and click Uninstall device.
3. Confirm your choice.
5. Address Overheating Problems
Overheating while gaming may cause the white screen on Windows 11. Since gaming is resource-intensive, you will likely have more CPU and GPU demand once the gaming app is launched. This can increase the temperature of the device.
Additionally, if you overclock the computer, you may experience higher temperatures that can trigger the problem.
6. Upgrade Hardware
If none of the solutions we have explored works, you should consider upgrading your hardware. This may entail getting a new GPU or CPU or increasing the RAM.
With improved hardware, you should not experience the white screen on Windows 11 while gaming.
Game Without Errors
Once you have followed the solutions in this guide, you should no longer experience the white screen problem while gaming. As a last resort, you may reset your computer, but this is extreme and would likely lead to some data loss.
FAQ
Why is my PC showing a white screen?
Hardware problems are the most common reason for the White Screen of Death. Software issues can also occasionally result in the Windows white screen of death.
Is the White screen a sign of a virus?
Not necessarily. However, you may run a virus scan with any reliable antivirus to rule out any possibility.
Updating your Windows computer is critical to optimal performance. However, the update process may encounter some challenges. Recently, we have heard people talk of the 0x8000ffff Windows 11 update error.
This error may indicate software conflicts, corrupted files, or problems with essential update components. Let us run you through some of the most effective fixes in this guide.
1. Run the Windows Update Troubleshooter
Windows has some built-in troubleshooters. The Windows update troubleshooter is one of them. This tool will scan your computer for updates and fix problems or recommend corrective actions. Follow the steps below to run the utility.
1. Press Windows + I to open the Settings app.
2. Click the System tab on the left, then click Troubleshoot on the right.
3. Click Other troubleshooters.
4. Click the Run button for Windows Update.
5. Follow the Wizard to complete the process.
2. Run the DISM and SFC Scans
Corrupted installation and system files commonly cause the 0x8000ffff Windows 11 update error. This is because the update process may rely on some of these files to complete successfully. Luckily, on Windows 11, you may employ the DISM and SFC tools to fix said corruption.
1. Press Windows + R to open the Run dialog.
2. Type cmd and hit Ctrl + Shift + Enter.
3. Type the command below, hitting Enter after each one to run the DISM scan.
3. Type the command below and hit Enter to run the SFC scan.
sfc /scannow
3. Perform the Update from the Windows Update Catalog
When updates are not completed successfully, there are chances that certain update components are not working correctly. If this is the case, you may perform a manual update. You will need to download the needed update from the Windows Update catalog. Also, you will need to find the problematic update. Follow the steps below.
1. Press Windows + I to open the Settings app.
2. Click Windows Update on the left pane and Update History on the right.
3. You should see the name of your most recent update. It usually starts with a K. Note the name.
4. head to the Windows Update Catalog website.
5. Past your update in the search bar, click Search, then click Download for the specific update you need.
6. Double-click the download to install it.
4. Reset your Windows Store Cache
Resetting the Store cache will fix corrupted or outdated cache data and conflicting cache entries that may trigger the update error. It also eliminates synchronization and permission issues,
1. Press Windows + R to open the Run dialog.
2. Type the command below and hit Enter.
WSReset.exe
5. Temporarily Disable the .Net Framework Feature
Disabling the.NET framework is one of the best ways to fix the Windows 11 update error with code 0x8000ffff. This is due to the possibility that the component will disrupt the updating process.
1. Press Windows + R, type apwiz.cpl, and hit Enter.
2. Click Turn Windows features on or off.
3. Uncheck all .Net Framework checkboxes and click the OK button.
4. Retry the update and re-enable the .Net framework when the update is complete.
No More Update Error 0x8000ffff
That is all you need to know about the Windows 11 0x8000ffff update error. In most cases, it is an easy fix. In rare situations, you may consider a reinstallation of the operating system. But this is a drastic measure and should be reserved as a last resort.
Do you have questions about the update error? We love to hear them in the comment section below. You may consider similar fixes for the 0x800f0831 Windows Update error.
You must have run into the Windows 11 application error 0xC00007b. This error comes with the error message: The application was unable to start correctly.
This error comes when opening certain applications, especially games. Users have observed it with apps like Sherlock Holmes the devils daughter, Dying Light 2, etc. This error may indicate missing DLLs, essential .Net components, or other app-dependent files. You may fix it with the solutions below.
1. Restart the Application
Before trying any complex solutions, restart the problematic application. During restart, you force all connected app processes to shut down, allowing them to reset and fix minor bugs that may trigger the application error.
2. Reboot Your Computer
While rebooting seems like an easy fix, it is often very effective. When you reboot the computer, you will stop all running processes and give the computer a soft reset.
This is a handy way of fixing minor bugs that may trigger the 0xc00007b application error in Windows 11.
2. Install DirectX
DirectX is a collection of APIs that offer a low-level interface for components like graphics cards, sound cards, and input devices. This Microsoft API is essential for running certain apps, especially game apps.
Since the 0xC00007b Windows 11 application error indicates configuration or missing dependencies, installing DirectX may cover these dependencies.
3. Double-click the downloaded file and follow the steps to install it.
3. Install the Missing DLL
DLLs or Dynamic Link Libraries are reusable code packages used by different applications on your computer. When a DLL that your app relies on is missing, you may get the 0xc00007b application error in Windows 11. If you know the exact missing DLL, you can try downloading it; if not, you may run the SFC scan that can repair file corruption or replace missing files.
1. Press Windows + R to open the Run dialog.
2. Type cmd and hit Ctrl + Shift + Enter to open the Command Prompt with elevated rights.
3. Type the command below and hit Enter.
sfc /scannow
4. Install .Net Framework and Enable the .NET Framework Feature
You may be getting this problem because .Net Framework is missing on your computer. Sometimes, it is corrupted, and you need a fresh installation. However, you should note that even if it is installed, there is a chance that the .Net feature will be disabled. The steps below show how to download and enable it.
1. Visit the .Net site and click the Runtime offline installer.
2. Double-click the downloaded file and follow the wizard to complete the process.
3. After the installation is complete, press Windows + R, type apwiz.cpl, and hit Enter.
4. Click Turn Windows features on or off.
5. Tick all .Net Framework checkboxes and click the OK button.
5. Repair the Application
If application files are damaged, you may encounter the 0xc00007b application error in Windows 11. Some apps come with a built-in Repair feature. You may access repair from the Settings app or the control panel. We explore both options below.
Repair App Using the Settings App
1. Press Windows + I to open the Settings app, click Apps on the left pane, and Installed Apps on the right.
2. Click the ellipses of the problematic app and click Advanced Options.
3. Scroll down and click the Repair button.
Repair App Using the Control Panel App
1. Press Windows + R, type apwiz.cpl, and hit Enter.
2. Click the problematic app and the Repair button (sometimes it may be a Change button).
3. Follow the wizard to complete the repair.
6. Reinstall the Application
If none of the solutions above work, you must consider reinstallation. When you uninstall the app, download a fresh copy that is void of any corruption, and reinstall it. Make sure you remove all leftover software before installing the new download.
1. Press Windows + R, type apwiz.cpl, and hit Enter.
2. Click the problematic app and the Uninstall button.
3. Follow the wizard to complete the process, then reinstall a fresh version.
Recovering From the 0xc00007B Application Error in Windows 11
This guide shows you the best ways to recover seamlessly from the 0xc00007B application error. You should choose what solutions resonate the most with your specific situation. While this problem is often seen with games, it may affect any other application.
Let us know what solution has been effective for you.