Containers have revolutionized how we develop and deploy applications. However, managing them on your desktop can be a hassle. Podman Desktop is a free and open-source tool that lets you manage containers and Pods using a graphical user interface. In this post, you will learn how to get started with Podman Desktop.
UGREEN NASync NAS Storage Software Early Beta Review
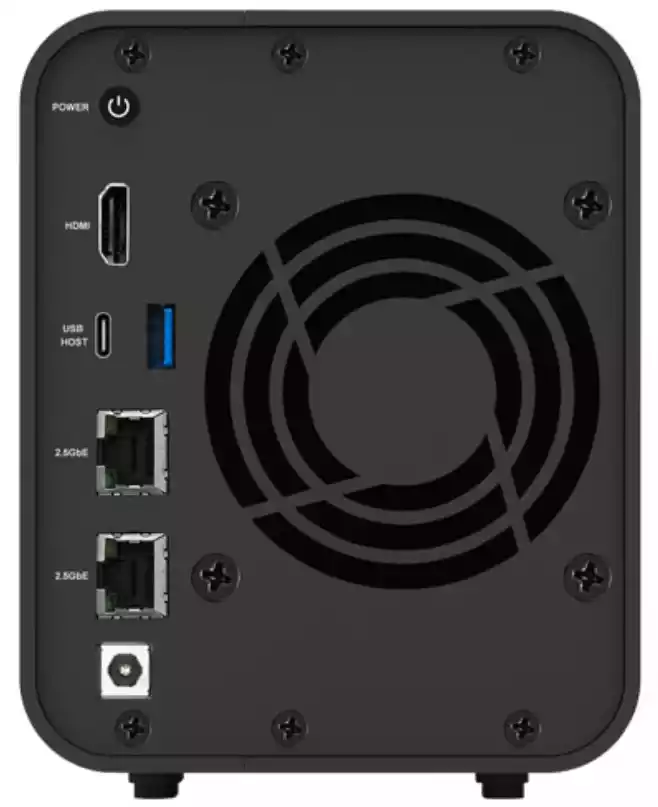
Many of you might have already heard about the NAS solution (the NASync DXP series) coming from UGREEN soon. Arriving initially on Kickstarter on the 26th March, this product will hopefully be rolling out to backers in mid-summer 2024, with it no doubt arriving at traditional retail after then. As good as the hardware all sounds on the DXP2800, DXP4800, DXP6800, DXP8800 and DXP480T), what about the software? UGREEN NAS devices arrive with the UGOS software (alongside some client toosl for PC, Mac, Android and iOS) and many users want to know if it is any good, what state the current beta is in, and ultimately how good is this inclusive software. So, today I am going through the UGREEN UGOS NAS software (at the time of writing, version 1.0.0.0483), discussing what I like, what I don’t and indications of where UGREEN seems to be headed with this Debian-based platform
UGREEN UGOS NAS Software (Beta) Review – The TL:DR
In a rush? let’s get to the point! Here is what I think of the UGREEN NAS software for desktop and NAS:
What I liked About the UGREEN UGOS Software Beta
What I did not like about the UGREEN UGOS NAS Software Beta
The Mobile Application is exceptionally good, for an ‘in development’ system
The building blocks for future apps and services are there
All the RAID, Caching, Maintenance and Sharing protocols are in place (BTRFS too)
Storage Manager is intuitive and clear
Very good help/assistance services
Search functionality and File Management tools are smooth, responsive and user-friendly
AI services in photo tools are good and diverse
Quick Repair for on RAID drive blocks is nice extra
The Manual Deduplication tool is also a nice extra touch
System power, controls, schedules and operation management is all very user-friendly
All the system options, UX and placement are exactly where they should be
File Service controls, Firewall Controls and Network management controls are clear and fully featured (for the most part, MTU was fixed)
Lack of 2FA/OTP Authentication
Inconsistencies in fonts and design at points
Lack of WORM and Encryption at key points vs others in the market
A rigid/fixed Photo Album is inflexible
Multimedia applications are few and far between currently
Currently no VM/Container tool
3rd Party OS support invalidates hardware warranty
Further drive performance optimization is needed (getting better with each update, but still not ‘there’ yet)
File transfer notifications not prominent enough
Security Manager priorities are poor and do not factor in system insecurities (i.e anti-ransomware protocols) and instead prioritize virus’ and malware
Backup and Sync Tools are still very early days and do not support Cloud services
Desktop Client tool feels unfinished ATM
UGREEN UGOS NAS Software Beta Review – Mobile Application
Although I will get onto the PC/Mac desktop user experience in a while, I wanted to start this software review with the mobile application as 1) It will likely be the most frequently used means for new/novice users to interact with the UGREEN NAS, and 2) because it is arguably further along in terms of development and polish than the browser GUI. The mobile application is available for iOS and Android and is genuinely exceptionally well presented. The main application dashboard allows you to manage multiple UGREEN NAS devices on the LAN/Network, or remotely via the UGREEN account relay services. Upon logging in, you are presented with a single mobile dashboard to manage..well… everything. In my testing and evaluation, I only found 2-3 things that are not possible in the mobile app that were possible via the desktop. The UX is smooth, clear and was responsive the entire time. ALL of the testing )(and screenshots below) were conducted with the app connecting with the NAS remotely over 5G/4G SIM (cellular) mobile services and not network/WiFi.
Rather than providing multiple tailored apps for photos, videos, system management, etc, UGREEN have instead opted for a Swiss army knife ‘1 app’ approach. All applications running on the NASync system are accessible and usable via the app (with the exception of the management of the Sync and Backup target tools – more on that later). In most cases the apps run in a tailored GUI (eg the photo apps is more thumbnail-focused with native tools to hand via overlay buttons, whereas config controls are more ‘textual’ and rigid). This also extends to the ‘Control Panel’ of the system, which has practically all system controls to hand and is usable to the same degree at the desktop via a browser. Really impressed with the work that has gone into the design and UX here.
Pretty much all the system information is accessible (supporting copy/paste click tools too) and further live hardware information is readily available (something often undercut or inaccessible in many NAS mobile apps, in efforts to ‘keep it simple’).
Interestingly, the hardware power controls via the mobile app are also pretty extensive. I expected ‘Power On and Off’ and maybe a Wake On LAN option sure, but I was not expecting fan controls, LED controls, scheduled power scheduling customization, drive hibernation controls and system file service actions. These are rarely all available in NAS mobile apps (for fear of overcomplicating mobile tools). It’s ALOT to take in, but overall I think it’s a good thing. Novice users might disagree.
File management services (ie a File/Folder’ explorer) is also built into the app that gives FULL access and control of the files on the NAS. There the basic ‘copy, paste, cut’ options and ‘upload from phone’ options, but it also then expands towards uploading specific file types (unusual), shared folder creation on the fly, changing access rights and permission to existing shared storage areas – it’s a lot of control to include in the swiss army knife single app, when they could have likely got away with a basic file manage option included with the system manager tool. Colour me impressed.
This level of control and management also extends to the main storage manager (i.e Pools, Volumes, etc). You can action complete Storage Pool creation (i.e RAID building), Volume creation, SSD cache options, manage permissions and even action RAID rebuilding when needed. Really impressed with the presentation and depth of control in this mobile tool.
The task manager tool in the mobile GUI is handled like any other application, with its own design and layout, but (much like the desktop experience i will discuss later) lacks historical analytics on the system hardware – something I hope UGREEN resolve later. Media Server services can be managed via the app, as well as accessing and pushing of links/3D barcodes and files to the download manager for HTTP/BT downloads.
The Photos tool is quick slick and responsive but is perhaps still in needs of a little more optimization, as although the thumbnail generation was quick snappy, the layout always felt quite ‘squished’. That said, all the photography options and control of the AI categorization services were present here. The Map view (using scraped metadata from mobile photos) worked great and all facial recognition tags that were actioned on the NAS Desktop GUI were carried over smoothly. As were sharing links that were created, that could be managed and customized with ease too.
Mobile synchronization was 50% good news and 50% bad news. The good news was that photo backups from your phone are smooth and can be tailored quite well to your network/storage needs (even including some useful destination sorting options). However there was NOT an option to arrange scheduled or automatic backups of the REST of my phone storage – just the photos. That is a shame, as I cannot be the only user who would quite like to automatically backup my WHOLE phone storage periodically on a schedule (maybe 1AM whilst I sleep?). Unfortunately, you are currently forced to manually upload files and folders to the File manager application. Hopefully UGREEN will roll out a ‘whole phone storage’ backup option down the line in future updates.
On the whole, I am really impressed with the mobile application for managing your UGREEN NAS and it feels like this has been a priority for the brand in the software development for this soon-to-land-on-kickstarter NAS. Let’s move over to the desktop and go through the system management of your UGREEN NAS on your web browser.
UGREEN UGOS NAS Software Beta Review – Browser GUI Presentation
The UGREEN NAS OS is accessible via the web browser, either over the local area network or remotely via the use of UGREEN’s online services with the use of a free account. This is pretty much the same as other turnkey NAS brands, but we have yet to see how well it will handle multiple users using this service on mass. Neverthless, if you only plan on local network access, this will work fine. The web based GUI (at least, in version 1.0.0.0483 that I used) was very responsive and did not require any internet access.
As you might expect, the user account that you create during initialization can be customized once you login (the super user admin account is disabled by default). The range of customization to the account is a little limited in the beta. You can change your user avatar, change your password, view your activity, check your storage quota and connect it with a UGREEN account. There is a lack of 2-step authentication in the beta (2FA/OTP etc) which I was a little disappointed by, but aside from that, this is all what I would have expected.
Changing the browser GUI is fairly normal and the range of changes (wallpaper, languages, time etc) are present, but that’s about it. Again, all standard stuff that is good to see, but not going to blow you away.
clicking the grid of menu dots at the top right shows you the app control deck that shows the tools and services you have installed. These can also be dragged onto the actual GUI desktop much like you would find on your local OS desktop from Windows, Mac or Chrome. I will add thought that the font of the text does seem quite dated.
Ther is a support option on the desktop and App list that opens up into a dedicated support portal. I tested this with the internet services disconnected and can confirm that all of the ‘App Guide’ options are locally accessible (i.e offline accessible), whereas the Information center requires internet access to open up and get further support.
The search functionality of the App Guide also works fast and it has pretty much everything you would need to get the basics/fundamental assistance you might need on the first phase of owning the device.
Eg, the network settings option below gave a decent amount of advice and information for IPV4/IPV6 gateways. There was certainly something of a conflict in the fonts and presentation again, but this is a beta.
The ‘Contact us’ tab of the support section provided numerous tools for getting in touch with UGREEN. There was the usual contact number, online messaging/IM platform and support portals, but what really stood out was the online remote access support option that could allow UGREEN to access your system for maintenance or support. This is not unusual (lots of NAS brands do it), but I am glad to see it present here and controllable from the user end. When my system was updated between versions, I encounter an issue (related to my system not being on a whitelist of approved beta OS devices) and I used this system to allow UGREEN in. I was able to monitor the access comfortably. I would nevertheless feel better if I knew I could lock this behind a unique 1 use key everytime though.
The main GUI also has a search functionality built into the top bar that was responsive and allowed me to quick search for filesacross the system, as well as utilize the ‘Universal Search’ function to search deeper and use tailored filters.
The Universal search function broke down searches quite well and even provided further image and file information as I searched – something generally not included in search tools at the surface level on a NAS, due to the indexing of the metadata being something of a pain at this level (though widely accessible in a file manager). Overall, I was happy with the zippy responsiveness of the search functionality. It will be interesting to see how much offline AI search functionality could be added here down the line.
UGREEN UGOS NAS Software Beta Review – Storage Manager
The storage manager is very well presented and showed me all the information that I wanted/expected. A graphical display of the populated bays, drive temp, suggestions of further actions I could/should perform and the additional context options were intuitively on the left-hand side.
A nice extra touch that I liked was the fact you can add storage widgets to the primary storage manager page. This means you can add specific monitoring for your needs.
For the more analytically minded, there is a much more text-rich breakdown of the storage in the control panel:
You can break down the storage manager view to the individual disks (which will depend on the UGREEN system being used) and from here you can view drive health (SMART), run performance tests individually, run scheduled checksum, check temps and more.
In a previous version of the UGOS UGREEN NAS software, when I ran the performance test on the Gen 4×4 slots of the DXP4800 Plus, I got quite poor speeds (around 1.5GB/s, instead of the expected 5-6GB/s at the very least). So, I was looking forward to retesting.
I am pleased to confirm that in this newer OS version, the 4×4 slot for this Gen4 NVMe was able to hit a comfortable 5.1GB/s Read or 5.5GB/s Write. Still not the 6GB+ I would have liked to have seen, but I appreciate that they are still optimizing this. Also, I would like to see further clarification on the actual test (block/file size for the test, something a little more analytical). Additionally, despite me running 3-4 different SSD performance tests, the layout of the GUI only allows me to see the first one (with no means to display the results of the later tests). Still, at least there is improvement here.
Alongside drive health and performance tests, there is also an option to directly wipe an HDD or SSD inside the UGREEN NAS. However, there was no clarification on the method/scale of this wipe (eg is this a secure wipe, writing out each block, or a casual format that just deleted the index). It would be nice to know more about the depth of this Data Wiping.
The Storage Management tab showed more information on the individual pools an volumes. I had a RAID 5 and BASIC pool in one UGREEN NAS system and RAID 0 and RAID 1 in another one.
You can choose to use EXT4 or BRTRFS as the file system of choice for the volumes, though there was no support of Write Once, Read Many (WORM) – which in 2024, is a bit of a pain!
There IS however, support of RAID resync priority options and even a Quick Repair option (whereby the system will prioritize only the areas of a disk during a RAID rebuild that would have data, then zero’s out the rest in order to vastly speed up the RAID rebuild of partially full Storage pools).
Creating Storage Pools and volumes feels easy and intuitive. They have kept it simply, which is going to be great for movies (but experts might find it limiting). There is support of the usual RAID configurations of RAID 0, 1, 5, 6 10, but no flexible RAID system (like Synology Hybrid RAID – SHR or TRAID).
You can apply schedule drive health tests (not uncommon on NAS devices).
Additionally, there are options present to control the USB drive via the storage manager to prohibit access generally or completely.
Overall, the storage management is a little sparse BUT it is definitely ease to use, intuitive and provides the majority of base-level functionality a new NAS user is going to need. I am disappointed at the lack of more prosumer options such as WORM (though I will forgive the lack of a flexible RAID system like SHR, as that is not exactly common in the world of NAS anyway). UGREEN are clearly focusing on the fundamentals here (perhaps looking at Synology and DSM for…inspiration?). I hope to see further optimization and explanation around the performance benchmarking tools, but apart from that I am happy. Let’s discuss the object file/folder access in the Web Browser GUI and the quality of the UGREEN File Browser.
UGREEN UGOS NAS Software Beta Review – File Manager
Much like turnkey solutions currently in the market from Synology and QNAP (with DSM and QuTS respectively), the UGREEN NAS software includes a browser-based File Manager. This allows you to see and interact with data on your NAS in a much more native way, as well as take advantage of traditional copy, paste, archive, uncompress and deletion tools. The File Browser also integrates native ‘right click’ context options whilst in use in your web browser. Again, as mentioned earlier, non of this is ‘new’ to the industry, but it is still good that this new NAS software in the market is nailing the fundamentals.
Folders can be created in the file manager that can be standard breadcrumb, personal folders that are related to an individual user, or shared folders that can be used by network-connected client devices or applications. Control and access (i.e Read/Write Rules) can be set to individual users and groups. There was no option to apply any encryption or write once rules to these shared folders however.
The context menus of the file manager also allow users to share files/folders easily, with support of sharing with other UGREEN NAS users or via a unique link. Rules for it’s use (date of expiry, number of access sessions, password protection, etc) can be applied during their creation.
Additionally, files can be directly shared from the Universal Search tool (discussed earlier) with similar share rule controls in place.
The overall/global settings of the file manager are all fairly standard, but more interestingly there are also a few extra options in the management tab. These include controls for your user personal folder, a management portal for existing shared links, a private collection folder option (to add specific files as needed on the fly), recycle bin management (date of true deletion, where it is applicable etc) and more interestingly, a File deduplication option.
The File Deduplication option (unlike backend deduplication which works automatically and, in the case of ZFS, in line) allows you to manually select folder directories and action the system to scan for duplicate files (so, photos, music, docs, etc) and then it will allow you to action space-saving measures. This feature felt a little unfinished and poorly optimized, but does show promise and is definitely positive feature!
I can also confirm that playback of video files, via the File Manager was smooth. It definitely required compression/license support on your respective browser/os, but files played and there was options to downgrade video quality, minimize in the corner of the screen and navigate playback easily. I would still much, MUCH rather a native video playback application (as I assume 3rd party client devices such as Amazon Fire TV, Roku, PS5, etc are going to rely on 3rd party network players), but this is still a positive development. On the other side, no Plex Media Server application in this current version of the beta, and no container application to create a custom deployment. Hopefully, this will be resolved soon.
When it came to checking photo viewing i nthe file manager, I can confirm that it i s supported and a Picture Preview service is included. Later on we will discuss the standalone AI powered photo application.
Unfortunately, audio playback was not possible and any attempts to playback .MP3, .WMA or .WAV all resulted in just a download prompt and no playback i nthe browser. Not a big deal, but without an audio player tool in place, it does make checking/previewing audio data rather clunky.
Copy/Paste/Cut actions on files generate a File Copy task in the notifications panel at the top right of the screen. This is all good and was dynamic/animated, however there was no clear indication that this was taking place (eg the notification appearing upon actioning the copy/paste) and no indication in the file manager. Not a massive deal, but it left me wondering if the action was actually happening. I should not need to actively check the task center to know that my ‘write action’ is occuring.
The File Manager is a robust tool that, although not currently as feature-rich as the one found in QNAP QTS or Synology DSM, it gives you pretty much everything you are going to need for basic/day-to-day file management in the web browser. It definitely still needs tweaks and optimization, but it’s in a very good state currently and even has a few options like manual deduplication and ‘collection options that are being presented uniquely in their platform. Let’s discuss system management via the Control Panel.
UGREEN UGOS NAS Software Beta Review – Control Panel
The control panel is pretty much exactly as you might expect, pretty clear UI and although I would appreciate an ‘advanced’ tab (as compressing all the system controls into 12 icons seems quite strict), it is definitely not an intimidating presentation here. To go through ALL of the settings would effectively quadruple the length of this UGREEN UGOS Beta review, but I will cover elements that stood out for me (both good and bad).
I like that the system is arriving (even in this beta) with a completely customizable and user-friendly scheduled On/Off organizer. Those of you who want to ensure the system is only in operation during peak/necessary periods (for reasons of noise, power consumption or security) will appreciate how fleshed out this section is.
Likewise, the system software already has fan controls in place (I tested on both the DXP4800 PLUS and DXP480T, both responded immediately).
There was also an option to reset all your network connections to default (setting all static IPs, subnets, etc back to dynamic and default), as well as the option to factory reset the system. I think the wording of the later needs to be improved, as it is not hugely clear about the implications of this choice.
Finally, there was the support of LED controls. This is something I hoped for, as the LEDs of the 3.5″ SATA UGREEN models are exceptionally bright (white) and alongside the option to dim them, there was even a scheduled option that allows you to set a plan to lower them during specific periods of the hour (and day/weel). It’s a small option, but I do appreciate it!
Alongside the network management options (that we will cover more later on in the article) there is also established support for bonding/trunking of the ports. Again, not ‘new’, but a welcome addition to this launch beta software.
There are established management and controls for the remote access via the UGREENLink service (As well as creating a dynamic domain name for the system for remote access). I did not explore this during my time with the beta, as I want to hold off till closer to the established product for a more realistic expectations vs experience on this one!
When it comes to terminal/backend access, the option for Telnet was disabled, but the option for SSH was ‘enabled’. I have mixed feelings about this, as although I did use SSH and Putty to access the system to verify the PCI layout and some disk testing for the system reviews, I KNOW it would be much better to have this disabled by default. As this is a Beta software package, there is a good chance that this will be disabled in the full software release (only enabled here for troubleshooting, debugging and maintenance), but nonetheless, I would like to see this ‘off’ by default in the full release.
The system task manager was fairly standard, showing plenty of system service and process information. There was no option to ‘kill/Hibernate’ services (as you might find in your Windows Task Manager), but that is not unusual in NAS software, for fear of corrupting the system services.
The graphical system resource display of the task manager was very detailed, clear and intuitive. It covered pretty much EVERYTHING and was very responsive. My only real complaint here would be that there was no option to record the task manager analytical information. i.e going into it showed you the current system resource use from that moment, nothing from the past. Adding an option to allow the system to maintain a record (even as a check box option, as featured in Synology DSM) would allow much, MUCH better long-term analytical benefits for this 24×7 system.
Regarding software updates, the system has configurable options to allow the system OS updates to be actioned automatically or manually, with the system periodically pinging the UGREEN update server to check it’s status (which can be disabled). I will add that during my early time with the UGREEN DXP4800 PLUS and DXP480T, I had difficulty upgrading my software to the newer version for this beta review and it turned out to be related to my address/serial requiring adding to a white list. I am sure this is not going to be an issue when the software and hardware fully rolls out, but those reading this wondering why their beta software is not showing the same version as them might find this is the issue.
Also, the UGREEN NAS systems arrive with UPS support to allow automatic pinging in the event of a power cut/brown-out and the system safely power itself down safely straight away, or maintain operation for a given period. This is a small thing and relatively common in NAS circles, but nonetheless nice to see in their software out the gate!
As mentioned, I could probably go through everything in the control panel and make this article a few thousand words longer… but I won’t! There are user/group controls, time and language controls (the later of which seemed to still present Chinese text periodically, but this IS a beta) and lots of system information options. Overall, it’s a decent control panel and backend, but maybe adding a few tips/guidance in places and perhaps an Easy/Advanced tab in a ver.2 of the software down the line might be appealing. Let’s discuss system security maintenance.
UGREEN UGOS NAS Software Beta Review – Security
Now, let’s be a bit neutral here for a sec! We are talking about a BETA of the UGREEN NAS software, so I understand that this is an in development product and therefore the potential for vulnerabilities, fixed default credentials and loose ends are going to be high. However, I DO think we need to use this UGOS beta for a good indication of what UGREEN are layout the tracks down for (both good and bad!). The system arrives with a Security Manager tool that allows you to action ad-hoc/scheduled system scanning. This generates logs and also allows you to select actions for files deemed suspicious or compromised.
I will say though, that it wasn’t hugely clear on what exactly was being actioned in this tool. It might well be a question of an ‘in development’ GUI overlaying the tool, but I assumed that a security manager on the UGREEN NAS would work through a list of pre-defined security parameters (eg weak passwords, SSH left enabled, default ports, firewall usage, etc).
This Security Manager seemed to be prioritizing the search for Malware/Exploitative Files/Virus’ etc – which is actually comparatively rare as an attack vector in modern in NAS circles compared to RANSOMWARE attacks – which only require a path INTO the NAS to inject code and get the system to lock up the data, which is then used to blackmail users into exchanging bitcoin for the key. This security manager didn’t give me a vibe that it was addressing this. Still, it IS a beta and I will 100% welcome being corrected on this.
The majority of the File services (except SMB) were disabled by default (and SSH was enabled, but again this might be Beta related).
The system also arrives with Firewall management services (disabled by default, but easy to enable).
I would say though that these controls do need a little more explanation for beginners (I say this to most NAS brands really) as a lot of users will blanketly enable this service, or worse play with their port services, without understanding the significance of the action. This does need a little more tips/explanation I think (there is a single ‘?’ tip, and that’s it).
There is also a log center that keeps track of the activity on the system. It’s all clear, if a little basic and reports can be exported logs from this GUI.
Alternatively, there is a notification configuration in the Log center to ensure that events and alerts are delivered to important system users as needed. The configuration and filtering of this is a bit sparse, but the structure is there to work upwards from.
Network management is also present and alongside the usual traffic controls (i.e MB/s limits to specific physical connections and even user network quota in other sections) are present, there is also fairly standard network configuration options. These include the jumbo frames / MTU, adapting the IP to fixed/dynamic, bonding the connections (mentioned earlier) and prioritizing connections. There is no options for virtual networks and management here (understandably not a priority as the physical connections are only 2x tops and there is no container/VM manager to necessitate this kind of service), and although an earlier version of the beta provided spotty network and SMB services, this has now been resolved in this software version.
The system’s default ports (for both encrypted and non-encrypted non-certificate access) can be adjusted at anytime via the control panel, as well as the option to apply custom certificates when needed too. Standard stuff, but positive to see it here on the outset.
With regard to security, what we find here in the UGOS beta is a lot of the entry-level stuff and fundamental building blocks, but still not quite enough for me to think this beta software is as watertight as TrueNAS or Synology DSM (understandable, given the beta status and maturity). The structure is there, it just needed building on and hopefully, this is what we will see as the software develops towards delivery. The security Manager tool needs to be better displayed, a deeper focus on system integrity checks in these scans, integration of 2FA/OTP services, etc. Until I see these features getting added (alongside assurances that SSH will indeed be ‘off’ be default), I would not be too cosy making this beta software internet-connected. Let’s discuss the individual applications that are included with this Beta of UGREEN UGOS currently.
UGREEN UGOS NAS Software Beta Review – App Center
At the time of writing and in the current beta version, the Application center has approx 15 applications (5-6 of which I would consider base-line / default). I fully expect more to appear when the software is more polished and closer to launch, as well as hopefully support of popular 3rd party applications to be adapted to the UGOS ANS system (Plex, Emby, TailScale, etc), but right now it is a little sparse (understandable for a beta – I KNOW I keep saying that!).
There is also the option to manually install applications, but these still need to be installed in the UGOS format.
Updates to the individual applications can be actioned manually, or set to automatically apply when the system is aware of a patch/update. These do NOT require the system to reboot, but will require the application or service to restart. All perfectly normal in a NAS.
Individual applications are displayed in a familiar format (name, version, description, images, etc) but also have the option to ‘stop’ when needed or restart. Again, all is fairly par of the course for NAS systems in 2024. Additionally, when installing applications to choose which storage volume you want to application to run from. This is less of a concern currently, but if the previously promised/discussed VM/Container tools arrive in time for full OS launch, these will certainly benefit from living on a faster media volume!
The Application center is all pretty much what you would expect. It’s nailed down all the framework and structure, it’s responsive (though you cannot install multiple apps at once, currently it is 1 at a time – optimization needed no doubt) and I cannot really fault the GUI of it. It’s just a little empty right now and until a better arrangement of tools and services are included, I will hold off any further judgement.
UGREEN UGOS NAS Software Beta Review – Multimedia
How the system handles your multimedia is going to be pretty important to a lot of users. In the beta version I was provided with, there was only a small handful of 1st party media applications to use, something that will no doubt change as time goes on (in particular, the support of 3rd party applications, thanks to the Debian base of the operating system). The main media apps that were included in my version of the OS was the Photos application and a DLNA Media Server app.
The Photos application boasts the support of AI recognition (something that is available from several of the established NAS brands and their OS right now), as well as easy file sharing, private/public photography areas, smart filters and metadata scraping for custom album creation. The thumbnail generation was very prompt and I was left impressed by it.
Additionally, you can switch between the full-screen display mode and the folder view at the touch of a button, which is nice. But that brings me to the whole ‘folder limit thing’…
One thing I was less impressed about however, was the fact the photo application requires a fixed directory for it’s media library. So, you currently cannot point the application at any custom folder to crawl for your media, but instead, it needs to be in a specific user folder. This is similar to what you find in the Synology Photos application, and many users (myself included ) weren’t huge fans of it then either!
Now, one of the reasons for this MIGHT be because the Photos application has an impressive range of AI core services available (scene/object recognition, faces, pets, offensive, duplicate and locational data scraping) that I imagine requires a lot of pre-set locations to run at their most efficient/effective.
The facial recognition is a little basic at the moment, but DOES work. It crawled the 5 sample albums that I uploaded quickly and it was roughly as successful as other NAS brand’s efforts in this area.
Merging user’s faces was quick and easy, though I did not find it especially good at searching for group users based on their names (eg text searching for photos with those 2 users tagged via facial recognition), but using the smart filters on the main page, right side, worked fine.
Likewise, the system did a good job of scraping the geolocational data from the photos, and then displaying them in a map format. It was a little temperamental (always starting in China), but you would be surprised how many NAS brands get this map view wrong, or not even provide it at all.
Additionally, the OCR/AI Text crawling that occurred during the indexing periods was very good and any photo that had text was immediately pre-crawled for words that would be displayed when clicking the relevant icon in the preview window.
Not to give the AI/Software too much credit, as a lot of the information is kept in the metadata of the images. Nevertheless, it was good that the system was able to take advantage of this so quickly and factor it into some intelligent searches and categorization. That said, the ‘object recognition was virtually zero and I assume this is something still WiP – annoying, but ok.
The duplication removal tool was also integrated here into the photo applications, as well as the management of the file sharing that you might be actioning. The blurred photo removal tool was a little hit and miss, but then again these 5 albums were already pre-curated and therefore there was;t much smudge/blur photography for it to get its feet into.
Image sharing provided pretty much all the configuration and security precautions we say previously (password, validity period, download #s, etc). There weren’t any restrictions for HTTPS, or encrypted transfers though. There was also an option to restrict to registered NAS system users only.
As mentioned, the only other media application that I was able to see in the beta software I used was the DLNA media server application.
This was super basic and only provided an on/off switch, then the option to choose which directories could be accessible for multimedia sharing on the local area network:
1st party multimedia playback support is probably one of the weakest areas of the UGREEN NAS UGOS software in this beta and I sincerely hope it gets addressed closer to launch. Additionally, the option to conveniently install 3rd party multimedia applications via a verified app center section that includes Plex, Jellyfin, Emby etc would make things significantly better!
UGREEN UGOS NAS Software Beta Review – Backups and Synchronization
Much like the multimedia support of the UGREEN UGOS NAS services, the backup and synchronization tools afforded to the OS are still ‘in progress’ in this beta. There are a few services in place and clear indications of things to come, but its still not a complete backup package yet at this time of writing. The Sync and Backup tool allows backing up of data from 3rd party and UGREEN NAS servers to sync with your NAS over RSync.
This works in either direction of course, but the range of supported targets ends there. There isn’t currently a desktop client backup/sync tool in place (hopefully this is something that might well get integrated into the UGREEN PC Client in time) and supported Sync/Backup platforms still does not include cloud services (Google Drive, DropBox, etc).
There are a few ‘coming soon’ options greyed out and the option to manually select a connected USB drive via the ‘local folder’ option is available,
But it still feels like it needs more time in the oven. There general structure is in place, but the scope of what yo can do with it in the desktop browser GUI is still in its early beta stages clearly.
Backups and Sync jobs DO at least have versioning supported, which does mean that wether you are syncing a local folder or remote system, the roll back option is still available.
Indeed, the system configuration backup is also available, but only the system backend – not the whole system data as an image backup. This configuration backup can be sent to a local folder (inc connected USB) or to your UGREEN account.
The backup and synchronization tools definitely need more time in development and although I am really pleased to see them here, I do think they are a good way away from completion to a stable and satisfactory degree for your 3-2-1 backup routines right now.
UGREEN UGOS NAS Software Beta Review – Desktop Client Tool
At the time of writing this review, UGREEN rolled out a range of client tools for PC, Mac, iOS and Android. Although the Mobile application review and write up is still in progress (but TLDR, it is VERY polished in comparison to the desktop browser GUI), the desktop client tool was available and although it works, the scope of what you can do with it is a little limited. You can use it to scan your local area network for a UGREEN NAS, or enter remote UGREEN account login credentials and sign in.. and.. that’s about it!
The UGREEN NAS Desktop client then opens up a faux browser window (akin to a remote desktop) to view the GUI of the NAS. That is really it. It’s not much different from the browser and is not a big difference in resource consumption on your local system either. I was hoping to see ‘mapping network drive’ options, remote system setting configuration, local folder sync or even a terminal input. But no, just allowing a browserless access portal.
This written review of the UGREEN UGOS NAS software is still very much ‘in progress’ and I will be adding further details later on, as well as detailing the mobile application.
What I liked About the UGREEN UGOS Software Beta
What I did not like about the UGREEN UGOS NAS Software Beta
The Mobile Application is exceptionally good, for an ‘in development’ system
The building blocks for future apps and services are there
All the RAID, Caching, Maintenance and Sharing protocols are in place (BTRFS too)
Storage Manager is intuitive and clear
Very good help/assistance services
Search functionality and File Management tools are smooth, responsive and user-friendly
AI services in photo tools are good and diverse
Quick Repair for on RAID drive blocks is nice extra
The Manual Deduplication tool is also a nice extra touch
System power, controls, schedules and operation management is all very user-friendly
All the system options, UX and placement are exactly where they should be
File Service controls, Firewall Controls and Network management controls are clear and fully featured (for the most part, MTU was fixed)
Lack of 2FA/OTP Authentication
Inconsistencies in fonts and design at points
Lack of WORM and Encryption at key points vs others in the market
A rigid/fixed Photo Album is inflexible
Multimedia applications are few and far between currently
Currently no VM/Container tool
3rd Party OS support invalidates hardware warranty
Further drive performance optimization is needed (getting better with each update, but still not ‘there’ yet)
File transfer notifications not prominent enough
Security Manager priorities are poor and do not factor in system insecurities (i.e anti-ransomware protocols) and instead prioritize virus’ and malware
Backup and Sync Tools are still very early days and do not support Cloud services
Desktop Client tool feels unfinished ATM
Click the Link Below to find out more about the UGREEN NASync NAS Series on the brand’s official Site:
In the meantime, you can use the video below for the FULL software overview of the UGREEN NAS software:
This description contains links to Amazon. These links will take you to some of the products mentioned in today's content. As an Amazon Associate, I earn from qualifying purchases. Visit the NASCompares Deal Finder to find the best place to buy this device in your region, based on Service, Support and Reputation - Just Search for your NAS Drive in the Box Below
Need Advice on Data Storage from an Expert?
Finally, for free advice about your setup, just leave a message in the comments below here at NASCompares.com and we will get back to you.Need Help?
Where possible (and where appropriate) please provide as much information about your requirements, as then I can arrange the best answer and solution to your needs. Do not worry about your e-mail address being required, it will NOT be used in a mailing list and will NOT be used in any way other than to respond to your enquiry.
[contact-form-7]
TRY CHAT Terms and Conditions
If you like this service, please consider supporting us.
We use affiliate links on the blog allowing NAScompares information and advice service to be free of charge to you.Anything you purchase on the day you click on our links will generate a small commission which isused to run the website. Here is a link for Amazon and B&H.You can also get me a Ko-fi or old school Paypal. Thanks!To find out more about how to support this advice service checkHEREIf you need to fix or configure a NAS, check FiverHave you thought about helping others with your knowledge? Find Instructions Here
Or support us by using our affiliate links on Amazon UK and Amazon US
Alternatively, why not ask me on the ASK NASCompares forum, by clicking the button below. This is a community hub that serves as a place that I can answer your question, chew the fat, share new release information and even get corrections posted. I will always get around to answering ALL queries, but as a one-man operation, I cannot promise speed! So by sharing your query in the ASK NASCompares section below, you can get a better range of solutions and suggestions, alongside my own.
Vous en avez marre de devoir garder une vieille bécane sous Windows juste pour faire tourner ce vieux logiciel qui ne marche que sous XP ? Ou alors vous aimeriez bien tester la dernière version de Windows 11 mais vous n’avez pas envie de vous embêter à l’installer sur une vraie machine ? Dans les deux cas, j’ai la solution qu’il vous faut !
Grâce au projet open-source Windows dans un conteneur Docker, vous allez pouvoir faire tourner n’importe quelle version de Windows directement dans Docker, le tout avec une accélération KVM et même un affichage dans votre navigateur web si besoin.
Pour faire simple, il vous suffit de récupérer l’image Docker dockurr/windows, de la démarrer avec quelques options bien choisies, puis de vous connecter sur le port 8006 avec votre navigateur. Et là, magie, l’installation de Windows va se lancer automatiquement ! Vous n’avez plus qu’à vous détendre le temps que ça se termine. Une fois sur le bureau, votre installation de Windows est prête à l’emploi. Vous pouvez commencer à bricoler dessus comme sur une vraie machine. Le pied !
Par défaut c’est Windows 11 qui sera installé, mais vous pouvez très facilement choisir une autre version en passant la variable d’environnement VERSION dans votre fichier docker-compose.yml. Vous avez l’embarras du choix :
win11 : Windows 11 Pro
win10 : Windows 10 Pro
ltsc10 : Windows 10 LTSC
win81 : Windows 8.1 Pro
win7 : Windows 7 SP1
vista : Windows Vista SP2 (pour les nostalgiques)
winxp : Windows XP SP3 (carrément old-school)
2022 : Windows Server 2022
2019 : Windows Server 2019
2016 : Windows Server 2016
etc…
Et si vous voulez pousser encore plus loin, sachez qu’il est même possible d’installer une version allégée de Windows comme Tiny11 ! Pour ça, il vous suffit de passer la valeur tiny11 à la variable VERSION. Idéal pour avoir un Windows léger qui tourne comme une horloge dans un conteneur.
docker run -it --rm --name windows -p 8006:8006 --device=/dev/kvm --cap-add NET_ADMIN --stop-timeout 120 dockurr/windows
Bon par contre, le viewer VNC accessible dans le navigateur c’est surtout pratique pendant l’installation. Pour une utilisation plus sérieuse, mieux vaut utiliser un vrai client RDP en se connectant sur l’IP du conteneur Docker avec l’utilisateur docker. Il y a de très bons clients RDP dispos, que ce soit pour Android, iOS, Linux (rdesktop) ou même Windows où c’est carrément intégré à l’OS.
Évidemment, ne vous attendez pas à des miracles niveau performances, on parle d’un Windows qui tourne dans un conteneur Docker quand même ^^. D’ailleurs par défaut le conteneur a le droit à seulement 2 cœurs de CPU et 4 Go de RAM, ce qui correspond à la config minimale requise par Windows 11. Mais ça reste largement suffisant pour faire des tests ou utiliser des vieux logiciels.
Si jamais vous avez besoin de plus de ressources, vous pouvez augmenter ça facilement en ajoutant les variables d’environnement RAM_SIZE et CPU_CORES dans votre docker-compose.yml. Pareil si vous voulez augmenter la taille du disque virtuel qui fait 64 Go par défaut, c’est possible en passant l’option DISK_SIZE. Par exemple pour avoir un disque de 256 Go :
environment: DISK_SIZE: "256G"
Enfin, si vous voulez bidouiller plus en profondeur, sachez qu’on peut même passer des périphériques entiers (disques, clés USB…) au conteneur pour que Windows puisse y accéder directement. Je vais pas m’étendre plus, je vous laisse aller consulter la doc.
Bref, vous l’aurez compris, ce projet est une petite merveille pour tous ceux qui ont besoin de faire tourner Windows dans un environnement isolé et facile à mettre en place. Que ce soit pour tester une appli, monter un labo ou même utiliser un logiciel qui ne tourne que sous Windows, ça peut dépanner dans plein de situations.
Et le meilleur dans tout ça ?
C’est que le projet ne contient que du code open-source et n’embarque aucun élément propriétaire. Les clés de licence utilisées dans le projet sont celles fournies par Microsoft à des fins de test. Donc a priori, c’est totalement légal. Après c’est sûr, faudra pas venir se plaindre si Microsoft n’est pas content qu’on fasse tourner Windows dans un conteneur Docker… 😀
Docker Desktop is designed for developers working on macOS and Windows. It offers a user-friendly interface for running Docker containers. It uses a lightweight virtual machine (VM) with a Linux kernel in the background so that you can run Linux containers on non-Linux systems. Docker Desktop does a great job hiding all the aspects of the VM under the hood so that Docker containers appear to be running natively on your host computer. Docker Desktop received an update a few days ago, and in this post, we will discuss what's new in Docker Desktop 4.28.
Vous voulez envoyer des emails chiffrés de bout en bout avec votre client mail favori, mais sans vous prendre la tête ? J’ai ce qu’il vous faut les amis : le projet open source ProtonMail Bridge pour Docker de mon gars sûr DaTux, un fidèle lecteur de Korben.info que je croise souvent sur mon live Twitch.
Ce mec a passé plus de temps à rédiger le README.md de son projet qu’à le coder, mais le résultat est là : une version dockerisée de l’interface en ligne de commande de ProtonMail Bridge qui crée un serveur SMTP local. Comme ça, vos autres conteneurs Docker peuvent envoyer des mails via votre compte ProtonMail. La classe, non ?
Bon par contre, petit bémol : pour l’instant, il faut un compte payant (Mail Plus, Proton Unlimited ou Proton Business) pour se connecter. Ça marchera pas avec les comptes gratuits. Mais vu le niveau de confidentialité et de sécurité que ça apporte à vos échanges d’emails pro, ça les vaut !
Pour commencer, récupérez la dernière image Docker avec :
N’oubliez pas de fournir un volume pour la persistance des données (mkdir /path/to/your/volume/storage).
Maintenant, ouvrez un terminal dans le conteneur en cours d’exécution et utilisez l’interface de commande interactive de ProtonMail Bridge :
docker exec -it protonmail_bridge /bin/bash
À l’intérieur, killez d’abord l’instance de bridge par défaut car une seule peut tourner à la fois :
pkill bridge
Puis connectez-vous à votre compte ProtonMail (rappel : faut un compte payant) :
/app/bridge --cli
Suivez les instructions à l’écran, renseignez votre nom d’utilisateur, mot de passe et code 2FA. Une synchro de votre compte va commencer. Prenez un café en attendant ! Si vous utilisez plusieurs domaines ou adresses email, passez en mode « split » qui va vous permettre de définir des identifiants pour chaque adresse du compte.
Ensuite re-faite ceci pour resynchroniser encore un petit coup :
change mode 0
Quand c’est fini, tapez info pour récupérer les infos de connexion SMTP/IMAP générées par ProtonMail Bridge. Copiez bien l’username ET le mot de passe (différent de celui de votre compte ProtonMail !!). Vous pouvez maintenant configurer votre client mail favori avec ces identifiants, en précisant les ports SMTP 12025 et IMAP 12143 qu’on a exposés au lancement du conteneur Docker.
Et voilà, vous pouvez envoyer des emails chiffrés de bout en bout dans la plus grande des discrétion ! Évidemment, le destinataire devra aussi avoir un compte ProtonMail pour les déchiffrer de son côté.
Pour aller plus loin, j’vous conseille de jeter un œil au README hyper complet de DaTux, avec tous les détails d’install et d’utilisation. Il a même prévu une version optimisée pour tourner sur un serveur TrueNAS Scale, le bienheureux.
En soutien, n’hésitez pas à lui mettre une petite étoile sur son repo GitHub et à partager ce tuto autour de vous !
Your Questions for UGREEN about their New NAS Solution
IMPORTANT March 22 Update – The UGREEN DXP4800 PLUS NAS Review is NOW LIVE, watch it HERE, read it HEREand learn about the Software HEREand HERE
With UGREEN still in the process of launching their Kickstarter campaign for a new NAS Storage Solution (the DXP NASync series) to market, many users (myself included) have a lot of questions about the product. Let’s face it, we are not talking about a standard ‘over the counter’ purchase where – this is CROWDFUNDING! Therefore, users need to take extra care and caution before considering putting down money (remember, crowdfunding is not the same as eRetail!). Alot of users want to know just what the UGREEN DXP NAS Storage solution can do, what it can’t do, UGREEN’s plans for the future and…at a very basic level… is the UGREEN NAS actually a ‘thing’! People have been burnt by crowdfunding before, plus UGREEN has no previous recognized experience in the world of NAS, They are definitely SIGNIFICANTLY more established in the tech market (12 years) than many other crowdfunded NAS/Private Cloud solutions that have popped up in the last 1-2 years to challenge the likes of Synology and QNAP, but this is their first NAS. Heck, it’s actually 4-5 different NAS’ arriving at launch – that’s a big, big undertaking! So, l asked you guys to fire me over as many questions as possible to ask the brand directly, and you did not disappoint! I have taken the many, MANY questions that were submitted and condensed them into the 20 questions below. With the crowdfunding launch for their product arriving towards the end of the month. many of the questions below represent users’ reservations and dealbreakers before they are prepared to engage with the brand, the solution and the launch! So, let’s go through the brand’s responses to your Questions.
UGREEN NAS Brand Q&A – The TL;DR
IMPORTANT – The Ugreen Q&A Video goes into ALOT more detail in the responses to each question, so if you want MORE detail, then do watch it HERE and use the chapters on the bottom of the video
I GET IT! You are in a rush! So, here is the short version, the skinny, the cliff notes! I asked 20 questions in total (slightly more in the zoom recording coming to YouTube), and here is the summary of their answers in bullet points:
Kickstarter Launch: UGREEN chose Kickstarter to engage with consumers early, gather feedback before official launch, and because other well-known brands have also launched products via crowdfunding.
Connectivity: The NAS device supports Thunderbolt connection for host use only, with plans to expand its capabilities. WiFi 6E support on the DXP480T Flash system allows connections both to and from the system, as well as to a router.
Third-Party OS Installation: Installing third-party operating systems, like UnRAID or TrueNAS, is not officially supported and voids the warranty. *Update on the use of 3rd Party OS’ on UGREEN NAS with hardware, with regard to warranty*: “The Ugreen team confirms that whatever is promised in their warranty policy will not change, which only covers the hardware. They also mention that there is a risk of damage if you install a third-party OS, including data loss and compatibility issues, etc.” – Ugreen Representative, 26/3/24
Availability: Initially, the product is available only in Germany, with plans to expand to more regions based on demand.
Security: UGREEN is focusing on financial-grade security standards, working on EN303645 and TruestE certification, and plans to enhance security features continuously.
Additional Options and Hardware Information: A PledgeBox option will be added during the campaign for adding HDDs and SSDs. Detailed PCIe lane layouts will be available in the product manuals.
Remote Access: The UGREEN Link service allows remote access to the NAS via a custom domain name after account registration.
Power Consumption: Details on power consumption will be included in the product manual, with specifics available upon request.
Kickstarter Campaign Delay: The campaign was delayed to incorporate user feedback on the app for a better user experience.
UGREEN OS Features: Support for automatic on/off schedules, SSD caching, full phone storage backup, online data scrubbing/checksumming with BTRFS, and basic to complex RAID configurations.
Native Applications and Functions: The NAS will feature a smart assistant for AI-based smart recognition and classification, virtualization, Docker support, and NFS protocol support, but lacks iSCSI support.
Future Developments: Some features, like full phone backup and virtualization/Docker support, are still under development.
So, some GOOD news, some BAD news and some ‘TBC’ news. Let’s dig more into the actual Q&A itself and go through those questions, one by one.
The Q&A with UGREEN – Answering Your Questions about their NAS Solution
Below is the written response provided to me by the HQ (handled by Diana An, a Marketing Specialist in conjunction with their product management teams) of UGREEN after submitting my questions, collected from user comments (HEREand HERE) between March 4th and 10th 2024. There is also a Zoom session with UGREEN that will be live soon/now that goes into much greater detail and analysis of these questions and answers, conducted with Hernan Lopez, a U.S.-based UGREEN representative. Questions were provided in advance to UGREEN 48 hours in advance of the Zoom session (timezone dependent) in order to allow UGREEN time to sufficiently source adequate answers. The questions and answers below are provided unedited and unchallenged, but further investigation was conducted in the Zoom recording that is/will be available on the NASCompares Youtube Channel HERE. I should also add that UGREEN has provided me with a DXP4800 PLUS and a DXP480T NAS unit for testing and evaluation, which I will be publishing videos and articles on later this month (hopefully, prior to the launch of the campaign) in order to evaluate these pre-release units and assess the quality of the hardware, software and viability of the solution.
Additionally, I would like to thank the many channel viewers and subscribers for providing the questions for this Q&A. There were around 100+ in total, so I was forced to consolidate them (merging similar/identical questions together, or answering less debated/unanswered questions in those comments of the initial posts (again, see HEREand HERE). Questions below have been credited to numerous YouTube members (denoted by the @ prefix, with my own name there too), but in many cases, the questions were asked by many, many users (eg why Kickstarter?), so I have attributed to just the first 2-3 users). Here is the Q&A:
Why Kickstarter?
Why Is UGREEN bringing this NAS solution to Kickstarter/Crowdfunding? UGREEN is an established brand, so why use Crowdfunding for this new product line?
@grege9862 , @InspectorGadget2014
Firstly, The UGREEN NASync is our new product line and we can have pre-connection and pre-communication with the consumers and get their feedback in advance before we bring it on Kickstarter. Secondly, many well-known brands also launched their new product line on kickstarter/Crowdfunding.
How is the Thunderbolt connection handled, is it host-only use, or can you connect to it over Thunderbolt (point to point) with a Mac or Windows system?
@michaelpaolini , @ajrfilm9951
Currently, Thunderbolt connection for our device is host only, and can be used for external storage. But some features like Thunderbolt Networking are in our development plan.
Same question as above, but for the WiFi 6E support on the DXP480T Flash system – Does this allow connections both TOO the system from a user AND connections for the NAS to a Router?
@DIGIBITE (Eddie!)
The wifi on our 480T device supports both functions above.
Is installing 3rd Party OS’, such as UnRAID and TrueNAS, possible and will UGREEN still support the user’s hardware 2-year warranty if they do so?
UPDATE 26/03/24 The position of UGREEN on the use of 3rd Party OS Use on their NAS hardware (with regard to hardware warranty) has changed since this Q&A.: “The Ugreen team confirms that whatever is promised in their warranty policy will not change, which only covers the hardware. They also mention that there is a risk of damage if you install a third-party OS, including data loss and compatibility issues, etc.” – Ugreen Representative, 26/3/24
Unfortunately, modifying the built-in system is not officially supported. It’s not suggested to do so. If users insist on doing it, they will lose the warranty permanently.
Why is the Product currently only available to buyers in Germany and the United States, and not the rest of Europe, Australia, and more? Will this change?
Our products are still in their infancy, and when expectations are good, we will gradually expand markets in more regions.
What provisions and plans do UGREEN have in place for their systems with regard to security? i.e what is “Financial Grade Security”, will they be publishing security advisories, pen testing, etc?
@michaelpaolini
We will be referring to Professional-grade security standards and continuously optimizing and improving the system’s security features.Currently we are also working on the certification of EN303645 and TruestE.
NOTE from Robbie – This question was expanded upon in the YouTube Q&A, and I recommend watching HEREfor a fuller response to this question
Will UGREEN be adding a PledgeBox option during their campaign to allow users to add HDDs and SSDs?
@famoussasjohn
Yes, we will add the PledgeBox option duringthe campaign.
Source www.techpowerup.com
Can you provide a breakdown of the PCIe lane layout of each system?
@Latino3650 , @GroundDwellerStudioS
We will have hardware product manuals that will contain device information. The product manual is currently in the editing process. Which model of product do you want to know about? We can send it to you separately first.
How will remote access to the UGREEN NAS be conducted via UGREEN services?
@michaelpaolini
To use the UGREEN Link service, you need to register a UGREEN Link account first, then log in to the control panel of the NAS device and set a custom domain name. After applying the settings, you will be assigned the corresponding domain name for remote access.
Can you provide further clarification on the power consumption of your devices, even as a level benchmark of a fully populated device during active/passive activity?
@Butyouveheardofme3486 , iVuehl
This information will be described in the product manual, similar to the PCIe issue. If you would like to know about a specific model, we can send it to you separately.
Why was the launch of your Kickstarter campaign delayed?
@nascompares
During the public beta period, we collected some user experience optimization suggestions for the App. And we hope to deliver a version with a better experience to everyone, so we delayed the launch for half a month.
Does the UGREEN os allow automatic on/off schedule
@overclocked9033
Yes, UGREEN OS supports this schedule and you can customise it in the control panel.
Is SSD Cache Supported?
@Fan_de_Parcs
Yes
Yes, you can use a SSD either for cache or storage usage. However, you can’t use the same drive for both caching and storage purposes.
Will the mobile software support full phone storage backup?
@Fan_de_Parcs
Yes, this backup function is in our plan and still under development.
Does their native OS use a filesystem that can do online data scrubbing / checksumming to detect errors? e.g. BTRFS or ZoL
@Dreamslacker
UGREEN OS supports BTRFS in terms of data scrubbing / checksumming.
Will RAID expansion be possible (i.e adding more drives to an existing RAID Pool)
Not possible yet.
(NOTE FROM Me/ Robbie – In a recent software update, I found that a new option is in place for expansions, but it is still WiP. It seems to only reflect INSIDE the system and not a physically connected external expansion however, i.e needs empty bays. See Below)
Will you be providing/supporting a flexible RAID system (comparable to Synology Hybrid RAID or Terramaster TRAID)?
@doppelherz
Basic,JBOD,Raid0,Raid1,Raid5,Raid6,Raid10 are supported.
On their Kickstarter page is mention of an AI integrated smart assistant, we are curious to know what that means?
@thomasm964
AI Smart Recognition & Classification(without Internet connection), search Pictures by Text. Search for photos of pets, fruits, vehicles or more simply by entering search keywords. Use smart recognition to create photo albums that intelligently identify and classify faces, places, animals, and more. AI service are going to operate in-system and without internet connectivity. If an app or service is installed on the system that requires internet connectivity, this will be made clear in the app release notes and controllable on the system GUI
Will there be virtualization and docker support out of the box?
@cyberlando
Yes, virtualization and docker will support out of the box. However, this is still early stage of our beta and these 2 functions are still under development.
What is the support/status of NFS Support or iSCSI Target/LUNs?
@dozix88
UGREEN NAS supports the NFS protocol, including NFSv3, NFSv4, NFSv4.1, while iSCSI is not supported.
How much will the UGreen NASync Series Cost and When Will It Launch?
The UGreen NASync series is poised to make a notable entrance into the NAS market with a range of devices that cater to different storage and performance needs. With the Kickstarter launch prices set attractively at $239.99 for the entry-level DXP2800 and scaling up to $899.99 for the high-end DXP8800 Plus, UGreen is competitively positioning its products. The mid-range DXP4800 and DXP4800 Plus are tagged at $359.99 and $419.99 respectively, while the specialized NVMe-focused DXP480T Plus is introduced at $479.99. Post-crowdfunding, the retail prices, also known as the Manufacturer’s Suggested Retail Price (MSRP), are expected to be significantly higher—almost doubling for some models, like the DXP2800 with an MSRP of $399 and the DXP8800 Plus which will retail for $1499. This pricing strategy not only provides an incentive for early backers but also underscores the value proposition of getting in early on the Kickstarter campaign. Nevertheless, THIS IS CROWDFUNDING and therefore not the same as buying from your usual retail outlet, be aware. UGreen is tapping into the growing buzz of middle-ground solutions between turnkey options from Synology/QNAP and BYO/DiY options that retire time and knowledge to build. If you are on the fence, there isn’t a tremendous rush, as crowdfunding officially begins on March 26th (see link below). We will be keeping an eye on this one as the weeks go on!
Click the Link Below to find out more about the UGREEN NASync NAS Series on the brand’s official Site:
This description contains links to Amazon. These links will take you to some of the products mentioned in today's content. As an Amazon Associate, I earn from qualifying purchases. Visit the NASCompares Deal Finder to find the best place to buy this device in your region, based on Service, Support and Reputation - Just Search for your NAS Drive in the Box Below
Need Advice on Data Storage from an Expert?
Finally, for free advice about your setup, just leave a message in the comments below here at NASCompares.com and we will get back to you.Need Help?
Where possible (and where appropriate) please provide as much information about your requirements, as then I can arrange the best answer and solution to your needs. Do not worry about your e-mail address being required, it will NOT be used in a mailing list and will NOT be used in any way other than to respond to your enquiry.
[contact-form-7]
TRY CHAT Terms and Conditions
If you like this service, please consider supporting us.
We use affiliate links on the blog allowing NAScompares information and advice service to be free of charge to you.Anything you purchase on the day you click on our links will generate a small commission which isused to run the website. Here is a link for Amazon and B&H.You can also get me a Ko-fi or old school Paypal. Thanks!To find out more about how to support this advice service checkHEREIf you need to fix or configure a NAS, check FiverHave you thought about helping others with your knowledge? Find Instructions Here
Or support us by using our affiliate links on Amazon UK and Amazon US
Alternatively, why not ask me on the ASK NASCompares forum, by clicking the button below. This is a community hub that serves as a place that I can answer your question, chew the fat, share new release information and even get corrections posted. I will always get around to answering ALL queries, but as a one-man operation, I cannot promise speed! So by sharing your query in the ASK NASCompares section below, you can get a better range of solutions and suggestions, alongside my own.
Les amis, aujourd’hui, je vais vous parler d’un projet très intéressant qui devrait ravir les utilisateurs de Discord et les amateurs de flux RSS : FeedCord. Ce lecteur RSS ultra simple s’intègre parfaitement avec Discord et vous permet de disposer d’un fil d’actualité directement dans votre serveur Discord.
Je suis depuis toujours un grand défenseur du format RSS et c’est quand même dommage que ça ait presque disparu.
Parmi les principales fonctionnalités de FeedCord, il y a donc l’intégration avec Discord, qui permet d’envoyer directement les mises à jour de vos flux RSS dans un canal Discord via un simple webhook. Côté config, c’est un jeu d’enfant puisque tout se fait dans un simple fichier JSON. Vous y ajoutez votre URL Webhook et vos flux RSS et en avant Guingamp !! FeedCord dispose également une prise en charge via Docker, ce qui facilite grandement le déploiement. C’est d’ailleurs la méthode d’install recommandée par les dev du projet.
Ensuite, il faudra mettre en place FeedCord en créant un dossier FeedCord à l’emplacement souhaité, puis en créant un fichier de configuration appsettings.json à l’intérieur de ce dossier avec le contenu approprié. Vous trouverez toutes les informations nécessaires et des exemples de configuration dans la documentation du projet.
Une fois ces étapes réalisées, il vous faudra déployer FeedCord avec Docker en créant un fichier docker-compose.yaml dans le dossier FeedCord et en y ajoutant le contenu adéquat.
version: "3.9"

services:
  myfeedcord:
    image: qolors/feedcord:latest # for amd64 architecture
    # image: qolors/feedcord:latest-arm64  # For arm64 architecture (Uncomment this line and comment the above if using arm64)
    container_name: FeedCord
    restart: unless-stopped
    volumes:
      - ./PATH/TO/MY/JSON/FILE/appsettings.json:/app/config/appsettings.json
Notez qu’il faudra remplacer les chemins vers votre fichier appsettings.json et adapter l’image Docker utilisée en fonction de l’architecture de votre système. Enfin, il vous suffira d’exécuter la commande
docker-compose up -d
dans votre terminal, depuis le répertoire FeedCord, pour récupérer l’image FeedCord la plus récente à partir de Docker Hub et lancer le service.
Et voilà, avec ces quelques étapes simples, FeedCord devrait maintenant être opérationnel et publier les mises à jour de vos flux RSS directement dans votre canal Discord. Pensez à rajouter le flux RSS de Korben.info pour ne manquer aucune de mes actus : https://korben.info/feed
Pour en savoir plus sur FeedCord, n’hésitez pas à vous rendre sur le dépôt GitHub à l’adresse suivante : https://github.com/Qolors/FeedCord.
Spinning YARN, c'est le nom associé à une campagne de cyberattaques qui a pour objectif de compromettre les instances Cloud sous Linux dans le but de déployer des logiciels malveillants. Les solutions ciblées : Docker, Redis, Apache Hadoop et Atlassian Confluence. Faisons le point.
D'après les chercheurs en sécurité de Cado Security, un groupe de cybercriminels cible les serveurs Cloud, soit en tirant profit de mauvaises configurations, ou en exploitant une faille de sécurité présente dans une version vulnérable. Plus précisément, les pirates ciblent Docker, Redis, Apache Hadoop ainsi que la solution Atlassian Confluence en exploitant la faille de sécurité CVE-2022-26134.
Dans un article de blog, Chris Doman, cofondateur et directeur technique de Cado Security, précise : "Les attaques sont relativement codées en dur et automatisées, de sorte qu'elles recherchent des vulnérabilités connues dans Confluence et d'autres plateformes, ainsi que des erreurs de configuration bien connues dans des plateformes telles que Redis et Docker."
Si l'on prend l'exemple de Docker, les attaquants ciblent Docker Engine API par l'intermédiaire d'une requête Web, dans le but de parvenir à exécuter du code sur l'hôte sur lequel sont exécutés les containers. Cado Security donne pour un exemple un conteneur basé sur Alpine Linux, sur lequel les cybercriminels sont parvenus à créer un montage bind pour le répertoire racine (/) du serveur hôte, vers le point de montage /mnt à l'intérieur du conteneur.
Lorsqu'une instance est compromise, les cybercriminels déploient un outil de cryptominage, ainsi qu'un reverse shell nommé Platypusqui leur assure à un accès persistant sur l'instance. Ainsi, ils peuvent utiliser cet accès pour déployer d'autres malwares par la suite. Ceci n'est pas sans rappeler les actions menées par les groupes TeamTNT et WatchDog, d'après les chercheurs en sécurité.
Docker, une cible à la mode
Cado Security alerte sur le fait que les cybercriminels s'attaquent à Docker de plus en plus fréquemment pour obtenir un accès initial sur un serveur ou un environnement complet.
"Il est bien connu que les points d'extrémité de l'API de Docker Engine sont souvent ciblés pour un accès initial. Au cours du seul premier trimestre 2024, les chercheurs de Cado Security Labs ont identifié trois nouvelles campagnes de logiciels malveillants exploitant Docker pour l'accès initial, dont celle-ci.", peut-on lire dans le rapport.
Je ne sais pas si vous trainez sur Twitter, depuis qu’Elon en a pris la (mauvaise) direction, mais en ce qui me concerne, j’étais là avant lui, et je serai là après lui. Donc je reste sur Twitter malgré sa faune parfois un peu glauque.
Mais ça ne m’empêche pas d’être également présent sur Bluesky et Mastodon, même si je ne les utilise pas vraiment. J’essaye quand même d’y partager mes articles. D’ailleurs, pour Bluesky, je me suis fait une moulinette en python, qui me permet d’y automatiser le post de mes articles de blog avec l’aide de ChatGPT pour que ce soit encore plus naturel.
Mais si vous ne voulez pas trop vous prendre la tête, y’a Louis Grasset qui a mis en ligne Touitomamout (Jeu de mots ^^ : Tweet To Mammouth). Il s’agit d’un outil qui peut s’installer sur votre machine / serveur / docker et qui permet de faire du cross-post depuis Twitter vers Mastodon et / ou Bluesky. En plus des messages textes, des images, des vidéos ou encore des gifs animés, l’outil permet même si vous le désirez de synchroniser l’entièreté de votre profil (nom, avatar, bannière, description).
Pour le faire tourner dans Docker, c’est easy. Il vous suffit de créer un docker-compose.yml et de mettre ça dedans :
You can manage Docker images and containers directly within Visual Studio Code (VS Code) with Microsoft's Docker extension. This article walks you through adding Docker files to a Workspace, creating a containerized application environment, and explains how to build and run Docker containers directly from the VS Code interface.
Un ensemble de vulnérabilités surnommé Leaky Vessels a été découvert dans l'outil CLI runc, utilisé notamment dans Docker et Kubernetes. En exploitant ces vulnérabilités, un attaquant peut s'échapper du container et accéder aux données de l'hôte physique. Faisons le point.
En novembre 2023, Rory McNamara, chercheur en sécurité chez Snyk, a fait la découverte de 4 failles de sécurité importantes présentes dans runc mais aussi dans Buildkit. Peut-être que ces noms ne vous disent rien, mais pourtant sachez qu'ils sont utilisés par des solutions populaires comme Docker et Kubernetes.
Par principe, un conteneur représente une application packagée qui contient les exécutables, toutes les dépendances nécessaires à son exécution, et tout le code nécessaire pour que l'application soit opérationnelle. Ceci crée un environnement isolé, vis-à-vis de l'hôte qui exécute le conteneur. Toutefois, si un pirate parvient à exploiter les failles de sécurité Leaky Vessels, il peut s'échapper du conteneur afin d'interagir avec l'hôte..
Voici les 4 failles de sécurité Leaky Vessels :
CVE-2024-21626
CVE-2024-23651
CVE-2024-23652
CVE-2024-23653
La vulnérabilité la plus critique, c'est bien la CVE-2024-21626 puisqu'elle permet, potentiellement, de compromettre l'hôte où sont exécutés les conteneurs. "L'exploitation de ce problème peut entraîner l'évasion du conteneur vers le système d'exploitation hôte sous-jacent, soit par l'exécution d'une image malveillante, soit par la construction d'une image à l'aide d'un fichier Docker malveillant ou d'une image en amont (c'est-à-dire lors de l'utilisation de FROM).", précise Snyk dans son rapport.
Quelles sont les versions affectées ? Comment se protéger ?
Même si pour le moment rien n'indique que ces failles de sécurité sont exploitées dans le cadre de cyberattaques, il est préférable d'installer les correctifs dès que possible. En effet, elles sont désormais divulguées publiquement et corrigées... Donc la situation pourrait évoluer.
Toutes les versions de runc sont affectées, et les développeurs ont mis en ligne runc 1.1.12 le 31 janvier 2024 afin de corriger ces vulnérabilités. En ce qui concerne Buildkit, les failles ont été corrigées avec la version 0.12.5.
A la même date, Docker a mis en ligne de nouvelles versions pour permettre de patcher ces vulnérabilités. Vous devez passer sur Docker 24.0.9 ou Docker 25.0.2. Pour Kubernetes, vous pouvez trouver des informations sur cette page. En complément, il y a d'autres bulletins de sécurité disponibles notamment du côté de chez AWS et Ubuntu.
J’avais besoin d’un système de facturation complet avec un gestionnaire de commandes et de clients. Après avoir essayé Invoice Ninja et InvoicePlane, qui ne m’ont pas satisfait à 100%, j’ai décidé de me tourner vers Odoo. A première vue, il peut apparaitre lourd ou trop complet pour un usage assez basique… pourtant, ce n’est pas le cas. Son fonctionnement par module le rend très flexible et relativement rapide. Aujourd’hui, nous allons voir ensemble comment installer la dernière version Odoo sur un NAS Synology avec Docker. Odoo et Synology Odoo (anciennement OpenERP) est une suite d’applications open-source écrites en Python et […] Lire la suite :Installer Odoo (ERP/CRM) sur un NAS Synology en 5 minutes
Aujourd’hui, nous vous présentons un guide pour installer facilement qBittorrent sur votre NAS Synology. Si vous lisez ces lignes, c’est certainement parce que vous recherchez une solution efficace pour gérer vos torrents. Grâce à la combinaison de qBittorrent et Docker, vous pourrez télécharger et partager vos fichiers depuis votre NAS Synology. Entrons dans le vif du sujet… qBittorrent et NAS Synology Avec Docker, il n’a jamais été aussi simple d’ajouter des fonctionnalités à son NAS. Dans ce tuto, nous allons voir ensemble comment installer qBittorrent avec Container Manager. Ce dernier permet de faire fonctionner des conteneurs Docker très facilement sur […] Lire la suite :Installer qBittorrent sur un NAS Synology
How to Install Proxmox on an Asustor NAS Drive – Step By Step Guide
There is no denying that when it comes to ‘turn-key’ NAS solutions, that Asustor NAS are still easily the best bang for buck out there! Arriving with a hardware price point that is often 20% or more lower than comparable solutions from Synology or QNAP, they allow users who don’t want to build or don’t know/want to build their own server to have a ready-built solution that also includes the ADM NAS software platform. However, when it comes to virtualization and VM tools, they do not supply their own premium software (but do support others from within ADM) and for those looking to run a handful of VMs or Containers in their homelab setup, that can be a little bit of a barrier. If you have been looking into server-based virtualization or high-efficiency container deployment, then there is every chance that you are well aware of Promox, the open-source alternative to enterprise/premium VM platforms such as VMware, Citrix or Redhat hypervisors. A hypervisor is a layer of software that lives on top of bare metal server hardware and/or lives as an executional package from within an operating system. Although Asustor NAS systems already arrive with a very good virtual machine hypervisor, VirtualBox, many users would still like the option to run a VM Hypervisor software directly from the bare metal (eg, remove a multipurpose OS and have the system immediately boot into the Hypervisor software). VirtualBox has a huge range of software options (including downloading ready-made VM images from marketplaces, huge customization supported, integration with the backup/sync services in QuTS/ADM and in a new update High-Availability support). Still, some users might have an Asustor NAS that is outside of hardware warranty or is relatively modest that will possibly run VMs better without the host OS in place, hence why some users think about installing Proxmox in its place on their Asustor NAS. Proxmox provides pretty much all the abilities and services of those bigger premium VM hypervisors, however in those premium platforms (VMware, Citrix, HyperV, etc) there are additional charges and tiers to their use – whereas Proxmox includes them all in a free, open-source package. So, there are plenty of reasons why you might want to repurpose your old NAS with this bare metal hypervisor software, and today I want to guide you through the process of installing Proxmox on your Asustor NAS.
IMPORTANT– It’s important to note that Proxmox is NOWHERE NEAR as user-friendly as Asustor ADM with VirtualBox and before making any switch to a new NAS OS, it is important that you understand the process, risks and differences in the platforms. This guide is designed to help you use your Asustor NAS to run Proxmox as it’s primary OS. If you go ahead with this and use the same HDD/SSDs in the system that you are currently using in the Asustor ADM Setup, it will likely format them, so IF you want to reverse your Asustor NAS back to its ADM set up with all your data/drives the same, you will need to remove them before using the Proxmox setup, put them to one side safely and use new HDD/SSDs for your Proxmox installation. Lastly, although this whole process is reversible, you are technically using the Asustor in a means that the brand does not state as ‘intended use’ and this MIGHT lead to support/warranty problems down the line if a fault appears in the Asustor or the software installation that was the result of the Proxmox installation (the bios records everything!). This is HIGHLY UNLIKELY but not impossible that you could make the system inoperable (e.g. you work a Proxmox server so hard and/or push the CPU to breaking point running particularly aggressive Proxmox VMs/Containers and/or amend the BIOS to a state where you cannot access it) – this would not be covered by your Asustor NAS support, as they did not certify that the system can handle this or be used in this way under the warranty.
Proxmox Software on Asustor NAS Hardware – What You Need?
It is worth highlighting that having just an Asustor NAS is not quite enough and in order to get Proxmox up and running on an Asustor NAS requires a few extra checks and use of a few items you might have already in the home/office, or a quick $10-20 shop online at most. In order to upgrade your system to Proxmox, you will need to consider/have the following:
an Asustor NAS Drive with (minimum) an Intel 64bit x86 CPU and a minimum 4GB of Memory (recommended 8GB+)
Download the latest stable release of Proxmox here as a system image (you will be converting this to USB later on) – DOWNLOAD
Any Data that is currently on the Asustor NAS RAID that is mission critical to be backed up or moved (as it will be completely formatted)
I recommend not using a USB larger than 32GB, due to the constraints of 1st party software to format larger than this in FAT32 (though you can use the Rufus software to format larger than 32GB drives to FAT32). Don’t be tempted to spend like $2 more for a 64GB, as the Proxmox installation will occupy the full USB space (as you will create a system-image-USB) and space is utterly irrelevant when the Proxmox installation is so small
A Disk Image to USB conversion too. I recommend ‘Rufus’, currently in ver 3.19 and can be run in a portable .exe form that doesn’t require installation – DOWNLOAD
A basic USB Keyboard (example HERE but really, any will do) and an HDMI Monitor (or simply any device that has an HDMI input – NOT output) such as a TV or Capture card
Hard Drive and/or SSD media (you should already have these, but just in case) for your storage Pool / RAID
Optional M.2 NVMe SSD of at least 120GB, but highly recommended – Installing Proxmox is not unlike installing a Windows OS on a new PC, as you are connecting a USB to run the installer, but you need to target a drive in the Asustor NAS to install Proxmox onto. Whichever drive you use, it will make that drive largely inaccessible for anything but the Proxmox operating system. Therefore IF you are running an Asustor NAS that has internal m.2 NVMe SSD bays OR one with dedicated 2.5″ SSD bays, I highly recommend getting a low-capacity drive of between 60-120GB (these will be very cheap compared with larger HDDs that start in the Terabyte scales) and then use this for the Proxmox software. This means that ALL of the main SATA storage bays of the Asustor are then used for your storage pool(s) (aka the RAID). Do NOT install Proxmox on another USB drive during installation, as this is less stable.
Optional – Download Advanced IP Scanner HERE, as it is a really useful tool for analyzing your network and finding your new Proxmox NAS for remote access
That is about it. Most of these are devices are that you will almost certainly already have to hand.
Can I Reverse the Proxmox Installation and go back to Asustor ADM?
Almost certainly YES! I say ‘almost certainly’, as there is one small caveat. When you make the change from Asustor ADM to Proxmox on the NAS hardware, the drives (HDD and/or SSD) inside used in Proxmox pools used in the new system software architecture. This works both ways if you want to revert back to ADM on the NAS too. You CANNOT use the Storage Pool, Volume structure, Folders etc of drives from an Asustor NAS in a Proxmox setup (you will need to format these in Proxmox). So, although the act of reinitializing the NAS to its original software is very easy (you just need to go into the BIOS of the Asustor using the same method in the guide below, then change the boot drive order BACK to the Asustor OS internal SSD), it will mean that any data that resides on the disks inside will be formatted. So, if you are choosing to make a change from one NAS OS to another, make sure you have your data appropriately backed up elsewhere OR move the drives that were in your Asustor (with their ADM Storage structure) to one side safely and install new 3.5″ storage media for the Proxmox pools etc. So, let’s begin the installation of Proxmox on the Asustor NAS.
Proxmox on an Asustor NAS – Step 1, Download Proxmox
Head to the Proxmox website HERE and download the latest stable release of the software to your local PC, Linux or Mac system. Make sure to remember where you downloaded it to.
Proxmox on an Asustor NAS – Step 2, Download Rufus USB Image Tool
Head to the Rufus website and download the latest version of that tool – I recommend downloading the standalone executable file here, as then it will immediately run when you double-click the file, without installation etc. It may redirect you to Github, but it will be the same executable file. Once again, remember where you downloaded it.
Proxmox on an Asustor NAS – Step 3, Preparing the USB
Connect the small form factor USB Drive to your system (again, this is the one I used from Sandisk) and after a few seconds, it should appear as an available USB Drive. The drive MAY need formatting (you will be prompted to do so), if that is the case, then you can format it via the system prompts and by default, it will format it to FAT32 (as long as your USB is less than 32GB). If you are not presented with a system prompt to format your USB, then you can head into My PC, or My Computer via a windows computer and right-click the drive, select ‘format’ and format it that way.
If you have used the USB for other things previously, there is a chance that the drive has existing partitions in place. For that, the quickest way to completely remove any partitions is to open up the bottom-left windows system menu as normal, and then just type diskpart and open the command-line GUI tool. From there, use the command list disk to show the available drives that are connected, you will see your USB (normally disk 1 or 2, but can differ depending on your system layout and can be spotted by the storage amount). From there, type select disk # (where # is the drive number that your USB is shown as) and then type clean, which will then remove any index structure for the drive (i.e the partitions and existing format) and then you can go back to the My Computer/My PC page and format the drive to FAT 32 as normal.
Proxmox on an Asustor NAS – Step 4, Creating a USB Installer Image of Proxmox
Open the Rufus application and from there you will see the USB Drive (listed as NO NAME, or ‘UNTITLED’, ETC) at the top. From there, look to the select image/find image option (depending on the ver. of Rufus or your USB Image Creator tool of choice) and find the Proxmox disk image you downloaded earlier). If the drive is not listed, it may have downloaded as a compressed/archive file. If that is the case, head to the location of where you downloaded Proxmox (in your file explorer, not in Rufus) and right-click the file you downloaded. If the option to ‘extract‘ is visible, then you can extract it (i.e unpack it to the original form) in that same download directory. From there, head back into RUFUS and then the Proxmox system image should be visible. Select it, then run the Rufus System image creator tool and create your USB bootable Proxmox disk image.
REMEMBER! This will completely format your USB drive and any files that are on that USB will be destroyed. The system image creator tool will turn the USB into a pure boot image tool – the USB will not be usable for traditional storage again unless you completely format it again.
Proxmox on an Asustor NAS – Step 5, REMOVE THE USB FROM YOUR PC!!!!!!!!!
Really, really important and sometimes overlooked. Once the USB creation is completed, you need to remove the USB (using the eject hardware safely option at the bottom right of your windows machine taskbar as normal). DO NOT accidentally leave the USB in your USB Ports for any longer than necessary. If you leave it in and your system reboots at any point (eg in a normal ‘end of day shut down, go home, reboot tomorrow’ scenario), then the system might boot directly into the Proxmox installation and although it is easy to exit from, it can change your system default boot preferences, maybe even remove your primary boot drive as the OS drive – requiring a little messing with a windows installation disk to change it back. The odds of this are very small, but not zero, so make sure to safely remove your USB drive when the Proxmox system image creator tool is completed.
Proxmox on an Asustor NAS – Step 6, (OPTIONAL) – Install an NVMe SSD
This is an optional step, but one I would certainly recommend for newer-generation Asustor NAS devices. Proxmox is a lot like a traditional computer operating system (eg Windows or macOS) in it’s architecture and will run at its best when the necessary boot files are located on a seperate, smaller and faster area of SSD/flash storage away from the general bulk storage. So, if possible/available in your Asustor NAS, I would recommend installing a smaller m.2 NVMe SSD drive and then using that as the target/location for your Proxmox installation. This is not compulsory and you can also use a single HDD or SSD in one of the main storage bays of your Asustor, however, it means that this drive will unusable for general storage (i.e in any RAID configuration or storage pool). This CAN be negated with some creative partiton creation, but I wouldn’t recommend it. Additionally, do NOT try to install Proxmox on another USB drive that is connected to the system – this isn’t particularly stable and tends to result in a poorer Proxmox experience. M.2 NVMe bays and their location in the Asustor NAS changes depending on the system. Some allow you to access these bays via the main HDD 3.5″ bays, whilst others (the majority) require you to remove the external chassis casing to access these bays (eg the TS-453E, TVS-872X, TS-873A, etc).
Reminder – Proxmox is NOT a big program and you can use an SSD as small as 32GB and still have a tonne of provision for future storage space. However, M.2 NVMe SSDs are not available in smaller sizes than 120GB. Lower size than this and you will generally only find 2240 SSDs and/or SATA M.2 SSDs. These are still perfectly fine to use, but the performance difference between SATA and NVMe (PCIe) is HUGE! You can find many SSD options here on amazon for as little as $30 – Find Low Capacitiy and Low Price M.2 NVMe SSDs HERE on Amazon (already filtered the results)
NOTE – If you plan on upgrading the memory of your NAS to 4GB-8GB-16GB or higher (in order to use ALL of the features of Proxmox to their fullest extent), I would recommend doing so at this point before rebuilding the physical chassis again, as many Asustor NAS have the 2nd SODIMM memory slot in really tight locations.
Proxmox on an Asustor NAS – Step 7, Connecting the USB, Keyboard and HDMI Monitor
Next, we need to connect the external means to install Proxmox on the Asustor NAS. Unlike when you set up your Asustor NAS for the first time, Proxmox cannot typically be installed via the network like ADM. Proxmox requires you to use a KVM (keyboard, Video Mouse – though you won’t need a mouse!) and go through the installation using a low-res graphical user interface. Now you will ONLY need this setup/items for the installation and initialization of your Proxmox server and after that, you will be able to use the server over the network/internet as normal. You are going to need a basic USB Keyboard (not a Bluetooth or wireless one, as these may need drivers to run and you cannot install drivers at this point) and an HDMI Monitor/TV. You CAN use a mouse, but it is not hugely necessary and 99% of the choices in the setup of Proxmox can/will be via keyboard input. Also, I would also recommend connecting the NAS to the network during setup as this will allow the system to assume certain network values during setup that will save a tonne of time later. Once that is all connected, do NOT turn the NAS on yet – there is one small and slightly time-sensitive thing to do.
Proxmox on an Asustor NAS – Step 8, Accessing the BIOS Menu of your Asustor NAS
Now that your Asustor NAS is all connected and you are ready at your keyboard/Monitor, turn the NAS on and wait till you hear a beep (should take between 5-15secs depending on the Asustor NAS). As soon as your hear that noise (and likely see a flashing character or underscore on the monitor screen), you need to continuously hit the ESC / F12 / F2 and/or DEL keys (not at the same time, just back and forth). One of these will result in the system displaying the blue BIOS menu (it changes between motherboards and Asustor uses a mixture of mobos in their Intel and AMD-powered systems). You need to be quick, as you only have about 3 seconds to do this before the Asustor will automatically boot from the small internal 4GB/5GB flash OS module that boots into Asustor.
Proxmox on an Asustor NAS – Step 9, Booting from the New Proxmox Installer USB
Next, you need to tap ‘RIGHT‘ on the keyboard and head to the ‘Save & Exit’ option. At the bottom, you should see, under the ‘boot override‘ option, your USB Drive. Tap ‘DOWN‘ until you are highlighting the USB and then tap ‘Enter‘ or ‘Return‘ on your keyboard, as this will push the Asustor to boot from that USB and begin the Proxmox installation. For now, we just need it to read from this USB this one time. If you already know the internal drive you plan on installing Proxmox onto (eg an M.2 NVMe SSD or a SATA SSD) that is already inside the system, make sure to change the boot priority of option #2 to THAT drive. As then, later on after the USB is removed, the system will automatically switch to the proxmox installed drive for the future.
Proxmox on an Asustor NAS – Step 10, Rebooting and Starting the Proxmox Installer
This next step is a bit of a quick one. Around 5-15 seconds after you selected the USB Drive in BIOS, the screen will display the Proxmox Installer option page and all you need to do is navigate the config choices to set up your Proxmox NAS the first time. Select ‘Install Proxmox VE‘.
Next, the Terms and Conditions will be displayed. Scroll through as appropriate, and either use the mouse or ‘tab’ key to make your way to ‘Agree’ and click enter.
Next enter your location, timezone and keyboard layout, then click ‘Next’.
Enter the password you wish to use for the ‘root’ account. This is the super-user (i.e All Access admin), which you can amend later on if you choose to. Additionally, add your email address for use in notifications, system alerts and abnormal behaviour reports. Then click ‘Next’.
Next, you need to configure your network connectivity. If your Asustor NAS has multiple ethernet ports, select which one you want to use as the Management Interface, for system software access. In the Hostname area, if you plan on only using this system on the local area network (you can change this later), just put ‘pve.lan’. The system will preselect an IP dynamically and arrange the DNS/Gateway, but again you can change all this later. You should DEFINITELY amend this si you are going to start giving Proxmox/VMs external access points. When you are satisfied with your setup, click next.
The system setuP will display a summary of the choices and configs you hav made and invite you to confirm and install the Proxmox software. Make sure to uncheck the box that suggests a reboot after the installation is complete. This is optional step and I only suggest it because it will allow you to remove the USB between the installation and first-time boot, ensuring the system doesn’t boot back into the USB installer afterwards, but recent versions of Proxmox actually take this into account and will go straight into the Proxmox boot disk – still, I would nevertheless factor in chance to remove the USB in the middle nonetheless. When you are ready, click ‘Install’ on the bottom right.
Installation of Proxmox will be quite quick, around 3-5 minutes. The system will let you know when the installation is done and, if you unchecked the box for auto reboot, you will be presented with your system’s local IP and port config.
You can now power down / reboot the system. Be sure to make a note of that IP that IP and Port number for when you want to access the Proxmox Asustor NAS server after it reboots – there is a small % chance that the IP might have dynamically changed (based your own network architecture), but there is another way to find the device on your network. Select Shutdown or Reboot as appropriate.
The system (via the HDMI interface) during the reboot cycle will give you a heads up when to remove the USB drive. Next time the system boots up, it should access the newly created Proxmox boot drive.
If the Promox boot drive boots fine, skip ahead to step 9. Otherwise, read below how to chance the boot drive arrangement again.
Proxmox on an Asustor NAS – Step 8, Remove the Boot USB Drive AND CHANGE BIOS!!!
Once your Asustor NAS has fully powered down, you need to disconnect the USB drive you installed earlier with Proxmox boot loader on it. You need to do this otherwise, when you reboot the Asustor NAS, it can potentially reboot into the bootloader again. You can skip past this and/or it will not action a reinitialization without your input, but better to remove the USB and therefore allow the system to always immediately boot into the Proxmox system you just created. Next, you need to head back into the BIOS from earlier. Keep the Keyboard and HDMI Monitor connected and use the same method you used earlier during the initial boot of the Asustor (pressing F12 /F2/ESC/Delete repeatedly when you hear the first Asustor beep after about 10-15 secs) and as soon as you are greeted with the familiar blue BIOS screen. From here, tap right a few times to highlight the ‘Boot’ option and change the option for Boot Priority #1. The default is Asustor OS, you need to change it to the drive you installed Proxmox on (whether that is a SATA/NVMe SSD or one of the main storage bays).
This will change the boot order to allow the system when it is first powered on to always boot into Proxmox. After this, you can click right again in the BIOS menu to select the option to Save and restart. The system will then boot into the Proxmox initialization (first-time setup).
Proxmox on an Asustor NAS – Step 9, Reboot the NAS
Upon rebooting the Asustor into Proxmox (can take up to 5 mins, but usually much quicker). You have two options with how to access the configuration and controls. You can use the HDMI+Keyboard if you choose for console/command level access.
Alternatively (much more recommended), use a program such as Advanced IP Scanner, which is free and VERY useful anyway, or even network command prompt) to scan your local area network and find where the Asustor with Proxmox is located (i.e it’s IP). This IP (eg 192.168.100.2) is what you put into the URL bar ofay web browser and it will load into the login GUI for Proxmox. From here you will need to use the username ‘root’ in combination with the password that you created during initialization.
And that is about it. You now have Proxmox installed as the default OS of your Asustor NAS. From here you can do anything and everything that his highly regarded virtualization server software offers.
EXTRA – How to Reverse Your Asustor NAS from Proxmox to Asustor ADM / ADM Software Again
Now, it is worth remembering that switching your Asustor NAS to run Proxmox instead of ADM is not a one-way street and you can reverse this relatively easily. Do remember first though that:
Any data on the HDD/SSDs inside the Asustor that were used in Proxmox server setup will not be accessible/usable with the Asustor NAS system and will likely be flashed/formatted during the Asustor ADM reinitialization
You will need your Keyboard and HDMI Monitor again in order to get back into BIOS
If you kept your original Asustor RAID Pool on HDDs etc to one side (i.e you removed the already configured storage media in their RAID from the Asustor when you changed to Proxmox and put these drives safely to one side), you should be able to migrate this data back into the Asustor NAS during re-initialization with ease. That said, YOU SHOULD ALWAYS HAVE A BACKUP FOR THIS DATA REGARDLESS
In order to reverse the Asustor NAS from Proxmox back to Asustor ADM Software, you need to (from a cold boot) access the BIOS menu again (so, at boot, with your Keyboard and monitor connected, press the DEL and/or F12 key over and over when the Asustor beeps, like before) and when you reach the BIOS menu, tap RIGHT until you reach the ‘Boot page. Then change the ‘Boot Option #1’ option from the Proxmox installation drive back to the Asustor OS (internal flash 5GB module). Once that is done, head into the ‘Save & Exit‘ and then select ‘Save Changes and Restart‘. Doing this will restart the Asustor NAS and it will automatically boot into the Asustor ADM boot sequence. From here your NAS will either automatically boot into the Asustor Setup page OR (if you have your original Asustor NAS RAID drives, with their Pools, Volumes, etc) it will just boot into the Asustor NAS software as normal.
Thanks for reading! I hope you found this helpful and that it really helped you to make the most of your storage. Want to help me continue to make more guides, reviews and tutorials on the subject of NAS? Then you can do so in a few different ways (any of which I will be eternally grateful for if you choose to!). You can visit the ‘Support NAS Passion’ page HERE and see a few different ways that you can help us keep the lights on. Alternatively, you can use one of the links below to shop for your hardware today or in future (visiting those sites via the link below ensures that we get a mall commission on absolutely anything you purchase – and doesn’t cost you anything extra). Finally, if you want to support us in spirit rather than financially, recommend our blog to a friend or professional colleague or share a link on your social media site of choice. Thank you for reading and have a fantastic week!
This description contains links to Amazon. These links will take you to some of the products mentioned in today's content. As an Amazon Associate, I earn from qualifying purchases. Visit the NASCompares Deal Finder to find the best place to buy this device in your region, based on Service, Support and Reputation - Just Search for your NAS Drive in the Box Below
Need Advice on Data Storage from an Expert?
Finally, for free advice about your setup, just leave a message in the comments below here at NASCompares.com and we will get back to you.Need Help?
Where possible (and where appropriate) please provide as much information about your requirements, as then I can arrange the best answer and solution to your needs. Do not worry about your e-mail address being required, it will NOT be used in a mailing list and will NOT be used in any way other than to respond to your enquiry.
[contact-form-7]
TRY CHAT Terms and Conditions
If you like this service, please consider supporting us.
We use affiliate links on the blog allowing NAScompares information and advice service to be free of charge to you.Anything you purchase on the day you click on our links will generate a small commission which isused to run the website. Here is a link for Amazon and B&H.You can also get me a Ko-fi or old school Paypal. Thanks!To find out more about how to support this advice service checkHEREIf you need to fix or configure a NAS, check FiverHave you thought about helping others with your knowledge? Find Instructions Here
Or support us by using our affiliate links on Amazon UK and Amazon US
Alternatively, why not ask me on the ASK NASCompares forum, by clicking the button below. This is a community hub that serves as a place that I can answer your question, chew the fat, share new release information and even get corrections posted. I will always get around to answering ALL queries, but as a one-man operation, I cannot promise speed! So by sharing your query in the ASK NASCompares section below, you can get a better range of solutions and suggestions, alongside my own.
Terramaster F4-424 Pro, F4-424 and F2-424 NAS for 2024
TerraMaster, arguably the value/affordable tier of the private NAS market, have revealed three new solutions that form the beginning of their 2024 series of devices – the Terramaster F4-424 Pro, F4-424 and F2-424 NAS. Arriving before their main competitors Synology, QNAP and Asustor, these new solutions are arriving with a more recent Intel N95 and N300 CPU series and will be available in 2-Bay and 4-Bay configurations.
Terramaster F4-424 Pro, F4-424 and F2-424 NAS – Hardware Specifications
At the core of the F2-424 and F4-424 models is the Intel Celeron N95 processor, a choice that balances power and efficiency. The F4-424 PRO, on the other hand, steps up the performance with the Intel Core i3 N300 processor, catering to more demanding tasks. Memory-wise, the F2-424 and F4-424 are equipped with 8 GB of DDR5 non-ECC SODIMM, while the F4-424 PRO doubles this capacity to 16 GB, enhancing its multitasking capabilities. Storage options vary across the models, with the F2-424 featuring two disk slots, suitable for personal or small office setups, and the F4-424 and F4-424 PRO offering four disk slots, providing more flexibility and capacity for intensive data storage needs.Here is a comparison table for the TerraMaster F2-424, F4-424, and F4-424 PRO NAS devices with the correct CPU specifications:
Feature/Specification
TerraMaster F2-424
TerraMaster F4-424
TerraMaster F4-424 PRO
Processor Model
Intel® Celeron N95
Intel® Celeron N95
Intel® Core i3 N300
Processor Architecture
X.86 64-bit
X.86 64-bit
X.86 64-bit
Processor Frequency
Max burst up to 3.4 GHz
Max burst up to 3.4 GHz
Max Turbo Frequency 3.80 GHz
Total Cores
4
4
8
Total Threads
4
4
8
System Memory
8 GB DDR5 non-ECC SODIMM
8 GB DDR5 non-ECC SODIMM
16 GB (Max, dependent on memory type)
Memory Slot Number
1 (DDR5 SODIMM)
1 (DDR5 SODIMM)
1
Maximum Supported Memory
32 GB DDR5 non-ECC SODIMM
32 GB DDR5 non-ECC SODIMM
16 GB
Disk Slot Number
2
4
4
Compatible Drive Types
3.5″ SATA HDD, 2.5″ SATA HDD/SSD
3.5″ SATA HDD, 2.5″ SATA HDD/SSD
3.5″ SATA HDD, 2.5″ SATA HDD/SSD
Maximum Internal Raw Storage Capacity
44 TB (22 TB x2)
88 TB (22 TB x4)
88 TB (22 TB x4)
Drive Hot Swap
Yes
Yes
Yes
External Ports
2 RJ-45 2.5GbE, 2 USB3.1, HDMI
2 RJ-45 2.5GbE, 2 USB3.1, HDMI
2 RJ-45 2.5GbE, 2 USB3.1, HDMI
Dimensions (HWD)
222 x 119 x 154 mm
222 x 179 x 154 mm
222 x 179 x 154 mm
Weight
2.2 kg
3.4 kg
3.4 kg
System Fan
80 x 80 x 25 mm
80 x 80 x 25 mm
120 x 120 x 25 mm
Noise Level
19.0 dB(A)
19.0 dB(A)
21.0 dB(A)
Power Supply
40 W
40 W
90 W
Power Consumption
22.0 W (active), 11.0 W (hibernation)
22.0 W (active), 11.0 W (hibernation)
33.0 W (active), 13.0 W (hibernation)
Operating Temperature
0°C to 40°C
0°C to 40°C
0°C to 40°C
Supported OS
Windows, Mac, Linux
Windows, Mac, Linux
Windows, Mac, Linux
Supported Browsers
Chrome, Firefox, Safari, Edge
Chrome, Firefox, Safari, Edge
Chrome, Firefox, Safari, Edge
Supported Mobile OS
iOS14.0+, Android 10.0+
iOS14.0+, Android 10.0+
iOS14.0+, Android 10.0+
Networking
TCP/IP, IPv4/IPv6, Link Aggregation, DLNA, VPN, DDNS
TCP/IP, IPv4/IPv6, Link Aggregation, DLNA, VPN, DDNS
TCP/IP, IPv4/IPv6, Link Aggregation, DLNA, VPN, DDNS
This table provides a detailed comparison across key features and specifications for these TerraMaster NAS models. A common thread among these TerraMaster NAS units is their robust build and reliable performance. Each model supports both 3.5″ SATA HDDs and 2.5″ SATA SSDs, ensuring versatility in storage media choices. Networking is a strong suit, with all models featuring 2.5GbE network jacks for faster data transfer speeds, and HDMI ports for direct video output. Compatibility with various operating systems including Windows, Mac, and Linux, alongside comprehensive security features like firewall protection and AES encryption, underscores their flexibility and security focus.
When assessing these models for purchase, potential buyers should consider their specific needs. The number of disk slots is a critical factor, with the F2-424’s two slots being ideal for less demanding storage requirements, while the four slots in the F4-424 and F4-424 PRO are better suited for larger storage pools and more intensive applications. The F4-424 PRO, with its superior Intel Core i3 N300 processor and expanded memory, is particularly geared towards business environments that require higher processing power and greater multitasking abilities.
Terramaster F4-424 Pro, F4-424 and F2-424 NAS – CPU Differences
The choice of CPU significantly influences the performance of these NAS units. The Intel Celeron N95, powering the F2-424 and F4-424, is a quad-core processor with a maximum turbo frequency of 3.4 GHz and a 6 MB cache, capable of efficiently handling everyday storage tasks. It supports both DDR4 and DDR5 memory types, up to a speed of 4800 MHz, and can manage 4K graphics output at 60Hz, making it suitable for media-heavy applications. The Intel Core i3 N300 in the F4-424 PRO is an 8-core powerhouse, offering a higher turbo frequency of 3.8 GHz, which translates into faster processing and more efficient handling of data-intensive tasks. This processor also supports the same memory types and speeds as the N95 but stands out with enhanced graphics capabilities, owing to a greater number of execution units and a higher maximum dynamic frequency.
Specification
Intel N95 CPU (F2-424 / F4-442)
Intel N300 CPU (F4-424 PRO)
Product Collection
Intel® Processor N-series
Intel® Core i3 Processor N-series
Code Name
Products formerly Alder Lake-N
Products formerly Alder Lake-N
Vertical Segment
Mobile
Mobile
Processor Number
N95
i3-N300
Lithography
Intel 7
Intel 7
Total Cores
4
8
Total Threads
4
8
Max Turbo Frequency
3.40 GHz
3.80 GHz
Cache
6 MB
6 MB Intel® Smart Cache
TDP
15 W
7 W
Max Memory Size
16 GB (dependent on memory type)
16 GB (dependent on memory type)
Memory Types
DDR4 3200 MT/s, DDR5 4800 MT/s, LPDDR5 4800 MT/s
DDR4 3200 MT/s, DDR5 4800 MT/s, LPDDR5 4800 MT/s
Max Memory Channels
1
1
ECC Memory Supported
No
No
GPU Name
Intel® UHD Graphics
Intel® UHD Graphics
Max Dynamic Frequency
1.20 GHz
1.25 GHz
Graphics Output
eDP 1.4b, DP 1.4, HDMI 2.1, MIPI-DSI 1.3
eDP 1.4b, DP 1.4, HDMI 2.1, MIPI-DSI 1.3
Execution Units
16
32
4K Support
Yes, at 60Hz
Yes, at 60Hz
Max Resolution (HDMI)
4096 x 2160@60Hz
4096 x 2160@60Hz
DirectX Support*
12.1
12.1
OpenGL Support*
4.6
4.6
OpenCL Support*
3.0
3.0
# of Displays Supported
3
3
PCI Express Lanes
9 Gen 3
9 Gen 3
USB Revision
2.0/3.2
2.0/3.2
TJUNCTION
105°C
105°C
Instruction Set
64-bit
64-bit
Advanced Technologies
Includes Intel® Gaussian & Neural Accelerator 3.0, Intel® Image Processing Unit 6.0, Intel® Speed Shift Technology, Intel® Virtualization Technology, etc.
Includes Intel® Gaussian & Neural Accelerator 3.0, Intel® Image Processing Unit 6.0, Intel® Speed Shift Technology, Intel® Virtualization Technology, etc.
Delving deeper into the usability aspects, all three models boast a user-friendly interface, making them accessible even to NAS novices. Their compatibility with various RAID configurations offers flexibility in data management and redundancy, crucial for data integrity and security. The inclusion of HDMI ports opens up possibilities for direct media playback, a feature that is particularly beneficial in home entertainment setups or digital signage applications. The TerraMaster NAS units also excel in connectivity options, with multiple USB and Ethernet ports providing the versatility needed in modern connected environments. This connectivity, coupled with their compact and sleek design, makes these NAS devices a fit for various settings, from home offices to more formal business environments.
Terramaster F4-424 Pro, F4-424 and F2-424 NAS – Should You Buy?
The TerraMaster’s F2-424, F4-424, and F4-424 PRO NAS units cater to a wide range of storage needs. The F2-424 and F4-424, with the Intel Celeron N95, are excellent choices for general home use and small offices, offering reliable performance for standard storage and media tasks. The F4-424 PRO, powered by the Intel Core i3 N300, is a step up, designed to meet the demands of business environments and power users who require enhanced processing power and expanded memory. This range from TerraMaster highlights a commitment to providing versatile, scalable storage solutions across different user needs and budget ranges, making them a noteworthy option in the NAS market.
This description contains links to Amazon. These links will take you to some of the products mentioned in today's content. As an Amazon Associate, I earn from qualifying purchases. Visit the NASCompares Deal Finder to find the best place to buy this device in your region, based on Service, Support and Reputation - Just Search for your NAS Drive in the Box Below
Need Advice on Data Storage from an Expert?
Finally, for free advice about your setup, just leave a message in the comments below here at NASCompares.com and we will get back to you.Need Help?
Where possible (and where appropriate) please provide as much information about your requirements, as then I can arrange the best answer and solution to your needs. Do not worry about your e-mail address being required, it will NOT be used in a mailing list and will NOT be used in any way other than to respond to your enquiry.
[contact-form-7]
TRY CHAT Terms and Conditions
If you like this service, please consider supporting us.
We use affiliate links on the blog allowing NAScompares information and advice service to be free of charge to you.Anything you purchase on the day you click on our links will generate a small commission which isused to run the website. Here is a link for Amazon and B&H.You can also get me a Ko-fi or old school Paypal. Thanks!To find out more about how to support this advice service checkHEREIf you need to fix or configure a NAS, check FiverHave you thought about helping others with your knowledge? Find Instructions Here
Or support us by using our affiliate links on Amazon UK and Amazon US
Alternatively, why not ask me on the ASK NASCompares forum, by clicking the button below. This is a community hub that serves as a place that I can answer your question, chew the fat, share new release information and even get corrections posted. I will always get around to answering ALL queries, but as a one-man operation, I cannot promise speed! So by sharing your query in the ASK NASCompares section below, you can get a better range of solutions and suggestions, alongside my own.

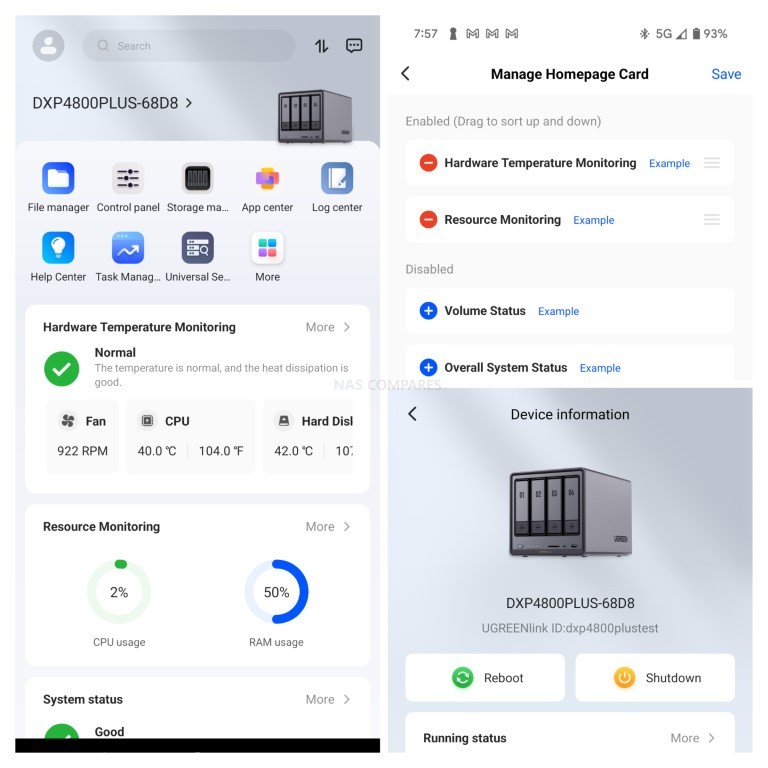
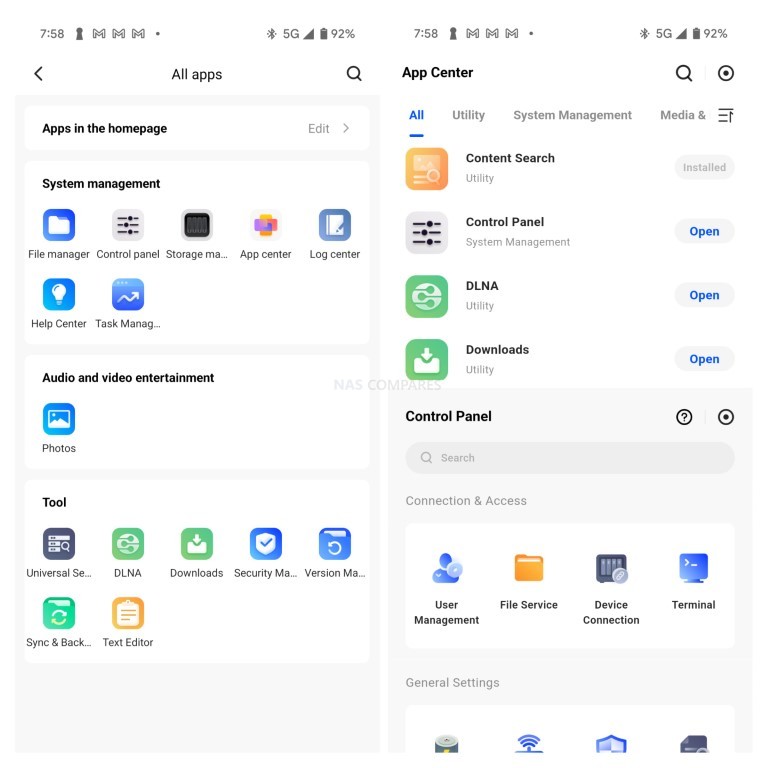
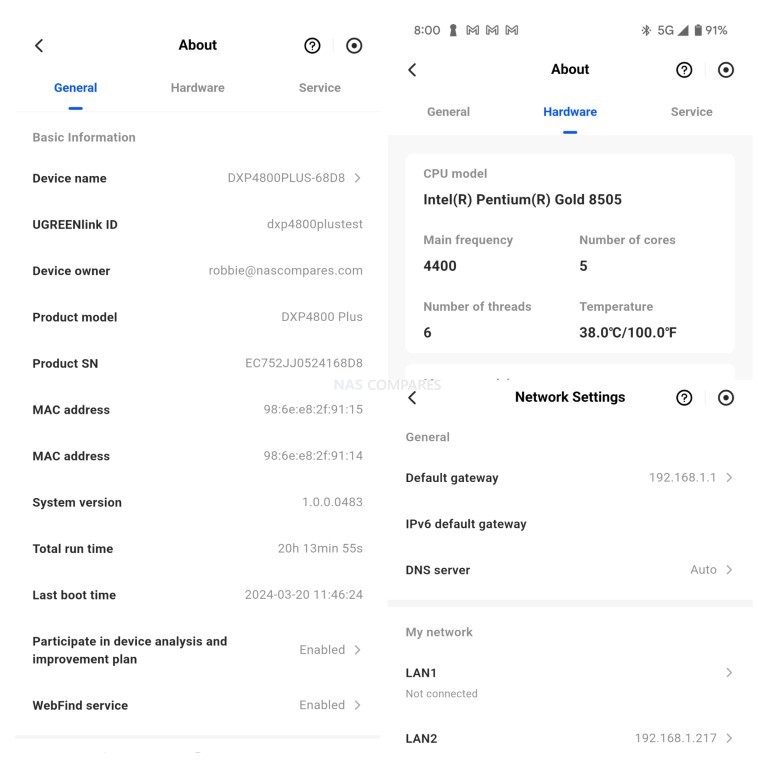
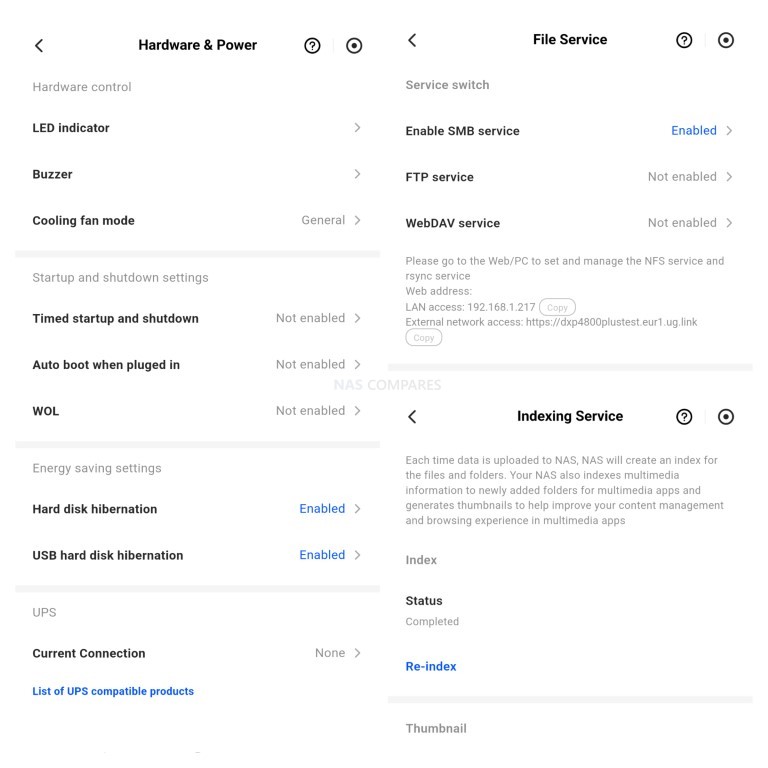
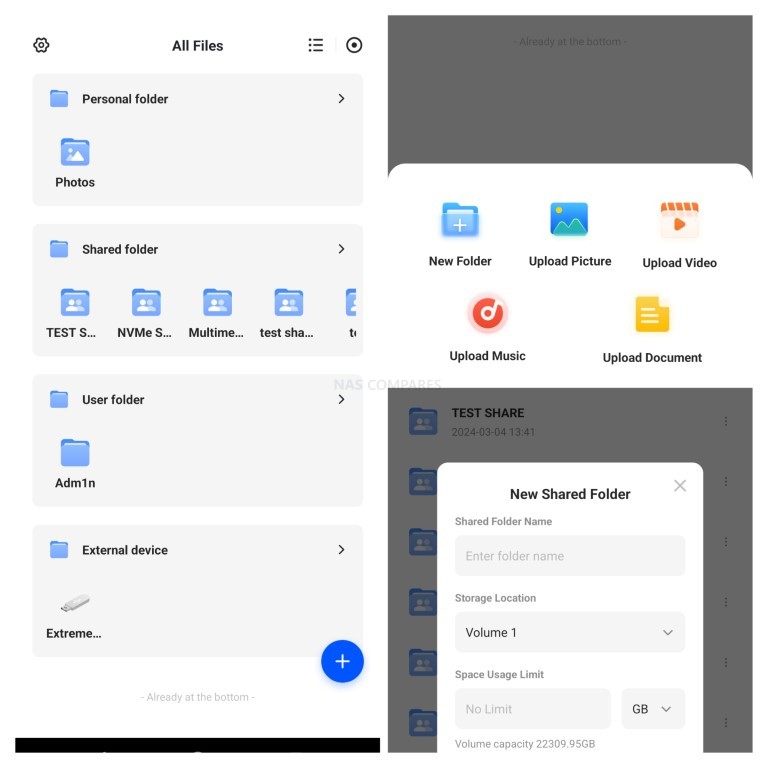
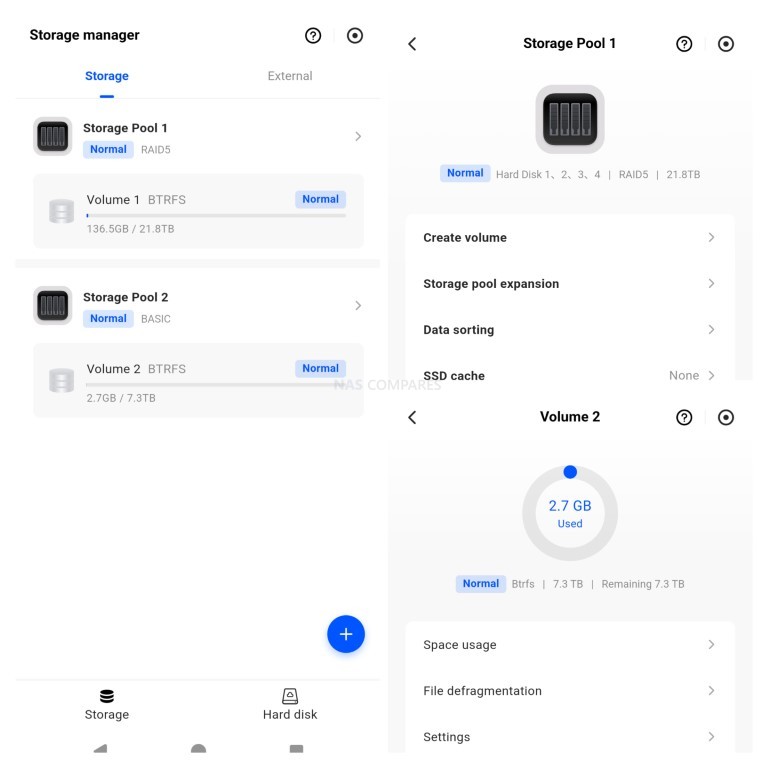
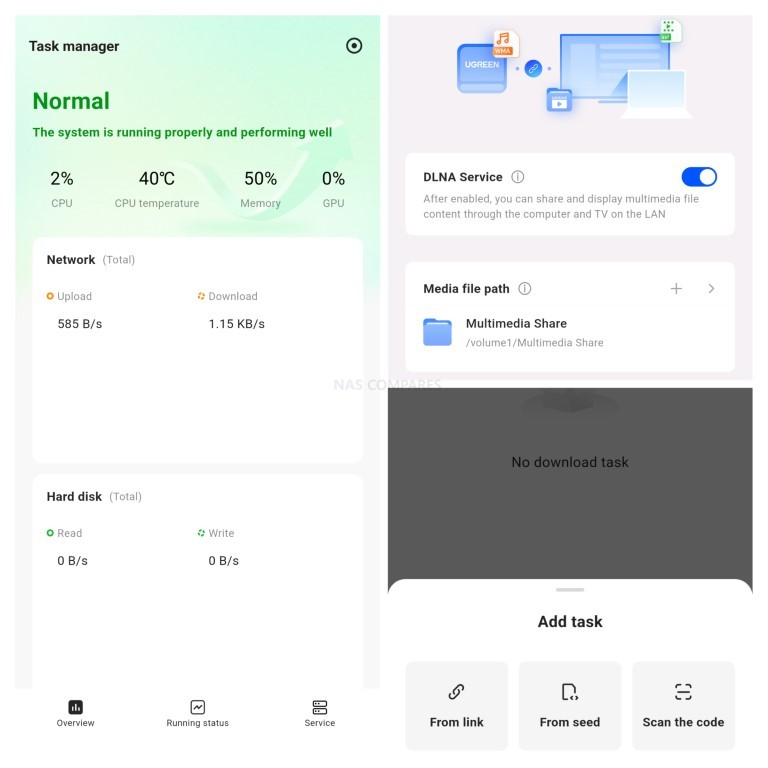

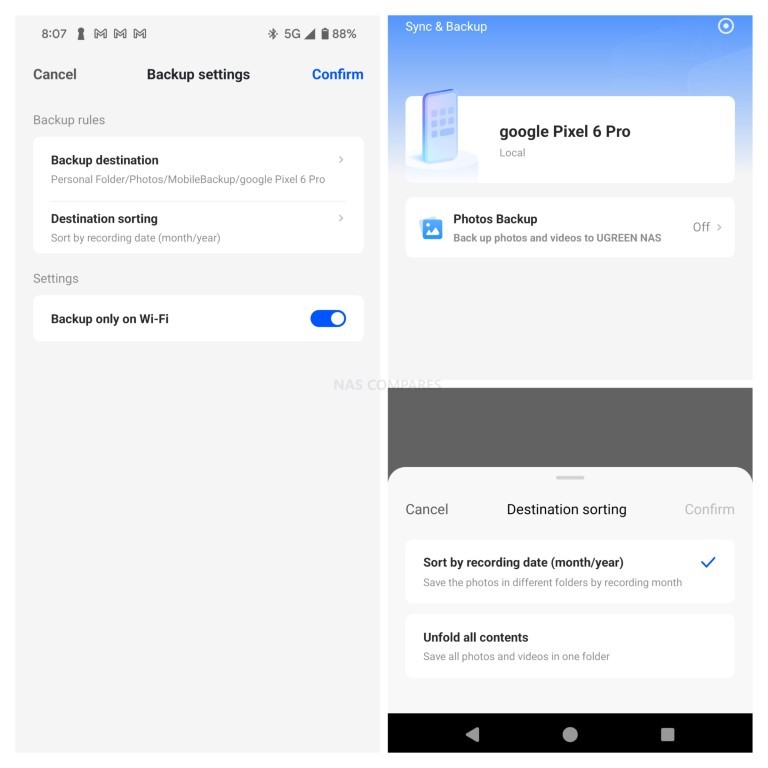

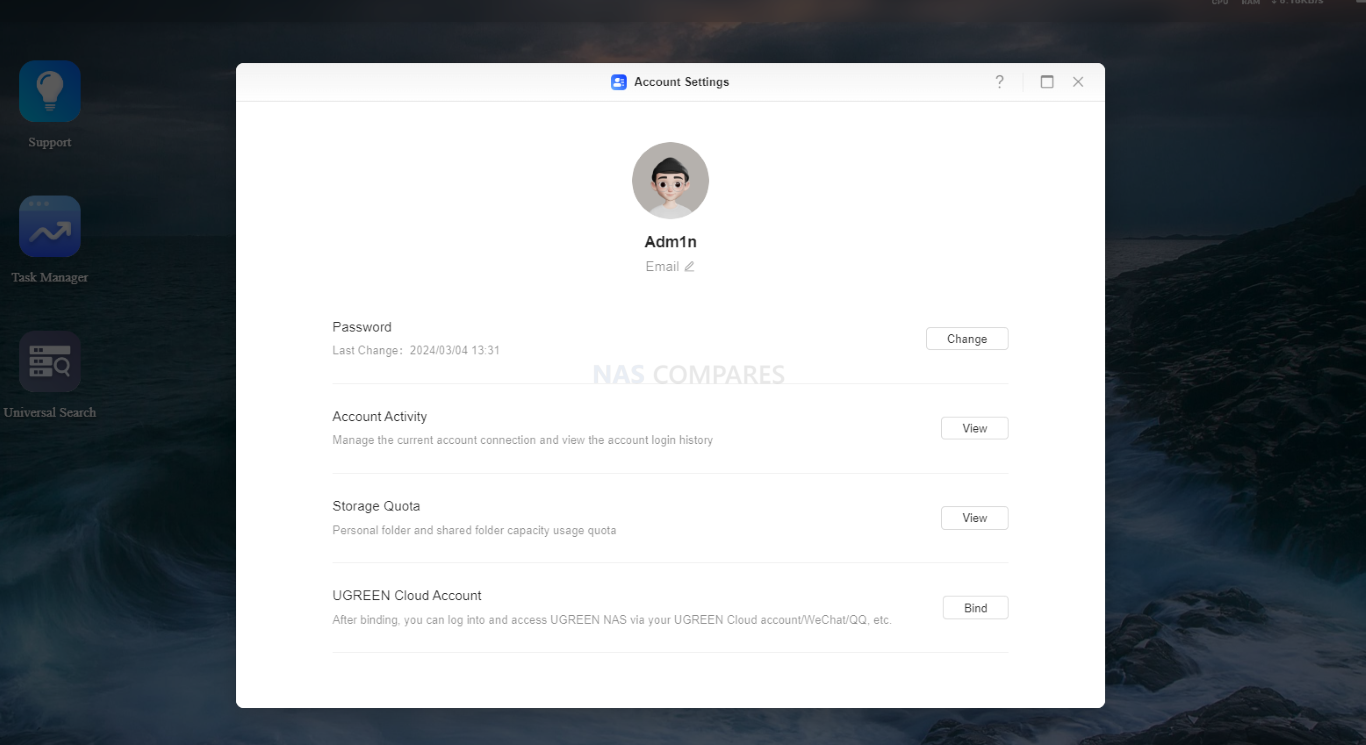
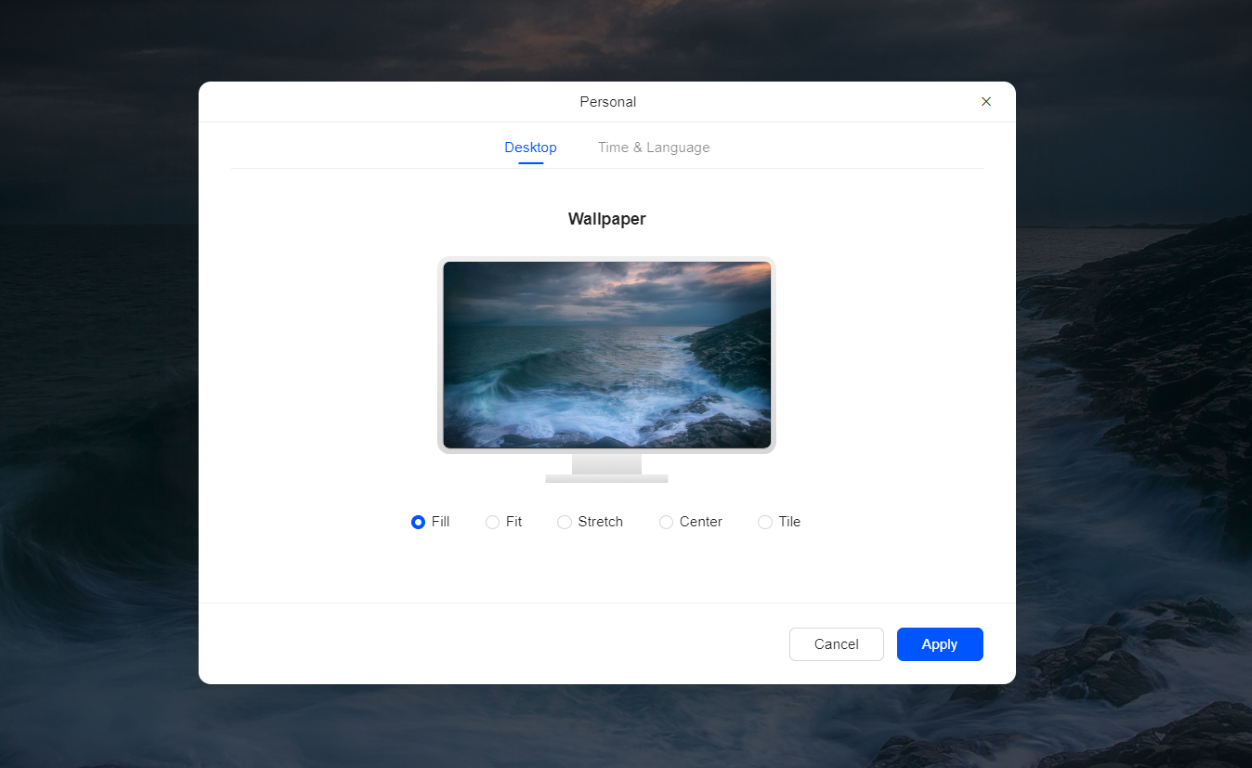
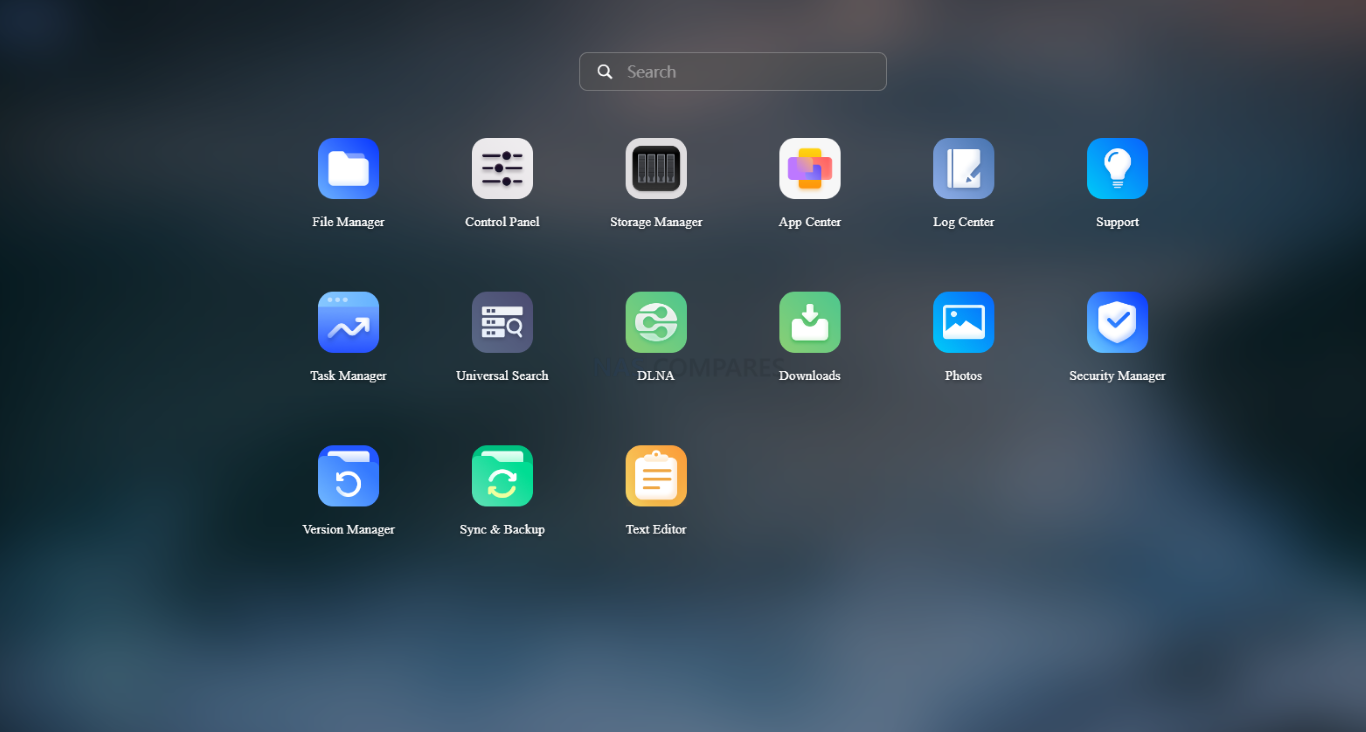
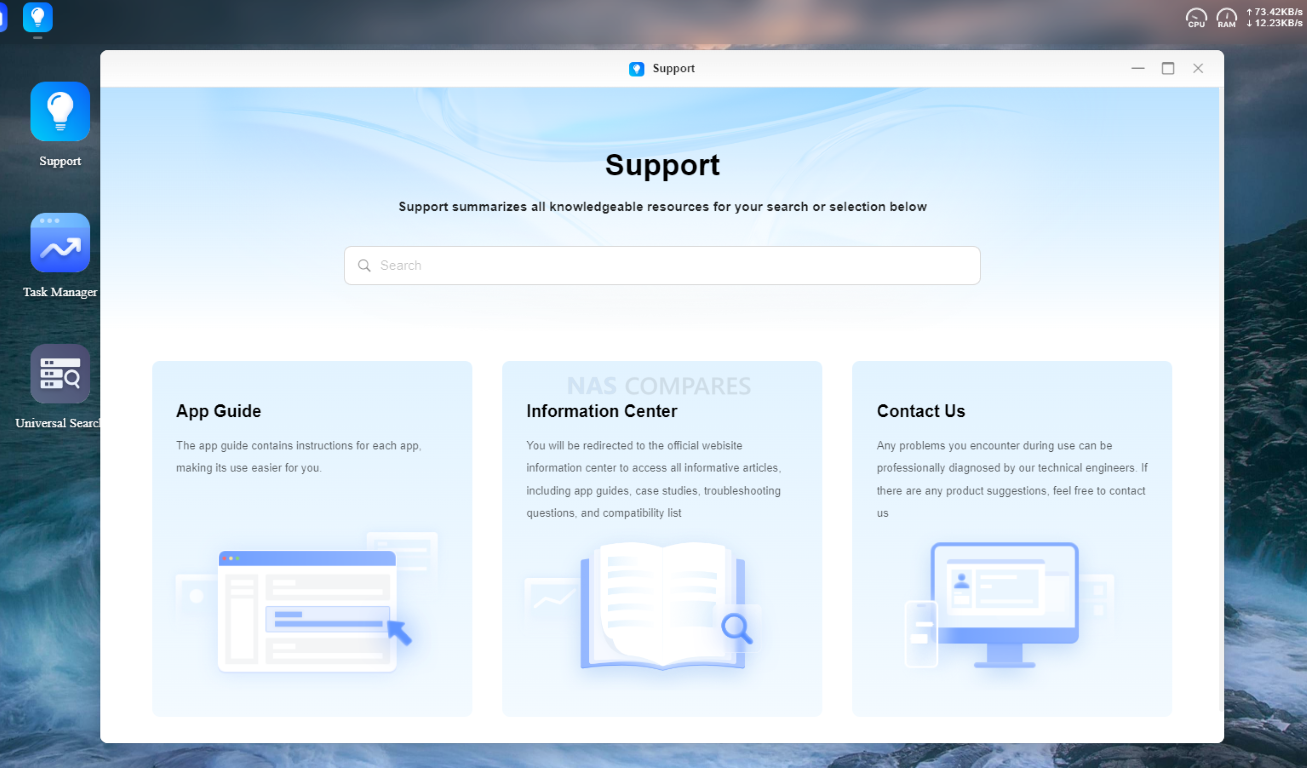

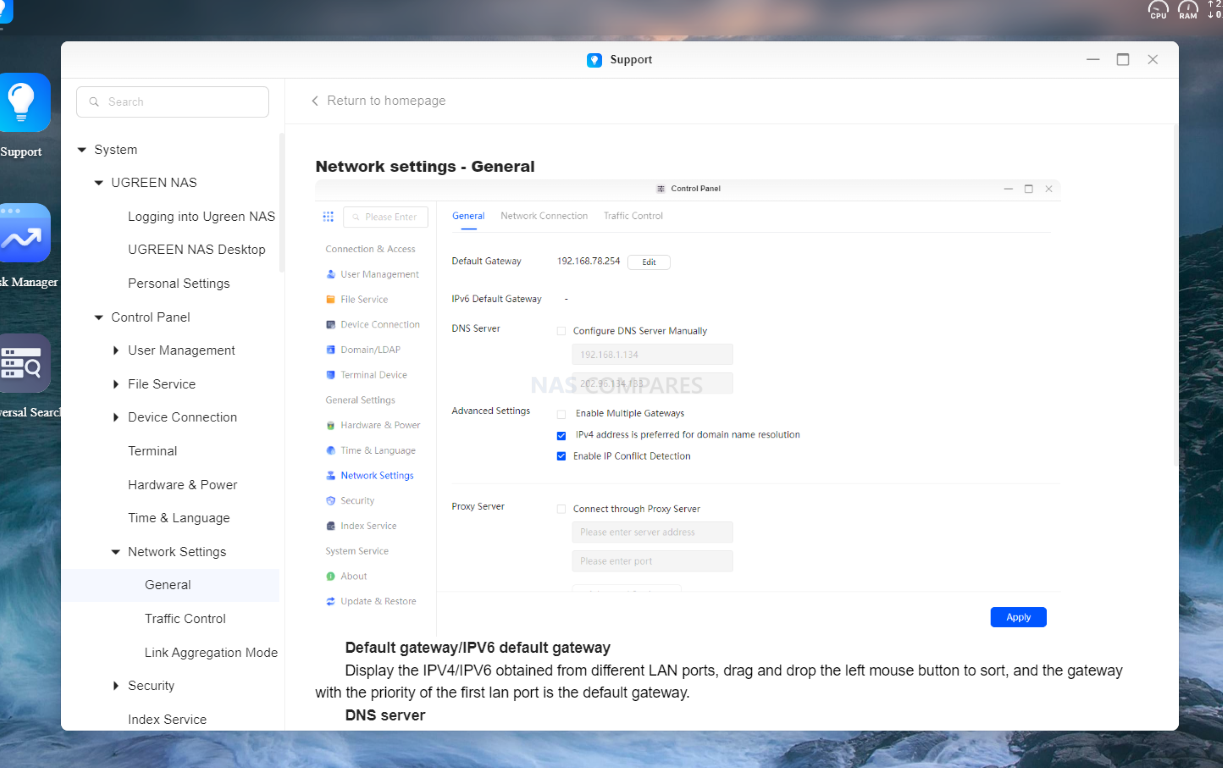
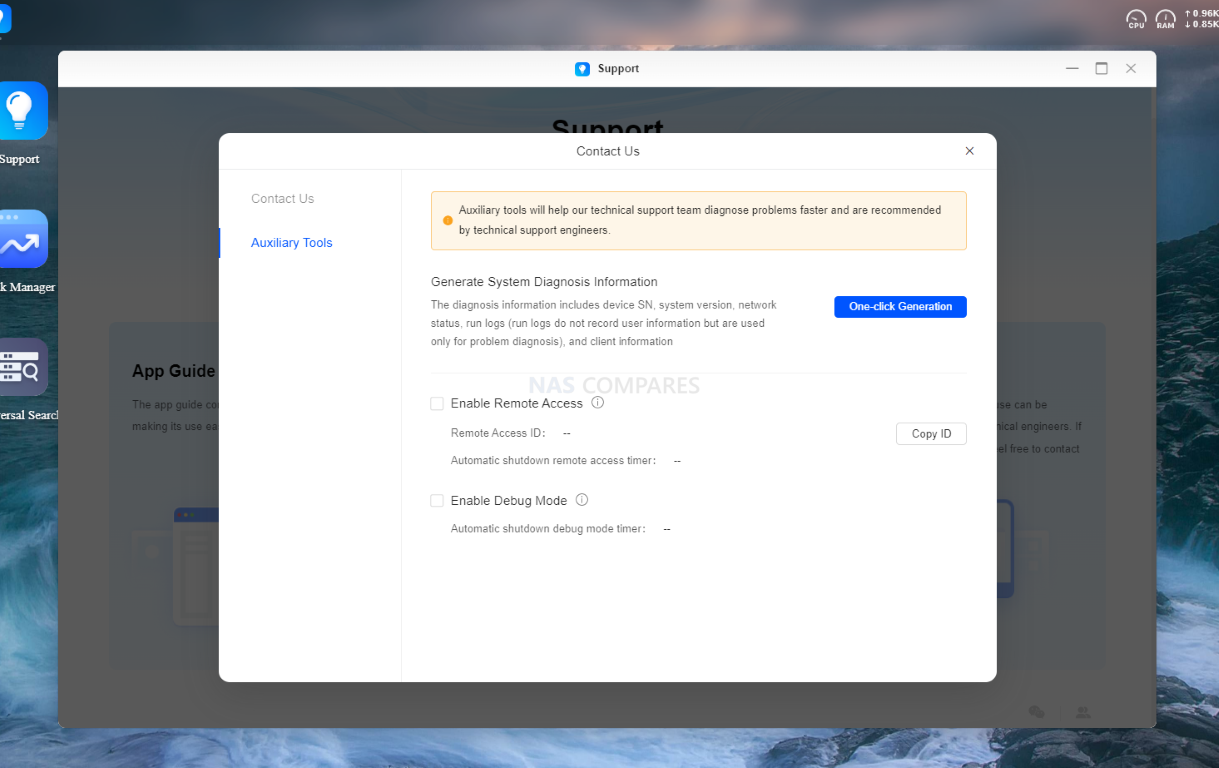
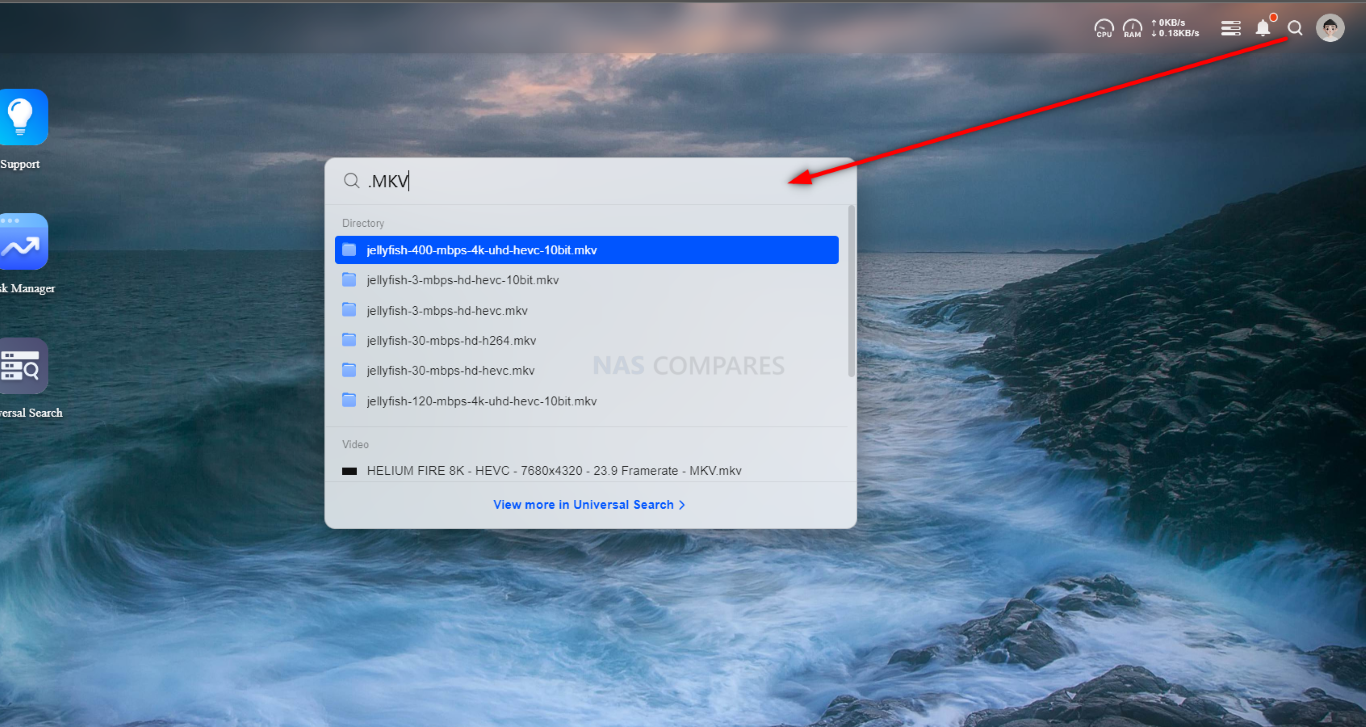


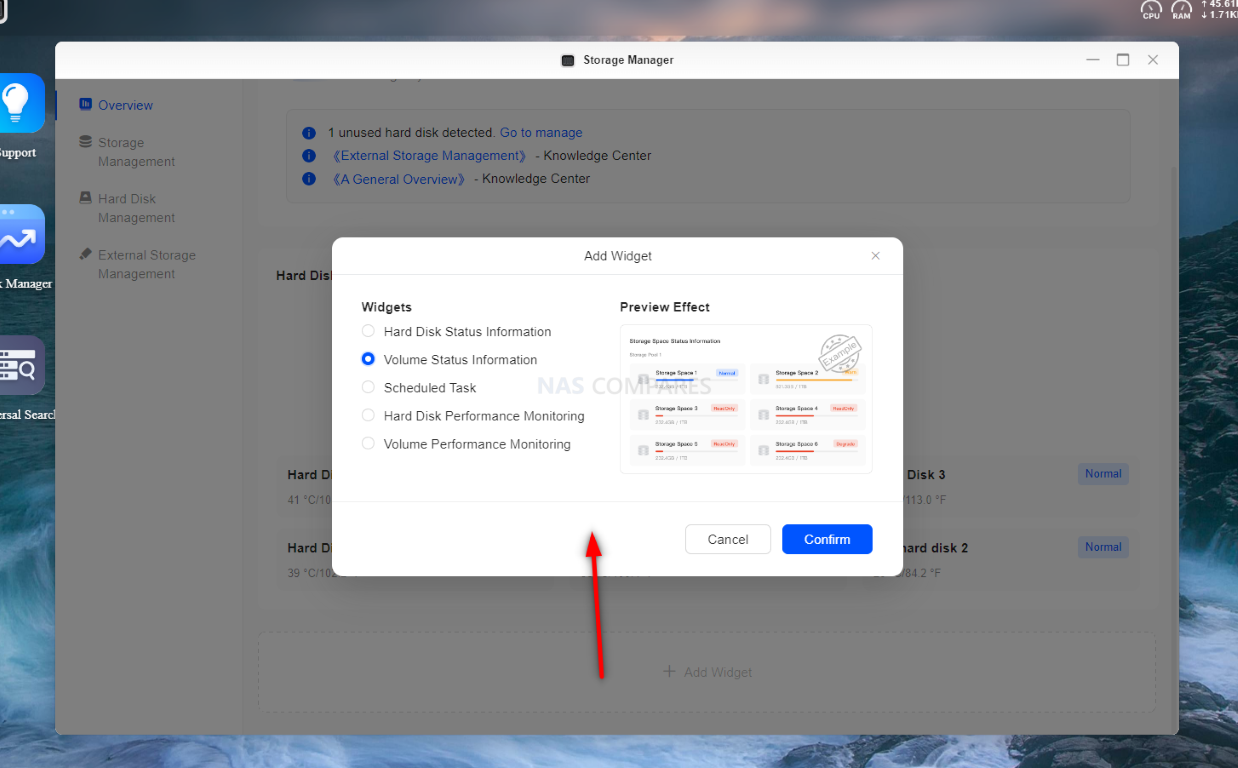
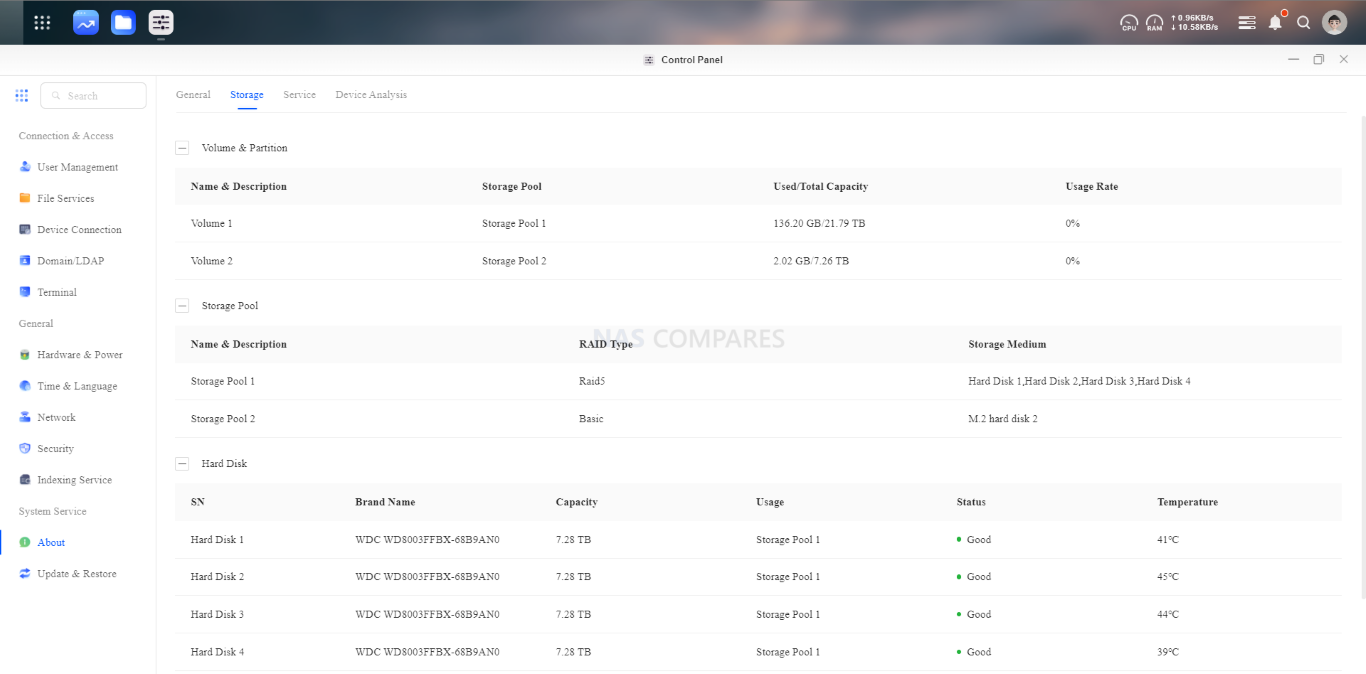
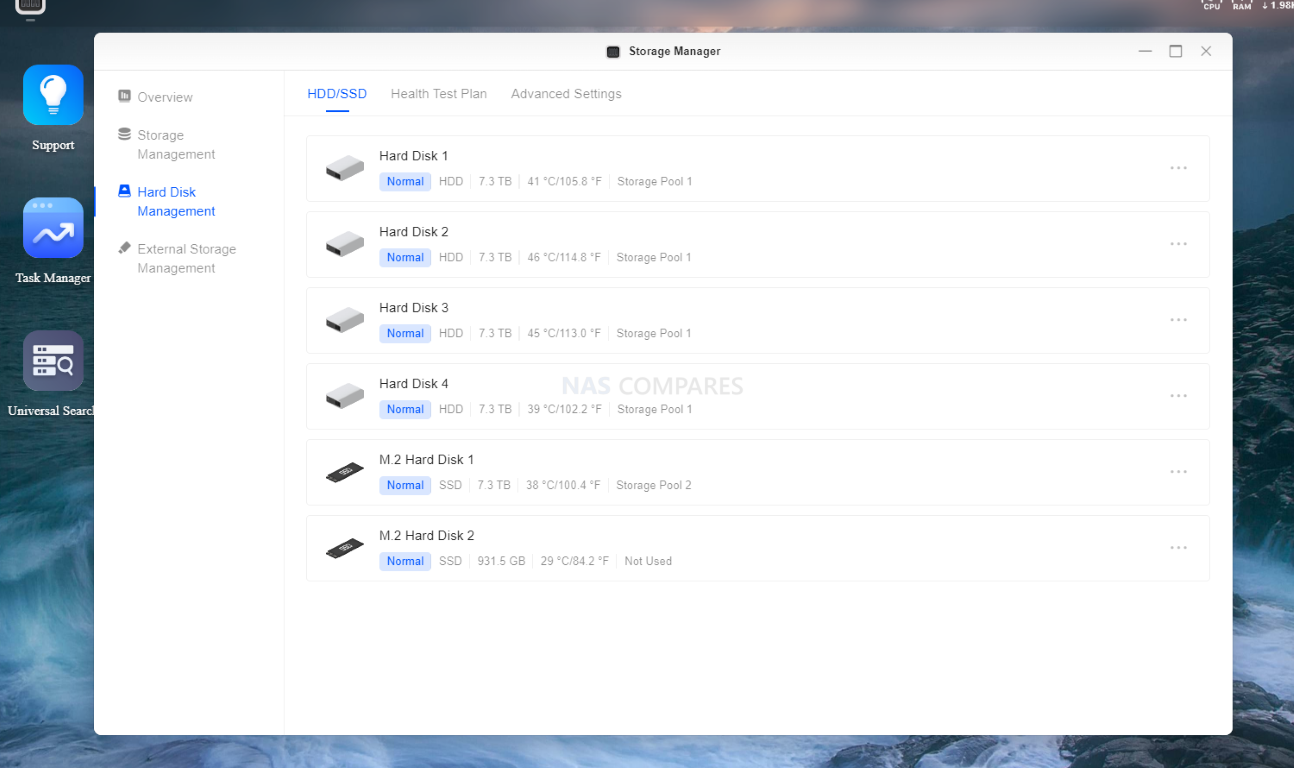
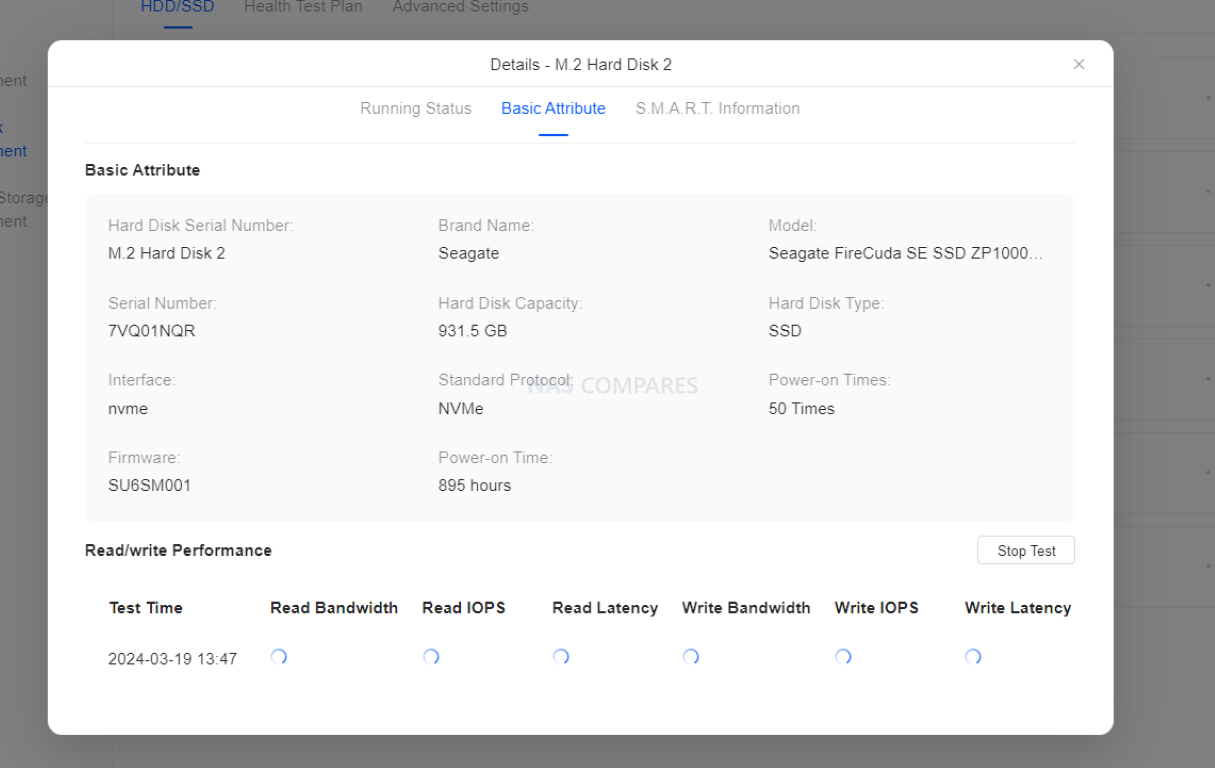
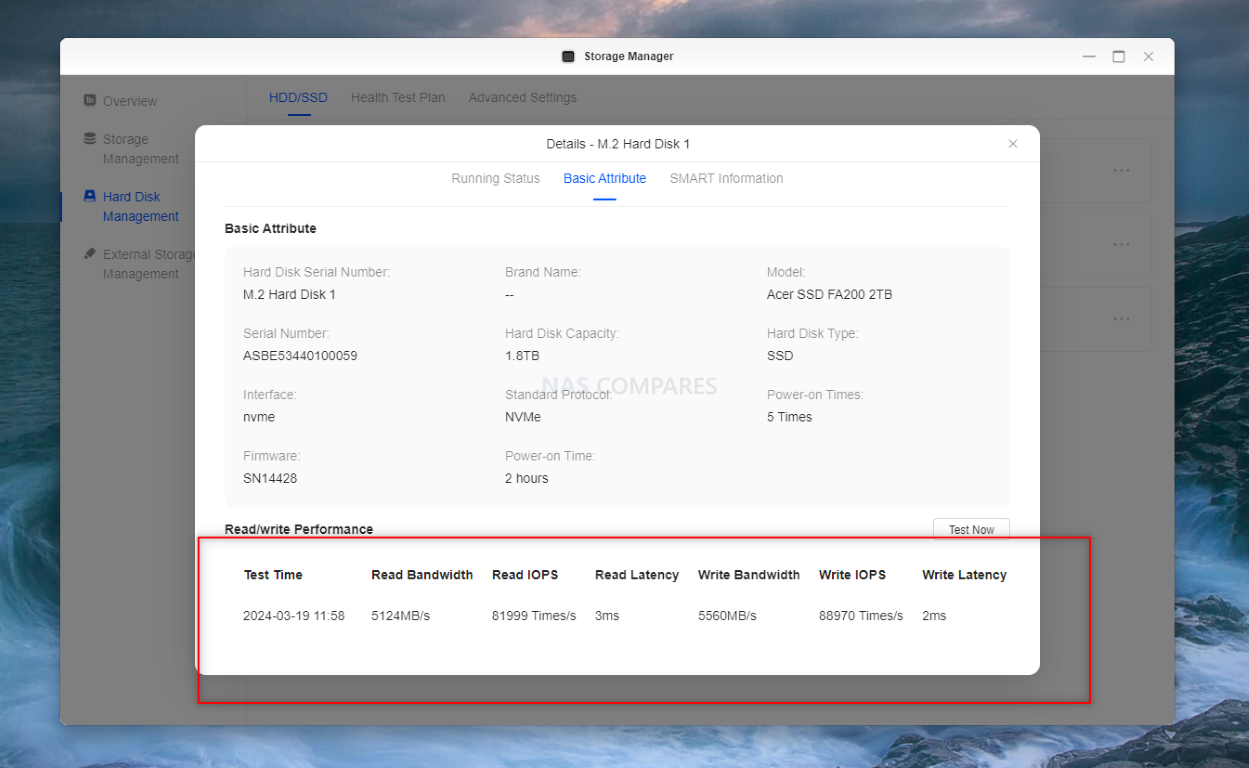
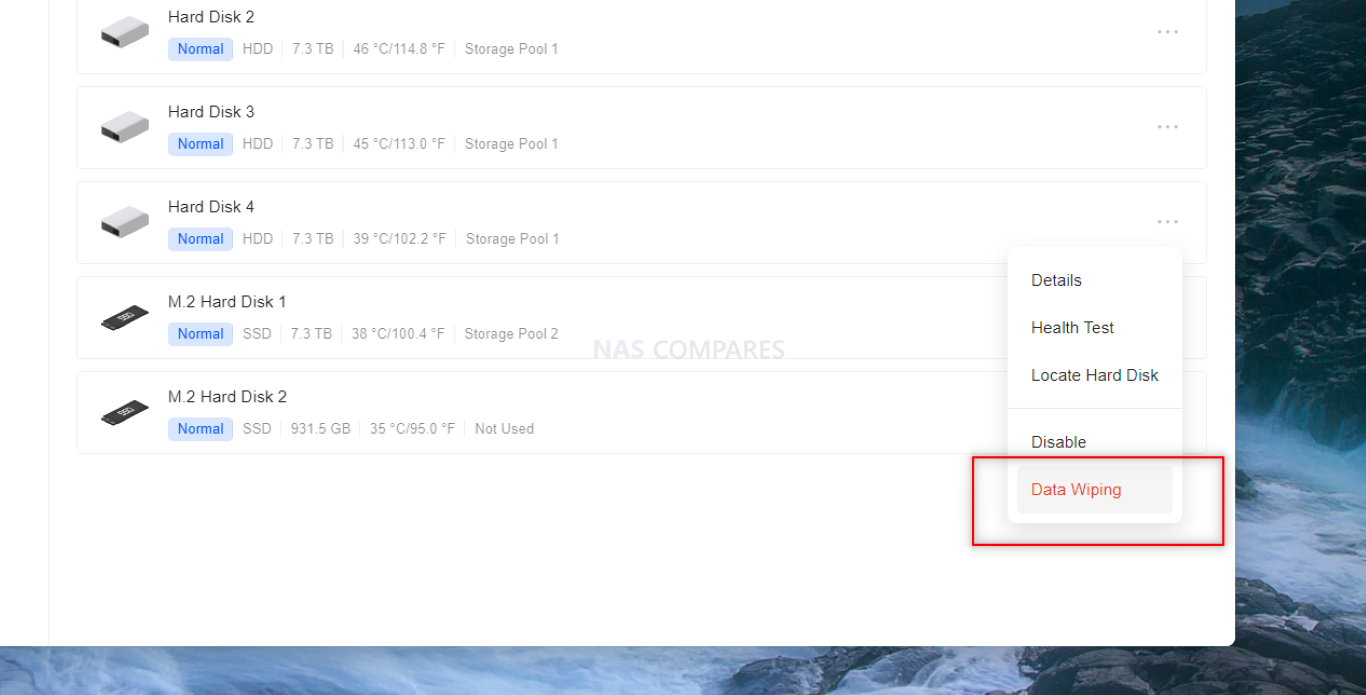

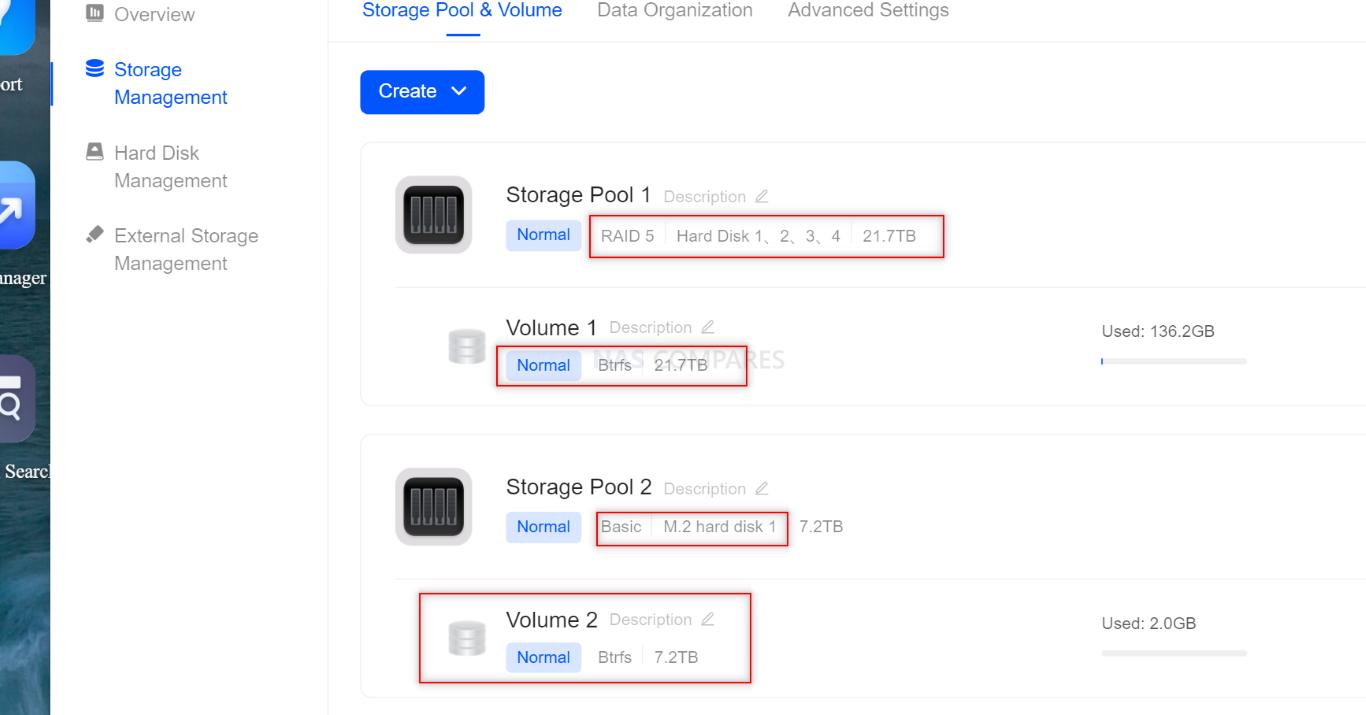
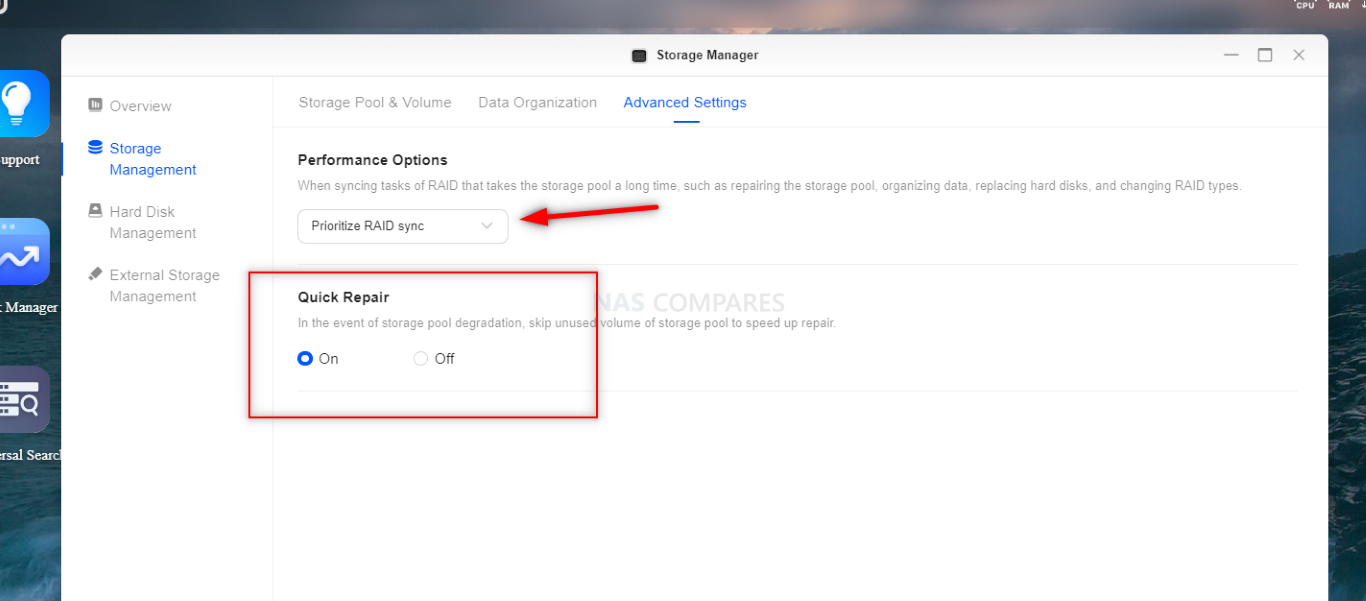
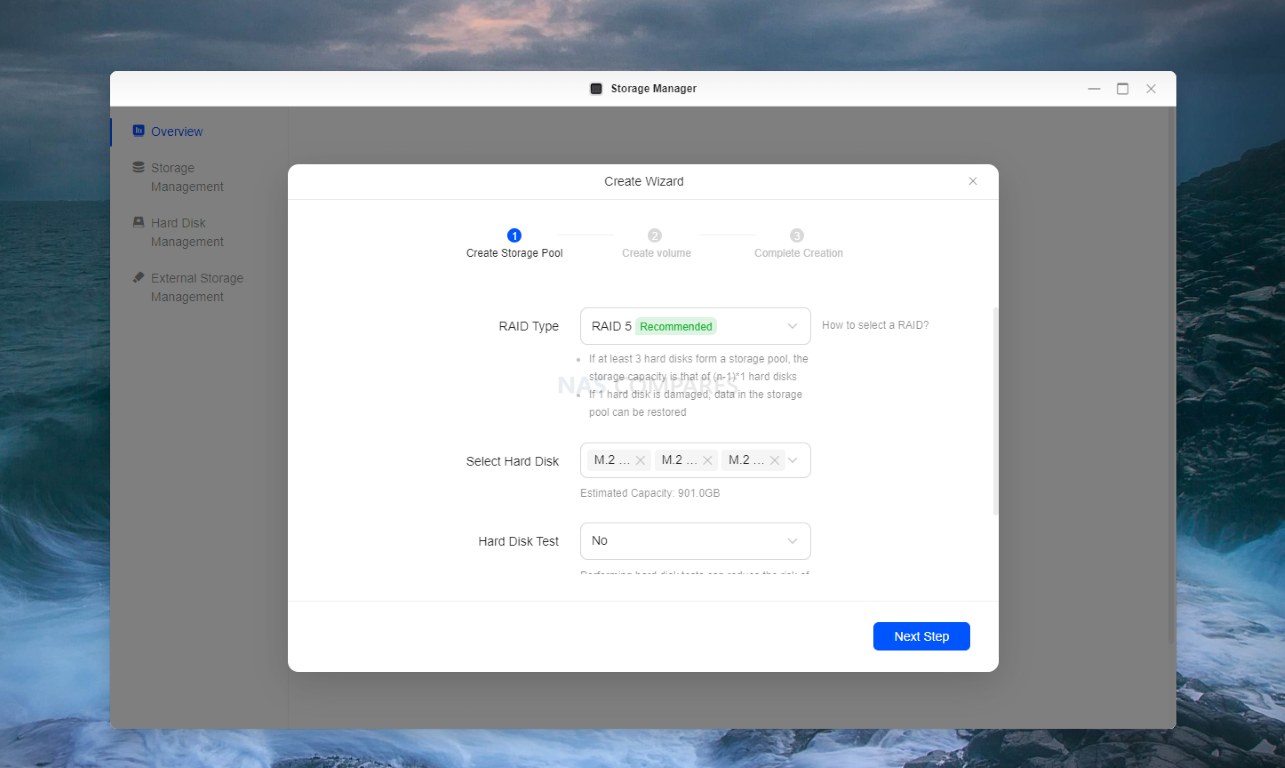

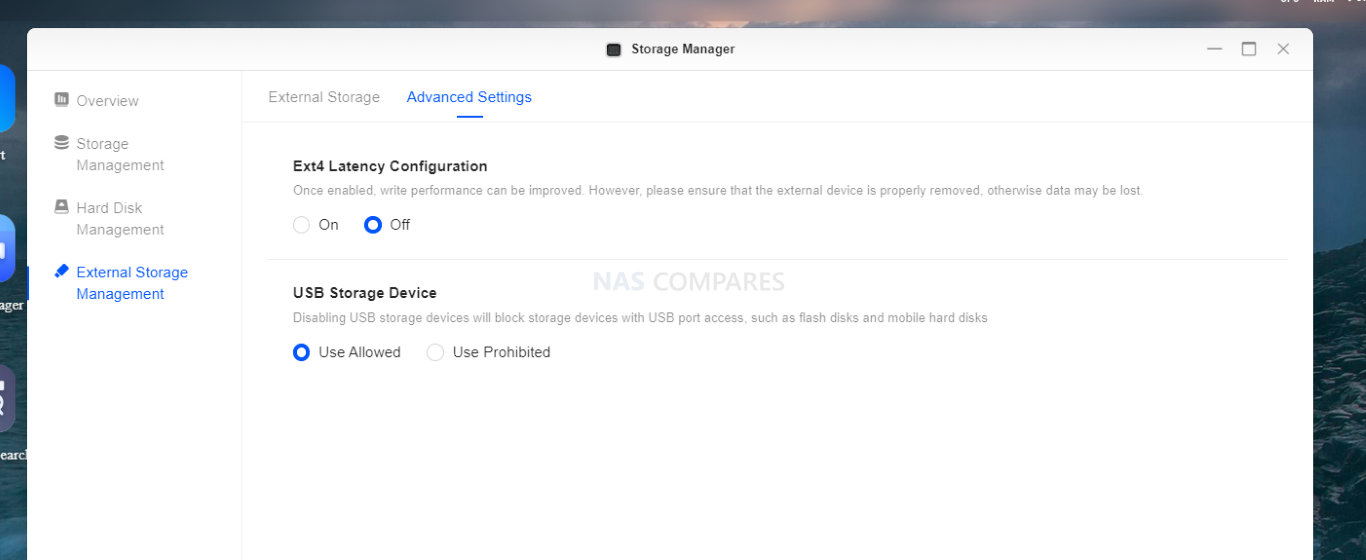
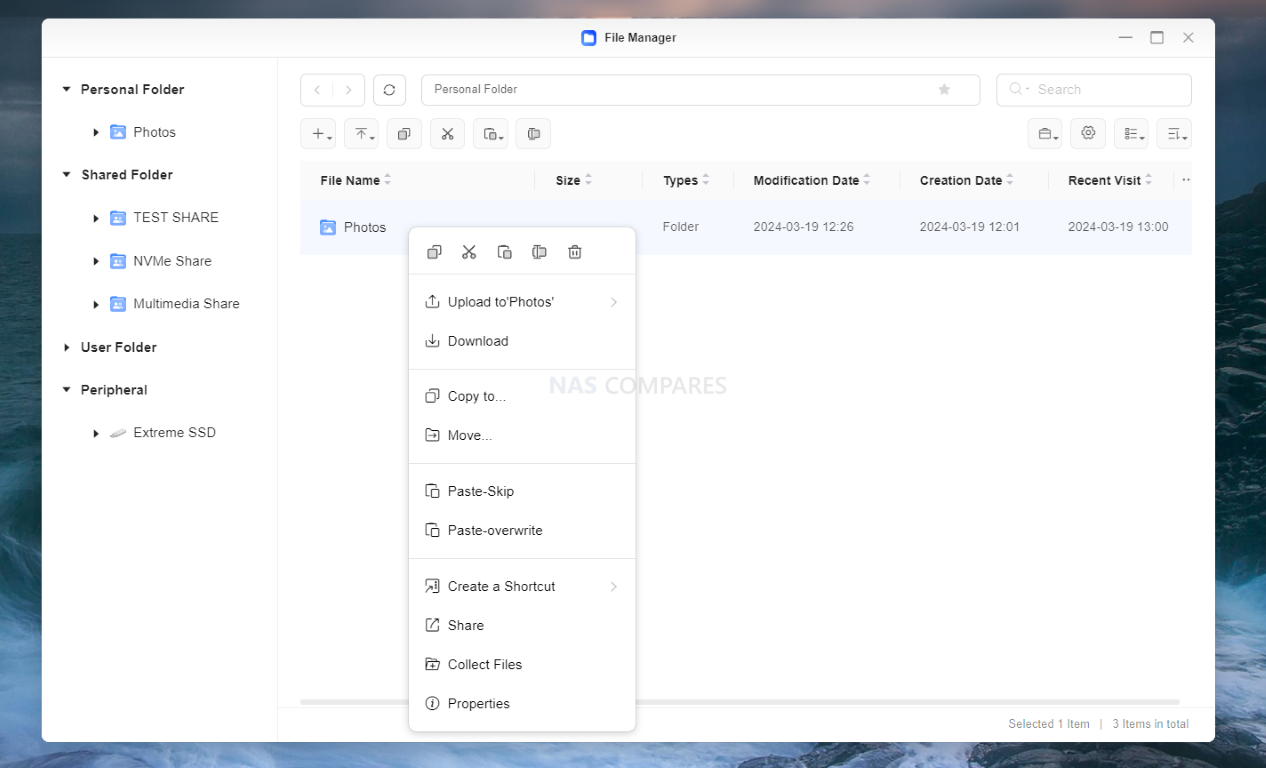
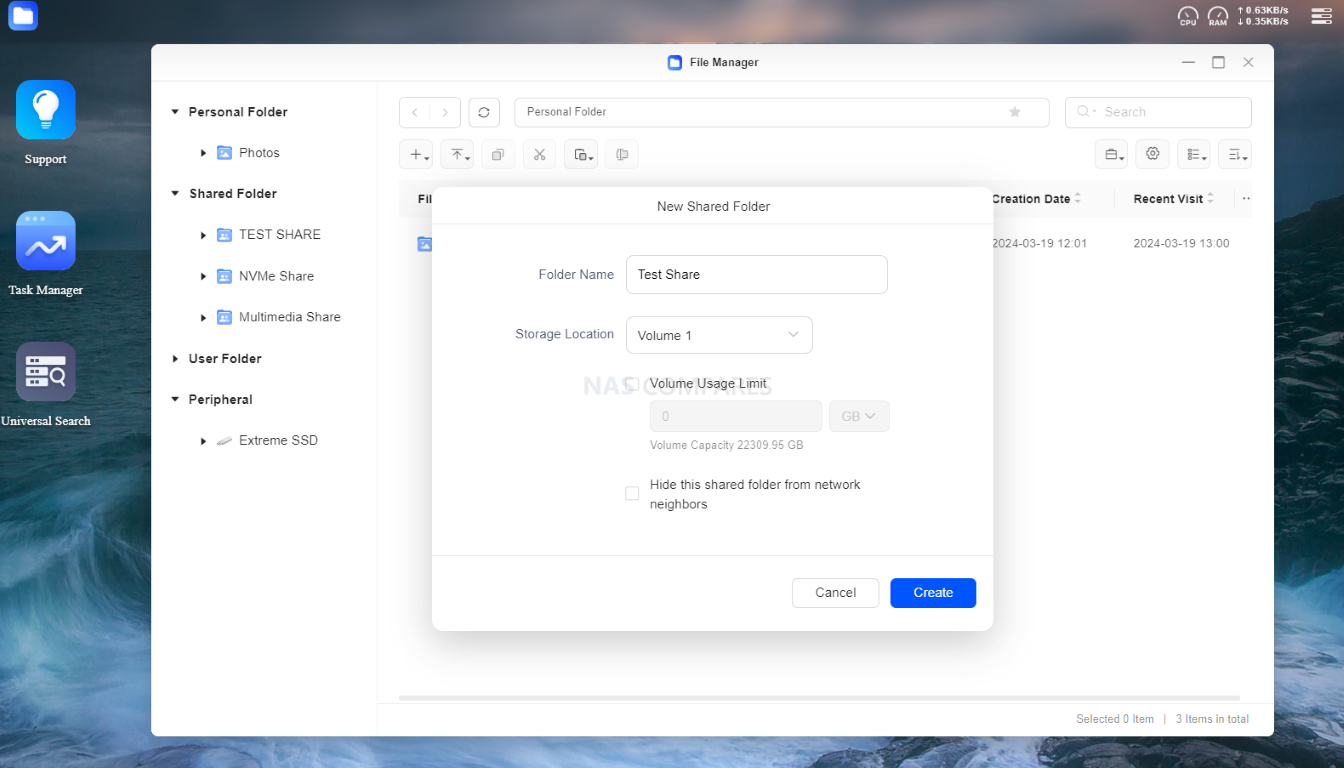
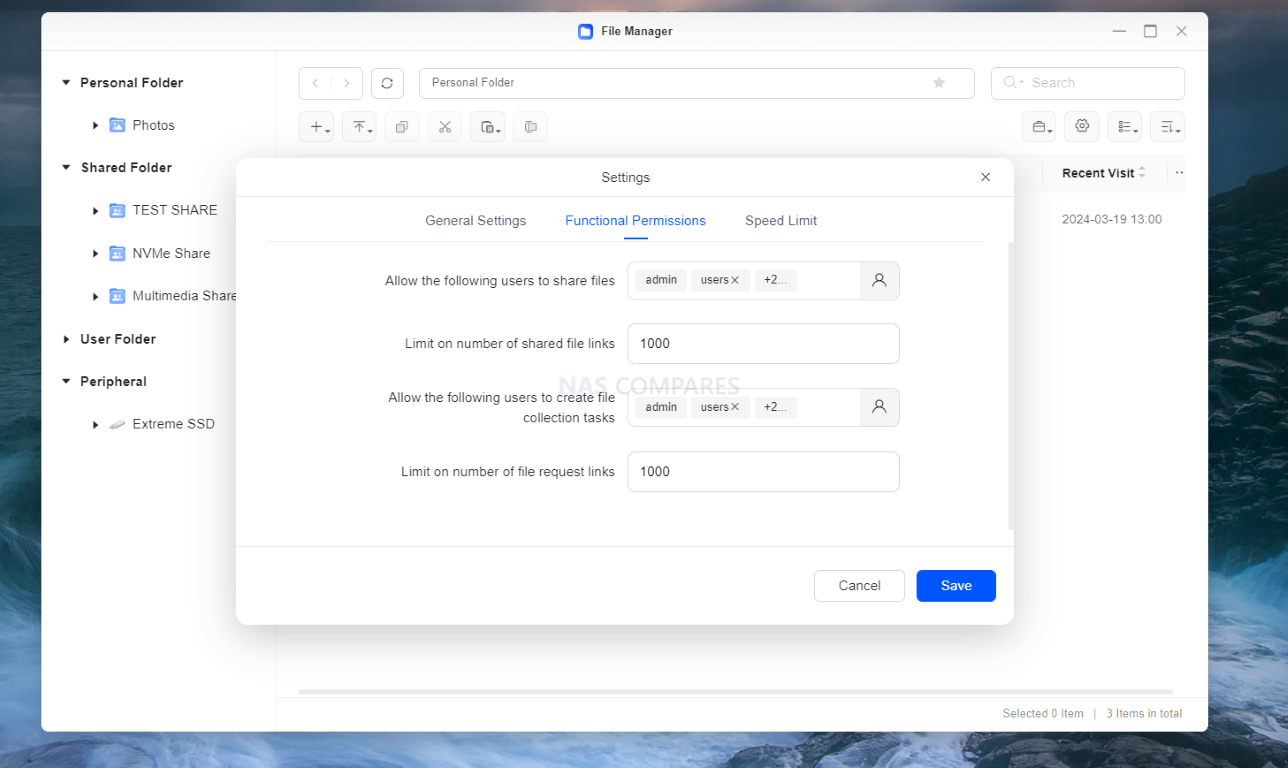
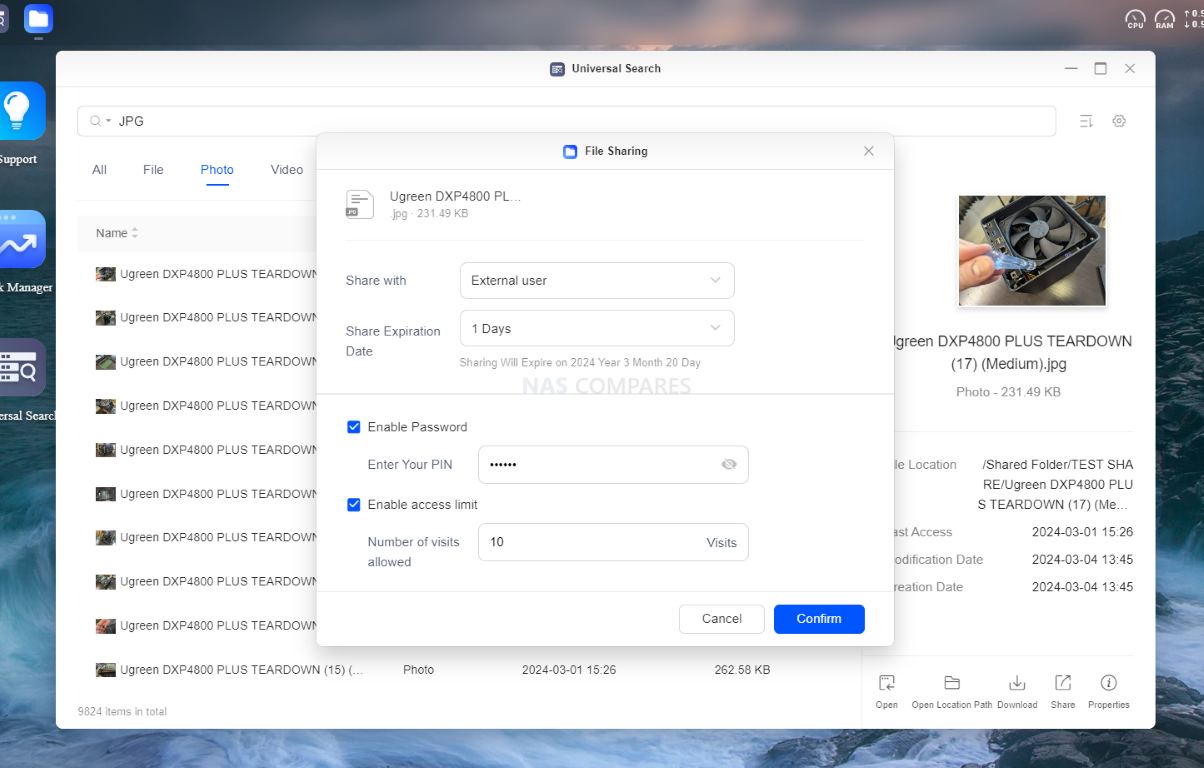
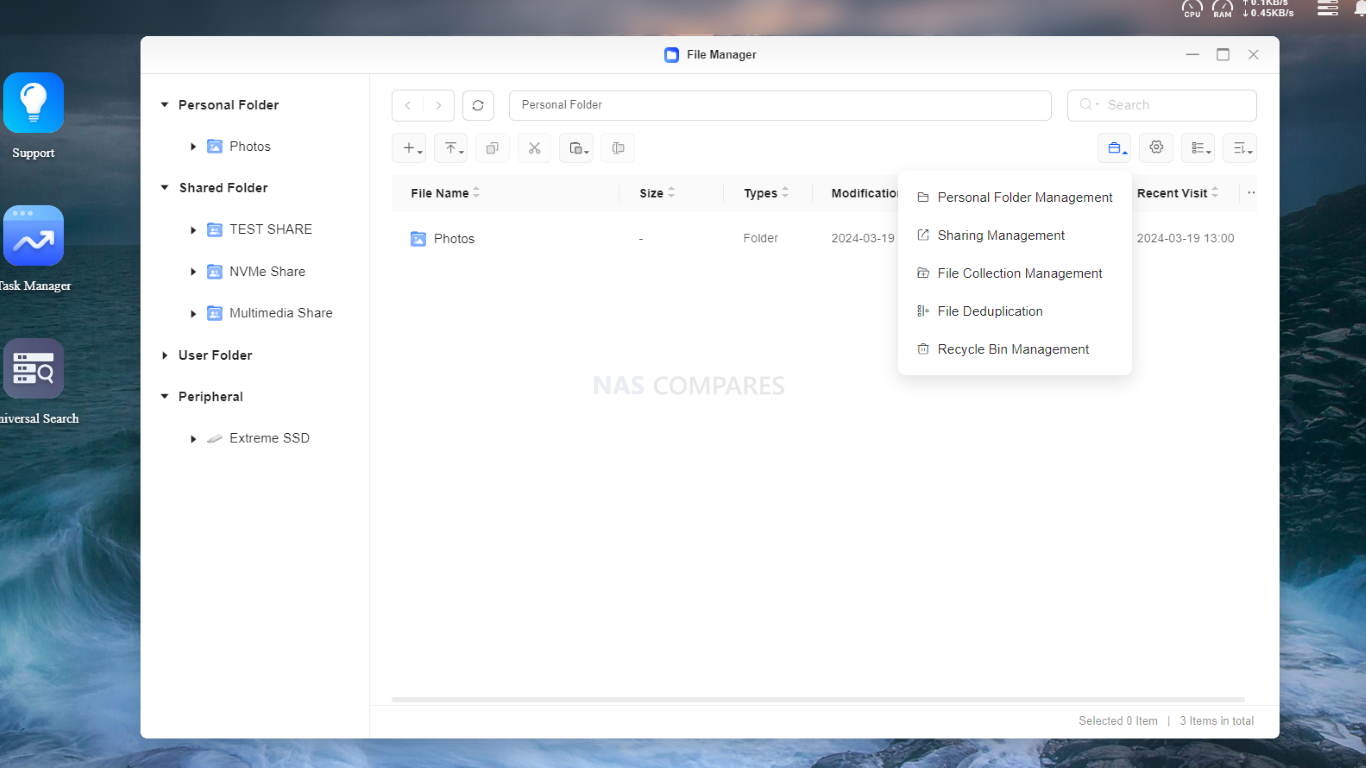
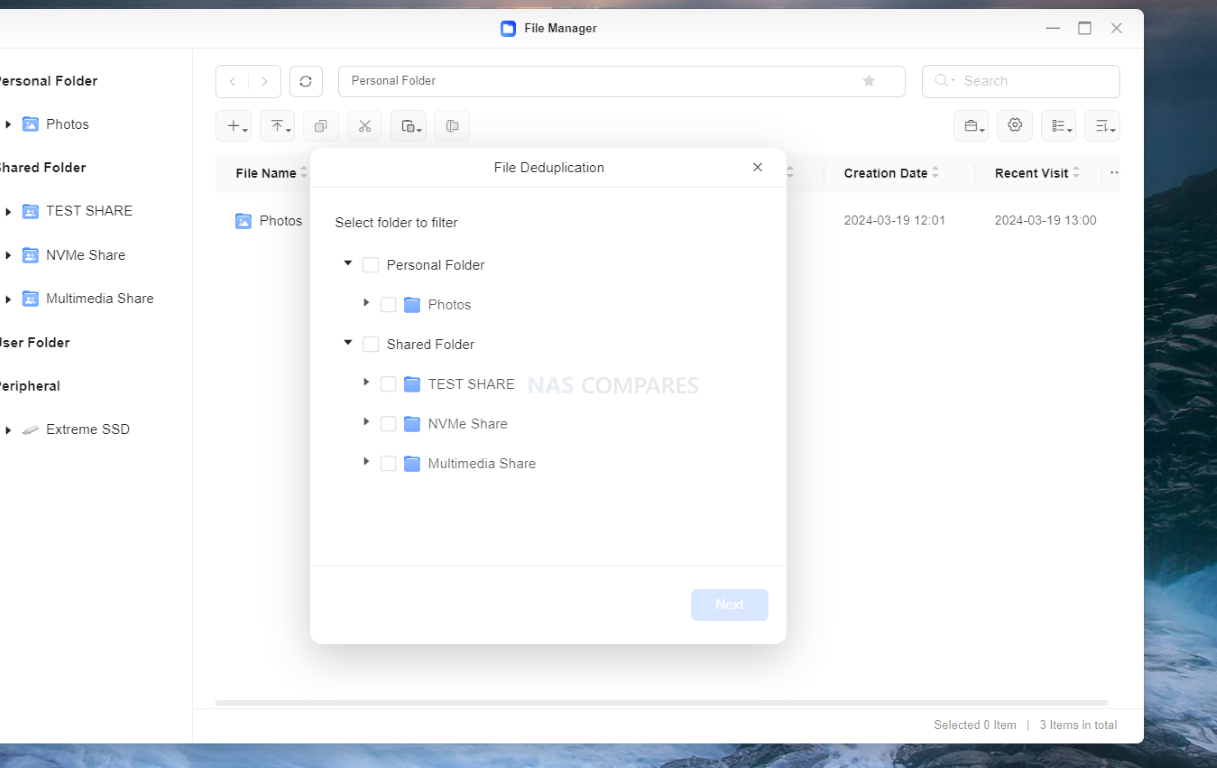
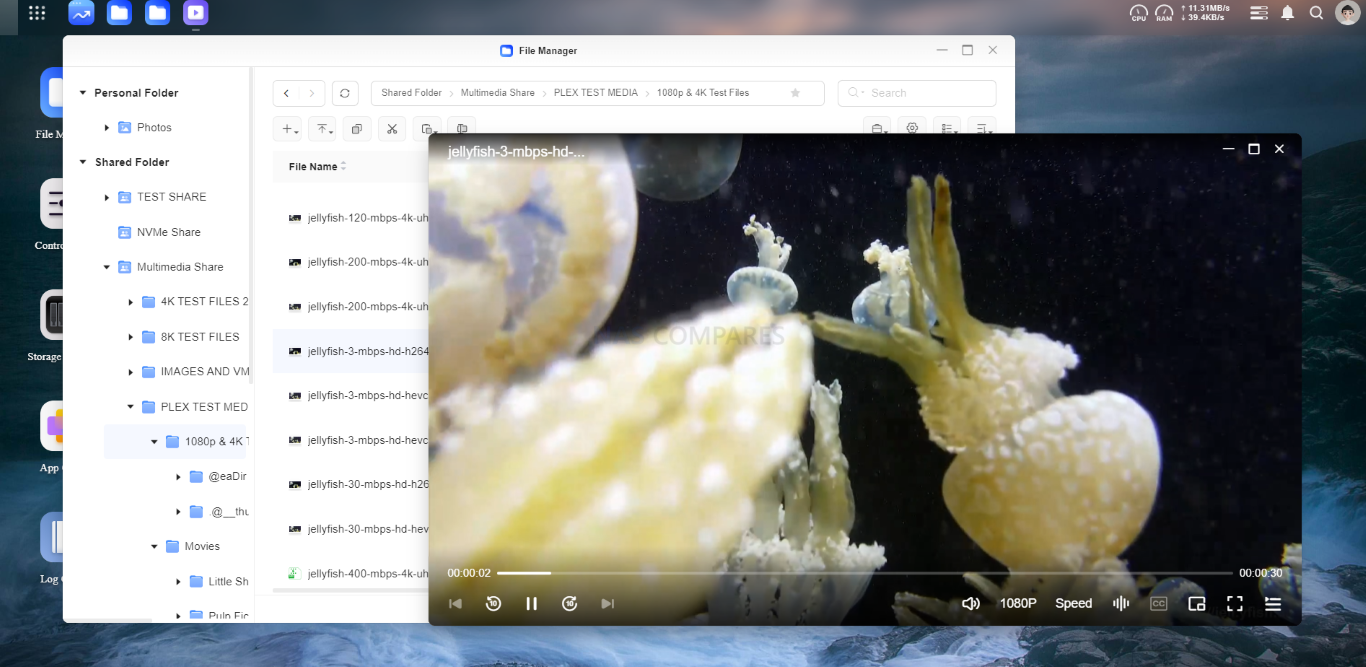
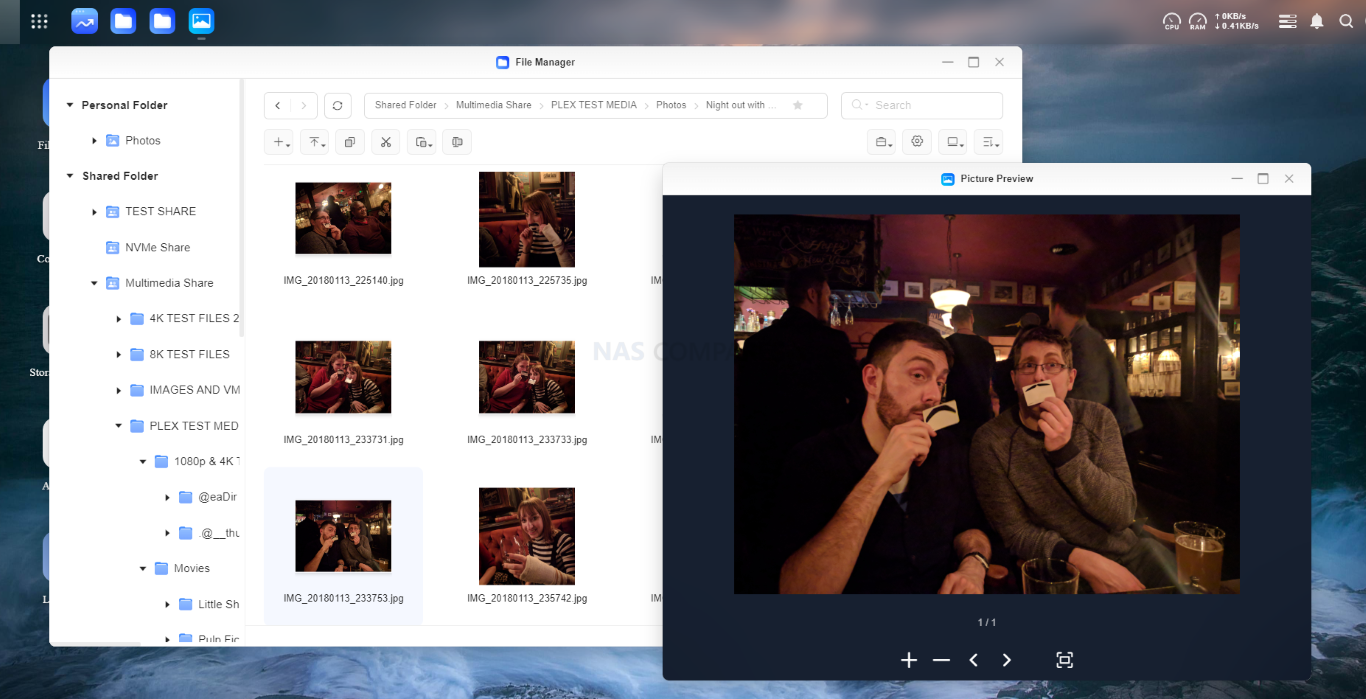
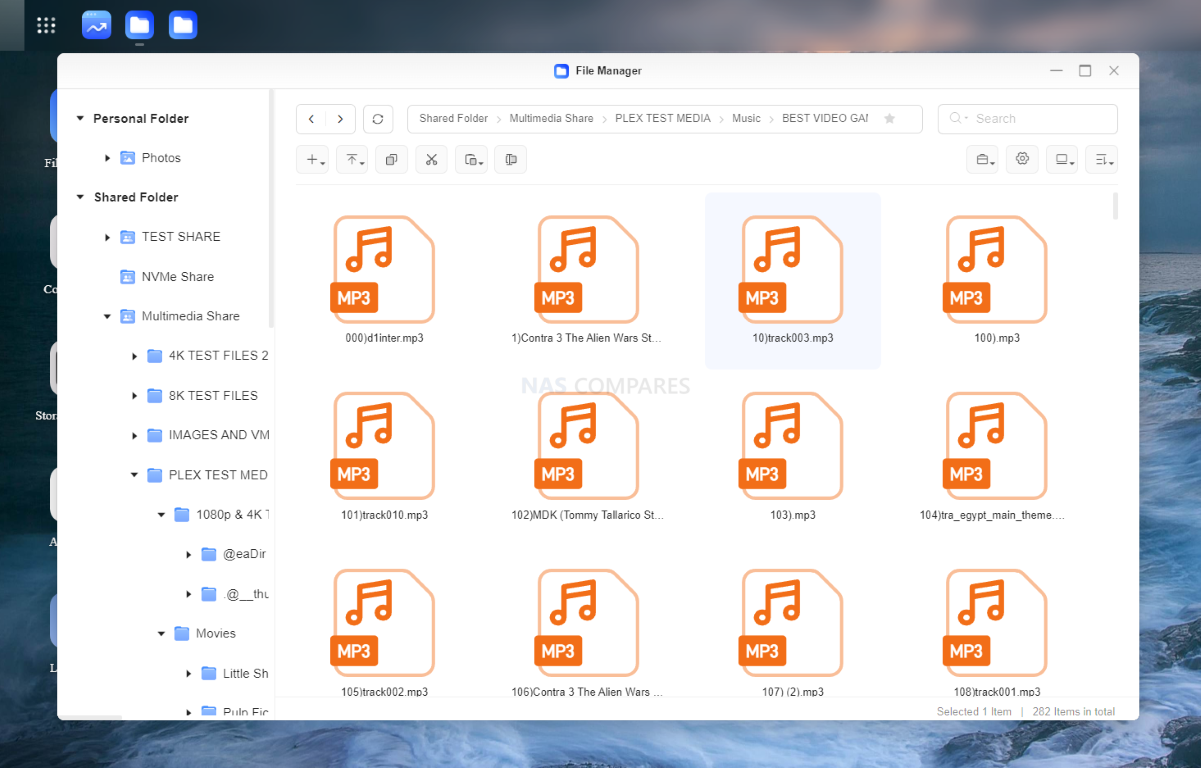
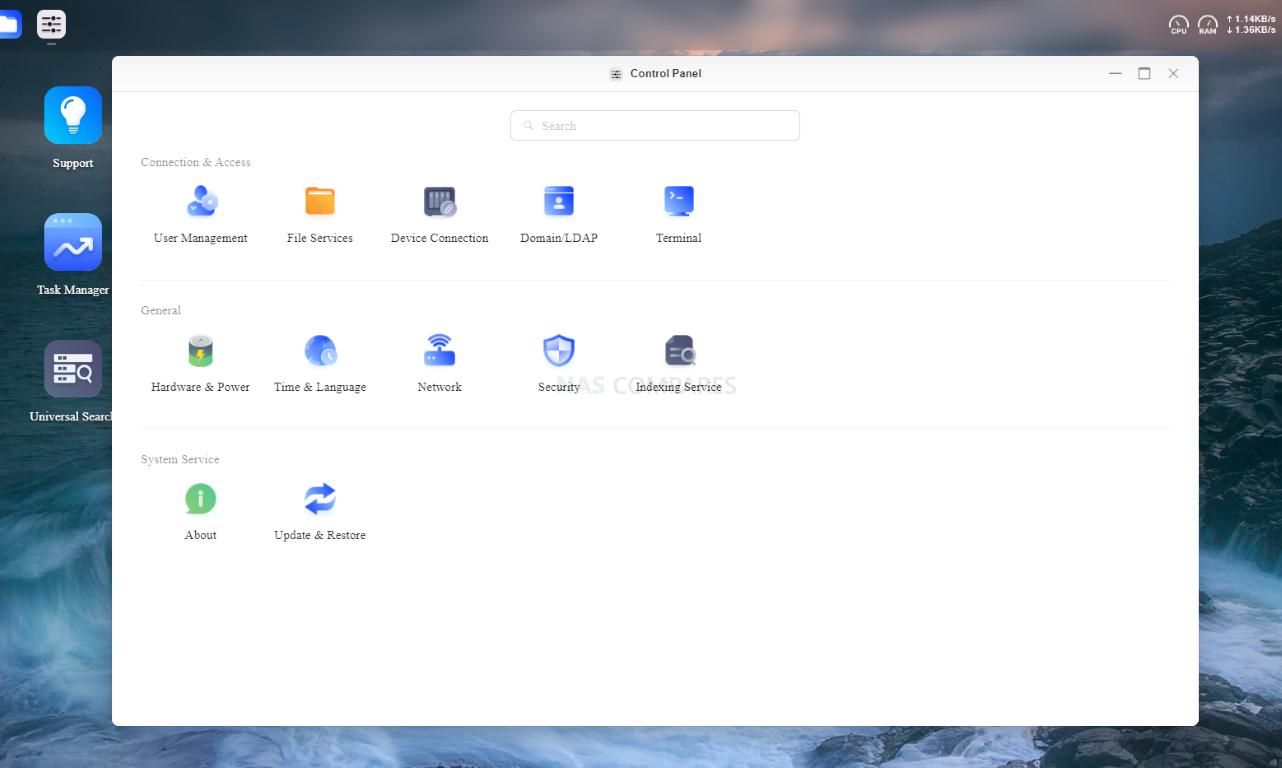
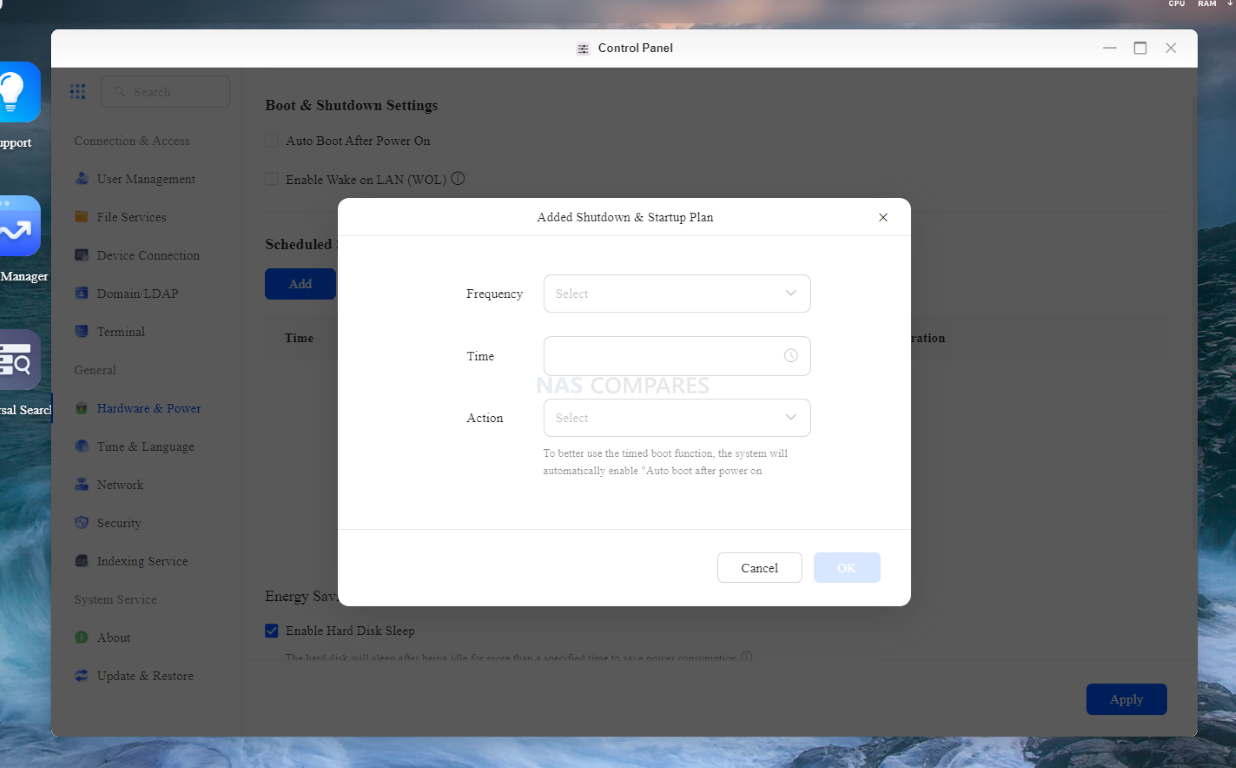
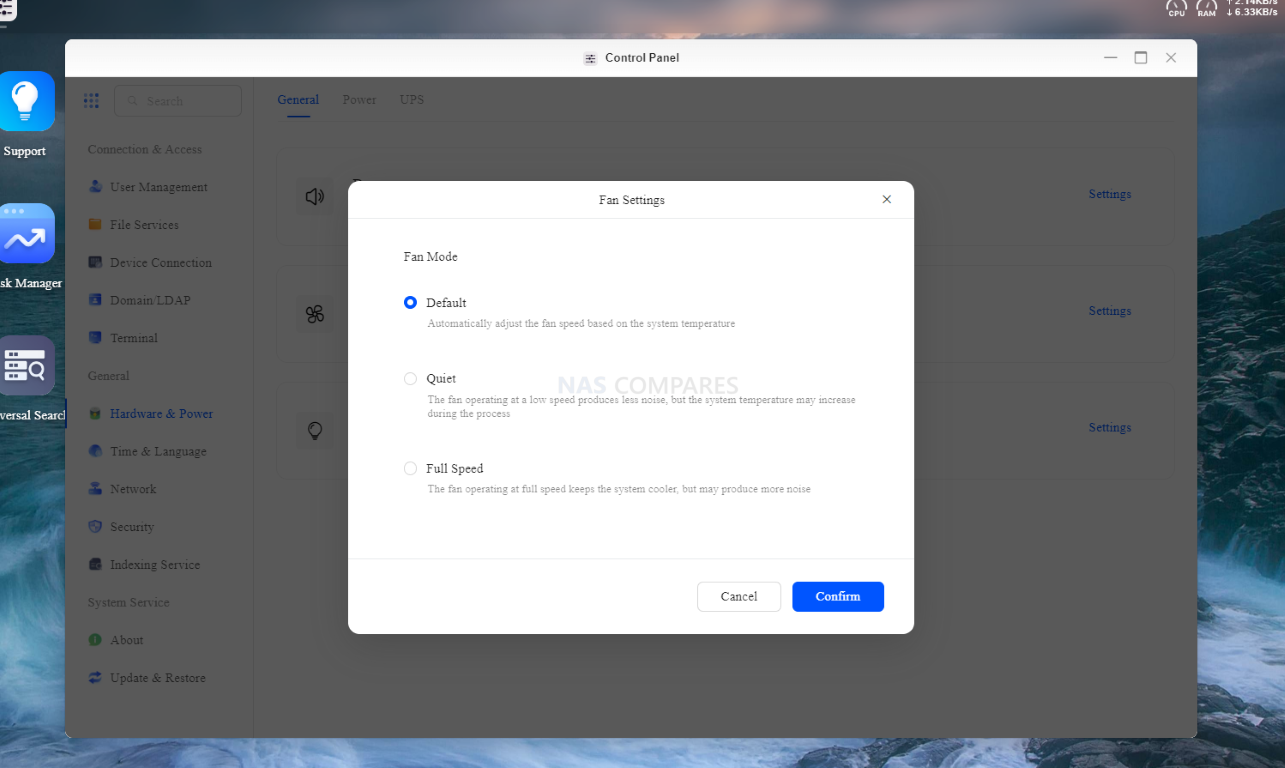
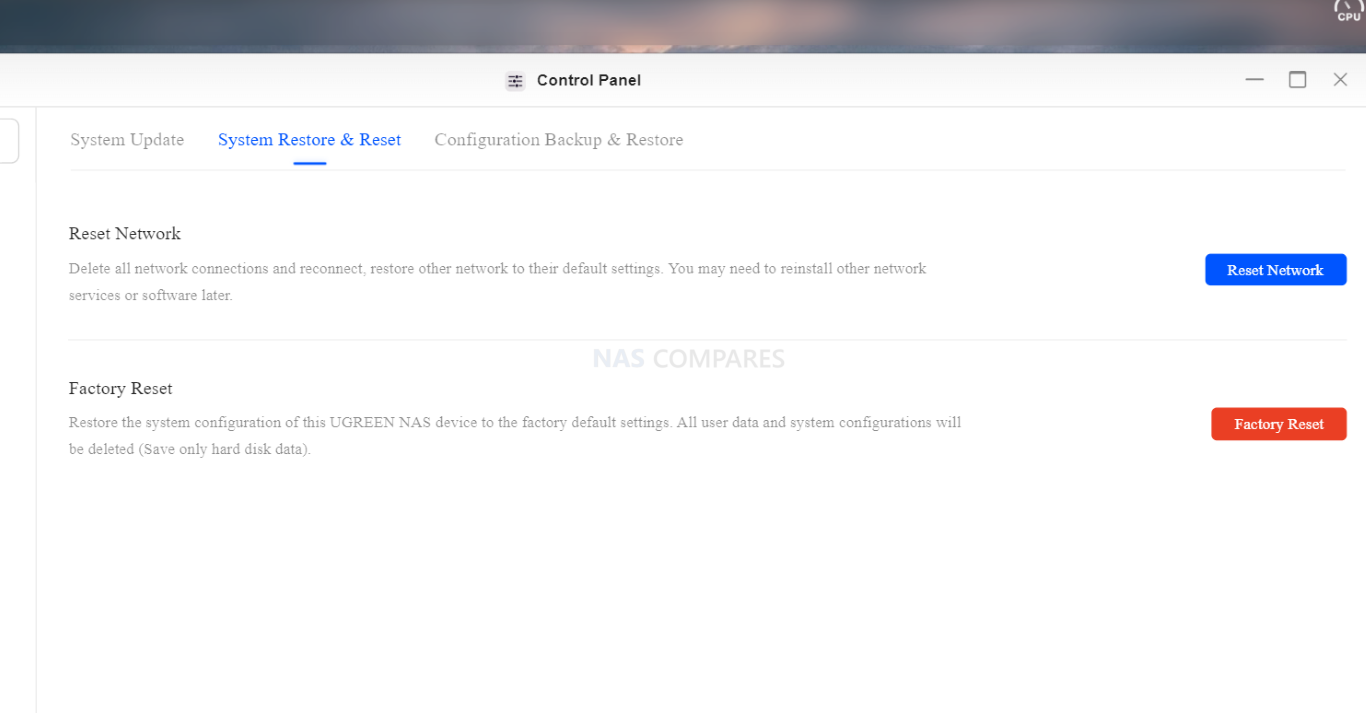
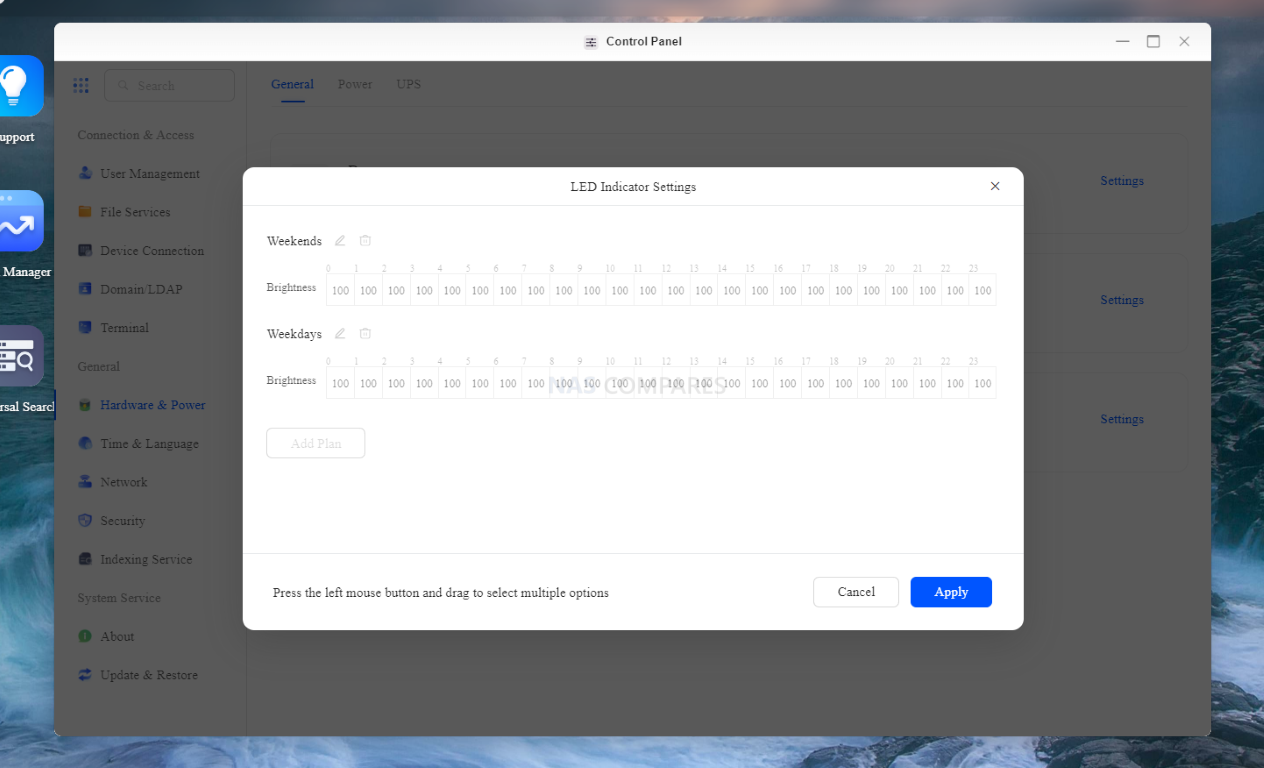
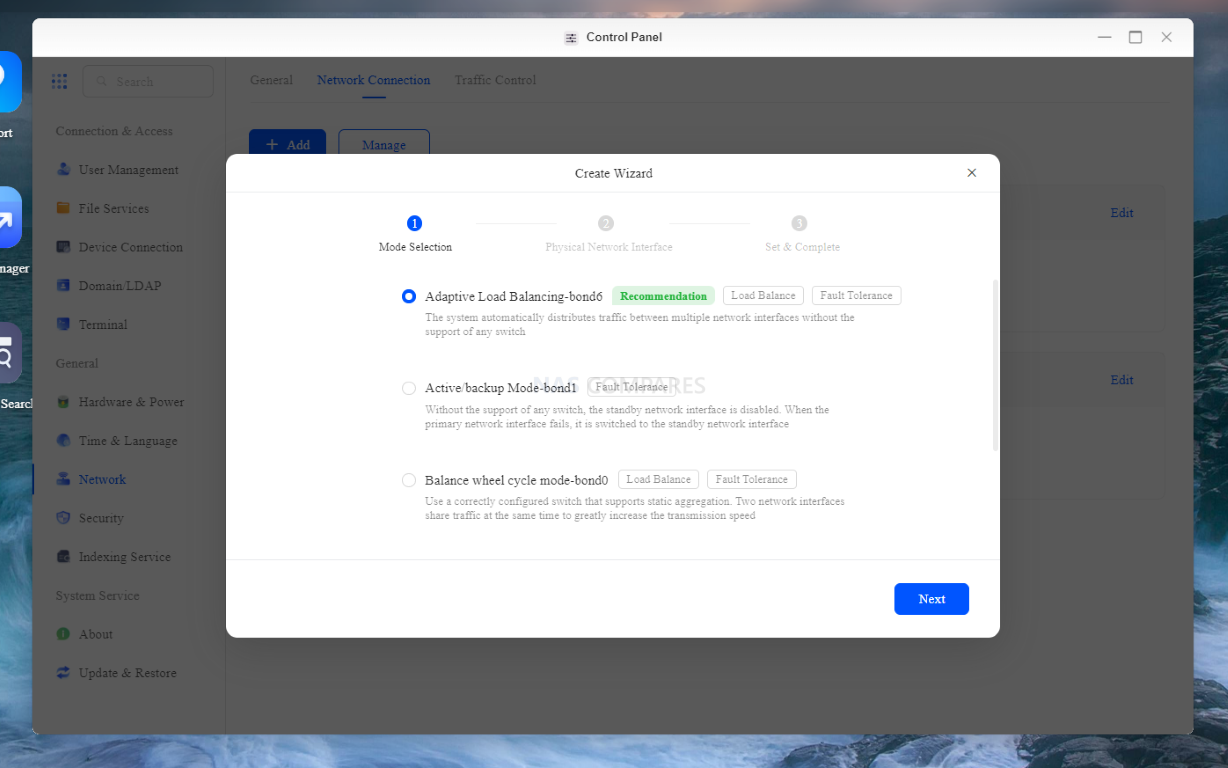
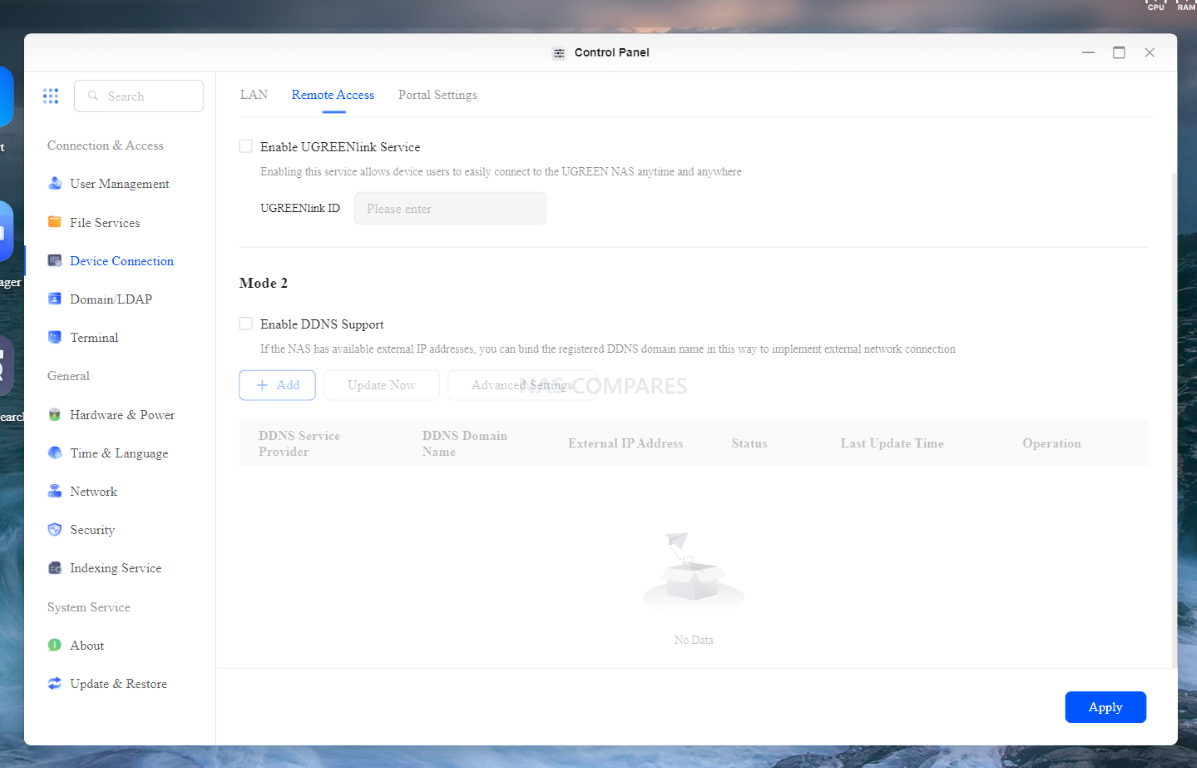
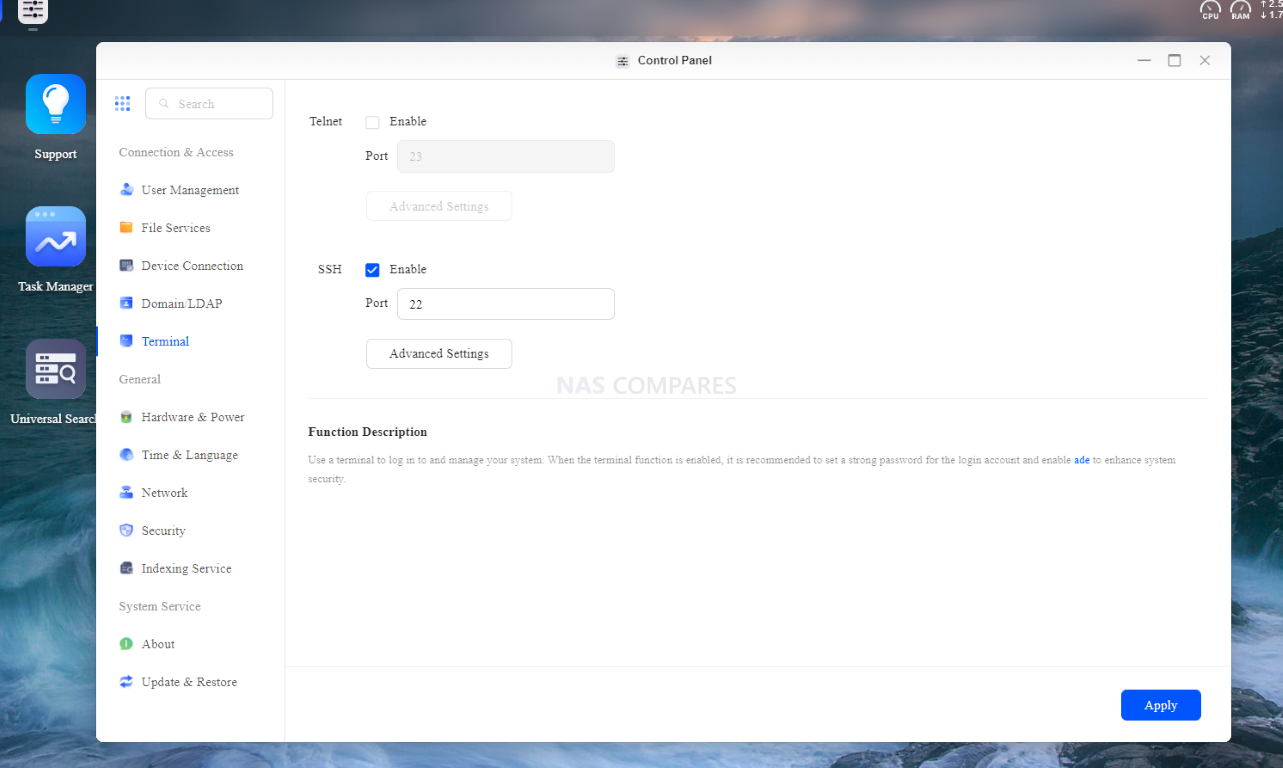
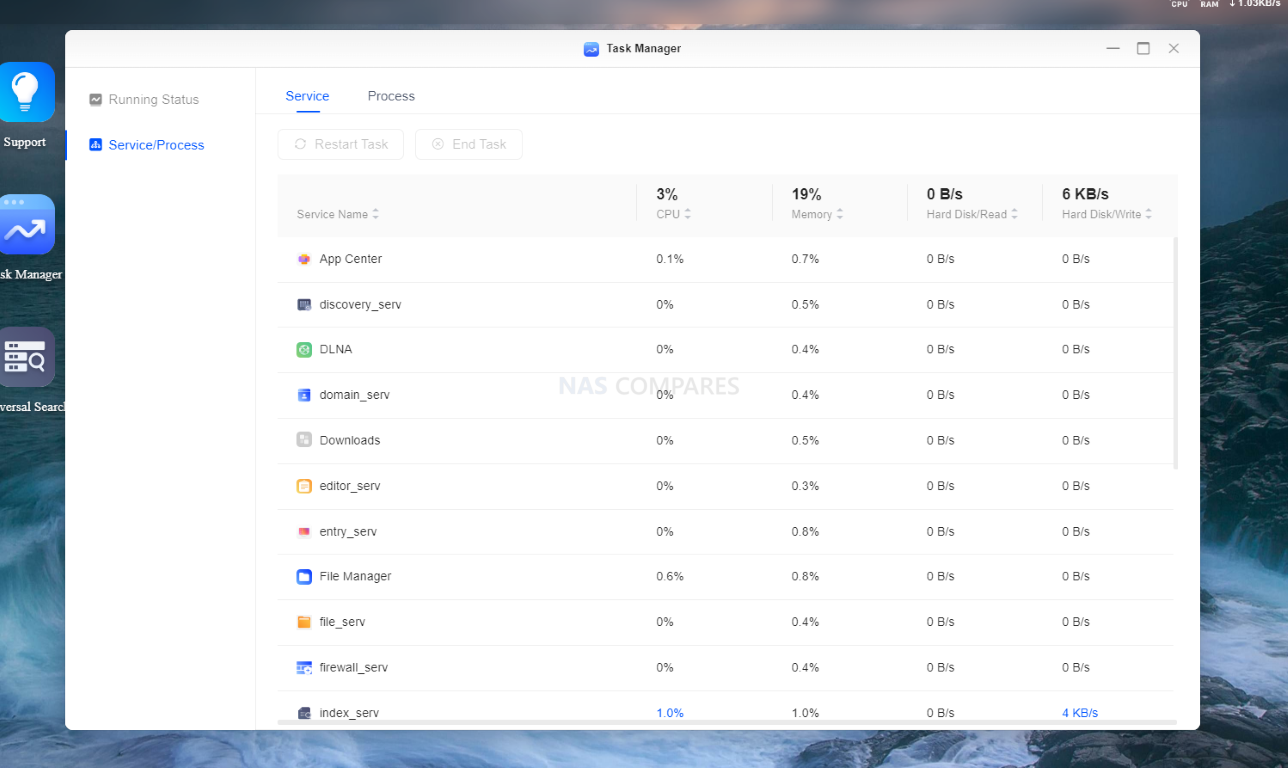
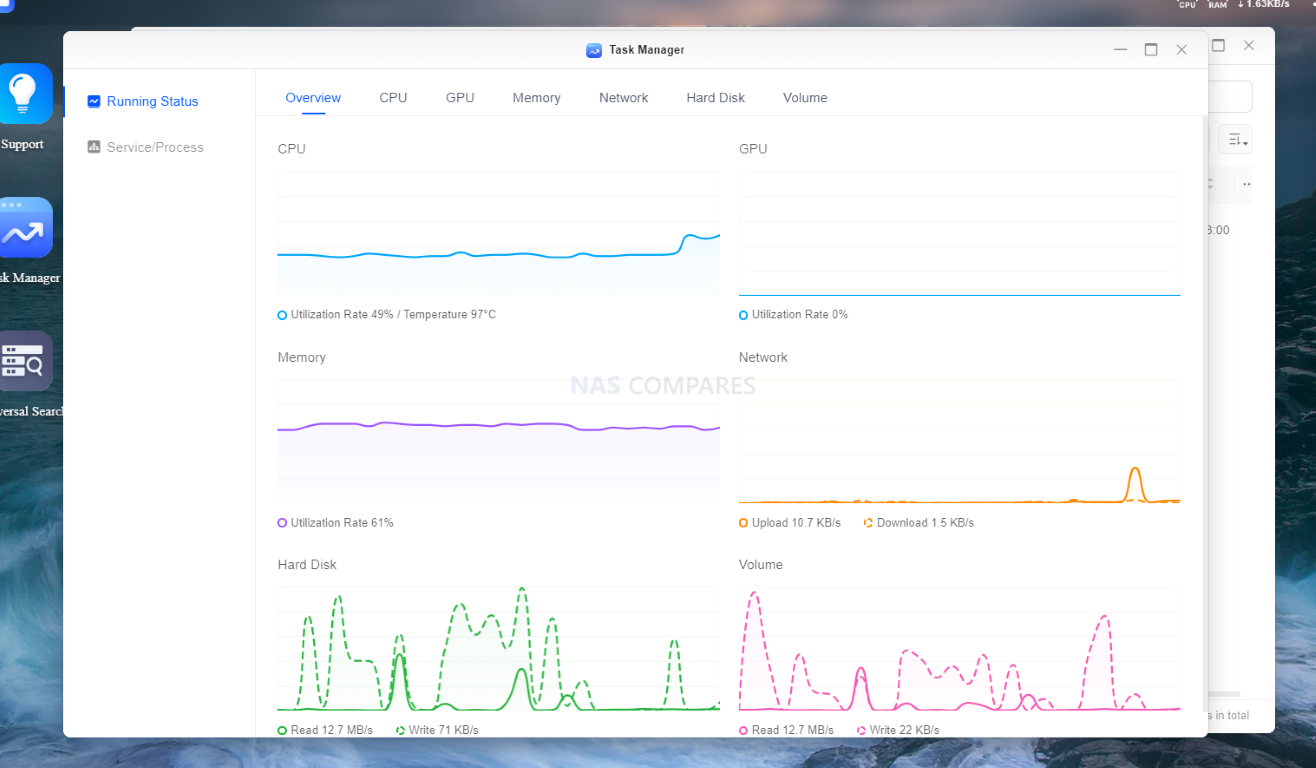
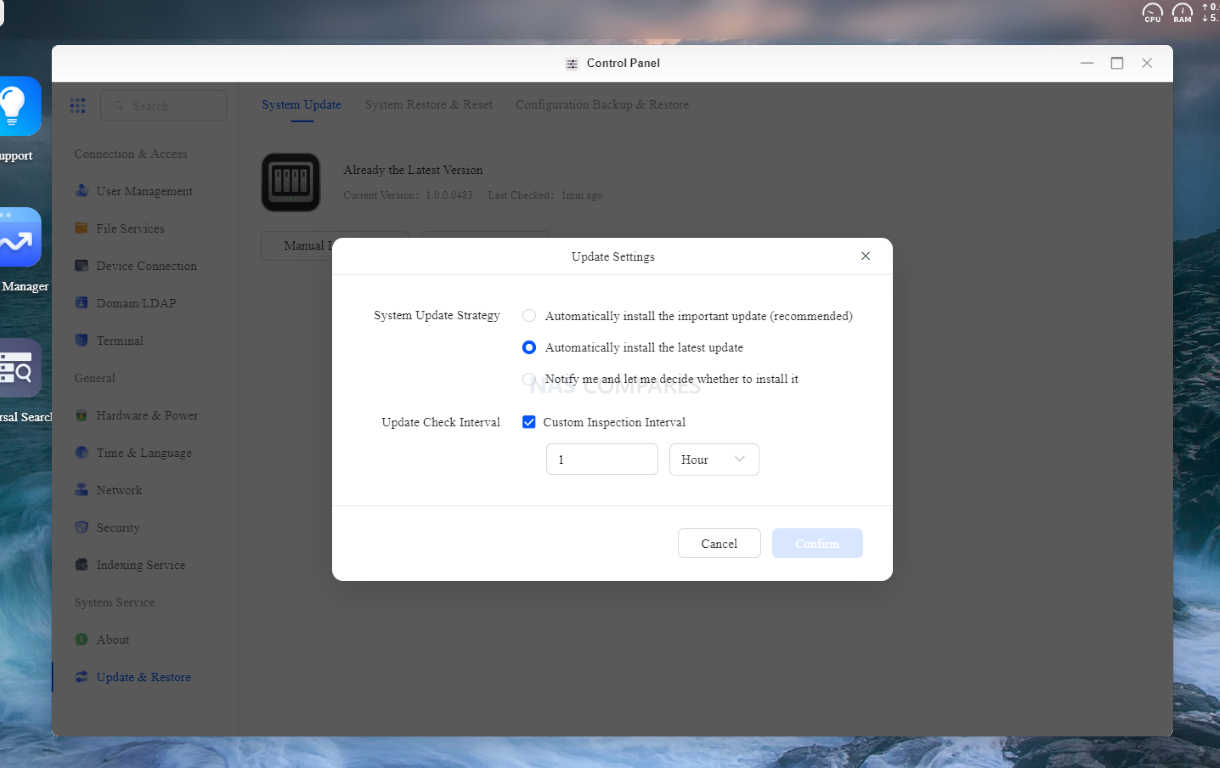
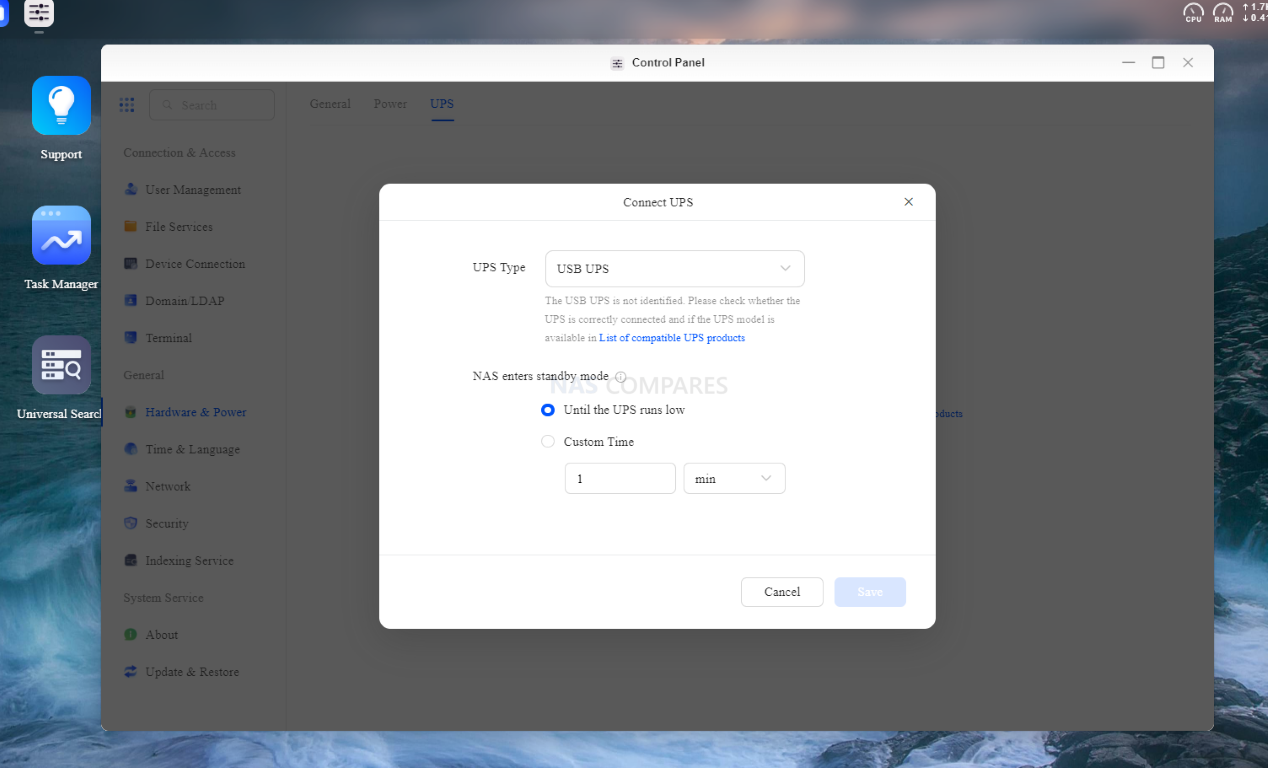
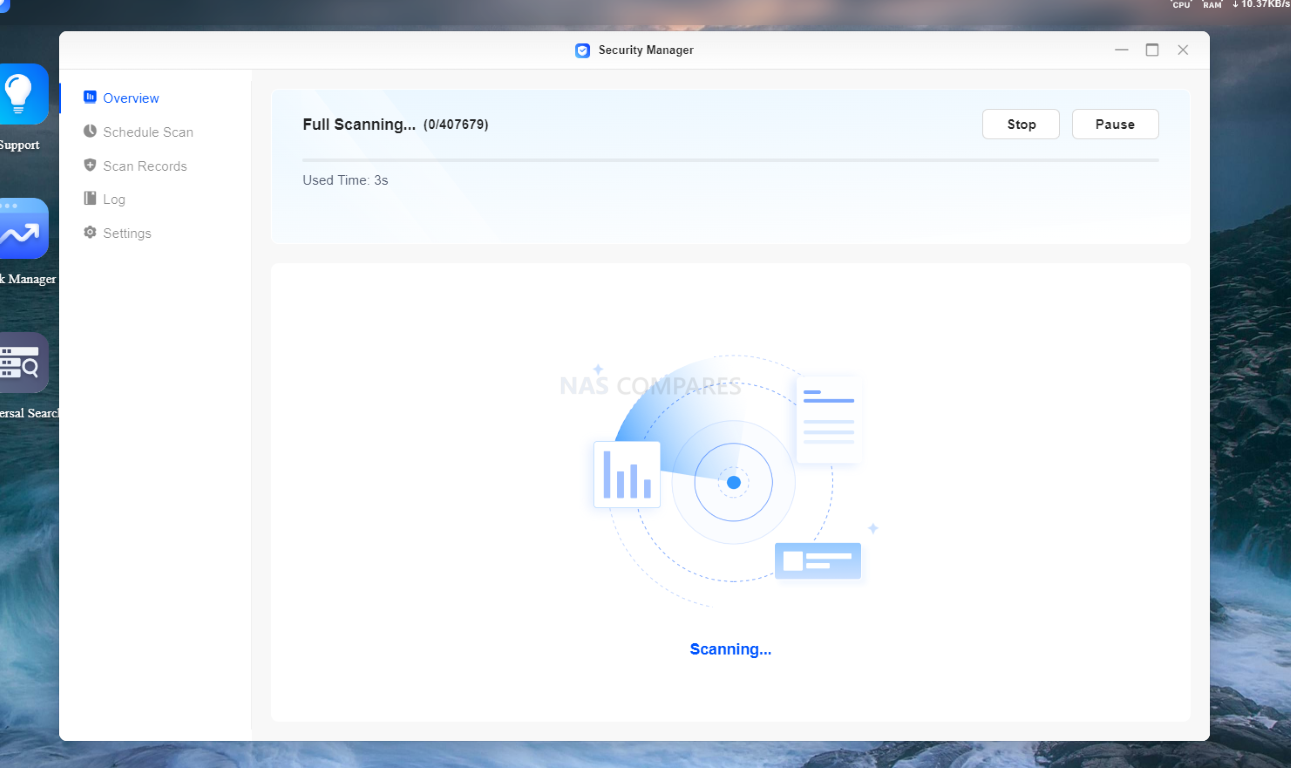
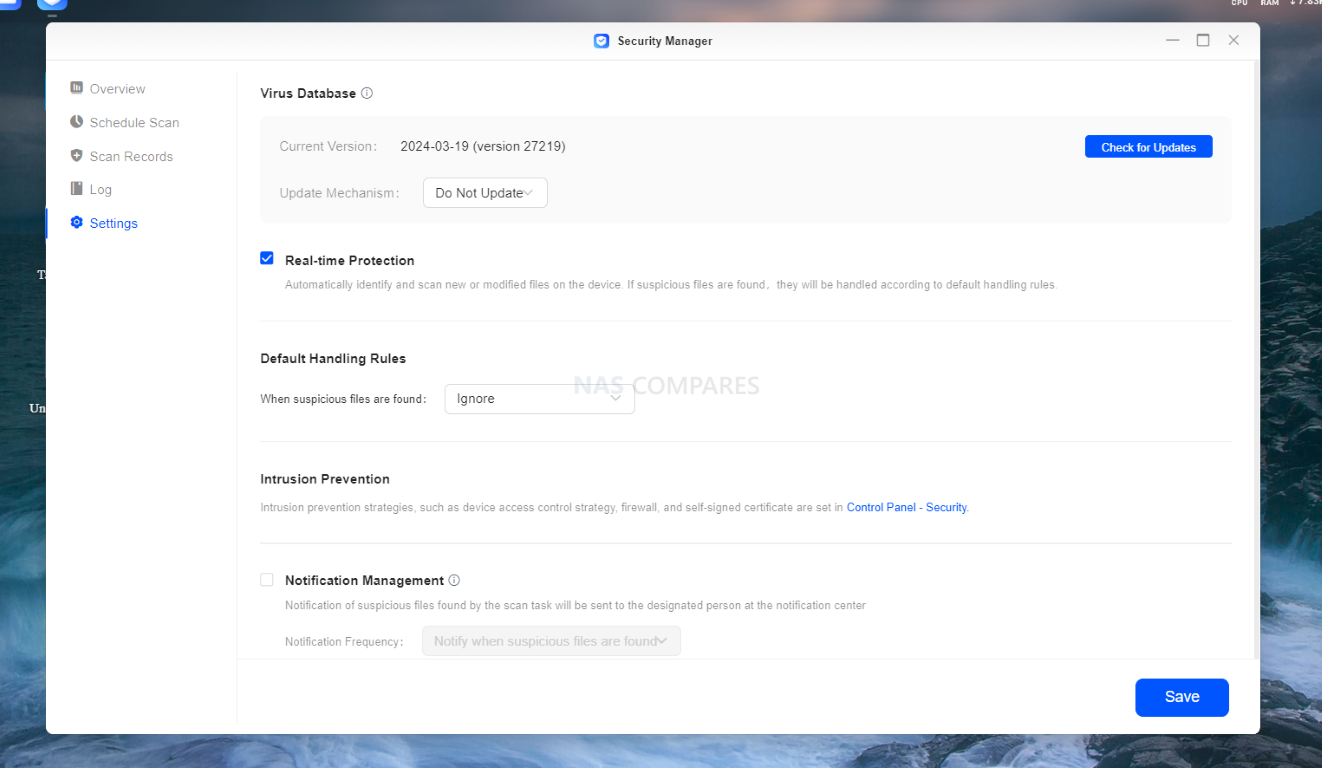
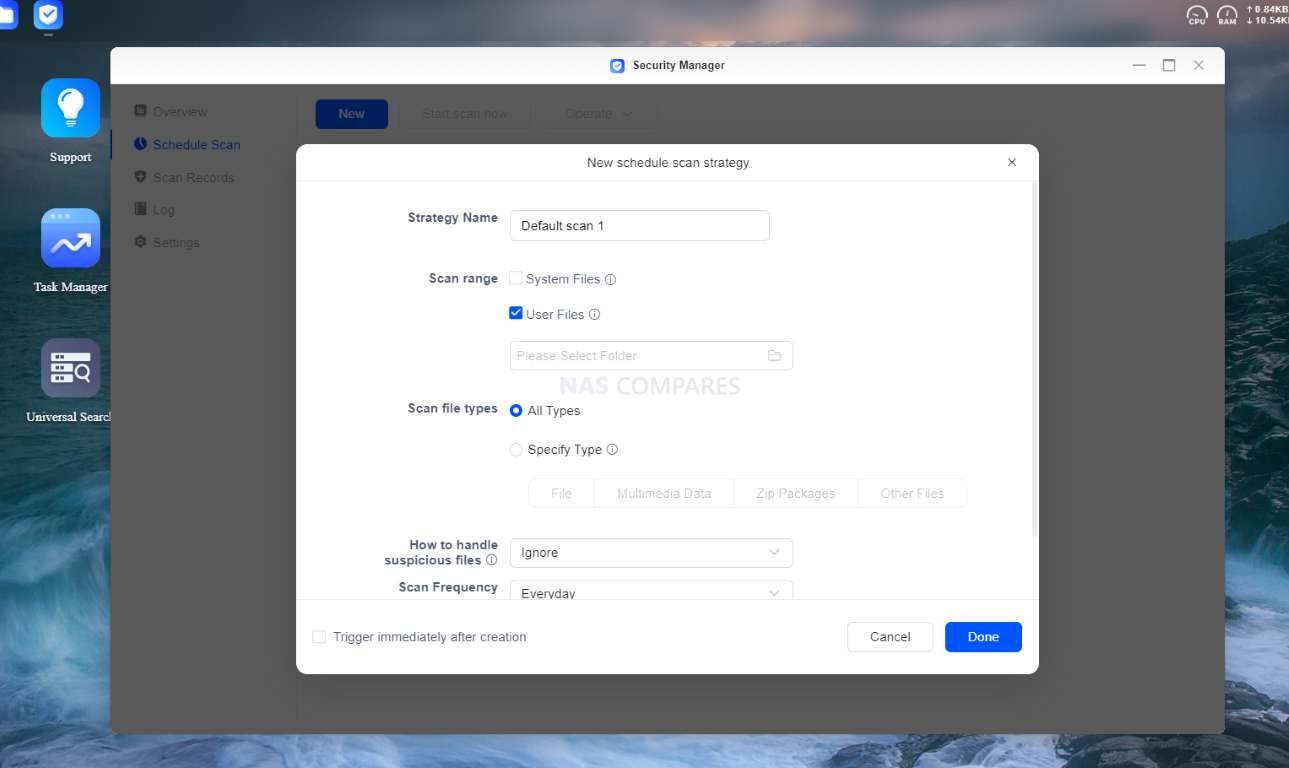
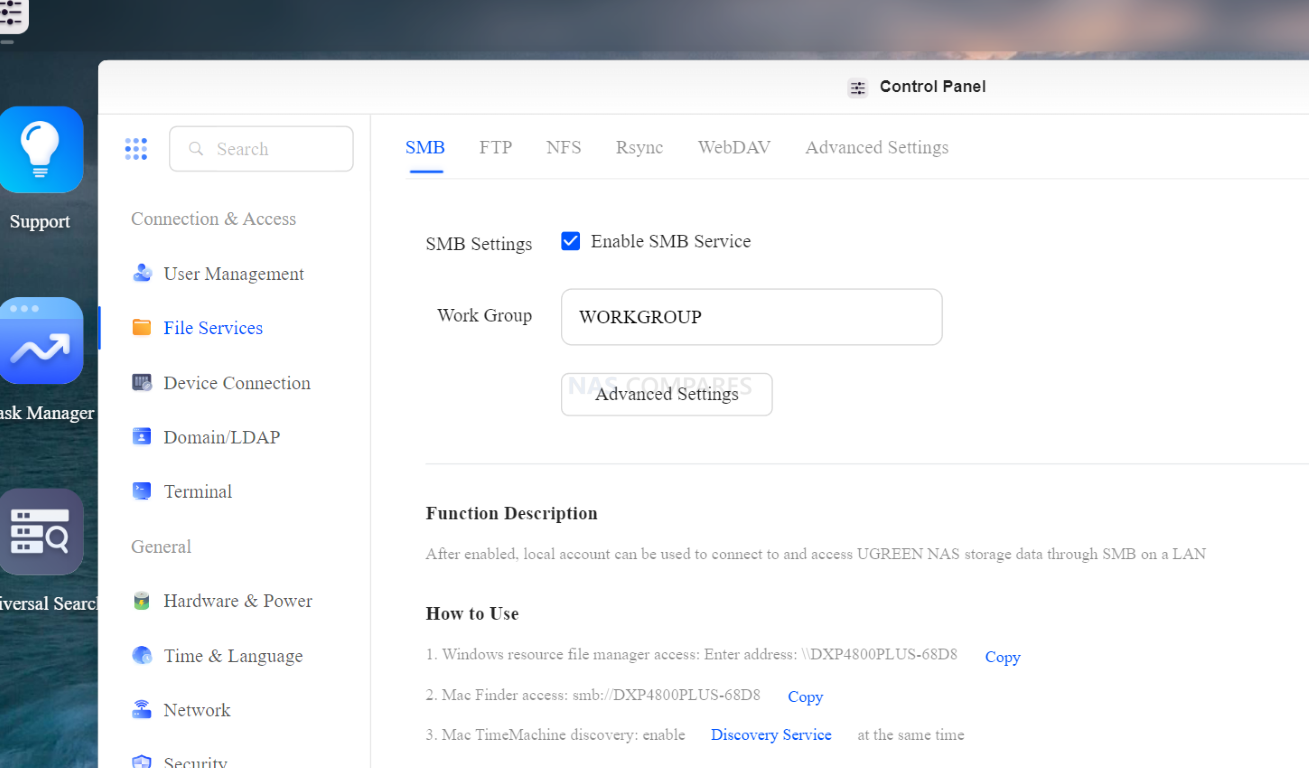
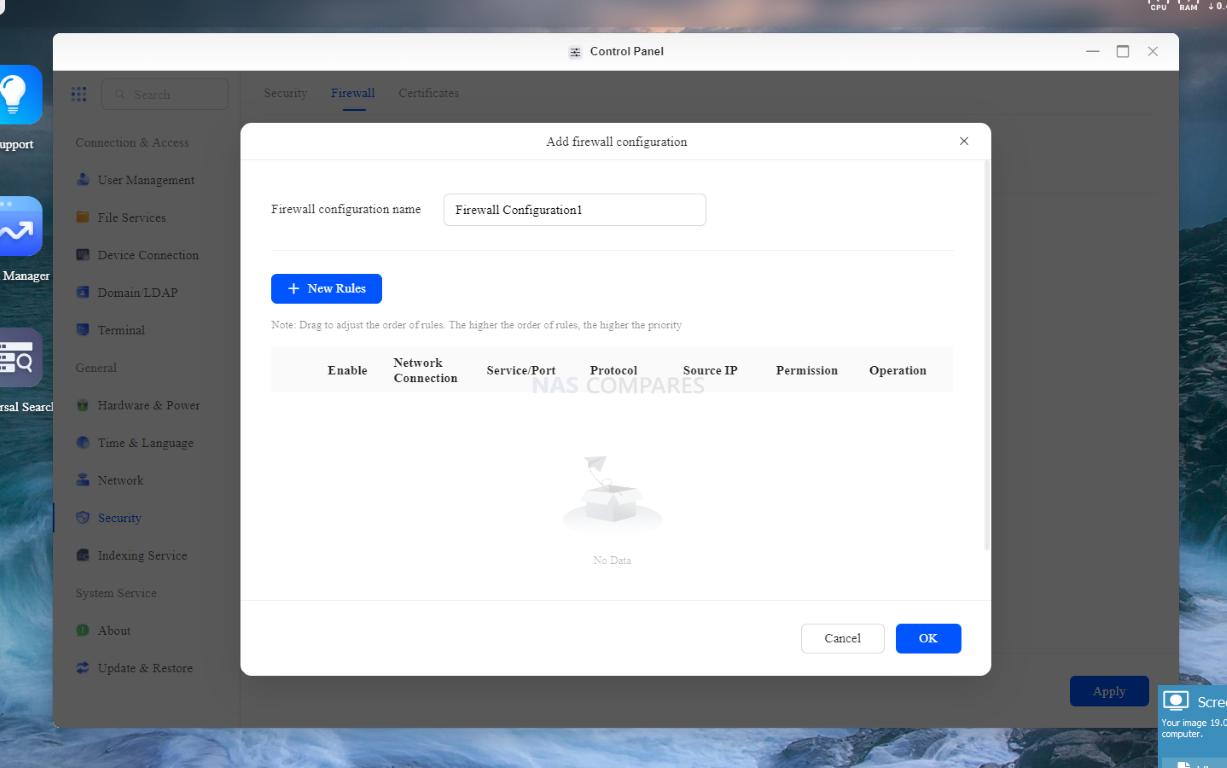
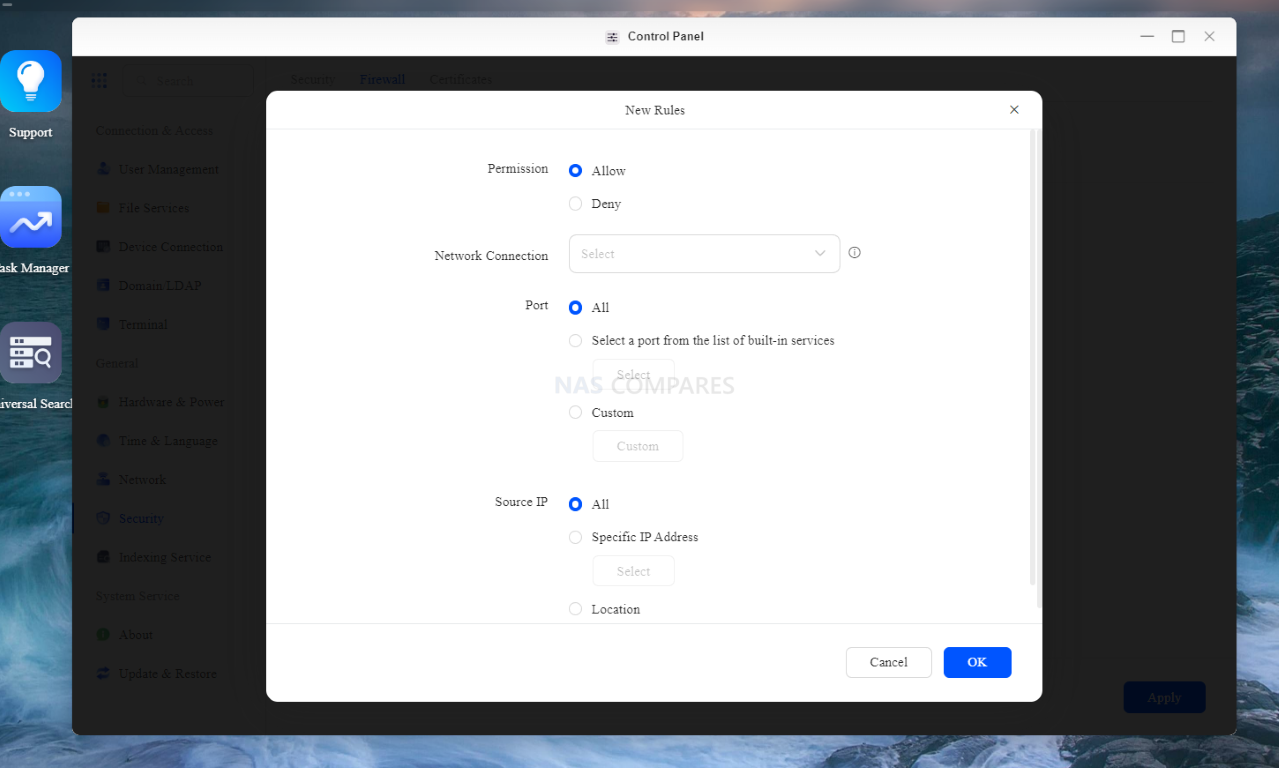
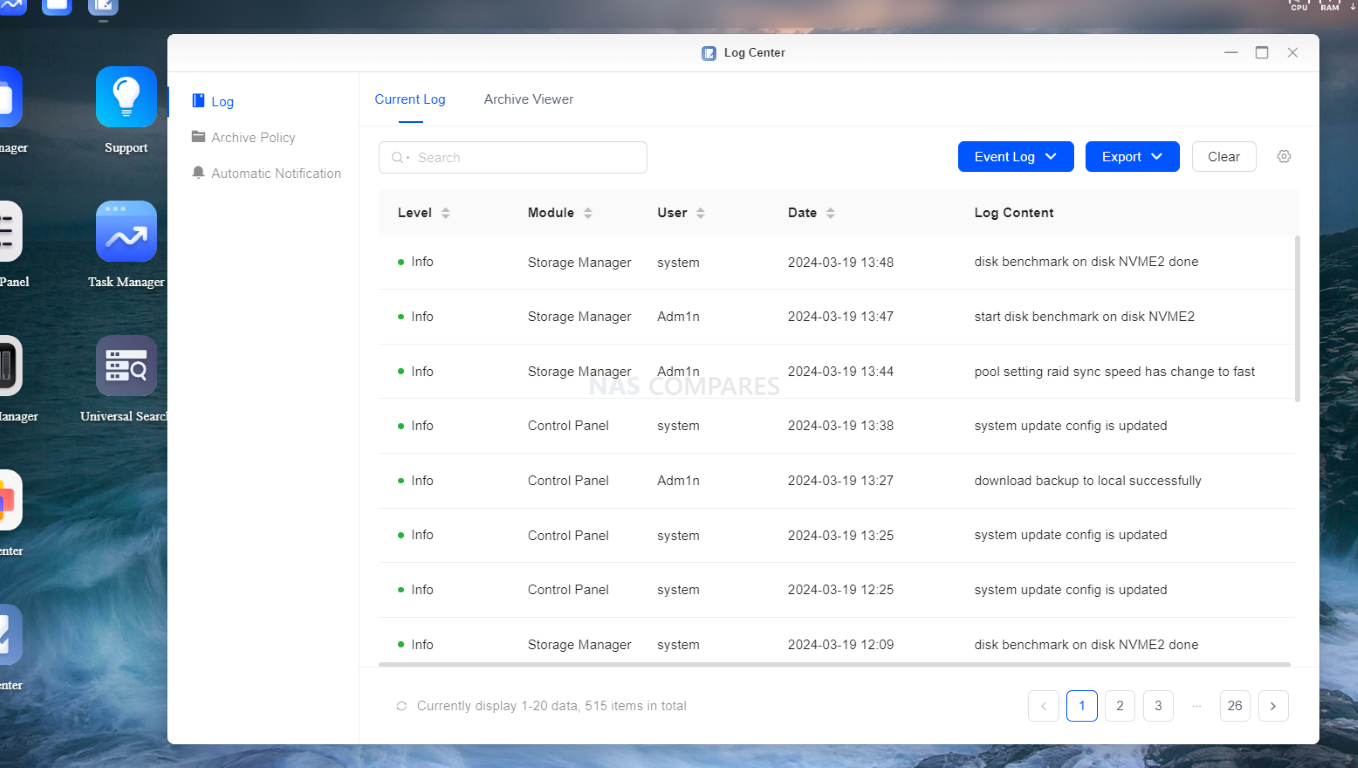
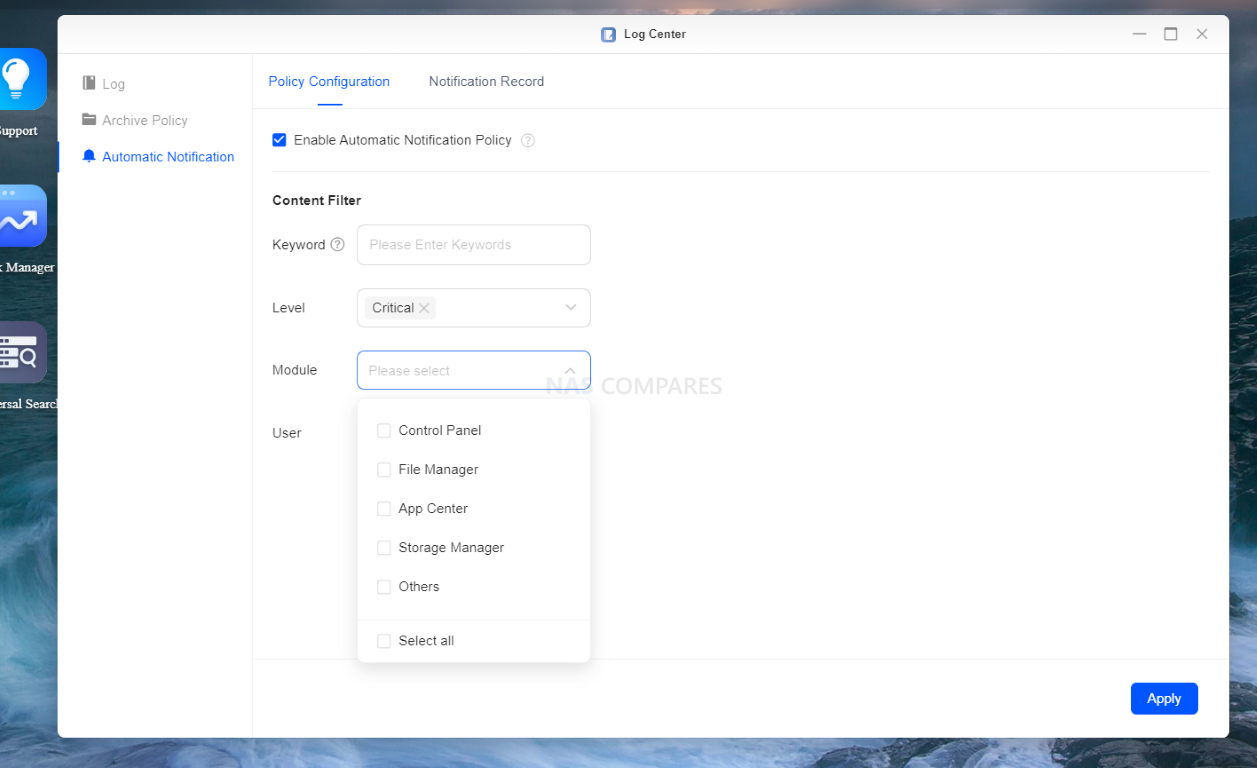
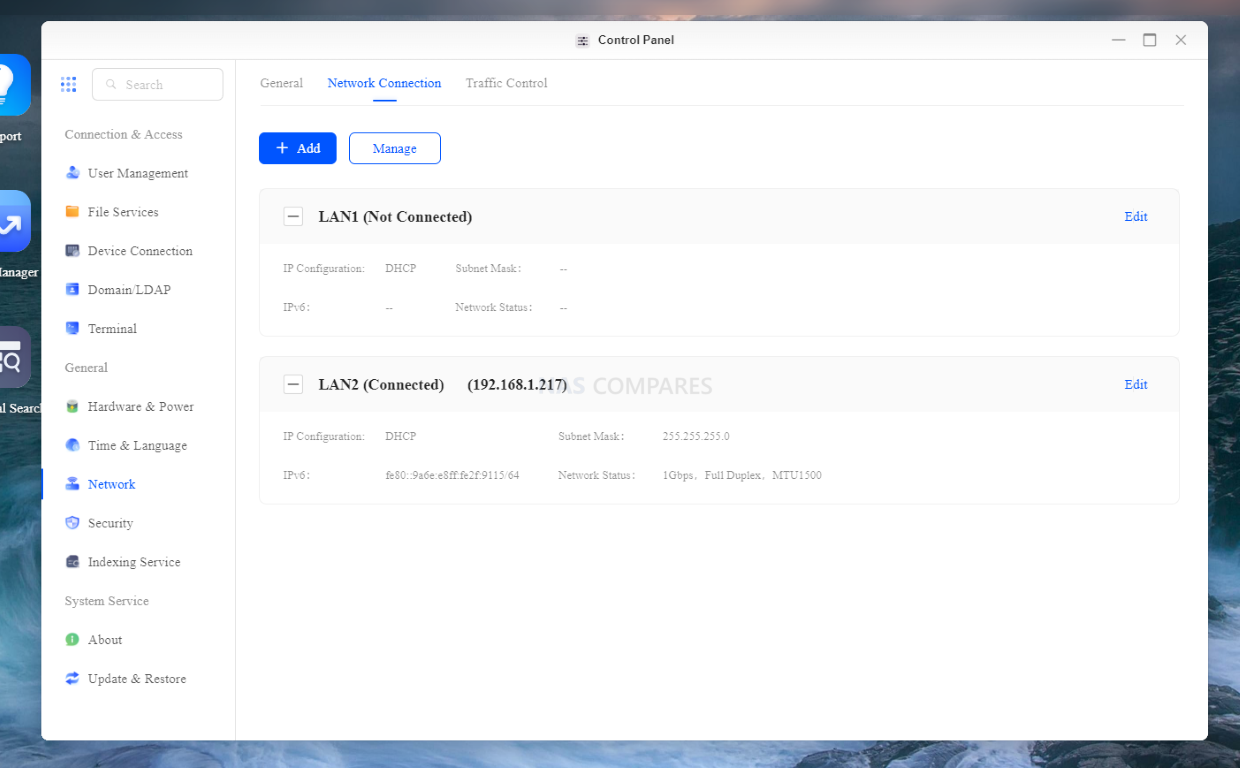
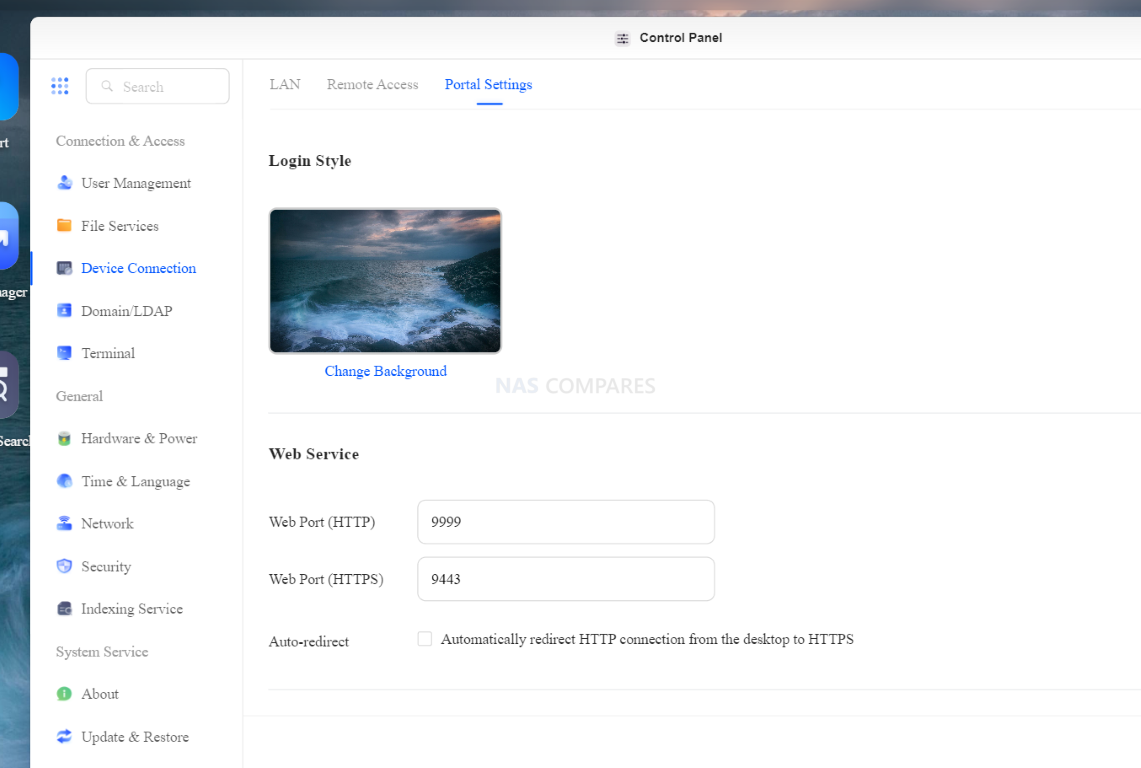
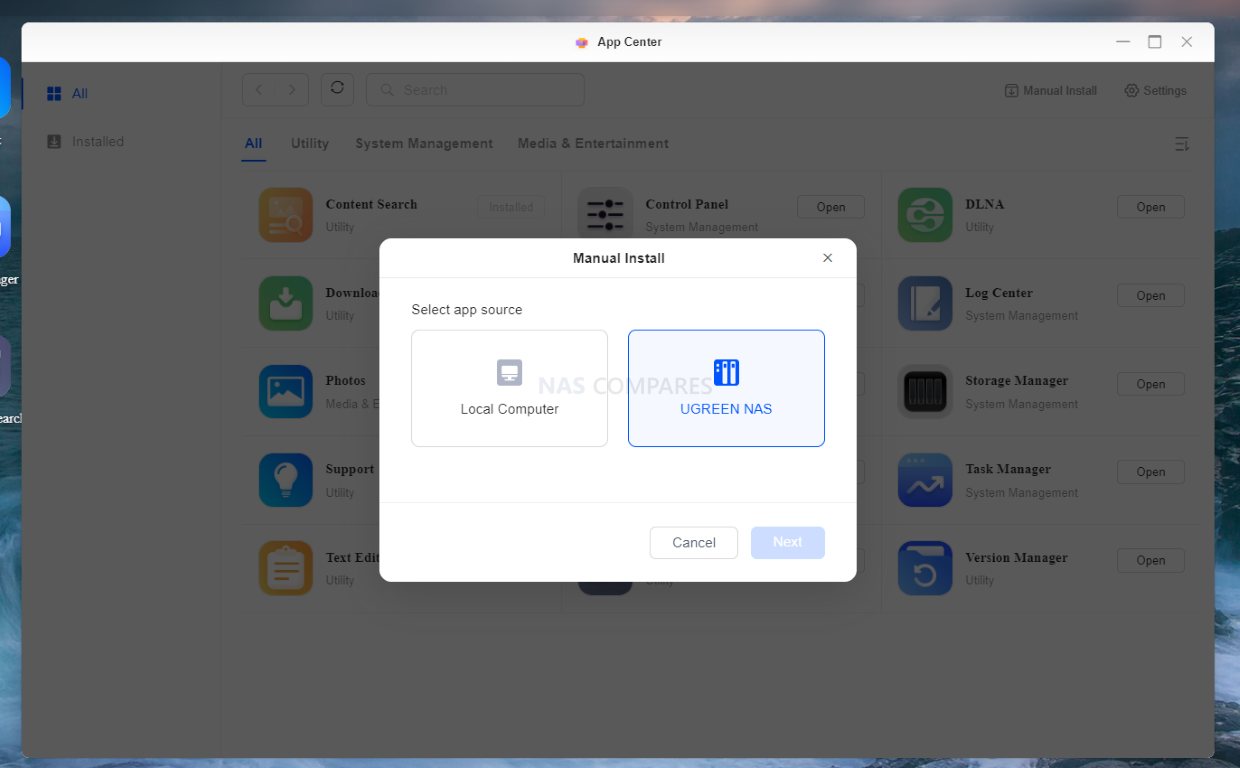
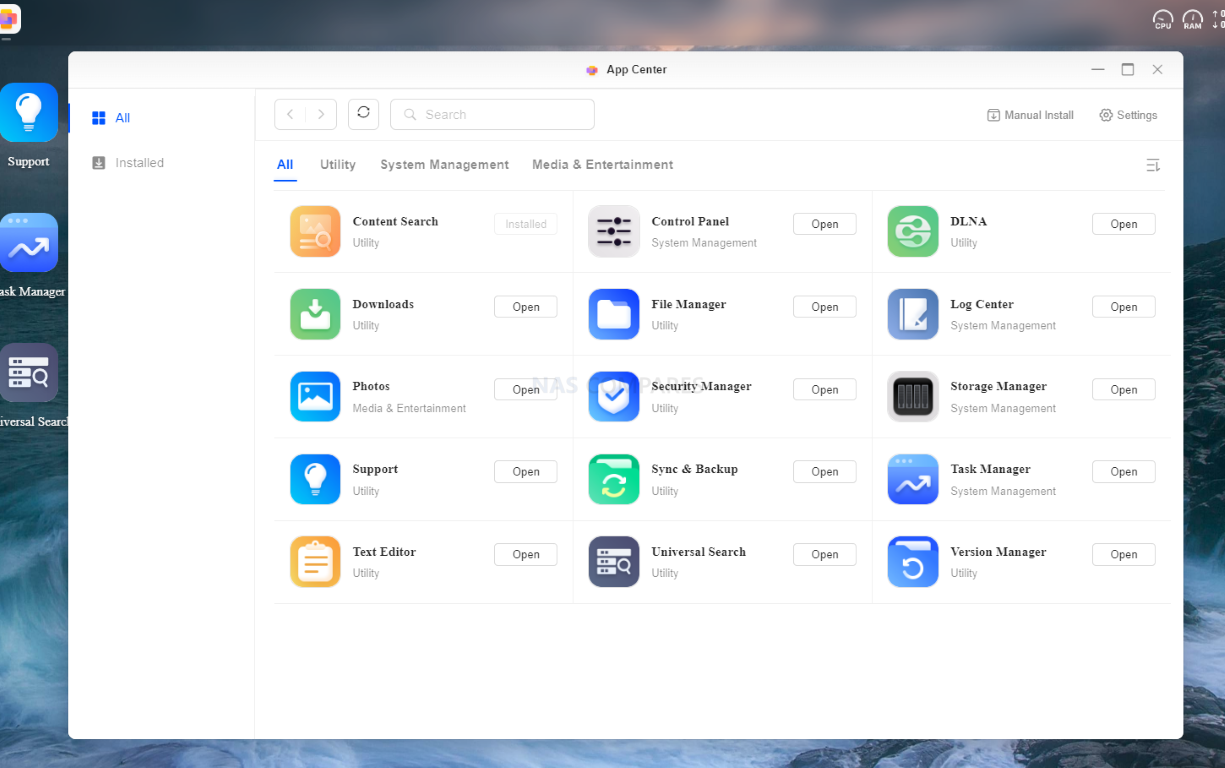
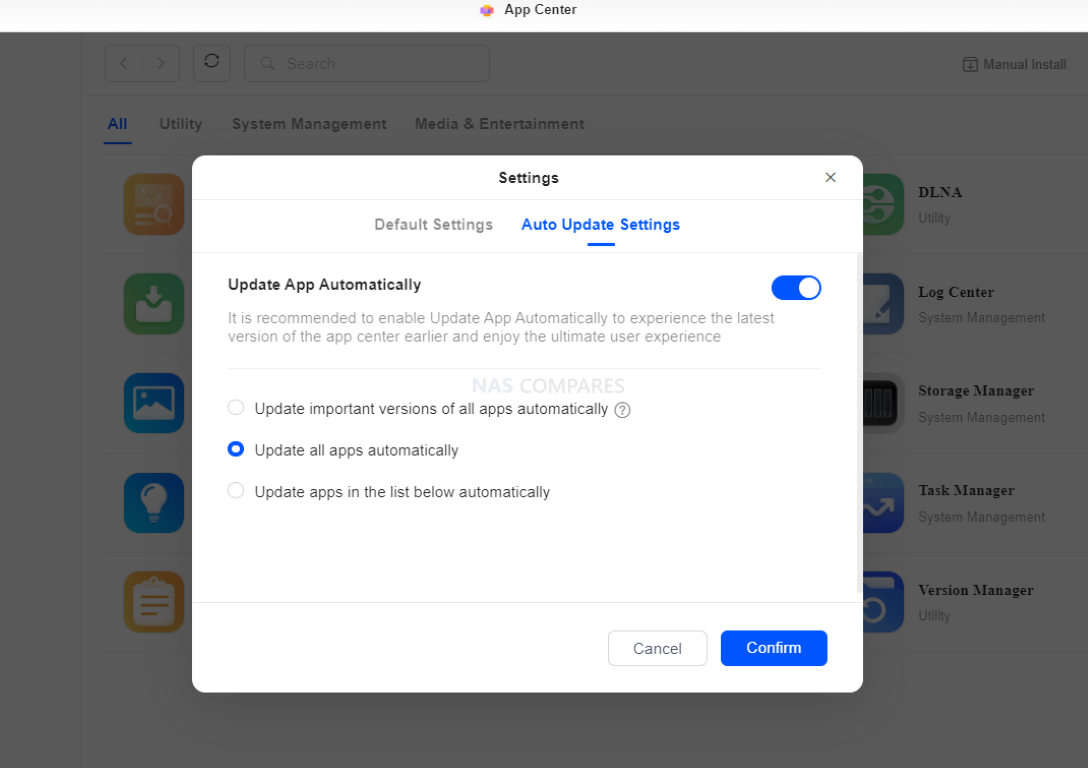
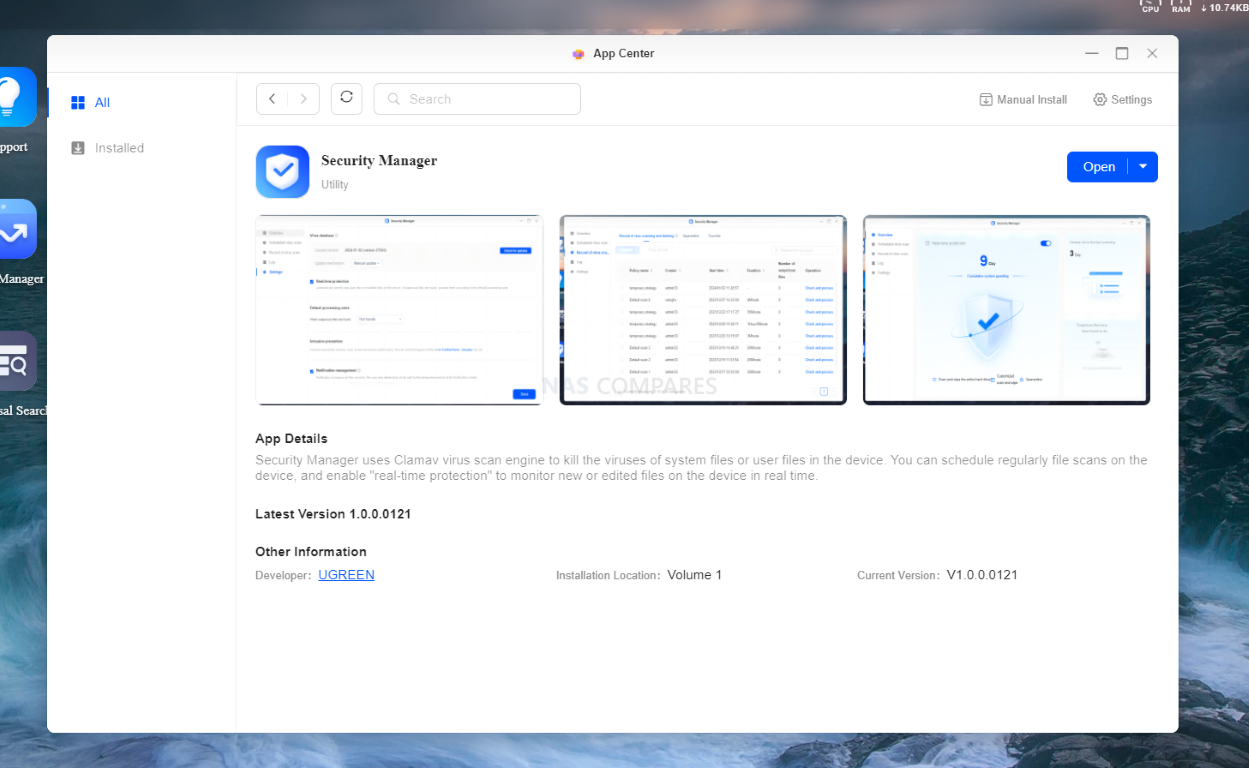
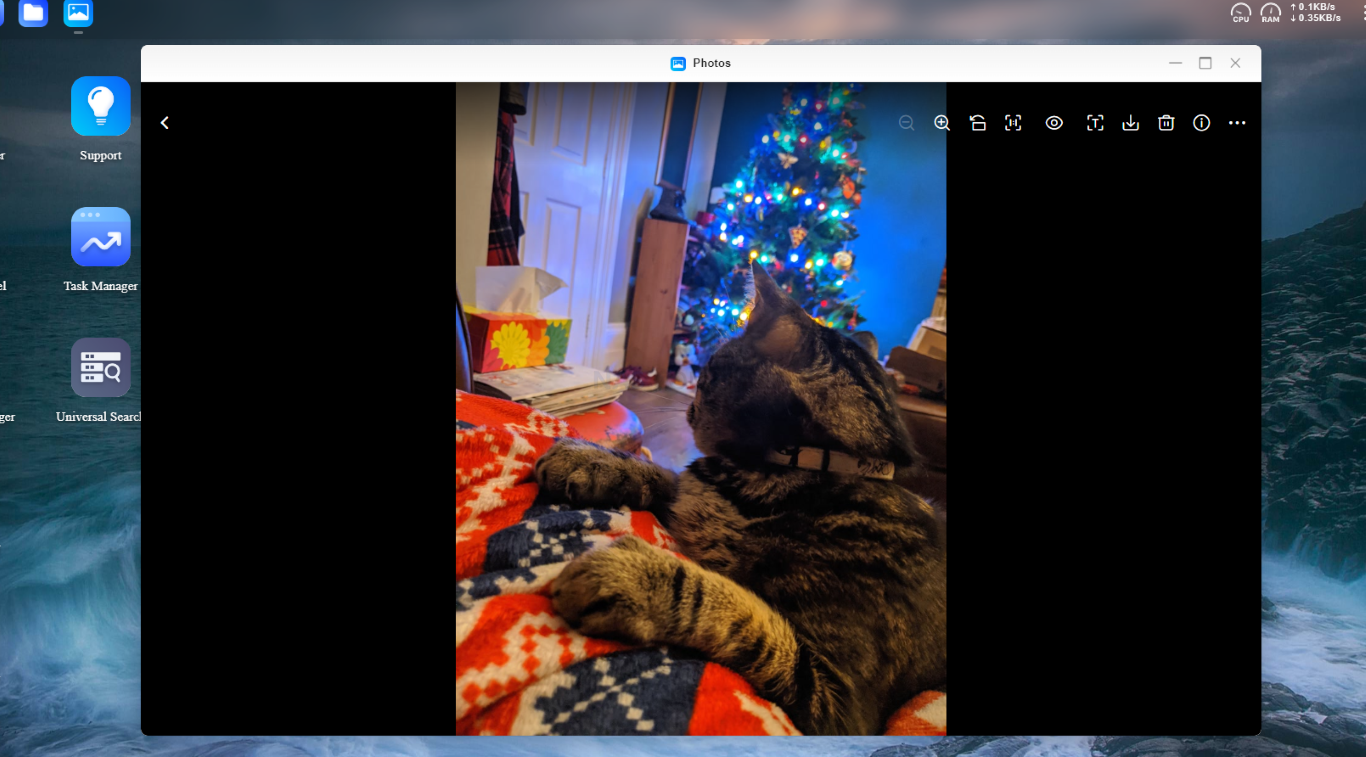
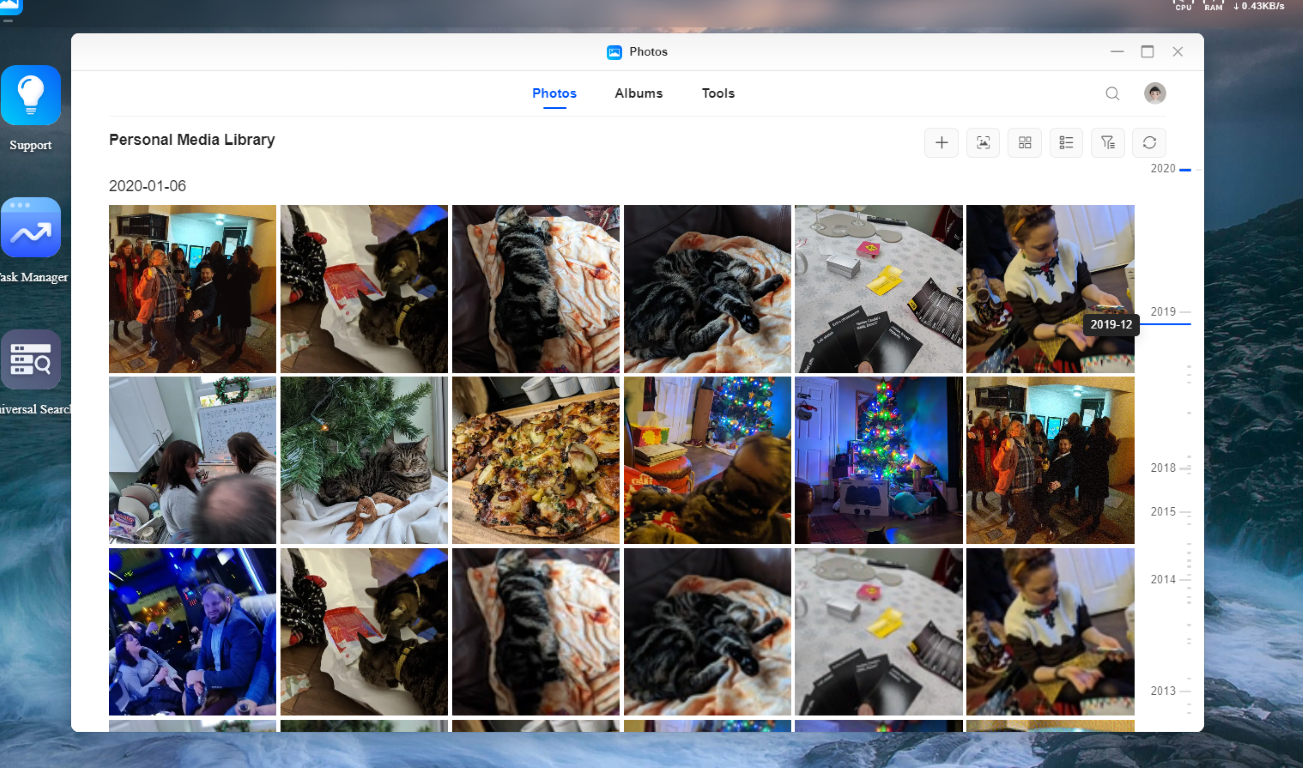
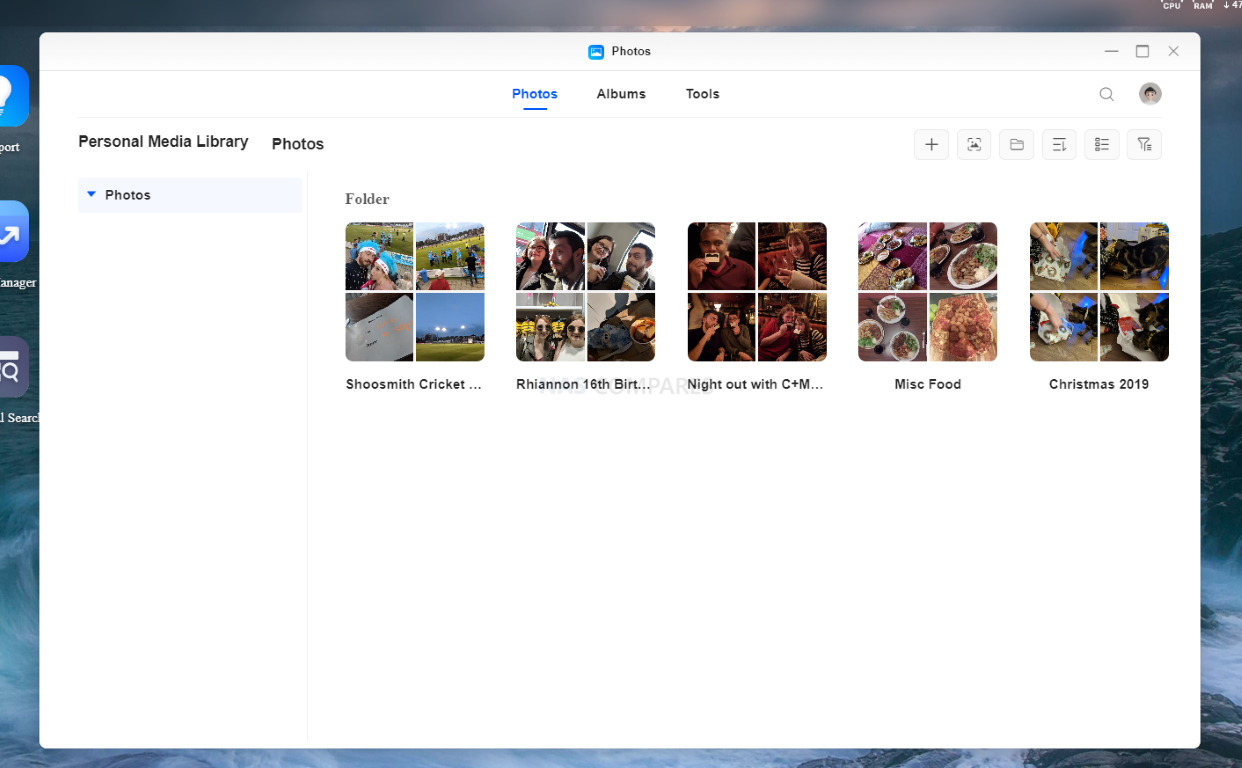
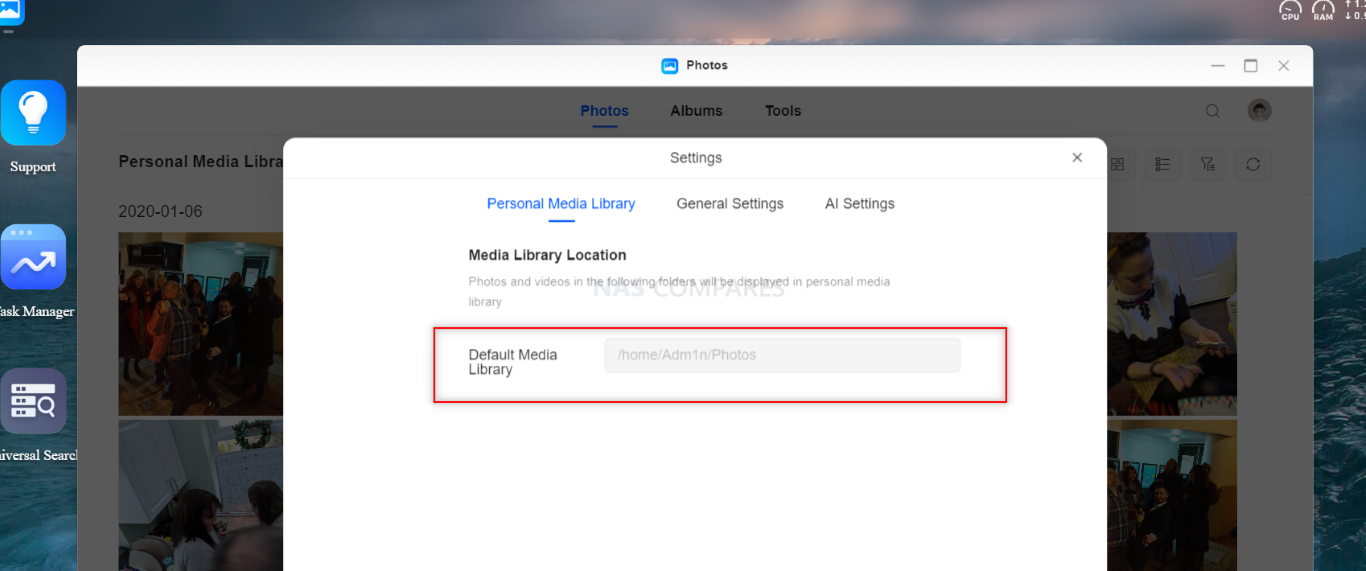
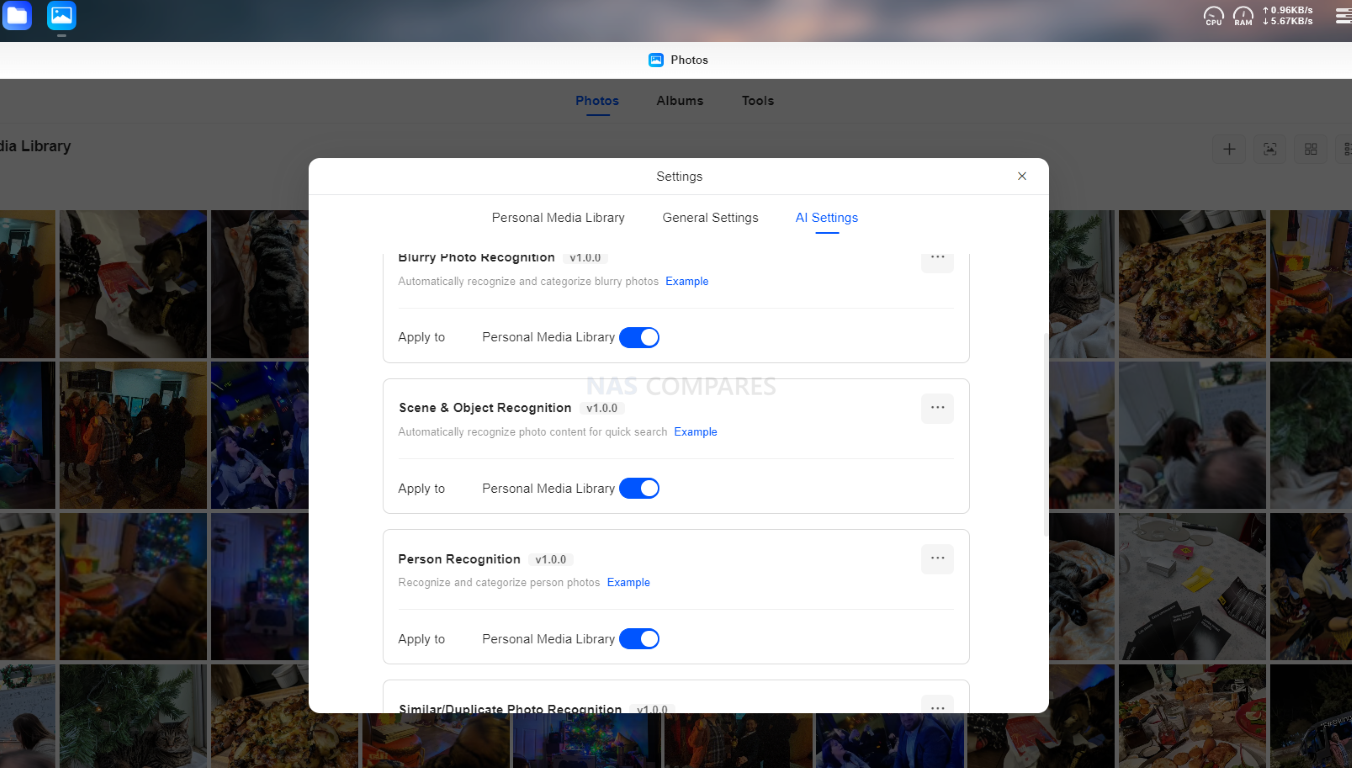
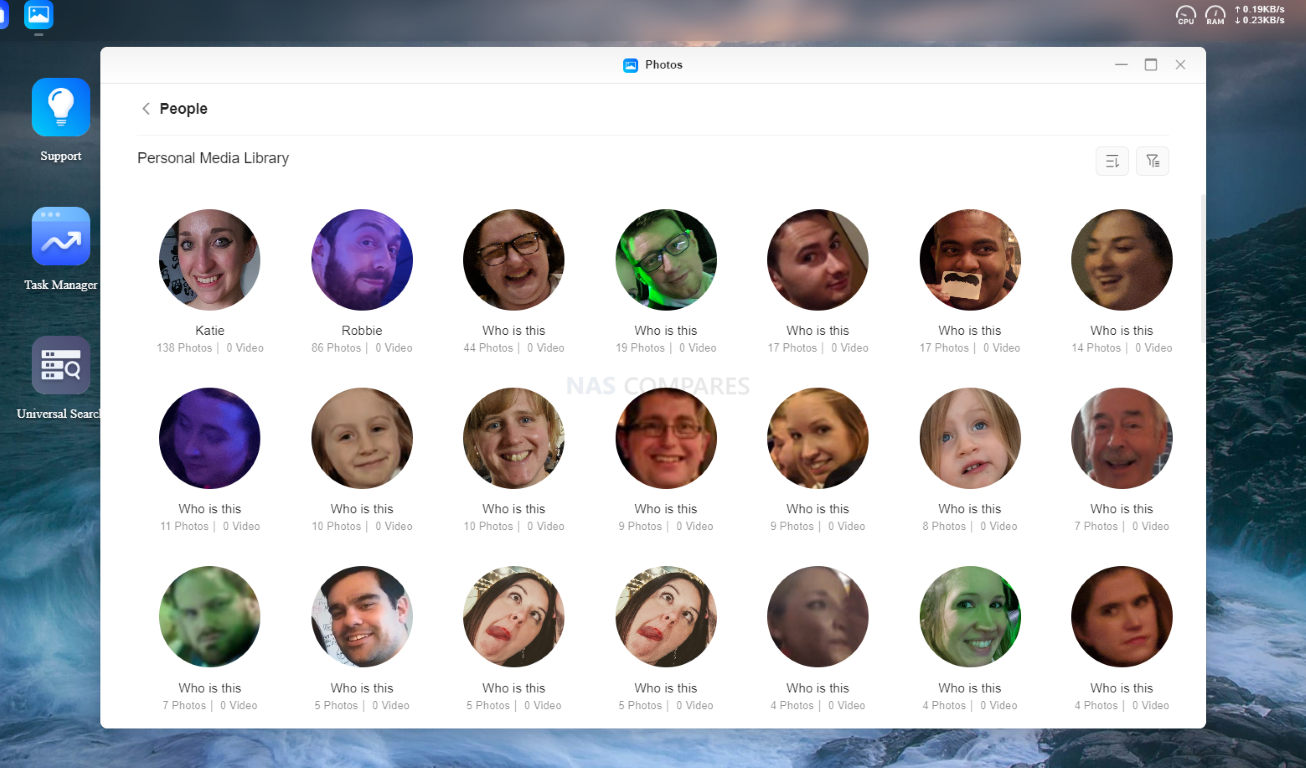
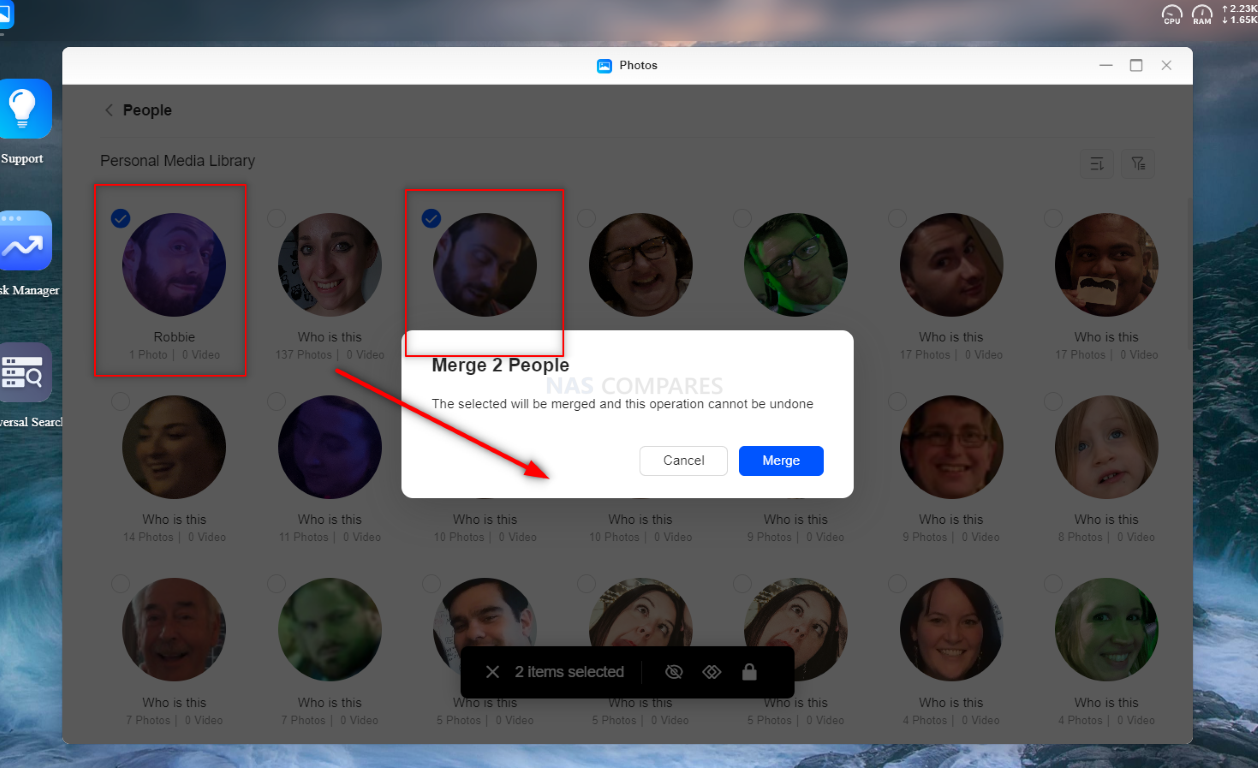
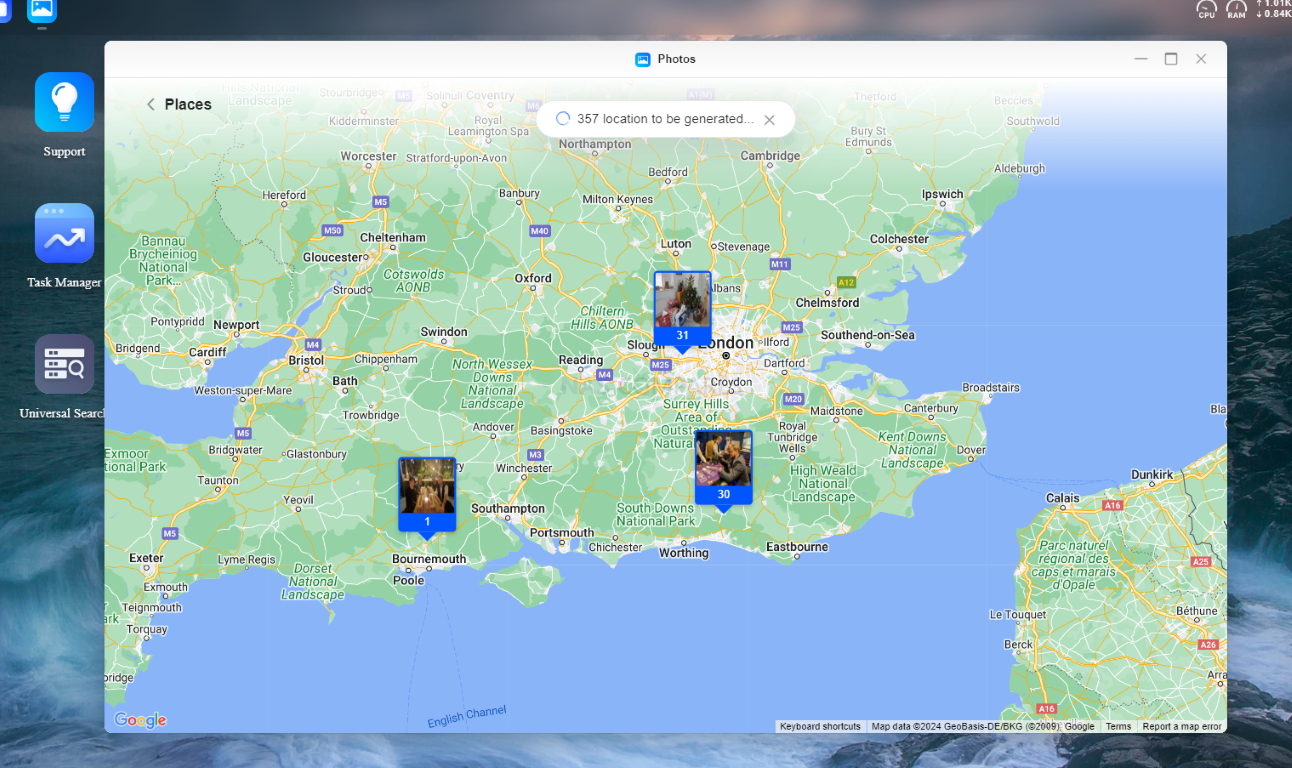
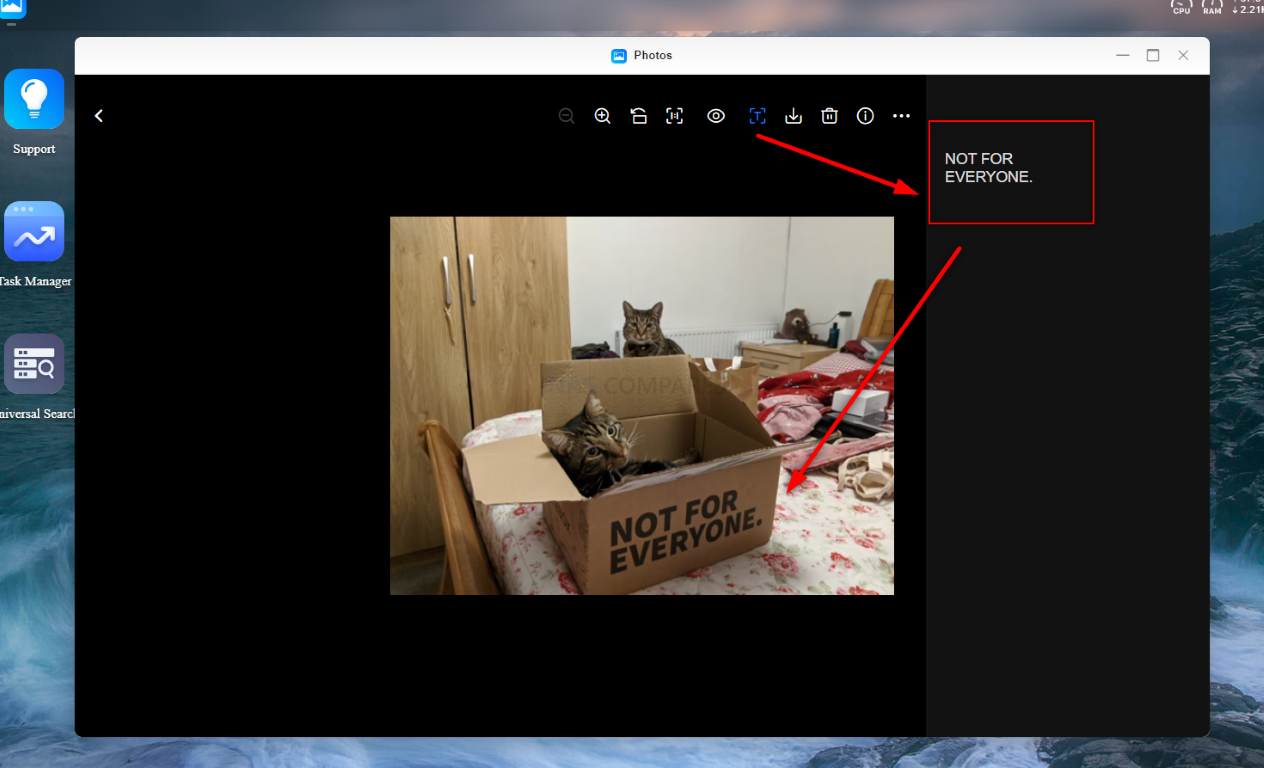
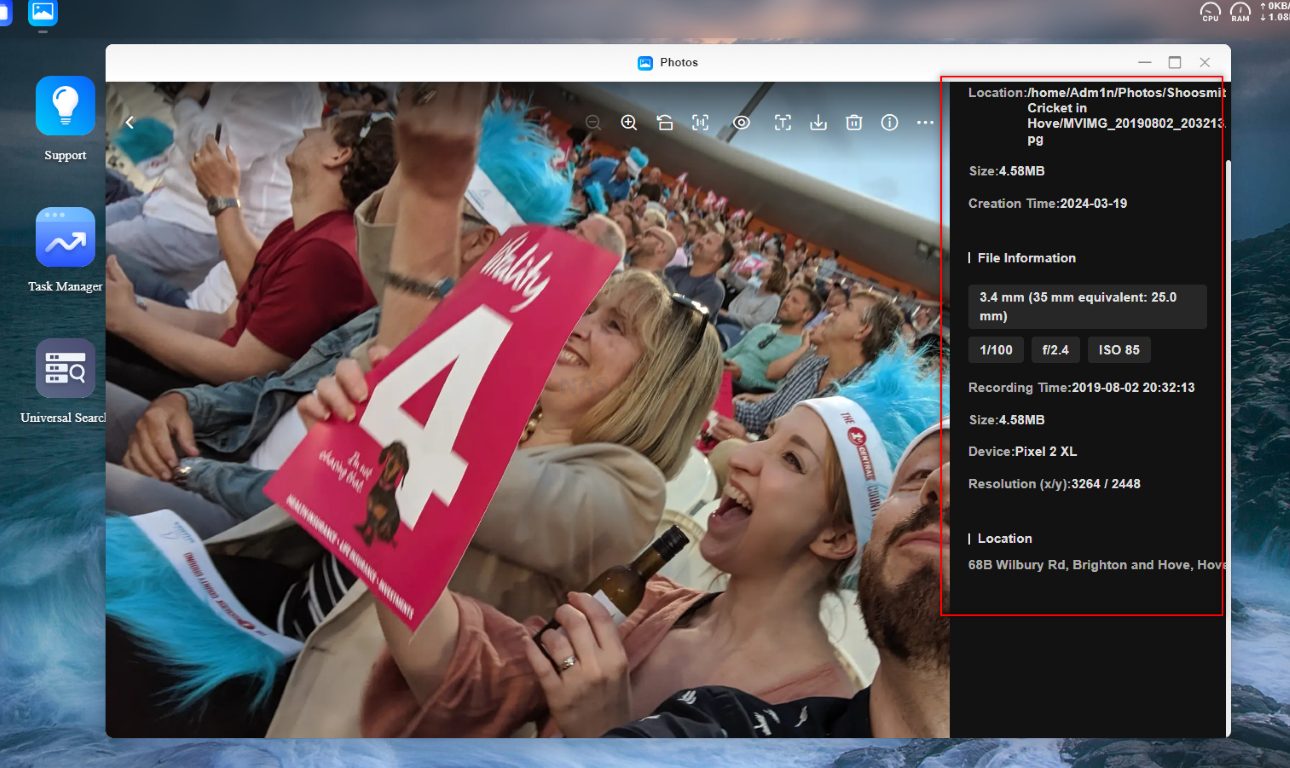
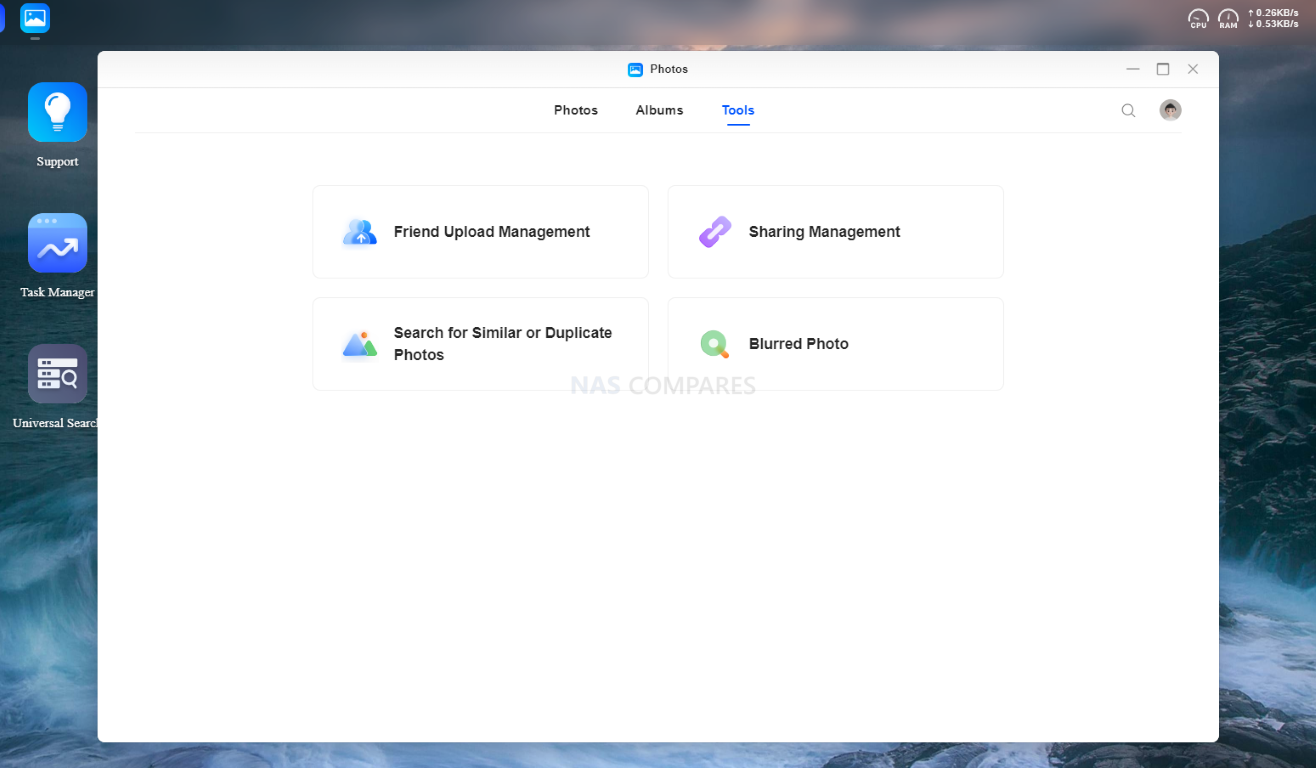
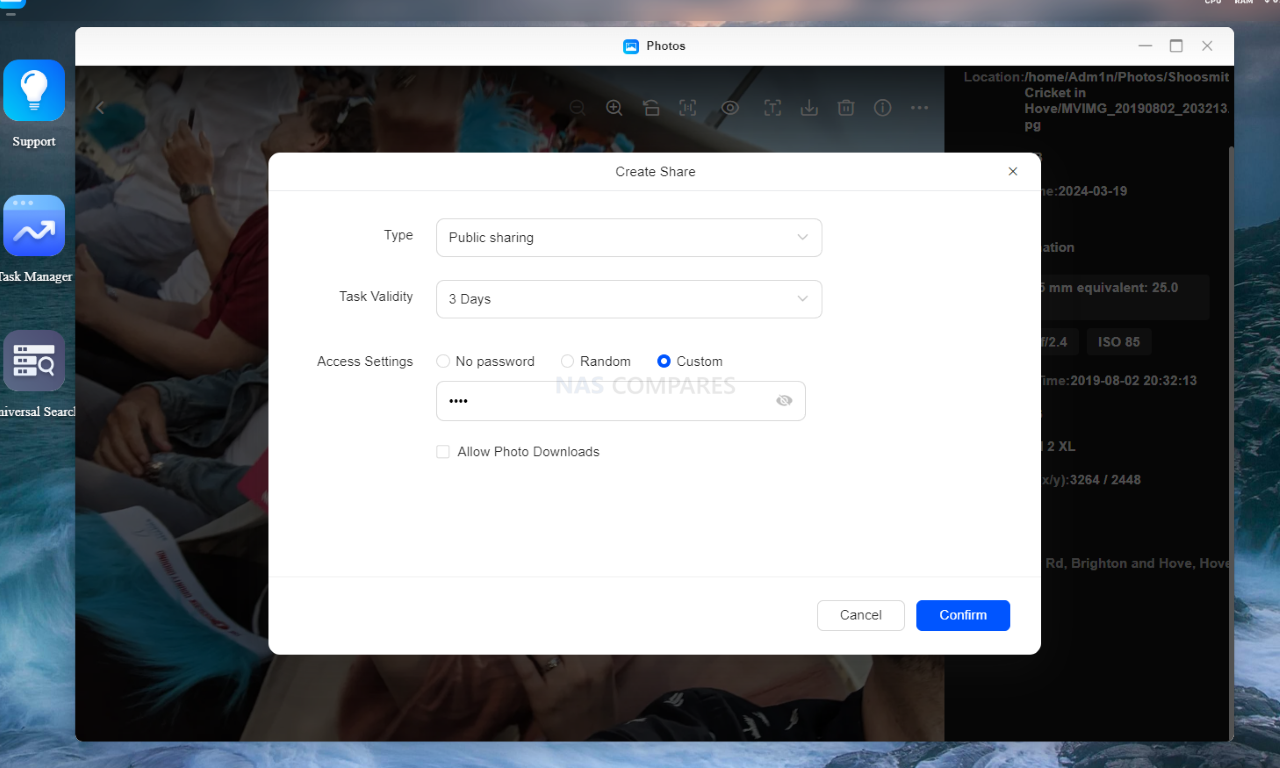
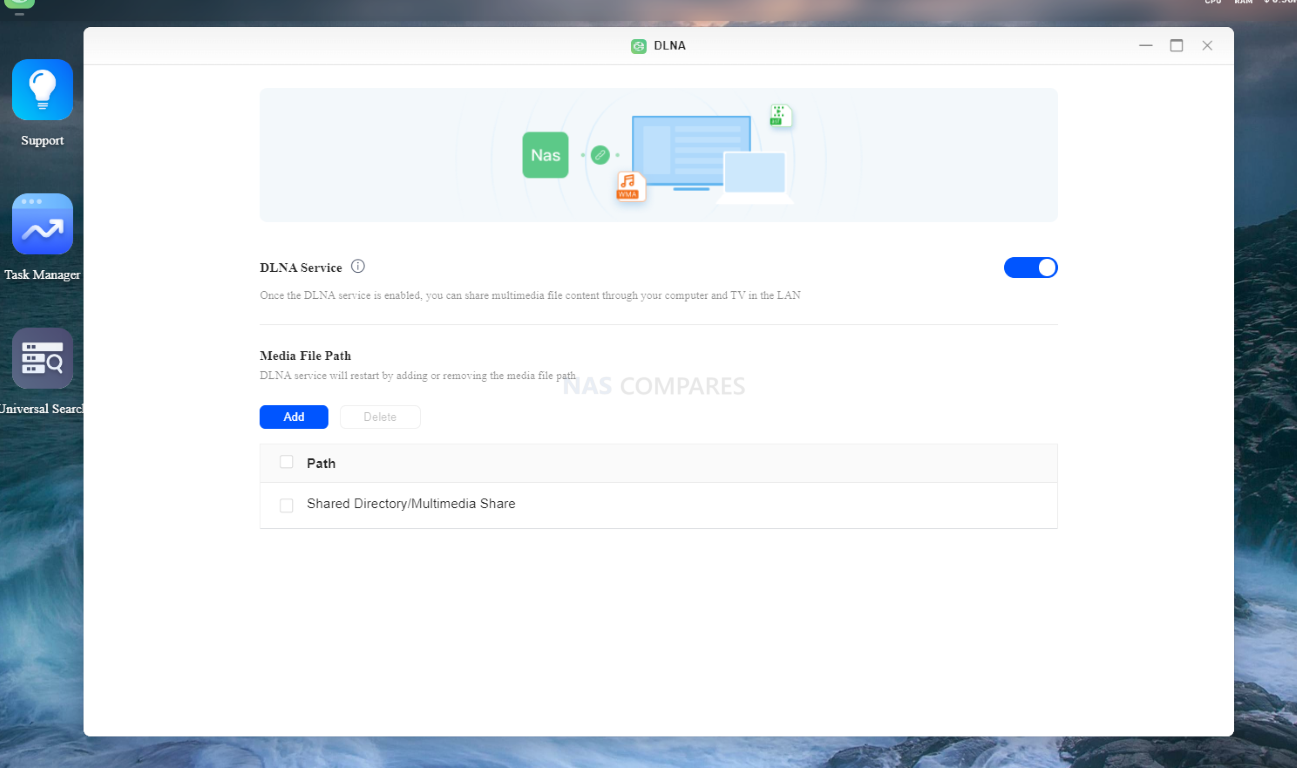
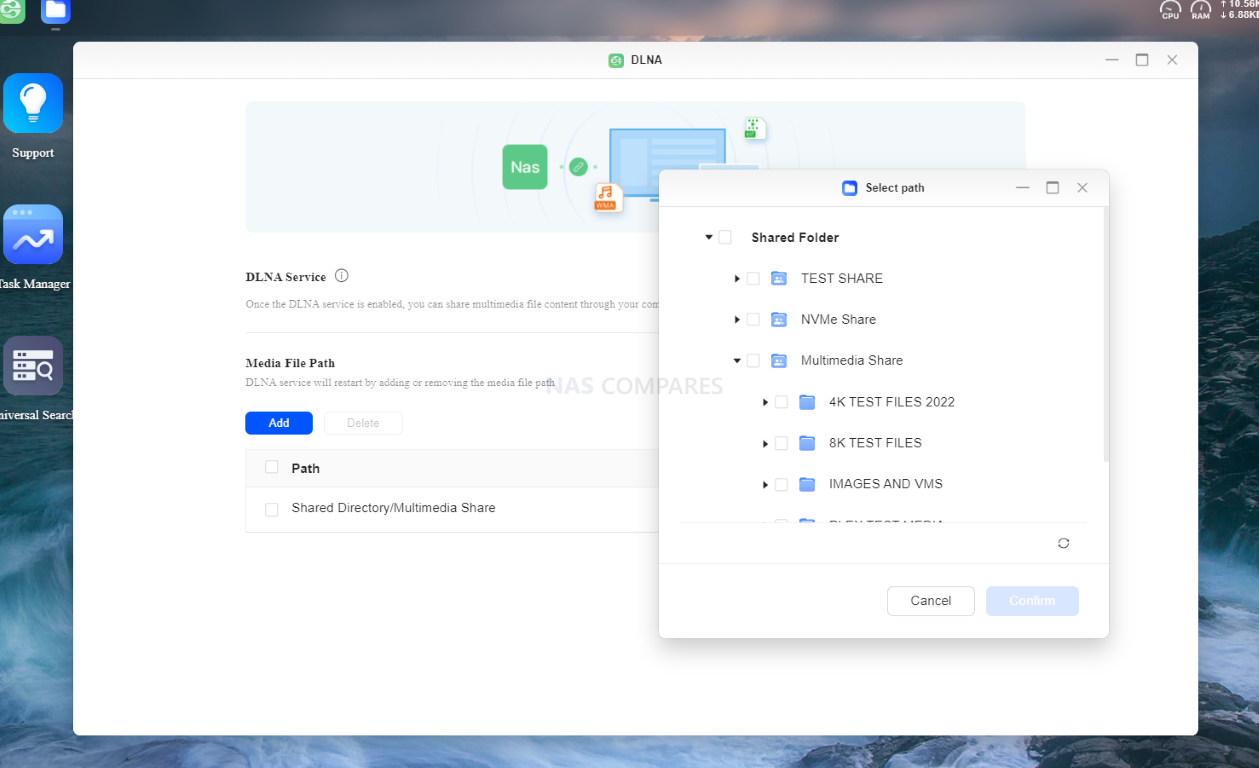


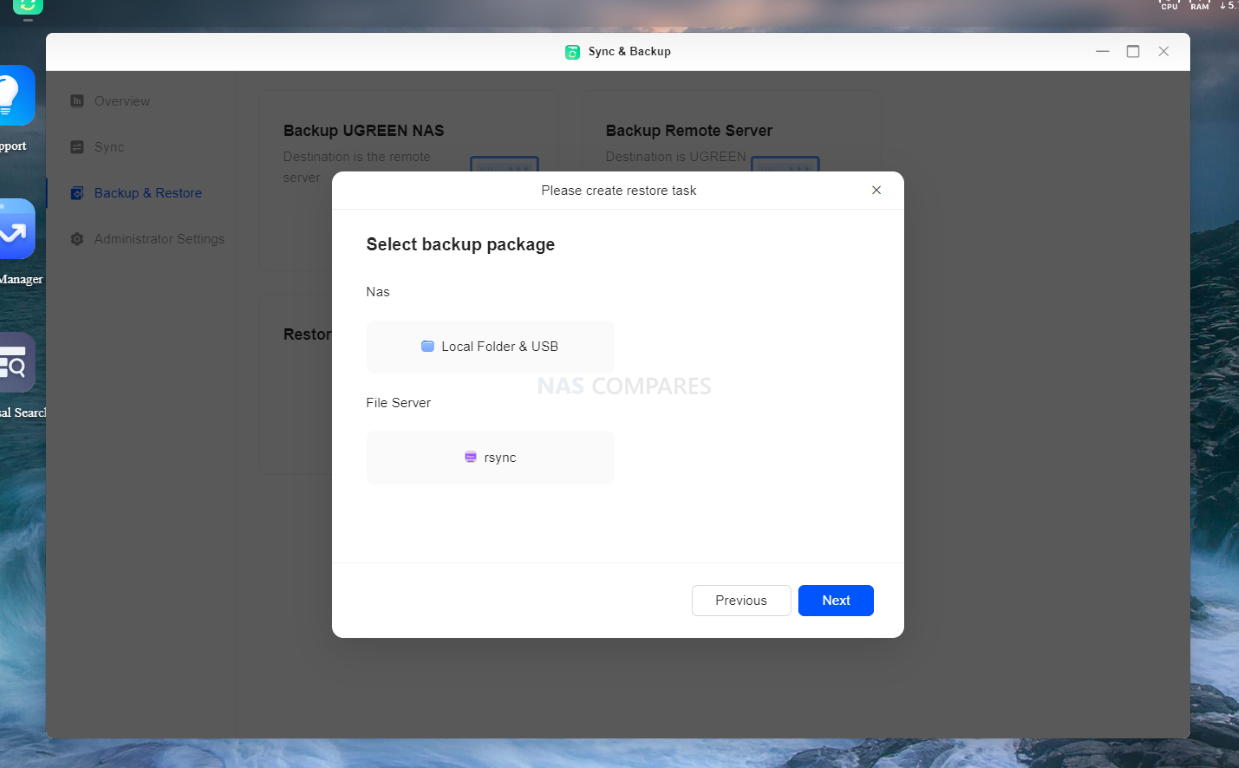
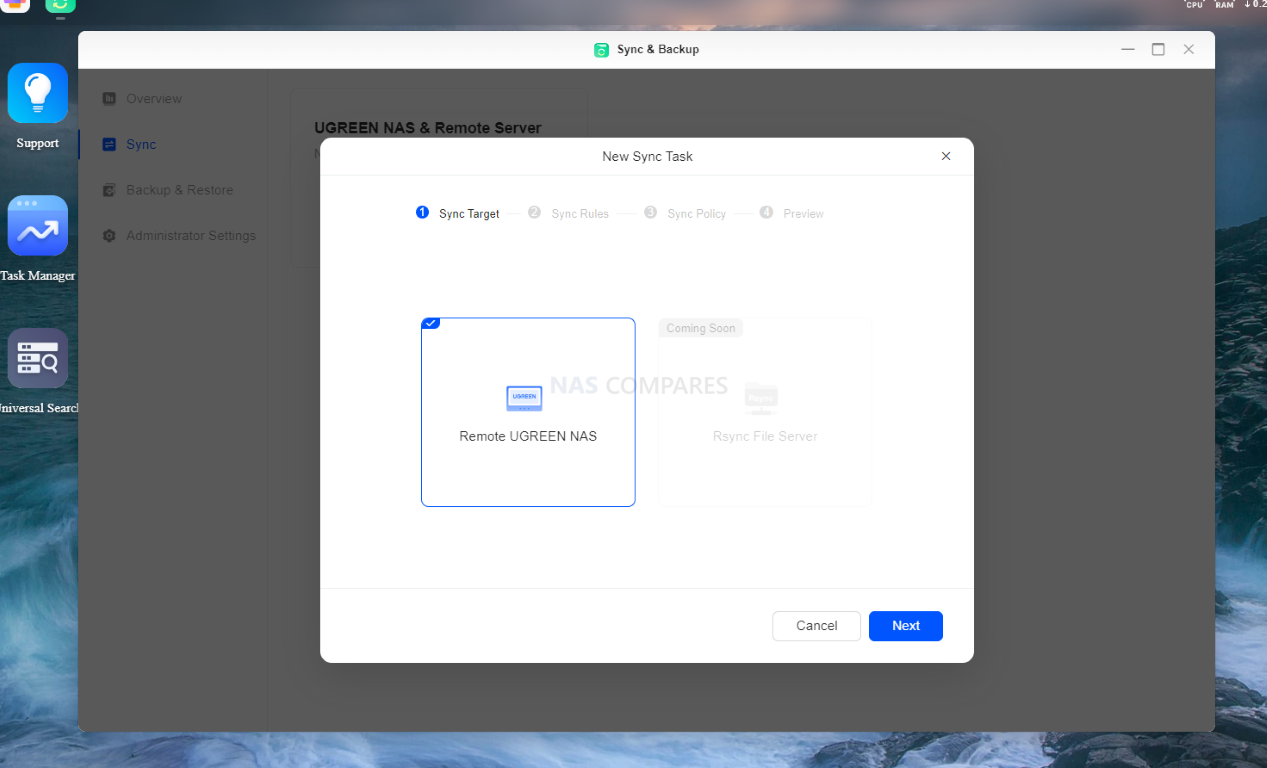
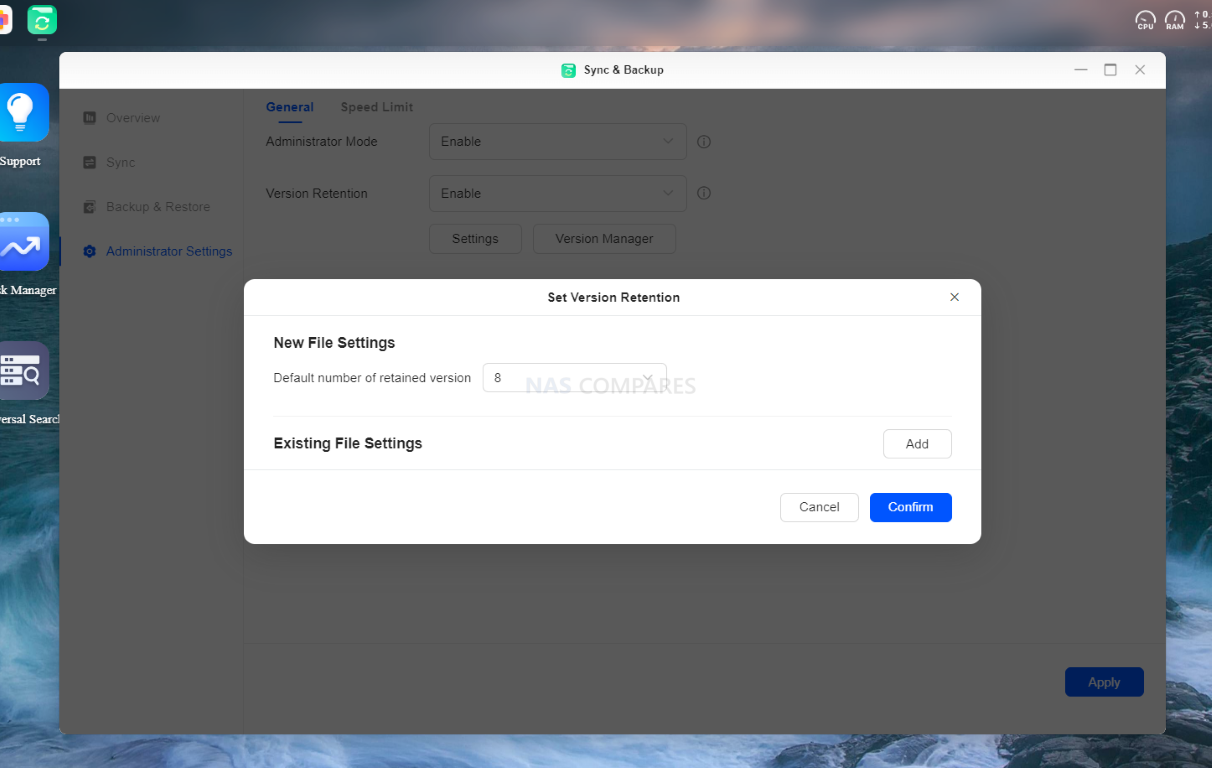
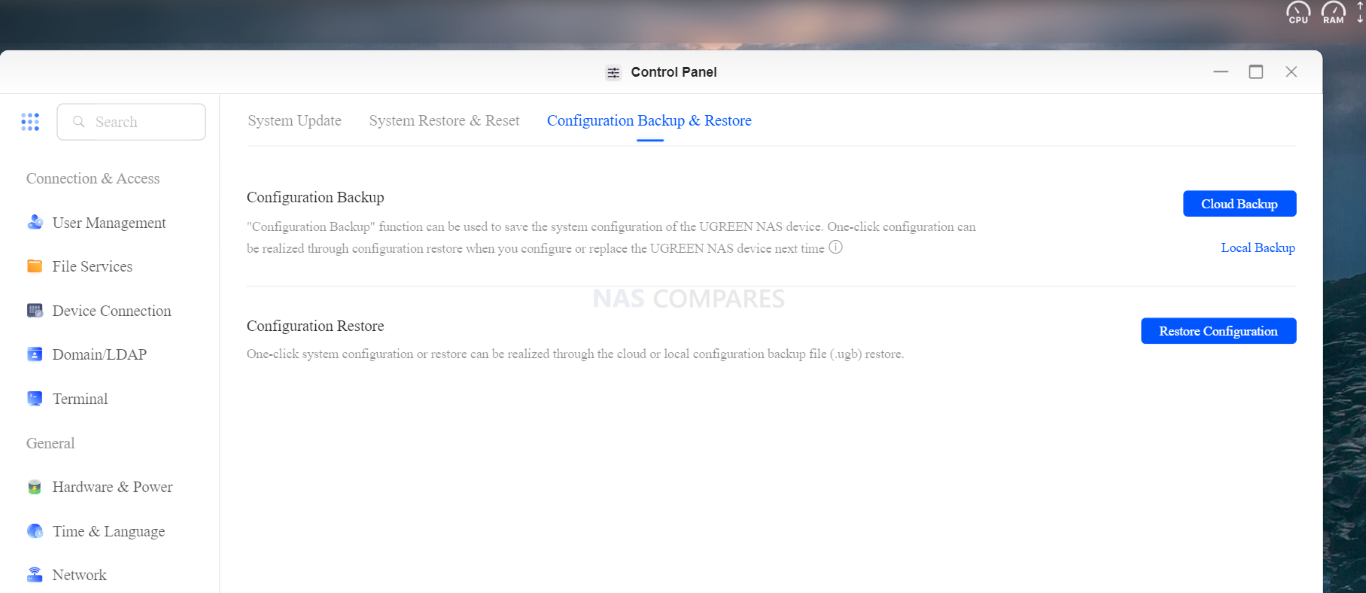

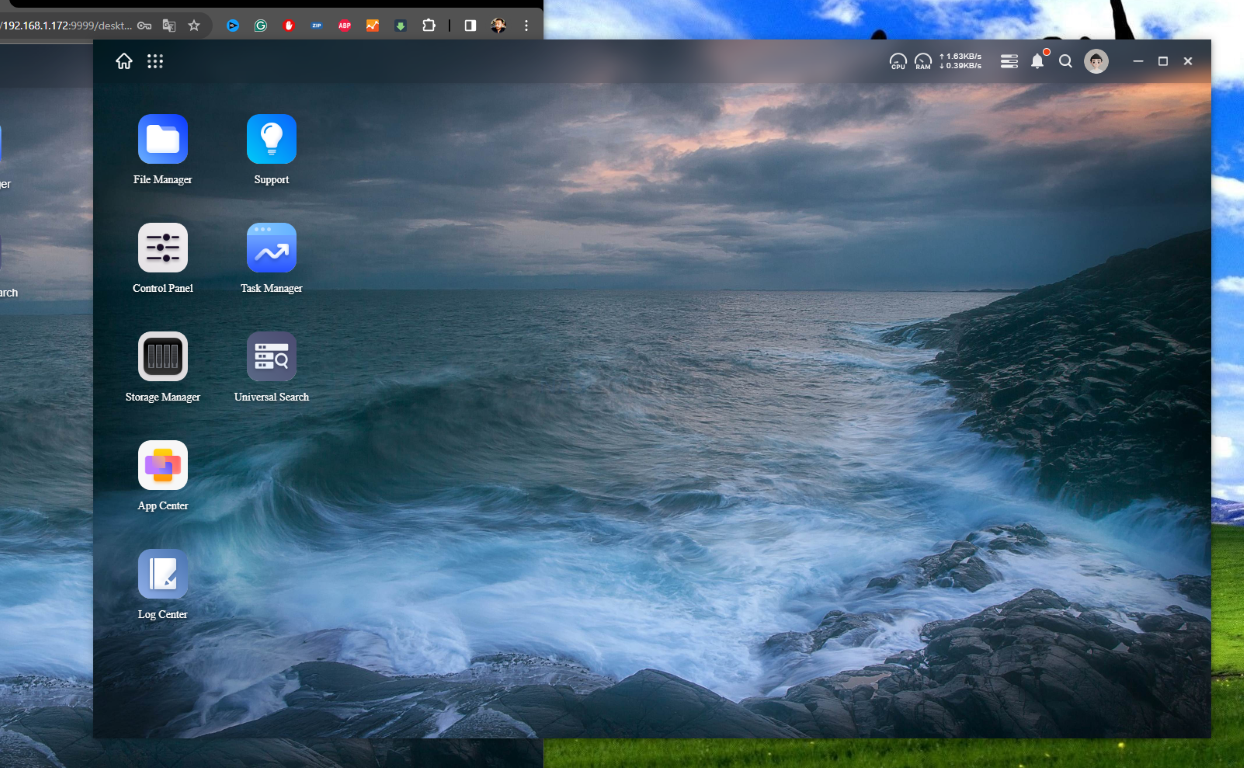
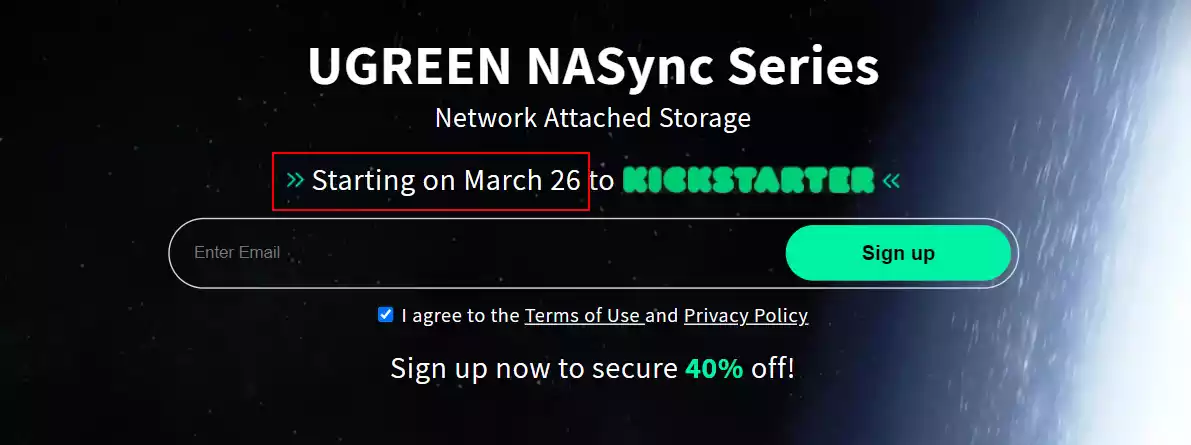
 SUBSCRIBE TO OUR NEWSLETTER


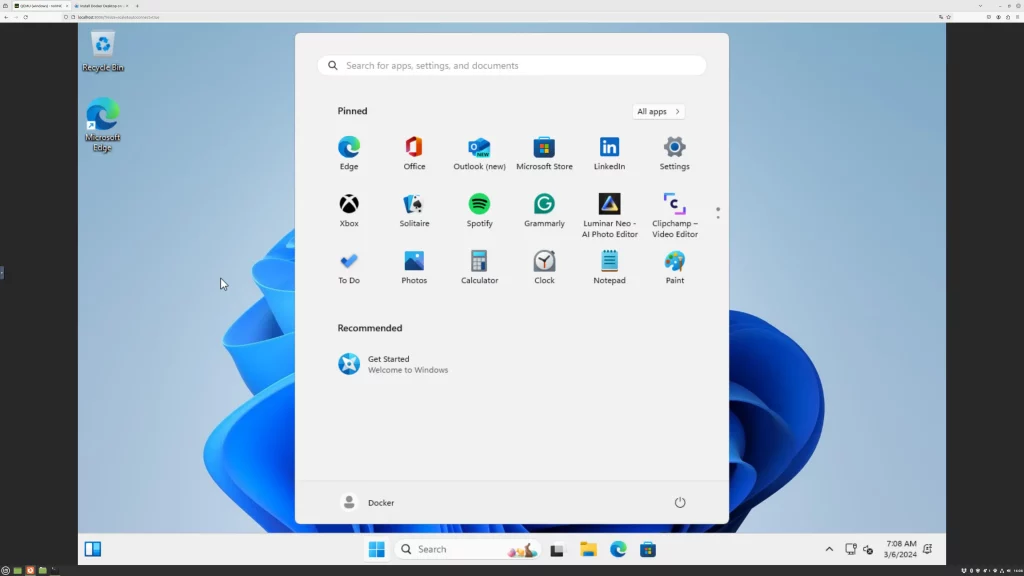
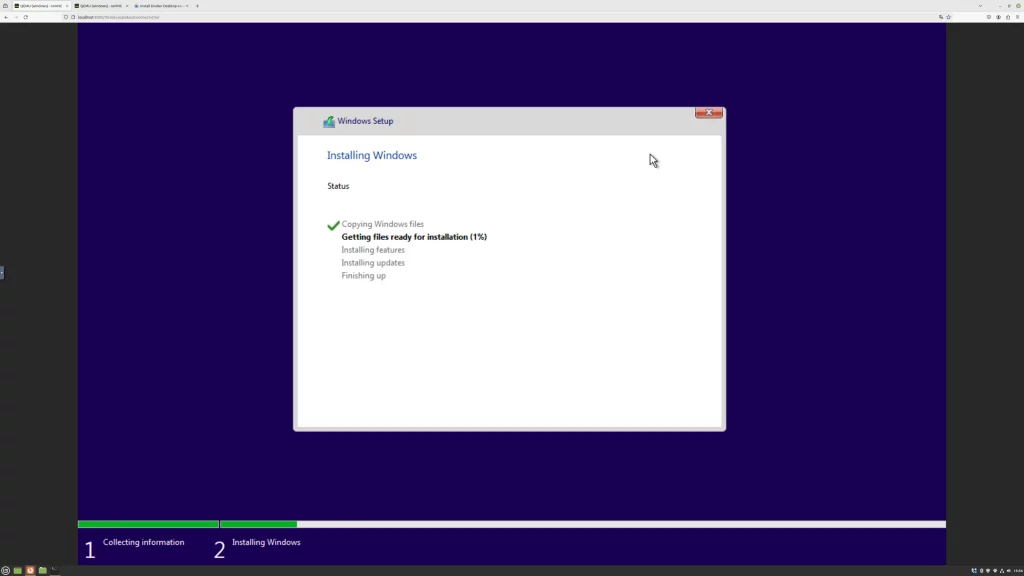

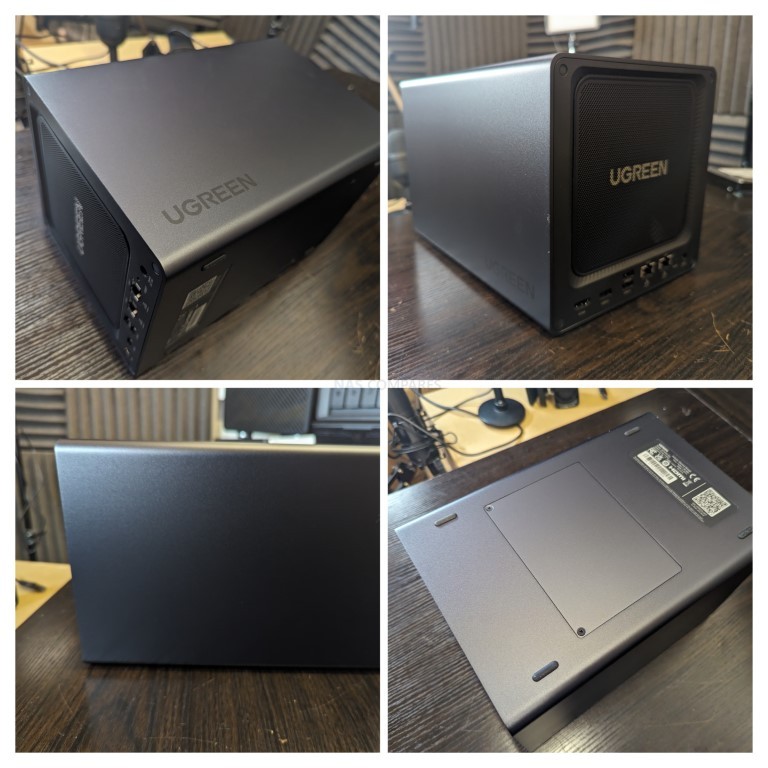
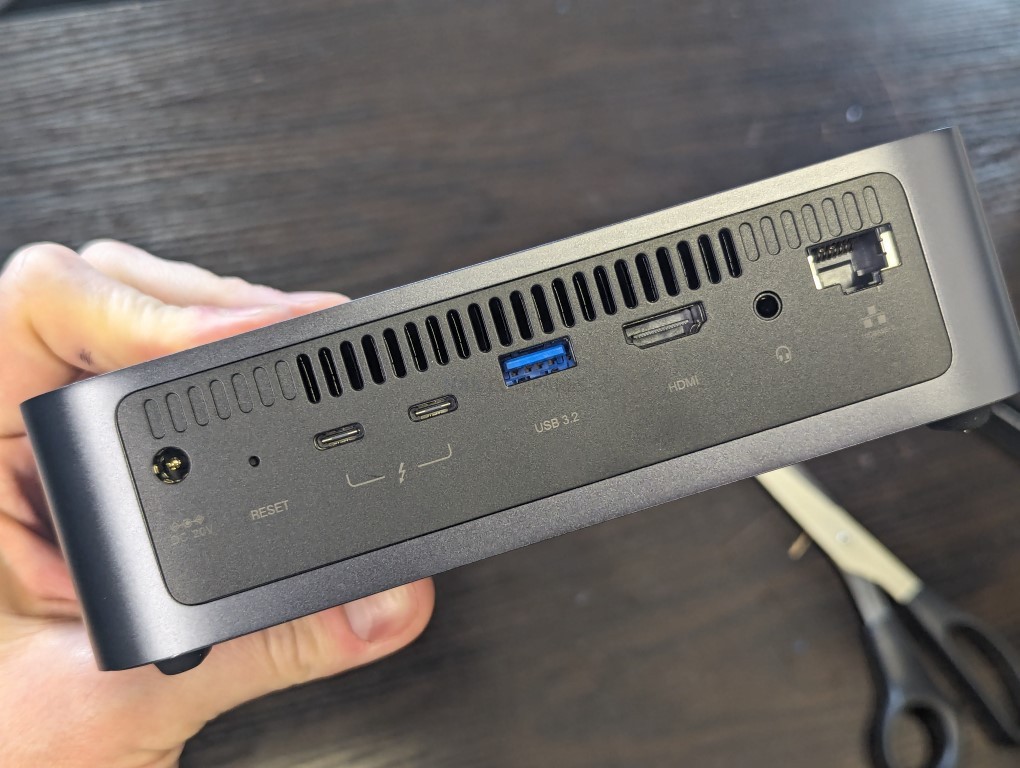
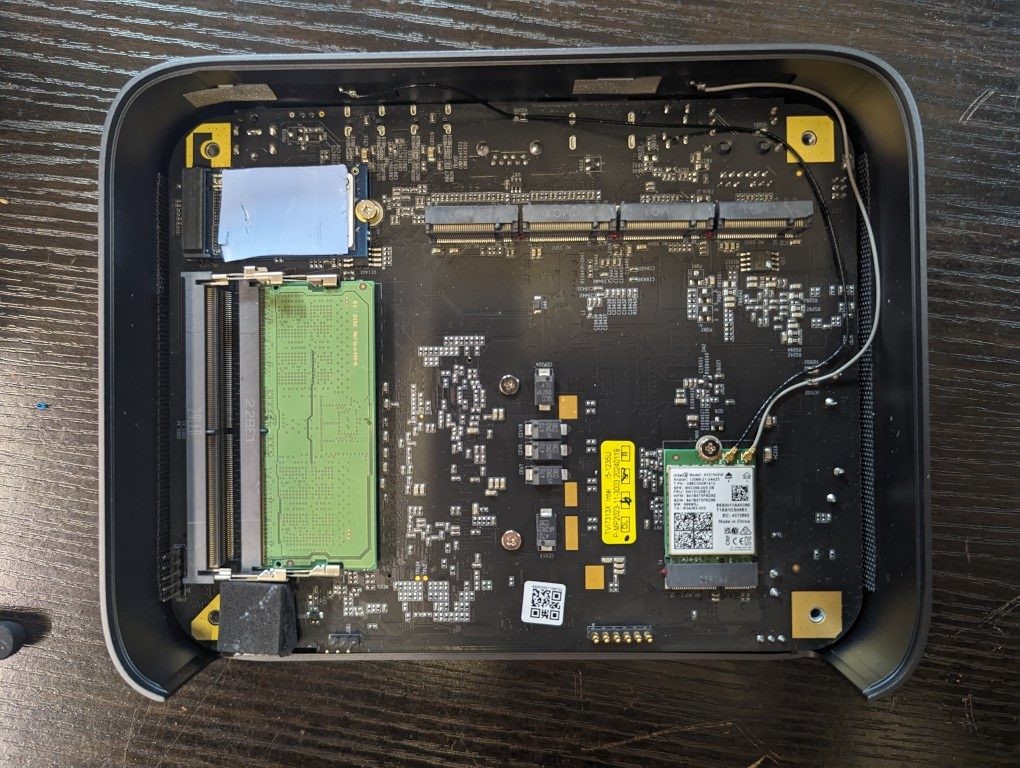
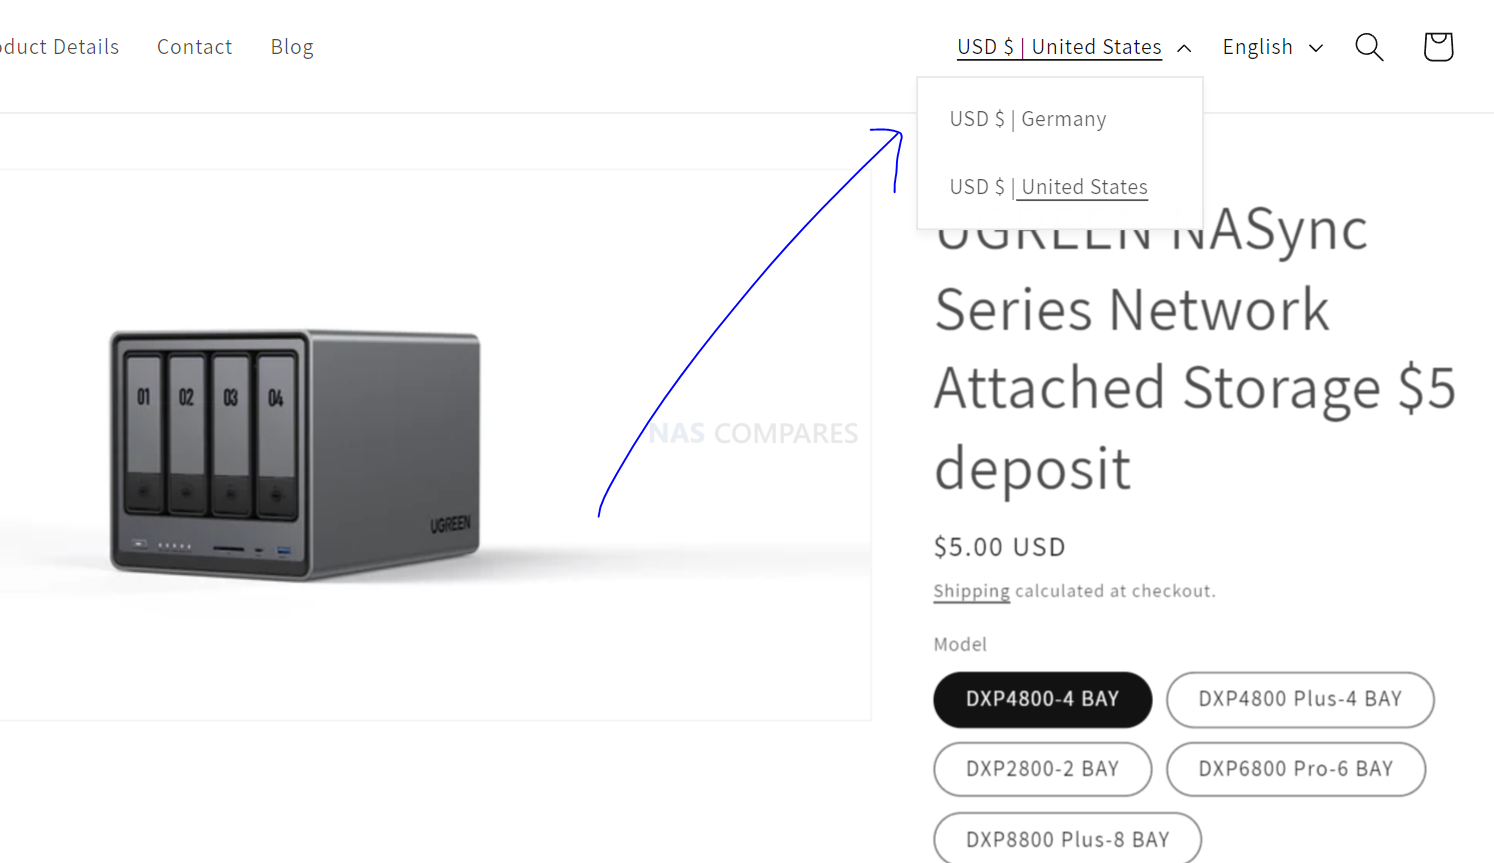
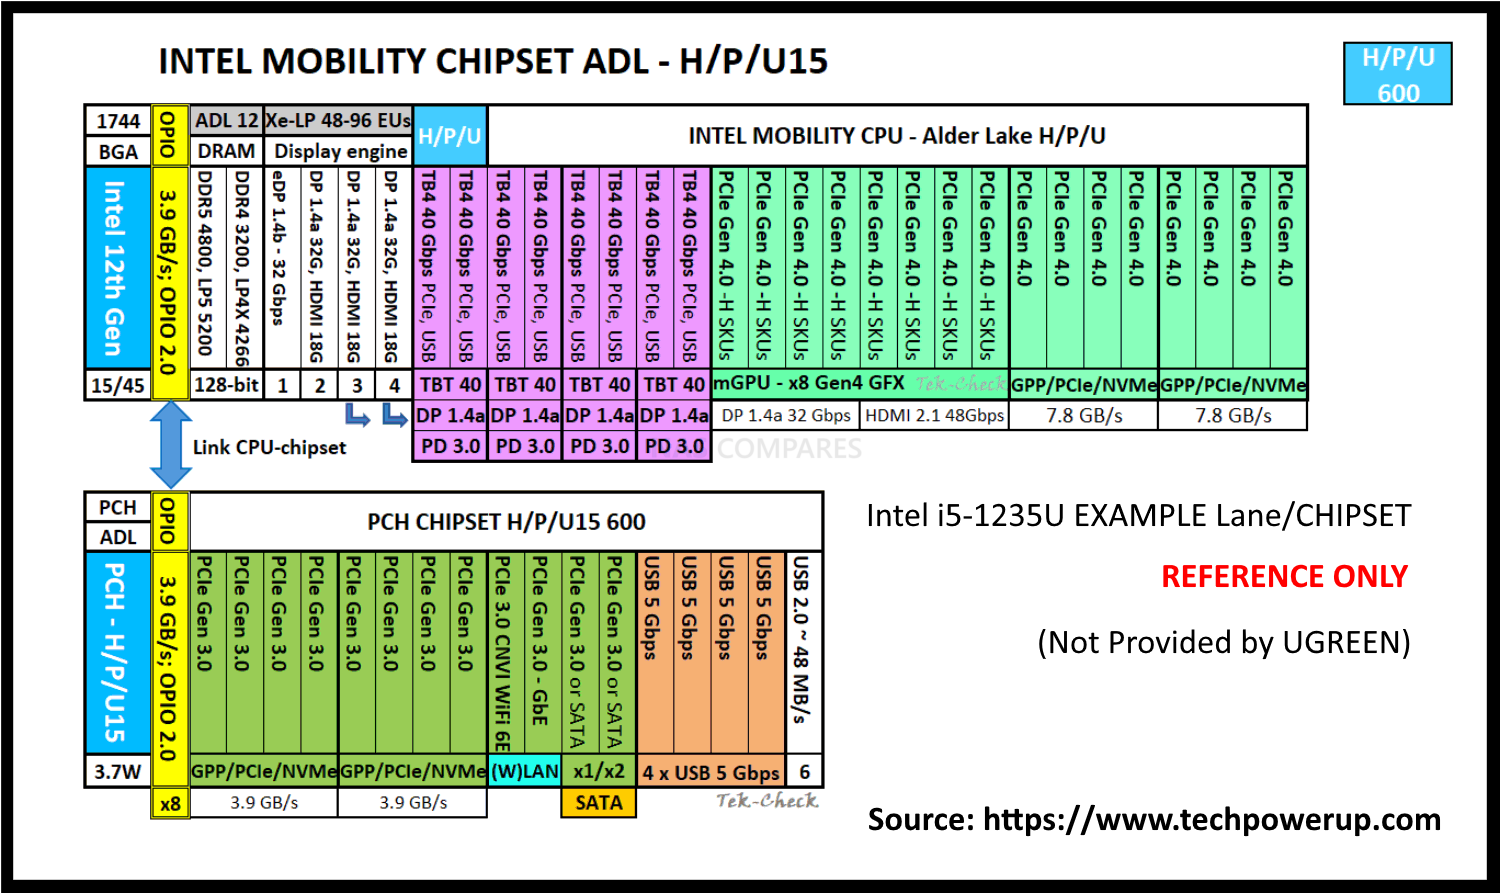
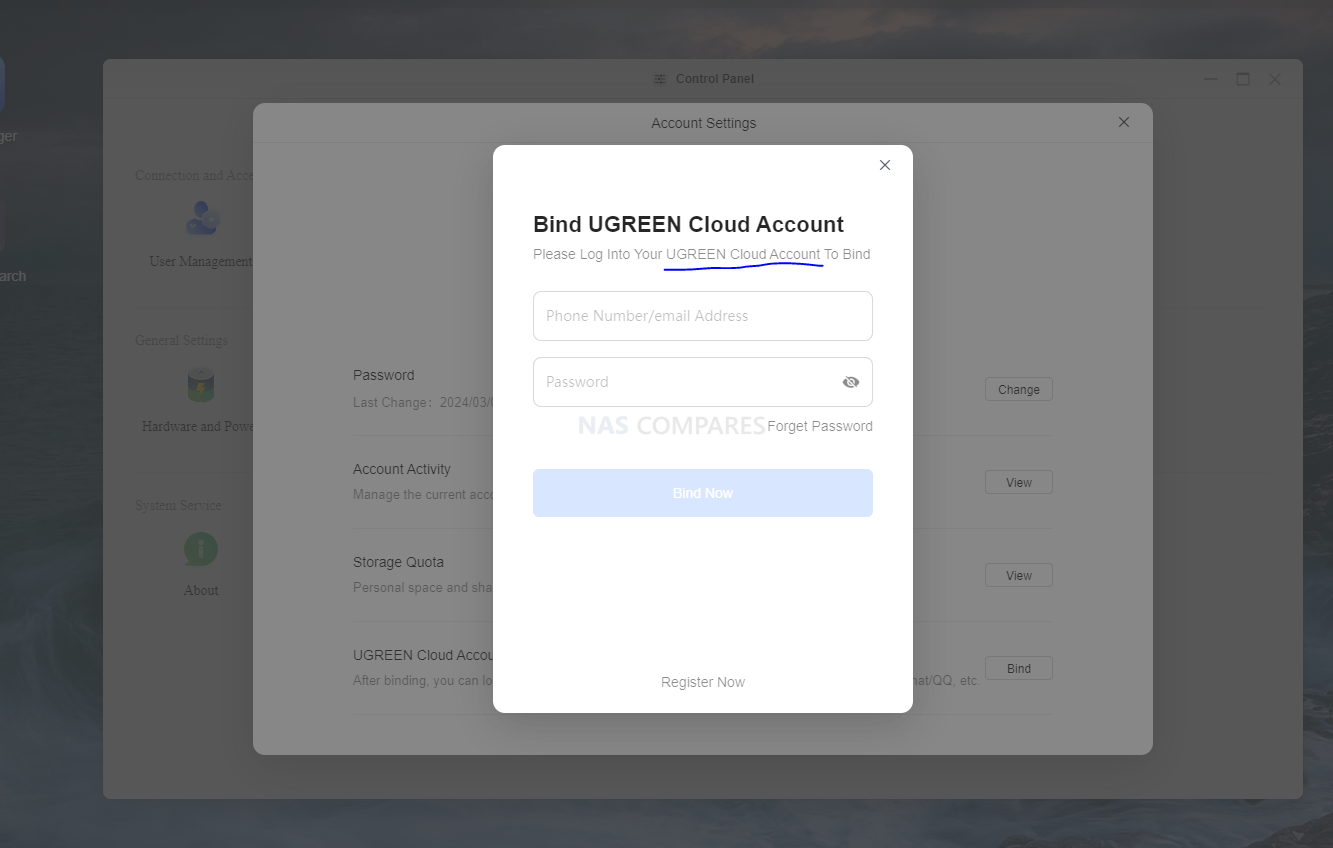
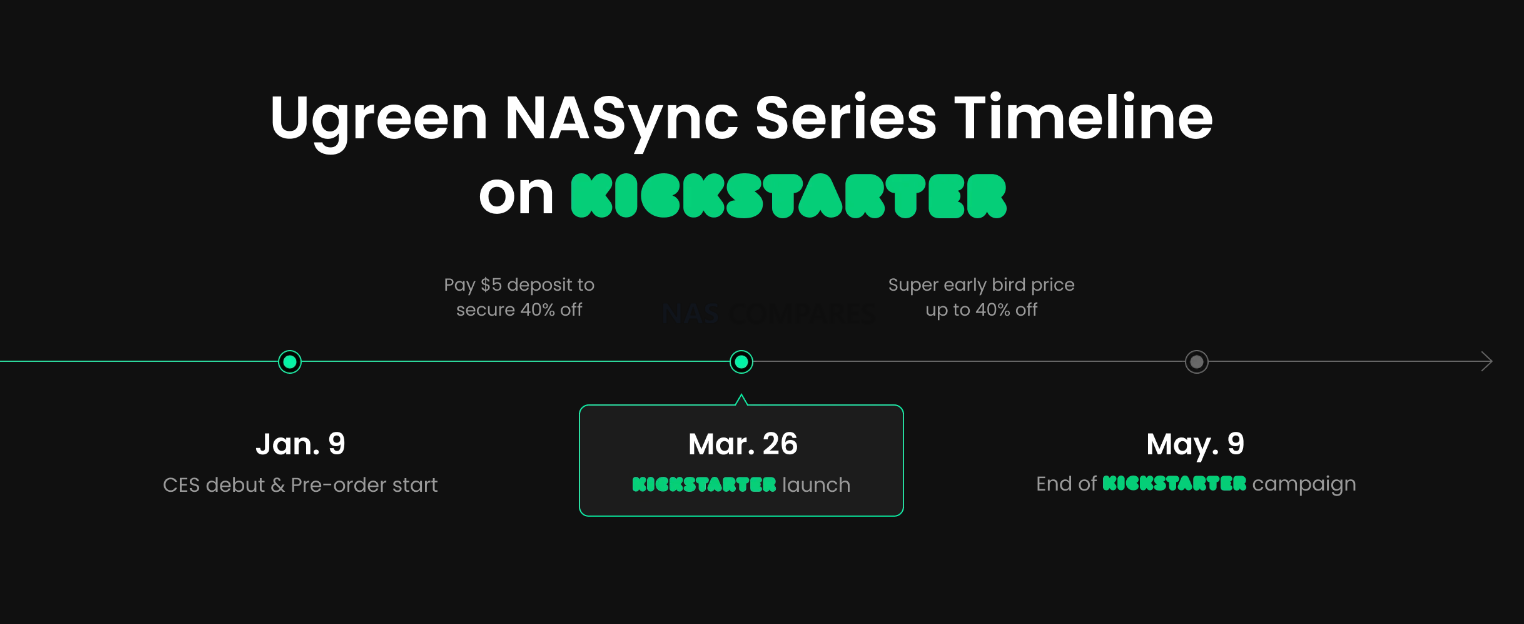
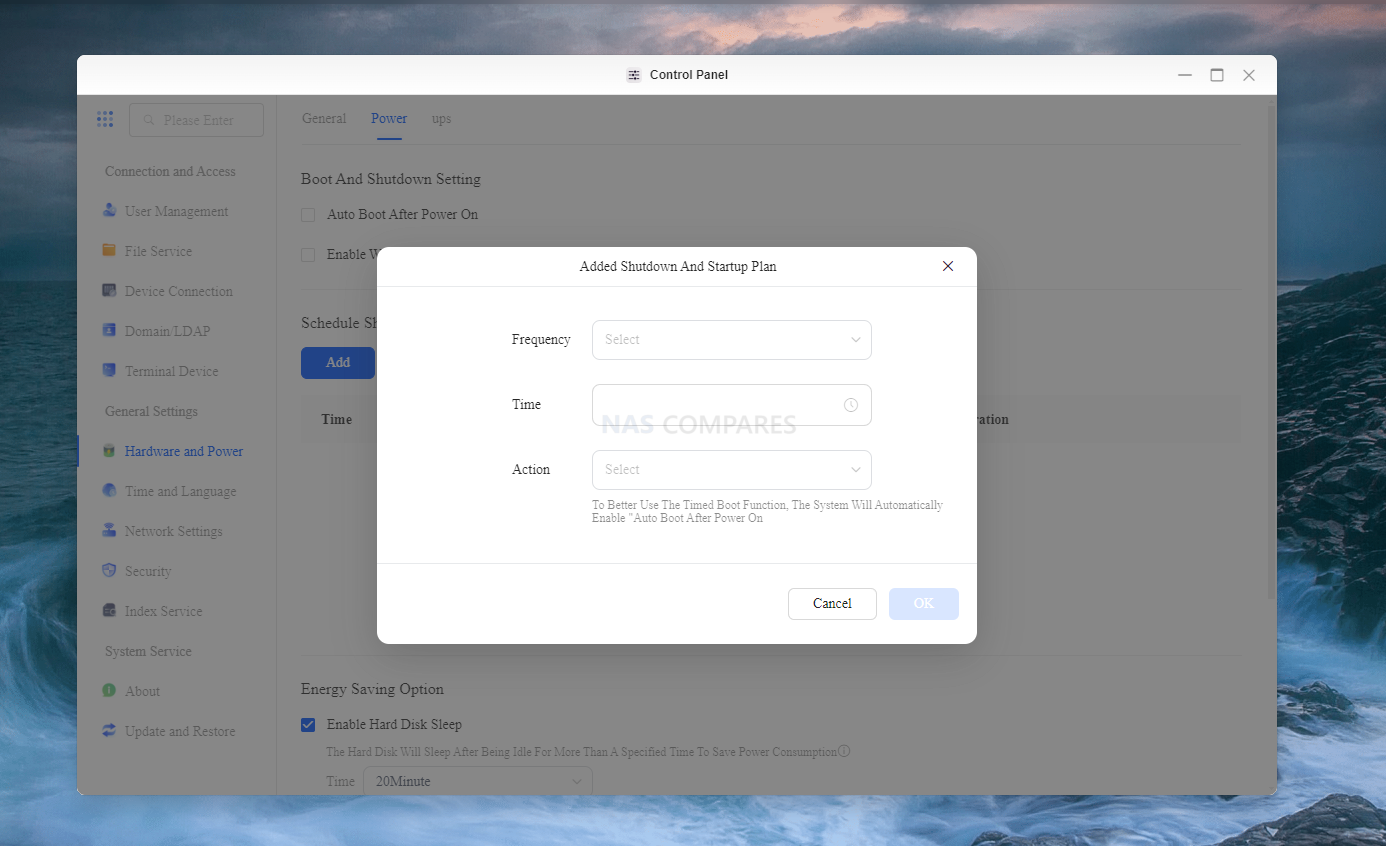
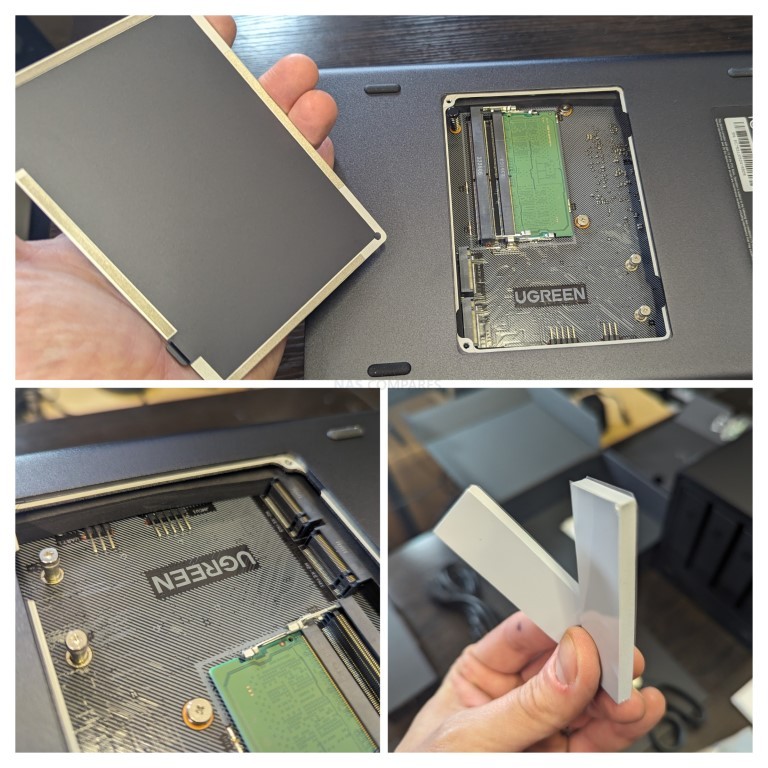
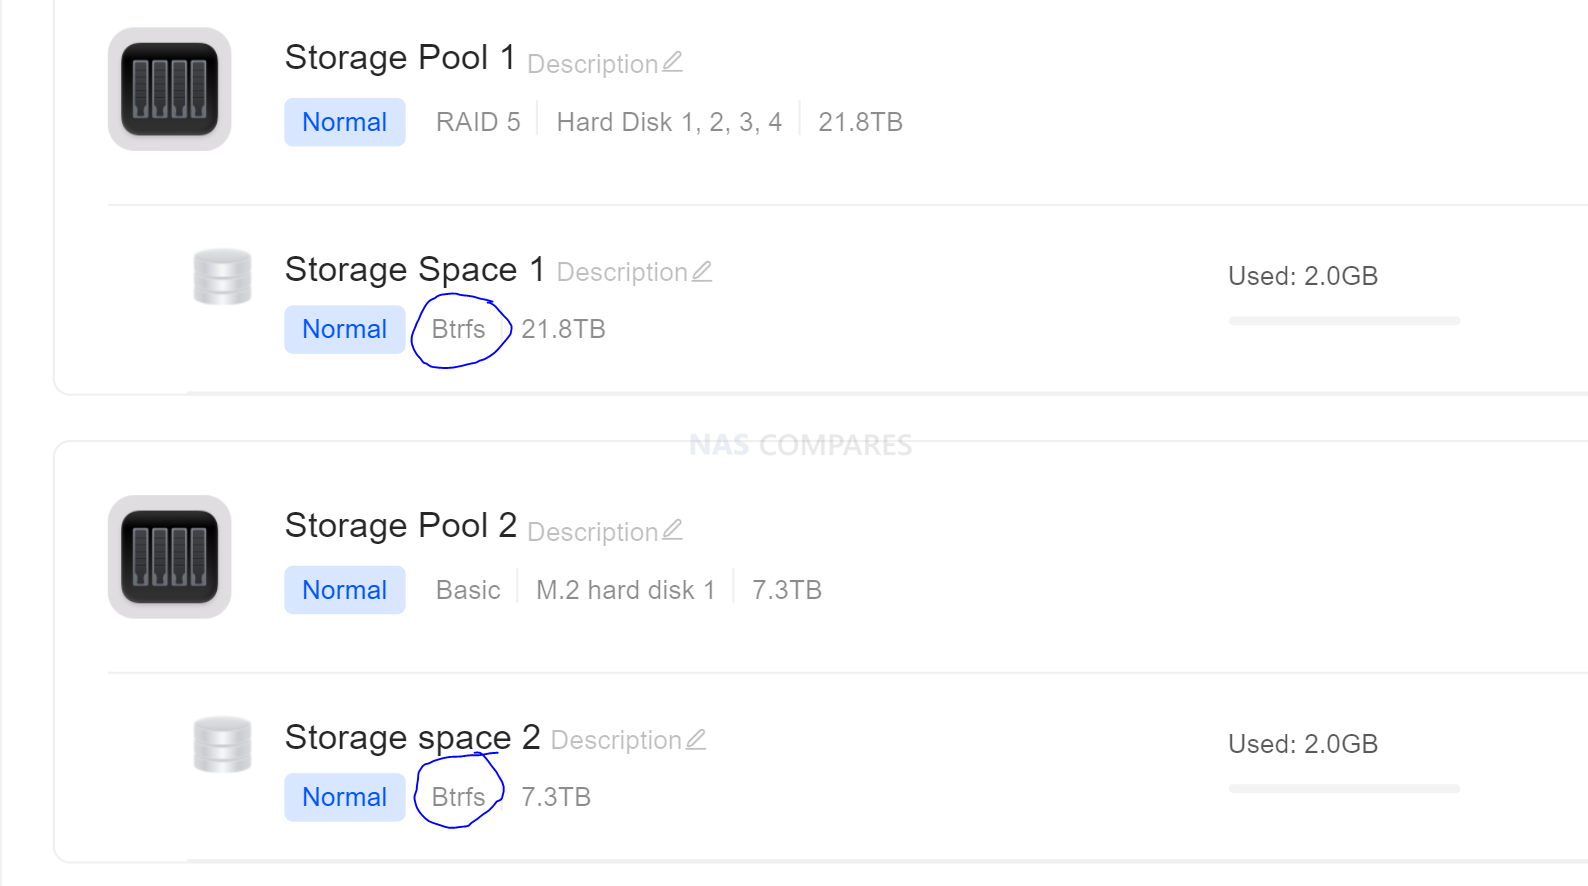
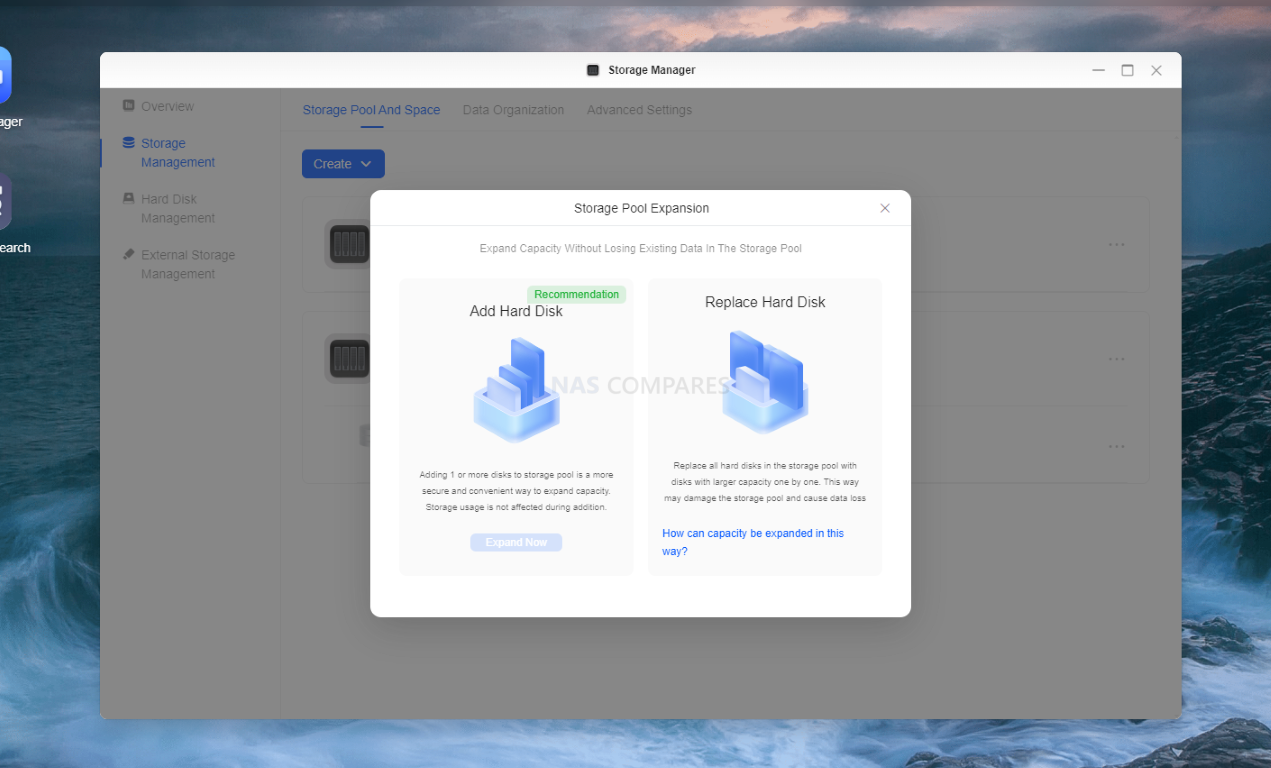

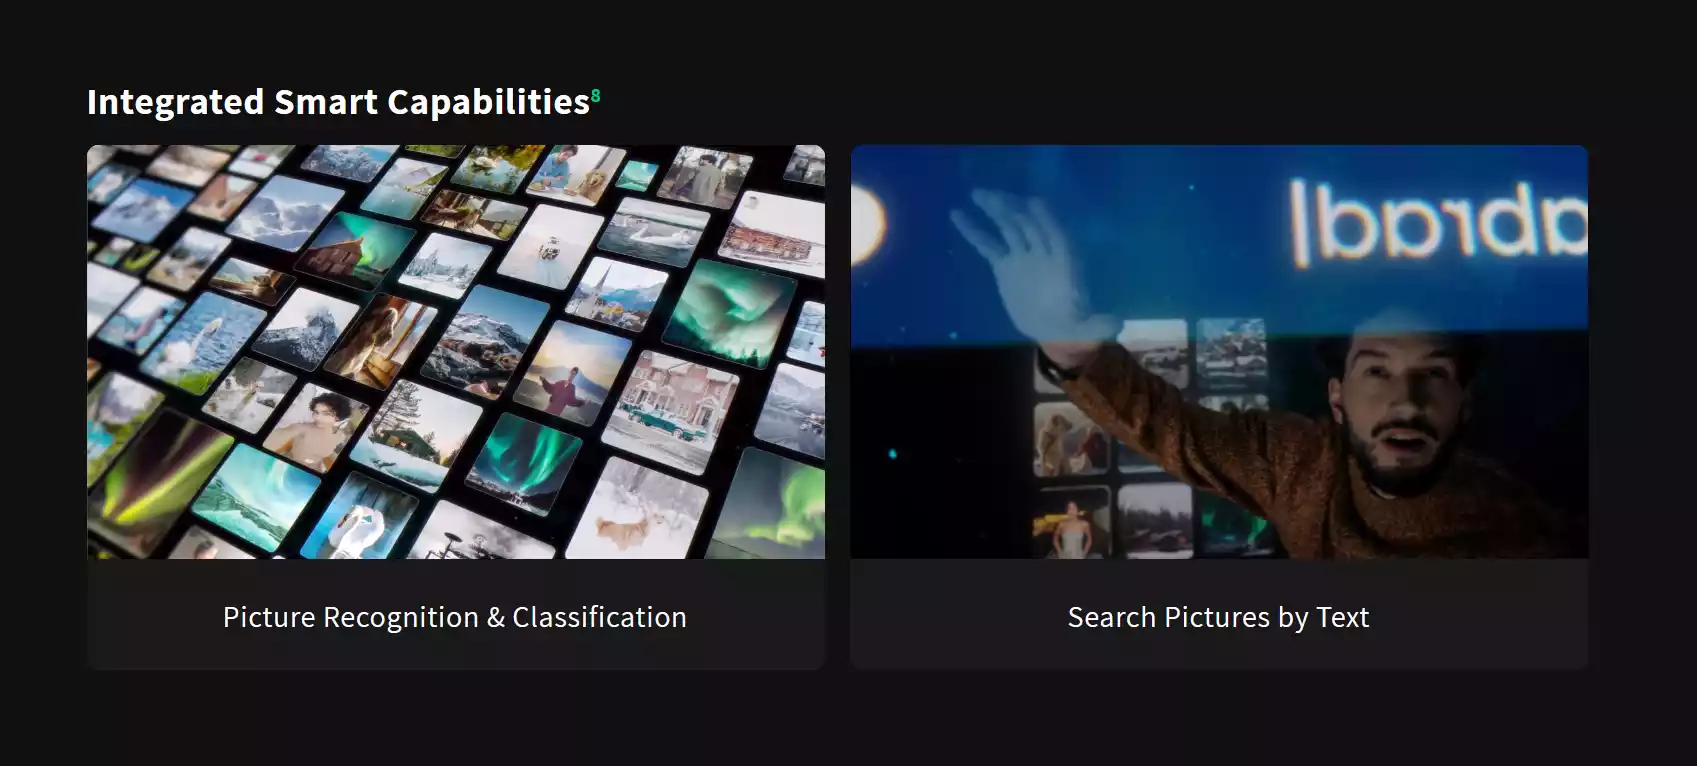


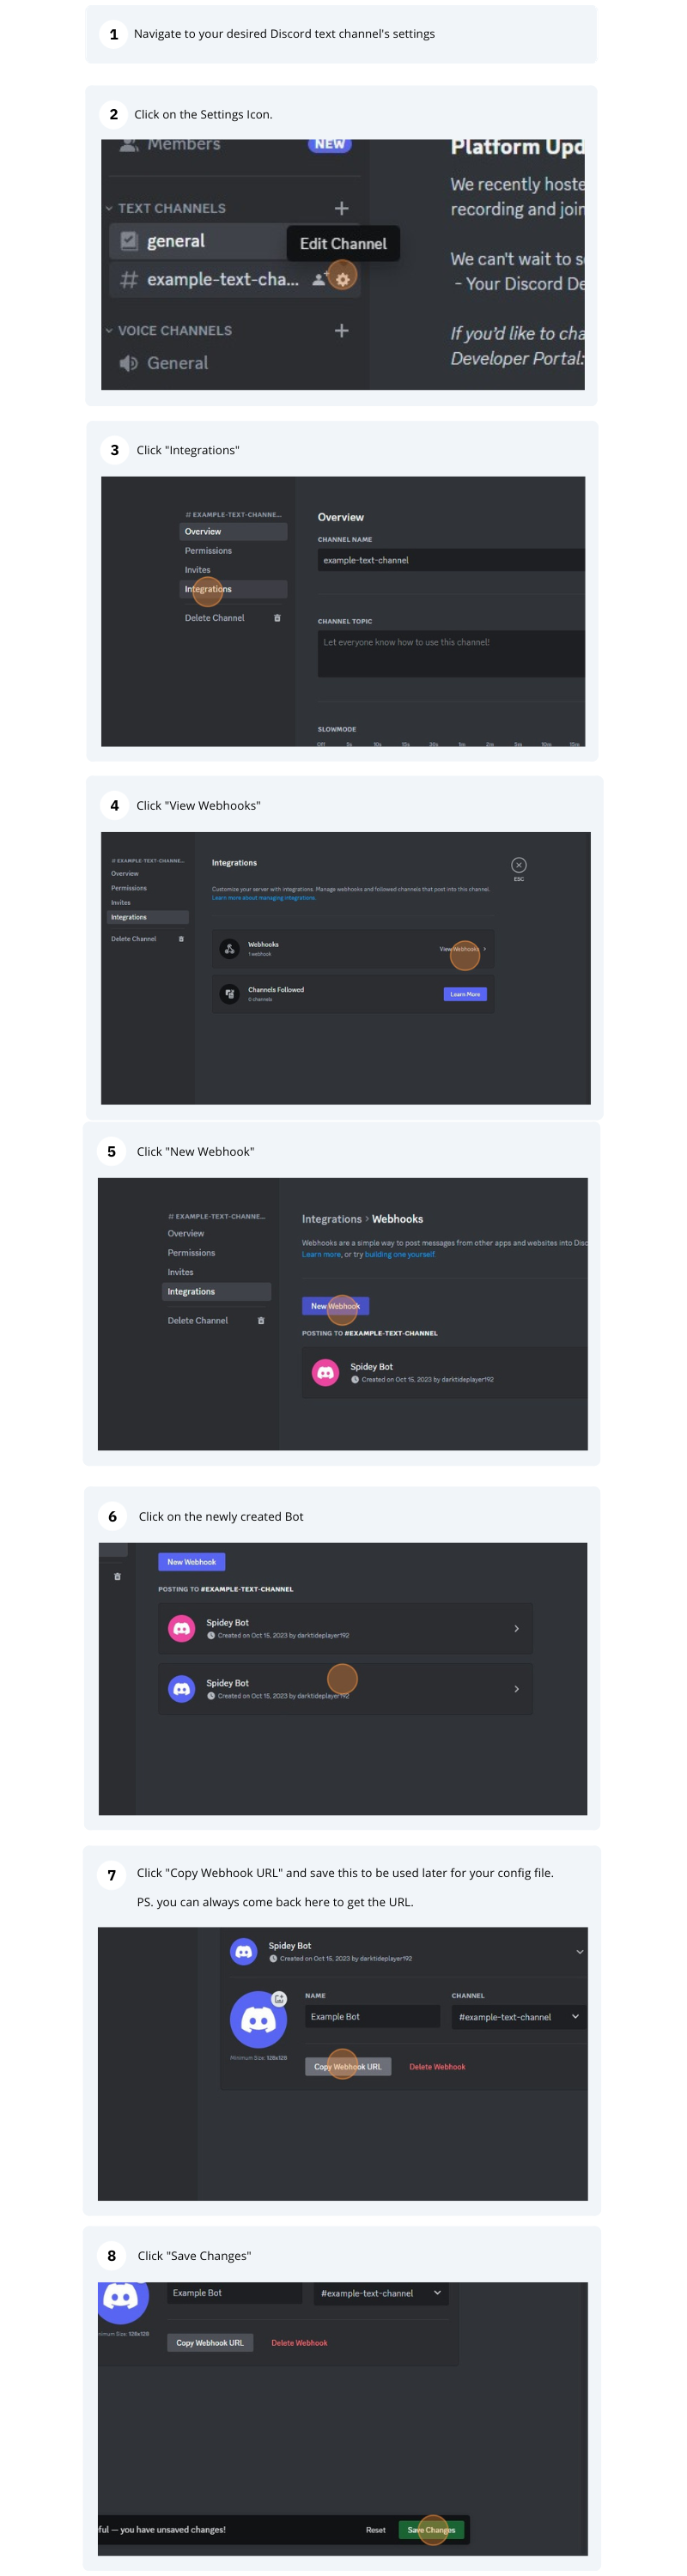


 J’avais besoin d’un système de facturation complet avec un gestionnaire de commandes et de clients. Après avoir essayé Invoice Ninja et InvoicePlane, qui ne m’ont pas satisfait à 100%, j’ai décidé de me tourner vers Odoo. A première vue, il peut apparaitre lourd ou trop complet pour un usage assez basique… pourtant, ce n’est pas le cas. Son fonctionnement par module le rend très flexible et relativement rapide. Aujourd’hui, nous allons voir ensemble comment installer la dernière version Odoo sur un NAS Synology avec Docker. Odoo et Synology Odoo (anciennement OpenERP) est une suite d’applications open-source écrites en Python et […]
 Aujourd’hui, nous vous présentons un guide pour installer facilement qBittorrent sur votre NAS Synology. Si vous lisez ces lignes, c’est certainement parce que vous recherchez une solution efficace pour gérer vos torrents. Grâce à la combinaison de qBittorrent et Docker, vous pourrez télécharger et partager vos fichiers depuis votre NAS Synology. Entrons dans le vif du sujet… qBittorrent et NAS Synology Avec Docker, il n’a jamais été aussi simple d’ajouter des fonctionnalités à son NAS. Dans ce tuto, nous allons voir ensemble comment installer qBittorrent avec Container Manager. Ce dernier permet de faire fonctionner des conteneurs Docker très facilement sur […]
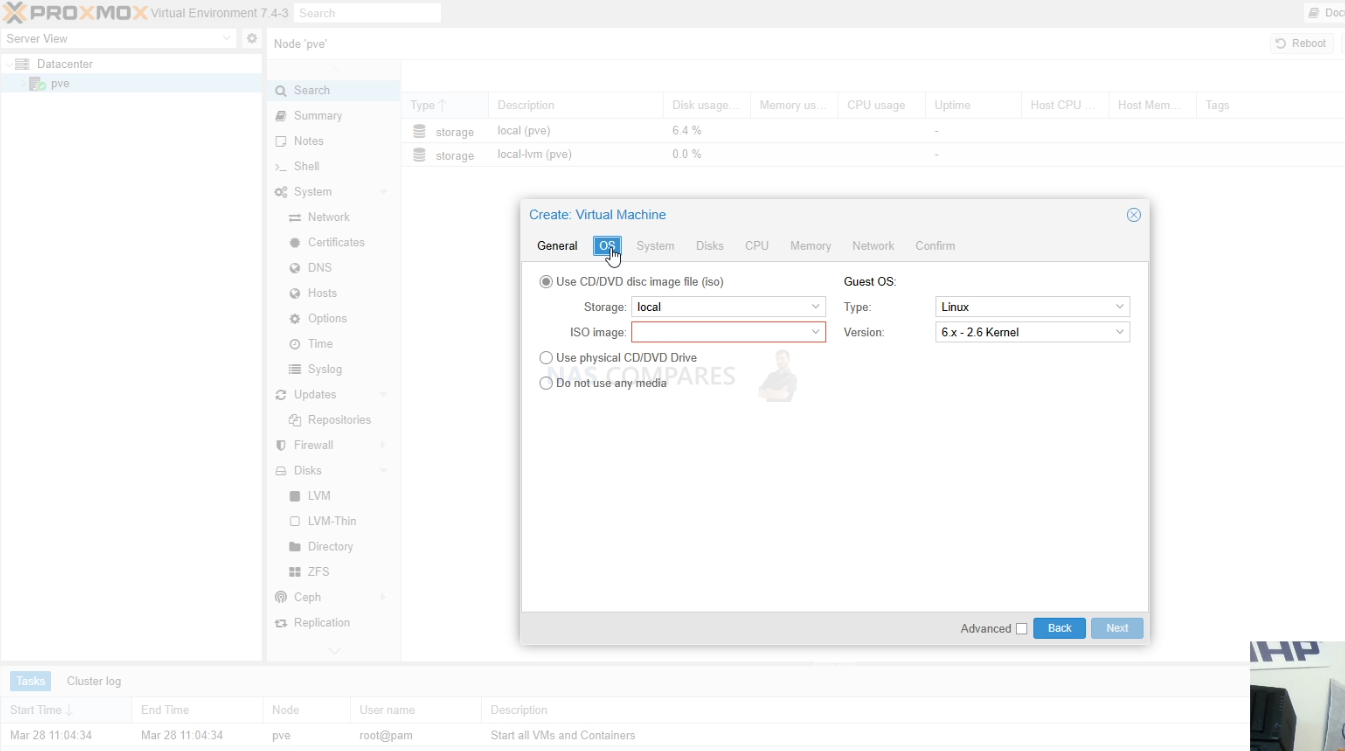
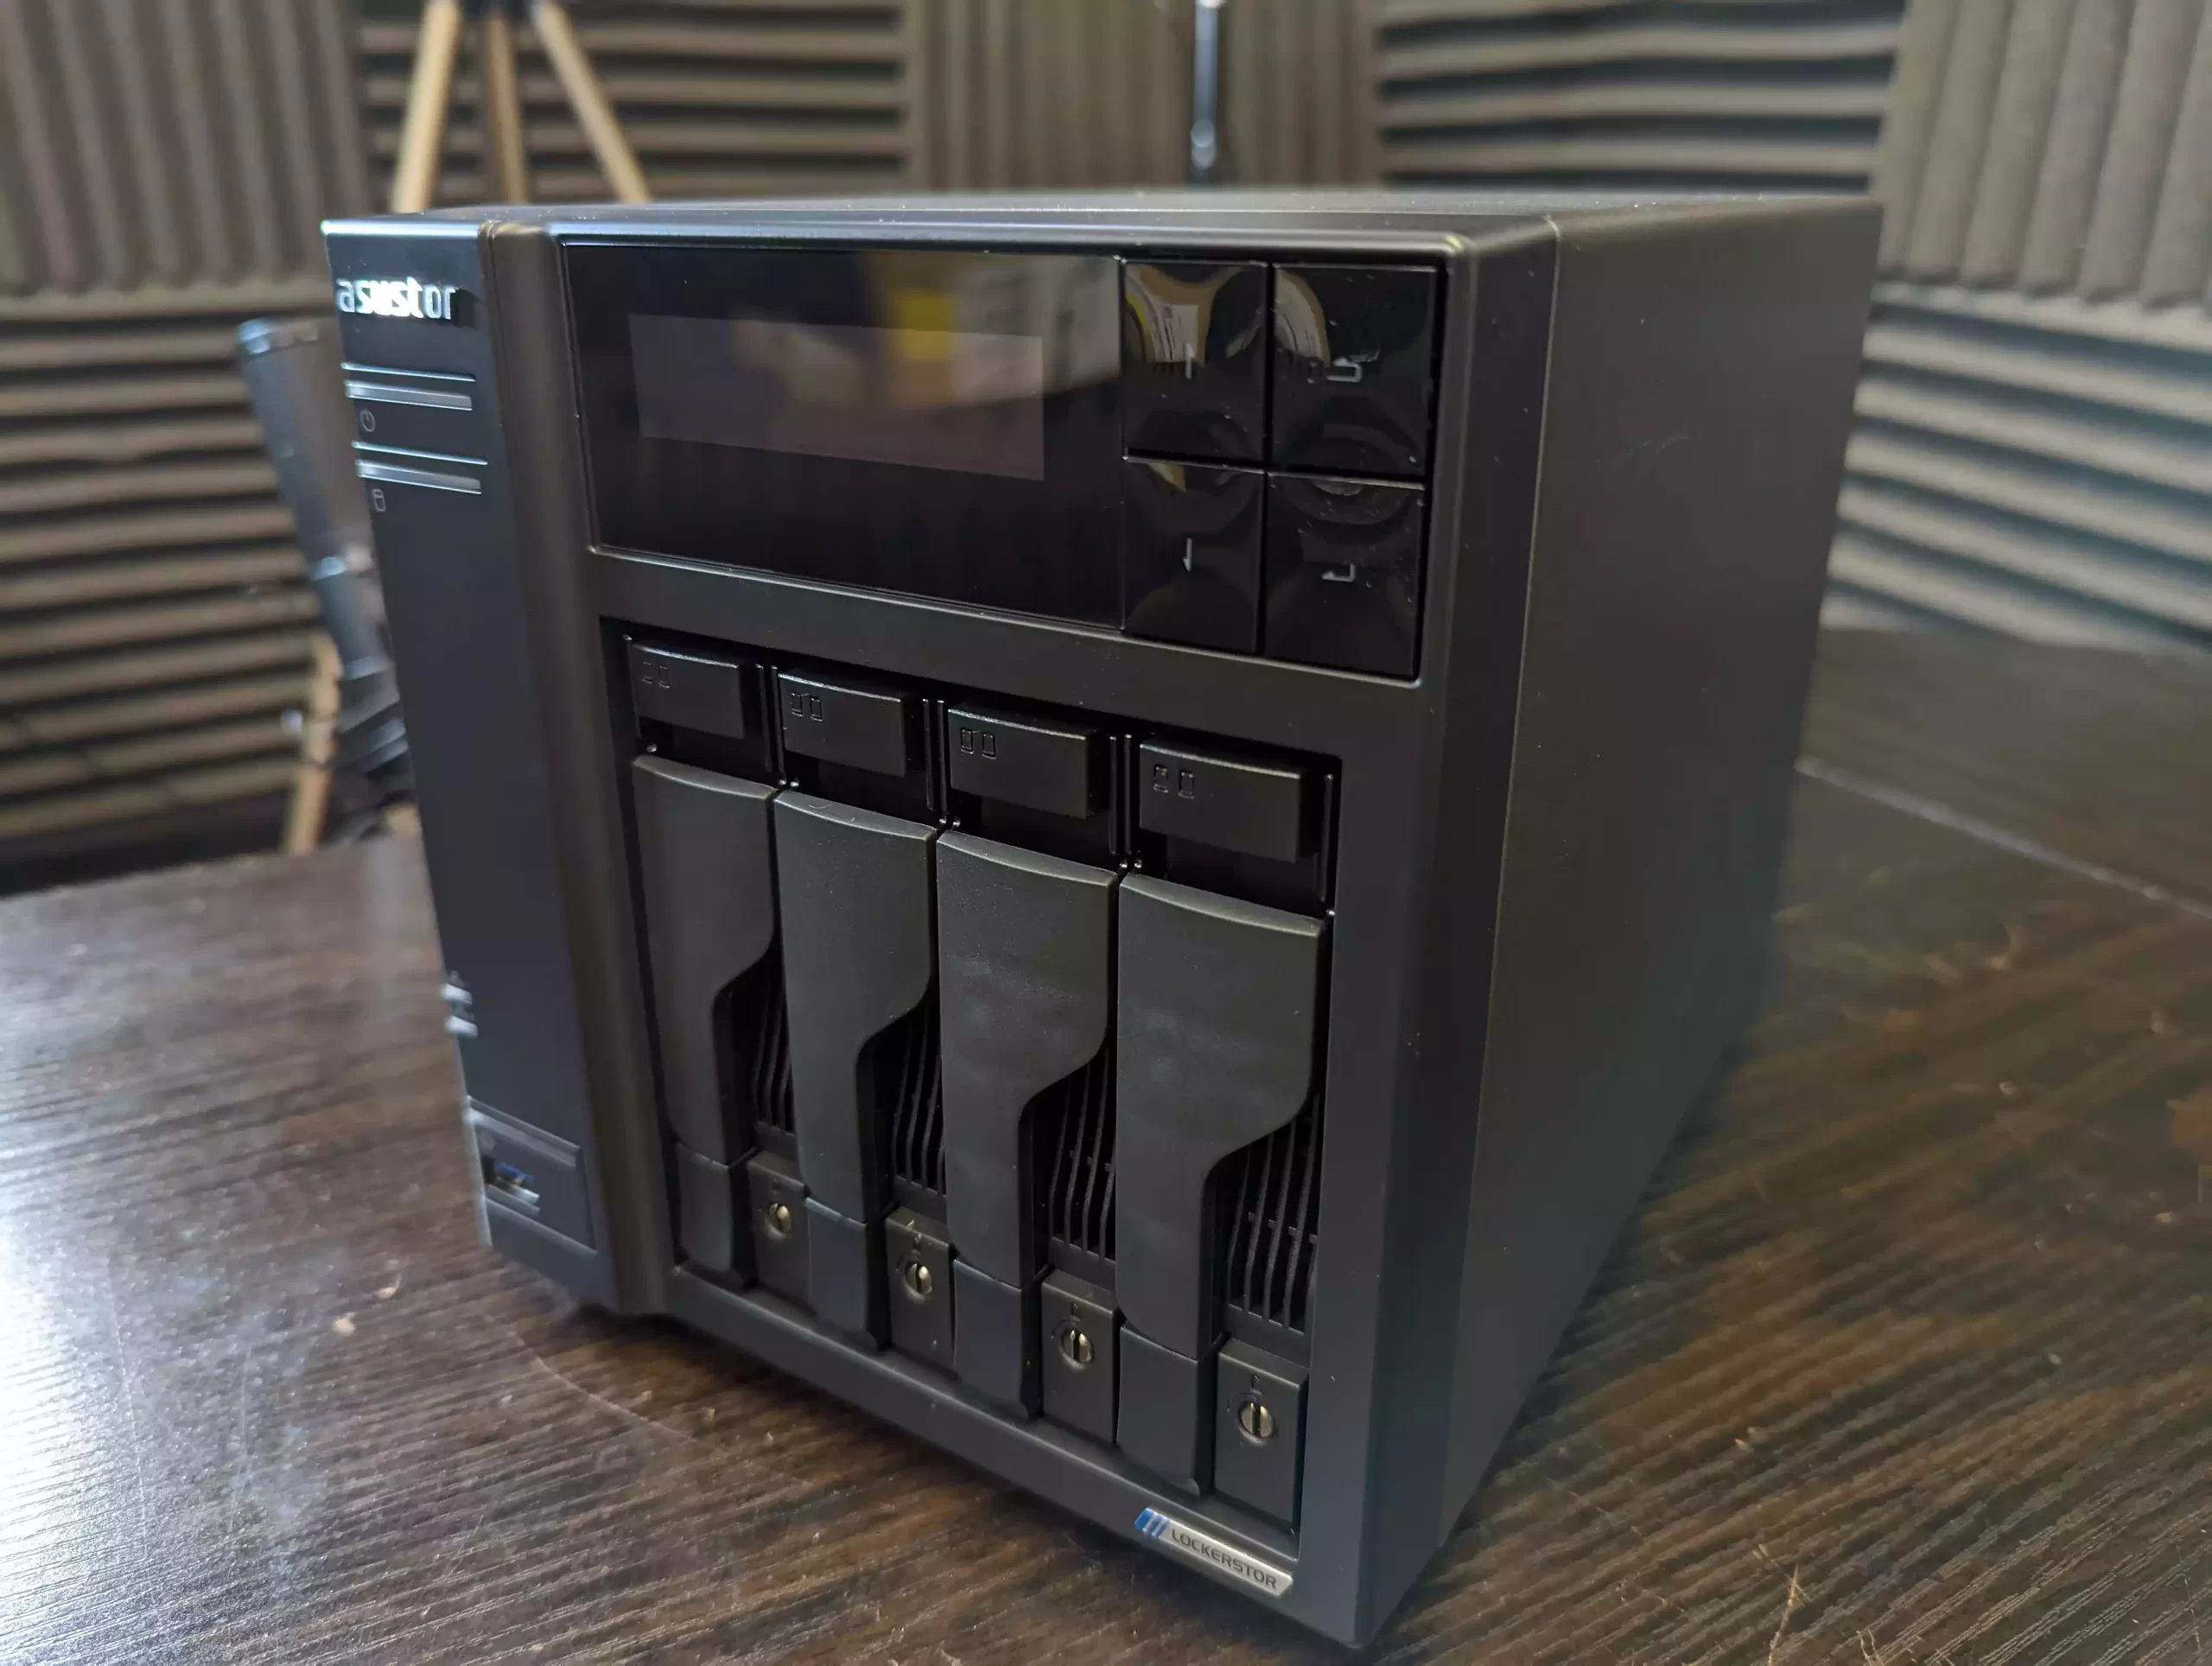
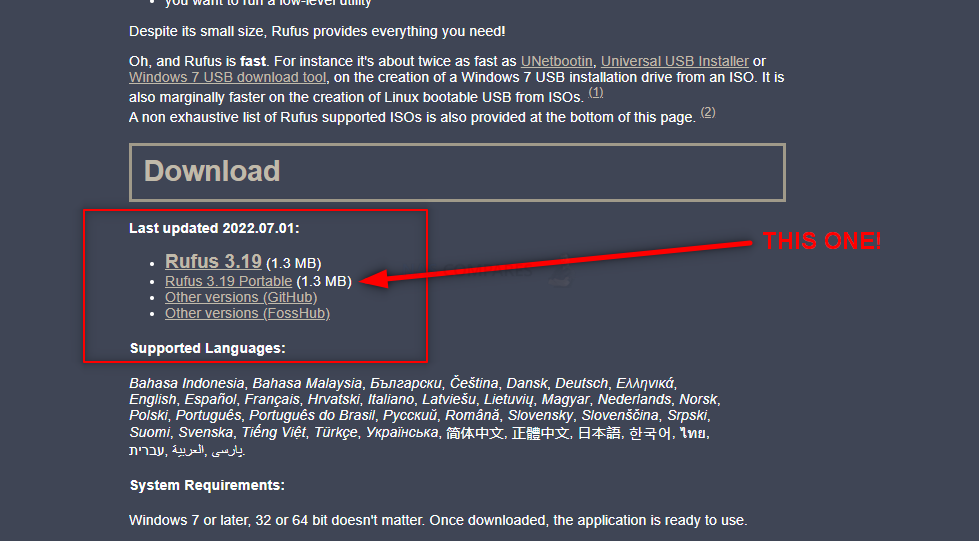
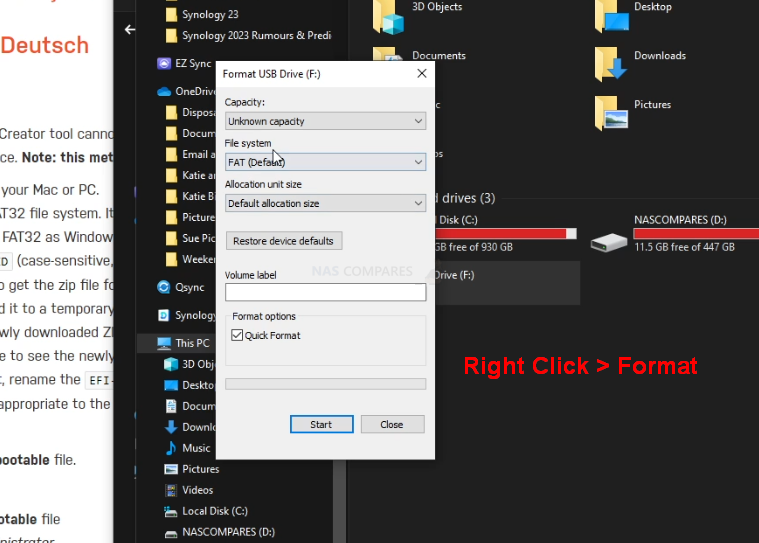
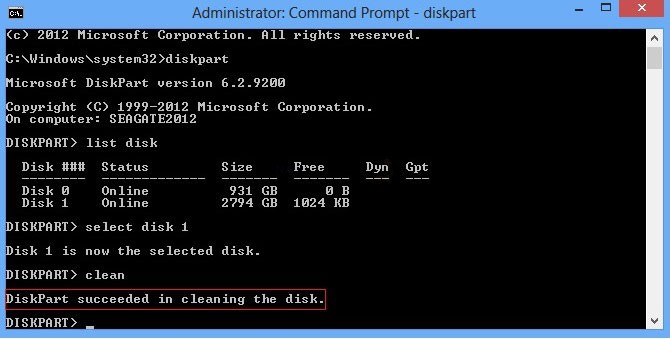
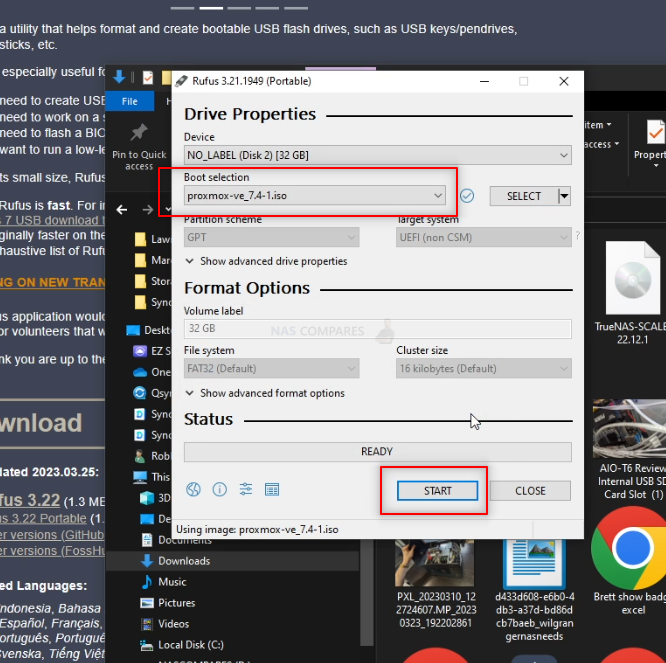
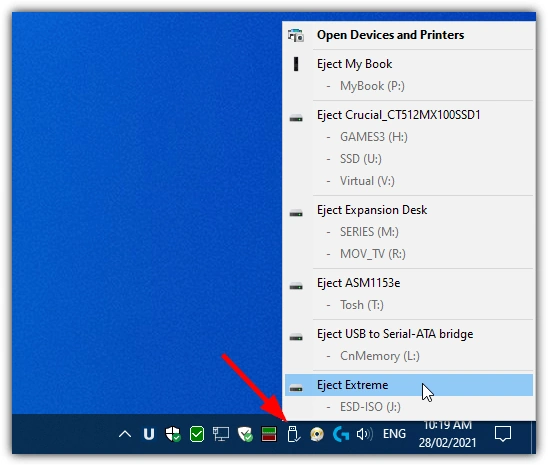
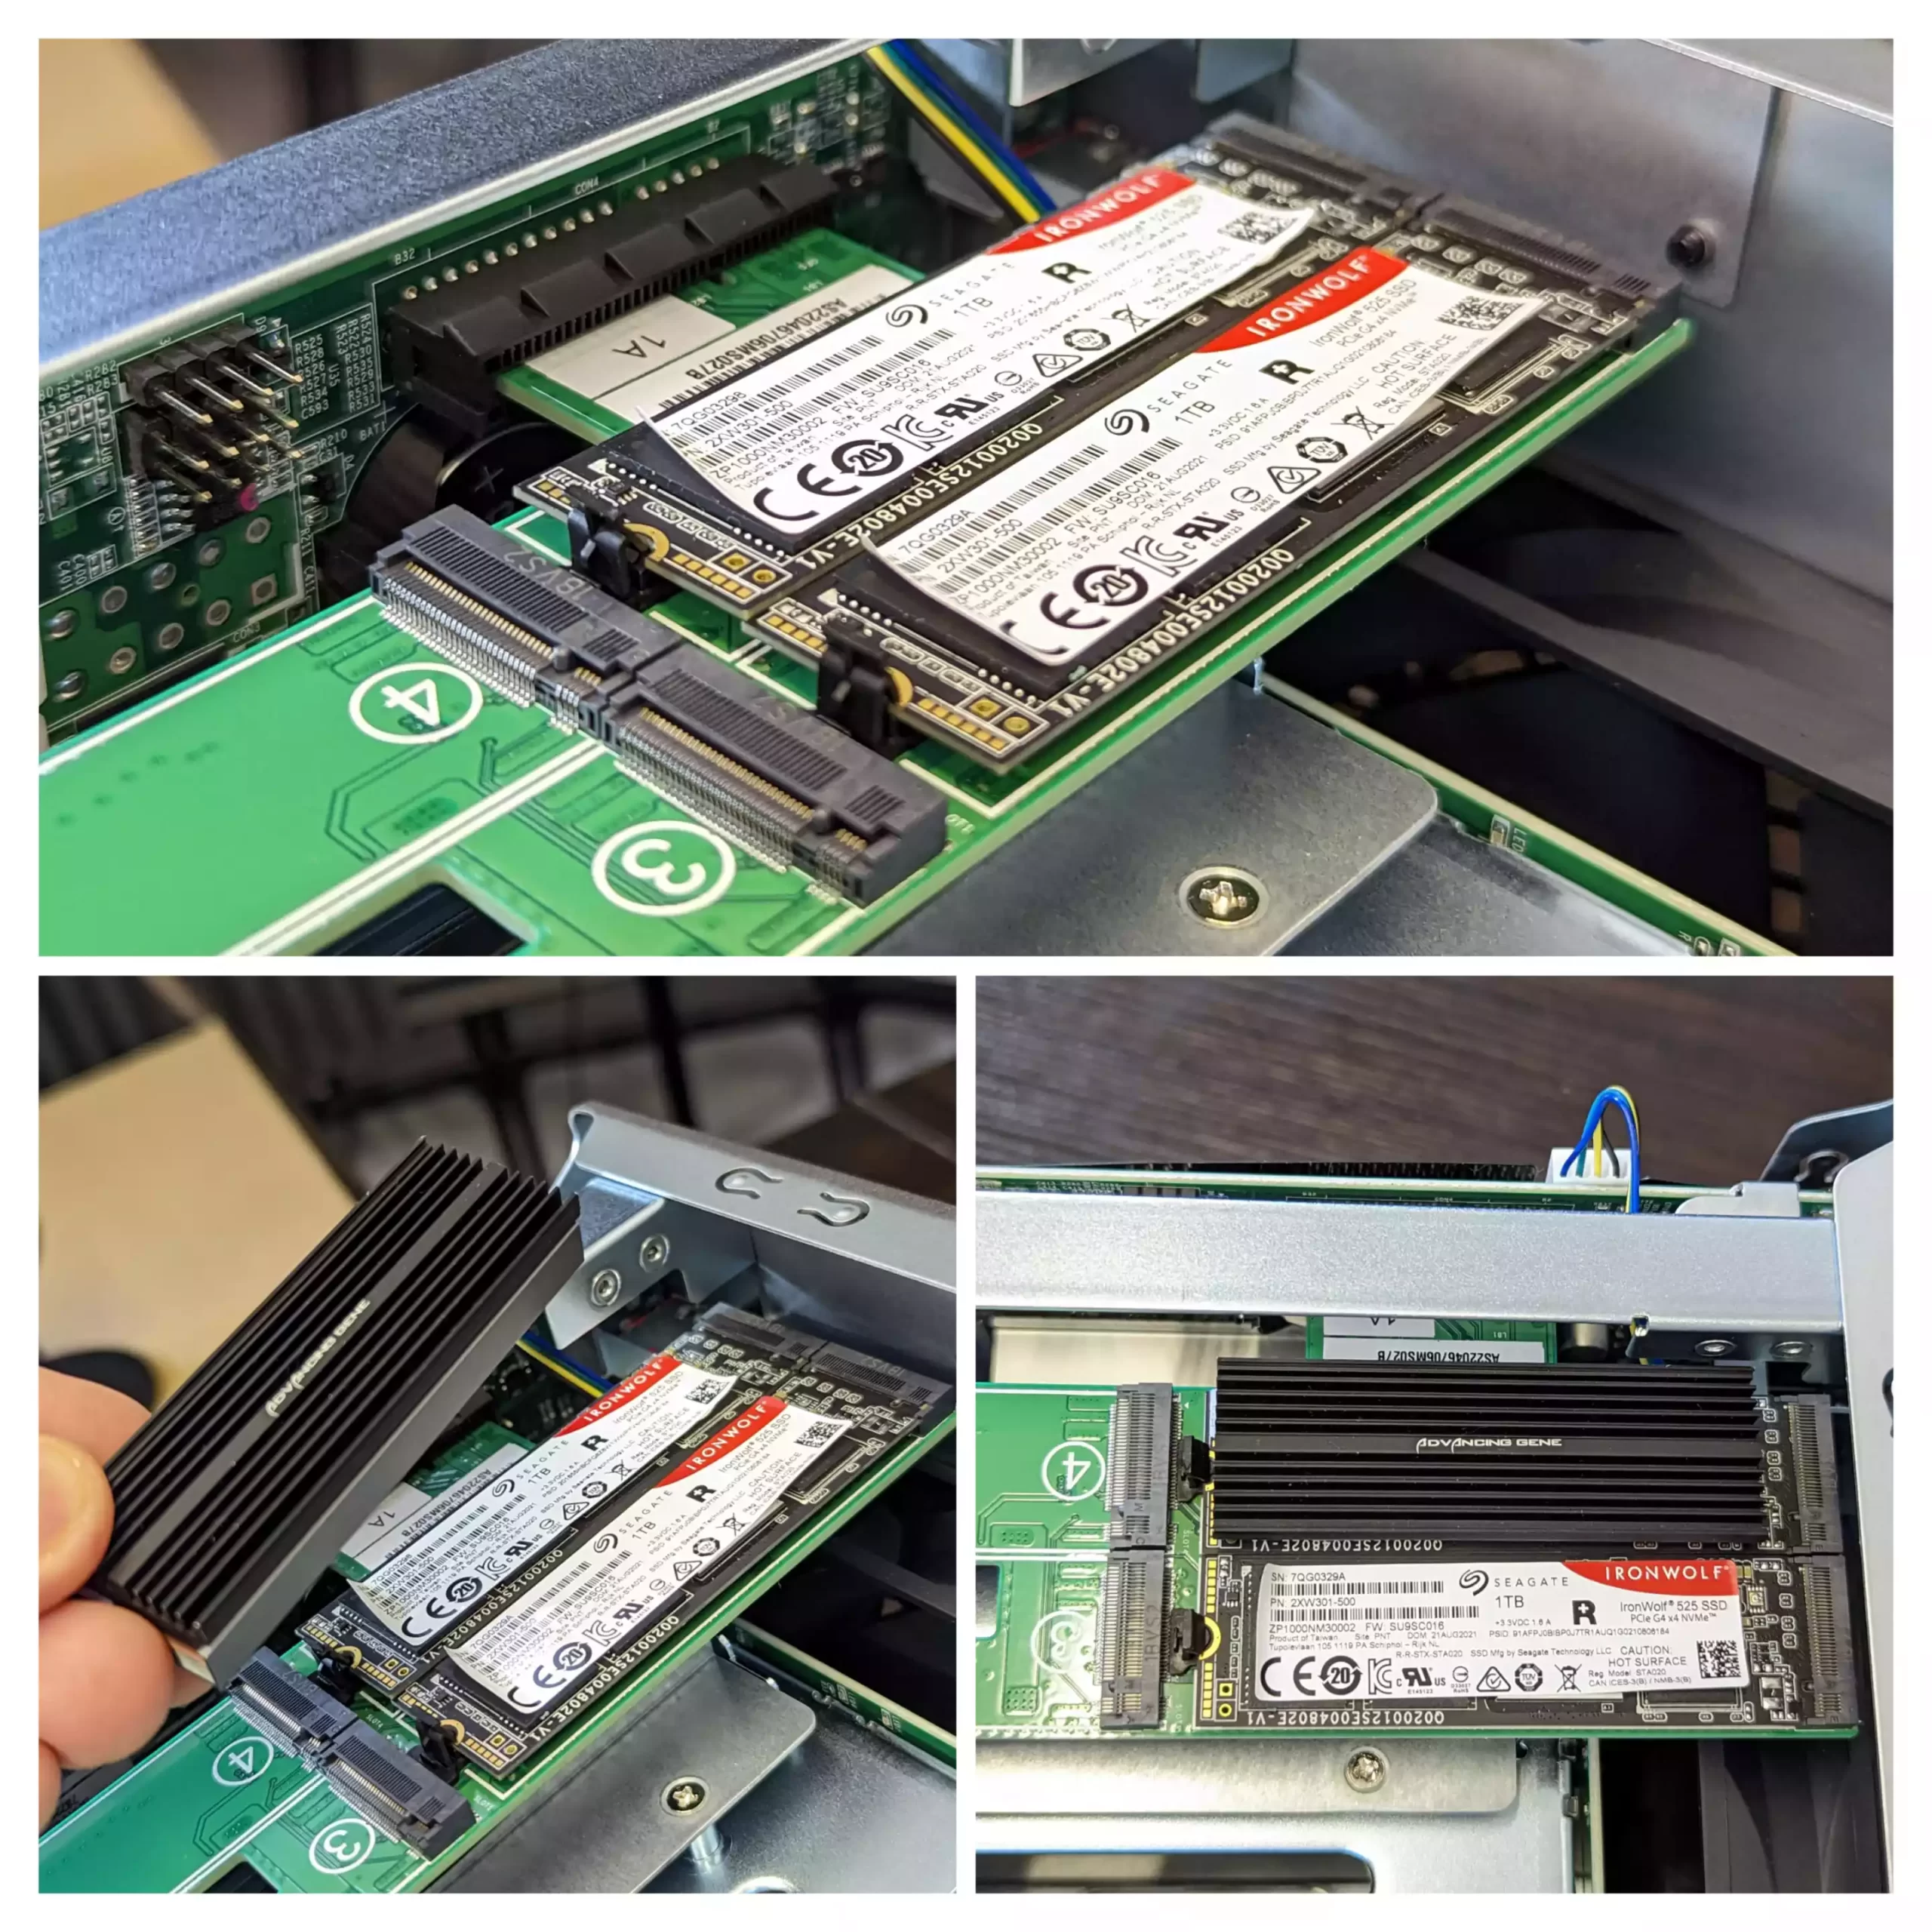
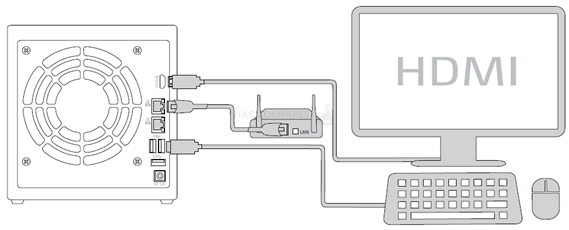
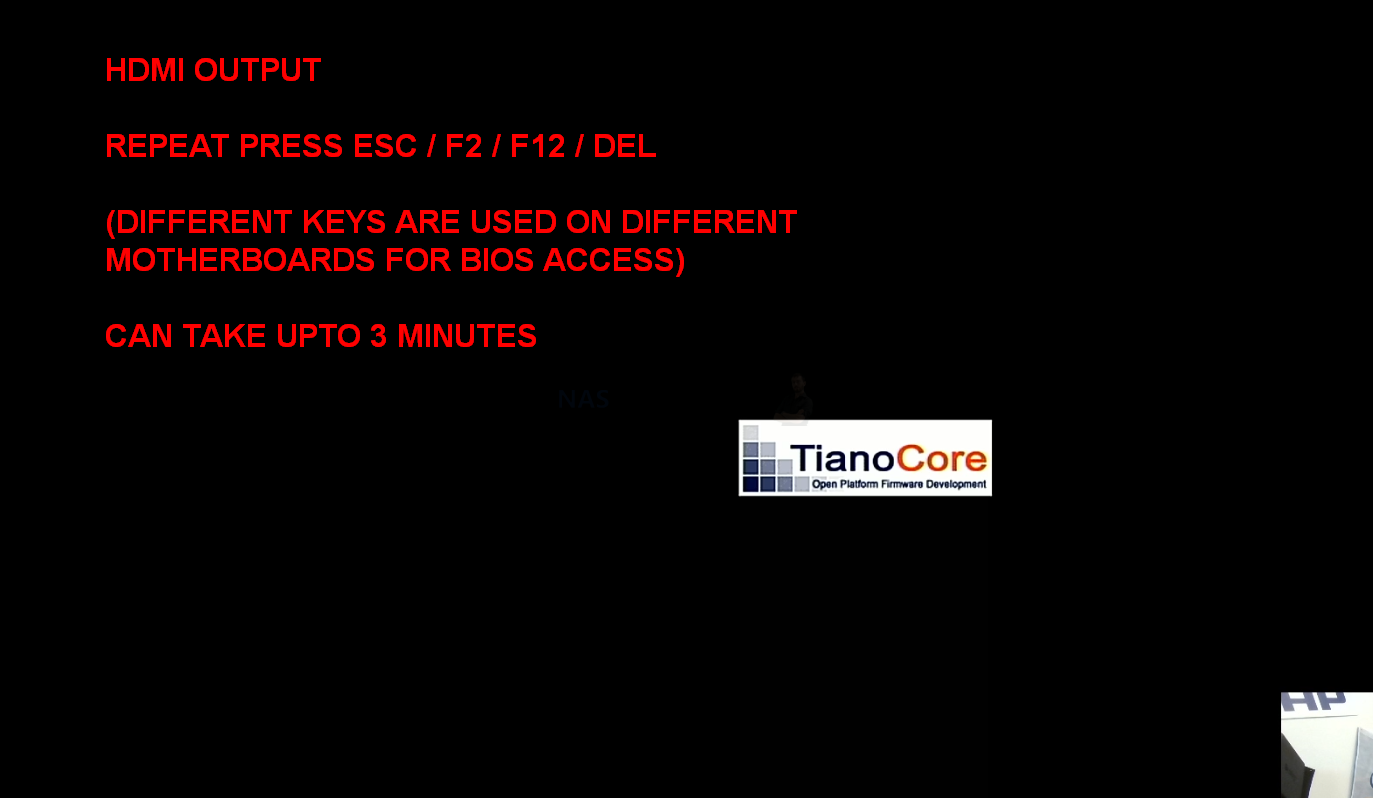
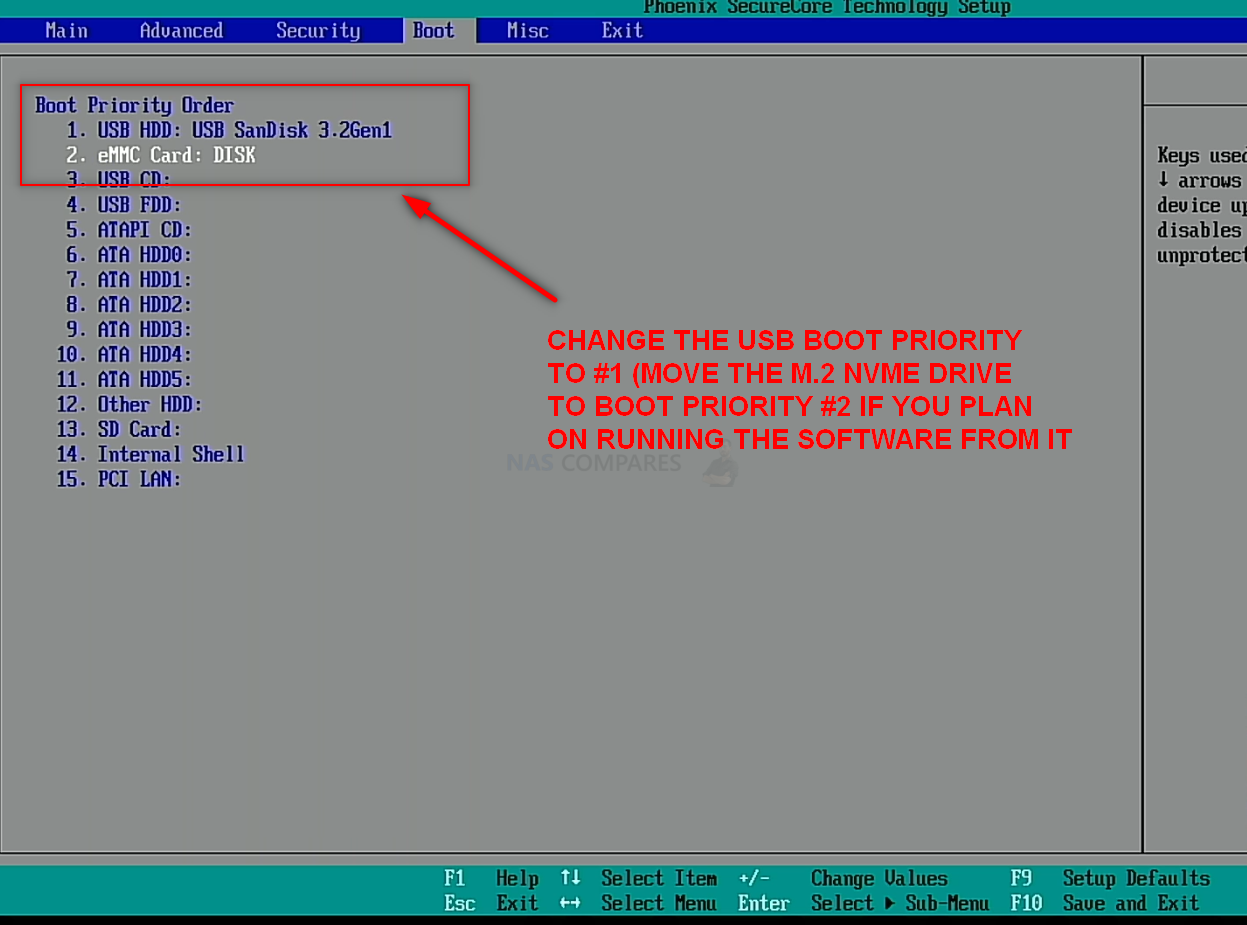
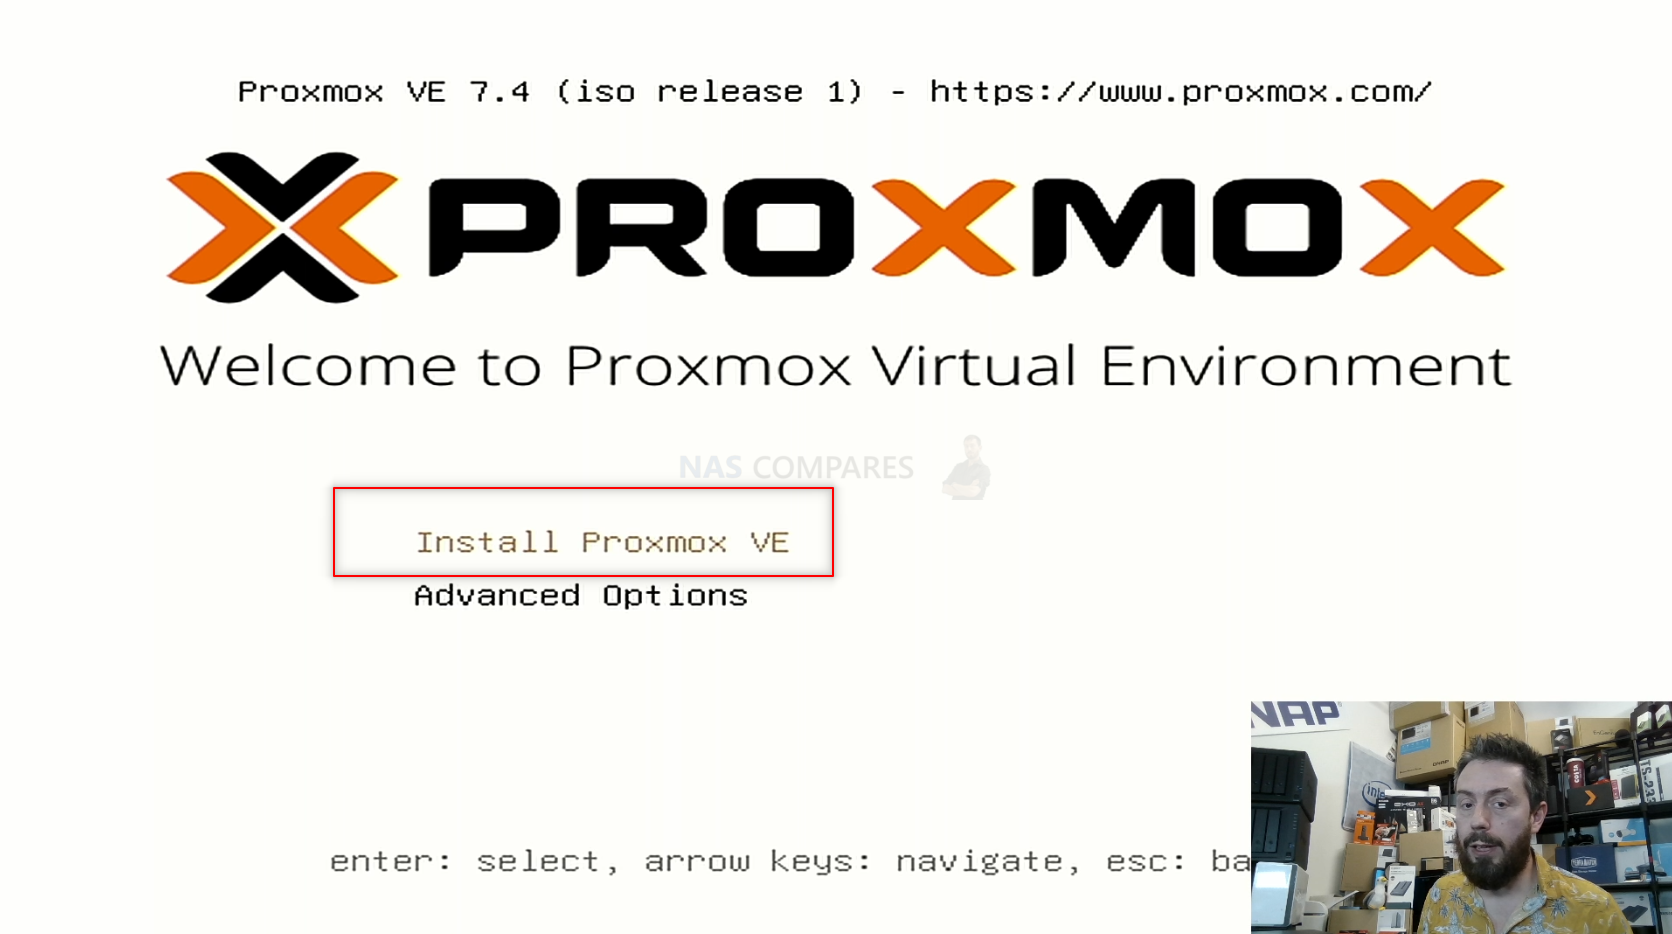
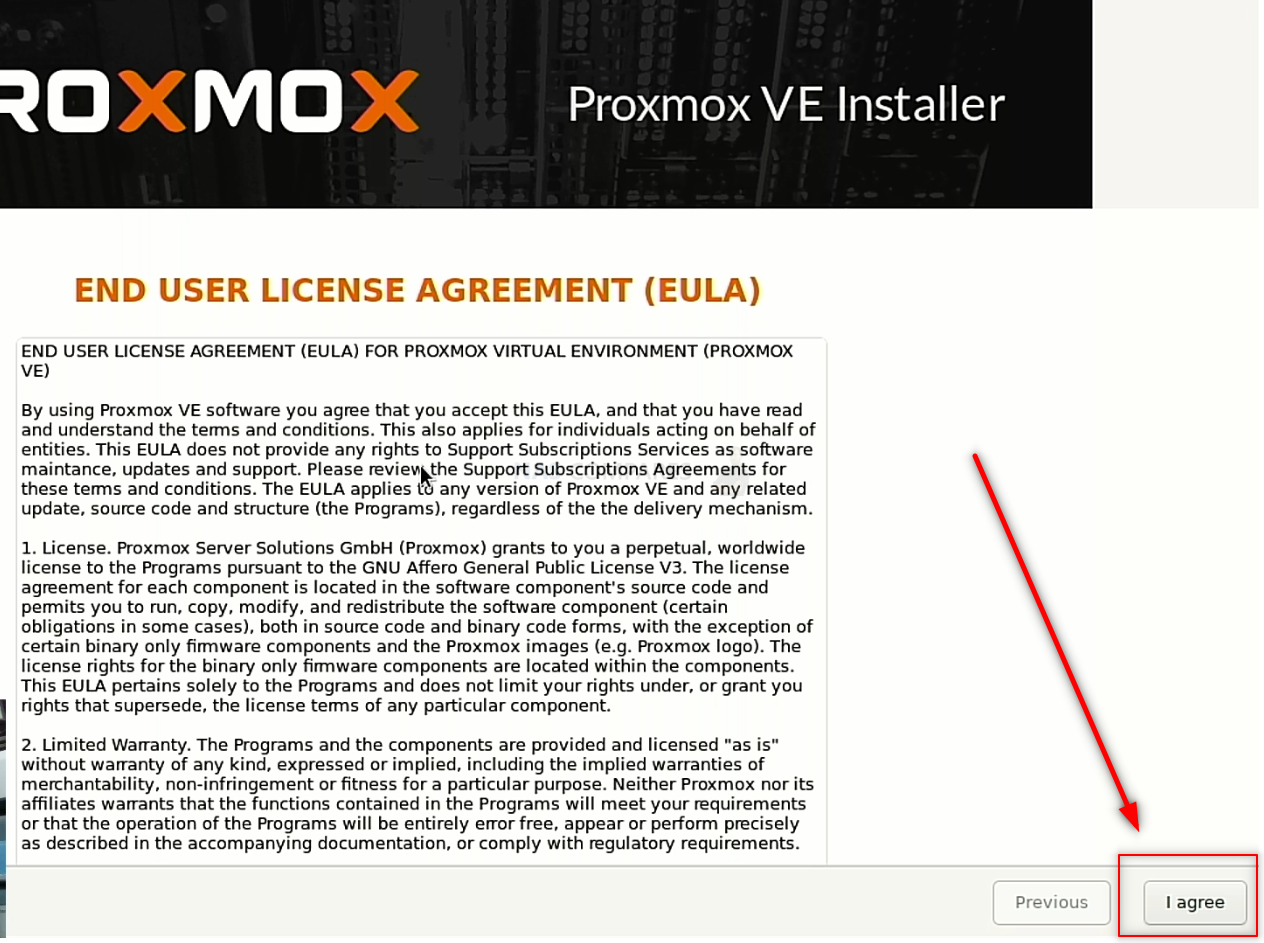

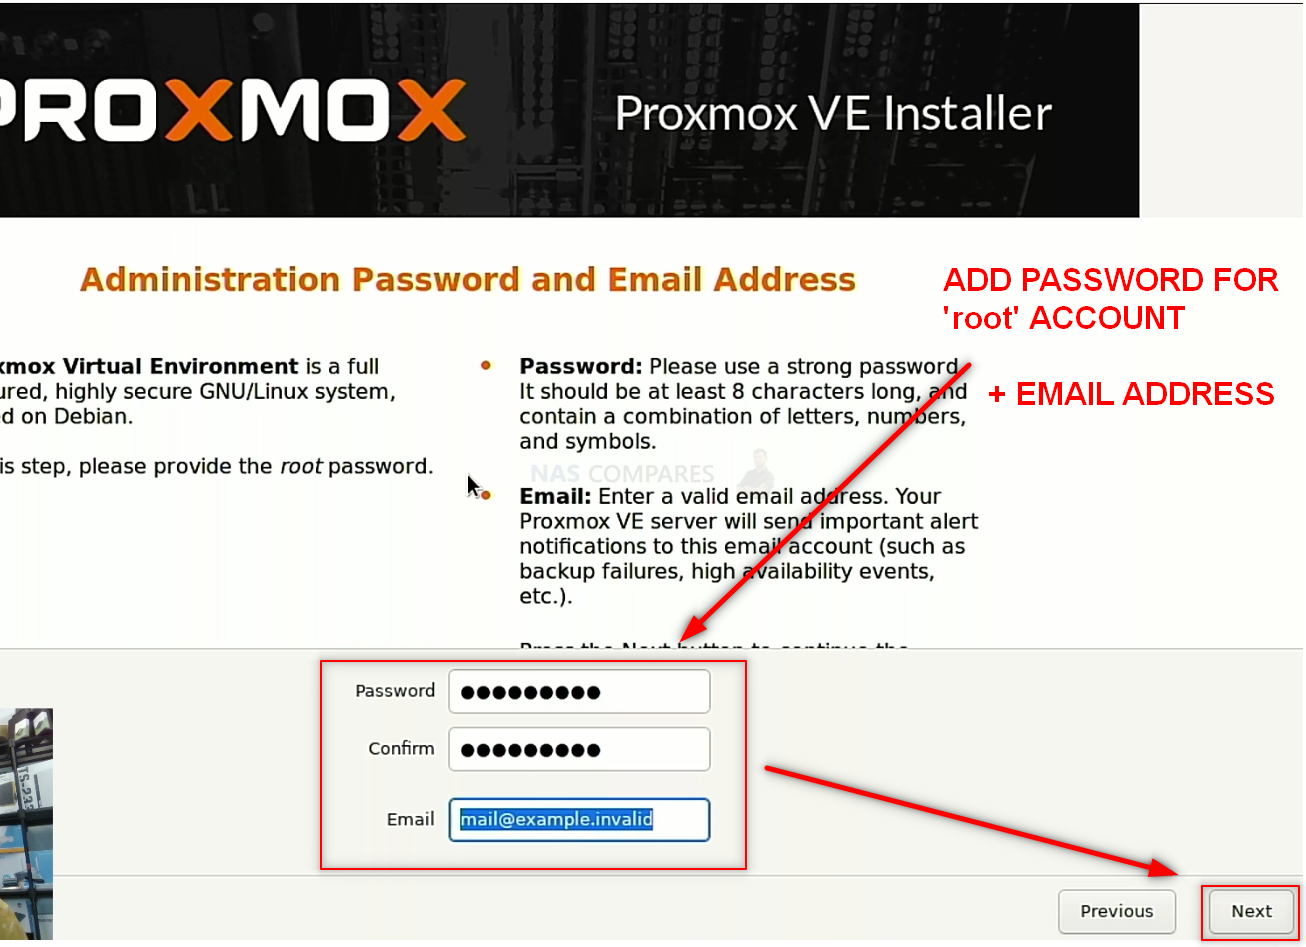
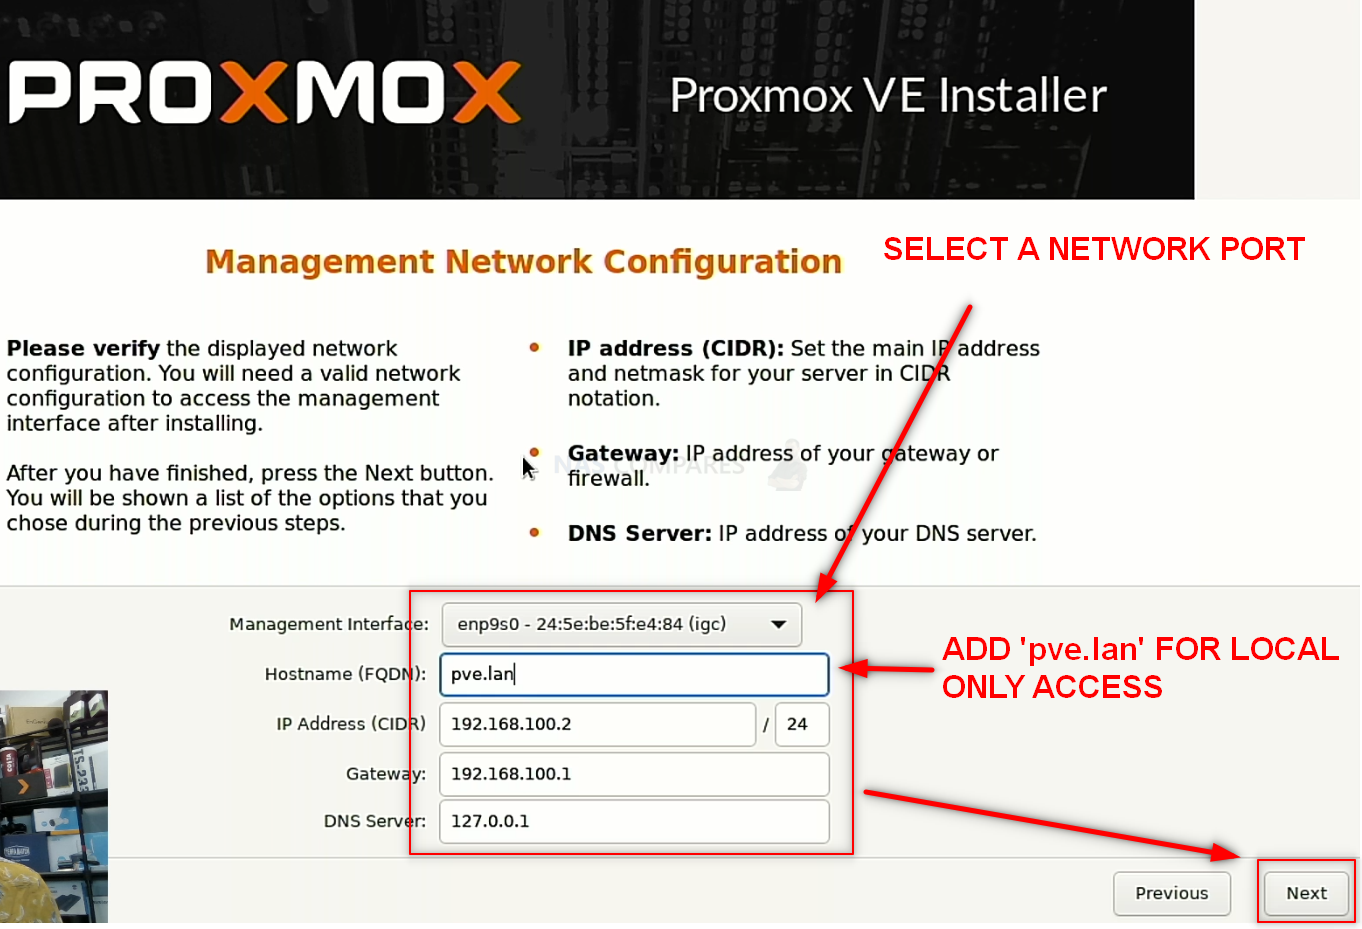
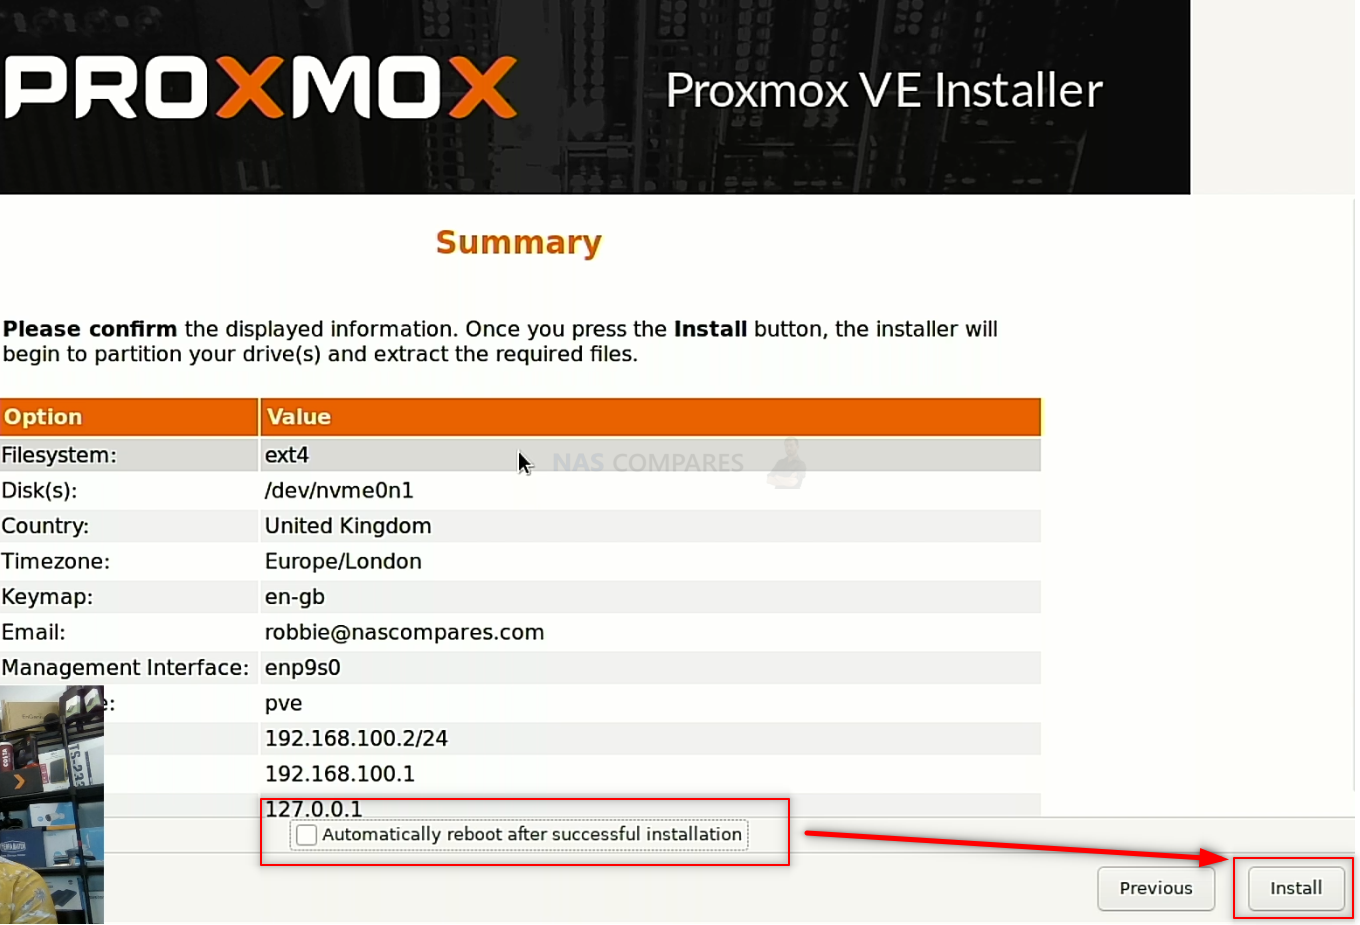
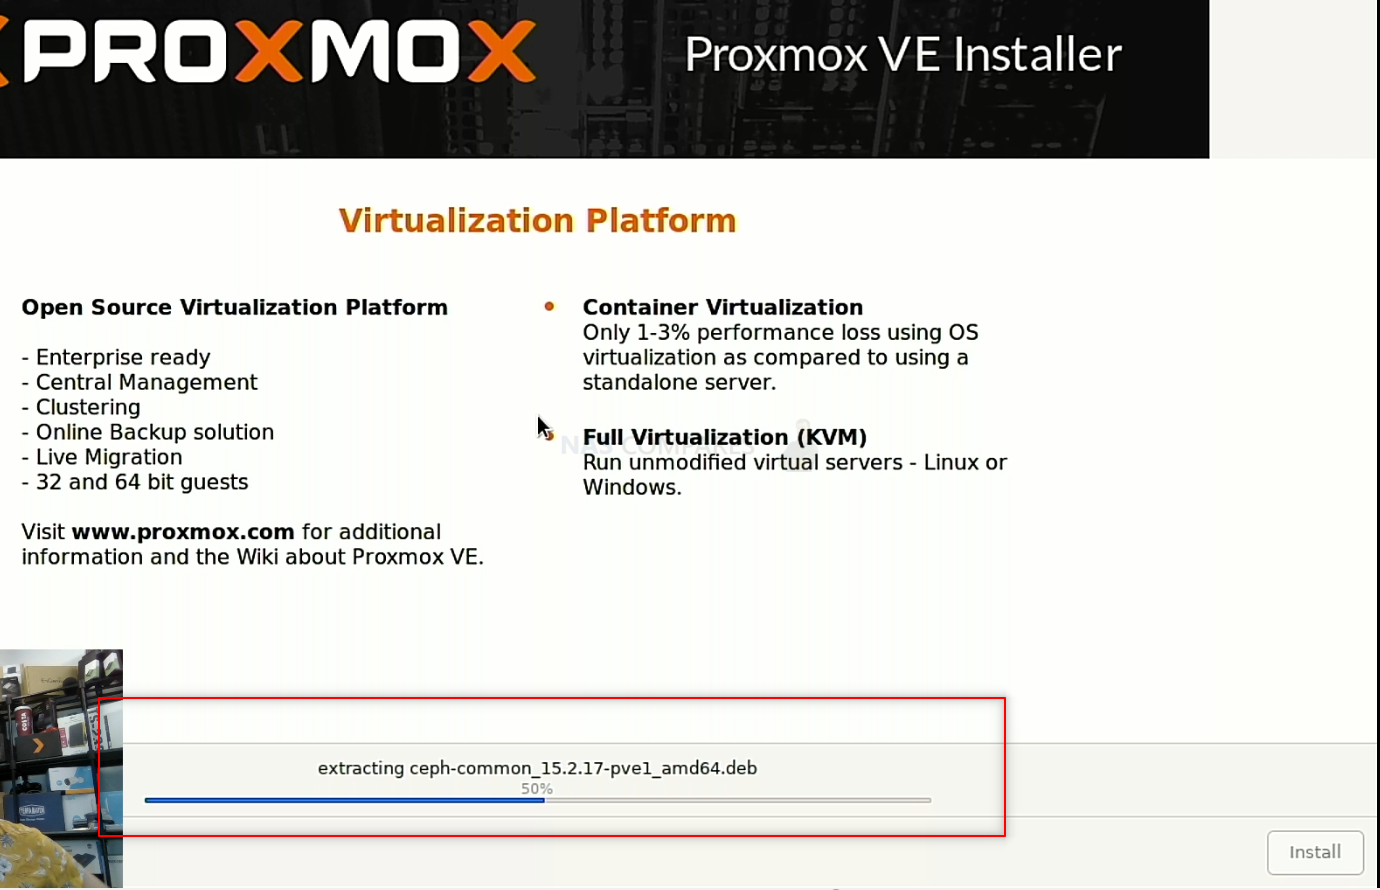
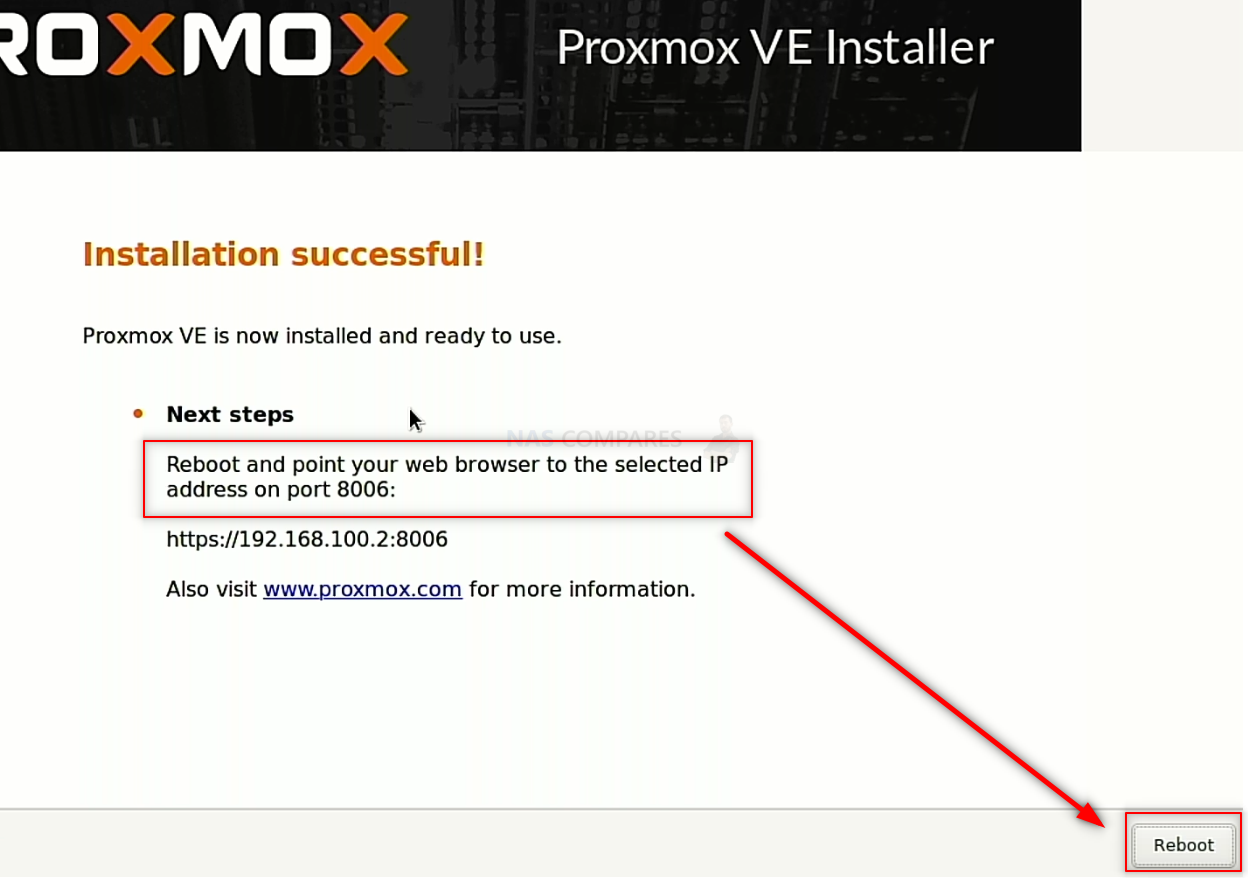
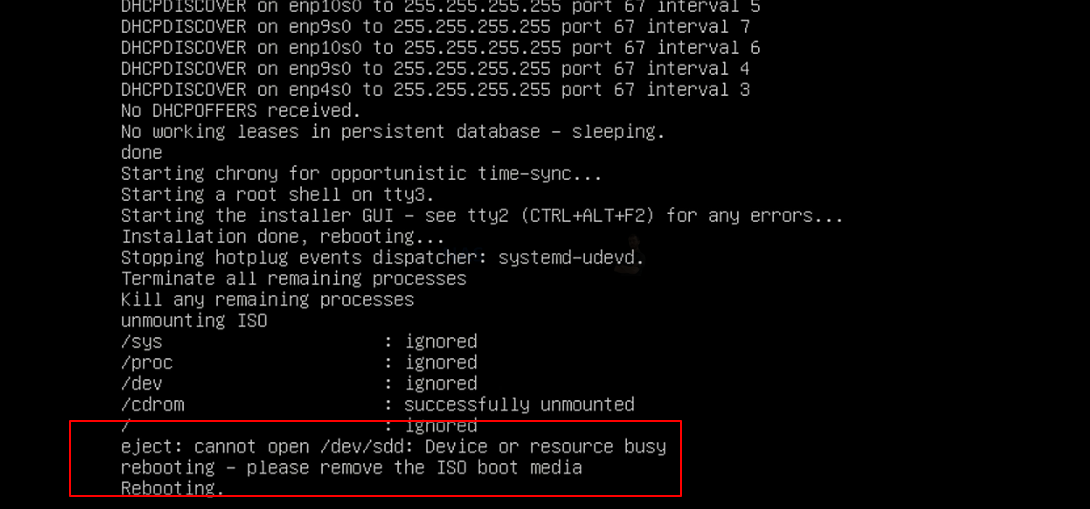
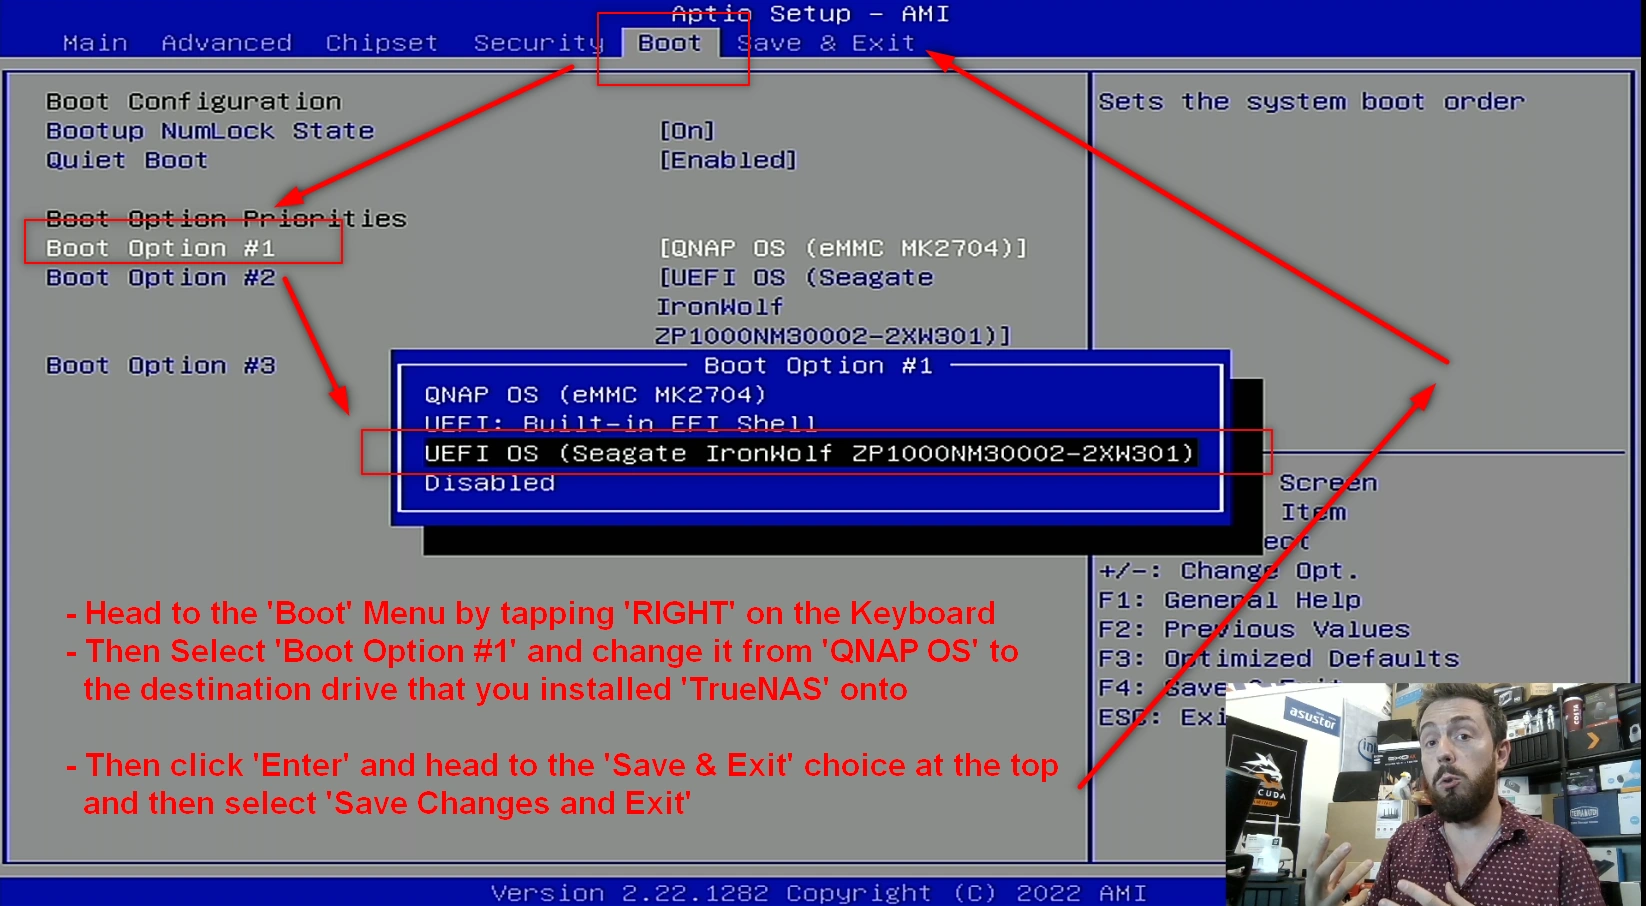
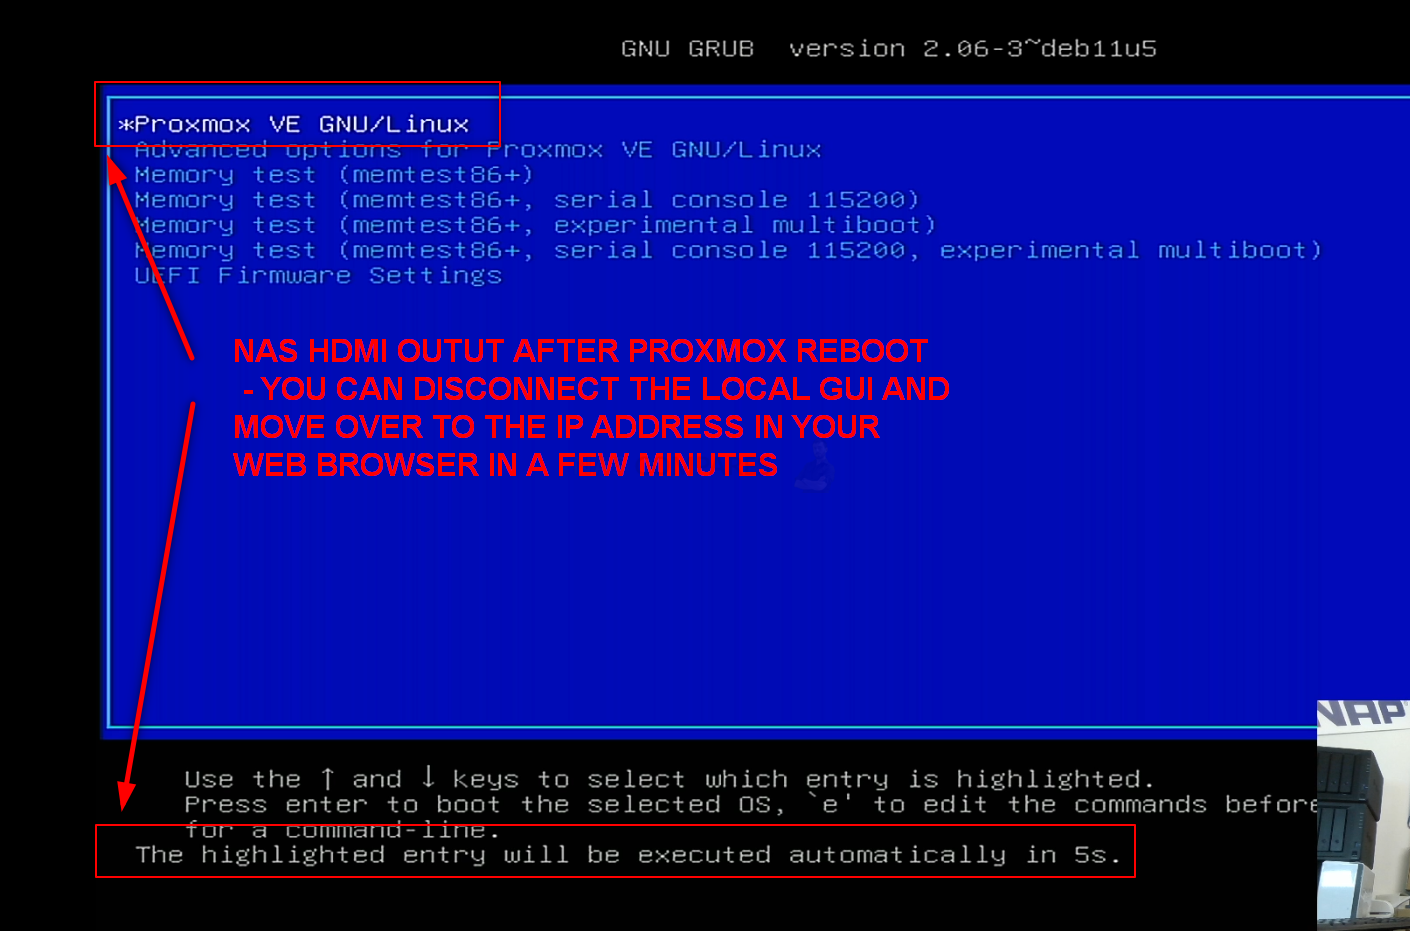
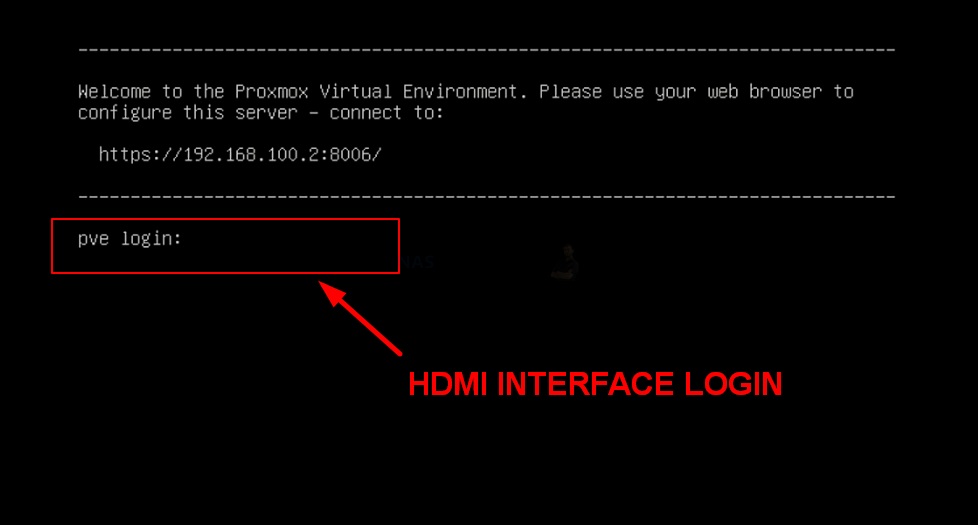
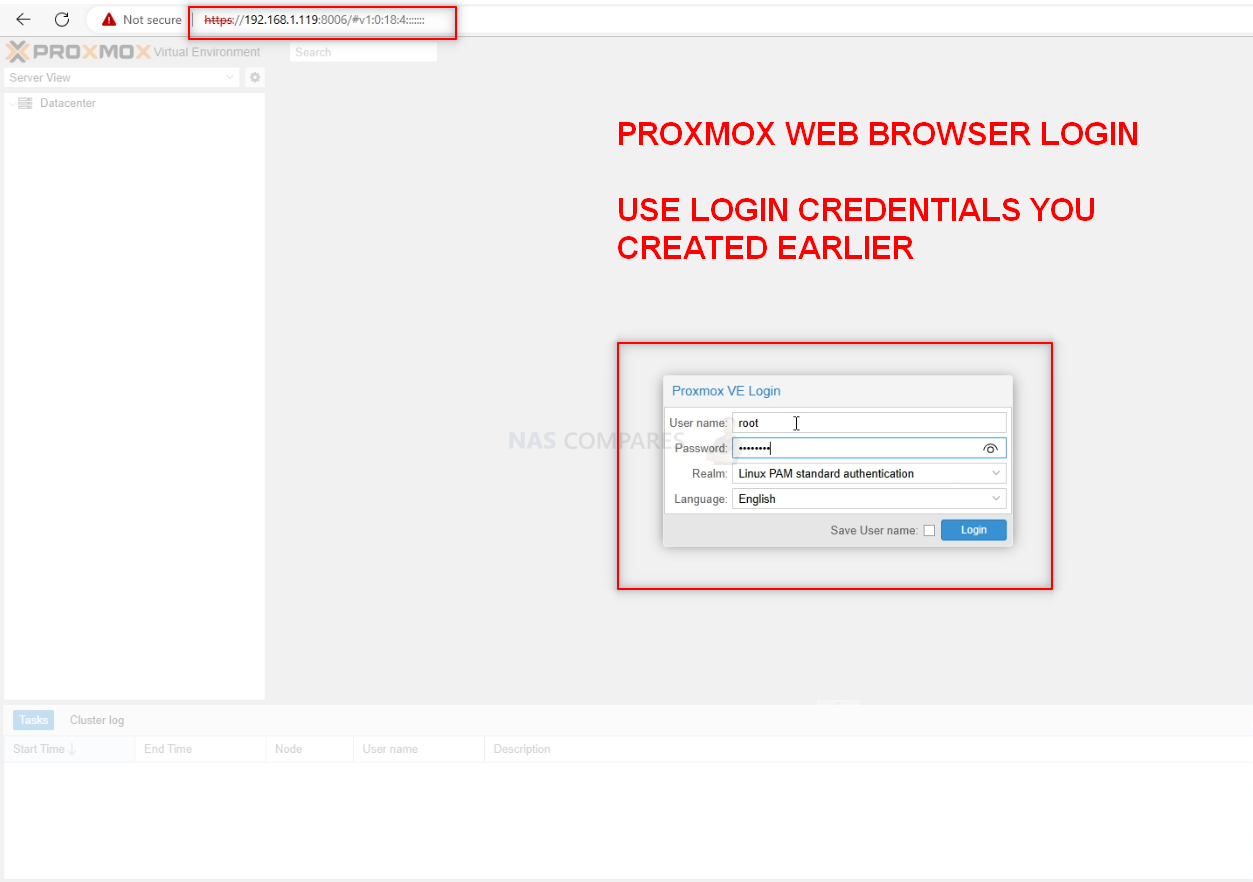
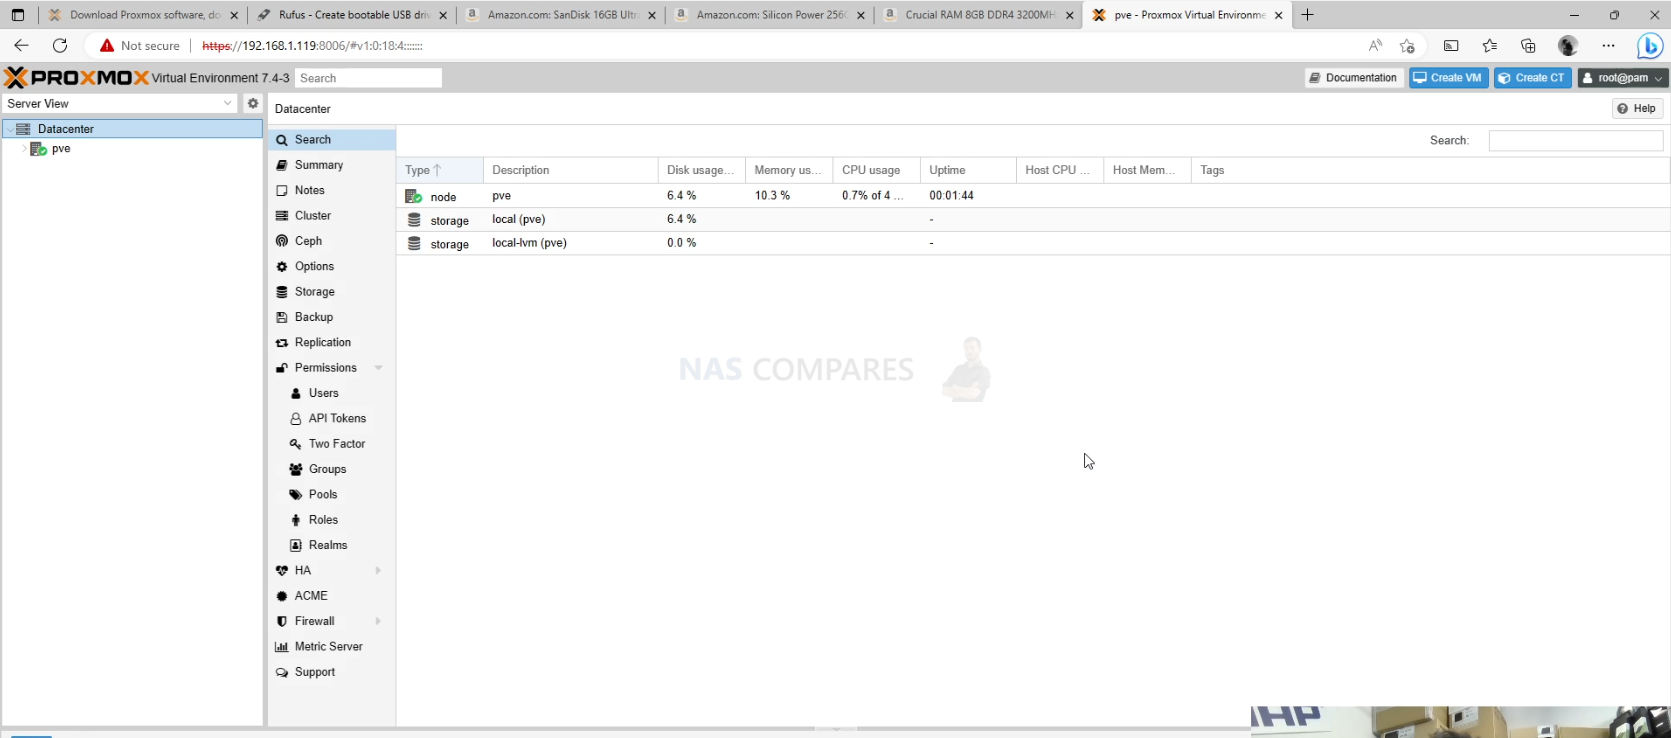


 SUBSCRIBE TO OUR NEWSLETTER


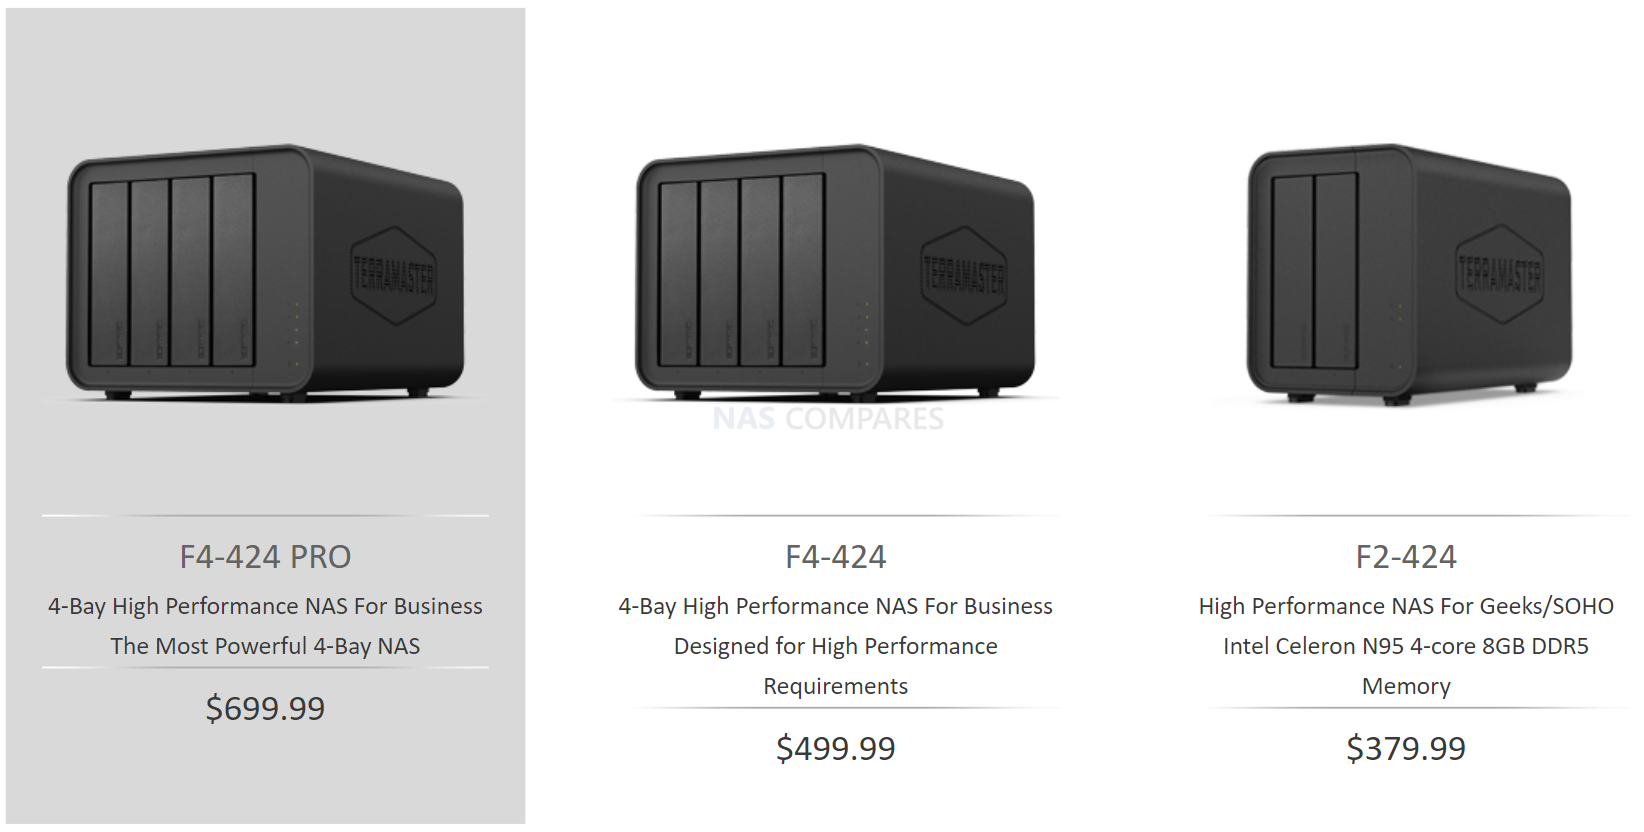
 i3 N300