How to Upgrade the RAM in your Synology DS723+ to 32GB and 64GB RAM Officially/Unofficially
The Synology DS723+ NAS is a NAS system that arrives with an impressive middle ground between Power, Efficiency and Price, thanks to that AMD Ryzen R1600 CPU, flexibility in a 10GbE upgrade, storage expandability and (of course) arriving with ECC memory. The DS723+ is one of the latest generation of Diskstation devices (in the 2022/2023 series) that seems to be targeting the more advanced SMB user, prioritizing throughput and performance, whilst also doubling down on data integrity with things like BTRFS and ECC memory. However, the system arrives with 2GB, but can be upgraded officially to a very impressive 32GB (for the scale of the system)! So, there are users that might want to upgrade that memory on Day 1 in order to remove any kind of potential bottleneck down the line (VMs, Databases, Surveillance, etc) or even just users that have set up the device to their own unique setup – but noticed that Memory usage is constantly hovering at the 60-70%. Synology NAS systems use quite proficient intelligent background memory use and flushing, but nevertheless, there are still plenty of users who want to scale up the base-level memory. In this article, I will show you how to upgrade the memory on your Synology DS723+ NAS, but also I will show several 3rd party (i.e Unofficial modules) that I have tested in this NAS.
Upgrading your Synology DS723+ with Unofficial Memory – Pay Attention
Before we continue with the guide, it is worth highlighting that the DS723+ manufacturer, Synology, stronglyrecommends that you do not exceed the stated memory limit on their specifications page. They also highlight that using non-official memory in your Synology DS723+ may well result in them being unable to provide technical support, as this would be an unsupported setup. We at NASCompares cannot be held accountable for how you use this guide. However, below I will show you where to buy the individual memory and Synology DS723+ NAS device you will need. ONLY attempt this upgrade if you are comfortable with the terms laid out above by the manufacturer. Finally, it is also worth remembering that just because a system can SEE more than the official maximum memory, there is no guarantee that you will be able to utilize the full visible memory at once. Synology’s recommendations on the maximum memory supported by their NAS systems are often governed by three factors:
The Recommended Maximum Supported Memory detailed by the CPU Manufacturer (e.g. Intel or AMD), which can also be a case of lanes and bandwidth allocation/availability
The number of memory slots that Synology add to the system. This can be a case of a NAS only having 2 slots (with only 32GB modules supported by the brand) but the CPU supporting more than that being a physical conflict
The Synology NAS might arrive with fixed/soldered memory for it’s default memory (e.g. the 2GB in the DS423+ or 4GB in the DS920+) but might also have a free memory upgrade slot – this leads to unusual memory caps such as the 6GB Maximum on the DS423+, despite it’s CPU supporting upto 8GB.
If you choose to go ahead with unofficial memory, afterwards, it is highly recommended to test the full quantity available with VM testing (assigning bulk memory to each virtual image) and running at the same time to see if it is utilized.
Synology Official Memory vs Unofficial Memory from Crucial, Kingston, Sabrent, etc?
Luckily Synology provides a wide range of official memory upgrades that can be purchased from numerous retailers online, however, they are generally more expensive than the 3rd party equivalents (see example above). Now, there could be a few good reasons for this. Firstly, these memory sticks are first-party and specifically selected to work on the Synology NAS systems (taking alot of the searching out of it for people in researching speeds, frequencies and supported PIN numbers), and officially branded components for any hardware manufacturer are always pricier.
Next, they do not have the rotation of stock that Crucial or Kingston has and therefore, the flexibility in pricing they might have is not available. Lastly, the Synology memory will often be ECC memory (especially in recent released NAS systems by them) and ECC memory always commands a higher price. However, given this memory is likely manufactured by a 3rd party, that does make it a little painful sometimes for smaller Synology NAS users who look at official memory and its often 2-3x pricepoint of equivalent modules from Kingston, Crucial and Samsung. So, in this guide we talk about upgrading your memory with both official and unofficial memory, what happens when you do and if there are risks to factor in. If you are a little unsure about whether you need to use ECC memory in your specific Synology NAS setup, you can watch the video below detailing the pros, cons and more:
1/2x Memory Upgrade Modules (Ranging from 4GB to 16GB and 32GB Individual Modules – Link below for Tested RAM modules from Crucial, Kingston, Samsung, Timtec and Synology Official Memory too:
VERY IMPORTANT – The Links used in the article below towards the correct unofficial memory are occasionally changed (beyond my control) as it will direct you to the site in your own region/country. MAKE SURE to check that the memory module (especially 16 and 32GB SODIMM modules) are DUAL RANK or ‘DR‘, as Synology NAS typically have trouble with SR/SINGLE RANK modules.
(OPTIONAL) Anti-static gloves and Envelope – useful to eliminate static charges and also to store the removed older official memory sticks):
First, we need to ensure the Synology DS723+ is completely powered down/off and the mains power has been disconnected. It is recommended that you remove the Hard Drive or SSD that you have installed before accessing the RAM as it may block the slots. Additionally, you should remove the hard drive media as the unit will be moved around a lot during the memory installation and this could damage the drives. Be sure to keep a note of the drives that you remove and the order they were installed (HDD Bay 1, HDD Bay 2, etc) as installing the drives in the wrong slots could damage any existing RAID you have setup internally.
Next, we need to access the memory upgrade panel. Now, if you are just adding the existing memory, you can just add the additional module to the available SODIMM slot. However, if you are upgrading the system’s memory with new pairs of memory sticks (eg upgrading from the default 2GB to 32GB with 2x16GB), you will need to remove the old memory (remember to store it in an antistatic bag afterwards)
If you are removing the original memory, be sure you eject the official memory sticks using the clips on either side of the slot, as well as only holding the memory sticks by the narrow side edges, never touching the chips or board of the money or NAS.
Once you have removed them, they can either be stored away for a later project, installed in a compatible laptop or sold on eBay etc to make a little cash back!
Once they are clear, install one or both of your chosen unofficial DDR4 SODIMM memory modules in the available slots, making sure that you click them both in with the clips on either side.
Synology DS723+ Official/Unofficial Memory Upgrade – Step 2, Checking the Unofficial Memory is Recognized
What you will need:
A web browser (Chrome, Safari, Firefox, etc) on a Windows, Mac or Android Machine) accessing the Synology DS723+ user-interface as you normally would.
Next, you need to power up your Synology DS723+ NAS and access it as you normally would. If you are buying this NAS first time and have yet to set it up, there are numerous first-time set-up guides and tips on the YouTube channel here – that will get you from the hardware installation to set up the Synology DS723+ NAS for use. Once the NAS user interface (UI) is ready to go, head over to the hardware specification page shown here:
As you can see in the image above, the Synology has recognized the increased memory. It is still recommended to head to Step 4 below to see how to use the official memory test feature of the system.
As mentioned earlier, Synology is pretty clear about its position on users opting for non-Synology memory in their systems or exceeding the officially stated maximum capacity of the DS723+. They feel this is using the system in a configuration that is outside of the guaranteed performance and stability that they advertise. This means that if your system encounters issues as a result of these unsupported configurations, they (at best) will have difficulty recreating this configuration to provide support or (at worst) refuse to provide support as they have been pretty clear on the setups that they state the DS723+ can run with. However, there is no avoiding that there have been countless examples of Synology NAS systems functioning perfectly well with 3rd party memory (YouTube Playlist of Synology NAS 3rd Party memory Tests HERE), so here are some examples of memory modules we tested on the Synology DS723+ NAS (including model ID and links as needed – again, DOUBLE CHECK THE MODEL ID before you buy, as retailers will check page links):
Synology DS723+ NAS + with 2x Sabrent Rocket 8GB 3200Mhz DDR4 SODIMM (16GB & 32GB also tested)
After installation, I checked the Synology Resource Monitor and the Sabrent memory was recognized:
Heading into the system information, once again, the 16GB Memory was recognized as recognised in total available physical memory:
Heading into the Virtual Machine Manager and assigned a massive chunk of the available memory to an Ubuntu VM to see if the system would have any issue with assigning it. No barriers or hurdles were raised.
Booting the VM, We were able to head into the Ubuntu System Monitor and see that the memory quantity was successfully allocated to the Virtual Machine:
Synology DS723+ NAS + with 2x Crucial 16GB 3200Mhz DDR4 SODIMM
After installation, I checked the Synology Resource Monitor and the Crucial memory was recognized:
Heading into the system information, once again, the 32GB Memory was recognized as recognised in total available physical memory:
Heading into the Virtual Machine Manager and assigned a massive chunk of the available memory to an Ubuntu VM to see if the system would have any issue with assigning it. No barriers or hurdles were raised.
Booting the VM, We were able to head into the Ubuntu System Monitor and see that the memory quantity was successfully allocated to the Virtual Machine:
Synology DS723+ NAS + with 2x Kingston 32GB 3200Mhz DDR4 SODIMM
After installation, I checked the Synology Resource Monitor and the Kingston memory was recognized:
Heading into the system information, once again, the 64GB Memory was recognized as recognised in total available physical memory:
Heading into the Virtual Machine Manager and assigned a massive chunk of the available memory to an Ubuntu VM to see if the system would have any issue with assigning it. No barriers or hurdles were raised.
Booting the VM, We were able to head into the Ubuntu System Monitor and see that the memory quantity was successfully allocated to the Virtual Machine:
So, those were the three unofficial memory types that I tested on the Synology DS723+ NAS. However, it is VERY important that (regardless of whether you choose official or unofficial memory for your NAS upgrade) you check that your memory is working perfectly. Do check this; you should use the built-in Memory Testing facility of Synology Assistant for PC/Mac. Below is how to conduct the test.
Synology DS723+ Official/Unofficial Memory Upgrade – Step 4, Checking the Memory is Usable
There are several ways to check the memory is working on your Synology DS723+ correctly. One easy method that can be done very quickly is using the Synology Memory Test tool.
To run a memory test:
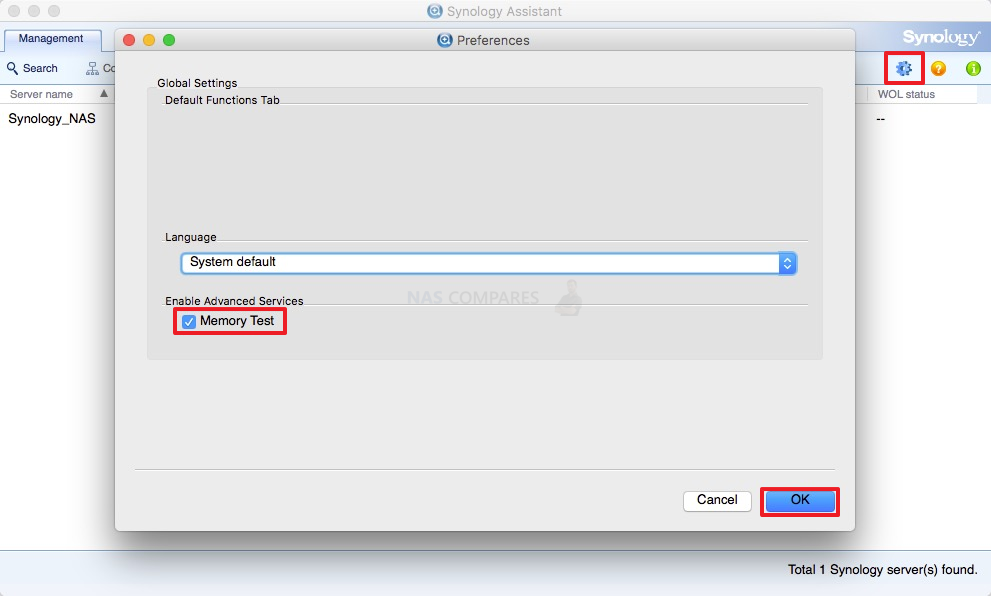
Download and install the Synology Assistant, where you can find the memory test function. The application is available at Download Center.
Open Synology Assistant, click and enable the memory test service.
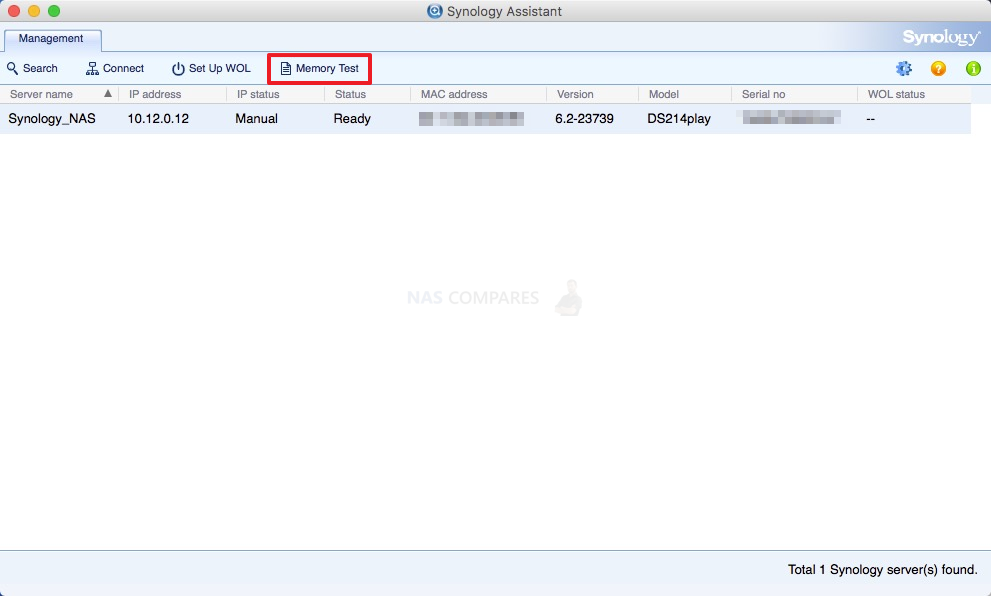
Select the device where you wish to run the test and click Memory Test.
During the memory test, your Synology NAS will be rebooted. It will recover after another reboot if its memory is normal and passes the test. However, if the memory test fails to finish or shows that there is an error, the memory may be faulty. In this case, you are strongly recommended to return your Synology NAS for repair. Just in case you have installed a non-Synology memory module, please remove it and rerun the memory test.
Though once again you should remember that Synology do not recommend using memory modules that are not from Synology themselves, so this test may not be indicative of the health of unofficial memory in your Synology NAS. Alternatively, you can perform as many actions and processes as possible (scans, copy/pastes, thumbnail generation, transcode a 4K file, RAID changes, synchronisation, etc) at once to see how the task manager and resource monitor behaves in the Synology DS723+. It should spike each time and at a greater height as you do more and more and once it exceeds the memory you had previously installed, this is a good confirmation that the installation is working fine. Alternatively, you can temporarily allocate chunks of memory and then that is a much more reliable test. Install the virtual machine application for the Synology DS723+ (P.S. for Synology users it is the Virtual Machine Manager and for QNAP it is the Virtualisation station). Then you can create individual VMs (it is alot easier than it sounds and the Synology DS723+ VM software is very user-friendly) then allocate a large number of GBs (Gigabytes) of memory to each one. When you have created 3 or 4 individual virtual machine containers on the Synology DS723+ software, then you can run them all at once and that will immediately use almost all the memory at once! If there are any issues with the memory, it will show here almost immediately. If no problems, then you know the Synology DS723+ unofficial Crucial/Kingston memory installation as successful. You can then delete the VMs in the virtual machine software and then free up all that memory again.
And there you go. You have now installed your unofficial memory in your Synology DS723+ NAS system. Remember, you are going to using an unsupported Synology setup, so regularly BACKUP to another NAS, a cloud platform, or even just a USB drive using the dedicated first-party software inside your NAS system. Thanks for reading this guide. Still need help? Use the NASCompares Free Advice section below. It is my free, unbias community support system that allows you to ask me questions about your ideal setup. It is NOT a sales platform, NOT a way to push hardware you don’t need and, although it is just manned by me and might take a day or two for me to reply, I will help you any way I can.
Link below for Tested RAM modules from Crucial, Kingston, Samsung, Timtec and Synology Official Memory too:
VERY IMPORTANT – The Links used in the article below towards the correct unofficial memory are occasionally changed (beyond my control) as it will direct you to the site in your own region/country. MAKE SURE to check that the memory module (especially 16 and 32GB SODIMM modules) are DUAL RANK or ‘DR‘, as Synology NAS typically have trouble with SR/SINGLE RANK modules.
This description contains links to Amazon. These links will take you to some of the products mentioned in today's content. As an Amazon Associate, I earn from qualifying purchases. Visit the NASCompares Deal Finder to find the best place to buy this device in your region, based on Service, Support and Reputation - Just Search for your NAS Drive in the Box Below
Need Advice on Data Storage from an Expert?
Finally, for free advice about your setup, just leave a message in the comments below here at NASCompares.com and we will get back to you.Need Help?
Where possible (and where appropriate) please provide as much information about your requirements, as then I can arrange the best answer and solution to your needs. Do not worry about your e-mail address being required, it will NOT be used in a mailing list and will NOT be used in any way other than to respond to your enquiry.
[contact-form-7]
TRY CHAT Terms and Conditions
If you like this service, please consider supporting us.
We use affiliate links on the blog allowing NAScompares information and advice service to be free of charge to you.Anything you purchase on the day you click on our links will generate a small commission which isused to run the website. Here is a link for Amazon and B&H.You can also get me a Ko-fi or old school Paypal. Thanks!To find out more about how to support this advice service checkHEREIf you need to fix or configure a NAS, check FiverHave you thought about helping others with your knowledge? Find Instructions Here
Or support us by using our affiliate links on Amazon UK and Amazon US
Alternatively, why not ask me on the ASK NASCompares forum, by clicking the button below. This is a community hub that serves as a place that I can answer your question, chew the fat, share new release information and even get corrections posted. I will always get around to answering ALL queries, but as a one-man operation, I cannot promise speed! So by sharing your query in the ASK NASCompares section below, you can get a better range of solutions and suggestions, alongside my own.
Choosing a NAS for Video Editing – Get It Right, FIRST TIME!
No doubt, you’ve got friends and professional colleagues working in the world of post-production and content creation who have staunchly recommended that you start editing your big projects on a NAS! Sounds simple, right? You’ve spent the best part of the last couple of decades editing and backing up projects onto a USB or Thunderbolt-connected drive. Yet now, with the influx of cloud services and the sheer size of projects these days, the appeal of moving your production over to your own private cloud NAS, with plenty of benefits in scale and performance possible, does sound remarkably appealing! However, the reality is not quite so simple, and unlike when you might have made the jump from a basic USB drive to an external Thunderbolt-connected SSD, network-attached storage has a little bit more of a learning curve, and novice users to this ever-growing storage alternative have got quite a lot of new things to learn. This is made even tougher when, as a content creator and video editor, you are far more concerned with media resolution, picture quality, and production factors than you are in just how many gigabytes and terabytes of space it takes up! So today, I want to go through the most important aspects that a video editor needs to factor in when considering a NAS device for use in video editing. At the end of this article, I will make recommendations based on different budgets, scale, and production levels. But for now, let’s crack on and go through each of the most important factors for those of you considering making the switch over to NAS in your post-production workflow.
This is probably one of the most overlooked factors when it comes to users editing on a NAS. Just because a system boasts a certain number of terabytes of storage, it does not necessarily mean that each is just as good as an identical system with the same number of terabytes that happens to be larger. What do I mean by that? Well, I am talking about the benefits of Redundant Array of Independent Disks, also called RAID. Originally, this was developed as a means of ensuring that if you had a large area of storage comprised of multiple drives, if one failed, you would not lose your data, as RAID provided a safety net in the form of a single drive (or two, in some RAID configurations) of failure protection. However, over the years, other inherent benefits of RAID have presented themselves, and a few of these are going to be massively desirable to video editors. The first advantage is performance. In almost all cases of RAID configuration, the more drives you have in a single storage array (e.g., the more hard drives you have in the box), the higher the performance! This is because the more drives you have, the more drives are going to be simultaneously read from and written to as you edit. That is why the more powerful video editing NAS systems tend to have more bays for drives, as this allows you to multiply the performance. So, sometimes if you see a NAS server with the same internal hardware in either a 4-bay or 8-bay form, it is always worth spending a fraction more on the larger system as it will allow more drives and therefore higher performance, which translates into a much smoother editing experience on your connected Mac or Windows machine.
Here is a Guide to Understanding Each of the Main RAID Types (Click Below to read in a new tab)
Next, there is scalability. Although you might be looking at 10TB of storage for your projects right now, that is going to multiply over time as your range of stock footage and completed projects increases over the years. You need to know that you can scale up the NAS system fluidly and easily over that time. Therefore, it is always worth purchasing a NAS with a bunch of empty bays inside it to add drives later or a NAS system that supports expansion devices (i.e., connected smaller boxes that add storage later down the line). All NAS boxes can run on just a single hard drive or SSD, so don’t be afraid to only partially populate a NAS rather than fully populating every single available bay on day one. Adding drives gradually over time will not only allow you to spread the cost of your expanding storage as the years go by, but it will also allow you to gradually increase the performance of your system over time too, and therefore allow you to know just the right performance level that you’re going to need for your video editing tasks in the long term.
Finally, a massively overlooked element of RAID is that it allows you to achieve much better value in terms of your storage. Commonly referred to as ‘price per terabyte,’ thanks to the balance between safety net and storage provided by RAID, it’s genuinely possible to achieve high capacity levels and save money easily. For example, if you buy 2x 10TB hard drives (so, technically 20TB data storage) in a RAID 1 in order to achieve one drive of safety net, you will lose 10TB of storage. However, if you buy 4x 4TB hard drives and put them in a RAID 5 (still one drive of safety net), you will achieve 12TB available storage, and you will have spent less on these four smaller drives than the two bigger drives, and you still get to have increased performance too! Although this logic is not foolproof on all drives, you generally find that this can ring true across the majority of different capacities, so never be afraid to weigh up the cost, benefits, and performance benefits of going for smaller drives in larger quantities.
In most cases, the price per terabyte on both sides will remain largely consistent at each capacity. HOWEVER, when you start putting these drives into a NAS/DAS enclosure and acting in the RAID configuration, it soon becomes apparent that the ben efits in Drive #s in a RAID 1 vs a RAID 5 immediately show a saving in almost every single capacity the smaller you go! Below are two examples of achieving 12TB in a NAS enclosure using RAID 1 vs using RAID 5 (so, still maintaining 1 disk drive failure protection and having 12TB of storage to use):
12TB Storage in a RAID 1 MIRROR
12TB Storage in a RAID 5
Why is Network Connectivity SO Important?
One of the things people often do not realize about the difference between using a NAS and previous experience with cloud storage such as Dropbox, iCloud, or Google Drive, is the performance benefits of connecting via network versus connecting via the internet. Those subscription cloud drives are heavily dependent on your internet speeds, and even if you choose to use high-end internet connections such as fiber optic and gigabit internet, the reality is that you simply will not get the same level of performance as is possible via your local area network. All the devices in a single office or business environment that are utilizing the same internet/router are typically on the same network. Think of all of the devices in your home/office as houses on the same street, whereas think of communicating over the internet as communicating with completely different towns and cities! Devices on the network (also referred to as the LAN or Ethernet) have much higher speeds possible, starting at 109 megabytes per second, and this can be scaled up substantially towards 1000 megabytes, 2000 megabytes, and more, thanks to bonding technology that harnesses and combines multiple network connections.
Different NAS devices will arrive with different network connections, as well as the option to increase and upgrade those network connections in the systems via USB adapters and PCIE upgrades. Equally, most PC or Mac systems provide the means to upgrade their network connections in the same way via simple, affordable USB upgrades, slightly more expensive PCIE upgrade cards, and even Thunderbolt-connected adapters that allow you to connect your PC or Mac directly (no switch or router in between) to allow much larger performance benefits for video editors that want to edit 1080p or 4K directly on the NAS. It is really important when considering a NAS for video editing that you factor in the network connections on the device, as well as the ability to scale them up accordingly throughout the system’s life and as your video editing demands increase over the years. Equally, you need to make sure that your editing machine has similar levels of network connectivity available, as your total maximum performance will always be dictated by the lowest speed device in the network. i.e., You cannot connect a 10-gigabit NAS to a 1-gigabit MacBook, as you will only achieve 109 megabytes (i.e., a Gigabit).
Why the CPU inside a NAS is MASSIVELY Important for Video Editing?
You may have already noticed when considering one NAS over another that although some systems seem very similar in size, their price tags can be wildly different! Although there are a lot of factors that make up the cost of a NAS, the CPU that the system arrives with is extraordinarily important. Much like the Mac or PC that you choose to edit your video on, a more powerful or more task-designed CPU is going to achieve the best results, and that is because of efficiency and having the tools built in to perform those certain tasks. More affordable and lower-end NAS systems tend to arrive with ARM-based CPUs. These are the kind of CPUs more generally found inside mobile devices, tablets, and pretty much anything that is designed to be on a limited power supply for long periods of time (as these are designed to compress commands given to and from the CPU to the rest of the system and that results in lower power consumption but also lower capabilities, as you have to factor in the shrinking of those commands by the processor). More capable and higher-priced NAS systems arrive with x86 processors, which are far more capable processors and will result in a larger frequency and higher complexity of commands handled inside the system. When you are editing data of any kind, the number and complexity of the instructions handled by the system will always govern the overall best performance possible, and in the case of video editing, which has exceedingly dense file sizes and formats, a much more capable CPU is going to make all the difference in terms of ensuring that the multiple files that you are editing at any given time in a single project are managed quickly and efficiently.
However, things get even more powerful when you start looking at CPUs that are either industrially designed for high-frequency file transmission or have integrated graphics. Generally, you find a more industrial component in servers to be a Xeon or AMD EPYC processor. These are designed for server use and enormously high-frequency transmission of data. But integrated graphics are a little different. This is a dedicated component of the processor that is designed to handle and manipulate graphical data. So, high-end video data definitely comes under the classification of graphical data! This is particularly true if you are running dense or lesser-supported formats. So, raw video that is uncompressed or files that are compressed with licensed formats such as HEVC will be made that bit easier with integrated graphics. The importance of the processor inside the NAS you choose to use for video editing is enormously important, and although it’s easy to overlook (as we are talking about one of the significantly more technical aspects and something you have to dig into the spec sheets to learn), it is definitely worth spending a bit of extra time to check the processor inside your NAS before you spend your money on a video editing solution.
Is Thunderbolt NAS Any Good?
Using Thunderbolt to connect with a NAS is something that has grown in popularity over the last 5 years or so. As mentioned earlier, you can purchase Thunderbolt to 10G adapters that allow you to connect directly with a NAS over 10G via an available Thunderbolt port directly on your video editing machine. However, a Thunderbolt NAS takes things further and actually features at least two Thunderbolt ports on your NAS that allow you to directly connect at least two video editing machines to the NAS system. This sets it apart from traditional Thunderbolt-attached storage (referred to as DAS, Direct Attached Storage) as it allows you to have multiple video editors connecting to the same storage device at the same time. But equally, it allows you to access all of the NAS features both via Thunderbolt and via the network, so you’re still able to utilize the device for multi-site backups, multimedia, surveillance, and anything else that you were considering buying a NAS for to maximize your investment in this purchase. Also, if your larger network has factored in some 10G appliances, you can utilize the Thunderbolt NAS as its very own Thunderbolt to 10G adapter, with the NAS connected via 10GBE to your local network. If you connect your Mac or Windows system via Thunderbolt to the NAS, you then instantly have access to the rest of the 10G network via it (known as T2E protocol).
Sounds great, right? Highlighting the advantages of a Thunderbolt NAS does come with disadvantages that are often overlooked or simply not known by a lot of video editors. For a start, Thunderbolt NAS is not a particularly common product and is widely only available from one brand, QNAP. They largely dominate the market for this product, and pricing can be quite high due to the lack of broader competition as found in the rest of the NAS industry. Equally, as mentioned earlier when I touched on the importance of CPU in a video editing NAS, most Thunderbolt NAS systems have particularly high-end internal hardware compared with most other NAS systems of a similar scale, and the CPU choices tend to result in much higher price points on Thunderbolt NAS systems. Finally, it is worth highlighting that, although Thunderbolt NAS allows you to still enjoy the user abilities and software features of a traditional NAS but using Thunderbolt, this does result in a drop in performance compared with connecting a normal Thunderbolt DAS system. Thunderbolt NAS is connected over a protocol known as IP over Thunderbolt/Thunderbolt over IP – which results in a heavier overhead for the system to manage these connections. The result is that you tend to see a drop in performance of around 20% to 30% in a Thunderbolt NAS compared with a similar storage scale Thunderbolt DAS. You can mitigate this in a number of ways, such as getting NAS systems with more bays, utilizing SSD instead of slower hard drives, increasing the memory, or utilizing combined SSD and hard drive storage pools such as caching or QTier. Nevertheless, if you’re running a multi-editor suite and need all of your editors to work from a single storage area with much higher speed overall than in most other cases, a Thunderbolt NAS can be a remarkably attractive proposition. Just be aware that it requires a little bit more set up and a learning curve than found in normal Thunderbolt plug-and-play storage.
Do ALL NAS Support Mac OS and iOS?
It is a common question when looking at a NAS for video editing, given the larger number of Mac-based video editors versus that of Windows users, but all NAS systems these days tend to support both Windows and Mac! Indeed, many users choose to use a NAS system because it can act as a cross-platform file system that can be accessed by both Windows and Mac systems simultaneously and allow users to much more smoothly exchange files across these two different OSes. That said, where in-system apps and connections are supported on both Windows and Mac, the individual client applications that you may wish to download for Windows, macOS, Android, or iOS may have varying levels of support in their individual tools on different app platforms. That is because the individual client operating systems provide their own toolkits which have their own updates, features, and restrictions that are only available on one operating system and not the others. A big part of this is why you tend to find that the newest features promised by a NAS brand are typically available on Android and Windows first, with a slight delay before they arrive for Mac and iOS. This is because macOS and iOS do fewer but much larger software updates, whereas Windows and Android tend to release many more subversions of this software and granularly roll out their new features. So just bear in mind that although the bulk of the features you may have heard about on a NAS will be possible and available on your operating system, it never hurts to check the release notes for any specific tools that you are interested in to edit video on the NAS.
NAS Video Editing – Mapped Drives, Synced Drives, and iSCSI SAN, What is Best?
This is where we get into the reeds somewhat! Most video editors in their career grow quite dependent on a handful of premium editing suites and packages in order to create those wonderful pieces of work! Most of the time this has been done with the PC or Mac system you are using editing on a storage drive inside your host editing machine or via a connected USB/thunderbolt storage drive, right? Well, almost all video editing suite software can edit this way as this storage drive is seen as a local (also known as logical) attached drive. This means that the software can treat this drive as immediately accessible and run the footage you are editing directly from the drive and in the system’s memory simultaneously. Editing on a NAS is slightly different, and the protocol that your system uses to communicate with a network/remote storage drive (often referred to as IP) is different enough that some video editing software will not work with it. This is because a lot of premium video editing software takes stability and smooth editing exceptionally seriously. Therefore, many video editing software packages will not allow you to edit on a NAS out of the box. Connecting a NAS to your PC/Mac system in terms of video editing is predominantly done in two main ways.
The first way is known as mapping network drives and is supported on all operating systems. Equally, a mapped network drive appears as another available drive in your list of available storage devices, but it’s clearly defined as a remote lead connected storage device, and whereas normal storage drives have a name/letter to define their identity (such as your operating system drive being listed as C:/ or a connected optical disc drive as D:/), remote drives will be connected via an identifying number on the network (e.g., 192.168.1.5). This means your video editing software will know it is a remotely connected drive, and in the case of some premium video editing software, it will not work with this NAS for video editing. This is why you need to consider the second method of remote connecting a NAS to your video editing.
The second method is a little more complex and depending on your operating system, is connected in slightly different ways. Referred to as iSCSI or IP SAN based connectivity, this creates a completely separate area of storage inside your NAS that has been designed for specific remote-only connectivity and cannot be interacted with from within the NAS software. On the face of it, this sounds kind of illogical to create an area of storage that you cannot access from within the NAS operating system, but the reason for this is you are creating an area of storage that will purely be used outside of the NAS and therefore allows you to craft it in a very specific way. From here, you need to use something called iSCSI protocol, using one of several applications for PC or Mac. Sadly, although you can use an iSCSI initiator for Windows systems that is completely free and available from within Windows, macOS needs you to use third-party peripherals to contact with iSCSI talkative storage area (also known as a LUN). However, once you have created this LUN and iSCSI target inside the NAS, you can then connect to it on your Windows or Mac system, and it effectively tricks your video editing workstation into believing the remote-connected NAS storage is, in fact, a locally attached drive. You can assign it a name or a letter (depending on your operating system), and from there have all of the benefits of fluid and instant connectivity that you would find when video editing on your locally connected drive. I know this all sounds quite complex, and I have already created both a video and an article on this. So if you want to learn more about this very specific process of editing on a NAS on certain video editing suite software, use the article and video below.
It is also worth highlighting that there is, kind of, a third option in the form of drive sync protocol. Known as Synology Drive on their platform, or QNAP Qsync on theirs, these allow you to create a synchronized folder (or folders) on your local PC/Mac system that is constantly mirroring a drive on your NAS. As good as they sound, and they are terrifically user-friendly, it is worth highlighting that this doesn’t necessarily synchronize all of the data between the two platforms. And unless you also want to use up an area of space on your local PC/Mac to mirror with the NAS fully. This means that it ever so slightly undermines the need for editing on a NAS if what the NAS is doing is synchronizing live data between it and your video editing operating system. However, this has been somewhat mitigated in recent years, thanks to processes known as file pinning, metadata pinning, and file streaming on demand. These allow you to see the contents of the NAS (complete file layout, folders, and structure – just not taking up any space, just think of it as a blueprint) in this synchronized folder via your operating system’s native file manager and allows you to pick and choose which files you want to live fully on the local OS without needing to download the whole thing. That is why this is more of a hybrid option and not recommended for everyone.
The Best NAS for Video Editing – Recommended Devices
Choosing the right NAS for video editing, even now that you know the importance of NAS hardware, software, and bandwidth to consider, is still no easy task. As mentioned earlier in this article, there are literally hundreds if not thousands of different NAS options available to you, and you don’t really want to get it wrong first time. These make an enormous difference! In order to help you out, below, I’ve detailed several of the current available NAS solutions available in 2023/2024 that best suit a wide range of video editing needs. Keep in mind that although I have detailed several solutions below, other newer options may have arrived since this article was written, which may be even better suited to your video editing needs. So don’t be afraid to use the free advice section on NASCompares at the bottom of the article, the free community forum AskNASCompares.com, getting in touch with other members of our community in the discord or me or at personally consult on the right video editing storage solution for your own very specific setup.
Business NAS Editing Solution – The QNAP TVS-h874
0-176TB, 8-Bays, 2x PCIe 4 M.2 NVMe 2280, PCIe Gen 4×16 Upgrade Slot, Intel Core 12th Gen i5/i7/i9 CPU, 16-64GB DDR4 Memory, 2.5Gbe Port, 10Gb x2 Prots (Intel i9 Version), KVM, ZFS or EXT4 Setup, 3-5yr Warranty, TrueNAS/UnRAID Support
The QNAP TVS-h874 NAS is easily one of the most hardware-capable desktop NAS systems that I have ever seen (as you would expect for £2500+) and has clearly been designed with phenomenal future proofing in mind! If you are concerned about the longevity of this NAS, this hardware architecture will still be top tier 5 years from now, with the added support of PCIe 4 meaning that high capacity and performing micro upgrades throughout its life also ensuring it remains relevant long after. It’s price tag clearly moves this purchase out of the home and squarely into the business market (though likely those that take their media seriously will add it to the cart) and the TVS-h874 will function as a solid solution for Video editing (even at 8K), high frequency and performing VMs, large scale AI powered Surveillance setup, hybrid cloud/on-prem alternative to Office 365/Google Workspace services and as the center point for all your data storage operations. Crucially though, it is that the hardware on offer here will be able to do ALL of these at the same time, therefore maximising the investment for most businesses that want to move aware from their cloud dependant ops. In terms of software,t things are a little less absolute, with QTS and QuTS still getting a little busy at times, with a steeper learning curve than its big rival DSM from Synology. That said, die-hard fans of ZFS (Zettabyte File System) will adore the inclusion of benefits in RAID handling, management and recovery that are exclusive to that platform, whilst enjoying the wide range of applications and service benefits in QuTS that are often restricted to Linux platforms.
The slightly conveluded approach to release hardware that does complicate the selection process (different CPUs in the Intel 12th Gen family changing the rest of the system architecture) is something that I hoped this brand would graduate from (for the sake of simplicity), but for many, this level of choice in hardware and budget will be welcome. As is QNAP’s position on the support of 3rd party hardware (drives, PCIe upgrades, etc) and software, something that we have seen a worrying trend in the last few years against elsewhere in the industry but some other brands, to err towards 1st party/proprietary compatibility more and more. There are still lingering doubts by some on the security of NAS, with ransomware attacks on the rise and ALL brands and ALL platforms being targetted (NAS, Cloud ,etc), finding a middle ground between ease of use and depth of security being a tricky tie rope walk indeed. The TVS-h874 arrives with a wide range of Day 1 tools, further rigid defaults in QTS/QuTS in 2022/2023, considerable security settings to configure and multiple system scan tools for recommendations & preventative measures available. The QNAP TVS-h874 is probably the most powerful desktop/tower NAS drive I have ever reviewed and if you are looking for a system that can legitimately do anything server-side, but you are also willing to put in the time to configure it correctly – you will genuinely be hard pushed to find a better system in 2022, 2023 and likely 2024 at this price point and scale.
SOFTWARE - 8/10
HARDWARE - 10/10
PERFORMANCE - 10/10
PRICE - 8/10
VALUE - 9/10
9.0
PROS
First Commercial Intel Core 12th Gen i5, i7 and i9 NAS Drive Upto 20 Cores, 24 Threads and High End Integrated Graphics PCIe Gen 4 x16 Upgrade Slot for 10/25/100GbE Cards and 2x PCIe Gen 4 x4 M.2 NVMe Slots for 7GB SSDs No Obstinant 3rd Party Hardware Limitations on Support or Compatibility Much larger support of 3rd Party Software Services than most other NAS Brands 10Gb/s USB Connectivity, in Type A and Type C Upto 64GB of Memory and Potential for 128GB ZFS or EXT 4 File System Choice M.2 NVMe SSD Bays can be used for Storage or Caching Volume Encryption, SED SSD Support and WORM Enhanced AI Surveillance Services, with opt to upgrade with $30 Google TPU AI Photo Management Tool (QuMagie) Includes Thing Recognition and works offline ALL the ZFS Benefits, whilst also the GUI and App benefits of a Linux Software Platform in one
CONS
Available Versions/Configs of the 4/6/8-Bay are confusing QVR Elite (not QVR Pro) only has 2 Cam Licences HDMI Output is 1.4b 10Gbe is ONLY included with the most expensive Intel i9 Model Noisy when in operation when fully populated Too Many licenses on Enterprise Tools (Drive Analyzer, Face Tiger, etc) with too few free licenses
Best Compact Video Editing NAS – Synology DS923+ NAS (with 10GbE Adapter)
Synology has clearly made something of a gamble in the release of the Synology DS923+ NAS. There is no avoiding that making the switch from the Intel Celeron that has historically been the build choice of this product family and opting for the AMD Emb.Ryzen has ruffled some feathers! On the face of it, the R1600 here has a heck of alot of going for it over the previous generation! Higher clock speed, greater PCIe Gen 3 Support throughout, that 4-32GB of DDR4 memory in such a compact system and just generally giving you a lot more horsepower to play with, as well as better bandwidth potential inside and out! But at what cost? The 1GbE standard connectivity in the base model leaves alot to be desired, the proprietary 10Gb upgrade (though incredibly handy) limits the upgradability a tad and the lack of an integrated graphics processor is likely going to result in many long-term Synology advocates to skip this generation. Synology Diskstation Manager (DSM 7.1 at the time of writing) still continues to impress and although the brand still continues to heavily push their 1st party priorities, they have left a little more wriggle room in DSM 7.1 than DSM 7 before it in terms of media compatibility.
In terms of design, I cannot fault Synology on this as the DS923+ chassis still arrives as one of the best-looking and still exceptionally well-structured devices at this physical scale and storage level. As always, a Synology NAS is more about the software than the hardware (and the DS923+ delivers in spades on the software side!) and with DSM 7.2 around the corner improving things. Just always keep in mind that the Synology DS923+ NAS is a system that arrives with the slight emphasis on having to do many things ‘their way’. If you are less technically versed, then you will definitely appreciate this level of user-friendly design and assistance, but more technically minded admins’ main strain a pinch! In short, the DS923+ IS a good NAS drive, but its focus has certainly ebbed more towards the business user this generation than the home.
SOFTWARE - 10/10
HARDWARE - 7/10
PERFORMANCE - 9/10
PRICE - 8/10
VALUE - 9/10
8.6
PROS
DSM 7/7.1 (and DSM7.2 Around the corner) still continues to be an absolute tour-de-force of NAS Software This latest generation expandable 4-Bay arriving with a 10G Upgrade Option is fantastic ECC Memory Support and scalability to 32GB is completely unparallel at this price point The design of the DS923+ NAS still continues to be market-leading The New CPU architecture allows great PCIe3 bandwidth to be afforded to the rest of the hardware, inside and out Low Noise, Low Physical Impact and Intelligent Automatic Power Use Adjustment Settings Increased Support for macOS in Synology Drive and Active Backup Suite (DSM 7.2) Synology C2 Cloud Services, 1st Party Backup/Sync Tools and Collaboration Suite App = Complete 1st Party Eco-system that can rival Office365 and Google Workspace PCIe Gen 3 M.2 NVMe SSD Support as Storage Pools!!! FINALLY! Tremendously User-Friendly!!!
CONS
The AMD Emb.Ryzen instead of a Intel Celeron (with Integrated Graphics) will be a dealbreaker for alot of users The default 1GbE ports that the system arrives with are tremendously dated The USB ports on the system are older gen USB 3.2 Gen 1 (5Gb/s) and their support/usability have been quite pared back in recent DSM releases The continued moves by Synology to prioritize 1st party hardware and software services may put some users off Plex Support on the Synology DS923+ is still great for native playback, client-side handling and client devices with relevant multimedia licenses in place, but if server-side media conversions are needed - this system will struggle in comparison with the DS920+ before it
DEAL WATCH – Is It On Offer Right Now?
Synology DS923+ 4 Bay NAS enclosure Amazon UK 20.87 OFF (WAS 601) [LINK] Synology DS923+ 4 Bay Desktop NAS Including Warranty Extension to 5 Years Amazon UK 21.81 OFF (WAS 893) [LINK]
These Offers are Checked Daily
Thunderbolt Ready Professional Editing NAS – The QNAP TVS-h874T Thunderbolt4 Server
In summarizing the capabilities and potential of the QNAP TVS-h874T NAS, released as a late 2023 update to its predecessor, it’s clear that this system represents a significant leap forward in desktop NAS technology. Priced over £2500, it’s a substantial investment, designed with future-proofing in mind. The TVS-h874T not only maintains the longevity and high-end status of the TVS-h874 but also brings to the table enhanced direct data access through Thunderbolt 4 integration. This advancement, supporting IP over Thunderbolt protocol, significantly boosts connectivity and speed, making the system an ideal choice for demanding tasks such as 8K video editing and high-performance computing needs in business environments. However, the question of whether Thunderbolt NAS is the right fit for all users remains. For those requiring high-speed, multi-user access and scalability, the TVS-h874T is a strong contender. Its support for the latest PCIe 4 standards ensures compatibility with high-performance upgrades, reinforcing its position as a future-proof investment. The software, featuring QTS and QuTS, might require some acclimatization, particularly for those familiar with simpler systems like Synology’s DSM. Yet, the benefits, especially for ZFS enthusiasts, are undeniable, offering advanced RAID management and a plethora of applications and services.
The TVS-h874T’s stance on open hardware and software compatibility is a significant plus in an industry increasingly leaning towards proprietary systems. It accommodates a range of third-party hardware and software, adding to its versatility. In the face of growing concerns over NAS security, the system is well-equipped with comprehensive tools and settings for enhanced security and data protection, addressing the pressing issue of ransomware attacks. In conclusion, the QNAP TVS-h874T stands out as an exceptional choice for businesses and power users who require a robust, scalable, and secure NAS solution. It offers an excellent balance of price, performance, and features, making it a worthy investment for those seeking top-tier server-side capabilities. However, for users with simpler storage needs or those not requiring the advanced features of Thunderbolt NAS, traditional Thunderbolt DAS devices might be a more suitable and cost-effective option. The TVS-h874T, with its advanced capabilities, is undoubtedly a powerhouse in NAS technology, but its full benefits will be best realized by those whose requirements align closely with what this advanced system has to offer.
SOFTWARE - 9/10
HARDWARE - 10/10
PERFORMANCE - 10/10
PRICE - 7/10
VALUE - 7/10
8.6
PROS
Only brand rolling out i9 Turnkey NAS Only NAS Rolling out Thundebrolt4 NAS (for now!) Upto 20 Cores, 24 Threads and High End Integrated Graphics PCIe Gen 4 x16 Upgrade Slot for 10/25/100GbE Cards and 2x PCIe Gen 4 x4 M.2 NVMe Slots for 7GB SSDs No Obstinant 3rd Party Hardware Limitations on Support or Compatibility Much larger support of 3rd Party Software Services than most other NAS Brands 10Gb/s USB Connectivity, in Type A and Type C Upto 64GB of Memory ZFS or EXT 4 File System Choice M.2 NVMe SSD Bays can be used for Storage or Caching Volume Encryption, SED SSD Support and WORM Enhanced AI Surveillance Services, with opt to upgrade with $30 Google TPU AI Photo Management Tool (QuMagie) Includes Thing Recognition and works offline ALL the ZFS Benefits, whilst also the GUI and App benefits of a Linux Software Platform in one
CONS
No Smaller 4-Bay Version QVR Elite (not QVR Pro) only has 2 Cam Licences Lack of ECC Memory will annoy some users 10Gbe is Missing (so no TB-TO-10GbE Pass-through) Too Many licenses on Enterprise Tools (Drive Analyzer, Face Tiger, etc) with too few free licenses
DEAL WATCH – Is It On Offer Right Now?
These Offers are Checked Daily
Low Price and Good Value 10GbE Editing NAS – Terramaster T9-450 Tower
Terramaster has really changed the playing field with the T9-450 NAS. I was already a big fan of their latest generation of 6-Bay, 9-Bay and 12-Bay desktop chassis – providing a pretty substantial amount of storage in a tower design that borrows ventilation methodology traditionally found in rackmounts, but the T9-450 takes this logic and doubles down on it hard. The dual 10GbE on the system means that, despite it’s comparatively modest price point (when comparing against similar scale solutions from Synology and QNAP) you genuinely have a solution with the potential to allow you to enjoy every single MB/s or GB/s of your RAID externally. This is further bolstered with additional 2.5GbE ports, m.2 NVMe bays, uncomplicated support of HDDs/SSDs and just generally a very sensible system that shows how much Terramaster has matured as a brand. The TOS software is still not quite up there with Synology’s DSM or QNAP’s QTS in terms of ease of use and AAA+ features, but it is definitely a great entry point OS that has tighted it’s security since the brand was targetted by a ransomware group (along with other brands, they were affected by Deadbolt attacks) – it certainly lacks some of the background optimization of it’s competitors, but then this is reflected in the budget of the system too.
The internal PCIe slot that has been largely ignored is a bit of a missed opportunity and I am not a big fan of how they have addressed memory compatibility, but overall it is very, very tough to criticise the T9-450 NAS when you factor in the value of the package here. Factor in that you can very easily swap out the OS for many others, and it largely silences alot of the negatives here too. Overall, the T9-450 could potentially be the best NAS that Terramster has ever released and if they continue to address later releases with the same level of hardware value, this could definitely give the bigger names in the industry something of a headache down the road. I highly recommend this system for its value and performance potential!
SOFTWARE - 7/10
HARDWARE - 10/10
PERFORMANCE - 8/10
PRICE - 9/10
VALUE - 10/10
8.8
PROS
Surprisingly compact for 9 Bays of Storage Good Middle ground between a Rackmount and Desktop System Dual 10GbE - LOVELY STUFF! Also has support of SMB MultiChannel and an extra 2x 2.5GbE Decent throughput Capable CPU Great RAID Options Snapshot Replication BTRFS/EXT4 Support as preferred A large amount of maximum memory supported (16-32GB - TBC) M.2 SSD Bay inside for caching/storage TOS 5.1 is genuinely good, if not quite as polished/evolved as it\\\'s competitors VERY easy to install TrueNAS, UnRAID, Proxmox, OpenMediaVault, etc (and also easy to reverse)
CONS
Secret PCIe Slot - Unused?! Supports ECC Mmeory, but not included (might annoy some) NOT QUIET!
This description contains links to Amazon. These links will take you to some of the products mentioned in today's content. As an Amazon Associate, I earn from qualifying purchases. Visit the NASCompares Deal Finder to find the best place to buy this device in your region, based on Service, Support and Reputation - Just Search for your NAS Drive in the Box Below
Need Advice on Data Storage from an Expert?
Finally, for free advice about your setup, just leave a message in the comments below here at NASCompares.com and we will get back to you.Need Help?
Where possible (and where appropriate) please provide as much information about your requirements, as then I can arrange the best answer and solution to your needs. Do not worry about your e-mail address being required, it will NOT be used in a mailing list and will NOT be used in any way other than to respond to your enquiry.
[contact-form-7]
TRY CHAT Terms and Conditions
If you like this service, please consider supporting us.
We use affiliate links on the blog allowing NAScompares information and advice service to be free of charge to you.Anything you purchase on the day you click on our links will generate a small commission which isused to run the website. Here is a link for Amazon and B&H.You can also get me a Ko-fi or old school Paypal. Thanks!To find out more about how to support this advice service checkHEREIf you need to fix or configure a NAS, check FiverHave you thought about helping others with your knowledge? Find Instructions Here
Or support us by using our affiliate links on Amazon UK and Amazon US
Alternatively, why not ask me on the ASK NASCompares forum, by clicking the button below. This is a community hub that serves as a place that I can answer your question, chew the fat, share new release information and even get corrections posted. I will always get around to answering ALL queries, but as a one-man operation, I cannot promise speed! So by sharing your query in the ASK NASCompares section below, you can get a better range of solutions and suggestions, alongside my own.
Video Editing over 10Gbe or Thunderbolt with a NAS Drive – The Easy Way in 2024
Video editing and production, as of 2024, continues to be one of the largest generators of unique and large-scale data. From various sectors like wildlife photography to large-scale movie production, video editing has evolved into a significant business requiring power, speed, and efficiency from its hardware environment. In the past, editing with software like Final Cut, Adobe Premiere, DaVinci, etc., was manageable on local HDD/SSDs or external drives. However, in recent years, the demand for performance due to the size of 4K and 1080p footage has outstripped the capabilities of most internal SATA SSDs and external drives. The industry has since moved to NVMe SSD and Thunderbolt DAS RAID external storage.
In a Rush? Here are the Best NAS Systems for Video Editing that I Recommend:
Despite their effectiveness, the cost of NVMe, its limited capacities, and the impracticality of Thunderbolt RAID DAS in field settings make them less than ideal. This leads us to the adoption of 10Gbe and/or Thunderbolt NAS for video editing, which offers several advantages:
Editing on a NAS over 10Gbe can provide up to 1000MB/s performance, potentially increased with link aggregation or network interface port upgrades.
Editing over Thunderbolt NAS can reach up to 1600MB/s, depending on the chosen storage media and NAS model.
Using a NAS allows you to upgrade the connection over its lifespan, enhancing performance significantly.
A NAS improves the workflow in video editing with multiple users, allowing simultaneous access with different priorities based on task needs.
Incorporating a NAS into your backup strategy significantly reduces the risk of data loss, using NAS backup software for scheduled or live duplications.
Remote uploading of raw/pre-production footage to a NAS enables efficient off-site work, ready for editing when you return to the desk.
Editing on a NAS drive, while not as straightforward as traditional USB and Thunderbolt DAS, offers several advantages to network hardware environments and improves the overall workflow. Let’s explore setting up a 10Gbe or Thunderbolt NAS for video editing, but first, some important considerations for 2024.
How to Edit Video on a Synology NAS
Video Editing on a NAS Drive – Important Things to Remember in 2024
Editing on a NAS in 2024 offers more space and potential speed over local/internal SSDs, but there are additional considerations when switching to NAS-based editing:
This guide simplifies the NAS setup for easy video editing, but other methods are available for those needing more technical setups.
For hard drive use, at least 4 drives in RAID 5 are needed to match single SSD speeds – more drives equal better performance.
10Gbe NAS devices are affordable, with the best rates from NAS with Intel/AMD CPUs (64bit x86) and at least 2GB of memory.
Installing NAS-brand setup software (like Synology Assistant, QNAP QVR Pro, etc.) on at least one PC/Mac system is recommended for easier setup.
NAS systems for video editing should ideally be 5Gbe, 10Gbe, or above.
Direct Mac/PC-to-NAS connections over 10Gbe, or through a 10Gbe network switch, are options, though they may affect the NAS’s media speed if multiple users connect simultaneously.
For Thunderbolt 3 Mac/PC Systems, simple Thunderbolt powered 10Gbe-to-TB3 adapters are available.
If NAS-based editing sounds like a fit for your workflow and productivity in 2024, proceed with the guide.
How to Edit Video on a QNAP NAS
Video Editing on NAS Drives Guide – What You Need to Do
These steps will guide you through how to setup editing on your NAS with software such as DaVinci Resolve, Adobe Elements, PowerDirector and more, as well as be applicable to NAS brands such as Synology, QNAP, Asustor and Terramaster. I will try to keep as many of the steps as ‘universal’ as possible, ut there might be the odd difference between one software brand and another. If you have any questions, scroll to the bottom of the page and content me directly on the ‘Free Advice’ section. It is all genuinely free advice, manned by me (so I apologise if I am not ‘lightning-fast’) and I will help get you all setup to the best of my ability. Let’s get the guide started.
Step 1 – Set Your NAS Up for Storage
Right so, this is probably the BIGGEST STEP! This guide is largely useless if your NAS system is not already set up – setting up a NAS (eg have it plugged in and ready to interact with, etc) is a whole guide in itself. Luckily I have made several of those in both written and video form. It is important that your NAS system has the following things done:
Latest Firmware Installed (generally this is done when the system is first set up automatically, but always check)
In the NAS User Setup, create a new ‘user’ for the video-editing with access to the folders in the NAS that are going to be used in your editing. You don’t HAVE to do this, but it’s best to leave the ‘admin’ account separate from this kind of thing, as you want that to be your ‘recovery’ if needed.
Have your Storage Pool (the RAID) setup and a Volume created. The guides will go into more detail about this for each NAS platform, but I recommend a RAID configuration with at least 1 disk of redundancy (so, 1 disk safety net if a drive breaks/fails) across at least drives. The Volume setup will ask you lots of questions about file systems and Encryption – those can largely be set to ‘default’ or as your own storage preference dictates.
Depending on your NAS Brand of choice, you can find a guide to setting up your desired system below:
From here you should be ready to start setting up your Mac/PC with your NAS system for video editing over 10Gbe and/or Thunderbolt.
Step 2 – Create a Shared Folder to Access Remotely as a Mounted Network Drive
Next, you need to create an area of storage on your NAS system that can be accessed by your Mac/PC system and in-turrn, the video editing software you are using. Remember, these steps will differ depending on the NAS brand you choose. First, you need to open up the NAS File Management tool (it will be called File Manager or File Browser).
From here, somewhere at the top, you will find an option listed as ‘create a shared folder’ or simple ‘Shared Folder Options’.
You need to give this new shared folder a name. It is recommended that you should not use spaces or special characters in this name, as some software might have conflicts with it. Additionally, you will be asked about which volume on the NAS you want the shared folder to be within. Be sure to select the volume where your best-performing media (HDD/SSD) are based.
After this, you will be asked several options (depending on the brand. These will include 1) If you want to encrypt the shared folder (which will lock it to only be accessed within the NAS, but can lower performance a pinch), 2) Do you want to create a task of periodic data health checks (up to you), 3) Do you want to set a storage quota (maximum space this shared folder can accumulate) and 4) Do you want to create storage snapshots of the shared folder to revert to later if needed (again, personal preference).
After this, you will then be asked which users on your NAS can access the shared folder. Be sure to allow both Read and Write access to both the Admin account and the one you created for your Video editing account.
From here, open up the client tool (Synology Assistant / Qfinder Pro, etc) and ensuring that the PC/Mac you are using to interact with your NAS so far is on the same network/10Gbe/TB3, Right-click on the NAS on the available and select the option labelled ‘Map Network Drive’
From here, you will be asked to provide the login details you created for the NAS. Here you will need to enter the video editing account details you created (or the Admin account), which will then show you the list of available network drives on the NAS
Select the shared folder that you created earlier, then you will be asked to give the NAS folder/drive a letter to assign on your Mac / PC (EG C:/ is the OS drive typically and D:/ is the CD/DVD/BD drive. Just give the drive a letter and then click confirm.
The new shared folder and Drive will now be available and visible on your My Computer / Finder and this is the drive that you will be editing your work on. As long as you connected to this drive via 10Gbe or Thunderbolt, it will allow considerably faster speeds than typical network/gigabit NAS connectivity.
Step 3 – Copy/Move your Asset Library to the NAS
The next step is quite straight forward. You need to copy or move your existing library of work over to the NAS. This can be done in numerous ways:
Method 1 – Simply Drag and Drop / Copy and Paste into the Mapped network drive
Method 2- Go into the NAS via your web Browser and Upload directly from the File Manager
Method 3 – Create a Sync Jobbetweena folder on your PC/Mac and the NAS using the free first-party tools (Synology Drive or QSync)
You will need to make sure that the bulk of the stock footage, music, photos and more that you use on a regular basis are on the NAS.
Step 4 – If Necessary, Change The Default Media Directory on your Editing Software
When you make the switch from editing video locally on your PC/Mac system and moving onto NAS based editing, the editing software you use (Adobe Premiere, Final Cut Pro, DaVinci Resolve, etc) will still have background actions and preferences that will be targeting your main system when in use. Typically these will be the default directories of when shadow files are created, the default location of where project assets are found and/or where temp files are saved.Each video editing software differs, so the options will be different from software to software. But it is recommended you change these to the NAS, as then the internal SATA SSD in your system, that will typically perform at 350-450MB/s (reported 550MB/s speed reports are based on ideal usage scenarios), will not present a bottleneck when your NAS can get up to 1,000MB/s on 10Gbe and more on a Thunderbolt-enabled NAS.
Adobe Premiere Essentials 2020
DaVinci Resolve
Step 5 – Optional BUT Important, Create a Job/Task on your NAS for Backing Up your Work Elsewhere
This one is not strictly essential, but I would recommend it. As you work on the NAS with your video editing, you are going to be creating both alot of files. Unlike when you were previously editing on a PC/Mac system and it’s internal SSD/HDD (whereupon you could then make a backup onto a USB drive or NAS), the video files you create will be living on the NAS drive ONLY. THAT is a big risk and means you do NOT have a backup. So, I recommend at least a 2 stage backup. That means that your data is in 1 location and then you have 2 more copies of ALL the important data in two more hardware and/or physical locations. Luckily, most NAS devices arrive with numerous multi-tiered backup software options included. In terms of backup options, I recommend one/two/all of the following (methods will differ between brands, but all of the top-tier NAS brands support these):
Backup the NAS Drive to a USB Drive
Backup the NAS Drive to another NAS Drive
Backup the NAS Drive to a Cloud Service
Recommended NAS Systems for Vdieo Editors?
There are ALOT of different NAS options for editing video, but some are more suitable than others. Having a 10Gbe port and/or Thunderbolt is not enough and in order to avoid you spending month unnecessarily, I have listed a few options below that suit different personal budgets and the extent that you wish to edit. Take a look and if you are still in doubt, you can contact me directly for FREE and impartial advice at the bottom in my free support section or on the right-hand side of the page.
Best Software and Features Video Editing NAS – The Synology DS1522+
0-110TB (90TB with Syn HAT5300s) , 5x SATA Bays, 2x M.2 NVMe 2280 (Pools and Caching), AMD R1600 2-Core / 4-Thread CPU, 8-32GB ECC DDR4 Memory, 4x 1Gbe Port, Optional 10GbE Upgrade, 2x Expansion Port, 3-5yr Warranty
YouTube Video Review – Watch , Before You Buy Video – Watch
What I said in my review June ’22:
The Synology DS1522+ is a good NAS drive and most business-focused users are going to appreciate what this newer configuration of hardware is able to provide. There was never any doubt in the extent to which this new NAS would support DSM7, and given its architecture, there is virtually nothing in the popular NAS software that this system cannot do. Likewise, having the option of 10GbE on a Diskstation of this scale will be hugely attractive to some, though the proprietary means with which you need to upgrade is arguably less desirable.
The R1600 CPU is a good choice of processor for file handling and simultaneous tasks, as is the 8GB of memory that this system arrives with, plus the potential to ramp it up to 32GB. After that though, the desirability of this system to home users and multimedia users is a little less compelling and with such a large audience of users who look at NAS for their media streaming, the DS1522+ not featuring a more graphically enabled chip will leave them somewhat underwhelmed. Bottom line, the DS1522+ is a solid and full DSM7 supporting system here and you cannot fault the design, internal/external performance and ease of use of this Synology NAS. However, there will always be users wondering why this NAS never arrived with an Intel chip.
SOFTWARE - 10/10
HARDWARE - 8/10
PERFORMANCE - 8/10
PRICE - 8/10
VALUE - 8/10
8.4
PROS
8GB of ECC Memory that can be scaled to 32GB – LOVELY STUFF Optional 10GbE Upgrade Continued Support of Synology Hybrid RAID on this scale 4x LAN Ports by default Expandable with another 10 Drives down the line (2x DS517) NVMe SSD Bays for Caching will be very useful with this 5-Bay RAID Storage DSM 7.1 is hands down the best NAS software and services in the market right now 3 years base warranty, with optional extra 2yrs Numerous storage service advantages inc. BTRFS, Fast RAID Rebuild and Auto-Repair First Party Hybrid Cloud services with Synology C2 Exceptionally good surveillance software included
CONS
That CPU is going to divide opinion HDD & SSD Compatibility list is a little thinner than I expected Optional 10GbE upgrade is via a heavily proprietary route
DEAL WATCH – Is It On Offer Right Now?
Synology 5-bay DiskStation DS1522+ (Diskless),Black https://www.amazon.com/b/ref=dp_bc_aui_C_5?ie=UTF8&node=20941687011 USA 15% Off [LINK]
These Offers are Checked Daily
Best Value SSD Video Editing NAS – The Asustor Flashstor 12 Pro NVMe Flash Server
I cannot stress enough how impressed I am that the Flashstor 6 and Flashstor 12 Pro are priced at $499 and $860, respectively, given the level of hardware on offer here. These are by no means enterprise-grade NAS server solutions, nor should they be thought of as such. However, given the cost of typical fully featured 4x HDD solutions from their competitors and the brand themselves, which often start at $550 and above, it is quite remarkable that the six M.2 SSD system with comparable internal hardware comes in at $499. As long as a user keeps their expectations in line with what this cost versus its capabilities, it’s really tough to argue with the price point that these two devices have arrived at on the market. The Asustor FS6712X Flashstor 12 Pro NAS presents a unique offering in the NAS market, leveraging NVMe technology to provide high-capacity, ultra-high-performance storage. The device’s design, with its rhombus-shaped enclosure and twelve M.2 NVMe slots, sets it apart from traditional NAS devices and offers a sleek and modern aesthetic.
The tool-less drive installation mechanism makes it easy to set up and expand the storage capacity. However, there are some considerations to keep in mind. The limited number of PCIe lanes provided by the Intel Celeron N5105 processor may restrict the performance of high-speed NVMe drives. The single 10GbE LAN port also presents a potential network bottleneck, limiting the device’s overall network performance. Users seeking maximum performance and network throughput may find alternative solutions better suited to their needs. Despite these limitations, the FS6712X shines as a storage solution for users who prioritize high-capacity storage, quiet operation, and low power consumption. The device’s ability to directly output 4K video, along with its range of Asustor-approved apps, makes it an excellent choice for media distribution and presentation. In terms of pricing, the FS6712X comes with a price tag of $850+. While this may appear high at first glance, it is comparable to 8 bay drive NAS SATA devices and many of those do not even include NVMe slots or 10GbE. Users looking for a more cost-effective option can consider the Flashstor 6, which offers half the number of slots and 2x 2.5GbE enabled ports for $499.
As the cost of flash modules continues to drop, and larger capacity drives become available all the way up to 8TB (even without QLC), the FS6712X provides an attractive solution for those seeking high-capacity and high-performance NAS storage. While some underlying performance relativity by the end user needs to be factored in and hardware limitations exist thanks to the use of that Celeron to remain budget-friendly, the FS6712X is a tremendously smart move by Asustor. A well-designed NAS that presents a much more confident solution demonstrating the benefits of NVMe-focused NAS devices to an audience that would have assumed such things are way, WAY outside the realms of affordability!
SOFTWARE - 7/10
HARDWARE - 9/10
PERFORMANCE - 7/10
PRICE - 10/10
VALUE - 10/10
8.6
PROS
6x NVMe SSD Flash NAS for under $500 - COME ON! Low Power Use Full 1st Party NAS OS Included USB 3.2 Gen 2 10G Connectivity and wide USB Support/Compatibility Very Slick and compact design SP/DIF and HDMI 2.0b Outputs will hugely please the multimedia user community Likewise, Plex Performance is very good for 4K and 1080p conversions
CONS
6x NVMe Performance will never be realised because of the Intel Celeron CPU inside and 3x1 Limits 2.5GbE x2 is good.. but its still hugely limiting for those NVMes Lack of ECC memory (cost prohibitive of course) will put some serious users off
DEAL WATCH – Is It On Offer Right Now?
ASUSTOR FLASHSTOR 6 Network Storage (FS6706T) Amazon UK 48.65 OFF (WAS 796) [LINK]
These Offers are Checked Daily
Best Value Hard Drive Video Editing NAS – Terramaster T9-450 Tower
Terramaster has really changed the playing field with the T9-450 NAS. I was already a big fan of their latest generation of 6-Bay, 9-Bay and 12-Bay desktop chassis – providing a pretty substantial amount of storage in a tower design that borrows ventilation methodology traditionally found in rackmounts, but the T9-450 takes this logic and doubles down on it hard. The dual 10GbE on the system means that, despite it’s comparatively modest price point (when comparing against similar scale solutions from Synology and QNAP) you genuinely have a solution with the potential to allow you to enjoy every single MB/s or GB/s of your RAID externally. This is further bolstered with additional 2.5GbE ports, m.2 NVMe bays, uncomplicated support of HDDs/SSDs and just generally a very sensible system that shows how much Terramaster has matured as a brand. The TOS software is still not quite up there with Synology’s DSM or QNAP’s QTS in terms of ease of use and AAA+ features, but it is definitely a great entry point OS that has tighted it’s security since the brand was targetted by a ransomware group (along with other brands, they were affected by Deadbolt attacks) – it certainly lacks some of the background optimization of it’s competitors, but then this is reflected in the budget of the system too.
The internal PCIe slot that has been largely ignored is a bit of a missed opportunity and I am not a big fan of how they have addressed memory compatibility, but overall it is very, very tough to criticise the T9-450 NAS when you factor in the value of the package here. Factor in that you can very easily swap out the OS for many others, and it largely silences alot of the negatives here too. Overall, the T9-450 could potentially be the best NAS that Terramster has ever released and if they continue to address later releases with the same level of hardware value, this could definitely give the bigger names in the industry something of a headache down the road. I highly recommend this system for its value and performance potential!
SOFTWARE - 7/10
HARDWARE - 10/10
PERFORMANCE - 8/10
PRICE - 9/10
VALUE - 10/10
8.8
PROS
Surprisingly compact for 9 Bays of Storage Good Middle ground between a Rackmount and Desktop System Dual 10GbE - LOVELY STUFF! Also has support of SMB MultiChannel and an extra 2x 2.5GbE Decent throughput Capable CPU Great RAID Options Snapshot Replication BTRFS/EXT4 Support as preferred A large amount of maximum memory supported (16-32GB - TBC) M.2 SSD Bay inside for caching/storage TOS 5.1 is genuinely good, if not quite as polished/evolved as it\\\'s competitors VERY easy to install TrueNAS, UnRAID, Proxmox, OpenMediaVault, etc (and also easy to reverse)
CONS
Secret PCIe Slot - Unused?! Supports ECC Mmeory, but not included (might annoy some) NOT QUIET!
DEAL WATCH – Is It On Offer Right Now?
These Offers are Checked Daily
Best Multi-Editor NAS Solution – The QNAP TVS-h874T Thunderbolt4 Server
In summarizing the capabilities and potential of the QNAP TVS-h874T NAS, released as a late 2023 update to its predecessor, it’s clear that this system represents a significant leap forward in desktop NAS technology. Priced over £2500, it’s a substantial investment, designed with future-proofing in mind. The TVS-h874T not only maintains the longevity and high-end status of the TVS-h874 but also brings to the table enhanced direct data access through Thunderbolt 4 integration. This advancement, supporting IP over Thunderbolt protocol, significantly boosts connectivity and speed, making the system an ideal choice for demanding tasks such as 8K video editing and high-performance computing needs in business environments. However, the question of whether Thunderbolt NAS is the right fit for all users remains. For those requiring high-speed, multi-user access and scalability, the TVS-h874T is a strong contender. Its support for the latest PCIe 4 standards ensures compatibility with high-performance upgrades, reinforcing its position as a future-proof investment. The software, featuring QTS and QuTS, might require some acclimatization, particularly for those familiar with simpler systems like Synology’s DSM. Yet, the benefits, especially for ZFS enthusiasts, are undeniable, offering advanced RAID management and a plethora of applications and services.
The TVS-h874T’s stance on open hardware and software compatibility is a significant plus in an industry increasingly leaning towards proprietary systems. It accommodates a range of third-party hardware and software, adding to its versatility. In the face of growing concerns over NAS security, the system is well-equipped with comprehensive tools and settings for enhanced security and data protection, addressing the pressing issue of ransomware attacks. In conclusion, the QNAP TVS-h874T stands out as an exceptional choice for businesses and power users who require a robust, scalable, and secure NAS solution. It offers an excellent balance of price, performance, and features, making it a worthy investment for those seeking top-tier server-side capabilities. However, for users with simpler storage needs or those not requiring the advanced features of Thunderbolt NAS, traditional Thunderbolt DAS devices might be a more suitable and cost-effective option. The TVS-h874T, with its advanced capabilities, is undoubtedly a powerhouse in NAS technology, but its full benefits will be best realized by those whose requirements align closely with what this advanced system has to offer.
SOFTWARE - 9/10
HARDWARE - 10/10
PERFORMANCE - 10/10
PRICE - 7/10
VALUE - 7/10
8.6
PROS
Only brand rolling out i9 Turnkey NAS Only NAS Rolling out Thundebrolt4 NAS (for now!) Upto 20 Cores, 24 Threads and High End Integrated Graphics PCIe Gen 4 x16 Upgrade Slot for 10/25/100GbE Cards and 2x PCIe Gen 4 x4 M.2 NVMe Slots for 7GB SSDs No Obstinant 3rd Party Hardware Limitations on Support or Compatibility Much larger support of 3rd Party Software Services than most other NAS Brands 10Gb/s USB Connectivity, in Type A and Type C Upto 64GB of Memory ZFS or EXT 4 File System Choice M.2 NVMe SSD Bays can be used for Storage or Caching Volume Encryption, SED SSD Support and WORM Enhanced AI Surveillance Services, with opt to upgrade with $30 Google TPU AI Photo Management Tool (QuMagie) Includes Thing Recognition and works offline ALL the ZFS Benefits, whilst also the GUI and App benefits of a Linux Software Platform in one
CONS
No Smaller 4-Bay Version QVR Elite (not QVR Pro) only has 2 Cam Licences Lack of ECC Memory will annoy some users 10Gbe is Missing (so no TB-TO-10GbE Pass-through) Too Many licenses on Enterprise Tools (Drive Analyzer, Face Tiger, etc) with too few free licenses
This description contains links to Amazon. These links will take you to some of the products mentioned in today's content. As an Amazon Associate, I earn from qualifying purchases. Visit the NASCompares Deal Finder to find the best place to buy this device in your region, based on Service, Support and Reputation - Just Search for your NAS Drive in the Box Below
Need Advice on Data Storage from an Expert?
Finally, for free advice about your setup, just leave a message in the comments below here at NASCompares.com and we will get back to you.Need Help?
Where possible (and where appropriate) please provide as much information about your requirements, as then I can arrange the best answer and solution to your needs. Do not worry about your e-mail address being required, it will NOT be used in a mailing list and will NOT be used in any way other than to respond to your enquiry.
[contact-form-7]
TRY CHAT Terms and Conditions
If you like this service, please consider supporting us.
We use affiliate links on the blog allowing NAScompares information and advice service to be free of charge to you.Anything you purchase on the day you click on our links will generate a small commission which isused to run the website. Here is a link for Amazon and B&H.You can also get me a Ko-fi or old school Paypal. Thanks!To find out more about how to support this advice service checkHEREIf you need to fix or configure a NAS, check FiverHave you thought about helping others with your knowledge? Find Instructions Here
Or support us by using our affiliate links on Amazon UK and Amazon US
Alternatively, why not ask me on the ASK NASCompares forum, by clicking the button below. This is a community hub that serves as a place that I can answer your question, chew the fat, share new release information and even get corrections posted. I will always get around to answering ALL queries, but as a one-man operation, I cannot promise speed! So by sharing your query in the ASK NASCompares section below, you can get a better range of solutions and suggestions, alongside my own.
An Easy Guide to Buying the Right UPS for your NAS System
The popularity of uninterruptible power supplies (UPS) has risen significantly in recent years. Not just for businesses, but for home users as well, who often have limited power setups such as houseboats, pop-up offices, and mobile homes. The value of having a safety net for your power-consuming devices is undeniable. Additionally, for those whose data is critical and whose business or personal life relies on constant access and read/write operations, a UPS can provide peace of mind. In the past, power failure solutions were only accessible to large enterprises and high-level businesses, with prices starting in the five figures. However, with the rise of network-attached storage (NAS) in homes and the increased efficiency of mass production techniques, owning a UPS device to protect data in both homes and businesses has become more affordable. However, choosing the right UPS for your NAS device, such as a QNAP or Synology, and finding one that fits within your budget can be challenging. In this guide, we will address the three commonly asked questions by users considering a UPS but unsure of which device to choose: 1) How does a UPS work and how will I benefit? 2) How do I determine the right Watts, Volts, and Amps to choose the best UPS? 3) How much will a UPS cost? We hope this guide is helpful for NAS buyers looking at brands such as Synology, QNAP, Asustor, Terramaster, and others, and also for anyone looking to choose the right UPS for other devices.
Click HERE to Skip ahead to the Recommended UPS for different NAS drives
What Are the Factors I need to consider when buying a UPS for my NAS?
Choosing the right UPS (uninterruptible power supply) for your Synology or QNAP NAS (network-attached storage) can be a complex task, as there are many factors to consider. However, by following a few key guidelines, you can ensure that your NAS is protected against power outages and other issues that could cause data loss or corruption. The first thing to consider when choosing a UPS for your NAS is the amount of power that your NAS requires. Desktop NAS devices with external PSUs typically have a power consumption of around 60-120 watts and rackmounts generally 250W and above, although this can vary depending on the specific model and the number of hard drives that are installed. It is important to choose a UPS that can provide at least this much power, as well as a bit extra to account for any other devices that may be connected to the NAS. Another important factor to consider is the runtime of the UPS. This is the amount of time that the UPS can keep your NAS running in the event of a power outage. The runtime of a UPS is typically measured in minutes, and you should choose a UPS that has a runtime that is long enough to allow you to properly shut down your NAS in the event of a power outage.
Another important feature to look for when choosing a UPS is the ability to communicate with the NAS. Some UPS’ have built-in USB or serial ports that allow them to communicate with the NAS and provide status information. This can be very useful in case of power outage, as it can allow you to monitor the status of the UPS and take appropriate action. Finally, you should also consider the size and weight of the UPS, as well as its overall design. A UPS that is smaller and lighter may be more convenient to deploy, but you should also make sure that it is well-designed and built to last. When choosing a UPS for your NAS, it is important to consider the amount of power that your NAS requires, the runtime of the UPS, the ability to communicate with the NAS, compatibility and the size and weight of the UPS. By following these guidelines, you can ensure that your NAS is protected against power outages and other issues that could cause data loss or corruption.
What is a UPS and Why Should I Buy One for my NAS?
The most frequently asked question about UPS is typically “What exactly is a UPS and what does it do?” UPS stands for Uninterruptible Power Supply and many users believe that purchasing a UPS means they can run their devices and access data from their NAS, DAS, or SAN for hours after a power failure. While this is technically true, it would require a significant financial investment in the form of a 5-figure sum. In reality, most users do not require hours of protection for their read/write data operations on HDD media. Instead, what is often needed is enough time to safely shut down the server or RAID storage. This can be achieved by spending only hundreds of pounds, not thousands, as it depends on the number of devices drawing power, their specific needs, and the efficiency of the chosen UPS. For more information on UPS and how to choose one, please watch the video below.
How Does a UPS Draw Power and How Do I Connect My Devices?
This topic can be challenging for some, so we will break it down and explain it in a simple way. Before delving into technical terms like Watts, Volts, and Power, let’s use an analogy that’s easy to understand. Imagine receiving electricity to your device as drawing water from a tap.
To understand this concept, we can use an analogy of a tap and water. Just like a tap needs water and pressure to deliver it through the pipe, an electrical circuit needs electrons and voltage to deliver electricity to a device. The water represents the electrons that carry electricity from the power source to the destination device, like a NAS, DAS, or PC. The tap represents the destination device and the water/electrons are going around in a circuit back to the water/power source, which is mostly unseen in the cables.
The pressure in the analogy represents the VOLTAGE, which is the strength of the electricity being pushed by the electrons in the circuit. It’s important to measure this as some devices are designed to only accept a specific amount of voltage. If the voltage is too high or too low, the device will not function correctly.
AMPS represent the amount of electrical charge that passes a given point in a second, similar to how much water passes through the pipe per second.
So, now we need to know the WATTS of the device. This is compiled with the following equation:
AMPS x VOLTS = WATTS
or
Water Volume x Water Pressure = Water Power
If you’ve ever experienced weak water pressure in a shower while living in an apartment on a higher floor, this is likely due to the water pressure not being strong enough to deliver the water to the destination device. Similarly, a smaller battery pack is often measured in milliampere-hours (mAh), which represents the amount of charge available, rather than time. Using the analogy of water, this would be like a large drum of water. The amount of water and how fast it travels from the drum is not as important as the available water that can be carried over to the tap. The output and result is heavily affected by the AMPS and VOLTS, similar to the pressure of water and the maximum or minimum amount of water the tap can receive.
Choosing the right UPS Battery for your Home or Office
The majority of UPS devices have a similar setup. You connect one end to your main power outlet (3 Pin, 2 Pin, etc) and the UPS has multiple ports for connecting your destination devices (PC, NAS, etc). Inside the UPS chassis, there is one or more batteries that are charged from the wall plug, while your devices are powered directly from the wall and not drawing from the batteries unless there is a power failure. In the event of a power failure in your home or business, the destination devices will switch to drawing power from the batteries, giving you time to save your data and shut down your devices safely, protecting your digital storage from corruption or loss. It’s worth noting that when buying a UPS, there are many figures to consider, but the power drawn by computing equipment is typically measured in Watts or Volt-Amps(VA).
BUT
The power in Wattsis the real power drawn by the equipment.Volt-Amps are called the “apparent power” and are the product of the voltage applied to the equipment times the current drawn by the equipment.
Inexpensive UPS devices typically have a shorter running time because they don’t provide as much charge. Mid-range UPS devices, on the other hand, offer longer charge times, more features, and additional functionality such as network alerts, internet alerts via SMS or email, an LCD display, USB connectivity for maintenance, and the ability to automatically save or shut down certain NAS or PC machines in the event of a power failure, eliminating the need for manual intervention.
There is more to choosing the right UPS than matching the WATTS of your destination device and that of the UPS
UPS capacities are giving in VOLT-AMPS , not WATTS
Remember again,
VOLTS x AMPS = WATTS
Well, Resistance present in electrical load means that the WATTS cannot be matched Like for Like. So:
How do I Choose the Correct VA for the Watts on my NAS, PC and more?
You will need to consider a UPS with a VOLT-AMP 50-70% higher than the WATTS present on your destination device. Don’t forget to factor into your consumption any other devices that are drawing from the UPS, as this consumption is not per device, but TOTAL.
What is Line Interaction on a UPS?
Some UPS devices have a “Line Interactive” feature that can strengthen a weak or inconsistent power supply, particularly useful for those in remote areas where maintenance may be less frequent. When it comes to sizing a UPS, it’s important to note that equipment nameplate ratings are often in VA which can make it difficult to determine the Watt rating. To avoid oversizing the UPS, it’s recommended to configure the system such that the VA rating of the load is no greater than 60% of the UPS VA rating. This will prevent exceeding the Watt rating of the UPS. However, this approach may result in an oversized UPS and a longer run time than expected.
– Battery Packs, Listed in VOLTS and can be added to an existing UPS
– Replacement Battery Cartridges, an Internal Upgrade, RANGE specific
– Available in Desktop or Rack mount
What Are the most popular brands in the UPS Market?
There are many brands that provide UPS (uninterruptible power supply) devices in the market, but some of the most popular ones include:
APC (American Power Conversion) – APC is a well-known brand that has been providing UPS devices for many years. They offer a wide range of UPS devices, including standalone units, rack-mount units, and network-grade units. They also offer a variety of software and accessories to help manage and monitor their UPS devices.
Tripp Lite – Tripp Lite is another well-known brand that provides UPS devices. They offer a wide range of UPS devices, including standalone units, rack-mount units, and network-grade units. They also offer a variety of software and accessories to help manage and monitor their UPS devices.
Eaton – Eaton is a well-established brand that provides UPS devices. They offer a wide range of UPS devices, including standalone units, rack-mount units, and network-grade units. They also offer a variety of software and accessories to help manage and monitor their UPS devices.
CyberPower – CyberPower is a brand that provides a wide range of UPS devices, including standalone units, rack-mount units, and network-grade units. They also offer a variety of software and accessories to help manage and monitor their UPS devices.
Schneider Electric – Schneider Electric is a brand that provides a wide range of UPS devices, including standalone units, rack-mount units, and network-grade units. They also offer a variety of software and accessories to help manage and monitor their UPS devices.
Liebert – Liebert is a brand that provides a wide range of UPS devices, including standalone units, rack-mount units, and network-grade units. They also offer a variety of software and accessories to help manage and monitor their UPS devices.
These are just a few examples of the many brands that provide UPS devices in the market. There are many other brands available, each with their own set of features, specifications, and pricing options, so it is worth researching different options to find the one that best suits your needs.
How Do Synology, QNAP, Asustor and Terramaster NAS work with a UPS?
Almost all NAS drive brands support the use of a smart UPS, connected via USB for monitoring or via the network. That said, how each NAS system reacts to a power cut and switching to the UPS battery does differ. I recently tested the CyberPower 1500 system with a selection of 4-Bay UPS systems to see how each NAS brand’s hardware and software react. Below is the video for each brand. Just click the video, or you can open them up in a separate tab by clicking the title.
Below are a number of tiered UPS systems for your individual power needs and budget. These are based on the Watts you need to cover and based on a single NAS of different size each. This, of course, is just the tip of the iceberg and for more precise advice based on a whole office or server room of hardware, we recommend getting in touch with us directly using the Free Advice section (no commitment and the advice is totally impartial) so we can save you money as well as provide you with a solution that will help you sleep at night! All solutions that I recommend below have to arrive with at least 2 Years of Manufacturers’ Warranty, 2 Years of Battery Warranty/Replacement Coverage, USB and/or Network Support, NAS compatibility, provides at least 10-20mins of continued client operation in a power-cut, support of line interaction and AT LEAST 6x mains power points for devices
Budget/Basic UPS (No Frills!) for Value and/or ARM-Based NAS
For much more modest Synology or QNAP NAS setups, as well as factoring in additional home/office equipment I would recommend the following UPS Device.
1-4 HDD NAS Drive with 90-120w PSU
1x Desktop PC with 250W PSU and Laptops/tablets
1x Router 30W internal PSU
+ Misc Other Office Equipment (50W avg)
Floor or Tower Versions
No LCD available
Option – The Amazon Basics UPS, Available in different versions that cover 400VA to 1500VA, 6-8 Ports – Starts at $49
Option – The CyberPower CP1500PFCLCD PFC Sinewave UPS System, Available in different versions that cover 850-1500VA (1000W), 10-12 Ports – Starts at $389
The lifespan of a UPS (uninterruptible power supply) battery can vary depending on several factors, including the type of battery, the quality of the battery, the usage, and the environment in which the UPS is used. However, on average, a UPS battery should last between 3-5 years with proper usage and maintenance. Lead-acid batteries, which are commonly used in UPS systems, have a typical lifespan of 3-5 years. However, this lifespan can be shortened or extended depending on the usage and maintenance of the battery. For example, if the battery is frequently discharged to a low level, this can shorten its lifespan, whereas proper charging and maintenance can prolong it.
It’s important to note that the lifespan of UPS batteries can also be affected by environmental factors such as temperature, humidity and the amount of use. High temperatures and humidity can shorten the battery life, while keeping the UPS in a cool and dry environment can extend it. It’s also worth noting that most of the UPS batteries have an end-of-life indicator, which will alert you when the battery is no longer performing as well as it should. This will give you an idea of when the battery needs to be replaced.
In conclusion, the lifespan of a UPS battery can vary depending on several factors, including the type of battery, the quality of the battery, the usage, and the environment in which the UPS is used. On average, a UPS battery should last between 3-5 years with proper usage and maintenance. Keeping an eye on the end-of-life indicator and maintaining the battery in a cool and dry environment can help to extend the battery’s lifespan.
This description contains links to Amazon. These links will take you to some of the products mentioned in today's content. As an Amazon Associate, I earn from qualifying purchases. Visit the NASCompares Deal Finder to find the best place to buy this device in your region, based on Service, Support and Reputation - Just Search for your NAS Drive in the Box Below
Need Advice on Data Storage from an Expert?
Finally, for free advice about your setup, just leave a message in the comments below here at NASCompares.com and we will get back to you.Need Help?
Where possible (and where appropriate) please provide as much information about your requirements, as then I can arrange the best answer and solution to your needs. Do not worry about your e-mail address being required, it will NOT be used in a mailing list and will NOT be used in any way other than to respond to your enquiry.
[contact-form-7]
TRY CHAT Terms and Conditions
If you like this service, please consider supporting us.
We use affiliate links on the blog allowing NAScompares information and advice service to be free of charge to you.Anything you purchase on the day you click on our links will generate a small commission which isused to run the website. Here is a link for Amazon and B&H.You can also get me a Ko-fi or old school Paypal. Thanks!To find out more about how to support this advice service checkHEREIf you need to fix or configure a NAS, check FiverHave you thought about helping others with your knowledge? Find Instructions Here
Or support us by using our affiliate links on Amazon UK and Amazon US
Alternatively, why not ask me on the ASK NASCompares forum, by clicking the button below. This is a community hub that serves as a place that I can answer your question, chew the fat, share new release information and even get corrections posted. I will always get around to answering ALL queries, but as a one-man operation, I cannot promise speed! So by sharing your query in the ASK NASCompares section below, you can get a better range of solutions and suggestions, alongside my own.
Plex Media Server Vs Synology Video Station on a NAS
One of the most popular reasons that users choose to buy a network-attached storage (NAS) device is for use as a media server. The appeal is pretty clear. With most users now owning decades of media (either in digital form or ripped from optical media at home), the ability to enjoy these box sets and Movies on the latest devices can be complicated. Despite this, streaming all of your multimedia from a NAS to all of your TVs, phones, tablets and other devices are growing increasingly popular and a lot of this is thanks to the increasing affordability of NAS from brands like Synology and QNAP and free software from companies like Plex and Emby. The most popular NAS for home media tends to be Synology, with its support of numerous media server applications and its own premium video service app too. This combined with the oversaturation of third-party online streaming services that ask you to pay a subscription (such as Netflix) with little control or right to ownership of the media you watch means that many users just want to enjoy their own unique media collections. So now that a lot of users are choosing to switch from the likes of Netflix and Prime Video towards an in-house media server, the next question is which piece of software they should choose.
The most popular private media server app right now worldwide to counter the likes of Netflix is Plex Media Server, software available in host and client form that allows you to transform your media collection into a glossy, slick and informative UI that genuinely rivals big online streaming platforms. Synology on the other hand would likely prefer users to stick with their own fully-featured media server application, Synology Video Station, which they have invested well in and developed to an impressive standard that easily rivals that of Plex. So today I want to compare these two media server choices and help you decide which one is the ideal media server choice for you.
Important – ‘Free’ Vs Paid Media Server Services on a NAS
Before going any further, it is worth addressing the elephant in the room, namely that a number of key media server services that are included with Plex Media Server are locked behind a paid subscription service known as Plex Pass. Whereas Synology Video Station is an application that is included with your NAS on Day 1 at no additional cost. All that said, neither service can technically be called free, as both still require you to purchase a Synology NAS. Additionally, it is still worth highlighting that some more recent Innovations in Plex online services and utilisation of hardware transcoding (the ability to use the CPU’s embedded graphics or an available graphics card to adapt files on the fly to make them better suited to a client) is not available on the free tier of Plex, but ARE available by default in the Synology Video Station application. You can still utilise software transcoding on Plex for free and this will deal with a large degree of transcoding requirements, but the fact that you have to pay extra within the Plex app to utilise the hardware already available on your NAS is something a number of users find difficult to accept. Throughout this article, any feature that is only available as a paid Plex Pass feature will be highlighted as such.
Plex VS Synology Video Station – Installation and First Time Setup
Installation of either the Synology Video Station or Plex Media Server application is near enough identical. Both are readily available in the Synology app centre and can be installed within two clicks. Both media server applications do not require your multimedia files to be stored in a pre-designated/directory location and the sources for TV shows, Movies and more can be scanned and indexed by each media server application after they are installed. In fact, the initial installation on both is incredibly straightforward and there is really only one main difference between them. That difference is that whereas the Synology Media application uses your original NAS login credentials, Plex will require you to set up an account with them online in order to use the software, even if you only intend to use your Plex Media Server on the local network/DLNA. As Plex is a third-party application, this is a little understandable if a tiny bit annoying for some.
It is also worth highlighting that both media server applications will receive regular updates during their lifespan and this is treated slightly differently too. As Synology Video Station is a first-party app, as soon as an update is available, you will be notified immediately in the app centre and even have the opportunity to apply these firmware updates automatically. Plex updates on the other hand will almost always need to be installed manually, as the available default Plex application on the Synology app centre is updated considerably less frequently and as soon as you setup Plex for the first time, it will ALWAYS inform you that there is a new update available straight away. The Plex Media Server application itself will tell you when an update is available regularly at the top right and in the settings menu, but requires you to download the latest Plex server update to a connected computer and then you need to upload this update directly to the Synology NAS app centre manually. It is only a small inconvenience really, but does mean that regular updates on your media server of choice are handled more easily and with likely more frequency on Synology Video Station rather than Plex.
Plex VS Synology Video Station – GUI, Media Support and Browsing
The user interface of Synology Video Station and Plex Media Server are quite similar when viewed on a client device, such as a console, TV and Amazon Fire TV stick. With all of your available Movies and Boxsets clearly shown and the metadata collected by each media server application creating a great user interface for your connected users.
However the back end/server view of each media server application is considerably different and where the Synology Video Station application is designed exclusively around video media options and configuration (as Synology have a wide range of applications for different Media types and general NAS server maintenance already available), Plex, on the other hand, is a far better equipped tool for a complete server, with the bulk of server maintenance and customisation options built into the single Plex GUI. If you are something of an IT novice, the wide range of options that Plex Media Server throws at you for system maintenance can be a touch intimidating and because Plex is designed around many different kinds of media support (something we will touch on later) it’s configuration needs to be noticeably broader than the video-centric options in the Synology official video application. These additional options, if you take the time to go through them, will definitely lead to a better media server user experience and a far better multimedia streaming system overall, it’s just a question of how bespoke and how elaborate you want your media server to be.
As mentioned, there is a clear difference in the multimedia types supported in Plex Media Server or Synology Video Station. In terms of handling of video Media, they are near enough identical with some exceptions with regard to specialist audio handling for certain dense Media. However, much like the back-end server control mentioned earlier, Synology Video Station only handles video media and relies on alternative applications such as Synology moments, photo station, Synology photos, audio station and download station to play and obtain other kinds of multimedia. Plex Media Server is a much more diverse multimedia tool with support of your photo collections (AI-assisted too), album collections, podcast streaming and several online video streaming services included. In both cases, it makes a lot of sense why they are designed this way, but some users may prefer their media server to be more of a Swiss army knife and others may want their video streaming, music streaming and photo streaming to be different services for different devices and clients. Neither Plex or Synology Video Station really gain any advantage here but simply show how they are different in their architecture. If you want simplicity in the user interface, go with Synology Video Station. If you want simplicity in your media server as a whole, go with Plex Media Server.
Plex VS Synology Video Station – Meta Data Scraping
The scraping of metadata in a media server is precisely what separates a bog-standard selection of files and folders on your screen from a slick graphical user interface that is engaging, informative and a joy to use. When we talk about metadata, we are talking about thumbnails, box art, media descriptions, cast listings, review scores, trailers and more. When we say scraping, that is the process of the software accessing numerous online databases to retrieve and store this information locally to the NAS. The result is your years of TV and movie collection being transformed into something near identical to Netflix and Amazon Prime video in presentation. Metadata ultimately benefits connected users and their client hardware devices, with both Plex and Video Station being very similar in how they look to a client device, albeit with a few branded differences in colour and config.
However, on the server-side, both Synology Video Station and Plex have gone a different way with metadata scraping at a setup level. Of the two, Synology Video Station is definitely the less option-heavy and although this is thanks in many ways to a lot of key options being found in the general server GUI outside of the app, it is still pretty thin on the ground for configuration of your video media server. This is not an enormous surprise given how Synology have generally erred towards keeping things as user-friendly as possible and this is often done by simplifying configurations and sitting numerous settings to system default. The options for scraping metadata on the Synology are surprisingly thin on the ground and some more advanced options require you to sign up to some resource database websites to obtain a two-way key. Despite this, Synology still manages to scrape a tremendous amount of metadata without this key and resource linking. Indeed, although the number of supported databases for metadata listed on the Synology Video Station app is few and far between, it was still able to find the same level of metadata found on the Plex Media Server application and displayed all of the test media perfectly.
Plex Media Server has access to significantly more online databases and although the system will generally ask you to select which one individually you wish to scrape for metadata in each library, it does do it with a high degree of accuracy. It also manages to scrape this metadata for more than just your Movies and applies this also to your music collection and podcast collection too within the app. Metadata scraping via Plex Media Server also does not require any kind of log-in to these individual databases and is largely automated off the bat, with users being able to switch designated databases for each Media type and folder on the fly. Of course, this all doesn’t guarantee accuracy and will still always be based on the format and layout of your Media in many cases (tv shows listed as S01E01 for season 1, episode 1, etc), but nevertheless, it has to be said that with more available resources and less configuration required for each of them, that Plex Media Server has the broader and more likely to succeed position on metadata scraping.
Plex VS Synology Video Station – Playback and Transcoding
This is one of the most important parts of any media server in the grand scheme of things – multimedia playback and transcoding. This is typically the action of changing a media file into a version that is more acceptable to the client device that you are enjoying it on (TV, Phone, Console, etc). This extends to but is not limited to, changing the resolution, changing the bitrate, changing the file format and ultimately compressing a file into a smaller version in most cases. Because Plex and Synology Video Station are available on the same NAS system, it means that media variations with regard to codecs, compressions and file types will be equally supported at the default level. If a file can be played back in its original version on Plex, it can be played back on Synology Video Station. However, it is when these files need to be adapted with transcoding that we see clear distinctions between each of them. Transcoding is something that remote accessing client users will likely use without even realising it, as they might well be on a limited data connection (speed or coverage at the time) or using a smaller device (such as a phone) to playback a monster 4K 60FPS movie that is overkill on that hardware. So, transcoding is at its best when you do not notice it is being done OR it is adaptable in as many ways as possible to cover all your likely scenarios.
When the NAS needs to perform a transcode on a file on the fly (eg, so you need to convert a video file into a better-suited version for the client watching device upon request and without delay) it will typically do it with software transcoding or hardware transcoding. Software transcoding is when the system uses the raw resources of the CPU and memory inside the NAS to convert the file. Hardware transcoding is when the NAS system features a graphical component (such as embedded graphics featured on a CPU) or an available graphics card that is installed – as these are designed for handling video files and/or graphical manipulation tasks, and will therefore utilise considerably fewer resources. Plex Media Server only provides hardware transcoding in the paid subscription service Plex Pass and then needs to be enabled in the encoding section by selecting the option ‘make my CPU hurt’. Software transcoding is available for the free version of Plex Media Server but is far less efficient and will result in much higher-end Media in 4K and 1080p playback consuming the majority of hardware resources to transcode or will simply not play at all.
Synology Video Station on the other hand, because it is a native first-party app, has full access to the hardware transcoding element of the NAS and therefore allows users to take advantage of it easily and immediately, and at no additional cost. This has been one of the driving forces behind the popularity of Synology Video Station application, as although the majority of NAS brands have their own video player, Synology is the only one that manages to merge the slick meta-data supported graphical user interface found in Plex but still manages to provide the free and unlimited limited access to the hardware resources you would expect after spending several $100s on a NAS. That said, the way that Synology handles the subject of transcoding in its user interface is a little peculiar, especially for users who are trying to balance the best possible playback vs the most appropriate transcoding level on the fly/manually.
When you wish for the NAS system to transcode a file in the Video Station user interface, you are presented with the options for adjusting the picture quality to high, medium, low, very low, etc. This is exactly what one might expect from a brand that wants to consistently keep things as simple as possible, however, for those who want to select a specific quality level to playback the file or want a better idea of the best quality level in future should be for other files, this will be extraordinarily limiting. Plex Media Server on the other hand allows you to switch between an automatic transcode option that changes the file to the recommended quality level for the client and connection, or you can specifically switch one of numerous video quality levels that break down into both resolution and bitrate in several places. Overall, the ability for Video Station to be able to take advantage of hardware transcoding at no additional cost and with little or no intervention from the end-user is still ultimately the best thing here. I just wish they gave uses a better degree of control and choice as found in Plex Media Server.
Plex VS Synology Video Station – Client Support
Having a slick and well-performing media server is always good, but if you cannot watch the media inside it on the devices you regularly use, then it’s all a bit pointless. Most people are already well aware that the multimedia collections they have on a NAS can easily be streamed over the local area network via popular methods such as DLNA and UPnP (digital living network alliance and universal plug and play). However, they are much more file and folder, breadcrumb level streaming and in order to enjoy the pretty GUI of Plex and Synology Video Station, an official client app needs to be available on the respective app centre or made unofficially and manually installed. This is an area where Plex Media Server almost completely wins over Synology Video Station, as it simply cannot compete with the variety and accessibility of the Plex client availability in popular app centres.
Full credit to Plex, they have really taken the time to make sure their platform is available on pretty much any modern device, in what multiple client or media server application forms. They also take the time after an official update of services and then push these updates across each available downloadable client. This is largely impossible for Synology to compete with and they instead opt for a much more targeted client support regime, supporting all modern mobile phone OS’, desktop operating systems and some of the major sofa accessible app centres on TVs and streamers like Amazon fire TV. In 8 out of 10 cases, your device will support both Plex and Synology Video Station, but this is by no means total and sometimes a hardware client (such as an off-brand Android phone, tablet or media box) that you hope to support Video Station will sadly not.
It is once again worth mentioning that Synology separates different multimedia types towards their own individual client apps, for example, DS Audio or Audio Station for music and DS Photo for photography. Indeed, some of these apps are quite advanced with practically unique connectivity to the likes of Amazon Alexa (something currently impossible on any other NAS platform without a 3rd party application like ‘my-media’ Alexa skill. But this, unfortunately, does not make up for being truly overshadowed by the wider degree of support available on Plex across numerous clients and smart Home devices – though the latter does require a Plex Pass. For sheer volume of connectivity on the clients, Plex wins by an absolute landslide.
Plex VS Synology Video Station – Conclusion
Throughout this comparison of Plex Media Server and Synology Video Station, it has become abundantly clear that one tool is designed around being a Swiss army knife of features and functions, whilst the other performs a smaller but key range of services exceptionally well. Those who have been using Plex Media Server for a number of years are highly unlikely to make the jump to Synology Video Station, as it may feel less feature-rich and perhaps a tad bare-bones. However, those users who are new to the idea of private NAS based multimedia streaming would do very well to try out Synology Video Station first, as I genuinely believe when it comes to concentrating on video streaming services, it is genuinely one of the best platforms out there – albeit clearly restricted to just Synology NAS devices. Plex Media Server attempts to do many things in its pursuit of being the go-to media server of choice for those jumping ship from Netflix and succeeds in most cases, it is just worth remembering that in recent years the platform has perhaps tried to diversify a tad too much.
PLEX MEDIA SERVER
Synology Video Station
Best for Mixed Media
Best for Ease of Access on Client Hardware
Best for Transcoding Control
Best for Add On Services
Best for Metadata Sources
Best for Price
Best Performance for Transcoding
Best for Ease of Use
Best for Ease Setup
Best for Updates & Firmware Revs
Thanks for reading and I hope this guide helps you choose the perfect multimedia server for streaming with your friends, family and colleagues. If you are still lost on the right NAS, multimedia software or ideal backup system for your needs, then take advantage of the free advice section below. This is a completely free and unbias service to help work out their ideal data storage solution for you. It is manned by my myself and EddieTheWebGuy, so although replies may take an extra day or so, we will answer your email and have your best interests in mind! Have a great week.
If you are thinking of buying a NAS for Multimedia, Please use the links below:
This description contains links to Amazon. These links will take you to some of the products mentioned in today's content. As an Amazon Associate, I earn from qualifying purchases. Visit the NASCompares Deal Finder to find the best place to buy this device in your region, based on Service, Support and Reputation - Just Search for your NAS Drive in the Box Below
Need Advice on Data Storage from an Expert?
Finally, for free advice about your setup, just leave a message in the comments below here at NASCompares.com and we will get back to you.Need Help?
Where possible (and where appropriate) please provide as much information about your requirements, as then I can arrange the best answer and solution to your needs. Do not worry about your e-mail address being required, it will NOT be used in a mailing list and will NOT be used in any way other than to respond to your enquiry.
[contact-form-7]
TRY CHAT Terms and Conditions
If you like this service, please consider supporting us.
We use affiliate links on the blog allowing NAScompares information and advice service to be free of charge to you.Anything you purchase on the day you click on our links will generate a small commission which isused to run the website. Here is a link for Amazon and B&H.You can also get me a Ko-fi or old school Paypal. Thanks!To find out more about how to support this advice service checkHEREIf you need to fix or configure a NAS, check FiverHave you thought about helping others with your knowledge? Find Instructions Here
Or support us by using our affiliate links on Amazon UK and Amazon US
Alternatively, why not ask me on the ASK NASCompares forum, by clicking the button below. This is a community hub that serves as a place that I can answer your question, chew the fat, share new release information and even get corrections posted. I will always get around to answering ALL queries, but as a one-man operation, I cannot promise speed! So by sharing your query in the ASK NASCompares section below, you can get a better range of solutions and suggestions, alongside my own.