Windows 11 : Comment supprimer le Watermark « Configuration requise non respectée »
16 février 2023 à 09:12
The Phison E26 Controller equipped Max14um SSD is currently on display at the Consumer Electronics Show (CES) 2024, where it’s a part of Phison’s exhibit showcasing their latest advancements in solid-state drive technology. Prior to its demonstration at CES, a unit of the Max14um SSD was provided in advance for the purpose of an in-depth review and benchmarking analysis. This review will delve into the hardware specifications of the Max14um SSD, examining the components and design choices that underpin its performance. A key focus will be on the SSD’s unique heatsink, an essential feature given the drive’s high-speed capabilities and the thermal challenges associated with such performance levels. Benchmarking results from a suite of tests, including ATTO, AS SSD, CrystalDiskMark, and AJA, will be presented to quantify the drive’s performance across various scenarios. These tests are designed to push the SSD to its limits and provide a comprehensive understanding of its capabilities in both sequential and random data handling tasks. The findings aim to offer a detailed perspective on how the Max14um SSD stands in the current market, particularly in comparison to its contemporaries.
Note – Video Review of the Phison Max14um SSD on YouTube HERE (Live Later today)
![]()
| Specification | Phison E26 Max14um 2TB | Phison E26 Max14um 4TB |
|---|---|---|
| Form Factor | M.2 2280 | M.2 2280 |
| Interface/Protocol | PCIe 5.0 x4 / NVMe 2.0 | PCIe 5.0 x4 / NVMe 2.0 |
| Controller | Phison PS5026-E26 | Phison PS5026-E26 |
| DRAM | LPDDR4 | LPDDR4 |
| NV Memory | Micron 2400MT 232L TLC | Micron 2400MT 232L TLC |
| Sequential Read | Up to 14,600 MB/s | Up to 14,600 MB/s |
| Sequential Write | Up to 12,700 MB/s | Up to 12,700 MB/s |
| Random Read | Up to 1,500,000 IOPS | Up to 1,500,000 IOPS |
| Random Write | Up to 1,600,000 IOPS | Up to 1,600,000 IOPS |
| Controller Tech | Dual-CPU, Arm Cortex-R5, TSMC 12nm | Dual-CPU, Arm Cortex-R5, TSMC 12nm |
| Flash Channels | Up to 8 channels, 32 CE | Up to 8 channels, 32 CE |
| Max Flash Transfer Rate | Up to 2,400MT/s | Up to 2,400MT/s |
| Security | AES 256, SHA 512, RSA 4096, TCG Opal | AES 256, SHA 512, RSA 4096, TCG Opal |
| Temperature Range | Operating: 0–70°C, Storage: -40–85°C | Operating: 0–70°C, Storage: -40–85°C |
In summarizing the capabilities of the Max14um SSD, it’s clear that this drive is a formidable presence in the Gen5 market, setting a new standard for speed and performance. The inclusion of 2400MT/s B58R NAND allows the SSD to fully capitalize on its potential, with the sophisticated cooling solution ensuring that this performance is sustainable over time. The compact form factor of the Max14um SSD is notably impressive, given its proximity to the bandwidth ceiling of Gen 5×4. The support and backing by Phison add a layer of reliability and assurance for the end-user. Additionally, the prospect of a 4TB model caters to the growing demand for high-capacity, fast storage solutions. However, the excellence of the Max14um SSD comes at a price, which is expected to reflect its high-end specifications and performance. Durability ratings, while not yet specified, are projected to be on par with industry averages, potentially around 0.3-0.38 DWPD. It’s important to note the cooling system’s reliance on a 4-pin CPU fan connector, which may not suit all users’ configurations, as it cannot draw power from the M.2 slot or a standard SATA/molex connection. Moreover, the drive’s ability to maintain its peak performance consistently will depend heavily on the specific client system in which it is installed.
![]() BUILD QUALITY - 10/10
HARDWARE - 10/10PERFORMANCE - 10/10PRICE - 7/10VALUE - 8/10
BUILD QUALITY - 10/10
HARDWARE - 10/10PERFORMANCE - 10/10PRICE - 7/10VALUE - 8/10
![]()
9.0
PROS
![]() Fastest available Gen5 drive
Fastest available Gen5 drive![]() Exceptional heatsink and cooling performance
Exceptional heatsink and cooling performance![]() Allows full utilization of 2400MT/s B58R NAND
Allows full utilization of 2400MT/s B58R NAND![]() Compact design despite high Gen 5 performance
Compact design despite high Gen 5 performance![]() 4TB option will be available
4TB option will be available![]() Full backing by Phison
Full backing by Phison![]() Approaches the limits of Gen 5x4 bandwidth
CONS
Approaches the limits of Gen 5x4 bandwidth
CONS
![]() High cost is anticipated
High cost is anticipated![]() Durability ratings are average and not yet specified
Durability ratings are average and not yet specified![]() Cooling relies on a 4-pin CPU fan connector, not M.2 or SATA/molex powered
Cooling relies on a 4-pin CPU fan connector, not M.2 or SATA/molex powered![]() Performance sustainability over time may vary based on client setup
Performance sustainability over time may vary based on client setup
Where to Buy a Product
![]()
![]()
![]()
![]()
![]()
![]()
![]()
![]()
![]()
VISIT RETAILER ➤
![]()
![]()
![]()
![]()
![]()
![]()
![]()
![]()
![]()
VISIT RETAILER ➤
|
These Offers are Checked Daily
|
![]()
The Max14um SSD, equipped with the Phison E26 controller, stands out in the realm of Gen 5 SSDs primarily due to its adoption of Micron’s B58R NAND flash, which operates at 2400MT/s. This specification is a significant step up from the 1600MT/s speeds that are prevalent among other Gen 5 drives currently on the market till now. The higher transfer rate of the NAND directly contributes to the increased performance of the SSD, allowing it to handle larger volumes of data more efficiently and resulting in the elevated sequential read and write speeds observed in this model.
![]()
The Phison E26 controller itself is a pivotal component, designed to leverage the full potential of the high-speed NAND. It employs a dual-CPU configuration with Arm Cortex-R5 cores and is fabricated using a 12nm process technology. This setup enables the controller to manage the data flow across up to 8 channels with 32 chip enables (CE), which is instrumental in achieving the SSD’s top-tier performance metrics.
![]()
Additionally, the Max14um SSD integrates LPDDR4 DRAM, enhancing the controller’s ability to handle the I/O operations effectively. This integration is vital for maintaining the drive’s swift response times and managing the NAND’s high-speed transfers without bottlenecking the system. As a consequence, this design choice facilitates the drive’s capability to reach and sustain its peak performance.
![]()
The operational parameters of the Max14um SSD, such as its operating temperature range and power management features, are aligned with the industry standards for high-performance drives. The SSD’s compliance with stringent security protocols, including AES 256 and TCG Opal, without affecting its throughput, reflects a well-rounded approach to design that considers not just performance but also reliability and data security.
![]()
The Max14um SSD’s thermal management is integral to its design, particularly notable given the drive’s performance during intensive benchmarking. Even when subjected to the rigorous demands of ATTO and CrystalDiskMark tests, the SSD maintained exceptionally low operating temperatures. This is a testament to the effectiveness of the included heatsink, which has been meticulously engineered to handle the thermal output of the drive under heavy loads.
![]()
The heatsink that accompanies the Max14um SSD is slightly taller than those found on alternative SSDs such as the ADATA 970 Legend or the Seagate FireCuda 540. However, this increase in height is marginal and carefully calculated, ensuring that while it provides superior cooling capabilities, it does not significantly impact the overall form factor or the ease of installation in space-constrained environments.
In comparison to other high-performance SSDs on the market, such as the Nextorage Gen 5 drive and the Gigabyte Gen5 Aorus SSD, the Max14um’s heatsink is significantly less obtrusive. These competing drives opt for much taller heatsinks to accommodate their thermal dissipation needs, which can sometimes lead to compatibility issues with certain hardware configurations or enclosures. The Max14um strikes a balance between efficient cooling and compactness, avoiding the potential pitfalls of larger cooling solutions.
![]()
The result is a cooling system that is both effective and unassuming, allowing the Max14um SSD to deliver its robust performance without the need for an overly bulky or cumbersome heatsink. This thoughtful approach to design ensures compatibility with a wide range of hardware setups, maintaining the Max14um’s position as a versatile and user-friendly option in the high-speed SSD market.
Performance benchmarks for the Phison E26 Max14um SSD were conducted on a midrange PC rig, in a Windows environment, with the Phison E26 Max14um used as an additional drive. The OS drive was a simple SATA SSD. Depending on the test results, a 2nd round of testing will be conducted on a higher tier Gen4 SSD OS test machine, but for now this arguably more domestic test rig was used in order to better represent an average PC user. The full machine test setup was:
![]()
The first tests were favoured towards Sequential (big, blocky and in-line) performance, using CrystalDiskMark on the Phison E26 Max14um, on 1GB, 4GB and 16GB Test Files. First up, the 1GB File:
![]()
Next up, the 4GB CrystalDiskMark Phison E26 Max14um Test:
![]()
Then, a much more dense 16GB File test
![]()
Finally, the largest 64GB CrystalDiskMark Phison E26 Max14um Test:
![]()
The next tests on the Phison E26 Max14um SSD were conducted with Atto Diskbenchmark, once again at three file size types (256MB, 1GB and 4GB). Atto Disk Benchmark has a slight difference in GB calculation to CrystalDiskMark, so do not be alarmed by the slight difference in stats. We looked at the Sequential Performance and the reported IOPS. First up is the 256MB Test File
Next up for the Phison E26 Max14um SSD was a larger round of 1GB tests:
Finally, the 4GB Test file. This was also the area when the SSD reached it’s highest temperature (mentioned earlier)
Next up was an arguably more SSD-focused test, this time with AS SSD on the Phison E26 Max14um SSD. Again, much like the other test flows, AS SSD has it’s own metrics, so cannot be directly compared against ATTO and CrystalDisk directly. The first test was using the 1GB Test file:
Next Phison E26 Max14um AS SSD test was a 3GB test file:
Finally, there was the larger 5GB test file.
Tests for all three AS SSD benchmarks were pretty comparable.
![]()
In conclusion, the Max14um SSD sets a new benchmark for Gen5 SSDs with its exceptional performance and efficient thermal management. It stands out as the fastest drive currently available in its category, a testament to the synergy between its cutting-edge 2400MT/s B58R NAND and the Phison E26 controller. The heatsink design deserves special mention for its capability to maintain optimal temperatures without bulking up the device, ensuring that the high-speed components can operate without thermal throttling. Despite its impressive speeds and cooling system, the drive’s size remains surprisingly compact, particularly when considering its performance metrics that are close to saturating the Gen 5×4 bandwidth. Furthermore, the upcoming availability of a 4TB option adds to its appeal for users seeking high-capacity, high-performance storage solutions. The backing by Phison, not just in terms of the controller but the entire drive, provides a level of assurance in terms of quality and support.
![]()
However, potential buyers should be aware of the expected high cost of the drive, which could be a significant factor in purchase decisions. Additionally, while the exact durability ratings (DWPD/TBW) are yet to be disclosed, they are anticipated to be average for high-end SSDs. The requirement of a 4-pin CPU fan connector for cooling may pose a compatibility issue for certain setups, as the fan is not powered directly by the M.2 interface or through SATA/molex power. It’s also important to note that the sustained performance of 14/12GB is contingent upon the client’s environment and workload.
| Phison E26 Max14um SSD
|
|
| Phison E26 Max14um SSD PROS | Phison E26 Max14um SSD CONS |
|
|
Choosing the right data storage solution for your needs can be very intimidating and it’s never too late to ask for help. With options ranging from NAS to DAS, Thunderbolt to SAS and connecting everything up so you can access all your lovely data at the touch of a button can be a lot simpler than you think. If you want some tips, guidance or help with everything from compatibility to suitability of a solution for you, why not drop me a message below and I will get back to you as soon as possible with what you should go for, its suitability and the best place to get it. This service is designed without profit in mind and in order to help you with your data storage needs, so I will try to answer your questions as soon as possible.
This description contains links to Amazon. These links will take you to some of the products mentioned in today's content. As an Amazon Associate, I earn from qualifying purchases. Visit the NASCompares Deal Finder to find the best place to buy this device in your region, based on Service, Support and Reputation - Just Search for your NAS Drive in the Box Below![]() SUBSCRIBE TO OUR NEWSLETTER
SUBSCRIBE TO OUR NEWSLETTER ![]()
[contact-form-7]
![]() Join Inner Circle
Join Inner Circle
Get an alert every time something gets added to this specific article!
Want to follow specific category?
![]() Subscribe
Subscribe
Need Advice on Data Storage from an Expert?
Finally, for free advice about your setup, just leave a message in the comments below here at NASCompares.com and we will get back to you.
![]() Need Help?
Where possible (and where appropriate) please provide as much information about your requirements, as then I can arrange the best answer and solution to your needs. Do not worry about your e-mail address being required, it will NOT be used in a mailing list and will NOT be used in any way other than to respond to your enquiry.
[contact-form-7]
Need Help?
Where possible (and where appropriate) please provide as much information about your requirements, as then I can arrange the best answer and solution to your needs. Do not worry about your e-mail address being required, it will NOT be used in a mailing list and will NOT be used in any way other than to respond to your enquiry.
[contact-form-7]
![]() TRY CHAT
Terms and Conditions
If you like this service, please consider supporting us.
We use affiliate links on the blog allowing NAScompares information and advice service to be free of charge to you.Anything you purchase on the day you click on our links will generate a small commission which isused to run the website. Here is a link for Amazon and B&H.You can also get me a
TRY CHAT
Terms and Conditions
If you like this service, please consider supporting us.
We use affiliate links on the blog allowing NAScompares information and advice service to be free of charge to you.Anything you purchase on the day you click on our links will generate a small commission which isused to run the website. Here is a link for Amazon and B&H.You can also get me a
![]() Ko-fi or old school Paypal. Thanks!To find out more about how to support this advice service check HEREIf you need to fix or configure a NAS, check Fiver
Have you thought about helping others with your knowledge? Find Instructions Here
Ko-fi or old school Paypal. Thanks!To find out more about how to support this advice service check HEREIf you need to fix or configure a NAS, check Fiver
Have you thought about helping others with your knowledge? Find Instructions Here
![]() Or support us by using our affiliate links on Amazon UK and Amazon US
Alternatively, why not ask me on the ASK NASCompares forum, by clicking the button below. This is a community hub that serves as a place that I can answer your question, chew the fat, share new release information and even get corrections posted. I will always get around to answering ALL queries, but as a one-man operation, I cannot promise speed! So by sharing your query in the ASK NASCompares section below, you can get a better range of solutions and suggestions, alongside my own.
Or support us by using our affiliate links on Amazon UK and Amazon US
Alternatively, why not ask me on the ASK NASCompares forum, by clicking the button below. This is a community hub that serves as a place that I can answer your question, chew the fat, share new release information and even get corrections posted. I will always get around to answering ALL queries, but as a one-man operation, I cannot promise speed! So by sharing your query in the ASK NASCompares section below, you can get a better range of solutions and suggestions, alongside my own.
![]()
![]()
![]()
![]()
![]()
![]()
![]()
![]()
![]()
![]()
IMPORTANT March 22 Update – The UGREEN DXP4800 PLUS NAS Review is NOW LIVE, watch it HERE, read it HERE and learn about the Software HERE and HERE
(Original Article)
Arriving on Kickstarter very soon, the UGreen NASync series of devices is an incredibly bold move by the relatively small Chinese computer accessories brand. Arriving with some genuinely industry-challenging hardware, six different configurations, and a multitude of high-bandwidth external connections spread across them, and even rocking out a competitively priced desktop flash system, it sounds like the DXP series of devices is really aiming for the sun here! Today, I want to go through each of these systems that UGreen is promising, discuss the logic, perhaps, behind the choice of crowdfunding to fund the product, and try to help you decide whether this series of devices, coming hopefully later in 2024, deserves your data!
Ugreen is rolling out this new series of NAS devices across six different hardware revisions, which is quite unusual for a product being launched on crowdfunding but is understandable for an established brand. Clearly, Ugreen wants to present a very strong and confident front in this new arm of their hardware business (a great example of this would be looking at the brand Sabrent, who for a long time were chiefly associated with docking stations and storage cases but now have a comparatively huge presence in the field of SSDs and even memory). Each of the solutions that Ugreen is promoting here can be broken into the standard, plus, and pro series, with each device improving in storage capabilities, network capabilities, and internal hardware. Alongside the five hard drive-focused devices, there is also a dedicated desktop NVMe flash model, which benefits from the heightened internal and external hardware attributes of its larger siblings. That said, each of the tower starter models also features additional M.2 NVMe slots that have varying levels of bandwidth and speed allocation due to the choice between the three CPUs available: the N100, the Pentium Gold, or the Lakefield model and the mobile SoC i5 model. Let’s compare the specifications of each below:
| Specification | DXP2800
|
DXP4800
|
DXP4800 Plus
|
DXP6800 Pro
|
DXP8800 Plus
|
DXP480T Plus
|
|---|---|---|---|---|---|---|
| Kickstarter Launch | $239.99 | $359.99 | $419.99 | $599.99 | $899.99 | $479.99 |
| MSRP | $399 | $559 | $699 | $999 | $1499 | $779 |
| Operating System | UGOS Pro | UGOS Pro | UGOS Pro | UGOS Pro | UGOS Pro | UGOS Pro |
| CPU Model | N100 | N100 | 8505 | 1235u | 1235u | 1235u |
| CPU Brand | Intel | Intel | Intel | Intel | Intel | Intel |
| CPU Architecture | X86 12th Gen N Series | X86 12th Gen N Series | X86 12th Gen Intel Pentium Gold | X86 12th Gen Intel Core i5 | X86 12th Gen Intel Core i5 | X86 12th Gen Intel Core i5 |
| Cores/Threads | 4/4 | 4/4 | 5/6 | 10/12 | 10/12 | 10/12 |
| Memory (RAM) | 8GB DDR5 | 8GB DDR5 | 8GB DDR5 | 8GB DDR5 | 8GB DDR5 | 8GB DDR5 |
| ODECC Support | Supported | Supported | Supported | Supported | Supported | Supported |
| Expandable RAM (max) | 16GB | 16GB | 64GB | 64GB | 64GB | 64GB |
| Flash Memory (System Disk) | eMMC 32GB | eMMC 32GB | SSD 128GB | SSD 128GB | SSD 128GB | SSD 128GB |
| SATA Drive Bays | 2 | 4 | 4 | 6 | 8 | 0 |
| M.2 SSD Drive Slots | 2 | 2 | 2 | 2 | 2 | 4 |
The UGreen NASync series presents a choice of CPUs across its range, tailored to different performance needs and price points. The entry-level Intel N100, featured in the DXP2800, is a mobile processor launched in January 2023, offering 4 cores and 4 threads with a boost frequency of up to 3.4 GHz. Its low 6W TDP suggests a design aimed at energy efficiency, with a production process size of 10 nm, denoting a relatively modern chip design. Here’s a comparison table for the Intel® Pentium® Gold Processor 8505, Intel® Core![]() i5-1235U Processor, and Intel® Processor N100:
i5-1235U Processor, and Intel® Processor N100:
| Specification | Intel® Pentium® Gold Processor 8505 | Intel® Core |
Intel® Processor N100 |
|---|---|---|---|
| Product Collection | Intel® Pentium® Gold Processor Series | 12th Generation Intel® Core |
Intel® Processor N-series |
| Vertical Segment | Mobile | Mobile | Mobile |
| Processor Number | 8505 | i5-1235U | N100 |
| Lithography | Intel 7 | Intel 7 | Intel 7 |
| Total Cores | 5 | 10 | 4 |
| # of Performance-cores | 1 | 2 | – |
| # of Efficient-cores | 4 | 8 | – |
| Total Threads | 6 | 12 | 4 |
| Max Turbo Frequency | 4.40 GHz | 4.40 GHz | 3.40 GHz |
| Performance-core Max Turbo Frequency | 4.40 GHz | 4.40 GHz | – |
| Efficient-core Max Turbo Frequency | 3.30 GHz | 3.30 GHz | – |
| Cache | 8 MB Intel® Smart Cache | 12 MB Intel® Smart Cache | 6 MB Intel® Smart Cache |
| Processor Base Power | 15 W | 15 W | – |
| Maximum Turbo Power | 55 W | 55 W | – |
| Minimum Assured Power | – | 12 W | – |
| TDP | – | – | 6 W |
| Marketing Status | Launched | Launched | Launched |
| Launch Date | Q1’22 | Q1’22 | Q1’23 |
| Embedded Options Available | No | No | No |
| Max Memory Size | 64 GB | 64 GB | 16 GB |
| Memory Types | Up to DDR5 4800 MT/s, Up to DDR4 3200 MT/s, Up to LPDDR5 5200 MT/s, Up to LPDDR4x 4267 MT/s | Up to DDR5 4800 MT/s, Up to DDR4 3200 MT/s, Up to LPDDR5 5200 MT/s, Up to LPDDR4x 4267 MT/s | DDR4 3200 MT/s, DDR5 4800 MT/s, LPDDR5 4800 MT/s |
| Max # of Memory Channels | 2 | 2 | 1 |
| ECC Memory Supported ‡ | No | No | No |
| Maximum Memory Speed | – | – | 4800 MHz |
| GPU Name‡ | Intel® UHD Graphics for 12th Gen Intel® Processors | Intel® Iris® Xe Graphics eligible | Intel® UHD Graphics |
| Graphics Max Dynamic Frequency | 1.10 GHz | 1.20 GHz | 750 MHz |
| Graphics Output | eDP 1.4b, DP 1.4a, HDMI 2.1 | eDP 1.4b, DP 1.4a, HDMI 2.1 | eDP 1.4b, DP 1.4, HDMI 2.1, MIPI-DSI 1.3 |
| Execution Units | 48 | 80 | 24 |
| Max Resolution (HDMI)‡ | 4096 x 2304 @ 60Hz | 4096 x 2304 @ 60Hz | 4096 x 2160@60Hz |
| Max Resolution (DP)‡ | 7680 x 4320 @ 60Hz | 7680 x 4320 @ 60Hz | 4096 x 2160@60Hz |
| DirectX* Support | 12.1 | 12.1 | 12.1 |
| OpenGL* Support | 4.6 | 4.6 | 4.6 |
| OpenCL* Support | 3.0 | 3.0 | 3.0 |
This processor supports both DDR4 and DDR5 memory, ensuring flexibility for users in their system builds. However, the N100’s single-channel memory interface and the absence of ECC memory support reflect its positioning as a budget-friendly option within the NASync lineup.
In terms of connectivity, the UGreen NASync devices offer a variety of options to accommodate different user needs. The series features USB 3.2 ports, with some models including front panel Type-C ports that support up to 10Gb/s transfer rates. High-speed networking is a highlight, with models like the DXP6800 Pro and DXP8800 Plus boasting dual 10Gb Ethernet ports, potentially offering a combined 20Gb/s network throughput when used concurrently. Thunderbolt 4 ports in the higher-end models further enhance the possibilities for high-speed external connections and daisy-chaining of compatible devices.
![]()
Storage flexibility is a key attribute of the NASync series, with models ranging from 2 to 8 SATA drive bays, catering to different scale requirements from personal use to more demanding business applications. M.2 NVMe slots are included for faster, more modern storage solutions, with bandwidth and speed allocations varying by model, dictated by the choice of the three different CPUs available. This tiered approach allows potential buyers to select a NAS solution that matches their storage size and speed needs without paying for unnecessary additional capabilities.
![]()
![]()
Ugreen, a brand that has been around in one form or another for more than a decade, is chiefly associated with power adapters, computer accessories, and generally providing solutions to connect one device to another. In recent years, they have gained a fairly enviable reputation, featuring on a number of prominent tech platforms with moderately high regard for their solutions. Ugreen is not the first largely computer accessory-related brand to decide to try its hand at their own NAS solution. Partway through 2023, we saw the affordable consumer laptop brand LincPlus take to crowdfunding to launch their own dedicated flash NAS system, the LincStation N1, which just started to receive at the start of 2024 to mostly positive responses. Ugreen first revealed their intention toward an in-house NAS system partway through 2023, and although the system has since seen a few specification changes and even a complete naming change from DXP to the NASync series, they have been quite outspoken at a few big marketing events. Probably one of the biggest that they attended, and in quite a prominent display, was CES 2024 right at the start of this year with a large stand, promoting the majority of their products but with a particularly large presentation on their NAS solutions. Once again, this saw quite universal coverage and, I guess, I can totally see why a user would opt for a Ugreen solution if they have had positive experiences with them in the past. However, why Kickstarter? Why crowdfunding?
![]()
It is a really good question! If a brand already has a long-running history of product distribution via normal retail outlets such as Amazon and Newegg, why would they suddenly choose to use crowdfunding to sell their new and ambitious product? 2023 and 2024 saw a huge number of new private NAS solutions arrive on the market via crowdfunding. Alongside LincPlus mentioned earlier, there was also the ZimaCube system from SkyWhale. This featured specifications not dissimilar in configuration to the Ugreen NAS systems. However, SkyWhale had two previous successful crowdfunding campaigns under their belt, and therefore it seems quite natural that they would opt for this model in their third release.
Discussing this with numerous brands in the past, the main reasons outlined to me have been the following:
One, crowdfunding allows relatively small and lesser-known brands to ascertain the level of popularity and engagement that they might achieve for a product prior to a formal release. If they promote a system’s capabilities (both hardware and software) and engagement is low, this allows them to not allocate large budgets that they can ill afford to a project that may perhaps be doomed to failure.
Two, a number of relatively small Chinese brands have difficulty forming marketing, distribution, and engagement with Western audiences. Not necessarily for reasons of language barriers either; this is the days of Google Translate, of course! Mainly, this comes down to understanding Western audiences, marketing on Western-focused social media platforms, and even understanding the requirements that that audience and its level of technological understanding need addressing. For a Chinese manufacturer to use crowdfunding platforms, they not only do it to garner money from the audience for their product but also to take advantage of an established marketing system, tools, and third-party supported social distribution that they neither have nor 100% understand. This can often lead to the crowdfunding campaigns perhaps being a touch overzealous in the marketing of a product that for them they do not understand implicitly, but this is certainly an allure for smaller Eastern companies to be able to distribute their product globally to a high degree of success.
Predominantly, those are the two main reasons that I find explained to me by Eastern brands that utilize the crowdfunding model to promote their product. I have both good and bad stories of server products going through the crowdfunding machine (read the full article here and watch the full video here on NAS Compares for more details on individual cases), but I do think there is a positive argument for why Eastern brands utilize crowdfunding to promote their products.
The UGreen NASync series is poised to make a notable entrance into the NAS market with a range of devices that cater to different storage and performance needs. With the Kickstarter launch prices set attractively at $239.99 for the entry-level DXP2800 and scaling up to $899.99 for the high-end DXP8800 Plus, UGreen is competitively positioning its products. The mid-range DXP4800 and DXP4800 Plus are tagged at $359.99 and $419.99 respectively, while the specialized NVMe-focused DXP480T Plus is introduced at $479.99. Post-crowdfunding, the retail prices, also known as the Manufacturer’s Suggested Retail Price (MSRP), are expected to be significantly higher—almost doubling for some models, like the DXP2800 with an MSRP of $399 and the DXP8800 Plus which will retail for $1499. This pricing strategy not only provides an incentive for early backers but also underscores the value proposition of getting in early on the Kickstarter campaign. Nevertheless, THIS IS CROWDFUNDING and therefore not the same as buying from your usual retail outlet, be aware. UGreen is tapping into the growing buzz of middle-ground solutions between turnkey options from Synology/QNAP and BYO/DiY options that retire time and knowledge to build. If you are on the fence, there isn’t a tremendous rush, as crowdfunding officially begins on March 12th (see link below). We will be keeping an eye on this one as the weeks go on!
![]()
This description contains links to Amazon. These links will take you to some of the products mentioned in today's content. As an Amazon Associate, I earn from qualifying purchases. Visit the NASCompares Deal Finder to find the best place to buy this device in your region, based on Service, Support and Reputation - Just Search for your NAS Drive in the Box Below
Depuis son entrée en vigueur en janvier 2023, la Directive sur la Résilience Opérationnelle Numérique (DORA) a établi un nouveau cadre réglementaire pour l’Union Européenne, spécifique à la cybersécurité et à la gestion des risques dans le secteur financier. Cette législation répond non seulement aux menaces numériques grandissantes, mais offre aussi aux institutions financières une […]
The post Régulation DORA : la clé de la résilience opérationnelle pour le secteur bancaire first appeared on UnderNews.Voici ci-dessous l’expertise de Diligent, spécialiste de la gouvernance, du risque et de la conformité (GRC) des entreprises, au sujet de la nouvelle directive NIS 2. Avis d’expert – A moins de six mois des JO, la cybermenace s’intensifie sur le territoire français et le moment choisi pour la mise en place de la directive NIS […]
The post Les JO 2024 et la cybersécurité : un défi majeur renforcé par la directive NIS 2 first appeared on UnderNews.Dans ce tutoriel, nous allons apprendre à installer les outils d'administration à distance, que l'on appelle également RSAT, sur une machine Windows 11.
Ces outils d'administration sont très utiles pour les administrateurs systèmes puisqu'ils permettent de gérer le système Windows Server, mais également les différents rôles : Active Directory, DNS, DHCP, etc... Certains rôles ont une console dédiée, tandis que d'autres sont administrables directement par l'intermédiaire du Gestionnaire de serveur. Ces consoles permettent de gérer le serveur local, mais également un serveur distant, ce qui permet d'avoir un poste dédié à l'administration des machines sur lequel nous pourrons installer les consoles RSAT.
Les outils d'administration sont toujours très utilisés, même si Microsoft travaille sur des solutions d'administration plus moderne, notamment Windows Admin Center accessible directement à partir d'un navigateur.
Sur votre machine Windows 11, commencez par ouvrir les "Paramètres" afin de pouvoir accéder à la section "Applications" puis cliquez sur "Fonctionnalités facultatives".
Dans la section "Fonctionnalités facultatives", vous devez cliquer sur le bouton "Afficher les fonctionnalités".
Une fenêtre va s'ouvrir. Elle va vous permettre de sélectionner les fonctionnalités que vous souhaitez installer. Recherchez "rsat" afin d'avoir la liste de tous les outils RSAT que vous pouvez installer. Cochez ceux que vous souhaitez installer. Pour ma part, je vais uniquement sélectionner "RSAT : gestionnaire de serveur". Quand votre sélection est terminée, cliquez sur le bouton "Suivant".
Puis, cliquez sur "Installer".
Vous n'avez plus qu'à patienter quelques secondes ou minutes, le temps de l'installation.
Pour accéder aux outils d'administration fraichement installés sur votre PC Windows 11, vous pouvez effectuer une recherche via la barre de recherche du système. Sinon, sachez que ces consoles seront accessibles par l'intermédiaire du dossier "Outils Windows" que vous pouvez retrouver dans la liste de toutes les applications (via le menu Démarrer).
Si vous le souhaitez, vous pouvez installer les outils RSAT sur Windows 11 à l'aide de PowerShell !
Pour cela, vous devez ouvrir une console PowerShell en tant qu'administrateur. Commencez par exécuter la commande suivante pour obtenir la liste complète des consoles RSAT disponibles, avec leur statut.
Get-WindowsCapability -Name "RSAT*" -Online | Select-Object -Property DisplayName, StateVoici le résultat obtenu :
Avec une seule commande, vous pouvez installer l'ensemble des consoles :
Get-WindowsCapability -Name "RSAT*" -Online | Add-WindowsCapability -OnlineMais, ce n'est peut-être pas ce que vous souhaitez.
Dans ce cas, exécutez la commande suivante pour obtenir la liste des outils RSAT avec le nom d'affiche et le nom "technique" correspondant au nom de la fonctionnalité facultative d'un point de vue de Windows.
Get-WindowsCapability -Name "RSAT*" -Online | Select-Object -Property Name, DisplayNameCe qui donne la liste suivante :
Ainsi, pour installer le rôle "Gestionnaire de serveur", nous devons exécuter la commande suivante :
# Syntaxe :
Add-WindowsCapability -Online -Name "<nom de l'outil RSAT>"
# Exemple :
Add-WindowsCapability -Online -Name "Rsat.ServerManager.Tools~~~~0.0.1.0"
Il ne reste plus qu'à patienter pendant l'installation !
Néanmoins, il est possible que vous obteniez l'erreur "Add-WindowsCapability : Échec de Add-WindowsCapability. Code d’erreur = 0x800f0950", notamment sur Windows 11 23H2.
Vous devez télécharger "Windows 11, version 22H2 and 23H2 Language and Optional Features ISO", à partir de cette page du site Microsoft. Une fois que c'est fait, montez l'image sur votre PC. Pour ma part, il est monté dans le lecteur virtuel "D:\". Avec une image ISO d'installation de Windows 11, cela ne fonctionne pas, donc il faut utiliser cette image ISO spécifique qui contient tous les paquets pour les fonctionnalités facultatives.
Relancez la commande précédente, mais ajoutez le paramètre "-Source" suivi de "D:\LanguagesAndOptionalFeatures" (en adaptant le nom de la lettre). Cette fois-ci, l'installation devrait être un succès !
Add-WindowsCapability -Online -Name "Rsat.ServerManager.Tools~~~~0.0.1.0" -Source "D:\LanguagesAndOptionalFeatures"Voilà, vous n'avez plus qu'à profiter des outils d'administration depuis ce poste de travail Windows 11 ! Sur Windows 10, la procédure est similaire, si ce n'est que les menus sont organisés d'une façon différente. Par l'interface graphique ou en PowerShell, à vous de choisir la méthode que vous préférez !
Il conviendra de connecter la console à un serveur distant, puisqu'ici le rôle ne sera pas hébergé en local. De plus, le "Gestionnaire de serveur" peut regrouper un ensemble de serveurs et vous permettre de les administrer à distance.
The post Windows 11 : comment installer les outils d’administration à distance (RSAT) ? first appeared on IT-Connect.
Dans ce tutoriel, nous allons voir comment personnaliser le menu Démarrer de Windows 11 à l'aide d'une stratégie Intune, afin de définir une liste des applications à épingler dans le menu Démarrer. L'objectif étant d'avoir une configuration uniforme sur son parc informatique.
Au sein du système d'exploitation Windows, le menu Démarrer joue un rôle clé, car il offre un accès direct aux applications installées sur l'ordinateur. Le menu Démarrer de Windows 11 permet d'épingler certaines applications afin de pouvoir les trouver facilement, juste en ouvrant le menu Démarrer. C'est précisément sur la liste des applications épinglées que nous allons agir aujourd'hui, en définissant une liste personnalisée d'applications à l'aide d'un fichier de configuration au format JSON.
En entreprise, cette configuration est utile pour avoir une disposition du menu Démarrer identique sur l'ensemble des sessions de vos utilisateurs. Ceci peut éviter qu'un utilisateur vous appelle pour vous dire qu'il ne trouve pas telle ou telle application dans le menu Démarrer. Néanmoins, sachez que cette configuration va venir écraser la liste des applications épinglées de l'utilisateur, et il ne pourra pas modifier cette liste (ses éventuels changements seront écrasés).
La première étape consiste à préparer un modèle de menu Démarrer. Pour cela, vous devez utiliser une machine Windows 11 et ajouter au menu Démarrer les applications que vous souhaitez épingler. Ne créez pas de dossiers d'applications, car ce ne sera pas conservé.
Voici un exemple :

Une fois que c'est fait, vous devez exporter cette configuration dans un fichier au format JSON. Cette action doit être effectuée avec PowerShell.
Ouvrez une console PowerShell et exécutez la commande suivante :
Export-StartLayout -Path "<Chemin/vers/fichier/JSON>"
# Par exemple :
Export-StartLayout -Path "StartMenuLayout.json"
Ceci va créer un fichier JSON qui contiendra la liste de toutes les applications épinglées dans votre menu Démarrer type.
Si vous ouvrez le fichier JSON, vous verrez les applications sous "pinnedList". Si vous ouvrez le fichier avec Visual Studio Code, utilisez le raccourci clavier "Shift+Alt+F" pour que le fichier soit formaté, ce sera plus lisible.
Par la suite, vous devrez copier-coller le contenu de ce fichier dans la stratégie Intune.
La suite de la configuration se passe sur le Centre d'administration Microsoft Intune.
Cliquez sur "Appareils", puis "Configuration", afin de cliquer sur "Créer" puis "Nouvelle stratégie".
Un panneau latéral va s'ouvrir sur la droite, faites les choix suivants :
Cliquez sur "Créer".
Ensuite, vous devez suivre l'assistant de création de la stratégie, en 5 étapes.
Commencez par nommer cette stratégie :
Puis, à l'étape "Paramètres de configuration", ajoutez un paramètre et configurez-le de cette façon :
Cliquez sur "Enregistrer" quand c'est fait.
Il n'y a que ce paramètre à configurer pour gérer les applications épinglées.
Passez à l'étape suivante dans le but d'assigner cette stratégie à des appareils : sélectionnez un ou plusieurs groupes, selon vos besoins. Dans cet exemple, je me permets de sélectionner "Tous les appareils" car c'est un lab.
Poursuivez jusqu'à la fin et créez la stratégie. Voilà, elle est prête à l'emploi !
Désormais, il ne reste plus qu'à tester sur un appareil Windows !
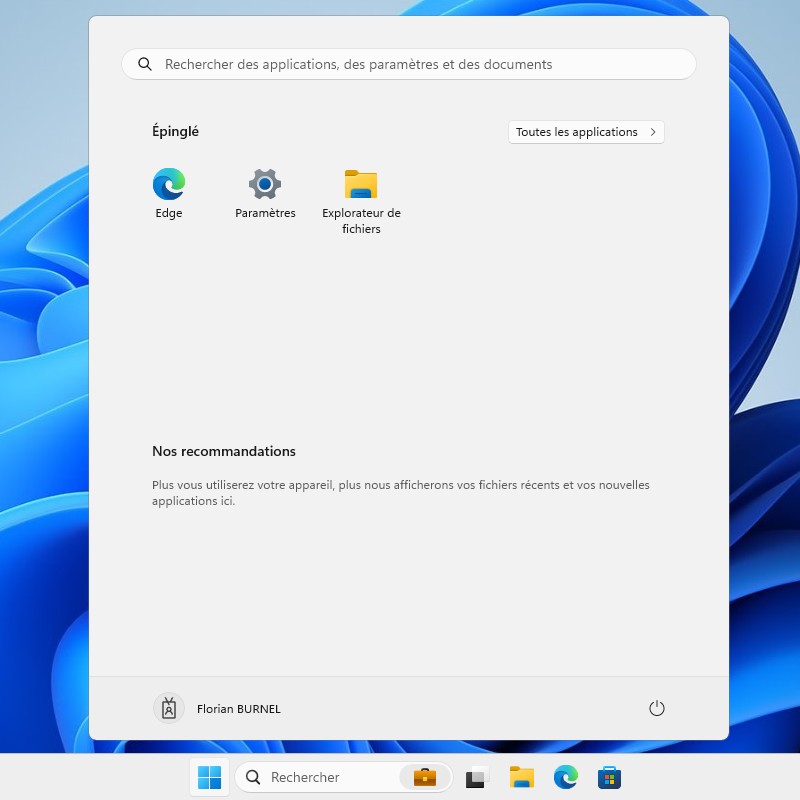
Après avoir effectué une synchronisation Intune sur la machine, vous verrez que le menu Démarrer va être modifié : la section "Epinglé" sera identique à votre modèle initial. La section "Nos recommandations" quant à elle, n'est pas impactée.
En suivant ce tutoriel, vous êtes en mesure de personnaliser le menu Démarrer de Windows 11 grâce à la création d'une liste d'applications épinglées ! Pour aller plus loin dans la personnalisation du menu Démarrer avec Intune, vous pouvez consulter cette page de la documentation Microsoft :
The post Intune – Comment personnaliser le menu Démarrer de Windows 11 ? first appeared on IT-Connect.
![]()
Il y a déjà eu une éclipse lunaire en mai 2024, par la pénombre. La prochaine éclipse de Lune est pour septembre. Ce sera une éclipse partielle. Que peut-on espérer voir ?
![]() Comment créer plusieurs dossiers en même temps sous Windows ? Comment créer simultanément plusieurs dossiers ?
Comment créer plusieurs dossiers en même temps sous Windows ? Comment créer simultanément plusieurs dossiers ?
Cet article Windows 11, comment créer plusieurs dossiers en même temps ? a été publié en premier par GinjFo.
![]() Sous Windows 11, comment trouver les spécifications matérielles de son PC ? comment trouver la configuration de sa machine ?
Sous Windows 11, comment trouver les spécifications matérielles de son PC ? comment trouver la configuration de sa machine ?
Cet article Windows, comment trouver les spécifications matérielles de son PC ? a été publié en premier par GinjFo.
![]() Windows 11 et 10 teste les performances de votre PC. Comment connaitre cette note, cet indice WEI déterminant la puissance de cotre machine ?
Windows 11 et 10 teste les performances de votre PC. Comment connaitre cette note, cet indice WEI déterminant la puissance de cotre machine ?
Cet article Windows 11 et 10, comment connaitre l’indice de performance de son PC ? a été publié en premier par GinjFo.
Dans ce tutoriel, nous allons apprendre à désinstaller une mise à jour sur Windows 11 ! Alors, vous allez me dire, mais pourquoi chercher à désinstaller une mise à jour ? En général, nous cherchons plutôt à installer les dernières mises à jour, non ?
Effectivement, mais il y a souvent (un peu trop souvent, même) des problèmes liés à l'installation d'une mise à jour Microsoft, que ce soit sur Windows 11 ou une autre version. Malheureusement, dans certains cas, ceci nous conduit à désinstaller une mise à jour de la machine en attendant une meilleure solution... Même si cette mise à jour sera probablement réinstallée par la suite.
Sur votre PC, ouvrez le menu Démarrer afin d'accéder aux Paramètres.
1 - Une fois que la fenêtre des paramètres est affichée, cliquez sur "Windows Update" dans le menu latéral positionné sur la gauche.
2 - Cliquez sur "Historique de mise à jour" dans la section "Windows Update".
Vous voici sur une page où vous avez la liste de toutes les mises à jour installées sur votre machine. C'est l'occasion de vérifier si la mise à jour que vous incriminez est bien présente. Ensuite, descendez tout en bas de la page jusqu'à trouver le lien "Désinstaller des mises à jour". Cliquez dessus.
Si vous êtes sur une version de Windows 11 antérieure à la version 23H2, une autre fenêtre s'ouvre, comme ceci :
1 - Sélectionnez la mise à jour à désinstaller dans la liste.
2 - Cliquez sur "Désinstaller".
3 - Cliquez sur "Oui" pour valider la désinstallation de la mise à jour.
Sinon, si vous utilisez Windows 11 23H2 (ou une version plus récente), vous allez arriver sur une fenêtre semblable à celle ci-dessous.
Sur le même principe, recherchez la mise à jour à désinstaller dans la liste, puis cliquez sur "Désinstaller" une première fois, puis, une seconde fois.
Patientez le temps de la désinstallation de la mise à jour et redémarrez votre machine lorsque Windows vous le propose. Suite au redémarrage, votre machine doit être plus "stable" qu'avant la désinstallation de la mise à jour problématique.
Désormais, nous allons voir comment désinstaller une mise à jour Windows 11 à partir de la ligne de commande, grâce à plusieurs outils. Ouvrez une console PowerShell en tant qu'administrateur sur votre machine et suivez la suite de cet article.
Avant de commencer, sachez qu'en ligne de commande, vous pouvez obtenir la liste des dernières mises à jour installées avec ces différentes commandes :
# Avec wmic
wmic qfe list brief /format:table
# Avec PowerShell
Get-WmiObject -Class win32_quickfixengineering
Get-CimInstance -Class win32_quickfixengineering
Voici un exemple de sortie :
Tout d'abord, sachez que pour supprimer une mise à jour en ligne de commande, vous pouvez utiliser l'outil natif et officiel pour interagir avec Windows Update : "wusa.exe". Pour désinstaller une mise à jour, la syntaxe de la commande est la suivante :
wusa.exe /uninstall /kb:<numéro KB> /norestart /logPar exemple, pour désinstaller la mise à jour KB5035853 sortie en mars 2024 et qui est à l'origine de plusieurs problèmes, nous devons exécuter cette commande :
wusa.exe /uninstall /kb:5035853 /norestart /logLa commande ci-dessus va permettre de désinstaller la mise à jour KB5035853, sans redémarrer l'ordinateur à la fin de l'opération. L'option "log" est facultative, mais elle permet de générer un événement (log) sur la machine locale et visible via l'Observateur d'événements.
DISM est un autre outil intégré à Windows et dans le cas présent, c'est une alternative à wusa.exe. L'outil DISM est capable d'agir sur une image Windows en ligne ou hors ligne, notamment pour réparer les fichiers système. Il sert aussi à gérer les fonctionnalités et les mises à jour, donc nous allons pouvoir le solliciter pour désinstaller une mise à jour.
Pour lister les paquets installés (fonctionnalités à la demande, mise à jour, etc.) on va utiliser l'option "/Get-Packages" de DISM. En effectuant un filtre sur la chaîne "Package_for", nous allons pouvoir récupérer seulement les mises à jour. Cela tombe bien, c'est ce qui nous intéresse dans le cas présent.
dism /Online /Get-Packages /Format:table | findstr "Package_for"Voici un exemple de sortie :
Ici, la principale difficulté, c'est de trouver le nom de la mise à jour à désinstaller, car il n'y a pas le nom "KBXXXXXX" pour toutes les mises à jour. Il faut essayer de faire le lien entre le nom "Package_for_" et le numéro de KB que l'on recherche. Pour cela, on peut s'aider du numéro de version à la fin du nom du paquet, plus il est haut, plus la mise à jour est récente, et de la date d'installation. On retrouve aussi la date d'installation dans l'historique d'installation des mises à jour.
Dès que nous avons pu identifier notre cible, nous pouvons passer à la désinstallation de la mise à jour.
Au final, la commande DISM ressemble à la commande WUSA, sauf que les noms des paramètres sont un peu différents. Voici un exemple pour supprimer le paquet "Package_for_RollupFix~31bf3856ad364e35~amd64~~22621.3296.1.6" (sélectionné au hasard dans la liste).
dism /Online /Remove-Package /PackageName:Package_for_RollupFix~31bf3856ad364e35~amd64~~22621.3296.1.6 /norestartAu bout de quelques minutes, la mise à jour est supprimée de votre machine ! Pour que l'opération soit effectuée silencieusement, vous pouvez inclure le paramètre "/quiet". Vous l'aurez compris, DISM est moins évident à utiliser que wusa.exe lorsqu'il s'agit de désinstaller une mise à jour, mais il représente une corde supplémentaire à notre arc...
Pour finir, nous allons utiliser une troisième méthode basée sur l'utilisation du module PowerShell nommé PSWindowsUpdate. Ce module permet de gérer Windows Update via des commandes PowerShell. Il est disponible sur la PowerShell Gallery donc nous pouvons l'installer facilement :
Install-Module -Name PSWindowsUpdateUne fois que l'installation du module est effectuée, vous pouvez obtenir l'historique des mises à jour installées avec cette commande :
Get-WUHistoryEnsuite, vous pouvez utiliser le cmdlet "Remove-WindowsUpdate" pour supprimer la mise à jour KB5035853 (adaptez en fonction de la mise à jour ciblée) :
Remove-WindowsUpdate -KBArticleID KB5035853 -NoRestartEnsuite, la commande ci-dessous ne devrait rien retourner puisque la mise à jour est désinstallée :
Get-WindowsUpdate -KBArticleID KB5035853Pour en savoir plus sur ce module PowerShell, vous pouvez lire cet article :
En suivant l'une des méthodes évoquées dans ce tutoriel, vous devriez pouvoir désinstaller la mise à jour de votre choix sur votre PC Windows 11, ou Windows 10. En effet, nous venons de voir 4 méthodes différentes pour désinstaller une mise à jour ! Sachez que vous avez aussi l'opportunité d'effectuer la désinstallation à partir du démarrage avancé de Windows (Paramètres > Système > Récupération > Démarrage avancé > Redémarrer maintenant).
The post Windows 11 : comment désinstaller une mise à jour ? first appeared on IT-Connect.
![]()
C’est vachement pratique de pouvoir récupérer sa chambre d’hôtel après une grosse journée, simplement en passant par le terminal qui se trouve dans l’entrée de l’hôtel. On tape son nom, on paye et paf, on récupère son numéro de chambre et le code pour y accéder. Sauf que ce que vous ignorez peut-être, c’est que ce même terminal vient potentiellement d’exposer votre code d’accès à des personnes mal intentionnées…
C’est exactement ce qui s’est passé dans un hôtel IBIS Budget à Hambourg, en Allemagne. Lors d’un congrès de hackers, la société Pentagrid a remarqué une faille de sécurité pour le moins inquiétante dans le terminal de check-in. Ainsi, en entrant une série de tirets à la place du numéro, le terminal liste toutes les réservations avec leur numéro, la date d’arrivée prévue et le prix total du séjour. Puis en sélectionnant une réservation, on accède directement au numéro de chambre et au code d’accès de la porte.
Dans l’hôtel en question, pas moins de 87 réservations étaient ainsi exposées, soit près de la moitié des 180 chambres de l’établissement !
Vous imaginez le désastre si ces codes tombaient entre de mauvaises mains ? Adieu vos effets personnels, surtout dans un hôtel bas de gamme comme celui-ci qui n’est pas équipé de coffres-forts dans les chambres. Et je vous parle pas des agressions en pleine nuit ! C’est la porte ouverte à toutes les fenêtres comme dirait l’autre.
Fort heureusement, Pentagrid a immédiatement signalé cette faille à la chaîne hôtelière Accor, propriétaire des hôtels IBIS. Le problème a depuis été corrigé, mais il aura fallu quand même plusieurs échanges et relances de la part des hackers pour que des actions soient entreprises de la part d’Accor.
Mais comment une telle faille a-t-elle pu se produire ? Et bien d’après les informations fournies par Pentagrid sur leur blog, il semblerait que le terminal de check-in ait une fonction de recherche des réservations qui nécessite uniquement le numéro de réservation pour afficher le numéro de chambre et le code d’accès. Donc c’est pas un bug, c’est une feature qui a mal tournée…
Le pire dans tout ça, c’est que de base, les numéros de réservation ne sont pas une donnée très sécurisée puisqu’on les retrouve sur toute la paperasse comme les factures…etc qui peuvent ensuite être récupérées dans une poubelle par exemple. Donc n’importe qui pourrait mettre la main dessus et accéder à votre chambre.
C’est pourquoi les auteurs de cette découverte recommandent aux hôtels de mettre en place une vérification supplémentaire pour accéder aux informations de réservation, comme un code PIN qui serait communiqué séparément au client. Les terminaux devraient aussi supprimer automatiquement les réservations dès que les informations ont été imprimées ou consultées.
En attendant, si vous séjournez dans un hôtel IBIS Budget prochainement, n’allez pas vous amuser à vérifier que la faille a été corrigée sur le terminal de check-in parce que vous ne voulez pas finir en prison pour piratage (lol).
En tout cas, sachez-le, la prochaine fois que je dors à l’IBIS, je vous attendrais de pied ferme en embuscade dans mon peignoir façon biopic DSK par Liam Neeson.
![]()
![]()
Vous avez sûrement entendu parler de l’impact environnemental faramineux de l’intelligence artificielle, que ce soit pour demander à ChatGPT de nous donner un coup de main ou pondre une image de fou sous Midjourney, l’IA a un appétit gargantuesque en énergie. Il parait qu’une seule requête à ChatGPT consommerait autant d’électricité que 40 recharges de smartphone ! Un peu dingue.
Mais rassurez-vous, tout n’est pas perdu. Une équipe de chercheurs en informatique de l’Université de Copenhague a trouvé une solution pour mettre l’IA au régime, sans pour autant lui couper les vivres. Leur étude, qui sera présentée lors de la conférence internationale ICASSP-2024, montre qu’en gardant l’efficacité énergétique en tête dès la conception des modèles d’IA, on peut réduire leur empreinte carbone de 70 à 80% sans sacrifier leurs performances. C’est pas mal, hein ?
Les chercheurs ont pour cela, passé au crible plus de 400 000 modèles de réseaux de neurones convolutifs, ces IA qui servent à analyser des images médicales, à faire de la traduction ou encore à reconnaître des visages. En se basant sur ces calculs, ils ont alors concocté un genre de « livre de recettes » pour les pros de l’IA, avec des exemples de modèles moins énergivores mais tout aussi efficaces.
Alors oui, dans certains domaines comme les voitures autonomes ou la médecine, il ne faut pas rigoler avec la précision. Mais pour le reste, les chercheurs insistent : il faut adopter une approche globale qui prenne en compte non seulement les performances des modèles, mais aussi leur impact climatique.
Si le sujet vous intéresse, je vous invite à jeter un œil à l’article original ! Les chercheurs ont même mis à disposition ce fameux « livre de recettes » sur Github pour que les dev spécialisé en IA puissent s’en inspirer et réduire l’empreinte carbone de leurs modèles. C’est un vrai premier pas vers une IA plus durable et responsable, et ça c’est cool !
![]()